popeye the sailor
-
Posts
16,007 -
Joined
-
Last visited

.thumb.jpeg.ee4d205046163acd786c8b7e92026d43.jpeg)


Recent Profile Visitors


-
 Old Collingwood reacted to a post in a topic:
RV Kilo Moana by J Harreld - FINISHED - Lego - 1:94 scale
Old Collingwood reacted to a post in a topic:
RV Kilo Moana by J Harreld - FINISHED - Lego - 1:94 scale
-
yvesvidal reacted to a post in a topic:
1955 Lincoln Futura by popeye the sailor - Revell - PLASTIC
-
Canute reacted to a post in a topic:
1955 Lincoln Futura by popeye the sailor - Revell - PLASTIC
-
modeller_masa reacted to a post in a topic:
1955 Lincoln Futura by popeye the sailor - Revell - PLASTIC
-
Old Collingwood reacted to a post in a topic:
1955 Lincoln Futura by popeye the sailor - Revell - PLASTIC
-
Jack12477 reacted to a post in a topic:
1955 Lincoln Futura by popeye the sailor - Revell - PLASTIC
-
GrandpaPhil reacted to a post in a topic:
1955 Lincoln Futura by popeye the sailor - Revell - PLASTIC
-
popeye the sailor reacted to a post in a topic:
The M&M Fun Ship by popeye the sailor - FINISHED - 1:33 scale - the lost log
-
popeye the sailor reacted to a post in a topic:
Herzogin Cecilie 1902 by Jim Lad - Four Masted Barque
-
 a recent development has occurred with this project. I'm always on the lookout for updated kits and stuff......but I haven't been following the histories as closely, as I used to. ..........way bigger stuff on the mind. I was looking on the home page of my internet browser. it amazes me how they can tailor the home page to show you things that you look for.........kinda neat. I saw on E Bay, that there was another Lincoln Futura in the offerings. this one is produced by Monogram {2003}. I'm thinking.......like wow.........perhaps they retooled it to assemble like a regular model kit, and not that caveman version I built. some of the old kits were produced like that......body assembled in panels and such. Atlantis and Round 2 are producing these kits..........I have an '56 Atlantis Cadilac Eldorado convertible that is like that. if I had given it some thought, I would have answered my own question. the box art for the revel kit is the same as shown on this Monogram kit..........also one has to remember that revel merged with Monogram back in the 80's or 90's. but as they say.........curiosity killed the cat........right?!?! look familiar?............the body color is even the same. I'm glad they showed it in black...........likely made the light bulb go on for the Batmobile. I did it in red to depict the movie "it started with a kiss". here is the revel box art... I received the kit yesterday...............opening the box, revealed that no updating had taken place. nice that it is molded in white, but sad that it still has plastic tires. the instructions differ slightly in the overall layout, but they are the same. keen to note that the polar lights Batmobile is roughly a half inch longer than these two models, but that may be scale difference {I haven't checked}. the parts look cleaner, free of excessive flash and stuff............proof is in the pudding


-
popeye the sailor reacted to a post in a topic:
Vought SB2U Vindicator by ccoyle - FINISHED - Kartonowa Kolekcja - 1/33 - CARD
-
popeye the sailor reacted to a post in a topic:
Vought SB2U Vindicator by ccoyle - FINISHED - Kartonowa Kolekcja - 1/33 - CARD
-
popeye the sailor reacted to a post in a topic:
Chevrolet C15a FFW by realworkingsailor - IBG Models - 1/35 - PLASTIC
-
popeye the sailor reacted to a post in a topic:
Chevrolet C15a FFW by realworkingsailor - IBG Models - 1/35 - PLASTIC
-
popeye the sailor reacted to a post in a topic:
Edward the Black Prince by king derelict - FINISHED - Andrea Models - 54 mm
-
popeye the sailor reacted to a post in a topic:
Edward the Black Prince by king derelict - FINISHED - Andrea Models - 54 mm
-
Jack12477 reacted to a post in a topic:
Vought SB2U Vindicator by ccoyle - FINISHED - Kartonowa Kolekcja - 1/33 - CARD
-
looking good Chris
-
I've always wanted to try the laser cut version of this model. the one I built was over 40 years old when I got it. I got another one some Christmas's ago, which I am scratch building the Progress. I'm still in the early process's of it..........still a ways to go yet. a few years ago, Billing finally began producing a fittings kit for this model........bit I'm not happy with some of the contents. they cheaped it out by supplying some of the metal parts with wood. the nice thing about yours, is you got netting with it........I had to source some for 'Ole Nordie {that's what I nicknamed her}. you've done a super job so far.........looking really sweet! don't mind me..........I love Billing kits - built quite a few in the past. the Nordkap and the Cux 87 were my first two wood builds.
- 76 replies
-
- 1
-

-
- Nordkap
- Billing Boats
- (and 2 more)
-
super looking tanks Greg.........great job with paint and weather
-
time has flown for this project........I have been too busy to get back to anything really. we are settled into the new house, but there are still things that need to get done. the big ones are out of the way for the time being, so I'm hoping I can return to the table. this of course has not stopped my acquiring new kits...the one shown above is one of them. a short time ago...........yes, on that accusive site I keep visiting.........I saw yet another Leopold model listed. this one is a 1:35 scale kit..........and I thought to myself, "I wonder how big it is". I'm sure that it would dwarf the 1:72 kit. the price was reasonable, so I ordered it. I was amazed to learn that the box was 14 LBS, which made me want to see it all the more.........holy cow! I looked inside and found that this kit was never unpacked............I'll get more into it when I start the log on it. it won't be for a little while yet. curious, I got out the 1:72 kit and compared the gondolas..........here the size really strikes home! combined with the Panzerjagerwagen, I think this will be an interesting display......when I get to it


-
good use of the law of probabilities. if it lacks the wood grain look, I might never know that it was wood. your use of the stock styrene makes me wonder though.........was that cab part too intricate to scratch build? I like what you did with the bed......well done
-
thanks for the replies gents! my god, it feels like it's been ages.......the only thing I've been playing with, are those new Lego kits that have been showing up in the stores. this is one of several that I've built. yes I know.........not productive use of my time so I tried to get back into ships......... I want to get the Titanic.........but the cost is what scares me. they even have the Endeavor. the issue with these is that they don't take long to build.........and then what do ya have?!?! they are fun to build, but don't really challenge the mind. I recently moved the tables around, so the admiral can do her puzzles in there. not that it matters much, but we've always shared a room when I modeled, so it should kick start something. I do have to sort table white out, due to it turning into a 'collect all' while the change was taking place. once that's done, I will likely continue with the Falcon. stay tuned...


-
interesting..............is this metal? sure looks it I was never the greatest with figures.........the only ones I did were the were the early Aurora offerings. of course, I was a kid at the time. if your focus is in figures, you might want to check out oldmodelkits.com. they have quite a few kits.......some of them are quite old. nice work thus far!
-
hello John! I see you have been quite busy since I last looked in! I have never seen this ship before, but it goes back to what I've said a long time ago...........there are so many ships, obscure to history, that deserve to be modeled. and as you've outlined in your initial post, some models even have a complex history as well she looks absolutely stunning..........you have come so far in making her a reality! love how you're creating the sails, not leaving them out, or finishing it as an admiralty model {that would be hiding how complex these ships were}. are you going to stick to simplified rigging, or are you going to include the other sail rigging {bunt, clew, lifts etc.} time sounds like an enemy..........looking at the time you started, your making great progress you'll have her out of drydock in no time my time here has been pretty scant........the past year has been quite busy for me as well. I hope to be back at my tables soon. the admiral will be happy too.........I'm beginning to get the idea that I have been 'underfoot' long enough. I hope your medical issue is progressing well and the duchess keeps you in tip top shape. keenly following along.
-
I see you caught the fever too. I'm not done with my 1:72 Leopold.........I had to box it up due to the flooding at the apartment {2023}. recently, an opportunity to purchase a larger scale of Leopold was presented to me, and I got it. OMG!!!! the size is staggering! unfortunately, I can't see a lot of your pictures, but it might be on my end. what I see though looks really good, with a lot of cool detail. following with interest.
-
hello Andy...........thought I'd pop in and see what your doing while I keep telling myself I should invest in armor kits, I seem to keep buying war ships, cars and planes. I agree with your view of the molds that make these kits........some have been passed around so much. the 1:72 stuka dive bomber is a good example. I believe the molds started out with Fujimi {hope I spelt it right}, and through the years, past hands to at least four other model manufacturers. the amount of flash is a good indicator as to how old a mold is. too much and they get retooled. some are different subjects, but are the same kit. cars do it too..........look at the older models and you'll see it. great job so far............I'm keen to follow
-
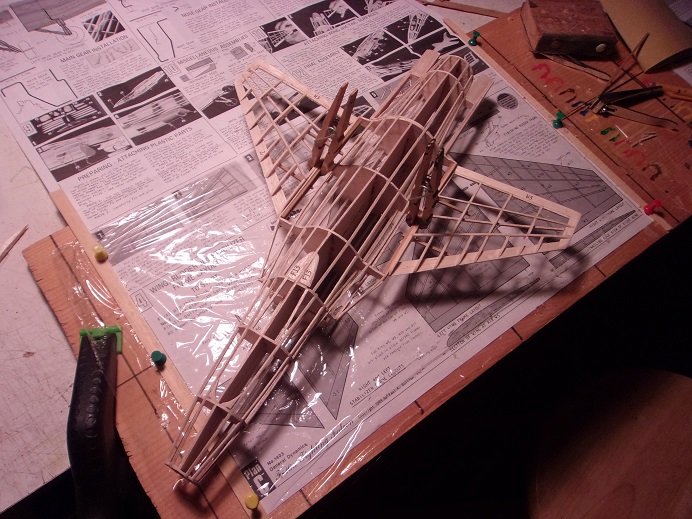
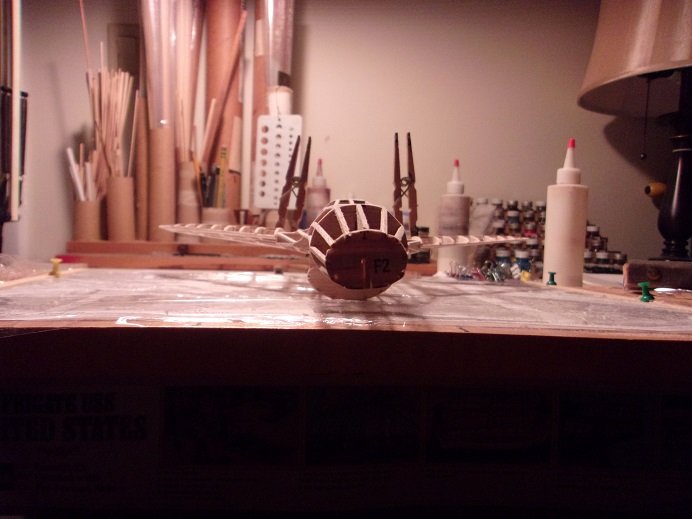
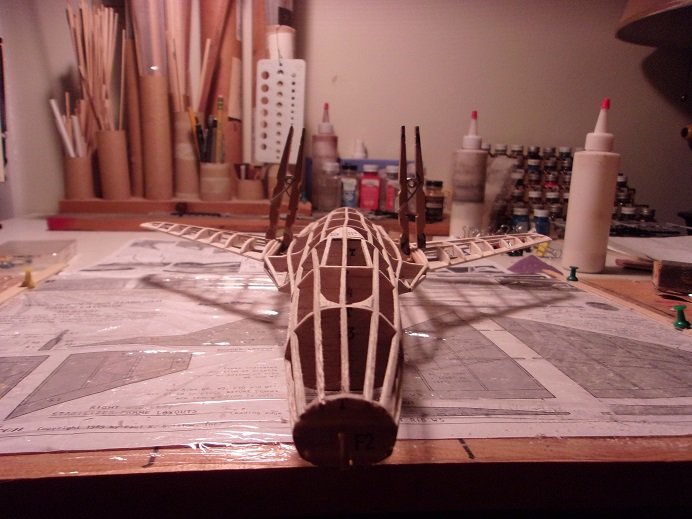
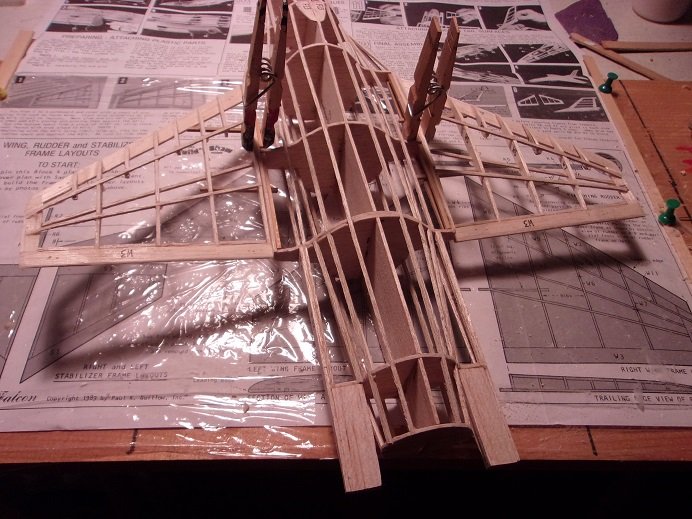
hello to all! yea......I can't believe it happened again..........life grabbed me by the nethers again things started off with the same thing that got us here in the first place.........roof leaks! we had the roof done, along with a few other bumps along the way. the hobby room is still not where I want it, but the recent changes I made in there will make it more tempting to pull something out. I hope so..........I haven't been building, but I am still collecting new projects. big to do concerning Leopold........wait till you see what I have found my car stash has gone mental........a few of them I built as a young lad...........scavenger hunting down nostalgia road. so here I am...........now the hope is to get in the hobby room and create some plastic or wood dust. at this point, I don't care.........as long as I can get back into the fray. the admiral will be happy too I'm not sure if I have any pictures I haven't posted on this build, but if I do, I will post them for you. I still plan to add tissue to these planes, all I needed was an atomizer bottle. I have it, so now to see where I left off. I also started to play with the Tomcat, but so far, it's been just the frame. I'll be back!
-
I see your still building these wonderful works of art! very nice.......the Fokker planes are among my favorites. still working to figure out how to do the lozenge though........hard to figure out the pattern. I noticed you had the same problem I had when building these planes in the past.......the tail skid breaking. a remedy I came up with was to rest the tail on something while building the model, so there is no weight on it. then there is the old favorite idea of adding it toward the end of the build. F1's and Dr1's have the wing skids...........those were another thing that needed to be watched out for. super job though........you truly are the master of paper!
-
I've been browsing/studying your build of the Andrea Gail. What a terrific piece of work you've accomplished. I would like to attempt this. I've scoured the web with no success finding any plans, especially for the hull specs and profile.
Are you aware if there any plans for sale? I can find hull length, width, and depth but nothing regarding the profile of the hull.
I'm not a scratch builder, but I think I can do this as I am a wood worker and have built a couple of ship kits over the years.
Thanks
Roy GrimesKentucky
-
hello there,
sorry for the late reply, but it's been hard for me to keep up with the site. lots of life event changes. as you might have read, the hull that I used was part of the group project I was working on. I have been experimenting creating multiple hulls from kits. the kit I used was the Billing Boats kit of the Boulogne Estaples. when I was assembling the kit hull frame, I marveled at how close it looked to the Andrea Gail. so when the hull became unsuitable to continue with the project, I modified it to look like the A.G. it's all outlined in the build log........I had a lot of fun doing it
") I had uploaded and copied the instructions for both Billing Boats kits of the Andrea Gail. this way, I had more info on the ship. the rest is history.
I had uploaded and copied the instructions for both Billing Boats kits of the Andrea Gail. this way, I had more info on the ship. the rest is history.
the instructions for the Andrea Gail can be found on either of these websites. they should have a place where you can upload instructions.
the bottom one should be the home site. if you don't want to go the route of scratch building, you can always purchase a kit. Model Expo has them. anyway, thank you for looking in on her and your kind word. she was the second project, where I went nutz. creative freedom
-
-
this will catch the progress up on the build so far. it's starting to look like a jet more to come. drat...........it's snowing this wet gunky stuff! might be a tough drive to work tomorrow