


popeye the sailor
-
Posts
15,993 -
Joined
-
Last visited
Content Type
Profiles
Forums
Gallery
Events
Posts posted by popeye the sailor
-
-
yep! one of these days, I'll get back to it. I've been looking at some of the HO structures that I can add to it. I might even look into a 'dummy' loco to model next to it.
I've been pick'in & paint'in of late on the General..........should have more to add very soon
")
-
looks great Danny .......there must be a printed outer skin to lay over the rear section. is there an inner skin for the rest of the body?
- Canute, Old Collingwood and mtaylor
-
 3
3
-
-
awesome video! interested in seeing what your going to do with the build
- Old Collingwood, Canute and mtaylor
-
3
-
check to see if the oval fits where it's supposed to go........that might give you something to work with.
- lmagna, Old Collingwood, Canute and 1 other
-
4
-
ahhh....necromancy.......my favorite flavor! looks like fun to me.......I'm here
")
- Canute, CDW, Old Collingwood and 3 others
-
6
-
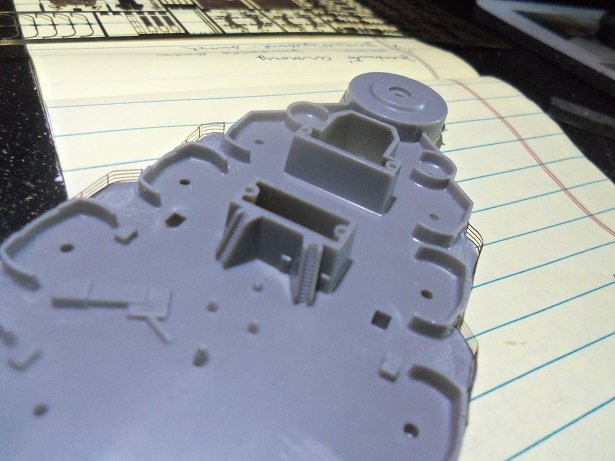
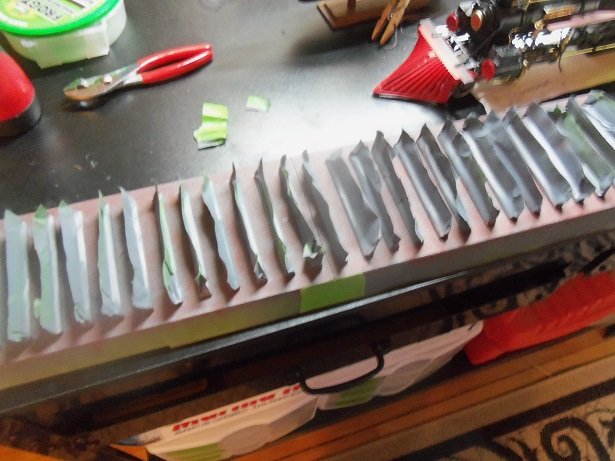
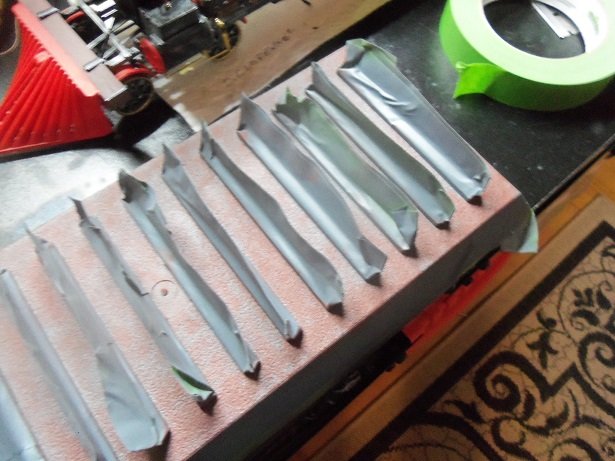
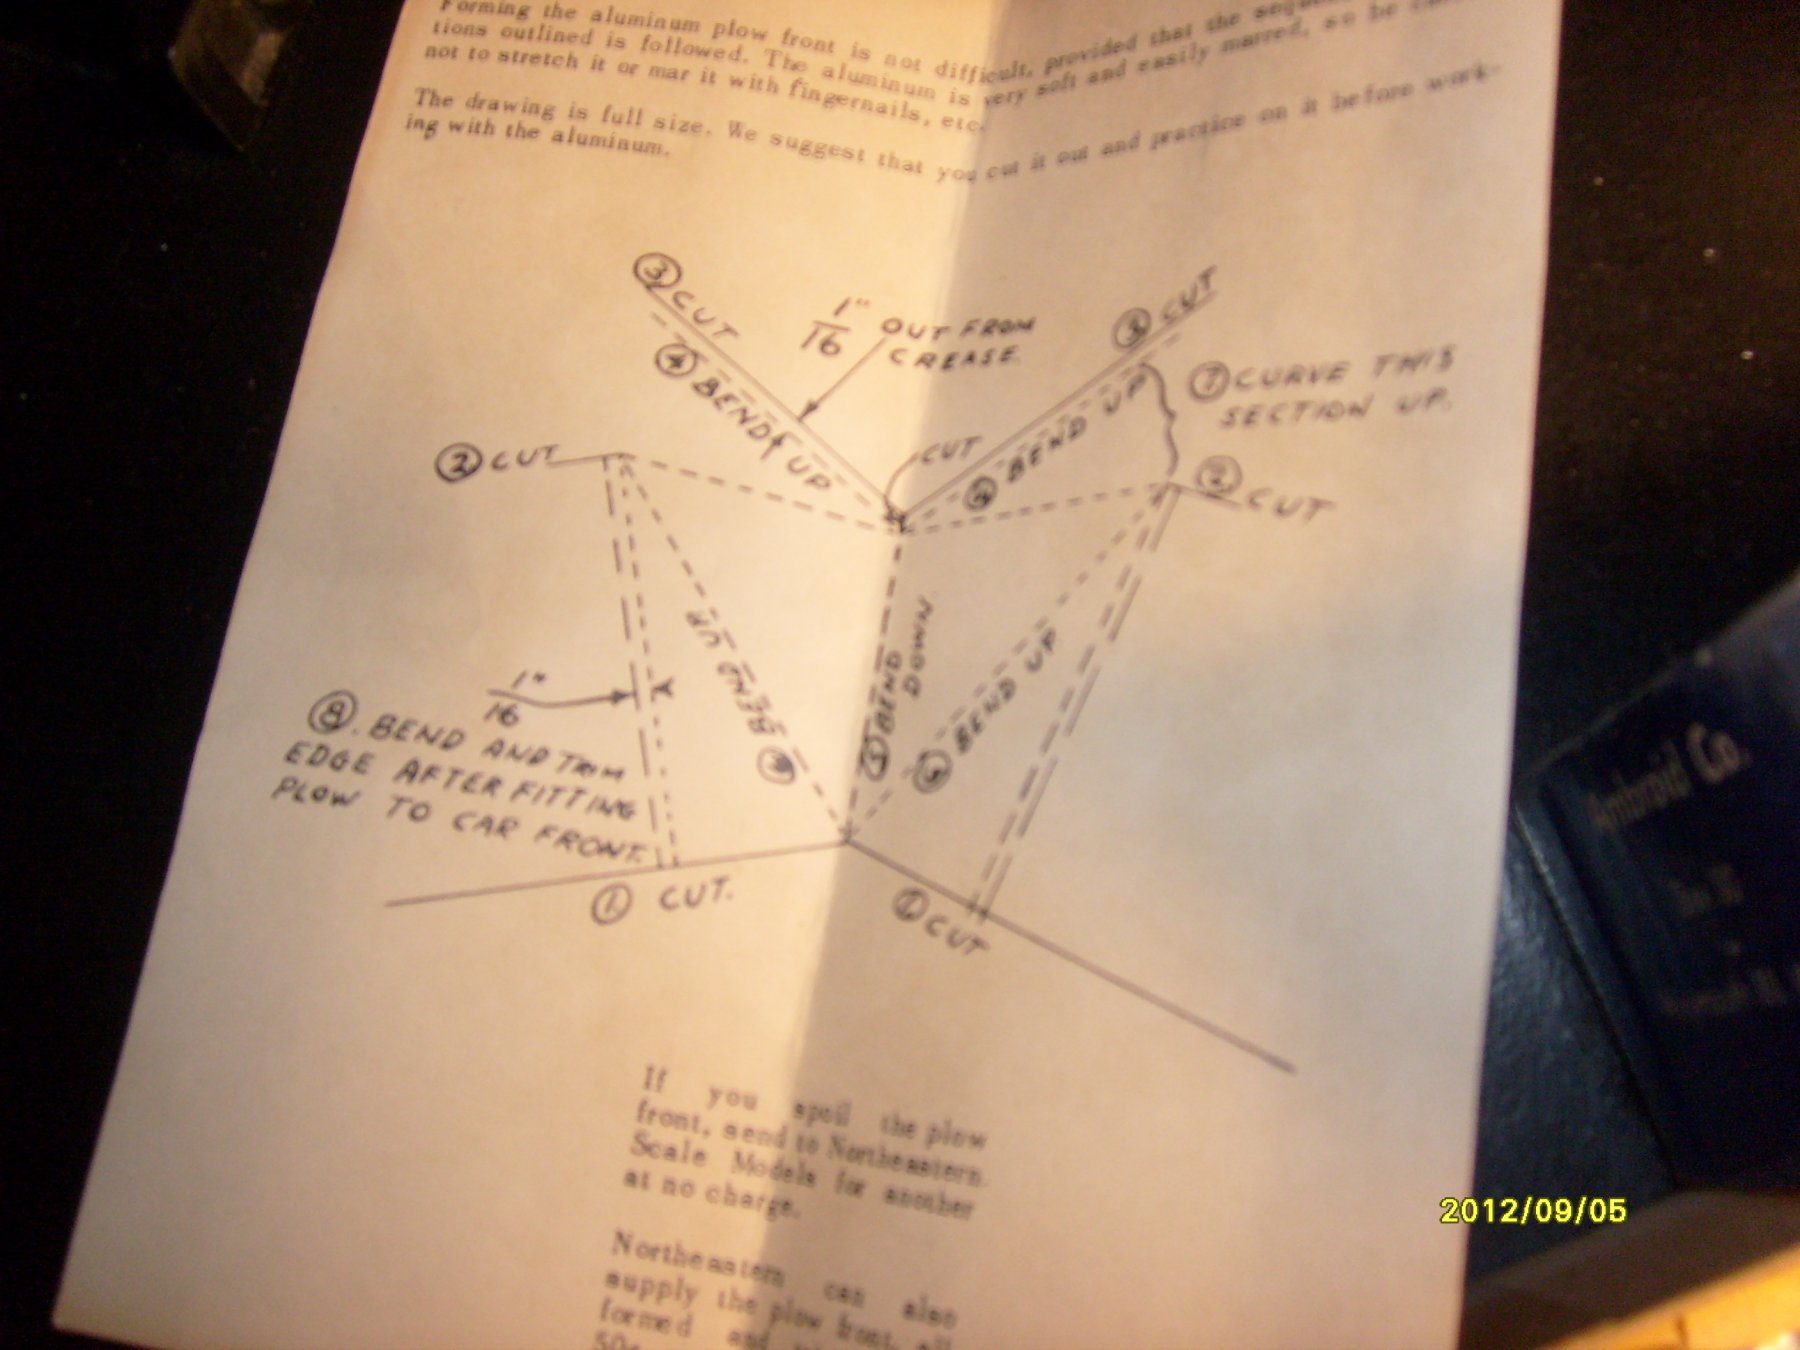
if I recall, there is a coupler for the front........there is foil that is shaped across the front. the gentleman who was building it had misshapen-ed it a little, so I had to flatten it out again. there are also two blades on the sides that have arms on them. I had a bugger of a time finding good decals for it too.
here are a couple pictures of what it looks like...
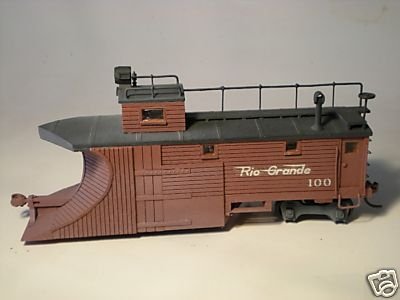
neither one used the foil.........the first one appears "planked", and the second one looks like it was shaped with putty or filler and painted. I really like the color.......it a good railway color. I've seen lots of cars painted in this shade of red / brown. I was thinking of doing a log here on it, but the pictures are mostly blurry.....likely attributes to my early days of documentation
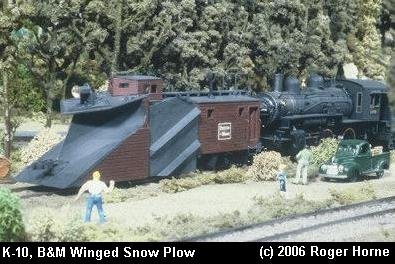
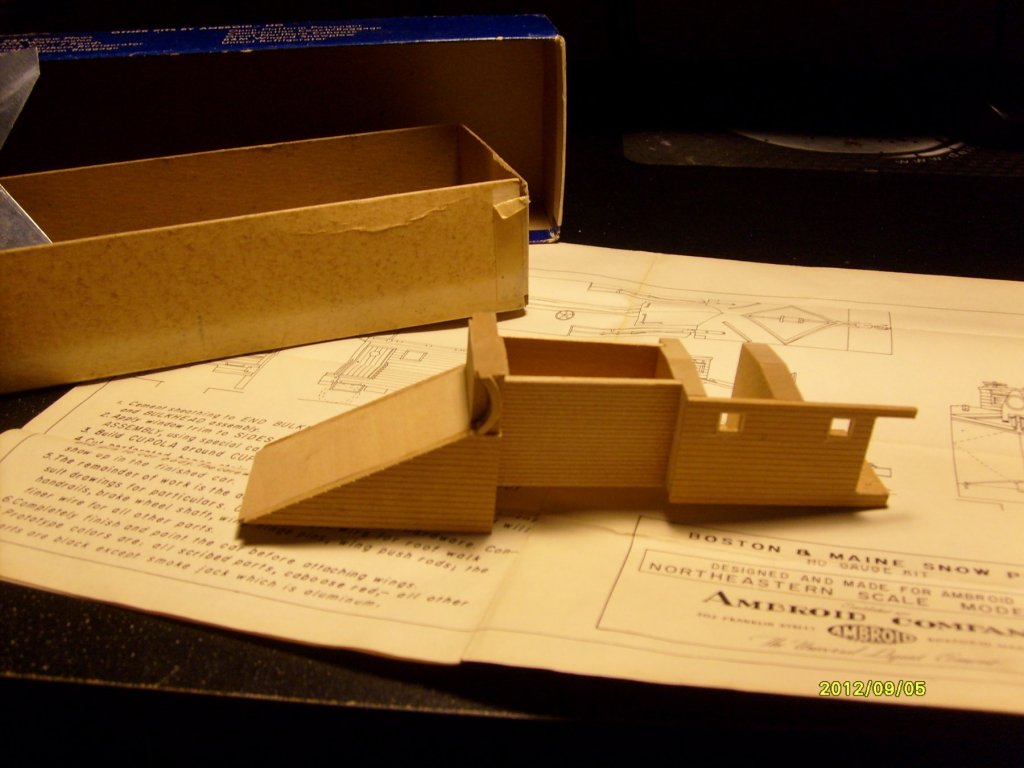
 {then I got a better camera}. I'm not sure who produced the one on the left, but the K-10 is an Ambroid kit.
it's not finished yet.......still grab handles and rails to go on, as well as the plow wings.
- GrandpaPhil, thibaultron, mtaylor and 2 others
-
5
-
hey there John........it's not too big just yet. basically, I'm assembling the frame of the winch so I can drill the holes for the shafts.

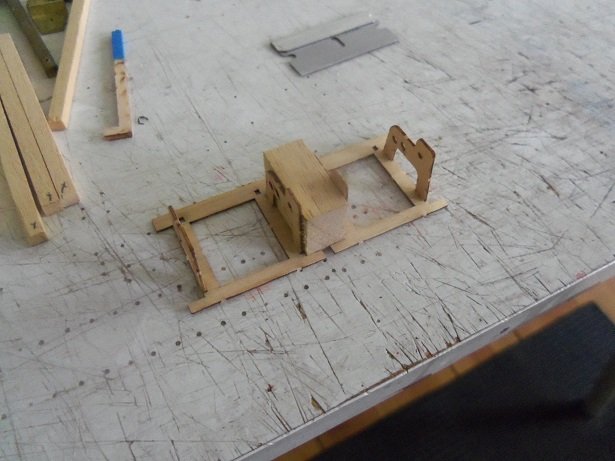
also shown are the parts to make the gallows.....I have four to make. I'm going to copy the metal ones that I got with the first Nordkap. I also scoffed the degausing cables from the hood PE, to use as electrical conduit for lights. just a little bit of extra detail......the structure is far from being done.
more soon.........:)
- mtaylor, J11, GrandpaPhil and 6 others
-
9
-
-
thanks for the kind comments.......good to know that I haven't scared anyone off
before I go further, I just want to mention an observation I made, while working on the General. I had painted the parts of the drive train with battle ship gray, and I couldn't help but notice, that the photos reflected the gray with a bluish tint. the paint I was using has battleship gray in it. I'm thinking of scraping that paint and continuing with the B. gray. of course I'll test it first. gotta fix the waterline.......short of trying to strip the entire hull, I guess it would be the better of two evils. I began to see what of the Hood PE I can use.......railings and hatches seem the safest. I had removed some of the casements between the 11 and 5 inch AA guns on the first level.
the open areas I will dub in sections of railings......I hope to do more as I work with the upper levels. first off though, I need to get the hull in order and do the railings there, so I'll know how much I have to work with. really wouldn't be beneficial to throw more money at this model. here is what I've done so far........it might be hard to see.
I got the rest of the open areas done........I did notice one that I had messed up on. I have removed it and will be re[placing it.
as I get more done......I will surely post it
thanks again for hang'in there......the rabbit hole is very deep. you would thing that with all the rigging thread I have, I'd have enough rope
-
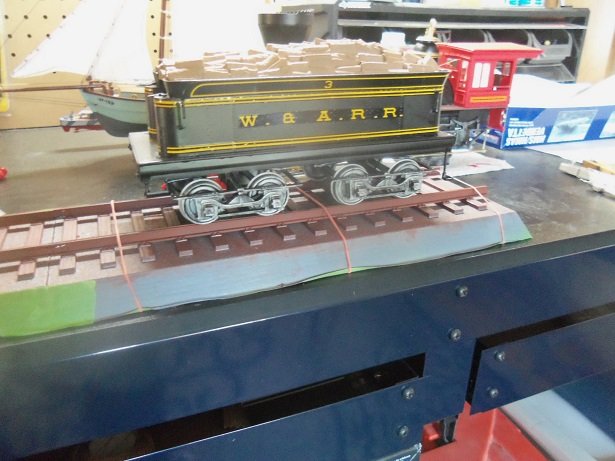
I got the underbrush for the snow plow diorama
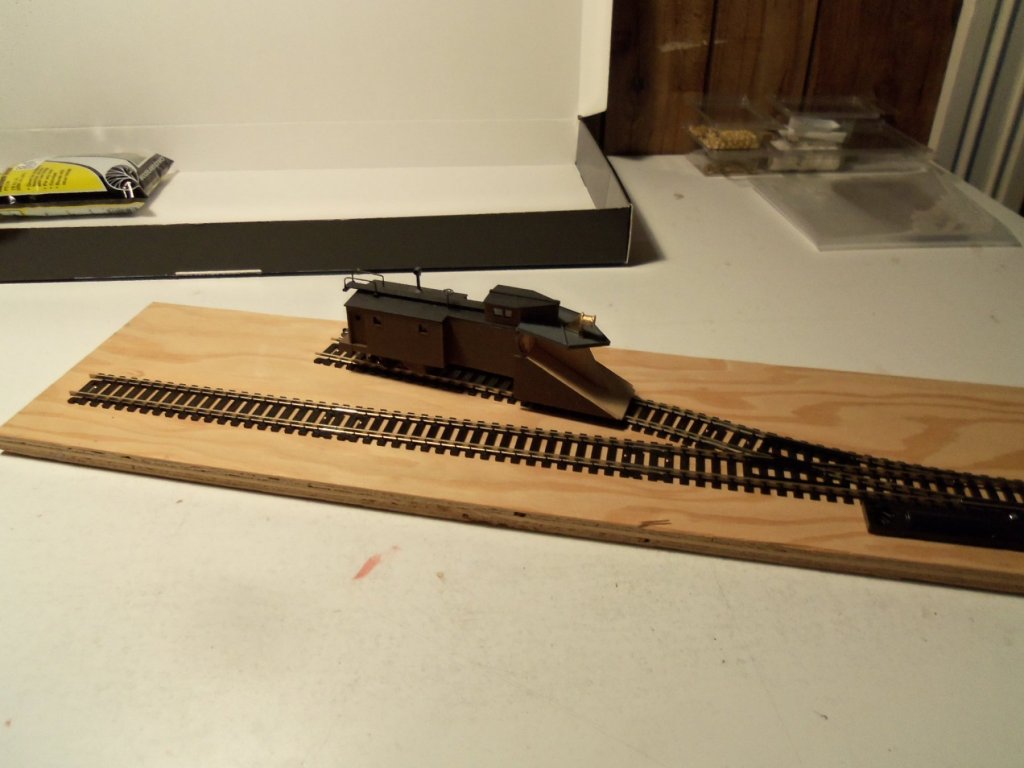
the train itself is not finished........when I got the poor thing, it looked like this
I had to buy the trucks and couplers for it separately. the date is incorrect.......I've had this since 2010........started to work on it in January of 2011. it has been short sessions after that. the diorama came into the picture in 2015. it was by luck that I remembered that I even had the underbrush stuff.
the one thing I came away with, working on this HO scale model, is I could see how interesting the early scratch built train must have been. these are some pretty cool kits.......don't let it fool you.......there's scratch building built in. I'll get back to it one day
- Canute, CDW, thibaultron and 1 other
-
4
-
thanks CDW.........being 26 1/4 inches long..........there are a few places I can think of. I'll post his display when finished
I have another model that is a bit longer than this one........can't wait to start that one, considering what I want to do to it. I've been trying nudge my way back to the ships.......I've been play'in with PE on the Arizona {even though I messed up the model}, and working on the winch for the Progress. there's still more to go on this project anyway........ when I'm almost finished, I'll put a wet finger to the air and see which way the wind blows
thanks for the good word and to those who hit the like button
- Canute, thibaultron, CDW and 1 other
-
4
-
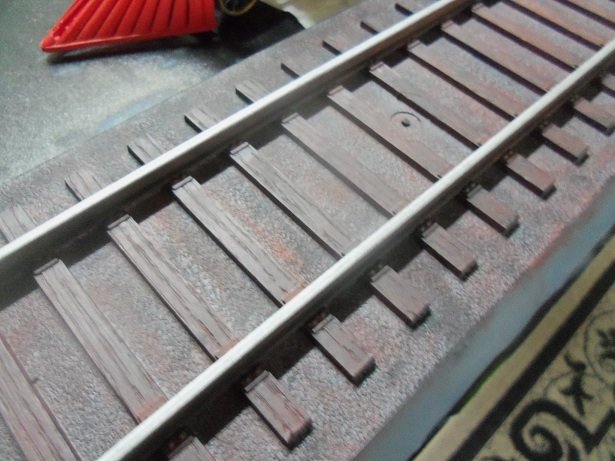
well........that was fast and painless.......I hope you weren't waiting too long
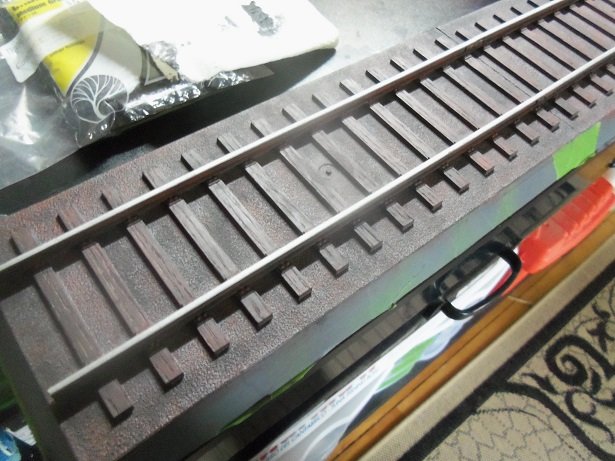
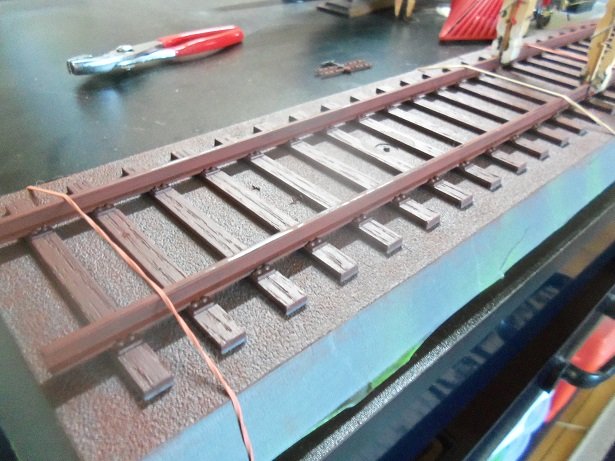
the finish of the base was in three more steps. first the flat black addition.........
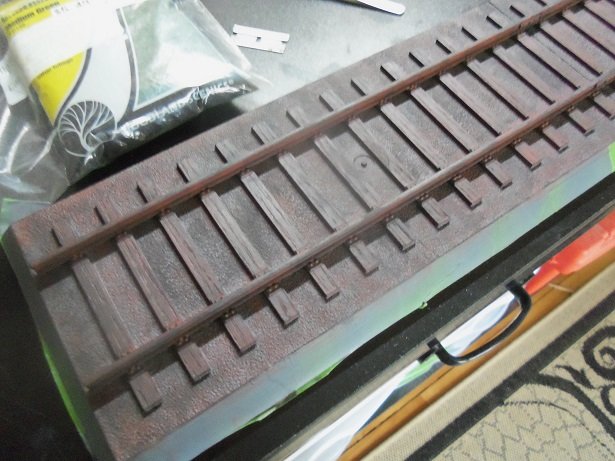
second.......the tops of the rials were painted with flat steel.....
I recalled I have a packet of underbrush, put out by Woodlans Scenics.........perfect to get rid of those nasty injection marks
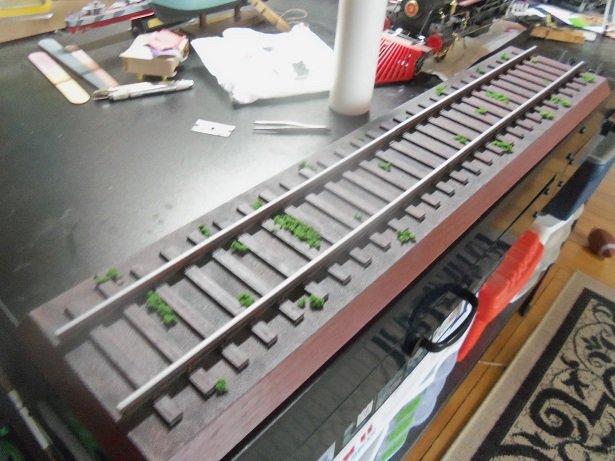
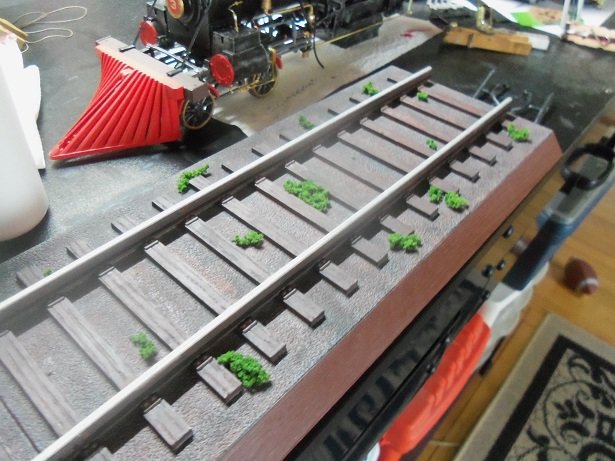
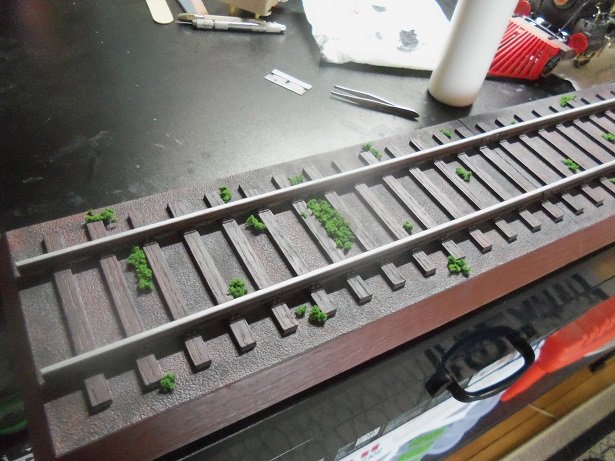
I do have some other type moss that I collected from the huge Oak tree in the field.......kind of looks like Cypress moss...but I might not add it. I think this looks good enough. I started to paint the drive wheels and painted the pins for the drive fenders.
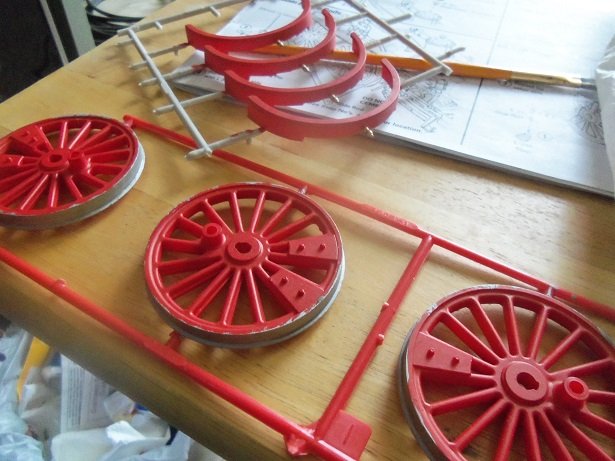
a bit more to do on them and then I can get them on the loco.....finish off the drive train, so to speak
then the fun of joining these two together, which is going to call for a little more scratch building and modification.
- mtaylor, Kevin, thibaultron and 8 others
-
11
-
I've always been a big fan of Clint Eastwood
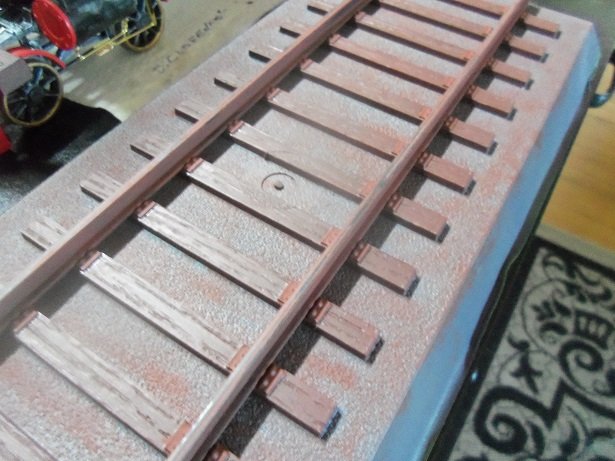
I got more done on the base. I wanted to work on it Tuesday evening, but I just didn't have the gusto. so.....in the morning, the rails were cemented on the base.
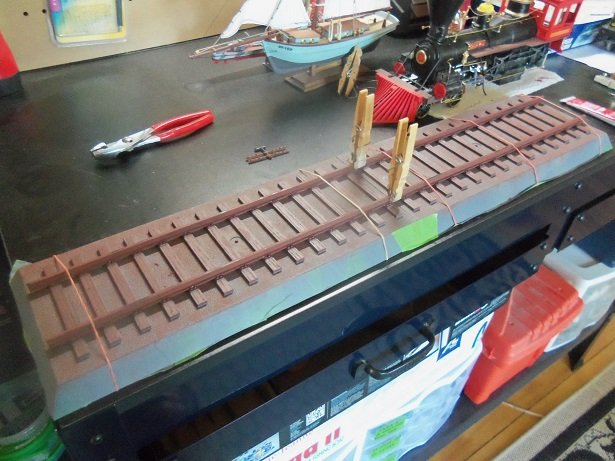
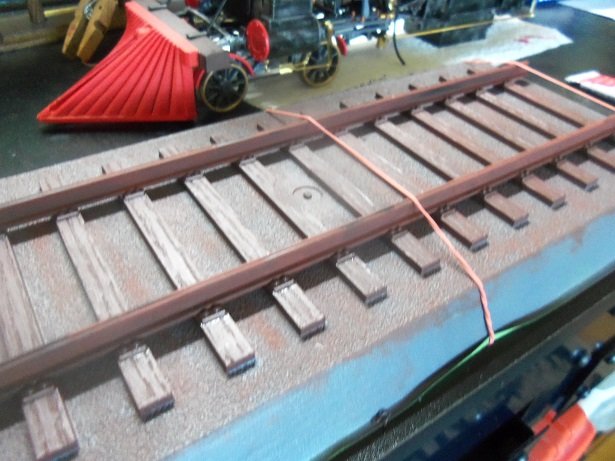
there are these two hideous injection marks on the halves........I have plans for them
icky mae.... once these were dry {I had books on them to hold them down for a spell}, the fish plates were added to the center joints of the rails. they were also painted with primer red.
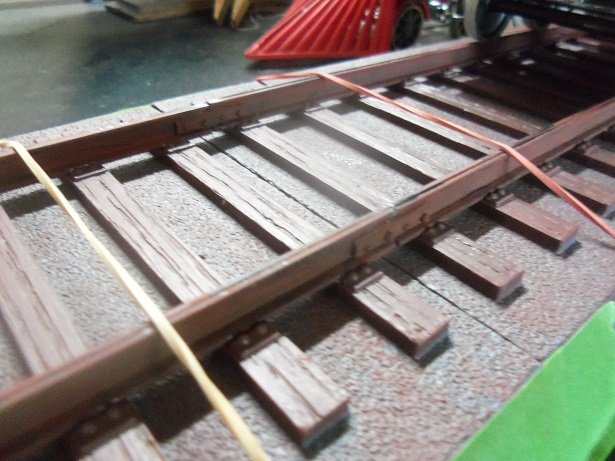
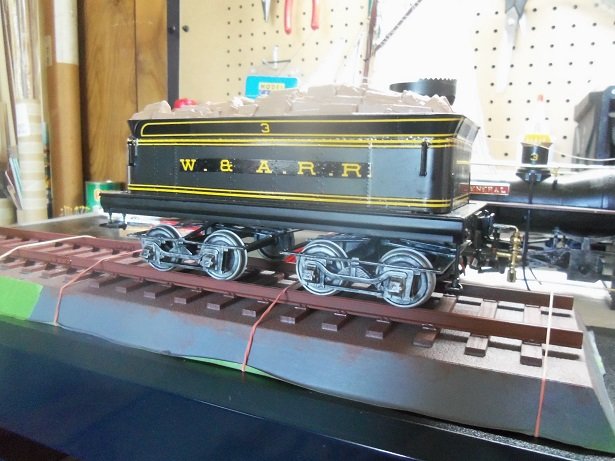
the tops of the rails were sanded later to remove the mold lines. for curiosity, the tender was place on the rails.
later, the fastenings on the ties were painted with primer red.

all this will totally dry before the flat black is added. today was a retest for the car's inspection......I had to go to my brother's shop in Heniker. I haven't see my younger sister in quite a while.........she lives on the way to his shop. my brother told me that she had underwent back surgery and wasn't doing too well. I made it a point to stop by afterwards......never got to see her though...she may have been lying down and didn't hear me pounding on her door. another time....soon
anyway........the check engine light had been out for almost three weeks. it passed the test and now I am legal....yeaaaaaa! but alas........just as I left Heniker, the light came back on!  it's raining at the moment, so I will wait till next week to check it out. I have more pictures in the camera.......I'll dig them out and post them as soon as I can
- GrandpaPhil, lmagna, mtaylor and 6 others
-
9
-
-
the earlier picture you posted shows how much wider the model will be if the studding sails were added. older kits are more challenging, since at the time, there wasn't much info on the subject. now with the internet and all, there is so much more research that can be done. these 1:96 scale kits are somewhat limited with factual detail.......but they were the most detailed for their time. your doing a superb job on her!
- EJ_L, Canute, Old Collingwood and 2 others
-
5
-
I believe I posted some pictures of her in the log. this is what I've done on her so far {it's a few years old}
I looked to see if I had any pictures scanned of the Alabama, but I must not have done them yet. these two were done when I had come to the conclusion that I really should be taking pictures of the models I build......during assembly and for posterity. I also experimented with wooden decks, only within the last year or so, finding out that there are wooden decks available for the Constitution and the Cutty Sark. these same decks can also be used on the United States and the Thermopylae, since these vessels are clones of Connie and Cutty. I tried to send you a PM, but I found that your not accepting PM's. if you haven't set this up in your profile, you might want to do it.
-
I made some movement on this model as well. earlier, I thought I killed it when I removed the railings before cementing the deck in place......I still think I did. either that, or I didn't do it any justice
. I've been playing with the PE........slowly learning to get used to it. I figure that this one would be good to practice on.....should have an update soon.
-
there has been some progress with this project........I have tinkered with the winch, and there is an advantage to an all metal construction. this half wood winch is a lot more delicate to work with. I should also be getting the hull into the garage for the rest of the sanding......just gotta get with it before my younger son comes up with another one of HIS projects {so far, he's getting more use of it more than I am
} when I have enough for an update, you can bet I'll post it for you all
-
checking in.........found there was some activity that I missed. thanks for the site Pete.......I book marked it so I can browse it in my spare time. any updates on the Cutty?
-
hello Ed........just reviewed the super job your doing here
I've heard of the concept your building her in........basically, it highlights the added detail and allows the viewer to see a larger scope. I have a set of 1:350 PE for the hood.......I've been having fun matching up the different parts your working with truly great job.......gonna be a monster when it begins to come together! taking a seat
- lmagna, Old Collingwood, mtaylor and 3 others
-
6
-
sure beats my board with the four screws in it
- Canute, mtaylor, Old Collingwood and 1 other
-
4
-
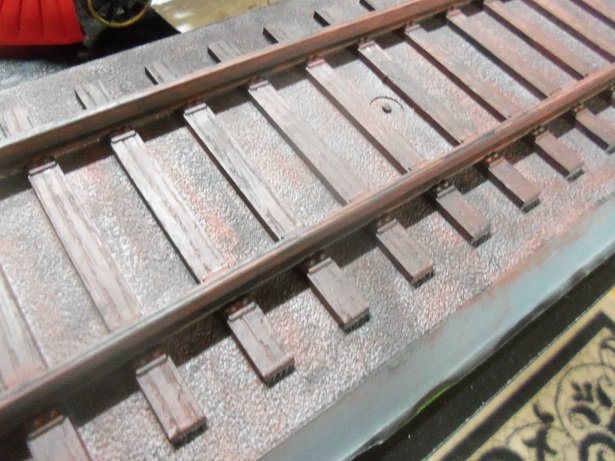
I finally got the pictures out of the camera. as mentioned, after the ties were painted dark brown, they were masked along with the perimeter, and given a coat of gray.
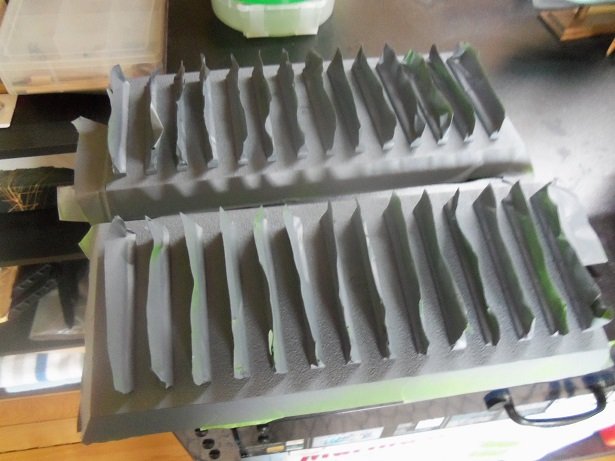
then given a dry brush of primer red
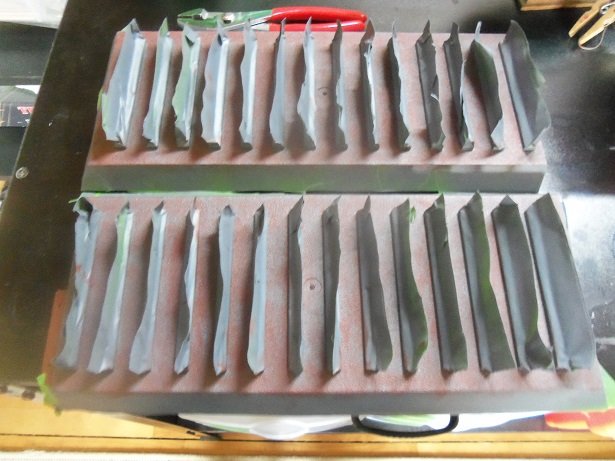
they sat for a day or two as I decided what the next step would be. since the rails were painted in the primer red, and will be getting the flat black dry brushing too, I figured that I'd assemble the rest of it and do it all at once. I'll be doing the ties as well.........the fastenings on the ties will get painted with the primer red before the black dry brushing. I'll detail the spikes with flat black. I might do blotches of flat green here and there and perhaps some shrubbery....NI.....NI
good that I've learned to check my feet under the desk........my partner in crime is at his usual post

for those unfamiliar...... this is my buddy Gibbs.......my shadow
- Canute, Old Collingwood, mtaylor and 6 others
-
9
-
I book marked another article on the Chase.......this one is a lot more descriptive
thanks Mark! you are correct about Disney making a film about it.
The Great Locomotive Chase | Disney Movies
Fess Parker also played Daniel Boone
- Canute, CDW, thibaultron and 2 others
-
5


U-552 by yvesvidal - FINISHED - Trumpeter - 1/48 - PLASTIC - Type VIIC U-boat
in - Kit build logs for subjects built from 1901 - Present Day
Posted
checking in on your progress Yves.........very impressive indeed! so glad to hear that you had a good outcome, looking for the parts you needed. I think that after this, Trumpeter should make them an accessory kit that can be purchased for this model. the deck is looking very good as well.......the PE and your efforts are really paying off! super job!")