


glbarlow
-
Posts
4,015 -
Joined
-
Last visited
Reputation Activity
-

 glbarlow got a reaction from FrankWouts in HMS Winchelsea 1764 by glbarlow - FINISHED - 1:48
Thank you, much appreciated.
Thank you!
Thank you!
I appreciate all your comments!
-
 glbarlow got a reaction from Nunnehi (Don) in HMS Winchelsea 1764 by glbarlow - FINISHED - 1:48
Thank you, much appreciated.
Thank you!
Thank you!
I appreciate all your comments!
-
glbarlow got a reaction from FrankWouts in HMS Winchelsea 1764 by glbarlow - FINISHED - 1:48
Thanks Rusty. One of my summer goals is to learn more about Photoshop’s new AI features. Maybe I’ll create an image of Winnie on the high seas😊
-
 glbarlow got a reaction from Erik W in HMS Winchelsea 1764 by glbarlow - FINISHED - 1:48
Thanks Rusty. One of my summer goals is to learn more about Photoshop’s new AI features. Maybe I’ll create an image of Winnie on the high seas😊
-
 glbarlow got a reaction from CiscoH in HMS Winchelsea 1764 by glbarlow - FINISHED - 1:48
Thank you, much appreciated.
Thank you!
Thank you!
I appreciate all your comments!
-
 glbarlow got a reaction from FrankWouts in HMS Winchelsea 1764 by glbarlow - FINISHED - 1:48
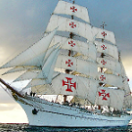
Chapter 11, the model save the headworks is complete. I thought I'd share some photos:
So many cool design features stand out. As simple as the bill board may appear it was a sharp addition. As I've mentioned, I dyed the deadeyes ebony. The dye, as opposed to black paint, allows the grain to show (though hard to see in photos) I'm pleased with how they complement the colors of the overall model.
The open deck allows a nice glimpse of the stove - such a fun thing to make I'm glad it's not completely hidden.
The decision is still pending on whether I place the swivel guns on the bollards. I'm not sure how I feel about the look, accurate or otherwise and I'm not completely confident drilling the holes for them to fit. I'll revisit it as I start work on the headworks.
The midship cannons were the last thing glued in. I was holding off while my friend and I fitted the base he's making to have a place to hold. Once the gang boards were mounted they became more the thing to avoid than cannon barrels.
I'm happy with my decision not to rig the guns this time around. Although I appreciate those that did, in this case I like how it provides for a nice clean look. Or maybe I just didn't want to rig 32 guns.
The transition to the quarterdeck, from the lower deck letter to the breast rail provides for a lot of detail and many, many hours of work over the past 2 ½ years. It's all worth it when it all comes together. Those posts took a lot of time. So glad I took that time.
I made the elm tree pumps two years ago but didn't add them until the ladders, rails, gang boards, and everything around them was complete. That was a good call, I would have broke them multiple times otherwise.
The stern is when all the fun is. Between port lids, more cannon, swivel guns and predominant deck furniture there is lots to see and lots of mini-projects to get there.
One very minor thing I'm happy with: I was able to wrap and match up paper friezes for six of the swivel guns. With the angle and only two sides showing that wasn't an option for the two on the quarter gallery roof. I'm no paint specialist but I kept playing with Winsor and Newton Cerulean Blue, Titanium White, and Grumacher Mars Black until I got a nice match with the paper frieze. I know it's a small thing, I considered going the Sherman Williams store for a computer based match but not sure what I'd do with the minimum order of a quart.
I've shown versions of this photo several times, I never tire of it. For me it's a piece of art all by itself and yet another signature tribute to Chuck's design and penchant for detail.
So here she sits ready for the final chapter. I'm taking some time off for other summer activities, I'll see how long I can go before jumping in to start chapter 12.
Thanks for stopping by, your likes and comments are always appreciated.
-
glbarlow got a reaction from Nunnehi (Don) in HMS Winchelsea 1764 by glbarlow - FINISHED - 1:48
Chapter 11, the model save the headworks is complete. I thought I'd share some photos:
So many cool design features stand out. As simple as the bill board may appear it was a sharp addition. As I've mentioned, I dyed the deadeyes ebony. The dye, as opposed to black paint, allows the grain to show (though hard to see in photos) I'm pleased with how they complement the colors of the overall model.
The open deck allows a nice glimpse of the stove - such a fun thing to make I'm glad it's not completely hidden.
The decision is still pending on whether I place the swivel guns on the bollards. I'm not sure how I feel about the look, accurate or otherwise and I'm not completely confident drilling the holes for them to fit. I'll revisit it as I start work on the headworks.
The midship cannons were the last thing glued in. I was holding off while my friend and I fitted the base he's making to have a place to hold. Once the gang boards were mounted they became more the thing to avoid than cannon barrels.
I'm happy with my decision not to rig the guns this time around. Although I appreciate those that did, in this case I like how it provides for a nice clean look. Or maybe I just didn't want to rig 32 guns.
The transition to the quarterdeck, from the lower deck letter to the breast rail provides for a lot of detail and many, many hours of work over the past 2 ½ years. It's all worth it when it all comes together. Those posts took a lot of time. So glad I took that time.
I made the elm tree pumps two years ago but didn't add them until the ladders, rails, gang boards, and everything around them was complete. That was a good call, I would have broke them multiple times otherwise.
The stern is when all the fun is. Between port lids, more cannon, swivel guns and predominant deck furniture there is lots to see and lots of mini-projects to get there.
One very minor thing I'm happy with: I was able to wrap and match up paper friezes for six of the swivel guns. With the angle and only two sides showing that wasn't an option for the two on the quarter gallery roof. I'm no paint specialist but I kept playing with Winsor and Newton Cerulean Blue, Titanium White, and Grumacher Mars Black until I got a nice match with the paper frieze. I know it's a small thing, I considered going the Sherman Williams store for a computer based match but not sure what I'd do with the minimum order of a quart.
I've shown versions of this photo several times, I never tire of it. For me it's a piece of art all by itself and yet another signature tribute to Chuck's design and penchant for detail.
So here she sits ready for the final chapter. I'm taking some time off for other summer activities, I'll see how long I can go before jumping in to start chapter 12.
Thanks for stopping by, your likes and comments are always appreciated.
-
 glbarlow got a reaction from dodgeyhack in HMS Winchelsea 1764 by glbarlow - FINISHED - 1:48
Chapter 11, the model save the headworks is complete. I thought I'd share some photos:
So many cool design features stand out. As simple as the bill board may appear it was a sharp addition. As I've mentioned, I dyed the deadeyes ebony. The dye, as opposed to black paint, allows the grain to show (though hard to see in photos) I'm pleased with how they complement the colors of the overall model.
The open deck allows a nice glimpse of the stove - such a fun thing to make I'm glad it's not completely hidden.
The decision is still pending on whether I place the swivel guns on the bollards. I'm not sure how I feel about the look, accurate or otherwise and I'm not completely confident drilling the holes for them to fit. I'll revisit it as I start work on the headworks.
The midship cannons were the last thing glued in. I was holding off while my friend and I fitted the base he's making to have a place to hold. Once the gang boards were mounted they became more the thing to avoid than cannon barrels.
I'm happy with my decision not to rig the guns this time around. Although I appreciate those that did, in this case I like how it provides for a nice clean look. Or maybe I just didn't want to rig 32 guns.
The transition to the quarterdeck, from the lower deck letter to the breast rail provides for a lot of detail and many, many hours of work over the past 2 ½ years. It's all worth it when it all comes together. Those posts took a lot of time. So glad I took that time.
I made the elm tree pumps two years ago but didn't add them until the ladders, rails, gang boards, and everything around them was complete. That was a good call, I would have broke them multiple times otherwise.
The stern is when all the fun is. Between port lids, more cannon, swivel guns and predominant deck furniture there is lots to see and lots of mini-projects to get there.
One very minor thing I'm happy with: I was able to wrap and match up paper friezes for six of the swivel guns. With the angle and only two sides showing that wasn't an option for the two on the quarter gallery roof. I'm no paint specialist but I kept playing with Winsor and Newton Cerulean Blue, Titanium White, and Grumacher Mars Black until I got a nice match with the paper frieze. I know it's a small thing, I considered going the Sherman Williams store for a computer based match but not sure what I'd do with the minimum order of a quart.
I've shown versions of this photo several times, I never tire of it. For me it's a piece of art all by itself and yet another signature tribute to Chuck's design and penchant for detail.
So here she sits ready for the final chapter. I'm taking some time off for other summer activities, I'll see how long I can go before jumping in to start chapter 12.
Thanks for stopping by, your likes and comments are always appreciated.
-
 glbarlow got a reaction from VonHoldinghausen in HMS Winchelsea 1764 by glbarlow - FINISHED - 1:48
Chapter 11, the model save the headworks is complete. I thought I'd share some photos:
So many cool design features stand out. As simple as the bill board may appear it was a sharp addition. As I've mentioned, I dyed the deadeyes ebony. The dye, as opposed to black paint, allows the grain to show (though hard to see in photos) I'm pleased with how they complement the colors of the overall model.
The open deck allows a nice glimpse of the stove - such a fun thing to make I'm glad it's not completely hidden.
The decision is still pending on whether I place the swivel guns on the bollards. I'm not sure how I feel about the look, accurate or otherwise and I'm not completely confident drilling the holes for them to fit. I'll revisit it as I start work on the headworks.
The midship cannons were the last thing glued in. I was holding off while my friend and I fitted the base he's making to have a place to hold. Once the gang boards were mounted they became more the thing to avoid than cannon barrels.
I'm happy with my decision not to rig the guns this time around. Although I appreciate those that did, in this case I like how it provides for a nice clean look. Or maybe I just didn't want to rig 32 guns.
The transition to the quarterdeck, from the lower deck letter to the breast rail provides for a lot of detail and many, many hours of work over the past 2 ½ years. It's all worth it when it all comes together. Those posts took a lot of time. So glad I took that time.
I made the elm tree pumps two years ago but didn't add them until the ladders, rails, gang boards, and everything around them was complete. That was a good call, I would have broke them multiple times otherwise.
The stern is when all the fun is. Between port lids, more cannon, swivel guns and predominant deck furniture there is lots to see and lots of mini-projects to get there.
One very minor thing I'm happy with: I was able to wrap and match up paper friezes for six of the swivel guns. With the angle and only two sides showing that wasn't an option for the two on the quarter gallery roof. I'm no paint specialist but I kept playing with Winsor and Newton Cerulean Blue, Titanium White, and Grumacher Mars Black until I got a nice match with the paper frieze. I know it's a small thing, I considered going the Sherman Williams store for a computer based match but not sure what I'd do with the minimum order of a quart.
I've shown versions of this photo several times, I never tire of it. For me it's a piece of art all by itself and yet another signature tribute to Chuck's design and penchant for detail.
So here she sits ready for the final chapter. I'm taking some time off for other summer activities, I'll see how long I can go before jumping in to start chapter 12.
Thanks for stopping by, your likes and comments are always appreciated.
-
 glbarlow got a reaction from chris watton in HMS Winchelsea 1764 by glbarlow - FINISHED - 1:48
Chapter 11, the model save the headworks is complete. I thought I'd share some photos:
So many cool design features stand out. As simple as the bill board may appear it was a sharp addition. As I've mentioned, I dyed the deadeyes ebony. The dye, as opposed to black paint, allows the grain to show (though hard to see in photos) I'm pleased with how they complement the colors of the overall model.
The open deck allows a nice glimpse of the stove - such a fun thing to make I'm glad it's not completely hidden.
The decision is still pending on whether I place the swivel guns on the bollards. I'm not sure how I feel about the look, accurate or otherwise and I'm not completely confident drilling the holes for them to fit. I'll revisit it as I start work on the headworks.
The midship cannons were the last thing glued in. I was holding off while my friend and I fitted the base he's making to have a place to hold. Once the gang boards were mounted they became more the thing to avoid than cannon barrels.
I'm happy with my decision not to rig the guns this time around. Although I appreciate those that did, in this case I like how it provides for a nice clean look. Or maybe I just didn't want to rig 32 guns.
The transition to the quarterdeck, from the lower deck letter to the breast rail provides for a lot of detail and many, many hours of work over the past 2 ½ years. It's all worth it when it all comes together. Those posts took a lot of time. So glad I took that time.
I made the elm tree pumps two years ago but didn't add them until the ladders, rails, gang boards, and everything around them was complete. That was a good call, I would have broke them multiple times otherwise.
The stern is when all the fun is. Between port lids, more cannon, swivel guns and predominant deck furniture there is lots to see and lots of mini-projects to get there.
One very minor thing I'm happy with: I was able to wrap and match up paper friezes for six of the swivel guns. With the angle and only two sides showing that wasn't an option for the two on the quarter gallery roof. I'm no paint specialist but I kept playing with Winsor and Newton Cerulean Blue, Titanium White, and Grumacher Mars Black until I got a nice match with the paper frieze. I know it's a small thing, I considered going the Sherman Williams store for a computer based match but not sure what I'd do with the minimum order of a quart.
I've shown versions of this photo several times, I never tire of it. For me it's a piece of art all by itself and yet another signature tribute to Chuck's design and penchant for detail.
So here she sits ready for the final chapter. I'm taking some time off for other summer activities, I'll see how long I can go before jumping in to start chapter 12.
Thanks for stopping by, your likes and comments are always appreciated.
-
 glbarlow got a reaction from Ryland Craze in HMS Winchelsea 1764 by glbarlow - FINISHED - 1:48
Chapter 11, the model save the headworks is complete. I thought I'd share some photos:
So many cool design features stand out. As simple as the bill board may appear it was a sharp addition. As I've mentioned, I dyed the deadeyes ebony. The dye, as opposed to black paint, allows the grain to show (though hard to see in photos) I'm pleased with how they complement the colors of the overall model.
The open deck allows a nice glimpse of the stove - such a fun thing to make I'm glad it's not completely hidden.
The decision is still pending on whether I place the swivel guns on the bollards. I'm not sure how I feel about the look, accurate or otherwise and I'm not completely confident drilling the holes for them to fit. I'll revisit it as I start work on the headworks.
The midship cannons were the last thing glued in. I was holding off while my friend and I fitted the base he's making to have a place to hold. Once the gang boards were mounted they became more the thing to avoid than cannon barrels.
I'm happy with my decision not to rig the guns this time around. Although I appreciate those that did, in this case I like how it provides for a nice clean look. Or maybe I just didn't want to rig 32 guns.
The transition to the quarterdeck, from the lower deck letter to the breast rail provides for a lot of detail and many, many hours of work over the past 2 ½ years. It's all worth it when it all comes together. Those posts took a lot of time. So glad I took that time.
I made the elm tree pumps two years ago but didn't add them until the ladders, rails, gang boards, and everything around them was complete. That was a good call, I would have broke them multiple times otherwise.
The stern is when all the fun is. Between port lids, more cannon, swivel guns and predominant deck furniture there is lots to see and lots of mini-projects to get there.
One very minor thing I'm happy with: I was able to wrap and match up paper friezes for six of the swivel guns. With the angle and only two sides showing that wasn't an option for the two on the quarter gallery roof. I'm no paint specialist but I kept playing with Winsor and Newton Cerulean Blue, Titanium White, and Grumacher Mars Black until I got a nice match with the paper frieze. I know it's a small thing, I considered going the Sherman Williams store for a computer based match but not sure what I'd do with the minimum order of a quart.
I've shown versions of this photo several times, I never tire of it. For me it's a piece of art all by itself and yet another signature tribute to Chuck's design and penchant for detail.
So here she sits ready for the final chapter. I'm taking some time off for other summer activities, I'll see how long I can go before jumping in to start chapter 12.
Thanks for stopping by, your likes and comments are always appreciated.
-
 glbarlow got a reaction from Trussben in HMS Winchelsea 1764 by glbarlow - FINISHED - 1:48
Chapter 11, the model save the headworks is complete. I thought I'd share some photos:
So many cool design features stand out. As simple as the bill board may appear it was a sharp addition. As I've mentioned, I dyed the deadeyes ebony. The dye, as opposed to black paint, allows the grain to show (though hard to see in photos) I'm pleased with how they complement the colors of the overall model.
The open deck allows a nice glimpse of the stove - such a fun thing to make I'm glad it's not completely hidden.
The decision is still pending on whether I place the swivel guns on the bollards. I'm not sure how I feel about the look, accurate or otherwise and I'm not completely confident drilling the holes for them to fit. I'll revisit it as I start work on the headworks.
The midship cannons were the last thing glued in. I was holding off while my friend and I fitted the base he's making to have a place to hold. Once the gang boards were mounted they became more the thing to avoid than cannon barrels.
I'm happy with my decision not to rig the guns this time around. Although I appreciate those that did, in this case I like how it provides for a nice clean look. Or maybe I just didn't want to rig 32 guns.
The transition to the quarterdeck, from the lower deck letter to the breast rail provides for a lot of detail and many, many hours of work over the past 2 ½ years. It's all worth it when it all comes together. Those posts took a lot of time. So glad I took that time.
I made the elm tree pumps two years ago but didn't add them until the ladders, rails, gang boards, and everything around them was complete. That was a good call, I would have broke them multiple times otherwise.
The stern is when all the fun is. Between port lids, more cannon, swivel guns and predominant deck furniture there is lots to see and lots of mini-projects to get there.
One very minor thing I'm happy with: I was able to wrap and match up paper friezes for six of the swivel guns. With the angle and only two sides showing that wasn't an option for the two on the quarter gallery roof. I'm no paint specialist but I kept playing with Winsor and Newton Cerulean Blue, Titanium White, and Grumacher Mars Black until I got a nice match with the paper frieze. I know it's a small thing, I considered going the Sherman Williams store for a computer based match but not sure what I'd do with the minimum order of a quart.
I've shown versions of this photo several times, I never tire of it. For me it's a piece of art all by itself and yet another signature tribute to Chuck's design and penchant for detail.
So here she sits ready for the final chapter. I'm taking some time off for other summer activities, I'll see how long I can go before jumping in to start chapter 12.
Thanks for stopping by, your likes and comments are always appreciated.
-
 glbarlow got a reaction from westwood in HMS Winchelsea 1764 by glbarlow - FINISHED - 1:48
Chapter 11, the model save the headworks is complete. I thought I'd share some photos:
So many cool design features stand out. As simple as the bill board may appear it was a sharp addition. As I've mentioned, I dyed the deadeyes ebony. The dye, as opposed to black paint, allows the grain to show (though hard to see in photos) I'm pleased with how they complement the colors of the overall model.
The open deck allows a nice glimpse of the stove - such a fun thing to make I'm glad it's not completely hidden.
The decision is still pending on whether I place the swivel guns on the bollards. I'm not sure how I feel about the look, accurate or otherwise and I'm not completely confident drilling the holes for them to fit. I'll revisit it as I start work on the headworks.
The midship cannons were the last thing glued in. I was holding off while my friend and I fitted the base he's making to have a place to hold. Once the gang boards were mounted they became more the thing to avoid than cannon barrels.
I'm happy with my decision not to rig the guns this time around. Although I appreciate those that did, in this case I like how it provides for a nice clean look. Or maybe I just didn't want to rig 32 guns.
The transition to the quarterdeck, from the lower deck letter to the breast rail provides for a lot of detail and many, many hours of work over the past 2 ½ years. It's all worth it when it all comes together. Those posts took a lot of time. So glad I took that time.
I made the elm tree pumps two years ago but didn't add them until the ladders, rails, gang boards, and everything around them was complete. That was a good call, I would have broke them multiple times otherwise.
The stern is when all the fun is. Between port lids, more cannon, swivel guns and predominant deck furniture there is lots to see and lots of mini-projects to get there.
One very minor thing I'm happy with: I was able to wrap and match up paper friezes for six of the swivel guns. With the angle and only two sides showing that wasn't an option for the two on the quarter gallery roof. I'm no paint specialist but I kept playing with Winsor and Newton Cerulean Blue, Titanium White, and Grumacher Mars Black until I got a nice match with the paper frieze. I know it's a small thing, I considered going the Sherman Williams store for a computer based match but not sure what I'd do with the minimum order of a quart.
I've shown versions of this photo several times, I never tire of it. For me it's a piece of art all by itself and yet another signature tribute to Chuck's design and penchant for detail.
So here she sits ready for the final chapter. I'm taking some time off for other summer activities, I'll see how long I can go before jumping in to start chapter 12.
Thanks for stopping by, your likes and comments are always appreciated.
-
 glbarlow reacted to Tossedman in HMS Winchelsea 1764 by glbarlow - FINISHED - 1:48
So good! Well done sir!
-
glbarlow reacted to Nunnehi (Don) in HMS Winchelsea 1764 by glbarlow - FINISHED - 1:48
Beautiful, Glen, just beautiful!
-
 glbarlow got a reaction from Dristigheten in HMS Winchelsea 1764 by glbarlow - FINISHED - 1:48
Chapter 11, the model save the headworks is complete. I thought I'd share some photos:
So many cool design features stand out. As simple as the bill board may appear it was a sharp addition. As I've mentioned, I dyed the deadeyes ebony. The dye, as opposed to black paint, allows the grain to show (though hard to see in photos) I'm pleased with how they complement the colors of the overall model.
The open deck allows a nice glimpse of the stove - such a fun thing to make I'm glad it's not completely hidden.
The decision is still pending on whether I place the swivel guns on the bollards. I'm not sure how I feel about the look, accurate or otherwise and I'm not completely confident drilling the holes for them to fit. I'll revisit it as I start work on the headworks.
The midship cannons were the last thing glued in. I was holding off while my friend and I fitted the base he's making to have a place to hold. Once the gang boards were mounted they became more the thing to avoid than cannon barrels.
I'm happy with my decision not to rig the guns this time around. Although I appreciate those that did, in this case I like how it provides for a nice clean look. Or maybe I just didn't want to rig 32 guns.
The transition to the quarterdeck, from the lower deck letter to the breast rail provides for a lot of detail and many, many hours of work over the past 2 ½ years. It's all worth it when it all comes together. Those posts took a lot of time. So glad I took that time.
I made the elm tree pumps two years ago but didn't add them until the ladders, rails, gang boards, and everything around them was complete. That was a good call, I would have broke them multiple times otherwise.
The stern is when all the fun is. Between port lids, more cannon, swivel guns and predominant deck furniture there is lots to see and lots of mini-projects to get there.
One very minor thing I'm happy with: I was able to wrap and match up paper friezes for six of the swivel guns. With the angle and only two sides showing that wasn't an option for the two on the quarter gallery roof. I'm no paint specialist but I kept playing with Winsor and Newton Cerulean Blue, Titanium White, and Grumacher Mars Black until I got a nice match with the paper frieze. I know it's a small thing, I considered going the Sherman Williams store for a computer based match but not sure what I'd do with the minimum order of a quart.
I've shown versions of this photo several times, I never tire of it. For me it's a piece of art all by itself and yet another signature tribute to Chuck's design and penchant for detail.
So here she sits ready for the final chapter. I'm taking some time off for other summer activities, I'll see how long I can go before jumping in to start chapter 12.
Thanks for stopping by, your likes and comments are always appreciated.
-
glbarlow reacted to Freebird in HMS Winchelsea 1764 by glbarlow - FINISHED - 1:48
Totally awesome Glenn!
Best Regards .... Rick
-
glbarlow reacted to Rustyj in HMS Winchelsea 1764 by glbarlow - FINISHED - 1:48
Glenn that is one beautifully built Winnie. The photos are awesome too.
-
.thumb.jpg.6d6ee4bdbfaac2c58ecc77e7b80ae374.jpg) glbarlow got a reaction from Matt D in HMS Winchelsea 1764 by glbarlow - FINISHED - 1:48
glbarlow got a reaction from Matt D in HMS Winchelsea 1764 by glbarlow - FINISHED - 1:48
Chapter 11, the model save the headworks is complete. I thought I'd share some photos:
So many cool design features stand out. As simple as the bill board may appear it was a sharp addition. As I've mentioned, I dyed the deadeyes ebony. The dye, as opposed to black paint, allows the grain to show (though hard to see in photos) I'm pleased with how they complement the colors of the overall model.
The open deck allows a nice glimpse of the stove - such a fun thing to make I'm glad it's not completely hidden.
The decision is still pending on whether I place the swivel guns on the bollards. I'm not sure how I feel about the look, accurate or otherwise and I'm not completely confident drilling the holes for them to fit. I'll revisit it as I start work on the headworks.
The midship cannons were the last thing glued in. I was holding off while my friend and I fitted the base he's making to have a place to hold. Once the gang boards were mounted they became more the thing to avoid than cannon barrels.
I'm happy with my decision not to rig the guns this time around. Although I appreciate those that did, in this case I like how it provides for a nice clean look. Or maybe I just didn't want to rig 32 guns.
The transition to the quarterdeck, from the lower deck letter to the breast rail provides for a lot of detail and many, many hours of work over the past 2 ½ years. It's all worth it when it all comes together. Those posts took a lot of time. So glad I took that time.
I made the elm tree pumps two years ago but didn't add them until the ladders, rails, gang boards, and everything around them was complete. That was a good call, I would have broke them multiple times otherwise.
The stern is when all the fun is. Between port lids, more cannon, swivel guns and predominant deck furniture there is lots to see and lots of mini-projects to get there.
One very minor thing I'm happy with: I was able to wrap and match up paper friezes for six of the swivel guns. With the angle and only two sides showing that wasn't an option for the two on the quarter gallery roof. I'm no paint specialist but I kept playing with Winsor and Newton Cerulean Blue, Titanium White, and Grumacher Mars Black until I got a nice match with the paper frieze. I know it's a small thing, I considered going the Sherman Williams store for a computer based match but not sure what I'd do with the minimum order of a quart.
I've shown versions of this photo several times, I never tire of it. For me it's a piece of art all by itself and yet another signature tribute to Chuck's design and penchant for detail.
So here she sits ready for the final chapter. I'm taking some time off for other summer activities, I'll see how long I can go before jumping in to start chapter 12.
Thanks for stopping by, your likes and comments are always appreciated.
-
 glbarlow got a reaction from baribeaujm in HMS Winchelsea 1764 by glbarlow - FINISHED - 1:48
Chapter 11, the model save the headworks is complete. I thought I'd share some photos:
So many cool design features stand out. As simple as the bill board may appear it was a sharp addition. As I've mentioned, I dyed the deadeyes ebony. The dye, as opposed to black paint, allows the grain to show (though hard to see in photos) I'm pleased with how they complement the colors of the overall model.
The open deck allows a nice glimpse of the stove - such a fun thing to make I'm glad it's not completely hidden.
The decision is still pending on whether I place the swivel guns on the bollards. I'm not sure how I feel about the look, accurate or otherwise and I'm not completely confident drilling the holes for them to fit. I'll revisit it as I start work on the headworks.
The midship cannons were the last thing glued in. I was holding off while my friend and I fitted the base he's making to have a place to hold. Once the gang boards were mounted they became more the thing to avoid than cannon barrels.
I'm happy with my decision not to rig the guns this time around. Although I appreciate those that did, in this case I like how it provides for a nice clean look. Or maybe I just didn't want to rig 32 guns.
The transition to the quarterdeck, from the lower deck letter to the breast rail provides for a lot of detail and many, many hours of work over the past 2 ½ years. It's all worth it when it all comes together. Those posts took a lot of time. So glad I took that time.
I made the elm tree pumps two years ago but didn't add them until the ladders, rails, gang boards, and everything around them was complete. That was a good call, I would have broke them multiple times otherwise.
The stern is when all the fun is. Between port lids, more cannon, swivel guns and predominant deck furniture there is lots to see and lots of mini-projects to get there.
One very minor thing I'm happy with: I was able to wrap and match up paper friezes for six of the swivel guns. With the angle and only two sides showing that wasn't an option for the two on the quarter gallery roof. I'm no paint specialist but I kept playing with Winsor and Newton Cerulean Blue, Titanium White, and Grumacher Mars Black until I got a nice match with the paper frieze. I know it's a small thing, I considered going the Sherman Williams store for a computer based match but not sure what I'd do with the minimum order of a quart.
I've shown versions of this photo several times, I never tire of it. For me it's a piece of art all by itself and yet another signature tribute to Chuck's design and penchant for detail.
So here she sits ready for the final chapter. I'm taking some time off for other summer activities, I'll see how long I can go before jumping in to start chapter 12.
Thanks for stopping by, your likes and comments are always appreciated.
-
 glbarlow got a reaction from VTHokiEE in HMS Winchelsea 1764 by glbarlow - FINISHED - 1:48
Chapter 11, the model save the headworks is complete. I thought I'd share some photos:
So many cool design features stand out. As simple as the bill board may appear it was a sharp addition. As I've mentioned, I dyed the deadeyes ebony. The dye, as opposed to black paint, allows the grain to show (though hard to see in photos) I'm pleased with how they complement the colors of the overall model.
The open deck allows a nice glimpse of the stove - such a fun thing to make I'm glad it's not completely hidden.
The decision is still pending on whether I place the swivel guns on the bollards. I'm not sure how I feel about the look, accurate or otherwise and I'm not completely confident drilling the holes for them to fit. I'll revisit it as I start work on the headworks.
The midship cannons were the last thing glued in. I was holding off while my friend and I fitted the base he's making to have a place to hold. Once the gang boards were mounted they became more the thing to avoid than cannon barrels.
I'm happy with my decision not to rig the guns this time around. Although I appreciate those that did, in this case I like how it provides for a nice clean look. Or maybe I just didn't want to rig 32 guns.
The transition to the quarterdeck, from the lower deck letter to the breast rail provides for a lot of detail and many, many hours of work over the past 2 ½ years. It's all worth it when it all comes together. Those posts took a lot of time. So glad I took that time.
I made the elm tree pumps two years ago but didn't add them until the ladders, rails, gang boards, and everything around them was complete. That was a good call, I would have broke them multiple times otherwise.
The stern is when all the fun is. Between port lids, more cannon, swivel guns and predominant deck furniture there is lots to see and lots of mini-projects to get there.
One very minor thing I'm happy with: I was able to wrap and match up paper friezes for six of the swivel guns. With the angle and only two sides showing that wasn't an option for the two on the quarter gallery roof. I'm no paint specialist but I kept playing with Winsor and Newton Cerulean Blue, Titanium White, and Grumacher Mars Black until I got a nice match with the paper frieze. I know it's a small thing, I considered going the Sherman Williams store for a computer based match but not sure what I'd do with the minimum order of a quart.
I've shown versions of this photo several times, I never tire of it. For me it's a piece of art all by itself and yet another signature tribute to Chuck's design and penchant for detail.
So here she sits ready for the final chapter. I'm taking some time off for other summer activities, I'll see how long I can go before jumping in to start chapter 12.
Thanks for stopping by, your likes and comments are always appreciated.
-
 glbarlow got a reaction from Jorge_Goncalves in HMS Winchelsea 1764 by glbarlow - FINISHED - 1:48
Chapter 11, the model save the headworks is complete. I thought I'd share some photos:
So many cool design features stand out. As simple as the bill board may appear it was a sharp addition. As I've mentioned, I dyed the deadeyes ebony. The dye, as opposed to black paint, allows the grain to show (though hard to see in photos) I'm pleased with how they complement the colors of the overall model.
The open deck allows a nice glimpse of the stove - such a fun thing to make I'm glad it's not completely hidden.
The decision is still pending on whether I place the swivel guns on the bollards. I'm not sure how I feel about the look, accurate or otherwise and I'm not completely confident drilling the holes for them to fit. I'll revisit it as I start work on the headworks.
The midship cannons were the last thing glued in. I was holding off while my friend and I fitted the base he's making to have a place to hold. Once the gang boards were mounted they became more the thing to avoid than cannon barrels.
I'm happy with my decision not to rig the guns this time around. Although I appreciate those that did, in this case I like how it provides for a nice clean look. Or maybe I just didn't want to rig 32 guns.
The transition to the quarterdeck, from the lower deck letter to the breast rail provides for a lot of detail and many, many hours of work over the past 2 ½ years. It's all worth it when it all comes together. Those posts took a lot of time. So glad I took that time.
I made the elm tree pumps two years ago but didn't add them until the ladders, rails, gang boards, and everything around them was complete. That was a good call, I would have broke them multiple times otherwise.
The stern is when all the fun is. Between port lids, more cannon, swivel guns and predominant deck furniture there is lots to see and lots of mini-projects to get there.
One very minor thing I'm happy with: I was able to wrap and match up paper friezes for six of the swivel guns. With the angle and only two sides showing that wasn't an option for the two on the quarter gallery roof. I'm no paint specialist but I kept playing with Winsor and Newton Cerulean Blue, Titanium White, and Grumacher Mars Black until I got a nice match with the paper frieze. I know it's a small thing, I considered going the Sherman Williams store for a computer based match but not sure what I'd do with the minimum order of a quart.
I've shown versions of this photo several times, I never tire of it. For me it's a piece of art all by itself and yet another signature tribute to Chuck's design and penchant for detail.
So here she sits ready for the final chapter. I'm taking some time off for other summer activities, I'll see how long I can go before jumping in to start chapter 12.
Thanks for stopping by, your likes and comments are always appreciated.
-
 glbarlow got a reaction from JpR62 in HMS Winchelsea 1764 by glbarlow - FINISHED - 1:48
Chapter 11, the model save the headworks is complete. I thought I'd share some photos:
So many cool design features stand out. As simple as the bill board may appear it was a sharp addition. As I've mentioned, I dyed the deadeyes ebony. The dye, as opposed to black paint, allows the grain to show (though hard to see in photos) I'm pleased with how they complement the colors of the overall model.
The open deck allows a nice glimpse of the stove - such a fun thing to make I'm glad it's not completely hidden.
The decision is still pending on whether I place the swivel guns on the bollards. I'm not sure how I feel about the look, accurate or otherwise and I'm not completely confident drilling the holes for them to fit. I'll revisit it as I start work on the headworks.
The midship cannons were the last thing glued in. I was holding off while my friend and I fitted the base he's making to have a place to hold. Once the gang boards were mounted they became more the thing to avoid than cannon barrels.
I'm happy with my decision not to rig the guns this time around. Although I appreciate those that did, in this case I like how it provides for a nice clean look. Or maybe I just didn't want to rig 32 guns.
The transition to the quarterdeck, from the lower deck letter to the breast rail provides for a lot of detail and many, many hours of work over the past 2 ½ years. It's all worth it when it all comes together. Those posts took a lot of time. So glad I took that time.
I made the elm tree pumps two years ago but didn't add them until the ladders, rails, gang boards, and everything around them was complete. That was a good call, I would have broke them multiple times otherwise.
The stern is when all the fun is. Between port lids, more cannon, swivel guns and predominant deck furniture there is lots to see and lots of mini-projects to get there.
One very minor thing I'm happy with: I was able to wrap and match up paper friezes for six of the swivel guns. With the angle and only two sides showing that wasn't an option for the two on the quarter gallery roof. I'm no paint specialist but I kept playing with Winsor and Newton Cerulean Blue, Titanium White, and Grumacher Mars Black until I got a nice match with the paper frieze. I know it's a small thing, I considered going the Sherman Williams store for a computer based match but not sure what I'd do with the minimum order of a quart.
I've shown versions of this photo several times, I never tire of it. For me it's a piece of art all by itself and yet another signature tribute to Chuck's design and penchant for detail.
So here she sits ready for the final chapter. I'm taking some time off for other summer activities, I'll see how long I can go before jumping in to start chapter 12.
Thanks for stopping by, your likes and comments are always appreciated.
-
 glbarlow got a reaction from Ronald-V in HMS Winchelsea 1764 by glbarlow - FINISHED - 1:48
Chapter 11, the model save the headworks is complete. I thought I'd share some photos:
So many cool design features stand out. As simple as the bill board may appear it was a sharp addition. As I've mentioned, I dyed the deadeyes ebony. The dye, as opposed to black paint, allows the grain to show (though hard to see in photos) I'm pleased with how they complement the colors of the overall model.
The open deck allows a nice glimpse of the stove - such a fun thing to make I'm glad it's not completely hidden.
The decision is still pending on whether I place the swivel guns on the bollards. I'm not sure how I feel about the look, accurate or otherwise and I'm not completely confident drilling the holes for them to fit. I'll revisit it as I start work on the headworks.
The midship cannons were the last thing glued in. I was holding off while my friend and I fitted the base he's making to have a place to hold. Once the gang boards were mounted they became more the thing to avoid than cannon barrels.
I'm happy with my decision not to rig the guns this time around. Although I appreciate those that did, in this case I like how it provides for a nice clean look. Or maybe I just didn't want to rig 32 guns.
The transition to the quarterdeck, from the lower deck letter to the breast rail provides for a lot of detail and many, many hours of work over the past 2 ½ years. It's all worth it when it all comes together. Those posts took a lot of time. So glad I took that time.
I made the elm tree pumps two years ago but didn't add them until the ladders, rails, gang boards, and everything around them was complete. That was a good call, I would have broke them multiple times otherwise.
The stern is when all the fun is. Between port lids, more cannon, swivel guns and predominant deck furniture there is lots to see and lots of mini-projects to get there.
One very minor thing I'm happy with: I was able to wrap and match up paper friezes for six of the swivel guns. With the angle and only two sides showing that wasn't an option for the two on the quarter gallery roof. I'm no paint specialist but I kept playing with Winsor and Newton Cerulean Blue, Titanium White, and Grumacher Mars Black until I got a nice match with the paper frieze. I know it's a small thing, I considered going the Sherman Williams store for a computer based match but not sure what I'd do with the minimum order of a quart.
I've shown versions of this photo several times, I never tire of it. For me it's a piece of art all by itself and yet another signature tribute to Chuck's design and penchant for detail.
So here she sits ready for the final chapter. I'm taking some time off for other summer activities, I'll see how long I can go before jumping in to start chapter 12.
Thanks for stopping by, your likes and comments are always appreciated.
-
glbarlow got a reaction from Erik W in HMS Winchelsea 1764 by glbarlow - FINISHED - 1:48
Chapter 11, the model save the headworks is complete. I thought I'd share some photos:
So many cool design features stand out. As simple as the bill board may appear it was a sharp addition. As I've mentioned, I dyed the deadeyes ebony. The dye, as opposed to black paint, allows the grain to show (though hard to see in photos) I'm pleased with how they complement the colors of the overall model.
The open deck allows a nice glimpse of the stove - such a fun thing to make I'm glad it's not completely hidden.
The decision is still pending on whether I place the swivel guns on the bollards. I'm not sure how I feel about the look, accurate or otherwise and I'm not completely confident drilling the holes for them to fit. I'll revisit it as I start work on the headworks.
The midship cannons were the last thing glued in. I was holding off while my friend and I fitted the base he's making to have a place to hold. Once the gang boards were mounted they became more the thing to avoid than cannon barrels.
I'm happy with my decision not to rig the guns this time around. Although I appreciate those that did, in this case I like how it provides for a nice clean look. Or maybe I just didn't want to rig 32 guns.
The transition to the quarterdeck, from the lower deck letter to the breast rail provides for a lot of detail and many, many hours of work over the past 2 ½ years. It's all worth it when it all comes together. Those posts took a lot of time. So glad I took that time.
I made the elm tree pumps two years ago but didn't add them until the ladders, rails, gang boards, and everything around them was complete. That was a good call, I would have broke them multiple times otherwise.
The stern is when all the fun is. Between port lids, more cannon, swivel guns and predominant deck furniture there is lots to see and lots of mini-projects to get there.
One very minor thing I'm happy with: I was able to wrap and match up paper friezes for six of the swivel guns. With the angle and only two sides showing that wasn't an option for the two on the quarter gallery roof. I'm no paint specialist but I kept playing with Winsor and Newton Cerulean Blue, Titanium White, and Grumacher Mars Black until I got a nice match with the paper frieze. I know it's a small thing, I considered going the Sherman Williams store for a computer based match but not sure what I'd do with the minimum order of a quart.
I've shown versions of this photo several times, I never tire of it. For me it's a piece of art all by itself and yet another signature tribute to Chuck's design and penchant for detail.
So here she sits ready for the final chapter. I'm taking some time off for other summer activities, I'll see how long I can go before jumping in to start chapter 12.
Thanks for stopping by, your likes and comments are always appreciated.