Charter33
-
Posts
455 -
Joined
-
Last visited
Content Type
Profiles
Forums
Gallery
Events
Everything posted by Charter33
-
Hi and welcome to this highly informative and supportive site! It's been my experience that there is little difference in working with wood that has been kiln dried or air dried as long as it has been done sufficiently in the case of air dried. As a rule of thumb it takes about a year per inch of thickness. Poorly seasoned wood will very likely warp, twist or split. Kiln dried tends to be more expensive because of the higher energy costs involved (plus all the possible associated environmental impacts). There is more control over the final moisture content however, and the process is much quicker - months rather than years. Producers often use a combination of the two forms of seasoning to balance cost against time. Just one other point to consider - kiln dried timber can have a different appearance to air dried. Beech in particular can take on a 'pinker' colour when kiln dried compared to a 'creamier' finish of air dried. This has something to do with the steam that is pumped into the kiln initially to deal with any insect or fungal issues prior to the main heating to reduce the moisture content I think. Hope this helps. Graham.
-
Thanks for the comments you added to my build log Patrick - your comments are much appreciated. I've just been reading your build log (can't understand how I managed to miss it before!). Lots of good advice and I gained some important insights into the challenges that lie ahead. Thank you - your log will be a regular port of call and I look forward to following it in the future. Progress with my own model has also been adversely effected similar health issues over the last couple of years, both my own and the Admiral's, so I think I know where you're coming from.... Keep up the good work. Graham
-
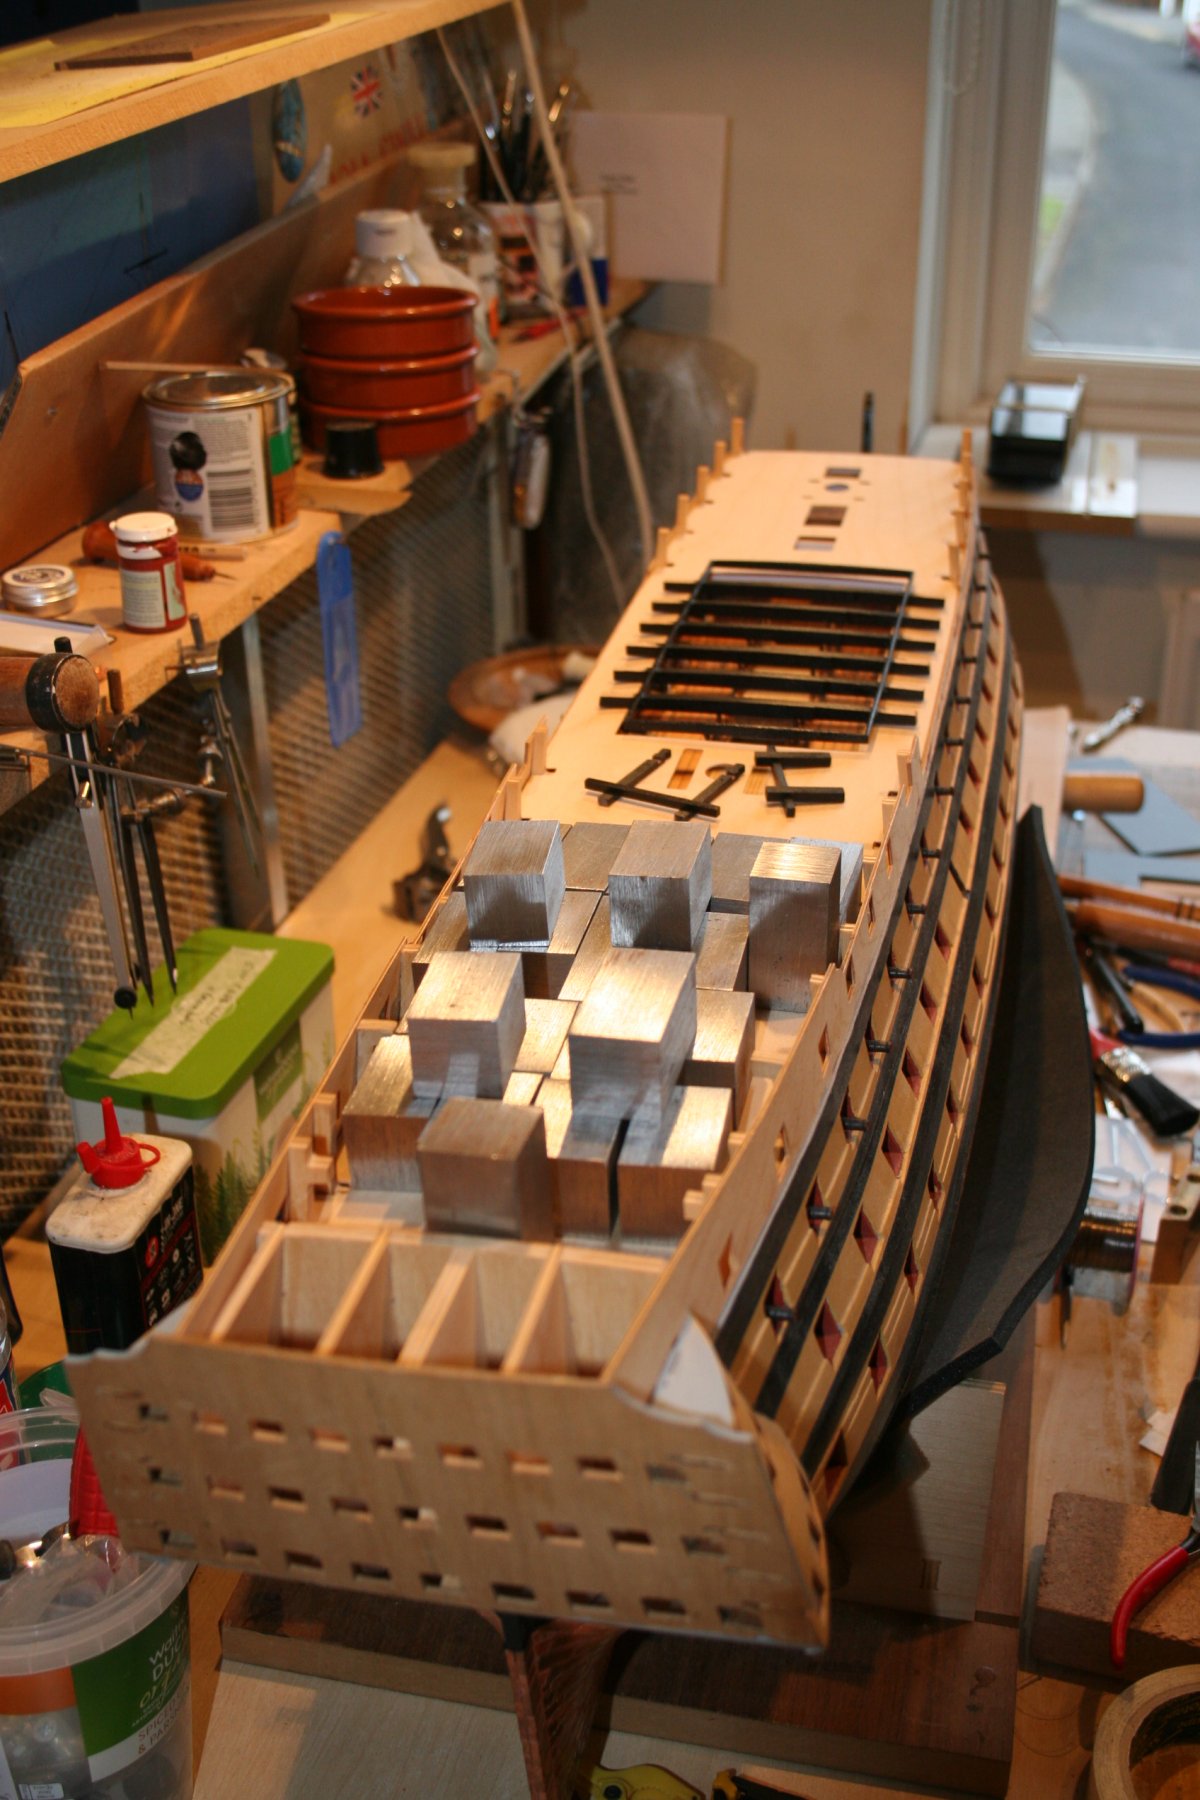
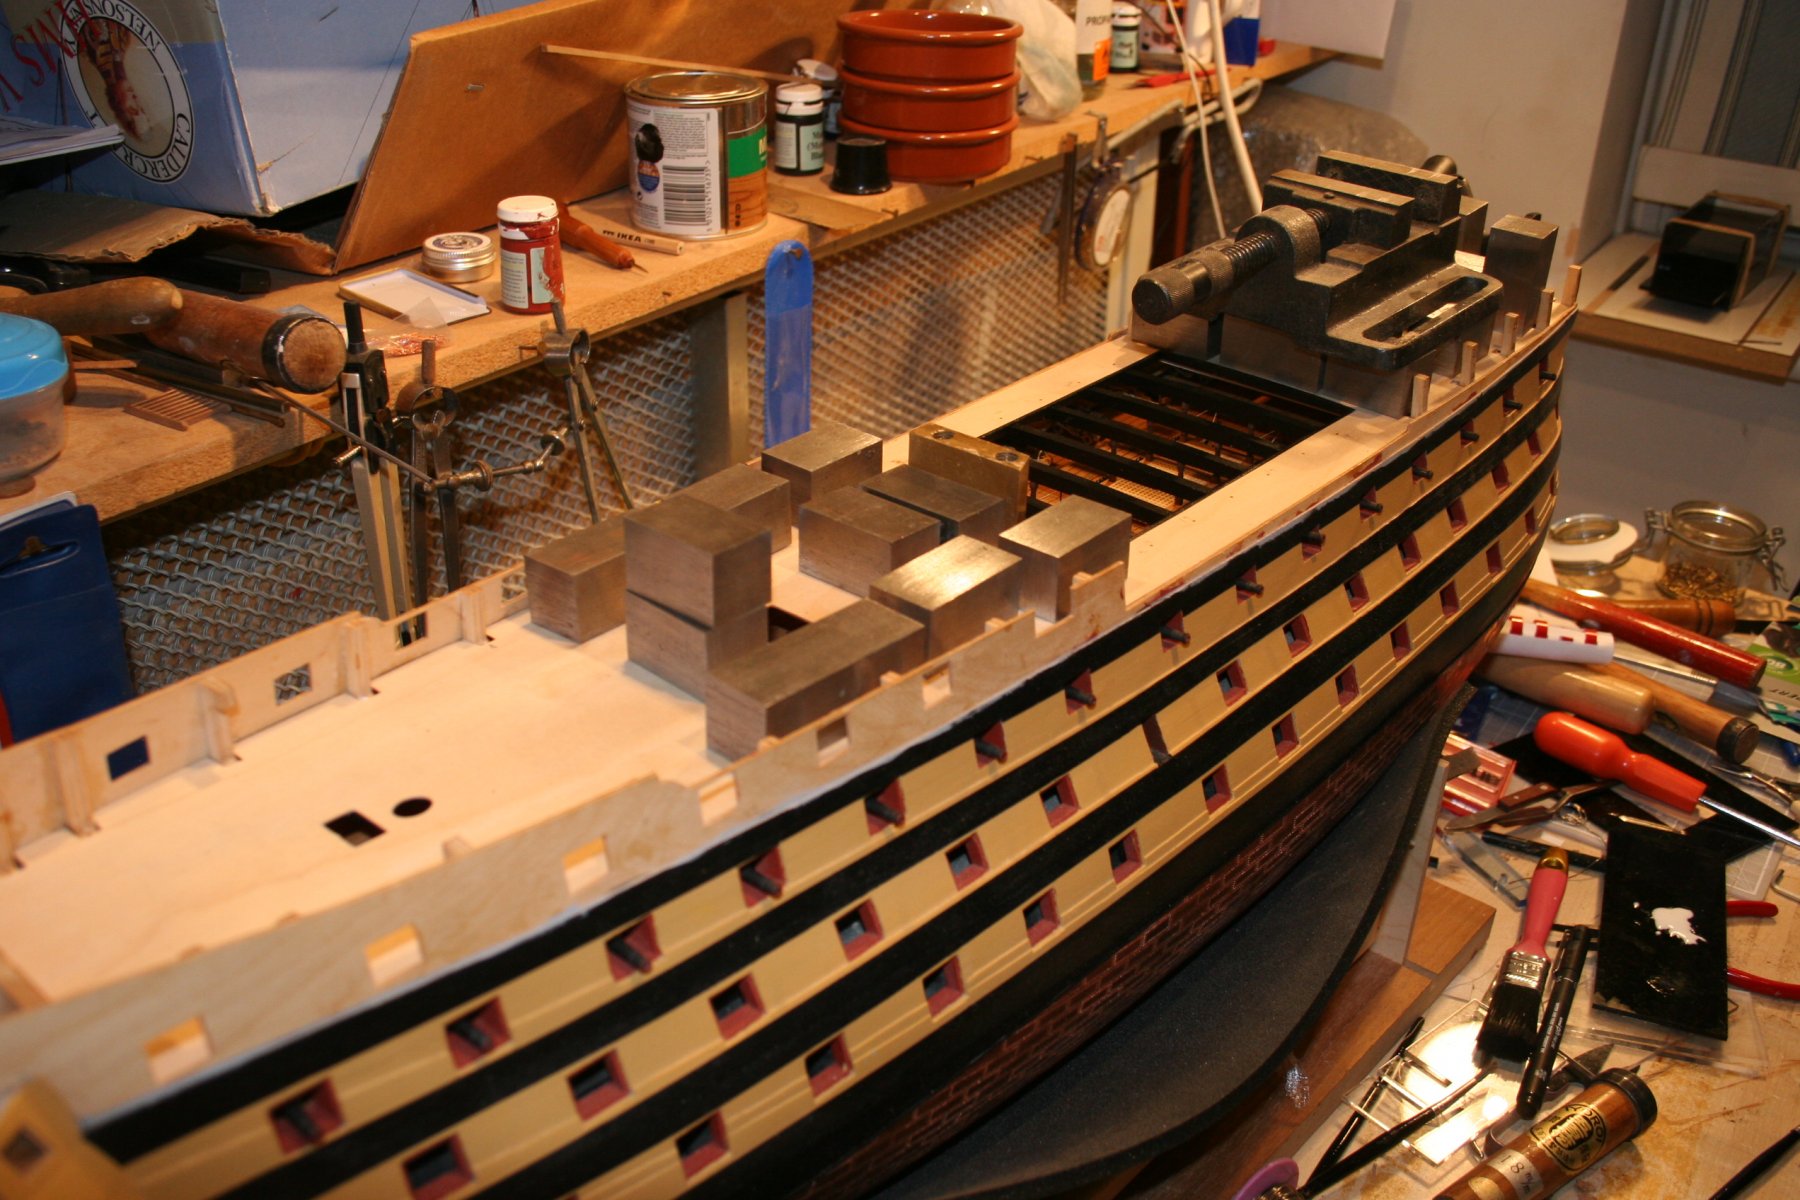
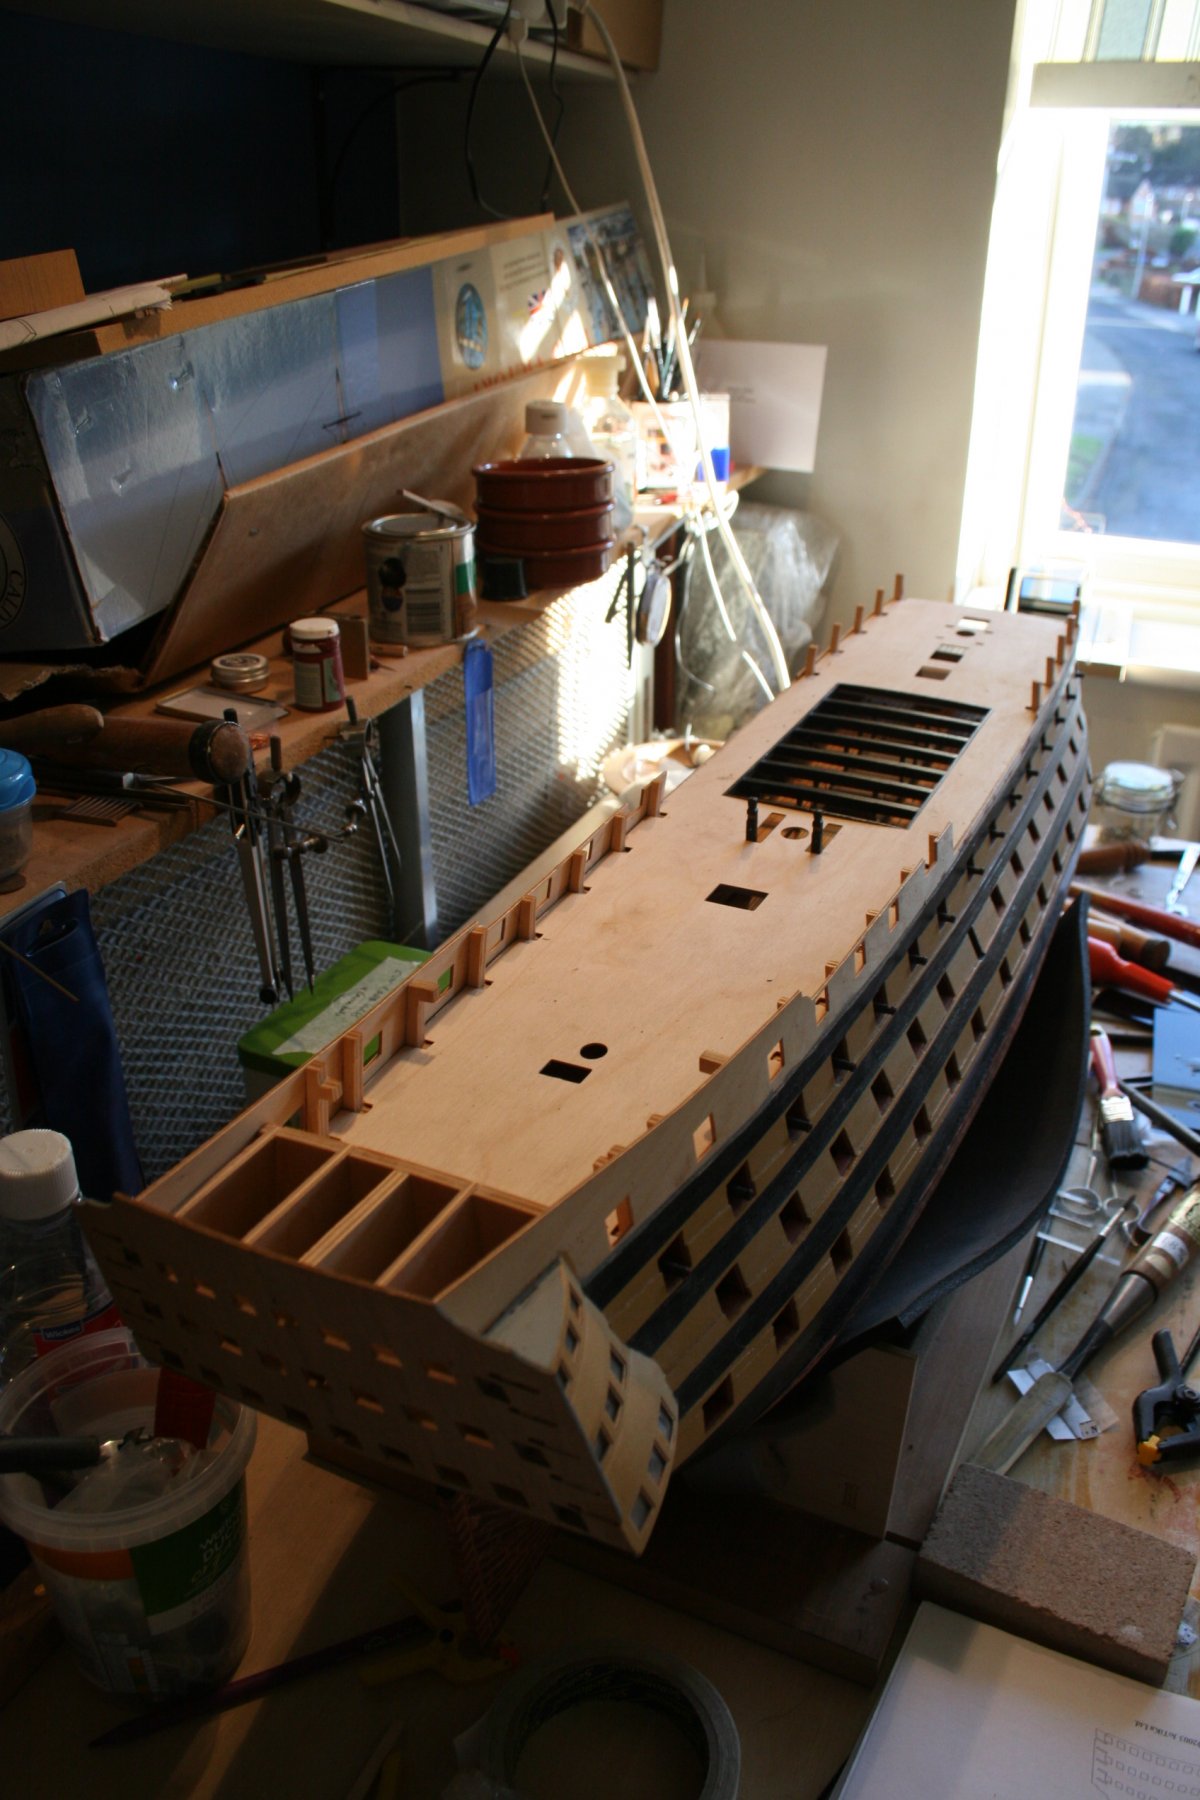
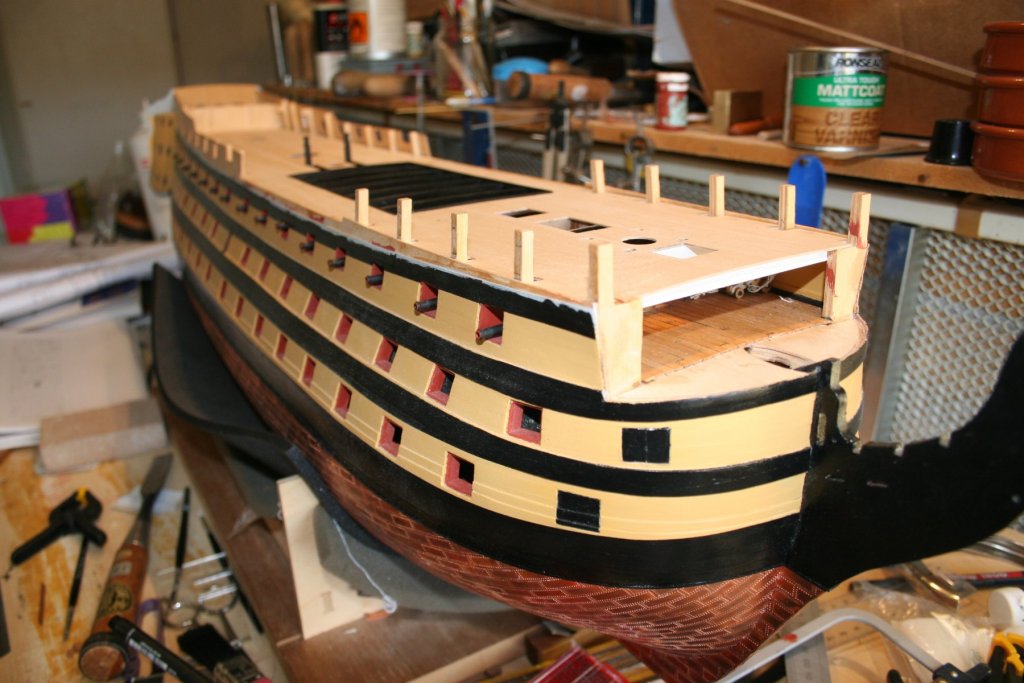
Hi, I've managed to make a bit more progress...... I did a dry run with the skid beam assembly fitted to the quarter deck to check the height the supports needed to be trimmed to. This turned out to be a couple of mm shorter than the drawing on the plan. I came up with this aid to help remove the correct amount from each end and then sand the ends square. The companionway guard rails could now be completed. I opened out the holes in the end stanchions so two threads could pass through, using one to 'serve' the other. With the steam trunk fitted, plus the galley chimney (shown on the plan but not mentioned in the instructions!!!) it was time to fit the quarter deck. The rear third of the deck glued in place, the weights used to hold things together while the glue dried giving the appearance of an 18th Century container ship......... The skid beam assembly has been painted as have the various brace bitts. The front of the deck, including these, was then glued onto place. Next task - assembling the beakhead bulkhead prior to fitting.... Cheers, Graham


-
Kindred spirits - so it's not just me!!! Forced into semi-retirement from a career in teaching by health issues, I had great plans for all that wonderful time I would gain - model ship building in daylight hours (Victory and Triton), re-building my Norton etc.. Fat chance!!! The Boss (Admiral) had other ideas including not only renovating the bathroom but also the sitting room and then the kitchen, and all on top of the usual daily tasks essential to achieve that secret to married bliss ie. anything for a quiet life. I now work in the classroom three days a week 'for a rest'. Naps, naps? no time for such luxuries. So much wood to shape ..... so little time .... Excellent work, Gabek. I'll be following your progress with interest. Graham
-
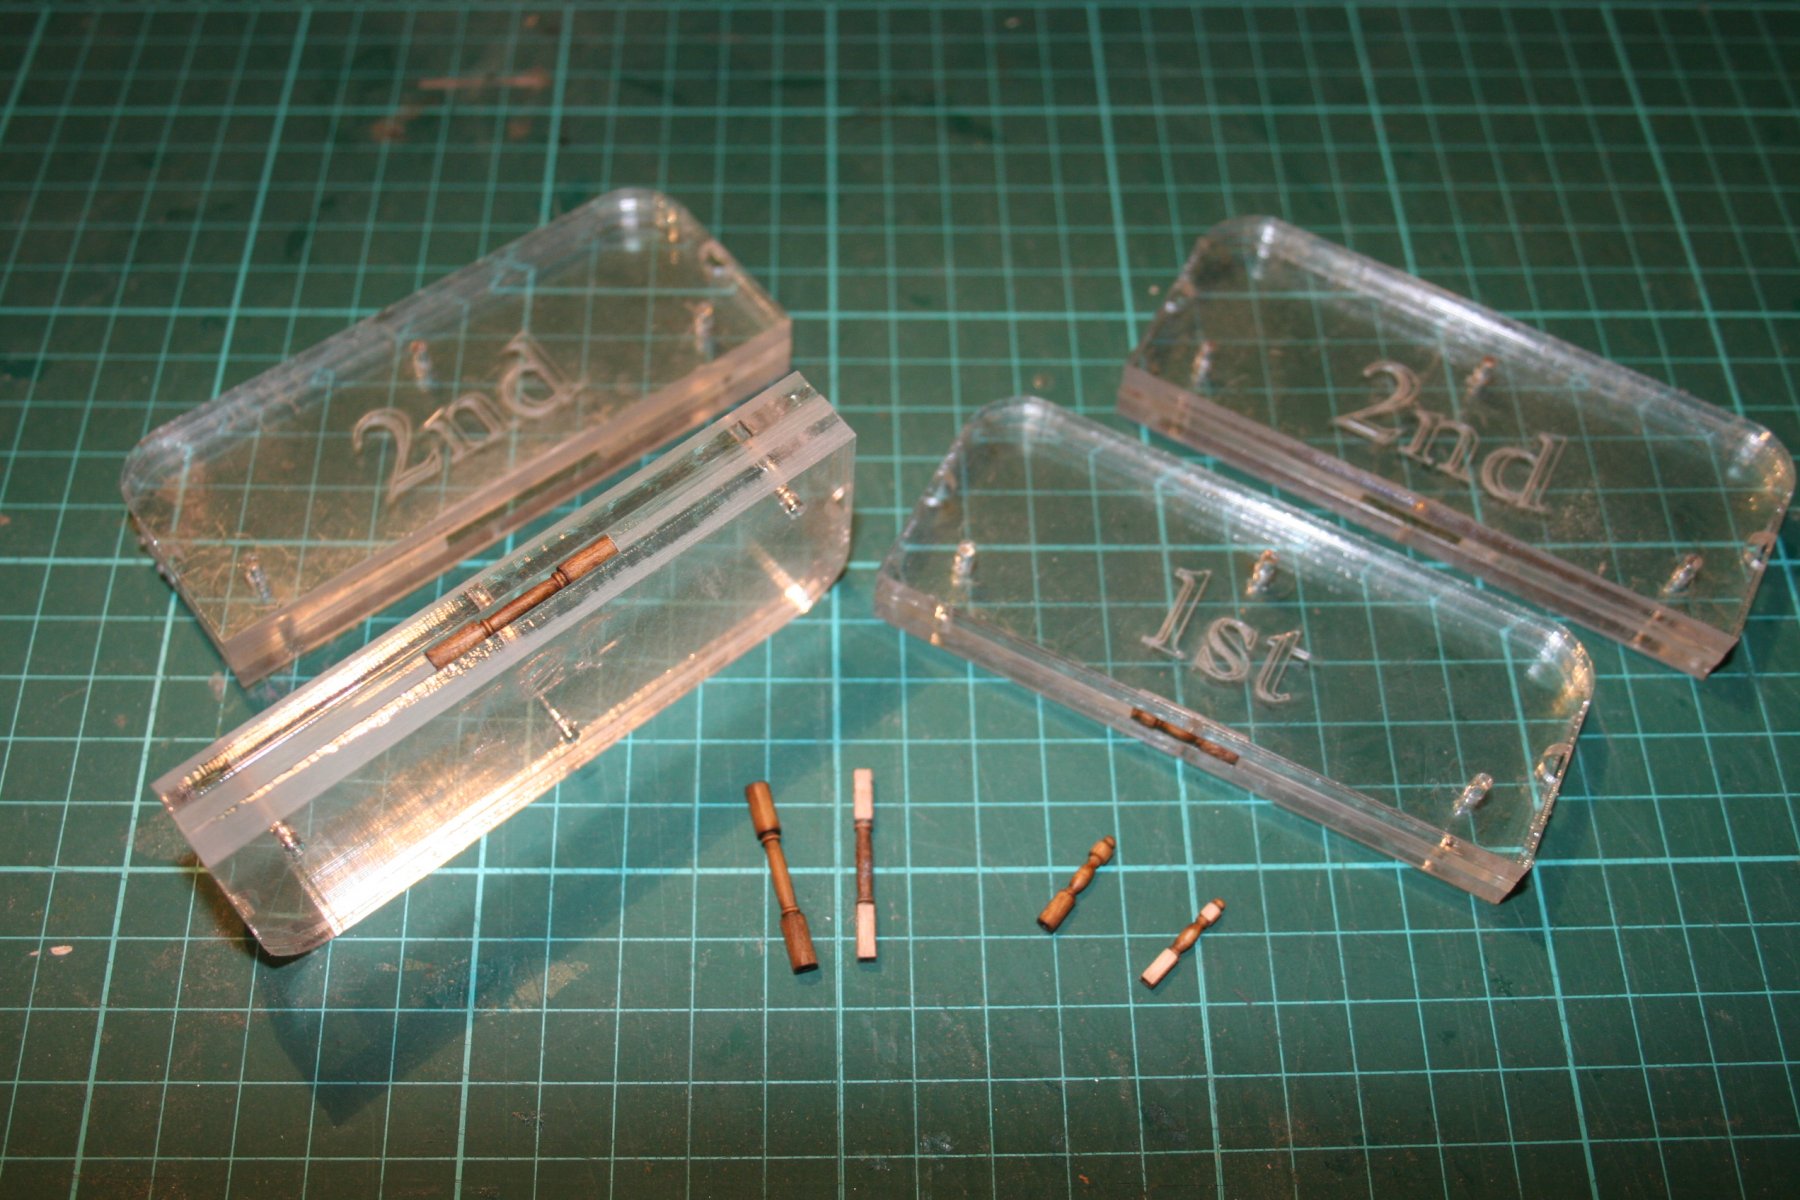
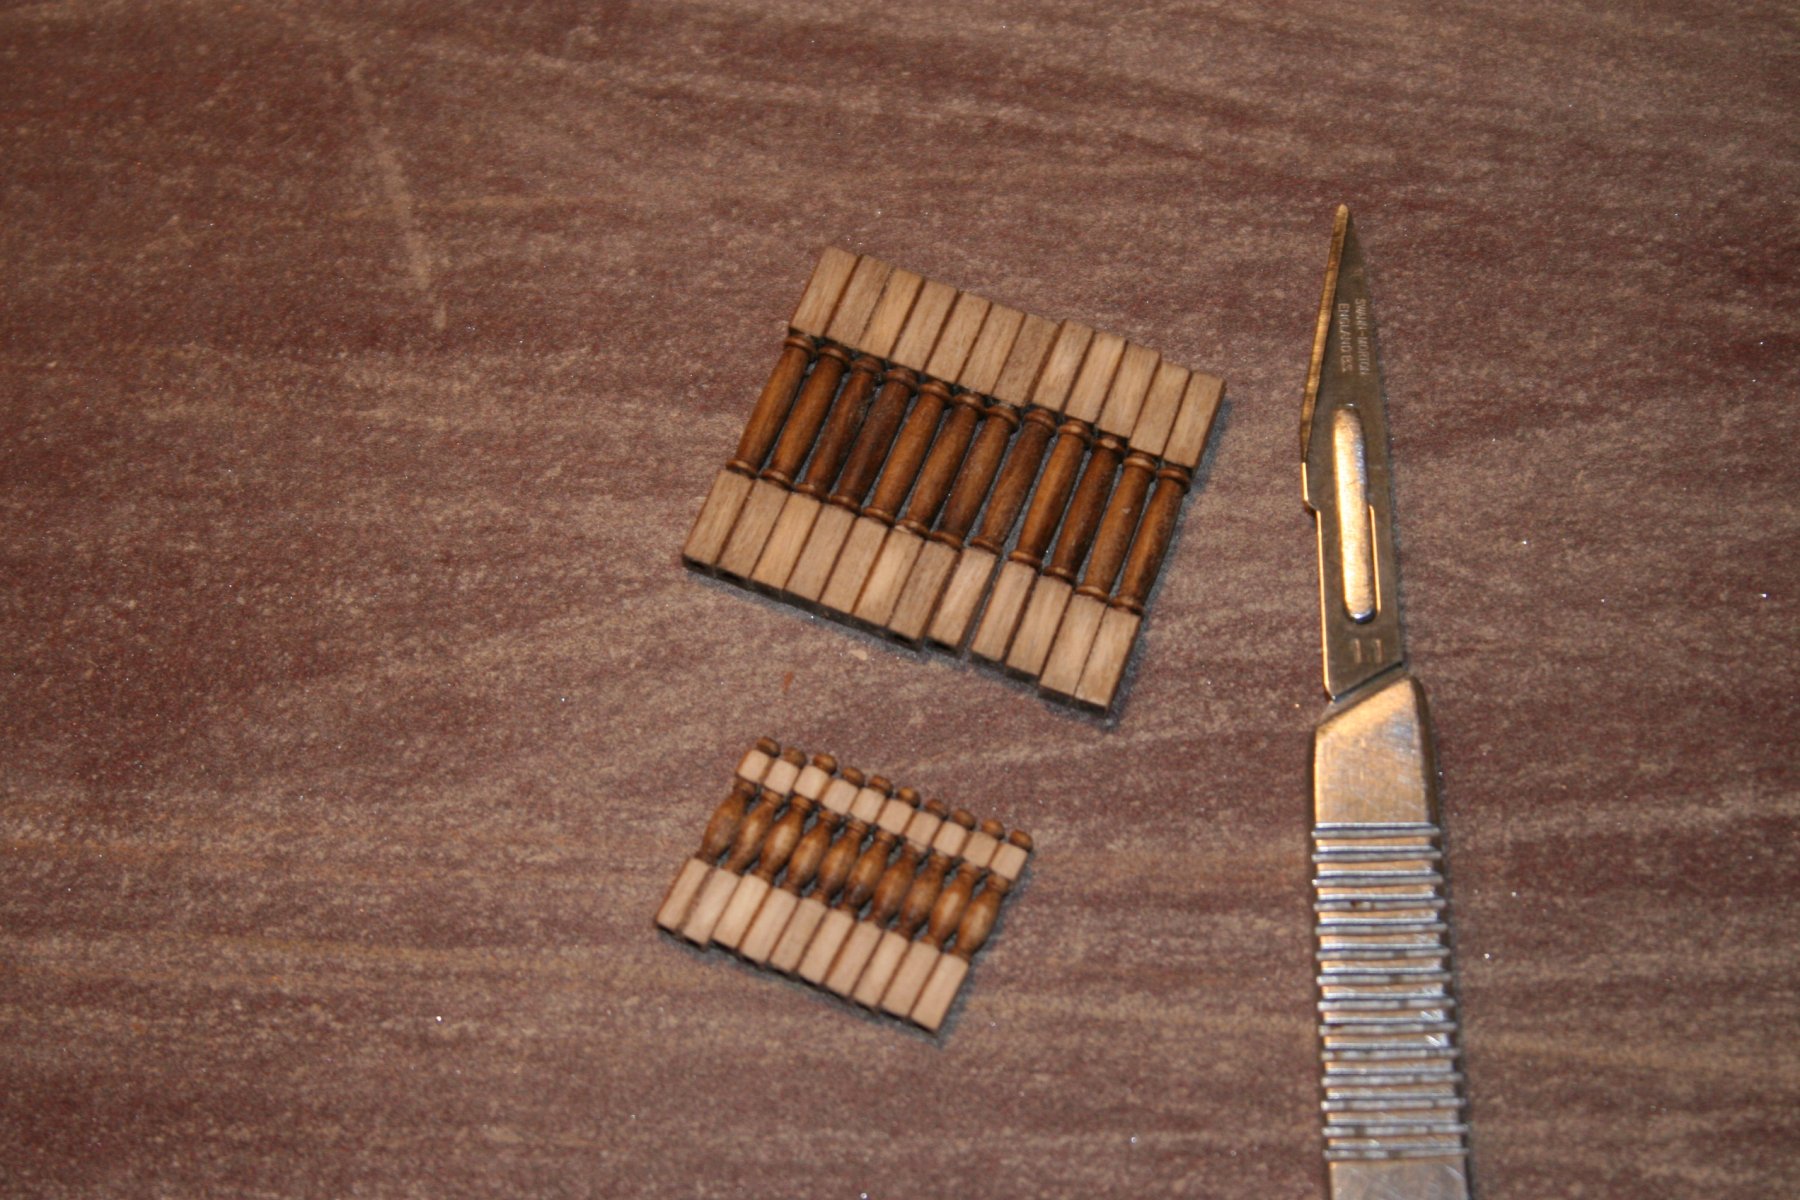
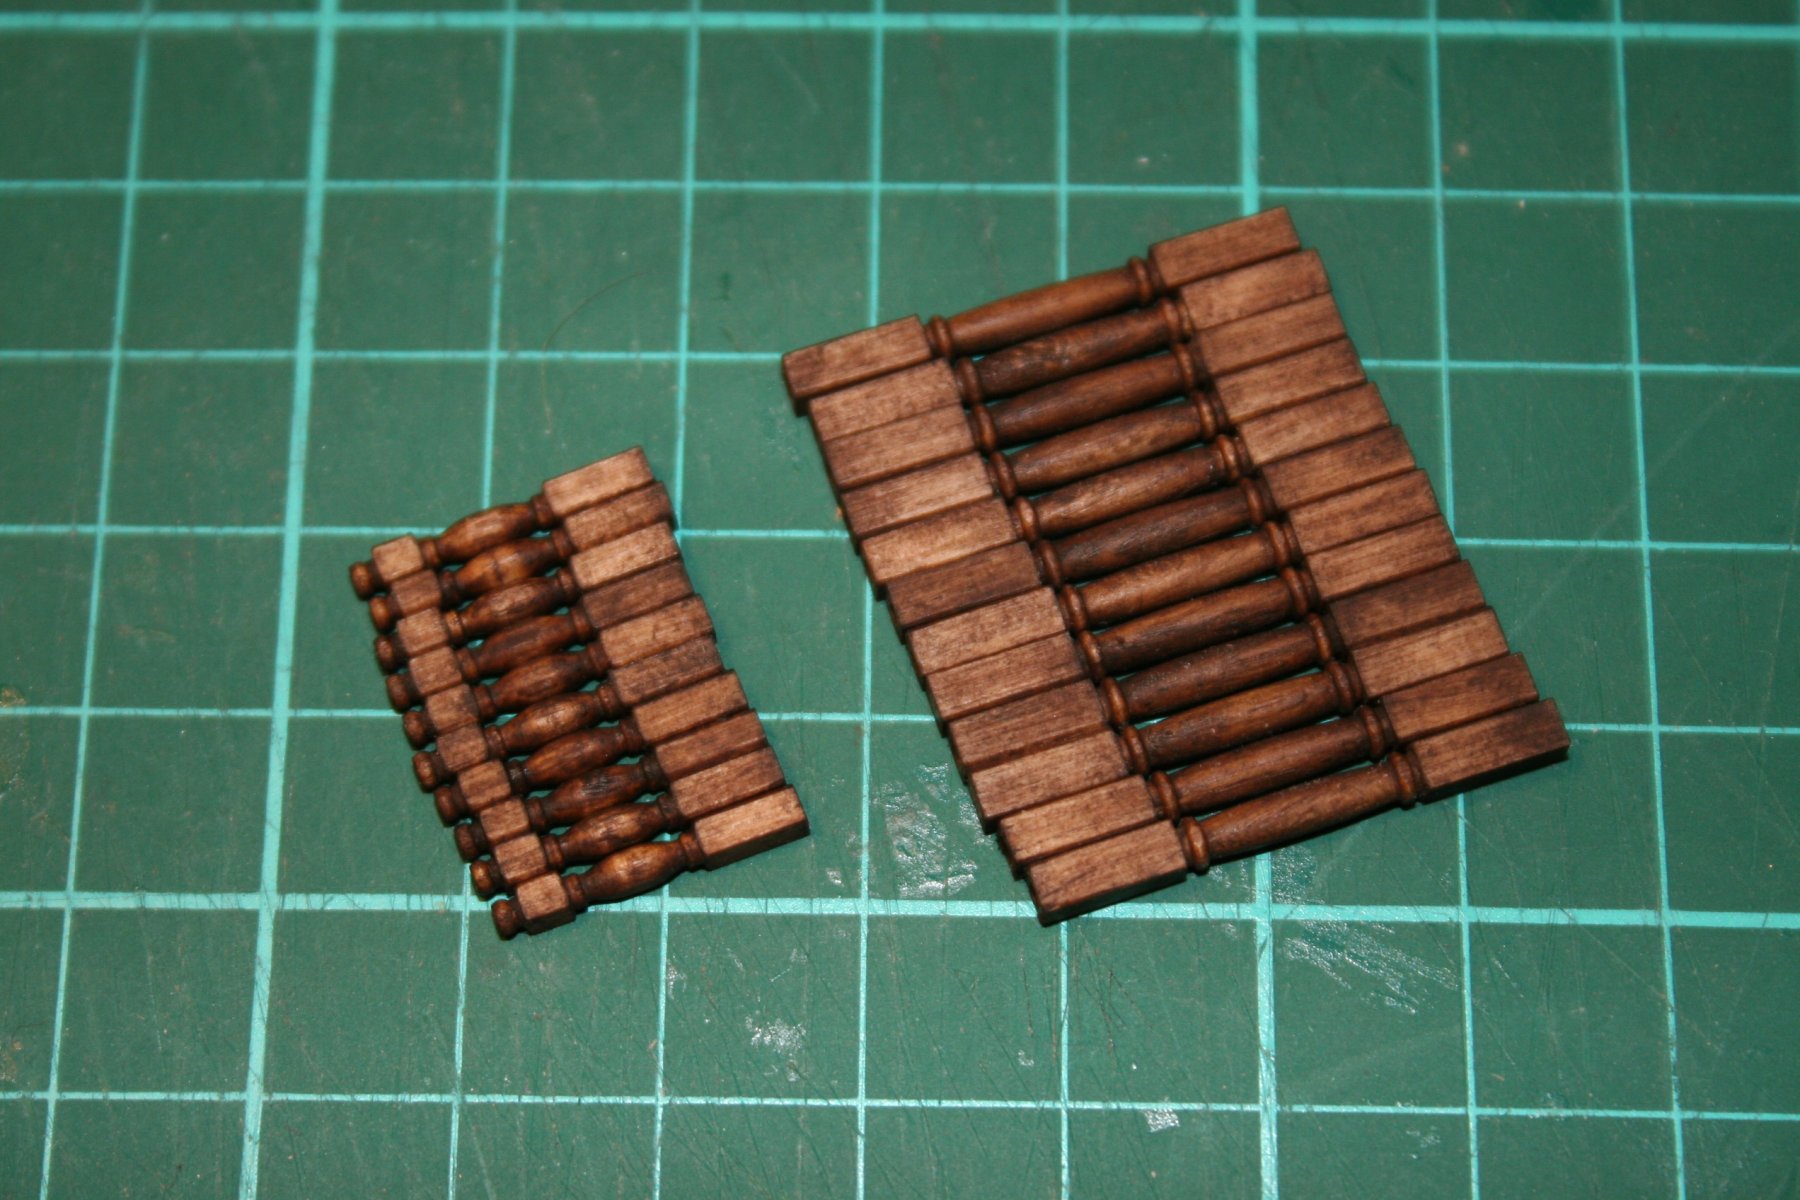
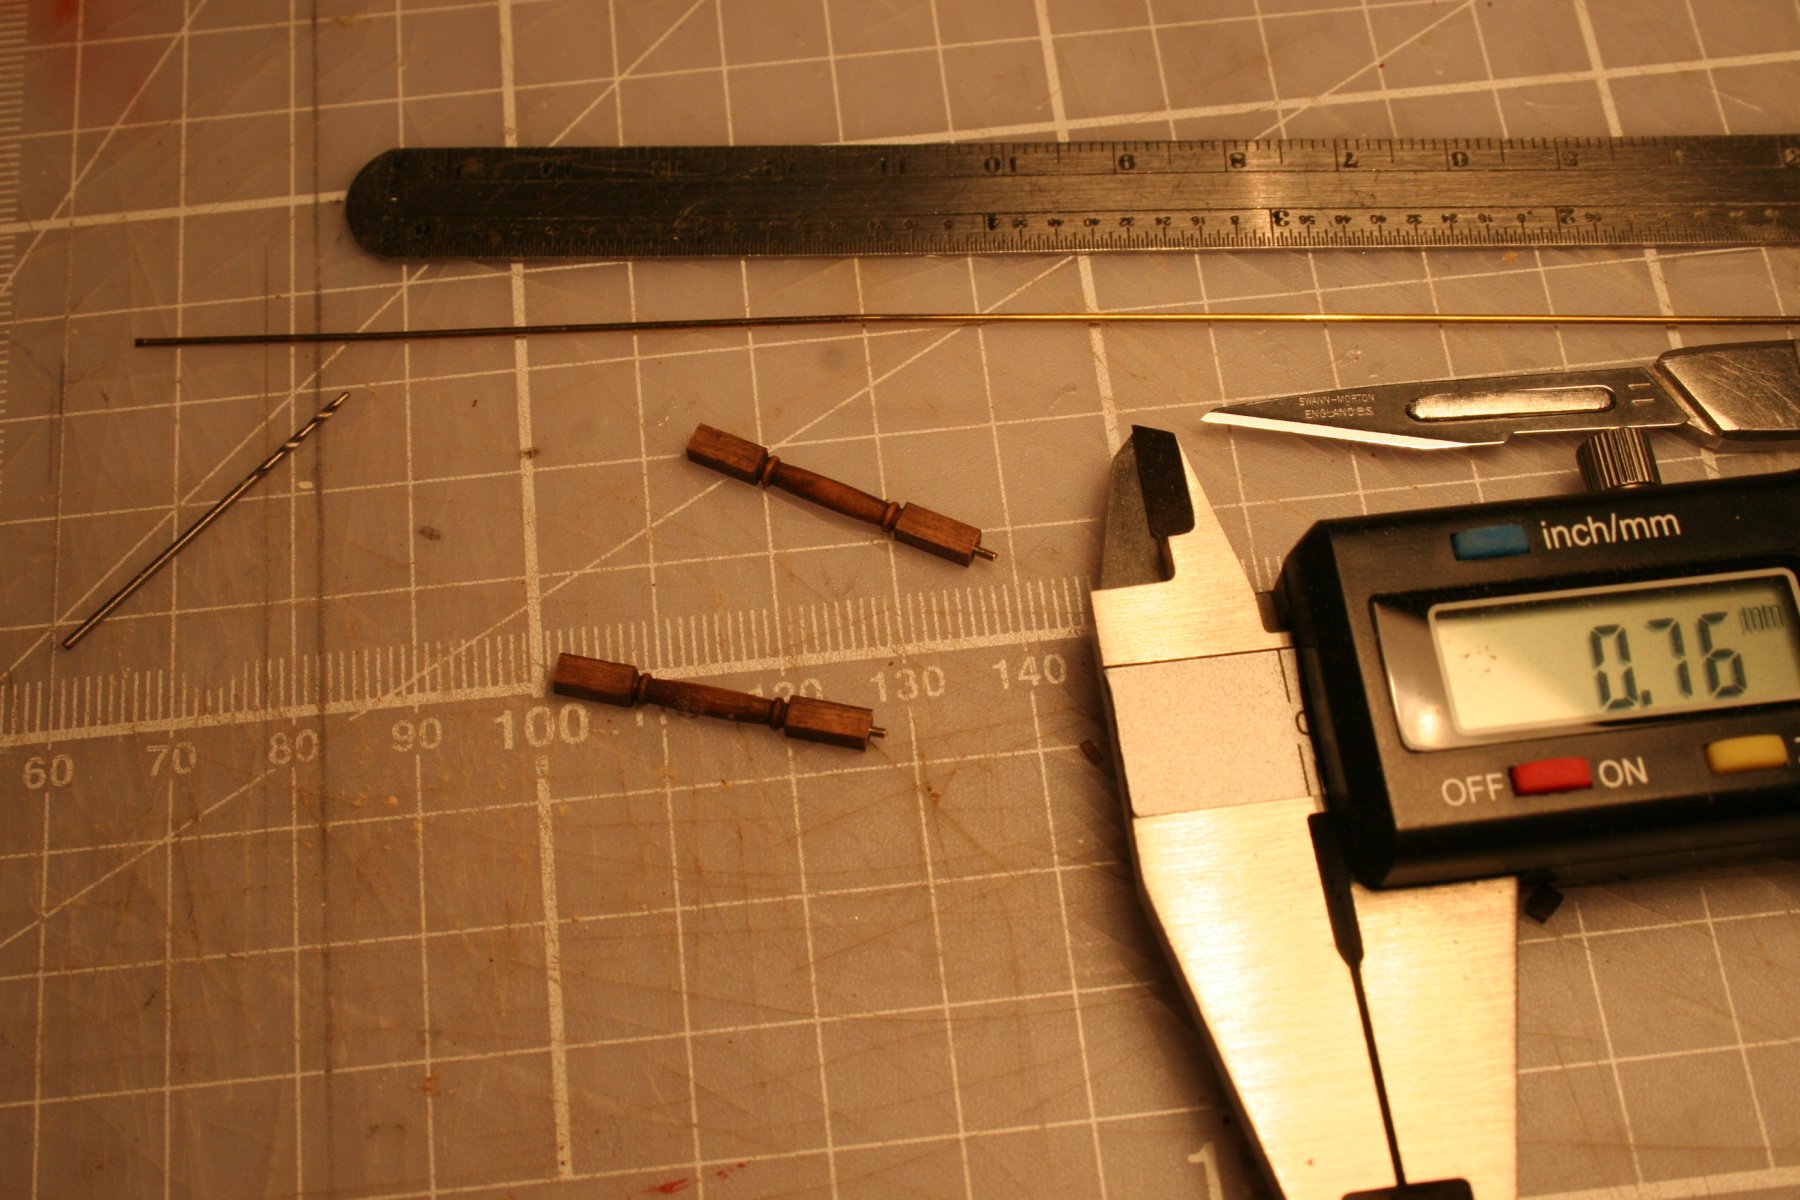
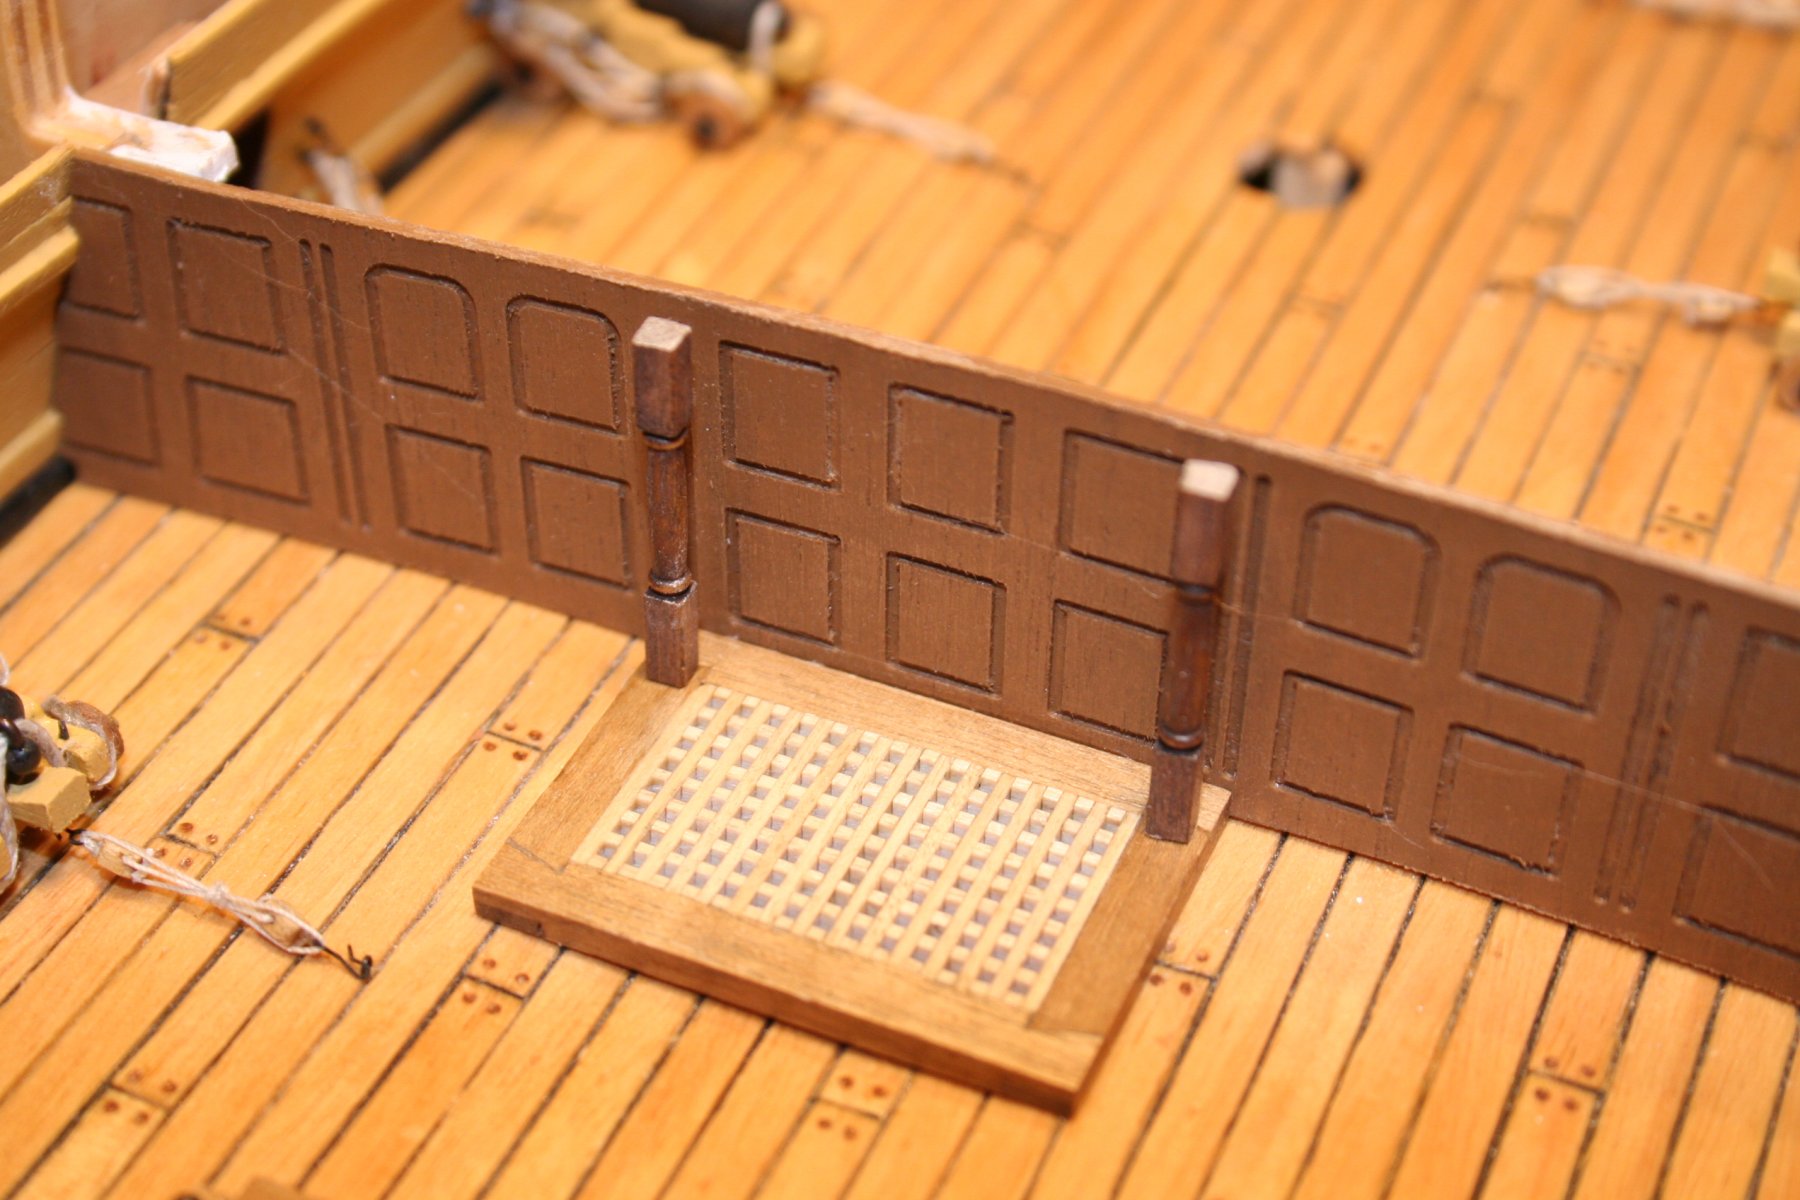
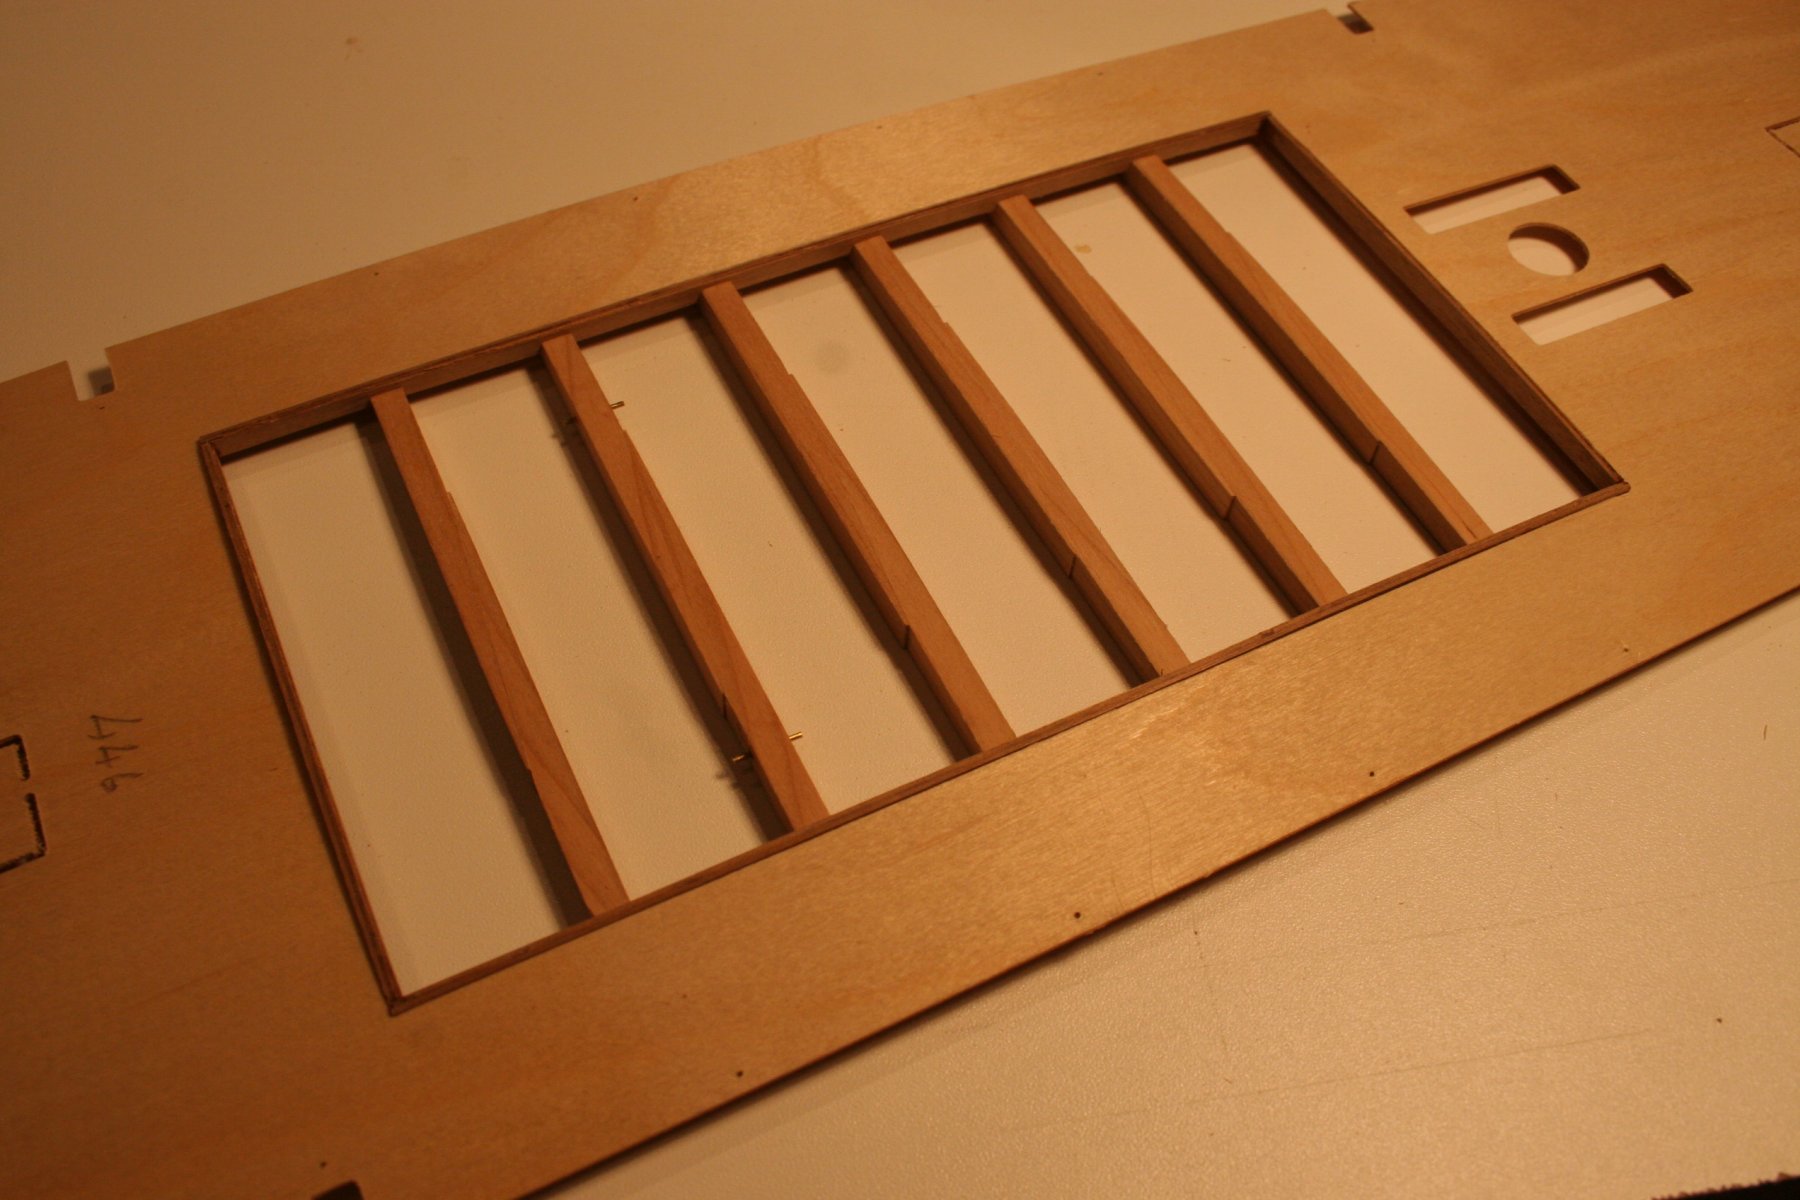
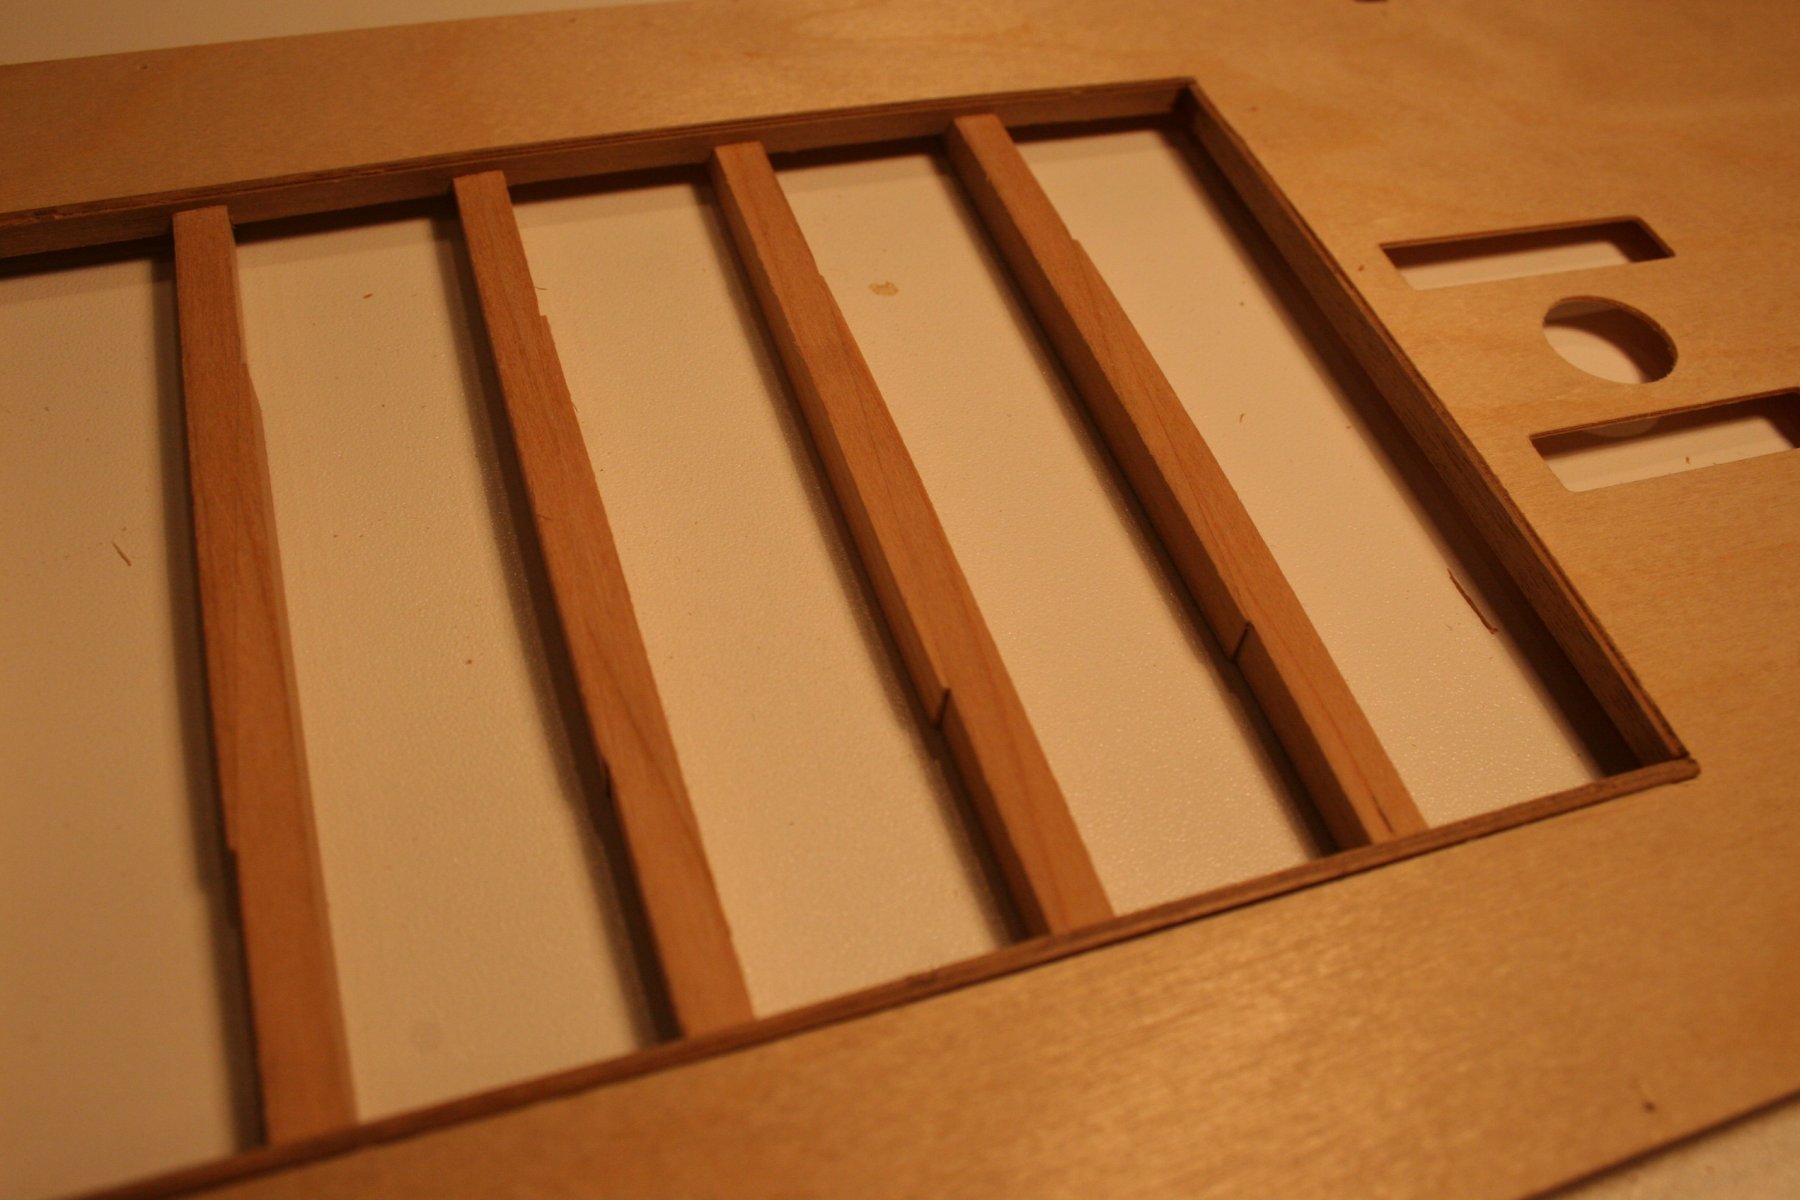
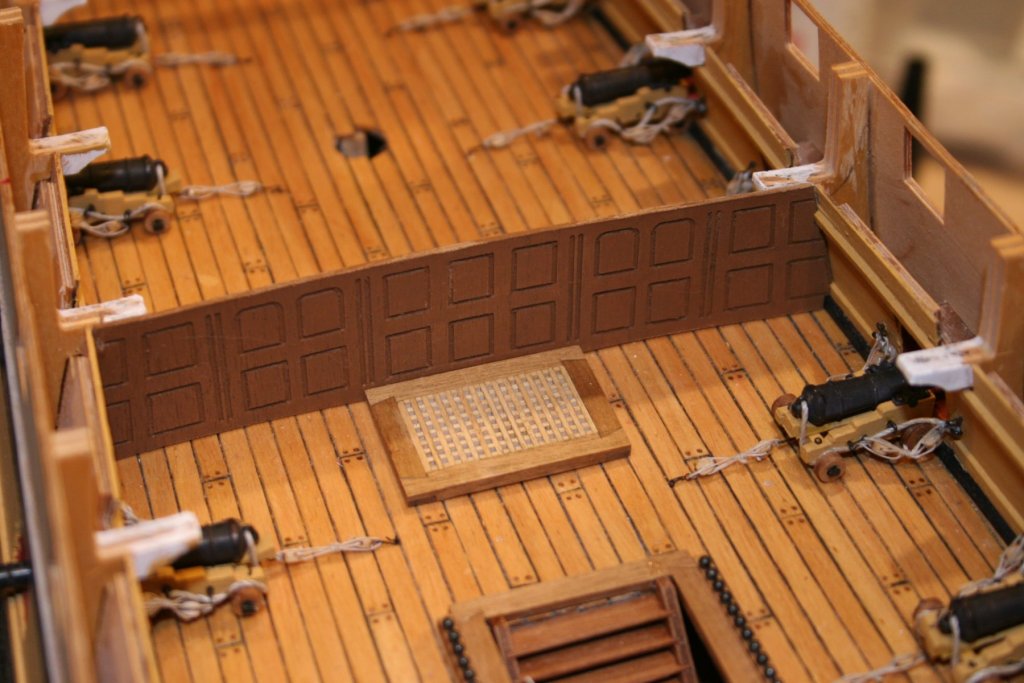
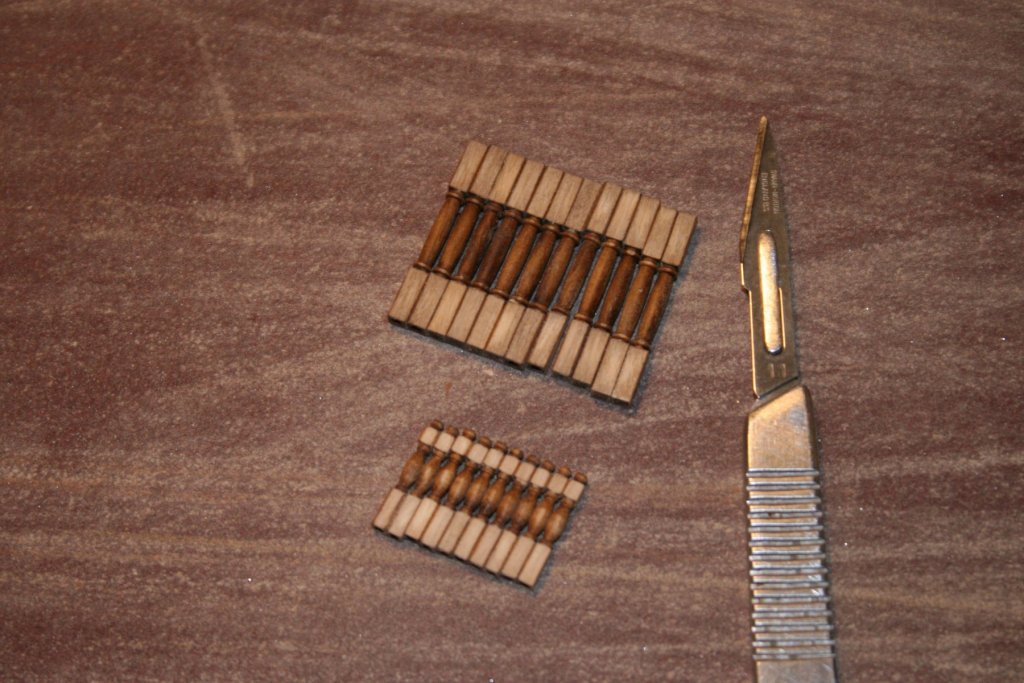
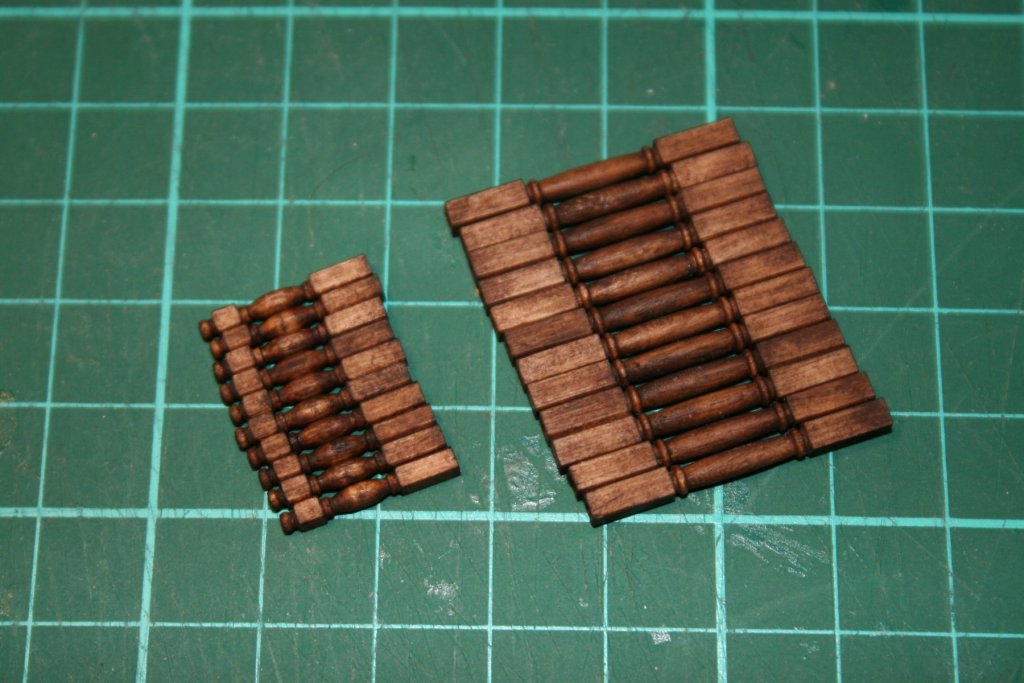
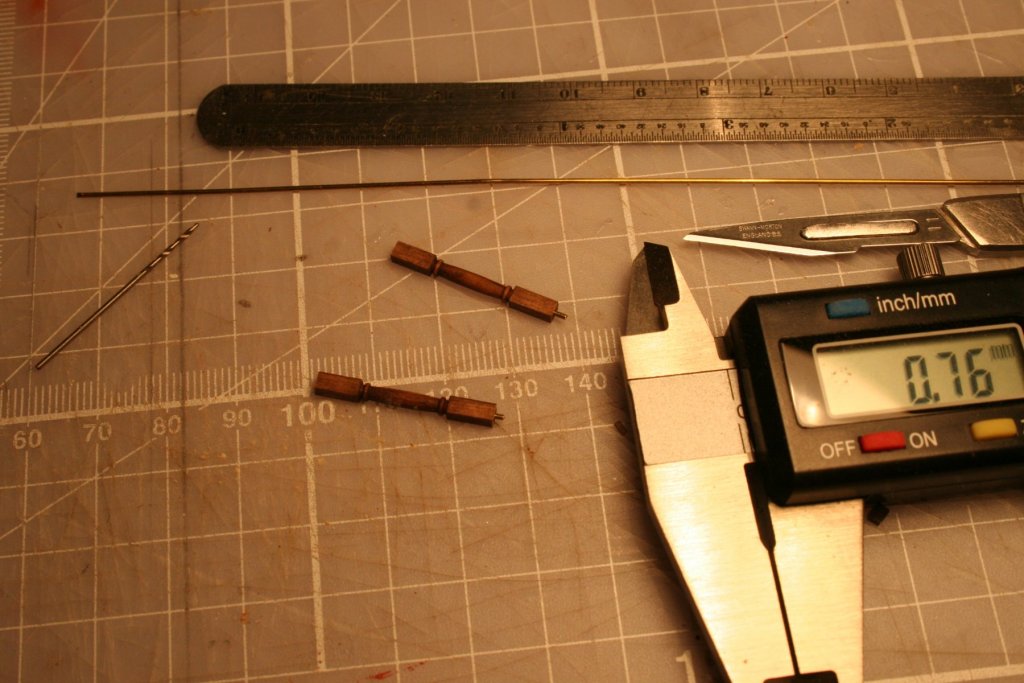
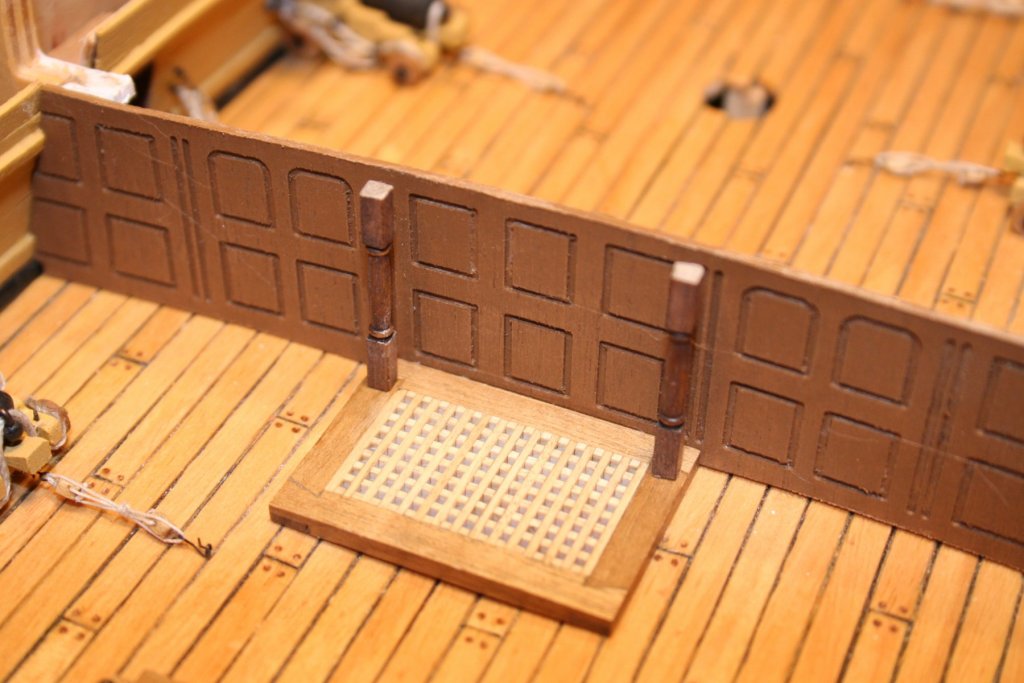
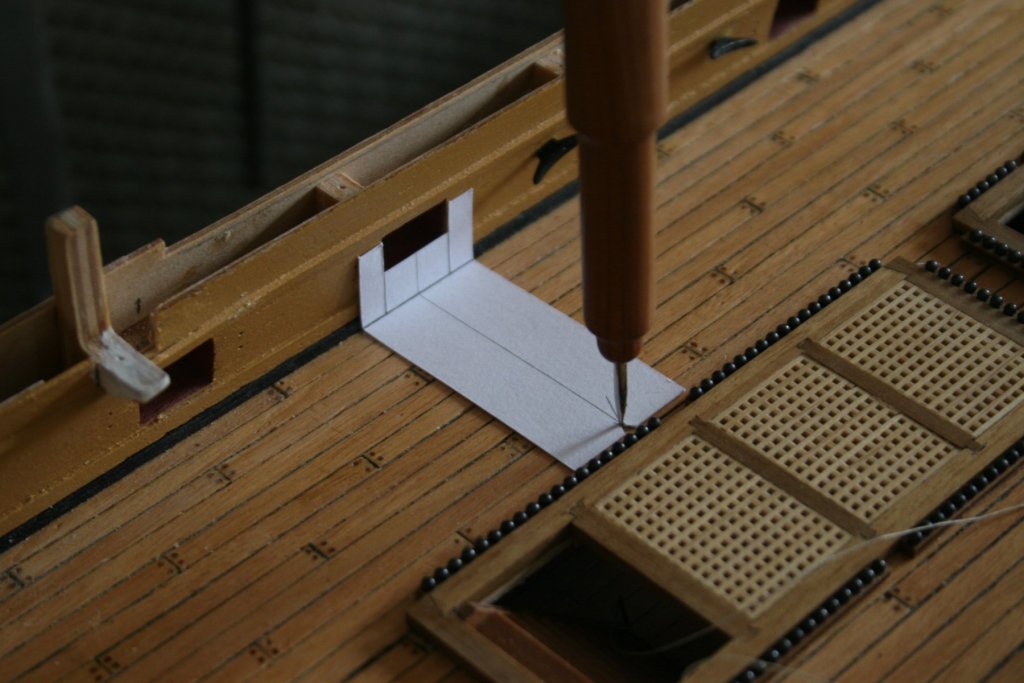
Hi, Fitting the upper deck screen bulkhead proved a little more challenging than the simple instruction in the manual. To get it to fit accurately around the beam shelves, stringers and waterways numerous card templates were made before finally trimming and adjusting the screen. To square off the ends of the support pillars and staircase balusters I designed and made these..... ... a pair of sanding aids for each. The '2nd' of each pair has the depth of the recess reduced by 0.4 mm to compensate for the initial reduction in thickness. All done ..... ... and taken back to the original colour with walnut wood stain. Bases of supports and balusters were drilled and fitted with thin brass rod, CA glued in place, before being finally located into matching sized holes drilled into the coamings or deck as required. The elm tree pump was fitted in a similar way. Cheers, Graham.

-
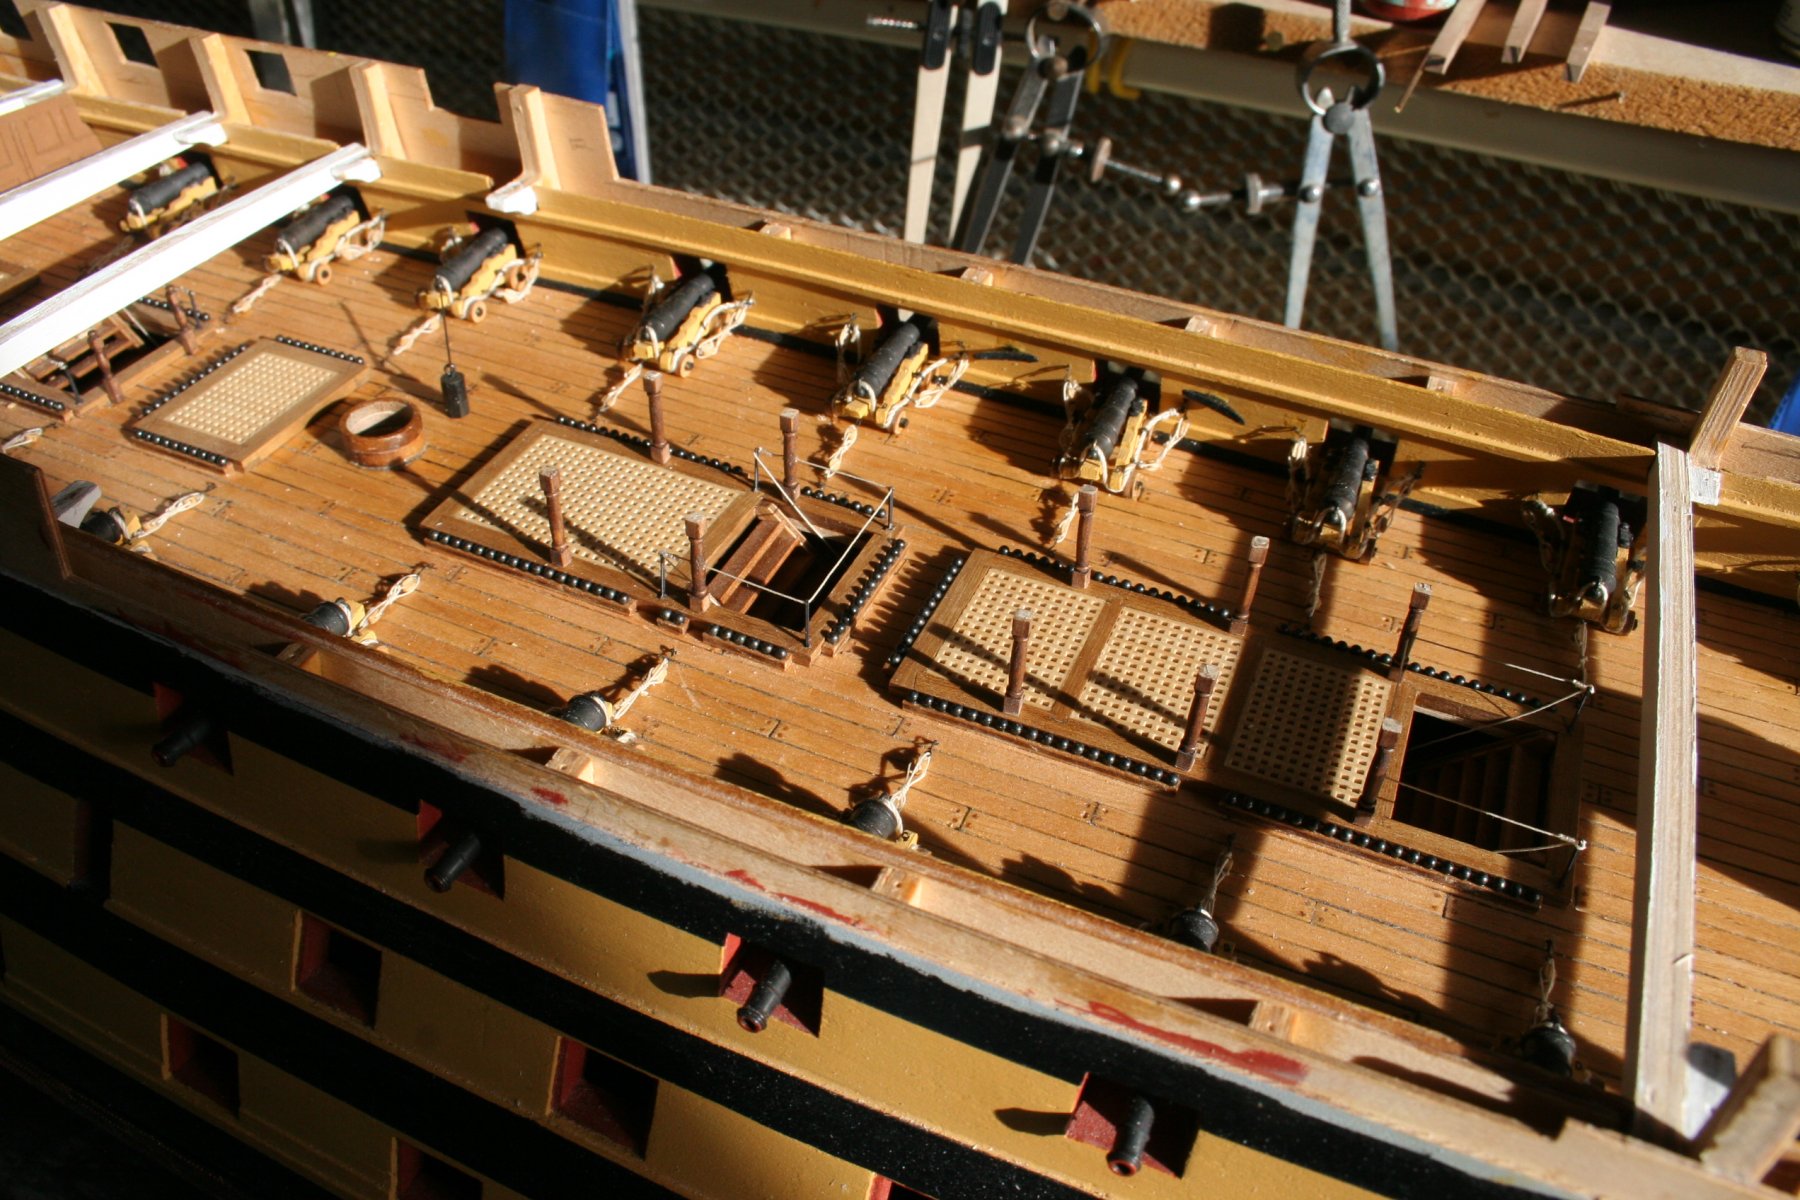
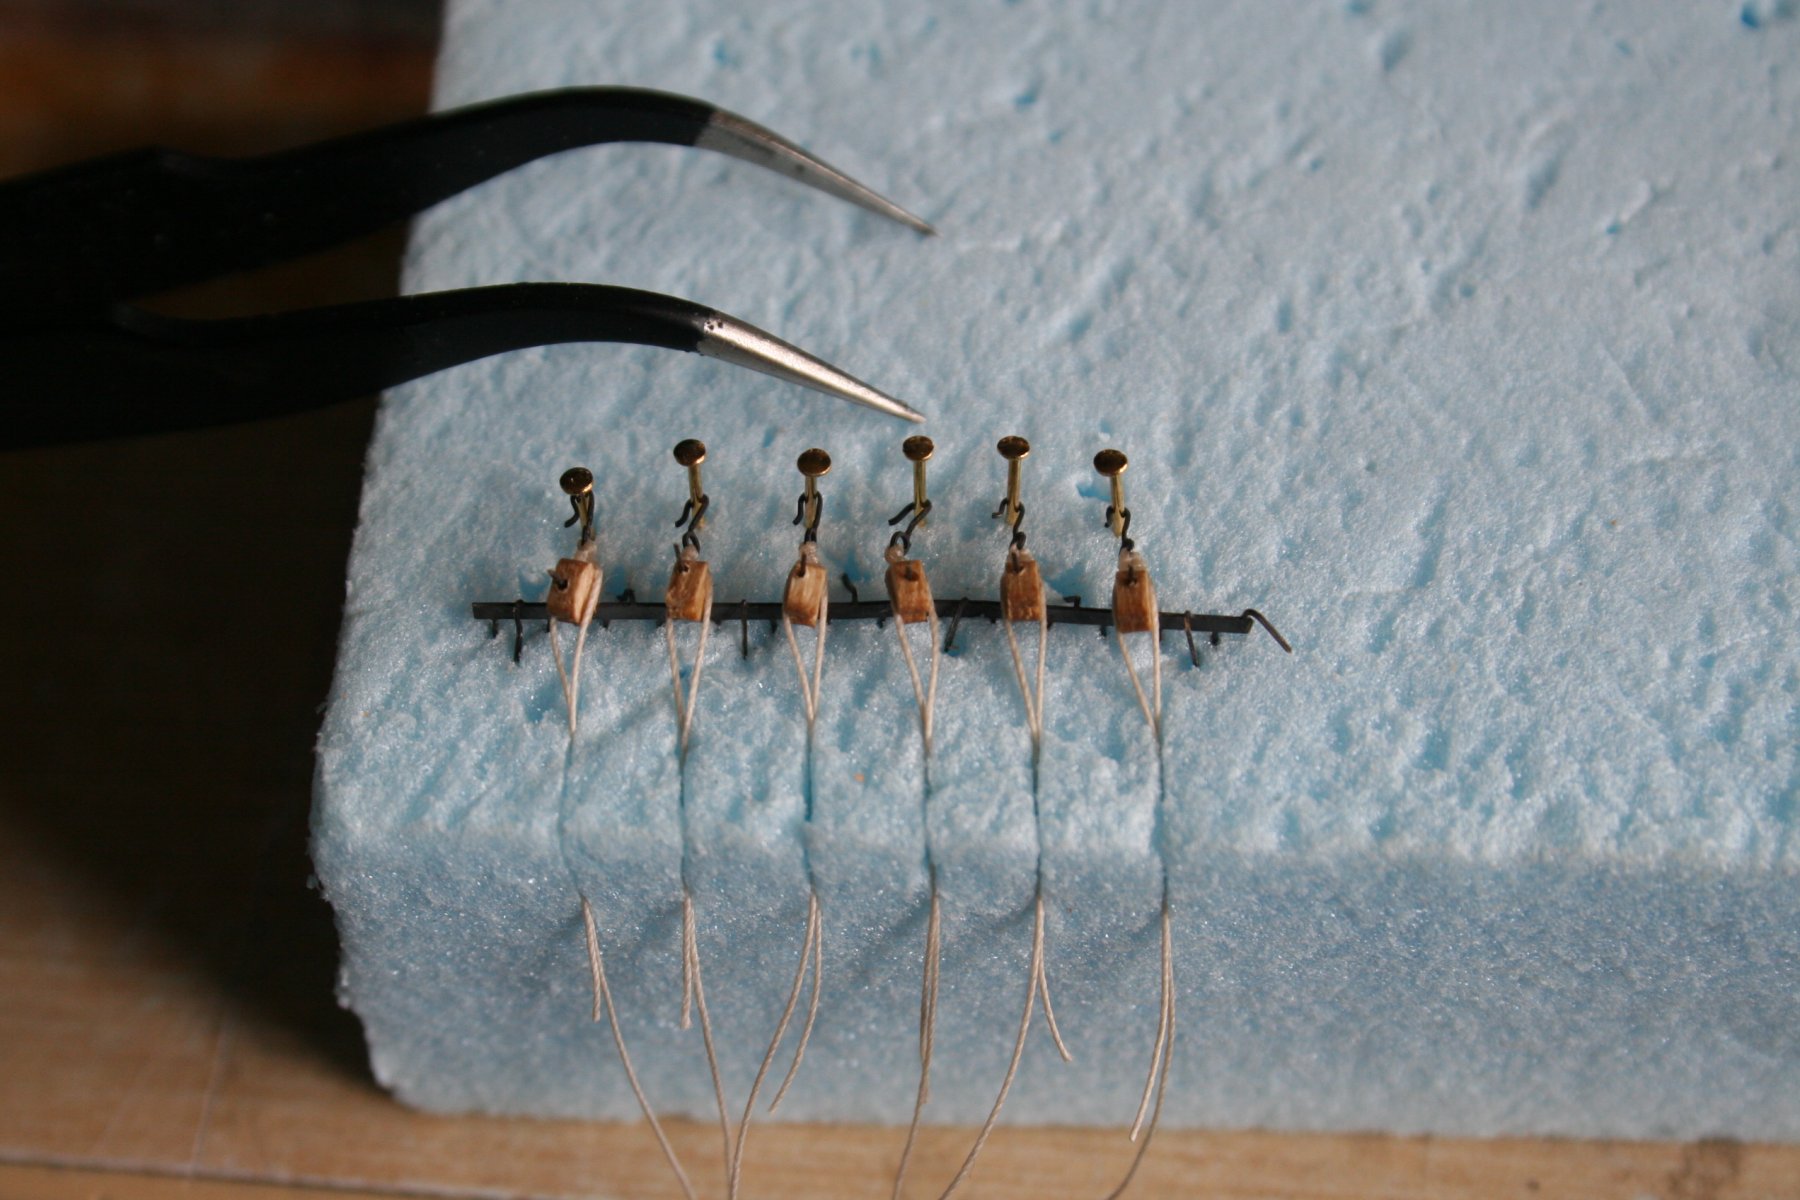
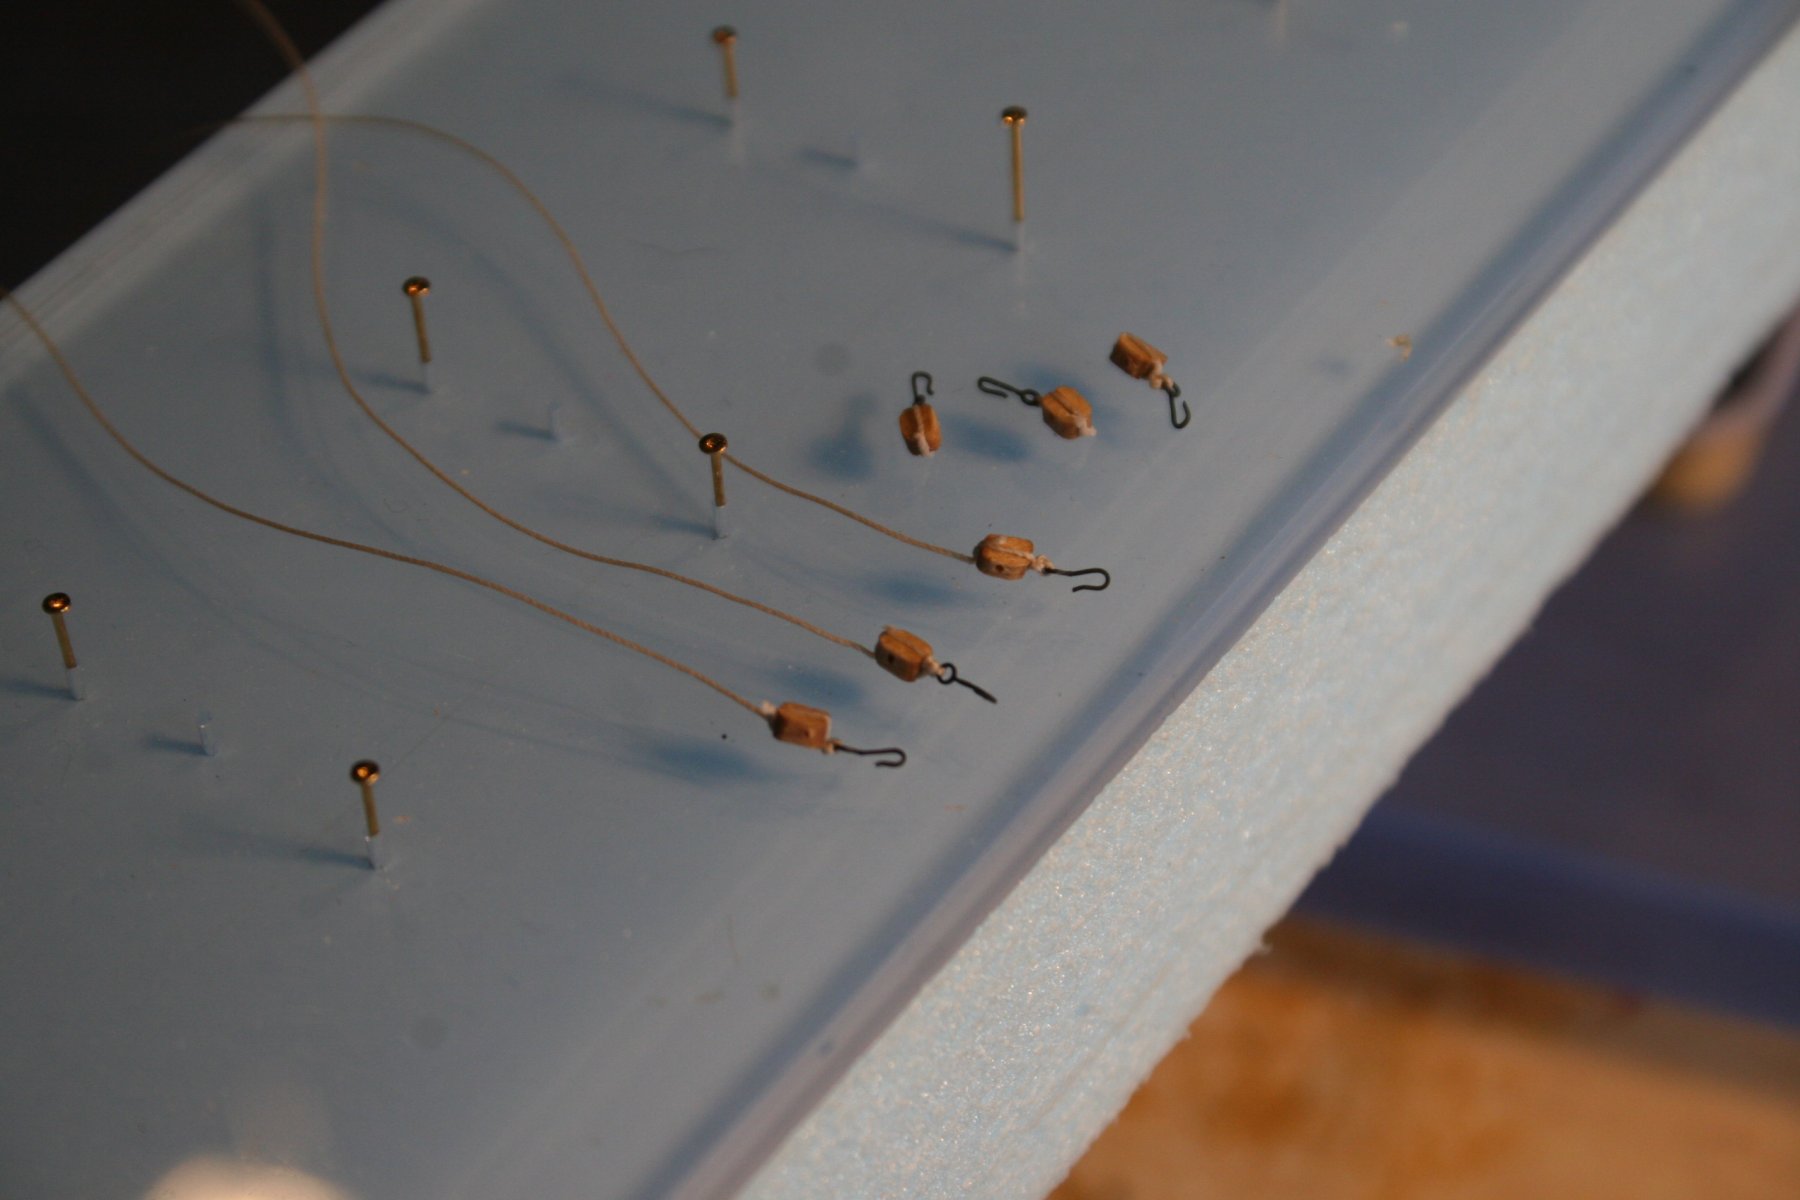
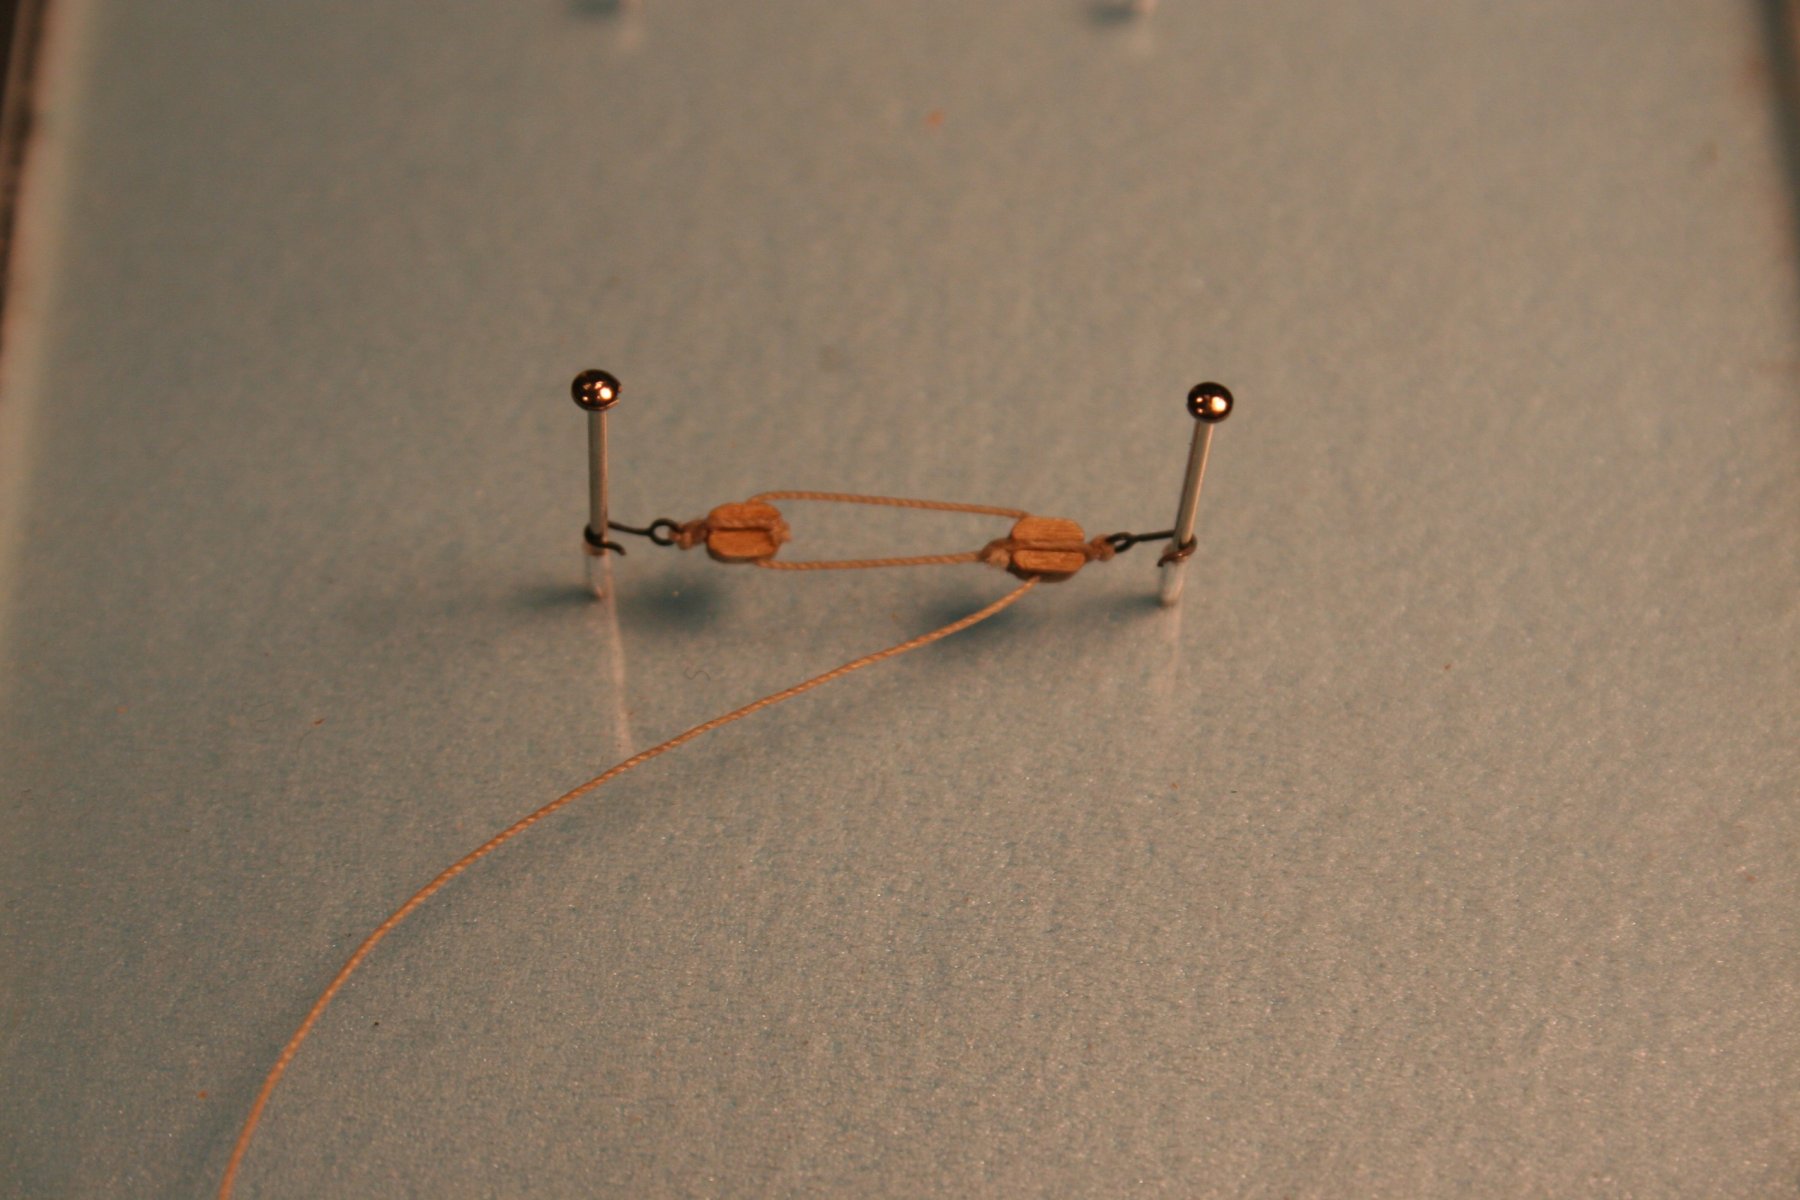
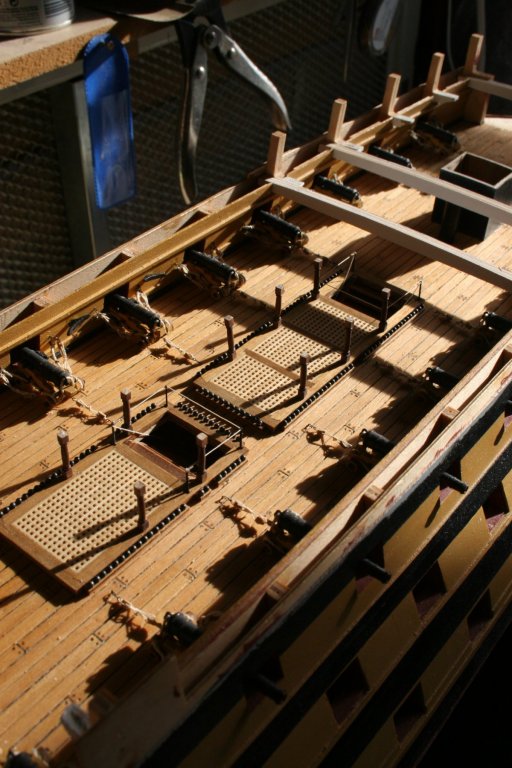
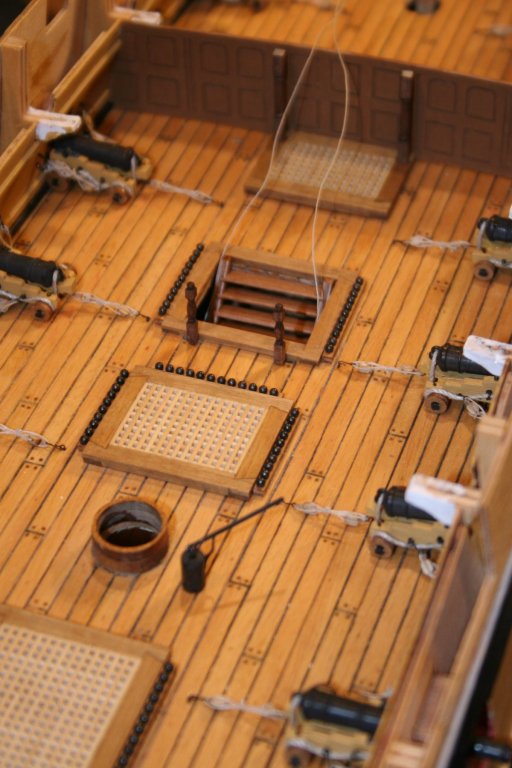
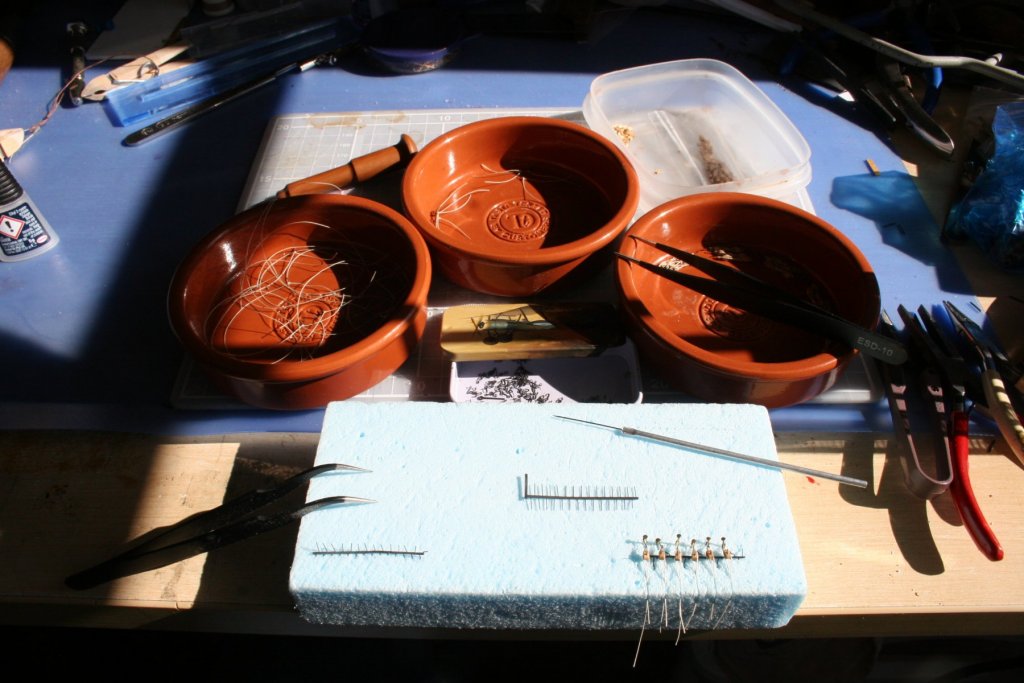
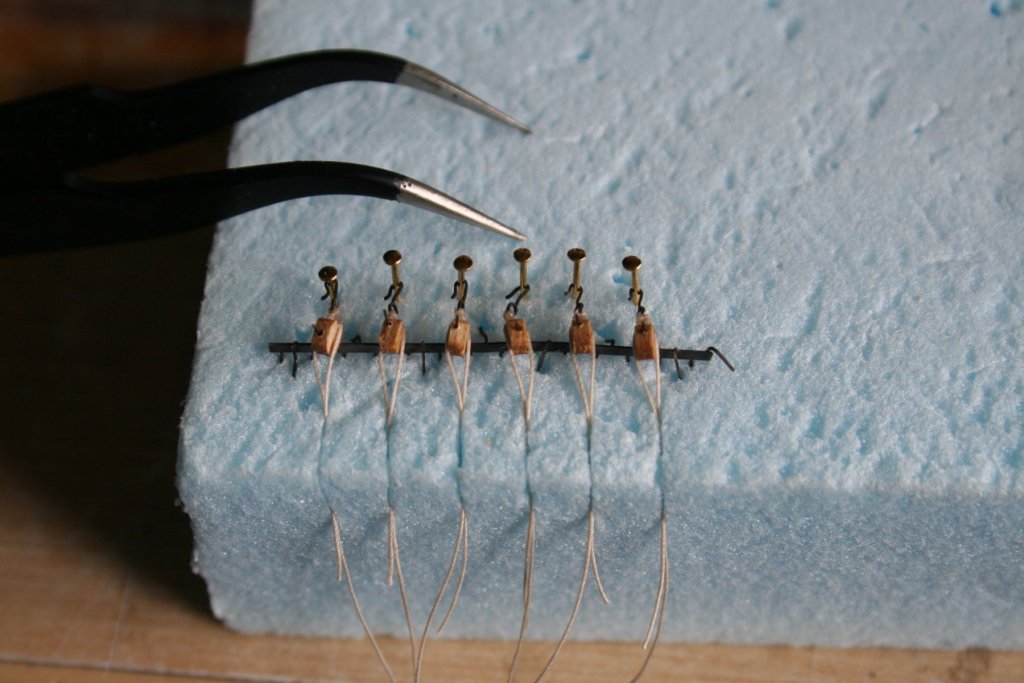
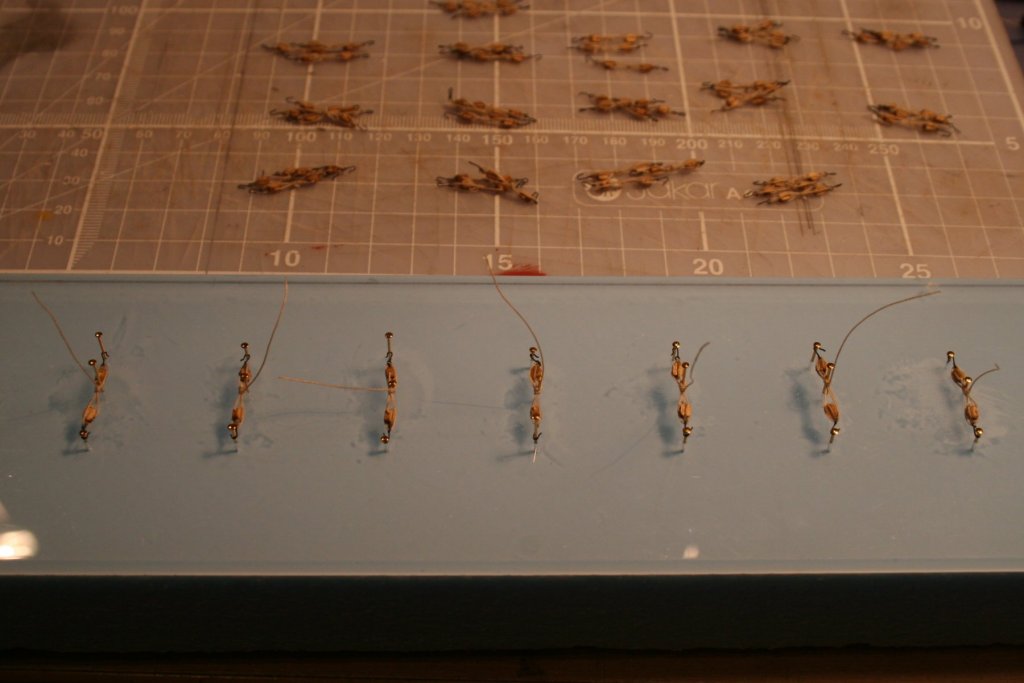
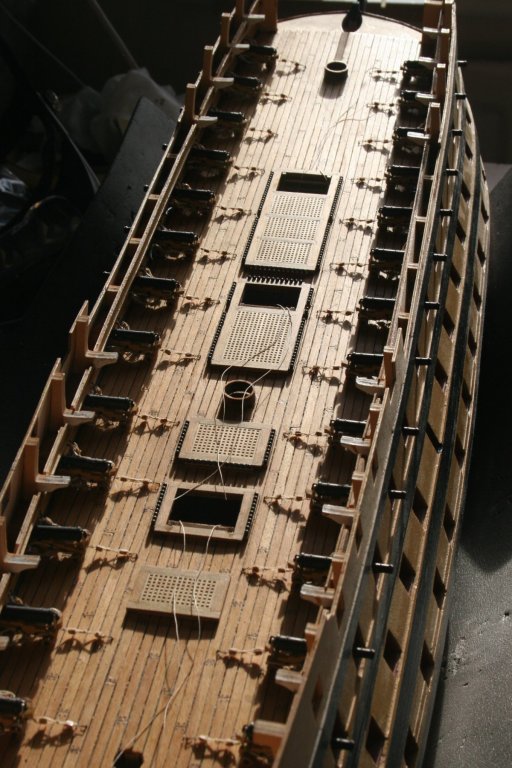
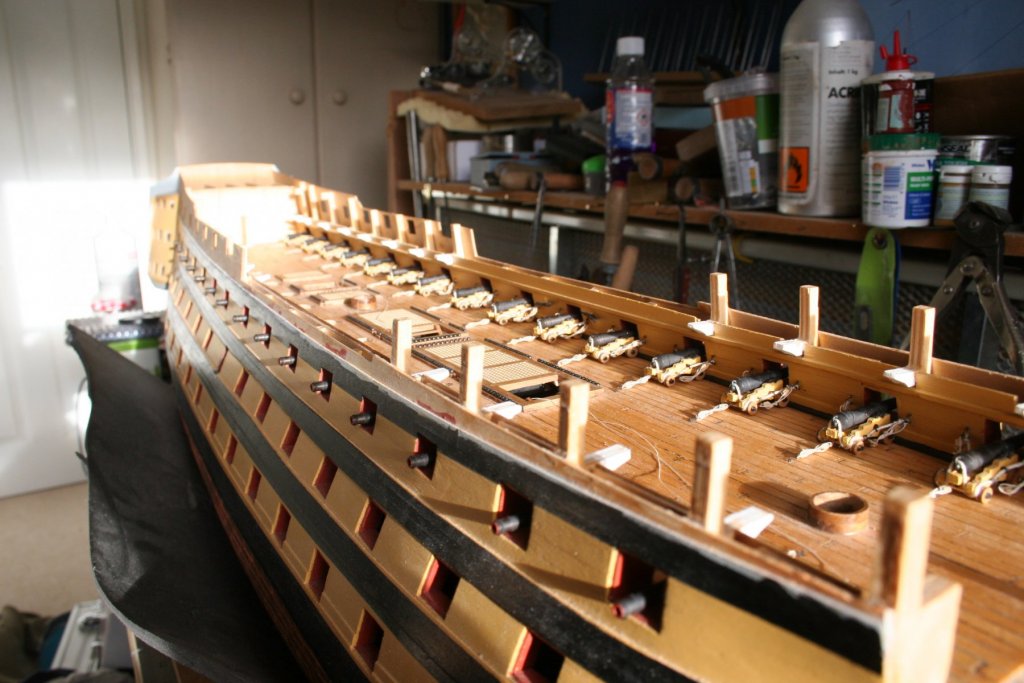
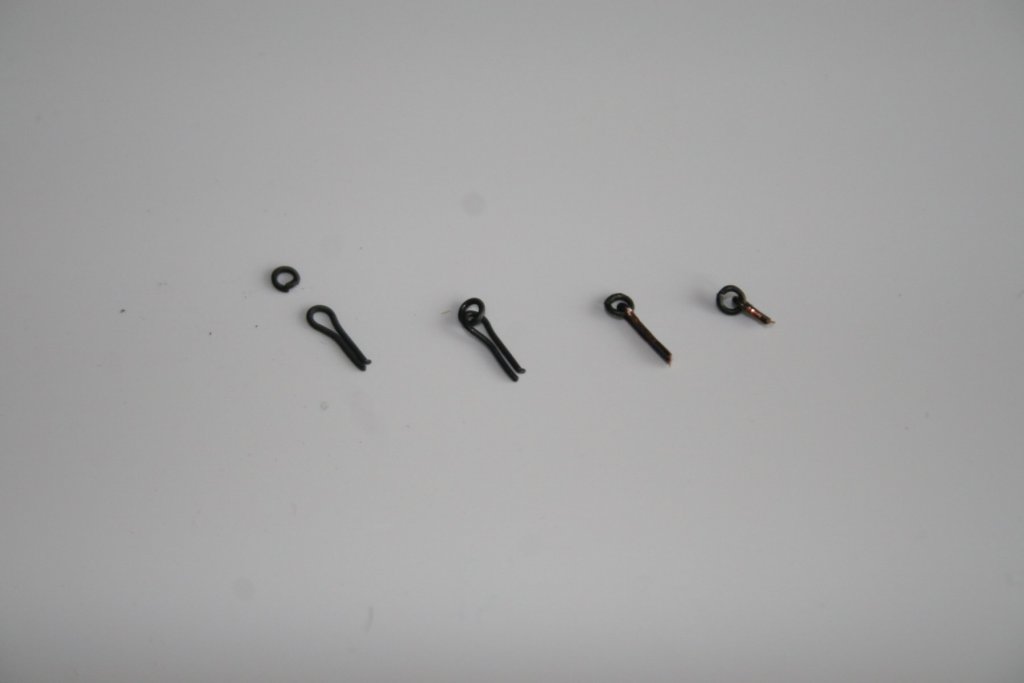
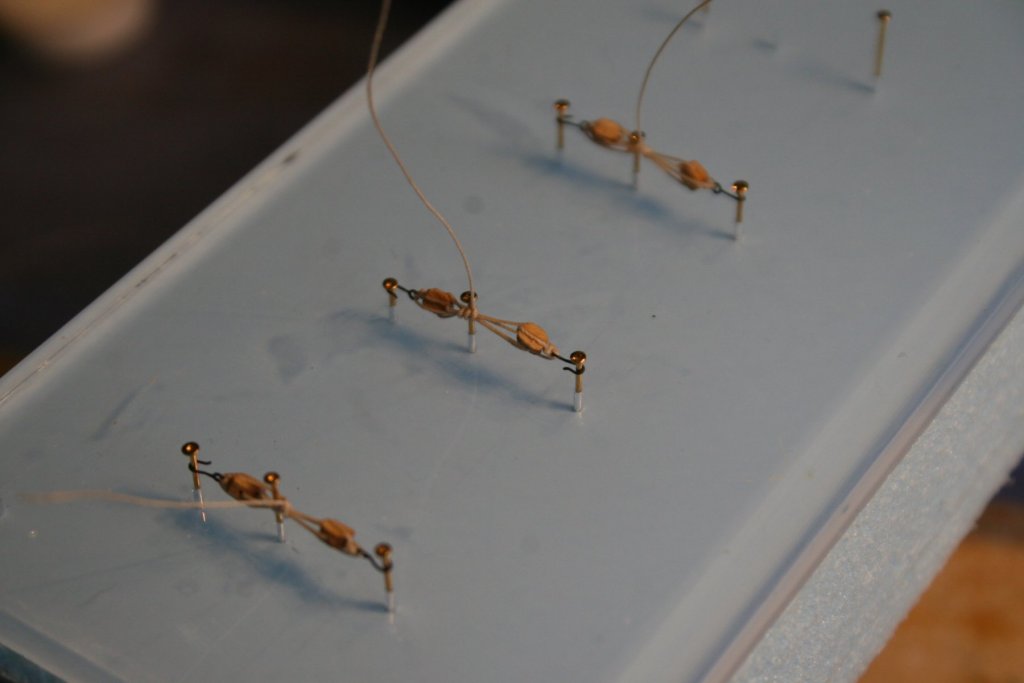
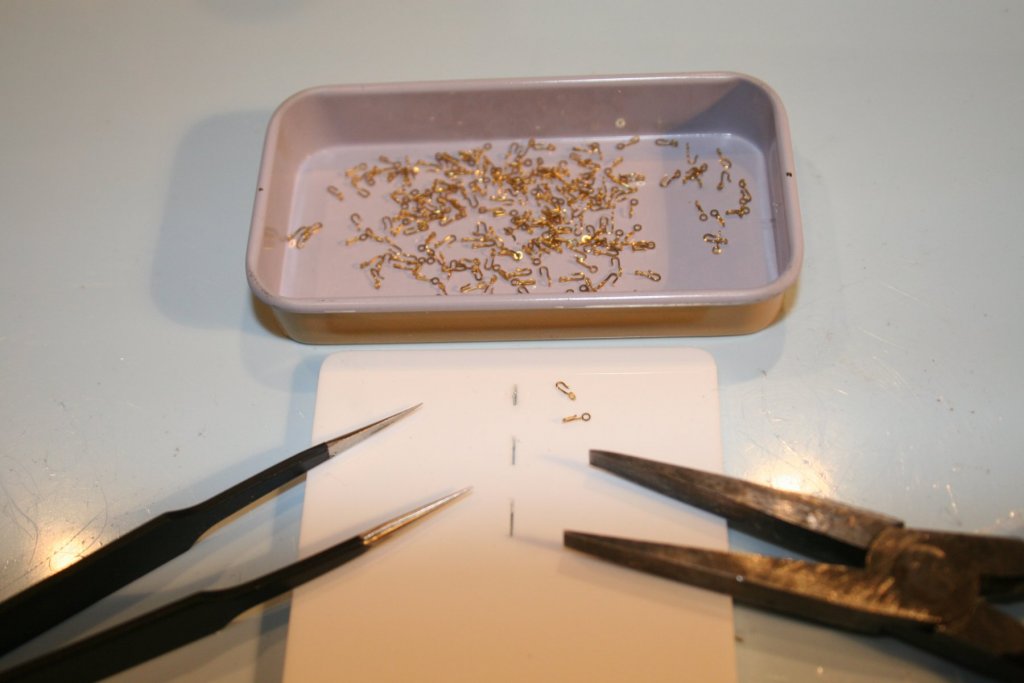
Hi, Made a bit more progress, slower than hoped for admittedly, but things should speed up in the new year! Production of the tackles begins.......... I gave up with the modified wooden pegs to hold the blocks while the hooks and ropes were being attached. Instead I made use of the left-over brass frames that held the eyelets (480). Pressed into a block of hard foam half a dozen blocks could be mounted with the hooks supported with lace making brass pins. A slit made in the edge of the foam with a scalpel secured the rope until the knot was tied and then given a coat of clear matt lacquer. The thin aluminium tube has the head of a pin crimped in one end - an inexpensive but effective tool to get small drops of glue into awkward places. The final batch of tackles gets assembled............ I'm guessing that time spent practicing tying tiny knots with tweezers is going to be a useful skill when I eventually get to the rigging........ After several sessions the gun carriages have now all been mounted. A Merry Christmas to one and all! Cheers, Graham
-
Superb work, Robert. Your accuracy and attention to detail is an inspiration - as ever! Cheers, Graham
- 527 replies
-
- 2
-

-
- caldercraft
- victory
- (and 1 more)
-
Having missed the first half of episode one of the series (and the last 15 minutes due to having to pick the admiral up from her latest 'evening class'!) I have just watched the whole 'Victory' program on catch up and thoroughly enjoyed it. After a bit of surfing the net I have discovered that it is being repeated tomorrow (22nd Sept on channel 5S at 5.00 pm if you can access it. Although one Channel 5 web page says 2 episodes in the series, another page on the same site quotes 6. Confusing, but the production company site (Windfall) lists programs on Victory, Mary Rose, the Golden Hinde, Cutty Sark, SS Great Britain and HMS Belfast. TV now set to record the series - but I hope they have the sense to release the series on DVD.
-
Just in case you were unaware, as I was until my sister-in-law emailed me a few minutes ago, Channel 5 (in the UK) are currently showing an hour long program on HMS Victory and Nelson,(8.00pm start). Enjoy!!! Cheers, Graham
-
Thanks for the 'likes'. Kevin - appearances are very deceptive. The secret is to use the camera 'creatively'. Get in close, tight focus and the mess is out of the picture. Most of the time the room I use is controlled chaos, not helped by the admiral considering the man cave as an ideal dumping ground for some of her bits and pieces. 😏
-
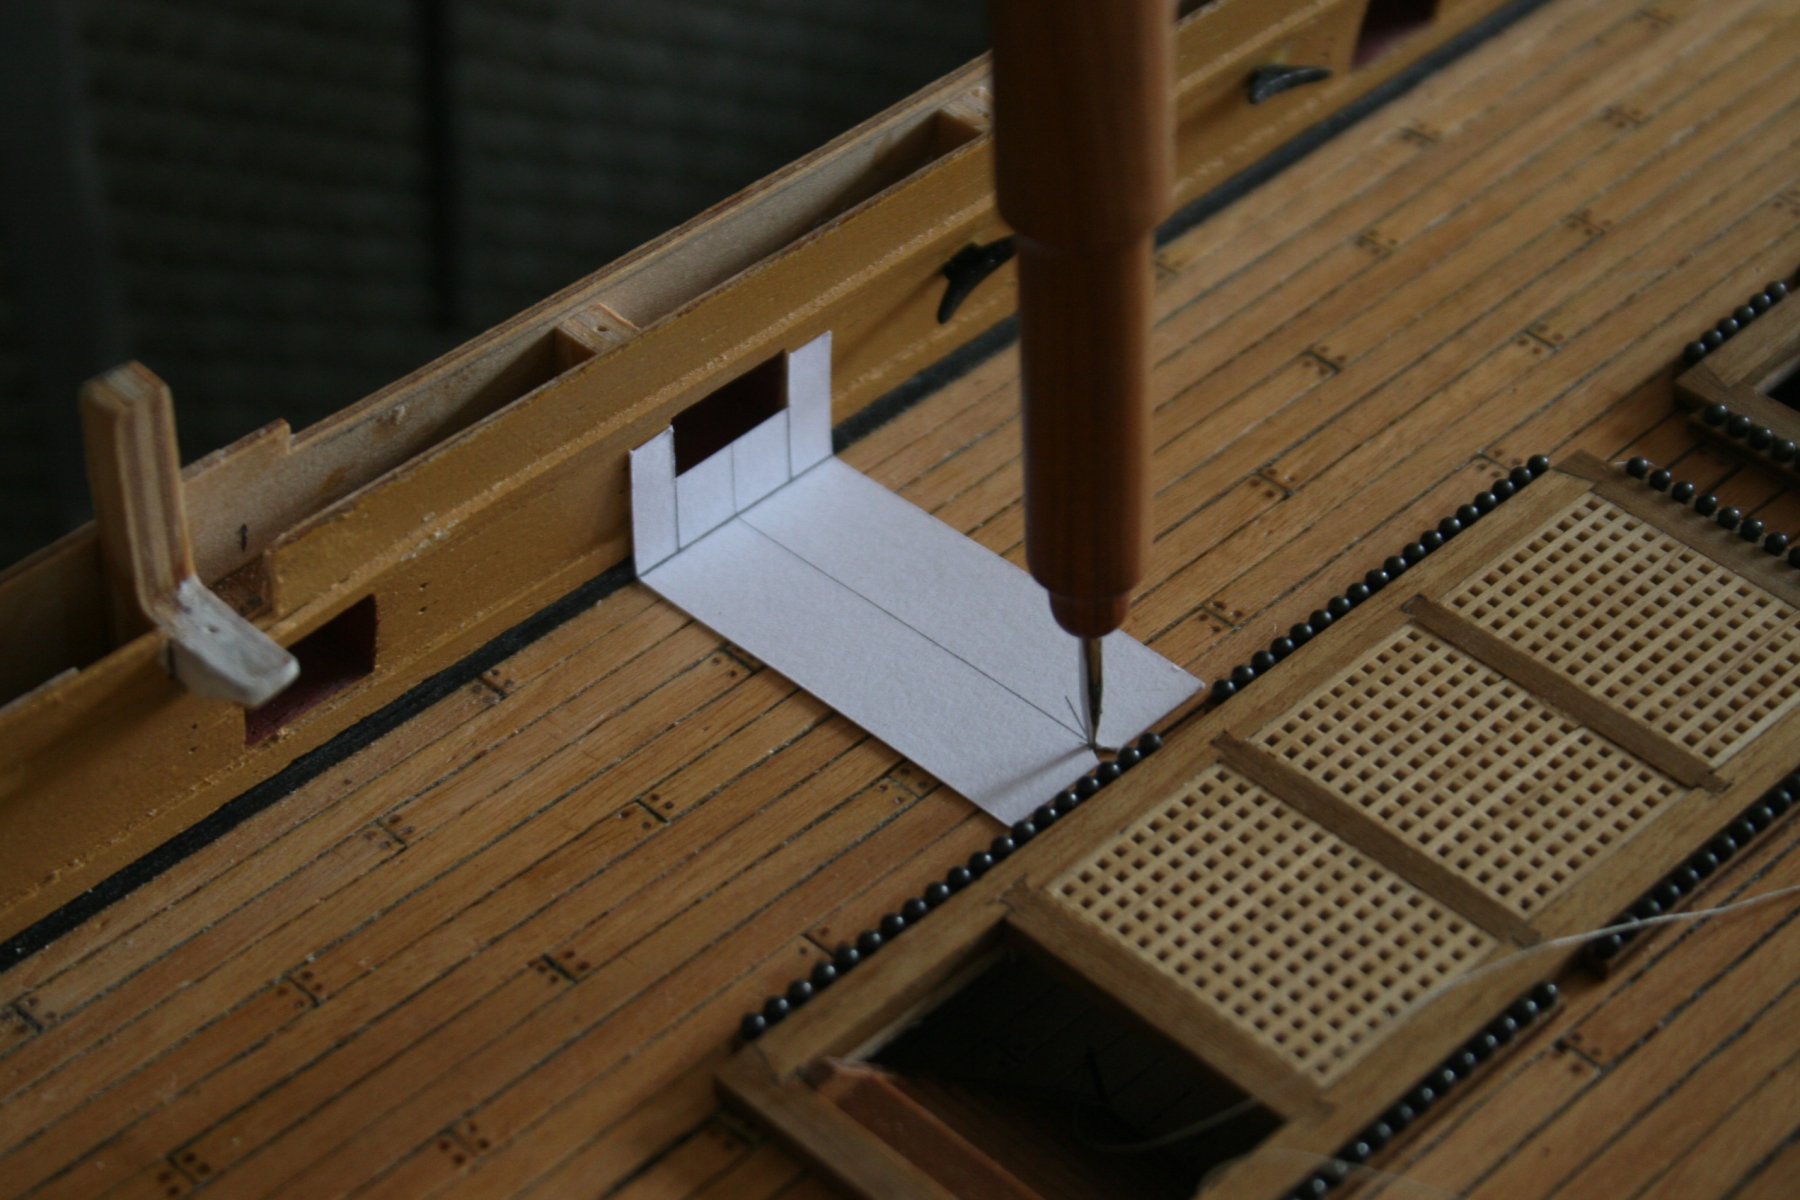
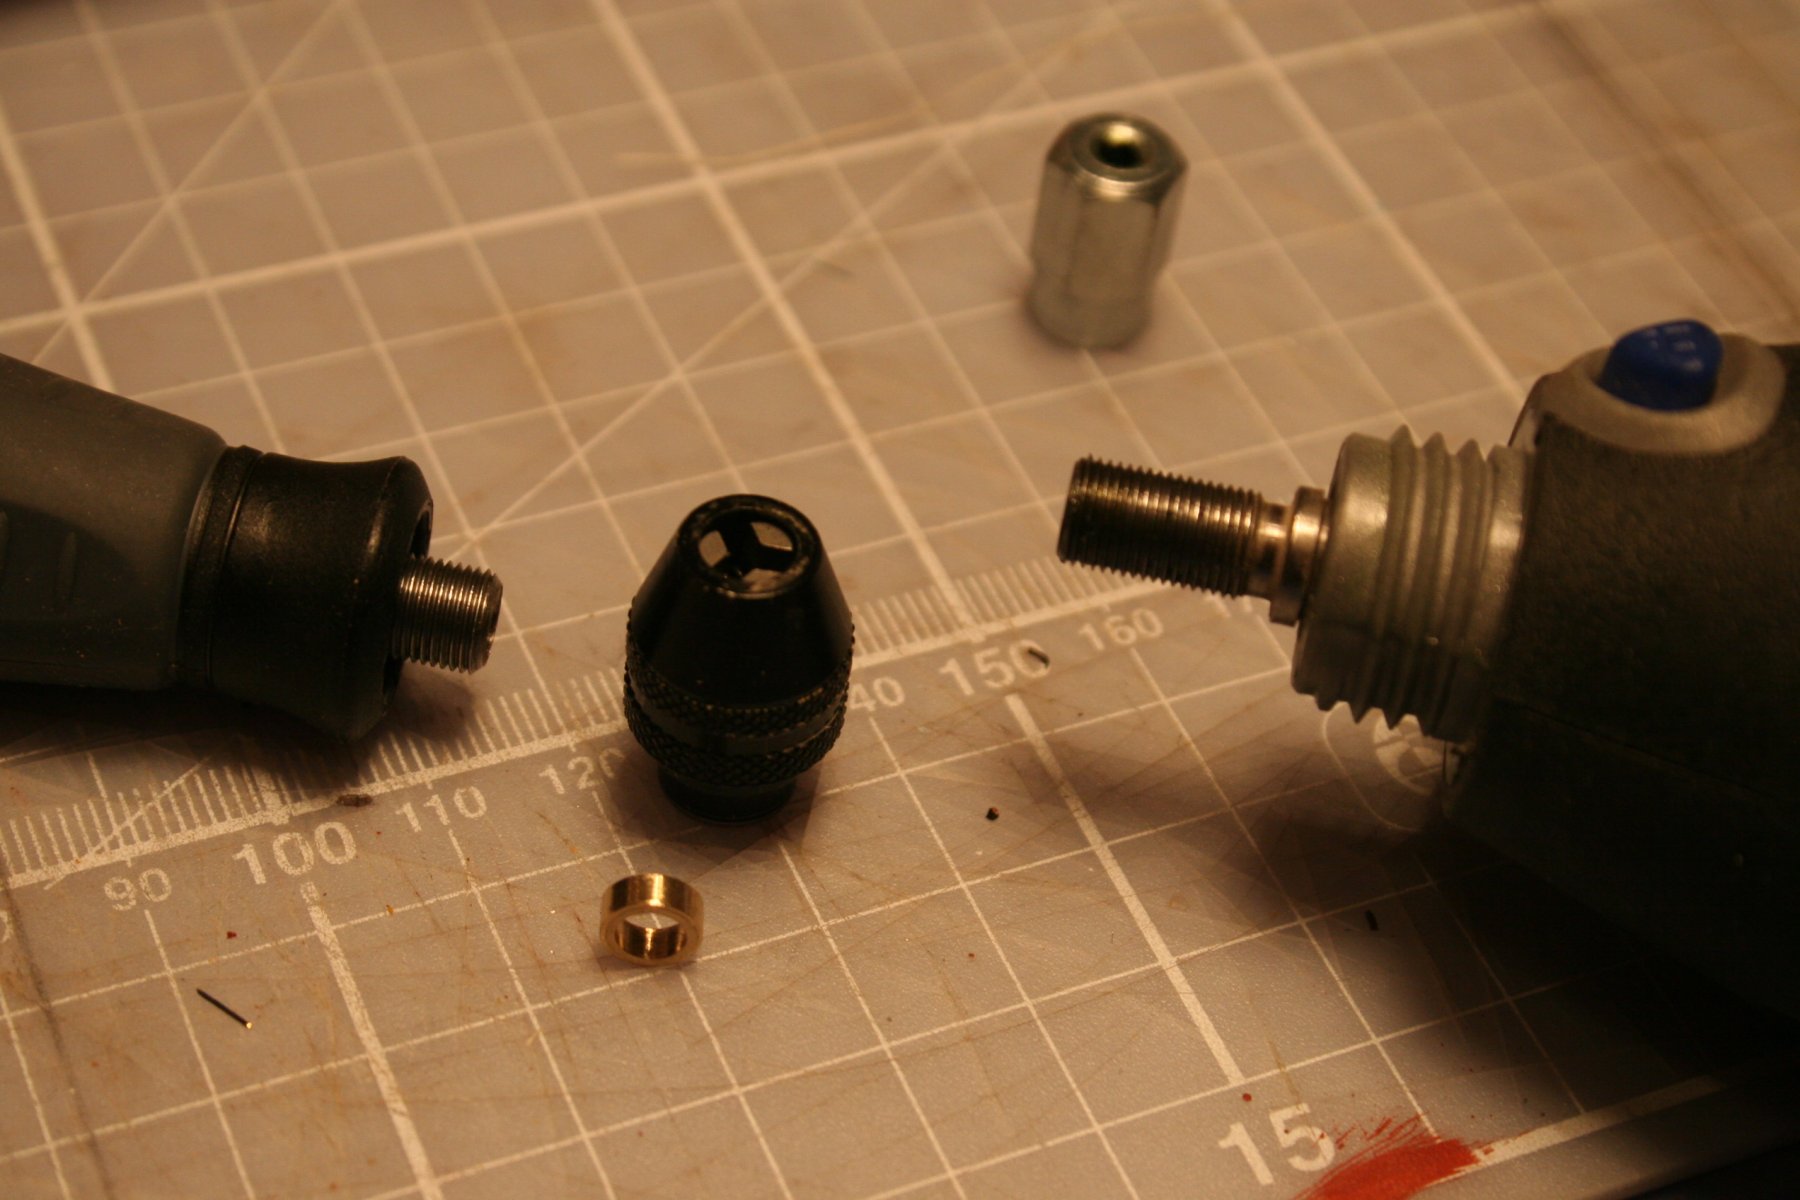
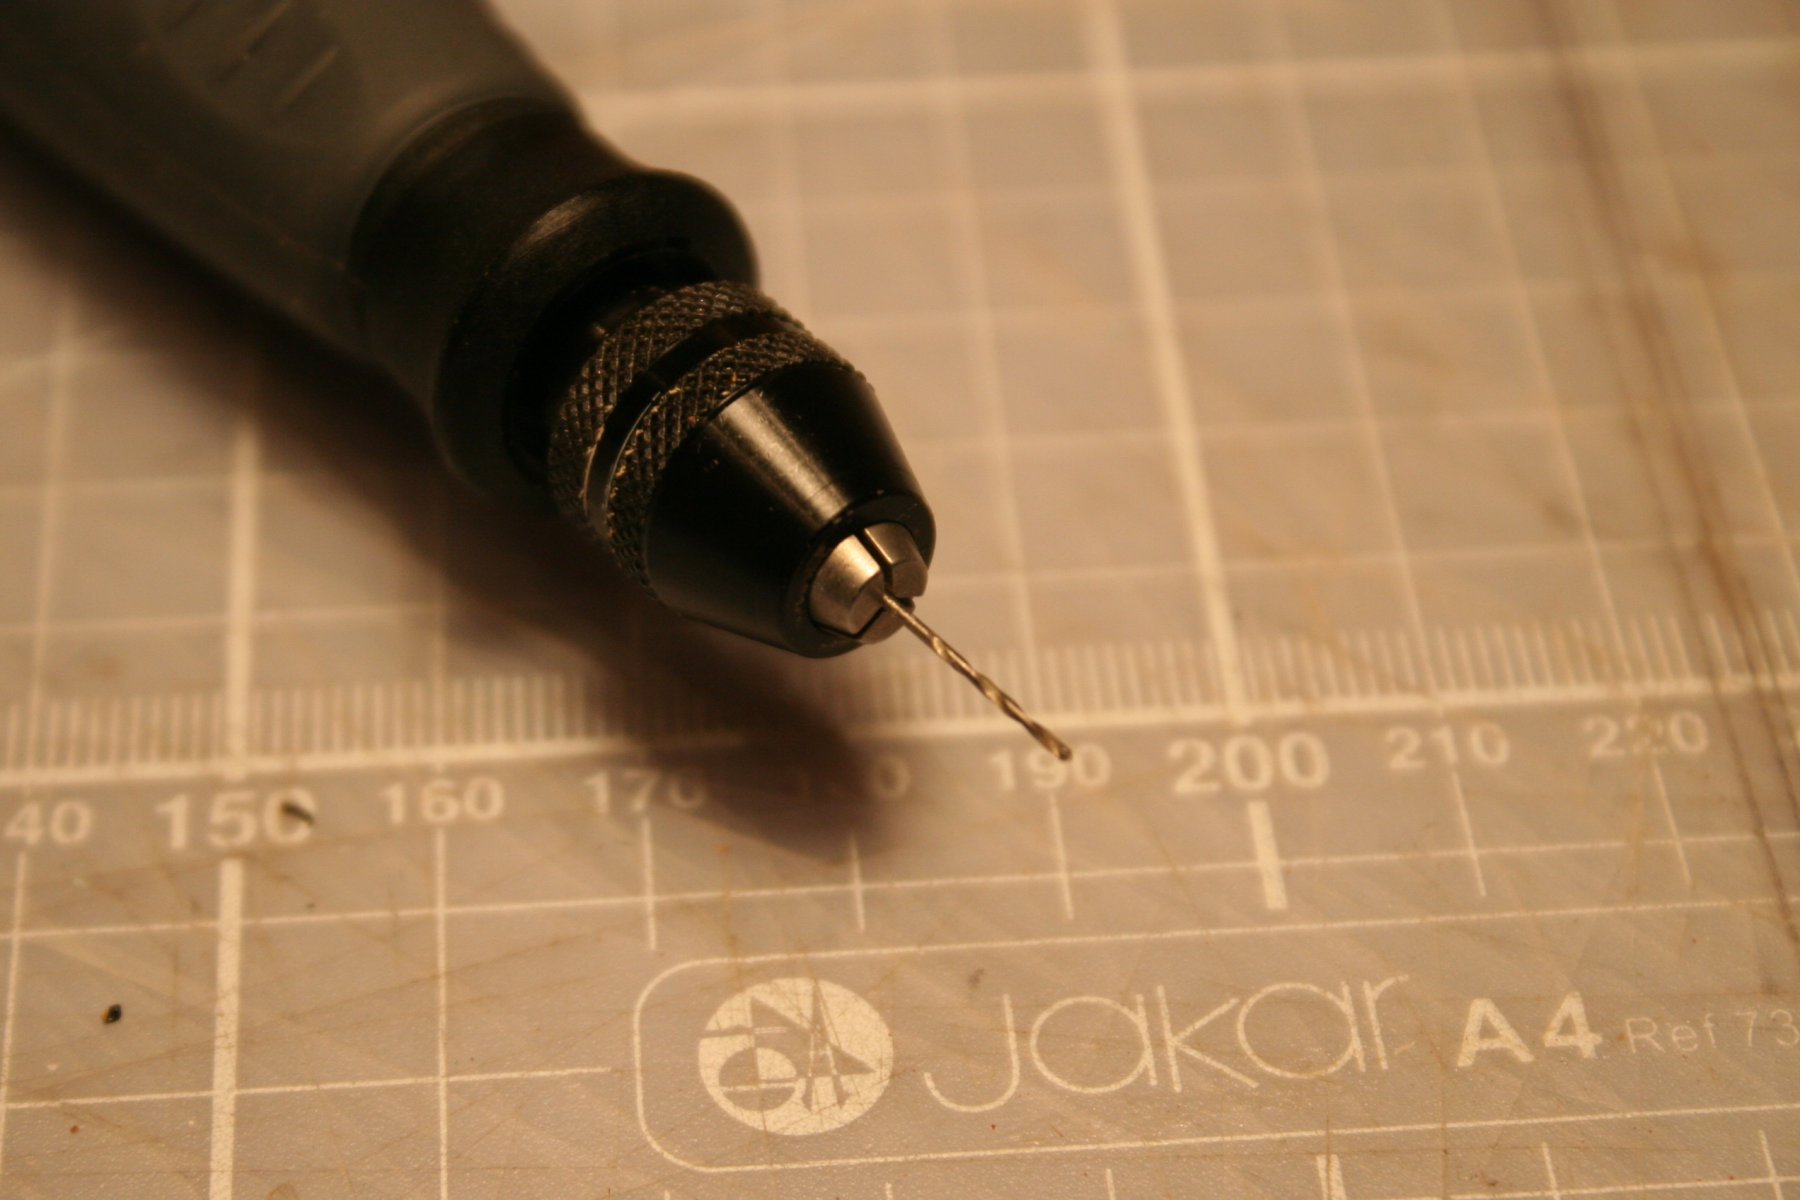
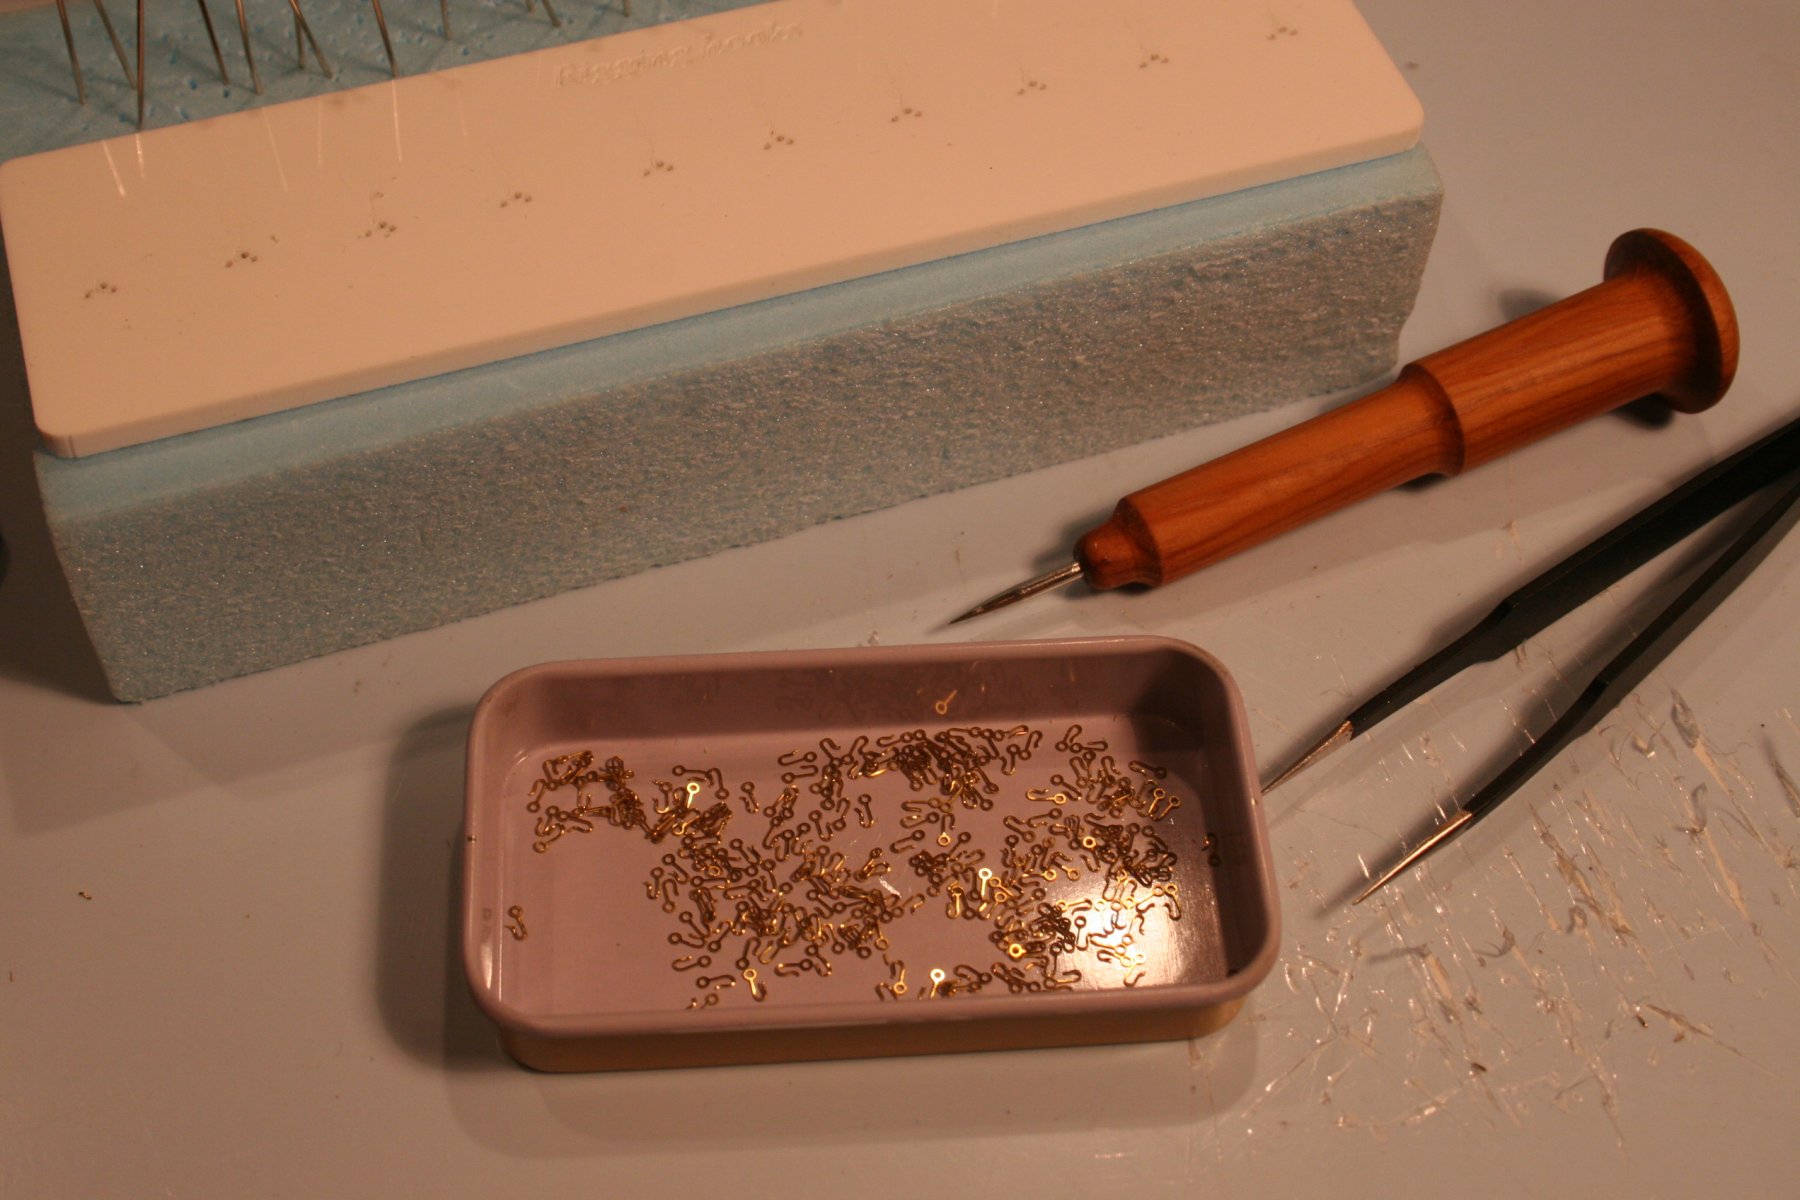
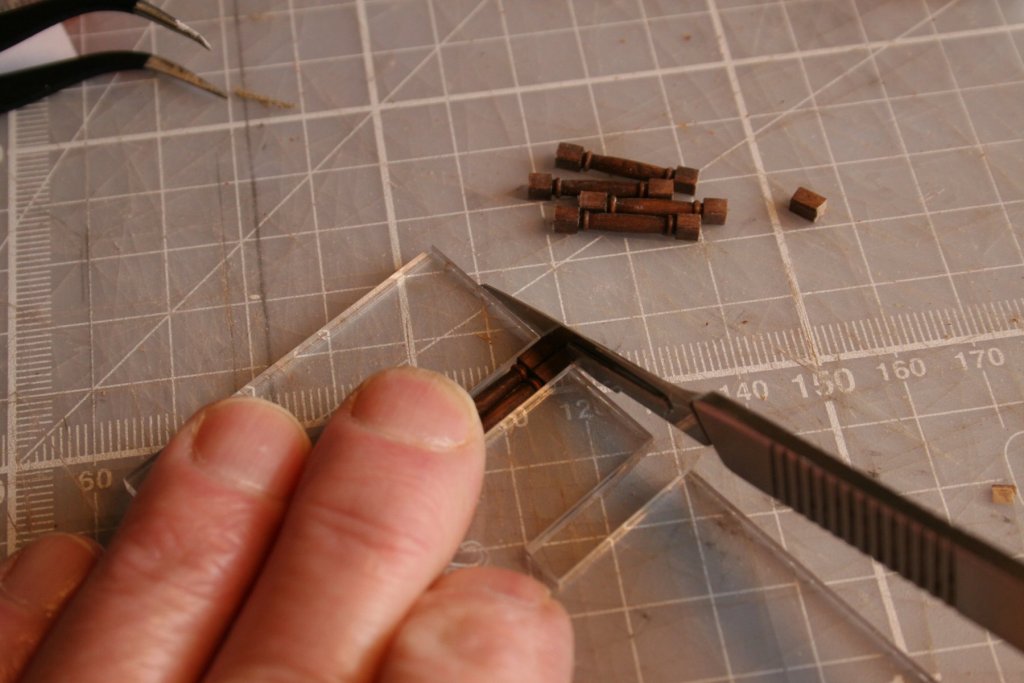
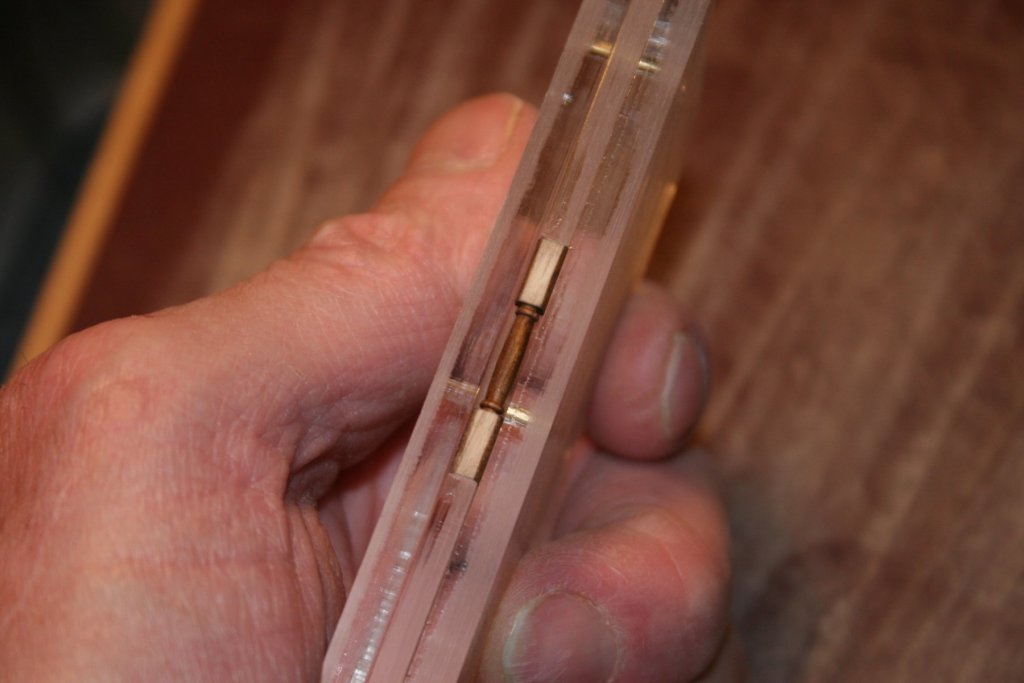
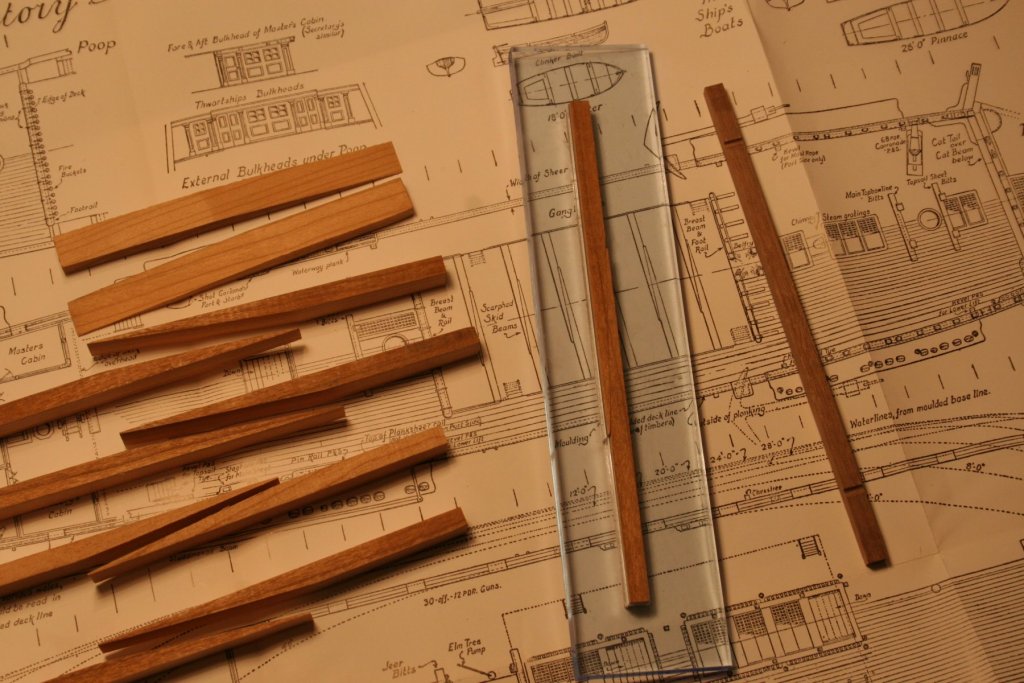
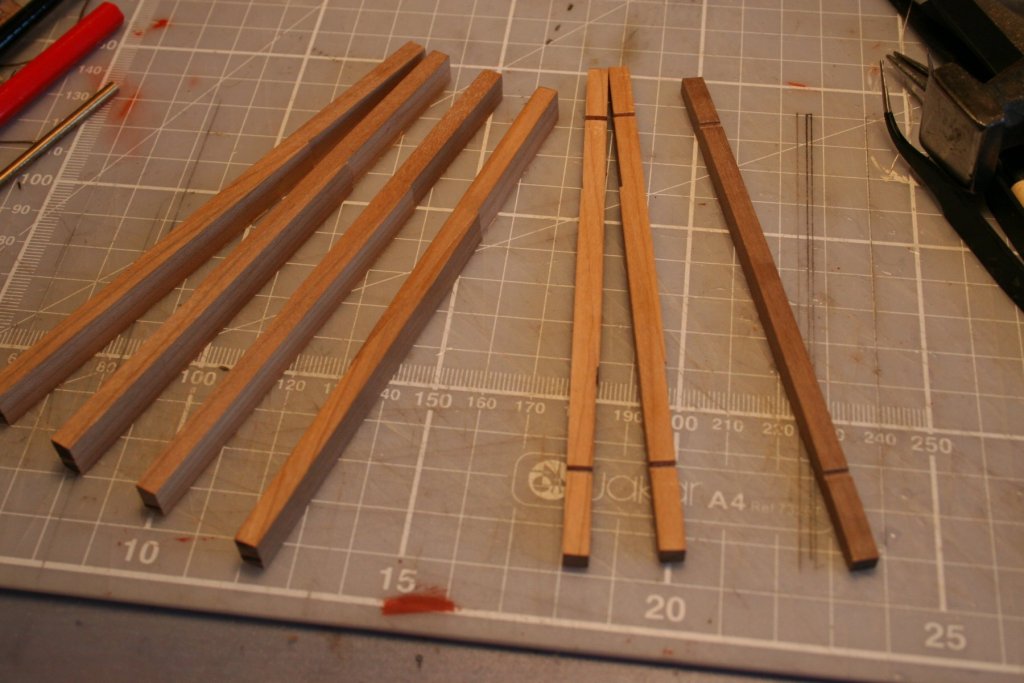
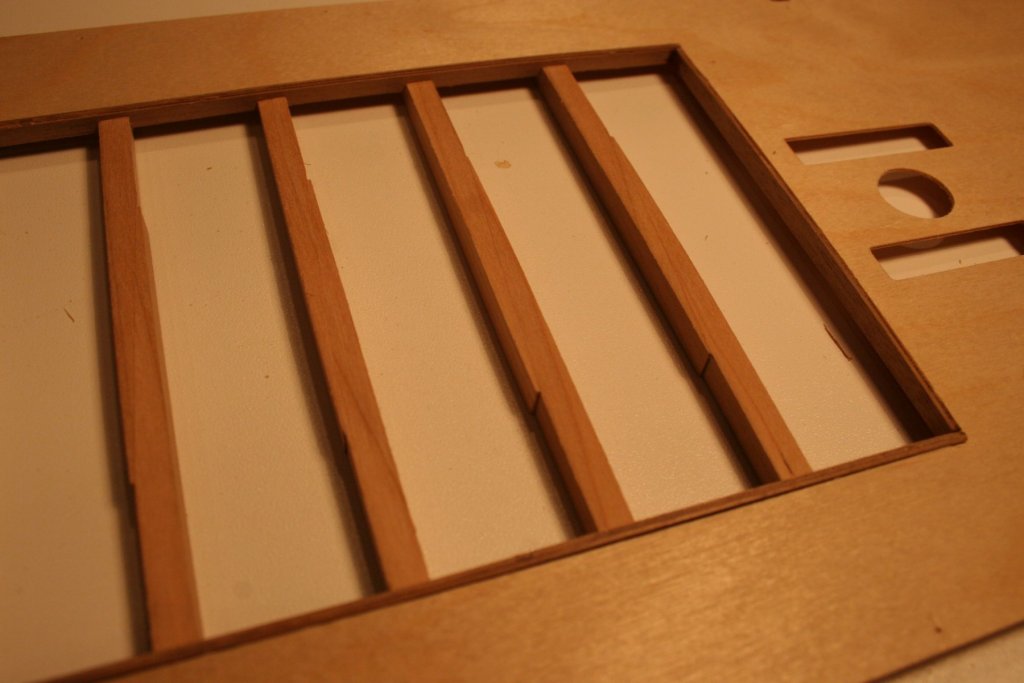
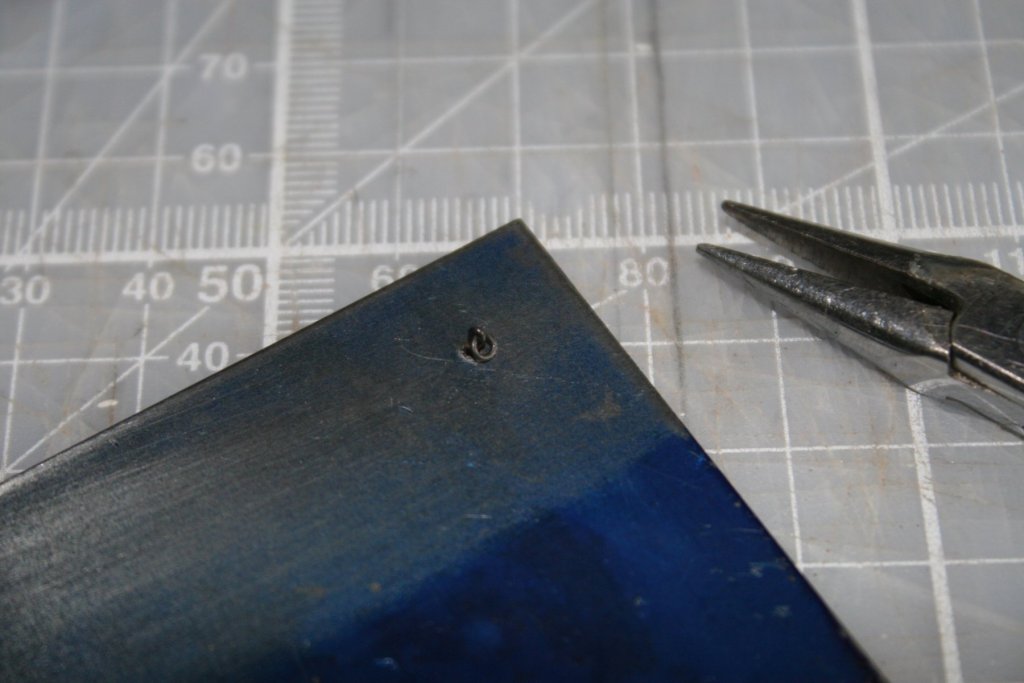
I needed a bit of a break from rigging up guns and carriages......... so I decided to mark out and drill the holes for their eyelets and rings ...... The holes for the 'trial' gun carriage shown previously were made by hand with the drill bits held in a pin vice. To make the process easier and quicker I invested in a flexible drive for the dremel I 'won' from my youngest son after he had moved on from a jewelry making 'phase'. There was a slight problem initially when the drill chuck was transferred to the end of the new drive. It is able to hold drills down to 0.4 mm, and probably smaller, when fitted directly to the hand set but the mounting thread of the new drive is shorter. This meant that although it could hold the shaft of the cutting and sanding mandrels small drill bits where far too small for the chuck jaws to grip. I managed to overcome this by turning and inserting a small brass extension bush in the back of the chuck and normal service was resumed . Looking at the deck plan in my copy of Longridge's 'The Anatomy of Nelson's Ships' I thought that the skid beams supplied with the kit lacked a bit of detail and decided to try and replace the originals with ones that have the distinctive scarf joint. Using cherry from my HMS Triton build I came up with these ...... Spot the mistake I made with the first two? These were replaced with a couple more, with the scarf the right way round. These next two pictures show the first dry assembly .....and now back to the gun carriage production line - 'only' 20 more barrels to mount, then 90 sets of blocks and tackles to assemble and fit.......... Cheers for now, Graham.


-
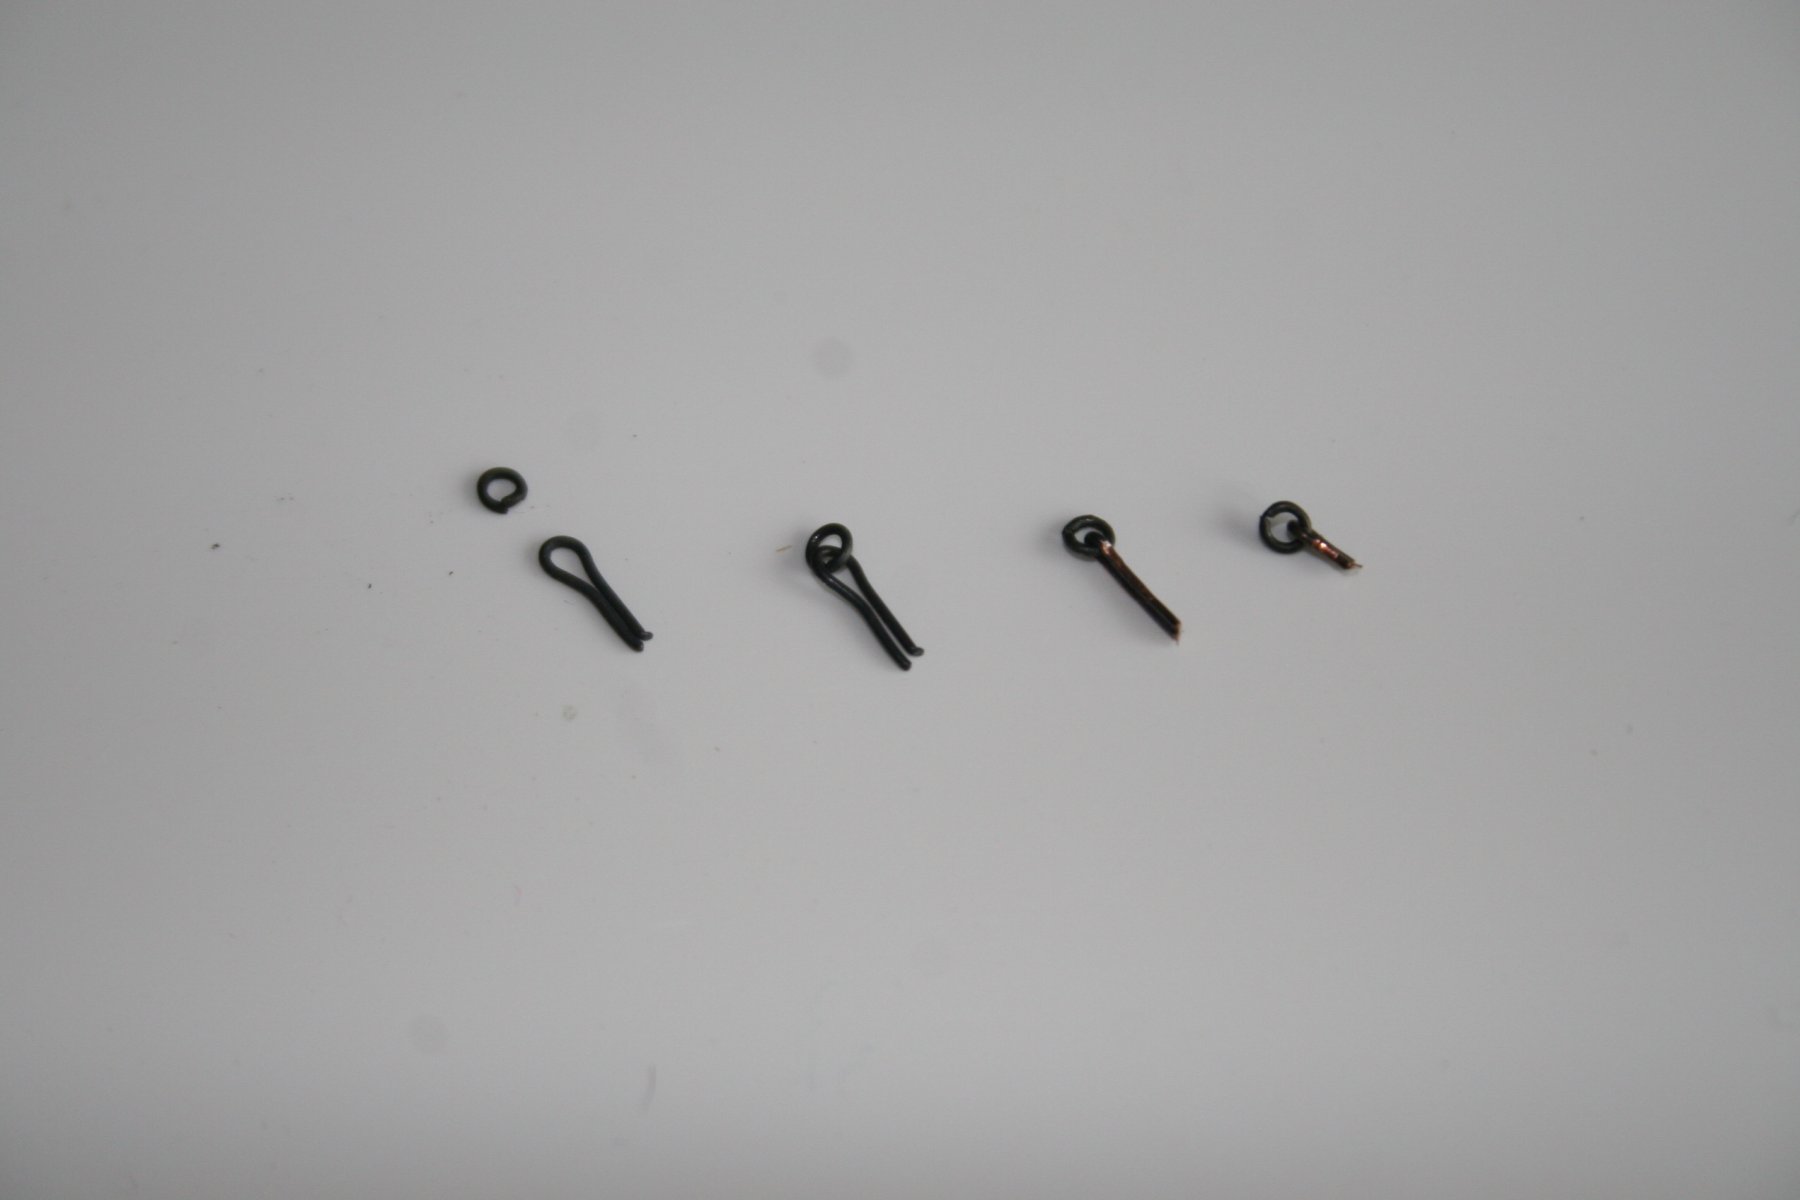
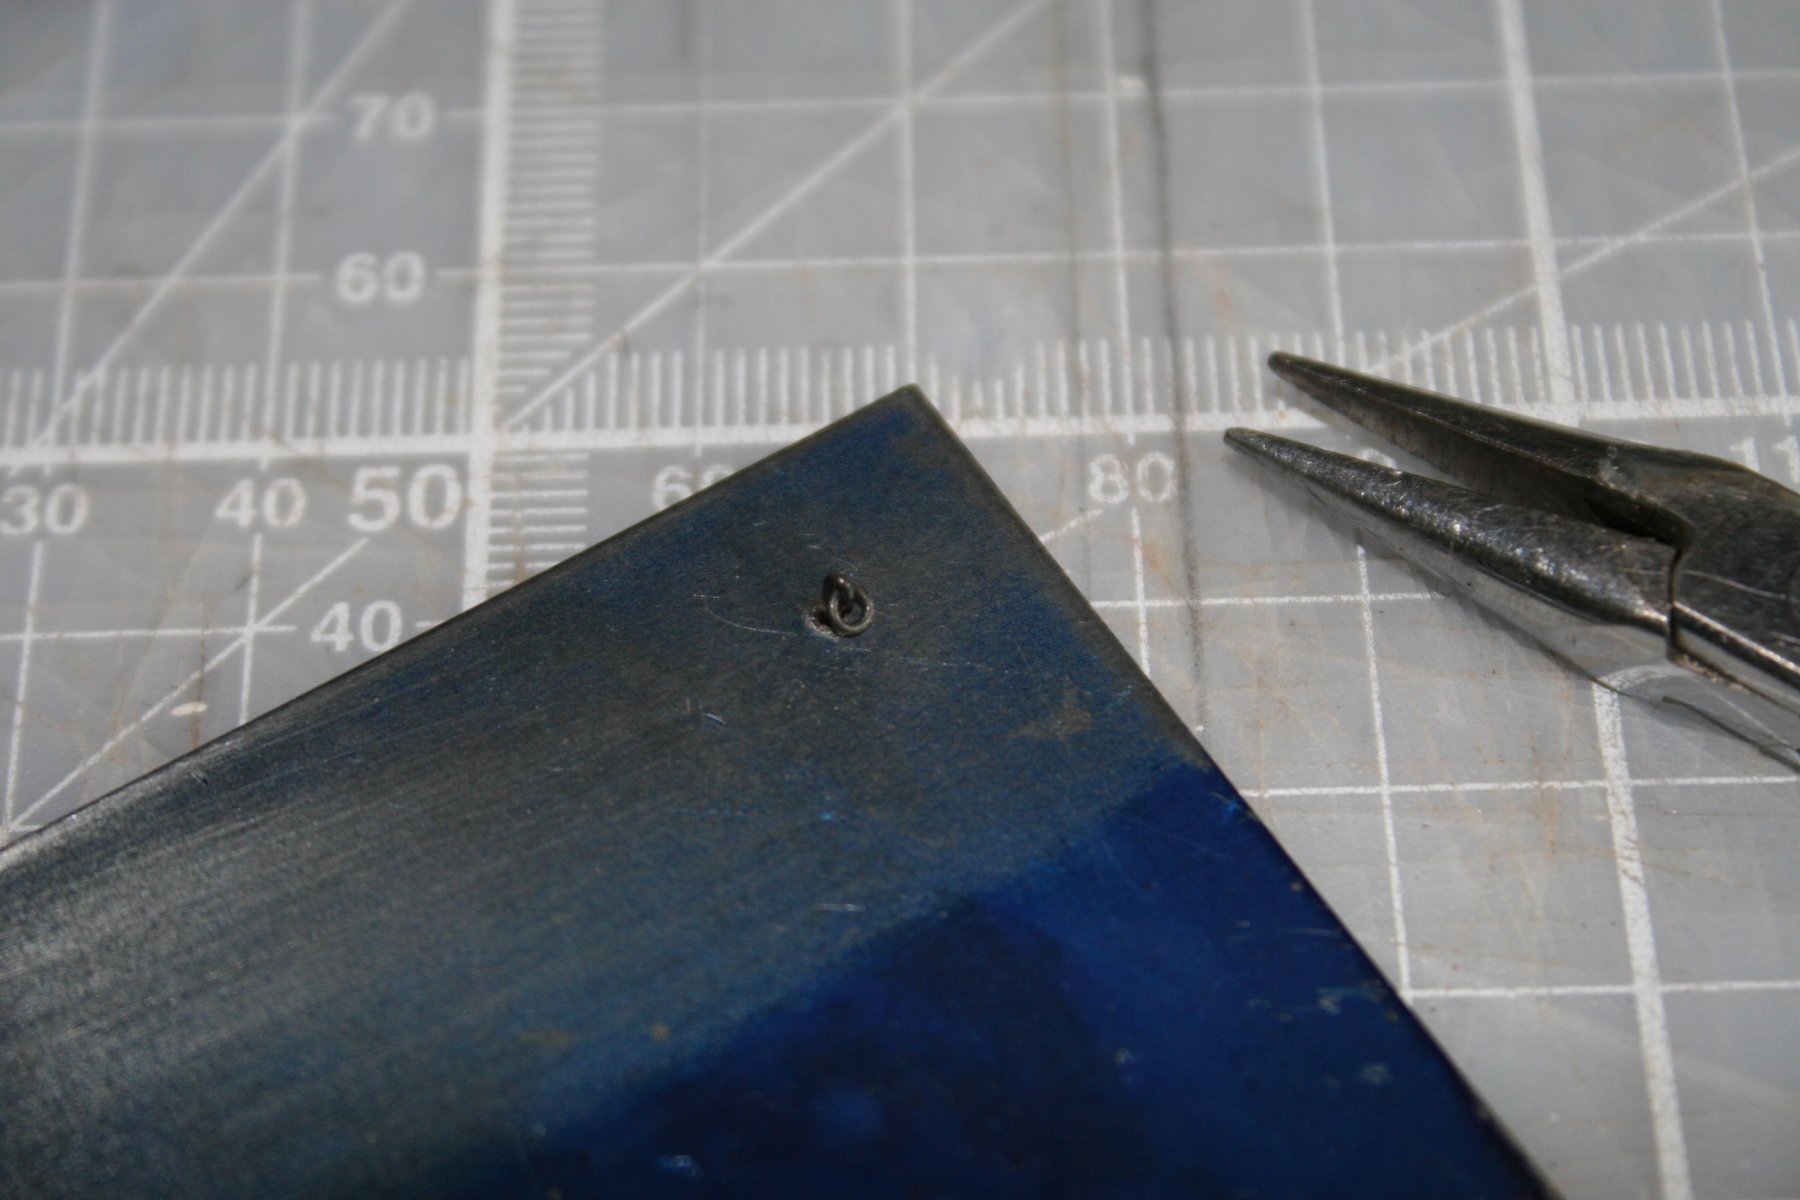
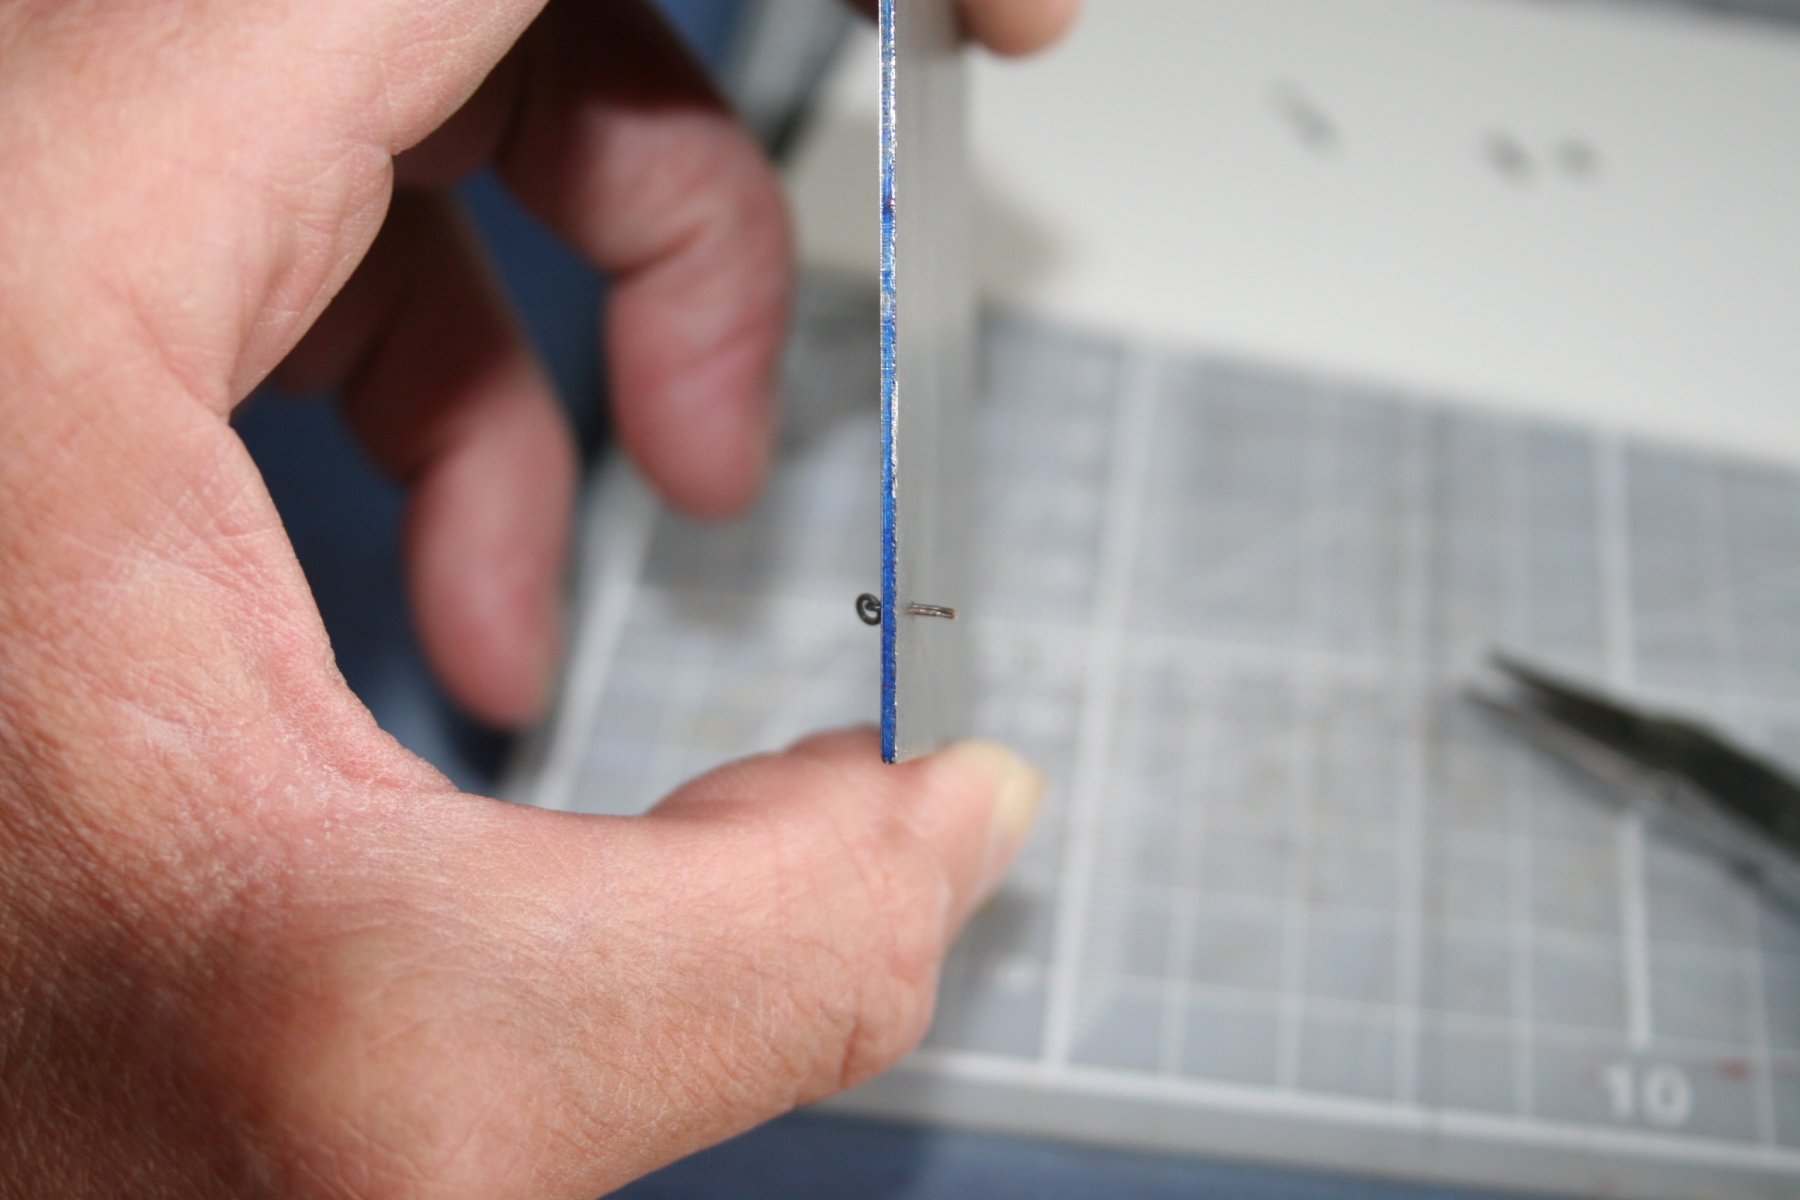
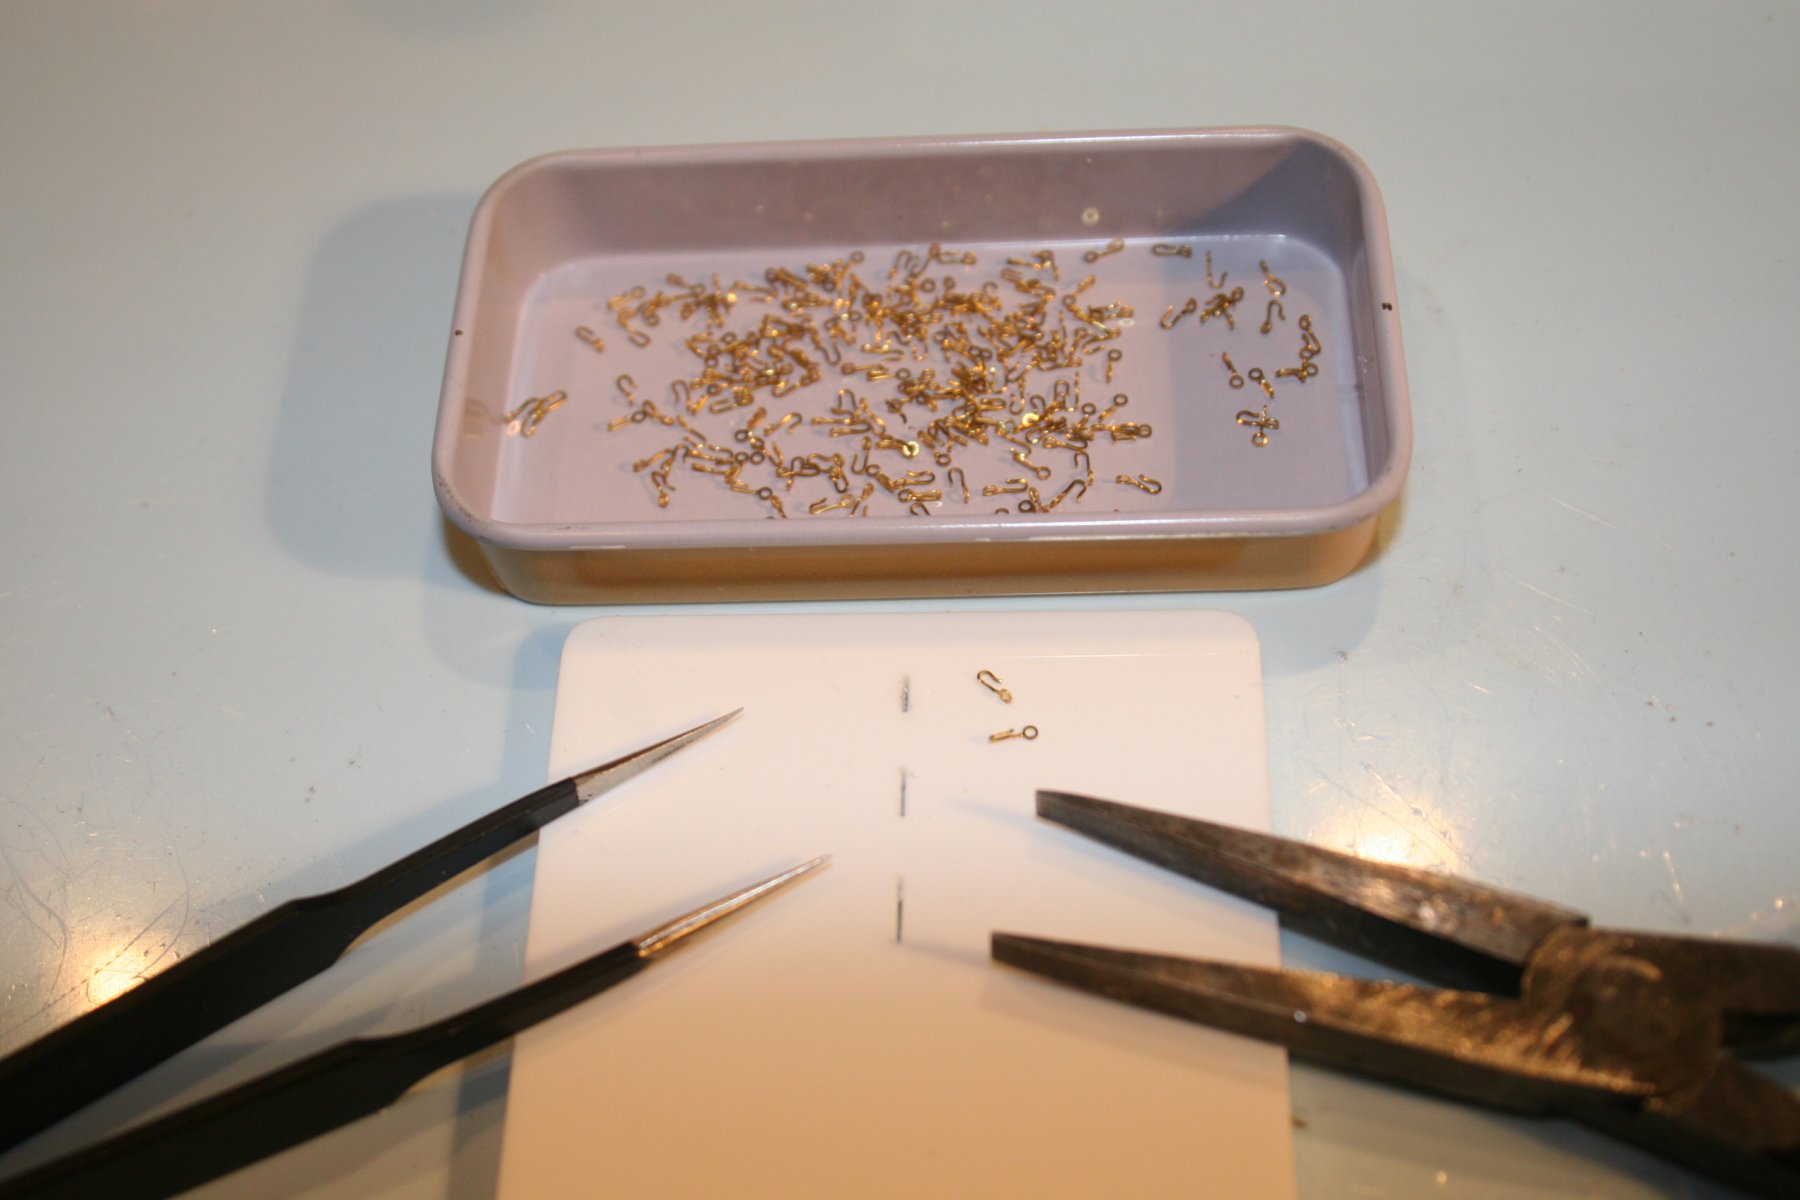
Hi, Thank you for your kind comments and 'likes'. David - Good to see you back. I'd seen that you had resumed building your HMS Diana and have been looking out for your updates. I particularly like the way you dealt with the deck planking. I'm sure it was your advice I followed about threading all the eyelets onto the breech rope before fitting it to the gun carriage. It worked a treat. Robert - Yes, the hooks were made from eyelets supplied with the kit. They are the 480 eyelets, the same as you show after 'blacking' on your build log. I'm not sure how generous the manufacturers are in the quantity of these they provide but if I run short of them later I know that they are easily obtainable from either them or CMB. To shape them I made a jig that used dress making pins liberated from the Admirals sewing box to secure and then provide support as the eyelets were bent using a combination of cocktail sticks and a home made bradawl to push them into shape. If it would help you I could send you a basic jig like the 'MK 2' (white acrylic) one which enables 10 hooks to be done at a time. Speeds things up a bit when you need to do 180! PM me your address if you're interested. Cheers, Graham.
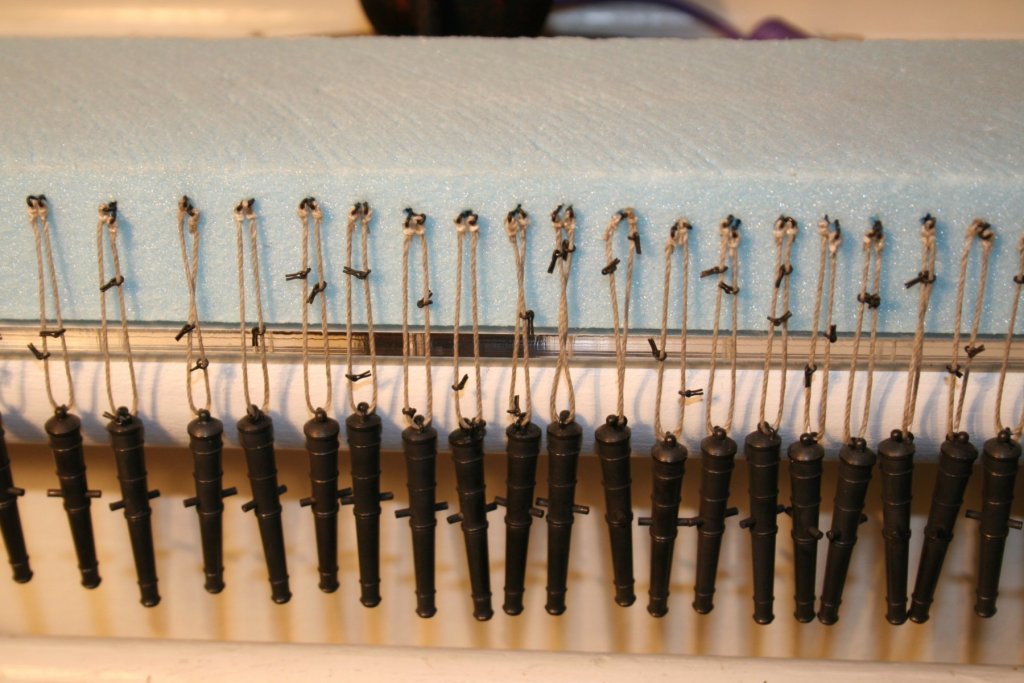
-
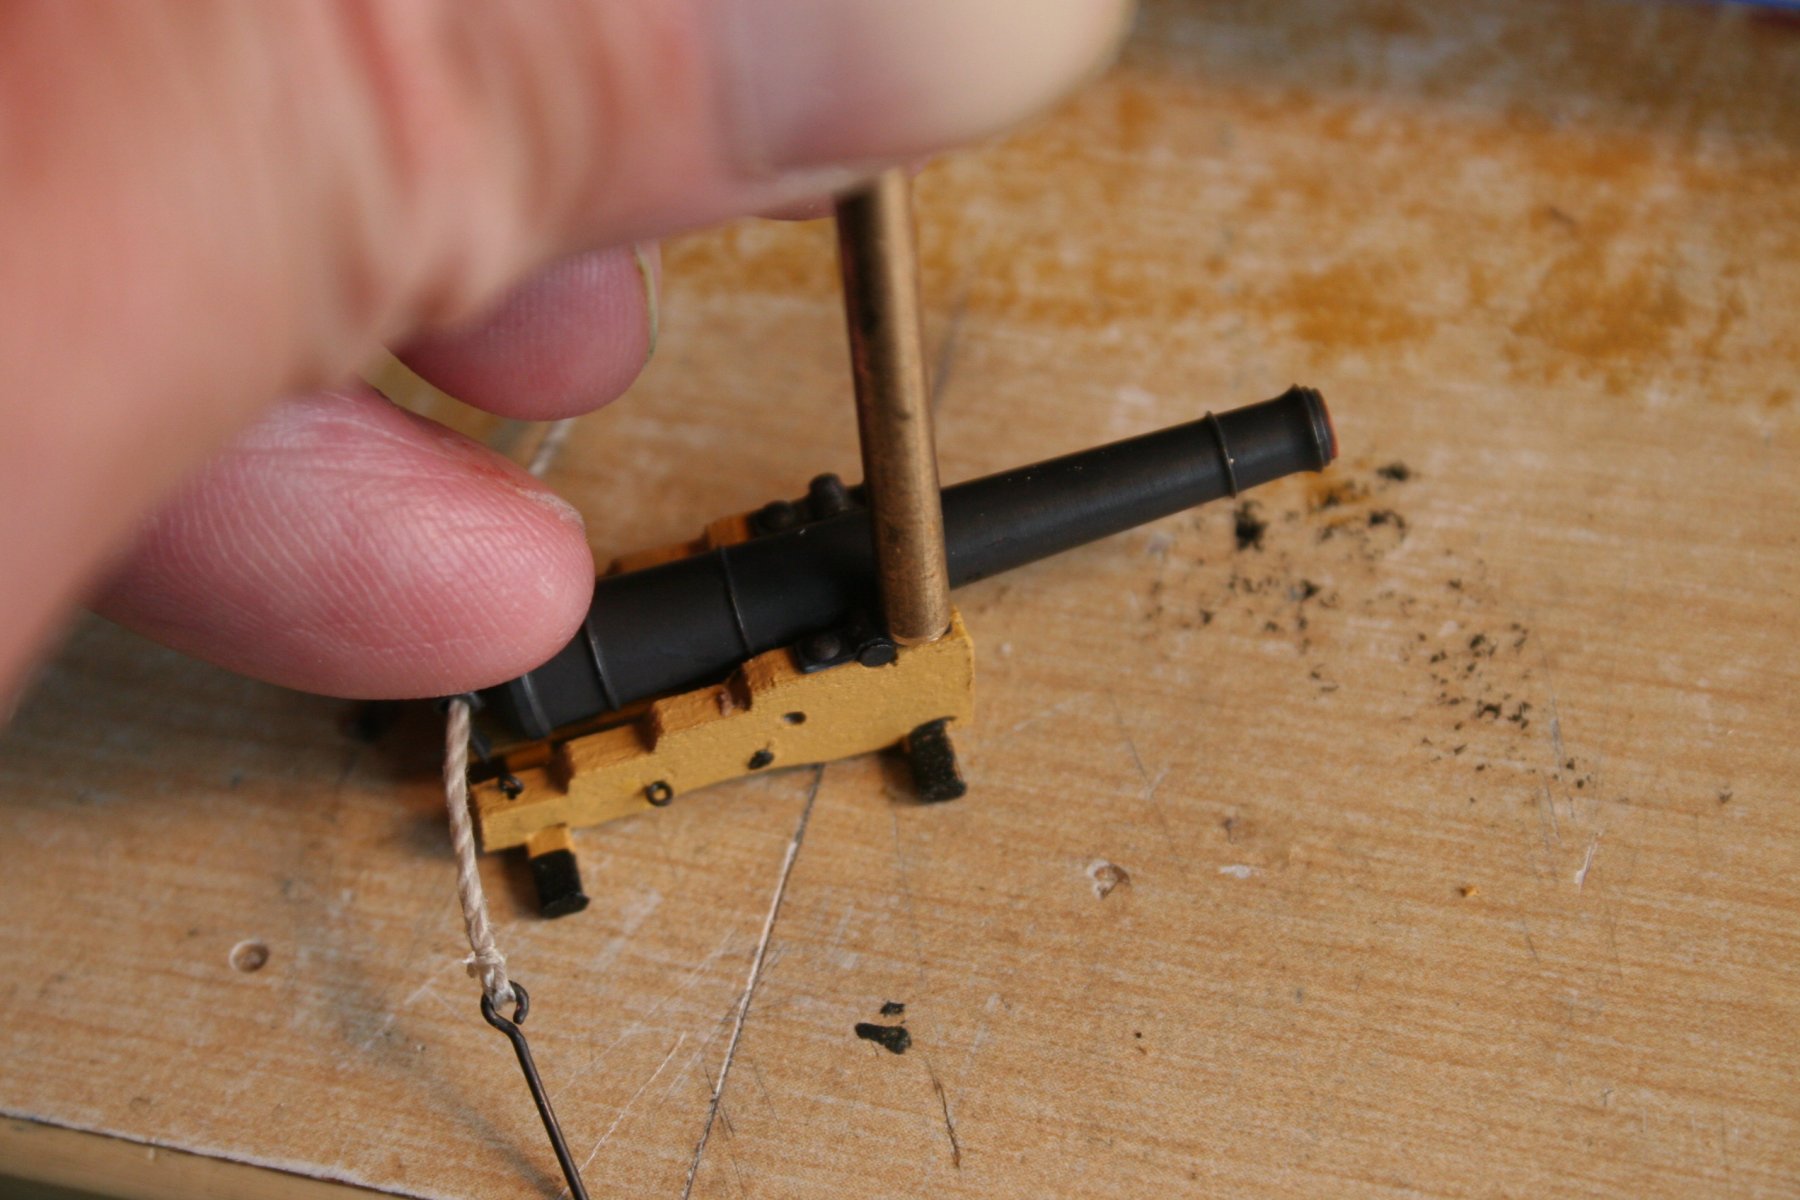
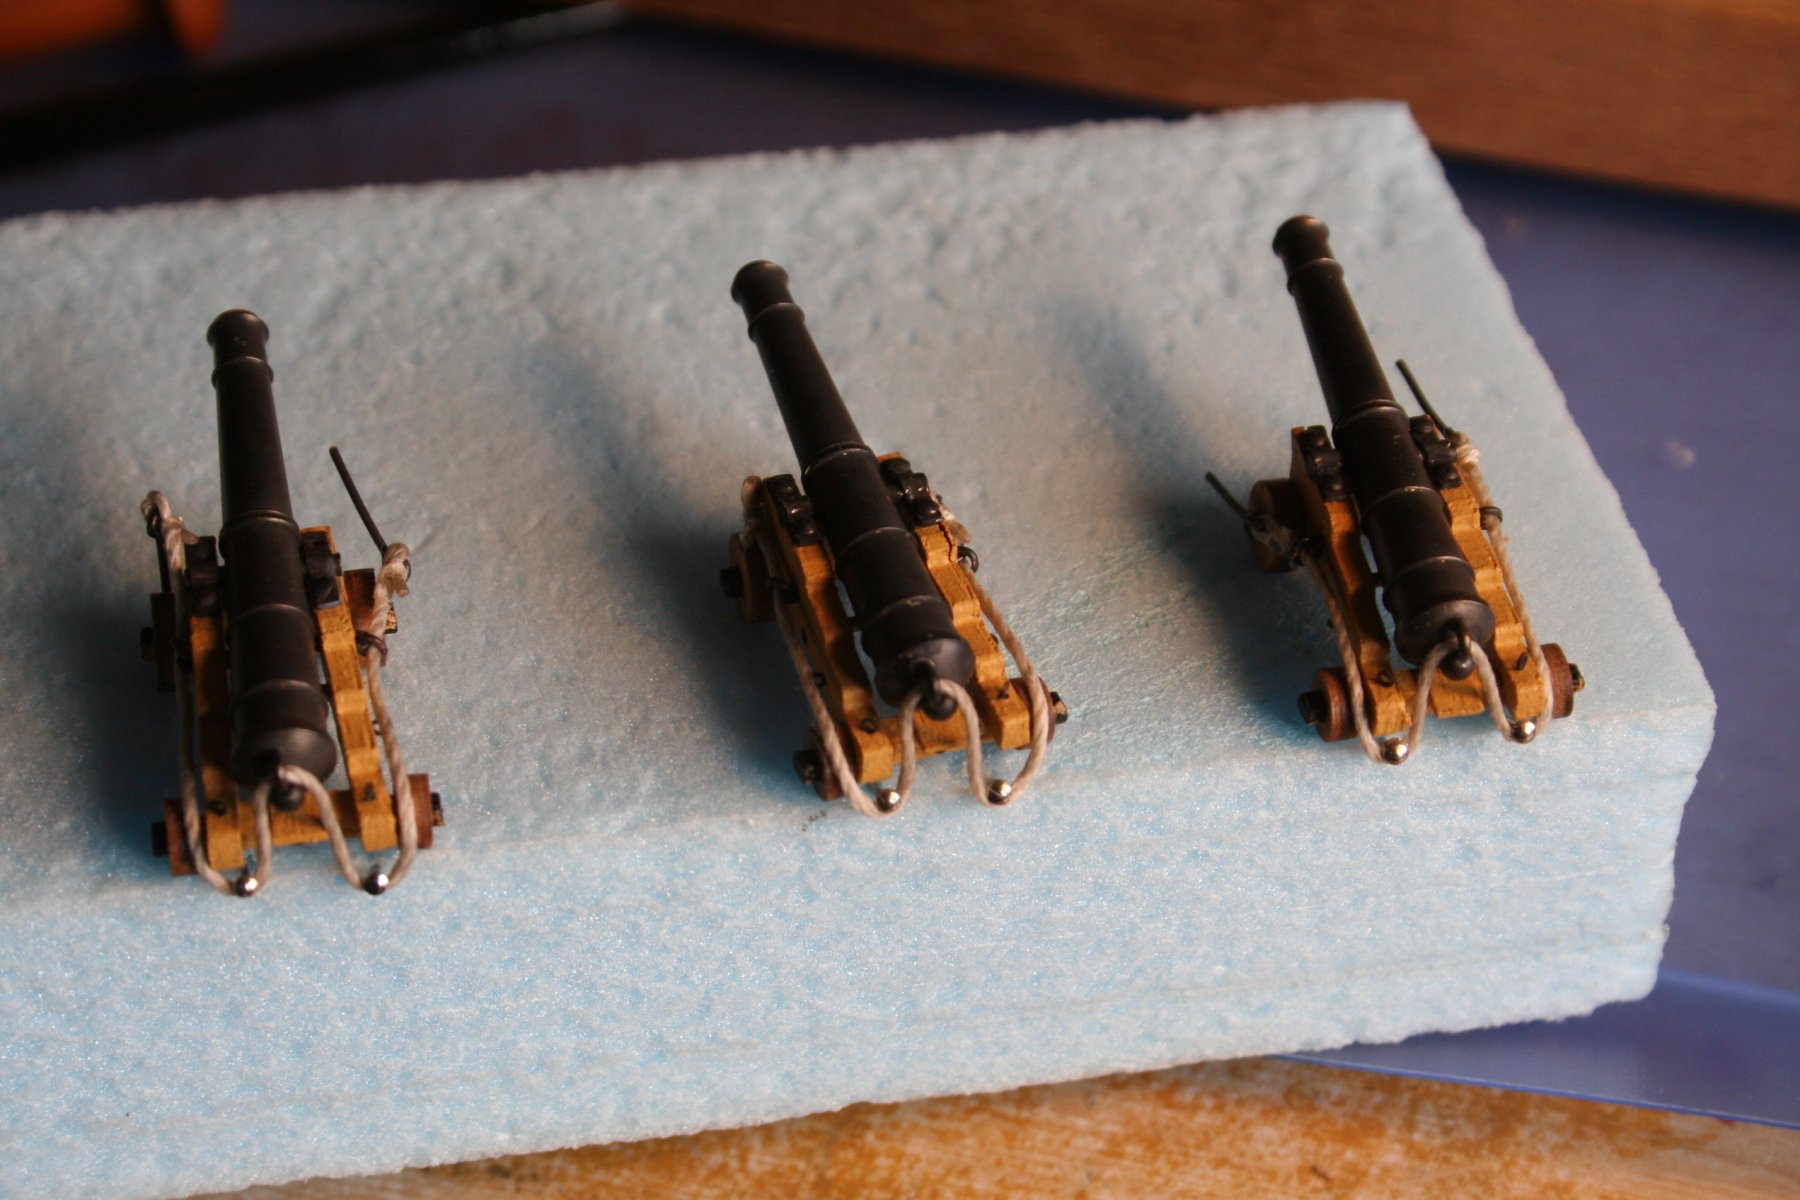
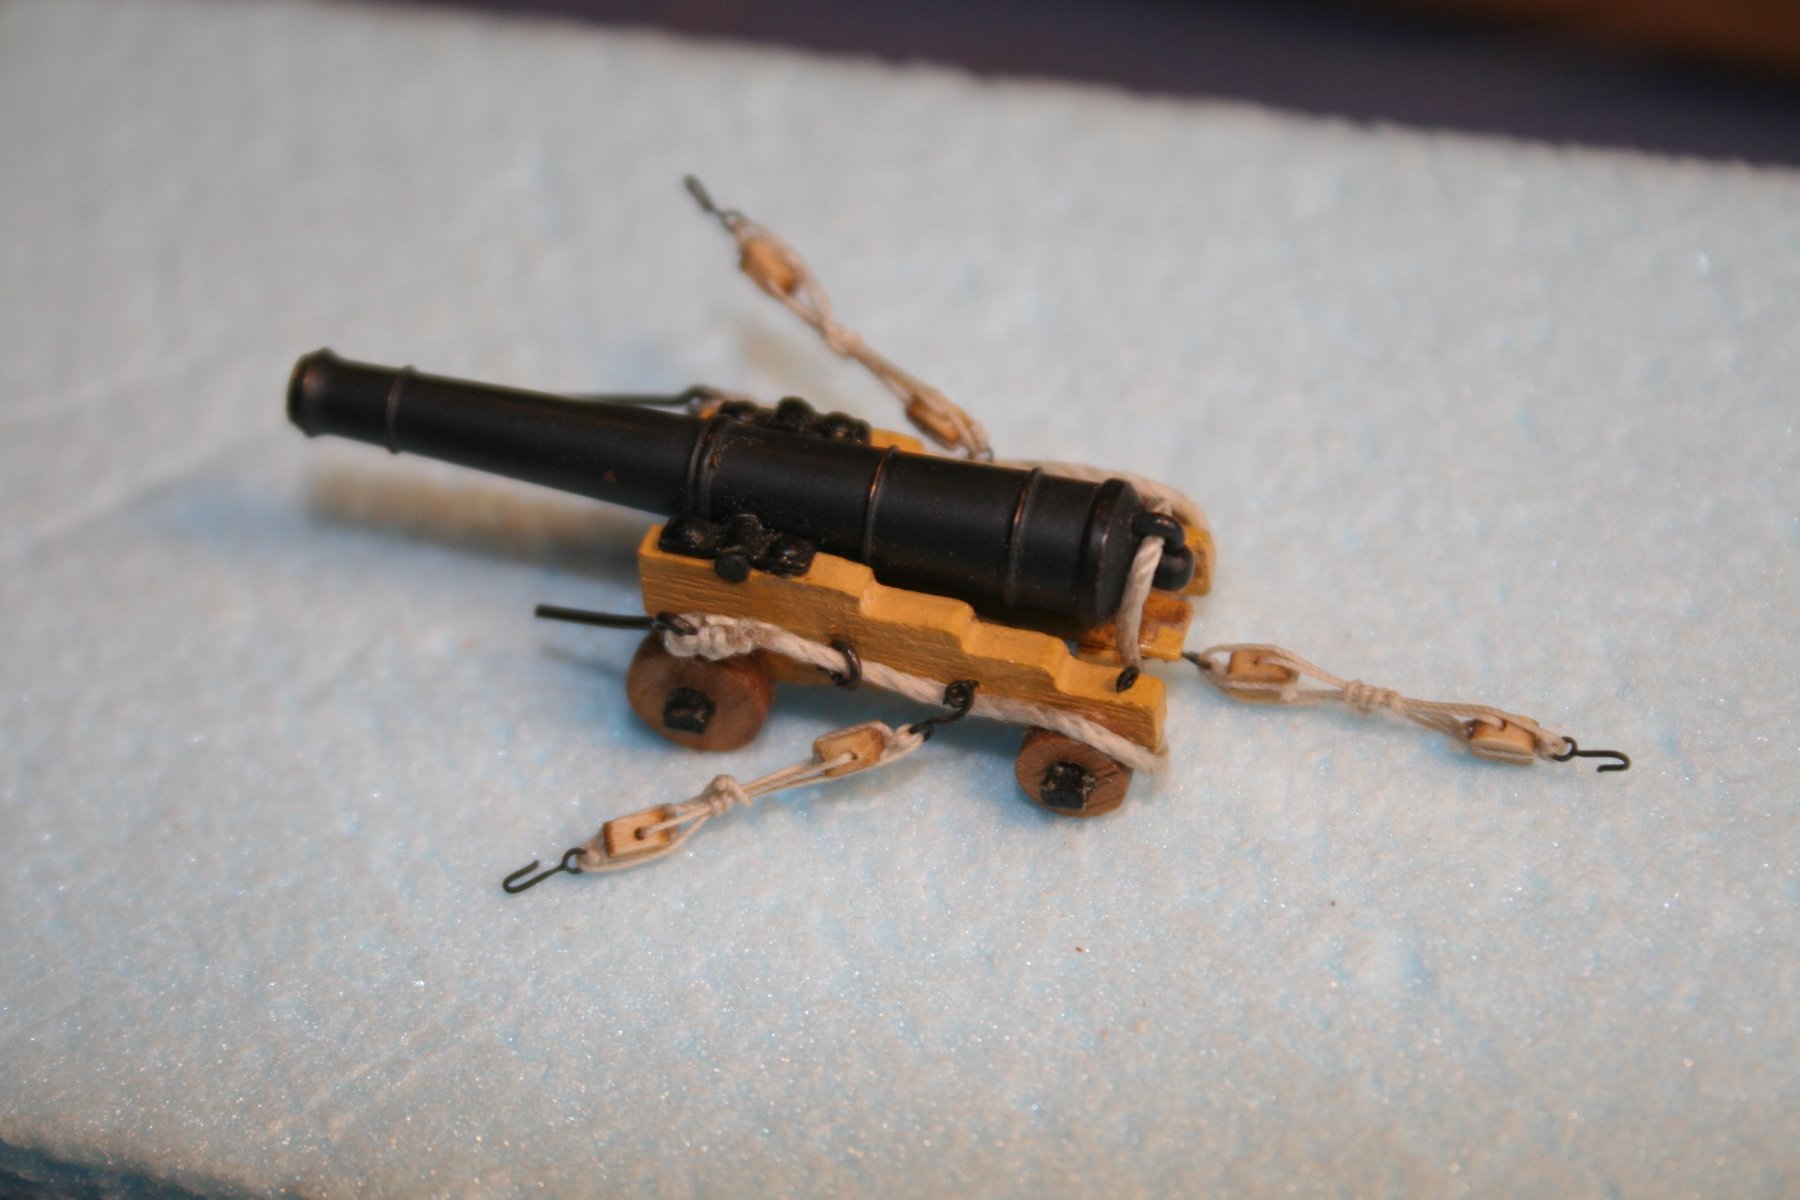
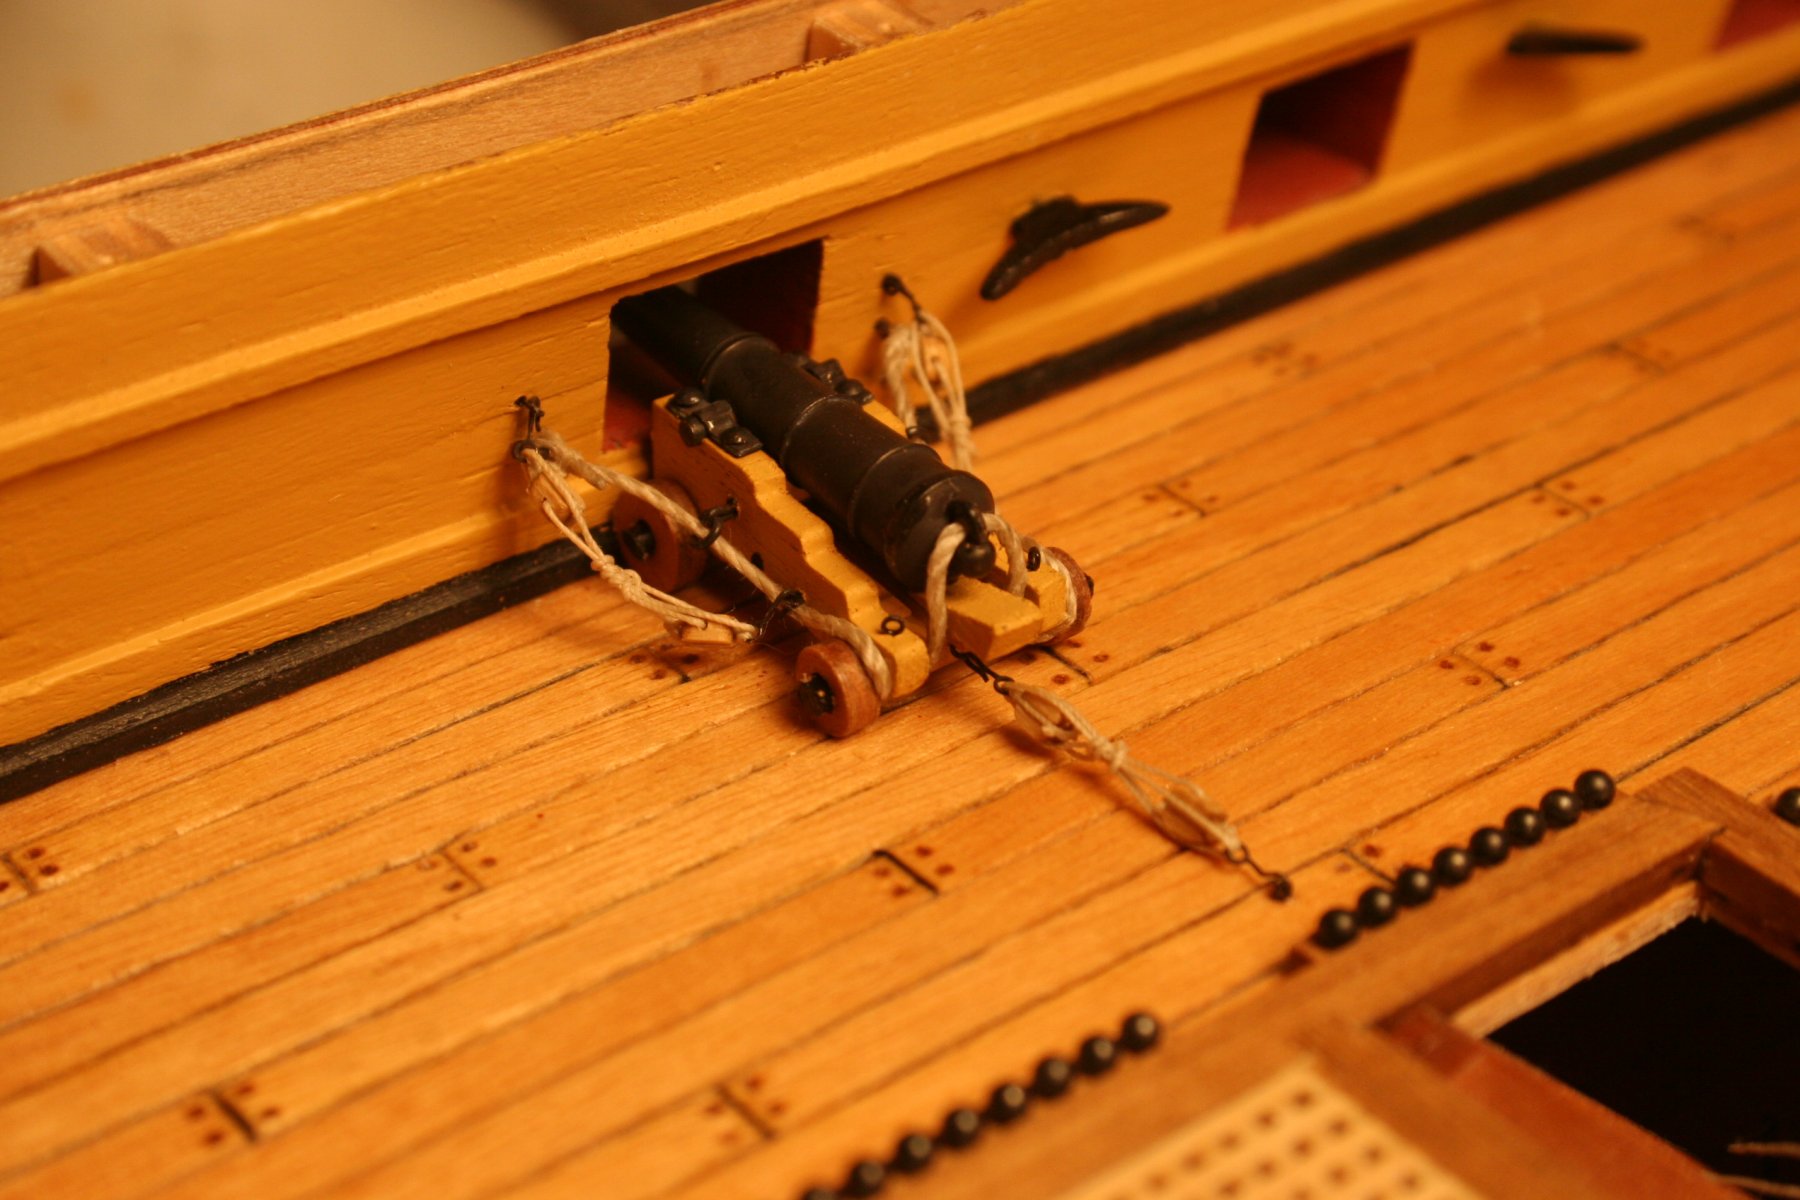
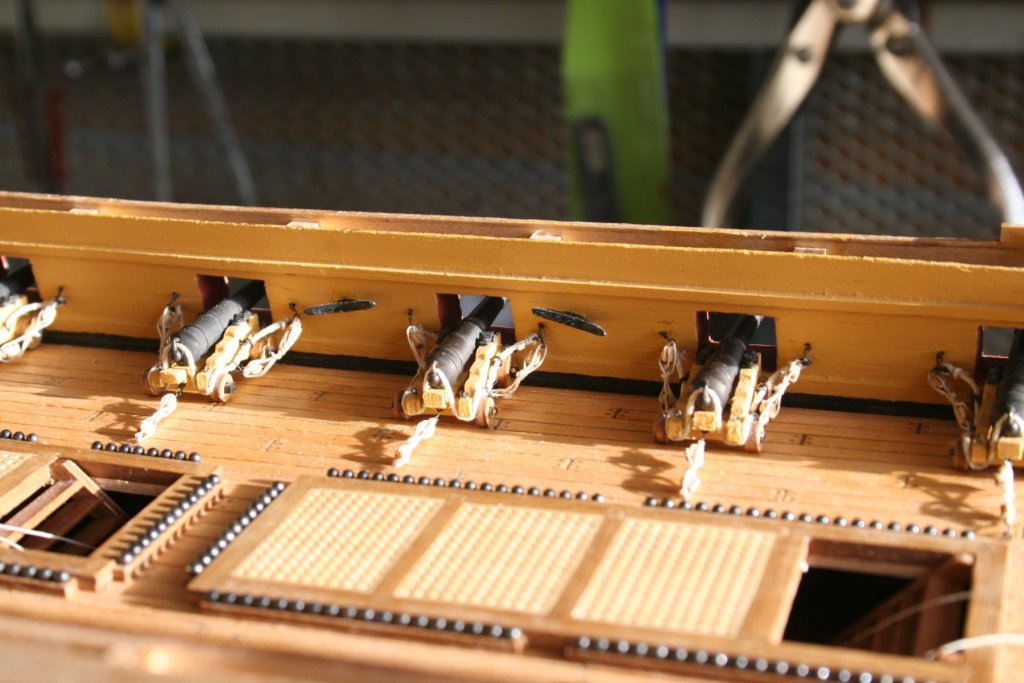
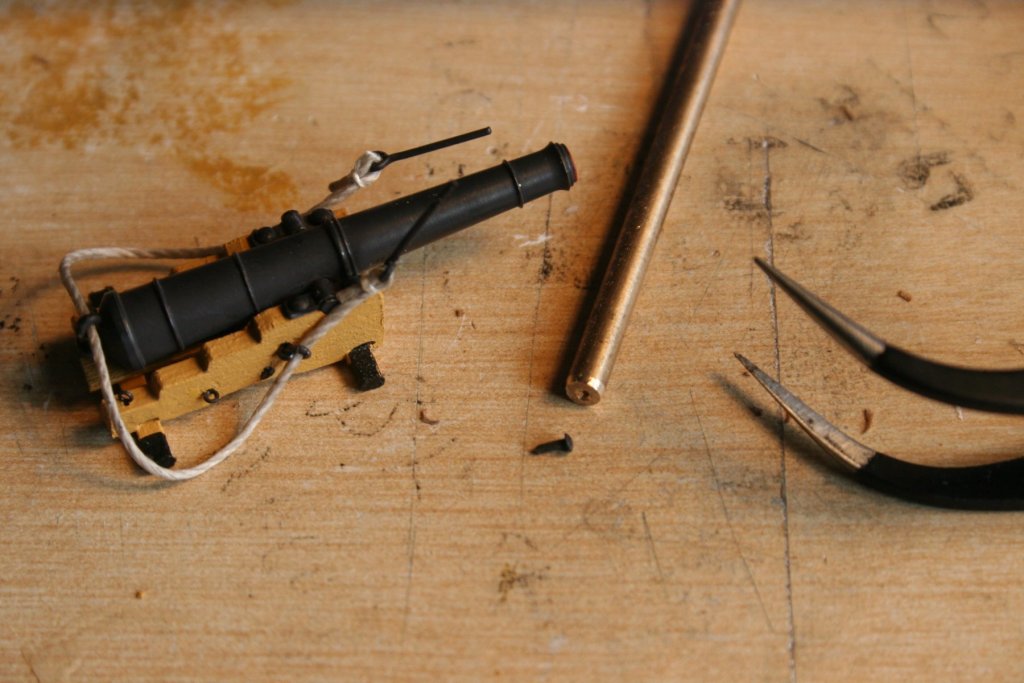
Work continues with the upper gun deck cannons ........ I've decided to replace the breech rope eyelets on the carriages with larger ones as I hope to increase the diameter of this rope to 1 mm rather than the recommended size that seems a bit small when compared with images I found on the web. These are Mantua Models eyelets but while the rings are okay, the second piece of each fitting needed to have the 'loop' tightened up a bit. This was achieved by pulling them part way through an improvised draw plate. After fitting the breech rope and it's eyelets to the barrel it was mounted on the carriage. A short length of brass rod with a small dimple added to one end was used as a simple drift to push the round headed pins into their pre-drilled holes. Trying to get the breech ropes to hang appropriately.......... Rigging hooks attached to 2mm blocks ... ...strung .... .... and attached And finally my first attempt to install one ...... One down, 29 to go ...... Cheers, Graham.


-
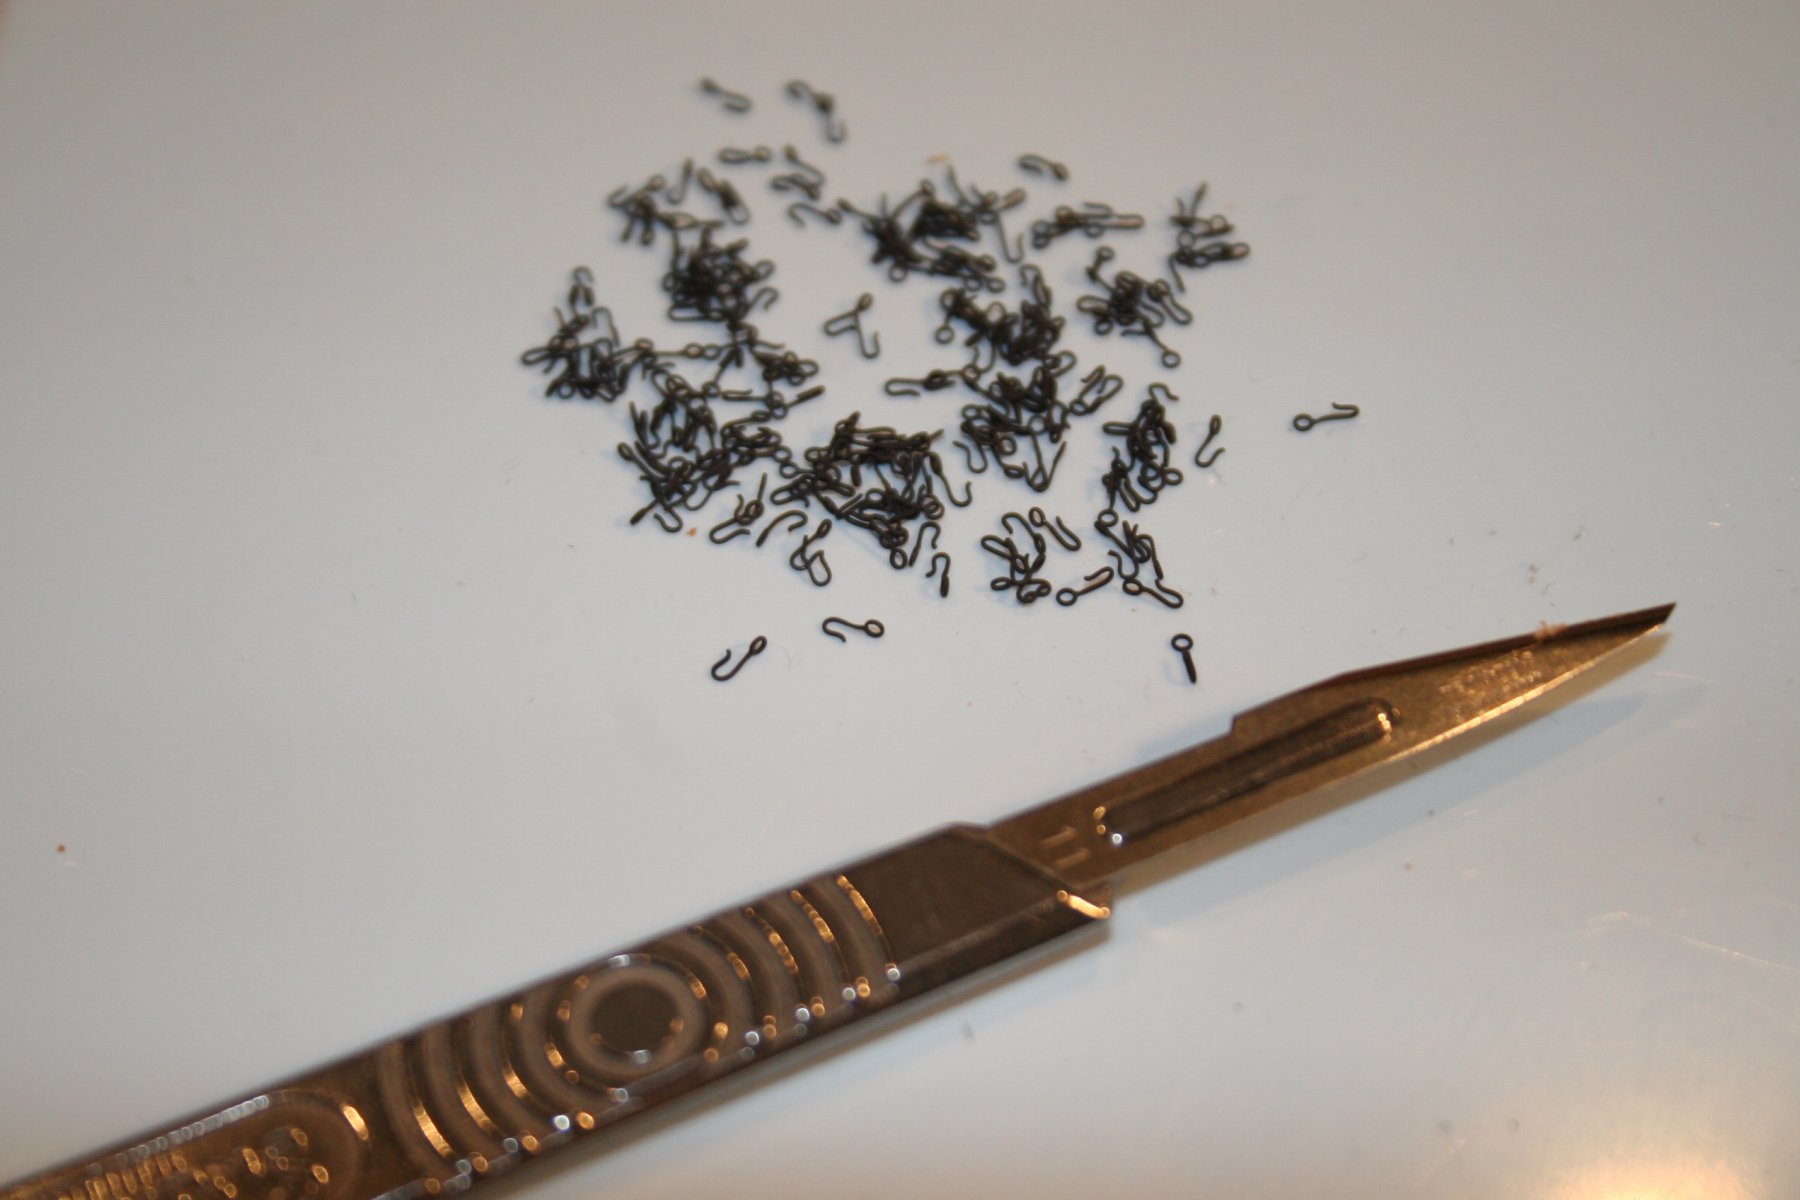
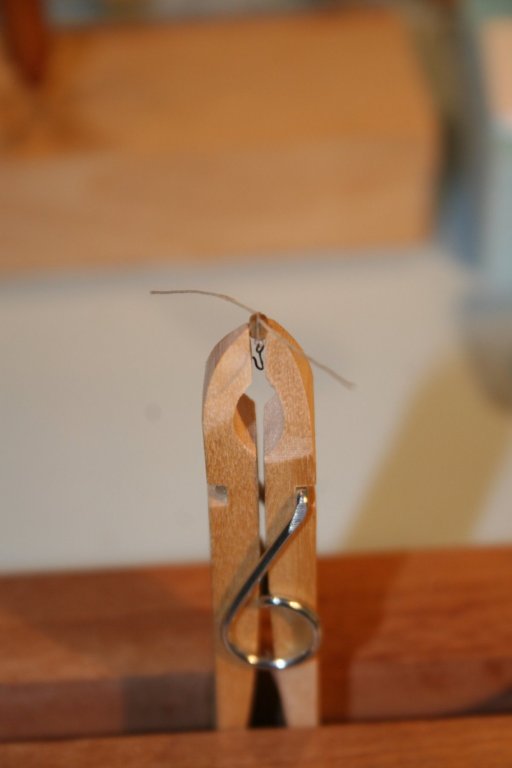
Started work on the tackles for the gun carriages. Eyelets have been bent.... .... twisted....... .... and blackened (after chemically cleaning approximately 15 seconds in Birchwoood Casey Brass Black) Joining a rigging hook to a 2mm single block, and a first attempt at bringing it all together ..... Cheers, Graham.


-
Another sunning piece of work. Love the detail and the atmosphere your work conveys. I was starting to get withdrawal symptoms - keep up the good work. Graham.
-
Ropewalk (and serving machine)
Charter33 replied to Charter33's topic in Modeling tools and Workshop Equipment
.... there's no such thing as 'stupid questions' ...... Good luck! Graham -
Ropewalk (and serving machine)
Charter33 replied to Charter33's topic in Modeling tools and Workshop Equipment
Hi, Wefalck - I fully agree with you. As with many things in life I believe that often the journey is as important as the destination, and when the outcome is helped by making tools to complete the task, even better, it's all part of the enjoyment. Mill Hill Supplies are the company I was talking about - need to start saving .... Mark - I had read your first reply just as you had intended it to be read. I could see where you were coming from, so please, there is absolutely no need to go stand in the corner. Mr Pucko - that was exactly the biggest issue I had. I did find a 'free' site where you could set parameters and print off a paper copy to stick onto a piece of wood and then cut out, and another where to use the 'free' download turned out to be not so free at all. I looked at meccano gears, and even considered drawing up the gears using the skills I learned (and subsequently forgot) for geometrically constructing involute spur gears as an 'A' level Technical Drawing student back in the early 1970's - but life is too short. I eventually resorted to machining the centres out of Lego gears and fitting an acrylic hub complete with a square hole suitable for 5/32nd brass tube. This, with a little fettling of the corners, was pushed into 6mm dia brass tube, selected as it fitted the Tamiya R/C car miniature ball races. CA glue secured the various bits together. There is definitely a market out there for suitable gears. It should also be possible to get the same sort of results with some form of pulley and belt drive. Do you have access to a small metal turning lathe? If you can get hold of Lego gears (found mine on the popular on-line auction site) I might be able to knock out some 'hubs' ... Cheers, Graham -
Ropewalk (and serving machine)
Charter33 replied to Charter33's topic in Modeling tools and Workshop Equipment
Thanks for that, Chuck - your comments are much appreciated. Graham. -
Ropewalk (and serving machine)
Charter33 replied to Charter33's topic in Modeling tools and Workshop Equipment
Yes Mark, and Domanoff's machines are superb, almost works of art. Having worked through the process of designing and making my modest examples I fully appreciate the time and effort that he has had to put into developing them. He has my total respect, as does Chuck and his Syren products. Foremost in my mind when putting together my own devices was the essential requirement that in no way could they be regarded as 'rip-offs' of other makers products. I'm right behind Chuck's fight against piracy. I know first hand what it's like to have this happen. A 'colleague' purchased a pair of the steam shaped hardwood salad tongs I used to sell at the school's Christmas market and promptly sent them to her brother on the other side of the world so he could copy them. A different scale compared to what is going on now, but still irritating! Other sponsors products are also available 'over this side of the pond'. I have found a UK based supplier of Sherline milling machines. I have one of these on my bucket list for the fateful day when I have to retire and will lose access to the equipment and workshops that have been an essential part of my working life for over 40 years. Graham. -
Ropewalk (and serving machine)
Charter33 replied to Charter33's topic in Modeling tools and Workshop Equipment
Hi, Great idea - but sorry, going into production is a bit of a non-starter. For a start both designs would need a lot of work before I would feel comfortable that they were good enough to be sold, especially the ropewalk where I am a complete novice at making my own rope. I wouldn't want to let anyone down with a product that is not up to scratch. Another point is that when making equipment for my own use you can get away with construction methods that are fine for a prototype but would need radically changing for larger scale production. The other major issue is that the equipment belongs to the school at which I teach. Putting one together out of scrap material destined for the bin is one thing, and using a project to develop understanding of design software can be loosely regarded as 'continuous personal development' - if you can't do it yourself how can you explain it to others?. Unfortunately using equipment belonging to the local Education Authority for profit would be frowned upon, to put it mildly! Shame really - it could help raise the sadly depleted 'future projects' fund. There are a couple of Adriatic fishing boat kits I'd love to get my hands on (I blame donrobinson and Jack.aubrey's excellent build posts for putting temptation in my way) Jacek - those delivery costs are a problem. It's a pity that there don't seem to be any European stockists for those excellent USA produced products but I dare say that there are commercial reasons for this that are way out of my field of knowledge. Mr Pucko - sorry to let you down. (currently enjoying your thread and responses to 'I'm not buying another model for at least 12 months'!) If I can help with any further details that would enable you or others to put together your own versions I'm more than happy to help. Cheers, Graham. -
Ropewalk (and serving machine)
Charter33 replied to Charter33's topic in Modeling tools and Workshop Equipment
Hi, Feeling a little overwhelmed by the number of likes and comments - thank you all. John - the 2 meter length was chosen simply as it meant it would fit on the dining room table - just!. To be honest I have yet to try it at its full length but hope to soon. Bill - there's nothing like making something like this to fully understand how it works. I made a few mistakes, some real howlers, along the way! There are some truly amazing commercial ropewalks available, but I love a challenge and found myself with a bit of time on my hands. My current aim is to use my version to produce the material for the breech ropes for the gun carriages on my Victory. The instructions say to use .5mm rope but this seems a bit small when I look at images of the real thing. I'm increasing the size of some of the eyelets and trying to use rope of around 1mm, at least that's the plan...... Cheers, Graham. -
Hi Robert, I look forward to seeing how you get on. One other point I forgot to mention - different components are often made from various grades of brass alloy and the differing copper content can have an impact on the speed of the process. Best to test a sample first. I found this out to my cost with the round headed pins where 30 seconds proved to be too long and the finish was awful. Wire brushing 200 of them in preparation for a second (but successful) attempt is not something I would want to do again! Good luck. Graham.
-
Hi Jeff, Have you thought of investing in a drum sander kit? I have found them invaluable - and they are relatively inexpensive. They come in a variety of sizes and consist of a cylindrical piece of rubber mounted on a threaded shaft. When a nut is tightened the rubber is compressed and expands, gripping an abrasive tube. My set of five, ranging from 13mm diameter to 50mm dia., in a plastic case, cost less than £10. They fit in a small electric drill although I find they are best used in pillar drill or a drill mounted in a vertical stand. Graham
-
Hi Robert, There seem to be a number of different approaches to using the Birchwood Casey product. Some advocate watering it down which apparently slows things down bit. I have found that it works best for me as I described in my previous post. It's essential to ensure the component is grease free. If the item is suitable I have used a small rotary brass wire brush mounted in a pillar drill to clean the surface before then resorting to the chemical cleaning. I used this on my barrels, especially around the breech rings I had added, to remove any excess traces of the CA glue I used to bond them in place. The eyelets, trunion brackets and pins blackend fine with just the white vinegar followed by the ethanol. Latex rubber gloves are useful to avoid contamination from oils in the skin. The secret is to not leave them in the blackening solution too long. If you do the finish flakes off. I give them 30 seconds, remove and rinse in water, and if they need to be darker dip them back in the solution again. As you use the solution it turns a darker blue but over time returns to its original lighter hue - but it doesn't appear to lose its strength. One other small bit of advice - do small batches and keep agitating the solution. An air bubble trapped in the end of the barrel can leave the bore untreated. Once done I leave the components for a while. I read somewhere (on this site but can't remember who's post it was - sorry) that the finish hardens further over time. I then gently buff them with a soft cloth. This removes the matt powder that forms on the surface and any 'bloom' that appears sometimes. I've not added any other finish such as varnish and I don't think it is needed. Hope this helps! Graham.
-
Ropewalk (and serving machine)
Charter33 replied to Charter33's topic in Modeling tools and Workshop Equipment
Thanks for that - it's mainly a case of having readily available access to both the material and the equipment to work it more than any other reason. Clear acrylic also has the advantage of providing views of what exactly is happening, useful when demonstrating to students in the classroom.