HOLIDAY DONATION DRIVE - SUPPORT MSW - DO YOUR PART TO KEEP THIS GREAT FORUM GOING! (Only 24 donations so far out of 49,000 members - C'mon guys!)
×


Pete38
-
Posts
687 -
Joined
-
Last visited
Content Type
Profiles
Forums
Gallery
Events
Everything posted by Pete38
-
 Soon as work will let me have a little time in the shop. As far as how much to leave....I would try for around a 1/16 (1 to 2 mm) . The more accurate you are at setting the frames on the keel and keeping them aligned the less you would need to fair them in. hope that helps..
 -
Welcome aboard, nice start to your build, looking forward to more
-
Welcome aboard, very nice start to your build, looking forward to more...
-
Very nice joints, Looking good
-
Glad that you were able to get something from my log, This is what makes this a great site, everyone sharing everything to help others. From the way you are proceeding so far in your build, the cross beams witll be no problem. looking forward to more from your build
-
Myself, I kinda like the contrast and color variation. Bet when they were building the original they didn't throw any lumber away because of the color variation. With that said, if it bothers you replace it, if it pleased you keep it. Your build your choice, do what makes you satisfied.
-
Like the contrast also, Looks nice. Will you clear coat to leave the natural color?
-
Looking Good, I have used cherry on my build and have not had any trouble with breakage, Maybe you got a bad batch or something.
-
Was able to do a small amount this moring after work. Started cutting the smaller beams for the lower deck, I had already sized the stock with my thickness planer to the proper width and height. Use a quick set up to get all 10 pieces correct lenght with no tear out coming out of the saw.\ Slowly but surely getting there
-
Finally got a little bit done on my cross section. Not to much but slowly moving forward. The rest of the knees done on the lower deck. Now to cut and install all the rest of the cross beams Hopefully will get some more done here real soon.
-
Your joint work is looking really nice.
-
i have used cherry for my frame on the Triton cross section and am very pleased with the looks and the way the wood works Very nice wood for a build
-
Welcome to the group. Looks like it will be an interesting build. At this scale do you plan on adding extra details to the cross section. Looking forward to more!!!!!!
-
Very nice, At this scale I think the art pencil was the way the go for the caulking, just enough but not to much. Looking forward to more......
-
Thank you for the likes and comments Mark, thanks for the good words, just hope it all works out Just a little more progress, started on the lodgeing knees Slowly but surely getting there Just a few pics of the minor progress
-
Thank you for all the likes.... Just a little more progress on the lower deck... A couple of bottom shots I said earlier that I was going to build the decks on the model, but just for some change and learning new ways to challenge myself, the next deck I will be building as a seperate unit off the model then installing it. Just to see if i can
-
Finally got back to the shop for a little bit of work on the lower deck. Decided to notch all the way through the beam for these parts instead of a half lap. To big of a chance for me to break them off Started by using a hacksaw blade to notch them to almost full depth Then clamped a backing board so to limit any tear out while using a small chisel to remove most of the material Then used a file to make any final adjustment for the fit Glued and installed clamps, waiting for to dry to start other side Not much by slowly getting there.
-
As Ken said above, try roughing the glueing surface with sandpaper. The smoother (finer) the sandpaper the more closed the wood cells will be and not absorb the glue as much, the rougher the sandpaper the more open the wood cells will be to absorb the glue and make a better bond.
-
Coming along great, very nice build. Wish you hadn't posted the link to the clamps, Now I will have to get some!!!! Thanks for the information. Looking forward to more
-
Chery has seemed to work well for mine and Maple for the planking as such. I is really your choice. As Mark said a tight grained wood work well for model at this scale (fruit woods). Pick something you like and go with it, it is your model and you are the one to please.
-
Welcome to the club of the cross section. Looks like your off to a great start. Looking forward to more!!!
-
Greg, found this site her http://www.taubmansonline.com/ They have the plans for a Sultana Mississippi River Paddle Boat that caught fire in 1865 killing 1547 people Hull length 34" 1/96 scale 5-sheets 9-detail sheets for $60.00 Hope this helps I did order the Belle of Louisvilee plans from them and had no problems, prompt delivery I am not associated with the company in any way
-
According to the description on the Serline web site thay are "steel beds"
-
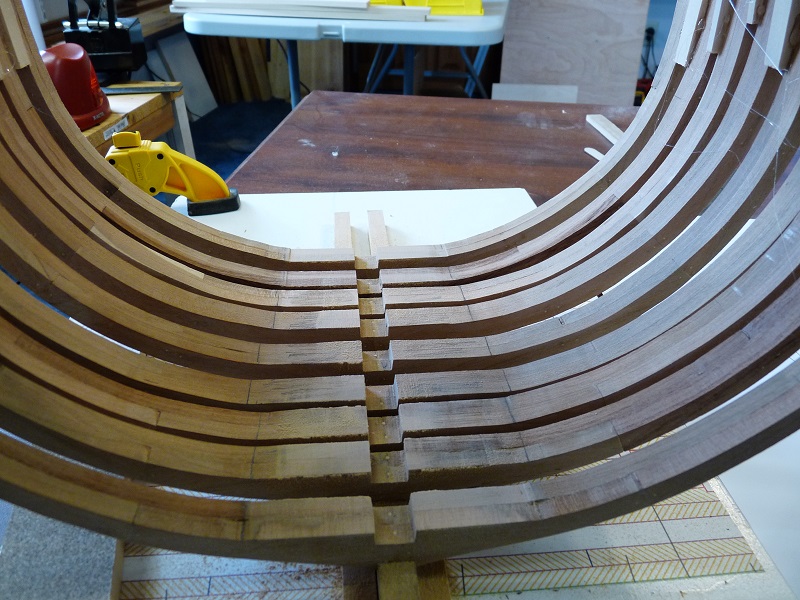
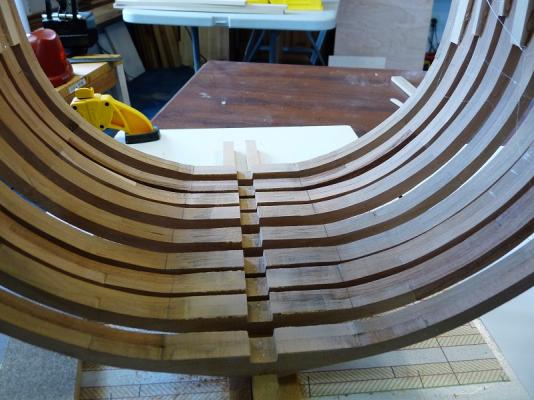
I have started on the next section of these beams. I have forgotten what they are called? Started with some rough stock and resized it down with my Byrnes saw and Drum sander Layed out the patten with some 3M contact spray. (Sprayed only the paper patten and let dry for about 45 seconds to a minute) this way it will come off with out to much trouble with little or no residue then sawed them out with my scroll saw and sanded to the lines. Now dry fitting them and marking for my cut joints
-
Thank you Captainscott for those kind words. Since this is my first build of a model ship like this it is all a big learning curve. I have managed to get all the large crossbeams installed. Not all were as tight of a joint as I would have like but I am pleased with it