

Jeronimo
-
Posts
715 -
Joined
-
Last visited
Reputation Activity
-

 Jeronimo reacted to Mike Y in Beavers Prize 1777 by Mike Y - 1:48 - POF - Hahn style
Now it's time to build magazines and all sorts of decks and beams. For that phase an accurate depth gauge is essential, so I've let my brain overthink yet another tool
The requirements are:
1) Soft plastic or wood to avoid scratching the model
2) Nice looking and pleasure to use, that tool would be in active service for at least a decade.
3) Ideally it should have a thumbwheel or a knob for fine adjustment.
I have a cheap plastic vernier calliper that satisfies the first requirement, but it does not have an knob / thumbwheel.
Could not find any plastic callipers with a knob, unfortunately. The plastic ones are already rare enough, let alone with a wheel adjuster.
Then I spotted a Lego set with a container loader ("reach stacker", to be more precise) that has a worm gear and tried to make an abomination out of it. It is surprisingly challenging to build a compact functional tool out of random lego parts, a whole puzzle of its own. Respect to people who do it on a regular basis!
It kind of works, but the play and precision is not good enough for my needs.
So I gave up on the wheel adjuster requirement and went back to the simple "calliper on a gantry" setup.
It was a nice warmup to recover some skills that I've lost over years of inactivity.
This time I even got help from my little helper! She enjoyed cranking the mill
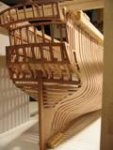
The resulting design has two parts - sliding gantry (no t-tracks, it is stable enough on its own) and a "calliper holder" that slides sideways on the gantry to allow the gantry keep contact with both sides of the baseboard.
The bottom edge of the caliper is trimmed to a flatter profile to avoid hitting the keelson. Both ends of the calliper can be used for a markup to allow for a comfortable pencil positioning.
The setup relies on three clamps to fix everything in position. These plastic clamps are a bit of an eyesore, maybe I will sidetrack again to build a nicer ones
-


-

-

-

-

-
-

-
-
-

-

-

-
-

-
Jeronimo reacted to Michel Bénard in French 64 Gun Ship 1729 by Jeronimo
Great continuation of this construction site, bravo!
.
-

-

-
Jeronimo reacted to Siggi52 in HMS Tiger 1747 by Siggi52 - 1:48 - 60 gun ship from NMM plans
Hello,
today the carpenters finished the screen bulkhead
-
Jeronimo reacted to Siggi52 in HMS Tiger 1747 by Siggi52 - 1:48 - 60 gun ship from NMM plans
Hello, and thank you for your comments and likes
today the carpenters repaired there mistakes from yesterday and finished the back side of the bulwark. Then they also build the doors. The shipwright is this time pleased and spend a beer. 😊
-
Jeronimo reacted to Siggi52 in HMS Tiger 1747 by Siggi52 - 1:48 - 60 gun ship from NMM plans
Hello, and many thak for your likes
we where busy here with the aft bulwark. That is the plan
and here the (third!) raw bulwark
Today we finished the outside of the bulwark
When I saw this picture, I think there is some work left for tommorow. Some of the plinths have to go.
-
Jeronimo reacted to HAIIAPHNK in Carving from Belgorod
After working on the top of the head there were some minor refinements and modifications. The largest of the interventions concerned the face of my Chewbacca. The carving of the face as a separate segment on the table, detached from the rest of the sculpture required correction. Not everything could be seen, and there was a fear of cutting off too much. And in the end the face turned out a bit flat. I wanted to add more gradients. Just a little bit. I left that question out on purpose. I was waiting until I could examine the whole figure. And now I waited for that moment.
I didn't take many intermediate photos. I took only the starting one, and then woke up when everything was already finished. It all happened so fast.
And there's a paradox. You can't tell the difference from the finished photos. It's as if I hadn't redone anything. But there is a difference. I "sunk" deeper lower eyelids, thus changing the vertical slope of the eyes, similar actions touched the cheekbones. And the rest of the small touches. It seems that in total the changes are not noticeable, but now my soul finally got what it wanted.
What's more noticeable is that now I've cleaned up the whole figure. And the fresh color looks completely different. You can also see in the last photos that the sculpture has become shiny, as if I polished it or rubbed it with oil. In this case I didn't even add a drop of oil. Since the work is not finished yet, oil can do some damage. The lion is assembled from segments that are held together with glue.
And there were already moments when we had to take the sculpture apart and glue it back together again. What if I have to take it apart again? Then the oiled wood could already be in trouble. So I didn't use oil. And I wasn't going to polish it to a high gloss on purpose. That's another difference with this kind of wood. It gets shiny very easily. This effect has been seen before, and then simple contact with a glove polished the surface in the same way. Now you can see the same effect, but without the darkening.
-
.thumb.JPG.4d3261ccae06041fa7cc2933fb43d577.JPG)
-
Jeronimo got a reaction from Ondras71 in French 64 Gun Ship 1729 by Jeronimo
Hallo Modellbaufreunde.
-
