

puckotred
-
Posts
430 -
Joined
-
Last visited
Reputation Activity
-

 puckotred reacted to James H in HMS Indefatigable 1794 (prototype) by James H - Vanguard Models - 1:64
A very brief update before the weekend one.
The office furniture has been painted by a friend of mine, and here it is. The round table will not be included with Indy, but the other table will, along with a couple of chairs. Here you can see a couple of incarnations of the furniture, 3D-printed and painted with oils. My friend also added the navigation charts for some extra effect!
These items, including the round table are available already though. https://vanguardmodels.co.uk/product/cabin-furniture/
-
puckotred reacted to ubjs in How many kits do you have on the go at the moment?
¨Interesting note there. As a retailer of kits, I see this on a regular basis.
Another way to ask this question would be, "why are you building models?"
Another view of this, is it really that important that you finish the model?
If you have fun and enjoy building why bother if its not finished, but that was maybe what you wrote.
I dont have a problem taking up a build that I have left, if I get the inspiration. My ¨problem¨ is that after a while I feel bored and continue with some other building project, a boat or modelrailroading.
I dont know if its me or the persons around me that have a problem with me not finishing models, something to think about as well.
-
puckotred reacted to Bedford in Royal Caroline by Bedford - Panart - 1/48
There's been a bit more progress.
The plan calls for two spiral staircases, one either side leading from the top of the kings cabin to the main deck but they don't include the doors which provide access below for the crew. According to the plan the hand rail across the front of the kings cabin carries from all the way starboard to a point which allows access to the stairway to the deck below on the port side therefore while the plan calls for two staircases it makes one redundant.
The "anatomy of" book about this ship clearly shows there is only one staircase, to port, but there is access to the below decks on both sides.
The kit doesn't call for any kind of hand rail for the spiral staircase but I'm working on a wooden hand rail. I bent some brass wire around the staircase following it's descent then found a round object of the same radius and laminated two pieces of walnut around it after soaking in boiling water. So far so good but a bit of work to do yet.
-
puckotred reacted to rwiederrich in Real knots verses what is practical for scale ships
Kind of a loaded question. If you are a purist and tend to make models for purist to view.....and your scale is large enough to warrant it, you try your best to replicate actual knots. However, modelers are *Modeling*..so they are not burdened with this issue. A good secure knot will do with scales under 1/72. I typically paint all my knots to replicate preservation any way...so it never is an issue.
Lastly....I don't want to take what will most likely take years to complete and add any more years to it....just to make a point. The most discriminating viewer should have learned patience and overlook your choice and the rest,....Well,......they, didn't even know it was a subject.
Rob
-
puckotred reacted to James H in HMS Indefatigable 1794 (prototype) by James H - Vanguard Models - 1:64
Just for some info, Indy will be approx 880mm tall.
Ok, onto business.
The hull is now faired. This isn't really a task you can sit there with a piece of sandpaper and hope to achieve inner calm. Chris finally talked me into getting a palm sander (mouse), so I splashed out on a Black & Decker one. Even with this, fitted with an 80 grit pad, this job still took me a total of about 5 hours, along with the final task of wrapping some sandpaper around a 12 inch piece of thin ply to absolutely ensure the curves were right....plus the joyous task of blending those last bulkheads and fairing blocks into the keel.
There is a lot of regular planking on Indy, but the inner core of the outer bulwarks are laser cut. So as not to stress out the forward bulwarks and those temporary gun port sections, these were first soaked and clamped in place. These were left for a full 24hrs to dry out and shrink back to their normal size. Pear has a hell of an expansion, even when soaked for 30 mins in hot water, so you really need to find a book to read, guitar to play, or TV to watch while this dries.
Now that the parts are completely dry, I draw around the forward position of the bulwark so that I have my positions for the flow of the first plank that runs below the gun ports, and also the extent of the planks above this. It's important to know here that this pear part sits along the top of the gun ports on the main deck.
The pear bulwark is now removed and the first 1.5mm thick lime strip laid along the bottom edge of the gun port sills, and along the lower line I've just drawn. On the prototype, each plank is 500mm long, and they meet up on the double thickness bulkhead #9. We're not yet sure if that will be the case on the final product.
The back end of the same plank run is now installed. These planks are pinned until dry. If you pin all the way through, they will penetrate through the inner bulwarks, but that doesn't matter as any holes will be in the area covered by the spirketting.
The pear bulwark sections are now temporarily clamped into position so the bottom edge runs along the top edge of the gun ports. You don't need top do this but I just considered that it was good insurance that the plank that runs directly underneath these pear parts, would be properly installed and a snug for in that area.It also gives you something to finally sit these parts onto later so you have a much better chance of both sides being exactly equal. Care is taken not to get any glue on those pear bulwarks. The spaces between the gun ports are now filled up with lime strip. This doesn't need to be neat at this stage. They'll be cleaned up later.
A razor saw is now used to cut away the lime strip in the top row, that is partially obscuring the gun ports.
The pear bulwarks can now be reinstated, but before this happens, you need to know a little bit about the side framing of the rear half of Indy. Not all of it will become a part of your finished project. When it comes to gluing the rear sections on first, the area in red here WILL NOT have any glue applied to it as that section will later be cut away. You can see the area with glue covers the the lower area just underneath the red area and for the rear section, it terminates at the point where the longitudinal strips were installed in sections. When you look at the model and my previous photos (without red marks), you can see that split in the strips, denoting the two areas.
The rear bulwarks are now finally glued into position after some final measuring, ensuring both sides are in exactly the same position. This isn't too difficult now that this part sits upon that lime plank. Other factors also help too, such as the two rear gunport frames on the quarterdeck and the quarter gallery doorway. Just check at the back end to make sure things align with the stern timbers. Of course, you don't need to worry about gun port alignment on the rest of the quarterdeck gun ports as those frames will later be removed, as discussed. 2 inch clamps are very useful here to make sure the bulwark is squeezed into the hull curvature, as they can hook through the gun ports.
The mid and fore pear bulkheads are now glued into place.
And for the last part of this update, here's how she currently looks. Next job is to cover that lower real estate in lime planks. Remember, this is the same size as Agamemnon!
Until next time....
-
puckotred reacted to Steve47 in Painting the hull
Thanks E Z Breeze and others.......that's what I did in the end and it was successful. I enclose a photo showing the hull completed from keel to deck level. Just the intricate parts on the decking to complete.........and then the rigging!!
-
puckotred reacted to James H in HMS Indefatigable 1794 (prototype) by James H - Vanguard Models - 1:64
Continuing today's update:
Time to get rid of that blank section in the last bulkhead. That was there to protect the bulkhead while work was being done on it with shaping the stern. A gentle twisting removes this from the hull.
Time for the stern timbers to be fitted. These slot across the rear two bulkheads, creating the correct angles for the parts. They also sit on the shaped stern upper block. First the inners, then the middles, followed by the outers.
Some filler blocks are now added to the outside of the outer timbers, creating the rest of the platform and something to plank to also.
Those fragile rear bulkhead ears are now bolstered with the addition of more longitudinal strips, all slotted to fit. The gap you see between some of them is to house the fore bulkhead screen. That's designed so you get zero gaps. You'll see that later in the build.
Door frames are added from the captain's cabin to where the quarter galleries will eventually fit. Once dry, the inner horizontal parts of the frames are cut out.
Part of bulkhead 18's ear is now cut out as this is the only one that would obstruct the gun port. That is sawn out and filed flush before the last gun port frames are glued in.
To create a rigid structure for fairing, the rear of the hull has some temporary MDF sections that are held in place with pegs. These are totally solid and shouldn't come loose.
And that is it for today. I'm whacked!
-
puckotred reacted to James H in HMS Indefatigable 1794 (prototype) by James H - Vanguard Models - 1:64
Small update as I hated leaving it without a bow and stern from the last update 😁
First, the bow. The foremost 'timberheads' near the prow are pear inserts to the MDF former so there's lots of strength up front when later work is carried out. Bulkhead #1 is temporarily fitted to the hull and then the formers are fitted in. The reason for doing this on model is so I can get the innermost formers snug against the keel. All these parts are numbered and the relative slots on the bulkhead are numbered too.
The assembly is now removed from the hull before the outer formers are set and the upper parts (35) are glued into place as seen here. Too stiffener pieces are also glued to the exposed side of the pear inserts. The assembly is now left to properly dry.
A sanding block is now taken to the bow and the whole lot is sanded and shaped in readiness to fit to the hull. The back side of this also hooks onto bulkhead #2. When I was happy with this, it was glued to the hull.
It's now the turn of the stern and fitting out the final bulkhead. As with the bow, this is fitted with a series of formers that are numbered in relation to the bulkhead slots. It's a no-brainer!
This is now carefully sanded to shape. It will doubtless be refined later when it comes to fairing the hull. Once happy with it, it's glued onto the hull.
Until later!
-
puckotred reacted to Peter6172 in HMB ENDEAVOUR by Peter6172 - FINISHED - Artesania Latina - 1/65
All the main timber work is now made; a couple of studdingsail booms and spare spars/yards to go on the rack still to be made.
Now time to start pre-rigging the yards with the various blocks, fitting the rest of the standing rigging and getting the yards slung before moving onto the running rigging.
-
 puckotred got a reaction from oakheart in HMB Endeavour by puckotred - Artesania Latina
Sorry for the delay, but I'm doing 4 different builds...
I have begun the planking...
A nice mess on the kitchen table, first two planks:
While the planks was drying after bending them I did the skylight:
As planking is boring to do and watch next update will probably take a while.
But I'll be back when something interesting happens.
-
puckotred reacted to James H in HMS Indefatigable 1794 (prototype) by James H - Vanguard Models - 1:64
Continued.
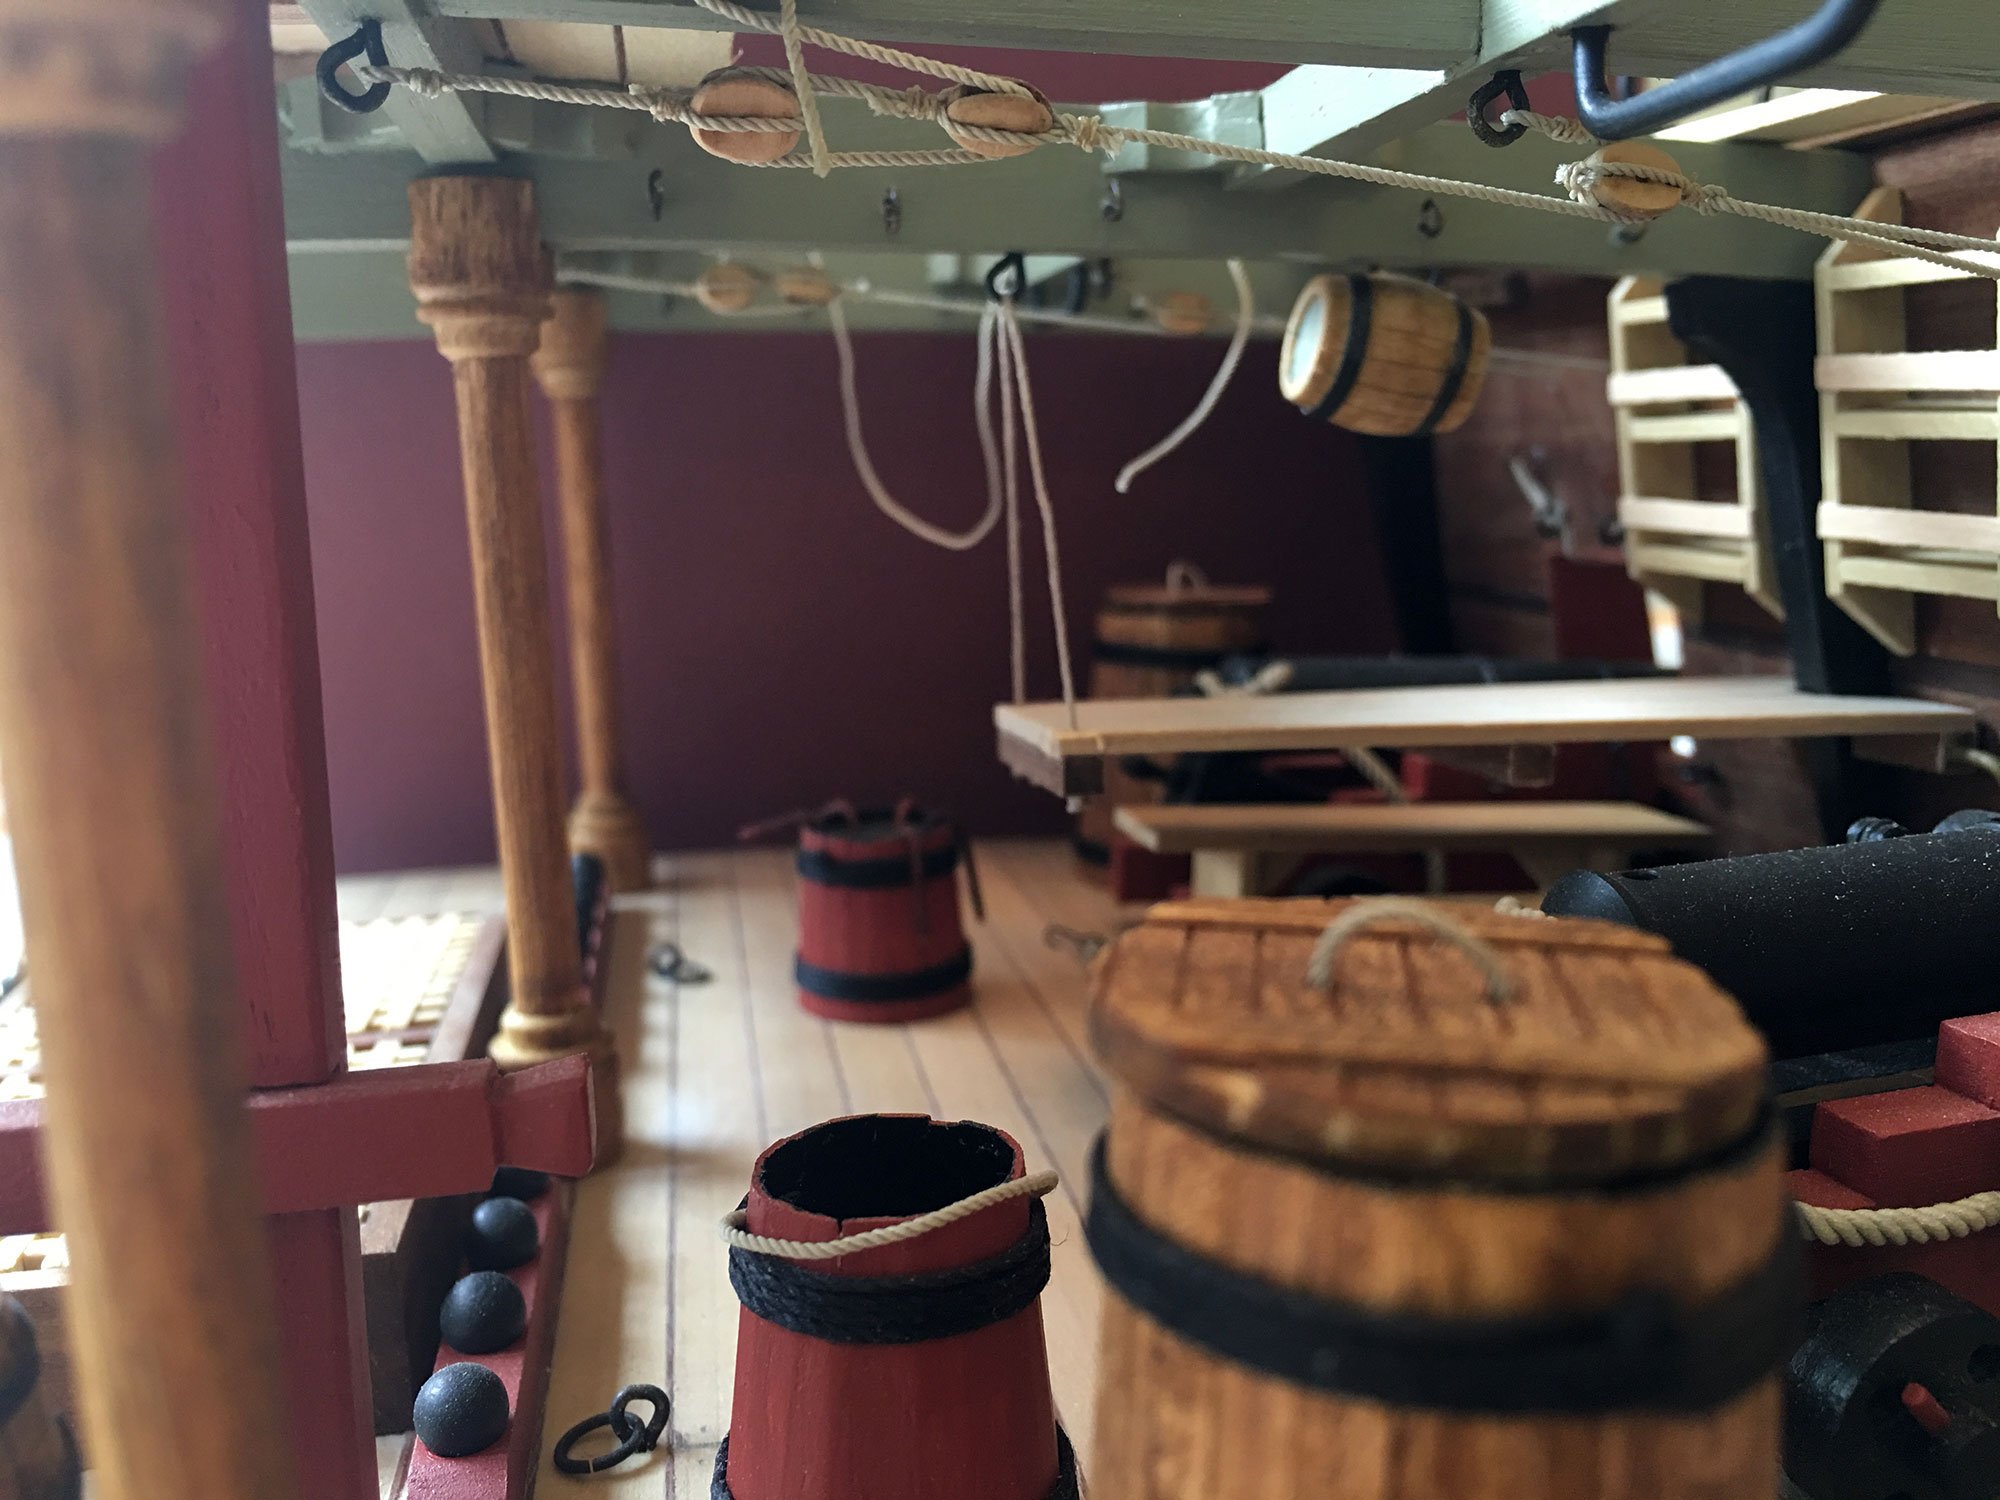
I've grouped most of these photos into thickness of sheet, and there are a lot of various thicknesses with multiple sheets for them. You can see the tabbed gun carts here too. Those tabs are on the forward 'bulkhead', closest to the inner bulwarks.
You're going to have to make FIVE ship's boats for this one!
Inner bulwarks are split into three sections to cover the entire length. There will also be doorways from the cabin into the quarter galleries.
3D printed stuff, like belfry, anchors etc. and I do see some copper tape there too.
Quirks of prototyping. Various cabin floor sections.
LOTS of strip too.
Decals for name and depth markings. Also, there is no white edge on that text. It's merely the light catching the ink edging! I have checked.
-
puckotred reacted to Peter6172 in HMB ENDEAVOUR by Peter6172 - FINISHED - Artesania Latina - 1/65
Fore and Main Masts 'fitted' with shrouds and forestays. Mizzen in place but I am waiting for my Ropes of Scale 0.6/0.7/0.8mm order to get the mizzen shrouds and stays done. Meanwhile I am continuing progress on the cannons and the yards. Spritsail yards are complete awaiting painting as are the Foremast yards.
-
 puckotred got a reaction from GrandpaPhil in HMB Endeavour by puckotred - Artesania Latina
Sorry for the delay, but I'm doing 4 different builds...
I have begun the planking...
A nice mess on the kitchen table, first two planks:
While the planks was drying after bending them I did the skylight:
As planking is boring to do and watch next update will probably take a while.
But I'll be back when something interesting happens.
-
puckotred reacted to Henke in HMS Agamemnon by Henke - Caldercraft - 1:64
Thanks for all likes and nice comments from KJacksonb from "down under" 🙂. Or am I upside down? Anyhow, planking of quarter deck is in progress.
Best regards
Henrik
-
 puckotred got a reaction from Barbossa in HMB Endeavour by puckotred - Artesania Latina
Sorry for the delay, but I'm doing 4 different builds...
I have begun the planking...
A nice mess on the kitchen table, first two planks:
While the planks was drying after bending them I did the skylight:
As planking is boring to do and watch next update will probably take a while.
But I'll be back when something interesting happens.
-
 puckotred got a reaction from allanyed in HMB Endeavour by puckotred - Artesania Latina
Sorry for the delay, but I'm doing 4 different builds...
I have begun the planking...
A nice mess on the kitchen table, first two planks:
While the planks was drying after bending them I did the skylight:
As planking is boring to do and watch next update will probably take a while.
But I'll be back when something interesting happens.
-
 puckotred got a reaction from gak1965 in HMB Endeavour by puckotred - Artesania Latina
Sorry for the delay, but I'm doing 4 different builds...
I have begun the planking...
A nice mess on the kitchen table, first two planks:
While the planks was drying after bending them I did the skylight:
As planking is boring to do and watch next update will probably take a while.
But I'll be back when something interesting happens.
-
 puckotred got a reaction from Prowler901 in HMB Endeavour by puckotred - Artesania Latina
Sorry for the delay, but I'm doing 4 different builds...
I have begun the planking...
A nice mess on the kitchen table, first two planks:
While the planks was drying after bending them I did the skylight:
As planking is boring to do and watch next update will probably take a while.
But I'll be back when something interesting happens.
-
puckotred reacted to Peter6172 in HMB ENDEAVOUR by Peter6172 - FINISHED - Artesania Latina - 1/65
Having completed the shrouds and forward stays on the Fore mast, I have moved onto the main mast. It was a little loose in its hole so I have had to wedge it before starting the shrouds. Even dredging it, I had to temporarily fit the Main stay to stop the mast from being dragged too far aft when tensioning the third and forth shroud pairs. I have also fitted the topmasts as the shrouds position around the mast top can affect fit (again only temporary at present).
-
puckotred reacted to Peter6172 in HMB ENDEAVOUR by Peter6172 - FINISHED - Artesania Latina - 1/65
Have made further progress this weekend. The Foremast Main and Preventer stays are installed after completing the 5th and 6th pair of shrouds. I also installed the final 10 deck fittings in the foredeck for running rigging.
I think tomorrow will see the main mast channel deadeyes installed but noting its Mothers Day in Australia, I may have other duties to perform....
-
puckotred reacted to Peter6172 in HMB ENDEAVOUR by Peter6172 - FINISHED - Artesania Latina - 1/65
Finally started some rigging.... well the steering anyway now that the rudder is in using 3mm SB, 3mm wire for deck rings and iron hooks and 0.5mm Ropes of Scale. Still have to secure each end to the iron rings.
I did modify the ships wheel structure to more closely represent the original.
I also fitted the iron end of the tiller with an iron clamp on the end of the tiller rather than rope lashing per the instructions.
The rear platform has been fitted, stained and then rubbed back to look like its worn from use. Still have the iron rings and rope railing to fit.
-
puckotred reacted to Peter6172 in HMB ENDEAVOUR by Peter6172 - FINISHED - Artesania Latina - 1/65
Well its time for rigging the ship so first things first, the bowsprit.
I am following the rigging sequence per Biddlecombe's "the art of rigging". The inner and outer gammoning, Bobstay collar, both Bowsprit shroud collars and both Fore stay collars have been installed as have the bobstay, and shrouds. I have also fitted the Bumpkin stays and my first thimble (for the Fore topgallant stay)
I will need to redo the outer gammoning as I only have 6 turns instead of the correct 8 (miscounted during install), and I have a further lashing to do on the bowsprit should deadeye.
QUESTION: Where thimbles brass or iron?
-
puckotred reacted to Peter6172 in HMB ENDEAVOUR by Peter6172 - FINISHED - Artesania Latina - 1/65
Handrails on and holes filled ready for sanding. Have made some preliminary progress with the transom; some cleaning up to do. I have also mounted the channels and started on making up the deadeyes; 24 down, 22 more to 'wire up' before assembling and fitting to the channels.
The boom has been fitted and 'bolted" in place under the foremost bitts. The catheads have also been installed as have the bumpkins. You may note that the ships bell has not yet been fitted but as its a swinging bell I did not want to to go astray. Some hatch covers have been installed on the STBD side too.
-
 puckotred got a reaction from bolin in Lisboa Tram and Diorama Occre
This is what I did waiting for shipments of DeAgostinis Vasa:
The lisboa Tram and the Diorama by Occre.
My Iphone is not happy with the yellow color of the tram....
-
puckotred reacted to Peter6172 in HMB ENDEAVOUR by Peter6172 - FINISHED - Artesania Latina - 1/65
Well, after an Easter long weekend with a cold (negative RAT results) I have managed to get from stern to midships with the deck blocks and rings. I have attached thread to all rings and blocks as well as sheaves in the bitt pins to make it easier to run rigging through them when the time comes.
Still have to attach cleats to transom, bulwark etc before I start mounting the bumpkins, catheads and bowsprit.