
HOLIDAY DONATION DRIVE - SUPPORT MSW - DO YOUR PART TO KEEP THIS GREAT FORUM GOING! (Only 51 donations so far out of 49,000 members - C'mon guys!)
×

catopower
-
Posts
1,877 -
Joined
-
Last visited
Content Type
Profiles
Forums
Gallery
Events
Everything posted by catopower
-
 Hi GrandpaPhil, I'm probably going to need to finish my V108 torpedo boat, and a couple other projects floating near completion before I start a blog for this. I've always had an interest in building a model of Le Coureur. I have the 1/96-scale kit too, but I'm mostly using it to test out ideas for this 1/72-scale build. Hope you start a build log for your 1/96-scale kit!
- 12 replies
-
- 2
-

-
- Le Coureur
- Shipyard
- (and 1 more)
-
This is a review of Shipyard’s 1/72-scale French lugger Le Coureur laser-cut card model kit. Shipyard is a Polish company that produces many very high quality paper/card model kits of sailing ships, lighthouses, and a few related structures. Regarding their sailing ship kits, they divide their products into three lines: Paper Kits (1:96 scale), Laser Cut Kits (1:72 scale), and Wooden Kits (1:72 scale) Paper Kits First are paper kits, which include color-printed parts on large sheets that the builder must cut out to assemble. This can involve cutting out hundreds of small, often delicate parts, to be glued together to build up the model. The builder is generally expected to use wooden dowels for masts and spars, and most of their kits provide laser-cut hull framework parts to simplify construction. All Shipyard’s paper kits are in 1:96 scale. Laser-Cut Kits Shipyard also makes a line of laser-cut kits (formerly referred to as “Laser Cardboard” kits), which are very complete and come in a boxed set. The kit includes sheets of laser-cut parts, paints, brushes, dowels for the masts and spars, pre-cut and printed sails, 3D printed or cast resin cannon barrels and decorative fittings, cardboard blocks and deadeyes the you assemble, rigging line, illustrated instruction book, and several large plan sheets. All Shipyard laser-cut kits are in 1:72 scale. Wooden Kits This is a relatively new line of products from Shipyard. Essentially, these are the same as the laser-cut kits, but the parts are laser-cut wood rather than card, and they're not intended to be painted, so no paint or brushes are included in the kit. There are currently only 4 wooden kits available, with a 5th kit soon to be released. All Shipyard wooden kits are in 1:72 scale. The Le Coureur Kit Shipyard’s laser-cut card kits come packaged in plain cardboard boxes, about 20″ x 14″ x 2″ thick. These folded boxes are very sturdy, and have printed paper covers glued to the front, back and sides. This seems to be more than adequate, and seems flexible and cost-effective for the manufacturer. The whole thing is protected by a clear plastic sleeve that encloses the box. Upon opening the box, you’re faced with a very well packaged kit. As you can see, the components are very well protected, being in separate cardboard box inserts that serve to keep things from moving around during shipment and storage. While these separate boxes are mostly air, they do a good job protecting the contents of the main box, and keep the components well organized. These component boxes are well labeled. In some cases, these are the only detailed descriptions of the accessory parts and their quantities. For those that don’t know, the Ø symbol is pretty universal, indicating diameter. Early Shipyard laser-cut kits used to include wooden blocks and deadeyes, but now provide laser-cut cardboard blocks that you assemble. Wooden dowels are provided for the masts and yards. Three sizes of rigging line are provided. This is unbleached cotton that looks like good quality, but you will need to dye the line the appropriate colors. As stated earlier, the kit includes a set of Acrylic paints. These are very high quality artists colors, manufactured by a Polish brand called Renesans. I’ve seen comments by other ship modelers that they just throw out the included paints, but I have a hard time understanding why. These are nice quality paints that are provided very thick, so they must be thinned down with a small amount of water. But, these paints cover well, and dry to a nice matte finish. Because these paints can be difficult for individuals to source, especially in the U.S., I try to keep a supply of them from past kits I’ve done. I’ve even gone so far as to find a European online art shop that carried the brand and would ship to the USA, but that was in pre-tariff days. The paints are subject to drying out, though they now come in plastic jars that contain a rubber seal in the cap. But, it’s a good idea to check them periodically and to add a little water to keep they from drying out. Also, the rubber seals of the jar lids tend to come loose, so it might be a good idea to transfer the paints to containers that seal well if storing for long term. Four colors are need for this build, and more than enough paint is provided to complete it. Instructions are provided for mixing the paints to get the appropriate shades to simulate wood to a very good effect. And, since the paint comes very thick, with thinning, the paint goes a long way. The brushes included are very nice quality artists brushes in wide/flat and small/round. The rings, eyebolts, and deadeye strops come in the form of coils of copper wire, from with you need to make these components. The accessories also include a piece of clear acetate for stern gallery windows, color printed stern decoration, and the French white naval ensign. Cannon Barrels In early kits, Shipyard provided turned brass cannon barrels, which is what you see in most of their product photos, even in the current kit’s instruction booklet. They have since switched to 3D-printed resin cannon barrels, swivel guns, and belaying pins. In the older kits, I believe they only included one size of cannon barrel. I was pleasantly surprised to see that they now correctly include two different sizes to represent the 2pdr and 3pdr cannons carried by the actual ship, and I believe the new barrels are more scale accurate. Laser-Cut Parts All the laser-cut parts come on eight A3-sized cardboard sheets of varying thicknesses. These come enclosed in a clear plastic folder to protect them during shipping. Unlike with their paper kits, the parts come pre-cut, but the plain cardboard requires the builder to paint all the parts, which is why paint and brushes are provided. Many structural parts have a part number etched in them, and in some cases, registration marks for properly aligning the parts. Parts that will be visible, often have details etched into them, such as plank outlines, part locator markings, and treenail details. Card stock is much easier to laser cut than wood, requiring less power and can be cut more more quickly, so there is very little char, though there is still some. Since some of these parts much be painted, I think it may be a good idea to take a large soft brush to clear out any loose char, as it may otherwise stain any paint that’s applied. Sails The kit includes six cloth sails that are nicely marked with seam lines, reefing bands, and tablings. These lines are very clear without being overly dark and don’t stand out too much. The builder will need to glue on bolt ropes, and to add reefing points, and such. The remaining components of the kit include the 20-page, color illustrated instruction booklet, a set of three double-sided, A3-sized (11.7″ x 16.5″) plan/instruction sheets, one single-sided, A3-sized plan sheet, and a set of printed cloth sails. The large plan/instruction sheets include one page of history of the ship, given in English, German, and Polish. The diagrams are very clear, but provide very little text. What little there is, is printed again in English, German, and Polish. Some of the pages are printed in scale. Those that are not, are clearly indicated. For the dowels shown on the plans, the shape and size of their cross-sections are indicated clearly. Length can be measured directly off the plans sheet. On the diagrams that show rigging, the numbers in triangles indicate the size of the appropriate rigging line. Numbers inside a circle indicate part numbers, while number with no circle identify individual rigging lines for matching them to their appropriate belaying points. The color instruction booklet is 20 pages long, containing mostly color or black & white photos. Short text descriptions label some of the photos, and are given in English, German, and Polish. The instructions show how to get a finish that nicely simulates wood, if followed carefully. For the most part, there are no paint color guides, except for reviewing the provided color photos. While builders may choose to make their own modifications to the paint scheme, following the kit photos, everything is either light-colored wood color for the deck and hatches, or a medium wood color, or black. Overall, this is a very nice looking kit, but it is also one of Shipyard's earlier laser-cut kits. Having worked on Shipyard's paper model kit of the same subject, I've read ahead through the bigger kit's instructions, and I can see that there are some parts that the instruction skip over. In particular, there are platforms underneath the open hatches, representing the deck below. The parts are included for these platforms, but I haven't been able to find any indication of them in the instructions. So, clearly, the builder will want to proceed very carefully with this build. However, this is a fairly simple looking ship to build. It is about the least expensive of this line of kits. The rig is about as simple as it can get, so this should be a good kit for beginning paper modelers, if caution is observed. This kit was purchased from Ages of Sail, but is also available for about $150 direct from Shipyard. There are several other similarly designed laser-cut kits made by Shipyard, including HMS Alert, the Santa Maria, the schooner Berbice, and their biggest kit of all, the British 28-gun frigate HMS Mercury. For a review of a similar, but more complicated Shipyard kit, please see my review of Shipyard's HMS Wolf Laser-Cut Kit here. Or my review of Shipyard's Hanse Kogge Laser-Cut Kit here.


- 12 replies
-
- 6
-
-
- Le Coureur
- Shipyard
- (and 1 more)
-
Jan, funny you posted that today! After recently watching the film The Cruel Sea, I came to the conclusion that those were most likely companionways. I was planning to mention that on my next post, but you beat me to it. Thanks for the post!
- 106 replies
-
- 2
-
-
- digital navy
- v108
- (and 3 more)
-
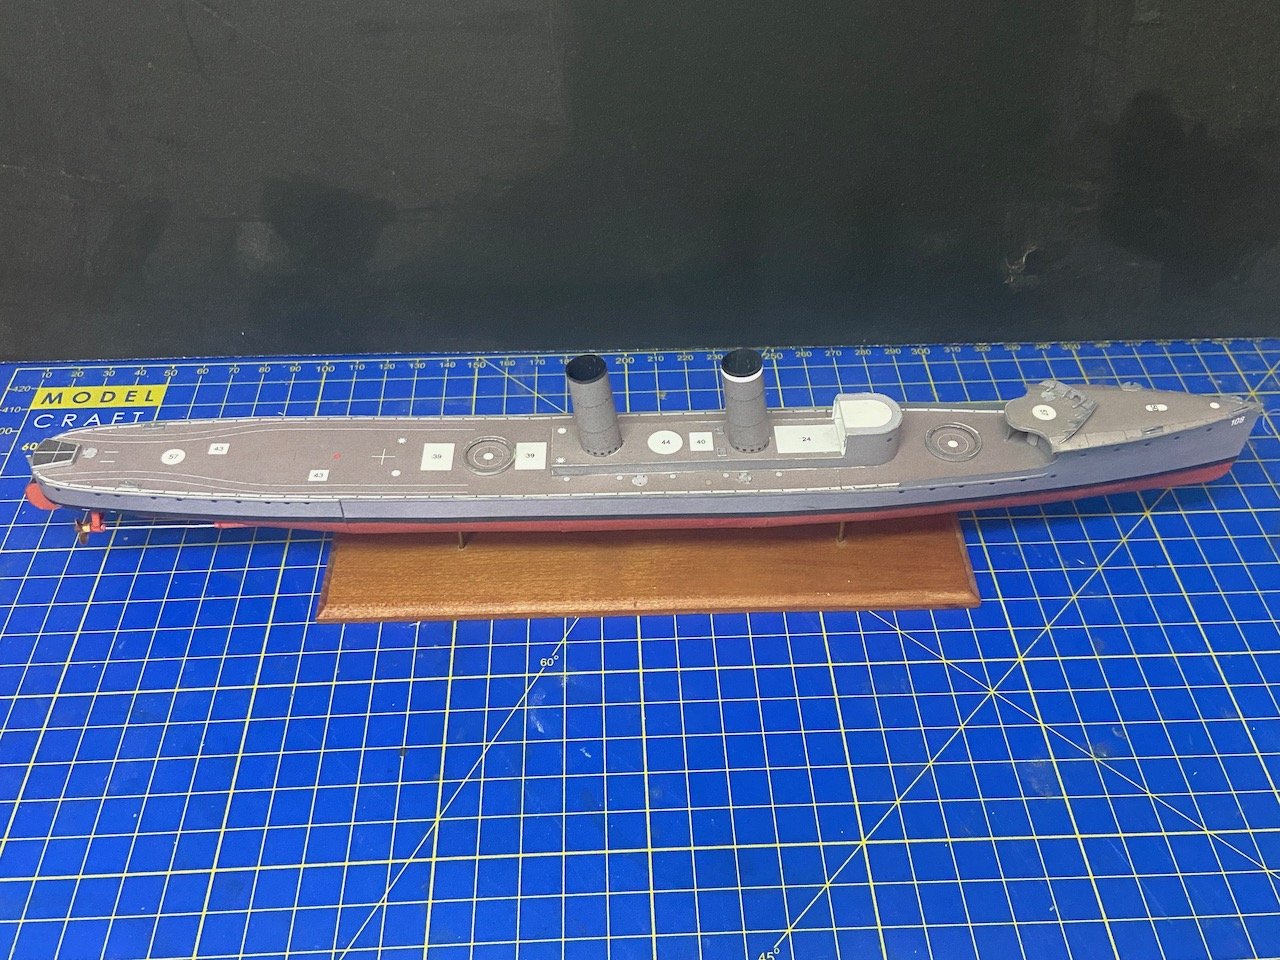
I swear I worked on the V108 for hours this week, but it just doesn't look any different, really. ... and, I still have a lot of parts still to go! Added brass rods to the ventilator bases, to secure them to the deck. Made the masts from very thin wood dowels and sized them down about as much as I could. The cross yards need to be even finer, so I used very fine brass rod. I added the yard on the forward mast, but waiting on the aft mast, until I get the booms installed. Or, do you still call them foremast and mainmast? Seems weird. Masts aren't permanently installed yet. Need to finish adding details to the aft mast. The provided parts for the mast bands at the doubling wouldn't fit, my yards are too thick. So, I scavenged some other parts off of one of my spare printed parts sheets. For the antenna wiring, guy wires, etc., I thought I'd try out EZ Line, so I bought both available sizes in black. EZ Line is elastic, but it's flat, not round. The Fine stuff is so thin, you don't really notice it's flat. The Heavy line's flatness is really noticeable. Anyway, it looks too thick for the model, so I'll just use the Fine line for everything. Well, assuming I have the skills to make the stuff work for me. I'm planning on starting with the funnel guy wires, but not until I get the remaining paper parts on the model. Still have all the bridge and gun details to go, plus a few other items.


- 106 replies
-
- 6
-
-
- digital navy
- v108
- (and 3 more)
-
Hi GrandpaPhil, I believe those kits are being sold by importers, which can deal with customs on large scale shipments from Europe. But, even these, if you look at customer ratings, seem to be showing signs of shipping problems/delays. If that Amazon store Plastic Models Store, which appears Ukraine based, would only carry he Ukrainian brand Avangard, I'd be set!
- 106 replies
-
- 3
-
-
- digital navy
- v108
- (and 3 more)
-
Beautiful work Chris! I wish we could still get the Master Korabel kits at Ages of Sail. The shop is down to just the Morel Secret Vessel and the Double Boat, though the Double Boat does look like a nice kit. Anyway, I really love seeing your progress on this one!
-
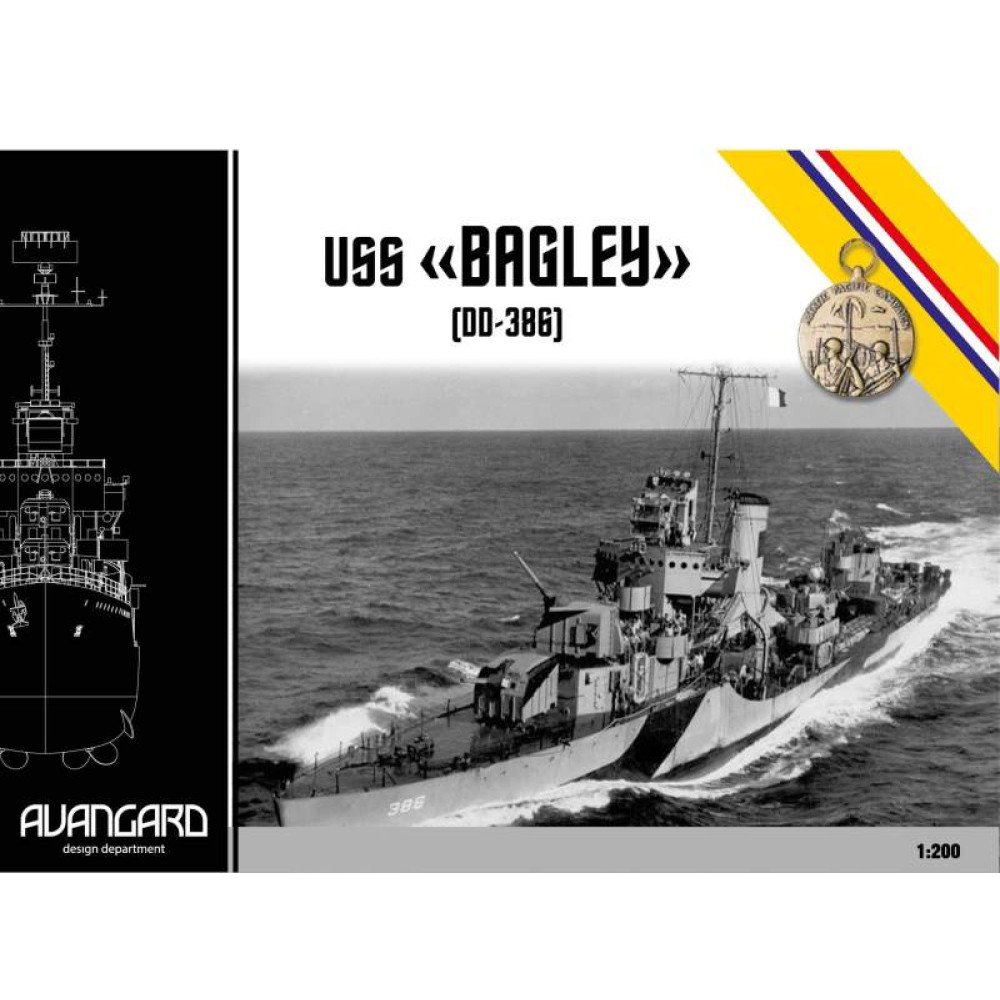
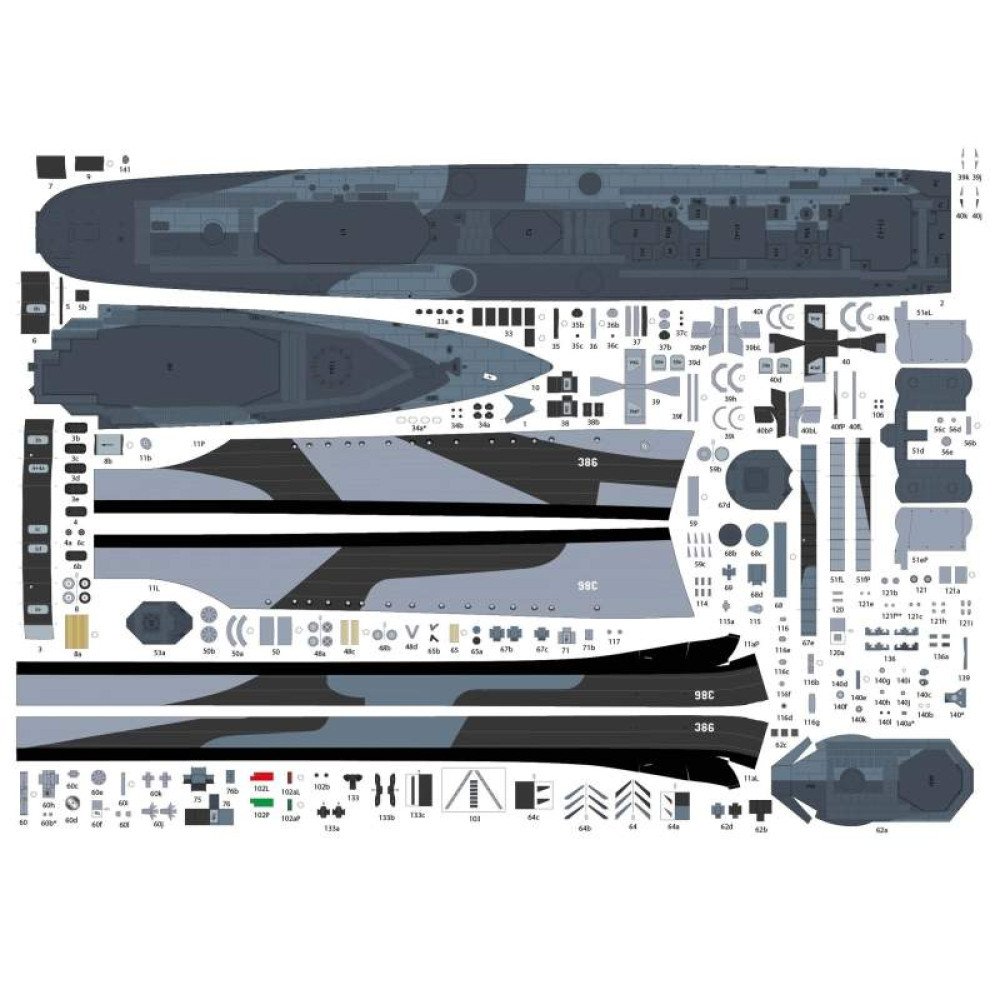
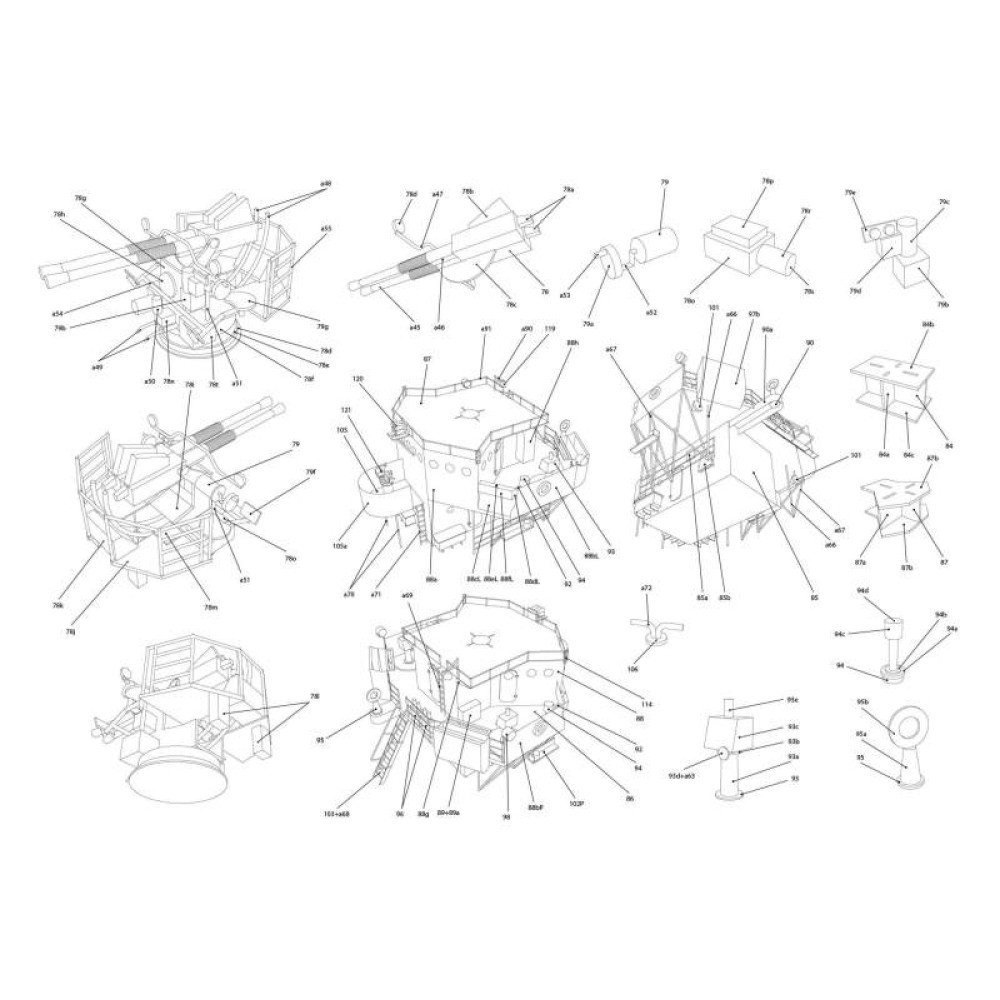
Not much news on the V108 build, as I've been trying to make some progress on other model fronts. But, the V108, being a paper model, is so easy to sit down and work on. So, I did get a couple of the ventilators made and started working on the masts. Biggest news is that Orlik just refunded my order of the USS Bagley kit. So, that's no Orlik, no GPM, and no Fenton's. I think that's the last hope I have of getting it, unless something changes regarding the tariff situation. ☹️
- 106 replies
-
- 2
-

-
- digital navy
- v108
- (and 3 more)
-
Hello stevenba21, thank you for sharing your find! I'm sure many members of this forum will find this information interesting and of value. What size/scale is the cannon?
-
I've bought way more Woody Joe kits that I care to admit, all from Kazunori Morikawa's online shop Zootoyz.jp, or his newer site https://www.japan-wooden-model-kits-zootoyz.shop. I don't really understand why he started the second online shop, I think due to some server problems he was having with the first. Anyway, prices are MUCH better than most that you'll find on Amazon or Ebay, and his service is excellent!
-
Kerry, Nice article! I too had the opportunity to visit Woody Joe in 2016 and met with Mr Tsuneki, Mr Arata, and Ms. Gojo. Wish I could go back and visit again.
-
Not really sure. It's not a huge company, but they're producing a large number of products. Might have something to do with providing good standard of living to the employees. I don't think they sell huge volumes of kits. I used to think their kits were expensive, but with the exchange rate as it is, I feel less that way now. I've bought many of their kits in the $200-$250 range. Which kits are you looking at that you consider expensive?
-
The second stack didn't turn out quite as nicely and wasn't quite as easy as the first, but it's done. And the build continues...


- 106 replies
-
- 5
-
-
- digital navy
- v108
- (and 3 more)
-
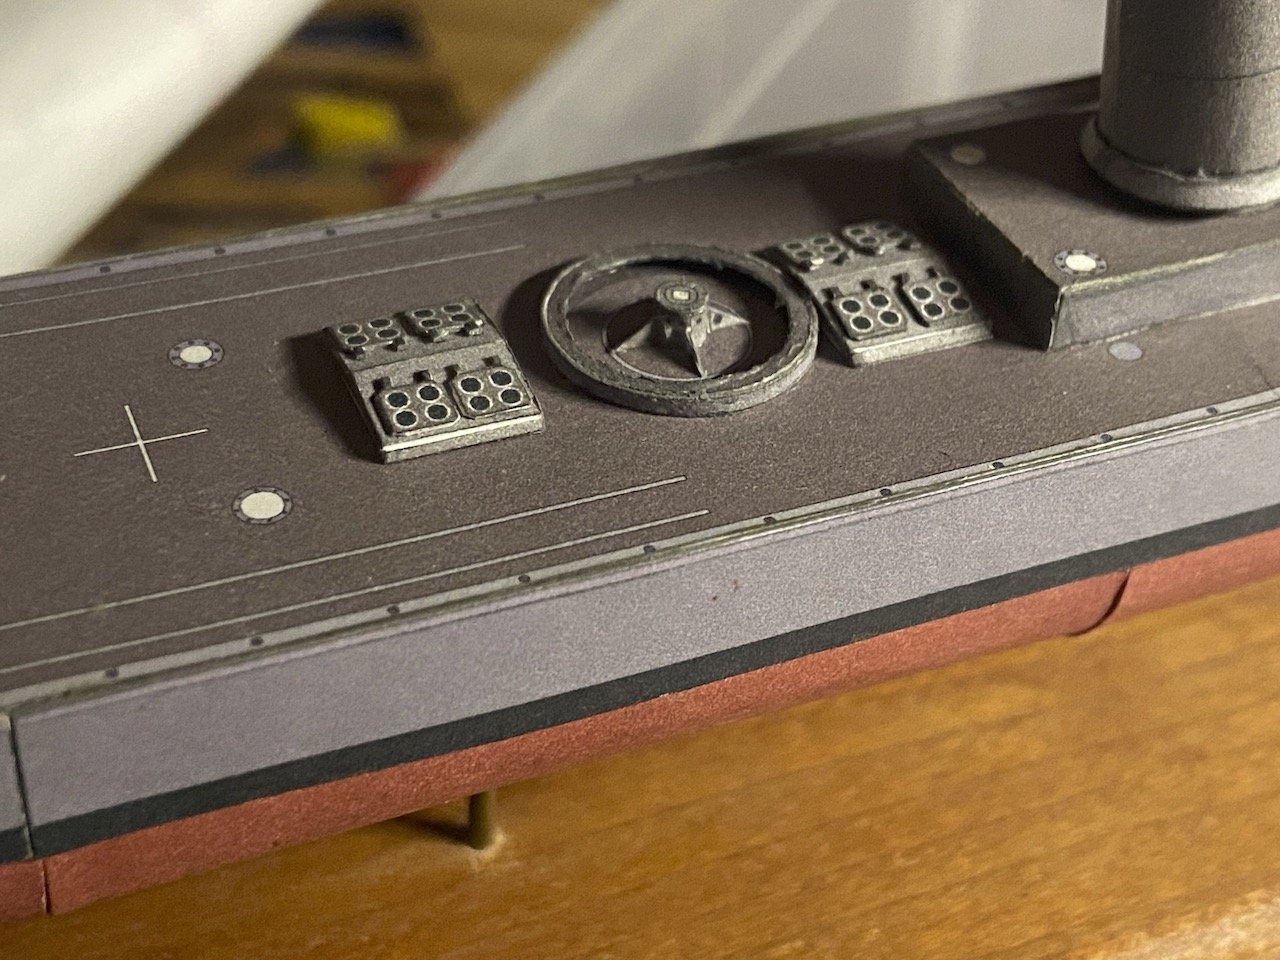
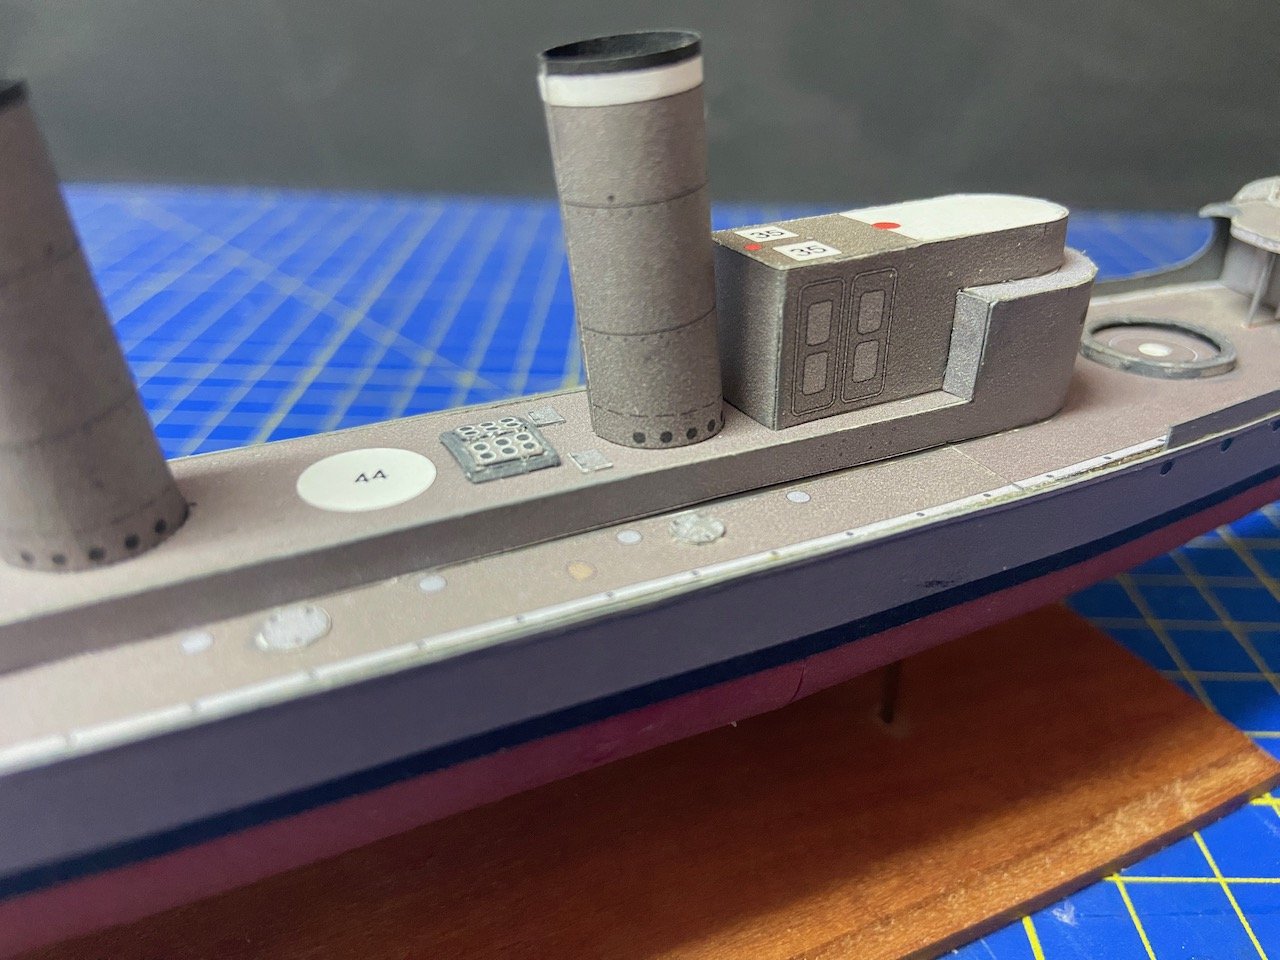
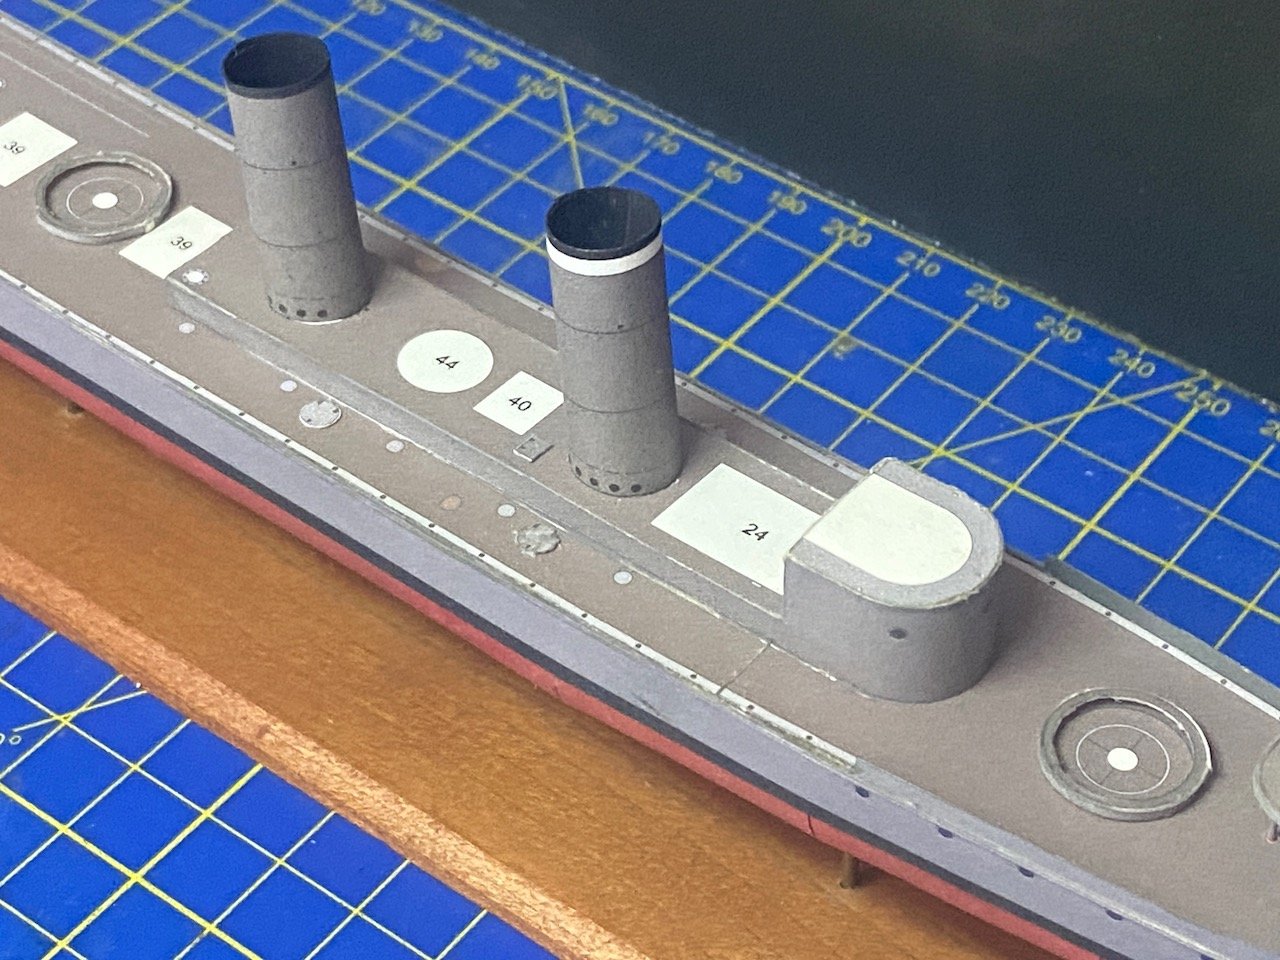
The PE parts arrive the other day, so I sprayed them with gray primer and just added the first ones to the forward funnel. The locations are printed on the paper, but these rungs are a bit narrower than allowed for on the part. I decided to use the left-hand side as my registration line. I used a dress-making pin, pressed it against the printed mark, and spun the pin a bit. It actually kind of drilled a tiny hole or a big hole, depending on how hard I pressed and how much I spun the pin. But, it worked well enough. I did the entire column this way and then just eyeball the other end and used the same procedure. I inserted all the rungs and adjusted them, then I used some Aleene's Tacky Glue on the inside of the funnel where the rung ends stick out. I'm pretty satisfied that this is going to work. This went a lot more smoothly and quickly than I'd expected. Plus, I don't think it turned out half bad. I have one more funnel to do, and then I this there are a few on the superstructure below the bridge. Also, I want to figure out what to do about the guy wires leading down from the funnels. I have some fine EZ-Line, but I think it's actually too thin for these guy wires.

- 106 replies
-
- 7
-
-
- digital navy
- v108
- (and 3 more)
-
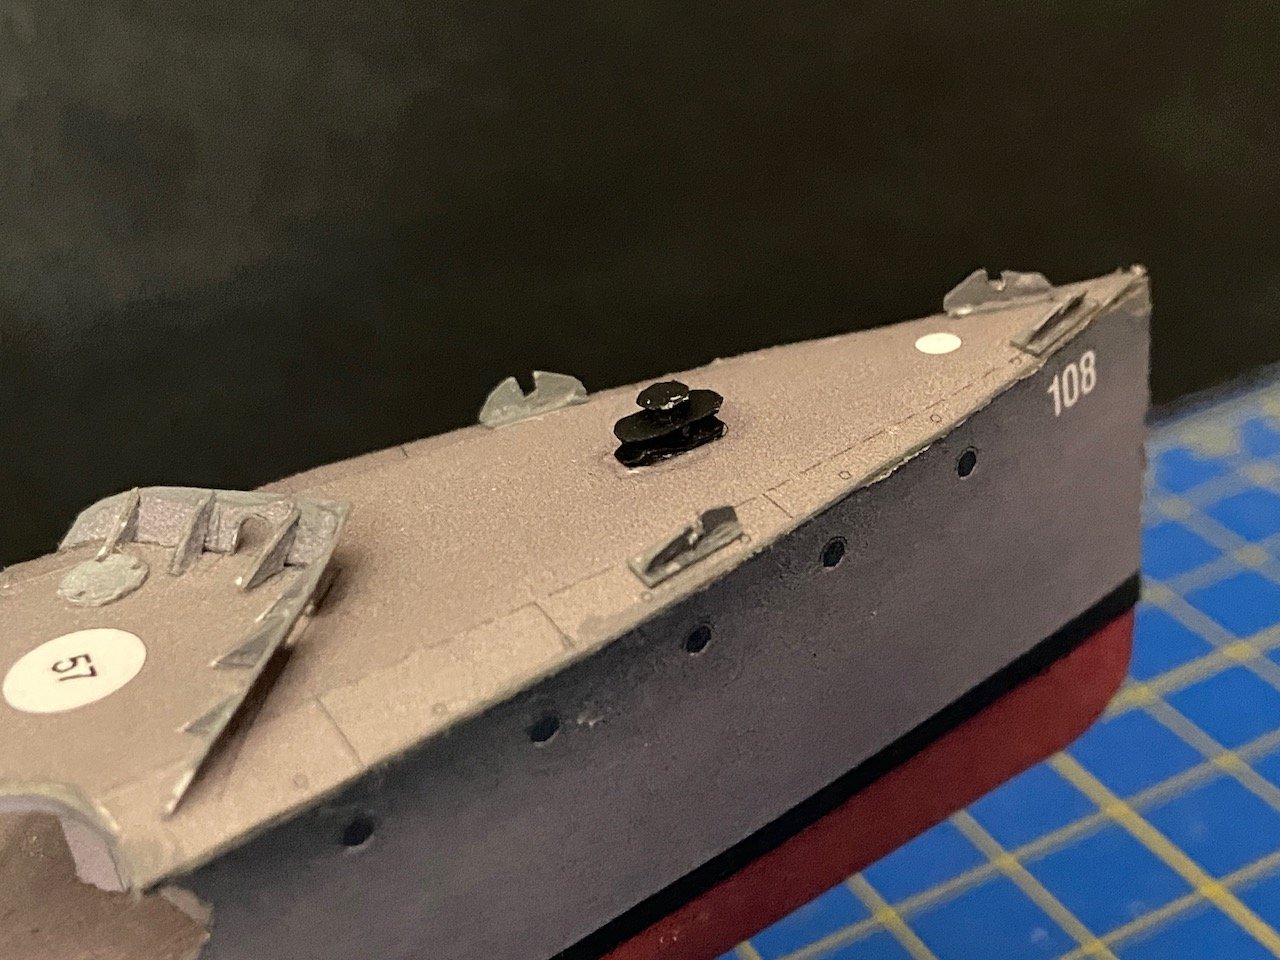
Progress continues on the V108. Had a meeting of the South Bay Model Shipwrights in Santa Clara on Saturday afternoon. I brought this along with me and that seems to have spurred me on to continue the work today. Added a few new details. I added what I assume are hose reels just aft of the big ventilator cowl. Also decided that the next assembly to complete were the torpedo launchers. So, while replaying the movie Greyhound for the umpteenth time, I built first the launchers barrels, then built the pedestals. I'm not sure how the bow launcher is supposed to work. It's actually too long to swivel from one side to the other without hitting a support post under the forecastle overhang. There's another reel at the aft end of the ship, four small ventilator cowls, and then the bridge detail to build next. A lot of this work should probably need to wait until next week. Still waiting for the PE parts for the funnel details. I'm also going to add support guy wires to the funnels, but will wait on that until I get the PE parts in place. Having a great time with this still!


- 106 replies
-
- 5
-
-
- digital navy
- v108
- (and 3 more)
-
I'll certainly post an update if the order arrives. I tried to see if I could order from GPM, but I don't think they're shipping to the US either – I just got stuck in a loop during the shipping address stage when I tried to process a small order.
- 106 replies
-
- 1
-
-
- digital navy
- v108
- (and 3 more)
-
I went ahead and ordered the USS Bagley and the two laser-cut sets that go with it from Orlik. At least the USA was still in the list of countries in the ship-to section of the online order form. We'll see if they ship it or if they cancel it. In any case, it's back to my current projects!
- 106 replies
-
- 5
-
-
- digital navy
- v108
- (and 3 more)
-
Thanks all for the ideas. I went ahead and bought some PE parts in 1/200 scale off of Ebay. We'll see how well they work. It's basically just railings and handholds. Don't know if I'll use them or not. Chris, I'm not sure about the Halinski kits, but I've been kind of eyeing some of the kits from the Ukrainian publisher Avangard. Do you know anything about them? The have the destroyers USS Farragut and USS Bagley (of classes of the same name), and the Gleaves-class destroyer USS Aaron Ward. Plus, I'm kind of intrigued by some of those Japanese Imperial Navy destroyers. There seem to be a few accessory sets available for these kits as well. I'm just not sure of the best place to buy their products.
- 106 replies
-
- 2
-
-
- digital navy
- v108
- (and 3 more)
-
I'm eyeing one of those Pinas cross section kits...
-
Thanks Phil! I ended up taking a few days off of work, so I've been able to spend some time with my projects. I'm shifting my attention between projects and it was time to work a little on the V108 . I started working a little on the bridge assembly, and you can see some of it in the first pic below. I decided not to mess with opening up the windows. I think it actually looks better to just leave them printed black, like all the portholes. Anyway, I don't think I could make them look right if I tried to make them clear windows. I also decided to build the pedestals for the ship's 3.5" guns. I also went ahead and mounted them on the deck, since the alternative was to keep them in my parts box and risk damaging or losing them. I also finished making all the skylights and mounting them. After that, I decided to tackle the big ventilator cowling that will fit between the stacks. That assembly went okay. It wasn't as hard as I thought it might be. Kind of wondering what to do about the inside of the cowling though. Leave it white? Or paint it and then what color? I don't know if I mentioned this before, but I'm generally not a Steel Navy modelers anymore. But, building this ship in paper has been a lo of fun and been very rewarding so far. I'd definitely consider doing another build in the future. Unfortunately, the subject and "kit" I find most intriguing, is the Fletcher-class destroyer that used to be published by Digital Navy, like the V108. Unfortunately, that website and its products have vanished from the Internet. 🫤 Well, I'll think about that after I get this one finished. Still a ways to go...


- 106 replies
-
- 7
-
-
- digital navy
- v108
- (and 3 more)
-
Thanks Druxey. We'll see if it stays looking good, and how long it takes me to get this project wrapped up... wish me luck!
-
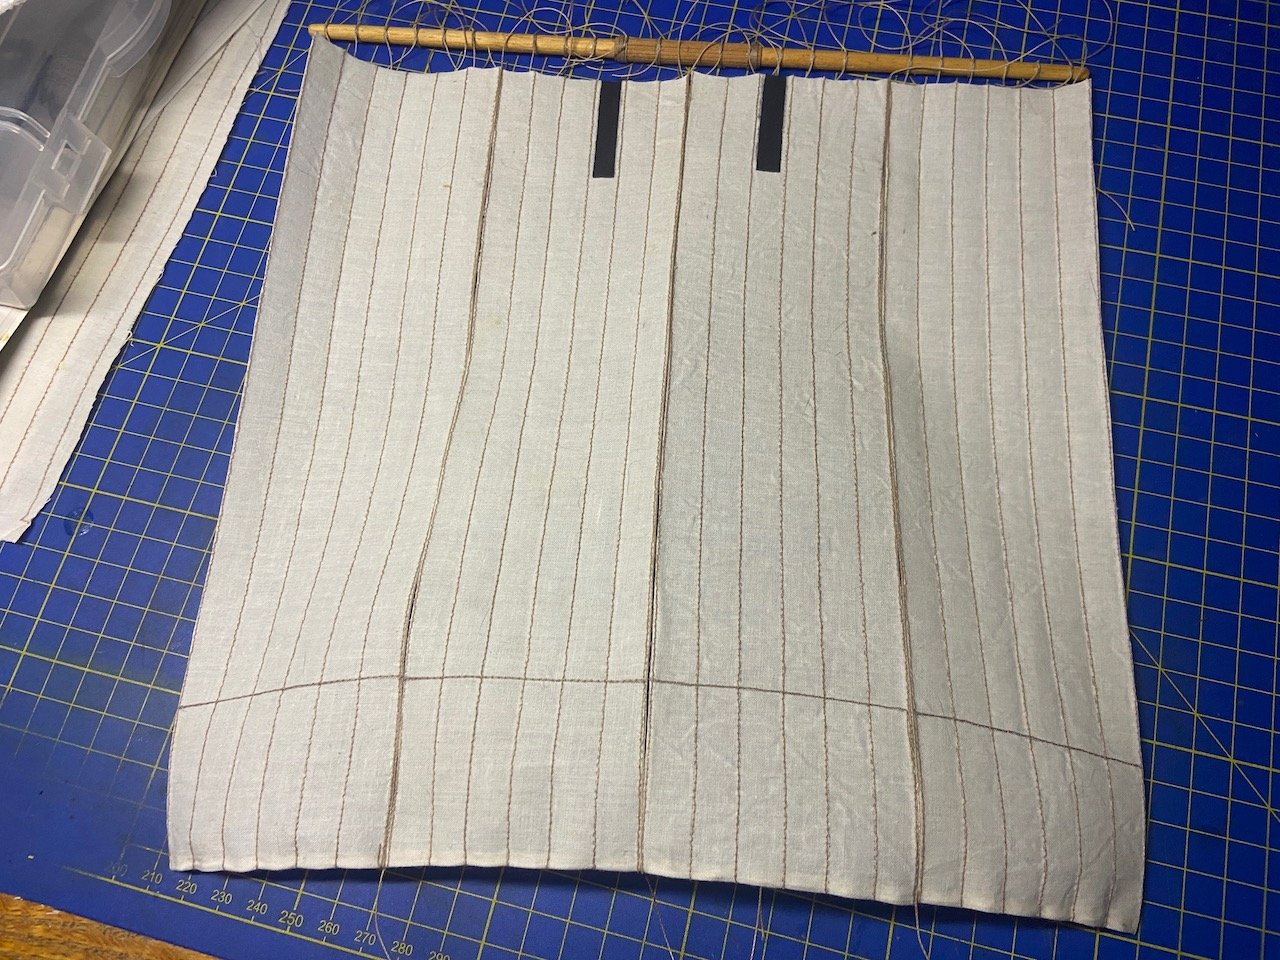
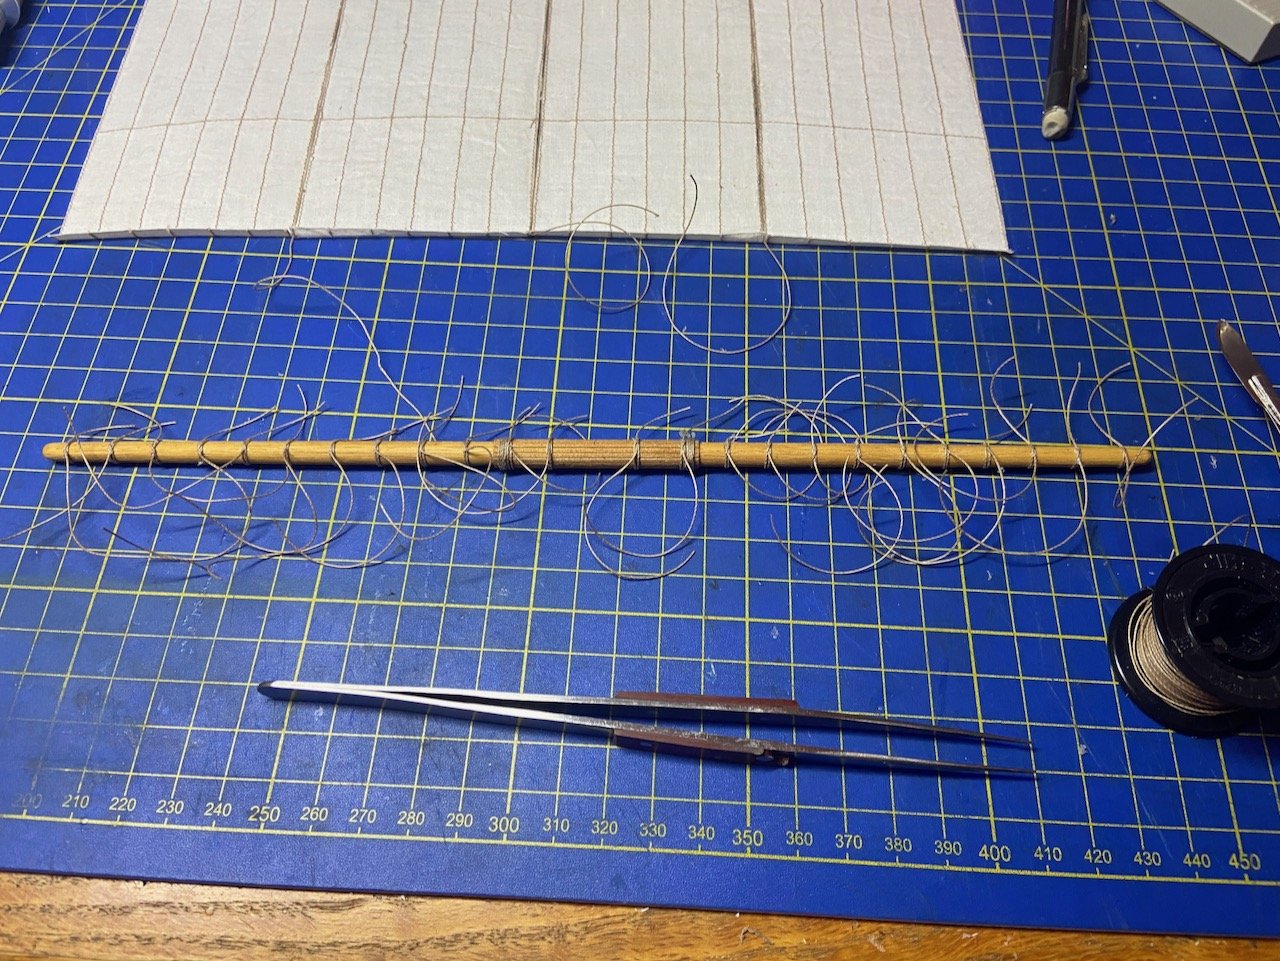
Since my last post, I glued rigging line to one edge of each the large panels, so that one piece of line would pass between each adjacent pair of sail panels, using Aleene’s Tacky Glue. There is a feature on kitamaebune that I didn’t is used on my previous higaki kaisen model. This is a marking on the main sail that identifies the owner of the ship. There are probably some known markings of famous Kitamaebune owners, but I just made up something that’s very simple, just black rectangles on the third cloth out from the centerline of the sail. I painted these using some artist’s acrylic that I use mostly for paper models. While paint and glue were drying on the sail, I decided to do the pre-rigging of the lines on the yard. For this, I simply followed the kit instructions and used the kit sail to get the proper spacing. The seams on my sails are actually slightly wider apart, but when attached to these lines, it should only work toward my attempt to make the sails look like Japanese-style sails. The knots on the lines on the yard are really just clove hitches. I'm used to tying these on ratlines, but on a thick yard, I had a hard time. The first 1/4 of them took me a long time, as I was using my fat fingers and also had a hard time seeing the ends of the lines. I finally got smart (or less stupid?) and broke out the headband magnifiers and rigging tweezers. The second quarter went better, but I needed a break. After that, the second half took me no time at all! The sail panels were all glued together here, and a length of coated wire was glued into the seam I made at the foot of the sail. In the photo below, you can see how it's giving some shape to the sail. Next, I need to attach the sail to the yard, then I'll need to cut small lengths of line to simulate ties that hold the panels together. I don't know that this will really have an accurate look, but I've seen a lot of Japanese museum models that have a similar look, so I think I'll be satisfied enough with it. There's a very small amount of running rigging to add after this, so I think it's safe to say I'm getting very near the end.

-
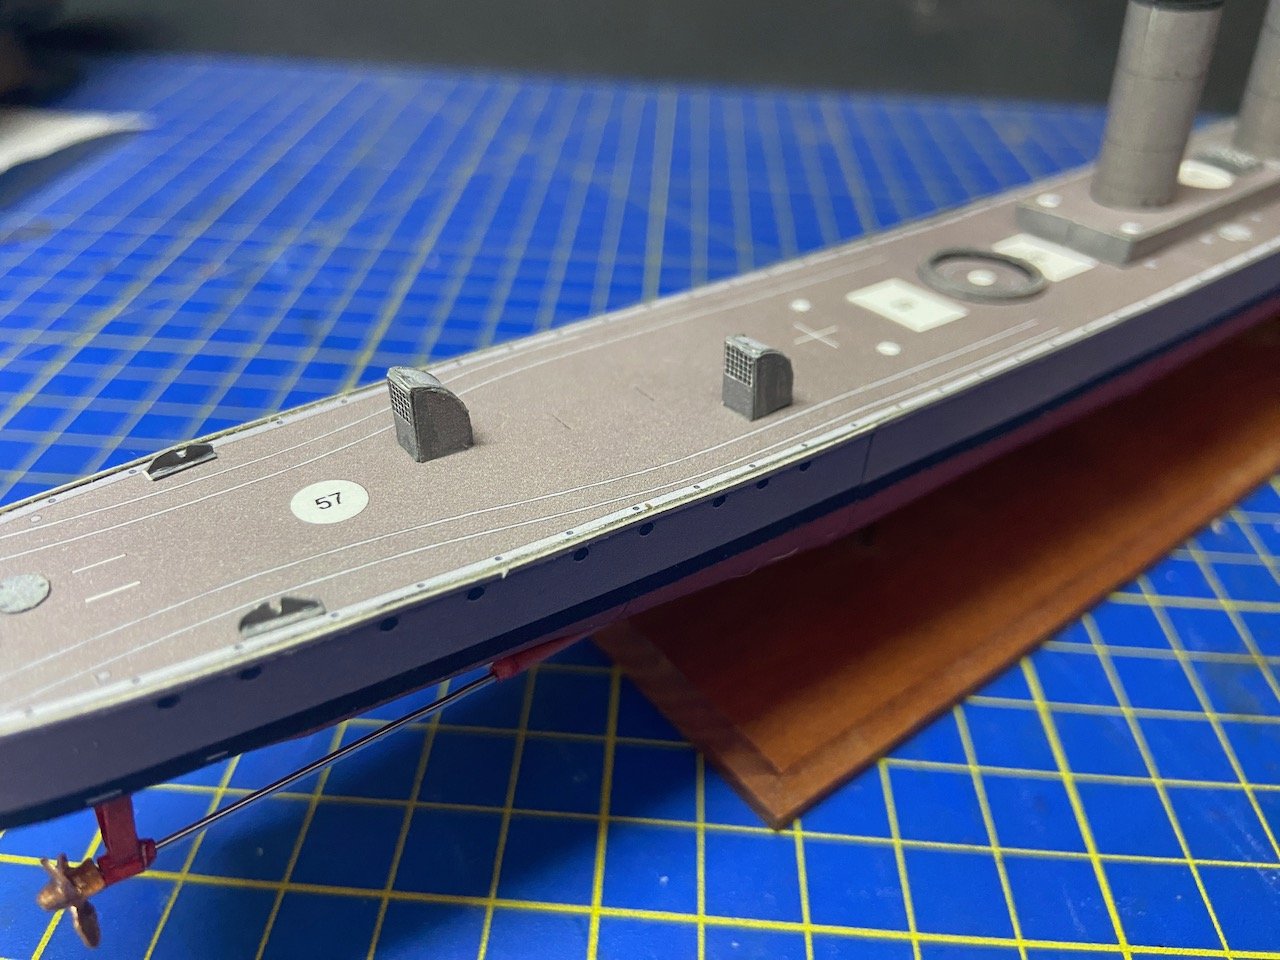
I had a little more time to work on my V108 yesterday. It doesn't really look much different, but I managed to add those cowlings on the af deck, and added the next assembly to the bridge superstructure. And, while I'd added the rudder last time, I managed to knock it off, so I'm leaving it off until a later stage. Chris, in his tutorial build log, mentions not knowing what these things are for. I don't know either, but I'm wondering if they could be smoke generators? Or, maybe they're just exhaust vents for blowing the hot air out of the engine spaces? Added to the bridge superstructure and added one of the skylight hatches. For mounting the superstructure assembly, I followed Chris's example of adding some guide strips to the deck. This helps align the parts and gives the glue a good surface and makes the added assembly pretty solid. And, finally, I added the little bollard or capstan assembly on the forecastle. There were too many little rings for me after making other parts, so I just cut some thin slices from a styrene rod instead, and painted it all black. These close-up photos make the model look so much worse than it does in real life. Or maybe my eyes are so bad, I can't see the missing paint, etc., except in close-up photos. Question: Not that I'm going to add any, but should there be some kind of screen inside the stacks? Right now, you can look down inside and see the big support piece there. I painted it black, so it's harder to see, but if there were a screen, you probably couldn't see any junk inside, so I'm just wondering.
- 106 replies
-
- 9
-
-
- digital navy
- v108
- (and 3 more)
-
Since I had the time, I didn't want to pause the build right after a difficult session. So, I figured I'd make the funnels and the tracks for the torpedo launchers. For the torpedo tracks, I built them before I looked again at Chris's build log and his idea for making construction easier. Mine turned out okay, but I just had to glue the outer edge of the ring on, little by little, to keep it straight. The funnels are nice, large parts, changing the look of the slowly evolving model. I painted the interiors black, but you can still see he white areas of the superstructure. I'll finish that painting after the funnels are glued into place. For now, the torpedo launcher tracks and the funnels are only dry fit I still need to clean-up and paint the insides of the torpedo launcher tracks, but then I think I'll glue them into position. I think I'll leave the funnels unmounted until I decide if I'm going to try to detail them any. For now, they're pretty safe like that, and they make the model look more like a ship.
- 106 replies
-
- 5
-
-
- digital navy
- v108
- (and 3 more)
-
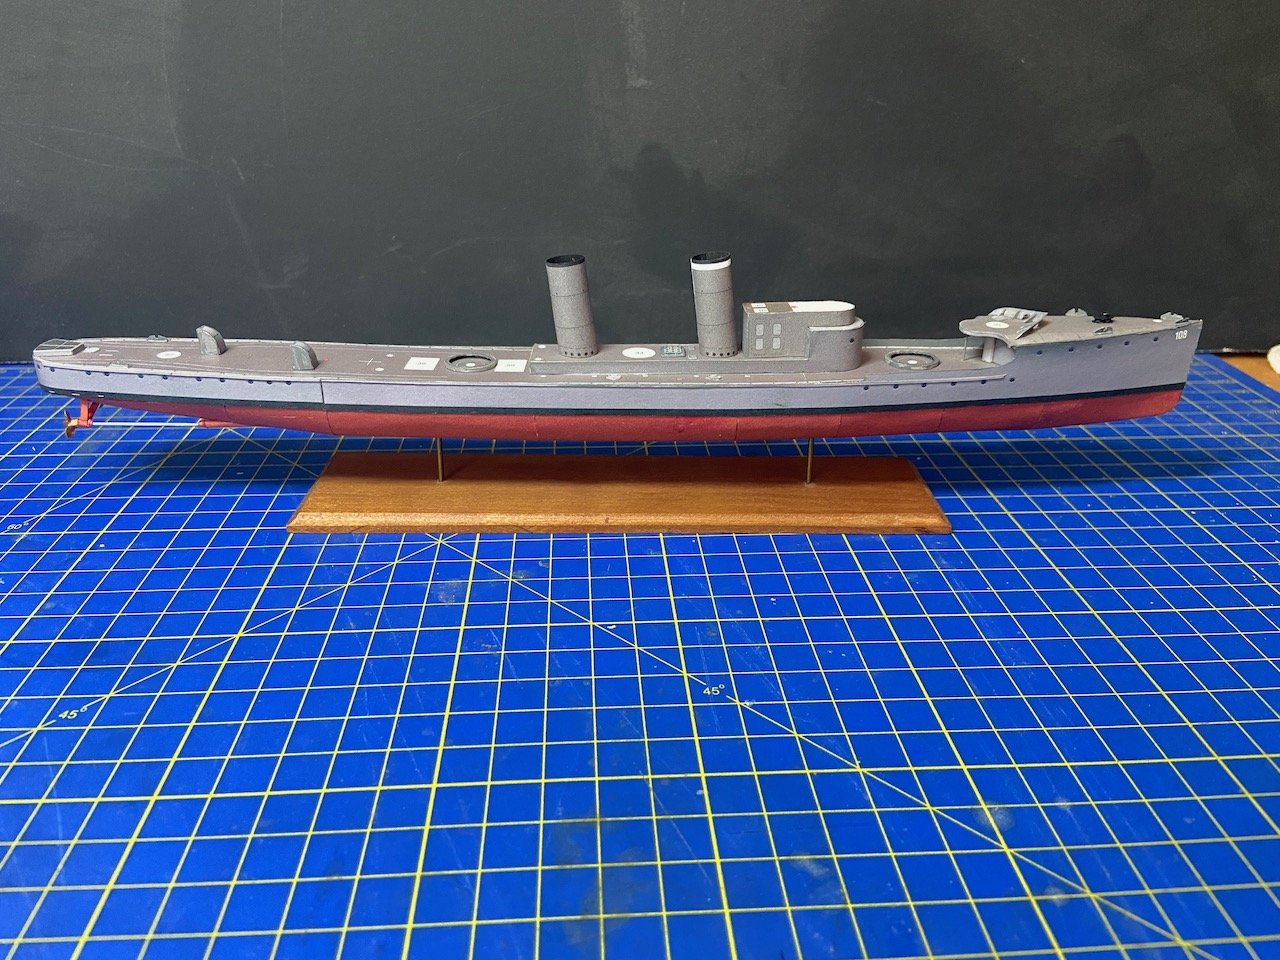
Thanks for the nice comments Richard, GrandpaPhil! Propellers and fairings... It's enough to make you want to stick to waterline models! 😀 But, now that these are done, I like the look, just not from TOO close!
- 106 replies
-
- 2
-
-
- digital navy
- v108
- (and 3 more)
-
Well, since Ages of Sail sells Vanguard Models products (and other those other European brands) and is in the US, that's still an option for US buyers, and no special paperwork is necessary. Pricing WILL need to be adjusted to cover the additional tariff cost, but as of this moment, it hasn't happened yet. There's been discussion about it, but I don't see anything happening before next week. Shipping to some countries though, is going to be tough. Canada requires the US sellers to collect the tariffs for them, and will bill the selling company. But, since this stuff is mostly products of Europe, there should be a way to ship that stuff to Canada without requiring tariffs anyway. But, it means a lot of paperwork.


