catopower
-
Posts
1,900 -
Joined
-
Last visited
Content Type
Profiles
Forums
Gallery
Events
Everything posted by catopower
-
 Hi Richard, You beat me to it. Yes, new site for all wooden models. Nice sale prices. Unfortunately, I already have a closet full of Woody Joe kits. But, they did come out with a few new items that I'm interested in, mostly architectural style kits. Zootoyz offers great service and I've purchased just about all my Japanese kits from there. Clare
 -
Thanks Druxey, Dave. Dave, thanks for the contact suggestion. It's always good to have more contacts! The biggest problem with obtaining information is that there are very few who actually have very specific information. I've been able to locate a lot of details of things that I'm not building right now. And, for the things I AM building, my information isn't as complete as I'd like. Not only do I not know who to turn to for information, there are very few people who would actually have answers. And you can't just contact people out of the blue like you can here. It's mostly that it's just not done – they'll be puzzled and who you are and why you're contact them and, probably, how you got their contact info. You really need to be introduced by someone they know. Working with Douglas Brooks has helped a lot. Also, a couple friends of mine are members of The Rope, Tokyo. And I was introduced to one of them by ship modeler Don Dressel of the SMA. I met with the Japanese gentleman on my last trip to Tokyo and he brought his ship modeler friend, who has become a great help to me. So, it's possible to get info and contacts, but it takes some effort. Fortunately, Facebook has also made outreach easier, because it's a pretty informal way to connect to people. So, I've met a couple people there who have provided information. Still, it's mostly information on things I wasn't originally looking for. But, I'm compiling just about every piece of information I can on Japanese traditional watercraft. Sooner or later, I'll need something and I'll find it in my archives! Clare
-
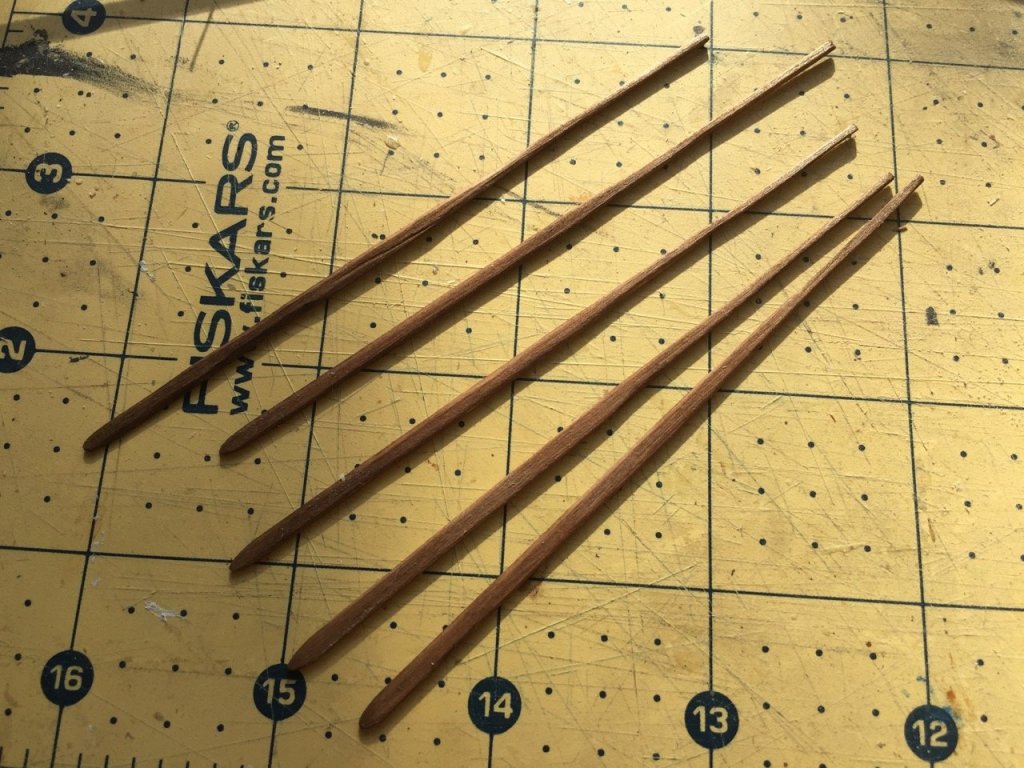
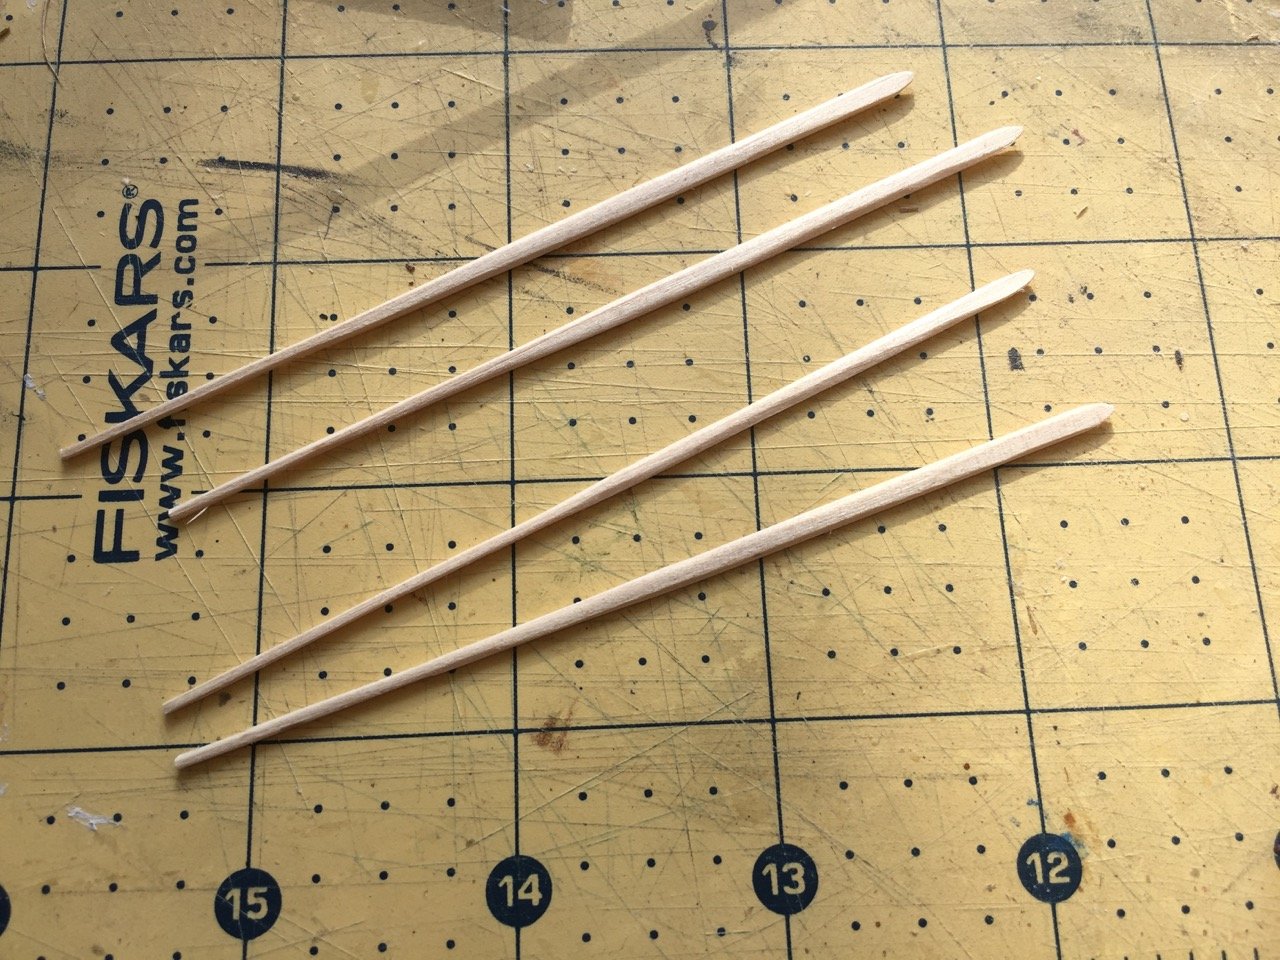
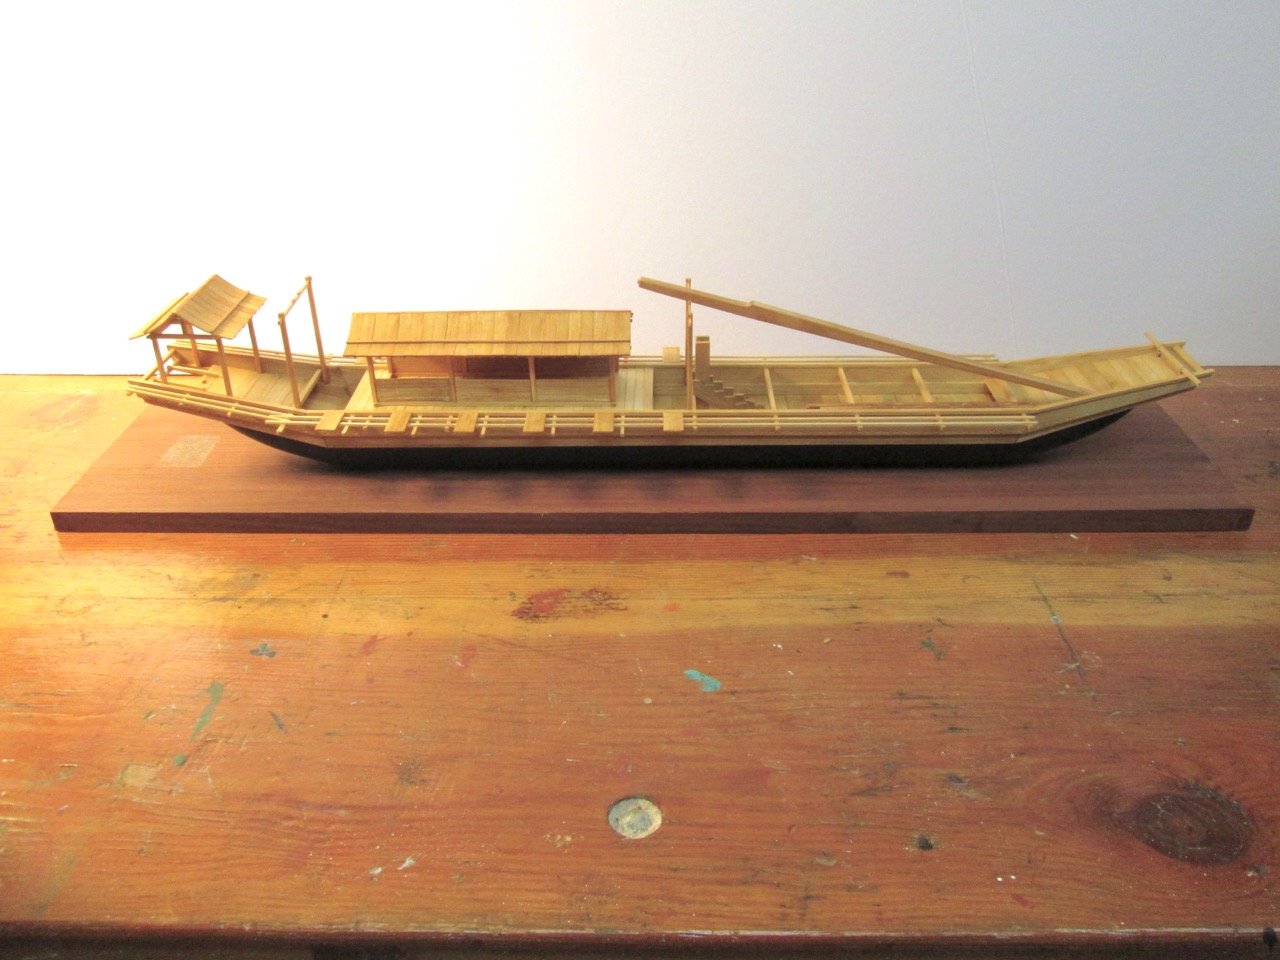
Thank you Pat. Well, I'm getting closer to the part I've been dreading somewhat. No, not the sails, though I've been considering the possibilities for that too. But, the hard part on this model, I think, are the oars. Part of this is the construction, and part is the mounting. But, a big issue is about the type of oars. Now, I've been thinking about this since the start of this whole project, and I've mentioned it in more than one post, I believe. Japanese boats mostly use long sculling oars. Some use paddles. And then, of course, there are river boats which often use poles. Some boats use some combination of these, since different methods of propulsion work better in some situations than others. Most of the models I've seen of Kamakura period sea boats have sculling oars, but they are of a straight variety, not the kind with an offset head, which often appear on traditional Japanese boats. But, the key artwork I'm using, shows the rowers facing backwards and pulling the oars. They are not sculling. If these oars aren't used for sculling, then the rope used to help scull probably shouldn't exist. And, the peg used to help scull and to which the rope is attacked probably shouldn't exist either. That's my feeling, but going against tradition has certain risks. The model itself may be dismissed as inauthentic, or the builder risks being considered a know-nothing outsider, which to a great degree, I am, even though I've spent more time and effort researching Japanese watercraft than most Japanese. Why should I care? To start with, I need access to information, which can be difficult to obtain, so I need the help of some folks in Japan. I've already recently hit a wall after writing to someone who I believe could answer some questions for me. I'm beginning to think I'm stepping on some toes by venturing into something that is culturally very Japanese. It's happened before, and I'm sure it will happen again. But, avoiding barriers is important. In any case, I did manage to make the straight oars without pins. They sure look a lot thicker here than they do when I'm working on them and trying not to break any. I made these from hinoki, like the rest of the model. I'm not sure what type of wood was used for real oars. I read it somewhere at one time, but I don't recall where. Douglas Brooks's book probably mentions it. Anyway, I wanted a little color change, so I used a Dark Vintage Maple wood dye on these oars. Twelve oars are needed for this boat. Next, I finally started to tackle the issue of finishing the aft deck house. At minimum, I need low partitions on the port and starboard sides. Some variations of this boat have the sides closed up with wicker walls. Others are pretty open air, which is what I'm thinking of doing. I made these wall sections, but I have yet to complete the fit. The ends need a little sanding and adjusting before I can glue them into place. Fitting these is a bit of a challenge, since the deck house, or yakata, is already in place on deck. I know I should have added these before I put the framework into place on the deck, but I really have been figuring things out as I went. Next time, I should have these in place. Then, I either need to make the anchors or deal with the sail.

-
Thanks, Mark. I actually have a copy of this already. The subject matter predates my boat by about 1000 years or so, but there are a features of the boat that relate to ancient developments, so it's very interesting to read through. Texas A & M seems to have a great nautical archaeology program. And, thesis papers there are in English, so no translation needed! At some point, I'd like to visit Kanegawa University in Yokohama. They have a graduate institute for the study of Japanese folk culture and part of that seems to cover traditional Japanese water craft. I know of an unofficial group that meets there monthly to discuss topics on traditional Japanese boats. Makes me sad I'm not there where I can attend. Well, that and that my Japanese language skills aren't very good...
-
Mark, this boat, in particular, probably has more in common with the Japanese carpentry/architecture you like. I realized recently that it's a bit like a simplified Japanese temple on a hull. It may have something to do with the fact that the basis for this model goes back to the scroll painting that followed the life of Sugarawa no Michizane (yes, I had to look that up), who was a very famous high ranking scholar, poet and politician. The Fujiwara clan plotted to have him discredited and exhiled to western Kyūshu island, where he eventually died. Some time later, a lightning storm struck the capital and many of the leading Fujiwara clan were killed and their residences were destroyed. The Imperial court decided this was due to the angry spirit of Sugawara no Michizane, so they deified him as Tenjin, which means sky god, and built a temple to him in Kyōto called Kitano Tenman-gu. The scroll painting was made after he was deified, so it may very well contain certain religious embellishments in the appearance of the boat. That's only my theory. I haven't heard or read anything that might suggest it's true. Anyway, I wonder if there was more of a religious influence in the watercraft like this. They weren't day-to-day workboats used by fishermen. There wasn't much cargo transport at this time (1200s), I believe, as consumerism and the merchant class didn't appear until after the 1600s. So, these were used for high value trade and transport of important passengers.
-
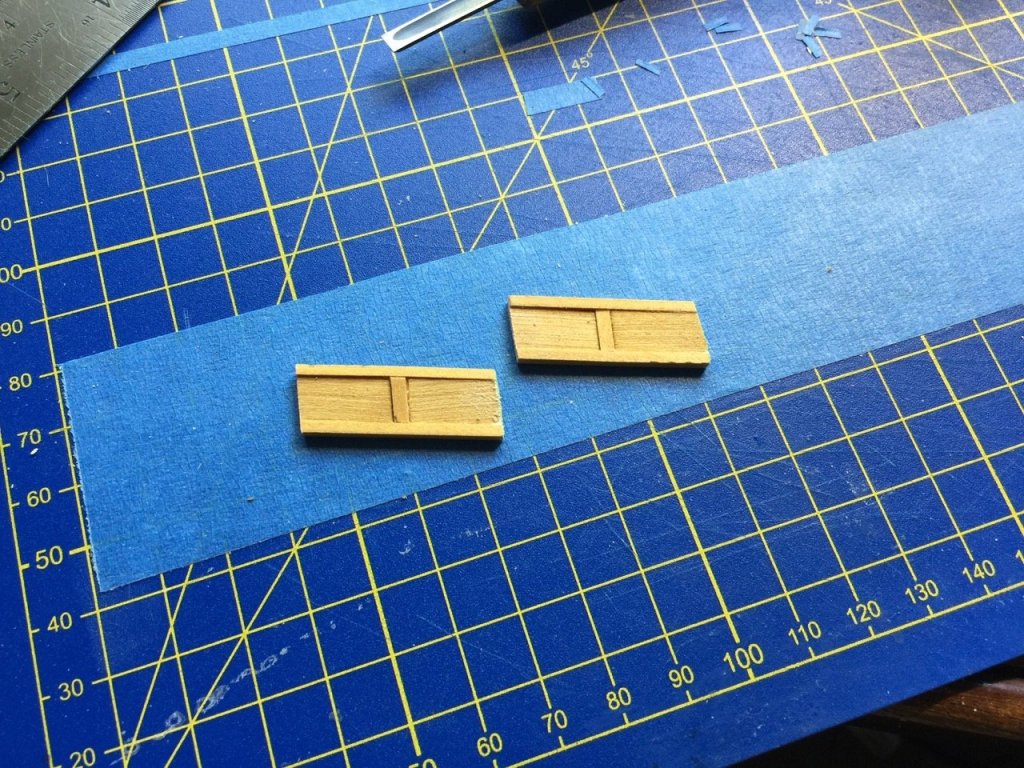
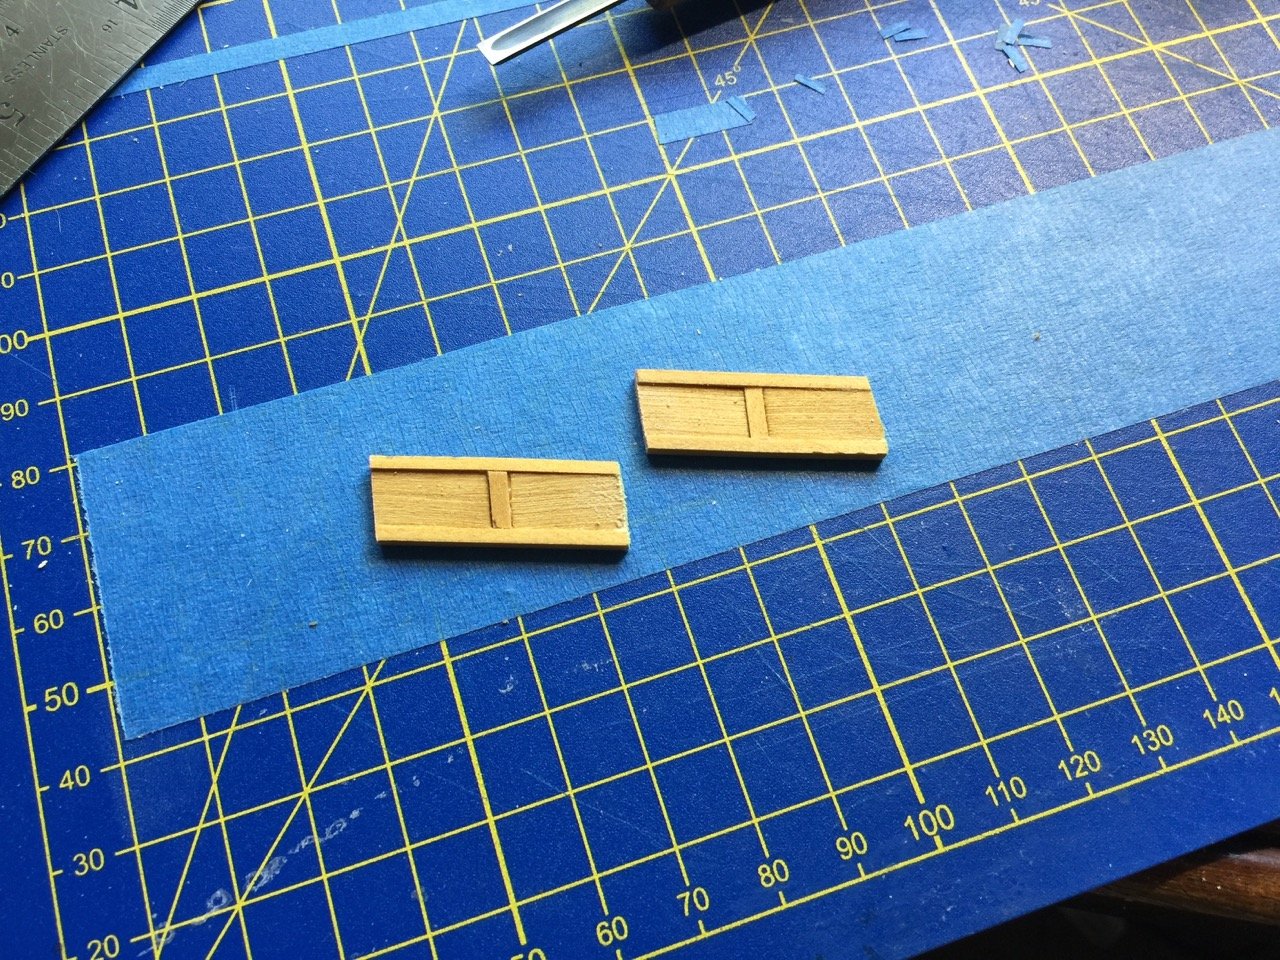
Thanks for the comments Mike, Pat. I'm glad you're enjoying the build. Here's an update... The next step was to add what I believe we call fascia under the ends of the roofs. This was relatively easy to do, and they give a fancier appearance to the boat. I also made a couple decorations that fit under the peak of the roof. I think this was originally a representation of a fish. It is called a gegyo. Note that this is not something I remember. I had to look up an email that someone in Japan sent me, explaining this feature to me. I have to add them to the aft yakata, still. Anyway, this often appears on temples and castles and such, and it appears on one of the museum models of the umibune. More later...

-
Interesting new model ship company
catopower replied to Erebus and Terror's topic in Wood ship model kits
Ah, of course. La Couronne is French for "The Crown". Better than "The Clone" – we've seen enough of that in the ship model manufacturing world... -
Interesting new model ship company
catopower replied to Erebus and Terror's topic in Wood ship model kits
Very cool to see a new company do something so ambitious. Like Woody Joe kits, they look like their aimed not specifically at ship modelers per se, but at those who like ship models and always thought it would be nice to build one. Also, the comment about La Clone being a mistranslation is correct. I looked at the Japanese spelling ラクローン, which sounds like Ra Ku-Rō-N (La Ku-Lō-N). Closest Google Translate can get is La Clone. Endeavor listed as 240 hour construction time. That's pretty darned quick. -
Thanks for the nice comments Druxey, Mark. As long as you don't think that I already know all of this stuff. I'm mostly one step ahead of each phase of construction. Mostly. Sometimes, I'm only one step ahead of the next glue joint...
-
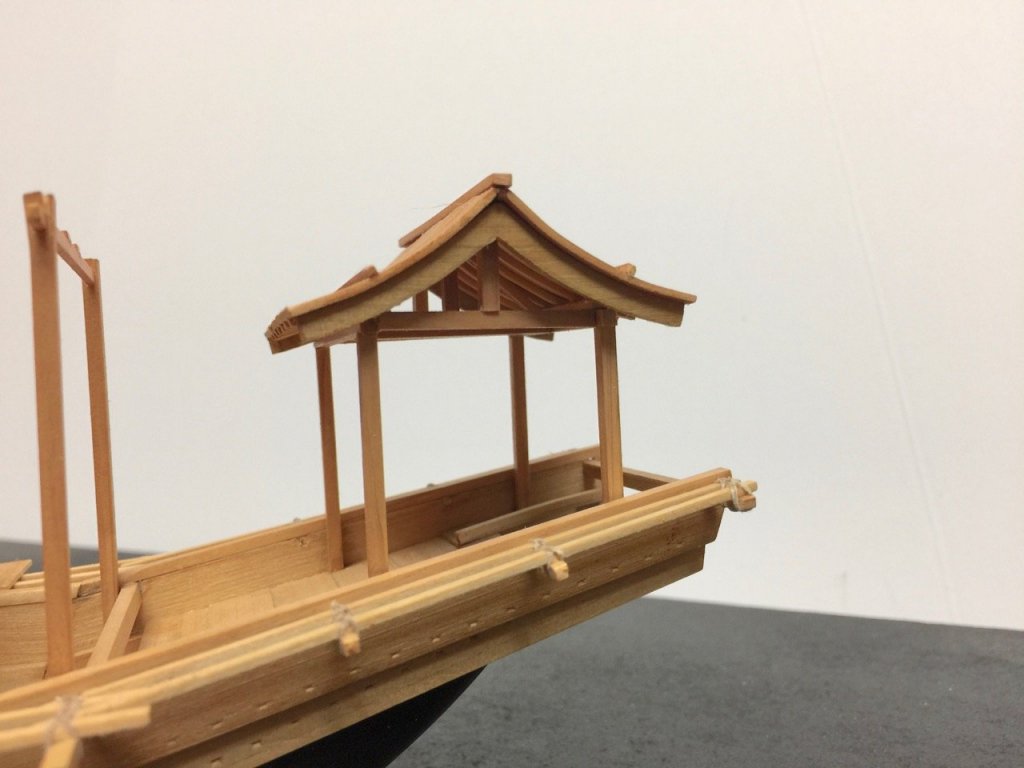
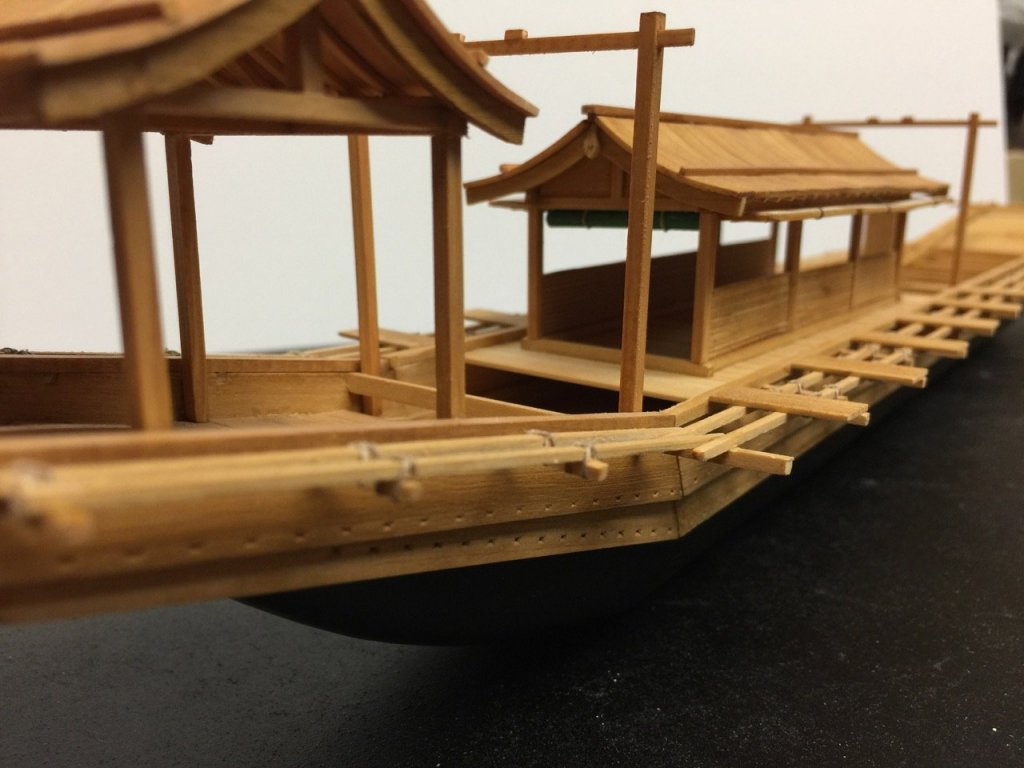
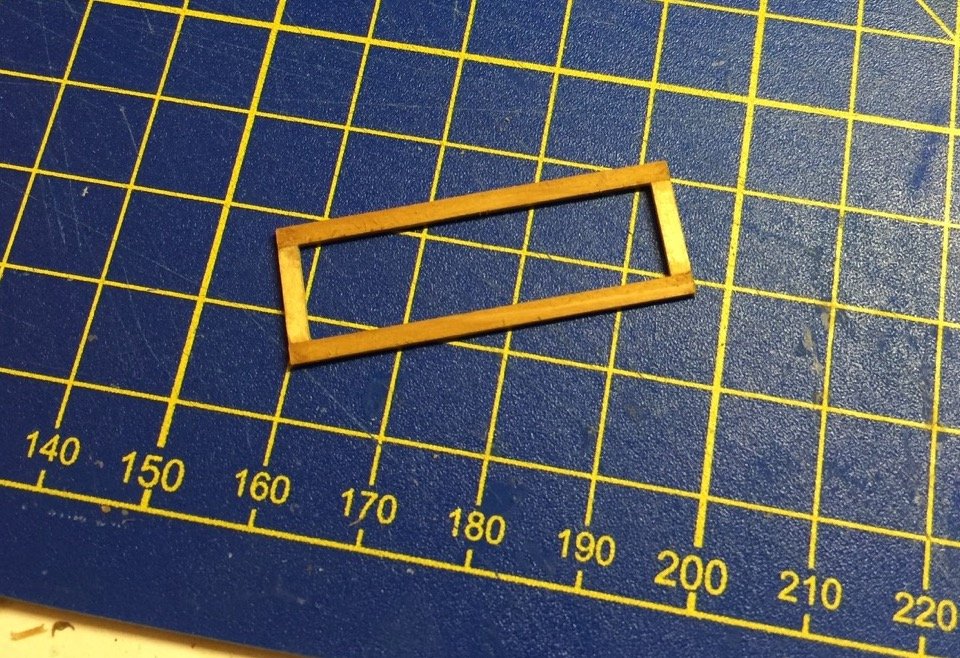
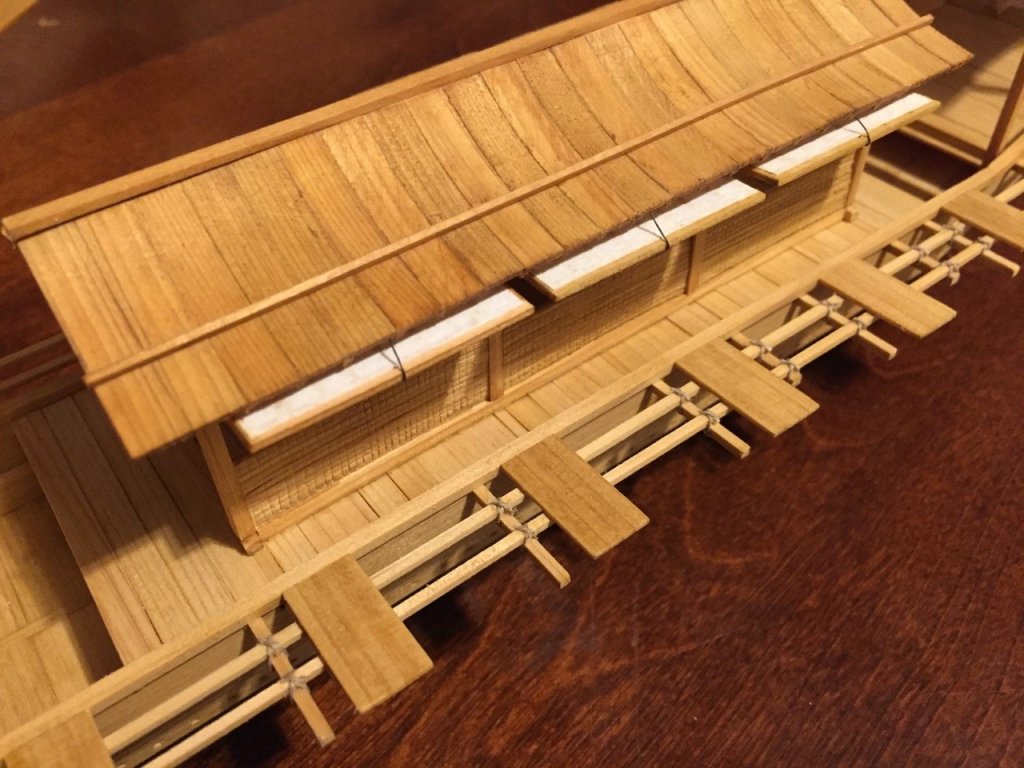
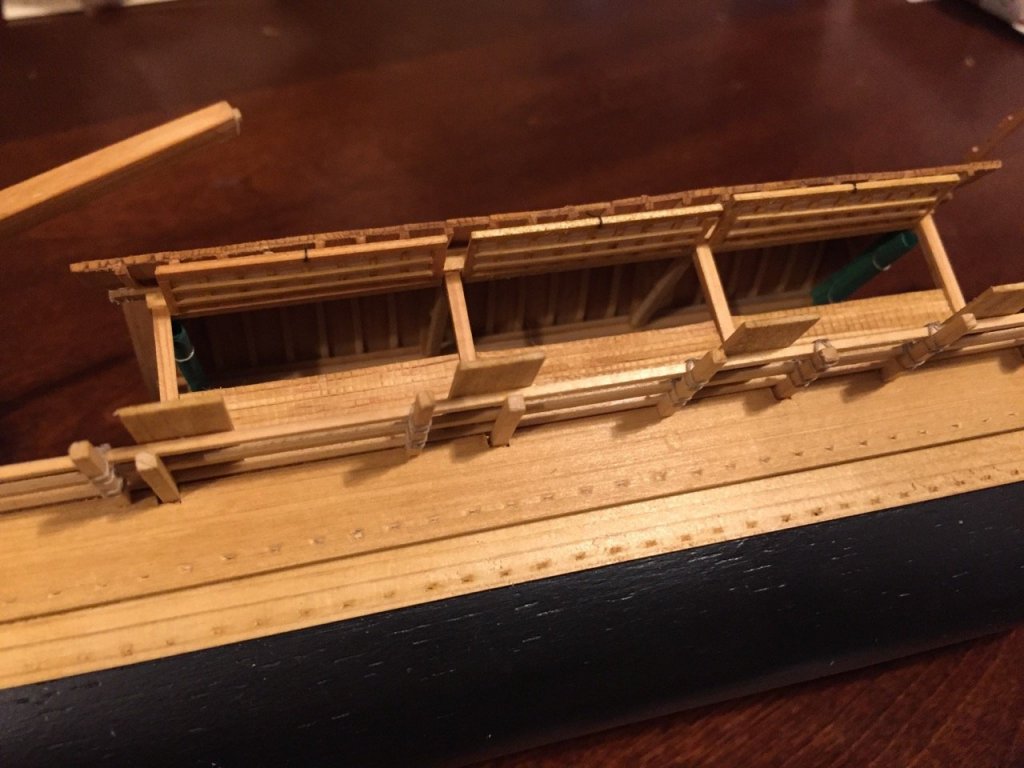
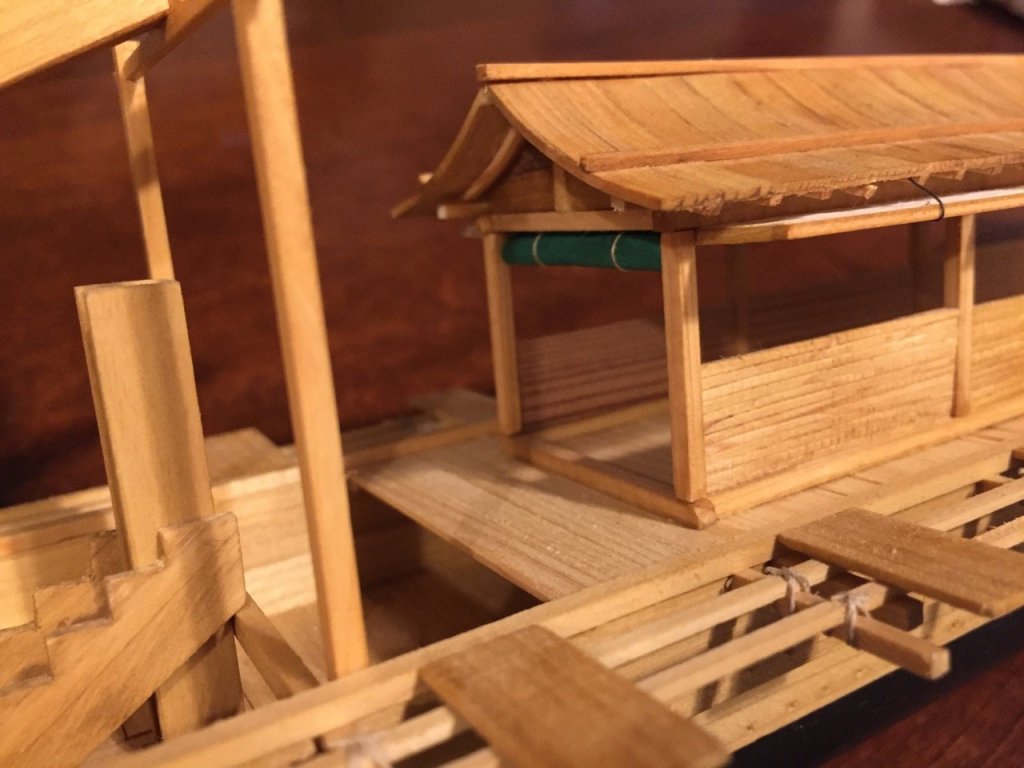
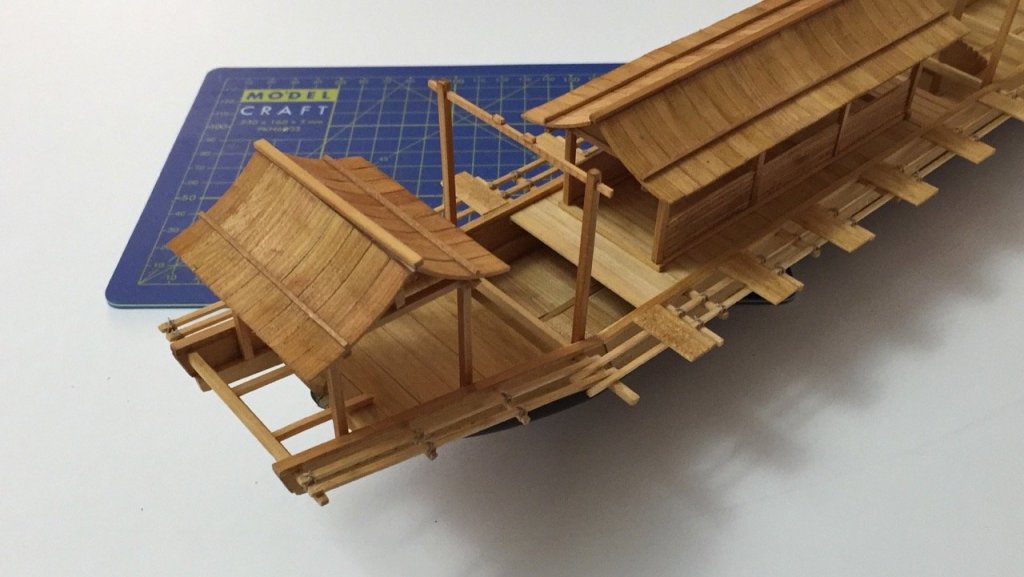
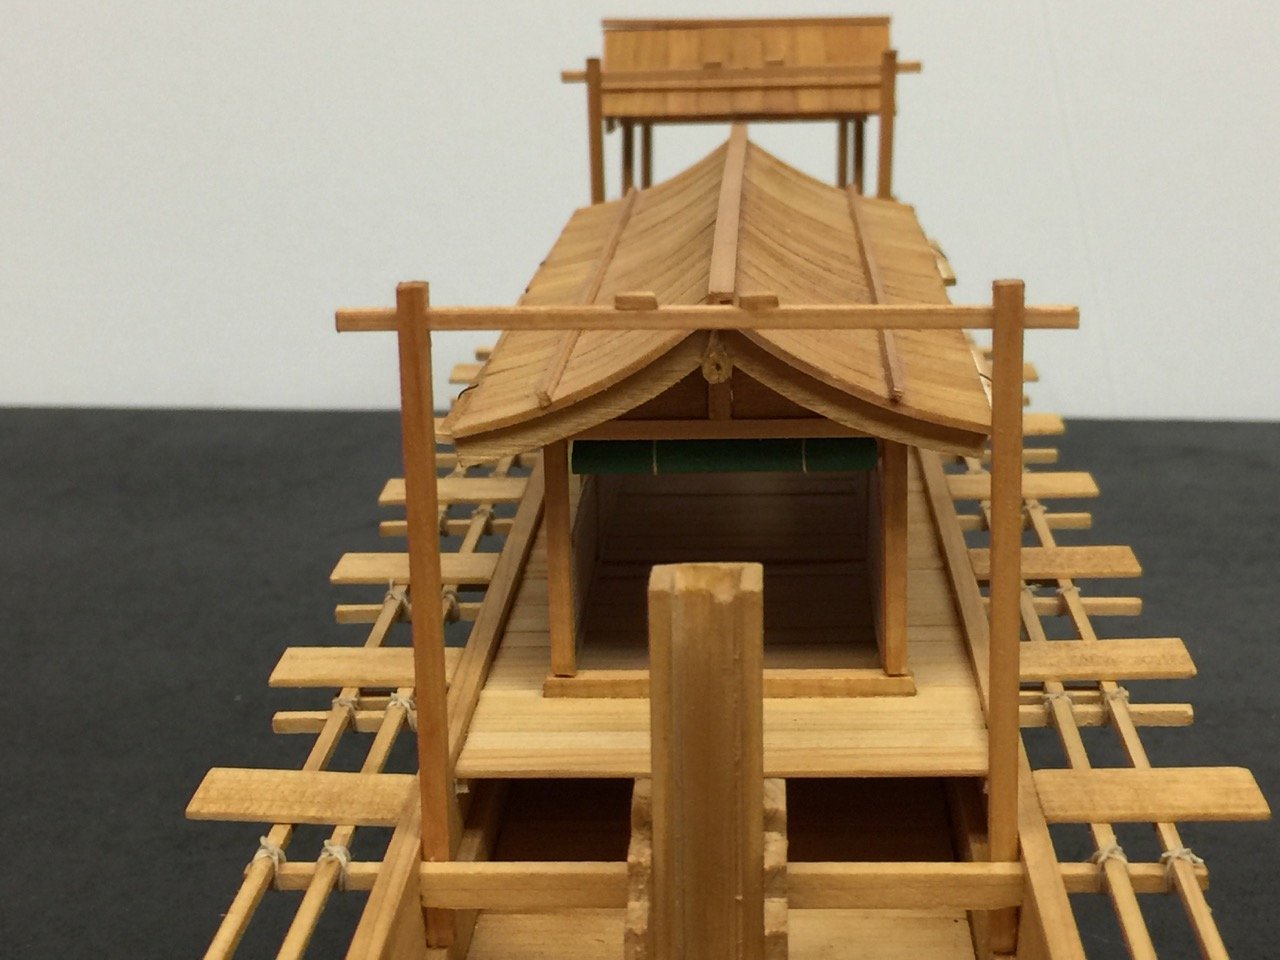
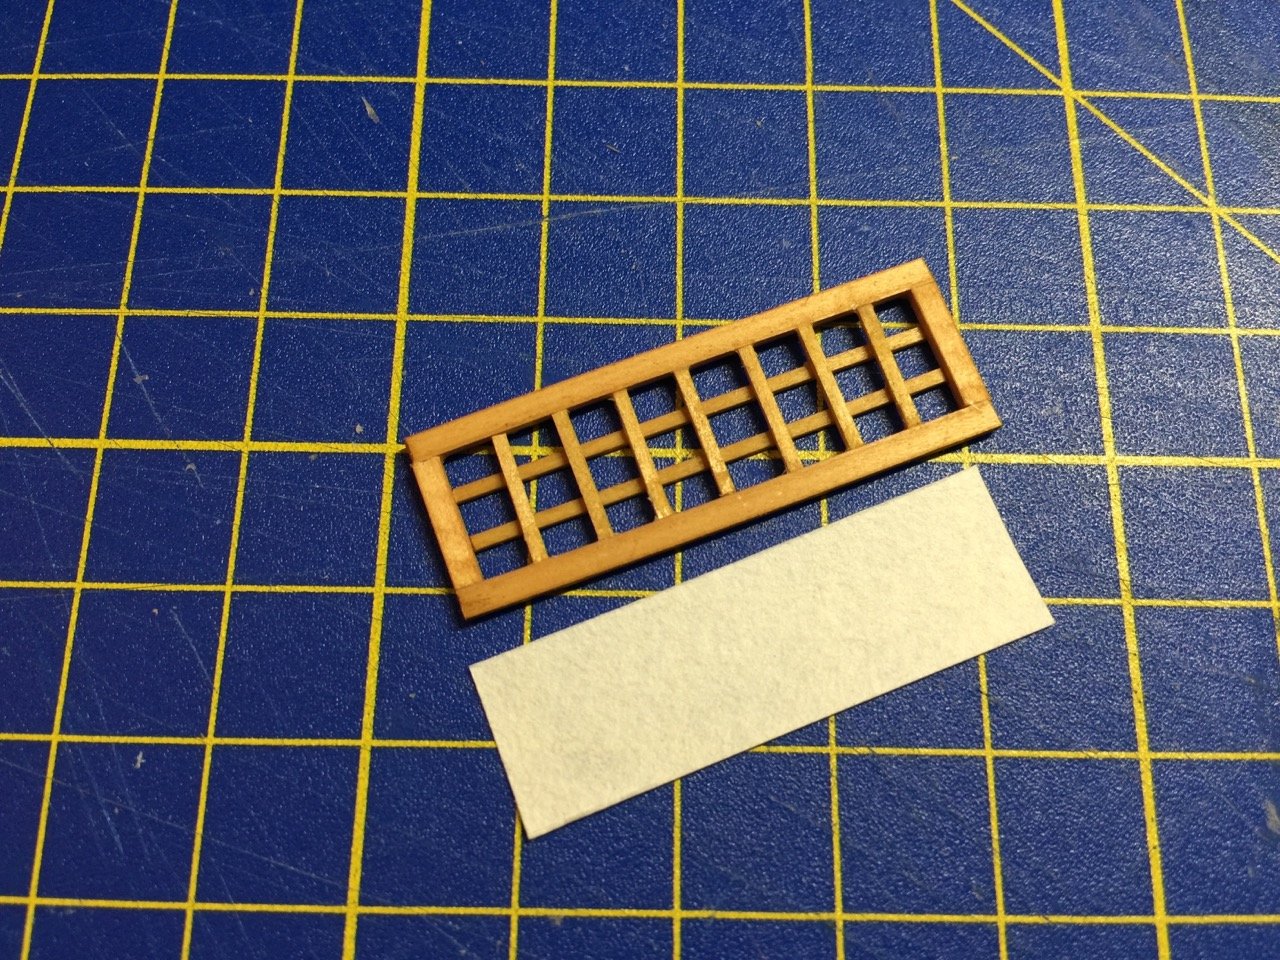
Wind screens The rectangular openings of the large yakata, or deck house, apparently had fold down screens. The exact construction of these aren't specified anywhere I could find, but they appear to be something akin to shoji screens, or the may have been solid wooden panels that lower when the weather is bad. I chose to make them like shoji screens. I created a frame and then added a wooden lattice structure, kind of like large gratings. But, rather than make them interlocking, notched battens, I just made them very thin and made them simply overlap. The lattice is then covered on the outside by rice paper. There were six of these panels needed, in all. They would normally be hinged, but I just glued them into place. You can't see where the hinges would be anyway. The open panels would also need some way to stay open. I decided that these would be hooked to the rafters of the roof overhang. I decided to simulate this by attaching a thin piece of wire that just pokes up into the underside of the roof. Again, at this scale, you can't really tell that they're just standing wire. Something I didn't really know about shoji screens until I was researching for work on Woody Joe's Yakatabune kit, is that the traditional shoji screens have the paper only on one side. The "nice" side is the inside of the room with the nice wooden lattice pattern showing. The "rough" shows only the uninterrupted paper. So, the paper is glued here onto the tops of the open panels. So, you can't see the lattice work unless you look up from underneath the model. At the ends of the yakata, are likely simple cloth or maybe bamboo curtain. Looking at various paintings, it seems that these would most likely roll up. I believe the term for these are noren. That's the name for cloth doorway room dividers. I don't know if these are the same, but I assume they fall into that category. I experimented a bit with different ways to represent these. In the 13th-14th centuries, and on a ship, I figured that this would be a plain design. Most noren are really visual dividers. They are normally split cloth and very lightweight, so they don't block the wind or anything. They seem to give more of a sense of division of space, marking an entrance. I planned to show them simply rolled up, so I experimented with printing a color or pattern on paper and rolling it up, but I didn't like the results. I then used a piece of silkspan tissue paper and painted it using very thin water based acrylic. To color it, I tried out a set of gouache paints that I wanted to test out for various purposes. These are basically opaque watercolors, and they worked really well on the paper. They added no thickness to the paper, and I was able to roll the paper up and tie it off to mount in the doorways on the model. The model doesn't have much color, so I just chose a simple green for the noren. In the following photo, in addition to the lattice work on the inside of the window panels, you can see the rolled up noren at the ends of the yakata. Here's another view at the forward end of the yakata.

-
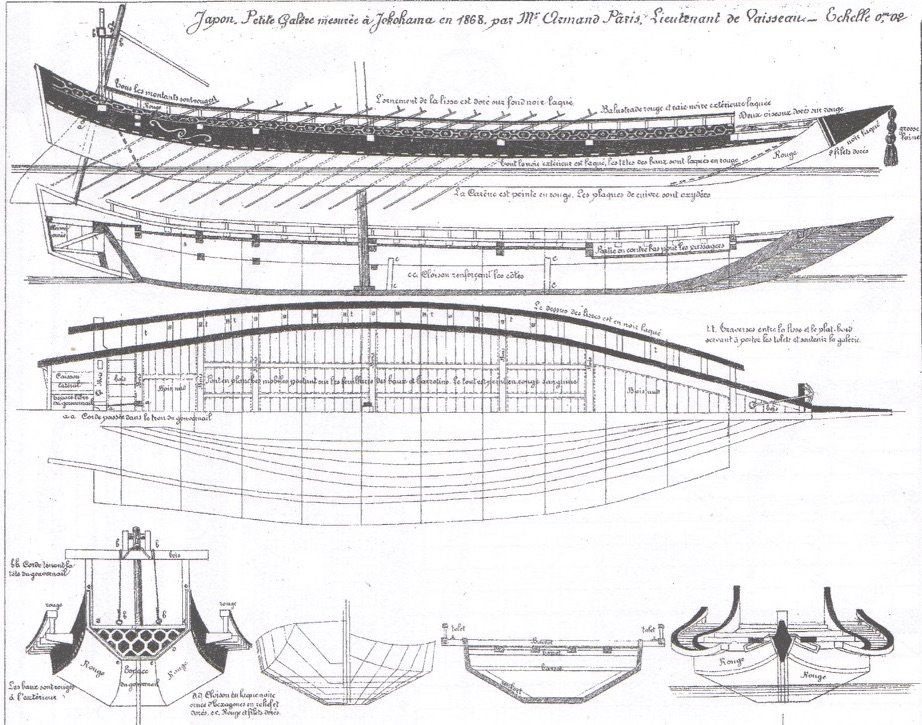
That's what I'm thinking. Now, not to abandon this model, but I did want to mention here that I've made some mental breakthroughs on some Japanese boatbuilding issues. And my next project, for which I'll start a blog, is the Gozabune, which is a term for a highly ornate boat used by Daimyo for entertaining and to carry or escort high ranking officials. Basically, a State yacht. These are basically dressed up warships. In this case, I'm looking at building something called a Kobaya, or small fast boat, though this one is not particularly small. We're fortunate in that a French officer recorded measurements of several Japanese vessels in 1868, at the beginning of the Meiji restoration, and it appears in the French tome Le Souvenirs de Marine. As is often the case, I don't start blogging about a project until I've done some experimental building, which often turns into a partially started (or completed) project before I'm confident that I'm on the right track. There is a nice model of this in the French National Maritime Museum. Also, a Japanese man by the name of Yukio Nakayama has made a huge range of models of Japanese watercraft in 1/70 scale and has made many similar Kobaya. His models are displayed at museums and other locations a few times a year.
-
I've posted a photo of this model before. But, here's a close up of the sails on it. This is a 1/10-scale model. I've never seen sails like this on other period Japanese models or paintings, and I don't know enough about it to say that it's right or wrong. It might be the ends of the mat fibers are left long, so they can easily be tied together. In any case, I probably won't try to simulate it.
.jpg.c68673dcece9269d188b778ab35c1fc6.jpg)
.jpg.68323e1e07c0ac311705c6377cbc2b98.jpg)
-
cog, you and Wefalck are giving me great ideas that I want to experiment with. I've never really considered rice paper. I always thought it a bit odd to use as it's slick on one side and rough on the other. I have a small roll of it that someone gave me. Wefalck, I like the possibilities in painting the sails with acrylics. I've never done it before, but it's something I may have to try out.
-
Thanks mwb, Andrew, oh and forgot to say thanks and welcome to Pat! I appreciate the discussion on sails, Carl, Wefalk. It has definitely gotten me thinking. Even if rice-straw mat is as much as 1/4" thick (and I'm sure it's much thinner than that in order to be able to roll it up and store it or raise sail), in scale, I'd have to use something no more than 0.005" or about 0.13 mm. A thin piece of cloth will easily exceed that. The printer paper I use is about this thickness. The Silkspan-type stuff I have is about 0.003". I might also try using a piece of drafting linen, as a friend of mine gave me a roll of it that he had sitting around. With only one small piece needed for this model, it might be the perfect use for it. I was originally going to go with a piece of cloth with fine machine stitching delineating the edges of the rectangular straw mat panels. I'll think on it for a bit. Still more construction to do yet.
-
Wefalk, thanks for posting the link. That is a very nicely done series that looks at traditional Japanese boats through the art of Japanese block prints. The author of that series, Jean Pierre Mélis, a Japanese ship modeler, Masami Sekiguchi, and I, actually had several email discussions about the boats in the prints for his article. I have to admit it was mostly Mr. Sekiguchi providing the information to questions for Mr. Mélis and myself. But, a small photo of my Tosa Wasen model is included in one of the articles. You make a very good point about understanding the function of features. That's been a big issue and a stumbling point in my projects. Without that understanding, it's very easy to misinterpret something you're seeing in a drawing, painting, etc. And, often, a feature is only known from a written description.
-
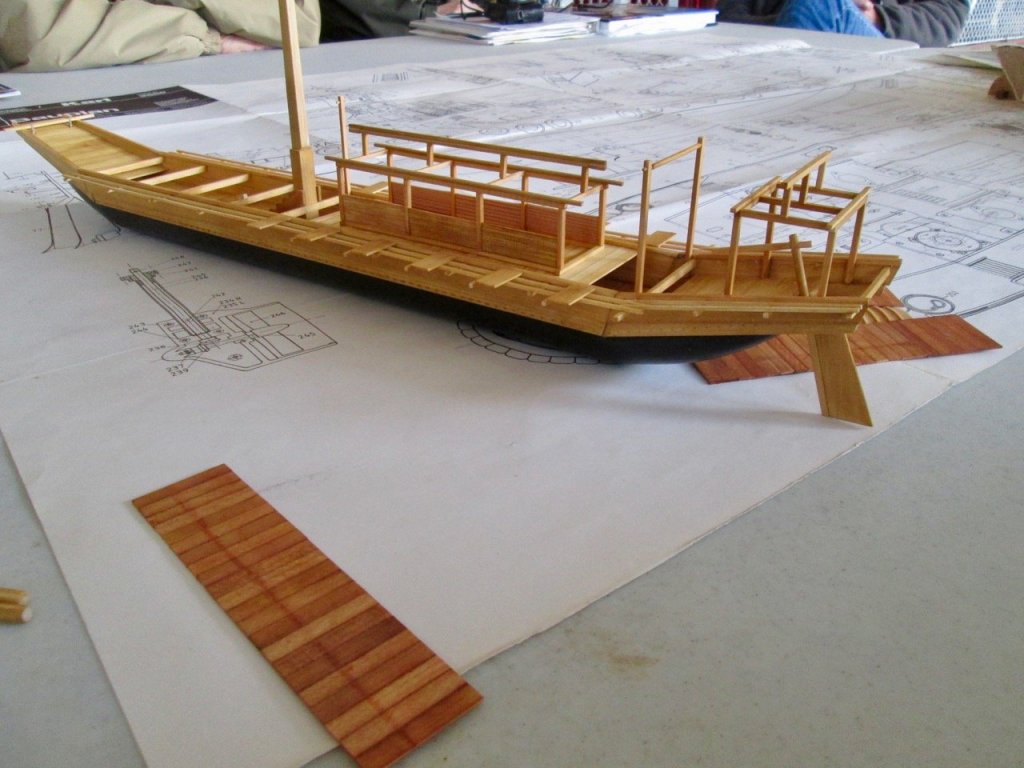
Thanks, Druxey. It's nice to see some discussion on the subject. But, since it's not a build log without photos of the build. Here are another couple pics of the model that were actually taken before the bindings were added to the rails. I don't know yet if I'll have the mast up with the sail raised or not. At this point in history, the Japanese did not use cloth sails. Instead, they used straw mat. They were bulky and heavy, particularly if they got wet. I'm not sure what the best way is to simulate them. Probably, I'll just end up sewing a sail of coarse cloth. Would be nice to see the rigging, though I like illustrating the way the mast was stowed in the lowered position. Maybe I'll have to make TWO models... Things left to do: Finishing the deck house details Making a sail and yards Making oars Making anchors Mounting the rudder Rigging (if the mast is raised) Also, it be really nice to have a figure in period costume to give a sense of scale and historical context. I've been experimenting with figure making, but not very successfully yet. And then, specifically, 13th century costume. We'll see...

-
Great comments. I agree that it helps to have some sense of the Japanese mentality. And, Japanese carpentry is pretty amazing. But, I think that boatbuilding takes a slightly different path than carpentry. There's a different sense of practicality for the builders of the workboats of the day-to-day fishermen and cargo boatmen. There is some amazing craftsmanship, but I think this is mixed with the need to be able build and to make repairs quickly and simply. There's actually very little information available about Japanese boatbuilding. Douglas Brooks's book Japanese Wooden Boatbuilding, is one of the few works, in English or Japanese, that gives great insight into the techniques of small boatbuilding. I have found two books in Japanese, published by museums, that discuss boatbuilding techniques in some detail. Both are out of print. I also have about a half-dozen books written in Japanese about Japanese wooden boats. But, most books are overviews of the coastal transports of the 17-19th century. The information on anything else is pretty sparse. In english, I've only found what's in the Osprey books, which is, at times, misleading and laughable. The way I've found to best understand their construction is to build them or model them... or to attempt to. Building Japanese kits really does teach you something of how the boats were constructed. Particularly the Tosa Wasen kit from Thermal Studio and the Higaki Kaisen kit from Woody Joe. And then scratch building one is great in that you discover how much you DON'T know.
-
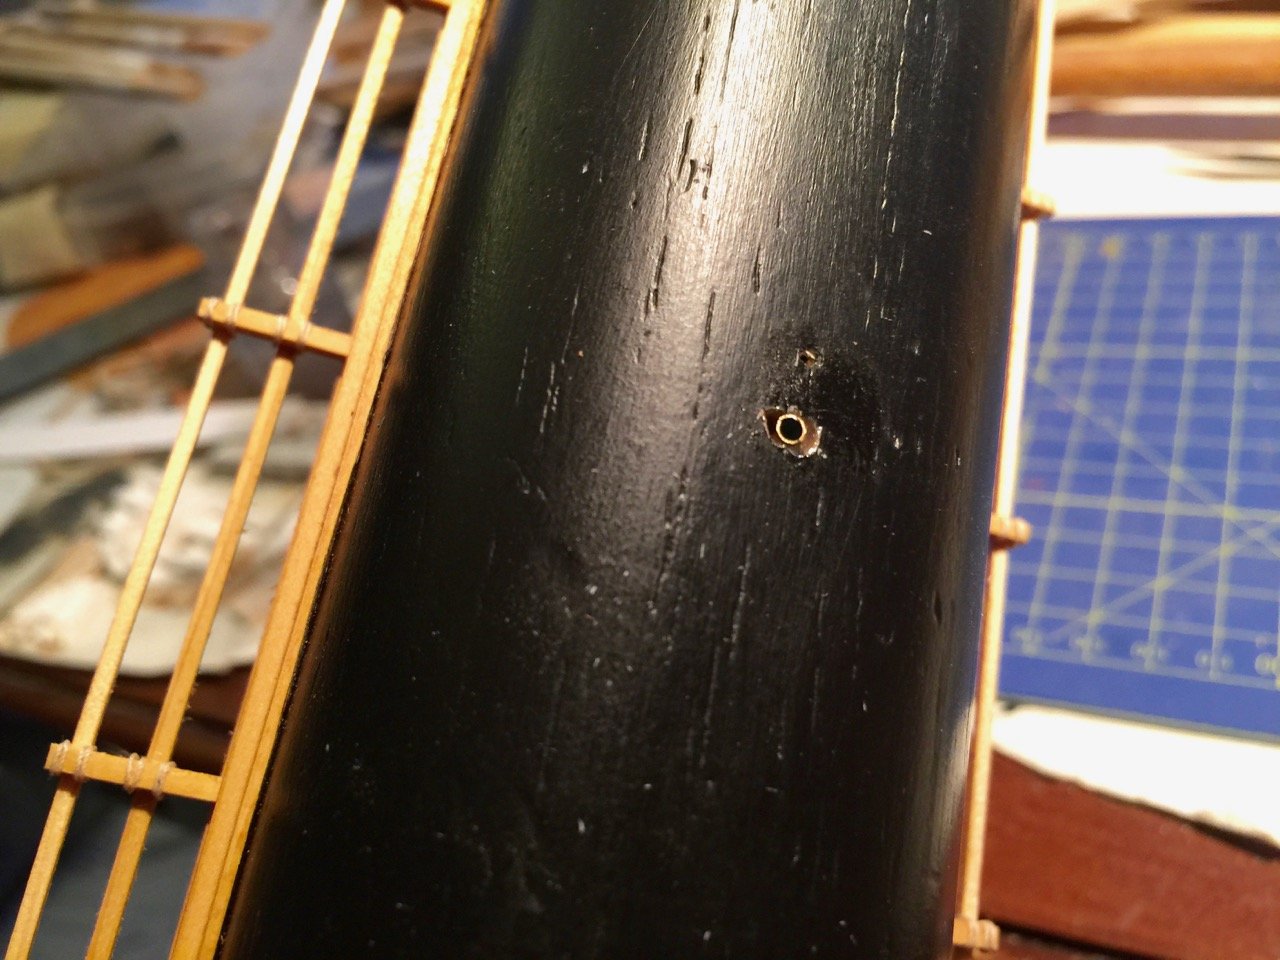
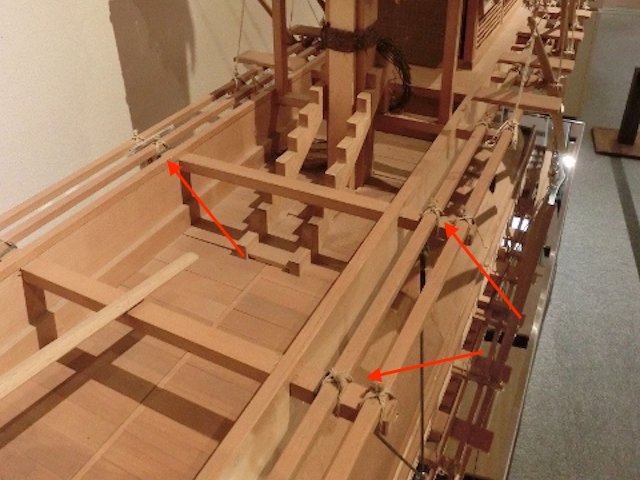
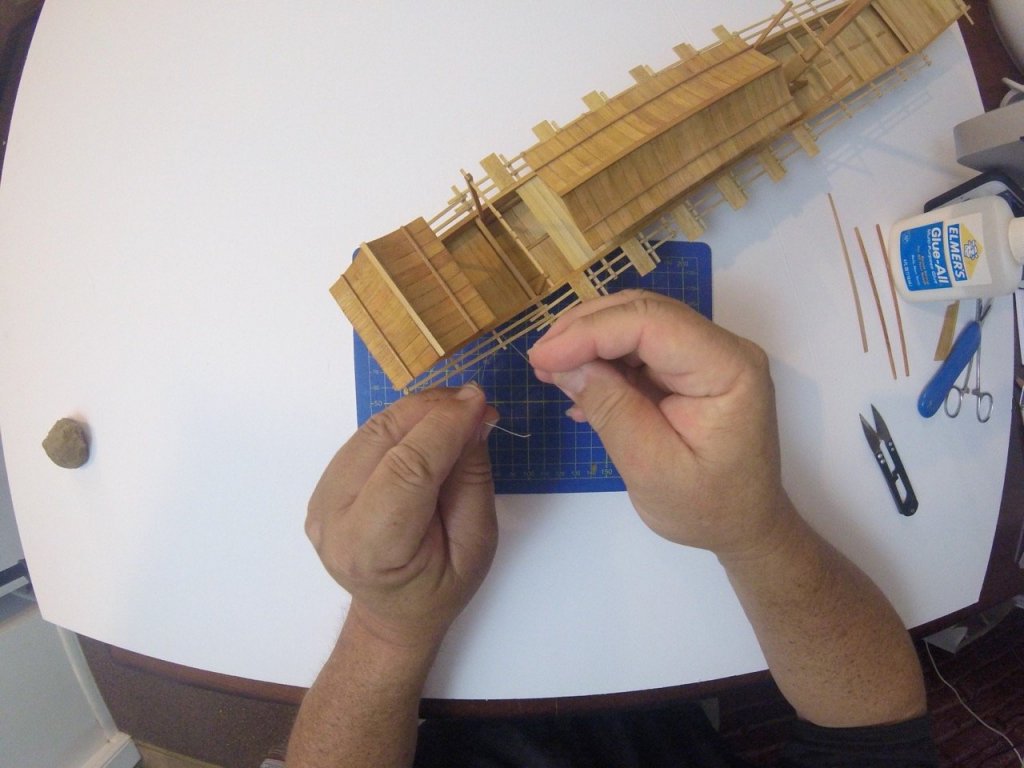
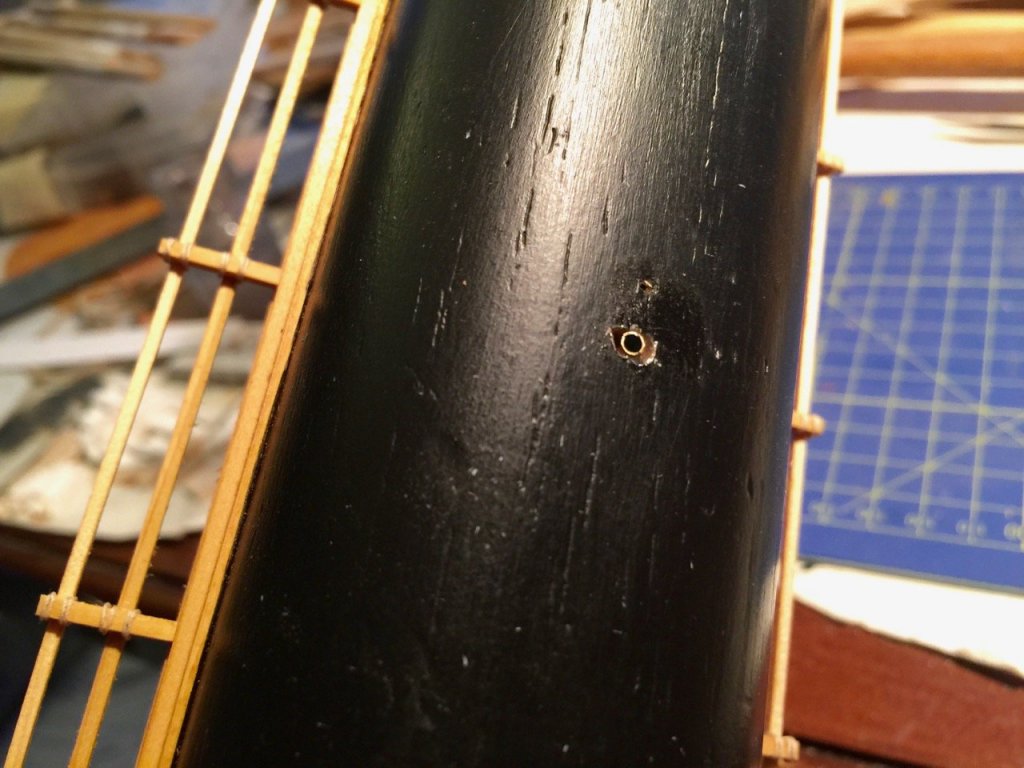
Some more pics to share... You might have notice all the rails along the sides of the boat. You may have also wondered how they were fastened down to the beams. I don't know if this was true of all boats of this type, or if this changed over time, but I went with rope bindings that some models show. Clearly such bindings weren't enough to keep the rails from slipping off the beams, but similar binding were used in the early days with the sculling oars where the handle section attaches to the shaft. Some kind of peg/key would likely have prevented the sliding, while the rope simply held the parts together. Now, if the rope binding is used to hold the rails to the beams, why aren't they used to hold the rowing platforms to the rails? I don't know. Perhaps because those platforms are larger, and need to be very stable, they are fixed to the rails using a more sophisticated fastening. In any case, on my model, I wanted to add these bidings. Here are some photos I took while experimenting with a GoPro camera I got last year... I wonder how many of you do the same thing with glue? When I'm working with many knots, I put a dab of white glue on the back of my thumb, so I have a constant ready supply without having to reach for a glue bottle. As for the bindings, I had to tie them carefully, so they all looked exactly the same as they wrapped around the beams and rails. In the photo below, you can see how they wrapped in kind of a figure-8 pattern, with the loops of the 8 wrapping underneath the beams. That hole in the bottom of the boat is where I glued in a piece of brass tubing to receive a mounting rod. There are a pair of these. The voids around the hole got filled in later. Below, you can see the progress on the bindings, with most of them tied here. You might also note the additional progress on the deck houses. Here, they have a central external beam attached. Also, note that the raised beams ("goal posts") have been changed. One of the round ones I had mounted earlier broke. So, I took the opportunity to change them to the rectangular style shown here. Pretty soon, I'm going to have to figure out how to finish the sides of that aft deck house...
.thumb.jpg.bb9d83d940c429c220424a65669c534e.jpg)
.thumb.jpg.a309d64e073c016dbfdd375dd748730a.jpg)
.thumb.jpg.7d5d9c83ce2c25e83d041e6f72feaaf9.jpg)
-
Thank you, Druxey! Sorry I'm not more of a regular poster. Fortunately, this is a project that does keep moving forward, so there will be more posts. But, I only work on this one from time to time – it takes me a while to figure out what to do next and how to do it!
-
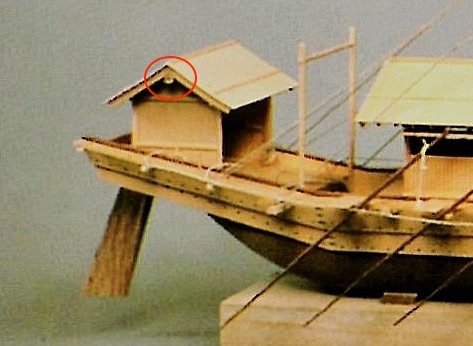
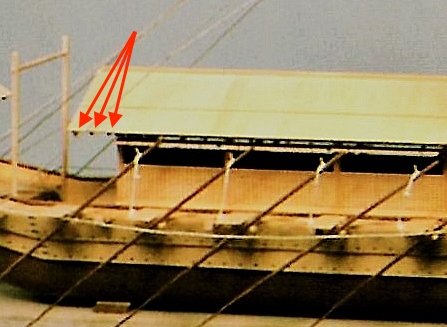
Somehow, I managed to forget to post an update here, even though I have made some progress on the model. Unfortunately, I didn’t take many photos of certain intermediate steps. But, it's been over 6 months, so I'd better write something here! Building the Yakata Roof Not really knowing how the yakata or deck houses were constructed, I began working on the roof, hoping something would come to me at some point. The roof itself was a bit confusing, as the drawings I’ve been using and the models I’ve been following as guides differ in the matter of the roof boards, the shape of the roof , and details. I've probably mentioned this before, but the scroll painting I’ve been referencing shows a curved rooftop with the roof boards running down from the top, and so does the drawing I'm using. However, some other models and drawings show boards that run lengthwise along the rooftop. Now, lengthwise boards make it easier to curve the rooftop, so that would seem to make sense. Even the museum model I've posted photos of has the boards running down from the rooftop, but with no curvature. Still, the scroll painting and drawing I'm using both show the curved roof board running down from the top. Well, I like the look of the roof in the scroll painting, and it is the only real historical record, correct or not. I had already cut and glued up the roof tops before I was convinced to curve them, so I had to try to add the curvature after the fact. You can see the roof assemblies in the photo below, taken at a meeting of the Hyde Street Pier Model Shipwrights. I realized after gluing up the boards that I should have used used a waterproof glue, like Titebond III, or maybe II would have been okay. As it was I used Original Titebond, so soaking the planks for bending caused many of the glue joints to fail, though I didn’t really have to use that much soak time with this wood. To bend a roof assembly, I simply clamped it between two heavy strips, dampened the wood, and applied pressure against the whole assembly. The amount of bend needed was pretty small, so this seemed to work well, bending each board in the assembly by about the same aount. Again, it wasn’t an ideal procedure, as I didn’t use waterproof glue, and the boards separated pretty easily when wet. But, they glued up easily after it was all done. Now, if you look at the following close-up of one of the museum models, you can see the ends of closely space rafters sticking out. I was a bit puzzled as to how you can have rafters like this and have roof boards that run in the same direction unless the edges of the boards ride on the rafters, but this doesn't seem very stable. But this is all I had to work with at the time, so I just added rafters to the roof assembly at the seam of each of the boards. Only recently did I find a couple nice photos showing the underside of a roof that made more sense of this kind of structure. Now, it's too late for this model, but it's something I can maybe use in the future. In any case, the roof were glued on, which made the model look a lot more complete, though there is still much to do...

-
Yeah, I don't think quality has changed that much. Overall, I think development costs for kits are pretty high. I don't know how much Matthew Betts got for the use of his drawings and research on HMS Terror, but I doubt that it was anything close to the cost of developing the kit design from scratch. NDC is doing their own development work and then paying Turk Model for the production work, so I wonder if they're making much money. The primary draw of these kits are the subject matter, as I think all the Nordic Class Boats kits are of currently existing vessels. Those interested might be a little more forgiving about dealing with various design issues, as they can add or fix-up details based on the real boats. At least, that's my theory. Clare
-
Hi Popeye, great to see your M&M Fun Ship build log back online! It's quite an extravaganza of candy-coated-chocolatey creativity... I love the separate (restroom?) doors for plain and peanut.
-
Hi Mark, Well, I did write a Ships in Scale article on building the Woody Joe Higaki Kaisen kit... Clare
-
Great job Mark! I'm really happy to see other people building Woody Joe kits. I still have a large stack of them waiting for me including another one of these Hacchoro kits that I'm hoping to do some extra detailing on. Some day... Are you considering any other Woody Joe kits? Clare
-
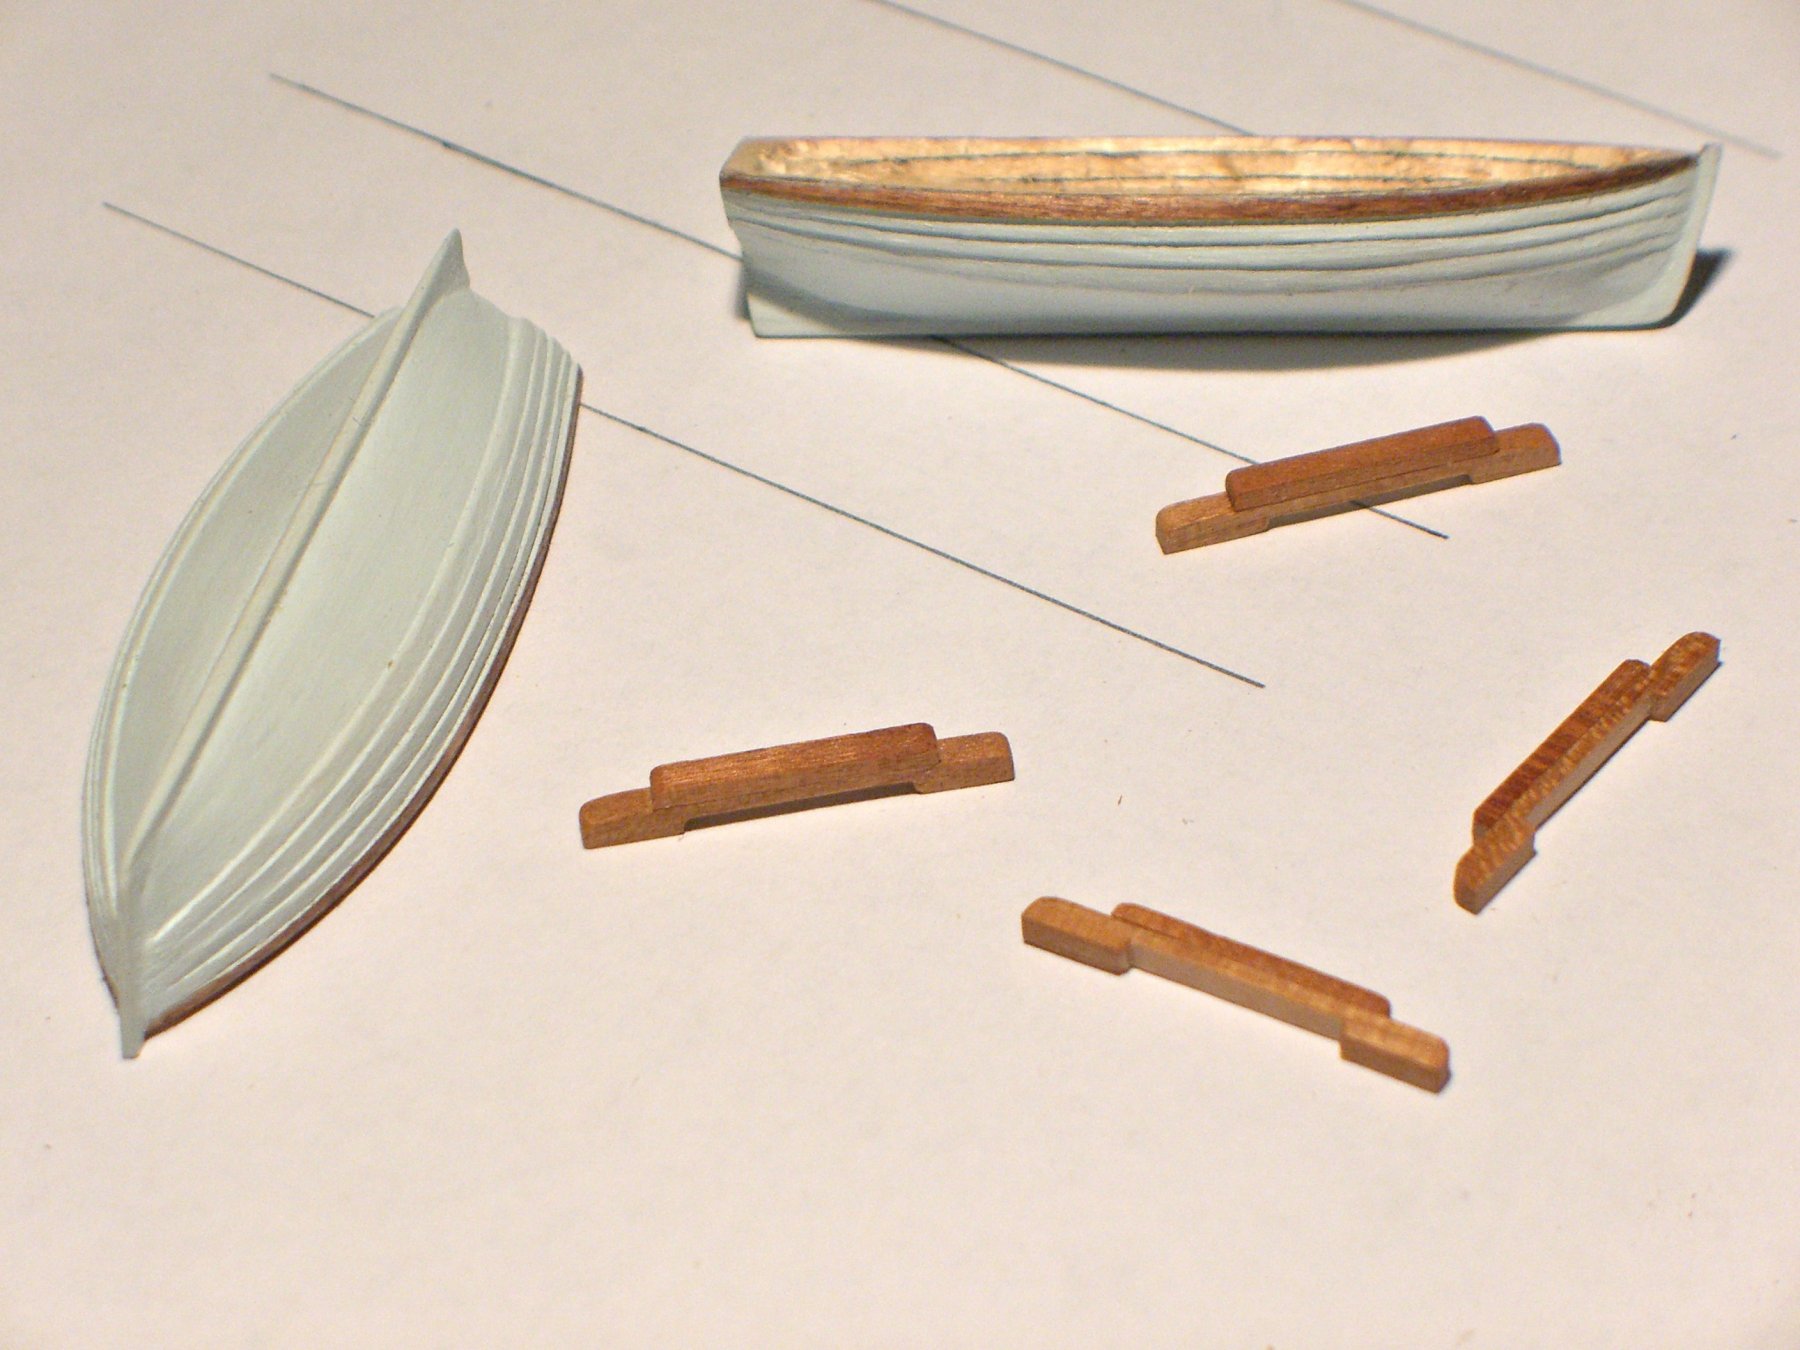
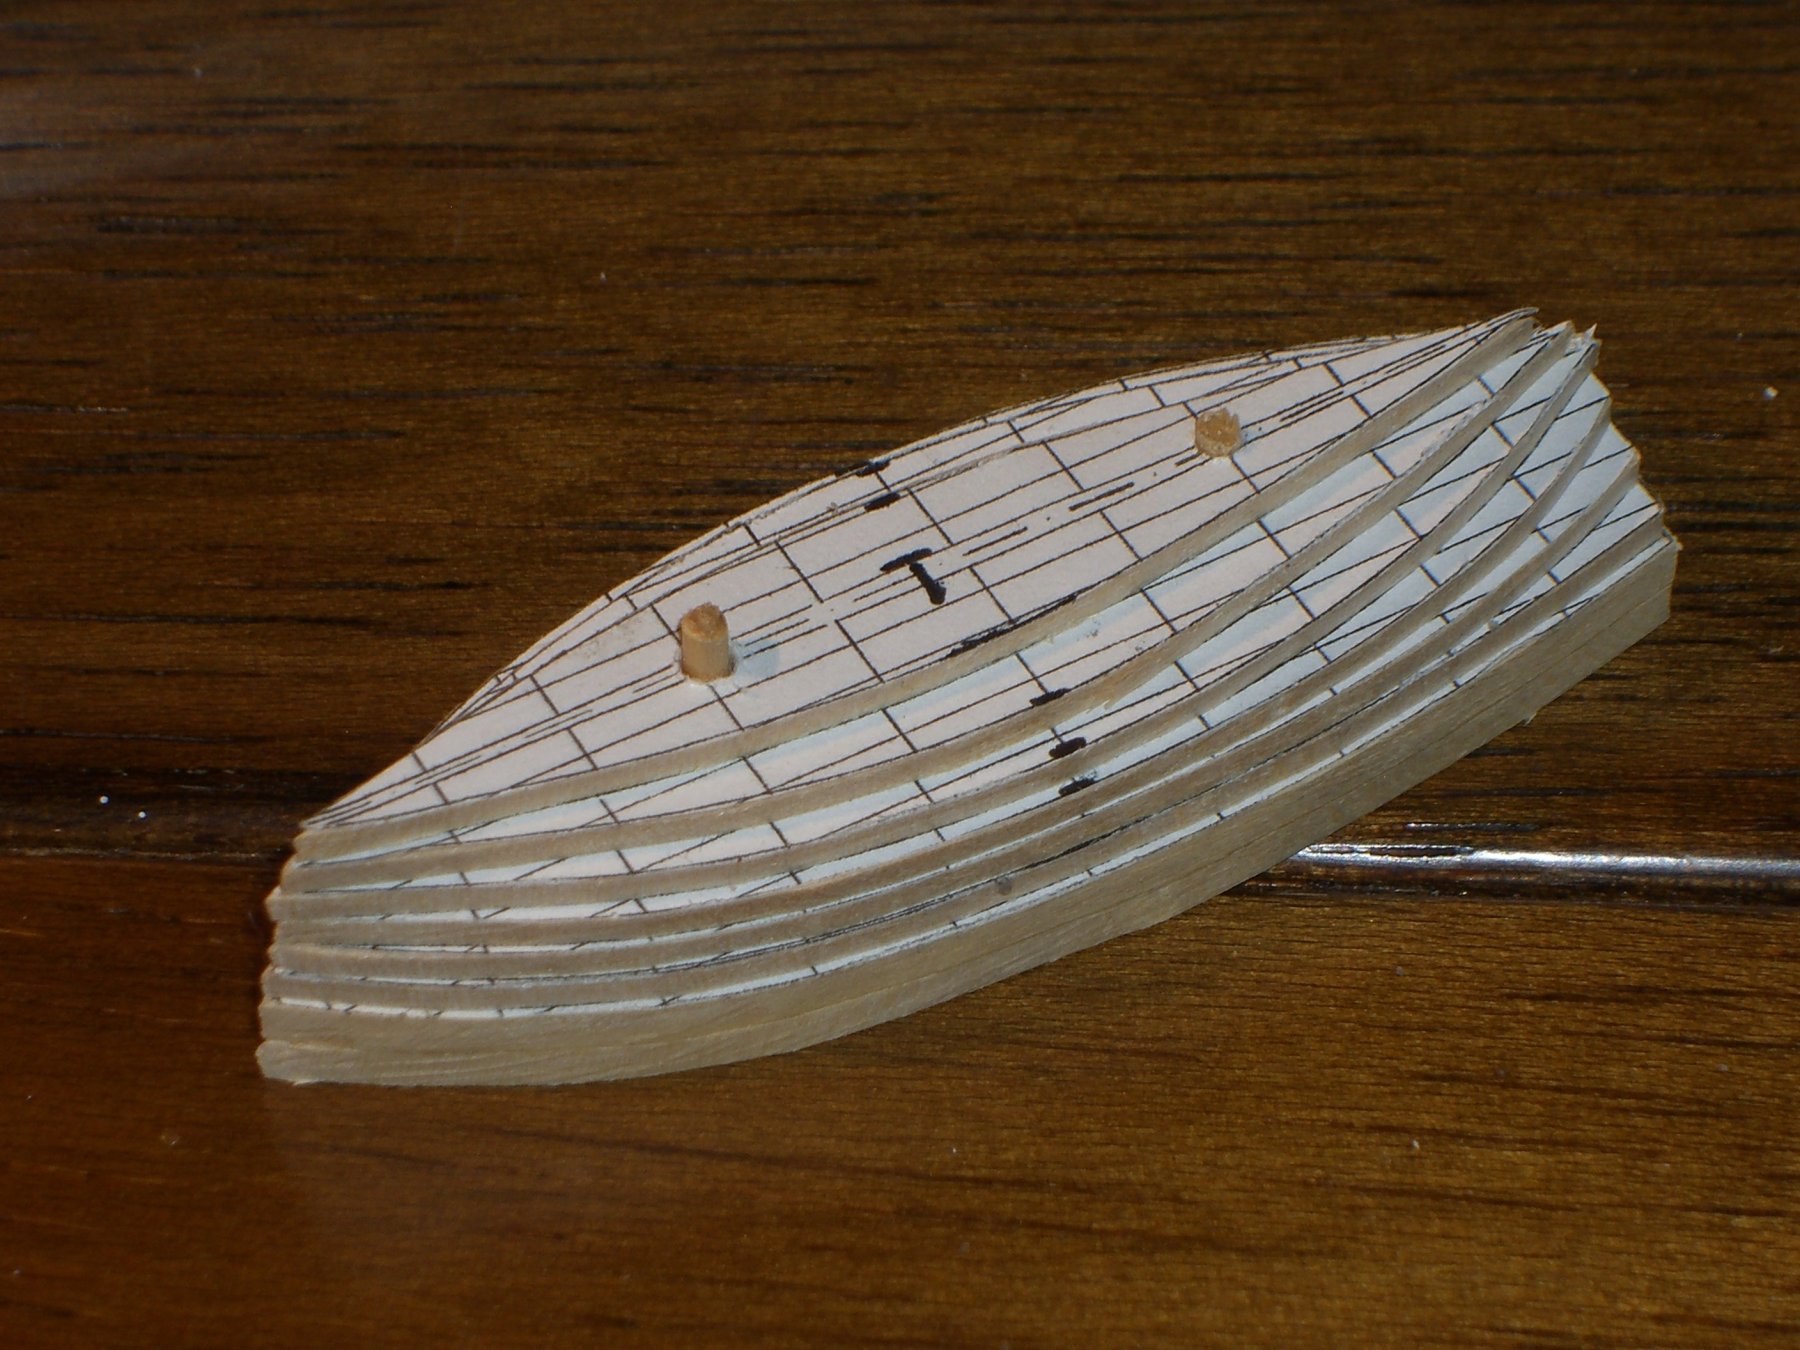
I agree that Tom Cunliffe's book covers the topic very well. I always felt that the shape of Ronnberg's pilot yawl didn't seem right to me. There are several photos of them in Cunliffe's book. If I recall correctly, there are also some small plans for them in the book. They are interesting boats. When I built my model of the Mary Taylor based roughly on BlueJacket's plans, I scratch built the pilot yawls. It wasn't difficult. If I recall correctly, I just use the plans in Cunliffe's book. Here are some pics... Clare
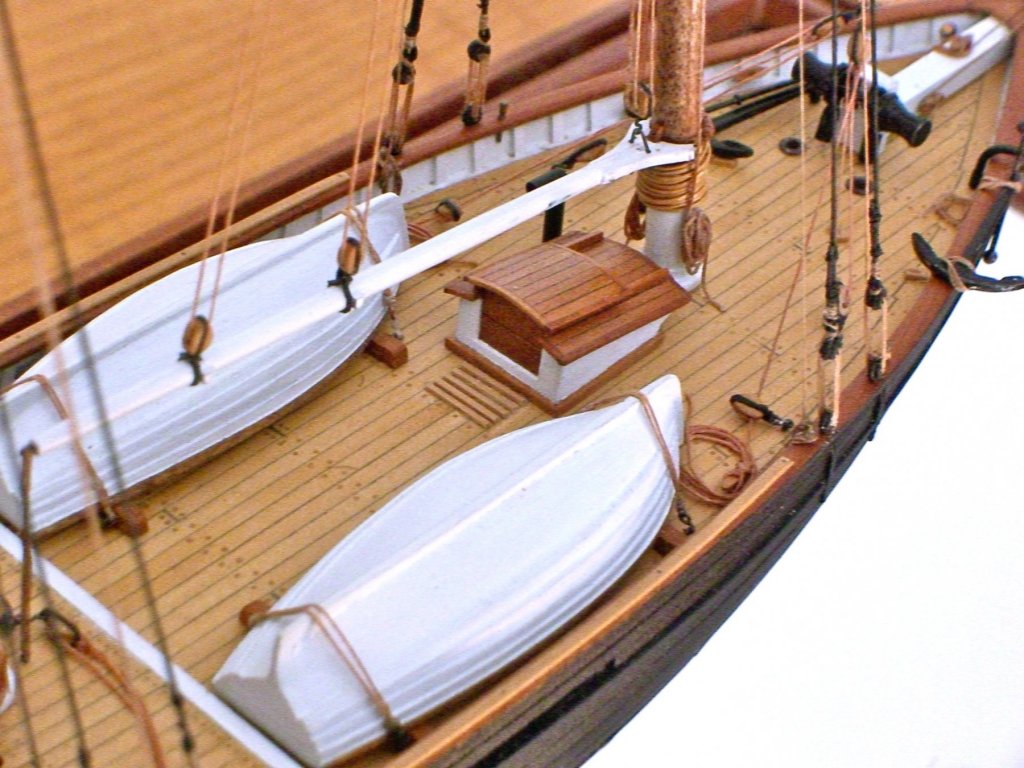

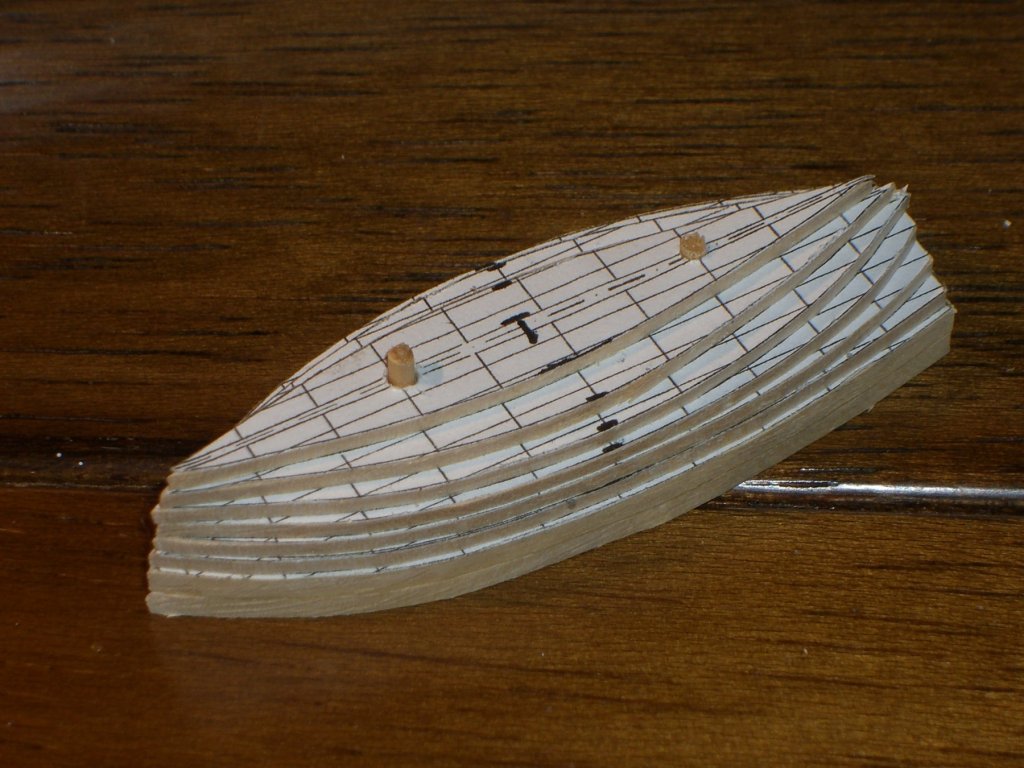
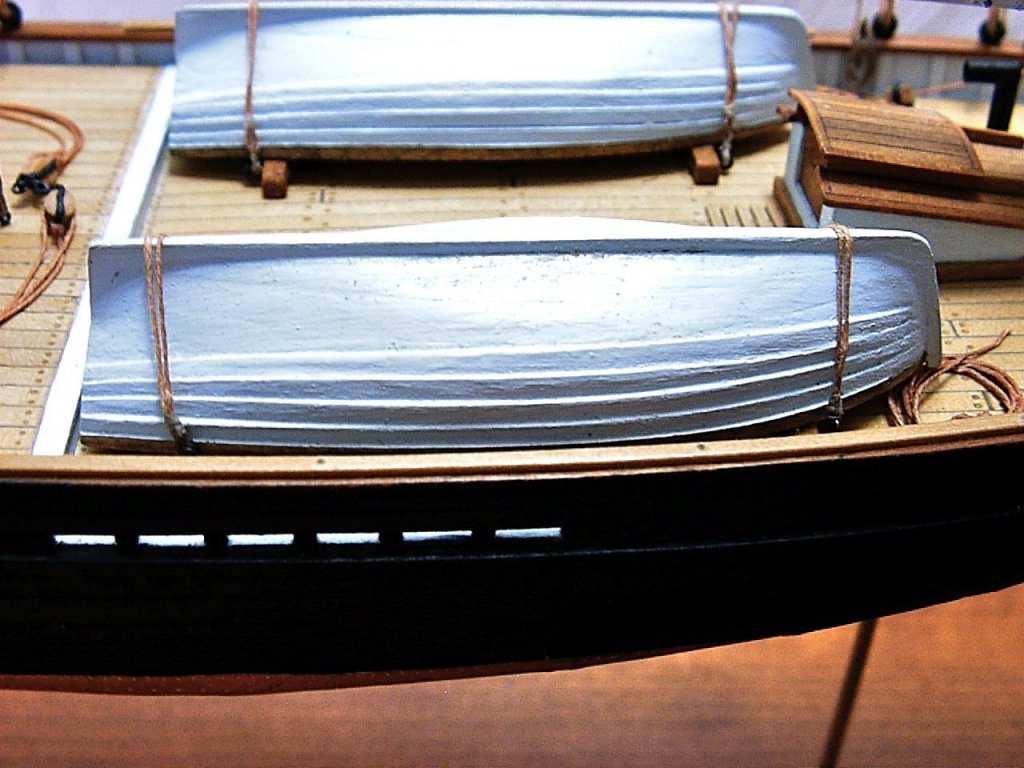


.jpg.455df9958f5c45564e1fd2efbe0fd967.jpg)
.jpg.4496e042b438d08eaa66675dd8f0c719.jpg)
.jpg.234ae30a3167cbddf087e9af4b678218.jpg)