catopower
-
Posts
1,900 -
Joined
-
Last visited
Content Type
Profiles
Forums
Gallery
Events
Everything posted by catopower
-
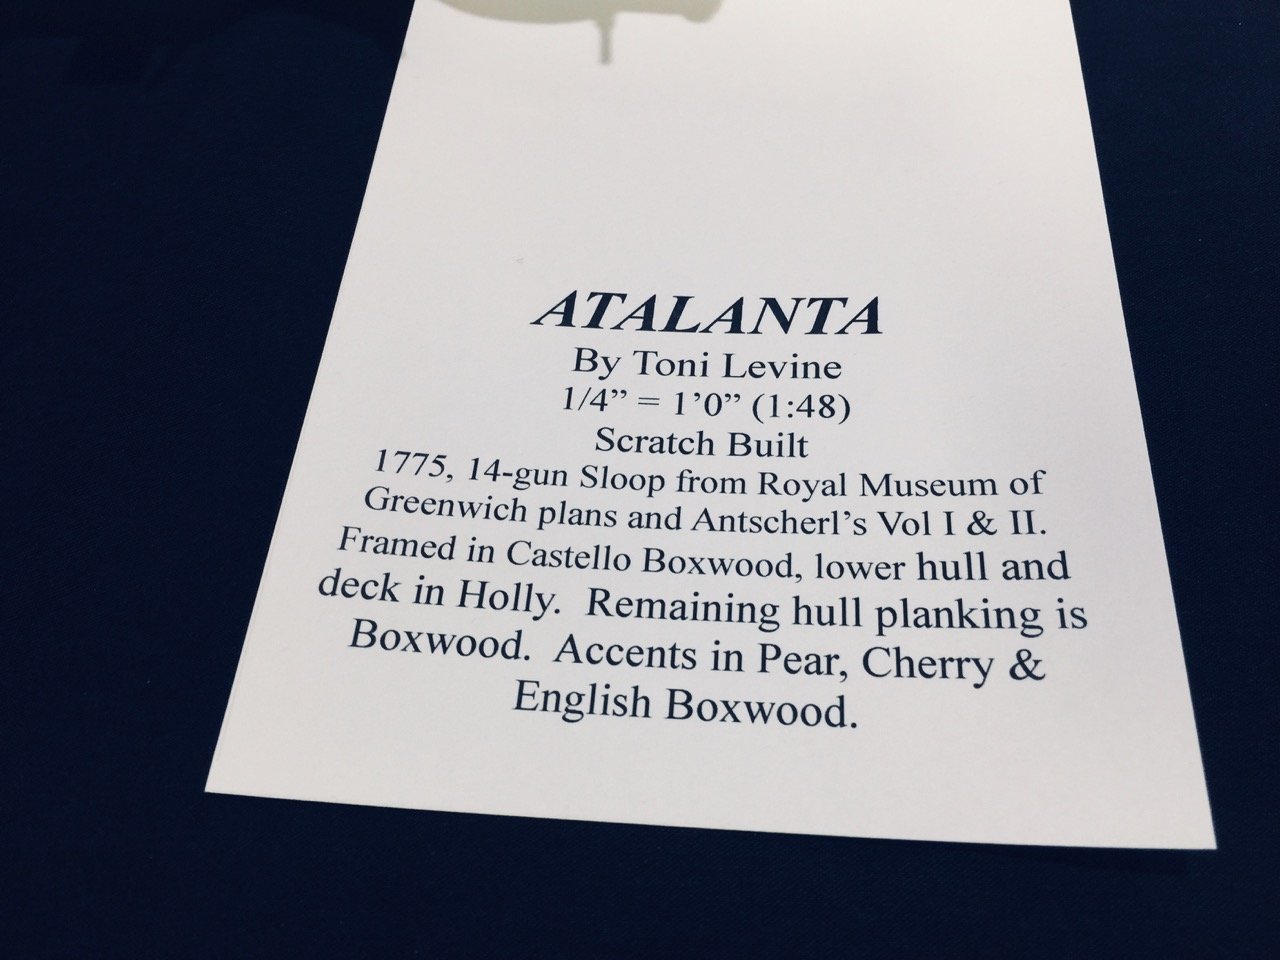
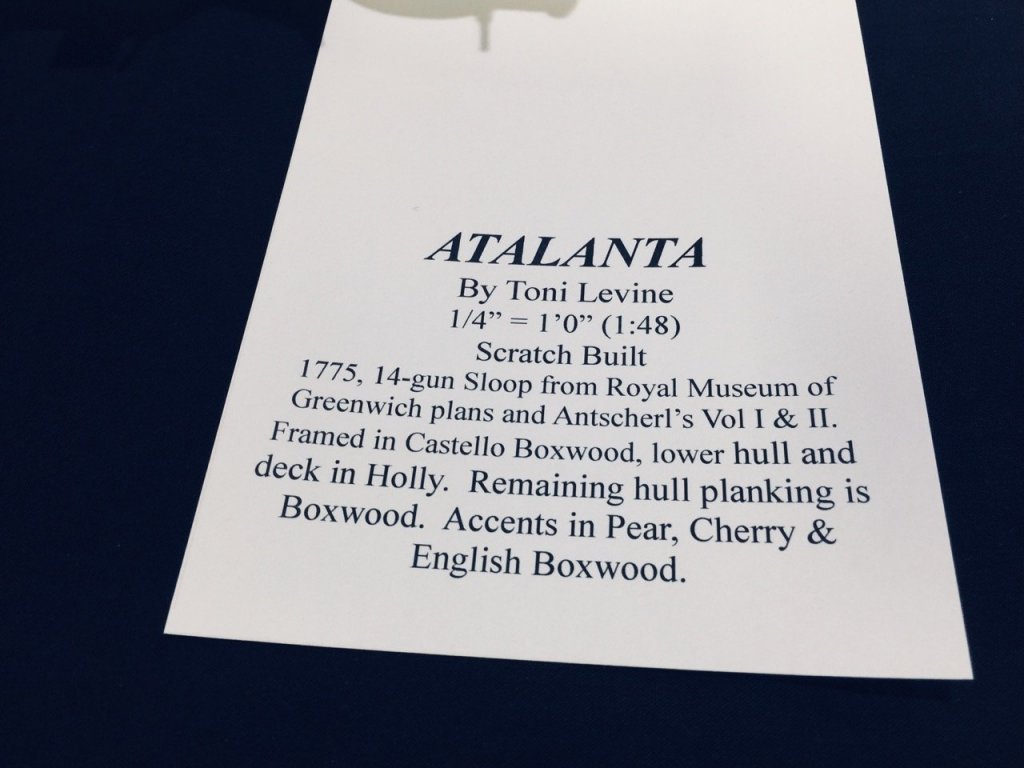
 Be careful when using cherry. Over time, it darkens quite a bit with UV exposure. I scratch-built a model using cherry and it is a LOT darker that when I built it 15(?) years ago. It looks nice, but not what I'd expected when I started. Clare
 -
I would add Shipyard (card model and soon to be a wood kit release, apparently), Disar, and Ship Model Okumoto to the list.
-
Hello Chris, Congratulations on getting the first kit done and on sale! The Alert looks like a really beautiful kit. I was reporting on its release in our club newsletter when I realized that there is no description of the kit contents on your product site. That would be very useful for those who aren't on MSW, or just for those who don't want to dig around to find the info. You know, something like, kit contains X laser cut sheets of high quality birch plywood, boxwood strips for planking the hull, large sheet of P.E. parts... all that marketing stuff. It's helpful to know, though most of us on MSW already know you and your work and I'm pretty sure would buy your products sight unseen – myself included!
-
Keep in mind that this is a kit from Billing Boats 600 series, so it's made to be built in two halves. The planking you're expected to do is very simple strip planking. The shape of the hull allows for that very easily. You could try to get fancy and spile/taper planks, but if you're painting the hull anyway, you can get away with just laying the planks down as is, the way the instruction book shows. Still, you should soak the planks before bending. A little heat always helps too. The hull of the Bluenose II is very easy to plank this way. But, of course, it's up to the builder. Once the planks are down, you can sand and use filler where needed to smooth out the hull and deal with any gaps.
-
Photo Etching - do it yourself
catopower replied to Dziadeczek's topic in Metal Work, Soldering and Metal Fittings
I have a book by these same authors – probably the same thing, but under a slightly different title: Photo Etching for Modellers. Dances around the subject without actually telling you how to photo etch. I have the Micromark set. The hardware might not be useful to your project, but you can experiment with it pretty simply and might be able to make use of the chemicals and photo-resist material, etc. In So. Cal, you should be able to find chemical suppliers very easily and avoid shipping. I found a place in Sacramento, but it was a while back. I assume you'll be using Ferric Chloride for the etchant and Sodium Hydroxide (Lye - nasty stuff) to strip the photo-resist. Those are what are included in the Micromark set. Micromark also sells those chemicals separately. 🤞 -
Heads up for those who are expecting this to be a 1/65-scale kit. I've been using info from Matthew Betts' excellent blog regarding his work on researching and building a 1/48-scale model of Terror. After I got the kit, I started doing some measurement comparisons and found that the stated scale of the kit is wrong. I exchanged a few emails with OcCre, however, and got them to see that they had made a scale error. This doesn't really affect the build, unless you are adding your own details. They have since changed the stated scale on their website, which is now correctly stating 1/75-scale. I expect it will be a while before we see kits with the updated labeling out there. There were a lot of these shipped out. I see that OcCre lists the kits as out of stock on their website. Perhaps they're repackaging them with an updated label(?).
-
Vanda-Lay Industries
catopower replied to BETAQDAVE's topic in Modeling tools and Workshop Equipment
I have their Acra-Mill Plus and also bought the parts for their drill press attachment. I bought these several years ago and they worked great with the Dremel. I milled small pieces of wood, made my own blocks and more. They're great for those with limited space in their workshop, as you can just set up your Dremel with the attachments you need. However, I found that as I accumulated dedicated equipment, the Vanda-Lay stuff got used less and less. The main problem with the Dremel attachments is that you have to reconfigure your setup when your needs change. For the drill press, I'm much happier with a very inexpensive, dedicated unit. It is much more convenient to use, solid, and with no setup required. -
If the wood you are using to line the gun ports is deep enough, you can leave a small amount sticking out from the gun port. This will help you control the positioning and keep it from falling inside. Trim off the excess after the glue dries.
-
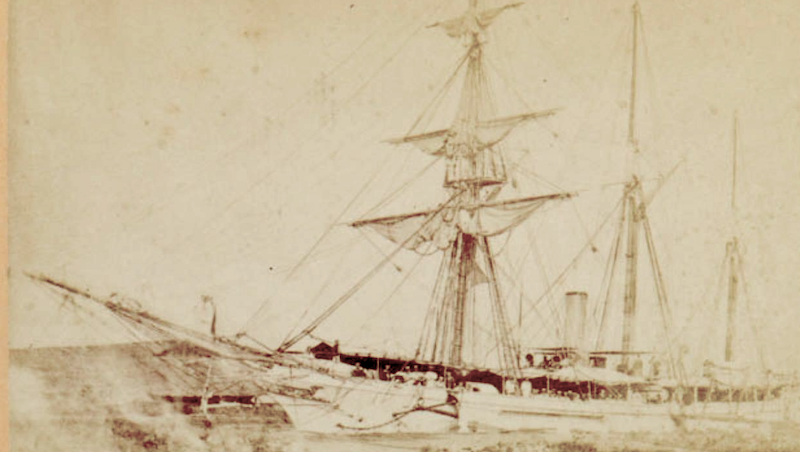
Pat, A great discussion you started here. I appreciate it very much since I've been studying the Kanrin Maru (ex-Japan). I missed the discussion on coal preservation, but I'll add that the Kanrin Maru only carried enough coal for 6 full days of steaming. Presumably, the engines were intended for use primarily for travelling into and out of port. For the most part, the fledgeling Japanese Navy (all trainees) used it primarily under steam – I guess they kept close to port. When she crossed the Pacific, she was under sail the whole time. The USS Saginaw, a topsail schooner rigged side-paddlewheel steamer of 1859, spent a year operating only under sail. I can't remember which year was referred to. I believe Perry's mission to open Japan was in part to secure safe harbors with supplies of coal. As for sail names. Lt. John M. Brooke kept a detailed log of his journey aboard the Kanrin Maru from Edo (Tokyo) to San Francisco. As I mentioned earlier, the Kanrin Maru has the same sail rig as you've been discussing and was referred commonly referred to as a bark. Brooke specifically mentions the gaff rigged sails, calling them "trysails".
-
James, it seems I was digging too deeply through the review and didn't spot the obvious! Yes, you are right, once you watch a video, the current will take you to the others.
-
Here's another thing to add to the HMS Terror kit review – at least I didn't see any mention when I dug through the review and follow-up posts... OcCre created a series of short videos to help less experienced ship modelers with their HMS Terror builds. They made 111 of them – yes one hundred and eleven – posted on Youtube. https://www.youtube.com/playlist?list=PLrPwa5r7zKUzCBCWrtnYjaSn4I5Ex-qBp
-
It's definitely not a one of a kind – I've run into this rig before a number times, particularly on steamers. I've been trying to classify it as well. It's a good question, and my first thought was also that this is a 3-masted topsail schooner. But even so, I think ships of this type may have been considered bark rigged, though they may not have strictly fit the definition. There's a beautiful model of the Russian steamer Strelok, I found one time. It has a similar rig: I've been studying the Japanese ship Kanrin-maru, a Dutch-built screw steamer with a similar rig, and she's commonly referred to as a bark. Her sister ship, the Bali (see below), was called a schooner, but had a pretty heavy square rig on the foremast, including a mast top. These steamers seem to have mucked up the classification system...
-
Hi Will, Looks like you are doing an excellent job with this model. I personally really like this line of Constructo kits, as I think they are enough of a challenge for first time builders, yet provide a taste of most of the tasks that will be faced with bigger kits. Also, it gives you a good platform to modify and upgrade to make it as complicated or as simple as you want. Regarding the rigging instructions, to be fair, I think rigging is really hard to explain, and most of it is better left to diagrams to show you where things go. If you looked at written instructions on rigging, you might be tempted to put the kit back up in your closet for being too much to deal with. Anyway, there's plenty of help here on MSW if you need it.
-
Well, I couldn't help it... I was at Ages of Sail, picking up items to take to tomorrow's IPMS show in San Jose (I'm manning the Ages of Sail table at this event), and they had the HMS Terror kits there – the shipment just came in. Not that I need another project to start, but I also want some experience with OcCre kits for my own blogging purposes. At least, that's my excuse for spending more money on yet another kit. Anyway, it's a great looking kit, and the Building Terror Blog is great material and inspiration for making an even better model. Looking forward to the build.
-
Hello Christos, Wow, you've done a really wonderful job with your Sir Winston Churchill build! I'm very impressed with your work and the results. As you know, I have the kit, but have been trying to get some other work done in order before I can get to it. You're definitely inspiring to press onward. Truly a lovely build. Clare
- 141 replies
-
- 1
-

-
- sir winston churchill
- woody joe
- (and 1 more)
-
Can anyone recommend a miniature hand plane?
catopower replied to Bettina's topic in Modeling tools and Workshop Equipment
I can vouch for the plane from Lee Valley Hardware that Jack posted. I LOVE this thing. Been using it for just under a year now. -
Early Swift, Virginia Pilot Boat ,1805 model
catopower replied to Keith Black's topic in Wood ship model kits
Hi Keith, That's a great project for some restoration practice, and an a classic Artesania Latina kit. The Swift is what actually lured me into wooden ship modeling – there was a nicely done model in a glass case in a hobby shop that was across the street from where I used to work. I'd find reasons to visit the shop, just so I could look at the model. It was around 1990 that it hooked me. Have fun with the model, and please bring her back to her glorious potential! Clare -
There are no Barbary Pirate kits per se. But, what you're probably looking for is a Xebec model kit. Amati and Occre both make kits in 1:60-scale, though I thought the Occre kit was a bigger scale. Anyway, these are about as close as you're going to get. The Amati kit is a little shorter than your Enterprise model and the Occre kit is a bit longer. You can find them online, but Ages of Sail has them both. Here are links to them: https://www.agesofsail.com/ecommerce/amati-xebec-am1427.html https://www.agesofsail.com/ecommerce/cazador.html I've seen beautiful builds of them both.
-
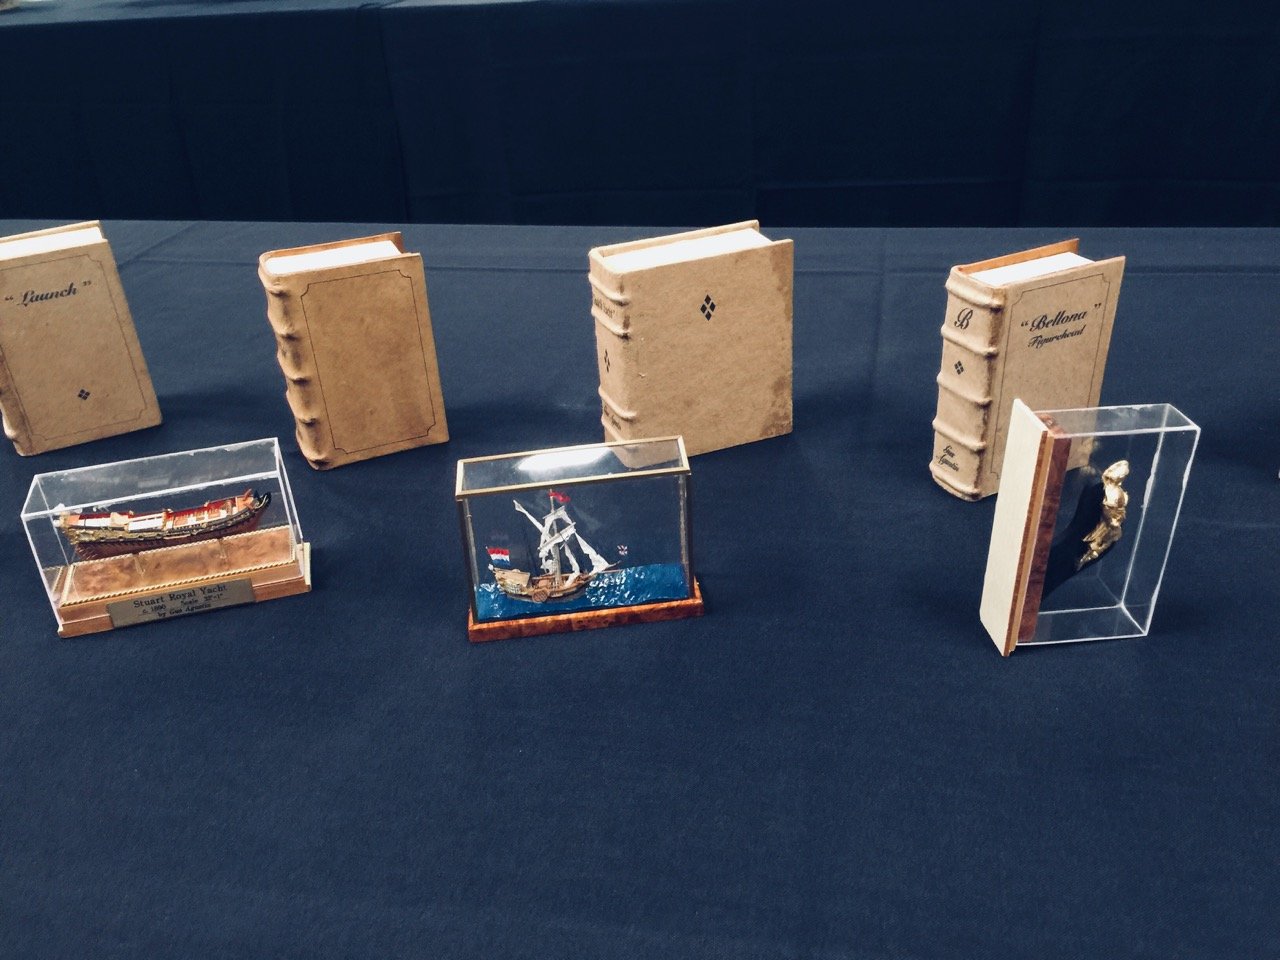
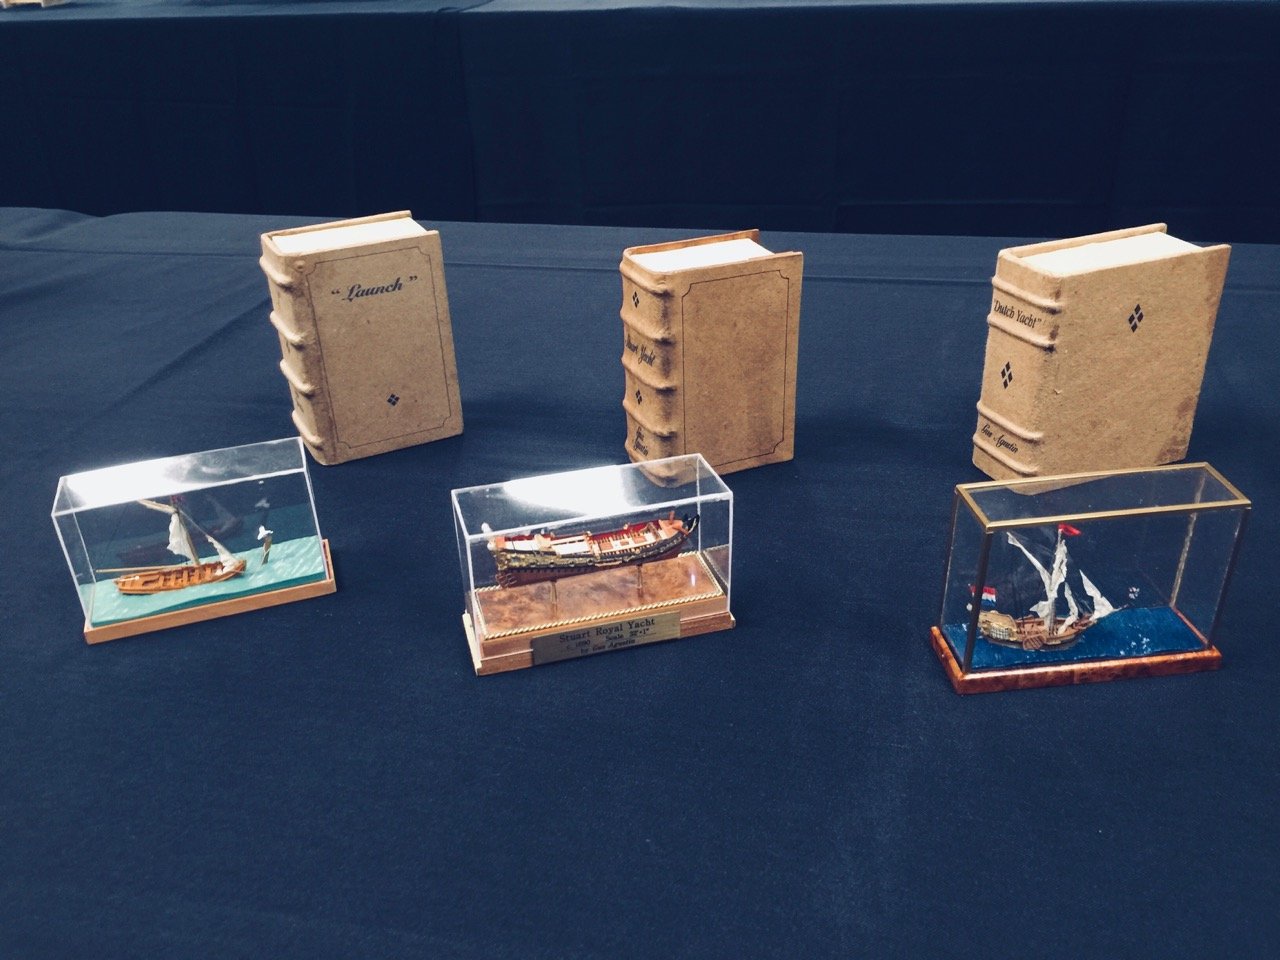
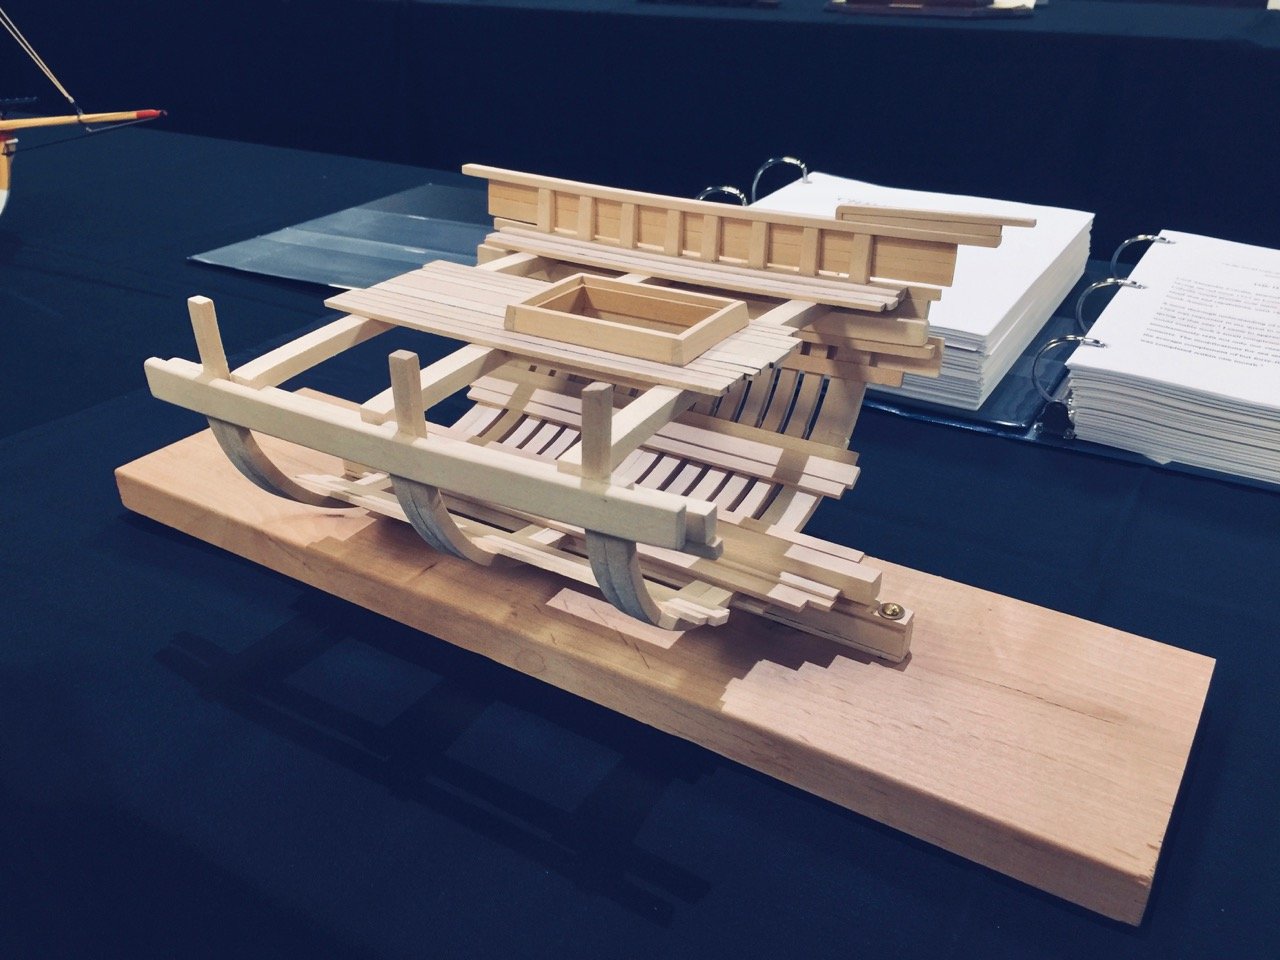
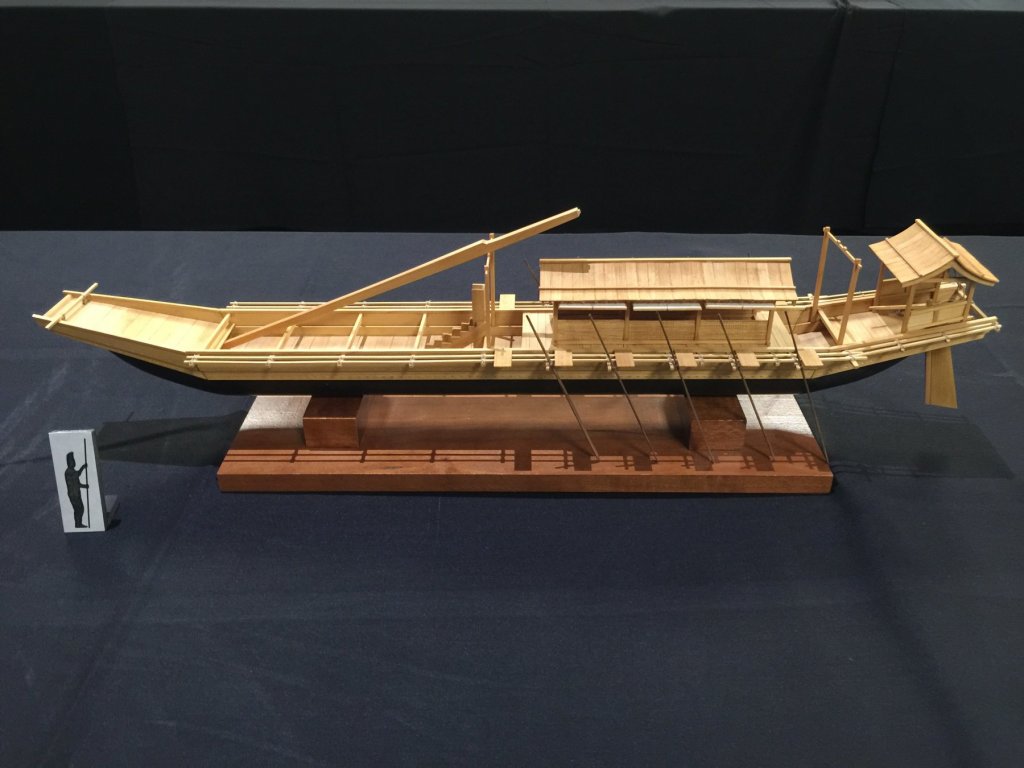
Thank you all for the kind words! Druxey, your comment about someone damaging two of your models on the same night is making me cringe! Perhaps I'll have to hear the story over a drink... or two! Also appreciate the support on the decision to end the project. I've decided to try building a very unusual subject based on Douglas Brooks's work: A Taraibune, or a Tub Boat of Sado Island. This is such a simple boat that I don't think there's much material for a build log. I've already pieced together the wood for the bottom and cut staves. The hardest part is probably going to be making braided hoops to fit around the "hull". What I probably WILL create a build log for is a small Gozabune, which is a type of highly ornate official yacht used by daimyo and their officials. There are two that appear in Souvenirs de Marine by Paris. I've already got a big start on it, so I'll be back filling the details of the build to this point.
-
How was the 2018 Conference?
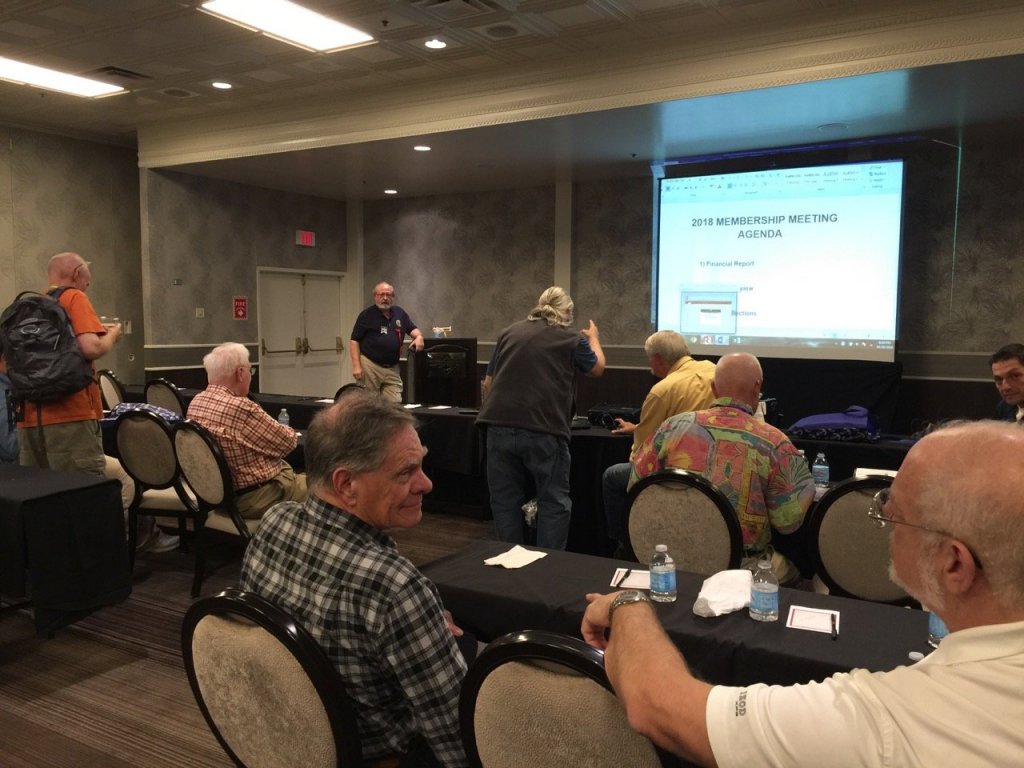
catopower replied to VinceMcCullough's topic in NAUTICAL RESEARCH GUILD - News & Information
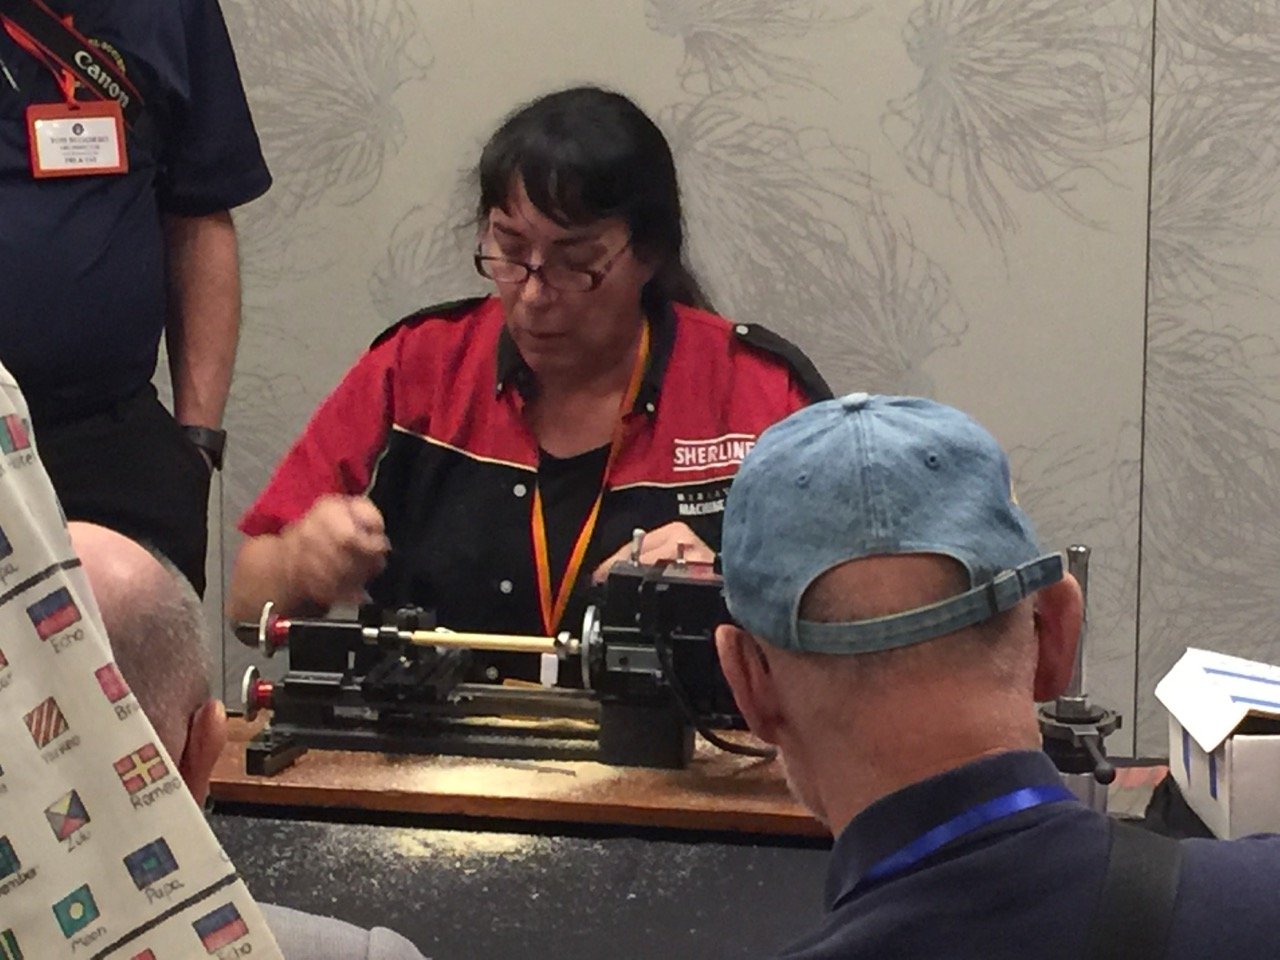
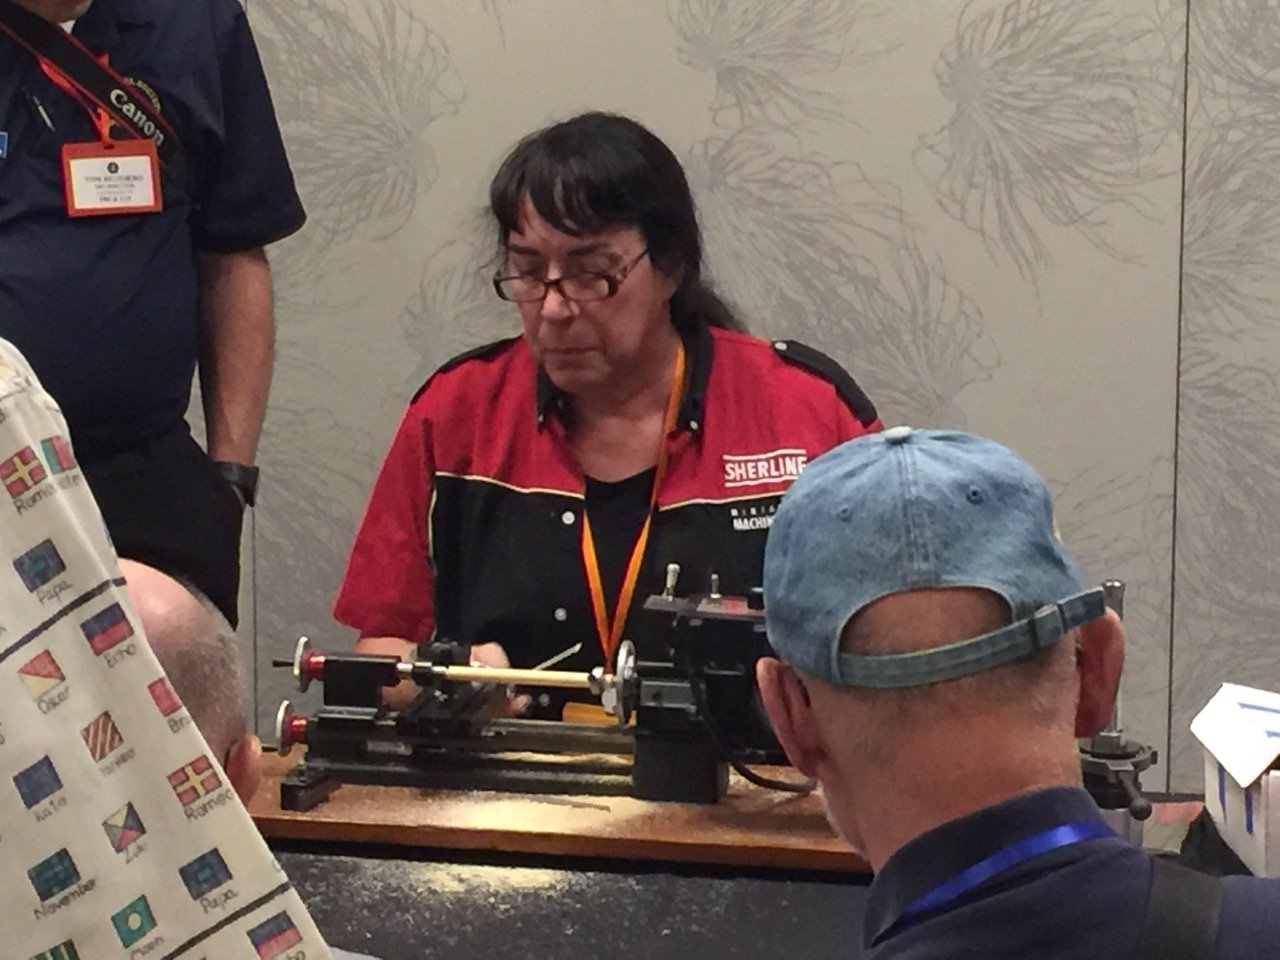
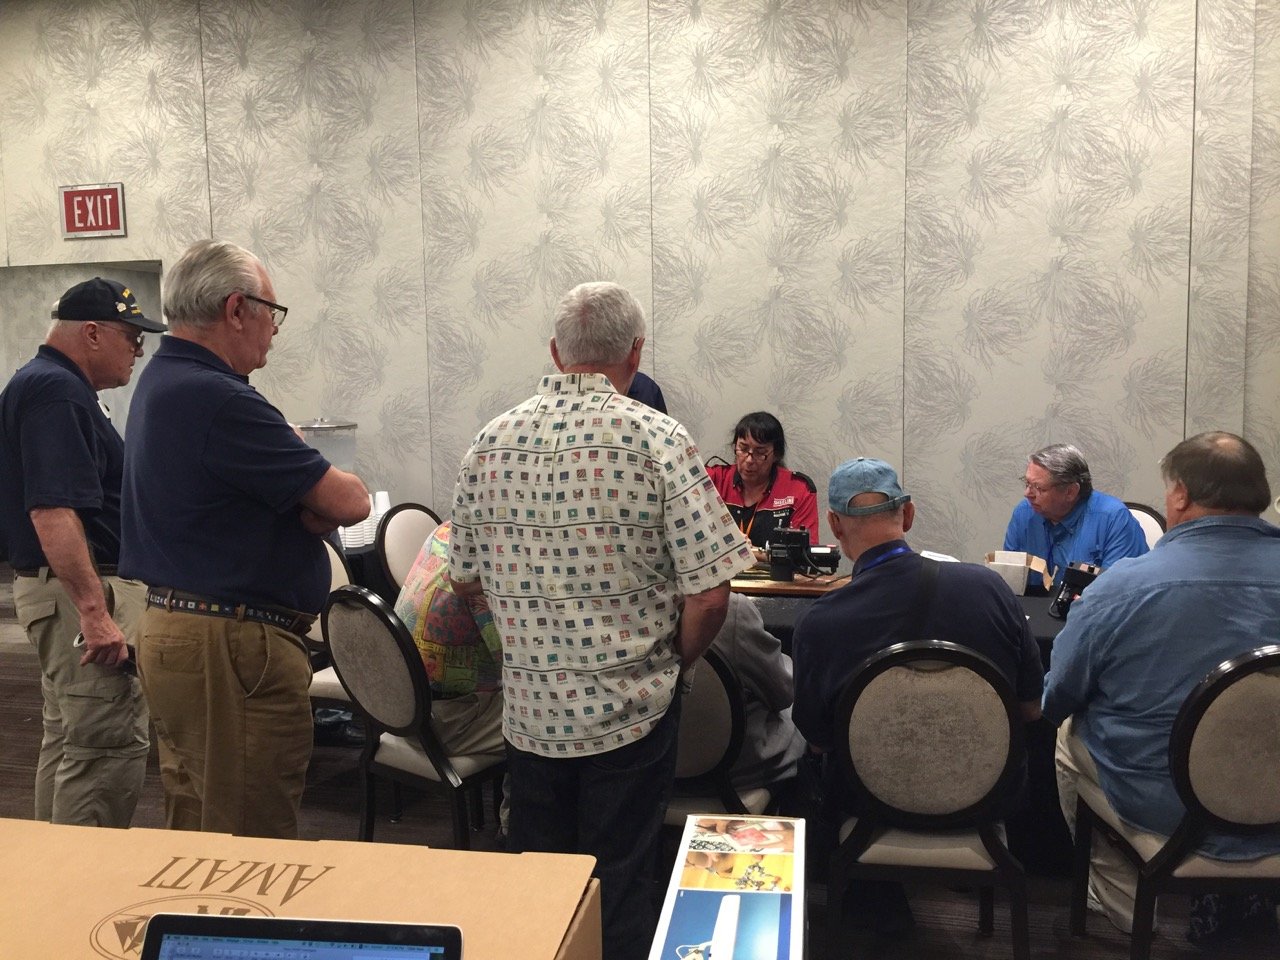
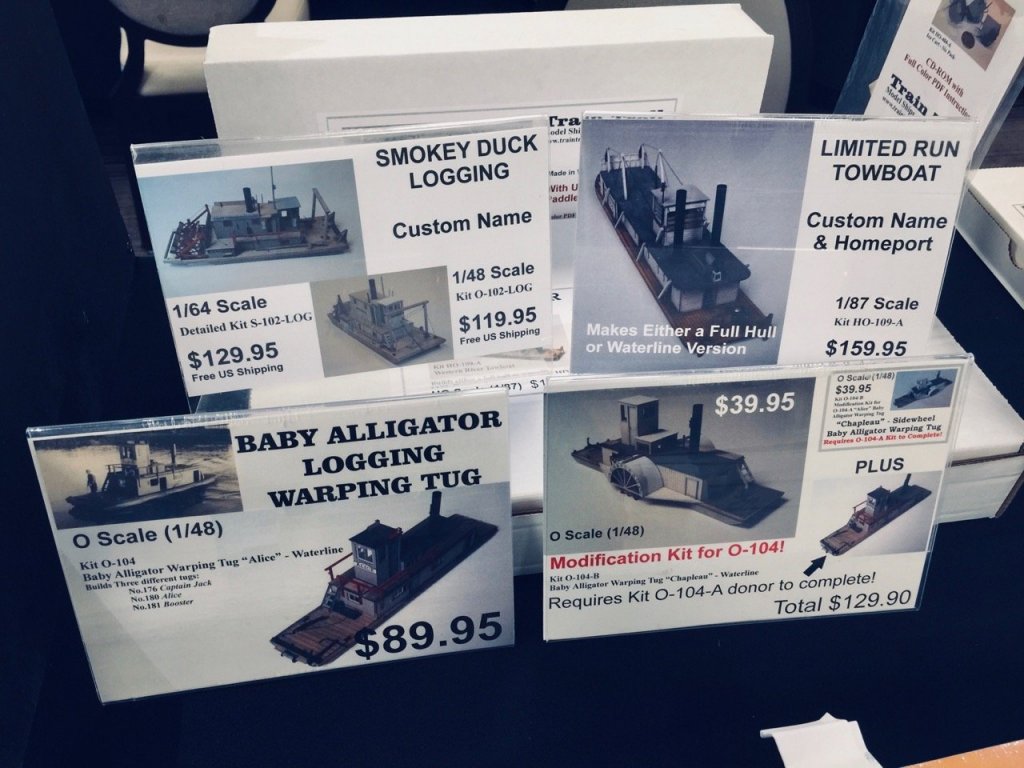
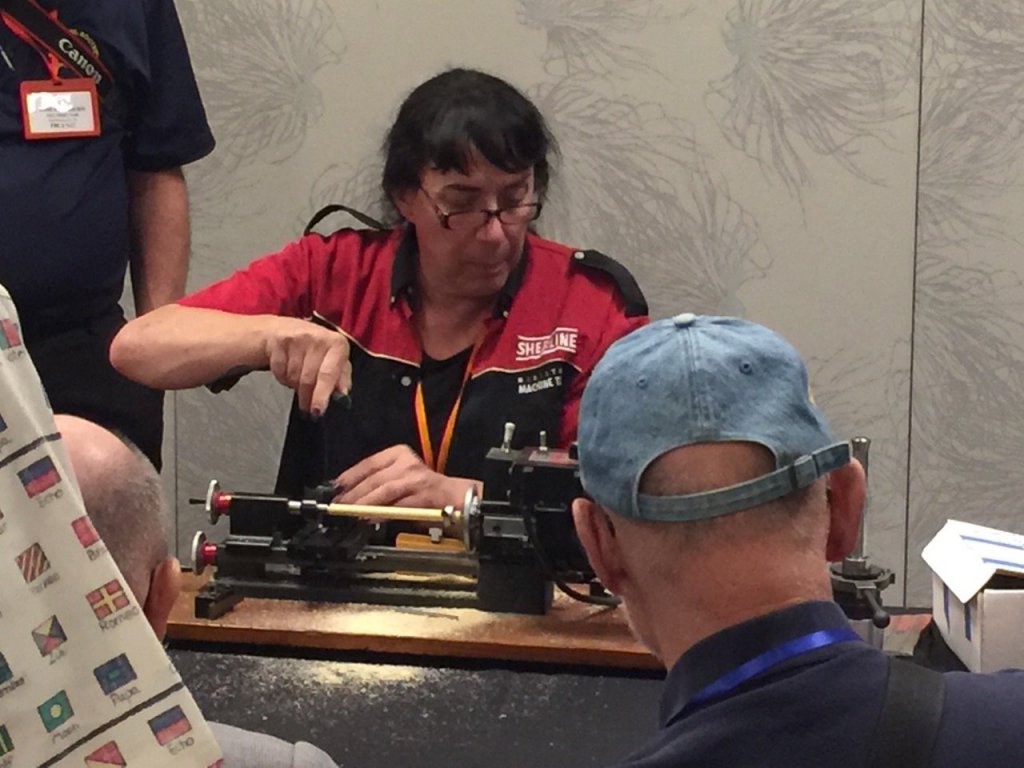
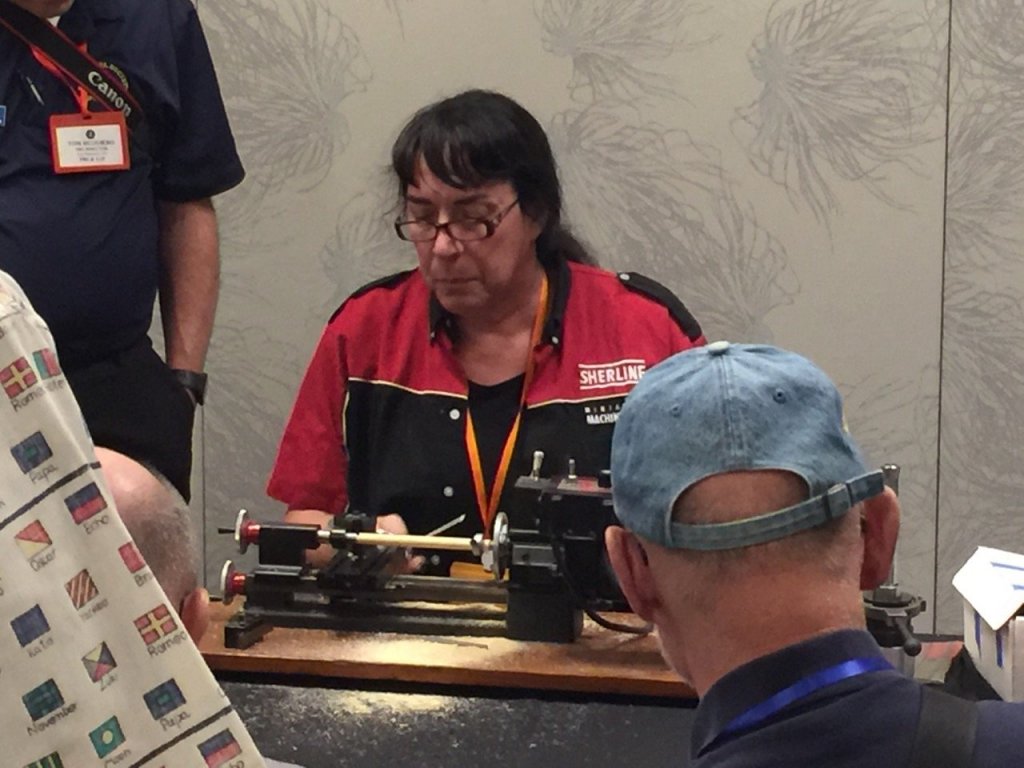
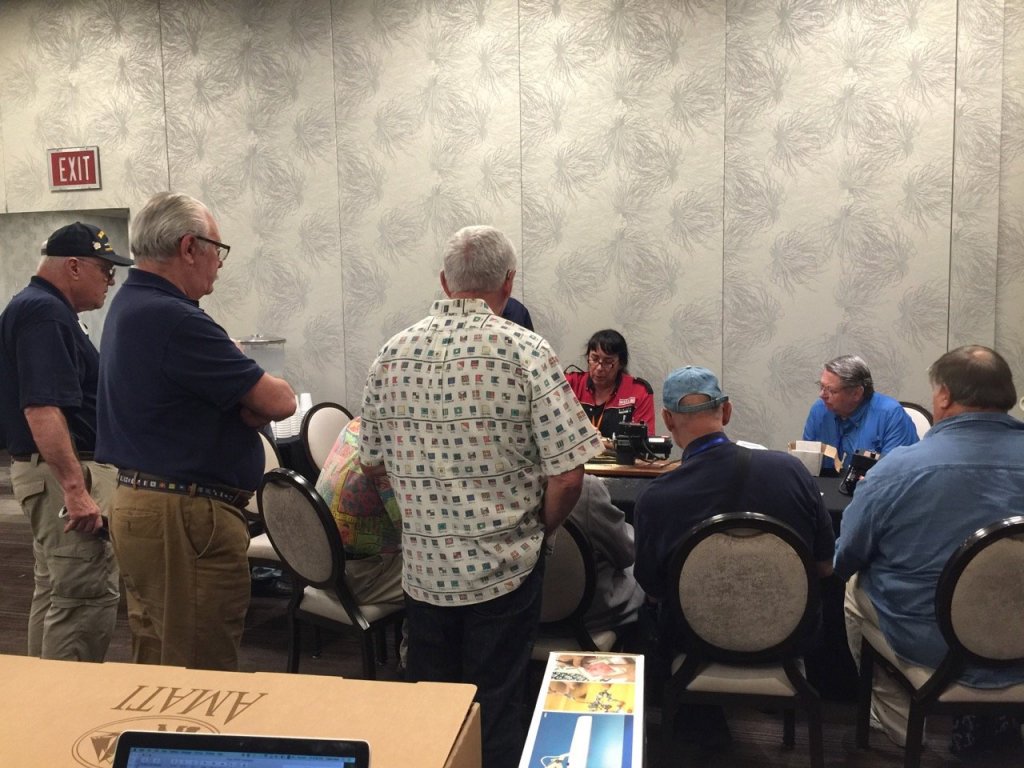
I'm no fan of Las Vegas but the conference itself seemed really good. Unfortunately, I was working the Ages of Sail table the whole time, so I didn't get to attend any of the events. But, I was at the member meeting and the dinner. Plus, I got to see a lot of great models and I spent a lot of time talking with Pam from Sherline and Nic and Al from Bluejacket since they were sitting in the vendor room with me. I managed to take photos, but somehow never manage to get photos of the Ages of Sail table(!). Always happens. I even brought some big kits, including Amati's Vanguard and Orient Express kits, Caldercraft's Diana, and others. Somehow, I also seemed to miss Bluejacket's table too. They had a new re-release of the brig USS Perry.


- 16 replies
-
- 20
-
-
Hello Wefalck, Yes, damage to models is a great deterrent to club meetings. Much safer to blog about them. But, I'm trying to help keep the local clubs going, so I try to take things if I can. Still, I do have models that I simply won't bring to certain meetings due to their locations, distance from parking spot, complexity of model, etc. Thanks for the link. I'm actually in regular contact with two members of The Rope Tokyo that went to Rochefort. One of them has been helping me obtain information from Japan and to make contacts. I did some online research once and found an obscure Excel spreadsheet, in Japanese. I recognized some of the information on it and translated enough of it to discover that it was an old list of museum model dispositions. I found several models listed in a regional city museum and asked my Rope contact about it. Next thing I knew, he had contacted the museum, found that the models were in storage, and he and two other members arranged to take photos of the models. I felt pretty good in being able to help them dig up some things they weren't aware of. He has since helped me many more times, visiting museum models that I've discovered, and sending me information, photos, and help me establish contacts. VERY helpful. I hope I can visit one of their annual model exhibits, which usually take place in the Spring. It's yet one of many things on my list of visits to Japan!
-
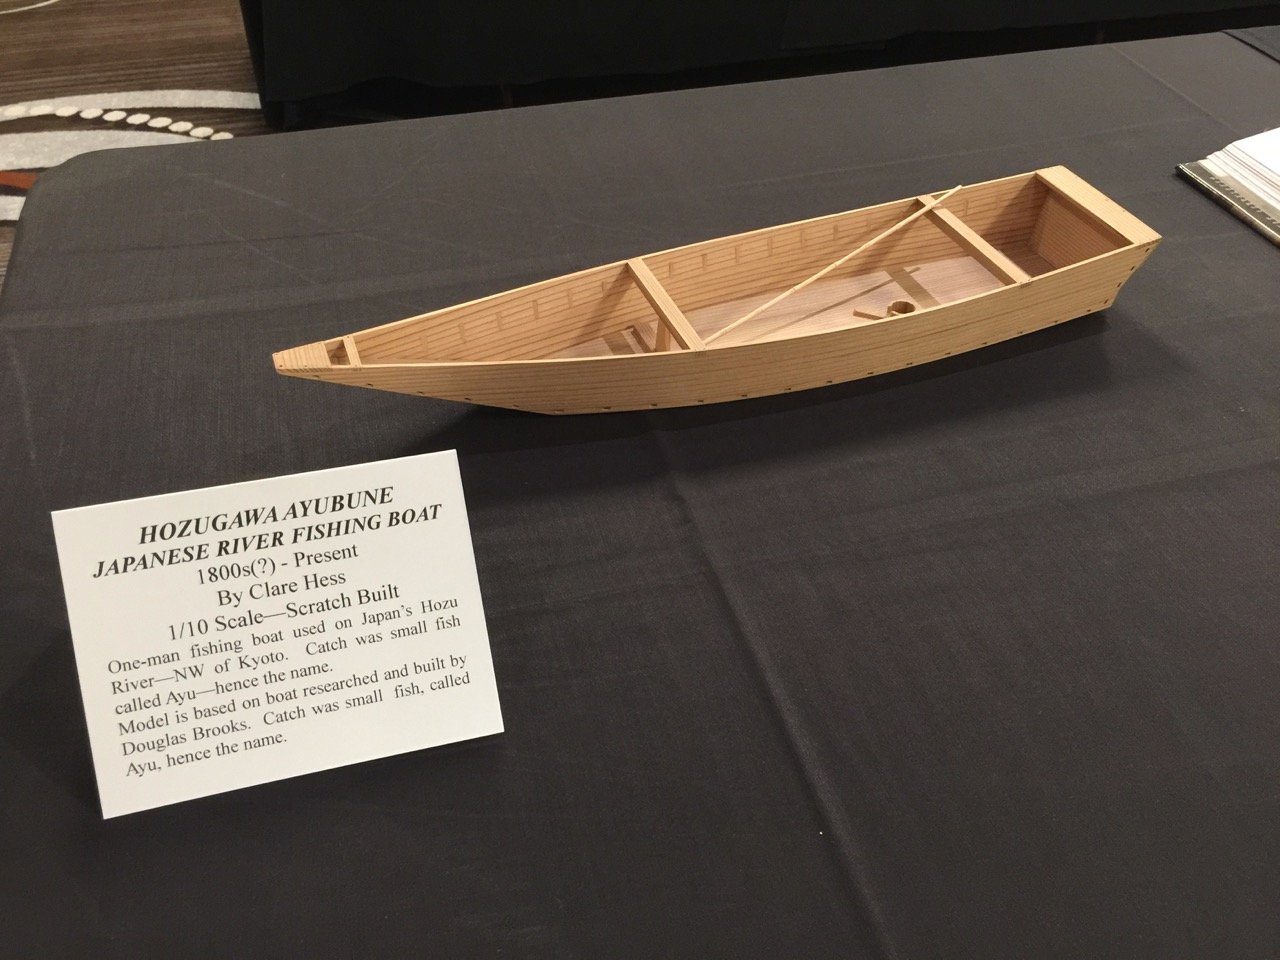
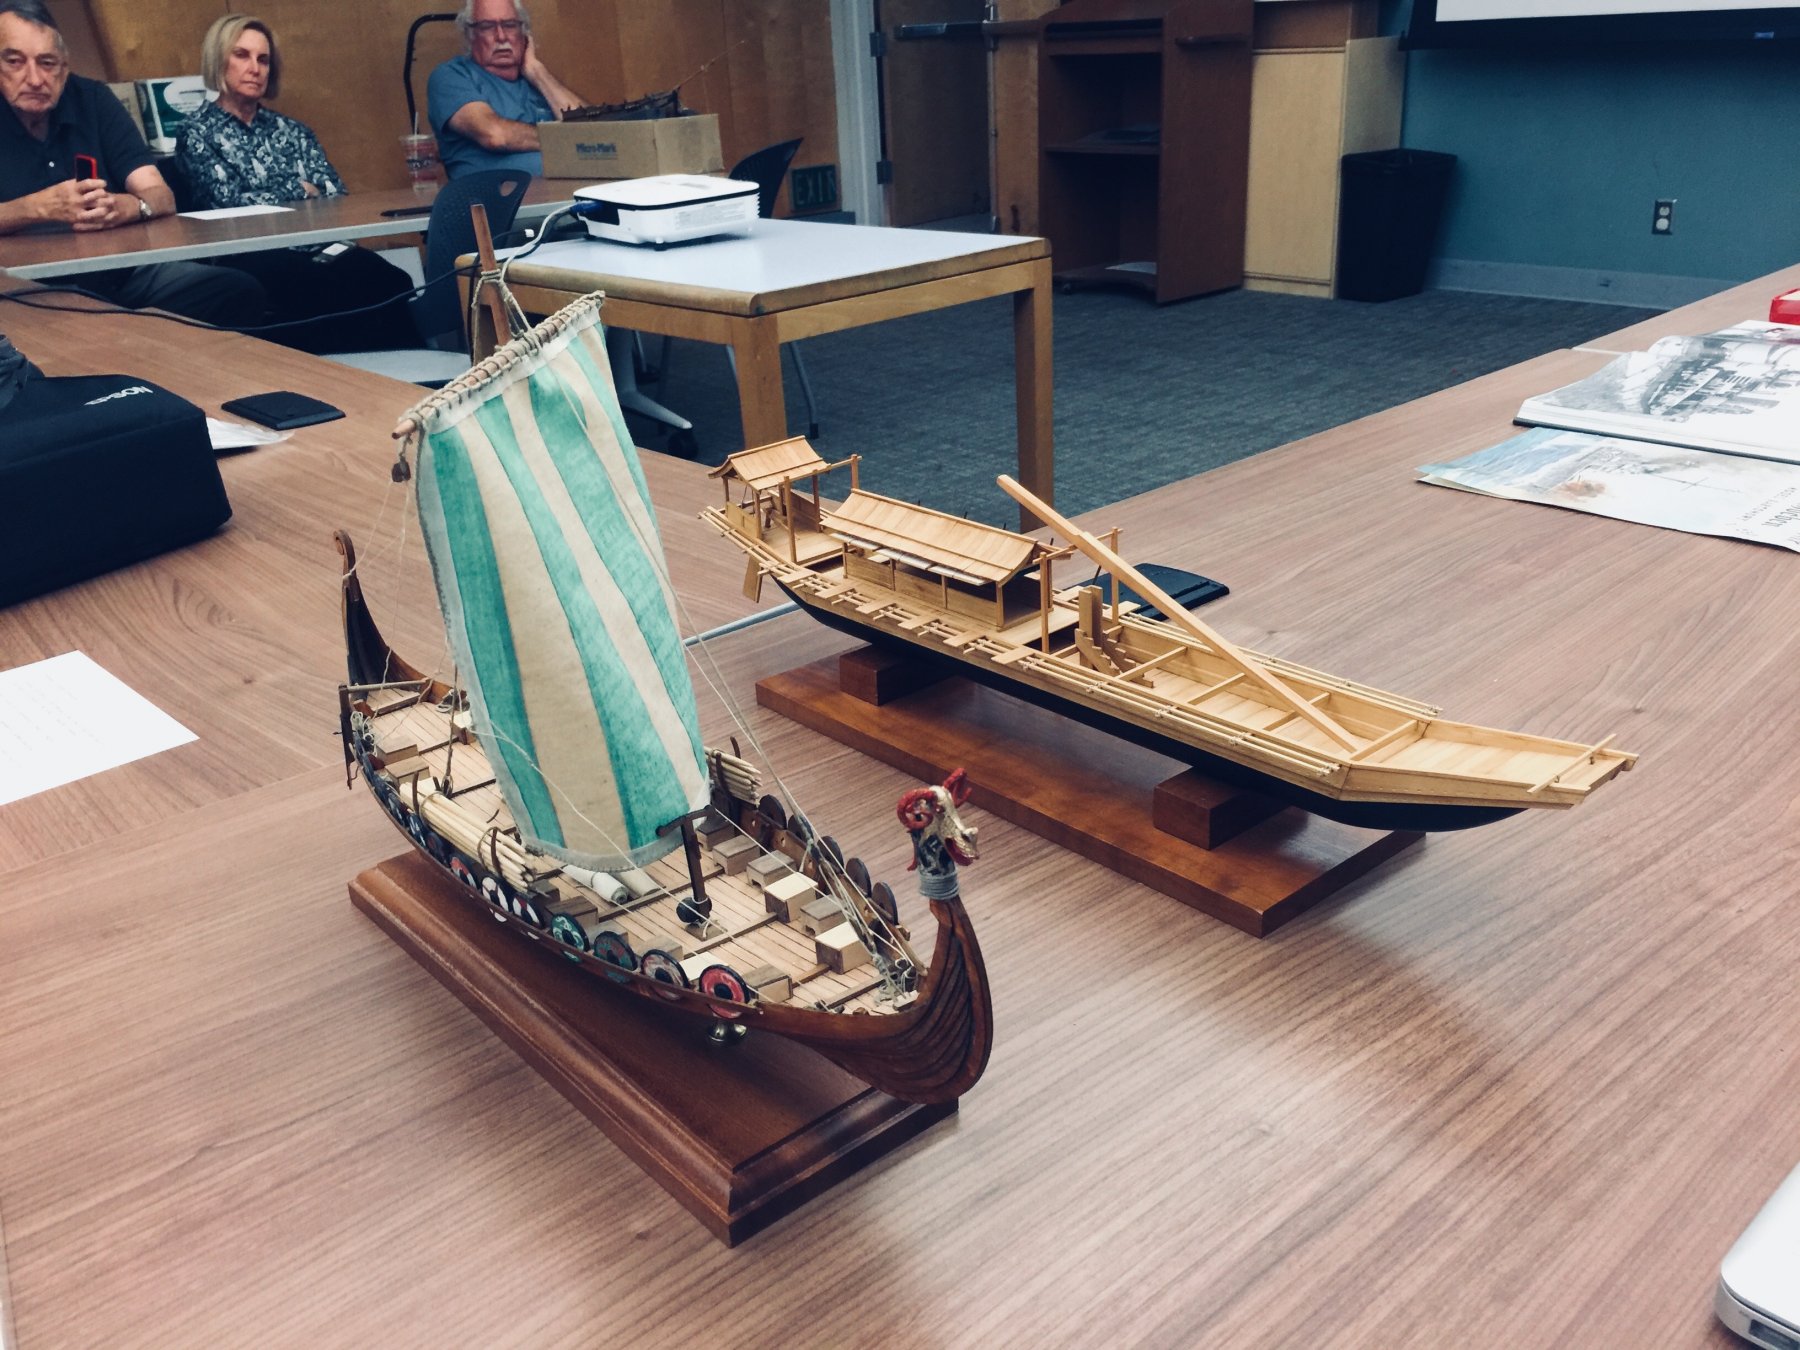
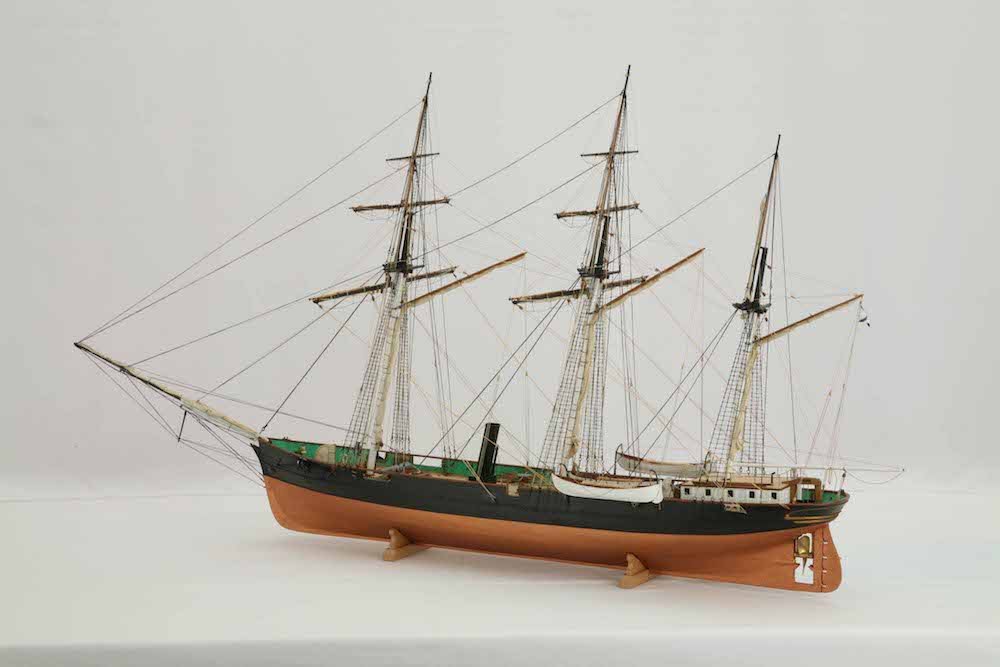
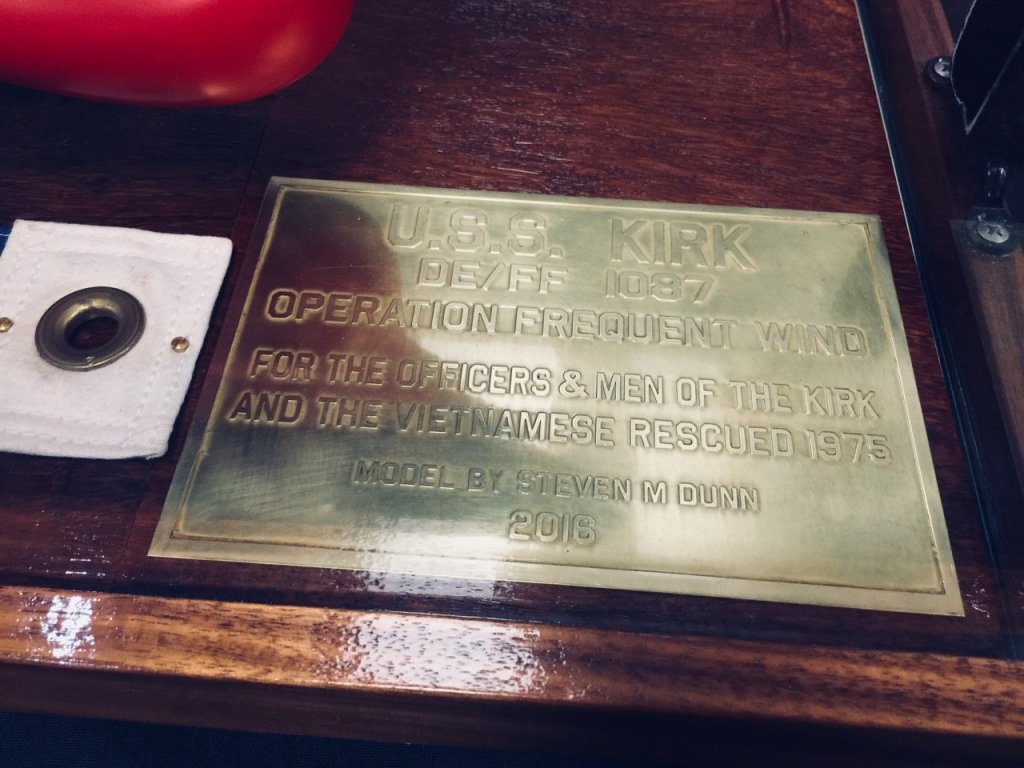
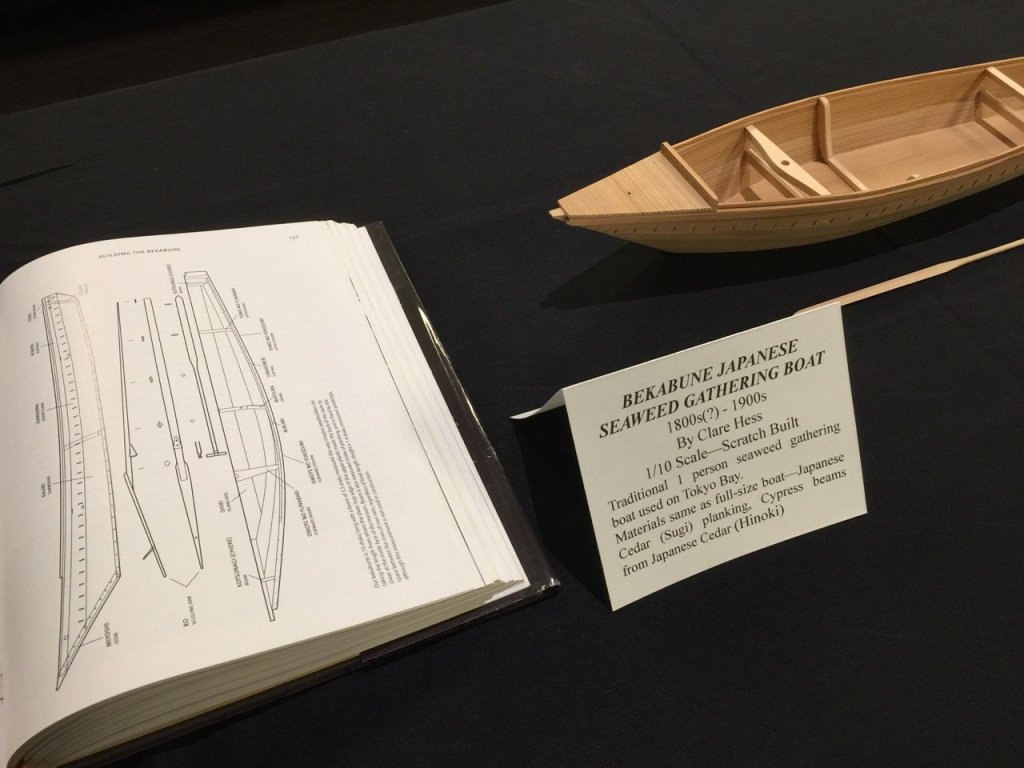
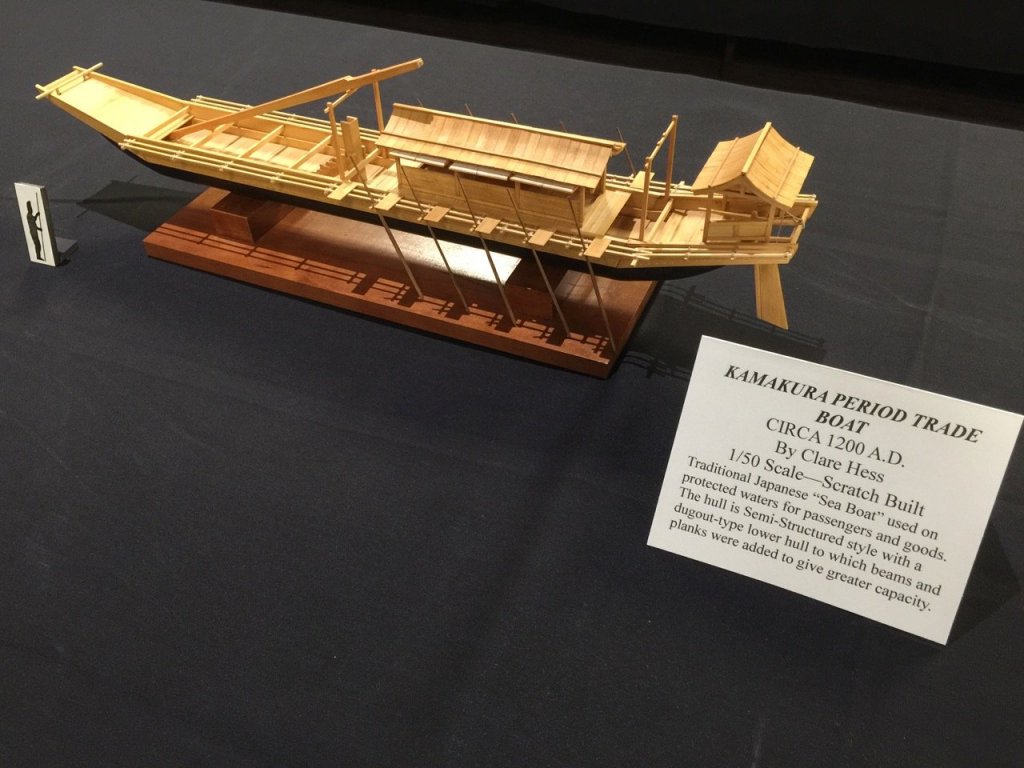
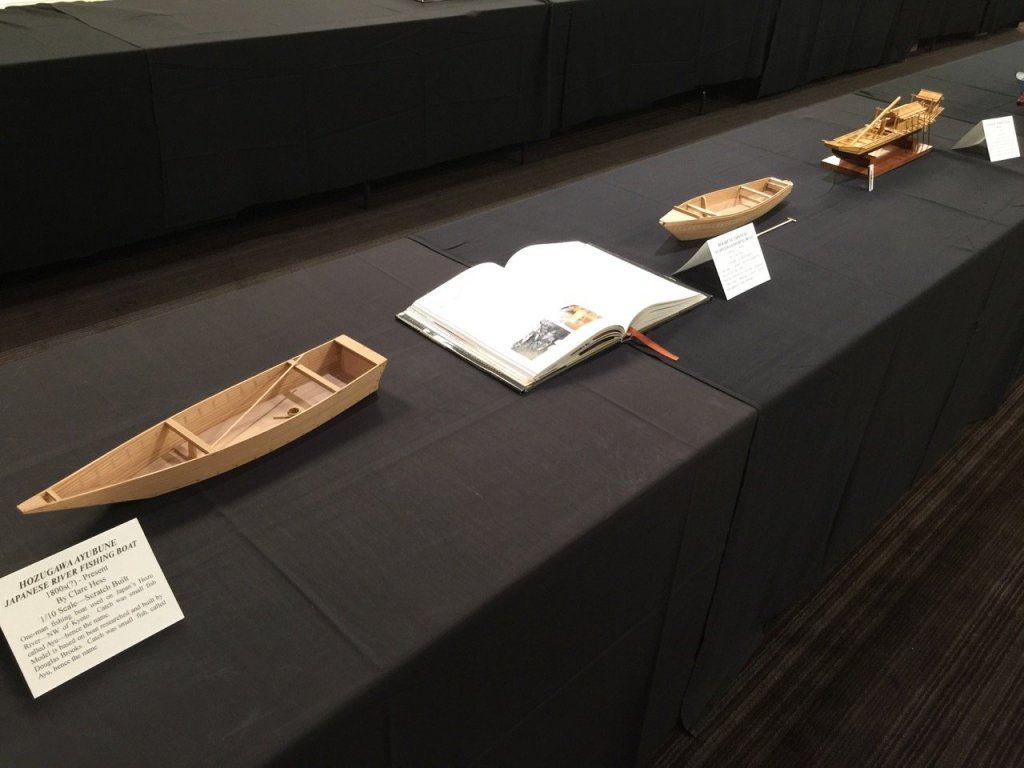
Well, tragedy struck when I took my model to one of the local club meetings. I don't know how it happened, but I had the model in a travel box to help keep it from getting damaged. It made it just fine through a 114 mile round trip to one meeting. The next meeting, more like 30 miles one-way, I'm pretty sure it survived just fine. It wasn't until it was sitting in the box in our model shop (I tried to keep it out of harm's way), that it looks to me like someone leaned on the box and broke up the aft structure. It's not the first time that taking a model to a meeting, particularly one stored in a box to protect it, appears to have been damaged in this way. I have one model that I just never got around to repairing. Fortunately, when I got it home, I found that most of the damage was done to various glue joints. No wood was actually broken. So, I had a small stack of puzzle pieces to fit back together. But, all in all, I was able to make the repairs pretty quickly, and with visible signs of the damage. However, this did keep me from finishing the oars before I had to leave for the NRG Conference. So, I simply took it with me, along with some tools, glue, etc. Since I was driving there anyway, taking the extra things was no problem. I got to the location in the evening and took the model up to my room, added the remaining oars, and it was on display the next morning! Here was the model the night before the accident, displayed at the meeting of the South Bay Model Shipwrights at the Los Altos Public Library. It is shown here next to a model of a club model of a Viking ship in the same scale. The model was one of three scratch built Japanese "wasen" models that I brought to the NRG Conference. That's the Japanese Wooden Boatbuilding book by Douglas Brooks, which I used for the Urayasu Bekabune model in the center. On the left is my Hozu river boat. And, finally, the completed Kamakura period Sea Boat... 鎌倉時代の海船 After seeing the model on display at the conference, I decided to officially call this project complete. Being that this is part of an ongoing research project, I'll always be adding some small details to it. I could either leave it as permanently incomplete, or simply call it "done" and sneak little additions to it over time. So, I'm opting for the latter option. I did feel that the model was a bit small for this display. At 1/50-scale, it's 21-1/2" long. If I make another, which is very likely, I think I'll opt for something like 1/30-scale, making it up to 35" long. Of course, the larger the scale, the more details I'll need to add, and the better job I'll have to do. In any case, this has been a test bed for reconstructing this type of boat. I think my next step is to get a first-hand look at a couple of the Japanese museum models built of this type of boat. That's going to take some savings and fundraising again to make the next trip to Japan!


-
Greg, I know that Wikipedia is not the greatest source for this kind of information, but they list HMS Wolf as a 14-brig snow rigged sloop with a launch date of 1742. They also show a plan of the hull, which looks very much like Shipyard's HMS Wolf. The ship is listed as Wolf-class, with only two other ships of the class being HMS Otter and HMS Grampus. There is no mention of the Speedwell or Cruiser classes. https://en.wikipedia.org/wiki/HMS_Wolf_(1742) I can tell you that the Shipyard Laser-cut boxed kit of HMS Wolf does NOT include the plans set that they sell for scratch modelers. Richmond, Keep in mind the pictures are actually of Shipyard's 1/72-scale kit. If something looks like it should be thicker in the pictures, it may just be that way on the larger kit. There definitely is a lot of care needed in "reading" the instructions, paper model instructions tend to be very sparse. Certainly, the Shipyard kits are that way. I'm curious as to what sheets you are missing. I have the kit and it has the number of sheets listed on the back. The "photos" and "drawings" sheets are double-sided, so one piece of paper translates to two sheets. I spot-checked the Ages of Sail inventory last year and discovered that one of the parts sheets that was supposed to be printed in color was, in fact, printed in black and white. So, I got Shipyard to provide those sheets for the shop's 6 kits. I have to say, it was a lot easier to contact them through their Facebook page than by regular email.
-
Good luck with your build, Richmond. I built the HMS Alert paper model and had a great time with it. I really like HMS Wolf and hope to get to that at some point. It should be much simpler than HMS Mercury, since all of Wolf's guns are on the open deck. Not sure why all those Eastern Europeans like to use double-edged razor blades. Shipyard even includes one in their boxed kits. The only thing about them is they are extremely thin and sharp, so it may be easier to use them, but I'll stick to using a scalpel for thin blade cuts. I've assembled some of the paper blocks from the kit and they really are challenging, but not impossible if you assemble them in groups as printed. But, for my HMS Alert, I just ended up using the wood blocks from Syren, even though I made all the necessary blocks. The Syren blocks just looks so nice on the small scale model. In any case, have fun with the build!
-
Chris, I suspect that anything you decide to do as a first subject will be a hot seller, so have at it! We're all waiting excitedly for it. Clare