catopower
-
Posts
1,900 -
Joined
-
Last visited
Content Type
Profiles
Forums
Gallery
Events
Everything posted by catopower
-

HMS Vanguard Victory models /Amati which to buy?
catopower replied to Ian B's topic in Wood ship model kits
Actually, all the Victory Models line of kits starts with a 1300. The 04 indicates specifically HMS Vanguard. I don't know of a way to identify any revisions of the kit. The only variances that I've been aware of is the current version vs. the old Model Expo version, though I imagine some other things have changed. I agree that if you purchase from a major supplier, like Ages of Sail or Cornwall, I'm pretty sure they go through enough of these that they will have the "current" version, good or bad. -
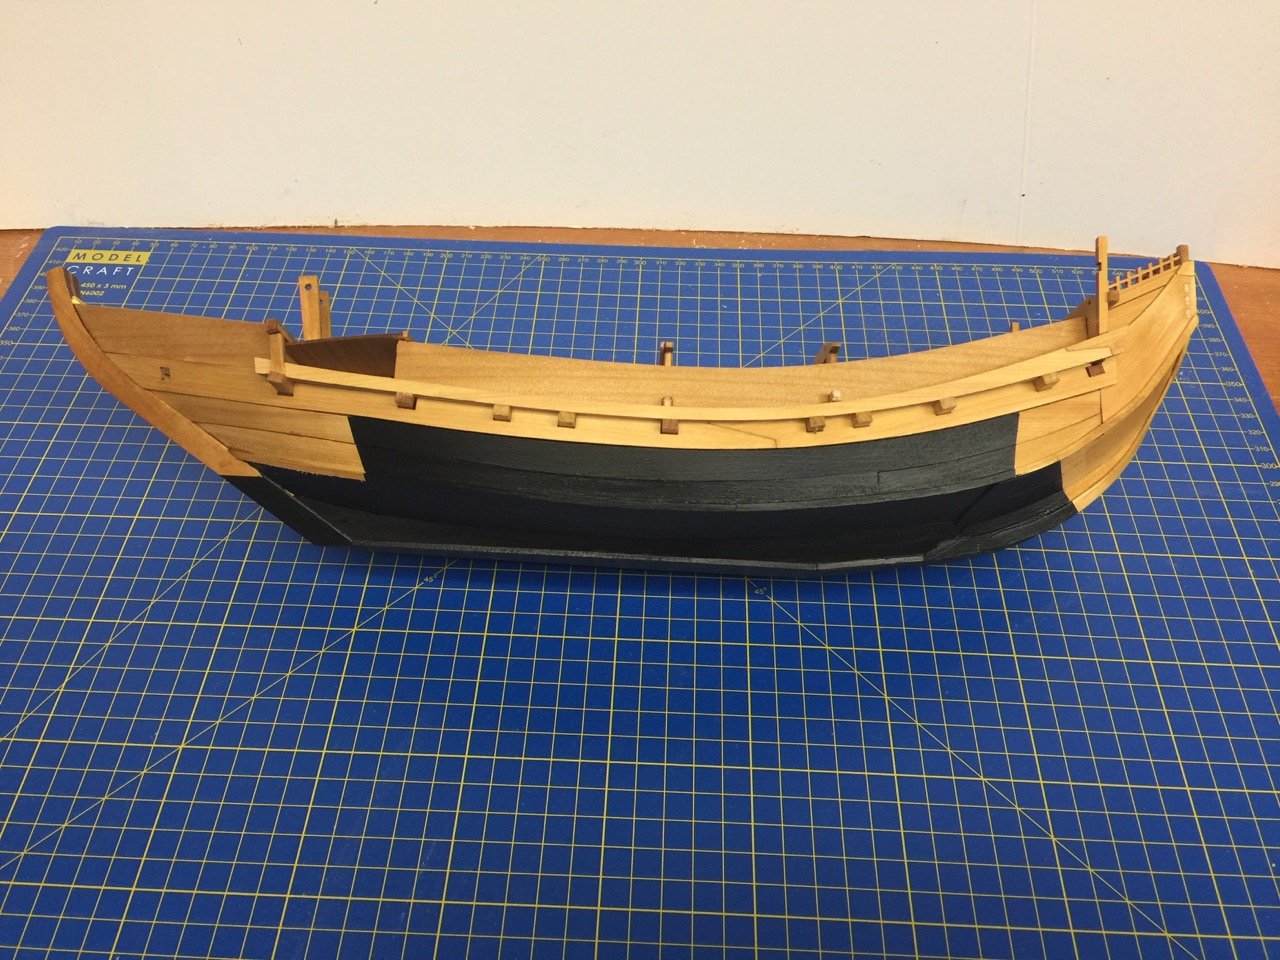
I'm sorry that I don't have any photos of the pieces I cut for the stern trim. I had cut, test fit, trimmed, test fit, and glued them into place, and they seemed to look just fine. So, I started to mask the bottom of the hull for the lower hull's paint job. I've seen slight variations on the paint scheme, but if you look at paintings, wood block prints, drawings, the replica ships, they're all pretty similar. I don't know why it was done this way. I masked off using Tamiya yellow masking tape, and the paint is Liquitex, an artist's acrylic. You'll notice in the last two photos an angled deck near the bow. You're looking at its underside, making it look dark. This, and the vertical supports were added, but I didn't post any info about it. This brought me up to Step 28 in the build. I was very happy to get to this stage in the build. The bottom paint give the model a more interesting, complete, look. Plus, it covers up all those errors in the hull.
-
I tried to build the Estes Saturn V kit, but it was too much for me. The best I did was the Orbital Transport. First launch went amazingly well. Booster came back down by parachute and the orbiter flew circles around it on the way down. Worst was a windy day and the launch of the "Interceptor" fictional Air Force craft with wingtip rocket pods. Flew straight up and a gust caught it about 1/3 way up and it made a right-angle turn. Had to go chase it down, but it was a fun flight.
-
Growing up next to Vandenberg AFB in the 60s, I remember weekly missile launches. It was the norm in the town of Lompoc, where you'd be inside, hear a rumble, the windows would start to rattle, you rush outside along with every family in the neighborhood standing out on their lawns, and watch the rising streak of smoke. You'd watch and look closely so you could see the puff of smoke from the staging. After a while, all you could see was the speck of light from the upper stage engine fading into the distance, and people all wandered back into their homes. They were all unmanned flights – a lot of them, test flights. They were very inspiring to a kid at a time when the space program was in full swing!
-
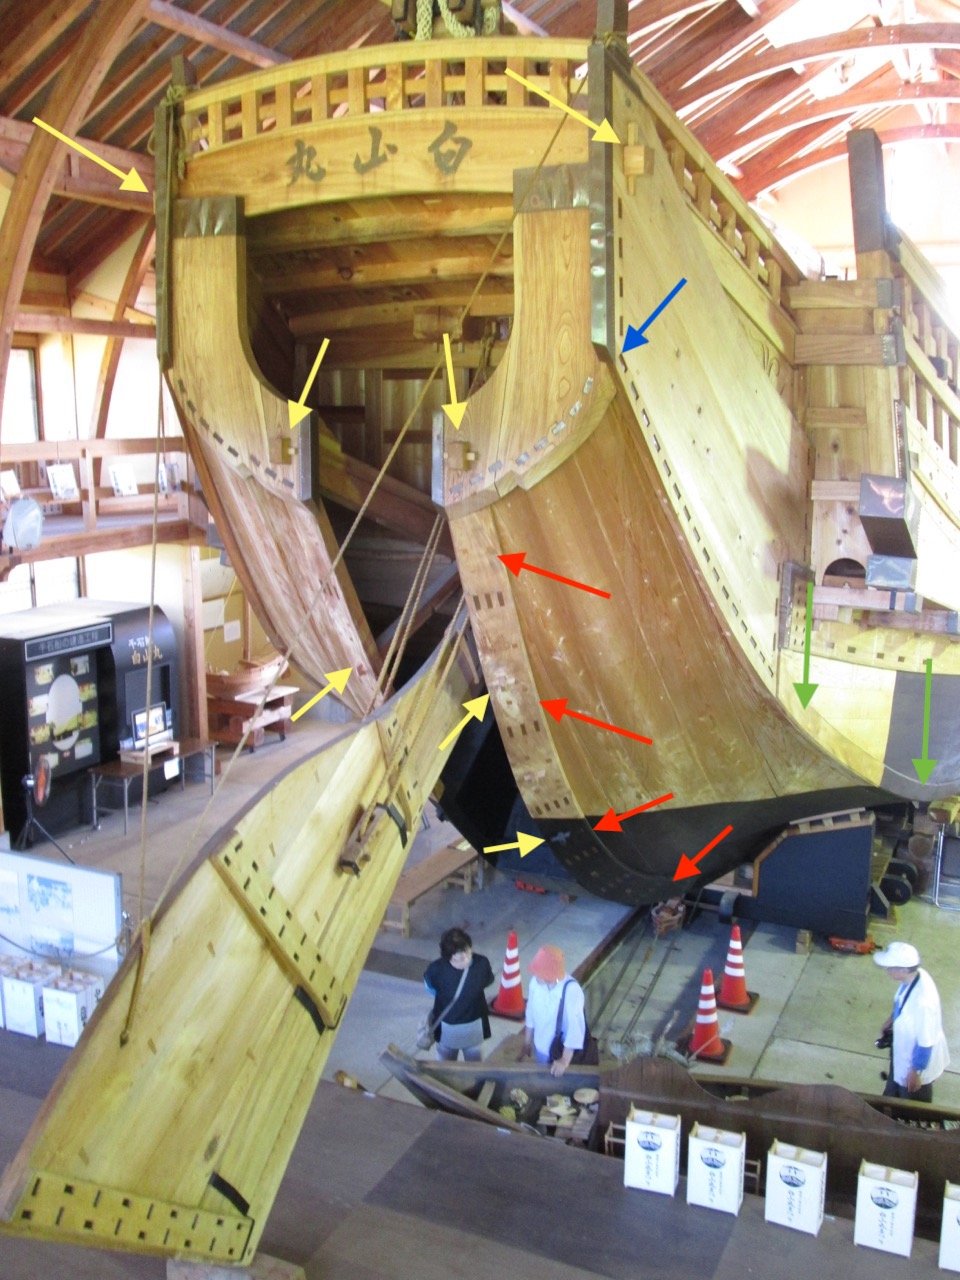
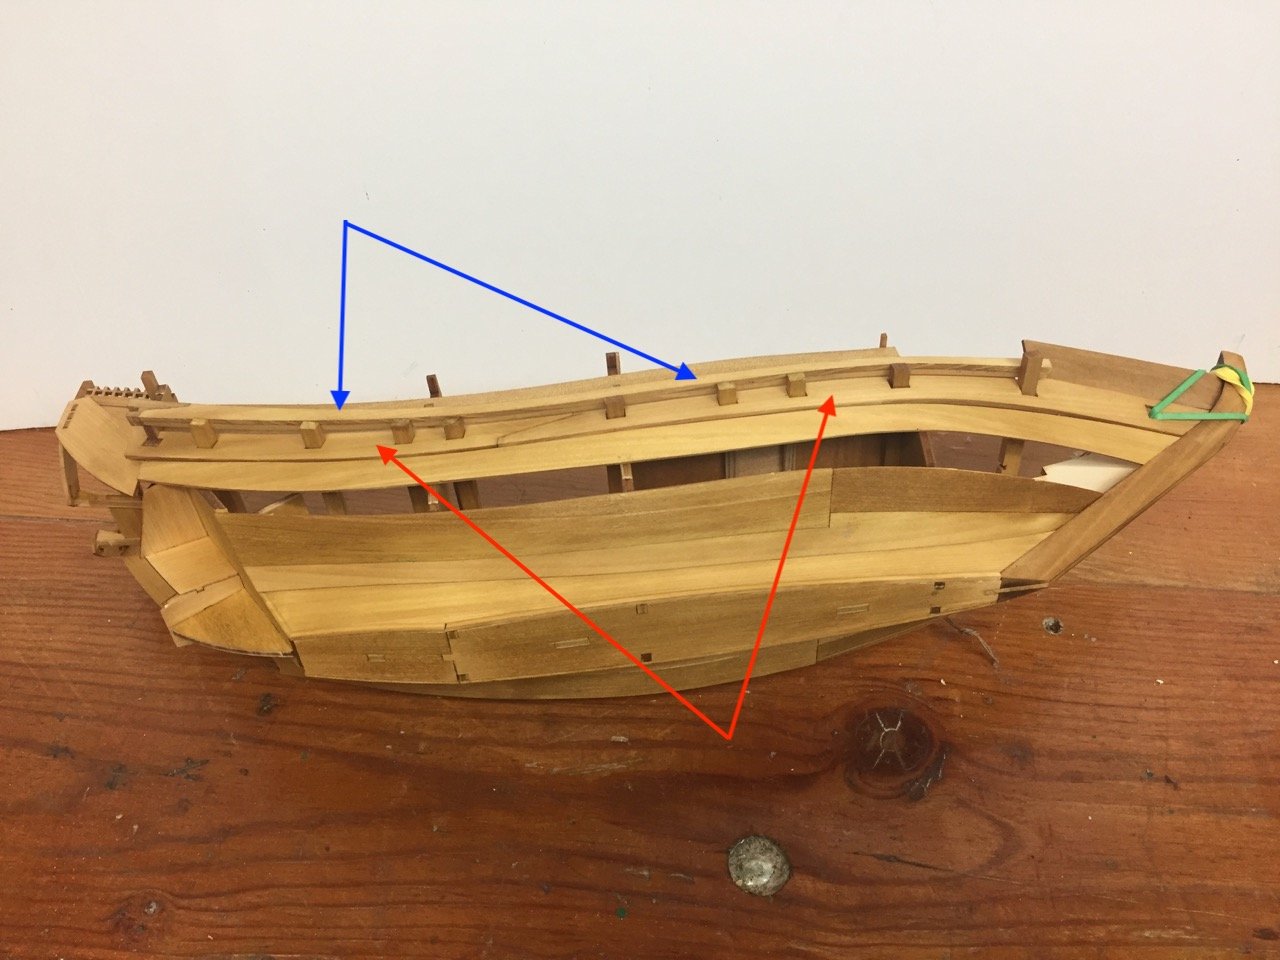
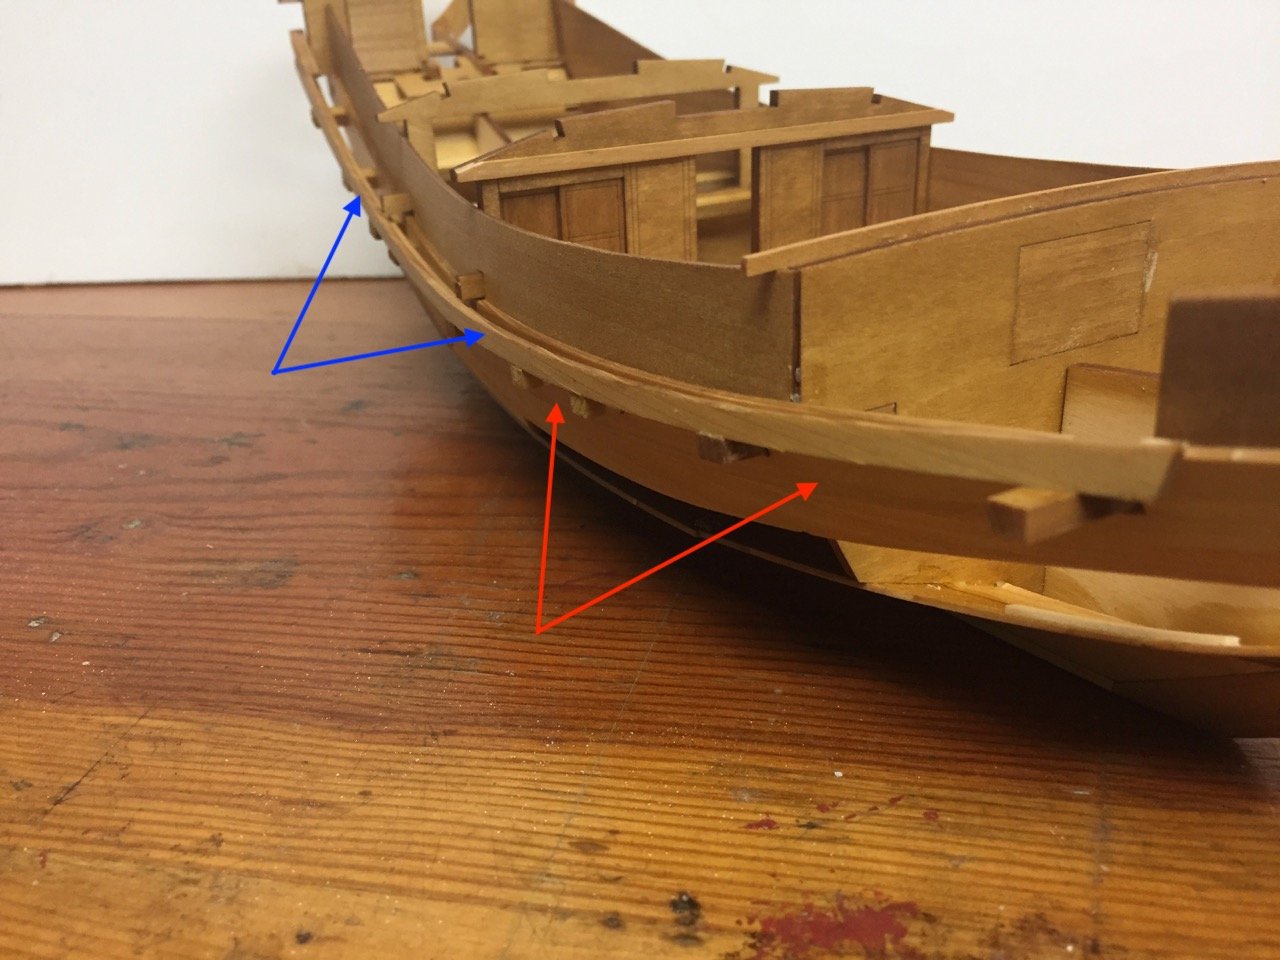
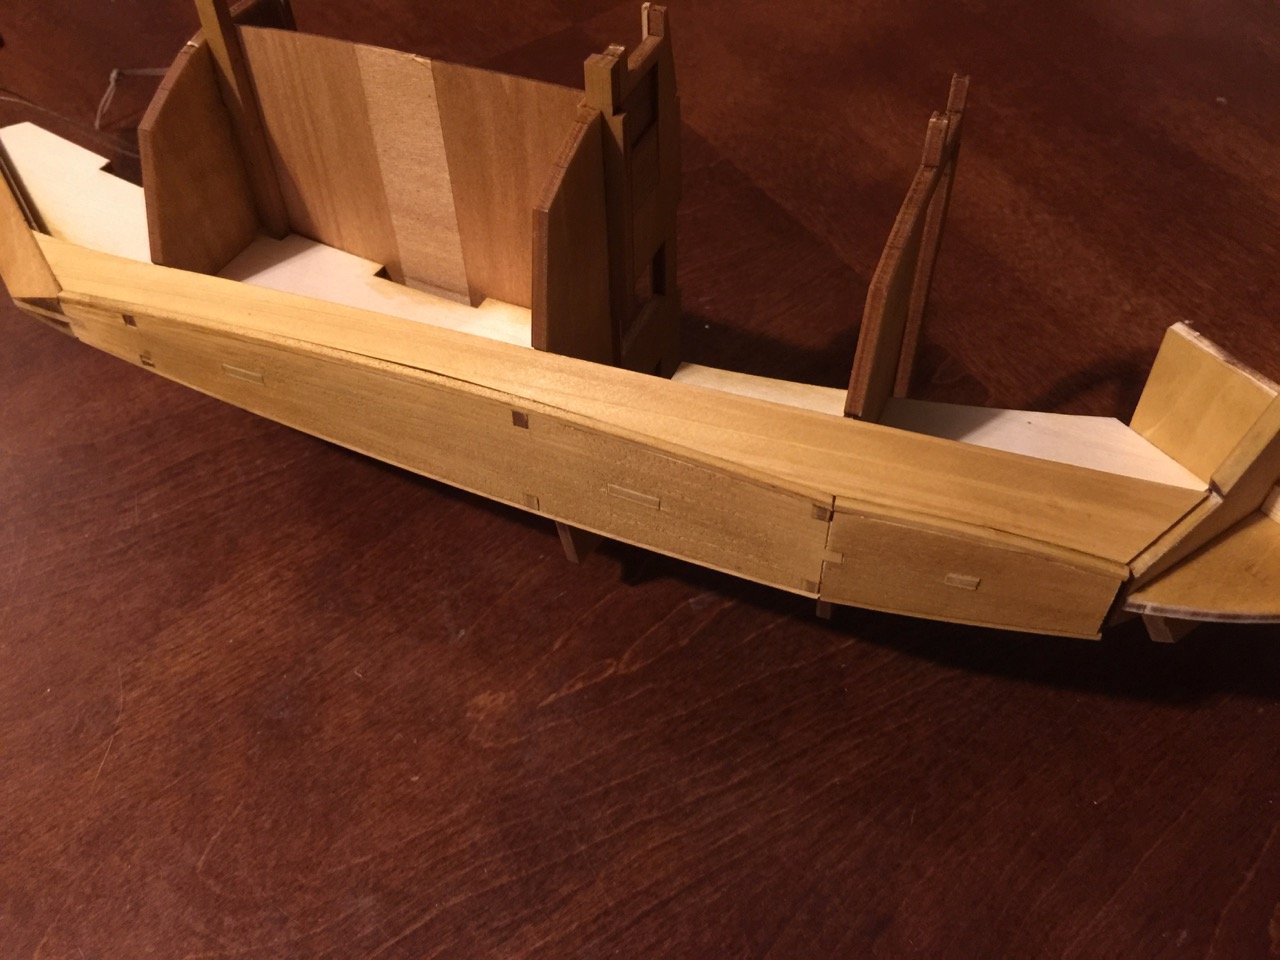
Thanks Druxey. Fortunately, with what you might call a facetted chine hull, one with many flat sides and angles, these gaps aren't as pronounced as they would be on a smooth planked one. I had a similar problem on the Higaki kaisen model, but only in one place. I mentioned the issues I had to Woody Joe and that an additional bulkhead at the bow might have helped. Initially, I though the Higaki kaisen had a better designed internal frame that make for better fitting plank pieces. But, I looked back at my old photos and see that it was about the same. I don't know why I had more trouble this time. In any case, I looked at my photos of the Hakusan Maru again, the ship I took photos of on Sado island, and noted some of the details that appear on that ship that don't appear on this model. Now, these ships had some variations to them, so certain modifications are just another option. But one seems to be certain on just about every replica and model I could find. That is the heavy plank at the edge of the rudder well opening. I marked up a photo to show this plank and other features. This photo also gives you a better sense of scale as it has some people walking around. The red arrows point out this heavy plank. If you look at the last photo of my model, the end you're looking at is the edge of the hull pieces. So, I'm going to see if I can add these pieces, though it might require a little trimming of the rudder well opening in order for the pieces to fit correctly. In any case, I also labeled in green a strip along the chine of the hull. This strip runs all the way to the bow. On some ships, it appears to run all the way back to the stern where the blue arrow is shown. On this ship, it actually stops at that last green arrow and there is a kind of fashion piece there. I'm going to take the simple route and run the strip all the way back. Finally, I thought I'd point out another feature that doesn't show up in these kits: There are tenons sticking through the planks where I've marked with yellow arrows. These have wooden keys that lock them into place, which you can see in the photos. I'm going to try to simulate the tenons – easy enough since I just have to glue wooden squares into place. I don't know that I'll be able to simulate the keys due to the small size. First Modifications Okay, I already did the easiest modification, and that was to add that strip along the edge of the chine of the hull. A very simple process of measure, cut, bend, trim, and glue. The application of the strip wasn't perfect, particularly on the port side. Also lining up right on the edge means that I need to file the edge in a couple spots where I didn't get it quite exact. Minor issues. Note the pencil marks along the edge of that bottom piece, aft. I've been testing out shapes for that edge plank and found that to get them to fit properly, I'd have to trim away that area. Next step is to make the pieces, trim away that section of the hull and glue them into place.

-
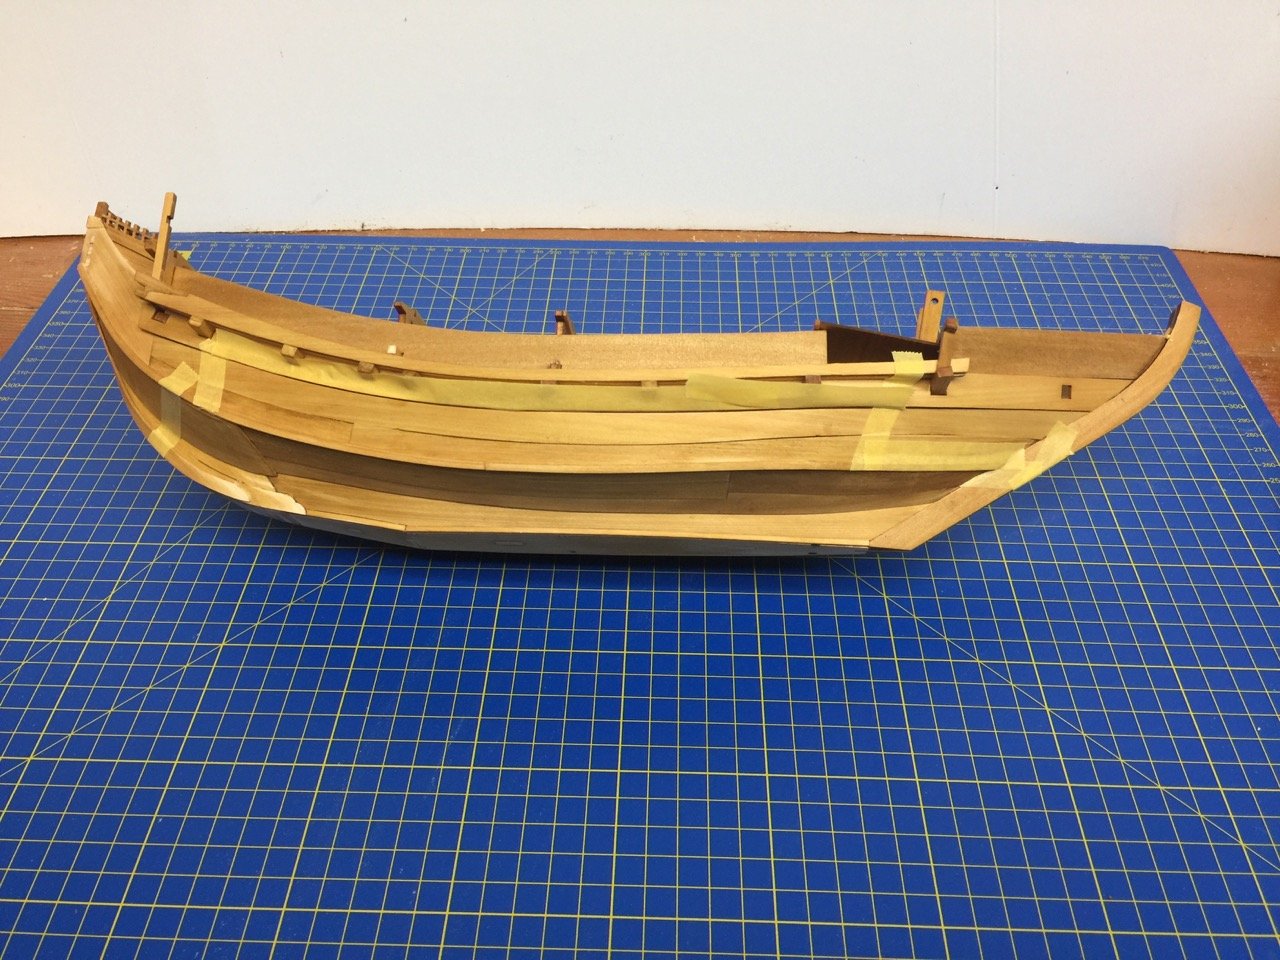
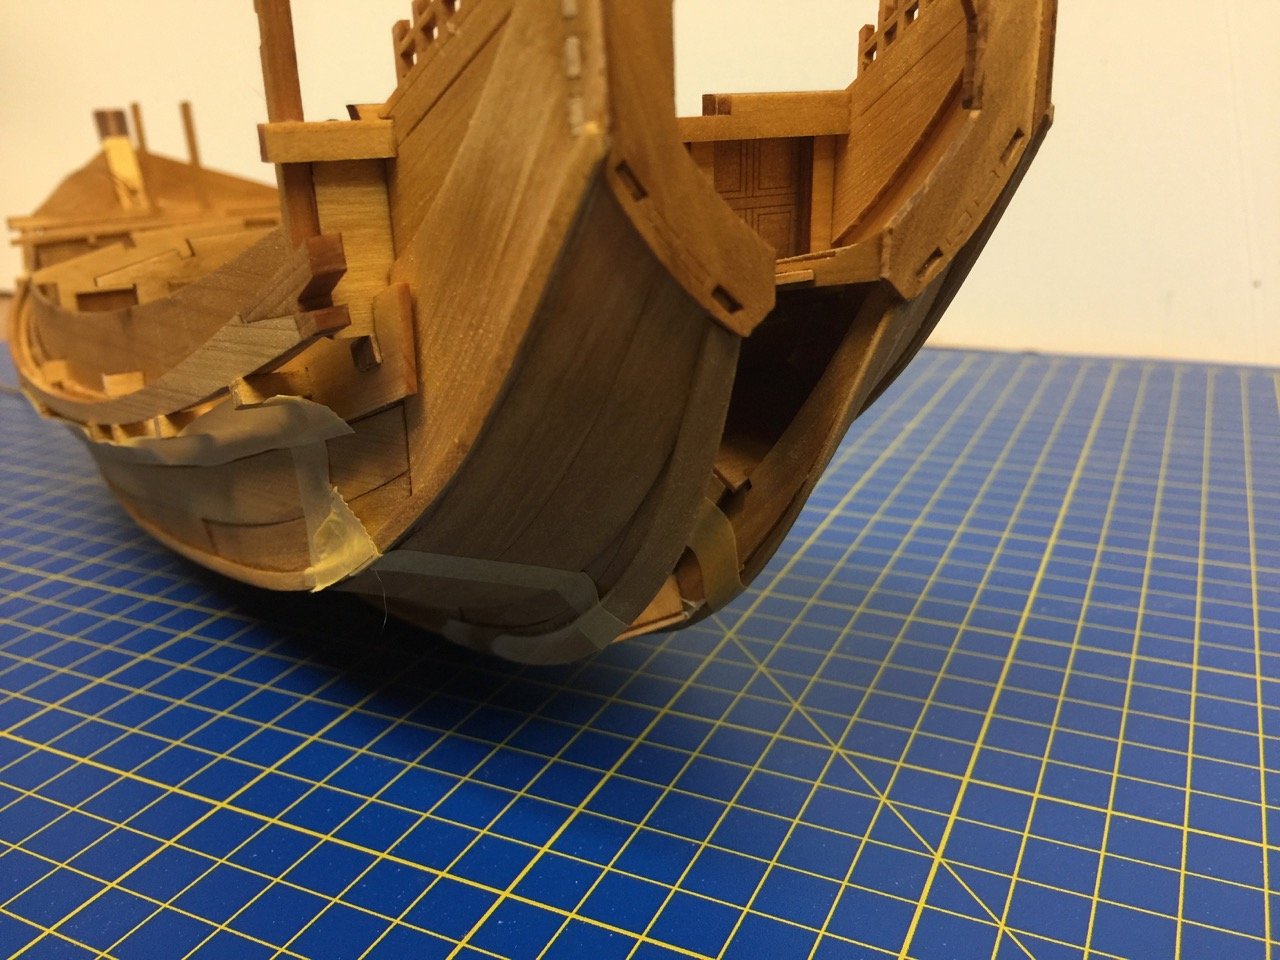
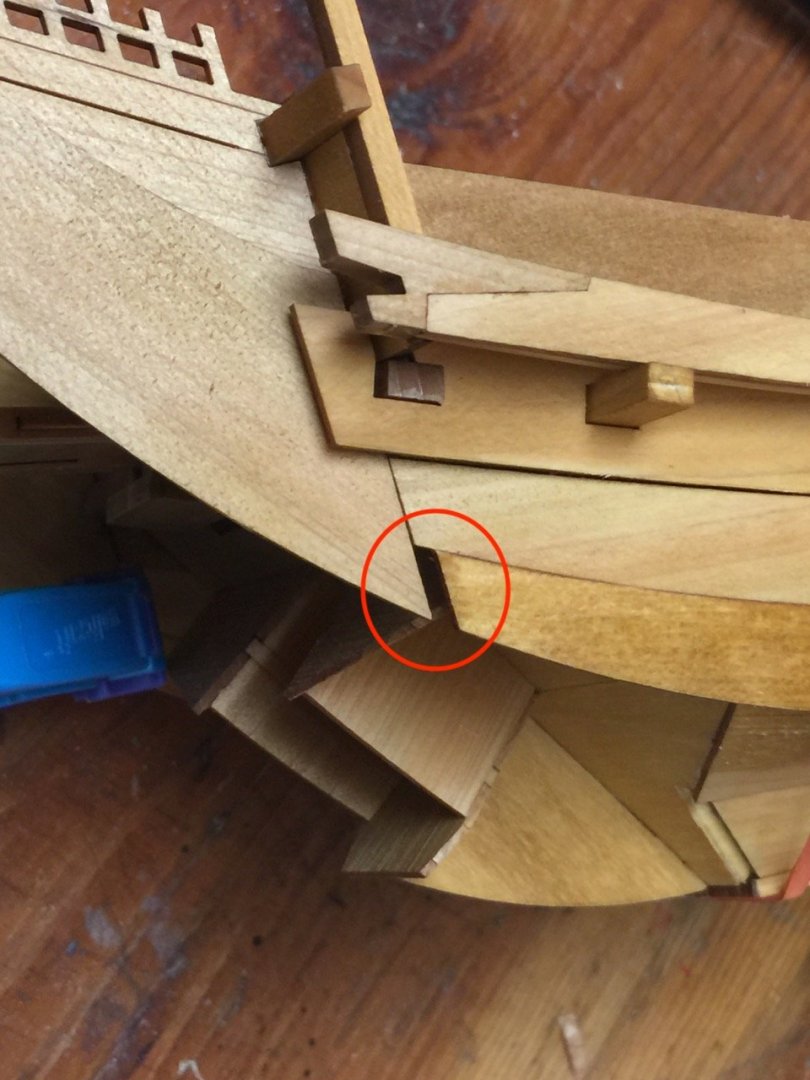
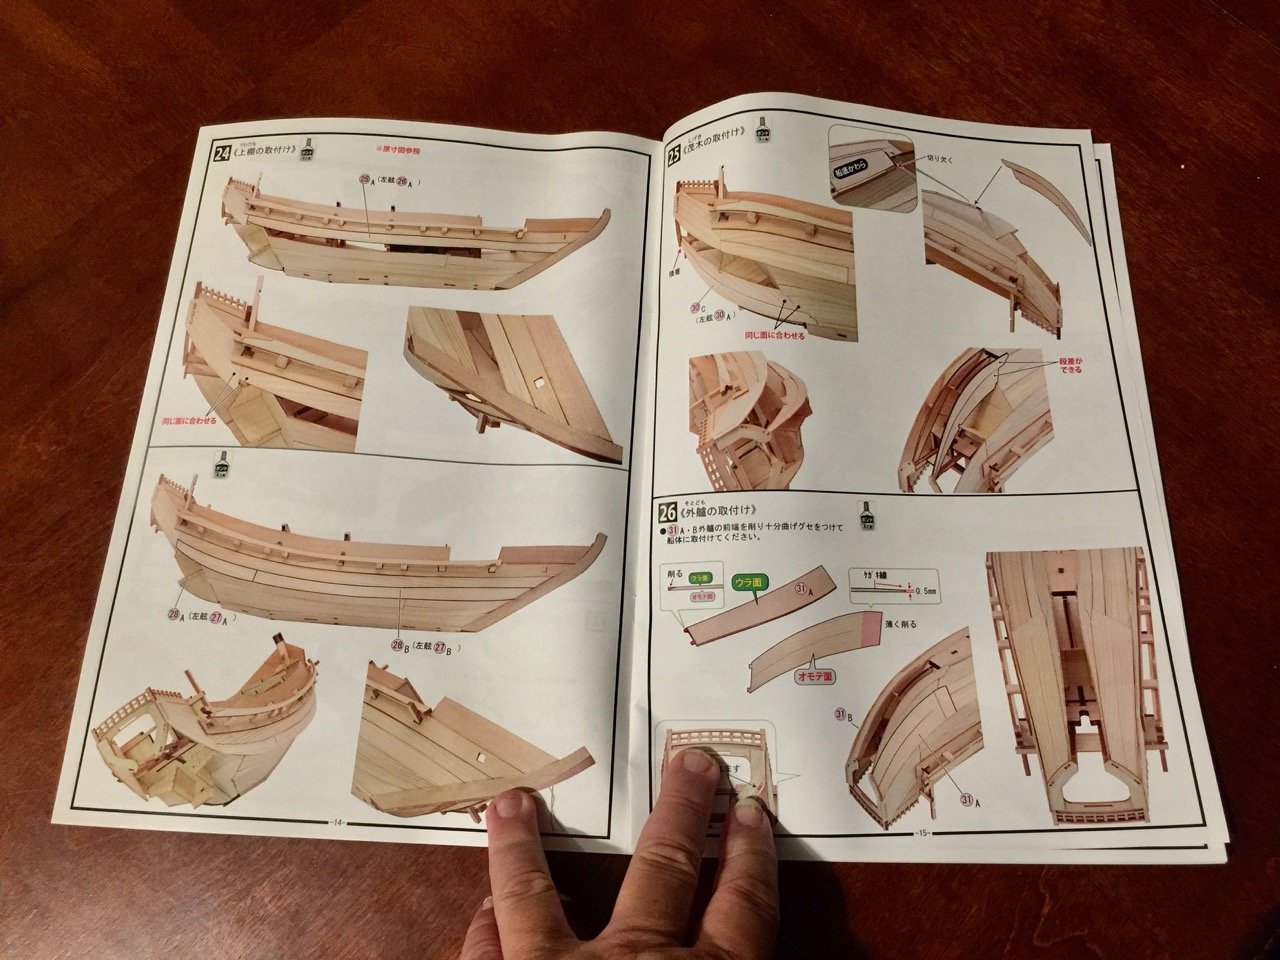
Finishing the hull planking As you saw from earlier pics, I had already started adding the last of the hull pieces, a.k.a. "planking". I finished up everything through Step 26 in the instructions. Construction was certainly not "trouble-free". The main issue I had was that I ended up with small gaps between many of the hull pieces. My biggest concern was that light might show through these gaps. Otherwise, most of these were not very noticeable. The biggest exception was the interface between the main hull pieces and the stern assembly. As you can see in the photo below, there was quite a considerable gap (inside the red circle). I don't know why the gap, but it must be that I left the hull somewhat wide close to the stem. I believe this comes from there not being a bulkhead close to the bow to set the proper curvature to the hull there. The piece is a simple one and I was able to find sufficient scrap wood among the laser-cut wood sheets in the kit to fashion replacement pieces. As for the other gaps in the hull planks, I ended up using scraps of wood to "light seal" all the small gaps. There were a lot, and you can see all the wood strips I glued into place to hide them. I felt that, in the end, blocking these gaps with wood would look better than sealing them with wood filler. Some of the gaps will also be hidden when I apply a paint scheme which covers the lower hull. At this stage, with the hull planks all in place, I'm starting to consider some modifications to the kit to make it look more like a real kitamaebune. I'll point out those as I progress further in the build. I have to say that I was a bit disappointed and frustrated with some of the problems I had with the fit of the hull parts. Others building this kit may or may not run into similar issues. But, I have to say that after getting it all together and cover the gaps from behind, I'm pretty happy with the project over all. The Kitamaebune kit has more frustrations than I remember when building Woody Joe's Higaki kaisen kit, but it really does go together more quickly.

-
Sometimes it seems like the old companies don't really appreciate their own early work. So, maybe it's just as well they are gone and replaced by a company that understands the importance of these old models. At least we're lucky enough to be able see them again and maybe build them.
-
I've admired this model kit since I was a boy. A friend of mine had built it and I loved that it had the whole launch pad complete with the erector truck. May not live up to modern kits with their photo etched brass, but the kit's still a classic. Congratulations on your find!
-
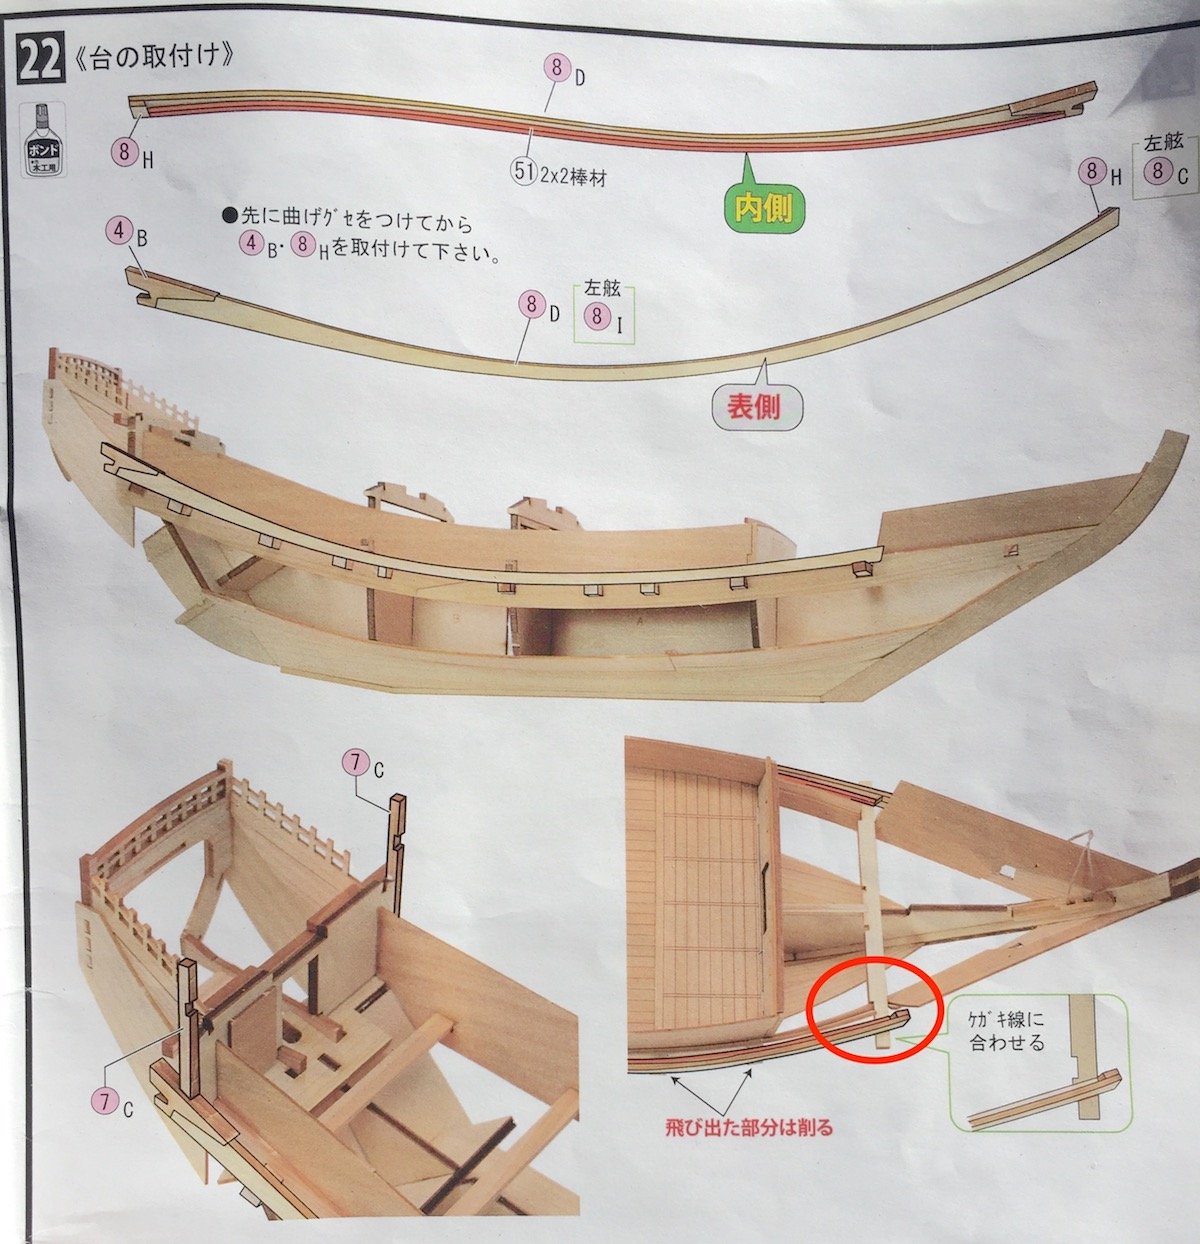
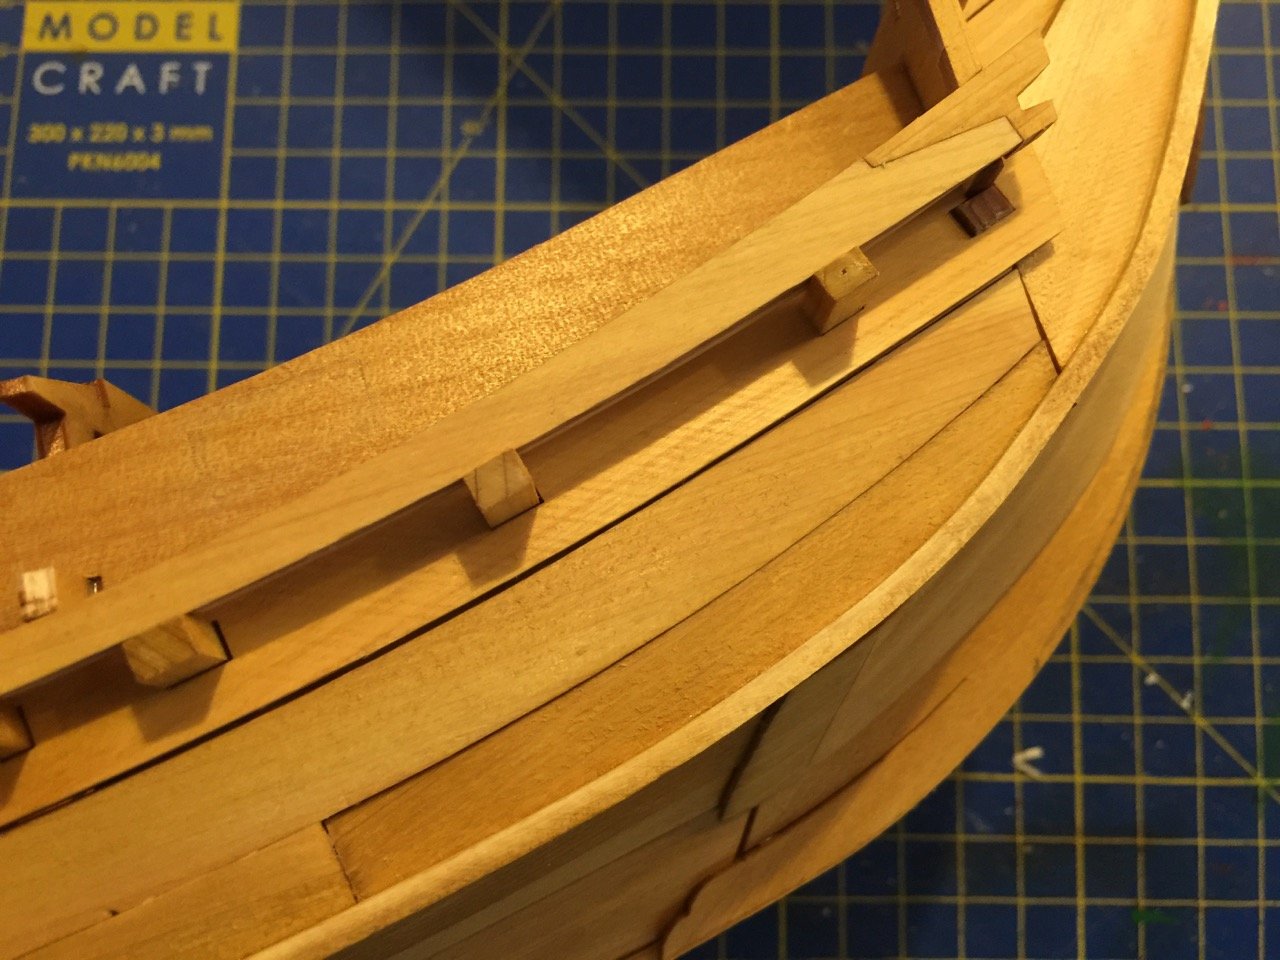
Something I neglected to mention in my last post is that each dai, the railing that runs along the tops of the beam ends, is actually made up of four pieces. So, there are pieces glued to each end, and a 2mm x 2mm strip along the bottom of the back side. That strip glued along the back will make it impossible to bend the assembly to the proper curve, so you really need to pre-bend the wooden pieces first, then glue them together. If the 2mm x 2mm strip is cut to length first, it will have to be shortened slightly to fit. The dai rests on the forward most beam, on which Woody Joe has scribed an line to help align the dai properly. I've circled the spot in red in the image below. So, it's important to look for that line. It also means that it's important to glue that piece in "right side up" in the earlier step. Another note about that forward beam. The beam is stepped, or notched, and the step is perfectly vertical and helps give the hull planking the proper curve. Now, the thing is, where the step hits the hull plank, the hull plank, which is angled, doesn’t fit the perfectly vertical notch nicely. The ship modeler in me wants to adjust that step, so that it fits flat against the hull, but this would be wrong. With these Woody Joe kits, if it needs to be filed or sanded, they’ll let you know, and the fit is as the designers intended. So, some ship modeler tendencies need to be suppressed with laser-cut models. However, there is some filing or sanding that does need to be done, as the ends of the beams need to be flush with the curvature of the dai. The last part of this construction step is to mount two vertical posts on top of the dai. These support the aft ends of the bulwarks “fences”. Because alignment is particularly important with laser-cut kits, I took the bulwarks fence piece that is installed in some later step and use it as a guide to help me make sure I glued the posts in at the correct angle.

-
Thank you, Druxey. In fact, the painting in the first post shows three ships with the same markings. This painting was, I believe, an ema, or votive painting commissioned by the ships' owner. By the way, I was wrong about these ownership markings being black. I saw a couple photos recently showing a ship with orange or red markings, and another photo showing a ship with one marking in black and another in orange or red. But, that's the first time I'd seen a color other than black. I don't know if I'll be adding any marking on mine, as I will likely ruin the pre-printed sail, which looks very good.
-
Getting back to the build, steps 19 through 22 involve the addition of some hull planks, a plank called a noke-dana, and a piece referred to in the instructions as a dai, which is the base for the bulwarks “fences” for lack of a better term. In the photos below, the red arrows point to the noke-dana, while the blue arrows point to the dai. I don’t really understand the meaning of the term noke-dana, except that danaor tanais the term for a plank. This piece is a heavy plank that is pierced for the main beams, locking them into place. In the kit, this piece is, of course, laser cut, but is actually made in two parts connected with a scarf joint. The tricky part is that it has to be gently bent, so, again with the dampening and bending it over a large round surface. I did this after the two sections were glued together using Titebond II, which is water resistant, making sure to dampen the wooden piece, but not at the joint. Once this piece is glued into place, the beams are cut and put into place. These are among the few structural pieces that have to be cut to size from provided wood stock. These beams protrude through the holes in the noke-dana – I’m sure that on the real ship they lock into that piece in some very clever Japanese way. The dai is mounted onto ends of these beams.
-
Imai is Woody Joe's predecessor. They generally made kits in larger scales and sizes than Woody Joe does now (except for the Shin Nippon Maru kit, which is slightly longer than this Susquehanna kit). I wish there were still this and the 1/50-scale Kanrin Maru kits available. Woody Joe makes great kits, but nothing is more impressive to display than a large scale ship model!
-
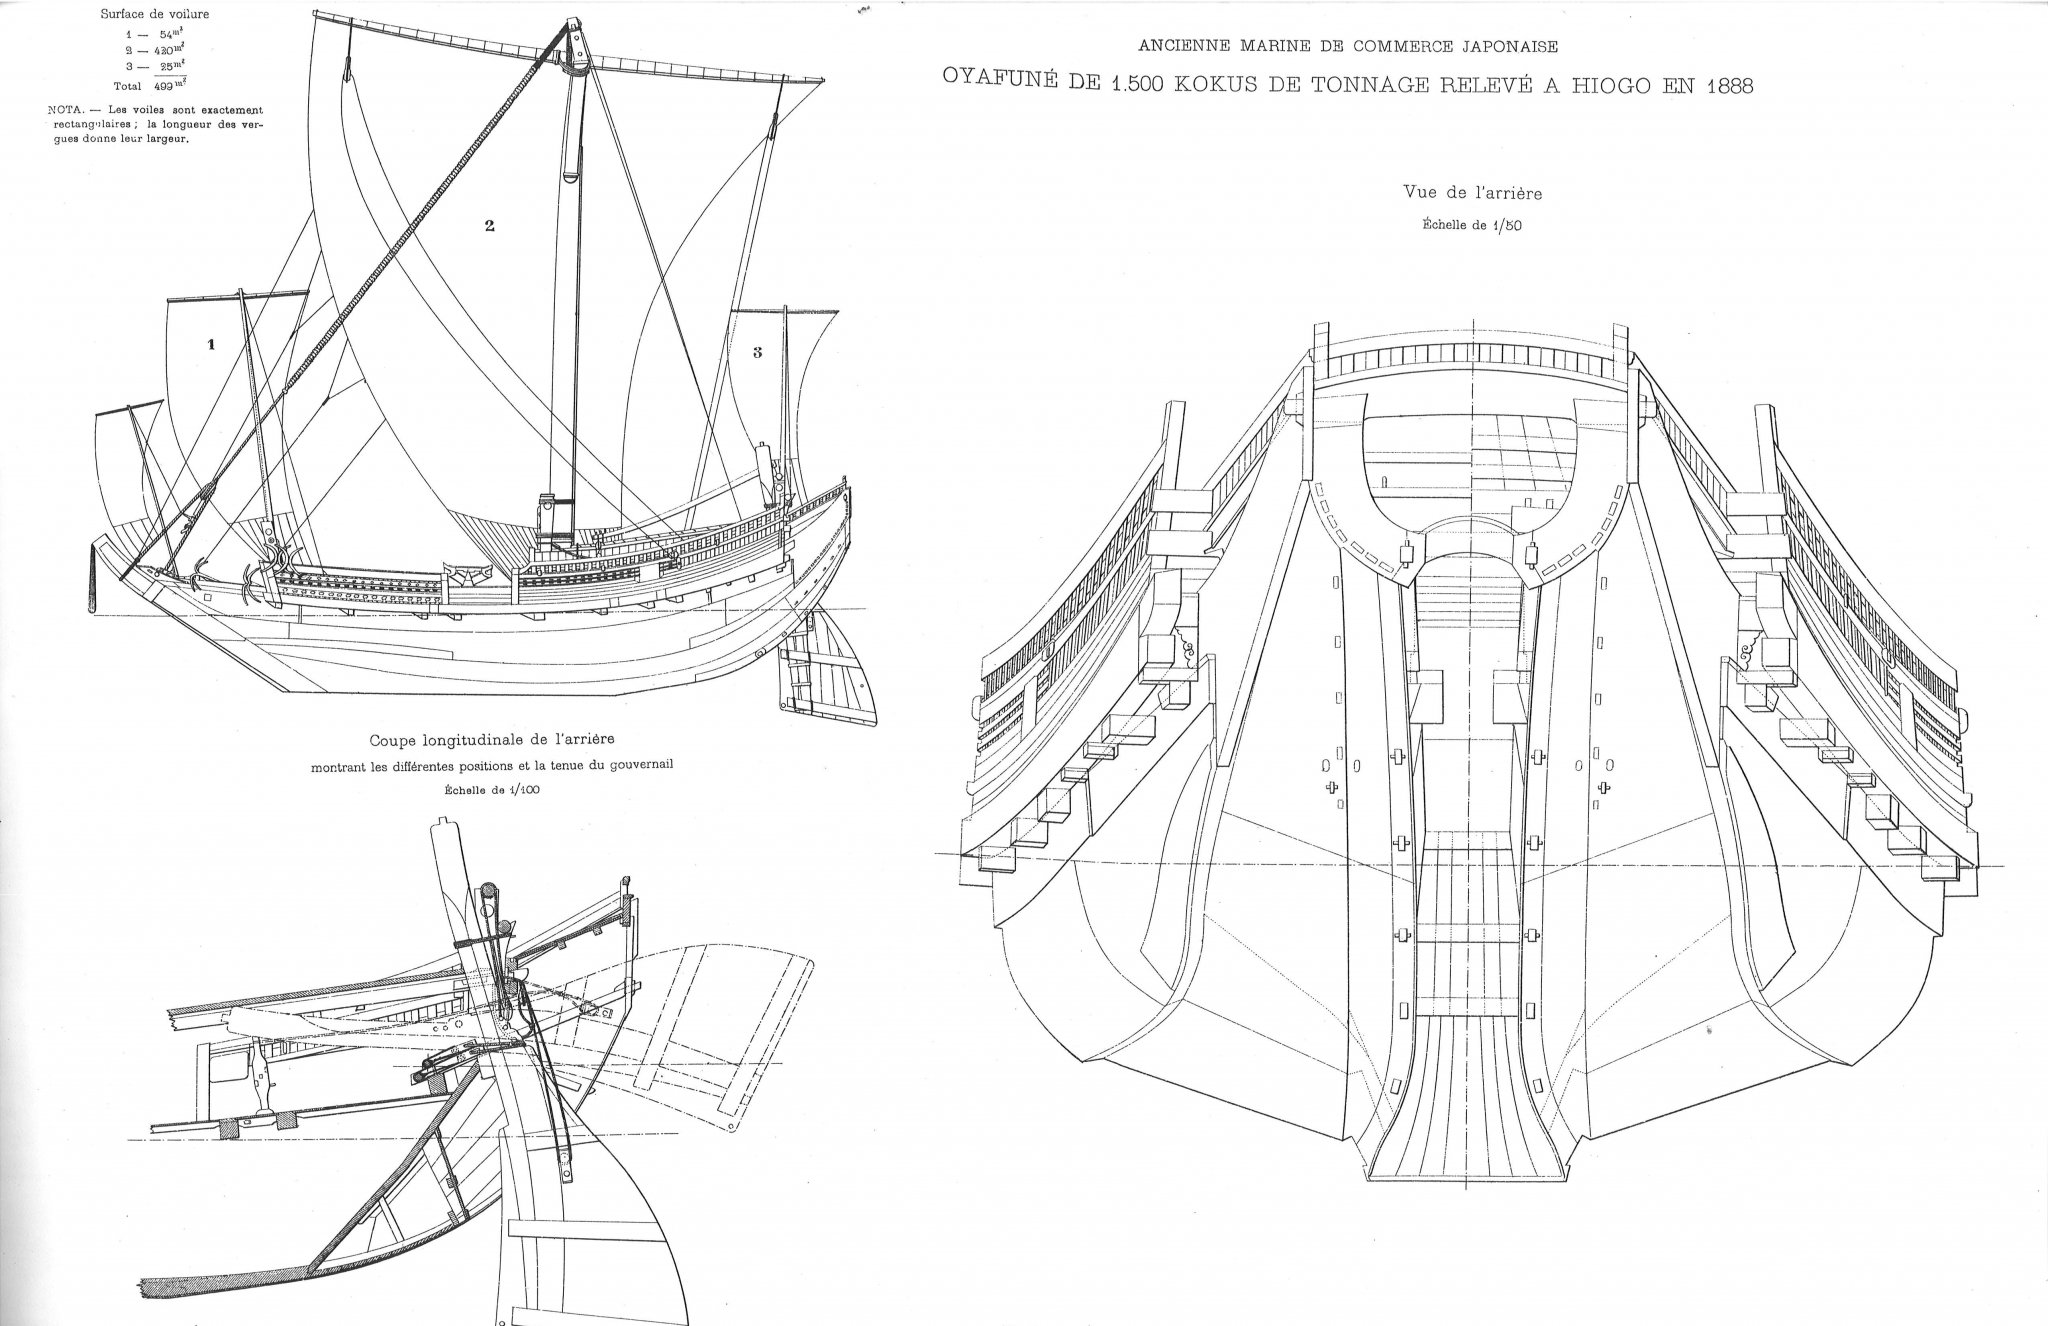
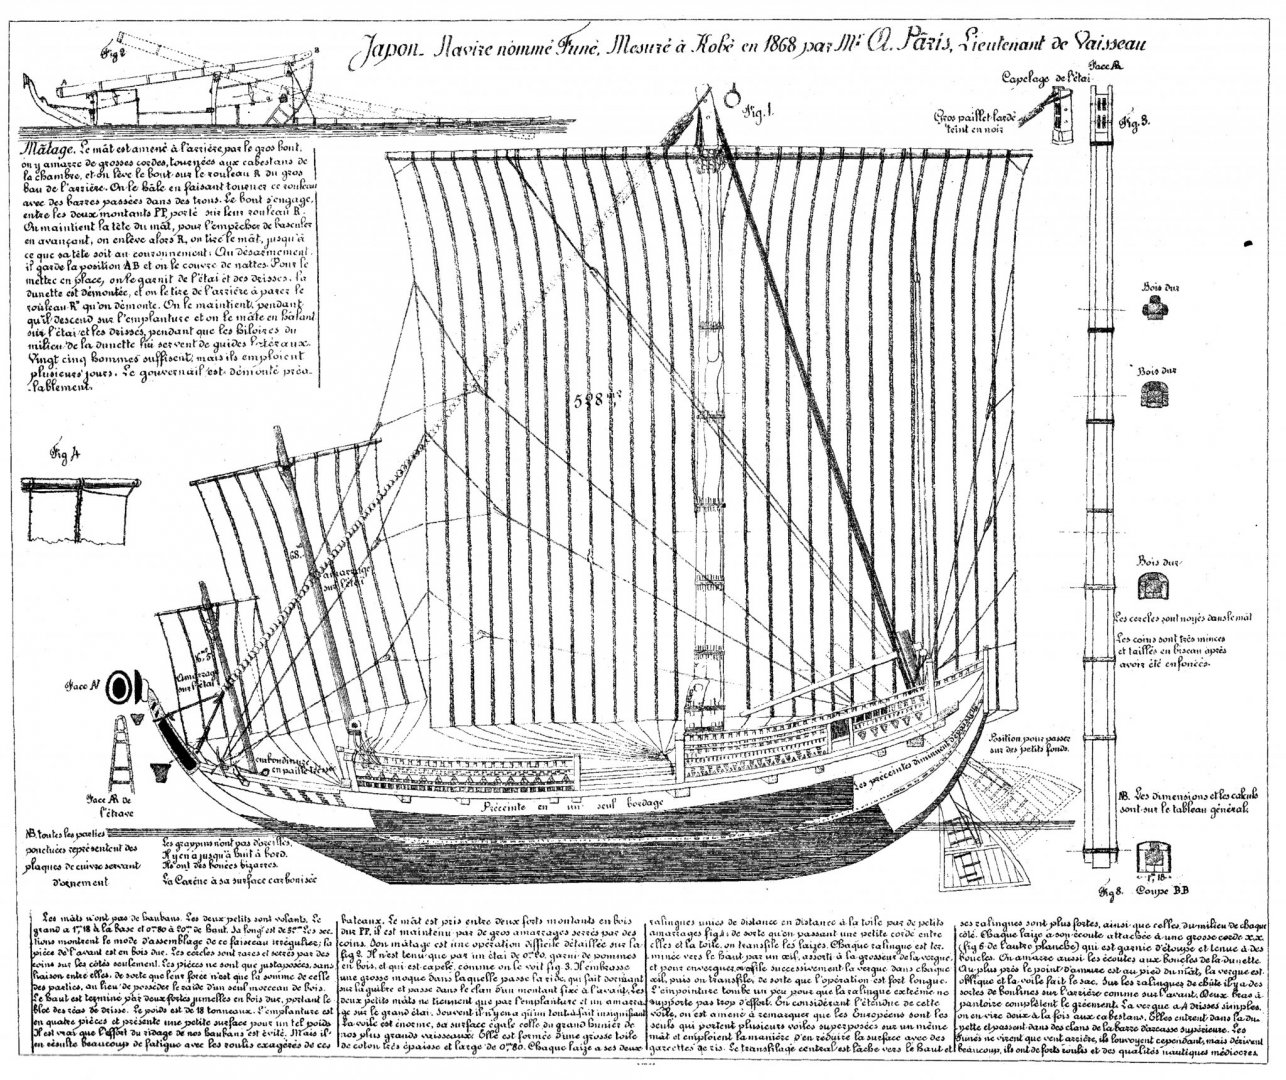
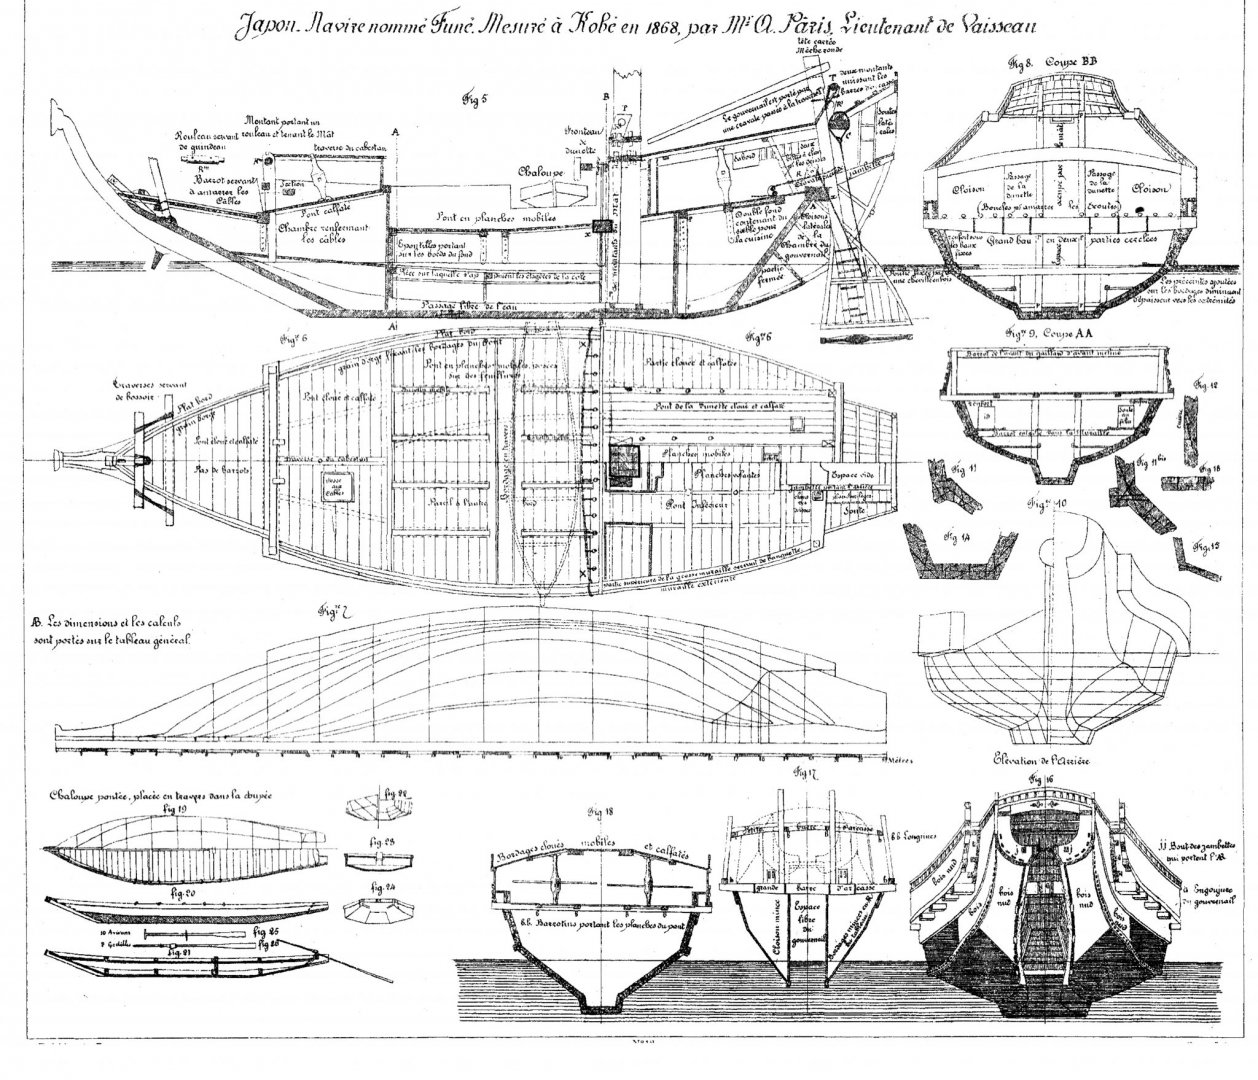
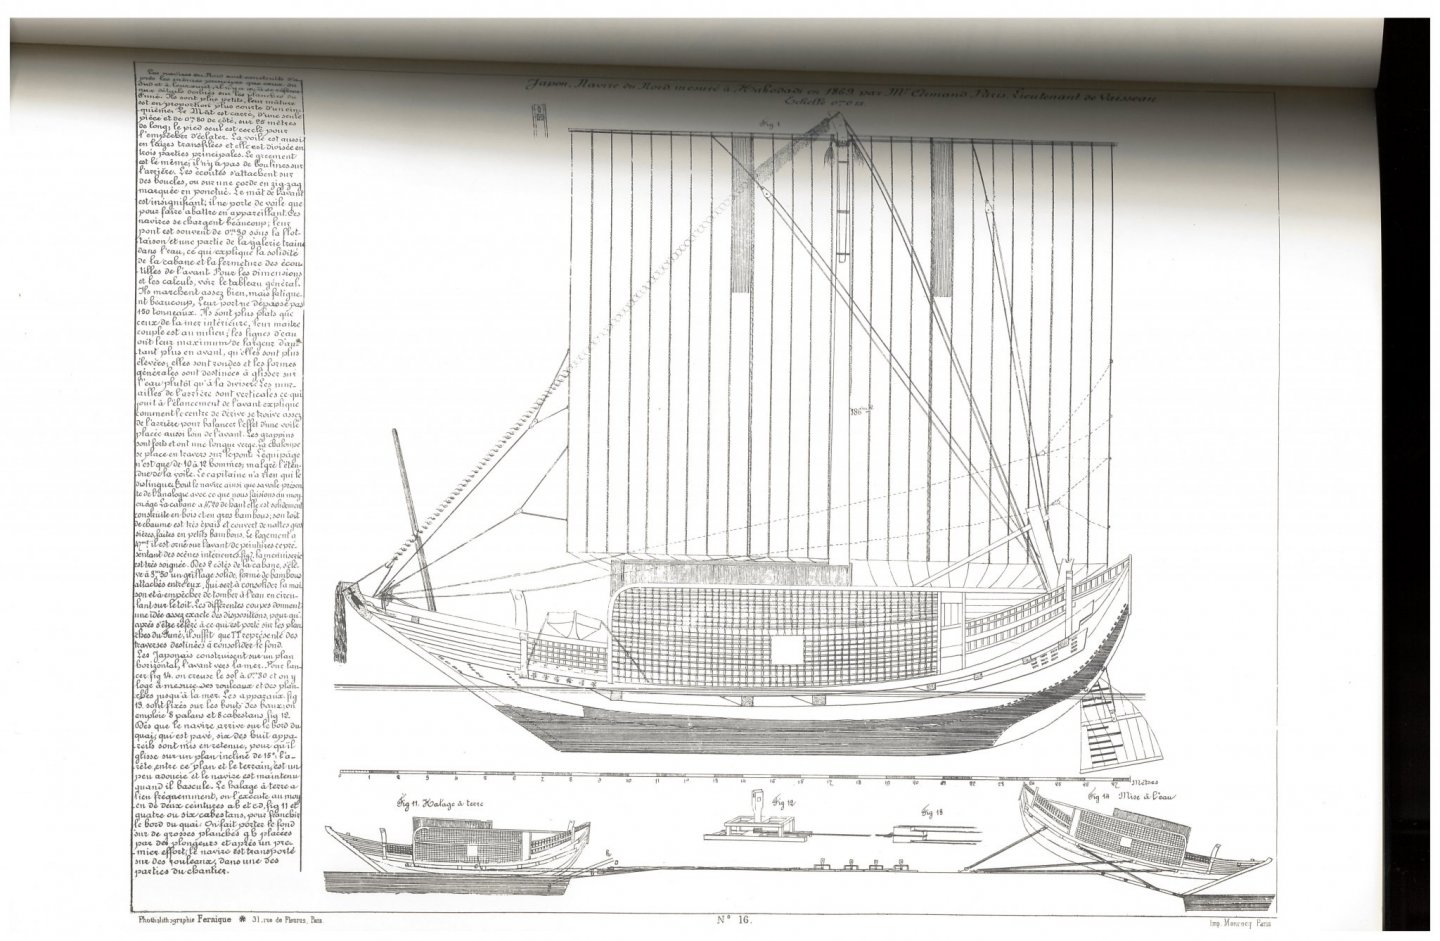
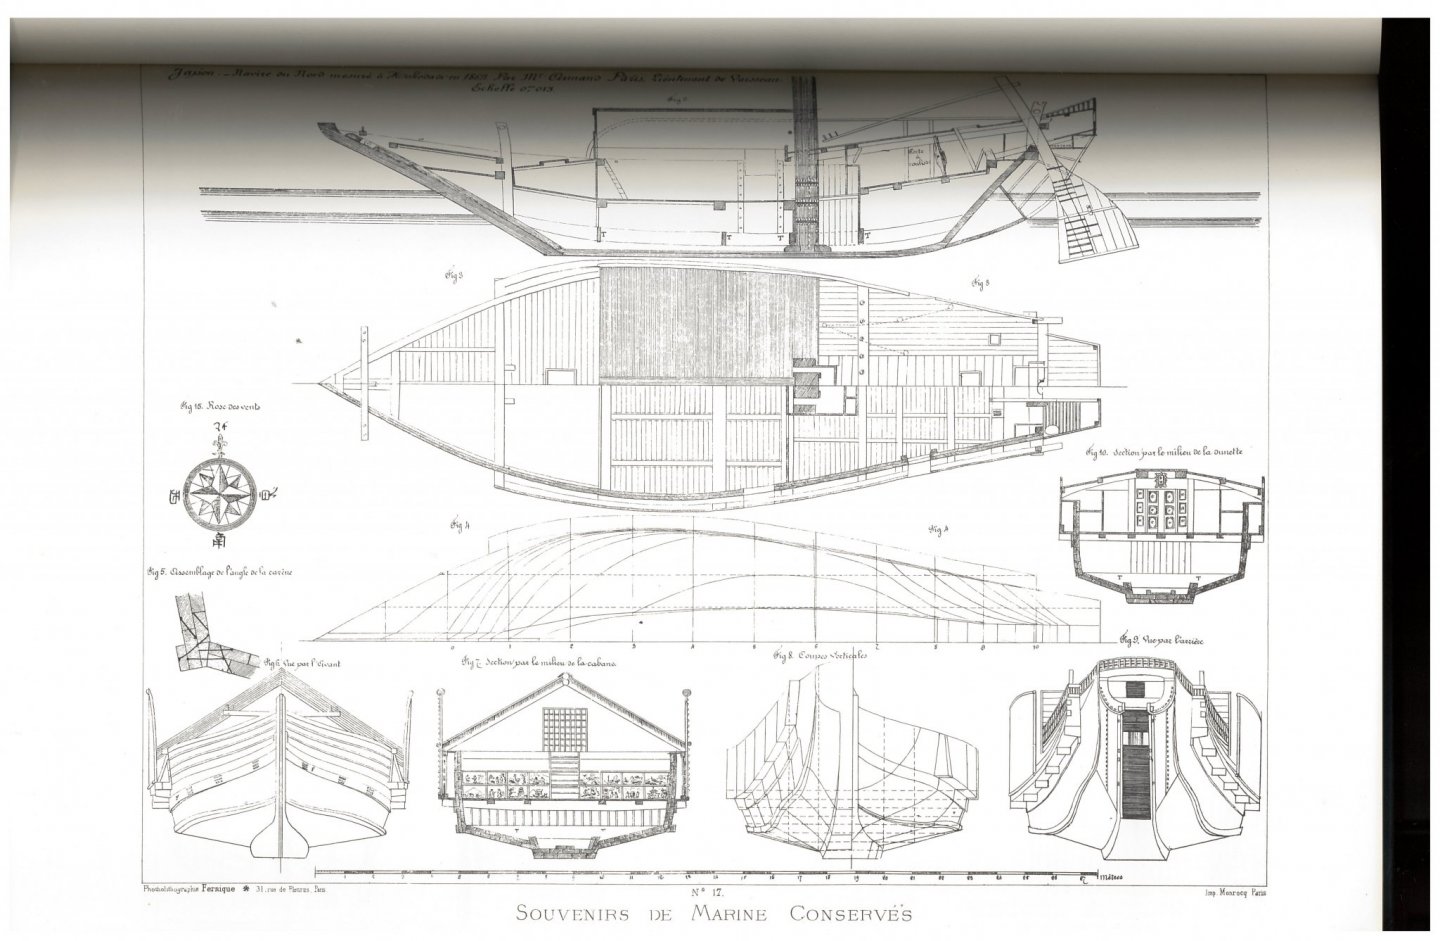
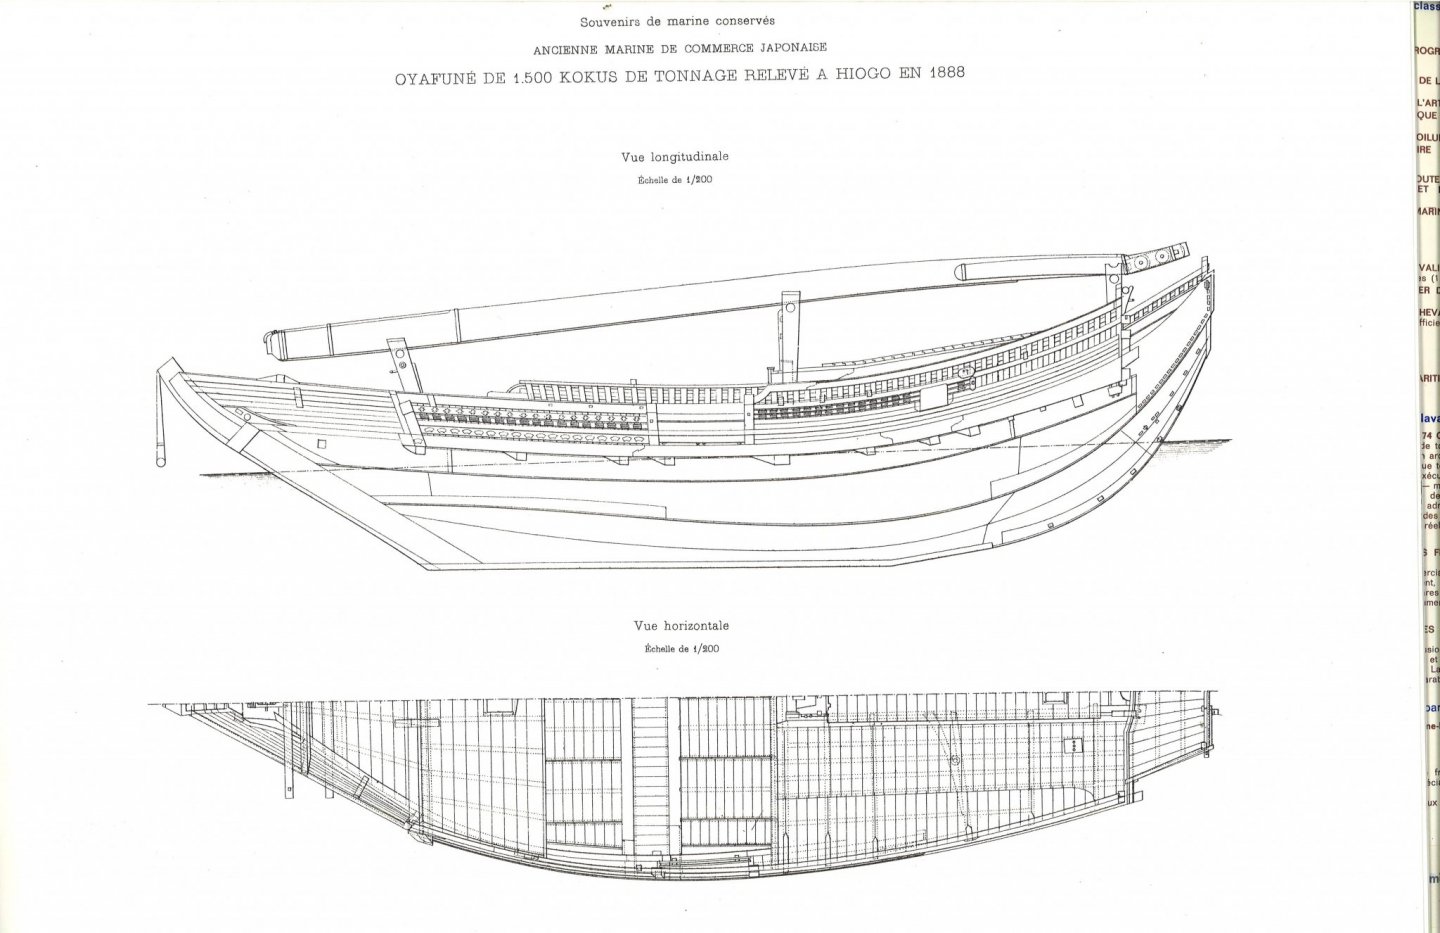
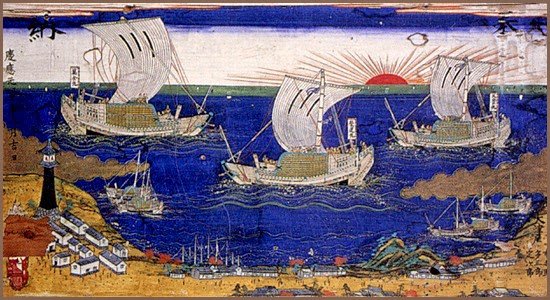
It occurred to me that there are a couple other scans of a similar type of ship in Souvenirs de Marine. These scans show what I believe to be an earlier version of the ship. The other scans were from a ship recorded in 1888, which is actually during the Meiji Restoration, while this one was recorded in 1868. I've begun to notice the difference in rudder shape, and the change in the decorative work on the end of the stem. I THINK this style probably dates to the early 1800s and possibly earlier. Ships of this type didn't change much during the Edo period, which began in 1603, but the demand for coastal transports really took off with the growth of Edo. This set of drawings is very nice in that it shows what is usually called a Tenmasen, the small lighter or ship's boat. Here are two more scans that I forgot about. Not super quality as there was an issue copying them from the original book. These depict another Kitamaebune, this time showing the temporary structure and fences erected to protect cargo on the deck, which was often piled high. This last one, also recorded in 1868, shows a much straighter stem. Interesting to me is that the run of the planking on the main cabin is longitudinal, rather than lateral. By the way, the markings on the sail, in this case the vertical rectangles at the top, indicate the owner of the ship. Rectangles in different patterns seem to have been the most common. But, I've seen other shapes too, mostly circles or balls in some combination. Clare
-
Hi L.H., Those drawings are in a book called "Souvenirs de Marine" by Vice Admiral François-Edmond Pâris, first published around 1892. It's usually found in 2 or 3 volumes (they're massive). The books are available in many reference libraries, so you might start there. I got mine from the San Francisco Maritime Research Center (J. Porter Shaw Library), which is part of U.S. National Park Service. It was a free service to provide scans. But, if you PM me, I can send you the three scans I received. They are in TIFF format and about 17MB each. Or, I can send you the email address of the reference librarian there who sent me the scans. Clare
-
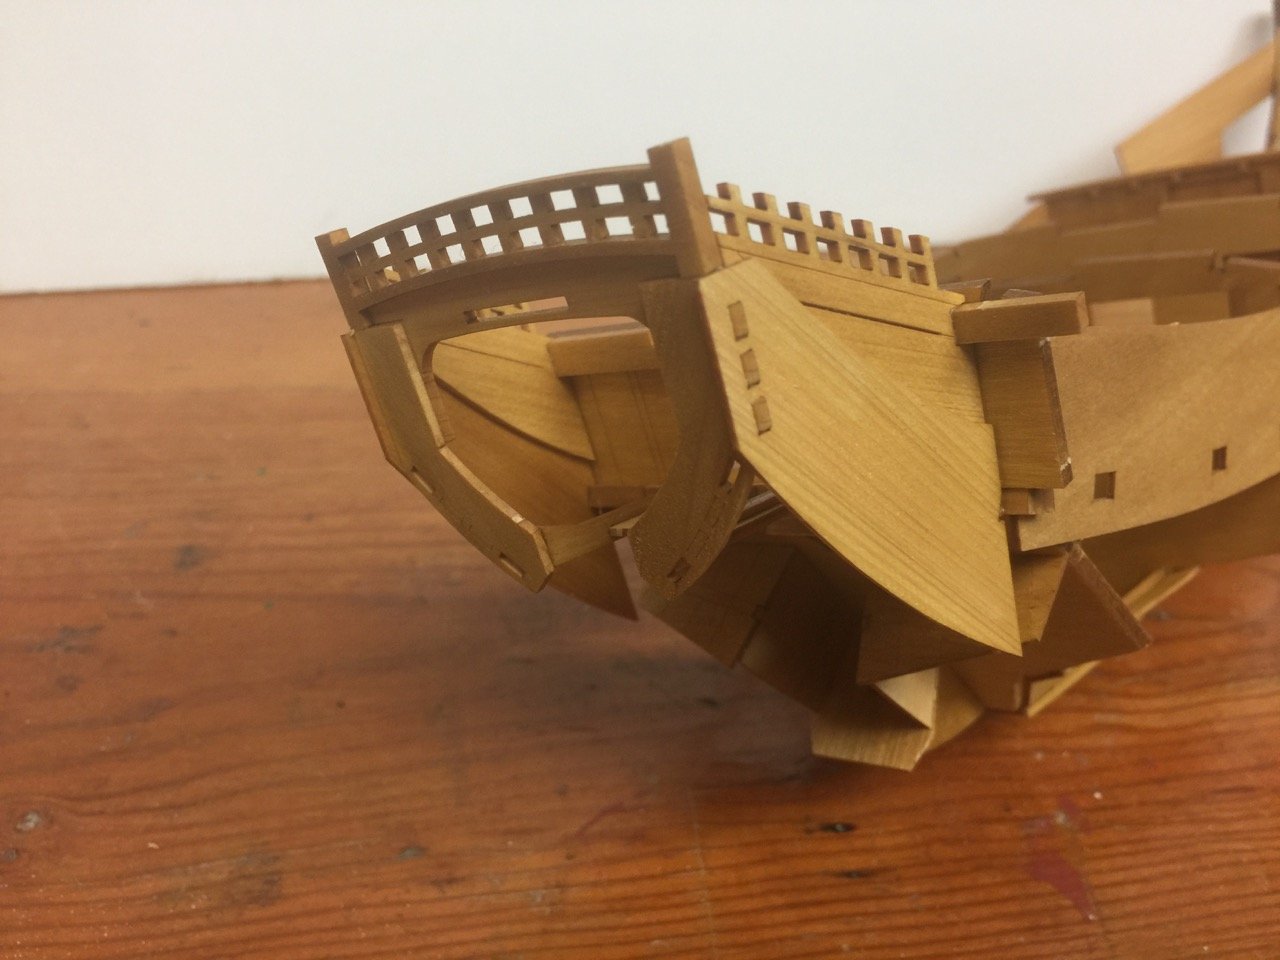
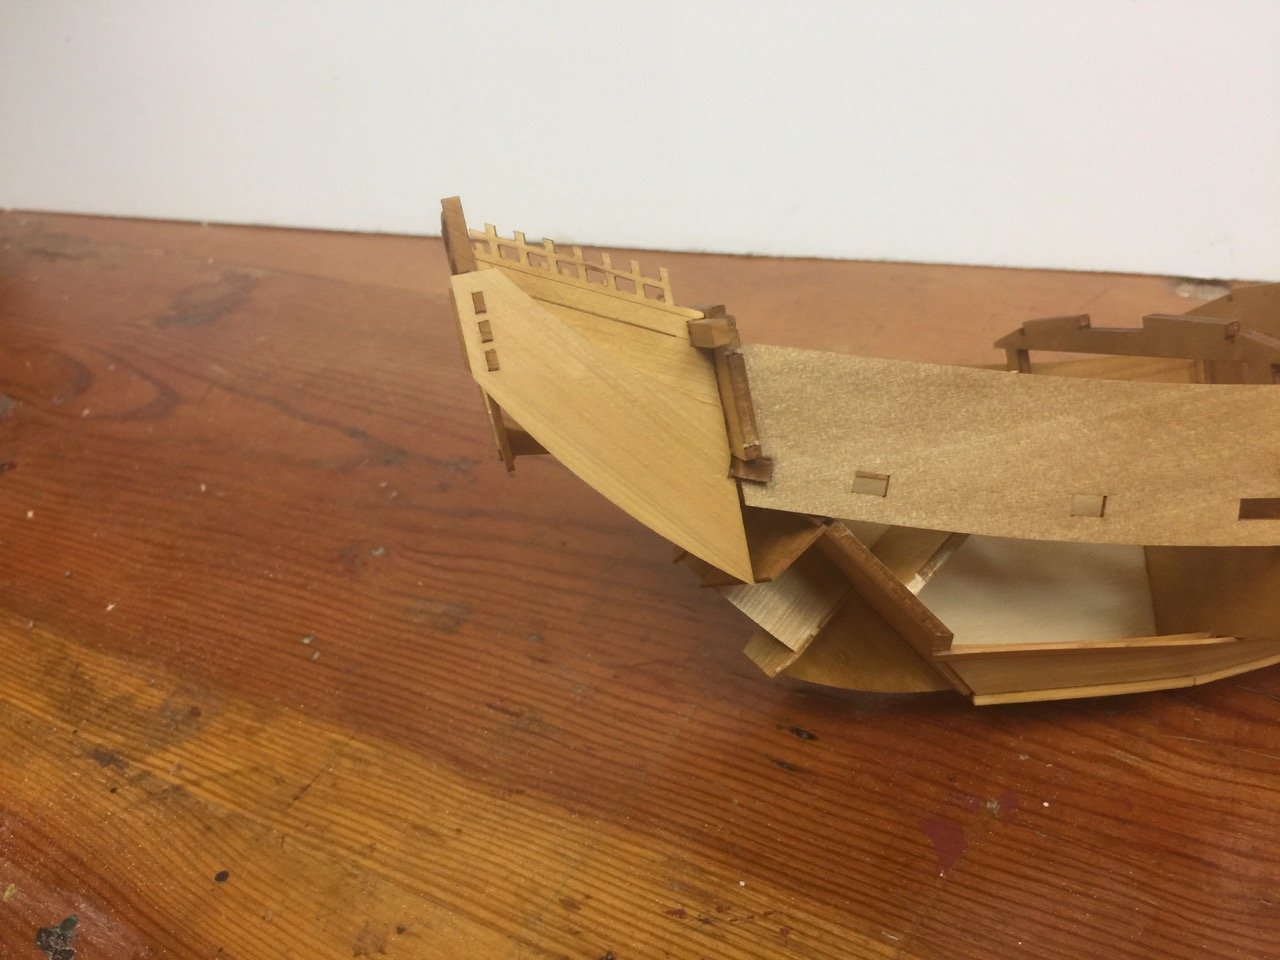
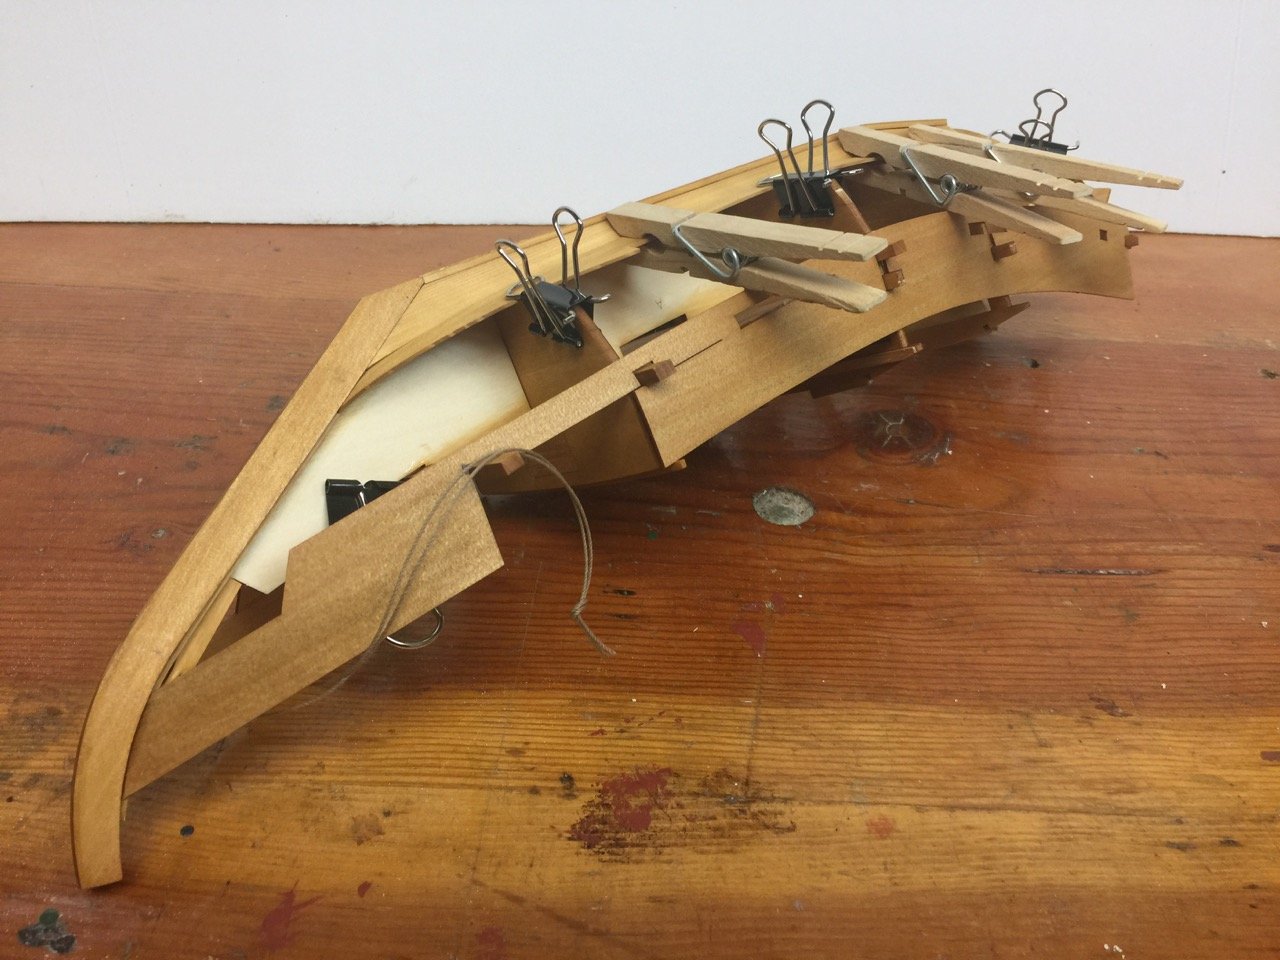
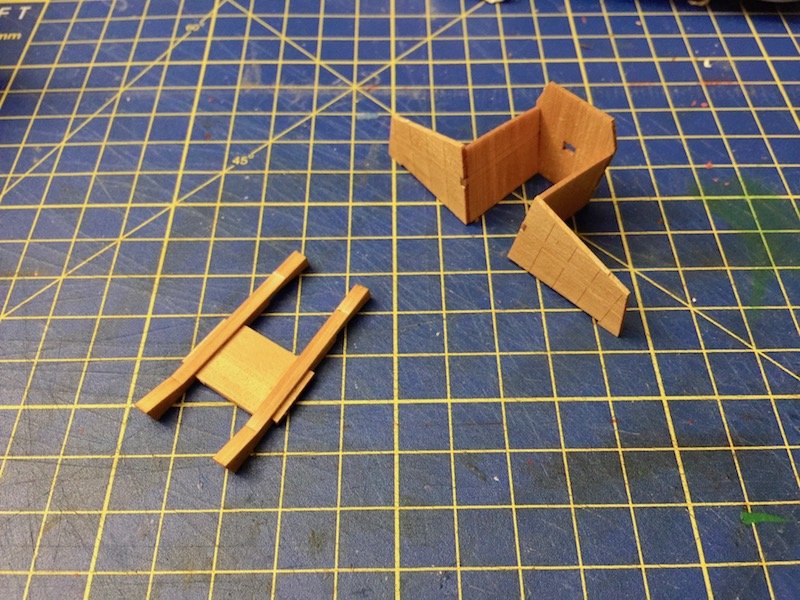
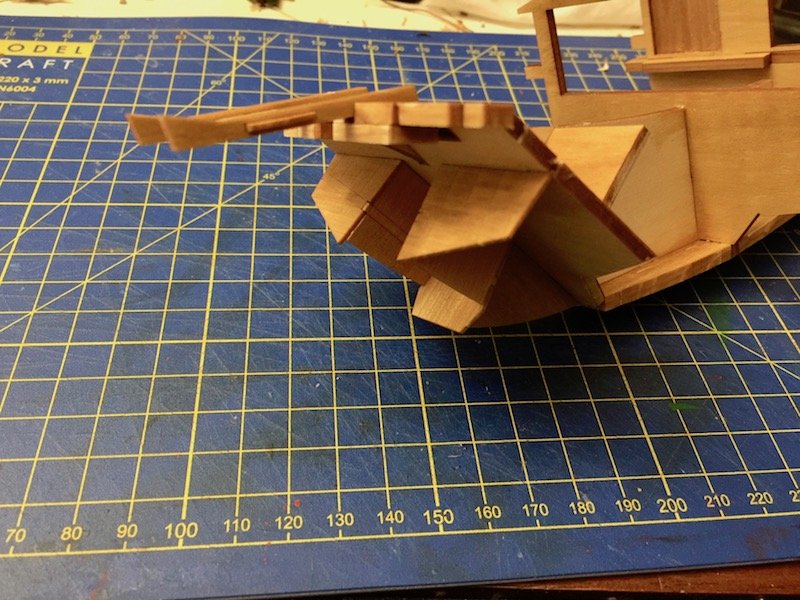
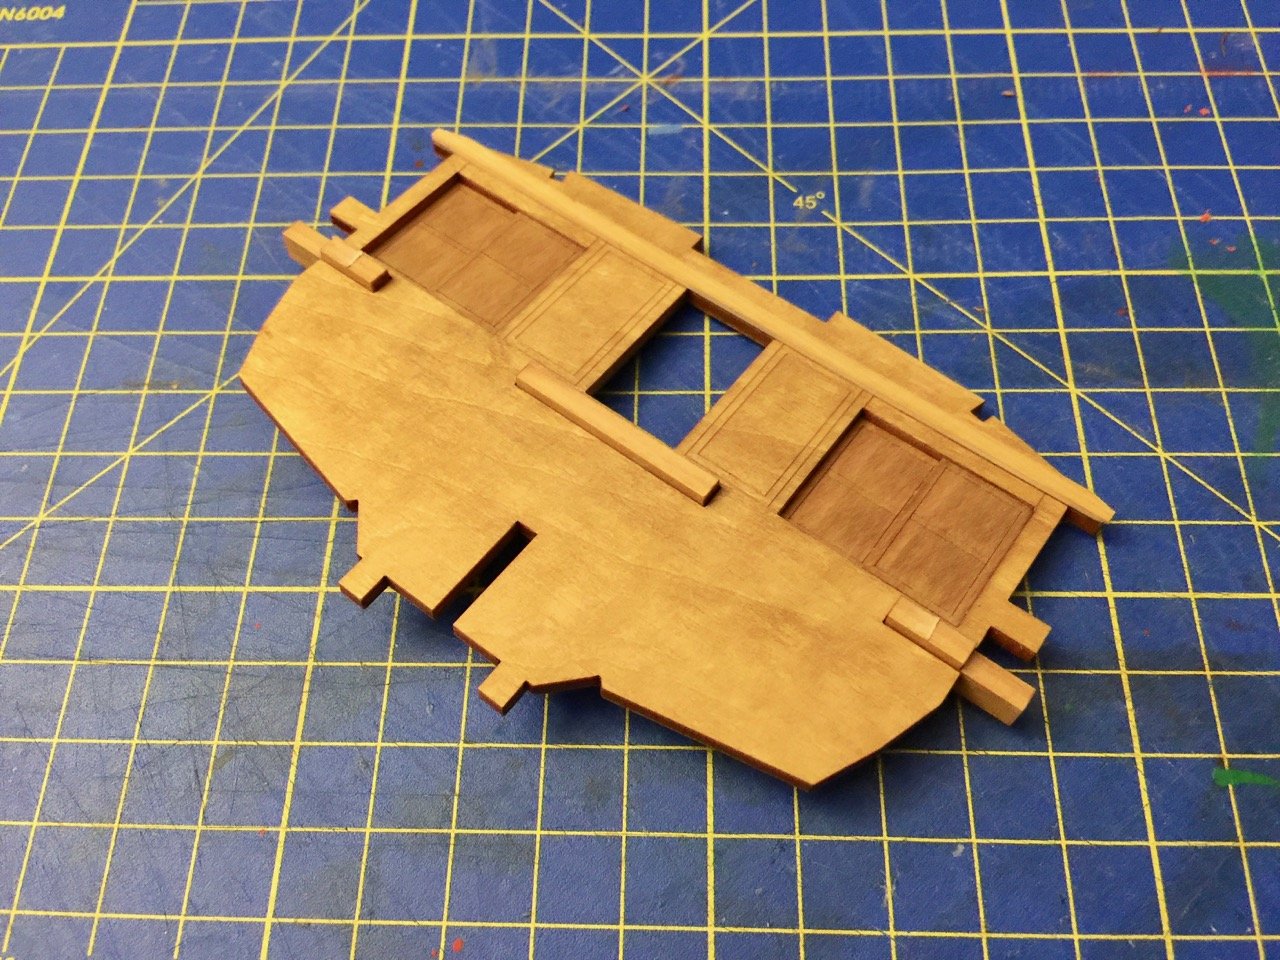
Getting back to model construction – here are the parts for the stern structure. Note that I've already assembled the parts that make up that stern facing. There are some interlocking parts here, and the tabs are oversized and out of scale. But, the make everything fit together nicely. During the build, I considered ways to make the model close to an actual bezaisen (general term for these large coastal transports). In the future, I may actually cut my own parts for some of these, so that the pre-cut tabs and laser etching don't show. This would allow me to add the details myself, as there are some small details, like fastenings, that aren't on the model. Still, it's a very nice kit. Note that the protruding beams at the stern are now glued to the stern facing. The whole assembly fits quite nicely into place. For a future scratch-building project, it's nice to be able to see that this section can be dealt with as a whole separate "module" like this. From the photos, I can see where the model needs a little touch-up with the wood dye where the tabs left from the laser-cutting were attached. This happens as I apply dye to the entire laser-cut sheet before removing the parts. Clare
-
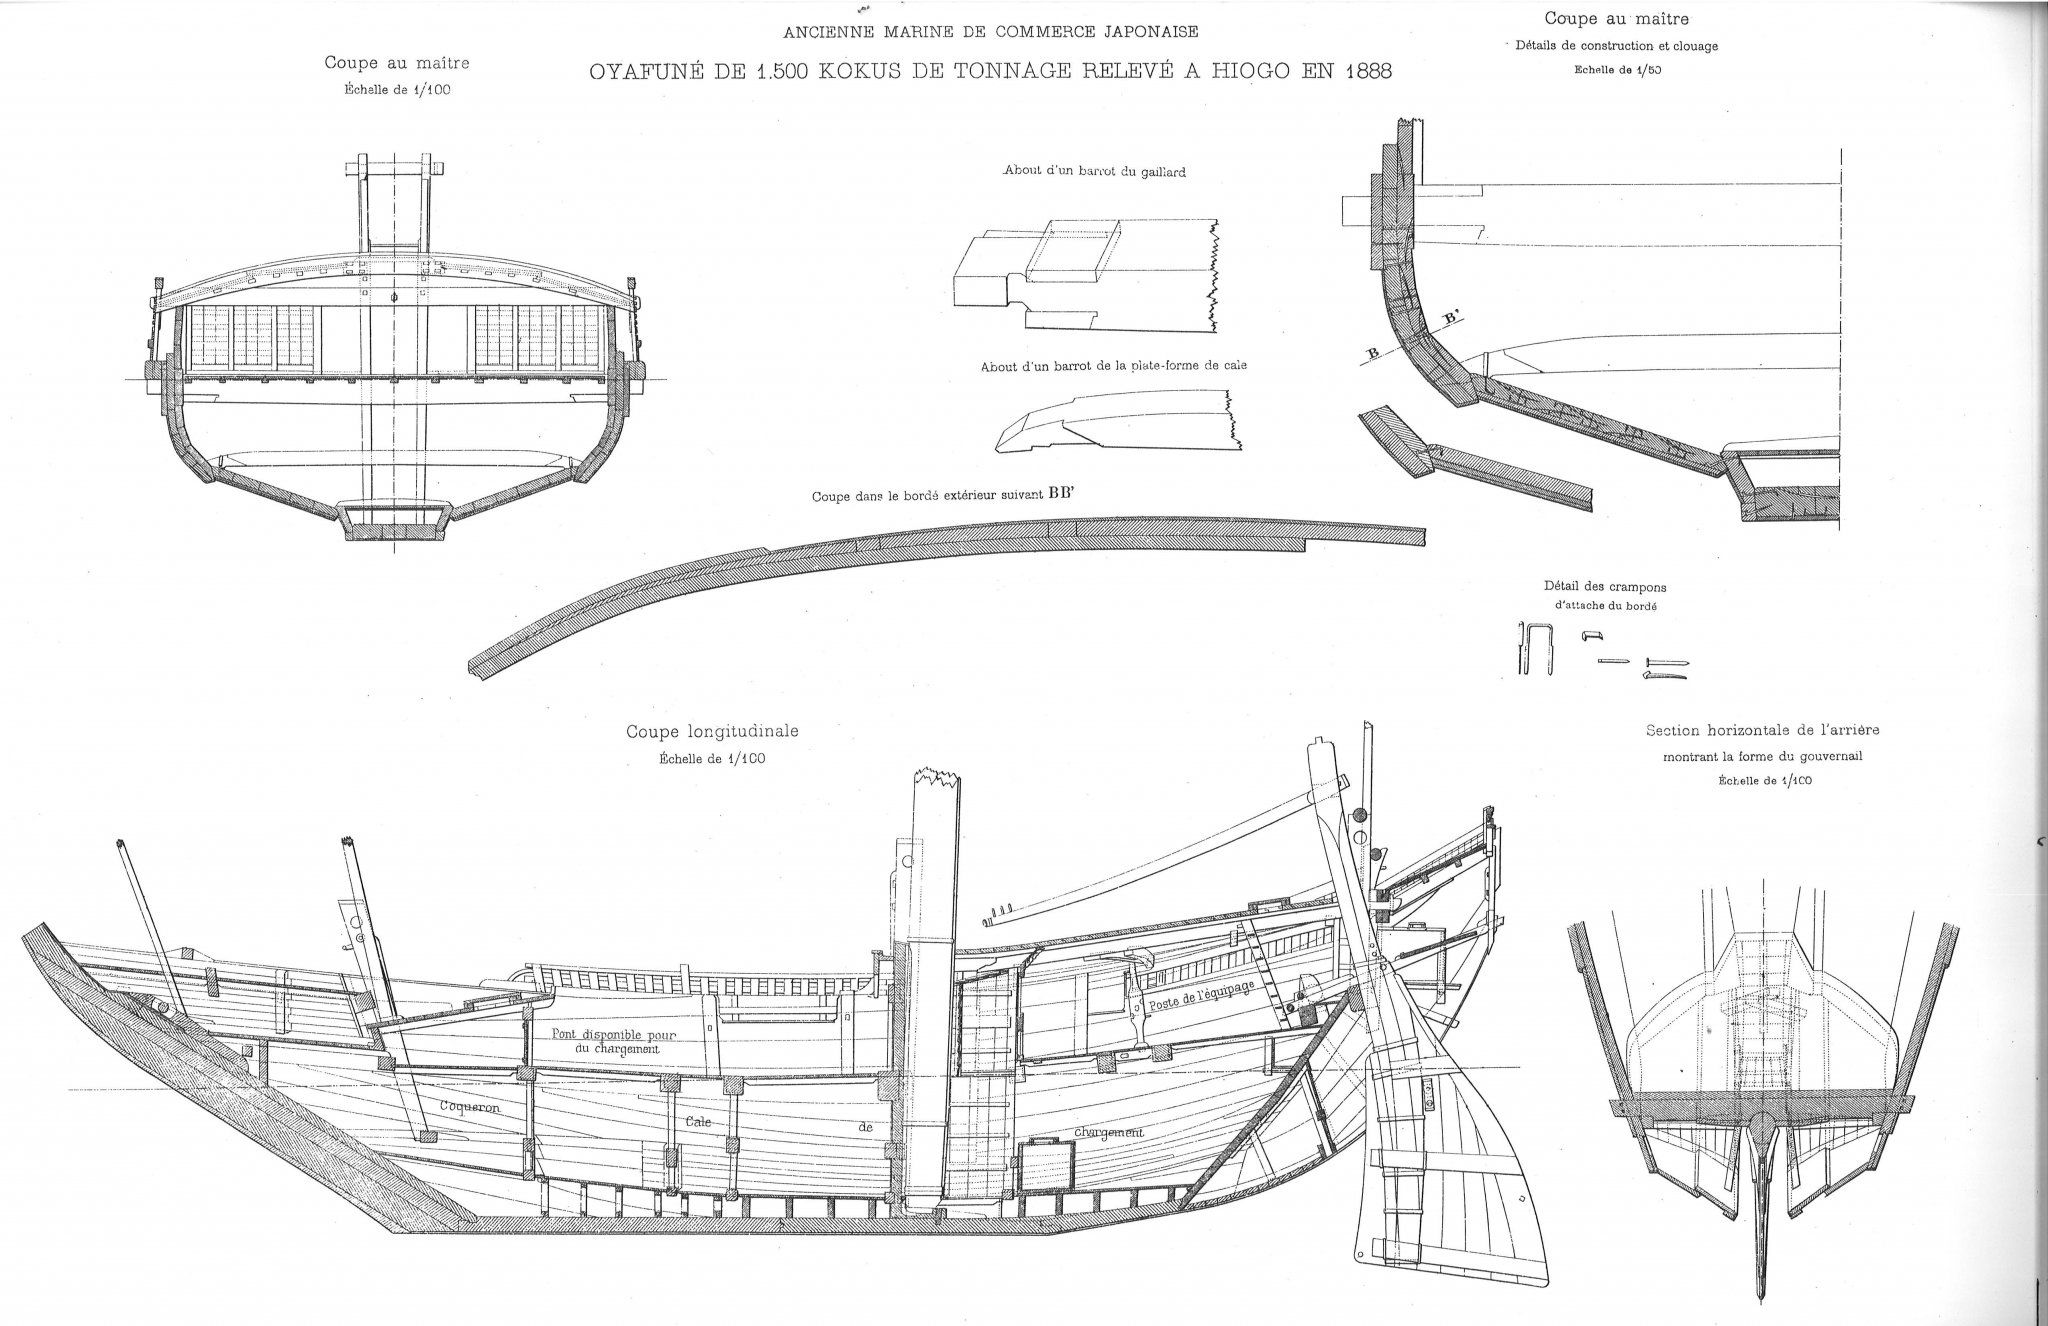
To me it's a bit mind boggling how complicated the design of the Japanese coastal transport can seem. But, I'm sure it makes perfect sense to one who understands the whole design. I'm starting to "get it" when I look at some various parts of these vessels. At least I THINK I am. Then again, when I give thought to scratch building one, I have a hard time trying to figure it out, even when I've seen detailed drawings and numerous models and all. I saw a model that someone had built from scratch, and they clearly didn't quite understand the structure of the ship, and the model looked very weird. I know if I tried, it would look really weird too. Either that or I'd just get stuck at some point (very early on, I'm sure) and wouldn't be able to continue. By the way, I just realized that I didn't reference one of the more detailed drawings done of an actual Kitamaebune. The following is from the Souvenirs de Marine, recorded in 1888. This ship was measured in Hyogo, Japan, in 1888. By the way, this is the same type of ship of the story of the 3 Kichi's. This sad tale involves one of these ships, the Hojunmaru, that set out to deliver a cargo of porcelain and rice to Edo 1832. Just off the coast, the ship sailed into a typhoon, and her 14-man crew had to cut down the mast to keep the ship stable after she lost her rudder. Without sail or rudder, she was blown out into the Pacific's Kuroshio, or "Black Current", which carried the ship northward toward the Arctic, across the Pacific below Alaska, and down the coast of Canada, to Washington state. After 14 months at sea, 3 of the crew survived, mostly from scurvy. The 3 survivors were Otokichi, Iwakichi, and Kyukichi. Two of the survivors were no more than 16 years old. Iwakichi, the ship's navigator, was the oldest at 29. Reportedly, some Makah seal hunters found and boarded the wreck, took a few items from the ship, and took the survivors with them, where they were cared for, but enslaved. Word reached the Hudson Bay Company at Fort Vancouver and the supervisor John McLoughlin, who set out to get the sailors released, and attempted, but failed to return them to Japan. There was apparently a Japanese film about the story, which starred Johnny Cash in his later years as John McLoughlin. You can read more about the Japanese castaways here: https://www.historylink.org/File/9065 Clare


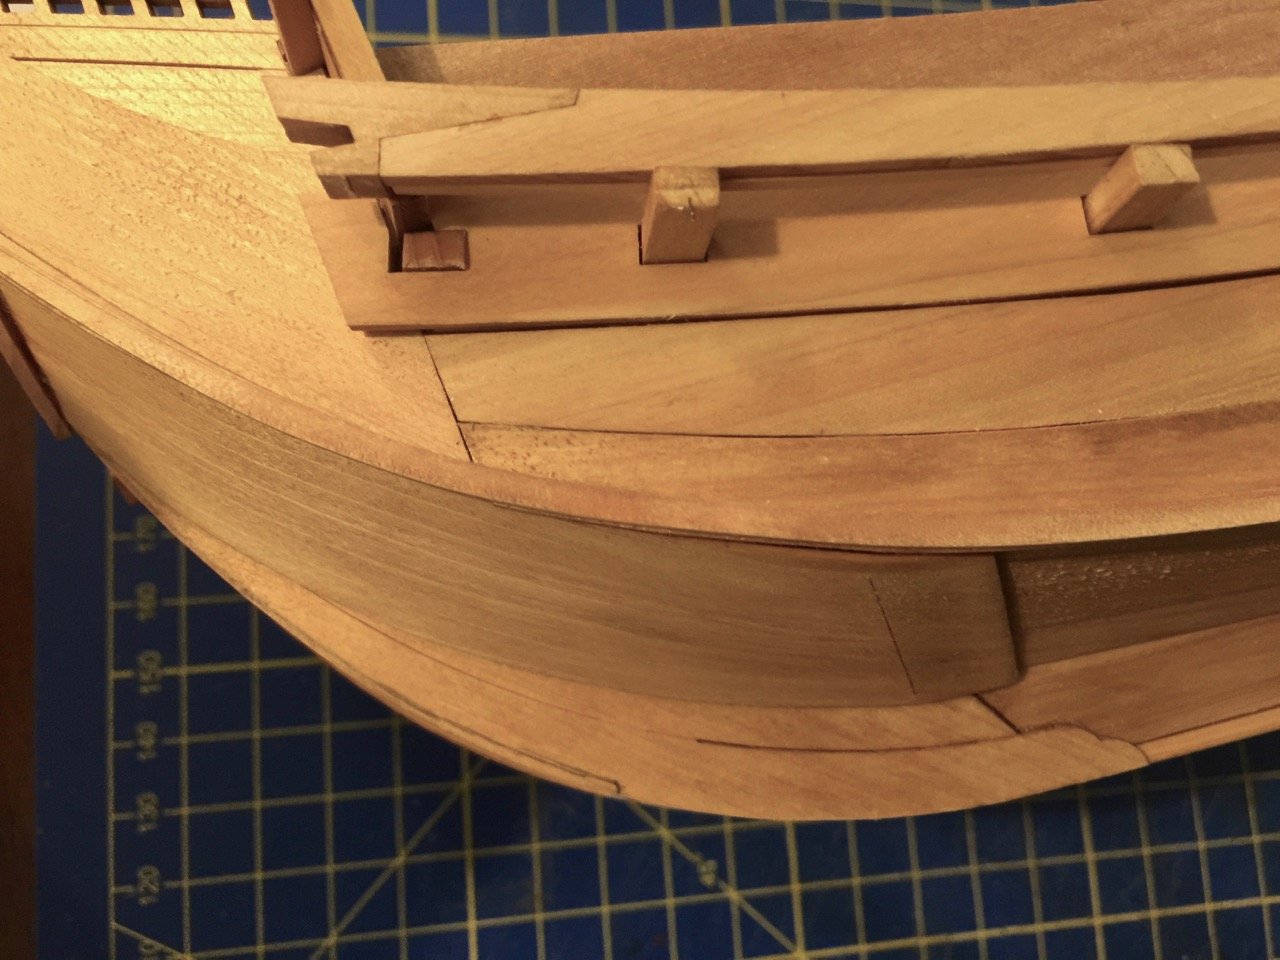
-
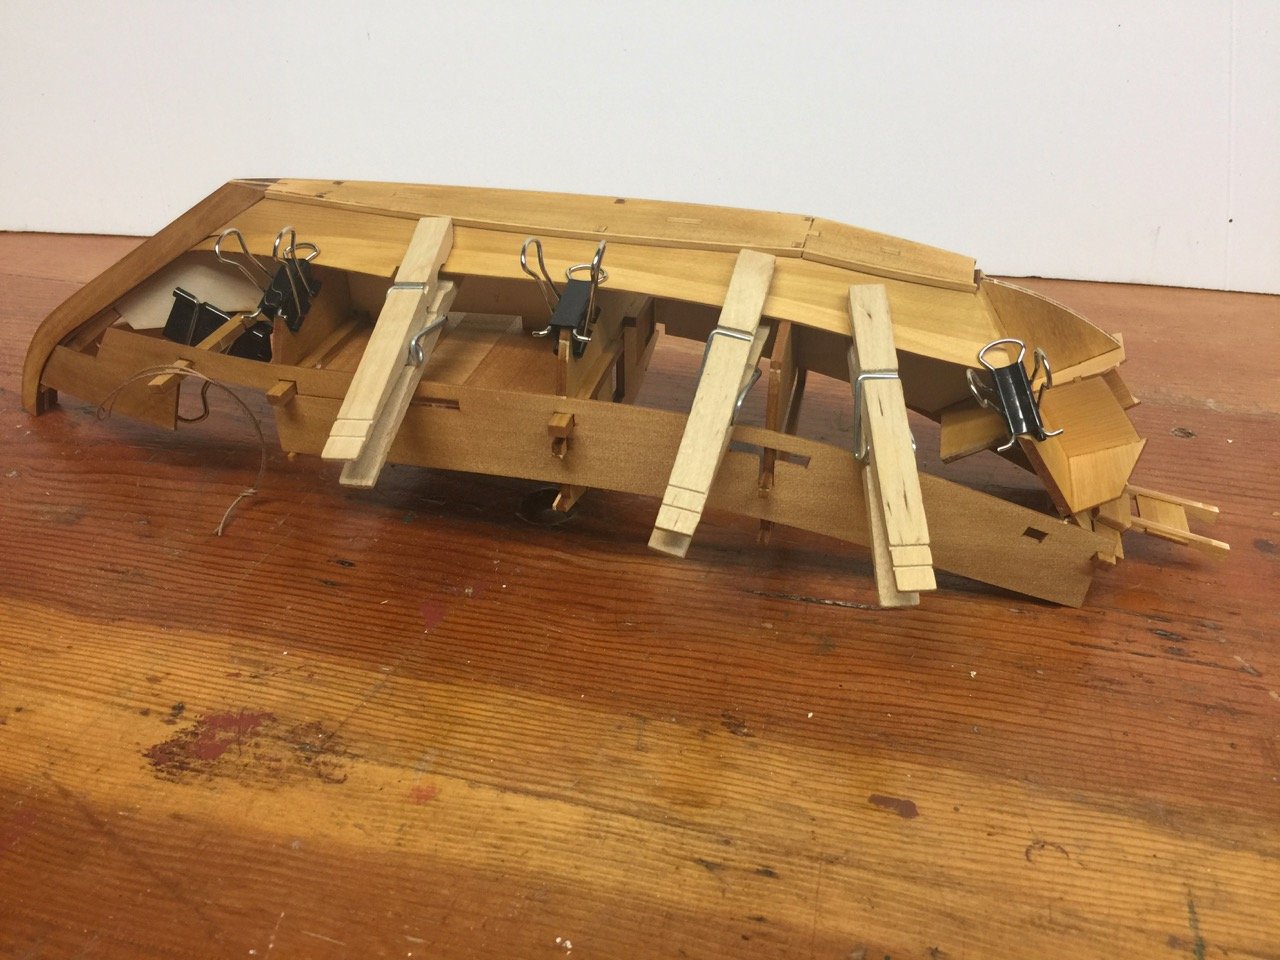
Thanks, Michael. Well, the next step is to add the bulwarks pieces. These are single, large, laser-cut pieces that need a little dampening and pre-bending. Before attaching this piece, I did a lot of test fitting. But, all the pre-cut holes and the already installed "beams" that fit through them pretty well lock the pieces so that they go exactly where they're needed. The only issue I ran into with the installation is that the forward edge of this piece is straight didn't fit the curve of the stem very well. I would have sanded a little, so it fit better, but that would then change the length of the piece ever so slightly. And, it's been my experience with these kits that these little changes propagate through the model and cause some other unintended mis-alignment. So, it's best to leave things alone. One possibility it to use a little bit of filler, but I didn't think the issue was noticeable enough to warrant it. The filler might just make the spot stand out like a sore thumb. After this, the hull planking continues. Again, the pieces are laser cut. This piece slightly overlaps the edge of that "garboard" piece installed earlier. The instructions say to consult the plan drawings, but I found nothing useful in the plan drawings that showed this piece. In fact, the end of the piece seems to fall in a different location in the drawing, so it just created some unnecessary confusion. The instruction booklet is clear enough here. Here you can see my high-tech planking clamps in action. You can also see below that I couldn't get the forward edge of this piece to fit perfectly flush with the stem, creating a sliver of a gap. I seem to recall having a similar issue with the Higaki Kaisen kit. I didn't worry about it, as this area of the hull will get painted. Next will be to build up the stern structure... Clare

-
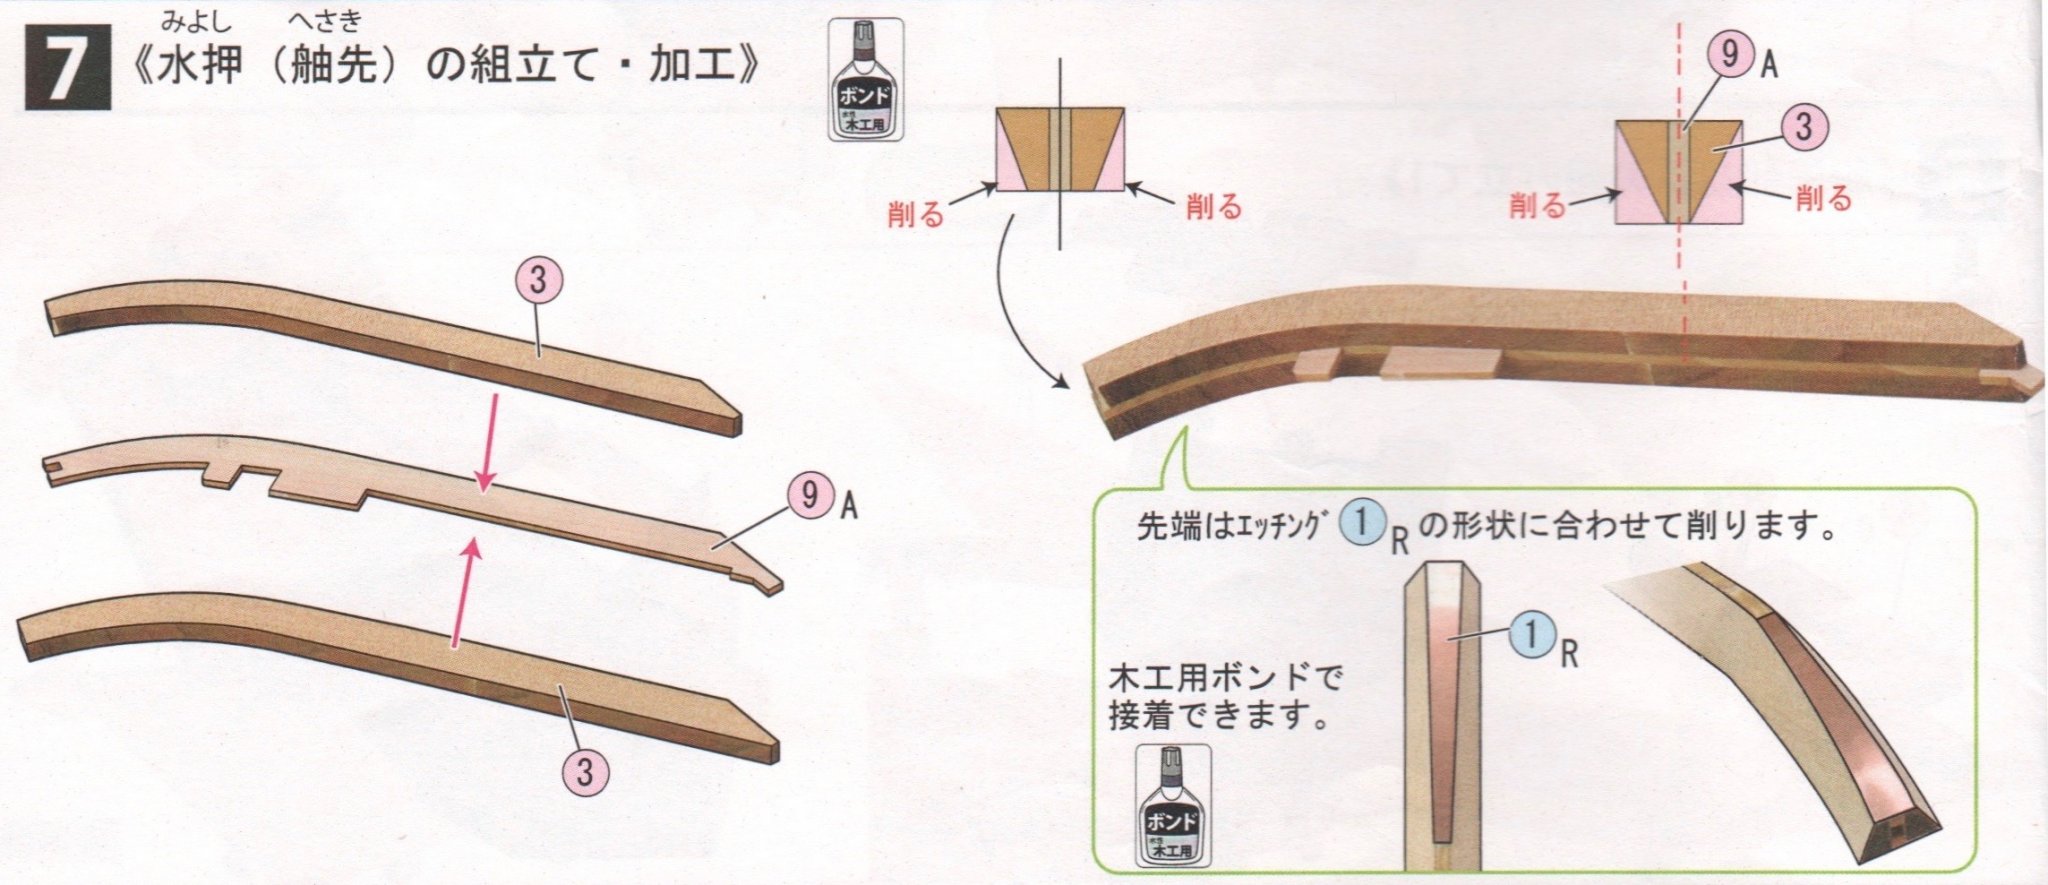
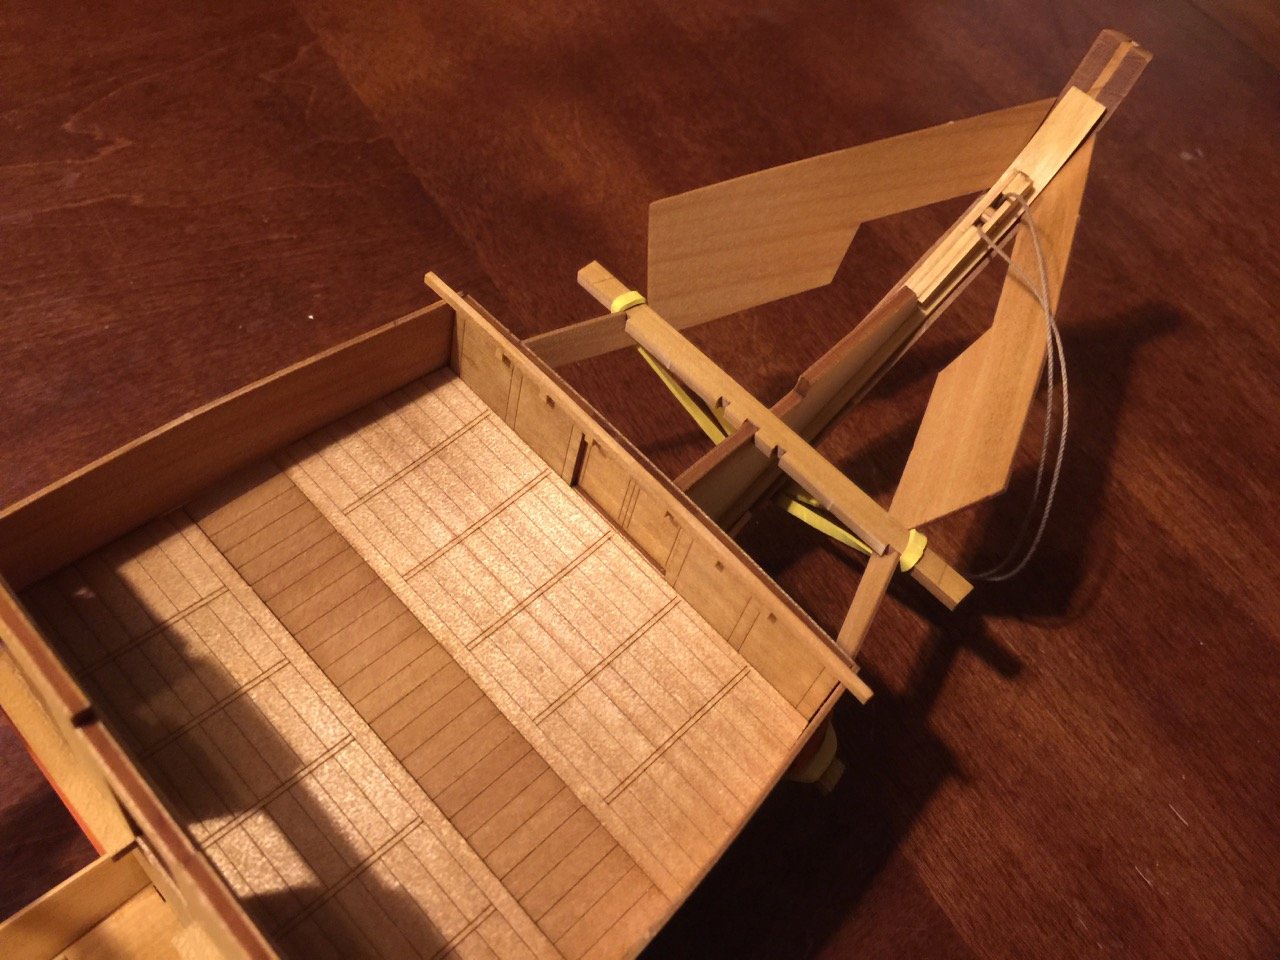
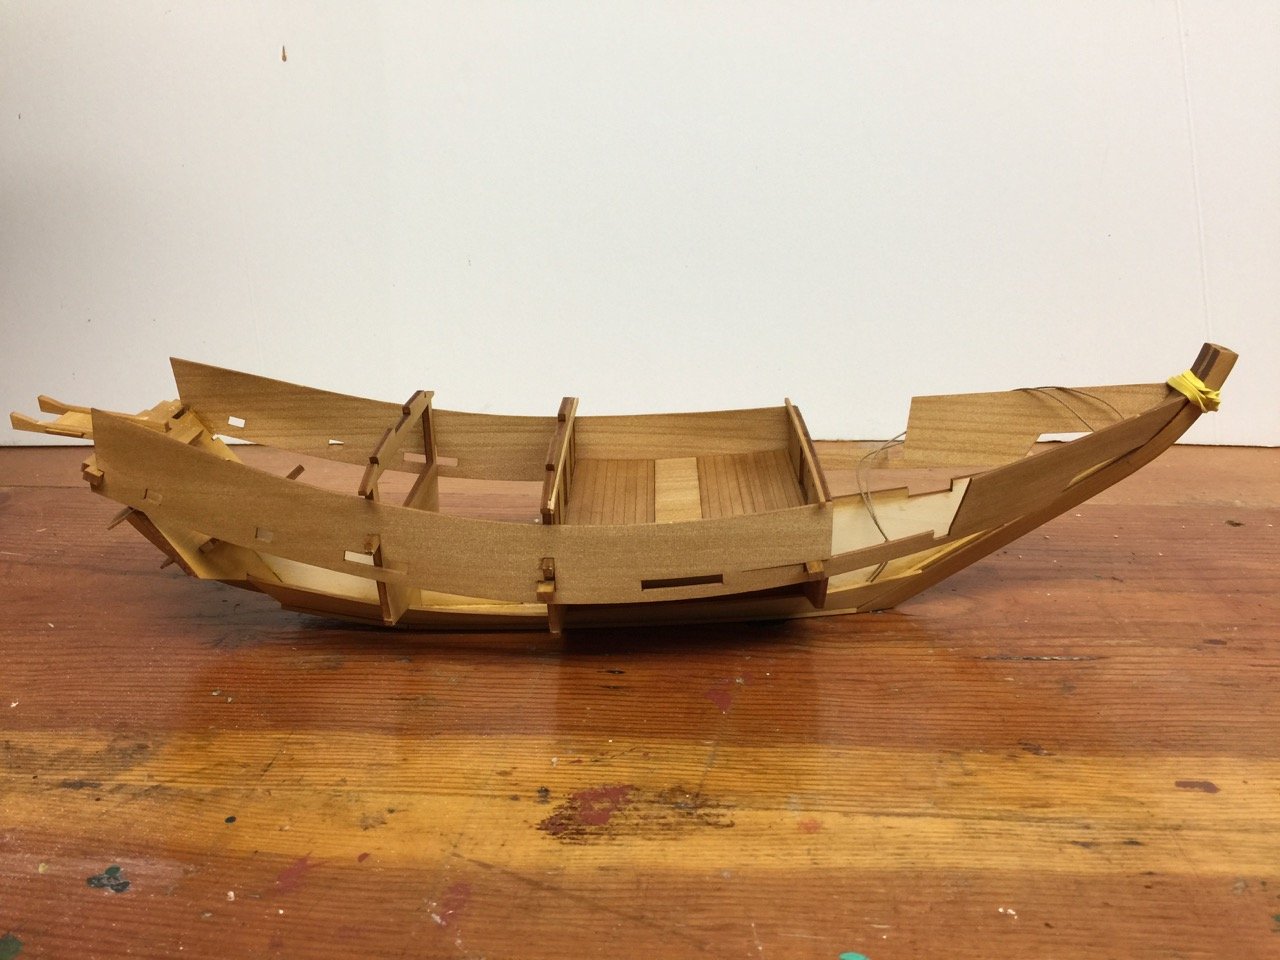
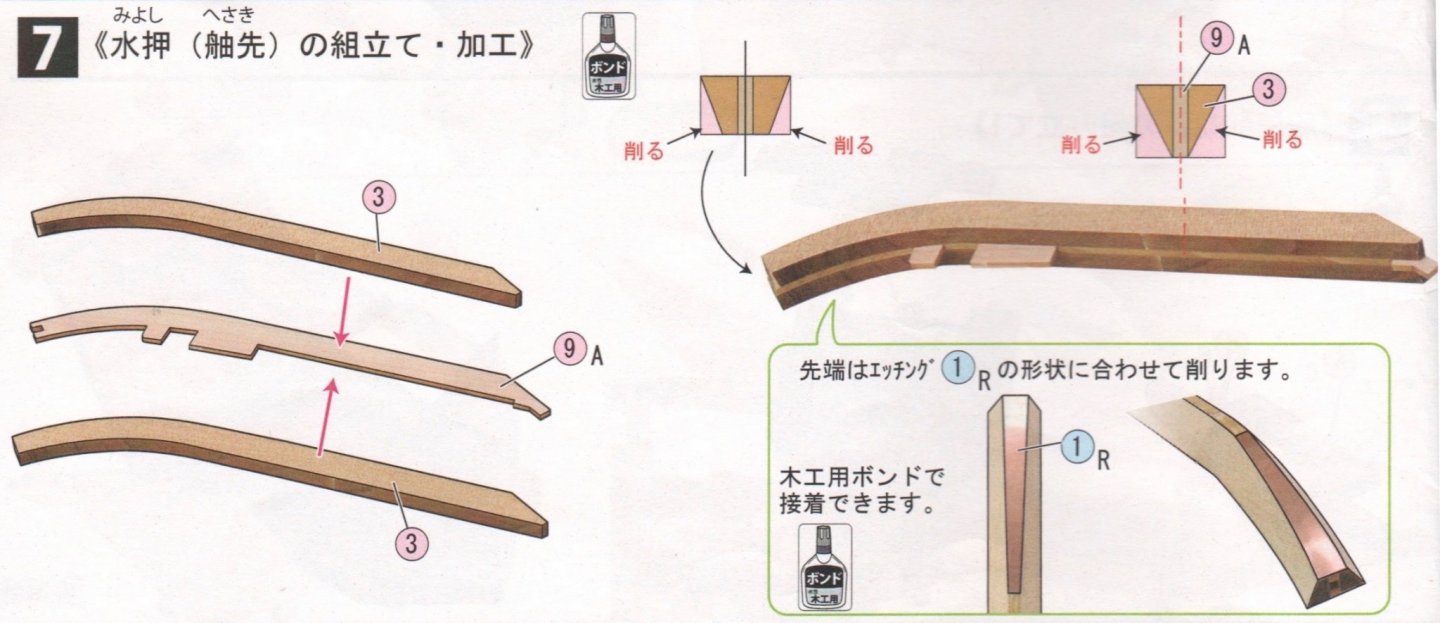
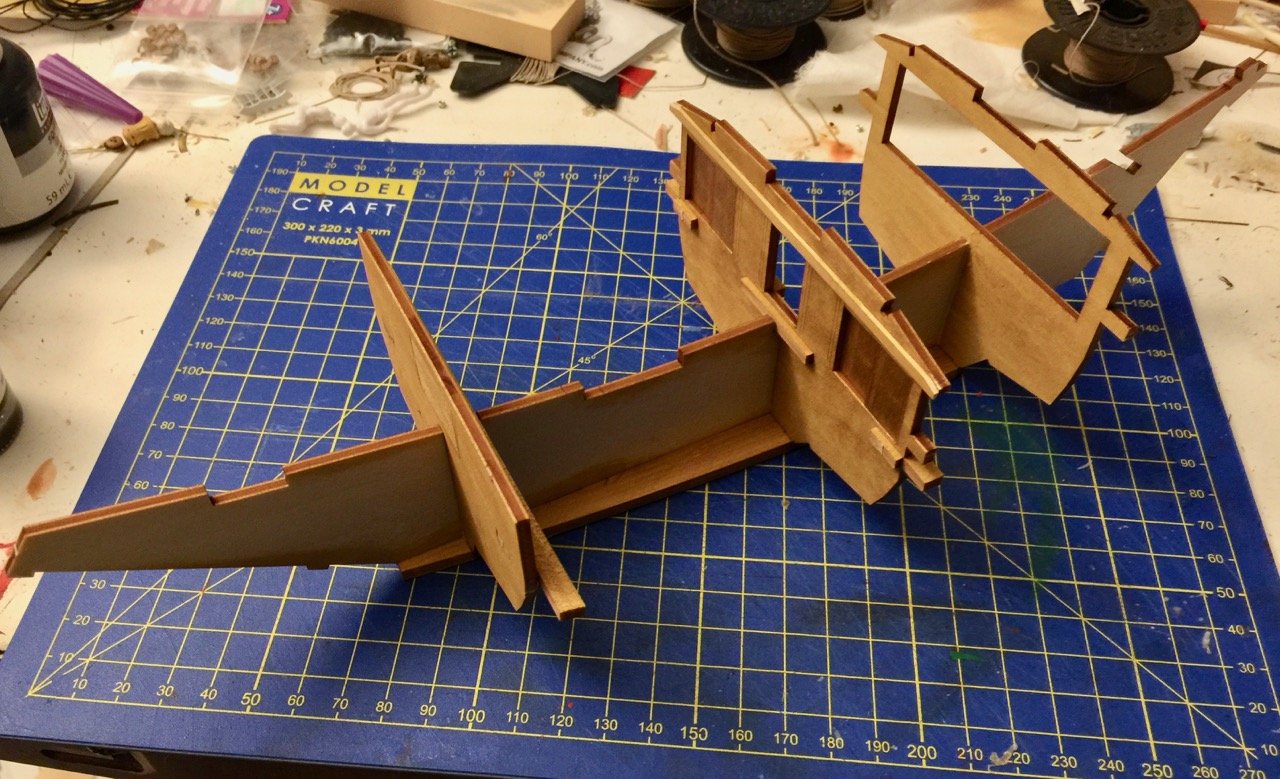
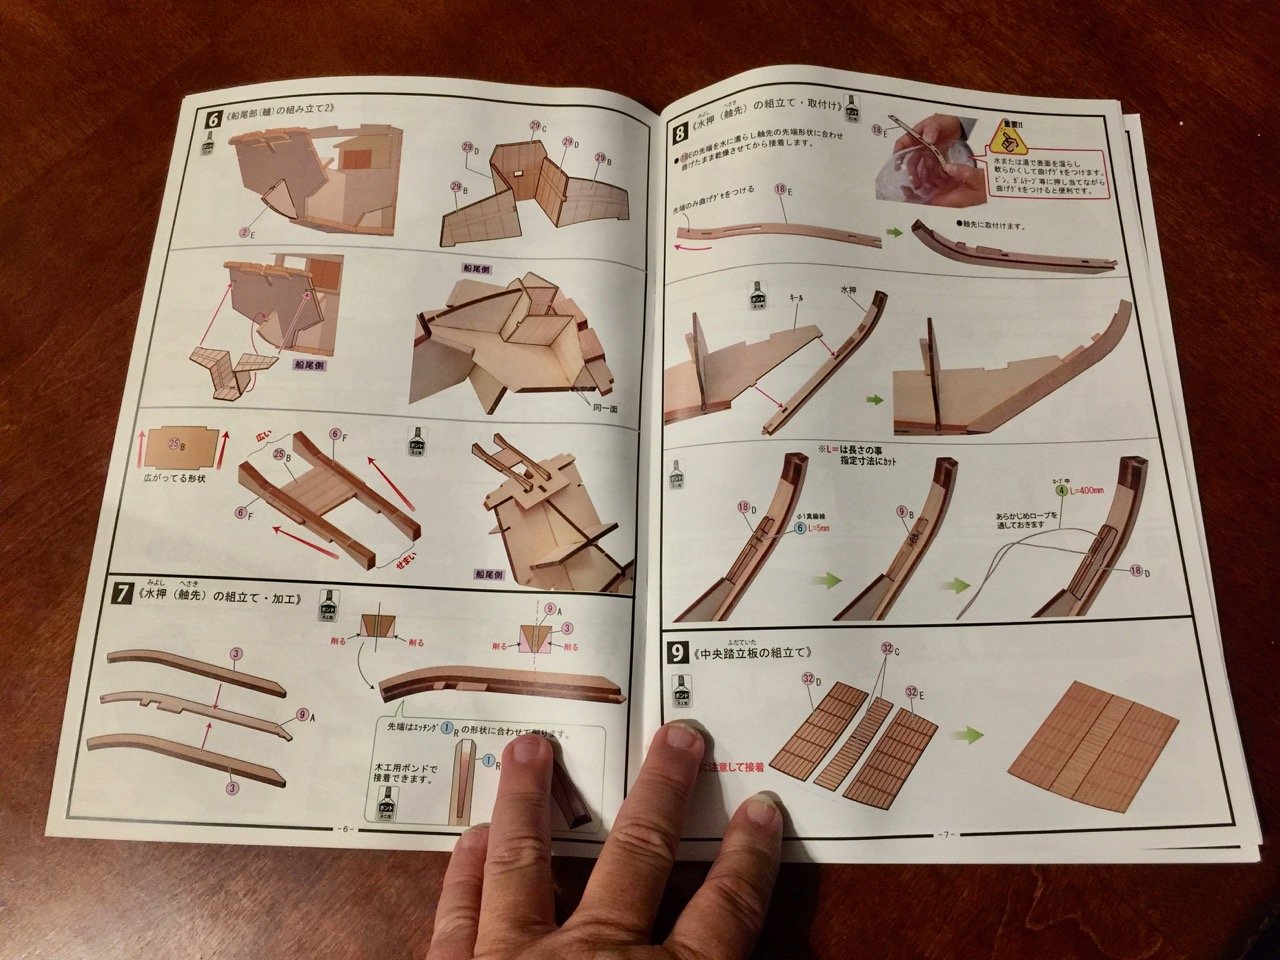
The stem is a 3 piece structure that's built in exactly the same way as the one on the Higaki Kaisen model. This is the only part of the kit that requires a great deal of tapering. As the taper has to be just right in order to cover the end with photo-etched copper pieces provided in the kit, it's necessary to use one of them to help judge the correct amount of taper. By the way, the snippets of the instructions are posted here with the permission of Woody Joe. Below, you can see the piece glued into place. The internal framing helps out a lot here. Also notice that I have attached a long piece on the back side of the stem. That piece needs to be curved slightly, and with hinoki, or Japanese cypress, you only need to dampen the wood to get it to bend. Of course, it helps that the wood in the kit is all pretty thin. But, DO NOT try to bend it dry. This wood is very brittle when dry! The rope you see is nice quality stuff and comes in, I think 4 sizes in the kit. Here, a length is passed through a sheave assembly that's attached to the back of the stem. Inside there is a brass rod axle passing through little wooden pulley. This piece of rope is tied off, so it doesn't slip out later. You might also see here that the plank that might be described as a garboard plank is glued into place. Prior to adding this piece, a thin square cross-section strip has to be glued to the lower edge of that bottom plank. This completed assembly is a kind of box structure that serves as a keel, even though the ship is sometimes described as keel-less. Again, the plank sheets need to be dampened slightly. The planks are then easily pre-bent, slightly. You'll also note the tabs from the bulkheads and frame that show through the bottom piece. In my case, the bottom of the model will be painted, so these won't show very clearly. You can also see here that the main deck is glued into place. This is a 3-piece deck that has to be glued together before installing here. It is very thin and seems a bit delicate. I would put something underneath to support the seams between the deck pieces, except that there are beams that will pass through this area later in the build, so it's best not to mess with it. It seems a bit early to install the deck at this point, as it prevents me from getting down to the inside of the hull to add any reinforcing to the inside of the hull later. But, I don't know how easy it would be to install this deck at a later stage. From looking ahead, it looks like it shouldn't be a problem, but you never know. This brings the model up through most of step 12. 46 more to go! Clare

-
Thanks again for the nice comments. Some manufacturers target the model scale so they can standardize on box sizes to keep costs down. I'm pretty sure Amati does that, which is why so many of their kits, aside from the Victory Models line, are of so many odd scales. I think Occre is that way as well. So, it wouldn't surprise me if that's a target. Also, a lot of people in Japan live in smaller spaces, so it's probably good to keep the completed models at a manageable size. But, yeah, it would be nice if the models were larger, as I like to put them on public display. In their pre-laser cutting days, their traditional Japanese ship model kits were larger – more like 1/60 scale. Better size for display purposes, but they were not as detailed. By the way, just found this on the web. Maybe I should try LEGO next time??? http://www.lets-brick.com/jpn/my/c1703_kitamae_bune/lego_my_a.html Clare
-
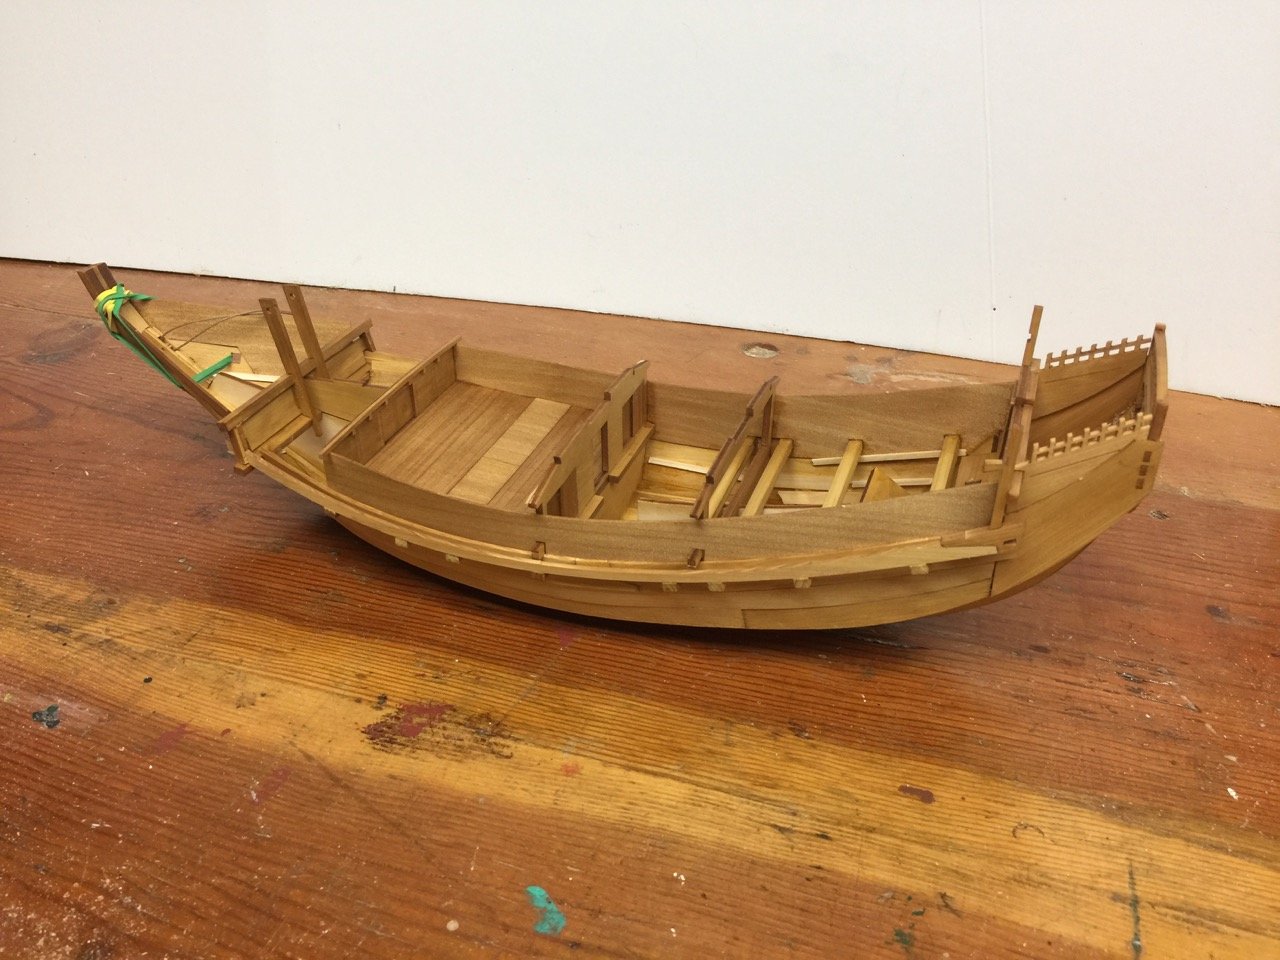
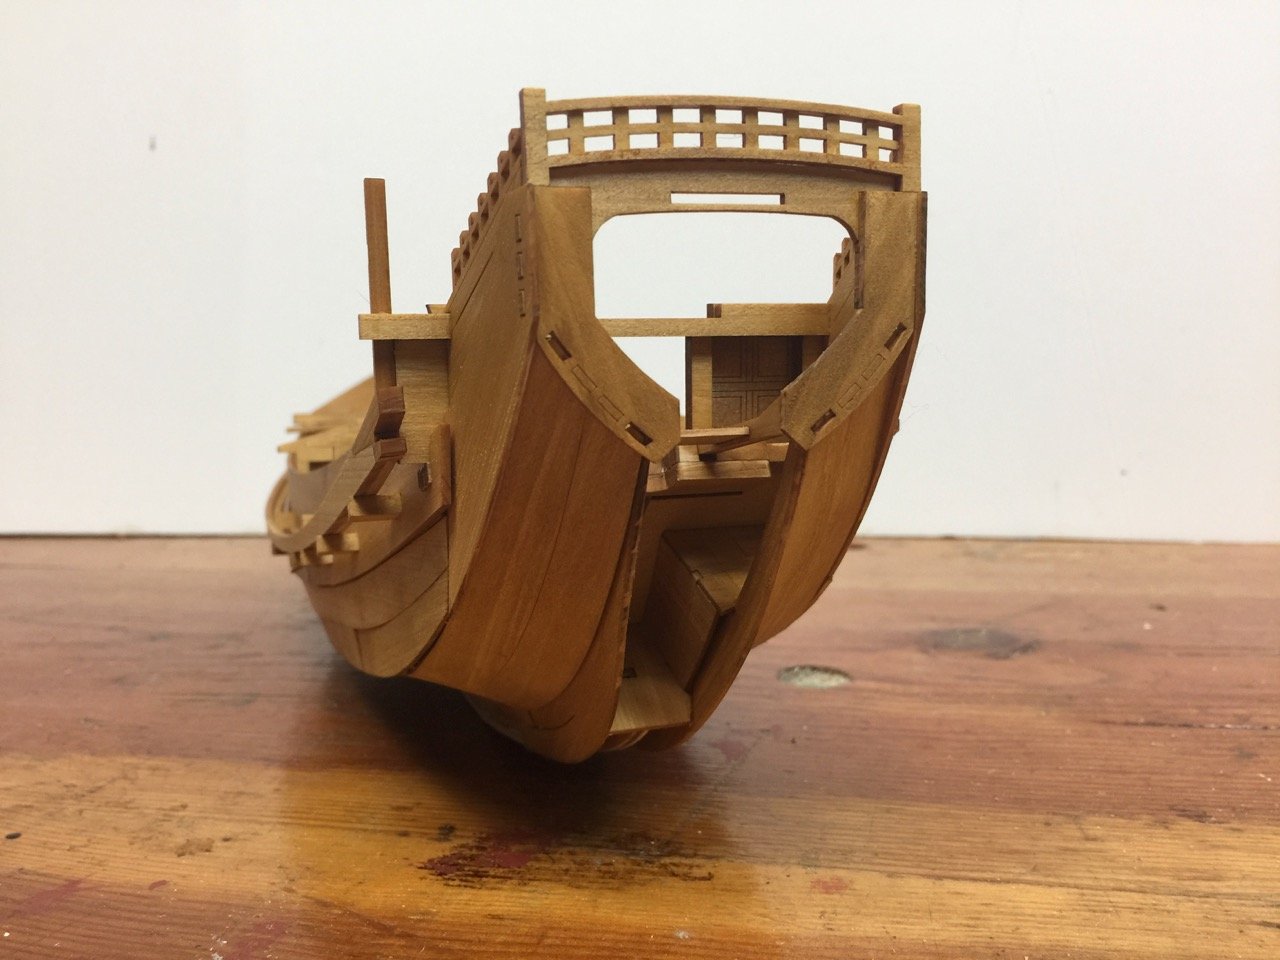
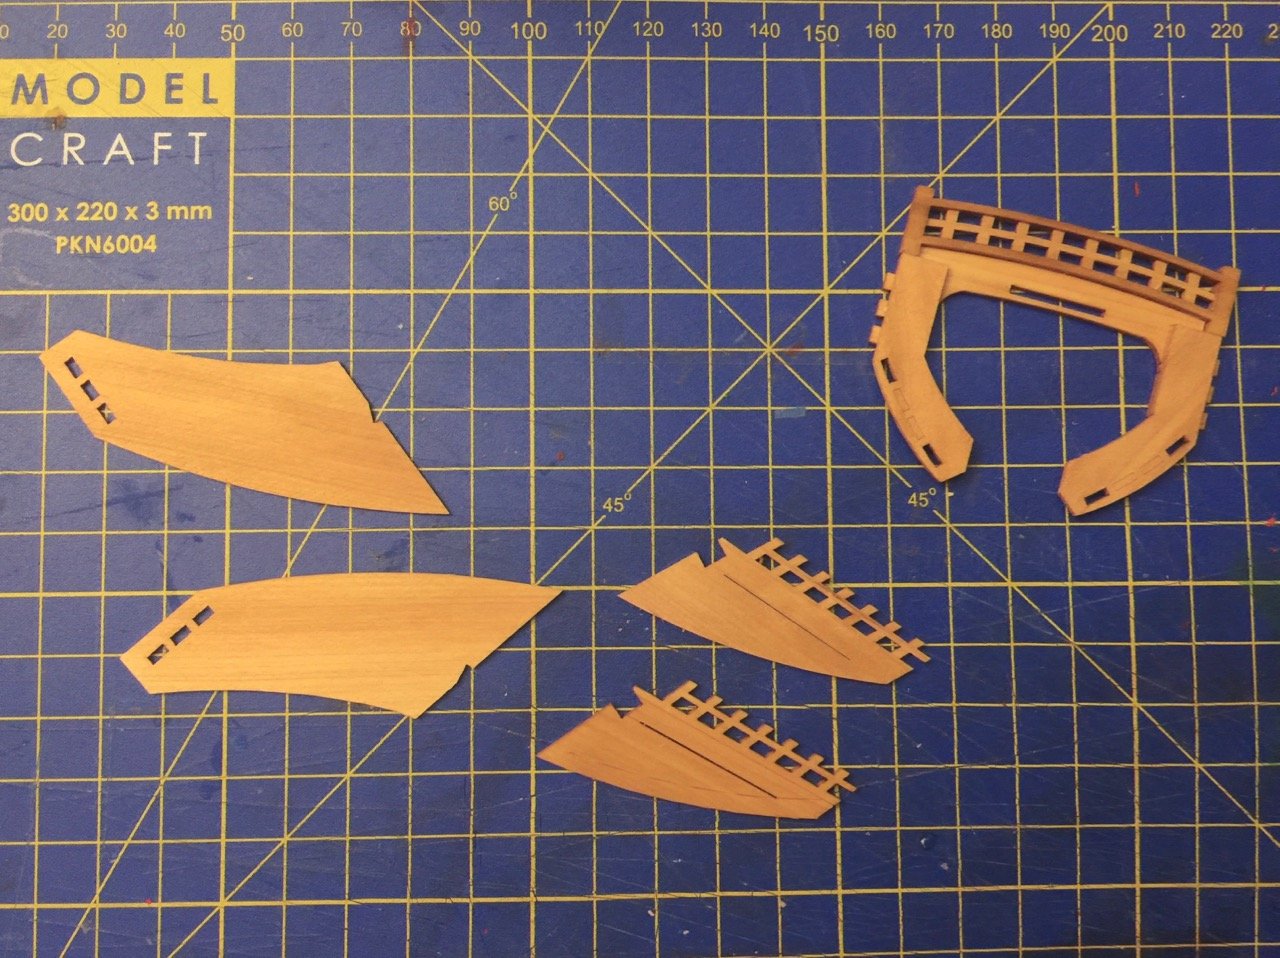
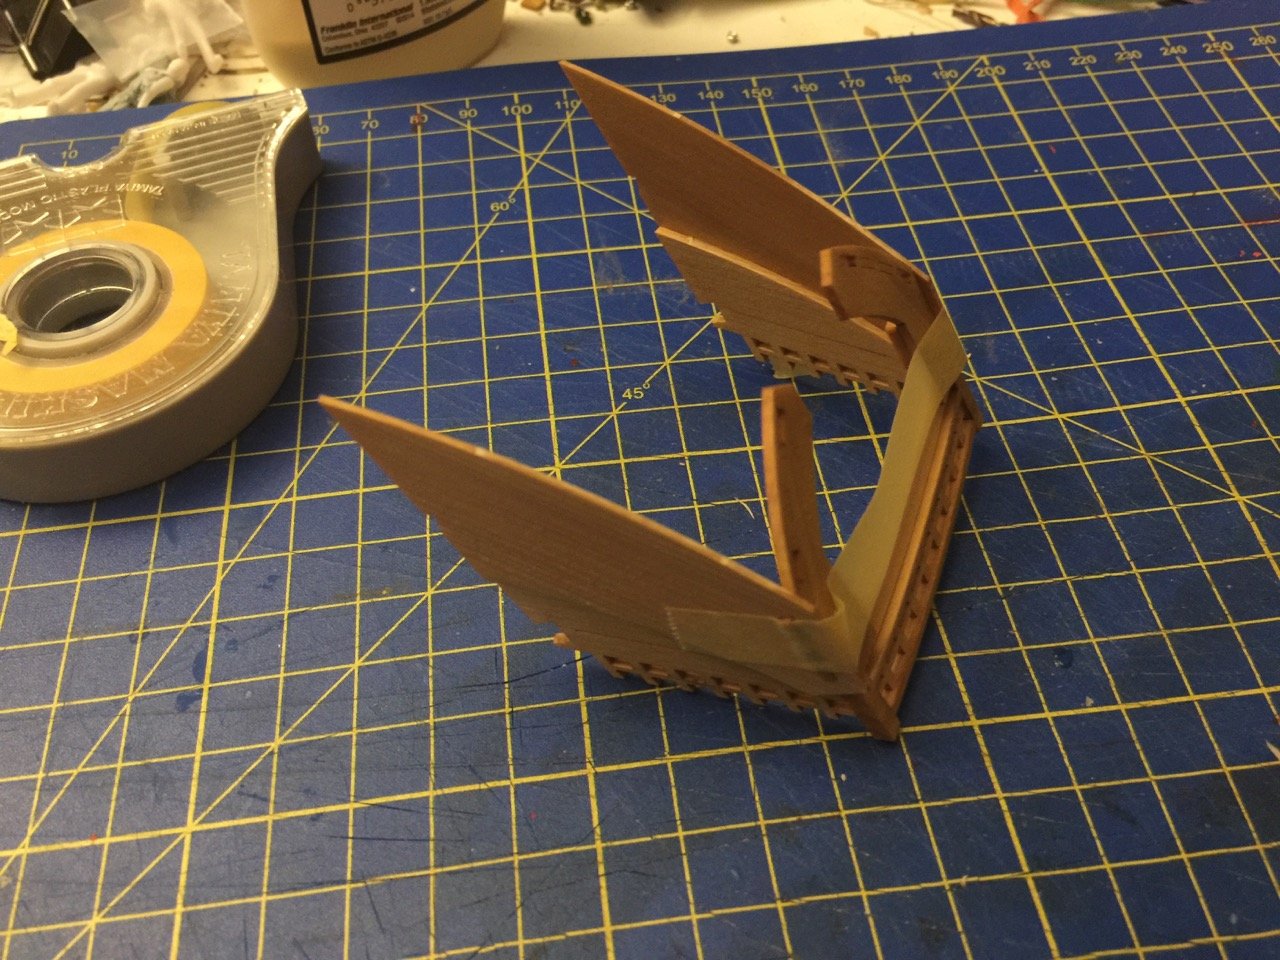
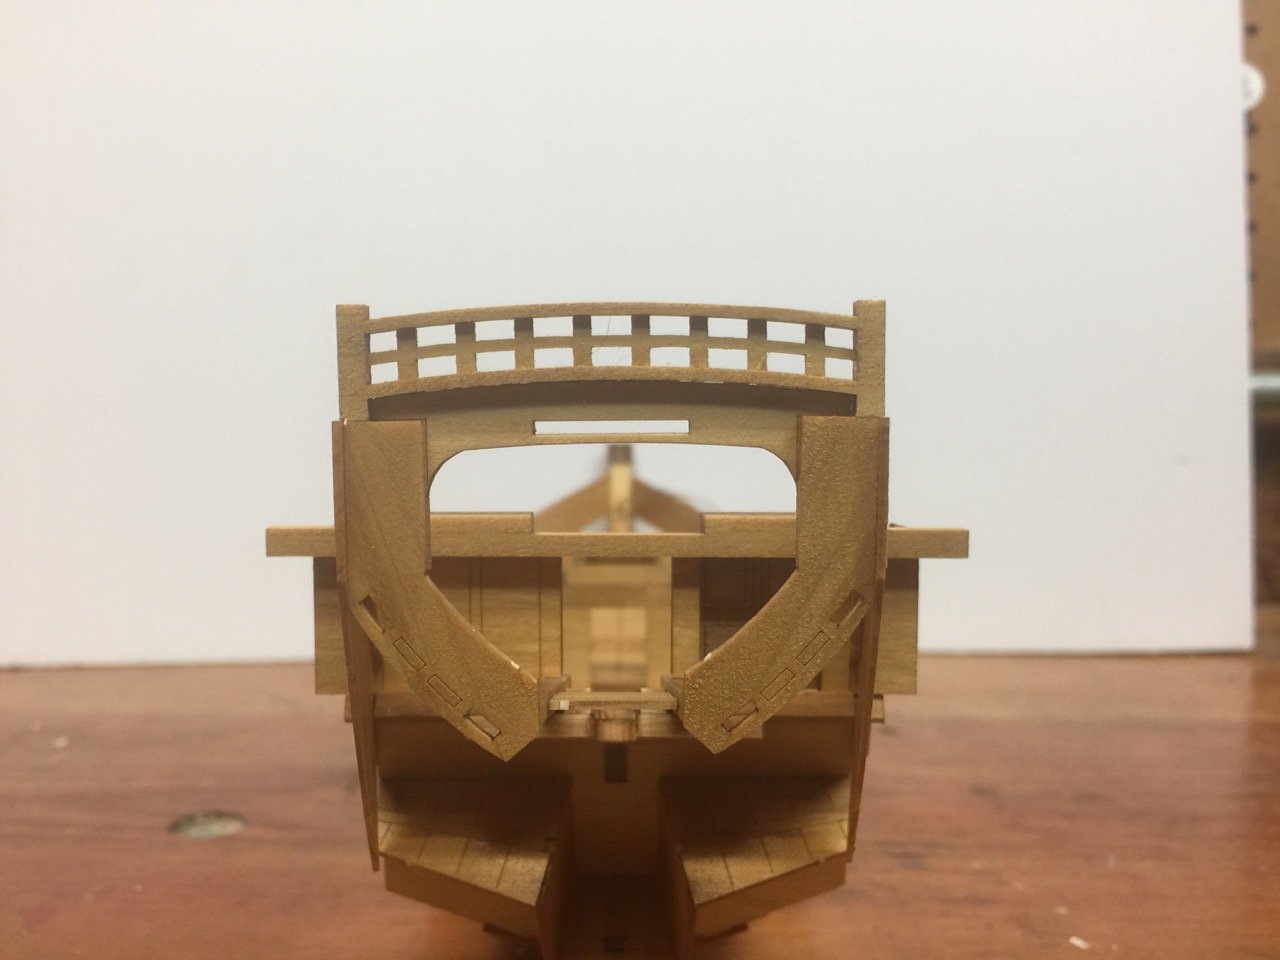
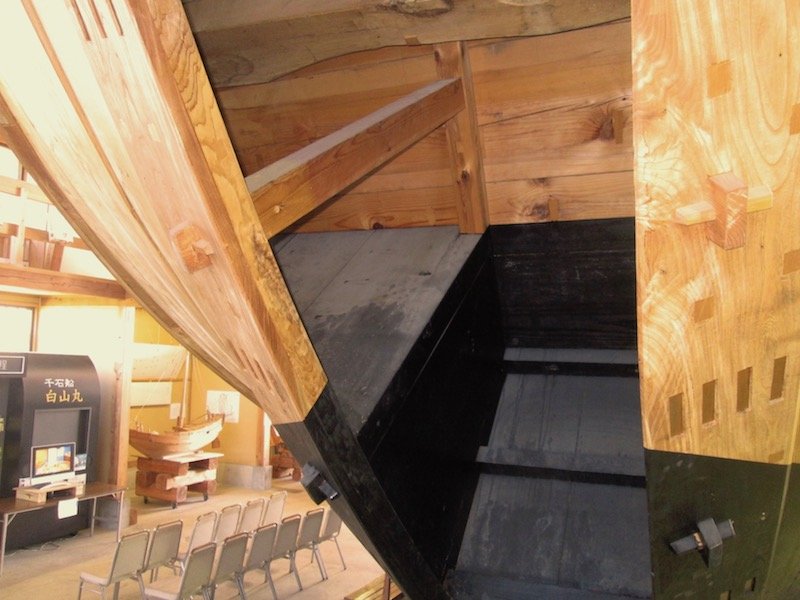
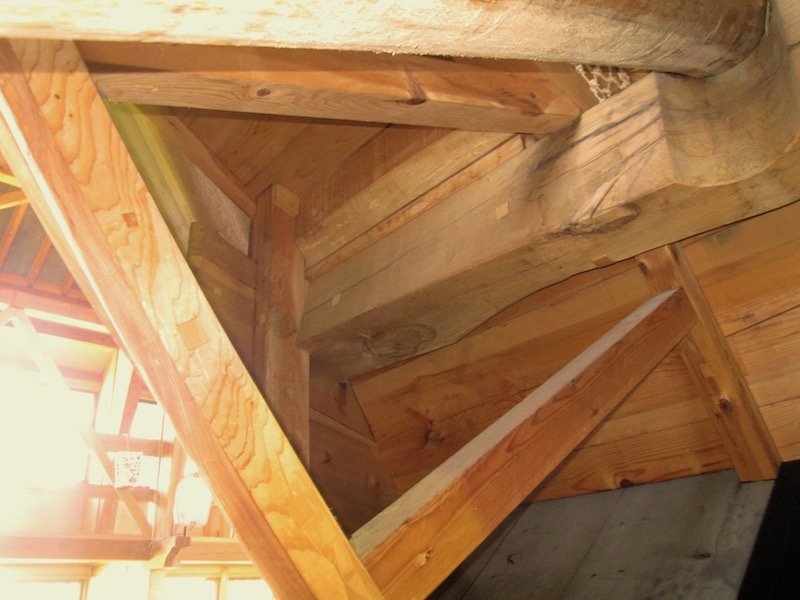
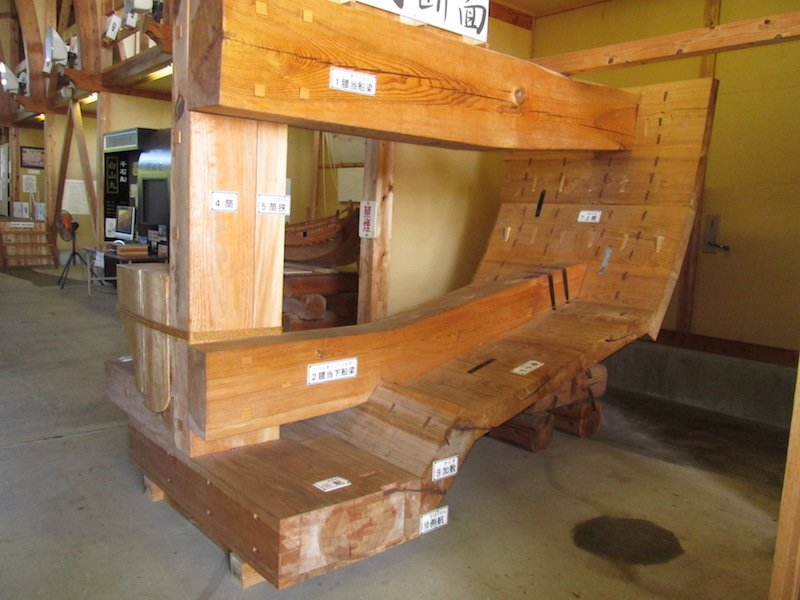
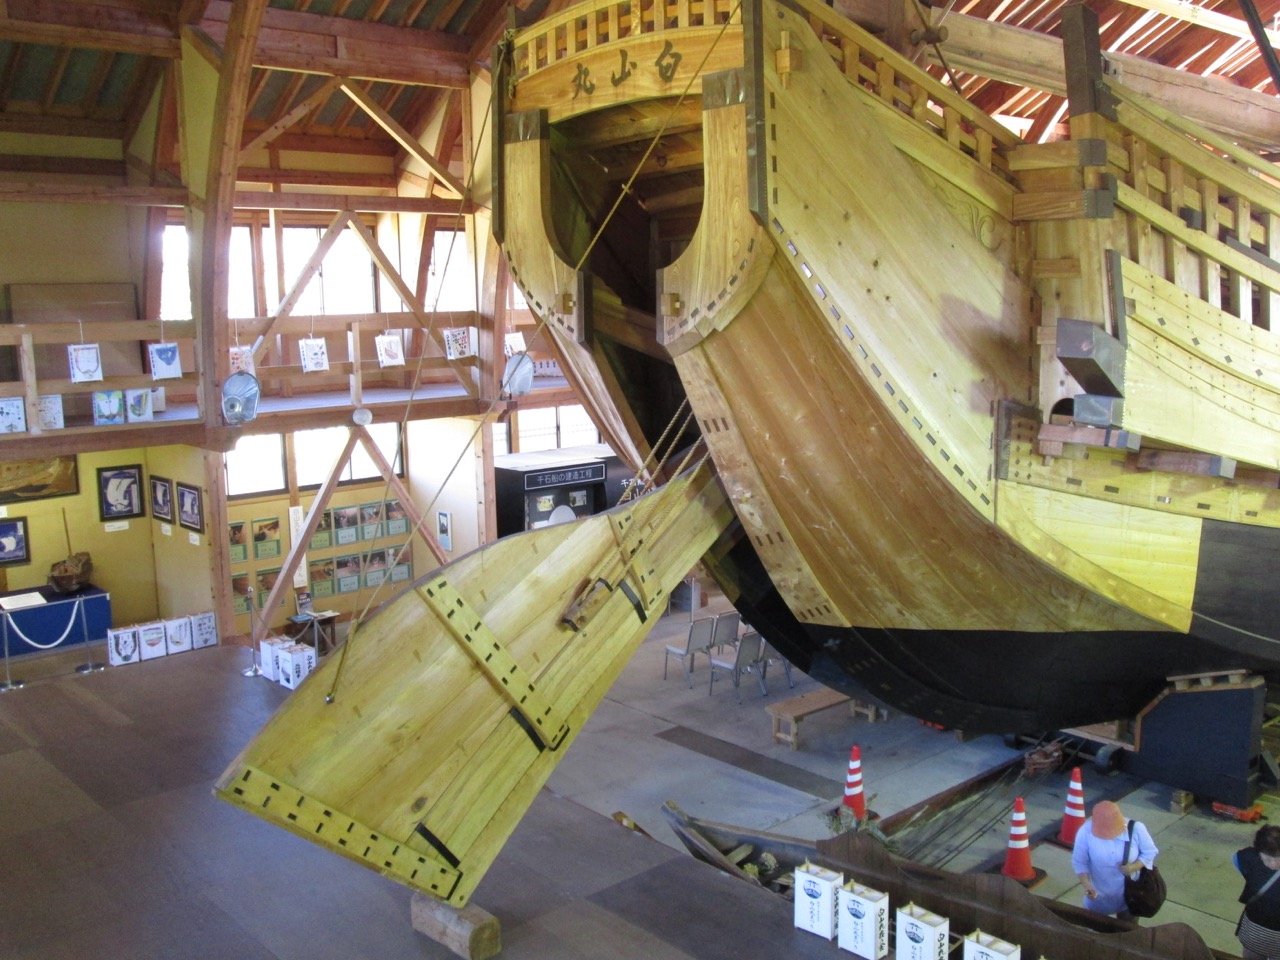
Thank you Mike, Gary, andante... Regarding magnifying visors, I couldn't do anything without a set, so it doesn't really matter that I'm working on a smaller scale. Anyway, the parts in this kit aren't that small. The tiny stuff will come when I add extra details much later in the build. For now, the next step in construction is to build the todate (tow-dah-tay) or transom. Unlike western ships, the transom on the Kitamaebune is somewhat buries inside the stern area of the ship, protected by the hull planking and some other wooden features. This is a trademark of most Japanese wooden watercraft, big or small. Again, instructions warn you to make sure that the beveled side faces aft. The instructions aren't entirely clear as it refers to the side that faces outward, and is visible, as the "front". Or at least that's the translation I get, but that side actually faces aft. Perhaps a better translation is "face". Anyway, if you read ahead and test fit things, it's all pretty clear. The kit has nicely laser-etched lines to indicate how far to bevel the transom piece. And then here are a couple views of the actual transom area of the Hakusanmaru... One thing that is noticeably missing from the kit are those braces that support the hull planking that wraps around behind the ship. By the way, while this kit's interior is a built up framework and all, below is a photo of a cross-section model at full scale, showing the beams supporting the hull at midships. At the base is a box-like keel structure. And, if you look closely, you can see the nails in the edge of the bottom planking. Clare

-
Thank you, Druxey! By the way, I just found a site that gives a lot of the history behind the Kitamaebune and its influence on the spread of local culture across Japan. It's very detailed and is available in English. http://en.kitamae-bune.com After the graphic loads, scroll down to just underneath and click on the button "What is Kitamae-bune?" The rundown is that Kitamae-bune were trade ships that operated from the early 1700s until the early 20th century. These ships came down the Japan Sea coast (the western side) from the northern port cities of Hokkaido buying and selling goods along the way. These ships were owned by individual owners who became rich from the trade, and many shipowners grew wealthy enough to have small fleets of Kitamae-bune. These ships spread culture throughout Japan, as sailors learned songs and dances in one location and brought them to other locations. They also brought popular goods to areas that did not have them, creating industry and widespread availability of many foods that became common standards in Japanese cooking. There's much more on the site linked above. Clare
-
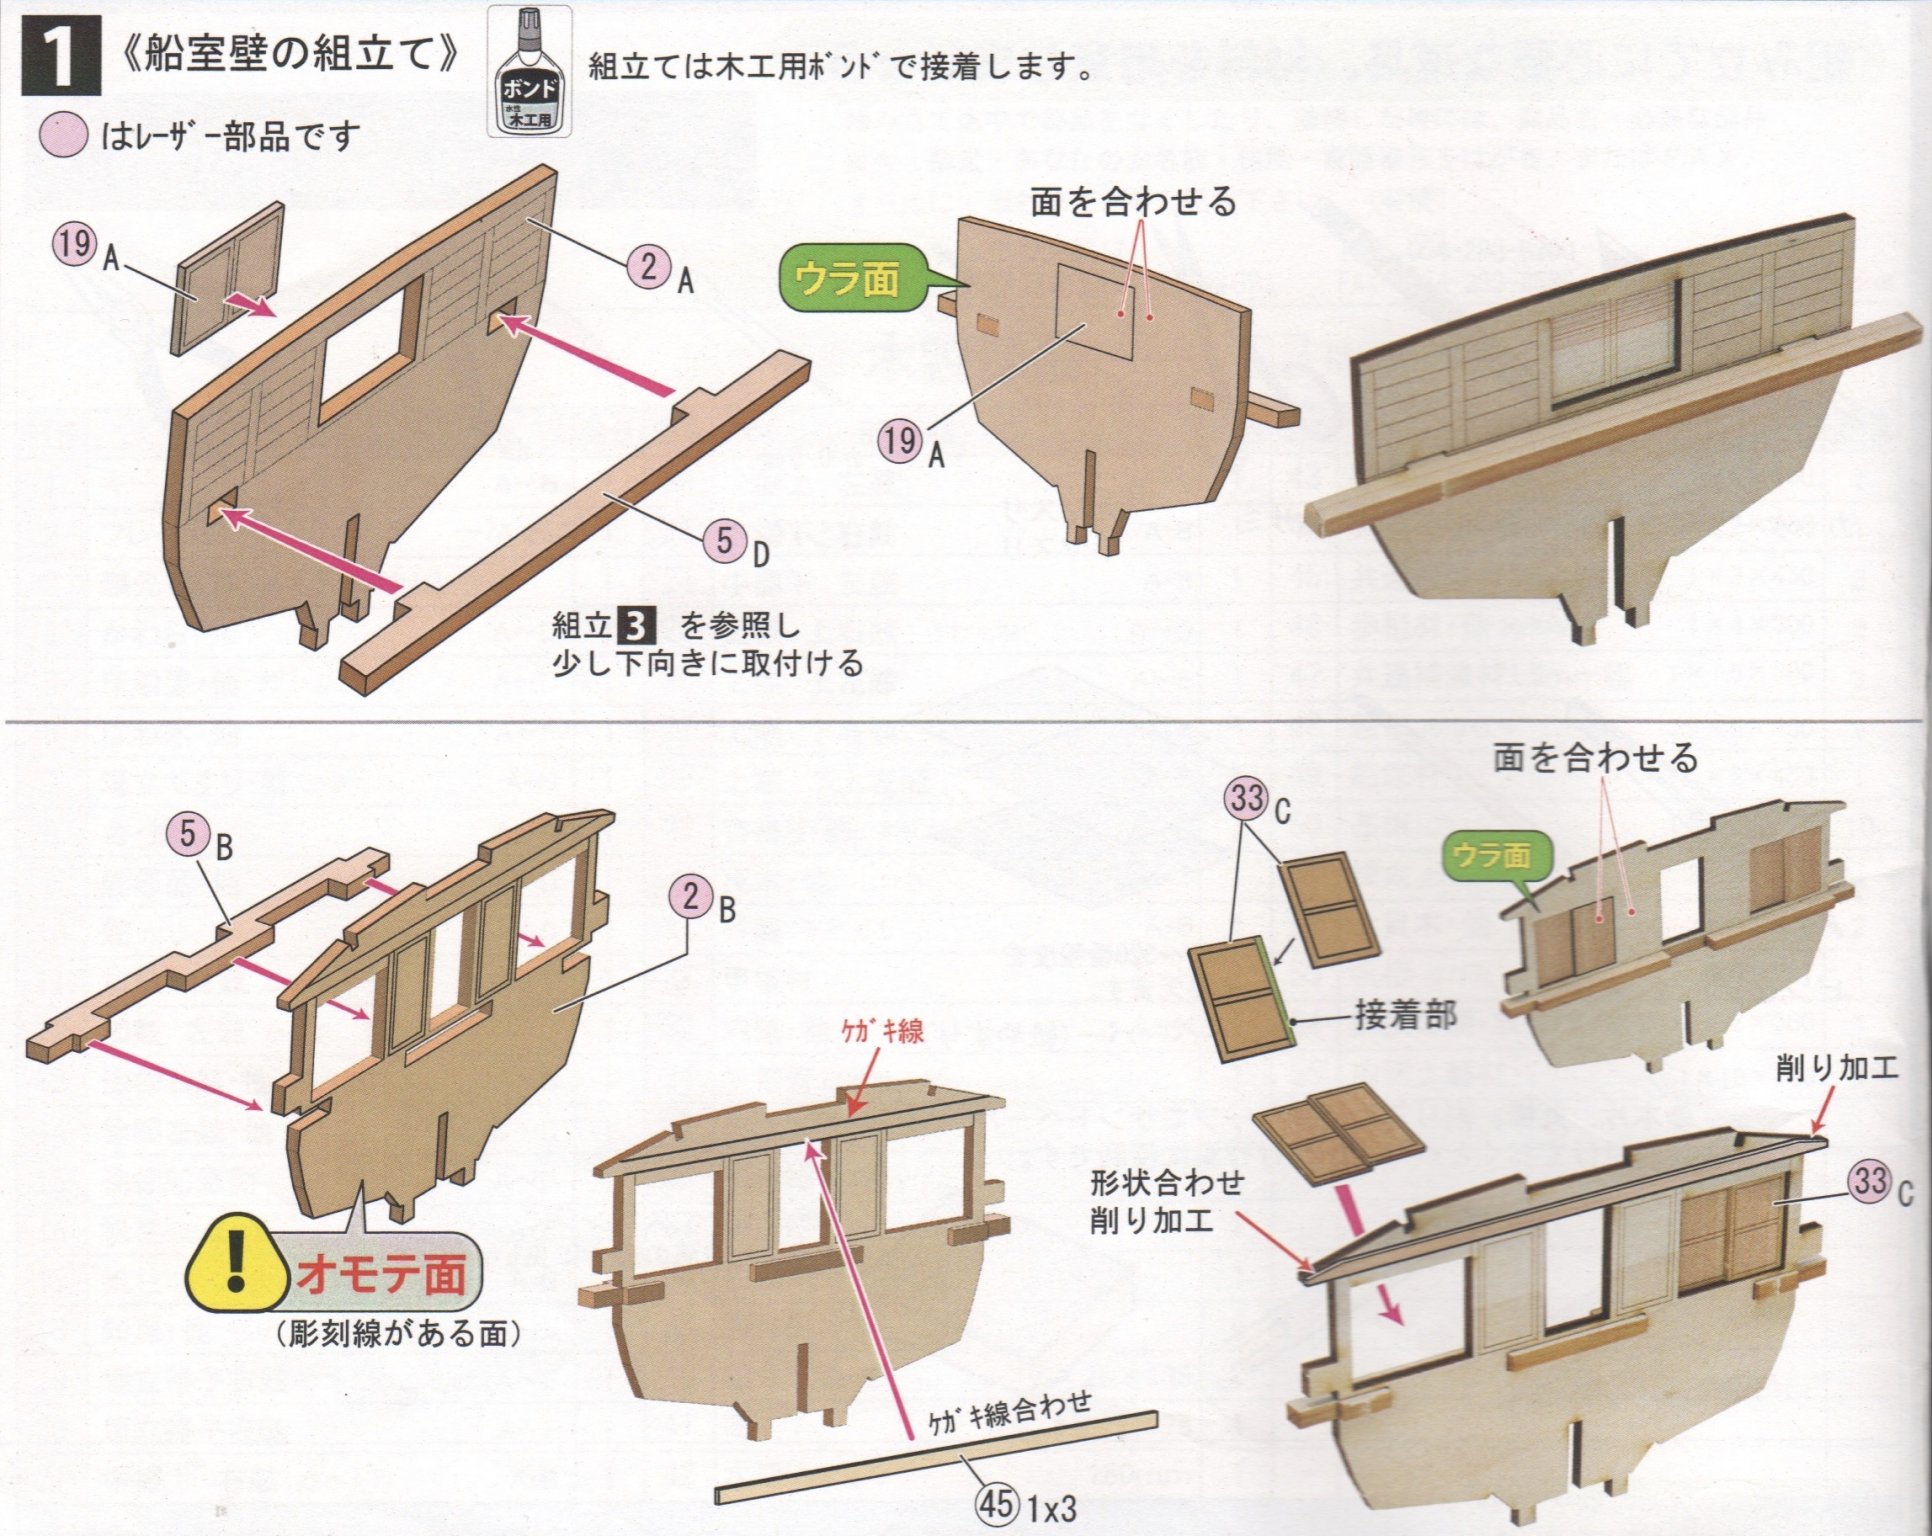
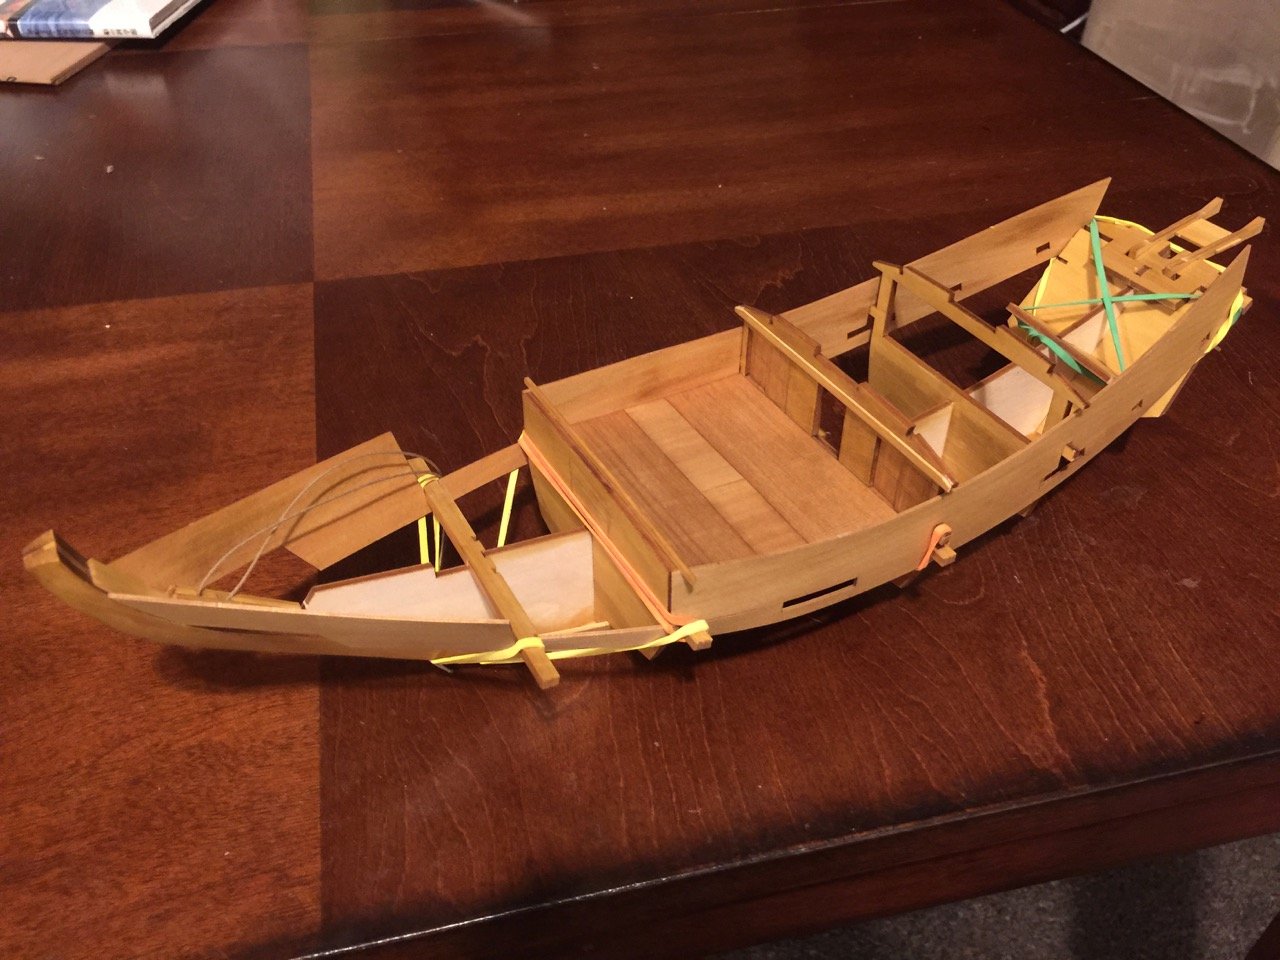
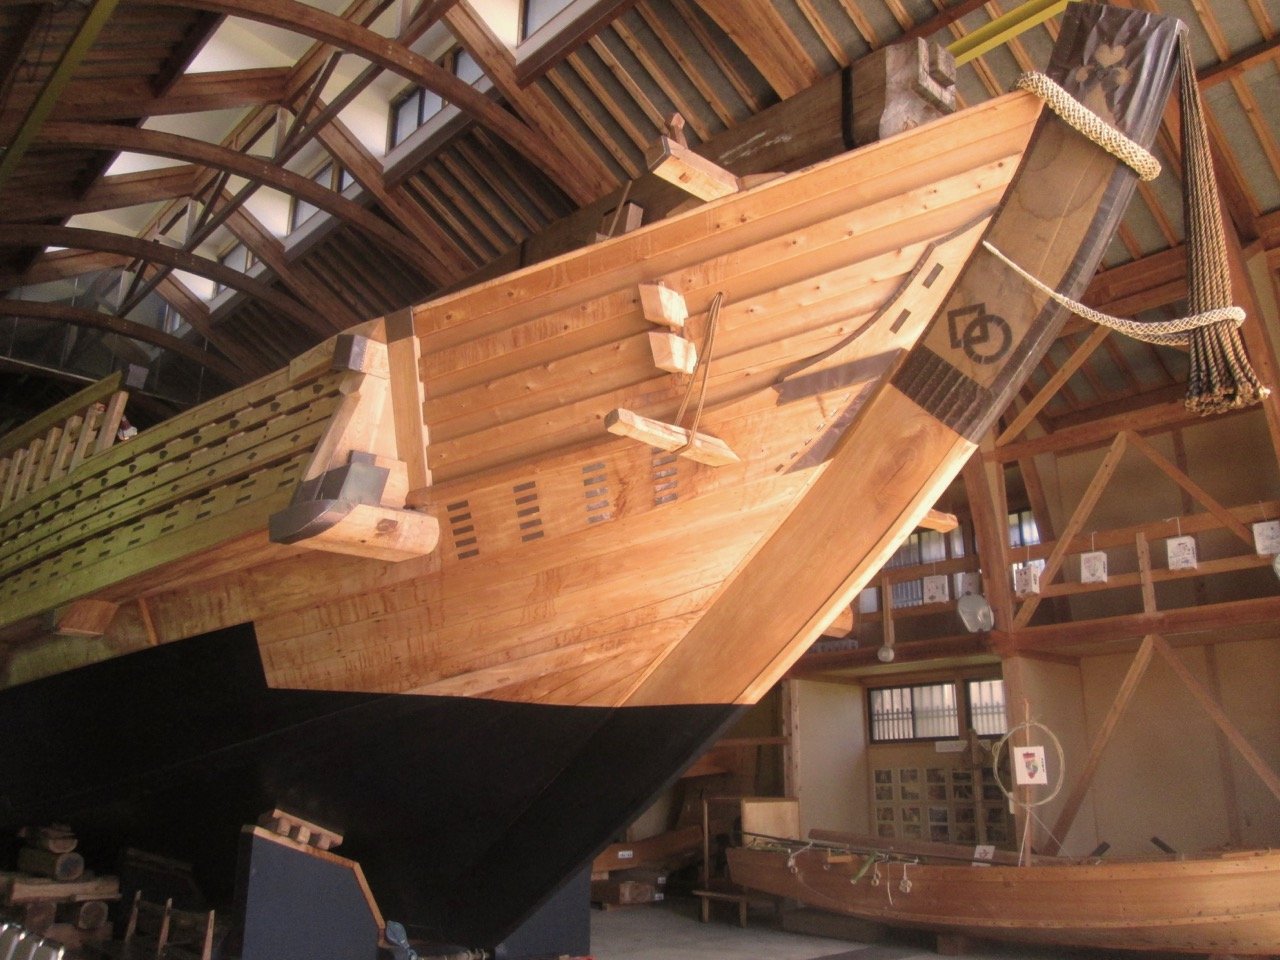
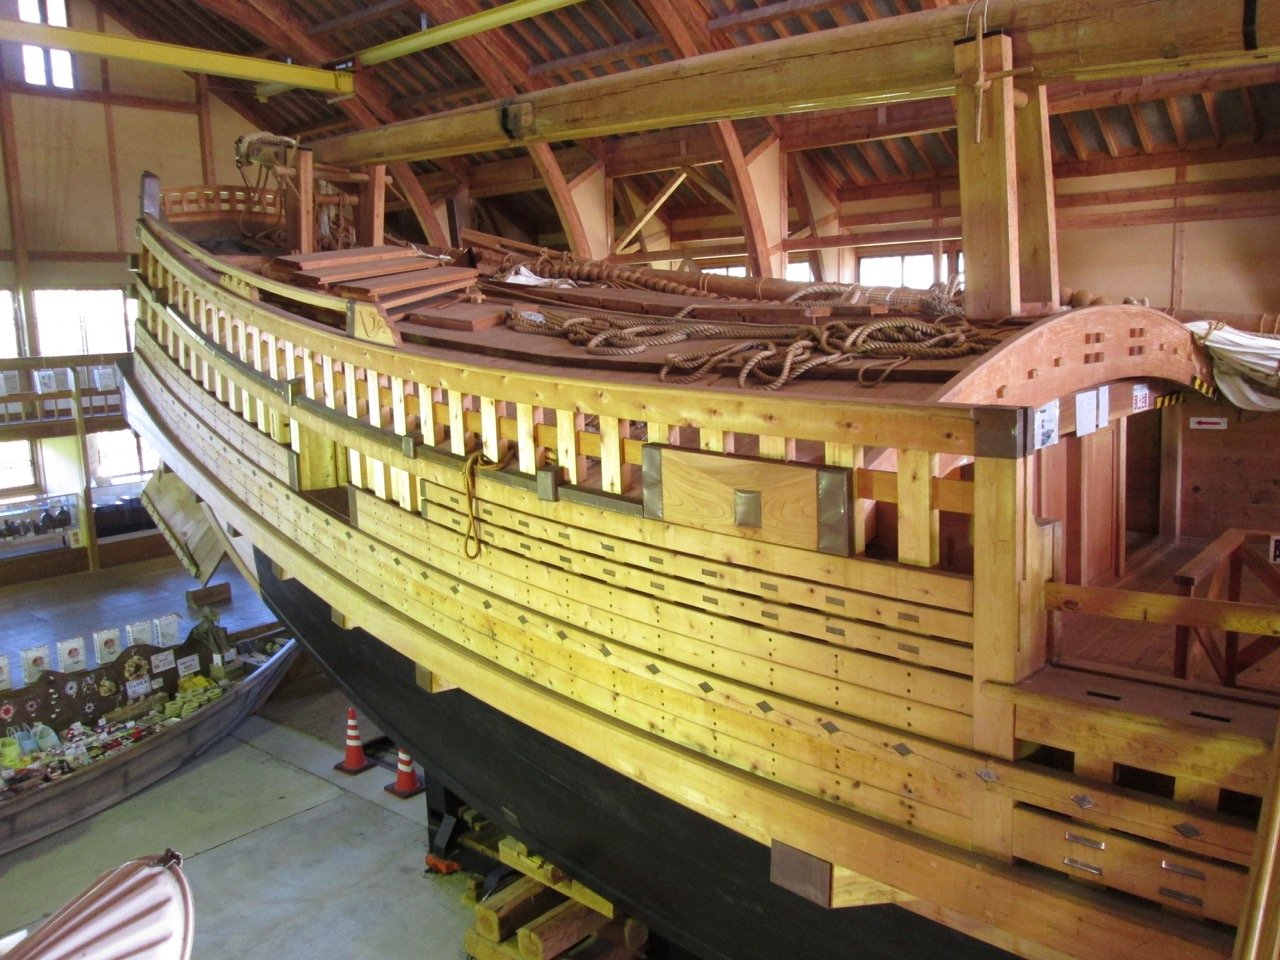
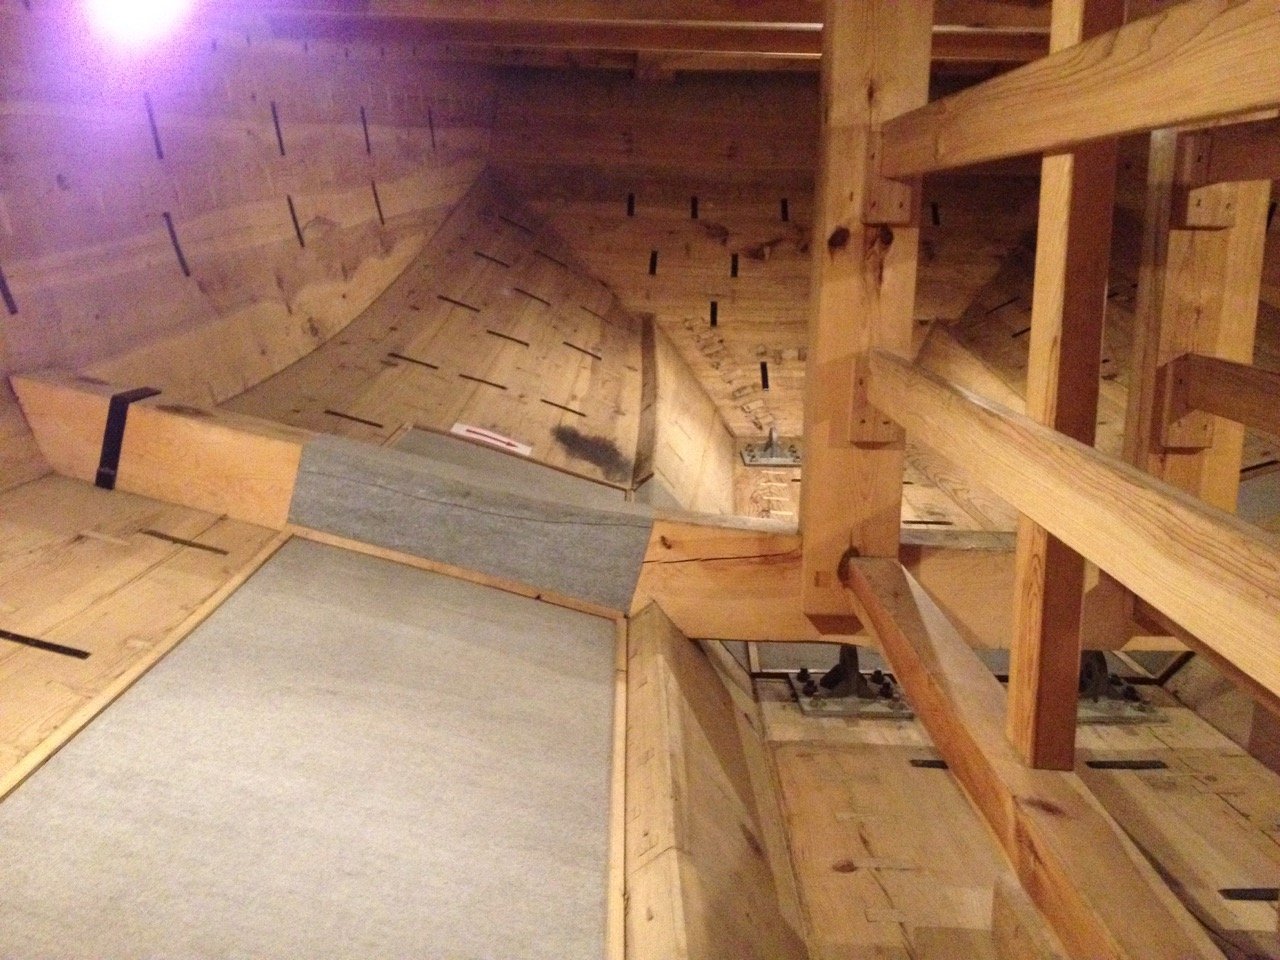
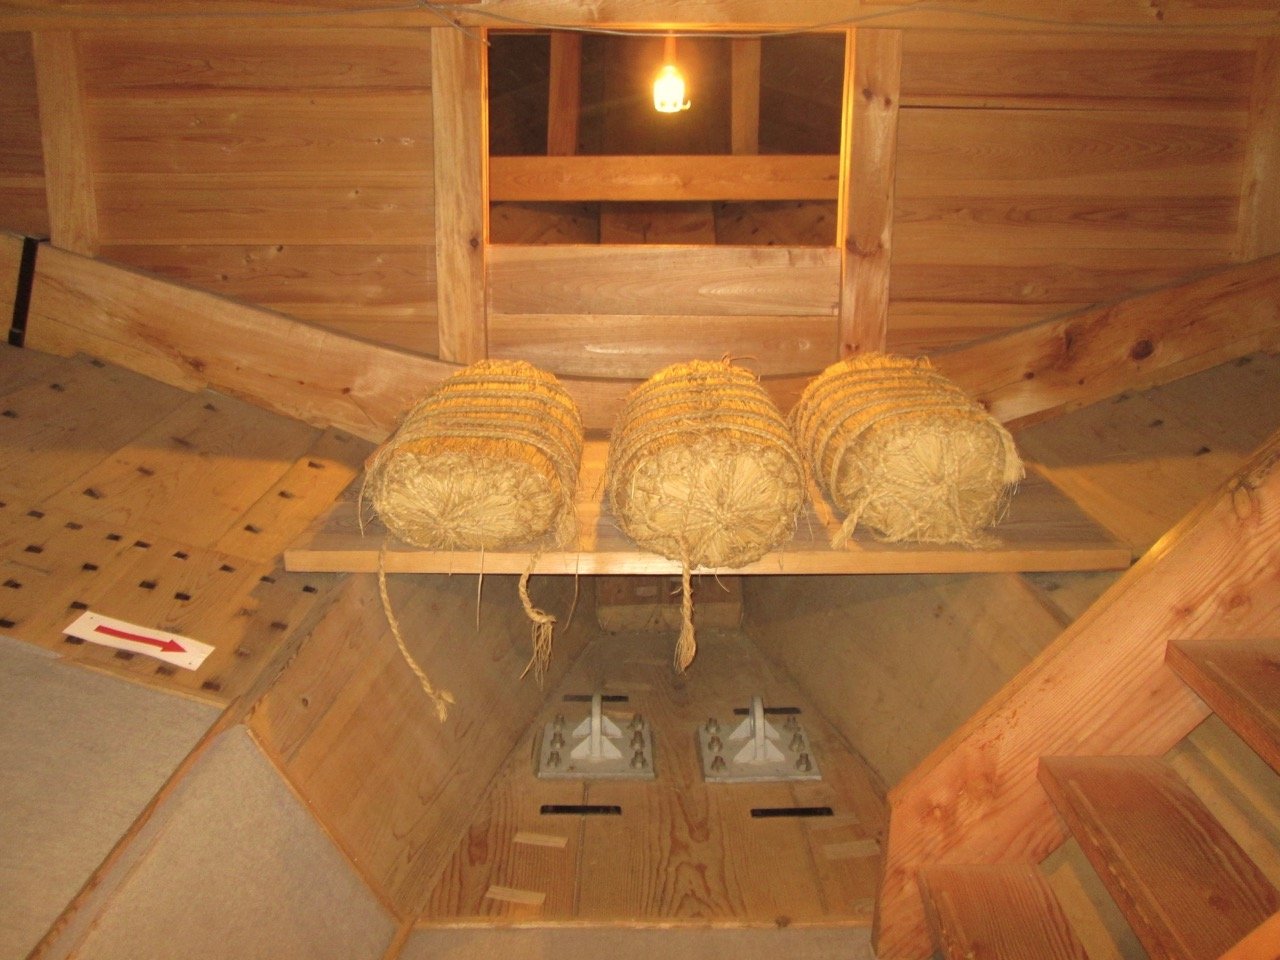
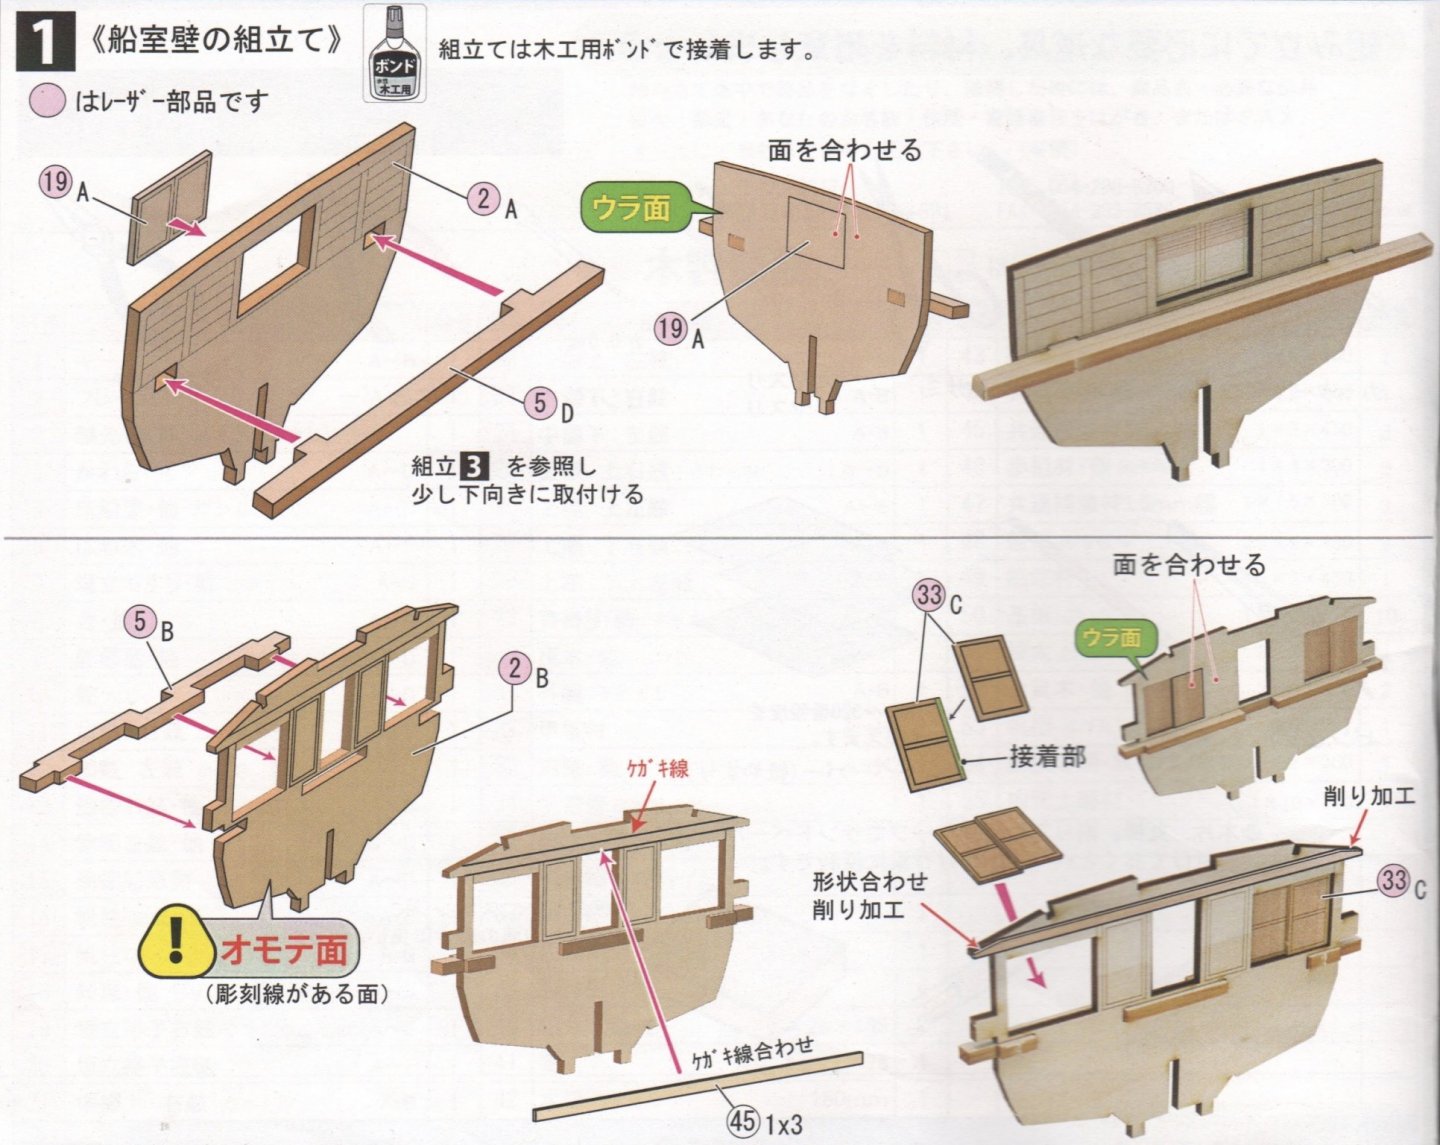
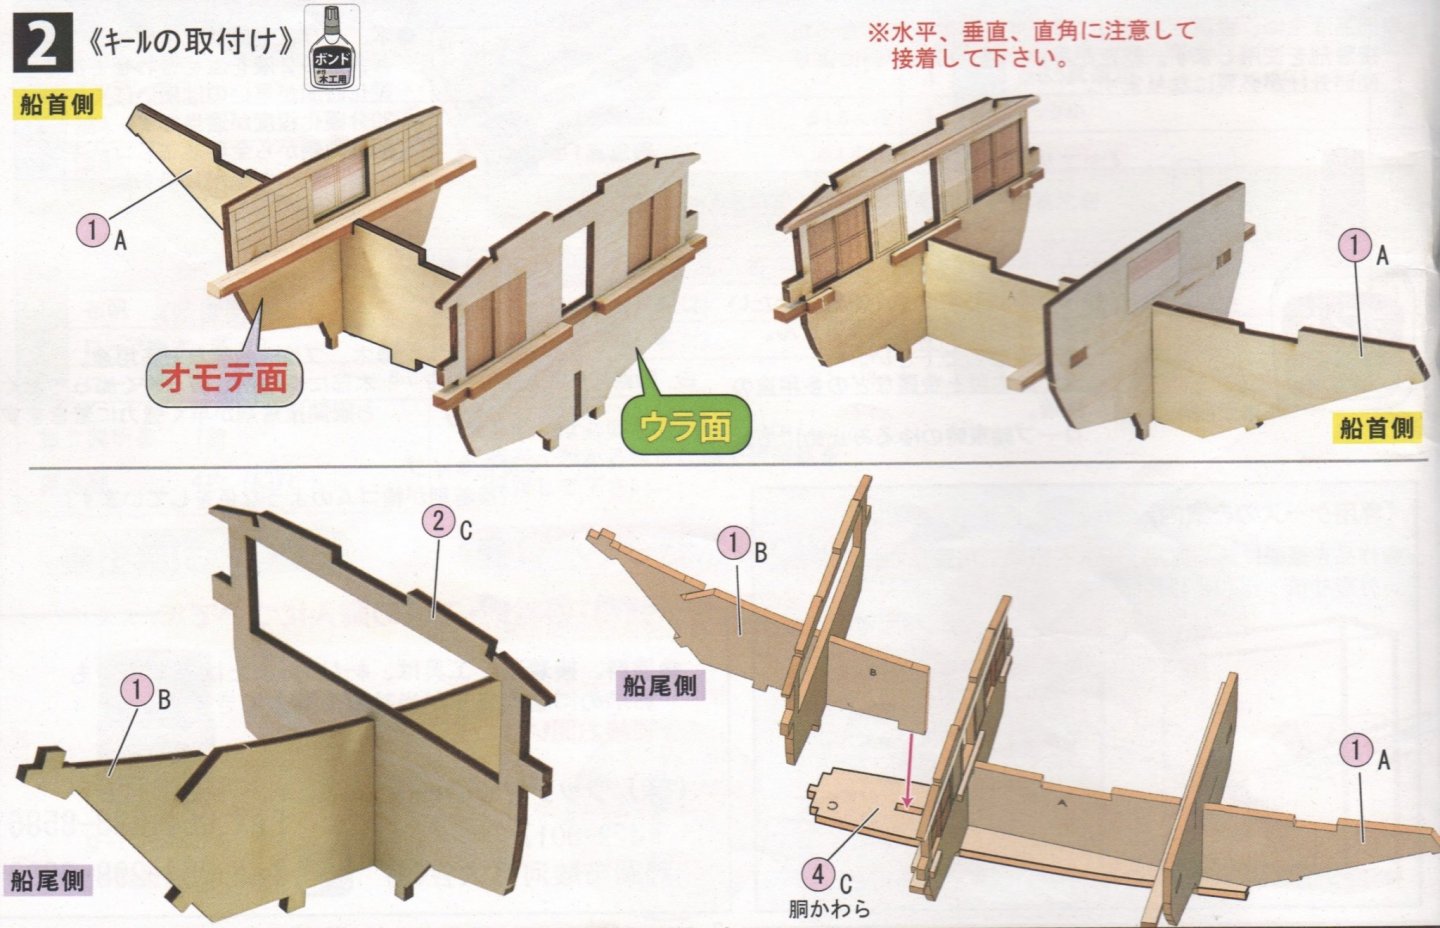
One thing aiding me in this build is a trip to Japan I made in late 2016, where I visited the Kitamaebune reconstruction ship Hakusanmaru on Sado Island. I made sure to take lots of photos, as this is probably the best preserved of four reconstructions built in recent decades, and may currently be the only one available for the public to actually climb down inside. I did take plenty of interior photos, but those don't really help with this model, as none of the interior is visible anyway. I do have another Higaki Kaisen kit waiting for me, so I'll be saving those details for that future build. As for the model construction, the first few steps are very simple, and involve the construction of the internal framework. Just a note here that these ships did not have much of an internal framework. They relied on heavy, wide planks, mostly edge fastened together using large, flat, iron nails, and what resemble big, iron staples. Here are a couple photos showing some interior below the main deck. The first is from about midships, looking aft. The second is from about the same position, looking forward. Those three straw bales in the second photo is a sample cargo of bags of rice. Getting back to the model itself, here are a few photos of the start of construction. The wood is naturally a very light color, like basswood, so I used a mixture of analine dye to add some more natural coloring. As I've described before, the product I'm using is called Transtint, and it comes in rather pricey little bottles. Luckily a few drops goes a long way. I recently came up with a mixure I liked, which I felt was pretty close to the right color. In a 2oz glass jar mostly filled with denatured alcohol, I added 24 drops of Dark Vintage Maple, and 12 drops of Amber. My experience is that to complete a model this size will require about 2 bottles of this mixture. I went ahead and applied the dye to all the laser-cut parts, and let that dry before I started construction. The first two steps of the build are nice and simple. Here's a scan of the first step. I have asked Woody Joe for permission to include scans of their instructions in my posts for illustration purposes. Construction is pretty straight forward. The special yellow text in the green bubble is a note that you're looking at the back side of the bulkhead. The red text in the gray bubble is indicating the front side. This is very important here, as there are laser-etched lines in several of the parts that are supposed to be visible on the model. Here are my completed bulkheads... The next step completes the internal frame... Notice that the term "front side" means the exposed side, not the side that is towards the front of the ship. And, don't forget to look for the laser-etched part labels. These should go on the inside of the ship, where they won't be visible. Yeah, I know... There's a lot of junk in my work area!
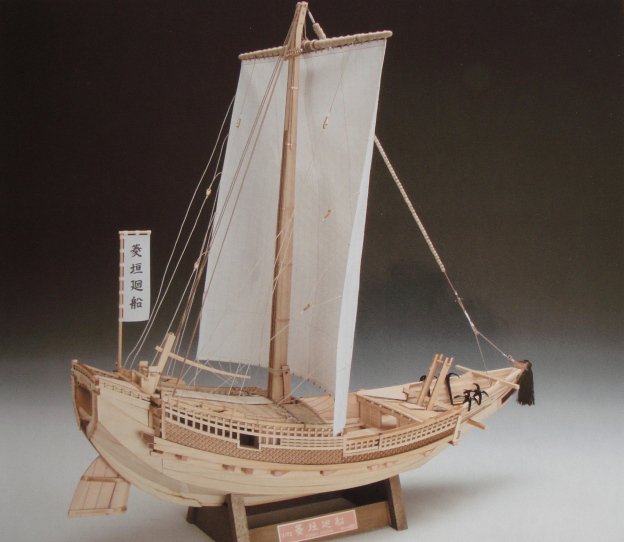
-
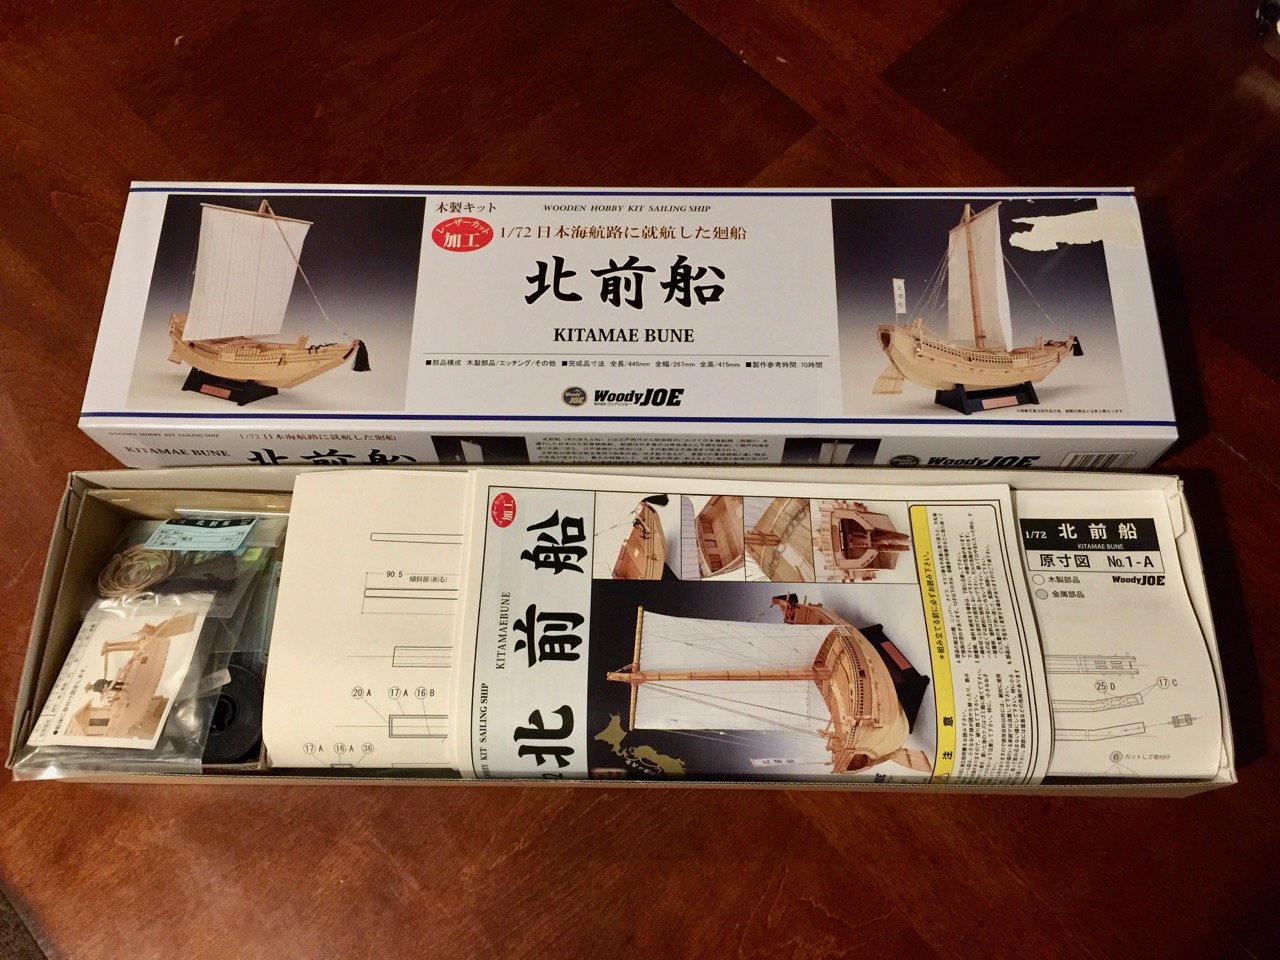
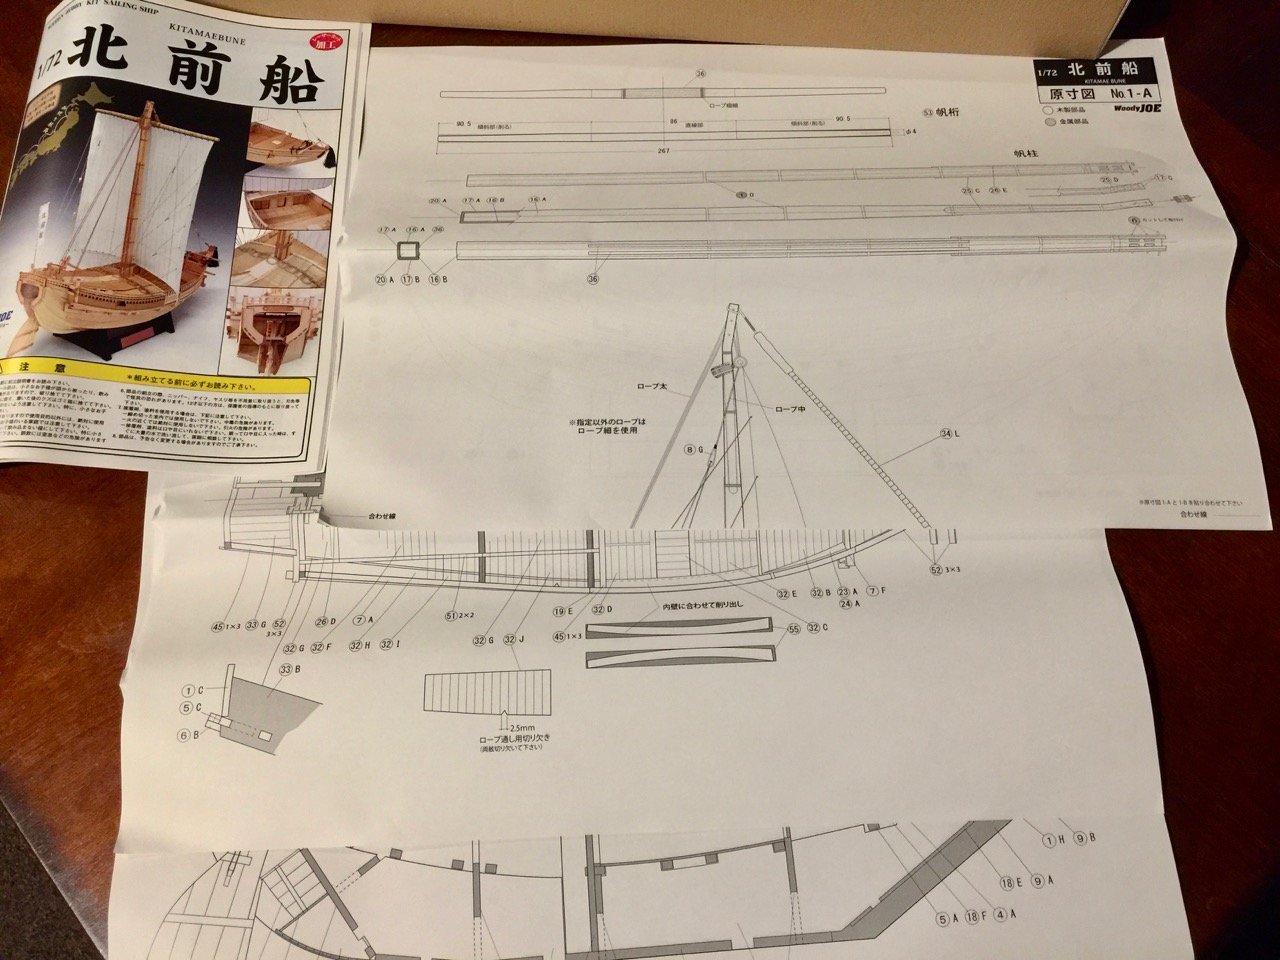
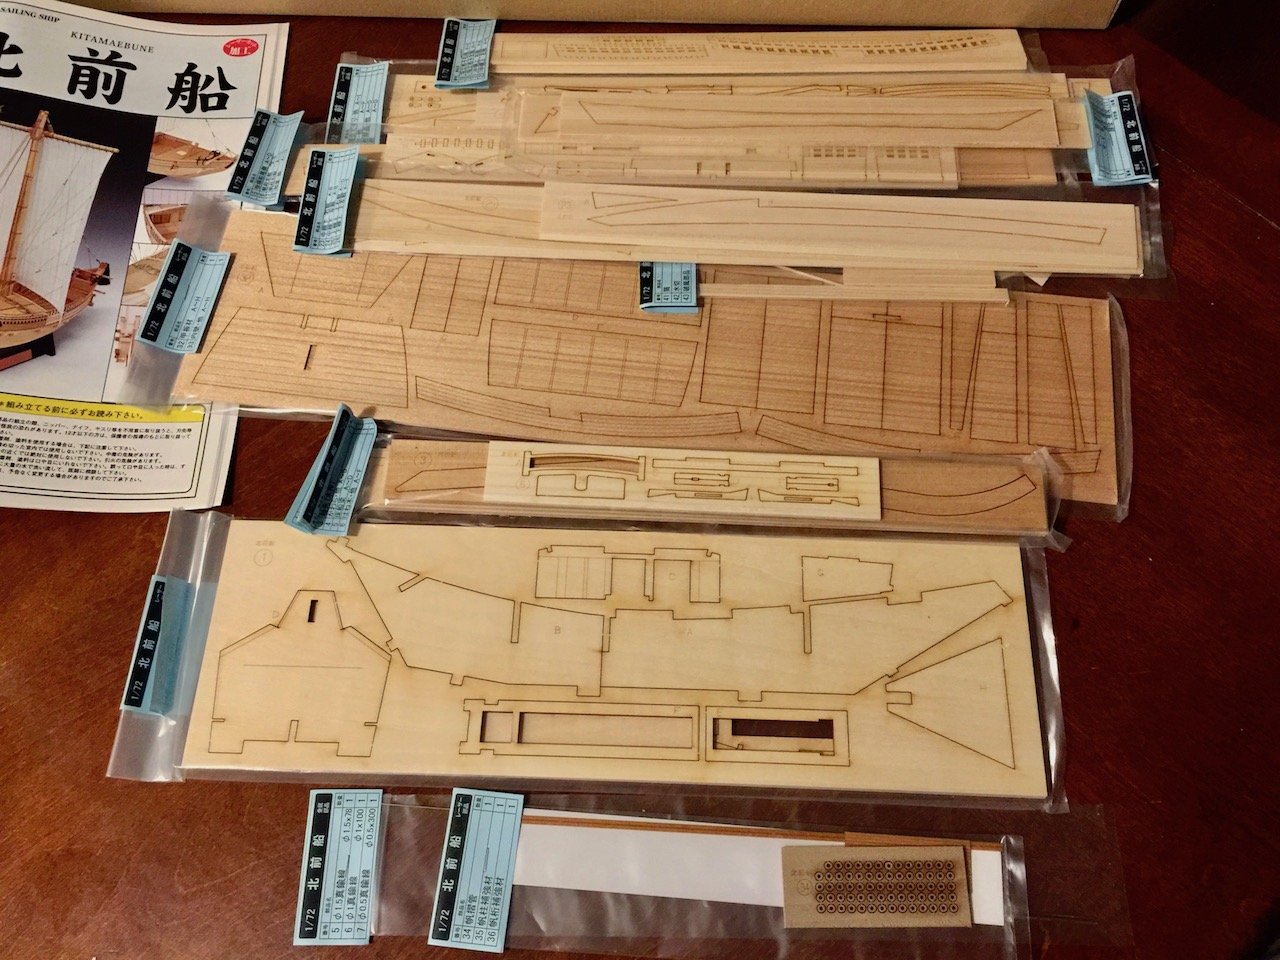
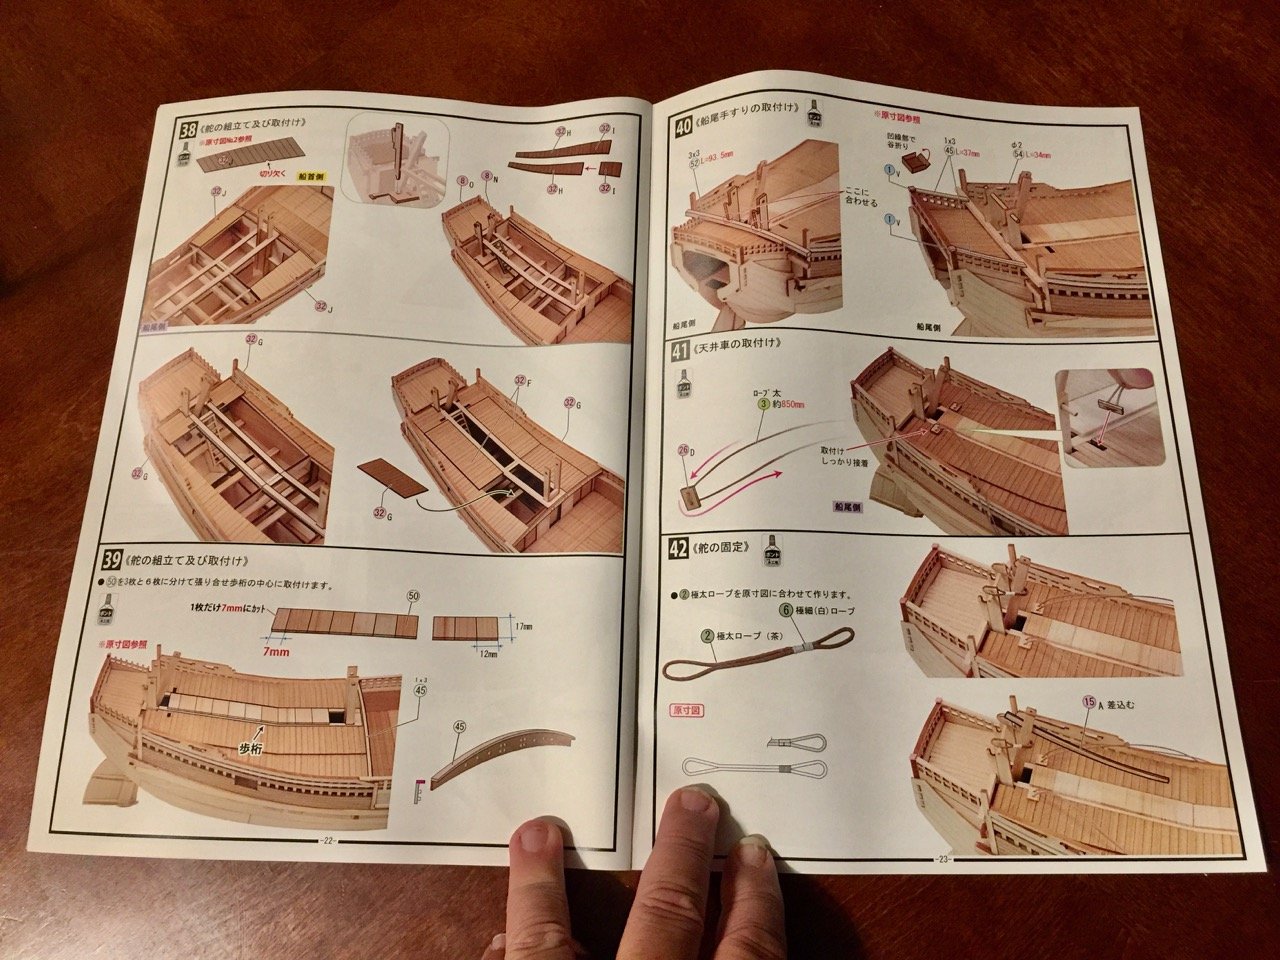
This is a project that's already pretty far along, but I realized that it would good to post my build notes here in hopes that it might encourage another ship modeler to build this kit from Japan's Woody Joe. The Kitamaebune (key-tah-mah-eh-boo-nay) is a 1/72-scale laser-cut kit of a Japanese coastal transport, similar to the Higaki Kaisen (he-gah-key-kah-ee-sen), which I built a few years back. This kit replaces their less accurate Kitamaebune model, which did not have laser cut parts, but was actually nice in that it was of a larger scale and made for a bigger model. The main tradeoff of the smaller scale is that it matches the scale of the Higaki Kaisen kit, and 1/72 is a commonly modeled scale, just not that common in ship modeling. The kit was released somewhere around February of 2016, but I had been too busy with other projects to take too much notice, and I didn't order the kit until early 2018. Even then, I didn't really have time to work on it, but finally broke down and started working on it last December. Kitamaebune model photo from Woody Joe: Higaki Kaisen photo from Woody Joe I ordered my kit, along with all my Woody Joe kits, from Kazunori Morikawa's Japanese online shop Zootoyz.jp. I can't say enough about his great service and support. The price for the kit, with express mail shipping included, came to about $270, and I had it about 10 days later. One note of caution: Be careful perusing his website, because you'll find all sorts of really interesting looking ship, temple, old house, and castle kits there. Woody Joe suggests that the kit should take about 70 hours to build. Building cautiously, which I highly recommend, I expect to at least double that time. Plus, I have some ideas about adding details, which will add many hours to the total. But, this is a good number to use for kit comparison, as the Higaki Kaisen model is listed to take about 100 hours. That's 50% longer. So, this kit is a much quicker build. The kit looks much like any other Woody Joe kit, with laser-cut parts on small sheets, bagged and labeled. Same goes for strip woods, dowels, and a few metal parts. The wood used in the kit is mostly Japanese cypress – Hinoki, in Japanese – which has a wonderful aroma that hits you as soon as you open the box. The plans are well illustrated, but text is all printed in Japanese. There's not a great deal of text, however, and what there is can be translated by Google Translate app on a smart phone. Overall, it's clear that this is a simpler model than the Higaki Kaisen kit. Many assemblies have been simplified by the use of laser-etched parts for the deck planking, for example. Also, the interior framework structure makes this go together more like a traditional ship model kit, with an inner keel and bulkheads. Being that I've actually gone through most of the build as I'm writing this, I can issue one word of caution: This kit, while a simpler build than the Higaki Kaisen kit, has some places where I feel the design of the kit could have been better. I ended up having a bit more trouble with this build, but nothing insurmountable. Building the more complex Higaki Kaisen kit first may have benefitted me here, as I was familiar with the various parts of the ship. The most important word of advise I can give here is to do a lot of test fitting, look ahead, and check the plan drawings, to make sure the parts fit exactly as they are supposed to.
-
This is very sad news indeed. Mitch was such a great guy and really made me feel so welcome at the NRG conferences. My sincerest condolences.
-
kit review 1:120 USS Susquehanna - WoodyJOE
catopower replied to James H's topic in REVIEWS: Model kits
Nice kit review, James! Glad to see you got a review kit from Woody Joe. I'll add that everything about this kit is pretty much standard Woody Joe product. Plastic blocks and deadeyes are standard in all their kits, as is the beautiful packaging and indexing of the parts. Very much Billing Boats like. And, as you point out, these parts are easily swappable for your favorite wooden deadeyes and blocks. Though, my preference is still the Syren stuff 😉 Their kits can sometimes be a little light on some details, but they also tend be pretty accurate on the measurements and scale, so it's very easy to do some of your own upgrades. I agree that RC is not the intention of the motor addition – it's more of an add-on capability "just for the fun of it". I'm not sure that one can actually buy direct from Woody Joe for shipment overseas. So, I'm surprised to see the store link. I've received things from Woody Joe before, but never a purchase. Actually, I highly recommend purchasing from an online hobby dealer that I and many members here have dealt with, Zootoyz.jp. The owner of the business, Kazunori Morikawa, can communicate in english and his site is in english too, making ordering much simpler than trying to do it in Japanese. He's also a great person and always sends little goodies with your model kit orders, and you won't get gouged on pricing like what I've often seen on Ebay and Amazon. He's very conscientious about his business and the products he sells. So, PLEASE, if anyone is going to buy one of these kits from him, make sure you know what you're getting into first, so you don't bch and moan to him if you're not happy with Woody Joe's lack of a free replacement parts policy – he takes your complaints very seriously and personally. Clare