catopower
-
Posts
1,900 -
Joined
-
Last visited
Content Type
Profiles
Forums
Gallery
Events
Everything posted by catopower
-
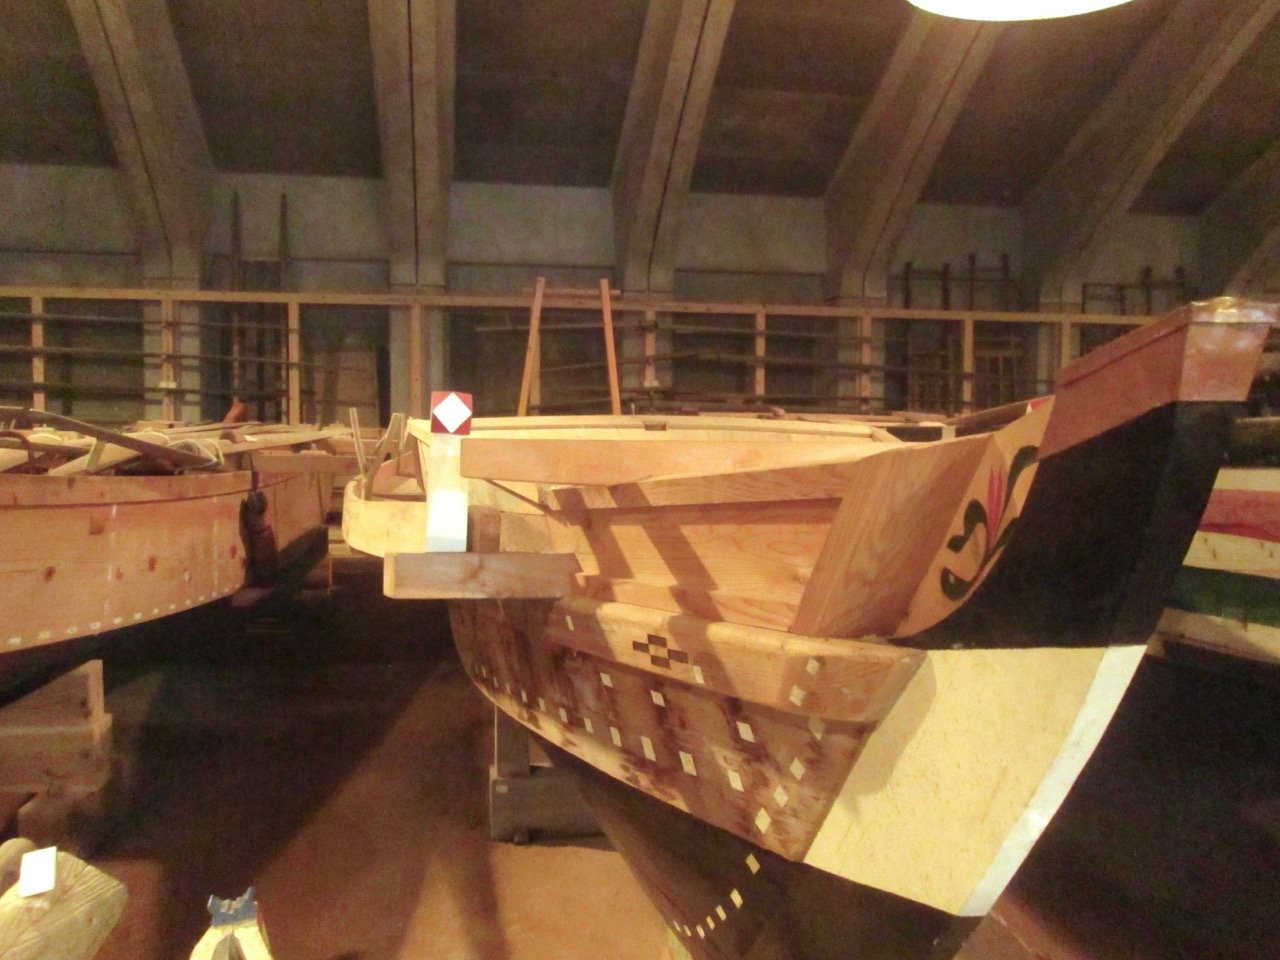
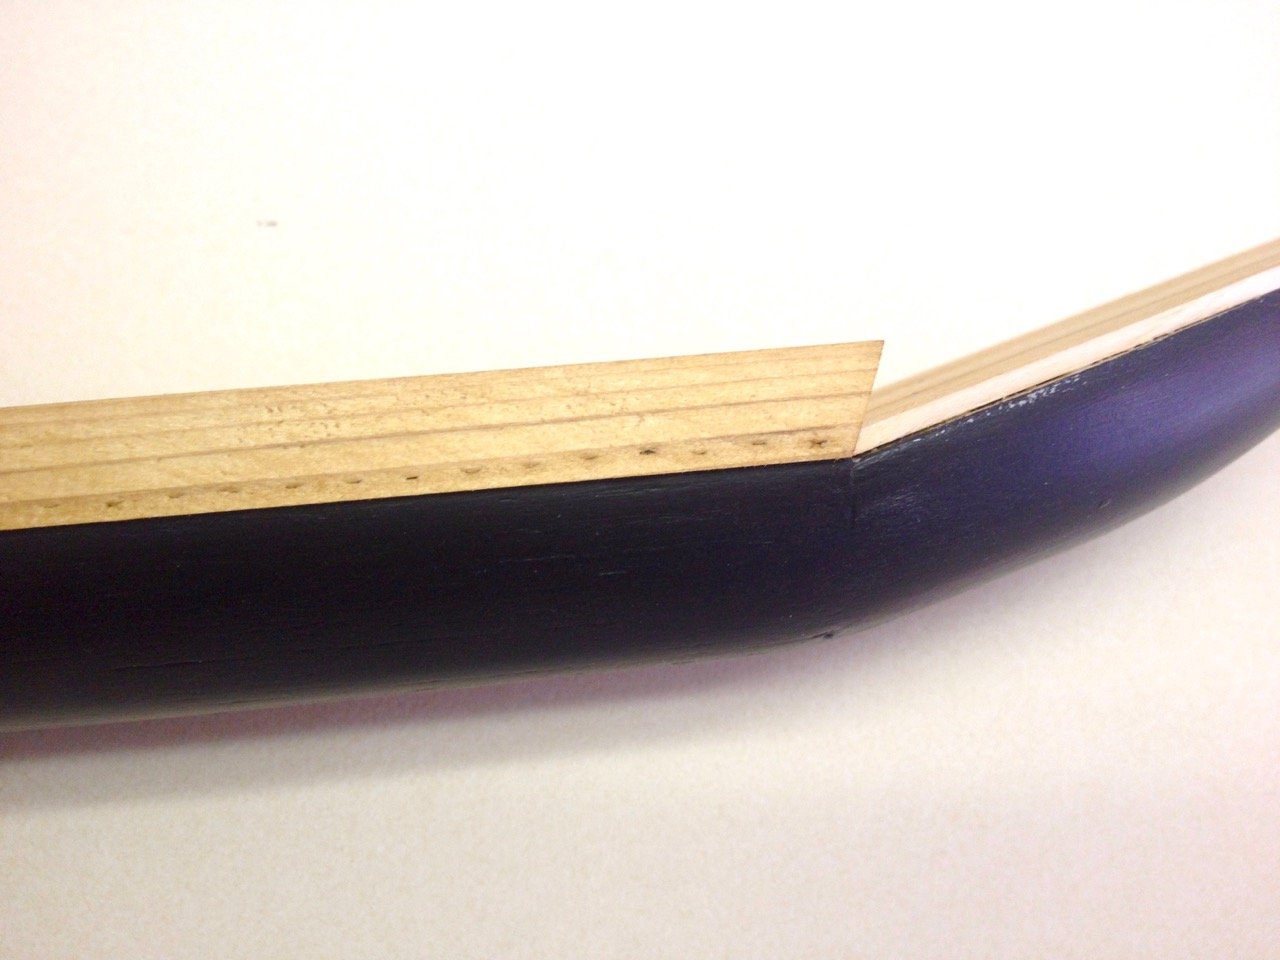
 Ken, those are actually rectangular mortises that were cut, plugged and painted. The painting is just decorative. The mortises are cut, and small rectangular pilot holes are cut through them into the stem to take large, flat, iron nails. These are nails that I got from Douglas Brooks, who has a small supply of them for his own Japanese boatbuilding projects. The one on the right is an original, hand forged in Japan. The two on the left were made for him by an American blacksmith from galvanized steele. So, those designs you like are just painted plugs, the boat does have some nice carved design work. From what I've seen, carvings like this aren't all that common. Nor is the white paint of the mortise plugs. It just depends on the region. But, you might appreciate the bow of this boat built in Okinawa, which uses wooden fasteners. This image is of a boat called a Sabani. You can see more about it on Douglas Brooks's website.
.thumb.jpg.e8d98b168b364befcc907e2c9f152381.jpg)
-
Hi Ken, Are you're referring to those faceted red and white painted vertical posts on the end of the beam at the bow? I don't know the Japanese term for those. I've tried modeling them before, but I keep screwing up that faceting pattern. I have yet to be successful.
-
Thanks Carl! But, I'm surprised at the length of page 1. I'm curious how the system decides when to paginate. It may just be a mystery of life... Nothing to post about the model today. But, I do need to share that my brain turned to mush last night. I had the day off and was doing online research on some Facebook posts I saw recently regarding some boat types from the very southwestern corner of Japan's southern island of Kyūshū. The boats I ran across in posts looked similar, but all descriptions were in Japanese and I can only read a very small amount of Japanese. So, I end up doing a lot of online translation. It takes a long time to translate and make sense of documents, figure out what their sources are, and then relate different documents together when they use different terms for similar types of boats. In the end, I determined that I was looking at two distinctive types of boats, though they were closely related by rig and some of their hull features. For one of the types, there turned out to be a treasure trove of information on its design, sailing characteristics, construction and so on. Apparently, the information was collected by a man who's father built them. He collected the information so it wouldn't be lost forever. At the same time, I found some old information on a former boat builder who became too old to continue the work. He turned to building models of his boats and there was information on an old exhibit that took place in a resort in the area where these boats were from. I think at least one of his models may still be on display there. The type is called a Satsuma-han-sen or Satsuma-gata wasen, which simply means Satsuma-type Japanese traditional boat. Being built in the far south western corner of Japan, there is a lot of Okinawan influence (= Chinese influence) on the design of the rig. The information I found suggest heavy western influence and relates the rig to the lug rig. But, I think it's actually more related to the junk rig. In any case, I was emailing back and forth with a couple people in Japan, checking with boatbuilder Douglas Brooks, translating text all day, looking up terms, referencing and updating my notes. Even with breaks, I barely got away from my computer and I think I shorted out my brain... But, on the positive side, I discovered that I had actually seen a replica of this type when I visited the Toba Sea-Folk Museum in Japan last year, and I have almost 2 dozen photos I took of the boat's details. But, after all that, I'm not actually planning on modeling the boat, but just understanding the type and to keeping up-to-date with the wasen enthusiasts in Japan. As soon as my brain solidifies, I'll get back to posting about the Kamakura period sea boat...

-
Wow, this topic FINALLY went to 2 pages. It seemed like a lot of scrolling to get to the bottom of the first page – or is that just my imagination?
-
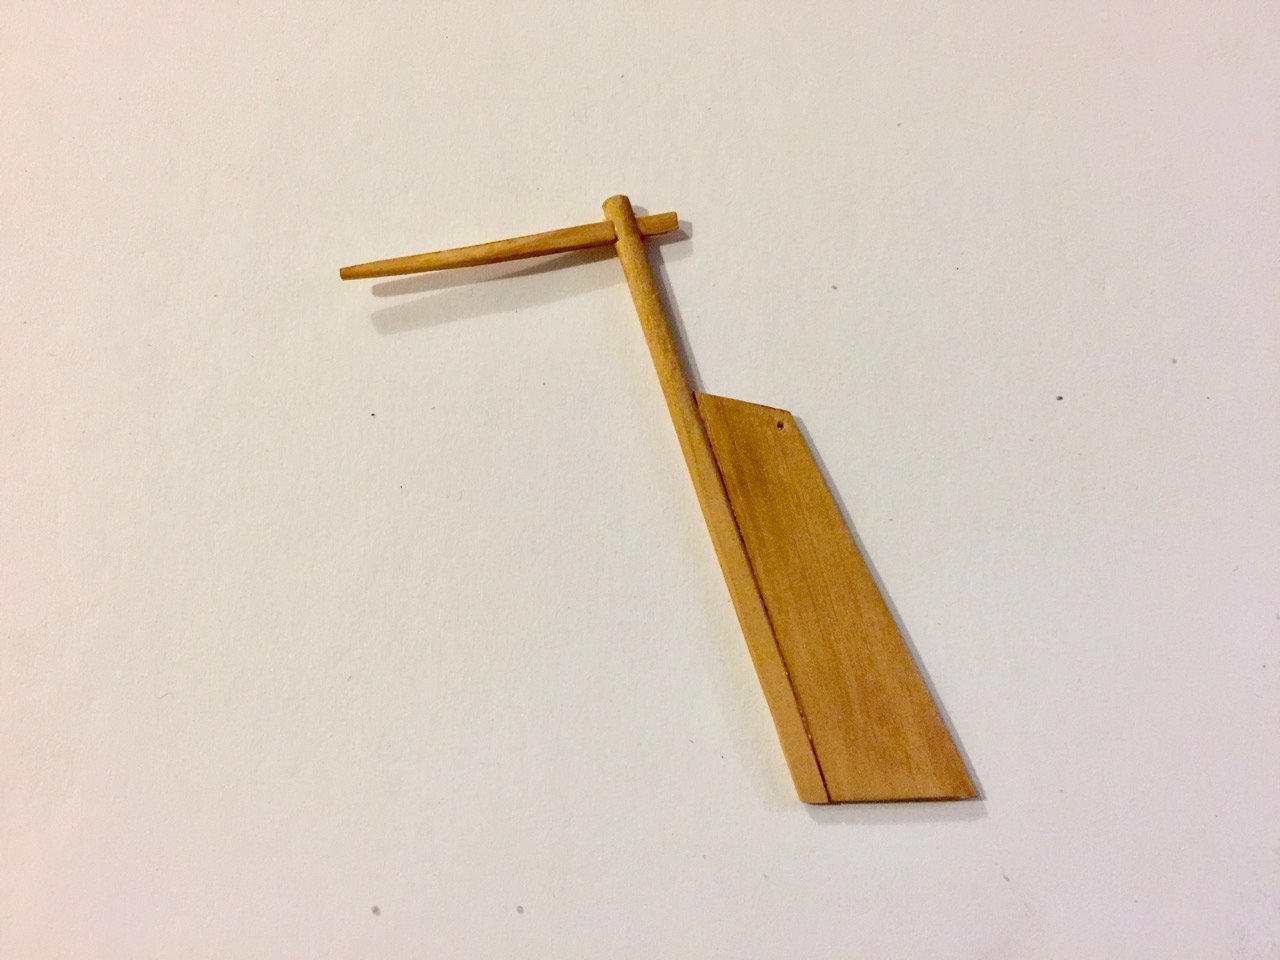
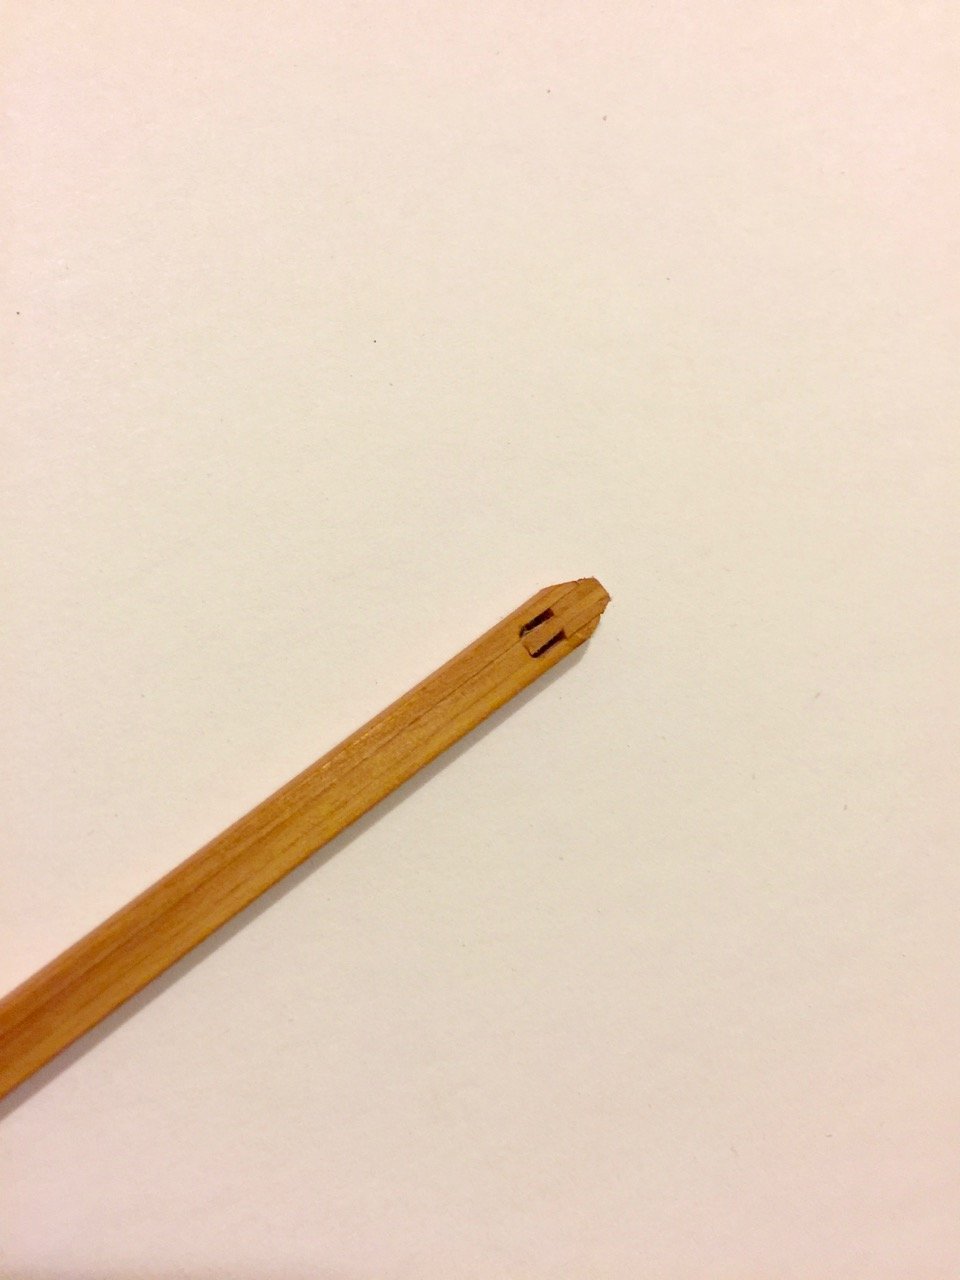
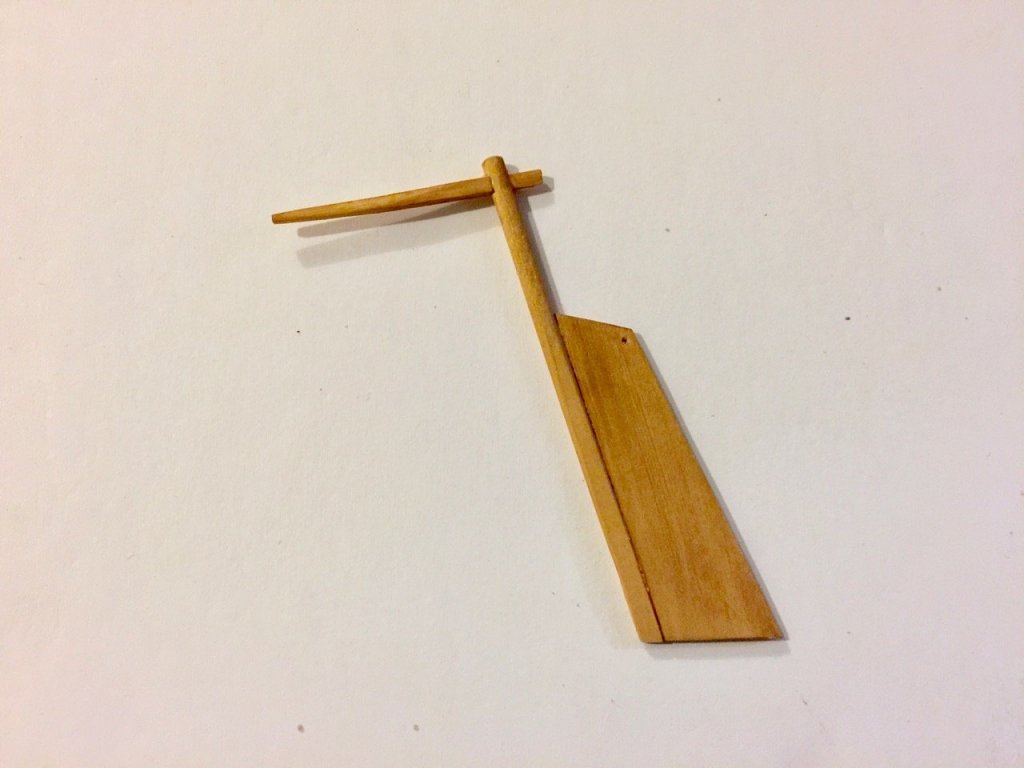
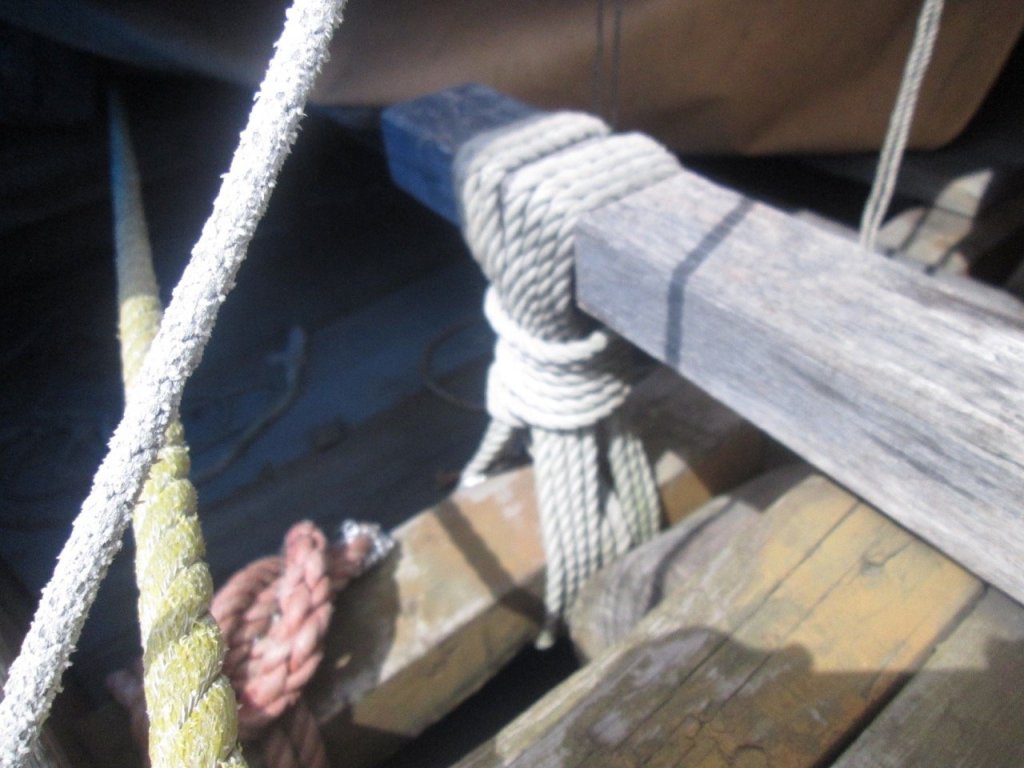
Here's a nice short post for a change... I'm constructing the rudder, or kaji, on the model in a similar fashion to what I've seen of the museum models. You'll notice that those models aren't very detailed in this area. Once I did was to use a separate rudder post, with the rudder itself glued onto that. The actual rudder and rudder post may have actually been a single piece. Given the size of tree needed to make up the hull, it's certainly not out of the question, as long as a single piece was sturdy enough. There is a small hole at the top end of the rudder through which a rope was tied. This rope supports the weight of the rudder, making steering easier. The depth and large size of the rudder itself allows it to make up somewhat for the lack of a keel. Even so, I doubt that this type of boat could sail into the wind to any degree, relying instead on oarsmen for that. As with later traditional Japanese boats, there were no rudder hinges. Instead the rudder post fit through a hole in the ōtoko, the great beam at the stern. The post is only slightly smaller than the opening in the ōtoko, and the opening is notched so that the rudder itself could pass through the notch, but the notch is too small for the rudder post to slip out. I've been reading recently that these were greased to allow easy movement of the rudder. But, friction meant that the hole would wear out over time and become enlarged and the ōtoko would need to be replaced. On the Hacchoro photo I showed in my last post, the rope tie-down was actually to secure the ōtoko. This could be untied and the ōtoko could be removed and easily replaced. This boat doesn't seem to have a similar tie-down feature, and I haven't been able to determine yet how the ōtoko was secured or removed.
-
Hey Slog, Your railing looks absolutely beautiful to me. I can't imagine that mine will look nearly as good when I get to it on my V108. Really lovely work! Clare
- 244 replies
-
- 4
-

-
- borodino
- dom bumagi
- (and 1 more)
-
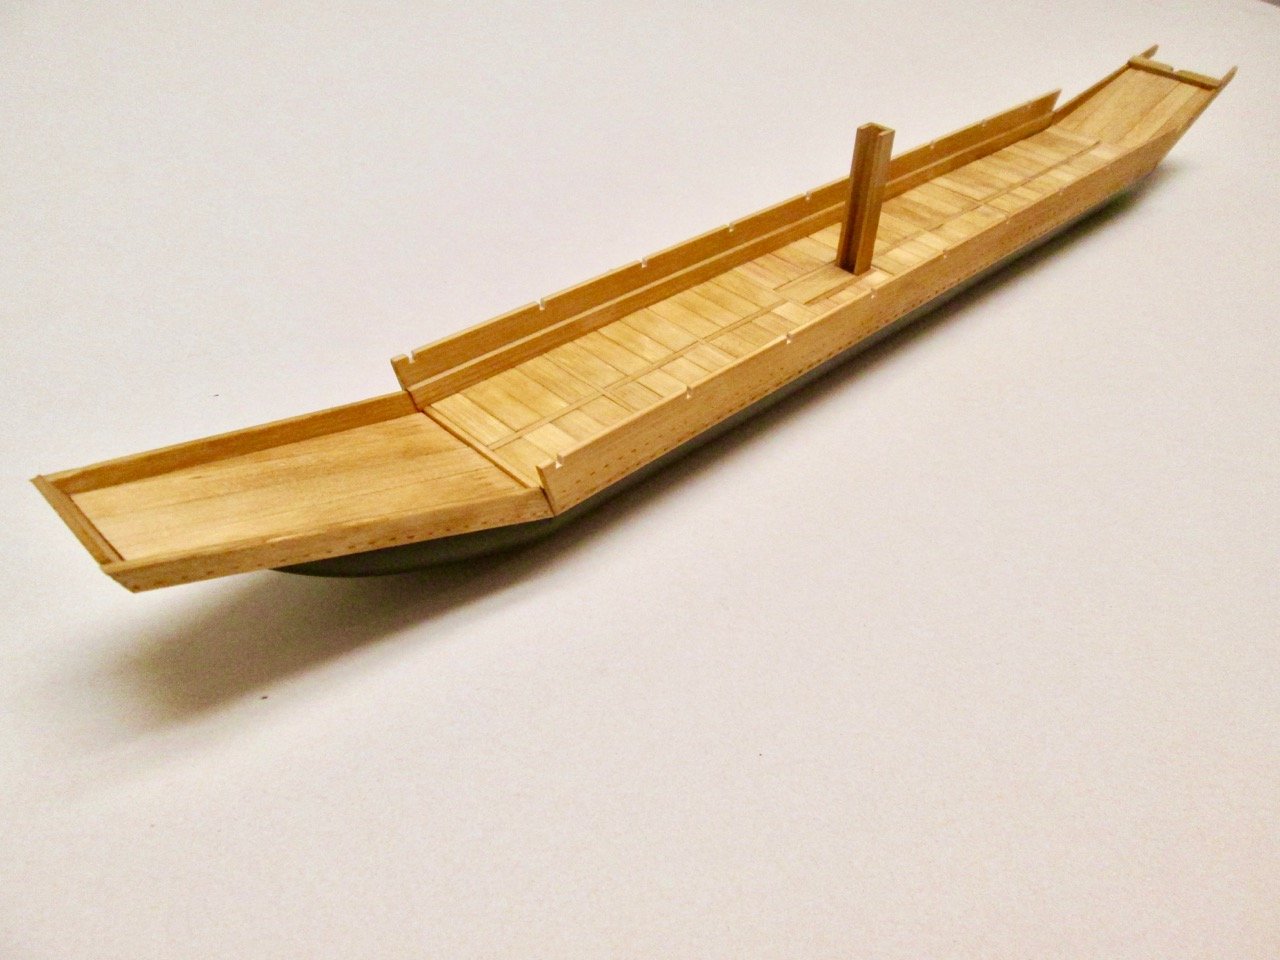
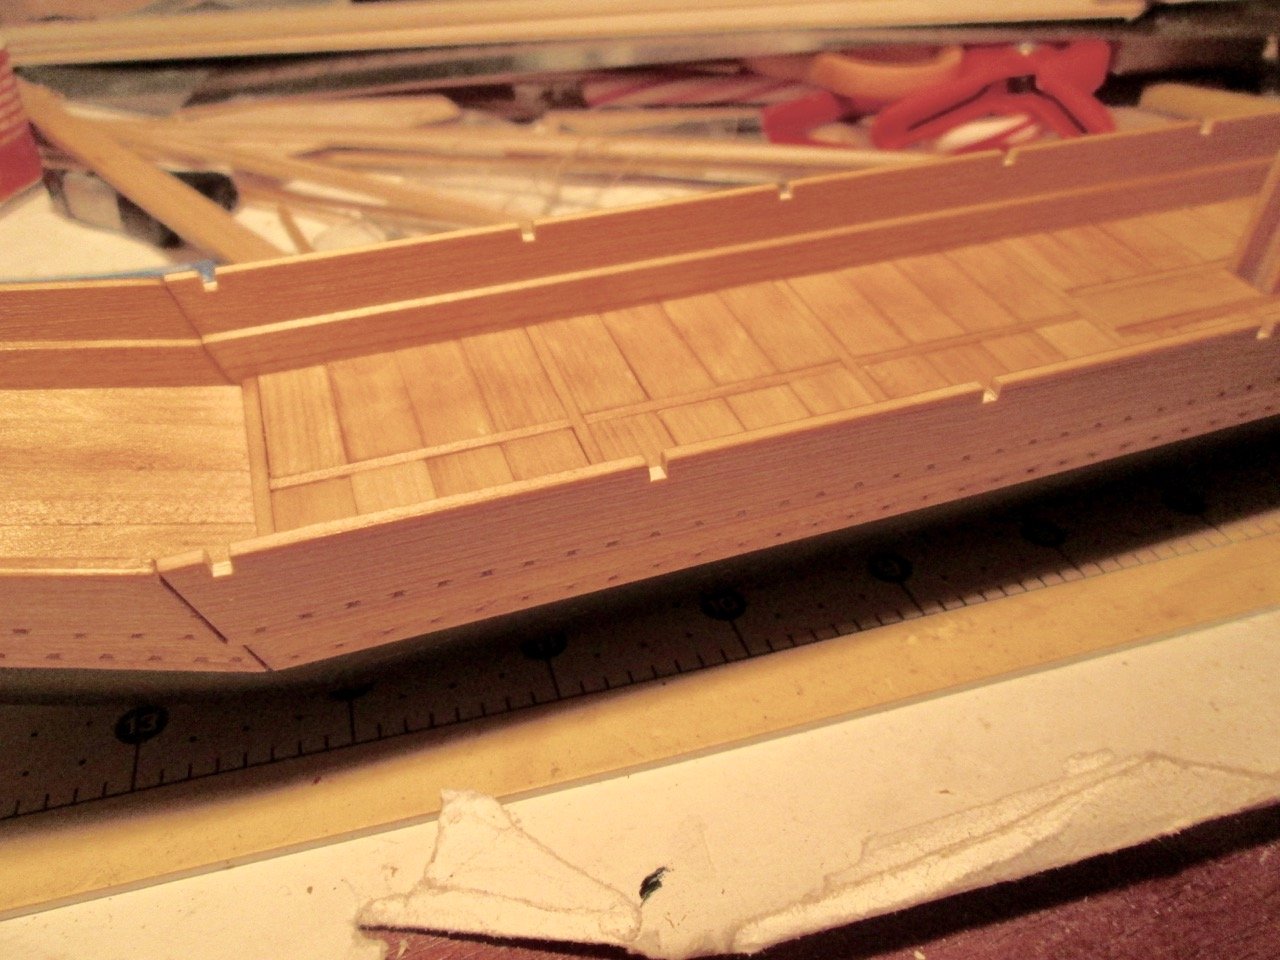
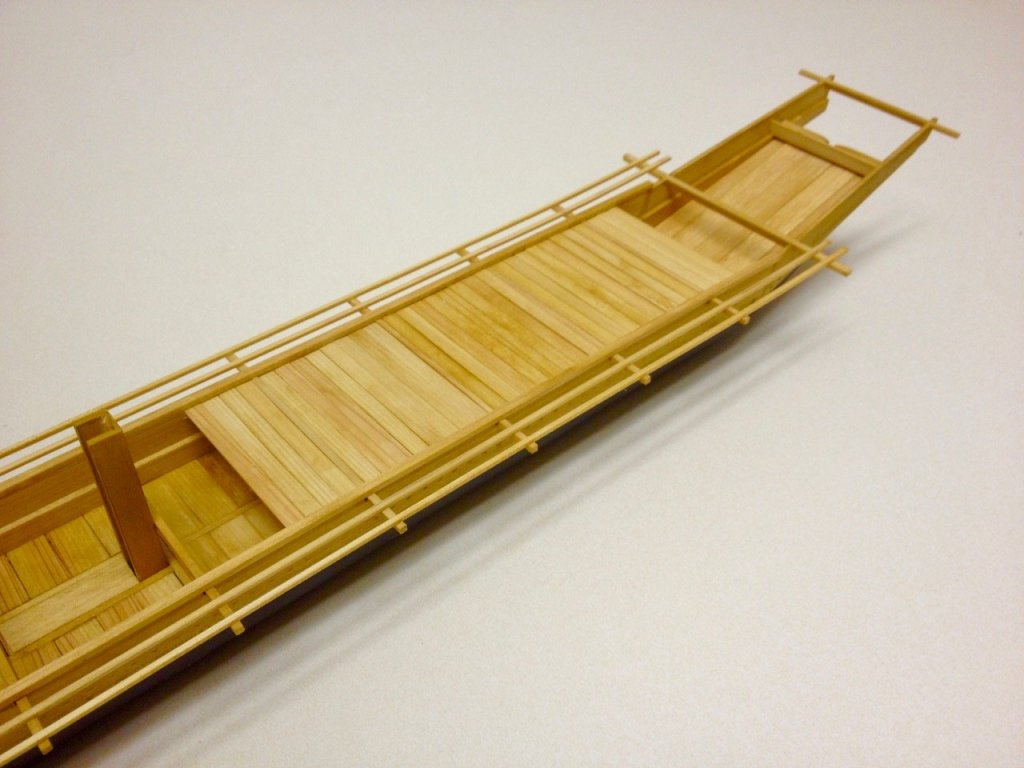
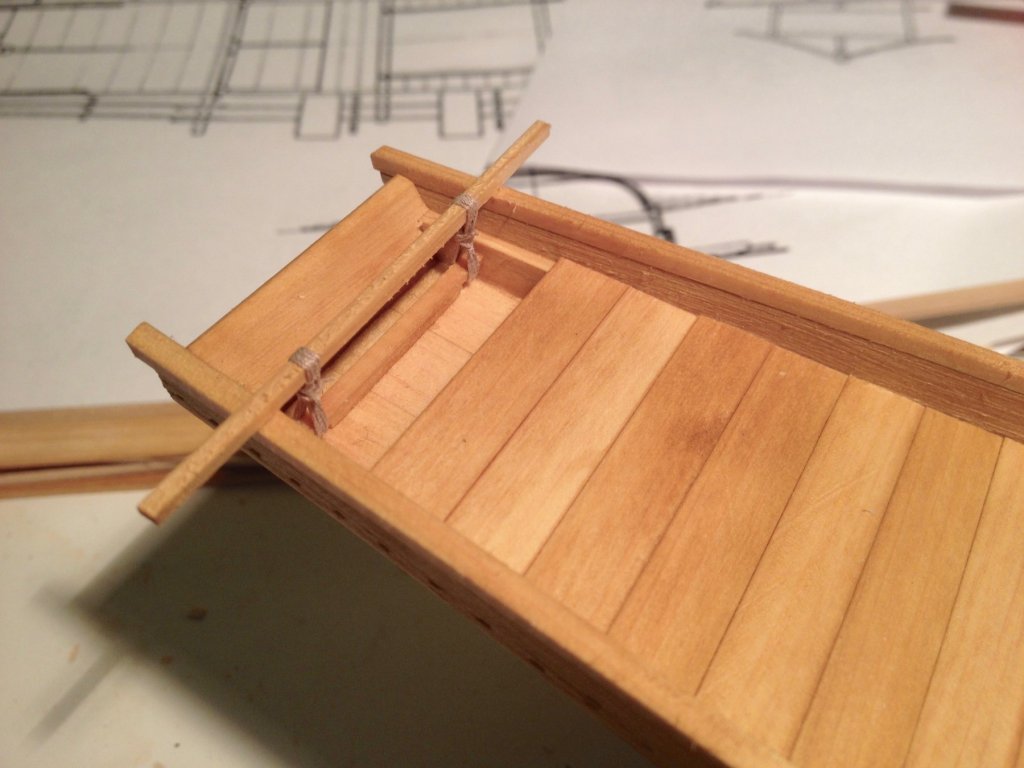
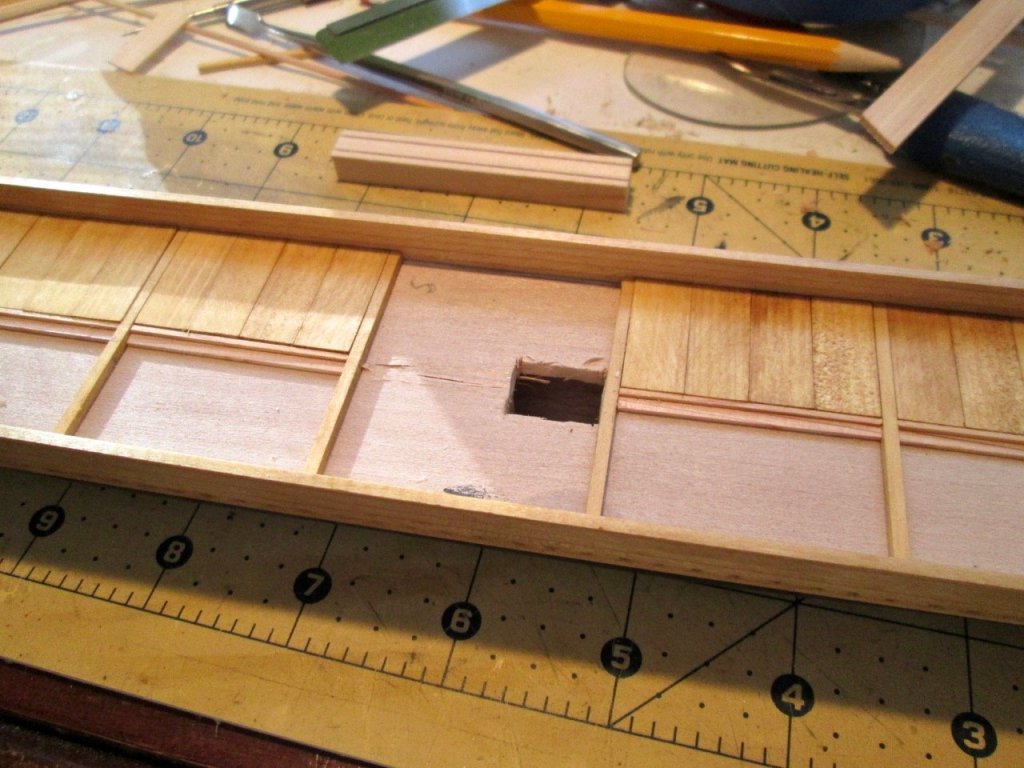
Thanks for the nice comments Carl, Druxey. Druxey, I'm giving your suggestion a try. When I looked at it last night with my eyes and not through a camera lens, I have to admit (Carl) that it's not very noticeable. Still, I added water, but this wood soaks it up like a sponge and didn't change much. I was reluctant to add any more water as I could see the area that was getting wet was growing too much. Doesn't look like the dye has been affected any. Looking at it today, it hasn't changed much. Seems that the Japanese wood is actually too hard to swell much. It is a very brittle wood unless wet. Both holes are a little smaller, and if I go over the correct hole with the "Tooig" it will probably look better. Unfortunately, the Tooig is easily misplaced, so the repair will have to wait a bit! Pressing on, the next step was to add the planking for the main deck house, or yakata. If you've looked at my other builds, you might have noticed that this is the same word as in Yakata-bune, a pleasure boat of a much later period, with a similar type of deck house. The large Umibune of the Kamakura period has a second small deckhouse at the stern for the pilot. This house is referred to as the tomo-yakata. And for those of you who are enjoying the Japanese terms, don't think for a moment that I have all these things memorized. I'm a student of wasen, or traditional Japanese boats, and I'm having to look this stuff up all the time. I laid down the raised deck for the yakata, and you'll notice that these had to fit precisely between the existing beams, or futabari. These are narrower planks than the ones on the main deck and they run the full width of the boat. To support them, I simply installed ledges along the hull planking, in between the beams, for the planks to rest on. One problem I ran across was what to do about the space under the upper deck. It seemed a little odd to just leave it open, but I had no information on whether these would be closed off or not. This is pretty much an open deck boat. The yakata, houses the passengers, but crew and some cargo would just be sitting out on the deck. If these openings were closed off, it would just be that much harder to store goods under there. The main deck planking might even be left off under this space, so as to allow for more cargo. Unfortunately, there just isn't much information available. I've seen museum models that appear to be done both ways. Above is a photo I posted earlier, but here I am focussing on the aft edge of that upper deck. This is about as good as it gets with most of the information I have. There's another photo of a similar model that looks about the same. There is clearly nothing visibly closing off this space, unless it is well recessed, and I don't see a reason it would be recessed. But then, we come to a larger model that I believe was more recently built. The above model was 1/20-scale. The model below is most likely 1/10-scale. The photo was taken early this year by my friend and fellow ship modeler, Mr. Masami Sekiguchi, who has been a tremendous help to me in my studies. This model, if I'm not mistaken, was in a gallery at Kanagawa University, which has a Japanese Cultural History department. I'd hoped to visit the gallery last year, but didn't have time. It's hard to see in this photo, but the underside of the upper deck, and also the raised deck at the bow, appear to be closed off. Of course, it's also possible that at this scale, the builder decided to do that, in part, so as not to have to speculate on the structure underneath these decks. It's actually one reason I didn't try to build my model at a larger scale: The bigger the scale, the more detail that needs to be included – details that I don't have information on. In any case, here's the completed upper deck. Also note that I've added a beam at the stern. This beam supports the outer rails, the segai, reinforces the hull planking, and serves as a place to secure the rope that will help support the weight of the rudder, or kaji. Later, a lower beam will also be added when I complete the structure at the stern. You'll note that I placed a kind of splash board on the forward edge of the ōtoko, or great beam. This was speculative, and I've actually removed it after looking at the various museum models.

.jpg.9635666575afa97bdcdffdd6ece3f90b.jpg)
-
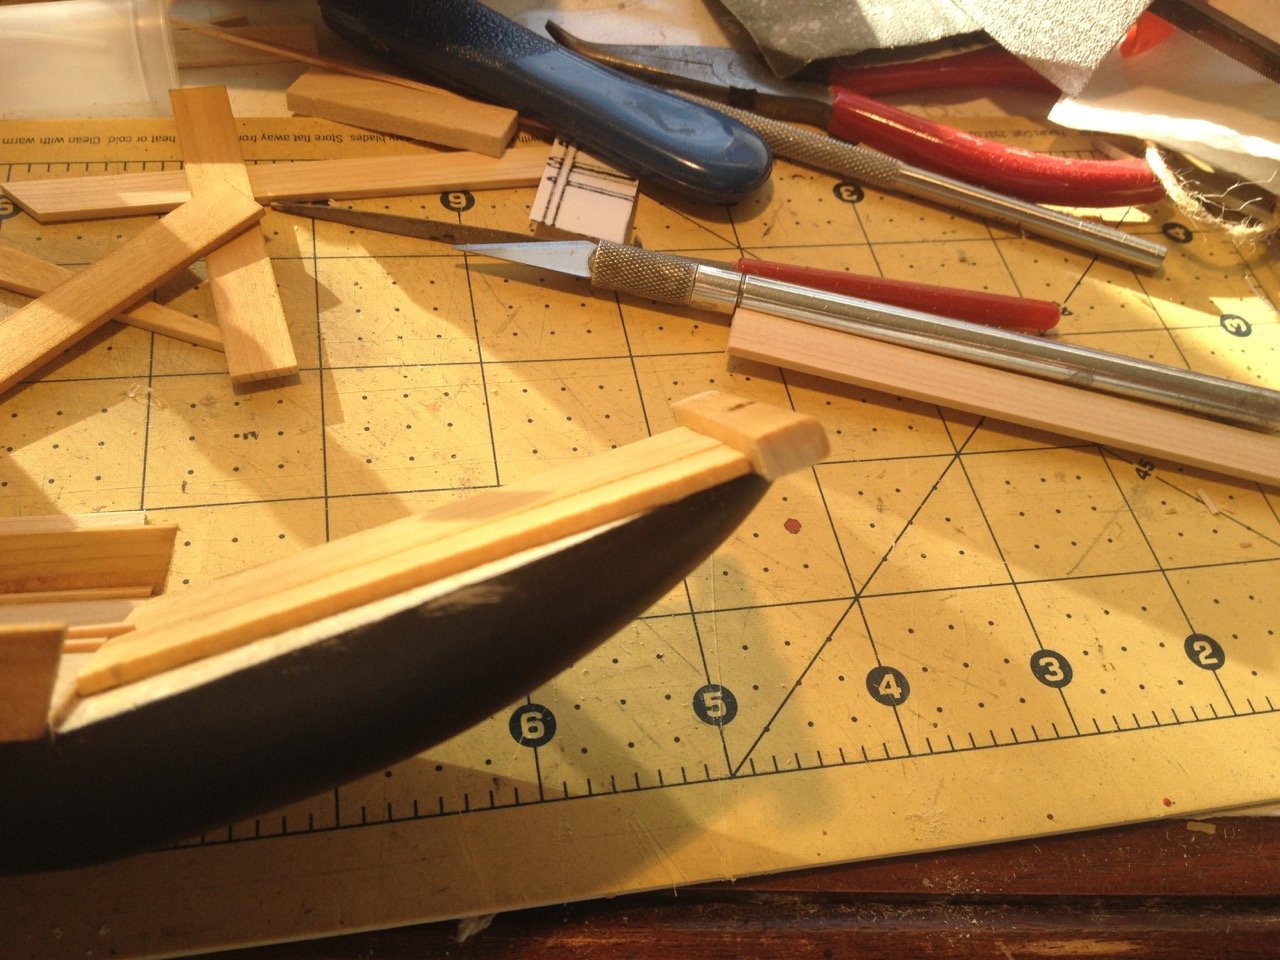
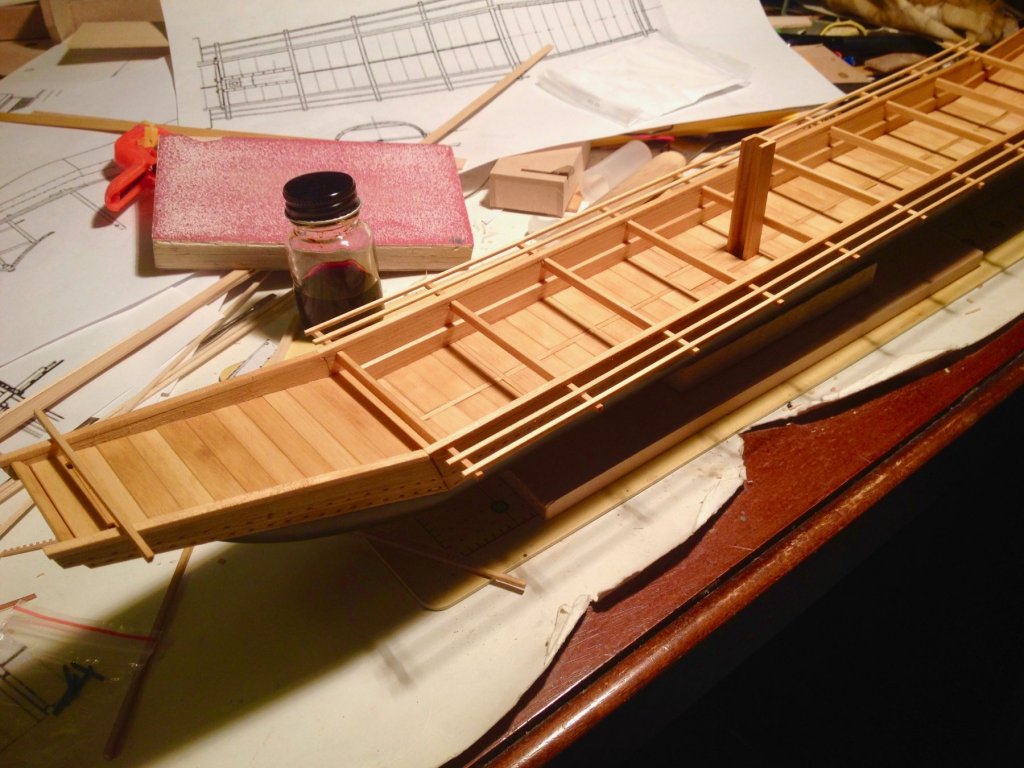
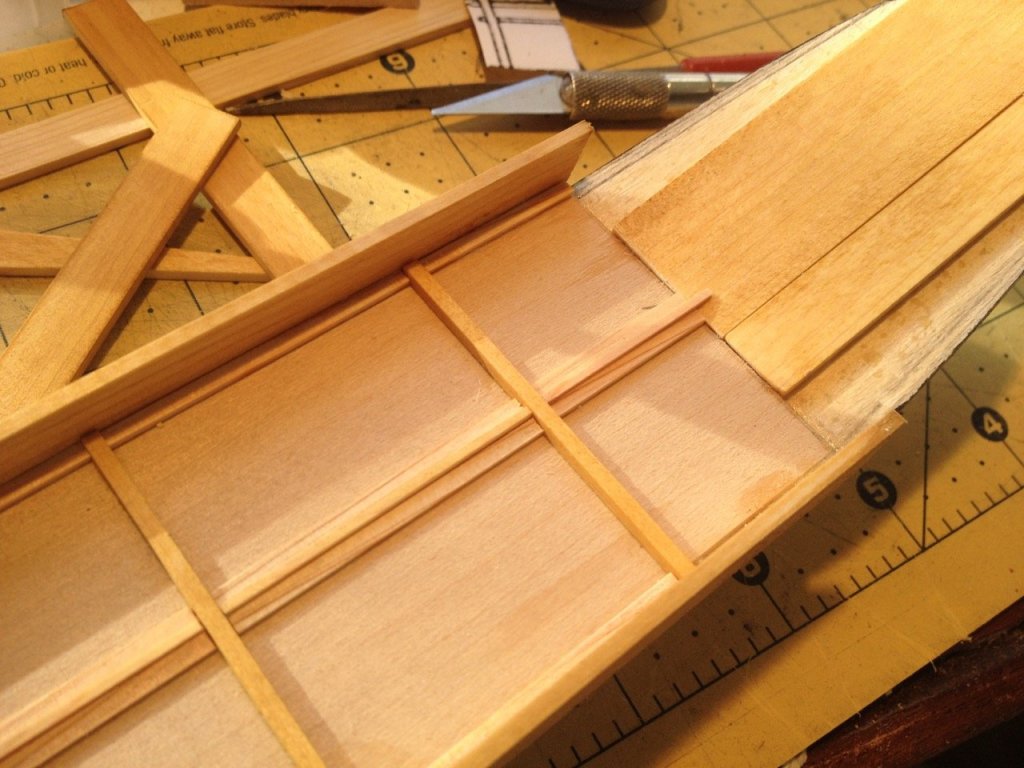
Thank you Mark, Carl. Carl, here you go: Okay, but it may be more a case of being "Shipmodeler-ese!" I didn't have any photos of it, but I used a piece of painters tape to create the line for the mortises, then I just used my mortising tool to make the impressions along the edge of the tape. The biggest problem I encounter is when I hit a hard spot in the wood that pushes aside the "tooth" of the tool. Anyway, the next step was to add the beams, or futabari, and the caprail. Japanese terms vary between regions and probably over time. On other wasen, or Japanese traditional boats, the caprail is called the uwakoberi. By the way, I learned recently that of the log hull, the bow section is called the omotegawara, the main hull section is called the dōgawara and the stern section is called the tomogawara. Kawara is a common term for the bottom of a boat. In the above photo, you can see the bottle of wood dye I've been using. If I didn't dye the wood, the model would have a similar color to that of untreated basswood. In any case, with the beams in place, I then added the outboard rails, which are called segai. On the real ship, these were tied down to the beams, so that's a detail yet to come. One thing that bothered me about some of the museum models I've seen is that the stay for the mast is attached to that beam at the bow. The problem is that I don't see any way that the beam could be securely fastened to the hull. So, I decided to employ a method used in other later boats, which was to tie the beam down to another beam which is mortised into the hull planking. Below is a photo I took of one of the replica Hacchoro boats at the port of Yaizu last Fall. You can see how a beam is tied down. It can be untied and removed when not in use, etc. I took the same idea and applied it to this bow beam on the umibune. The photo above shows the beam tied down into place. I temporarily removed the deck planks here. I also notched them to allow for the passing through of the rope. This would, of course, necessitate the ability to remove the deck planks as needed, but removable deck planks is a common feature of traditional Japanese boats. The only thing is that if that's the case, some of the planks should probably have a finger hole to allow one to more easily pull up the planks. Also, certainly on Edo period boats (400 or more years later), a pattern was commonly cut into the surface of planks like this to make it visually easier to identify which plank goes where. I haven't seen the feature or the finger holes on any of the museum models, so I'm not incorporating them here – the builders probably know something about these that I don't!

-
New Member from Sunny Southern California.
catopower replied to ruben_dominguez's topic in New member Introductions
Hi Ruben, Have you looked into the Ship Modelers' Association that meets in Fullerton? I don't think they're terribly far from you and there's a lot of great talent there. I recommend making one of their meetings. I maintain a membership with the group, but I live in Northern California, so I've never made one of their meetings. Together with this site, I think you'll get lots of good help and inspiration on on your ship model project. You can find their website at http://shipmodelersassociation.org. Clare -
Next step was actually very simple, which was to add the upper planks to the hull. These were notched where necessary for the support beams, called futabari. I created the simulated mortises on the planks and then glued the central plank into place, slightly overlapping the lower plank. On the real ship, I suspect this was actually made up of separate lengths, fastened together end-to-end in some way. As you can see, I had a little trouble with the alignment of the mortises in the upper bow plank. I may try to fix this later.


-
Hi Druxey, it's easy when you have a Tooig!
-
Don't know why I kept calling you Mark, maybe because you posted a note to Mark at the end of one of your posts and I wasn't paying attention and thought it was your signature(?). Anyway, yeah, I heard back on my query to Emilio Marletti. I believe he's the president of the company. Apparently the PE sheets for the ME version of the kit were laid out completely differently. It's not that the parts were different, but he has to figure out which parts you mean exactly, so he knows which sheet or sheets you need. Things get re-engineered for efficient production, so it's quite possible hooks are on a sheet that's also used for other kits now. I was trying to figure a way to show him the right parts, but it sounds like you already took care of it. I'm sure he'll figure it out from there.
-
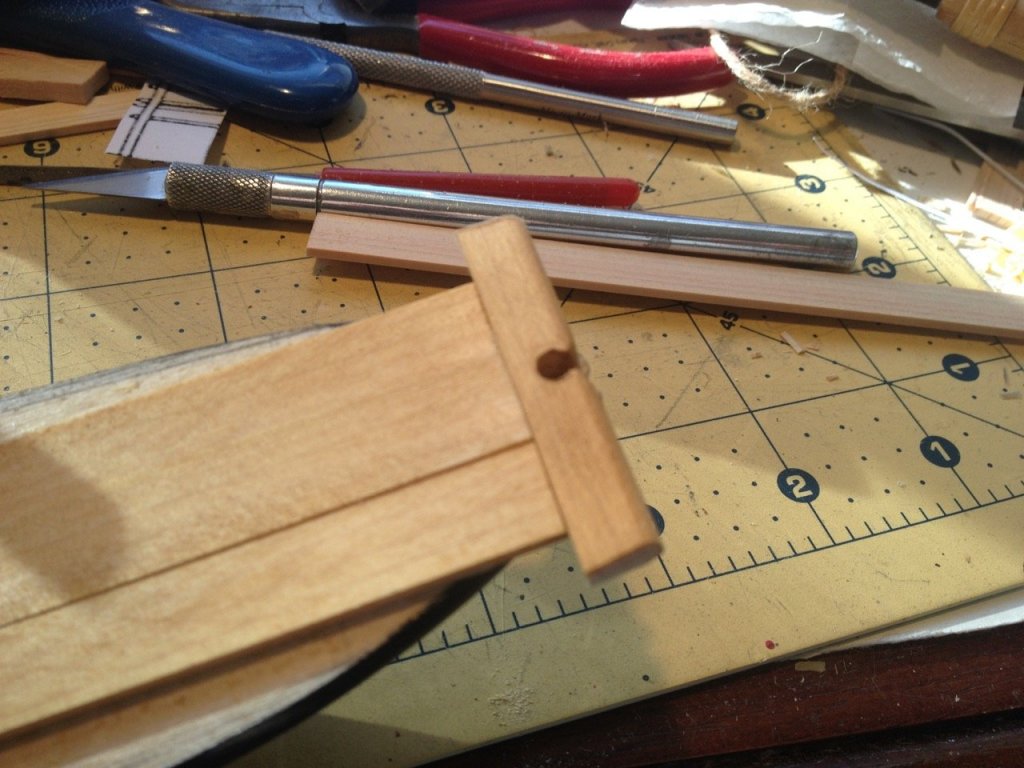
Before going any further on the deck planking, it was necessary to cut an opening in my false deck for the mast. I haven’t decided if the mast will be mounted in a raised position with a sail flying or if it will be shown lowered as shown in the plan drawing. The mast itself is similar to one from Woody Joe’s Higaki-kaisen kit. I have no way of knowing how accurate this is, but it is based on the drawings and on museum models. Basically, it’s a square cross-section mast that is thick at the base and tapers slightly towards the top. At the very top, it's cut for a pair of sheaves. Again, I have no access to information on the historical use of sheaves or blocks by the Japanese. One gentleman in Japan who was connected with a group that operates a modern replica boat had commented to me that the blocks on the replica (17th century boat) were modern and that the Japanese didn’t use blocks back then. Of course, I could have mis-understood him. Still, it was enough to make me think about the need for some historical information on simple technologies like these. As you can see, I started the deck planking at the same time. Below is the piece for the mast. I cut two slot using the table saw and chiseled out the center. I cut a mast support and the finished shaping the mast to fit it. At the bottom end of the support, I glued a wooden base, notched for a tennon in the end of the mast that would help lock it into place when erected. The support assembly was glued to the bottom of the hull, and planking of the deck was then completed. On a replica of a 17th century fishing boat, the single plank directly in front of the mast was notched to completely cover the opening in the deck. This would be replaced with a second plank, cut to leave an opening for the mast, when stepped.


-
Thanks Druxey, it's a... Jool! (sounded better than a Tig)
-
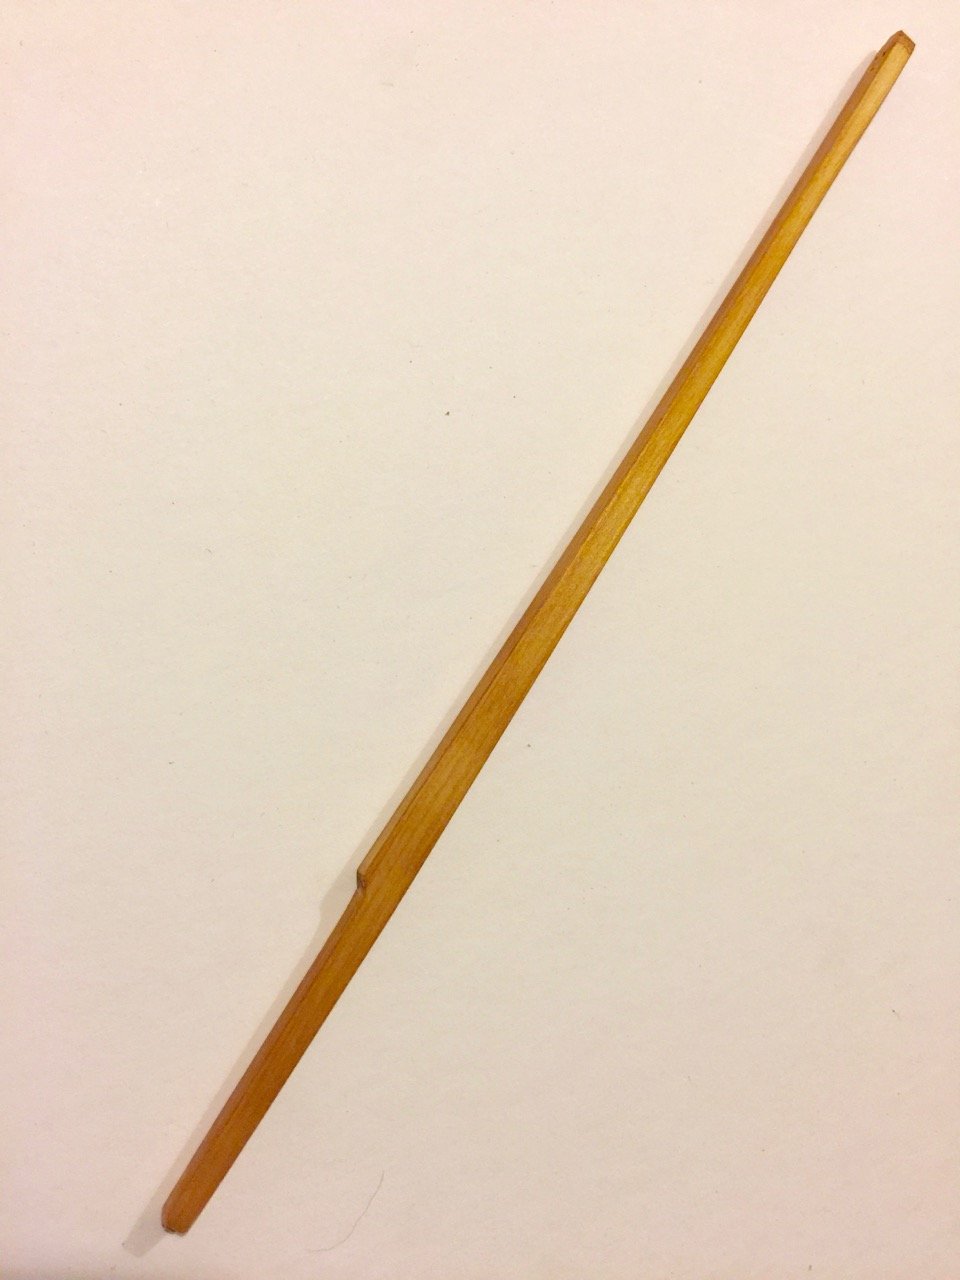
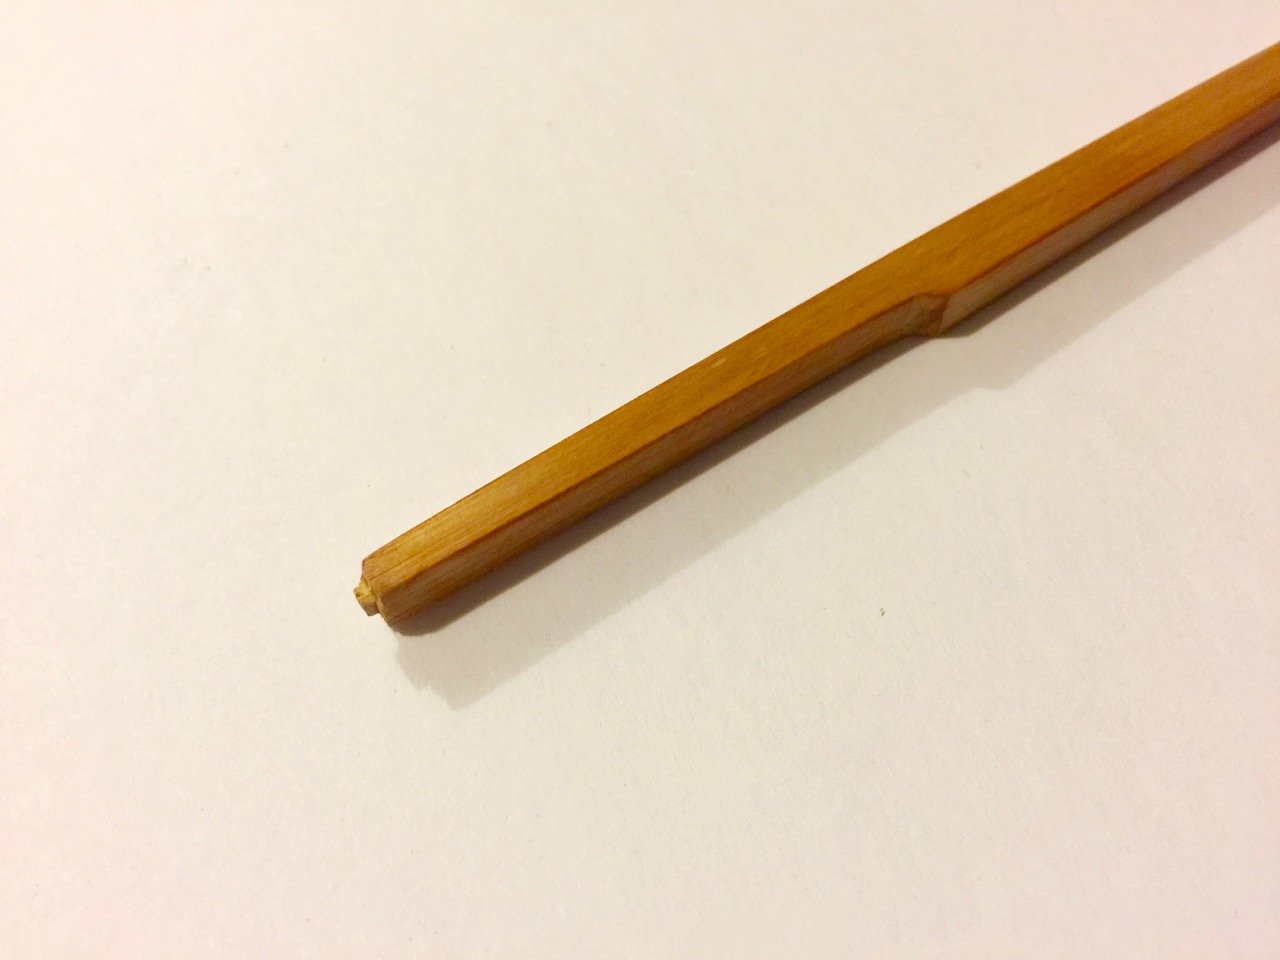
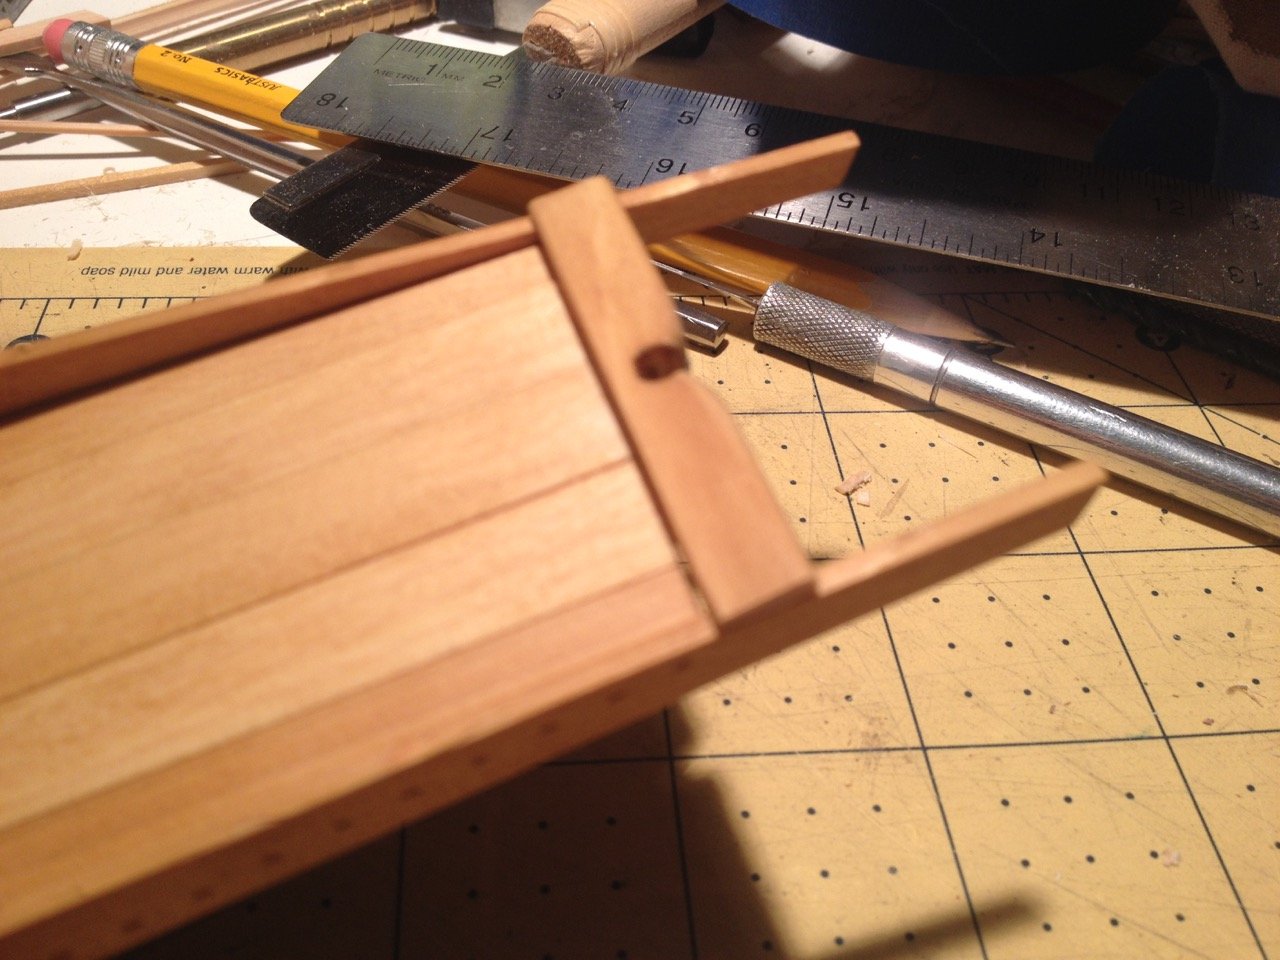
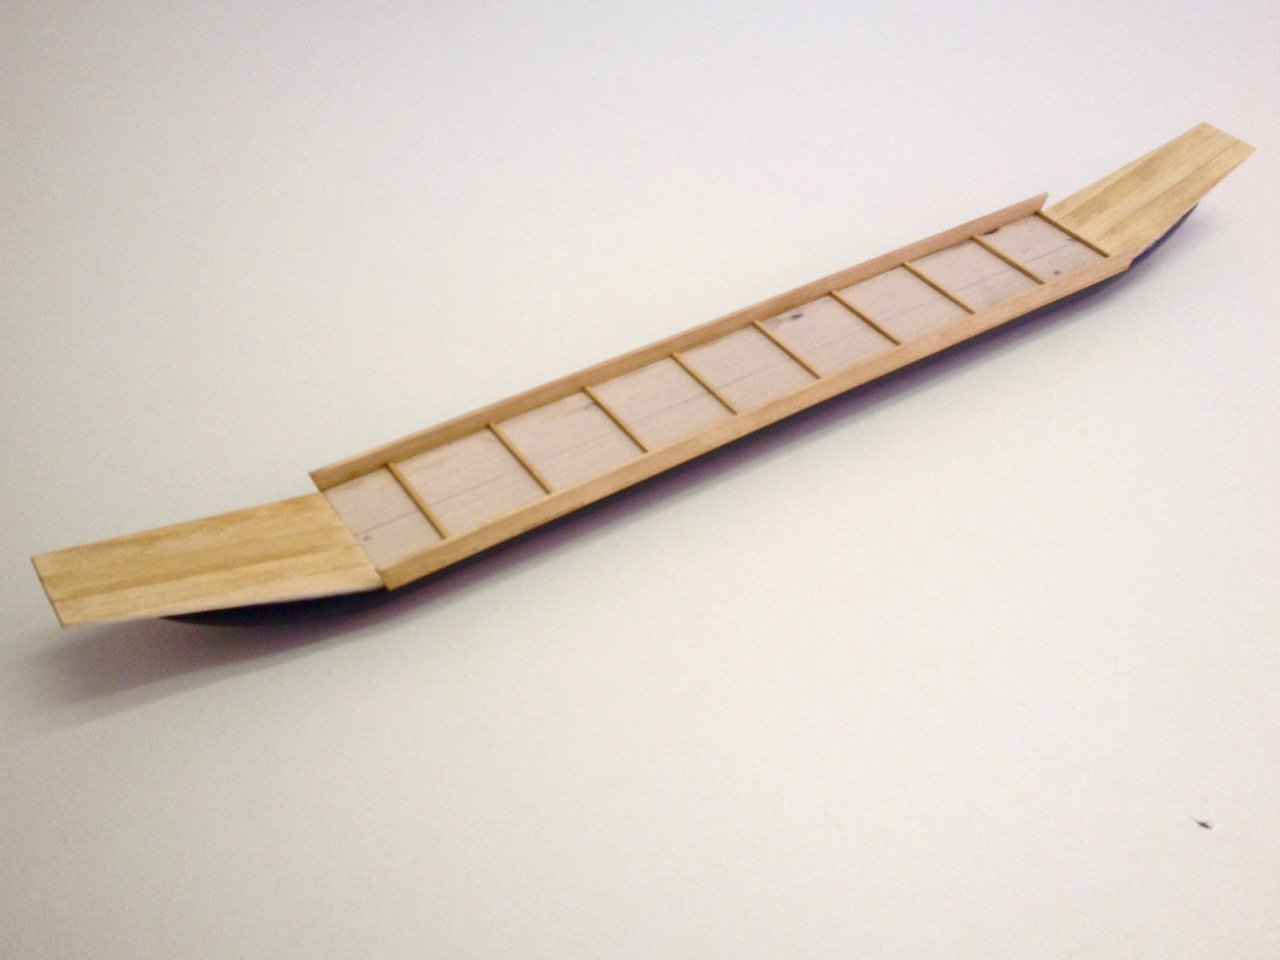
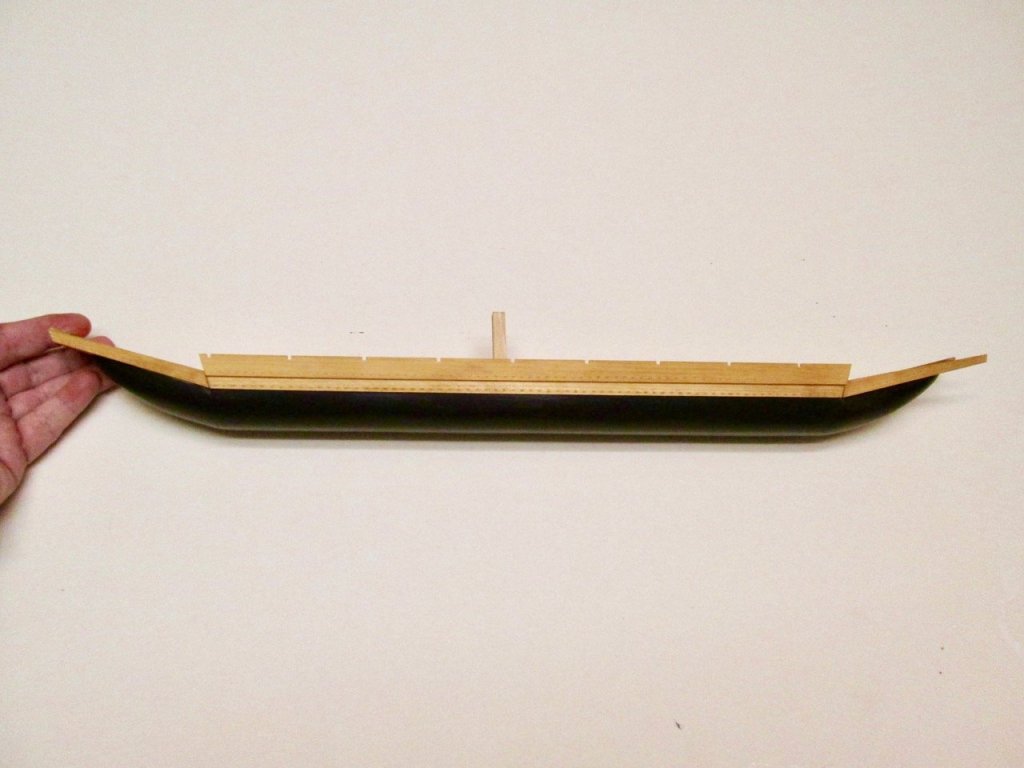
The completion of the first of the hull planking gave me a little more confidence to press ahead on the model. There is still much that is unknown at this point, but I’m hoping that some of those details will work themselves out over time. I made platforms at each end of the hull, but realized that the stern platform does not extend all the way to the end of the hull planking. It should stop short, forming something of a “well” for the rudder. In addition, there is the matter of the “great beam”. This is a feature that exists on every type of Japanese boat I’ve seen which has a rudder. There are many regional terms for parts of boats, but this one seems to be universally referred to as the Ootoko (Oh-toko). This is generally the heaviest beam on the ship, and it is notched for the rudder post to pass through. Since the rudders on traditional Japanese watercraft didn’t use gudgeons and pintles, this beam provided the leverage needed holding the rudder against waves, and allowing large rudders to act as keels when under sail. I initially made an otoko and mounted it into place, but later realized that it really needed to be notched to better fit the hull planking. Also, because the ootoko appears to be directly over the aft hull section (the carved block), I found it necessary to notch the end of the carved block. I don’t know that this would be correct, but it was necessary for the way I built this model. While working on the ootoko, I also decided to add the centerline beams for the deck. Based on work I’d done on other Japanese traditional boat models, I knew that the beam had to be cut into sections and fastened between the transverse beams. Also, the centerline beams had to have ledges onto which the deck planks would rest. Similarly, I needed to add a ledge around the edge of the hull. These were all made with 1mm thick hinoki. After I laid out these remaining deck beams, I went back and added the first hull planks at each of the ends of the ship. That's when I discovered that I needed to modify the ootoko. In general, I was very happy with the ootoko I originally made, but it just needed to be better, so I made a second one. The second one was longer and notched so that it fit over the first hull planks. Apologies for the blurry photography. Hopefully, you get the idea. Note how the mortises on the hull planks of the stern platform rise up, as they would have to have been nailed to the deck planks here.


-
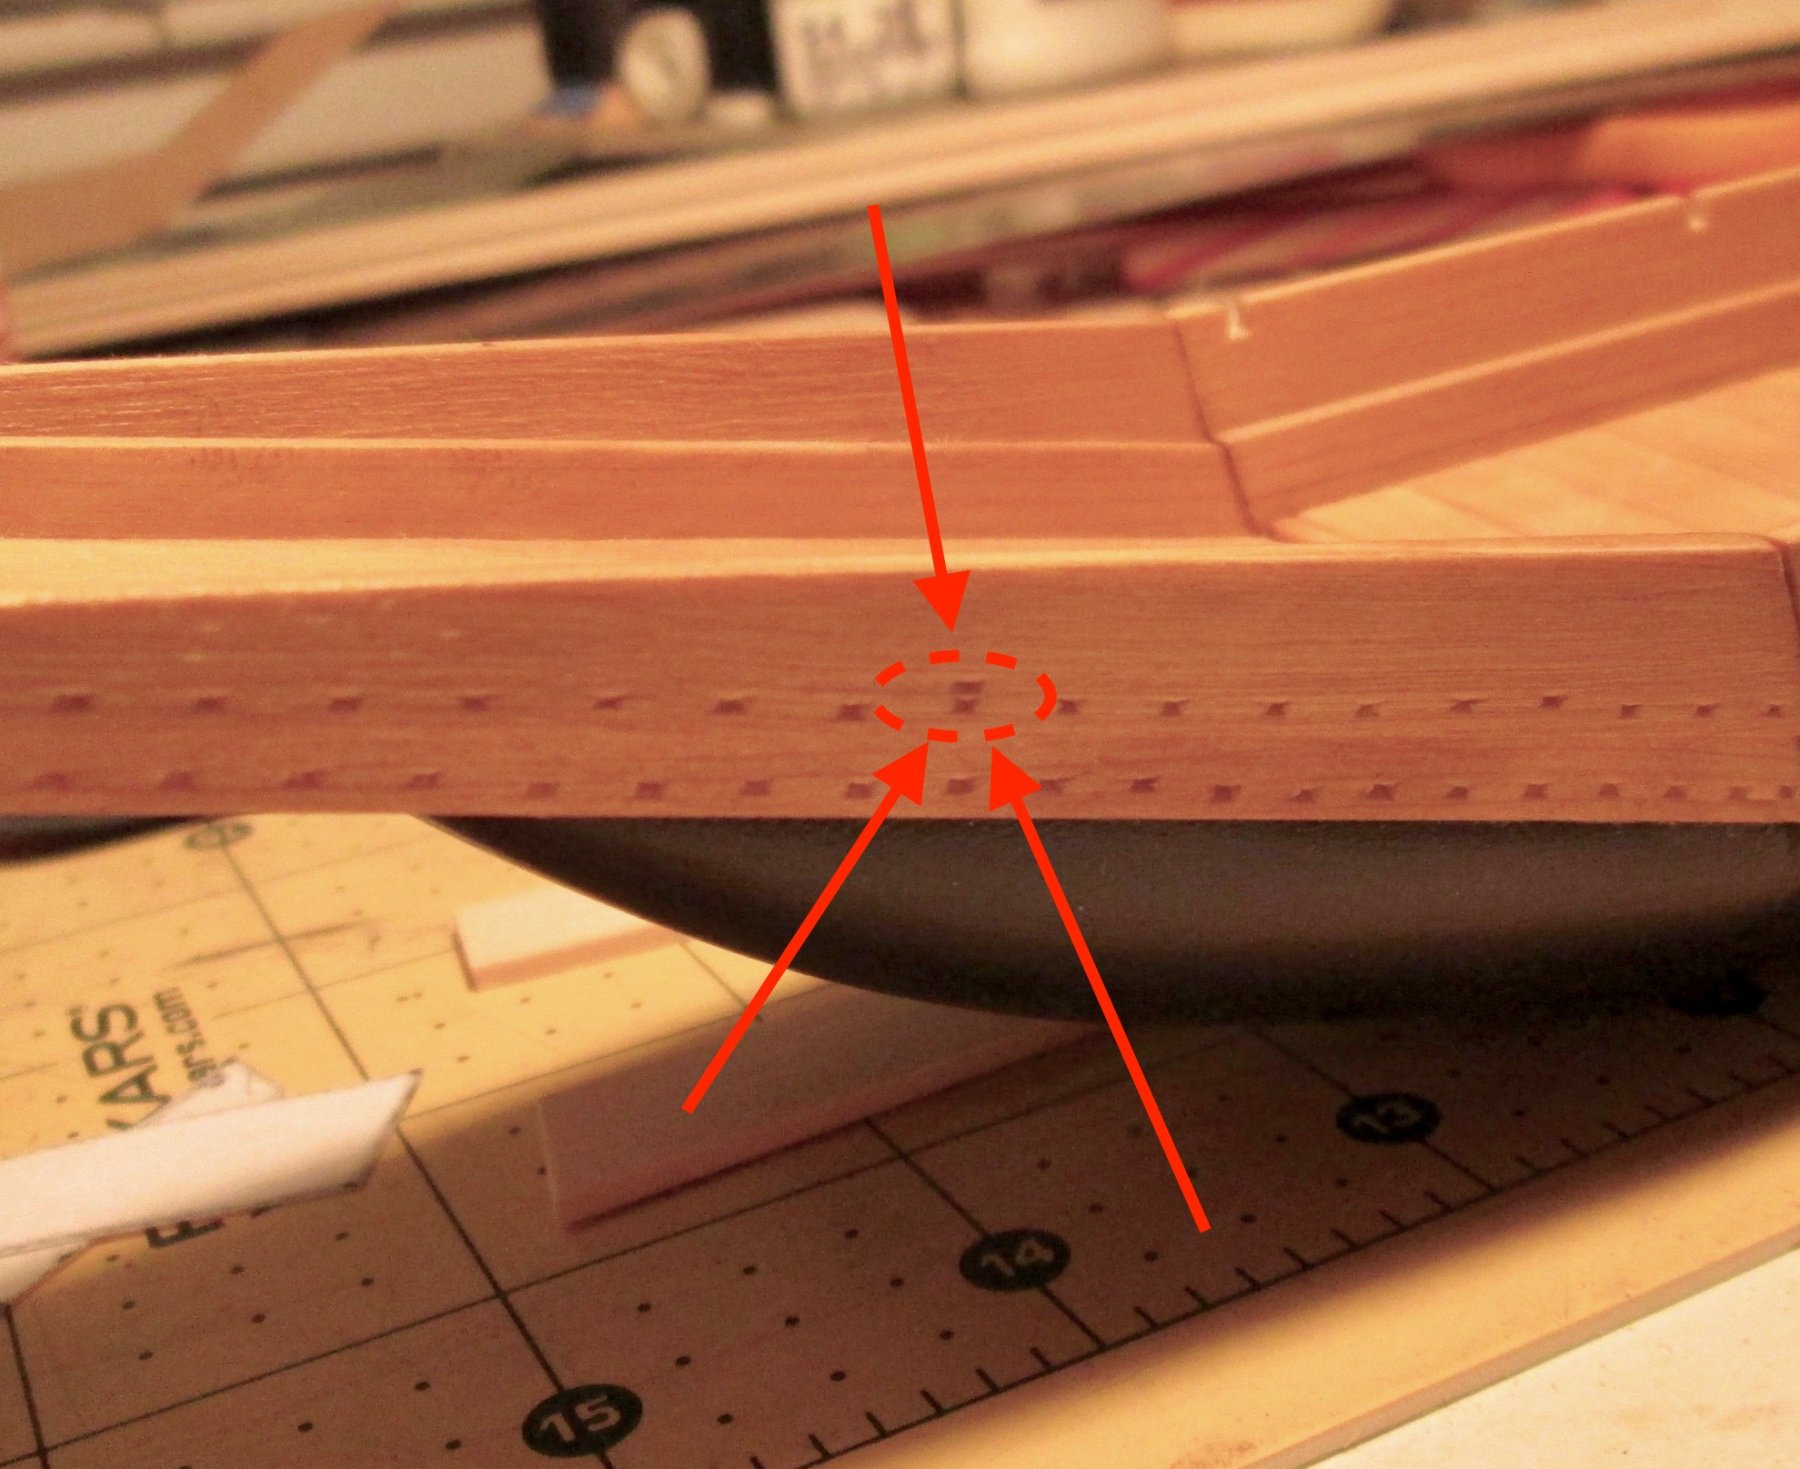
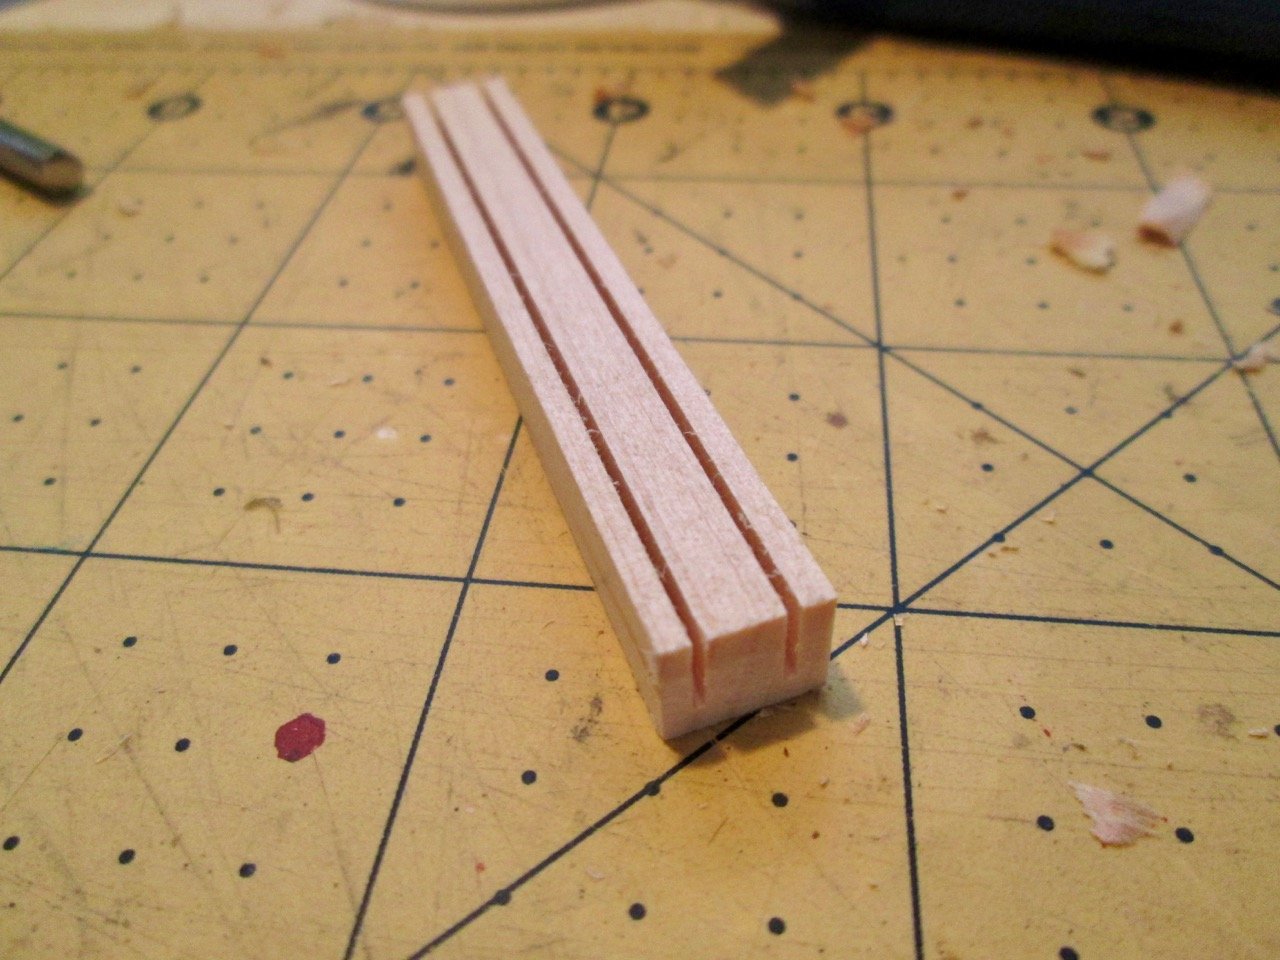
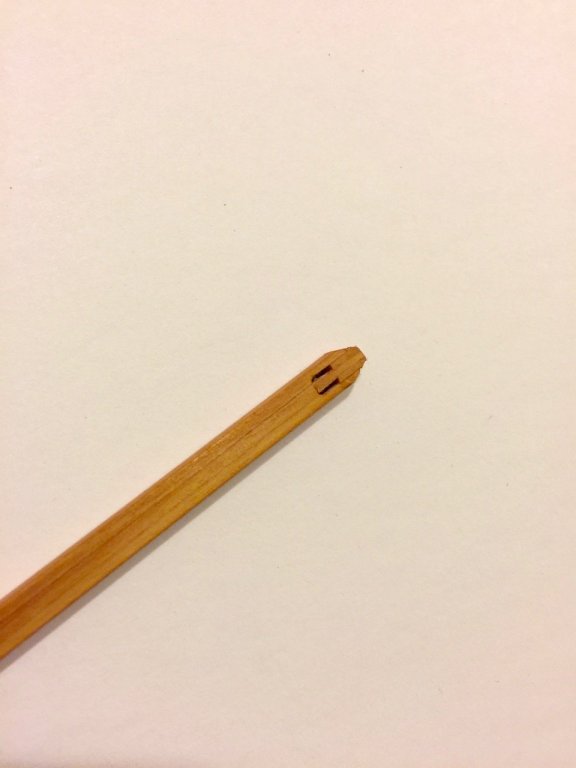
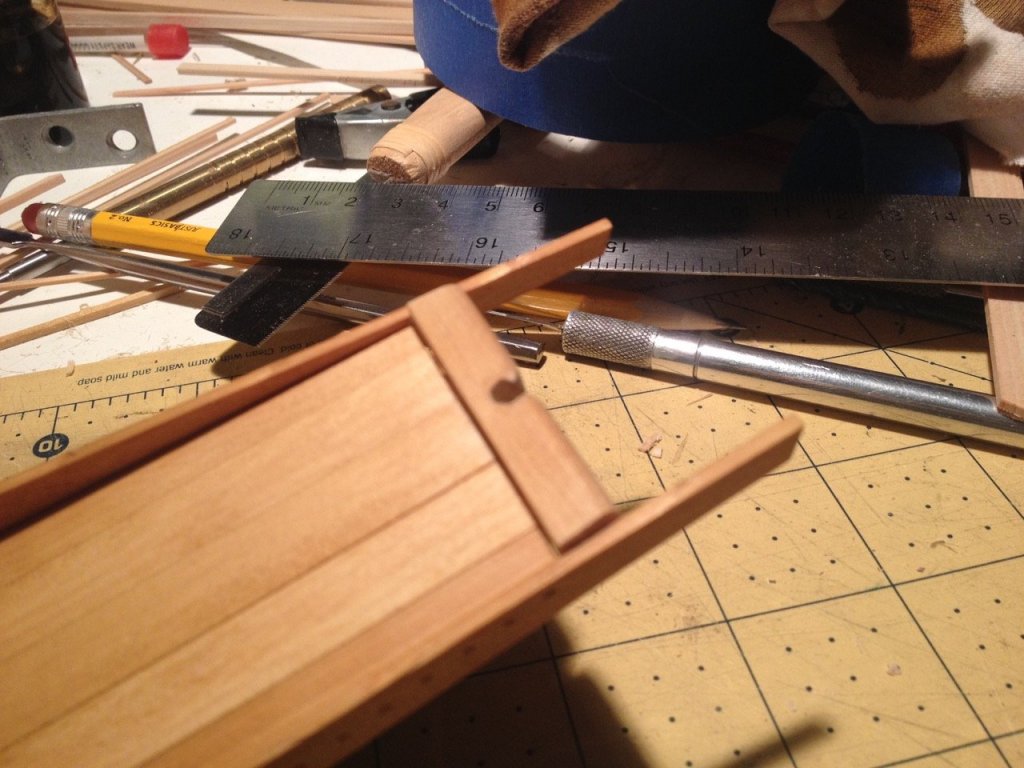
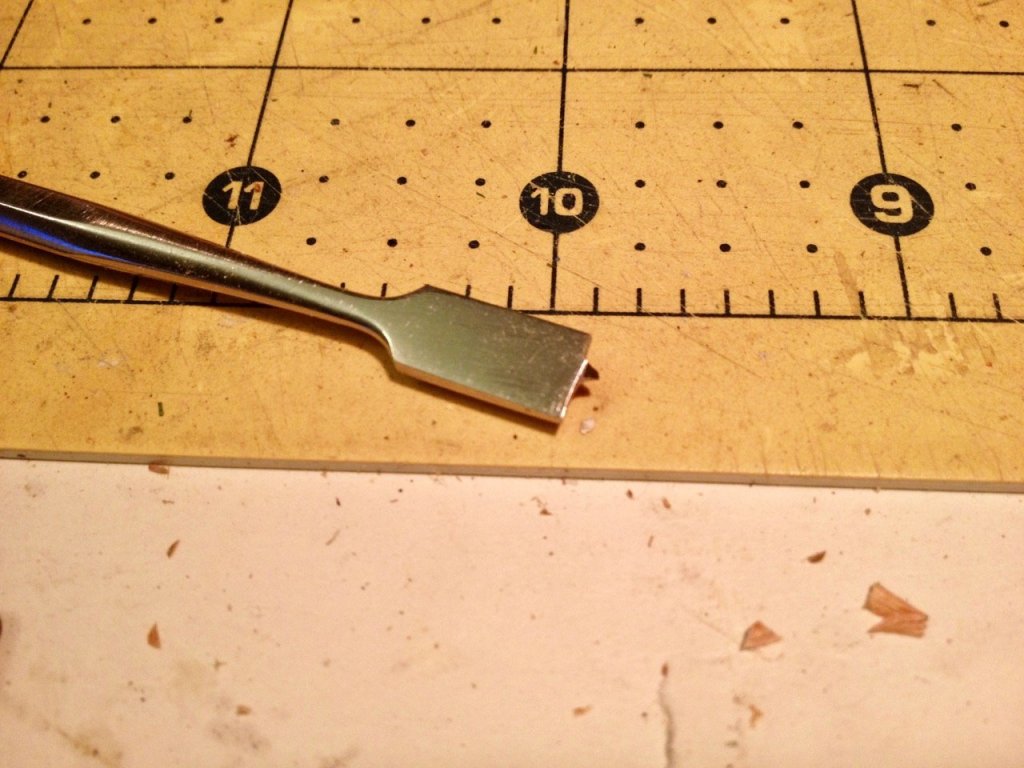
The next item to deal with is the main deck. To begin with, I installed beams directly on the hull. These are 2mm square stock hinoki wood. Of course, the real vessel would have a hollowed out hull, but this works out just fine. Most references I could find seem to suggest that beams on Japanese boats are lined up with those above or below them. This makes sense as you want to be able to load cargo without having to deal with beams getting in the way. So, beam placement was easy. With the beams in place, I measured out the spacing for the planks and cut some 1mm thick hinoki strips that I had on hand. They had to be trimmed slightly so that an even number would fit between each beam. In the meantime, I was anxious to get to the hull planking, so I cut some strip stock to fit. As the planks are simple straight pieces, I could use the plans as a direct pattern. The main reason I was anxious to work on the hull planks was to try out a method of simulating the mortises in the wood for the edge-fastening nails. Some time ago, someone gave me a set of stainless steel chisels that I found to be absolutely useless for anything I tried to use them for. Somewhere along the line, I got the idea that I could grind them down to something I could actually use. I decided to buy myself a cheap little bench top grinder, and I made a tool for making mortises in the soft hinoki wood. By pressing the tool lightly into the wood, a rectangular impression could be made. Of course, at this scale, it’s really more of a small slot in the wood. I had originally attempted to grind the “tooth” so that it was centered. That obviously didn’t happen. Then, I realized that I could work this to my advantage. The distance from one edge to the “tooth” was about the spacing I wanted between mortises. So, I used the width of the tool as a visual guide for spacing the mortises. On the real boat, mortises would be cut in the wood and a pilot hole would be made to line up with a similar pilot hole in the edge of the log hull. Then, flat iron nails would be pounded into place. It’s possible that these were made to drive all the way through the log hull, where they might have then bent over and pounded into the wood on the inside of the hull to give them a more secured hold, but I have no evidence of this. In the case of my model, it doesn’t matter, as the inside is not visible, and the presence of the nailing is only represented by the mortises made with the new tool which, by the way, made short work of it.


-
Hi jct, yeah, Shipyard has changed their online store policies a couple times. Roger at Ages of Sail doesn't want to carry more fittings than he already does, so he hasn't been interested in carrying the paper blocks from Shipyard. Paper ship models are still a niche market in a niche market (ship models) in the US, and Shipyard doesn't really understand why Ages of Sail isn't selling more stuff. I think they may be doing this on purpose to get Ages of Sail to buy more stuff and carry the blocks. But, that's just my theory. All i I know is that when Roger put in an order, he gets maybe $8000 worth of product (retail value) at a time. They probably really like that and so they keep bugging him to order. They even bug me about it now, since I help out Ages of Sail with some things. Long winded way to say, I don't know. Might help if people wrote to Ages of Sail asking them to carry the paper blocks. You can also do what I did and just use wooden blocks. Or, if you really want paper, check Cornwall. I think they started selling some Shipyard stuff.
-
Mark, I just got a verification from someone who handles Amati's social media that the offices are closed until the beginning of September, though he said someone might be there a few days earlier. So, it might be a while before you can get any help on this. I did send a message to them about the PE sheet. But, it will probably go unread until then.
-
Hi Mark, Problem may be that a lot of Italian companies close for an extended Summer holiday in July and August. I'll look into it.
-
Things happen... Congratulations on getting these Mamoli kits out! They were sorely missed.
-
Daniel, I notice, and spot checked a few of these kit images on your website, that your kits indicate that they have Pre-carved hulls now. Is this an artwork mistake? Or is this a major product shift?
-
Hi Kurt, Sounds like you've got it pretty well covered. The clinker planking is already laser cut and I doubt that you'll find it difficult at all. I built Shipyard's HMS Alert paper model, which had clinker planks pre-designed in a similar fashion and found it to be quite easy. Much easier, in fact, than carvel-built planking. The Le Cerf monograph is great, I have a copy myself, but it just makes me want to try to scratch build the thing! I love how the deck in the Dusek kit is already laser cut for you in pear wood so that the planks follow the curve of the hull. Not only does it simplify a difficult to build feature, it makes short work of the deck planking too. I suspect that between the laser-cut deck, and laser-cut clinker planking, you will find this to be a very quick build.
-
Hi Mich, you know Amati's a sponsor of MSW, so you can just click on their banner on the front page and go to "Where we are" under their Contacts tab, that has the phone and email. But, you said you contacted their distributor here and didn't get a positive response, do you mean Ages of Sail? And what wasn't a positive response? I help out Ages of Sail with various things, so I can ask about it. Normally they can order the entire PE set as a special order, but obviously, you just need the missing sheet. The only issue I see might be if the sheets have changed. Usually, things can be special ordered, but it can take a really long time. I'll ask about this.
-
Hi Kurt, Funny you should mention it. I have the kit right here as I was going to do a little slide show or video of the contents of the kit for Ages of Sail, which carries the kit. I think it's oddly overlooked by the general ship modeling community. The standard kit, like other Dusek kits, uses resin castings for the cannons, and that's the only downside I see to it, as I prefer nicely turned brass. Probably something Chuck sells might work. What I really love about the kit is that it's one of the few non-Viking ship model kits that features clinker built planking. I've been planning on taking some photos and I can post them here for you in the next couple days.
.jpg.057360cfd0c4a517ddb30e81b5249914.jpg)