catopower
-
Posts
1,900 -
Joined
-
Last visited
Content Type
Profiles
Forums
Gallery
Events
Everything posted by catopower
-
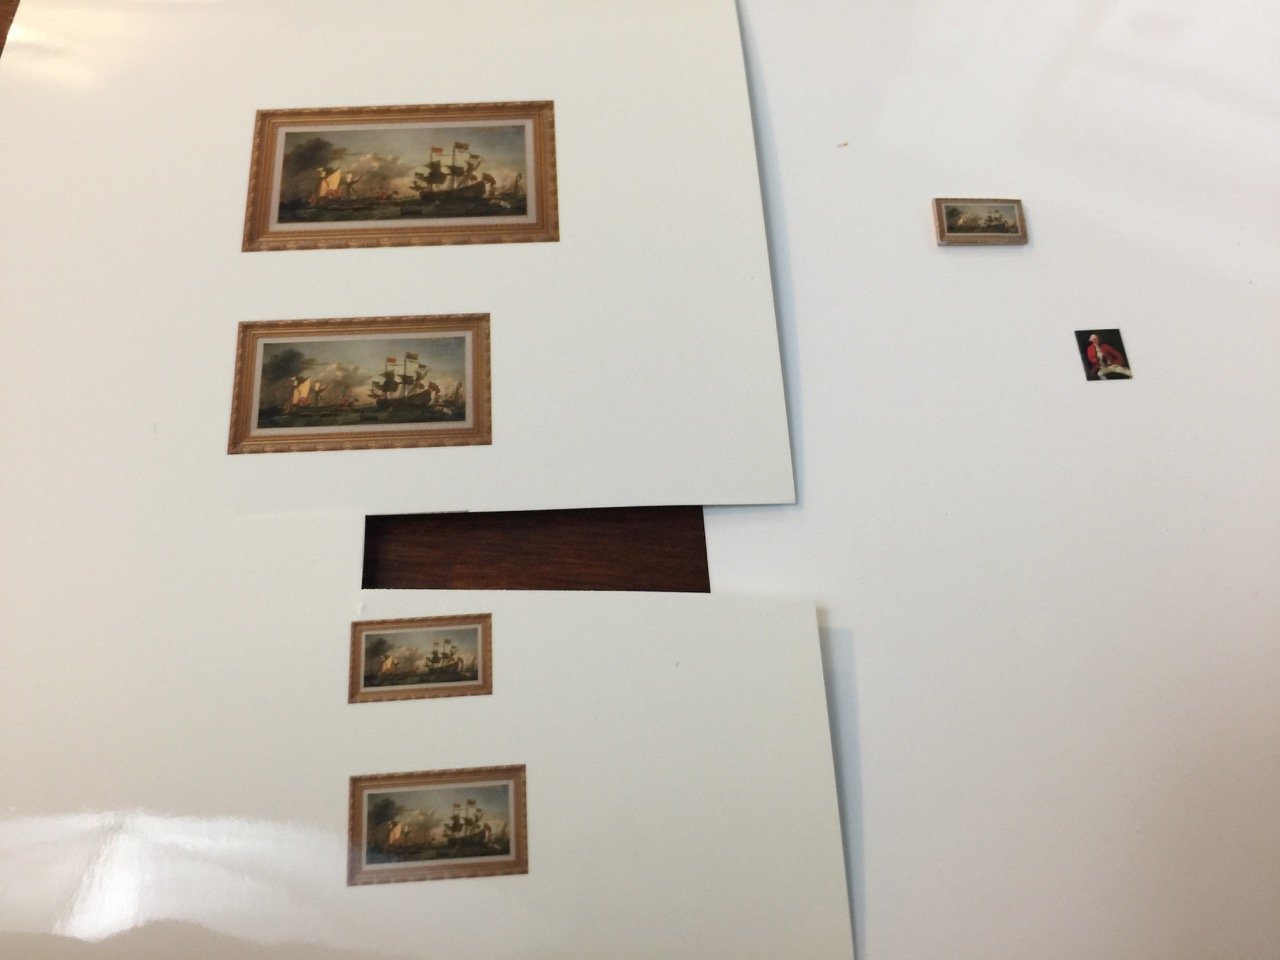
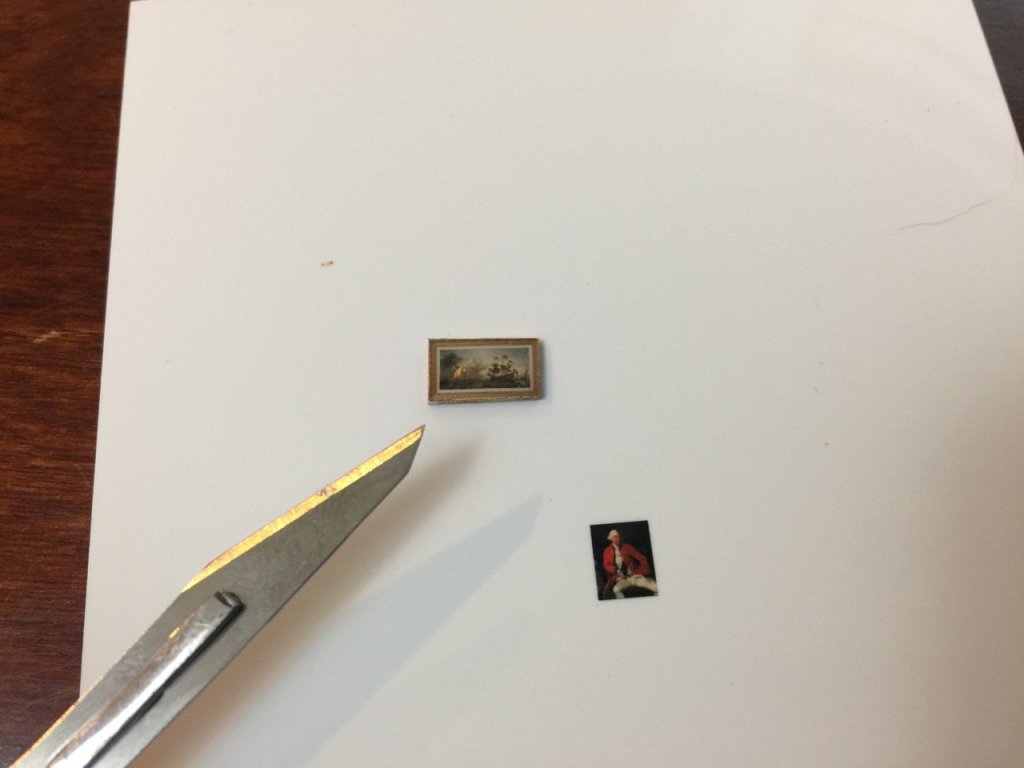
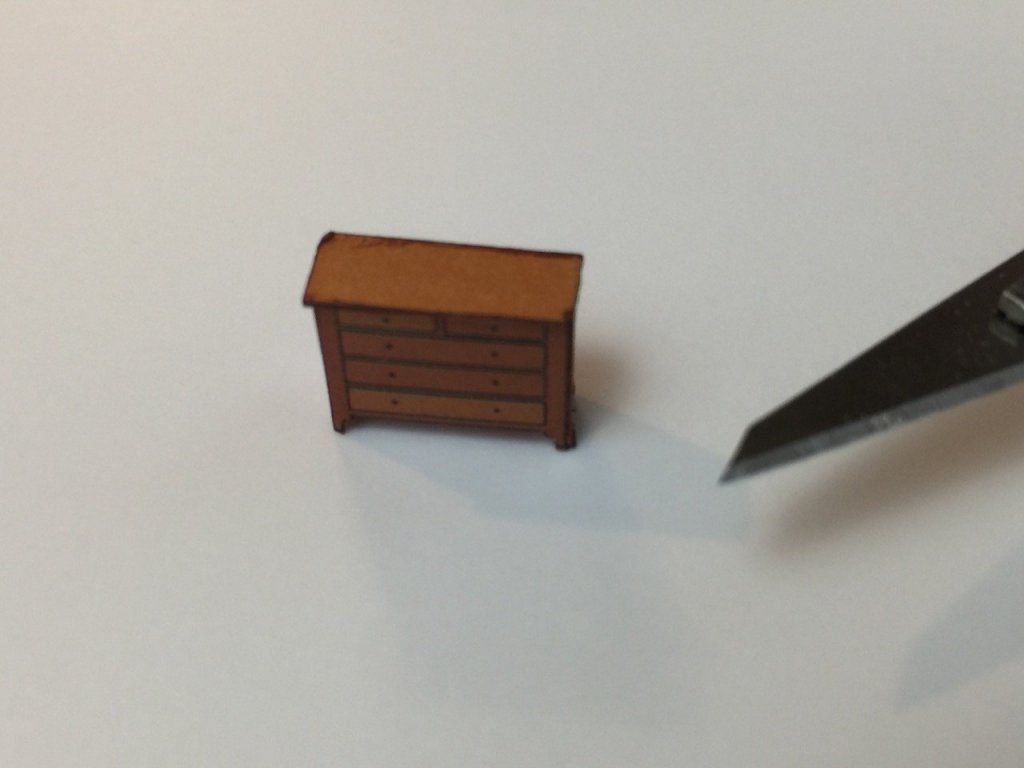
 Okay, here's a very brief update again. I don't know why it's so easy to get sucked into a paper project, but it is... About a week or so ago, I made this chest of drawers for the Captain's day cabin. The kit photos showed a couple items sitting atop, and I'm contemplating a rolled up map, maybe a book. Yeah, it gets addictive. Just today, I set it into place to see how it would look and above it, on the partition wall, was an empty space, and I thought "That would be a great place to hang a painting". Next thing I know, I'm on the Internet looking for paintings appropriate to a British ship of 1778 or later. I hunted down a Willem Van de Velde the Younger, Royal visit to the fleet in the Thames Estuary, 6 June 1672. I also found a nice portrait of King George III, but settled on the former. I found a site that sold framed artwork that allowed you to see what the painting would look like with a choice of frames. I figured that tastes were more toward what we would consider gaudy. So, I did a screen grab. I probably should have photoshopped out the matte, but didn't think of it. I don't know if I really care, though I might if people could really see the painting clearly. The pic in the screen grab had a watermark, so I used photoshop to overlay another image I found that didn't have one, then proceeded to size it appropriately. A put a few different sizes on a small piece of photo paper, which I printed on my inkjet. Now, if I had been more ambitious, I might have also built up the frame a bit, so it didn't look so two dimensional. But, I did laminate the print to card stock to make it thicker. I also edged this with a gold paint pen. If I'm not happy with this when I go to install it, I do have a somewhat larger image I printed earlier without a frame. I could always build up a frame and use that instead. Anyway, it was yet another fun distraction.
- 82 replies
-
- 12
-

-
Thank you Pav. This is the easy part, I think. But, I'll gladly accept any compliments I can get!
- 106 replies
-
- 2
-
-
- digital navy
- v108
- (and 3 more)
-
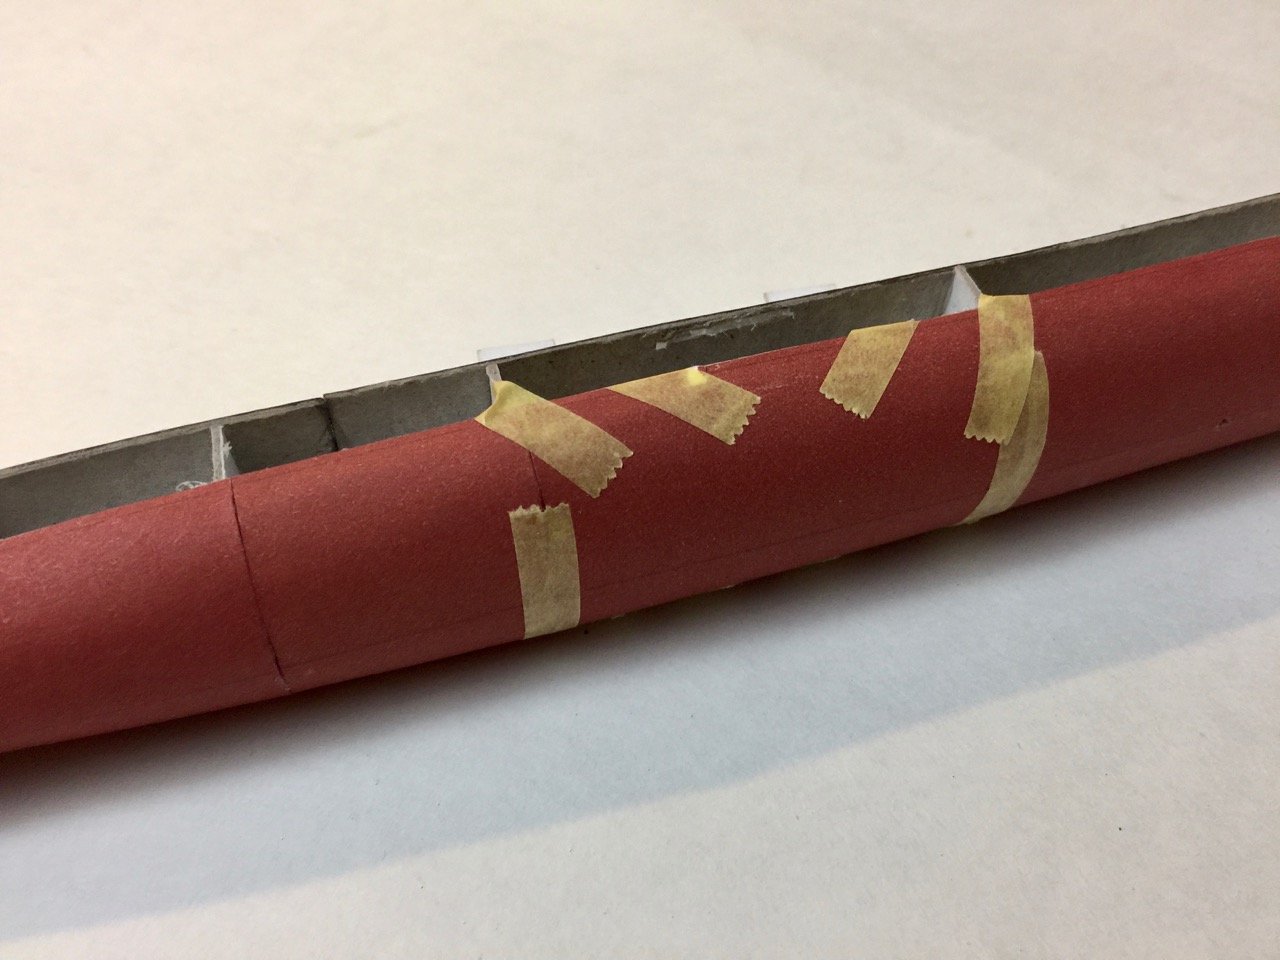
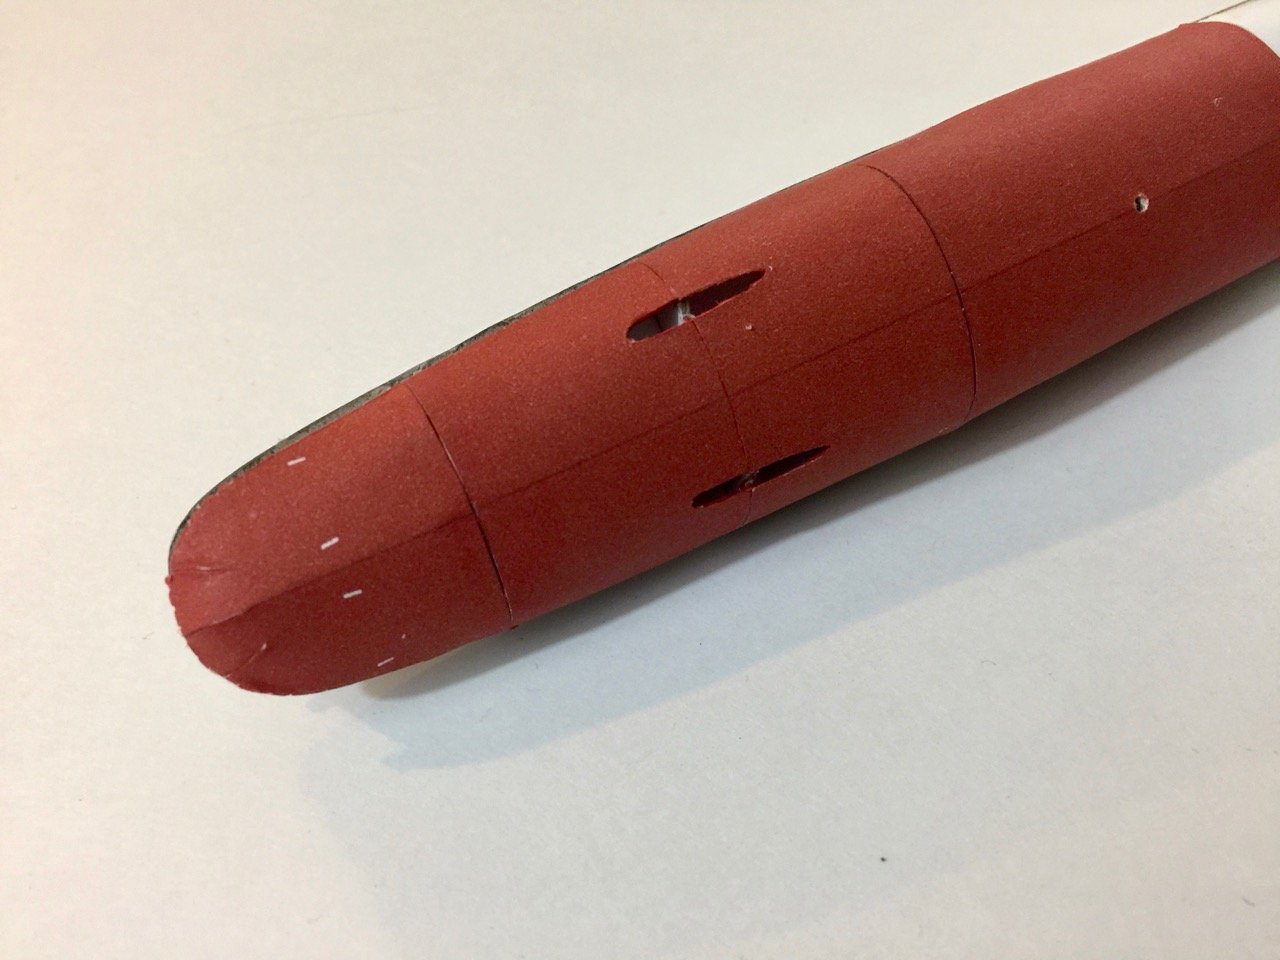
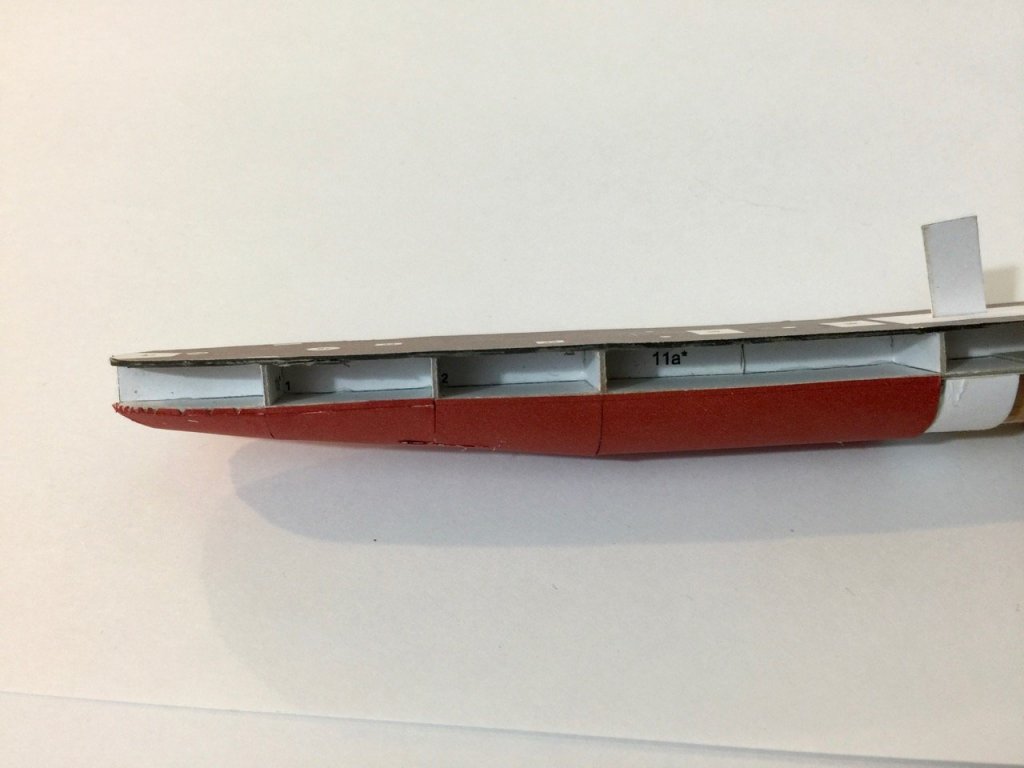
It didn't take long to finish the hull below the waterline. I didn't add the shafts, props or rudder. I thought I should at least wait until I have the rest of the hull done before I go back to do that. Since I had already finished the four sections aft, I figured it might be best to start at the bow and work my way back. That way, the bow was sure to come out correct and I think it looks good. I used little pieces of Tamiya tape to hold pieces into place while the glue dried – I used Aleene's Tacky Glue for everything here. When it was dry enough, I pulled the tape, revealing the finished hull. Certainly, my work is not perfect, but I'm having fun, and, so far, it doesn't look terrible... By the way, I took this model to three local ship model meetings, and people were VERY interested in the model. I love the fact that because these part are printed on my own printer, if I screw something up, I can just print another parts sheet. There are an awful lot of teeny parts, though. I did a rough count and I think I got to around 250 pieces. So... 31 down, 219 to go!

- 106 replies
-
- 11
-
-
- digital navy
- v108
- (and 3 more)
-
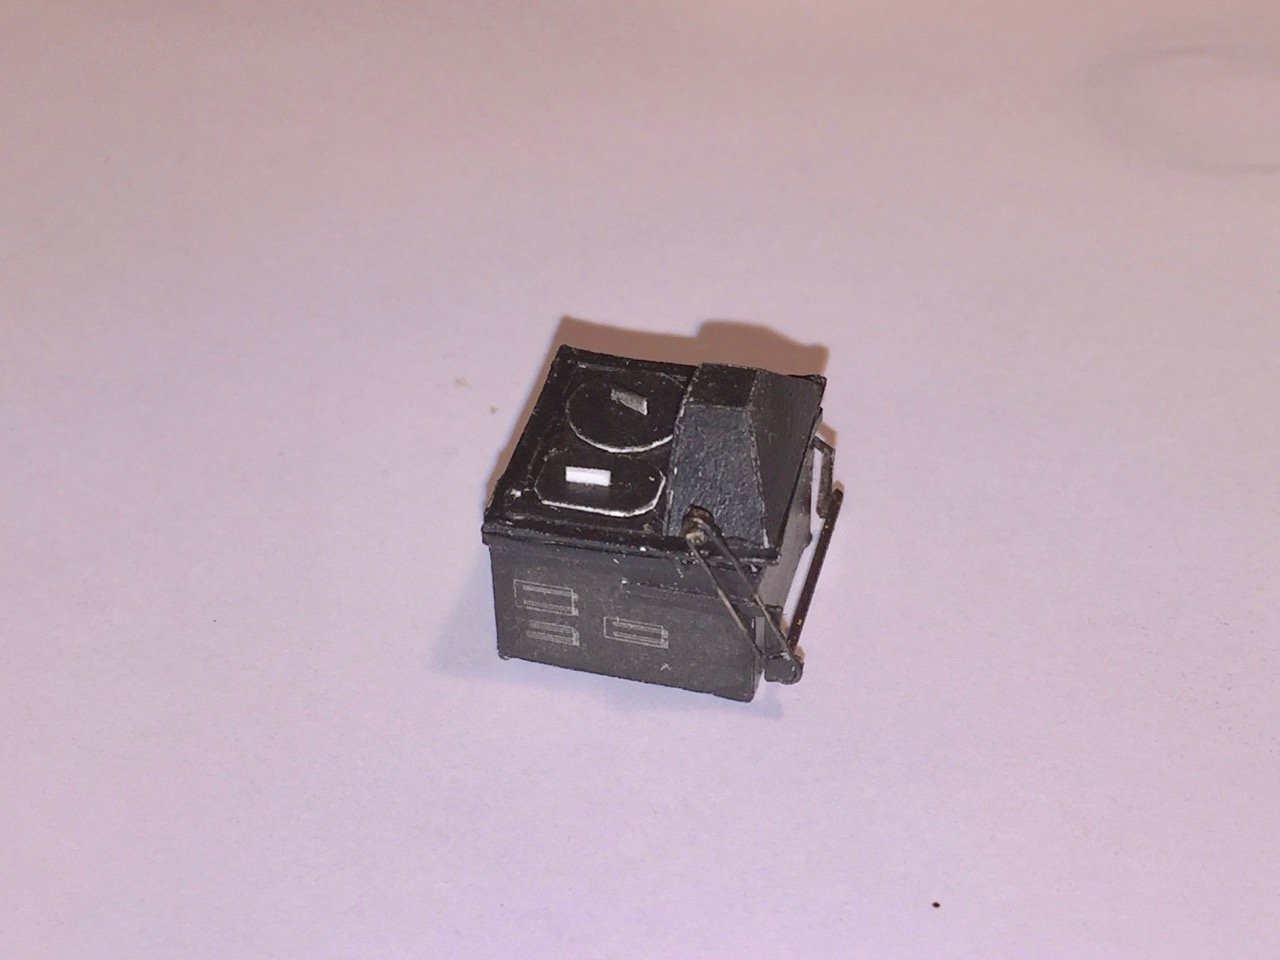
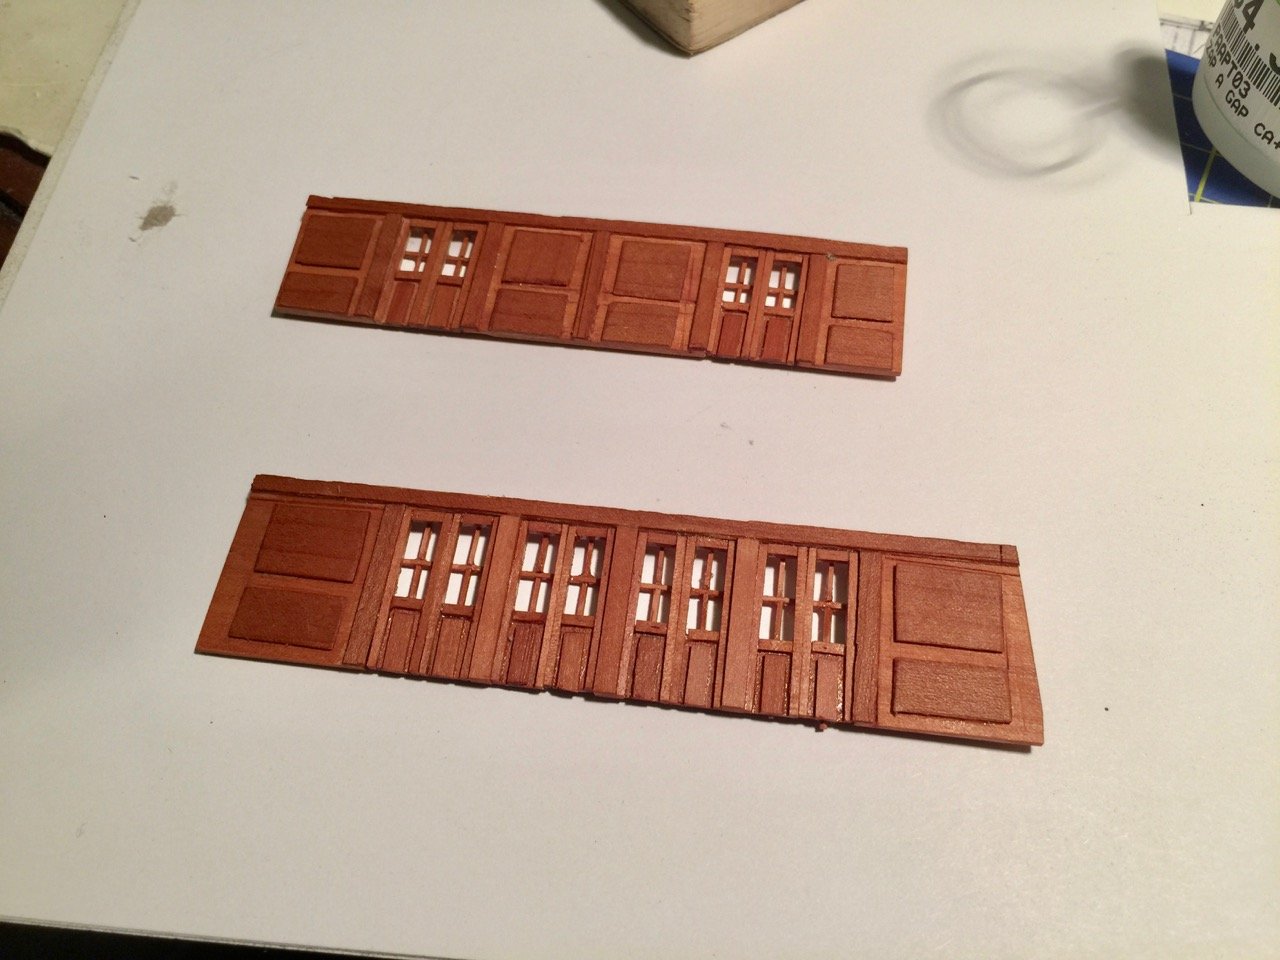
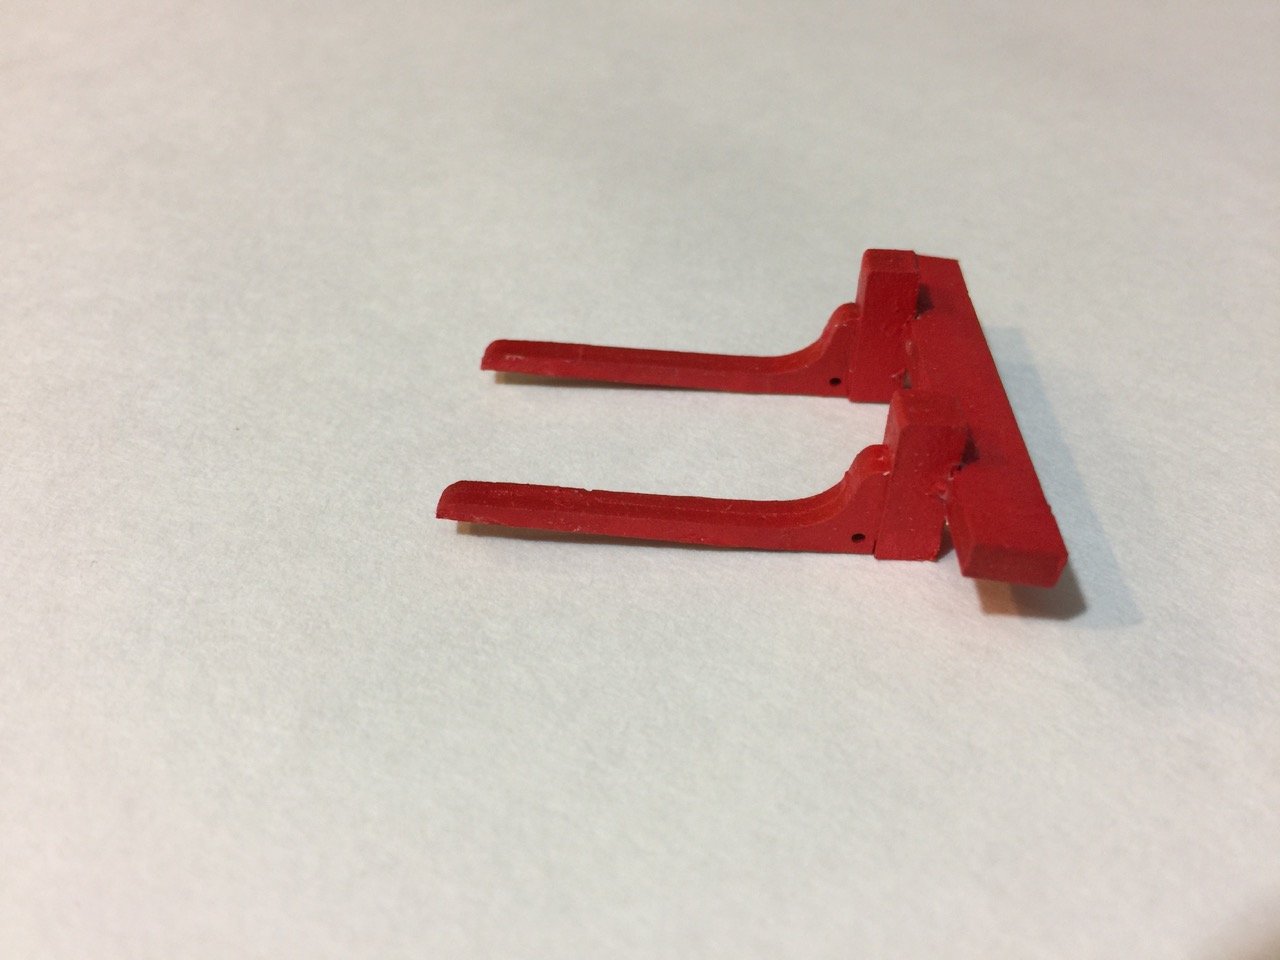
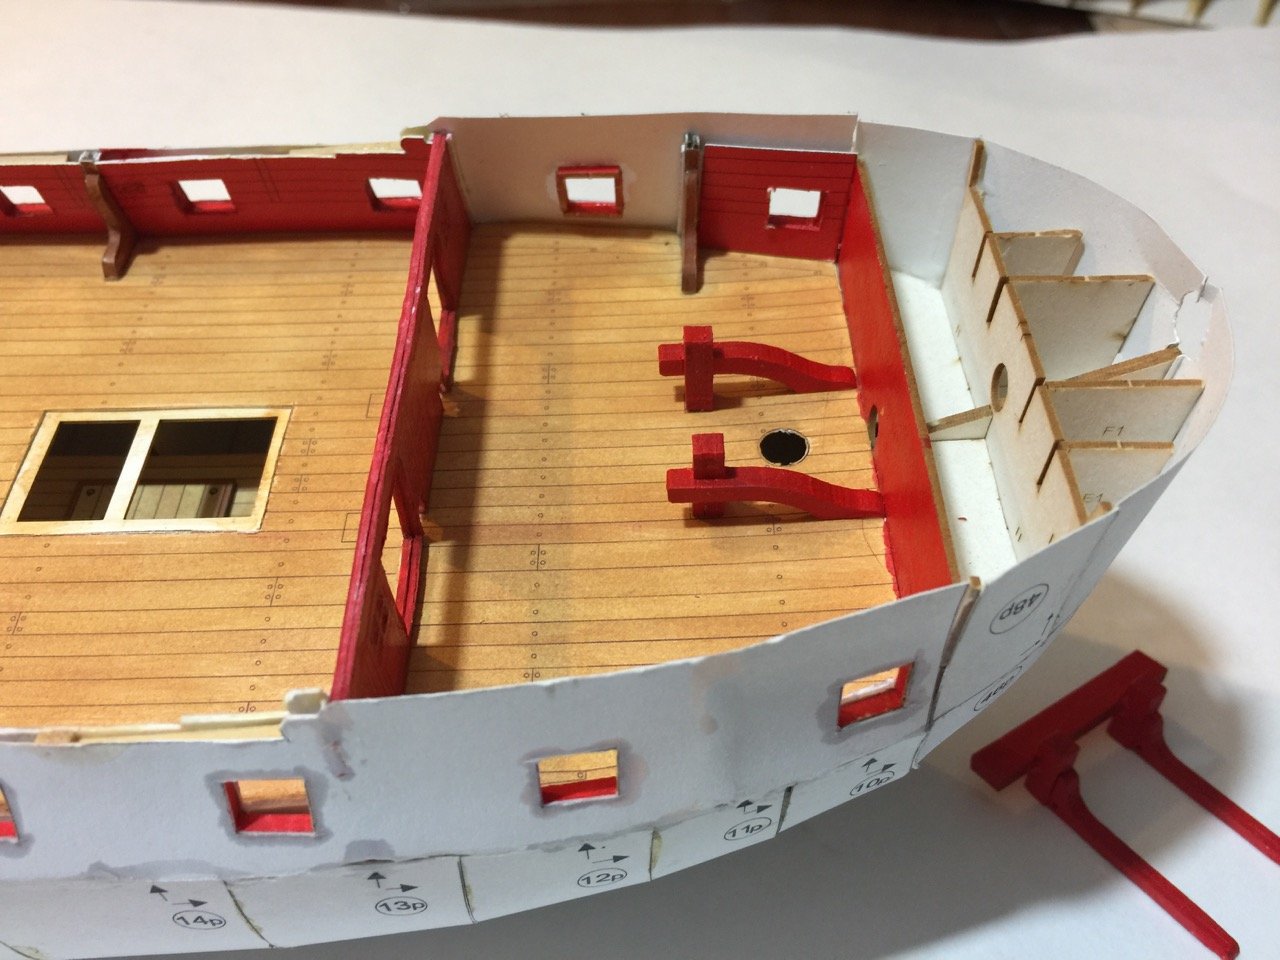
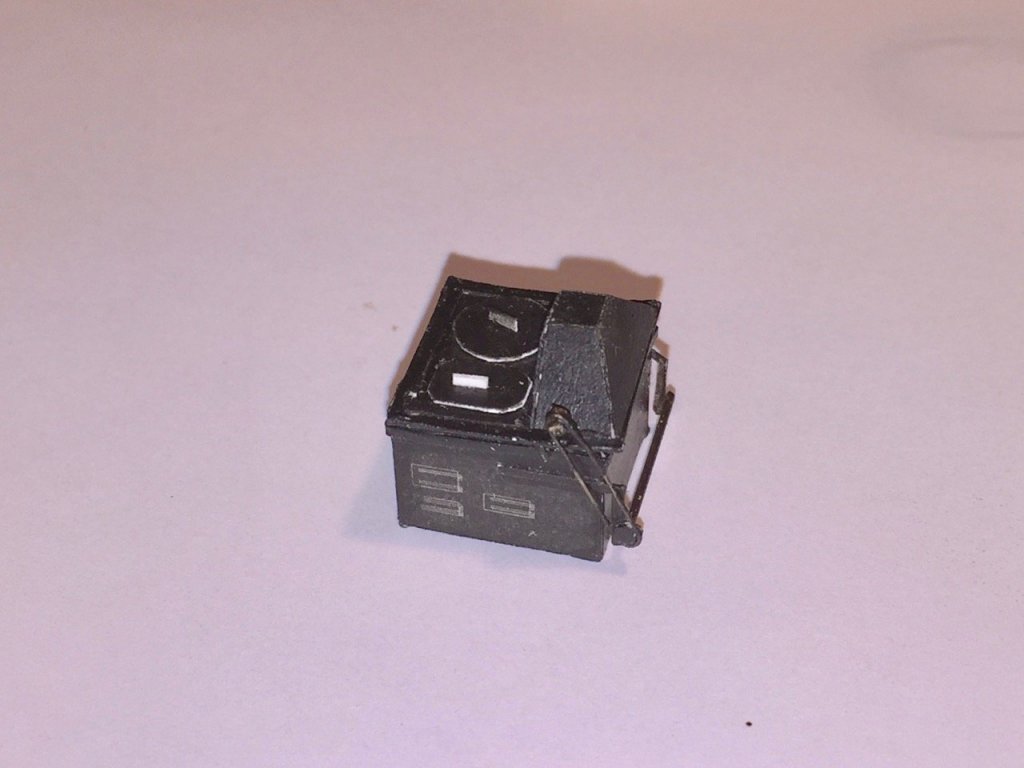
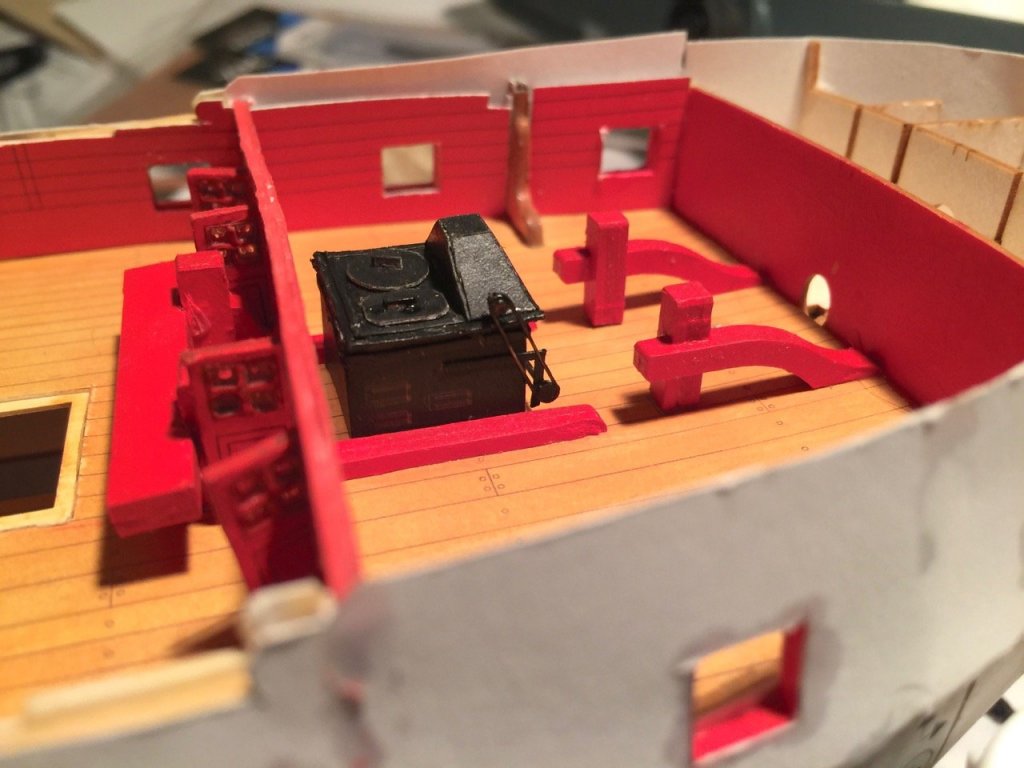
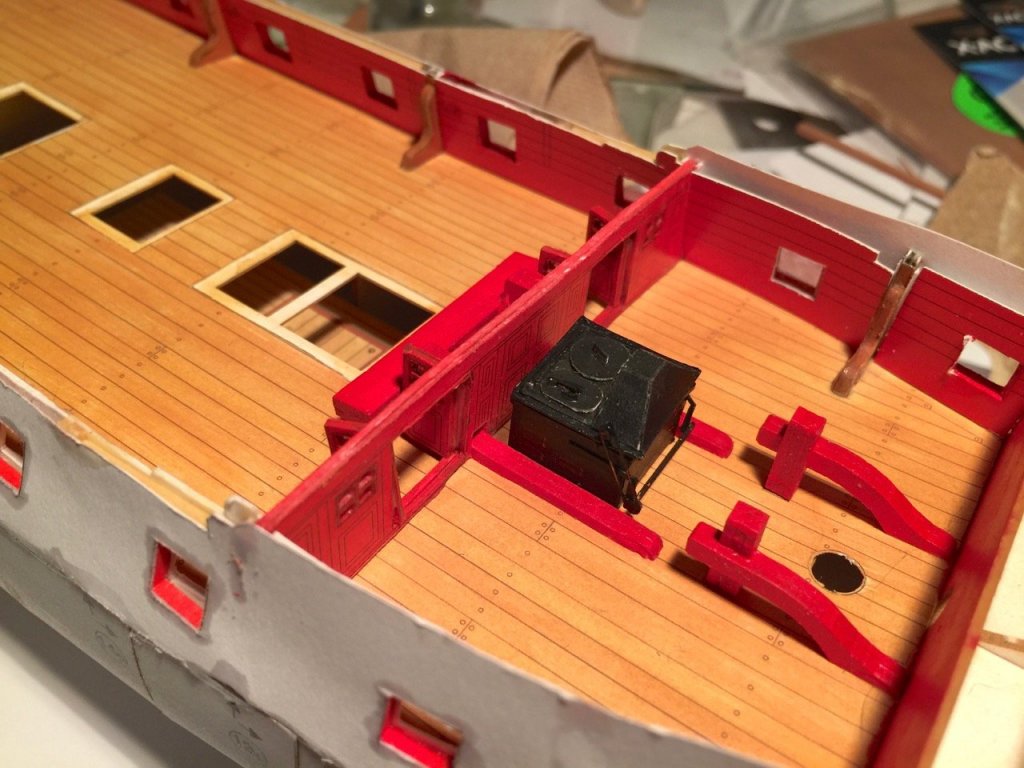
Hi Carl, it also ties me to the build too. I can't write something like that and then just leave it at that. Just a little progress, but it's something. Plus, it was a pretty neat assembly – the Brodie stove in the forecastle. The instructions were a little messed up in one spot, showing the top of the stove mounted backwards. Another drawing showed it correctly after I'd done the work. Since I wanted to make a slight detail modification anyway, I cut the top free and reattached it in the proper orientation. I also decided to insert a small block of basswood inside to make the stove body more solid before cutting the top off and I'm glad I did. Here's an early pic showing the basic structure. Note how I have it in backwards at this point. It's actually the top that was backwards. Below is the rebuilt stove. There was a very 2-D looking chain assembly printed in the kit. I replaced this with wire and the end of a small dowel that I filed down. After I saw what the real thing looked like, I added the shaft onto the arms. You'll note the white cover handle. This is again a modification of the kit, and the one I originally made popped off during "surgery", and the new one hasn't been painted yet. The completed stove is shown here, temporarily in place. I want to figure out what I need to do for the carriage guns before I install it permanently. Below is another view of the stove temporarily in place. While not part of this model, working in paper led me to making a small detail that will go into the cabins at the stern of an HMS Victory model that I've been working on. These clearly are rough and not accurate, nor are they meant to be. I just want an observer to see a representation of interior space, should they manage to look inside the gallery lights. Again, this is really a direct result of working with these paper kits, since they actually include these kinds of details. Also, the pattern came from an HMS Victory paper model kit. I enlarged a scan of these partitions to the scale of my model and used those as templates for making them out of swiss pear. At this stage, there are really different aspects of the ship model I can choose to work on. I have some furniture to make for the great cabin. That's actually in progress now and I'll probably be posting some pics of those items next time. At least some of them. I'm also thinking about finishing the deck by completing the deck hatches/gratings. I also have to make some cannon carriages and possibly I'll try making the barrels from paper. But, on my HMS Alert, I just used brass cannon barrels. The matter of which color scheme to use is also a decision I'll need to make very soon. The kit includes parts printed for an 1778 color scheme, as well as parts for an early 1800s color scheme. If I go with the 1800s scheme, I'll probably copper the lower hull. If the 1778 scheme, I may want to come up with some form of planking patterned after the nicely printed planks of the sheets that will cover the existing hull.

- 82 replies
-
- 12
-
-
Hello Pucko, very nice looking build. I've been eyeing a couple xebec kits including this one. Hollowneck did a nice job on his and is in the gallery. Looks like you're doing a great job!
-
Hi Michael, I have a copy that I don't really need. I'm sending you a PM about it. Clare
-
Maturin, at least you have the Puritan already. I'd like to build that, but I'm in the same fix as you, and there's only one left, so I don't expect it's going to be there for long. I also really have been interested in building the Yacht Mary, ever since I saw the Ships in Scale article by Jean Eckert, long ago. They're gone now, but fortunately, I managed to get my hands on one. Clare
-
Hey, check this out! I made my first Youtube video, a slideshow really, of the Shinmei-zukuri build. I think it turned out pretty nicely, so I think I'm going to have to do the same for my other builds. But, the most well documented are the fairly recent Woody Joe kits I built. Would be nice to have a square-rigger or at least a schooner in there somewhere. Clare
-
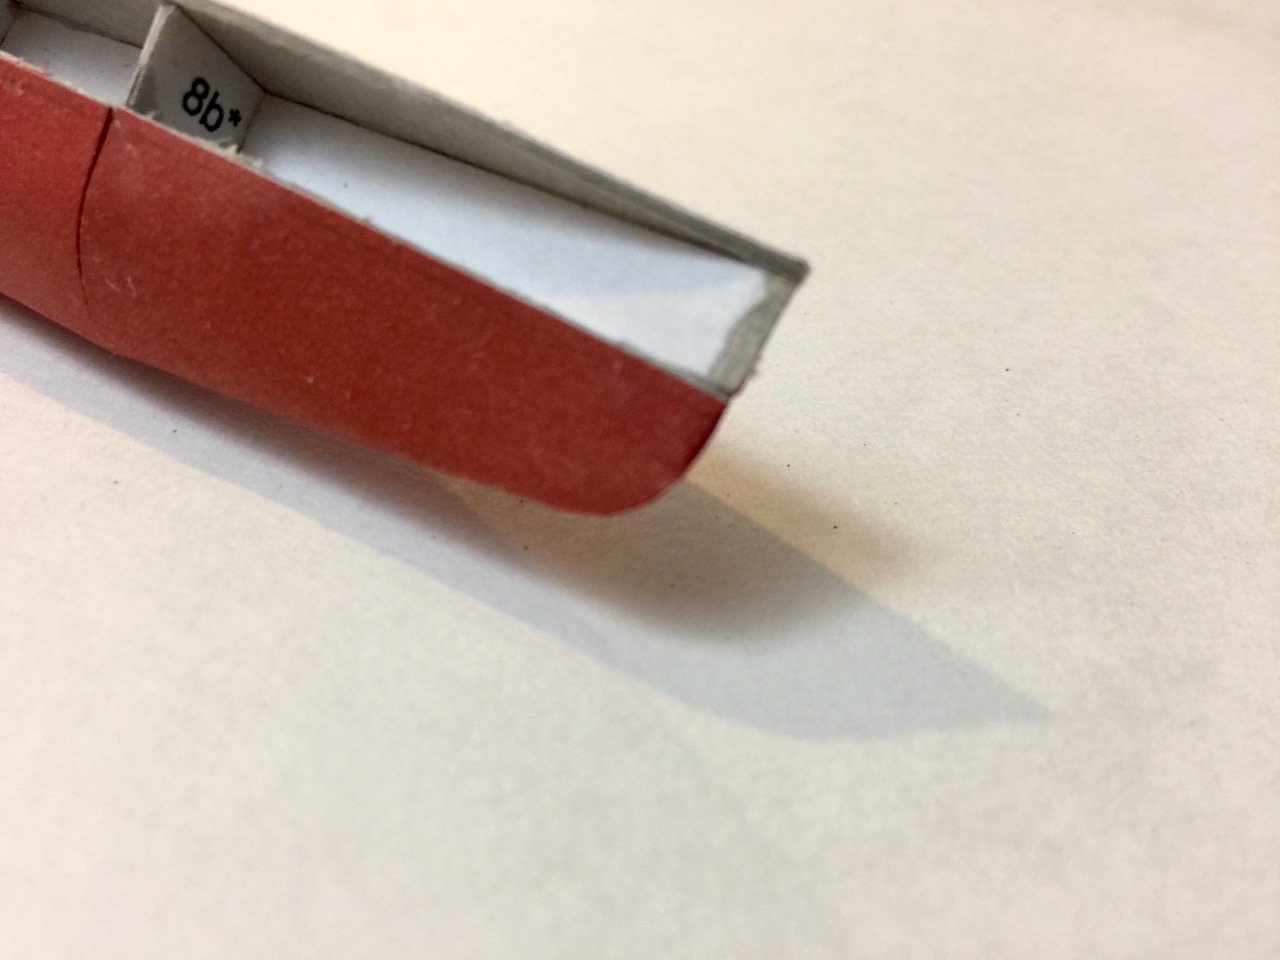
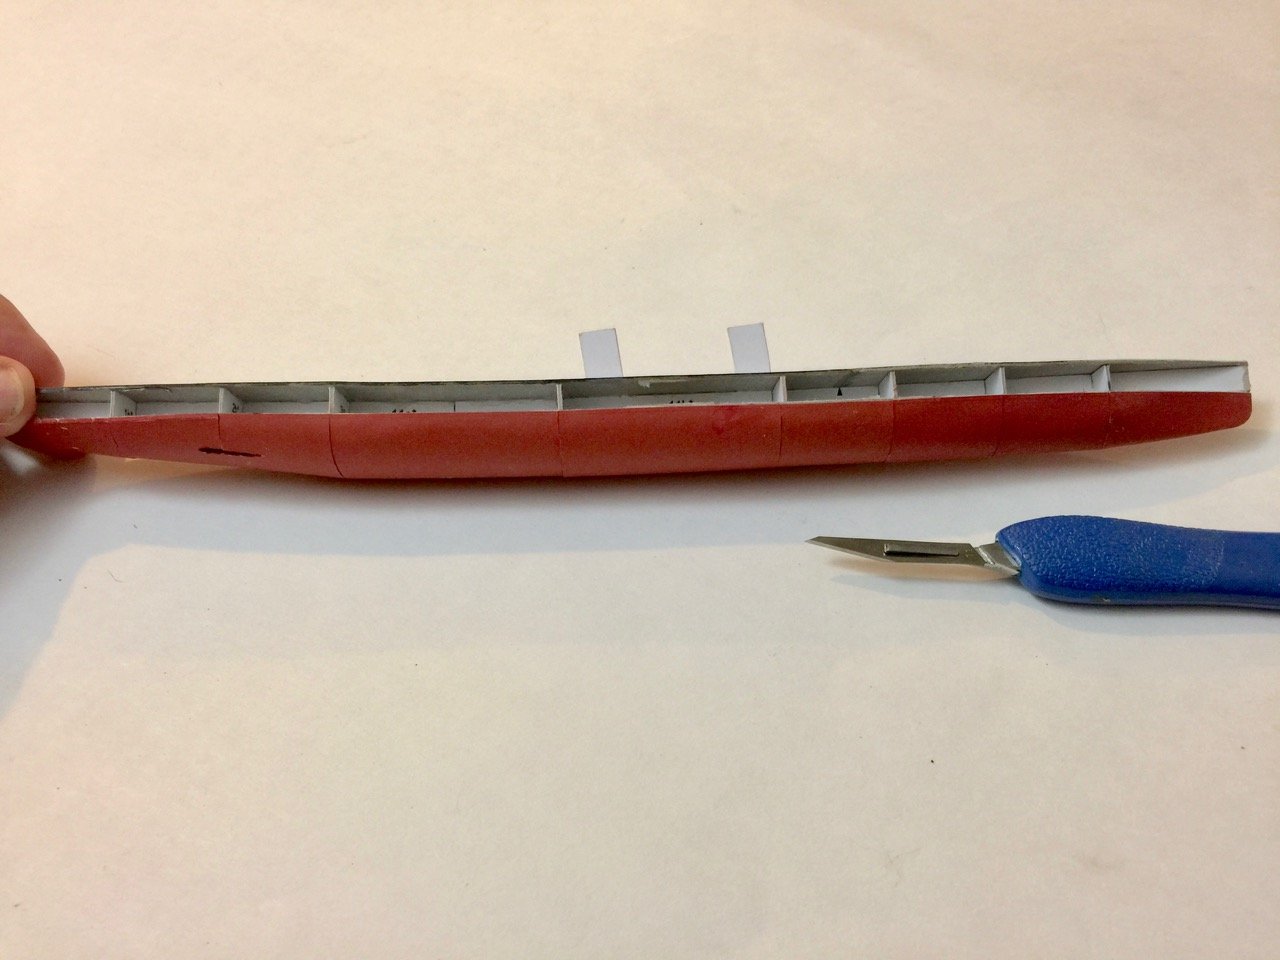
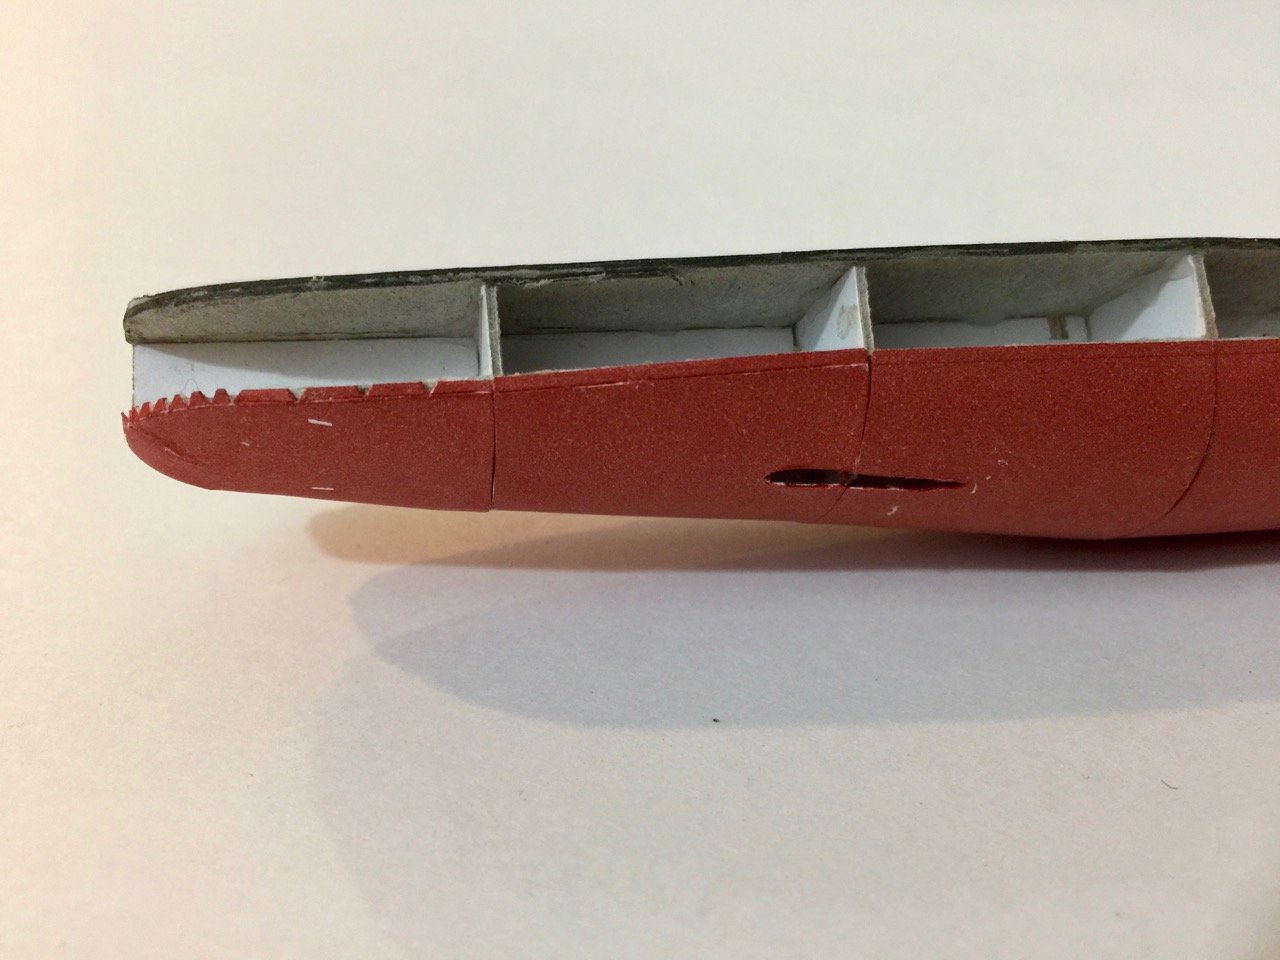
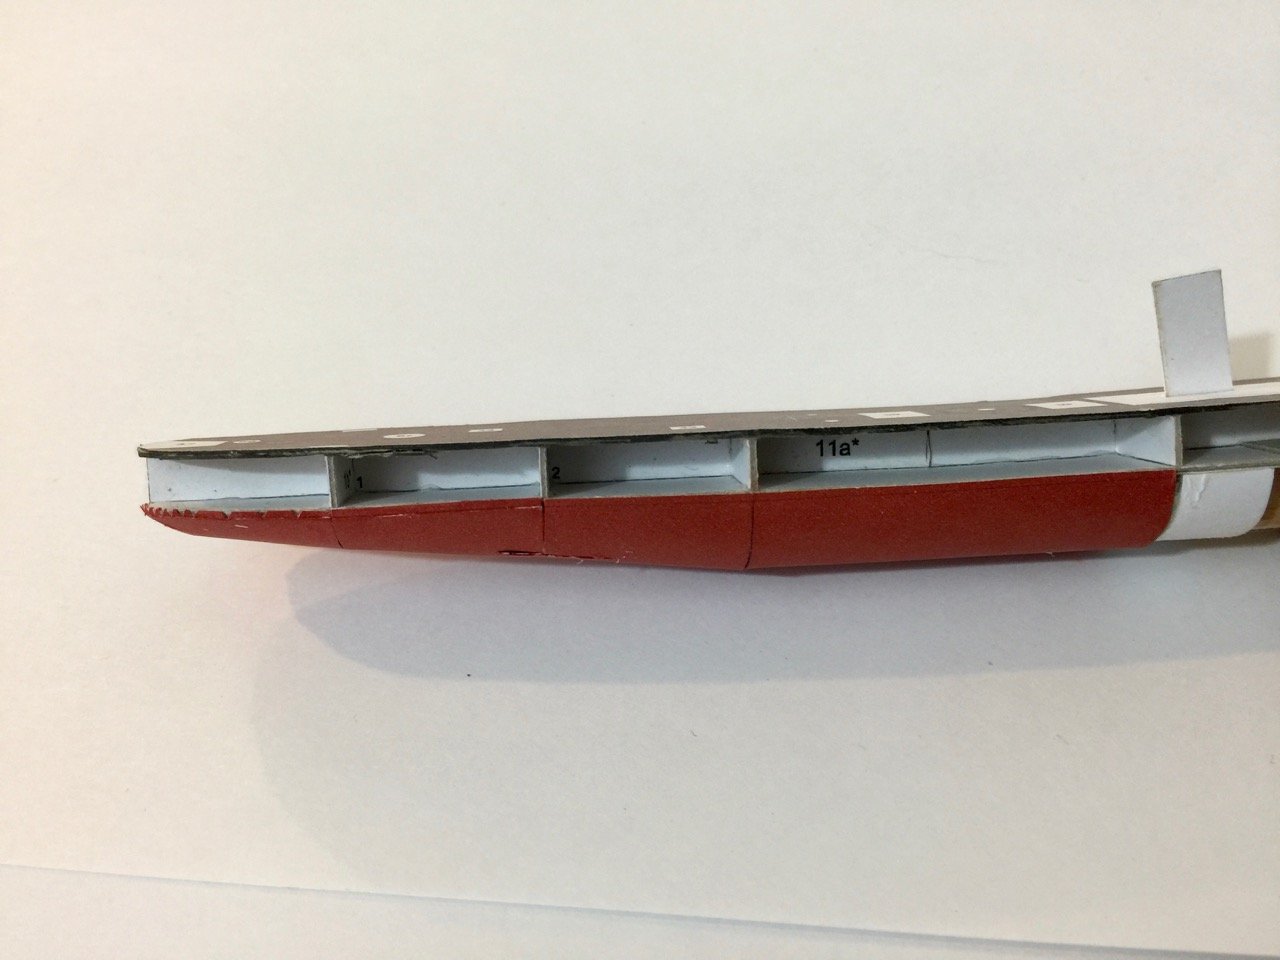
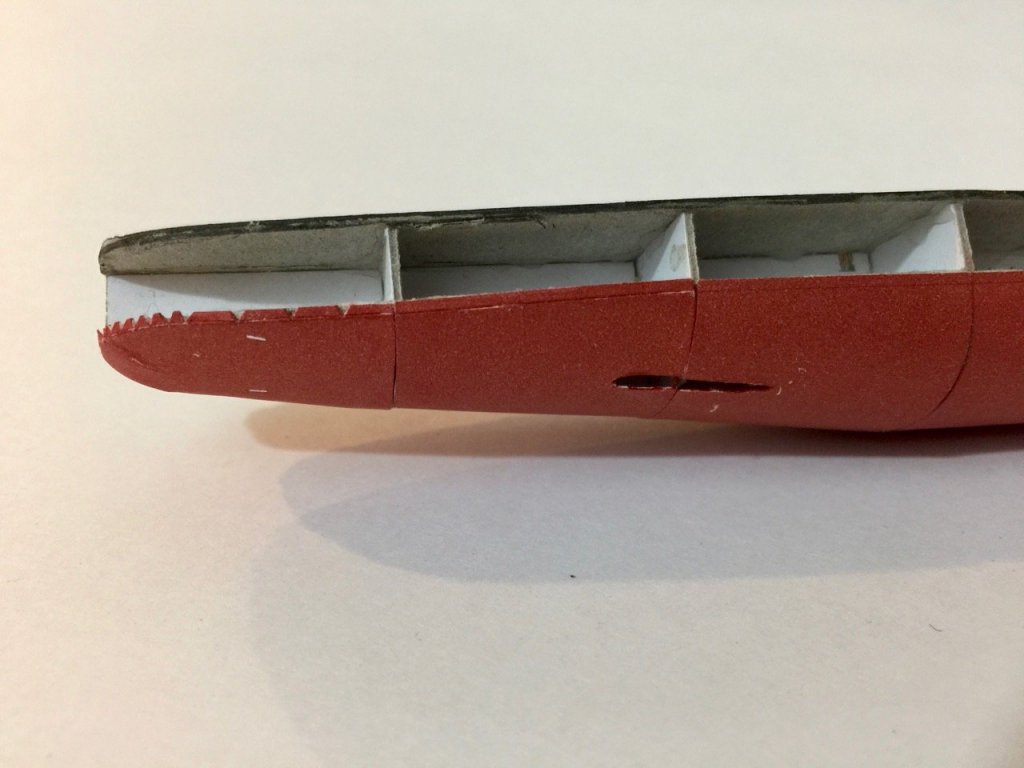
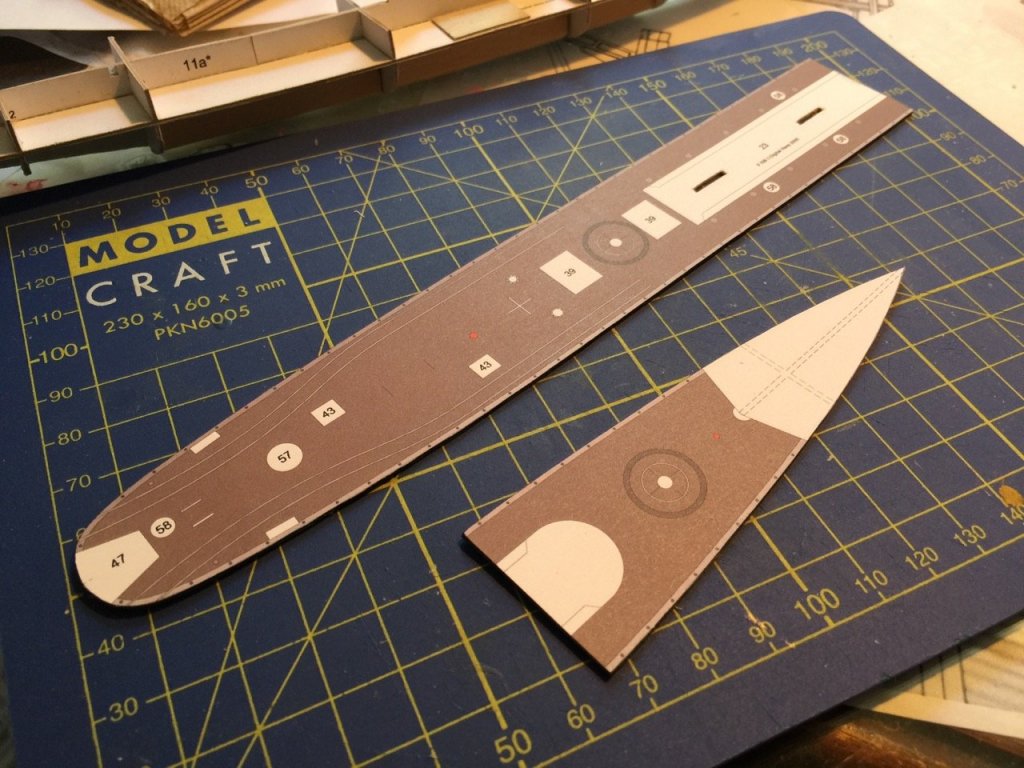
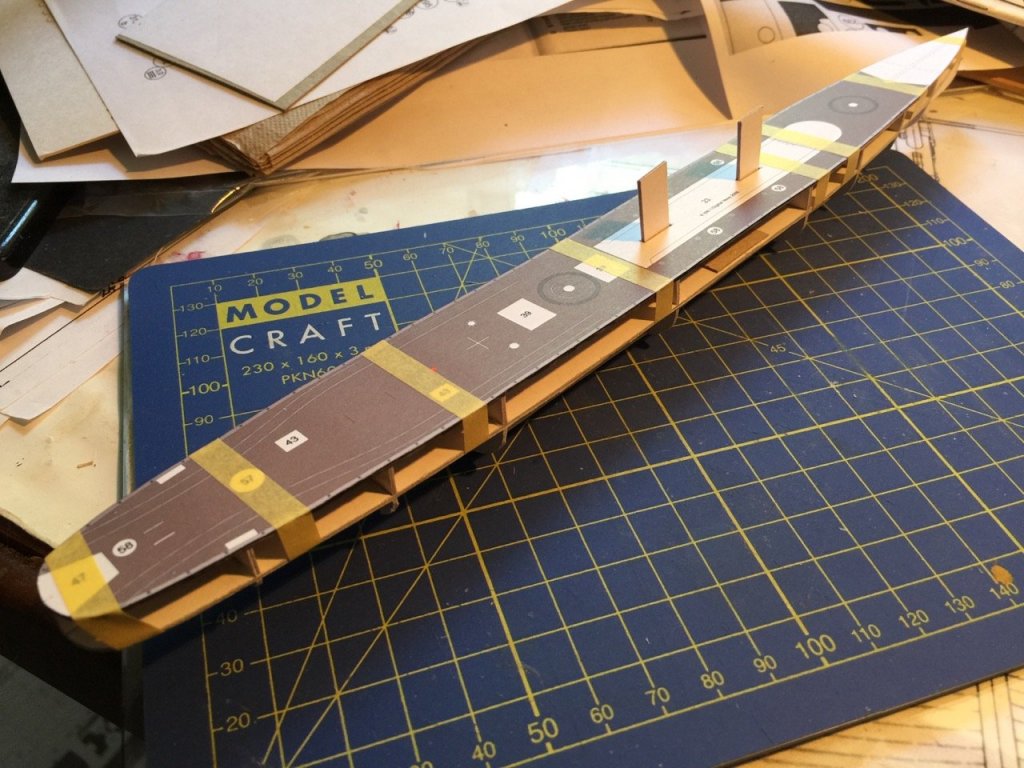
Thanks for your input Pav and Chris. As it turns out, when I posted about the lower hull, my mind was still in the Shipyard kit mode. This kit, and maybe those of all steel-hulled ships, has a single piece that wraps from the waterline on one side of the ship to the waterline on the other side. So, it really does become necessary to do the bottom of the hull first. Here's my attempt at adding the first four parts of the lower hull. There are five more to go. A couple things I've noticed. First, I think it may be unnecessary to try to reinforce the hull like I did. This is a small model and the bulkheads are mostly just over an inch apart, except amidships, where they may be about 2 inches apart. If anything, the reinforcement just got in the way and needed to be trimmed down. The second thing I noticed about this kit is that these lower-hull pieces overlap the waterline "deck," and will completely conceal the edge. My only concern is at the stern, where the bottom of the printed boot-top may extend down just a tad much. But, at this scale, it will probably be fine unless someone is taking a magnifying glass to it. I did paint the edges of the lower-hull pieces with some darkened red acrylic, and also did a little touch-up on afterwards. You can see the seam pretty well, but I may just leave it that way, at least on this model. I wanted to get at least this far for a get-together of ship modelers in Vallejo, California. One of the members, built the Trumpeter kit of the Iowa now on display at the USS Iowa Museum in San Pedro. He's now building the Bismark in the same scale of 1/200, which is the same as this kit, and I wanted to do a size comparison. Unfortunately, he just got home from a long drive the night before and couldn't make it. Now, I'll have to wait for the next gathering, which isn't for another 3 months. But, I imagine this should be done by then, as long as I have time to keep working on it. Clare

- 106 replies
-
- 8
-
-
- digital navy
- v108
- (and 3 more)
-
Thank you Zoly, Druxey! Druxey, don't feel bad about the posts not being on your radar, I often fly too LOW... Mark, Mark and Chris, no worries about hijacking. I was wondering the same thing about Mark's location. I wonder how many ship modelers are in that general vicinity? If there were a ship modelers' gathering there, I'd definitely consider making the trip. Nice country up there! Meanwhile, I've set aside HMS Mercury to get some other things done, but it's darned hard to stay away! I glued up some parts for the great cabin furniture and ship's stove. I'll post some pics in a week or two after I have some of those things completed. Clare
-
Happy 4th of July, all! I have a bit of time before a friend comes by and we do the whole burger thing and then watch fireworks, so I thought I'd take a few minutes to post a question. CDW, thanks for the advice. If I go the P.E. route, I was figuring on ordering the completed railings as well as the 2 hole stanchions. The relatively small size of the ship means I should be able to get by with only one P.E. sheet of each. But, I may simply try out Chris's method from his tutorial. We'll see how I feel about it when I get to that point. So, I have a question for the experience builders of paper models of steel hull ships regarding covering the hull and the order it is done. Most builds seem to start covering the hull below the waterline before dealing with the upper hull. But wouldn't it be better to do it the other way around? My thought is that the waterline is the most visible and important feature of the ship, followed by the seam between the upper hull "plates" and the deck. So, shouldn't the upper hull be dealt with first? Then, the plates for the lower hull should go on, focussing on getting the waterline perfect. Any imperfections then should be on the underside of the hull at the keel, where people really aren't looking, except perhaps a fellow modeler who wants to see how good a job you did. For this model, the hull coverings have the lowest part numbers, so the designer, more or less, expects you to put them on first. Any thoughts? Clare
- 106 replies
-
- 3
-
-
- digital navy
- v108
- (and 3 more)
-
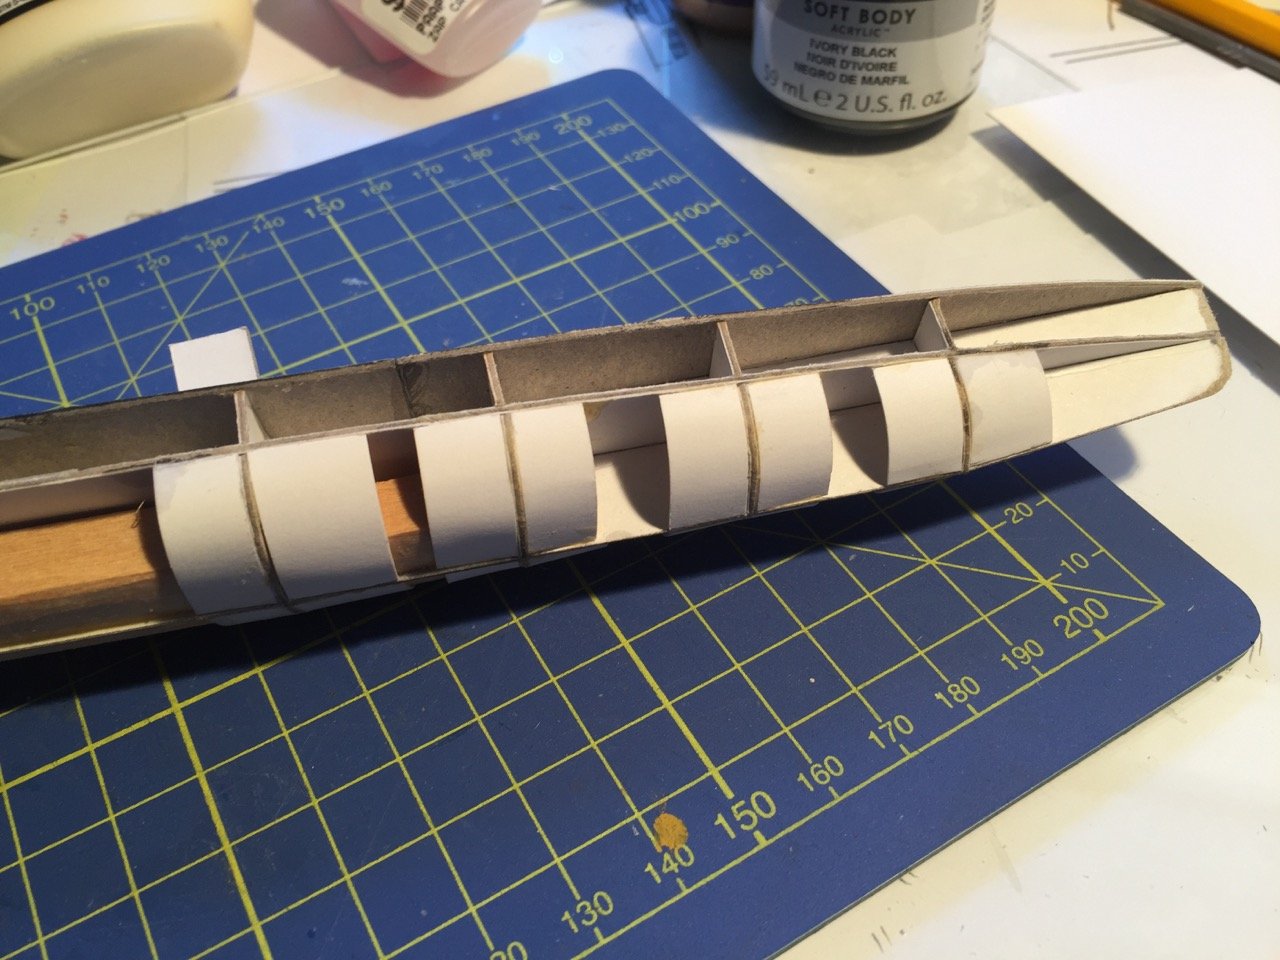
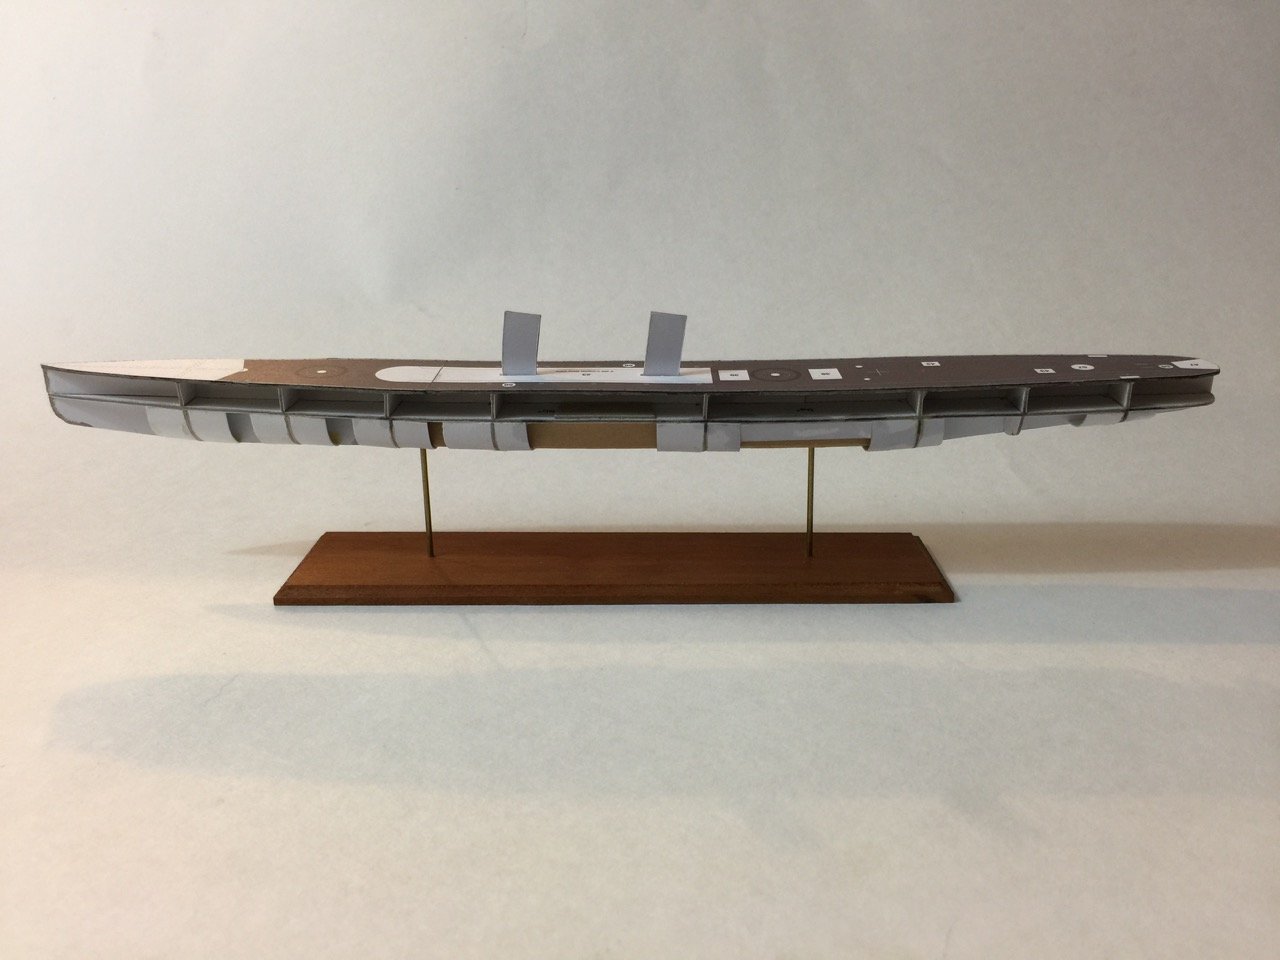
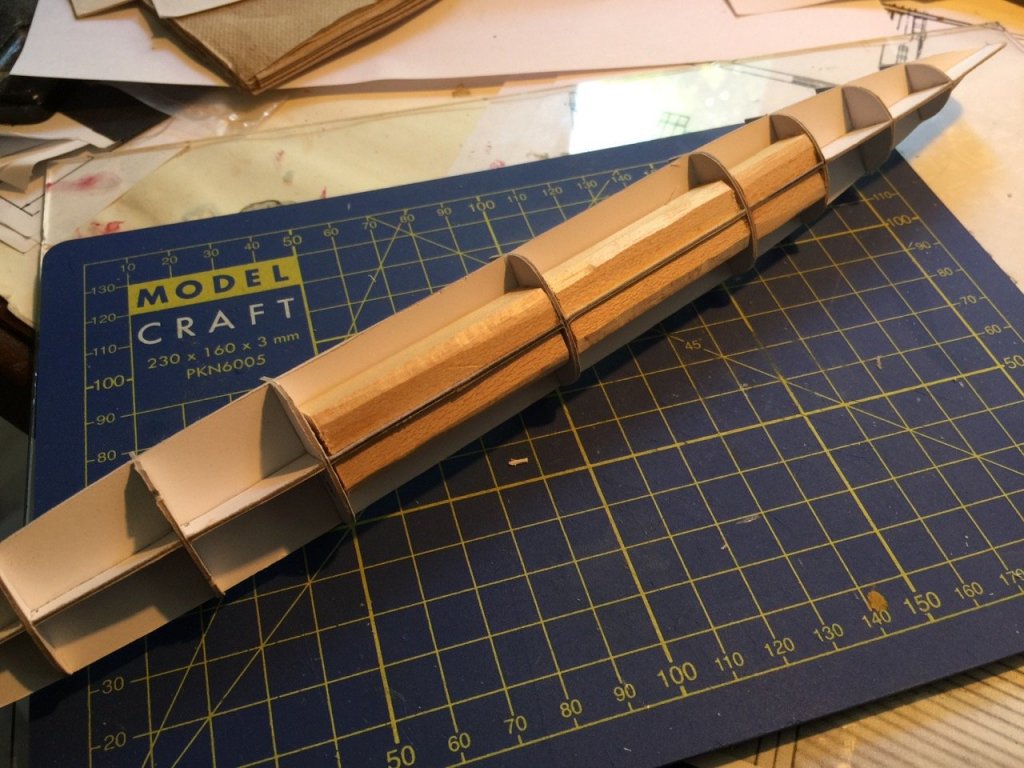
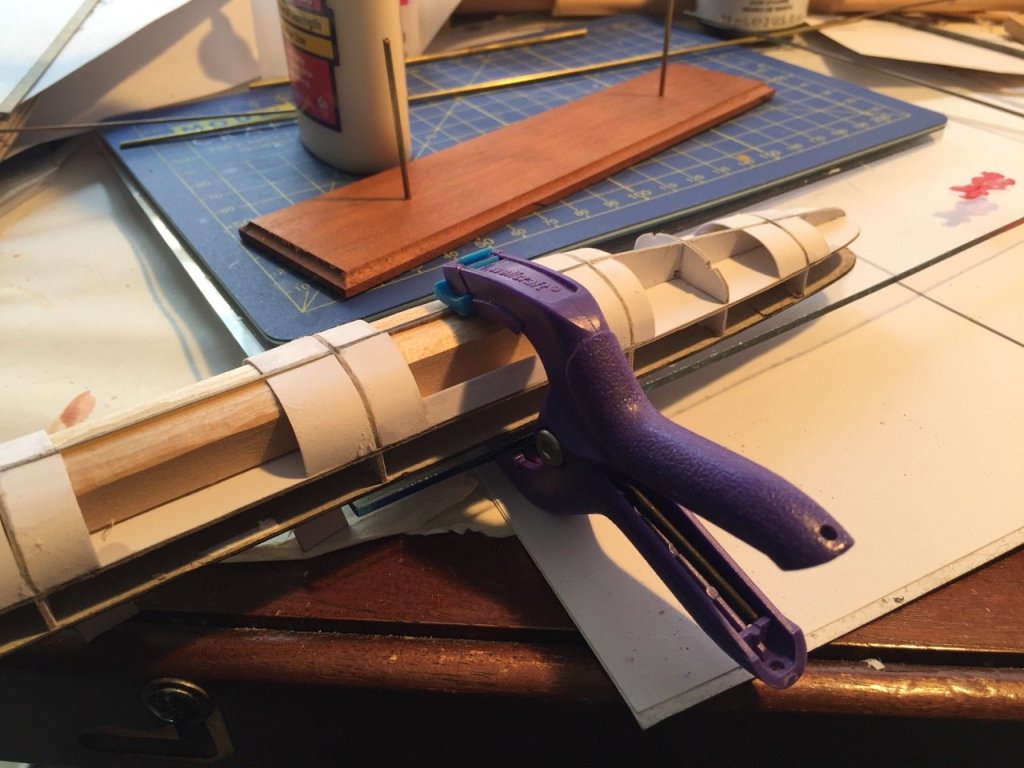
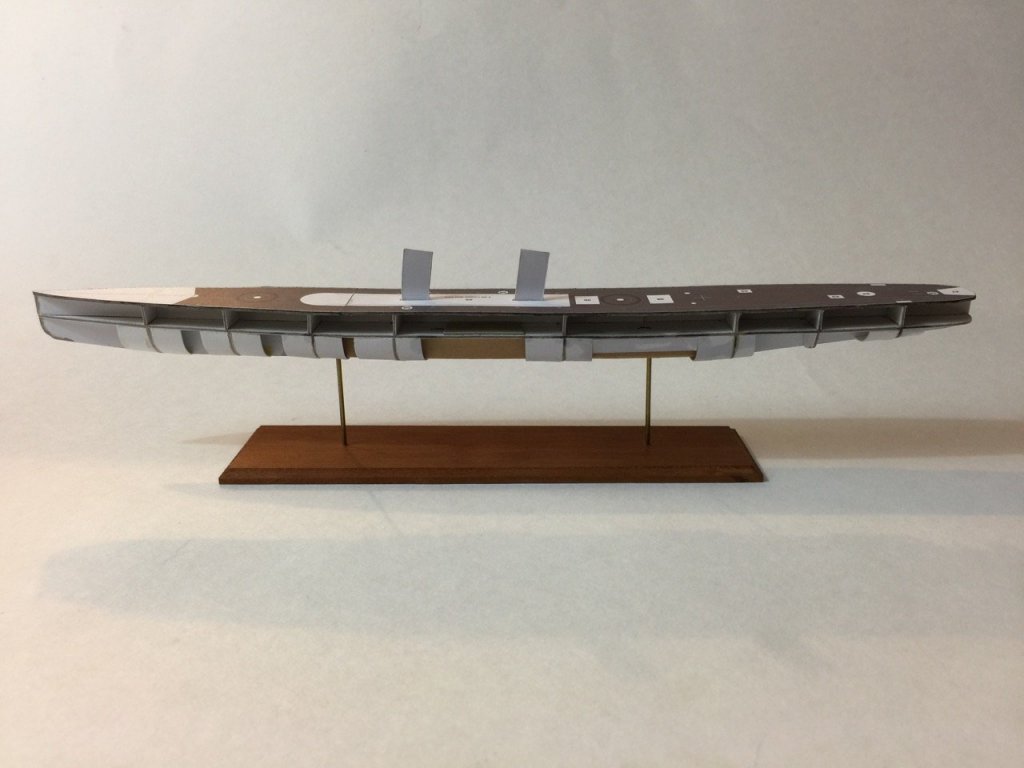
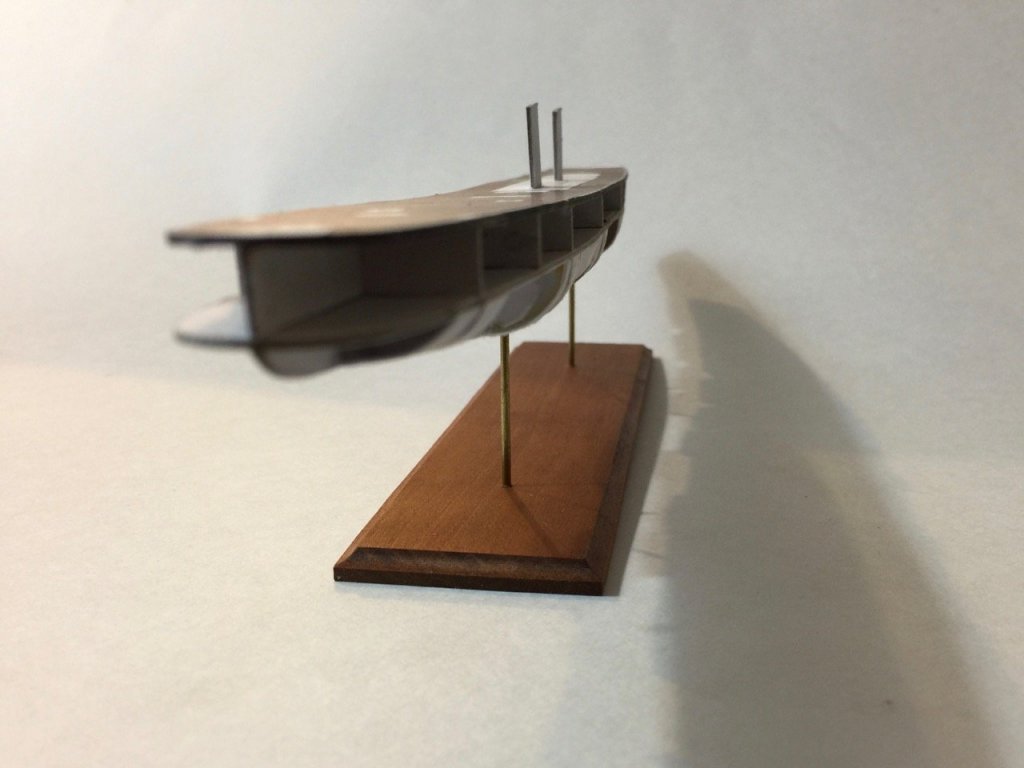
Bill, I'm not sure what I want to do about railing. Chris's technique sure turned out well. However, I may just check out the PE stuff that GPM makes. The only thing is that the deck has the locations of stanchions pre-printed, so I'm guessing the PE stuff won't fit exactly. So, we'll see. I have been eyeing that HMS Bellona kit too. I figured if I can get through the frigate HMS Mercury, the Bellona would be an interesting subject. Jan, Ken, CDW, happy to have you aboard. CDW, please tell your wife "Cousin Clare" says "hi!" The V108 Build As for the V108, since I'm building the lower hull, I'm already diverging from the tutorial and in uncharted waters for myself. I went ahead and glued up the parts for the lower hull and added some reinforcing blocks for display stanchions. I cut the parts for the main deck and glue them to the frames. All the parts sheets, by the way, I gave a couple coats of artist's fixative to protect the print. Also, added some reinforcements that I'm hoping will help keep the lower hull plates (or skins, as some people seem to like to call them) from puckering too much. It's all a big experiment for me, so we'll just have to see how things turn out. One thing I discovered at this stage was that I managed to impart a bit of shear to the hull. From the drawings, it clearly is not supposed to. So, I cut some of the frames loose and re-glued the parts. I clamped the hull to a sheet of glass to help flatten it out. As you can see, it still has a little shear. Hopefully, it's not enough to be a problem. You can also see another view of the hull reinforcements I added. Not perfect, but we'll see how things fit. As you can see, I also drilled out the keel where the support blocks are and I made a little display stand. I just did that today, but the posts are a bit on the tall side, so I'll cut those down a bit at some point. Depending on how I'm feeling about it, I may or may not add some brass tubing sleeve over the rod to make the posts visually thicker. But, making them shorter may create the same overall effect. Anyway, I have to focus on the lower hull next. We'll see then if this is worth keeping and continuing. Clare
- 106 replies
-
- 10
-
-
- digital navy
- v108
- (and 3 more)
-
Hi Stevinne, you may not want to follow me, I don't know where I'm going! You should check out Chris Coyle's tutorial here on MSW. That's what I'm basically following. I'm probably going to mount this model in a similar fashion to yours, with brass posts. Chris, It felt a little weird that nobody had a build log based on your tutorial. Since I was considering a card model of a steel navy ship anyway, I figured I'd try out your tutorial on this neat little model. Hey, it's a free download, and your tutorial is free, so why aren't there a bunch of build logs here? I figured I could at least start one. It's not my first card model, but it's still my first model of this type, so we'll see how it goes. Slog Your builds and comments have helped to inspire me to try a model of this type. This will be something of a surprise when I bring it to the local ship model clubs, as I haven't built a steel navy ship since the 1970s! Bill, I'm kind of hooked on them myself. The pre-printed kits are neat, but I think that also means that you have to be extra neat when working with them. On the shipyard models, since they represent wooden ships in larger scales, I've been able to get away with painting lightly over the printed detail. I don't think I can do that here. So, we'll see how it goes! Clare
- 106 replies
-
- 5
-
-
- digital navy
- v108
- (and 3 more)
-
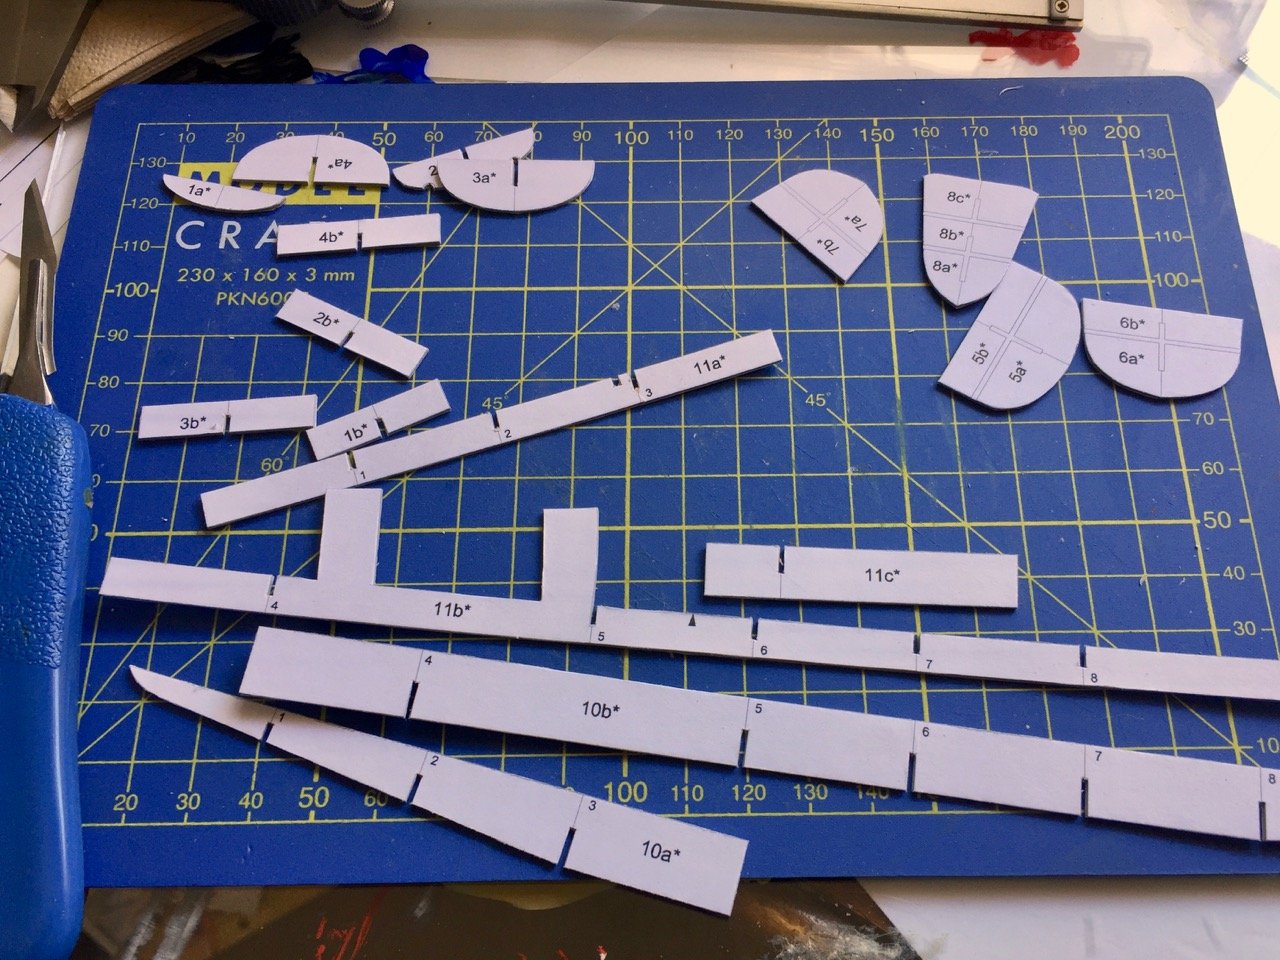
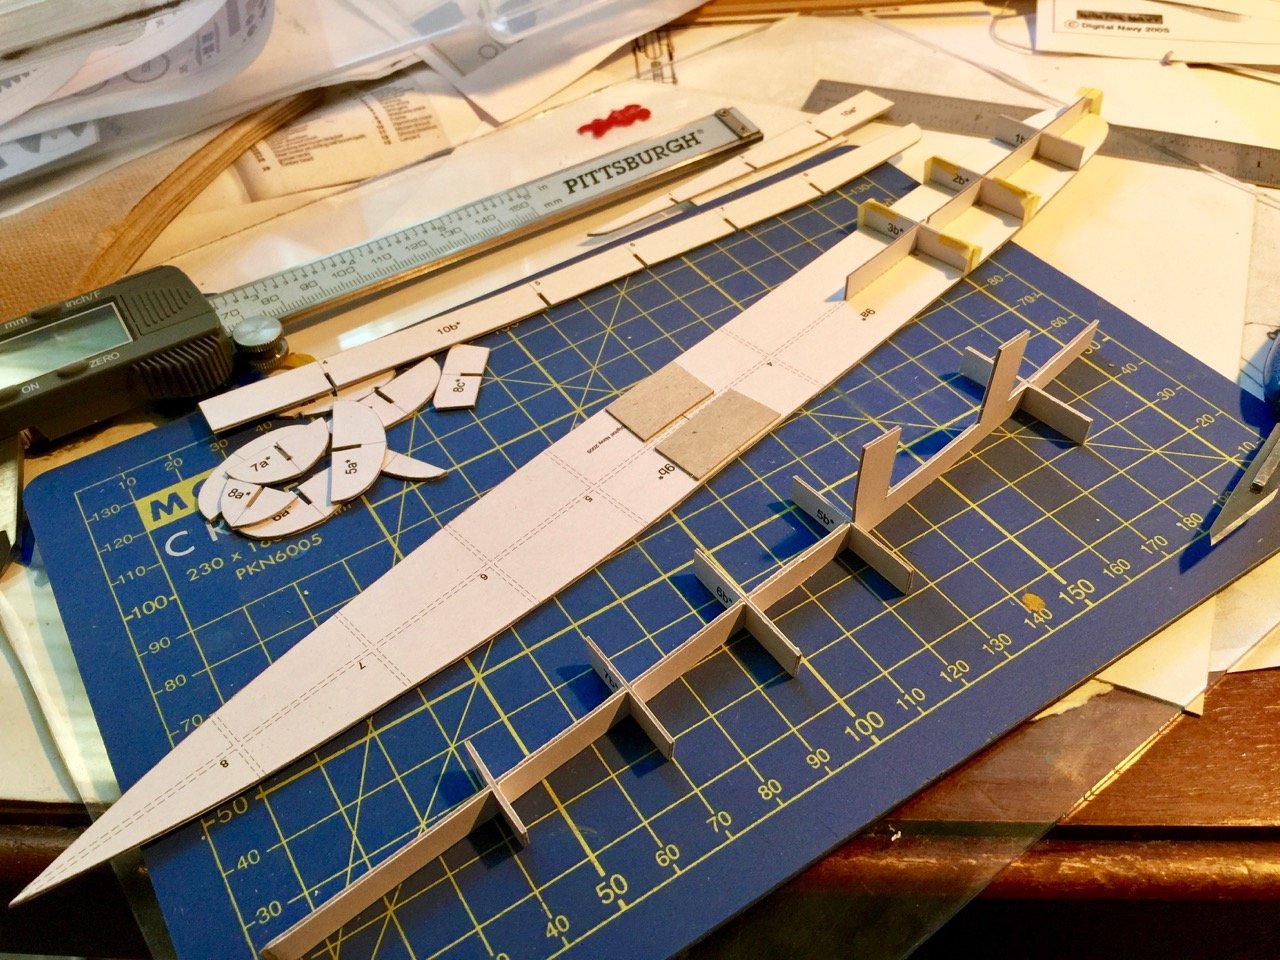
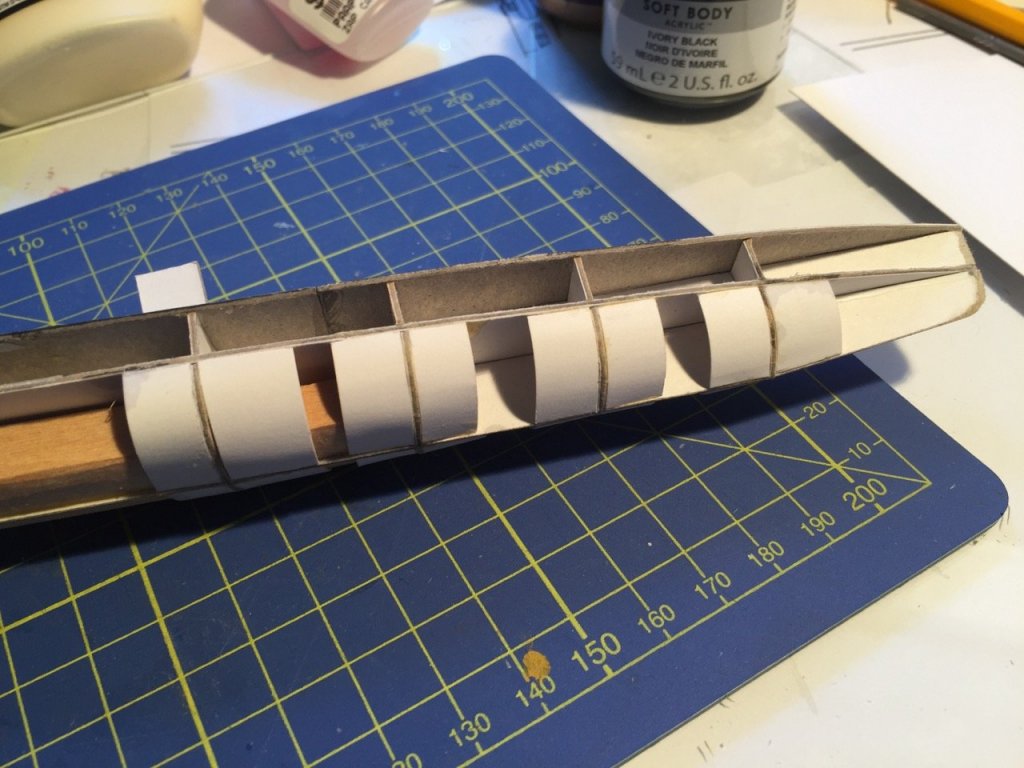
Hello, my name is Clare. I don't know how it happened. I suppose this is typical. Somehow, without knowing it was happening, I have become a card model junkie... I began, innocently enough, experimenting with a kit from Shipyard, the 1/96-scale paper model of the cutter HMS Alert. I didn't plan on finishing it, I just wanted to start it to see what the build was like. But, it became very interesting and unexpectedly quite rewarding. I ended up completing it and a fellow modeler wanted to buy the completed model from me, so it found a home. But, building the model was such a rewarding experience, I ended up building a Shipyard lighthouse kit and starting another Shipyard paper ship model kit, HMS Mercury, which is now under construction. HMS Mercury was intended as another kind of experiment and something I would just work on in between other projects. So, I haven't worked steadily on it. But, recently, I put in some work on the model and have had a difficult time breaking away from it. After my last build log post, I figured I'd step away from it, but I couldn't help myself. I did a little more work on it. But, paper models cover a diverse range of subjects, and most paper model, or card model subjects (as some people prefer to call them), are not of sailing vessels, but of steel navy ships. My "Go To" shop for this stuff is usually the Polish seller GPM. They have all subject matter in kits from a wide range of manufacturers. One of the things I like to do is to check out some of the fascinating subjects, ships mostly, and look at the kits and available laser-cut and photo-etched accessory sets they sell for them. I've been seriously temped to try out one of these, but then I took a good look at the card modeling tutorial that Chris Coyle did here on MSW, using the German V-108 torpedo boat kit from Digital Navy as the subject. Having finally replaced my malfunctioning color inkjet printer, it seemed like a good opportunity to test it out and to print the parts sheets for the V-108 model. I hope Chris doesn't mind, but, above, I've posted a photo of his completed model from his tutorial, which is the subject of this build log. The tutorial and the links to the download can be found here: V108 Paper Model Tutorial Now, I'm not following the tutorial to the letter. Chris' model is a waterline model, and I really want some practice building the hull below the waterline too, so I'll be attempting the full-hull build. This is a small model at 1/200 scale, and I don't anticipate this taking a great deal of time, especially in comparison with a sailing ship model. So, I'm planning on spending a bit more of my time on this build. I went ahead and downloaded the files from the links provided in the tutorial. There are four pages in all, but only two of those pages are parts. They fit on standard 8-1/2" x 11" paper. I didn't end up printing anything directly on cardstock, laminating Pieces onto cardboard as necessary. I then began cutting out the structural pieces as needed and building the basic framework. Okay, so there we go with another one. I've glued up the upper and lower frames together, but don't have a photo yet. Next, I'm going to add some hardpoints to the keel so I can eventually mount the model securely on a display base. Clare


- 106 replies
-
- 14
-
-
- digital navy
- v108
- (and 3 more)
-
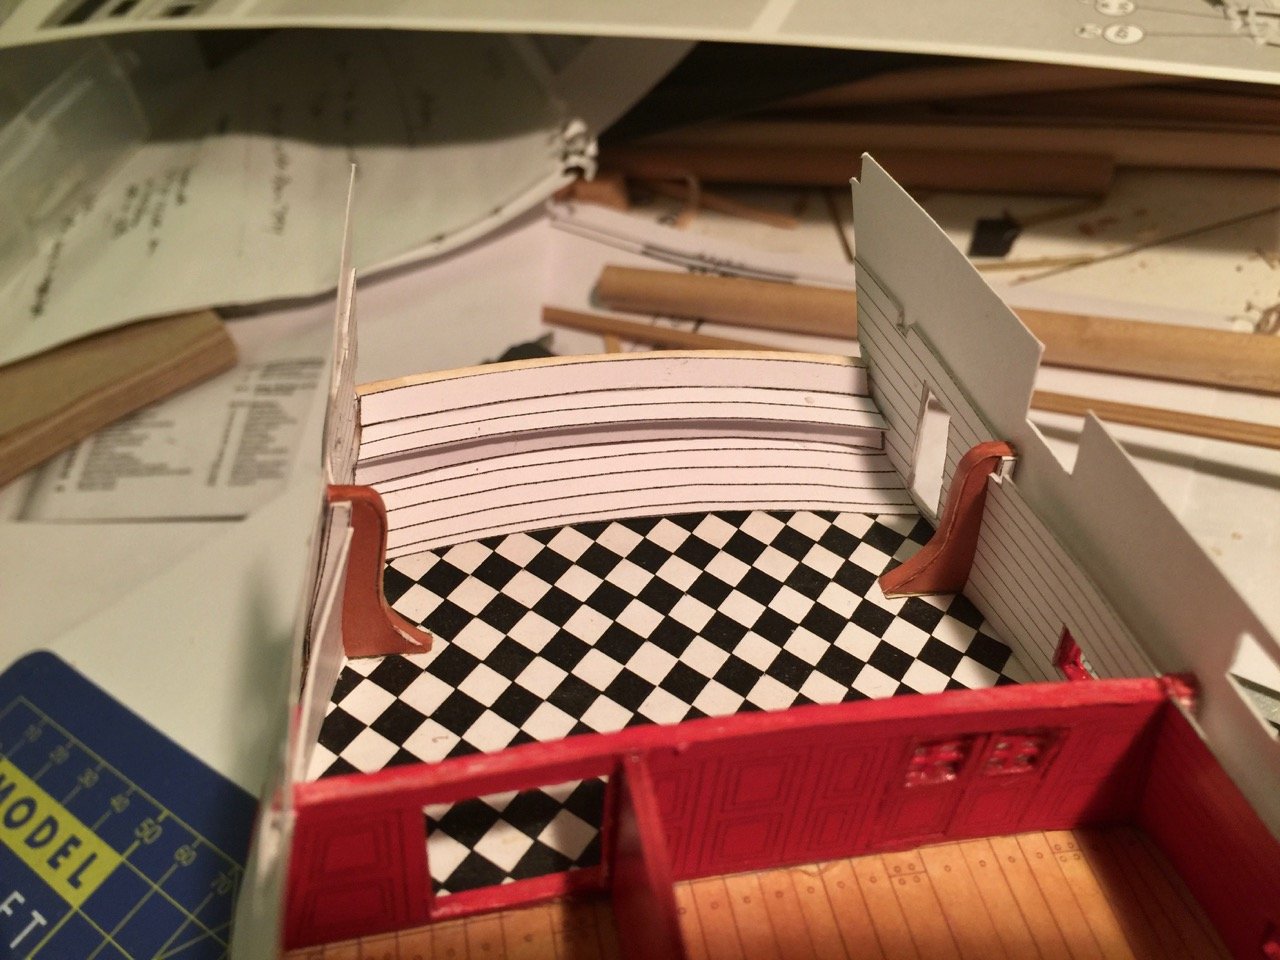
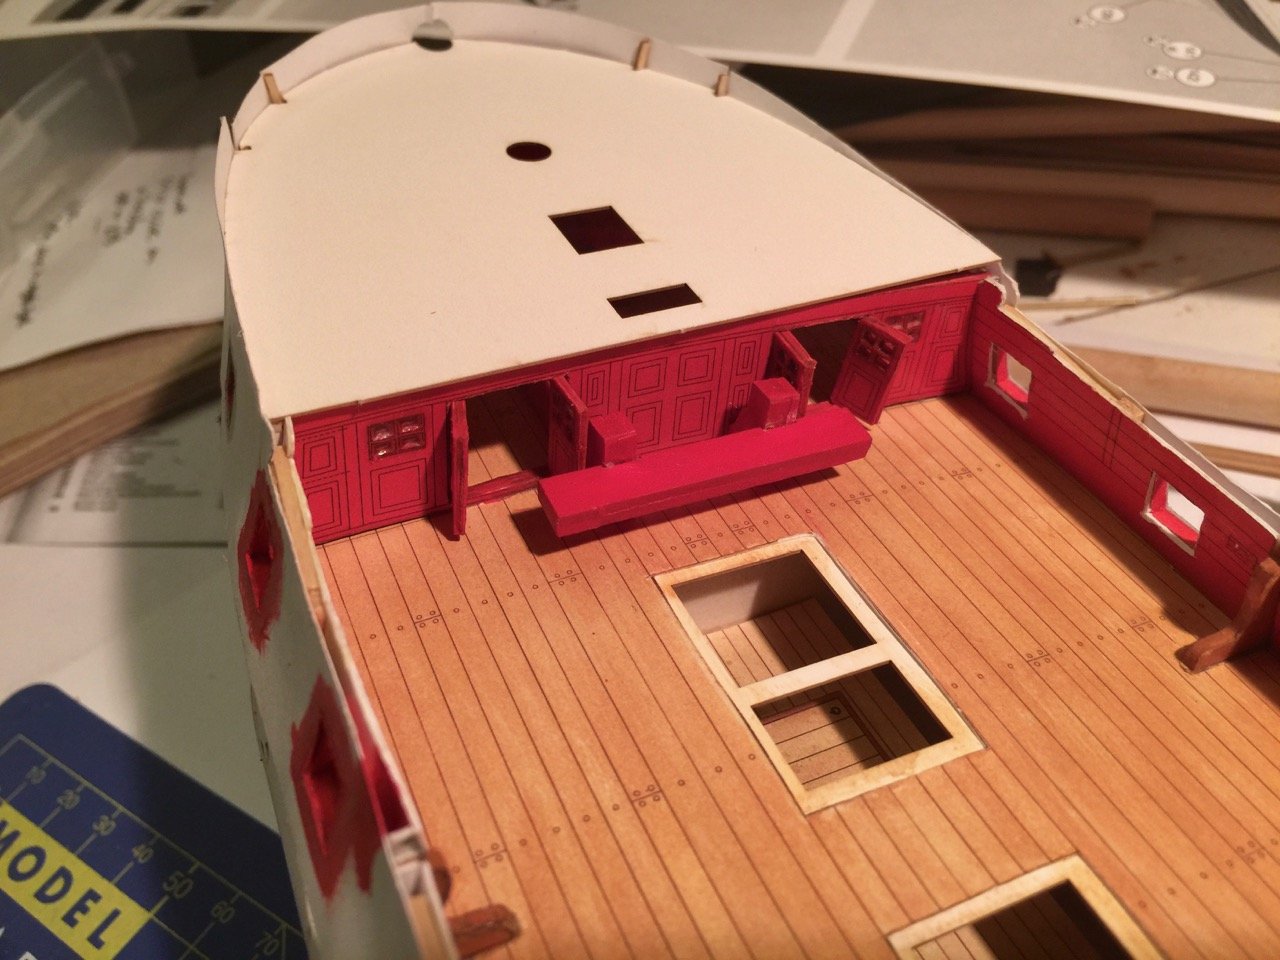
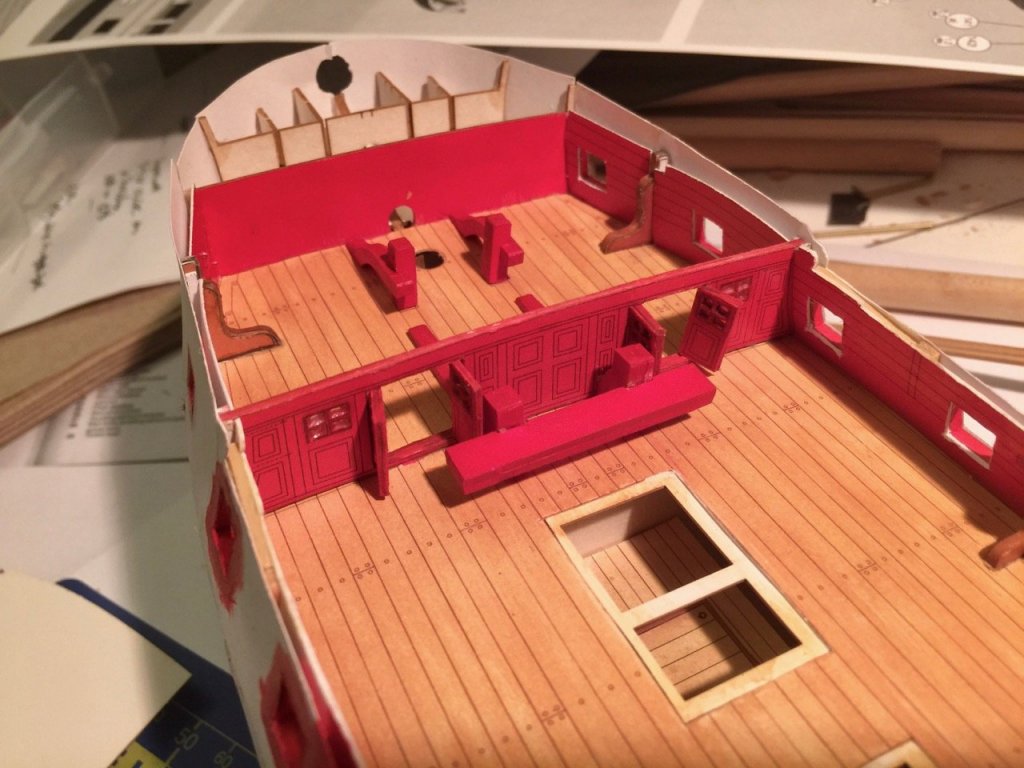
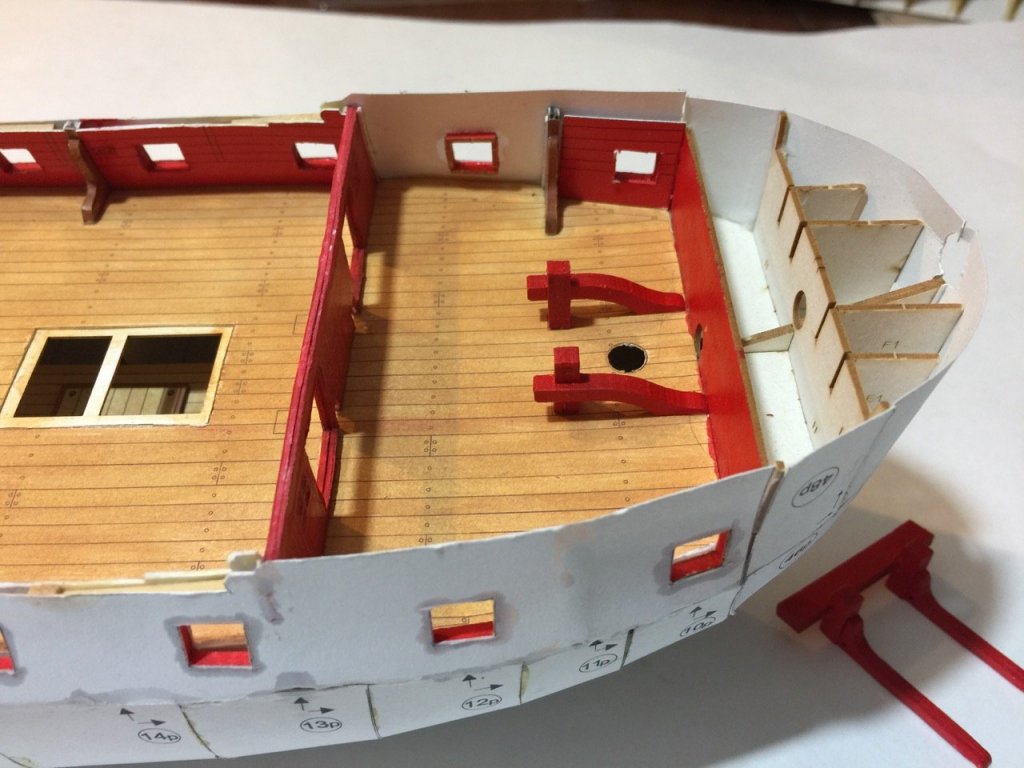
Mark, I completely forgot that you lived up there in Medford. I passed right through your fine city on Monday afternoon! Hello Peg Leg Greg from Australia. Glad you found the build log. As I generally warn people, this is really a side project, but I'm having a hard time tearing myself away from it. This card modeling stuff is addictive! And, I have to revise something I stated earlier about card modeling being challenging. The biggest challenge is a mental one. When you get one of these kits, you instantly see a gazillion parts, and you have to cut out each and every one, plus you might decided to cut out windows instead of using printed windows, etc. That's intimidating. So, I'm finding that it's like tying ratlines. You can't think about all those knots you have to tie – you just have to start and do one at a time until you get to the end. Building this model is about baby steps. You can't count how many baby steps you have to take, you just have to take them one at a time. HMS Mercury Progress Well, I made a little more progress that I thought I'd post for now. First off, I glued the new pieces into place in the fo'csle and then added the doors back on. If you recall, I'd added the doors earlier and then decided I didn't like printed windows. So, I removed them and the related partitions and cut out the window panes and used canopy glue to add the "glass". In addition to the doors, I also finished the inner bulwarks pieces at the bow. As you can see in the photo below, I still have to "edge" the gun port sills with red paint. At this point, I began to wonder how well this model was going to go together and test fit the fo'csle and quarter decks. I had to dig through the diagrams and all to figure out if this was all going to work okay in the end. So far, it seems like it should be okay, though there's more gap around the bow that I would like. Not sure yet how to fix this, if it even needs fixing. But, it was nice to see how well the decks seated into place. There are a couple beams I will have to fashion and put into place before these decks can go on. And, of course, I'll need to finish some internal details, plus the cannons. In the lower photos, you can also see the galley stove under construction. Below, you can see where it will eventually go. Of course, there's a lot of work to do to the stove before it goes into place. Finally, I added the remaining parts for the interior of the great cabin, aft. There's some furniture to go in here. That's one of those things which is pretty neat about these Shipyard ship model kits. Of course, if you want to be able to see any of this stuff, you'll have to modify the original kit, which includes printed windows. Those would normally need to be carefully cut open, but the detail kit I bought from GPM includes some laser-cut parts for the gallery windows. I'm starting to think about the outer layer that's going to go on the model. The kit includes printed parts for two configurations of the ship, one for the original 1779 paint scheme and another for the 1795 (Black and Yellow) paint scheme. I was always planning to build this in the 1779 configuration, but I'm thinking about the later configuration, just because it's different (for this kit, anyway). With that, I'm going to try to set this aside for a bit and get some other work done. It's pretty difficult, as I'm starting to feel a little like a card model junkie! Clare


- 82 replies
-
- 12
-
-
Hi Slog, I haven't been online much until recently, so I haven't been checking in on your build until now. Beautiful work! You and Danny, among others, have me kind of charged up about paper model projects. I'm having a hard time walking away from my HMS Mercury build as I'm having too much fun, even though I've got other priority work to do. Anyway, I'm enjoying following your progress. Clare
- 244 replies
-
- 4
-
-
- borodino
- dom bumagi
- (and 1 more)
-
Hi Mark, Yeah, I just drove down I-5 on Monday and it took about 4-1/2 hours to get home from there. A bit far to travel unless you're spending the weekend or something. Clare
-
I think Doris must be the most famous ship modeler in the world. I've seen mention of her in other languages, other sites. I must avert my gaze, lest I be compelled to burn my models... Clare
-
Ron, There are some really neat non-ship model paper kits out there. That looks like a nice subject. I've been thinking about taking on a steel navy build. In fact, I finally started reading Chris Coyle's tutorial and build of the V108 Torpedo Boat. I downloaded the pages and had to immediately start tinkering with it. Looks like a nice way to get started: https://modelshipworld.com/index.php?/tags/Intro to Card Models/ It's hard not to get distracted by these things – they're so cool! Clare
-
Hi Mark, There are a lot of great wooden kits out there. Where in Northern California are you located? We have a small group of ship modelers, including at least one beginner, that's meeting in Vallejo a week from this coming Saturday. So, that's July 8th. You're welcome to join us if you can. Also, I do some work with Ages of Sail, which is one of the sponsors of MSW, and their store is located in San Lorenzo. It's a great place to peruse the aisles for kits to build – a little dangerous actually, if you bring your wallet! Clare
-
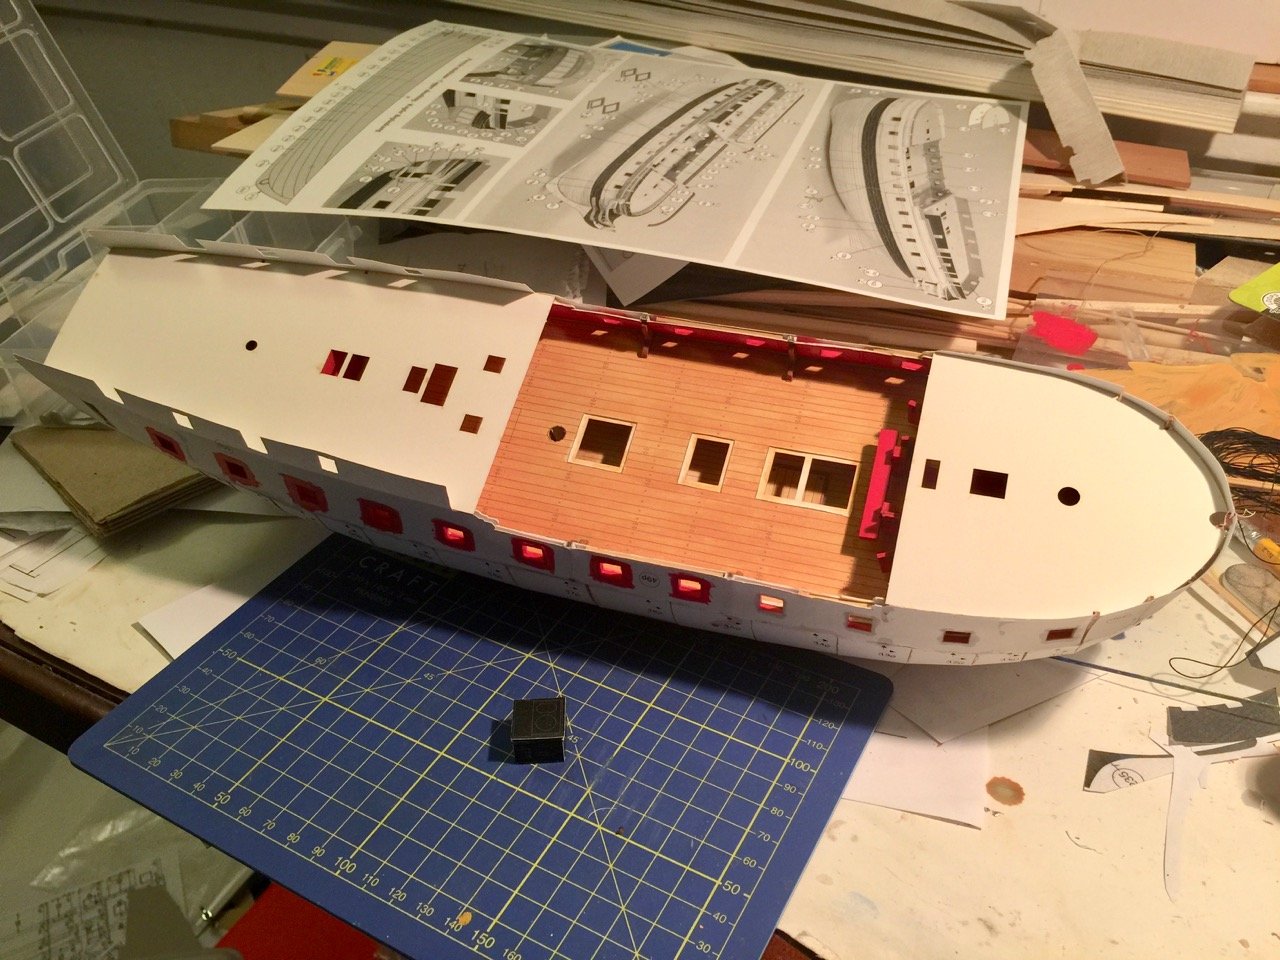
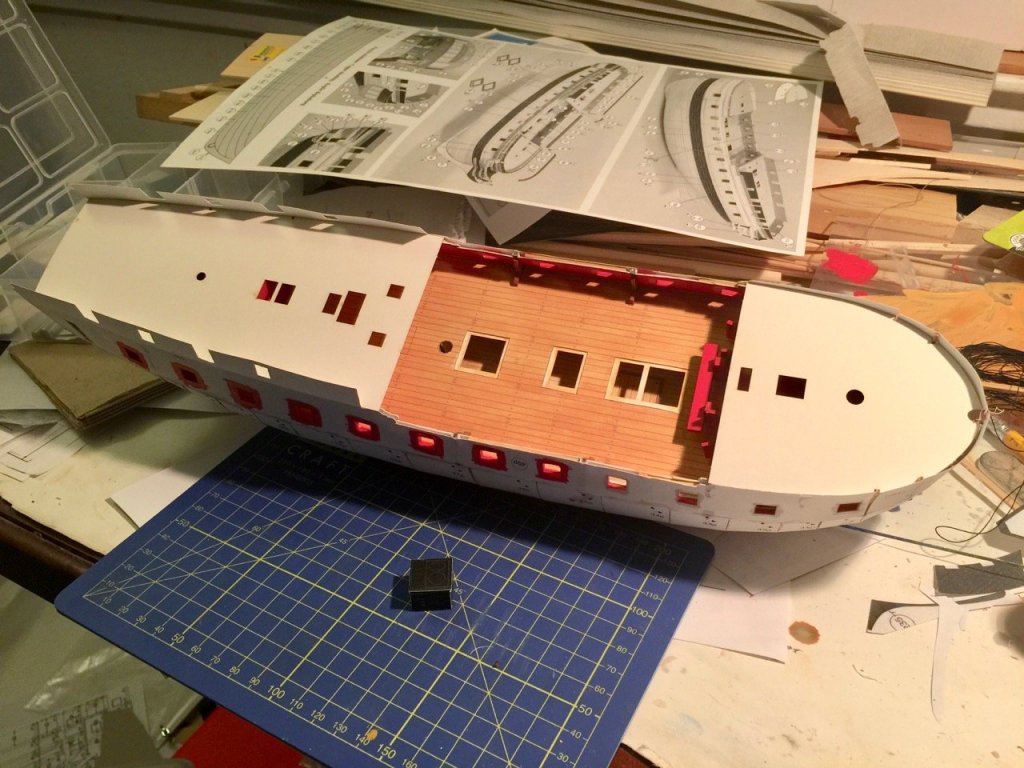
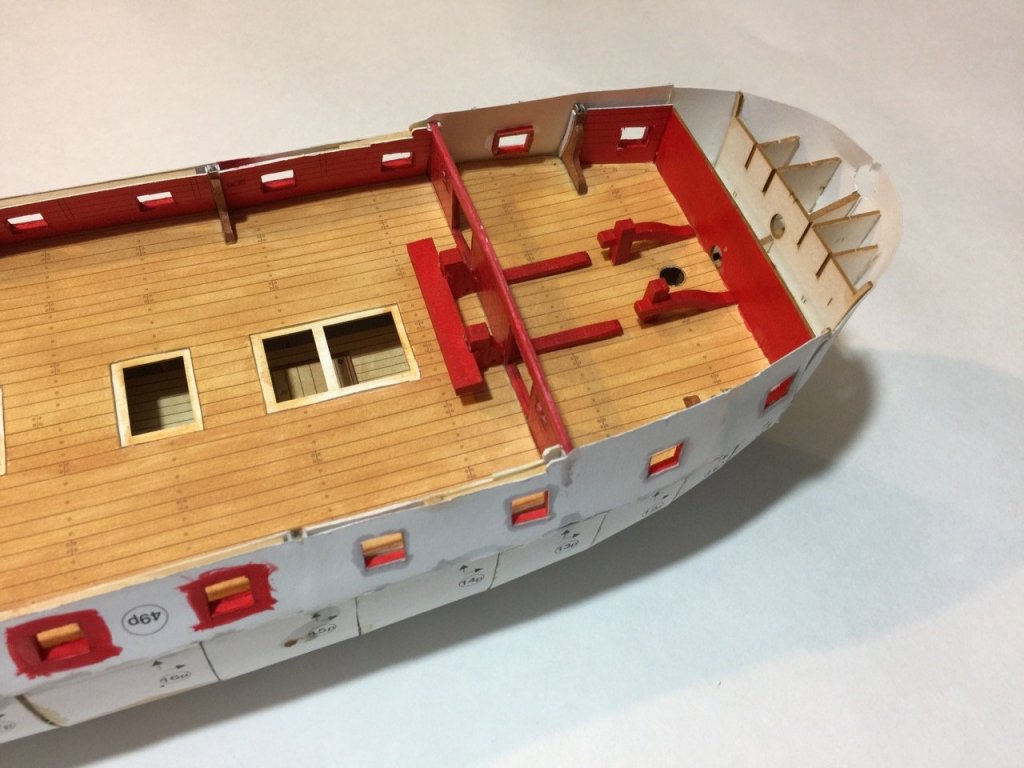
Well, as long as I'm posting things here, I might as well post a few photos of some recent work I did on the Mercury. When I have a chance to use laser-cut parts, I take it if they are sturdy enough. In general, laser-cut parts tend to use thick cardboard. Any pieces I cut for myself, I make from many layers of laminated paper, and they tend to be sturdier. So, there are places where I don't really like laser-cut parts. On a paper model, the nice thing is that laser-cut parts are an option. There always seem to be printed parts you can use instead, if you prefer. But, in this case, these large parts go together quickly, and they're easy to use. I've been switching to the use of Liquitex Soft Body Acrylics instead of the Renesans brand acrylics. I LOVE the Renesans brand, but they're only available when you buy the boxed Shipyard kits. I've looked, but they are really hard to buy here. I have a supply, but I've been needing to test out alternatives I can recommend. The main issue now is that I've found that some of the paints that Ages of Sail has been getting in the kits they sell are drying out on the shelves. In a kit of the Crowdy Head Lighthouse that I got off the shelf at Ages of Sail, the paints were mostly dried up. I found that with some work, and a little water, I was able to revive them. But, not everyone is going to want to go through that. I tried several acrylic brands, and I found the Liquitex Soft Body Acrylics seem to have the most similar coverage characteristics. I still prefer the Renesans brand as they go on VERY FLAT. Liquitex has a slight sheen unless you can apply it thinned with water. Anyway, I decided to give the deck a wash of paint to kill some of that printed paper look. I also used the HMS Mercury Detail Set I bought from GPM.PL to make the new parts you see here instead of making them from the printed paper parts in the Shipyard kit. You'll notice I painted the forward bulkhead. The kit doesn't mention anything, but it does show a photo where that bulkhead is black. I figured it was close enough to the bow to just go ahead and paint red. It's unlikely it will be very visible anyway. Another thing you may notice is what some might consider a cheat. If you look at the gap in the inner and outer bulwarks parts, you'll see strips of wood I inserted to stiffen the walls a little and to keep them from bowing too much. You can see that I still have some inner bulwarks pieces to add. Then, I can paint around the remaining gun ports and then turn my attention to the stern cabins. Clare

- 82 replies
-
- 14
-
-
Hi Mark, I'm fist and foremost a wood ship modeler, but I find the paper models really fascinating. I'm not sure if I can answer that question fully, as I've only built one paper model, HMS Alert, and the only Shipyard laser-cut kit I've built was a lighthouse kit. So, whatever you read here, please keep that in mind. What I find is that the paper models are great if you have no place to make a little mess. If you're in an apartment, no workspace, etc., paper models are great. I don't see them as being easier than wooden ship modeling. In some ways, they seem to be harder. Printed paper kits, in particular, have far more parts than other kits, and each piece has to be cut out, laminated, and it usually takes several pieces just to make, say, a fife rail. In a laser-cut kit, that same item could be as few as 3 parts. Wood kits may provide them as laser-cut parts, or may require you to fashion them from a couple strips of wooden. I will always recommend building in wood, if that is your goal. Paper models seem to be in a class of their own. Like I said, paper models are great when you don't have much room. Also, they require very simple tools. Paper kits can also be a lot cheaper than building in wood, though that can depends on the kits, etc. The laser-cut kits are really nice. Of course, you have to paint the model, but I seem to be doing a lot of that, even with the printed kits. There are certainly far fewer pieces that a printed paper kit when you consider all that you have to cut out with the printed paper kit. The laser-cut kits also have the advantage of including the dowels, turned brass cannons and 3-dimensional figureheads and carvings instead of simple 2-D printed parts. So, I'd say that if you're planning on taking on a paper/card model, go with the laser-cut ones. They're also larger scale, which should make them easier to work with. If you're just considering ship modeling and wondering if paper ship modeling is the best ways, I'd still suggest getting a nice wooden kit. Hope that helps! Clare
-
Hi Rick, I'm finally on board watching your build. Glad to see the posts about the Berbice's color scheme. I got myself the 1/96-scale version with quay port, so I could do a simple photo review. It's a neat kit, but of course the pre-printed parts show a black and white color scheme and coppered hull. When I get to it, I'd like to build it with the color scheme of the Smithsonian model, but that will be something of a challenge, as I might have to re-make the printed parts, or figure out a way to score the planking outlines and paint over it. Anyway, I'm looking forward to seeing your build. Clare
-
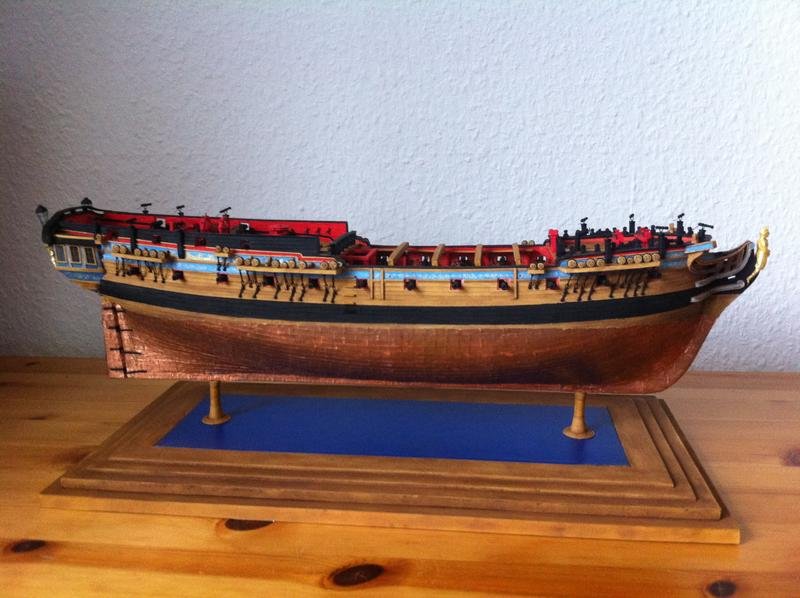
Nothing more to report here, but I ran across this amazing build of the exact same Shipyard 1/96-scale paper model kit on the German paper model forum Kartonbau.de. OMG, what an incredible build. I'm completely blown away. I highly recommend checking this out for yourselves. I took the following photo of the completed model from the builder's blog, but there are MANY more great photos there, and hopefully this will inspire people to check it out. The URL for the build log is: http://www.kartonbau.de/forum/hms-mercury-1779-1-96-von-shipyard-construction-reports-ships/board5-ships/t25313-f6/?l=2&l=2 The blog has already given me ideas, including starting over! Clare
- 82 replies
-
- 12
-
-
Hi Dave, I'm sorry I haven't been around much lately. But, I show up and see that your Colonial Schooner is looking terrific! Nice job on that hull planking! That lower hull looks slick. I like the contrasting color of the timberheads against the bulwarks too. Very fine job. I'm sorry I haven't been paying closer attention! Clare