
MORE HANDBOOKS ARE ON THEIR WAY! We will let you know when they get here.
×


Katsumoto
-
Posts
431 -
Joined
-
Last visited
Content Type
Profiles
Forums
Gallery
Events
Everything posted by Katsumoto
-
 Congratulations on completing your Santa Maria. She is a beauty. 😃
 -
Take care Max and see you soon! Peter
-
Nice update and looks of this beautiful ship! Love the color of the pearwood in combination with the black caprailing. Nice touch! 👍
-
Hi guys, Today I did some small "detail" work on the halfdeck and made some ironwork eyebolts and rings from brass. First things first. The halfdeck ends just as shown on the photo below. You can see the endgrain of the veneer wood and the false deck below, so I wanted to change that and place a walnut strip at the end to cover this up. Well, there wasn't enough space to place the plank and the only option was to cut-off the end of the deck so the plank would fit in between the bulwark. I decided to use my knife to make the cut. To keep a straight line, I use a "guide" made of a piece of walnut. The result is a straight line which needed only a small bit of sanding. After that a placed the strip of walnut. After this I worked on the eyebolds and rings. The eyebolds were part of the kit, but a bit out scale, so I reduced the diameter and blacked them with Brass Black. After the rings and eyebolds were put together, I placed them on the bulwarks. The breach rope of the cannons will be attached to these rings. And that's it for this update, Thank you for all the likes and comments and help I get allong the way. Pete
- 208 replies
-
- 11
-

-

-
- kitbashing
- Woodcarving
- (and 4 more)
-
@Tomasz B Thank you for your reply! 😃 Just practice with your tools help you to “get to know” the tools better. Because I don’t have a lot, I just get the maximum out of them as I can. But you are right, in this scale it is tiny. When you’re in front of the ship you reallize the small size and it’s something else I can tell you. 🙃 ah well, I just need to “copy” my work to the other side of the ship…
- 208 replies
-
- 2
-
-
- kitbashing
- Woodcarving
- (and 4 more)
-
Part 3 of the gun carriages The closing of an era. I finished all the carriages. Luckily there were only 20. I let the pictures do the talking and before I forget, I still need to fabricate all the bolts, rings and blocks for all these cannons...so...I'm not out of the woods yet... Then a question for those who has the knowledge about rigging these guns. It's a mid 18th century Spanish ship with French influence. Does any of you have a picture how these cannons were rigged? I mean, I have seen pictures were the thick cable goes through the carriage and I have seen pictures where the cable lies round the back of the cannon / barrel. I do not know what is correct or not. Your help is much appreciated. 🙂😅 Until the next update, Pete


- 208 replies
-
- 10
-
-
- kitbashing
- Woodcarving
- (and 4 more)
-
I use a medium oak stain and then Danish Oil as a finish.
- 208 replies
-
- 1
-
-
- kitbashing
- Woodcarving
- (and 4 more)
-
Hi guys, I'll continue with the gun carriages. This time I fabricated all wheels. I use two different diameters on the wheels. The front wheels are bigger that the ones on the rear axel. I have only one diameter of walnut and so I fabricate the smaller wheels by hand with a knife, file and some elbow grease. Wheels done, time to move on to the fabrication of all the axles. I made them out of toothpicks. All the carriages are rolling now but I need to make all the parts that support and aim the guns. Well, still not finished, to be continued... regards, Pete
- 208 replies
-
- 11
-
-
-
- kitbashing
- Woodcarving
- (and 4 more)
-
Working on the gun carriages Hello guys, Last weekend I continued to work on the fabrication of the gun carriages. I needed to make 20 in total and already made two previous examples. So, I opened the production line and get started. First step is to cut some Limewood strips to length. I use a simple strip cutter from Amati. Second is to model all the individual parts like sides, axels, wheels etc. For that I use my knife and needle files. Next update will show all pieces ready! Pete
- 208 replies
-
- 10
-
-
- kitbashing
- Woodcarving
- (and 4 more)
-
This build brings back memories. 😉 First of all, you have chosen a very good kit of Amati. Second, you build it very very good! Very crisp lines and additions you made yourself. For your first build this is extraordinary! keep up the great work, Pete
- 93 replies
-
- 2
-
-
- santa maria
- amati
- (and 1 more)
-
Soleil Royal 1/72 - Artesania Latina Ref.22904
Katsumoto replied to modeller_masa's topic in Wood ship model kits
I think this is one of the best progress or results Artesania Latina has made lately, is to make a very detailed building manual with a lot of pictures explaning how to make each step! However, I think AL can make each kit more interesting to create kit options. So, you can buy the "standard" version with "cheap" woods and a lot of plywood and requires paint. Or you buy the "premium" version and replace the cheap wood with descent hardwood like "Walnut" or "Oak" or "Cherry or Pear", more PE materials and better guncarriages, ropes etc. Some " classic modelers don't like to paint their models and just want to spend some extra money for an upgrade. At this moment this is not possible and not all modelers can mill their own lumber. 😉 -
Thanks for the likes, loves and comments guys. Much appreciated! @Baker thank you! 😀 @BobG thanks Bob. 👍 @bruce d I like the colorscheme as well. It turned out okay so to say. Always a gamble when you try something new. I shall make some more pictures up close of the carvings, but a few posts back a lot of detail photo's are allready posted. 😉
- 208 replies
-
- 4
-
-

-
- kitbashing
- Woodcarving
- (and 4 more)
-
Chapter 16 - Correcting the stern and placed the rudder It's been several weeks since my last update on Cazador. Well, sometimes work and family takes up all my time and so the ship had to wait. However, I found some spare minutes last week and made some progress on Cazador. Unfortunately I didn't have enough time to shoot pictures of the building process and for that I'm sorry. Next time I'll keep in mind that the creative fabrication process is one of the most appealing things to watch. The things I've done so far is remodeling the part where the rudder meets the hull. The kit had it wrong so I needed to correct this before attaching the rudder to the ship. I replaced the plywood with walnut and copied the original piece with these "notches". I removed the wood between the notches and placed a solid walnut piece in between. Much better if I may say so.... Also carved some more items and placed these on the stern of the ship. After this I attached the rudder and finally applied the Danish Oil on the outside of the hull and the inside of the bulwarks. Time to pop the texture of the wood out. I love this moment! I hope you guys like the progress, next time I'll make some photo's of the fabrication process, promise! 😉 Cheers! Pete
- 208 replies
-
- 14
-
-
-
- kitbashing
- Woodcarving
- (and 4 more)
-
Hi modeller_masa, it's all about dedication. You are going the extra mile with your diagrams and explanation of the construction. So, thumbs up for you! 👍 To me it doesn't matter how long a person is building or how "good" they are to follow a buildlog. Building a model is like running a marathon, not a sprint competition, so speed doesn't matter. I'm just curious how you are building Santa Maria and I'm looking forward to your next steps. 😉 regards, Peter
- 77 replies
-
- 3
-
-
- Santa Maria
- Artesania Latina
- (and 1 more)
-
Great work on the SM. I do like the "old" kit much better @Artesania Latina More solid walnut parts and less plywood please! You have probably know my completed buildlog and heavily "upgraded" the standard kit. However, I did use all the materials within the kit. The kit itself is a nice kit, it just need some upgrades. You did a nice job on the planking pattern. Looking forward to the next steps. I hope my buildlog wil help you on your way to make your own choices. regards, Peter
- 77 replies
-
- 2
-
-
- Santa Maria
- Artesania Latina
- (and 1 more)
-
Hi Gregg, You ran yourself in a "nasty" situation, but solvable. What I can see on your photo is the 3 strakes closest to the keel are at the bow not tapered or not enough tapered. So the other strakes left to place need to become too narrow at the bow and you need to work with drop planks like Allan showed you. An alternative is to remove the 3 strakes including the garboard strake and recalculate the width of each strake per bulkhead and perhaps and re-do the work. Perhaps no drop planks are needed if you do this. I can't tell from this position. Please, read my post about tapering and planking during the build of my Santa Maria or Cazador. I think this will help you on your way. Both can be found here: good luck and nice model btw.
-
Soleil Royal 1/72 - Artesania Latina Ref.22904
Katsumoto replied to modeller_masa's topic in Wood ship model kits
It is a matter of opinion. I think that the AL and OcCre kits are overall pretty good designed or engineered. By that I mean, the construction goes well together and is for a modeler pretty "easy" to build in comparison to let say most Italian brands (except Amati). However, I agree that the Spanish labels tend to use generic materials like gratings, boats, pins, anchors, cannons and re-use them for almost all their models. Out of scale or out of period or not. It's all about cost control. For a modeler not always pleasing to see or use and require bashing to get the model to a better or higher standard. But it seems that's common with most brands. The newer / upgraded kits all have laser-cut parts with perfect fitting. However, cheap plywood is used for almost everything. Exotic woods (walnut) are expensive and getting rare in their kits. Something to due with regulations, availability and costs. So, now they sell all sort paints and stains to give the cheap wood a representative "look". Cheaper wood costs less, extra sale on paint and stains, the price of the kit remains the same or goes up due to the "better and upgraded" marketing label and are all benefits for the owner / investor of the company. So with the Soleil Royal kit, this is no exception and we see a kit pretty "good" in overall appearance kit. When you zoom in, it's where the issues start. Lots of paint and cheap materials but with a high price on sale. It's "upgradable", but as a modeler you have to spend the extra bucks to achieve your goal. One thing I have to say is that the ornament or sculptures of this kit and also of the Vasa kit are exceptionally nice and very beautiful to see. It is what really will sell this kit! -
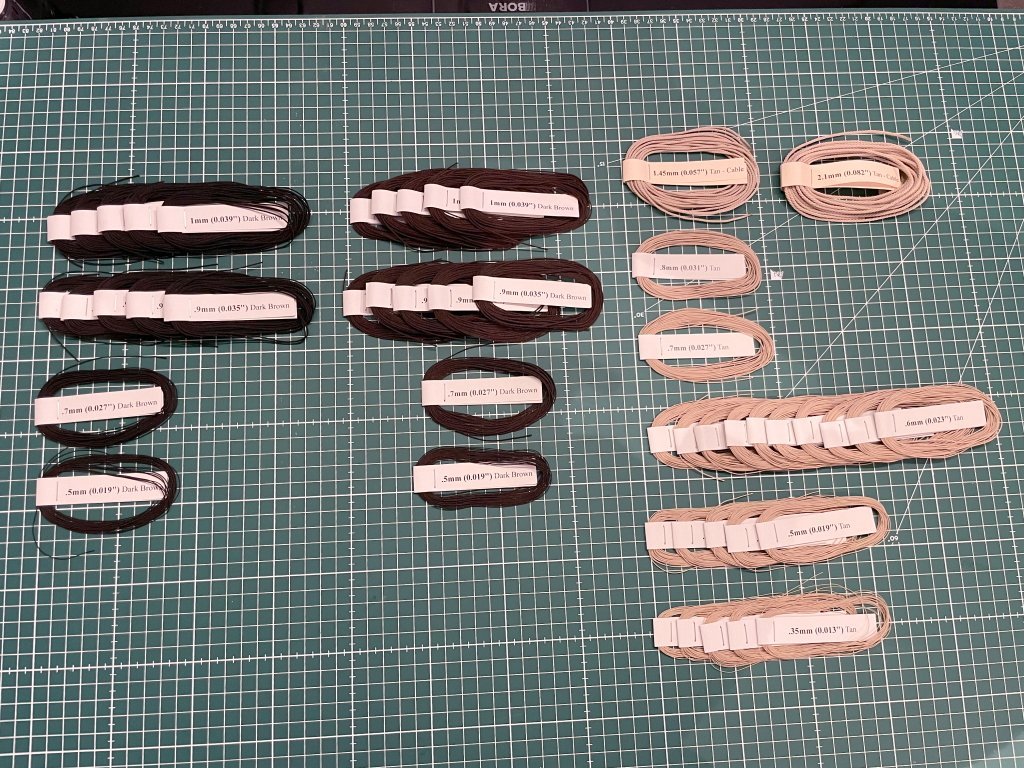
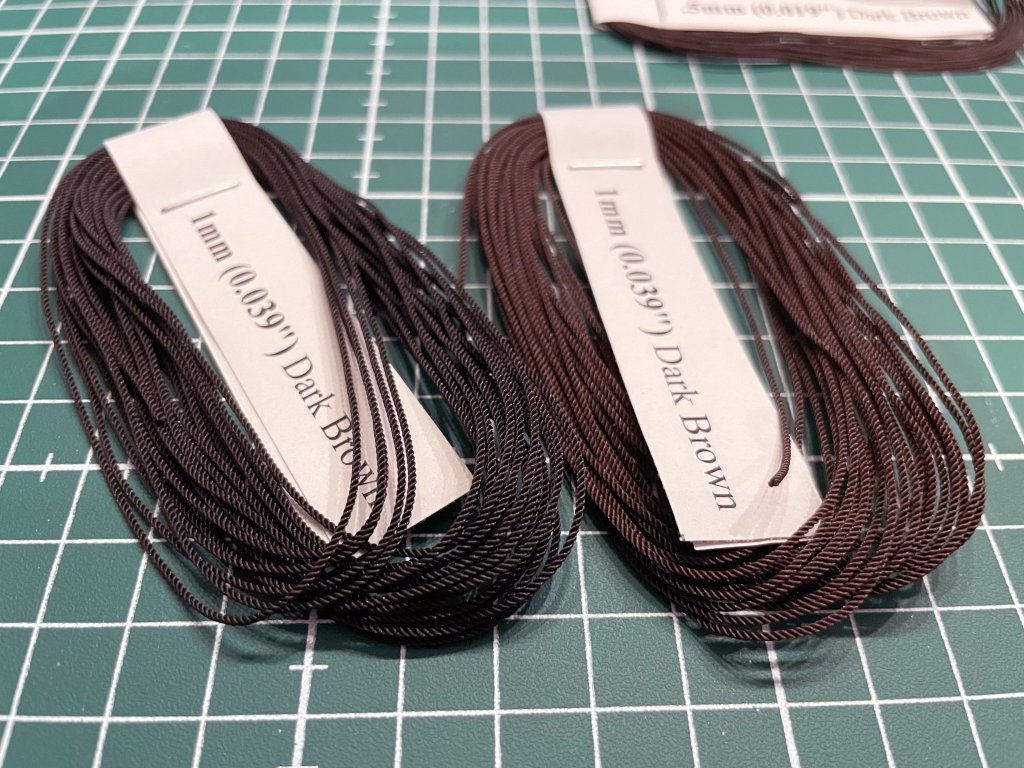
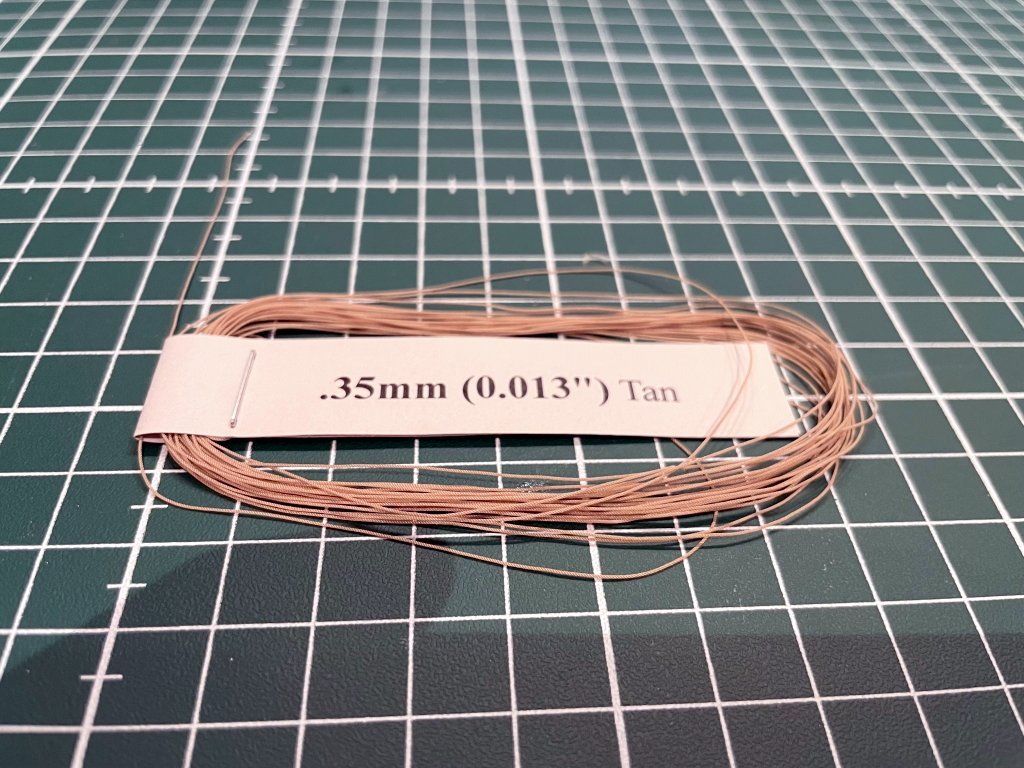
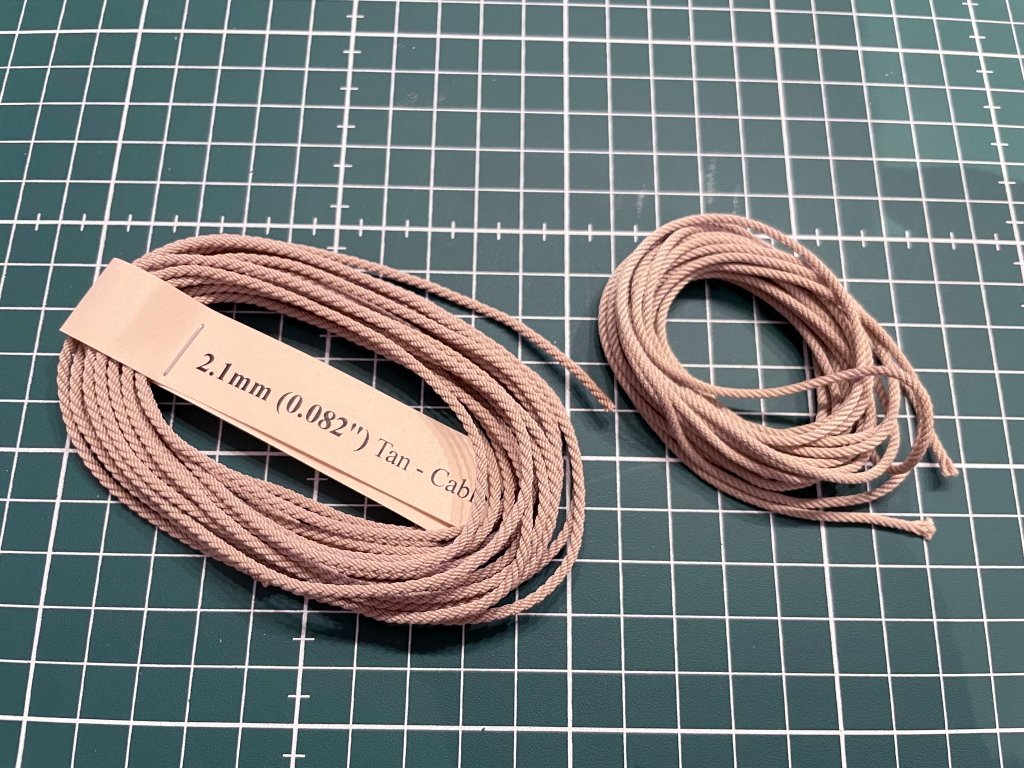
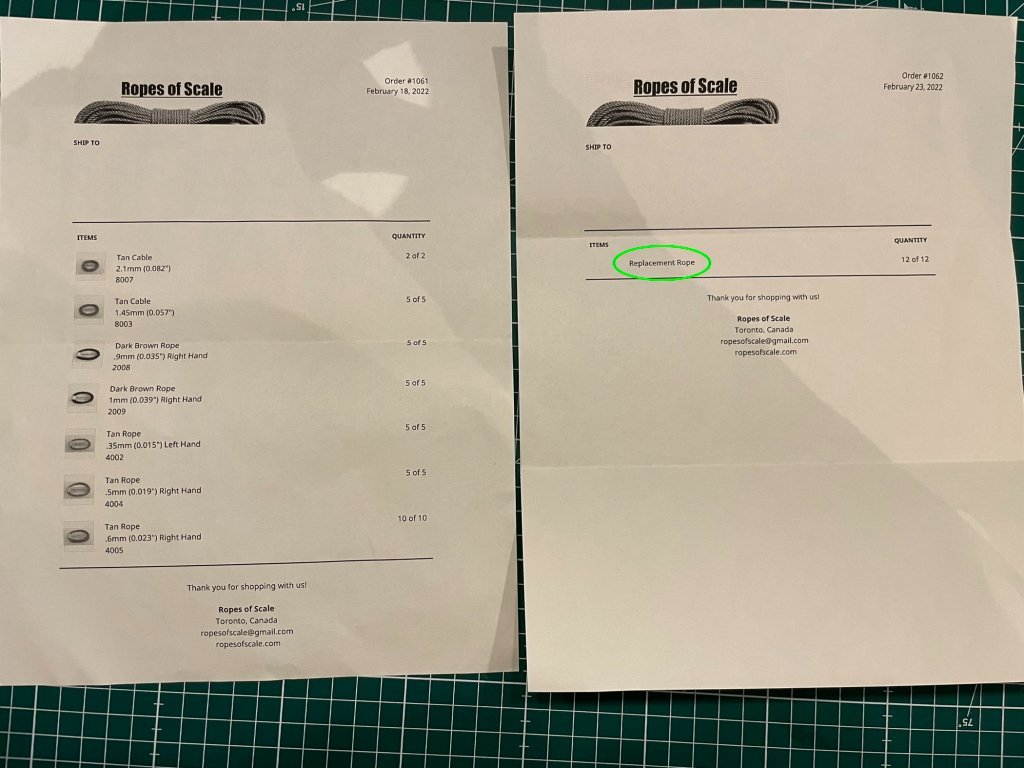
I have had the opportunity to order rope from Ben (RoS) as well as from Chuck (Syren). Both outstanding quality and quick delivery. Syren has limited the amount of rope per placed order and I needed much more for my ship, so I found RoS and ordered the rest of what I needed. I am pretty overwhelmed by Ben's service and the quality is phenomenal. I mean really really good! I am not in the position to make my own quality rope and I was looking for an upgrade for my current project Let me explain a bit further, from Syren the rope I've ordered is a cotton / polyester blend or mix and so I've ordered at RoS cotton ropes (took a leap of fate because I didn't know Ben or RoS) to have sort of the same. However, Ben contacted me by pm and asked me if I would upgrade the ropes from cotton to 100% Gutermann polyester rope for free. To me poly rope has some benefits over cotton, like no fussiness, better resistance with climate changes and humidity and long lasting. So, I opted for the upgrade! Well, when received my package of ropes, I couldn't be more pleased. You should have seen the smile on my face when opening and layed out all the ropes and cable. Boy, the quality, tightness is fantastic. But, this is not the end of the story. Ben again contacted me short after sending out the package and apologized for the color of the "dark brown" batch. To him, the color was a bit too dark like almost black. He knew I didn't want black but more like a chocolate brown and so he told me that he's sending me a new batch with a lighter color for free! This is absolutely top service I didn't expected and when I received the second package and compared both colors, he was right down to the money! The replacement batch of the lighter dark brown color was just perfect and exactly what I wanted. I know this is a personal preference, but the service and the way Ben wanted me to get the right color and not disappoint me is a service which becomes rare in this world. For me this was a done deal, and I will order again! What a more than outstanding service! I have no ties with RoS nor with Ben personally, but RoS deserves a good review so, I give one! The batch of ropes I've ordered and a comparison of the dark brown color and a comparison of cable. So the picture below shows cable from Ropes of Scale and Syren. This is not a comparison which one is best, because to me both are excellent quality and I love both of them and I think the best out there on the market you can buy. I only want to show you the difference between left 100% polyester and on the right a mix of cotton / polyester. (I don't know the percentage but I think it's more cotton than poly) It's more a personal preference I'll guess. So, for my project Cazador I will use Ben's ropes and I'm looking forward how they will look on the ship. I'll have to wait though, because I'm very busy with carving at the moment and not gotten to the rigging part of the ship. I would like to thank Ben for his service and if you guys have any questions about Ben's ropes or service I'm happy to answer them. Just send me a pm! regards, Peter
- 48 replies
-
- 18
-
-
-
-
As from now on, my log has been moved to the right era 1501 - 1750 in the buildlog era's. Apparently I made a mistake and somehow started this log a while ago in the 1751-1800 era. Thank you @James H for helping me out and moving the log to the right era! 🙂
-
You're welcome! I'll have to do a figurehead which is a 3d sculpture for this ship. I'll shall make some more pictures during the process and perhaps this will help you on your next "project" 🙂
-
If you're using a drill, keep it on a low RPM. When the RPM is high, your bits become very warm / hot and the metal looses it's hardness quickly. The same is when you use too much pressure. The result is a dull bit. So, low RPM and let the tool do it's job for you. Do not take too much wood at a time. With 3d figures use a saw / scrollsaw to shape the profile of the figure. So sideview and front view. The rest you can do with chissels or your drill. Patience is a virtue my friend....😉 Thanks for the reply, your figures looks very nice tho, don't give up, keep going! 👍
- 208 replies
-
- 2
-
-
- kitbashing
- Woodcarving
- (and 4 more)
-
Chapter 15 - Woodcarving continues part 4 Hi guys, Ouch, I was searching for my log....it was on the third page. Guess a new update is in order. 😛 I had some obligations towards my family and I was occupied by my job, so you had to wait for this update. Thank you for your patience. You guys are rocking it with all the new posts in your logs. Keep it going! In this update I'll continue with some carving elements on the side of the ship. I made a new design for the frames around the gunports. Somehow the laurel wreath didn't do it for me. Second I made the panels and third I made the carving for the back panel. Still not done, but I'm getting there....one step at the time..... If you're here reading my log, thank you and please leave a comment if you like. Until next update, Regards, Pete
- 208 replies
-
- 15
-
-
-
- kitbashing
- Woodcarving
- (and 4 more)
-
it looks awsome! love the paint and how the colors turned out! 👍
- 857 replies
-
- 2
-
-
-
- Sphinx
- Vanguard Models
- (and 1 more)
-
Chapter 14 - Woodcarving continues part 3 In this update I'll like to show you 3 vertical pilars I've carved out of boxwood. The pilars have a leaf motif. Between the last and the middle pilar I need to carve a frame with a flying eagle on it. It will be a difficult one. Also I need to carve some decorations around the round gunports. These are for later... I really appreciate your support, likes and comments! Thank you for following my log! 😀 Pter
- 208 replies
-
- 14
-
-
-
- kitbashing
- Woodcarving
- (and 4 more)