

UdoK
-
Posts
173 -
Joined
-
Last visited
Reputation Activity
-

 UdoK reacted to drobinson02199 in King of the Mississippi by drobinson02199 - FINISHED -- Artesania Latina - 1:80
I have now completed the hull planking. Pictures after the first coat of varnish are below.
I think I'm going to like this boat and like building it, but I have to say that I'm not completely happy with how the walnut hull turned out. The wood Artesania Latina provides for this is flimsy, and chips easily. More comments on the kit itself in the next post.
-
 UdoK got a reaction from Piet in VOC Retourship BATAVIA by UdoK - 1/72 kit
Thank you Robin and Michael for the link,
although I have collected a whole bunch of photos I didn't know this one, awesome Pictures!
-
UdoK reacted to md1400cs in VOC Retourship BATAVIA by UdoK - 1/72 kit
Udo,
You, of course, know this link (;-)
http://www.bataviaphotos.com/index.html
-
 UdoK got a reaction from PeterB010 in VOC Retourship BATAVIA by UdoK - 1/72 kit
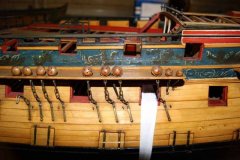
The positions of the gunports has been determined and the boxes have been glued in place. To add more strenght to the boxes and create a bigger lip for the surrounding planks some extra strips have been installed.
In order to determine the run of the wales and position of the gunports all the bulkheads come with laser marks for each wale. Basically a good idea, but due to my decision to close the hull with plywood not many of the marks are still visible. So I had to take the dimensions off the drawings and transfer it to the hull.
Before starting the installation of the wales I did plank the concave area above the transom with basswod strips 1x4 and sanded them to shape. After one coat of sanding sealer and intermediate sanding several coats of a acrylic paint (Ivory) were applied.
Finally I have prepared the transom wales from a walnut strip 1,5 x 5 and glued them into position.
-
UdoK got a reaction from PeterB010 in VOC Retourship BATAVIA by UdoK - 1/72 kit
Hi all,
Because of the fact that I lost my interest and the enthusiasm for some of my started models, these were canceled and the corresponding build logs deleted.
Other projects such as the build of the Bounty, Gunboat William and the HMS Endeavor take a break.
After a visit to the Batavia shipyard in Lelystad / Netherlands, I finally started to realize my long-standing desire to build a model.
The Kolderstok kit was ordered and the construction began, this was in July already. Unfotunately I didn't take pictures from the beginning, so the Photos below show the Status as of today.
-
UdoK got a reaction from PeterB010 in VOC Retourship BATAVIA by UdoK - 1/72 kit
Thank you Scott, this glue is my favorite too.
Before the construction goes on a short look inside the Kits box.
The wood is of very good Quality troughout, the Accuracy of the Laser cut parts like Bulkheads, Keel, Stem and Stern parts is excellent. Walnut strips are included for the single Planking and Furniture. The figures and carvings are casted from resin and obviously also very well done.
The Assembling guide consists of 6 sheets of Drawings plus a photo-illustrated booklet.
-
UdoK got a reaction from PeterB010 in VOC Retourship BATAVIA by UdoK - 1/72 kit
Thank you Piet and Robin.
In the museum shop of the Batavia warf I had the opportunity to inspect the kit of the Duyfken, it is also a very interesting ship.
I am already very excited about the Kolderstok kit of the Zeven Provincien which is supposed to be released at the end of the year.
The pictures show the model of the Zeven provincien at a scale of 1/10 in the warf Workshop, it's huge!
-
UdoK got a reaction from PeterB010 in VOC Retourship BATAVIA by UdoK - 1/72 kit
Thank you for your Likes, construction continues!
After planking the stern and closing the gun ports with walnut strips the last remaining bulkheads got filled with plywood and sanded to create the largest possible surface to fix the single planking.
Unfortunately a few of the very fragile bulkhead stubs broke off during sanding the hull, but not major issue, will be a easy fix.
The lasercut parts for the keel are cleaned up and glued together along with a basswood strip to form the false keel. As the hull below the waterline will be painted the keel is made from basswood, the upper stem and stern parts are walnut.
While waiting on the glue to set I have constructed already the gunport boxes for the canon dummis from the lasercut parts.
-
 UdoK got a reaction from cog in VOC Retourship BATAVIA by UdoK - 1/72 kit
The positions of the gunports has been determined and the boxes have been glued in place. To add more strenght to the boxes and create a bigger lip for the surrounding planks some extra strips have been installed.
In order to determine the run of the wales and position of the gunports all the bulkheads come with laser marks for each wale. Basically a good idea, but due to my decision to close the hull with plywood not many of the marks are still visible. So I had to take the dimensions off the drawings and transfer it to the hull.
Before starting the installation of the wales I did plank the concave area above the transom with basswod strips 1x4 and sanded them to shape. After one coat of sanding sealer and intermediate sanding several coats of a acrylic paint (Ivory) were applied.
Finally I have prepared the transom wales from a walnut strip 1,5 x 5 and glued them into position.
-
 UdoK got a reaction from prutser in VOC Retourship BATAVIA by UdoK - 1/72 kit
The positions of the gunports has been determined and the boxes have been glued in place. To add more strenght to the boxes and create a bigger lip for the surrounding planks some extra strips have been installed.
In order to determine the run of the wales and position of the gunports all the bulkheads come with laser marks for each wale. Basically a good idea, but due to my decision to close the hull with plywood not many of the marks are still visible. So I had to take the dimensions off the drawings and transfer it to the hull.
Before starting the installation of the wales I did plank the concave area above the transom with basswod strips 1x4 and sanded them to shape. After one coat of sanding sealer and intermediate sanding several coats of a acrylic paint (Ivory) were applied.
Finally I have prepared the transom wales from a walnut strip 1,5 x 5 and glued them into position.
-
 UdoK got a reaction from CaptainSteve in VOC Retourship BATAVIA by UdoK - 1/72 kit
The positions of the gunports has been determined and the boxes have been glued in place. To add more strenght to the boxes and create a bigger lip for the surrounding planks some extra strips have been installed.
In order to determine the run of the wales and position of the gunports all the bulkheads come with laser marks for each wale. Basically a good idea, but due to my decision to close the hull with plywood not many of the marks are still visible. So I had to take the dimensions off the drawings and transfer it to the hull.
Before starting the installation of the wales I did plank the concave area above the transom with basswod strips 1x4 and sanded them to shape. After one coat of sanding sealer and intermediate sanding several coats of a acrylic paint (Ivory) were applied.
Finally I have prepared the transom wales from a walnut strip 1,5 x 5 and glued them into position.
-
UdoK reacted to Robin Lous in Duyfken by Robin Lous - Kolderstok - Scale 1:50
Indeed...it makes a mess.
When I was in the middle of using my saw table and disk sander to shape the blocks for my first filling....the Admiral came home.
To my amazement, she didn't complain.
First done...
It's made of 3 pieces....15mm thick. Shaped the blocks with both proxxon tools and sanded smooth after fitting. Pre fairing of course.
One down...25 to go. The Admiral will likely change her mind when the dust starts to settle down.
Also did the basic construction of the stern...not fixed to the ship yet.
Needed some dry fitting to figure out where to drill the hole for the rudder control rod. (it probably has a nice fancy name unknown to me).
I look forward to plank the stern with walnut.
More soon,
Robin
-
UdoK reacted to Robin Lous in Duyfken by Robin Lous - Kolderstok - Scale 1:50
Thanks gentlemen,
Some progress on the shipyard...
I placed the frames and started with the deck.
The frames fit the slots very well, only very little adjustment was needed to get them at the right angle.
Same with the decks (2 halves)...a snug and precise fit. I used a crazy amount of clamps and rubber bands because of the slope.
I'll do the rear part of the deck tomorrow...no hurry!
Yep, yep.
Further news:
Yesterday I contacted Hans from Kolderstok, because of some air bubbles on the surface of some of the resin parts.
And today...
A new set together with a new version of plan 1. There seems to be a minor scale issue on the older version I had.
Now...that's what I call...Service!
Furthermore...
Received an email from Syren (Chuck), letting me know my order is on it's way.
Oh...and also an email from the manufacturer of the bronze swivel guns...they can't deliver the guns. No drama, the white metal ones are fine and I'll blacken them anyway.
When I finish the rear part of the deck I'll do the stern, so more soon.
Robin
-
UdoK reacted to Robin Lous in Duyfken by Robin Lous - Kolderstok - Scale 1:50
Cleared (and cleaned) my workspace,
so...let the fun begin!
Dry fitting the frames...they fit.
Robin
-
UdoK reacted to Robin Lous in Duyfken by Robin Lous - Kolderstok - Scale 1:50
My second wooden ship model build...
De Duyfken VOC verkenningsjacht (scouting yacht) 1595-1608, a pinas. From Kolderstok scale 1:50.
Lenght about 65cm, height 55 cm, width 25 cm.
Armament: 10 cannons and 4 swivel guns.
Link to the Duyfken replica foundation
Being Dutch, I'm proud of our maritime history and achievements.
I'm well aware and of course not proud of the many horrible things our exploring forefathers did to gain power and wealth.
Nonetheless, their exploring achievements were remarkable and it's almost unbelievable such a tiny country managed to become a powerhouse.
I'm excited to start this build, still so much to learn and I think this is a good choise for my second build.
I got the kit last year as a Christmas gift from the Admiral.
Since I believe this is the first Kolderstok Duyfken on this forum, let's have a look at what you get....
From Kolderstok...the kit, the extra gun set (4 guns) and a resin name plate.
I was happy to find the (out of print, Dutch translation) National Geographic book about the building of the replica ship. Superb photo's...very helpful.
There's no ship's boat included, but since you can't discover the world without one...I bought a suitable resin one.
And inside the box...
Wow!...a lot!
Very nice step by step manual with good colour photo's. In Dutch, there's an English version included also.
Wood...
Good quality planks and dowels, the laser cut parts look really sharp. The larger parts are pre-cut to make life easier.
Bits and bobs box...
Looks good...resin and thin laser cut ship decorations, white metal anchor and 4 small swivel guns, brass cannons, neat looking blocks, brass nails, several types of rope and cloth for the flags.
The printed flags (good colours!) can be ironed on this cloth.
Also included is fabric for the sails. Fine quality, cream colour. 2 large plans, a part list and a seperate manual on how to build the grating.
Well...I guess that's all nice and fine. Now let's see what I can do with it.
I can start when I cleared my workspace, so...the usual: More soon!
Robin
-
UdoK reacted to Robin Lous in Greek Bireme by Robin Lous - FINISHED - Dusek - Scale 1:72 - First wooden ship build
FINISHED
I'll make better photo's for a gallery asap, but this is what it is....
Thanks for watching, thanks for the support, thanks Daniel Dusek, thanks to the Admiral for pretending she likes what I shown her during the build ..."look a 7 part rower seat!", "look! an oar!".
It was a joyful ride...I love this kit and I liked to do all the modifications. Daniel Dusek did a fantastic job...I gladly build another (but different)!
Thanks again guys...really, without this forum there wouldn't be a finished model!
More soon...but something else!
Robin
-
UdoK reacted to Robin Lous in Greek Bireme by Robin Lous - FINISHED - Dusek - Scale 1:72 - First wooden ship build
Thanks guys, the support is not only appreciated. Without...this build would likely have ended in the fireplace shortly after opening the box!
Anyway, with a severe man flu to deal with...I treated myself to a small fun job. The flag!
Now...a flag is a flag, but 550 BC...flags were still a bit different. On Greek ships anyway.
Like this...
Strange flags....
Not sure what to make of this. Probably a frame of twigs tied together...covered with fabric.
It can even be something like a tube shaped wind vane or like a horo on the back of a samurai messenger (Google that lol).
After some trial and error I made this...
And now painted and with a couple of streamers...
The colours can be anything, but I payed a tribute to the Greek black pottery makers.
So, different shades of ochre and black
A dry fit on the ship...
Note: the ochre looks yellow on this photo, but that's because of poor lighting.
The streamers are just painted paper. I'll bend the lower one a bit more and I'll make the pole shorther.
After a final inspection...matt varnish and done. 6 hours work....was fun!
Robin
-
UdoK got a reaction from CaptainSteve in VOC Retourship BATAVIA by UdoK - 1/72 kit
Thank you for your Likes, construction continues!
After planking the stern and closing the gun ports with walnut strips the last remaining bulkheads got filled with plywood and sanded to create the largest possible surface to fix the single planking.
Unfortunately a few of the very fragile bulkhead stubs broke off during sanding the hull, but not major issue, will be a easy fix.
The lasercut parts for the keel are cleaned up and glued together along with a basswood strip to form the false keel. As the hull below the waterline will be painted the keel is made from basswood, the upper stem and stern parts are walnut.
While waiting on the glue to set I have constructed already the gunport boxes for the canon dummis from the lasercut parts.
-
 UdoK got a reaction from md1400cs in VOC Retourship BATAVIA by UdoK - 1/72 kit
Thank you for your Likes, construction continues!
After planking the stern and closing the gun ports with walnut strips the last remaining bulkheads got filled with plywood and sanded to create the largest possible surface to fix the single planking.
Unfortunately a few of the very fragile bulkhead stubs broke off during sanding the hull, but not major issue, will be a easy fix.
The lasercut parts for the keel are cleaned up and glued together along with a basswood strip to form the false keel. As the hull below the waterline will be painted the keel is made from basswood, the upper stem and stern parts are walnut.
While waiting on the glue to set I have constructed already the gunport boxes for the canon dummis from the lasercut parts.
-
UdoK got a reaction from Piet in VOC Retourship BATAVIA by UdoK - 1/72 kit
Thank you for your Likes, construction continues!
After planking the stern and closing the gun ports with walnut strips the last remaining bulkheads got filled with plywood and sanded to create the largest possible surface to fix the single planking.
Unfortunately a few of the very fragile bulkhead stubs broke off during sanding the hull, but not major issue, will be a easy fix.
The lasercut parts for the keel are cleaned up and glued together along with a basswood strip to form the false keel. As the hull below the waterline will be painted the keel is made from basswood, the upper stem and stern parts are walnut.
While waiting on the glue to set I have constructed already the gunport boxes for the canon dummis from the lasercut parts.
-
 UdoK got a reaction from Dutchman in VOC Retourship BATAVIA by UdoK - 1/72 kit
Thank you for your Likes, construction continues!
After planking the stern and closing the gun ports with walnut strips the last remaining bulkheads got filled with plywood and sanded to create the largest possible surface to fix the single planking.
Unfortunately a few of the very fragile bulkhead stubs broke off during sanding the hull, but not major issue, will be a easy fix.
The lasercut parts for the keel are cleaned up and glued together along with a basswood strip to form the false keel. As the hull below the waterline will be painted the keel is made from basswood, the upper stem and stern parts are walnut.
While waiting on the glue to set I have constructed already the gunport boxes for the canon dummis from the lasercut parts.
-
UdoK got a reaction from cog in VOC Retourship BATAVIA by UdoK - 1/72 kit
Thank you for your Likes, construction continues!
After planking the stern and closing the gun ports with walnut strips the last remaining bulkheads got filled with plywood and sanded to create the largest possible surface to fix the single planking.
Unfortunately a few of the very fragile bulkhead stubs broke off during sanding the hull, but not major issue, will be a easy fix.
The lasercut parts for the keel are cleaned up and glued together along with a basswood strip to form the false keel. As the hull below the waterline will be painted the keel is made from basswood, the upper stem and stern parts are walnut.
While waiting on the glue to set I have constructed already the gunport boxes for the canon dummis from the lasercut parts.
-
 UdoK got a reaction from Waitoa in VOC Retourship BATAVIA by UdoK - 1/72 kit
Thank you for your Likes, construction continues!
After planking the stern and closing the gun ports with walnut strips the last remaining bulkheads got filled with plywood and sanded to create the largest possible surface to fix the single planking.
Unfortunately a few of the very fragile bulkhead stubs broke off during sanding the hull, but not major issue, will be a easy fix.
The lasercut parts for the keel are cleaned up and glued together along with a basswood strip to form the false keel. As the hull below the waterline will be painted the keel is made from basswood, the upper stem and stern parts are walnut.
While waiting on the glue to set I have constructed already the gunport boxes for the canon dummis from the lasercut parts.
-
UdoK got a reaction from prutser in VOC Retourship BATAVIA by UdoK - 1/72 kit
Thank you for your Likes, construction continues!
After planking the stern and closing the gun ports with walnut strips the last remaining bulkheads got filled with plywood and sanded to create the largest possible surface to fix the single planking.
Unfortunately a few of the very fragile bulkhead stubs broke off during sanding the hull, but not major issue, will be a easy fix.
The lasercut parts for the keel are cleaned up and glued together along with a basswood strip to form the false keel. As the hull below the waterline will be painted the keel is made from basswood, the upper stem and stern parts are walnut.
While waiting on the glue to set I have constructed already the gunport boxes for the canon dummis from the lasercut parts.
-
 UdoK got a reaction from *Hans* in VOC Retourship BATAVIA by UdoK - 1/72 kit
Thank you for your Likes, construction continues!
After planking the stern and closing the gun ports with walnut strips the last remaining bulkheads got filled with plywood and sanded to create the largest possible surface to fix the single planking.
Unfortunately a few of the very fragile bulkhead stubs broke off during sanding the hull, but not major issue, will be a easy fix.
The lasercut parts for the keel are cleaned up and glued together along with a basswood strip to form the false keel. As the hull below the waterline will be painted the keel is made from basswood, the upper stem and stern parts are walnut.
While waiting on the glue to set I have constructed already the gunport boxes for the canon dummis from the lasercut parts.