


The Gimps Chimp
-
Posts
159 -
Joined
-
Last visited
Content Type
Profiles
Forums
Gallery
Events
Posts posted by The Gimps Chimp
-
-
Hi Capella,
I see your concern here. I also had issues with my first planking if you look at my build log. To me, it looks like some of those planks don't appear to be sitting flat on the first bulkhead. As you get the planks closer to the bow not only do they bend in towards the bow (vertical plane) but they also start to roll over in the horizontal plane. A couple of the planks appear to remain vertical.
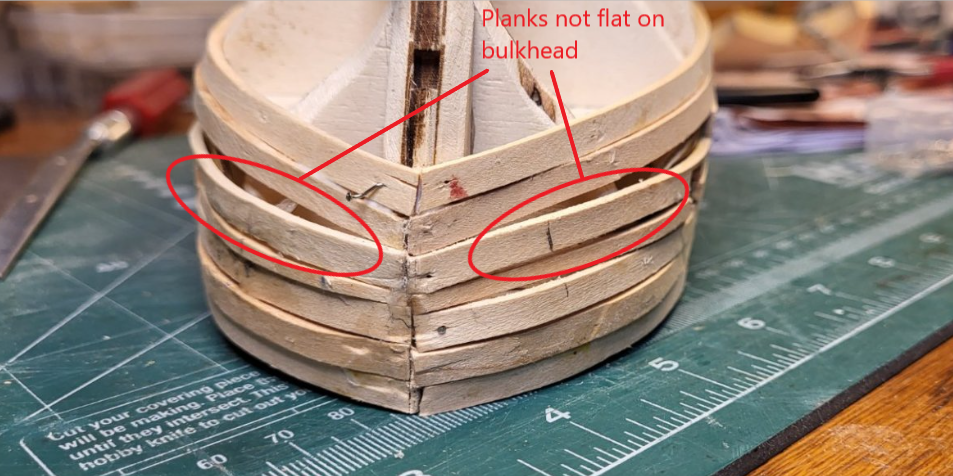
You could just use plenty of filler and sand it all to shape and that does generally work well for the first planking. My concern would be that there may be some points where the inside of one plank sticks out further than the outside of an adjacent plank. This could result in you sanding through an entire plank when trying to get the high-points down. If you decide to go with the fill and sand method I would glue in thin slithers of wood between the planks where you have gaps to ensure there is plenty of wood there to provide strength to the structure.
Alternatively if you cut out the offending planks and reset them flat on the bulkheads that may solve your problem. Don't worry about running short of the planks as I had enough to make two models.
Hope I've managed to explain my thoughts here. It was clear in my mind what I was trying to say but maybe it didn't come out that well. (feel free to ask me to explain further)
Chimp
-
Hi Capella,
When I did my first planking on the Beagle it looked absolutely appalling. However, by the time I had filled and sanded the hull it didn't look too bad and I was quite happy with it. My advice would be to allow the planks to follow a natural path without applying too much force to make it fit.
Looking at the last photo of your post I would say the top plank looks to be in the correct position. (maybe I've misunderstood your question)
Chimp
-
Hi Capella,
I didn't use the nails provided in the kit but preferred to use the clamp technique using small bulldog clips on the bulkhead and/or removeable noticeboard pins. Not sure if the supplied nails should be left in or removed. If they're left in then sanding down the planks once finished is very difficult. If they are to be removed then they shouldn't be pushed fully home otherwise it will be very difficult to pull them out once finished.
Chimp
-
On 2/4/2023 at 11:11 PM, Capella said:
New term for me!
What is it and why do you think you need it?
Hi Capella,
Not sure if you've seen this very informative document:
http://modelshipworldforum.com/resources/Framing_and_Planking/plankingprojectbeginners.pdf
I would highly recommend it. I must admit I haven't been able to practice all of it yet but it's my plan to do so on my next build.
Chimp
-
-
9 hours ago, Capella said:
I don't see any difference in the keel between the fore and aft.
Hi Capella,
You're right in that it's difficult to see the difference but maybe the photo below will help.
Your build is coming along great, keep up the good work
")
Chimp
-
20 hours ago, RobTBay said:
Beyond just wanting to enjoy building the ship, I wanted to use this build as a bit of a learning experience. Which is to say, I want to step outside the instructions a little and add some extra details or move a little closer to the prototype. Not that I don't think that the kit wouldn't build a nice model, just that I can see places where I could do a little more and learn a bit from trying. The kit design obviously made some simplifications to put the kit in the price point and a build difficultly they were targeting, nothing wrong with that. In the end I don't expect to build a museum quality piece or match the prototype exactly (as can be seen in many places around this forum!), I just want to try my hand at doing a little bit more.
One thing I've learned from my previous build attempts, is that never having enough time to spend on your projects leads to rushed work and simply having to accept however it comes out on the first attempt. I finally have some time that I can spare for building, which means I can also spare a little time for exploring and testing (or redoing if it doesn't work out on the first attempt!).
Having said all that, in my wish list of possible items to adjust or add, I can see that some of them should be well within my reach, and a few might be more of a challenge for me. My intent is to give them a try, but if I bog down or I'm not happy with my results, I'm giving myself permission to fall back to the instructions as written if necessary. I would rather complete a nice ship as per the kit instructions, than a nicer ship sitting unfinished on the workbench that I've gotten frustrated with. I'm going to try to build any adjusted/refined/added components, rather than just buying replacement parts. Otherwise, I should have just spent the money on a more detailed kit ...and I'll lose the learning opportunity of trying to do it myself (I may yet relent on that condition, but we'll see).
So, here's my list of possible adjustments or additions (which will likely change as I progress! 🙂)...
- The provided material for the deck boards is 5 mm, which would make them close to 12" wide at full scale. My understanding, and some course measurements from Marquart's Anatomy of the Ship, would suggest something closer to 8" would be more realistic (a little less than 3.5 mm at 1:60). So, I may cut the supplied deck boards down to 3.5 mm before installing.
- I also may cut the boards to realistic lengths before installing, rather than using pencil marks to indicate the end of the boards. The hope is that I will get a little better effect this way?
- Treenails ...to add or not? Well done treenails can be quite nice, but if they are overdone, they seem to detract from the model. In my (humble) opinion they should be a detail you see when you get close to the model but are not obvious from a distance. If I can do them subtly, then I'm happy to add them. If I can't do them subtly, then I plan to leave them out. I think a little testing will be involved here (and same with the use of the scale length planks as well).
- A lack of deck camber has been pointed out in a couple of the build logs (the deck in the kit is flat). I could adjust the frames to force a bit of a camber, but I am concerned that this may cause a domino sequence of additional issues and frustrations down the road in the build (all the components in the kit are designed to be installed with the assumption of a flat deck!). I think this is one I will leave alone. For the subtle gain in prototype accuracy, I may gain a whole lot of frustrations.
- The deck boards towards the bow on the prototype would have been joggled, which might be a bit finicky, but I think could be within my grasp to take a stab at.
- The addition of something to represent waterways along the edge of the decks might be a nice addition. I'll have to think a bit about how I would do that.
- The material for the hull planking is the same 5 mm width stuff, which again might be a bit wide (12" at full scale). So, once again, I may thin down the strips to around 4 mm (?) to bring them closer to about 10" at full scale.
- While on the topic of hull planking, I'm planning on trying to follow the articles/videos from David Antscherl and Chuck Passaro rather than the kit instruction's approach to planking.
- Cabin bulkhead planking again uses the same 5 mm material, which is likely out of scale. So, I'll try to thin it down a little to bring it closer to around 8" at full scale (3.5 mm?).
- The brass doors provided will either be painted or replaced with something I make from wood.
- The brass windows will also be painted, and I want to try to provide some kind of "window" material behind the frame to reflect the presence of glass.
- In general, I'm not shooting for a brass and wood-stained finished model. Where appropriate a little brass may be present and certainly there will be places where there may be unpainted wood, but generally I'm working toward something that looks like the Beagle as it was in use.
- The one exception to my avoidance of a vast expanse of stained wood might be in the coppering of the hull. I'm not sure I want to go through the effort to go with coppering the hull but will allow the stained sapelli (red brown) to represent the area of coppering, with the rest of the hull painted (which is probably the intent in the kit design anyway). What can I say, I like the look of stained wood ...I can have my cake and eat it to! 😁
- The canons in their stowed positions could be improved with a little bit of additional detail, which I will attempt to provide.
- When I work on the ship's boats, there may be some opportunity to provide a little refinement. The parts look to be a little chunky for scale. But I'll have to wait to see how difficult this will be at those small sizes.
- There is only one size of blocks (both single and double) and a limited choice in rigging line sizes. I may try my hand at making blocks to give me at least one additional size, but this might also precipitate the need to also come up with another rigging line size. So, perhaps I'll look at building a simple rope walk and try to make some rigging lines? This one might cause me to want to replace all the line ...which might become a bit of a project?
- The ever so slightly oversized deadeyes I can probably live with. The significantly oversized belaying pins will need something done. I will try to adjust their size a little (bring them a little bit closer to an appropriate size ...at least make them less objectionable). This may be the one place I simply buy my way out of the problem and order replacement belaying pins.
- There are some plywood parts in the deck fittings that could be fairly easily replaced with hardwood components. I don't plan to replace all the plywood but may selectively replace key visual items. I have basswood and maple stock at hand, so replacement wood is not a problem.
- I have seen some minor additional detail added to things like the winches and capstan in some of the build logs that goes a long way to improving their look ...not bringing them to complete prototype accuracy, but just enough additional detail to make a big visual difference.
- The anchor stocks are cast with the anchor shafts. I may think about cutting off the stocks and replacing them with wood ...or just doing a nice detail paint job to make them look more like wood?
- The hammocks in the hammock rails ...not sure what to do here. I can see they don't look terribly realistic as they are, but not sure if I have a good idea how to make them better without digging myself into another serious project. I think I will do a little experimenting and then decide.
- The brass wire approach to the scroll work can look decent if done well. But I plan on trying my hand at making the scroll work in wood. This may be one of those items where I go back to the kit instructions in the end, but I'll give it a try.
Wow, that list got long fast! 😬 We'll see how it all goes as I progress ...I'm sure there's other things I'll think of.
The one thing I'll have to remember is that I've given myself permission to fall back to the kit instructions before I get frustrated with the build. Try some new stuff, push my skills a bit, but more importantly have fun with the build even if I don't achieve all the items on my improvements list!
Now on to the actual construction...
Rob
Hi Rob,
Wow, that's a long list! Not wanting to make the list any longer but have you considered the rope? I see that you now get wooden blocks, deadeyes and belaying pins so hopefully the quality of the kit parts are being improved. If so, then maybe the quality of the supplied rope has improved. The rope I was supplied was poor so I decided to make my own which I very much enjoyed doing. Now I don't worry about being frugal with the rope I use
You look to have made a fantastic start! I'm following your build log with interest.
Chimp
-
15 hours ago, Capella said:
Organized and labeled all of the planks and dowels:


Beagle build veterans, please read!
As it is now, I'm having a hard time reconciling the planks with the drawings and the parts list.
For instance, the first time you come across using any of the planks is planking the deck, which is indicated in the plans by A20, and in the Parts List A20's measurements are listed as 0.6 x 5 x 340, but after organizing everything by size (using a digital caliper), I don't have anything like that. The closest I have is 30+ pieces of white planks measuring .5 x 4 x 420. I assume, since the plans indicate to make the deck planks 60mm long, the overall length doesn't matter, but I just want to make sure that I use the right planks for each intended use.
I'd appreciate any advice on this.
Thanks!
Hi Capella,
I've just measured the wood I had in the kit for the deck planking, it measured 0.5 x 5 x 600.
In the parts list it mentions Sycamore, Lime wood and Sapele having a 0.5 x 5 cross-section. Now I can't remember three types, only two types - one dark and one light. Having said that it was quite some time ago now so may have been three
Over the time of building this kit I have developed a love/hate relationship with the instructions (more hate than love dare I say). The build logs on this site are a fantastic source of information to supplement the instructions and are a good way to rationalise the instructions.
Chimp
-
6 minutes ago, allanyed said:
What about the deck rounding? Decks other than the platforms and orlop were rounded as much as 9 inches depending on the deck and size of ship rather than lay flat.
Hi Allan,
You're absolutely right in what you say. However, when I did mine I wasn't aware of this and just followed the instructions. I don't believe there is any camber included on the bulkheads in the kit and are made flat. Of course you could modify the bulkheads to include a camber.
Looking at the AotS for the Beagle, there doesn't appear to be much of a camber, and I would say much less than 9 inches.

As with all these things in scale modelling, how far do you go?
I must admit there has been so much about this kit which I've found frustrating but have learnt to accept it for what it is and use it as a learning process to try and hone my skills. As with any kit, it's a starting point. We are free to change any aspect of the kit we so choose to. I suppose the ultimate is to scratch build, but my skills are a long way from considering that unfortunately. As I said above, how far do you go?
Chimp
-
7 hours ago, Capella said:
Hey, Chimp
I'm at this very stage now on my own Beagle and I'm wondering at what point(s), exactly, did you actually glue the bulkheads and deck?
My thinking is to:
1) dry-fit the bulkheads
2) dry-fit the PLANKED deck on to ensure proper alignment of the bulkheads since the bulkheads lock in to the notches in the deck3) glue the bulkheads on to the keel only
4) glue the deck onto the bulkheads and keel
What are your thoughts/comments on this strategy? What steps, exactly, did you take in the above regards?
Thanks!
Hi Capella,
I think the sequence you are suggesting makes sense. From memory I recall my sequence being very similar:
1) Dry-fit bulkheads
2) Dry-fit UN-PLANKED deck
3) Glue bulkheads to keel
4) Plank deck
5) Glue PLANKED deck to bulkheads
To be honest It amounts to the same thing.
What I think is important is that you plank the deck before gluing it to the bulkheads. It will be so much easier to plank the deck on a flat surface rather than trying to plank it after it's glued to the keel.
Chimp
-
On 1/3/2023 at 3:51 AM, Capella said:
So encouraged by your progress, Chimp! I'm waiting on my Beagle to arrive and have found there are PLENTY of logs for the ship here at MSW.
I've made several notes from your log. Keep up the good work!
Hi Capella,
Many thanks for the words of encouragement. I'm currently a bit bogged down with other things and have lost my way a little with the build. I found the rigging of the masts became a little onerous with conflicting and confusing instructions. My intention is to restart the build very soon (New year and all that...). I'm hoping to get it finished soon as I have another kit waiting to go and I don't want to have two kits on the go at the same time.
I'll be watching your build log with much interest
Chimp
- Mr Whippy, Capella and DonSangria
-
 2
2
-
 1
1
-
-
Hi Dean, on that same sheet you should have 3 more views labelled A, B and C. They will be what you see when looking from the direction of those arrows. A is looking up the mast, B and C looking down.
Regards Chimp.
- Keith Black and mtaylor
-
2
-
-
-
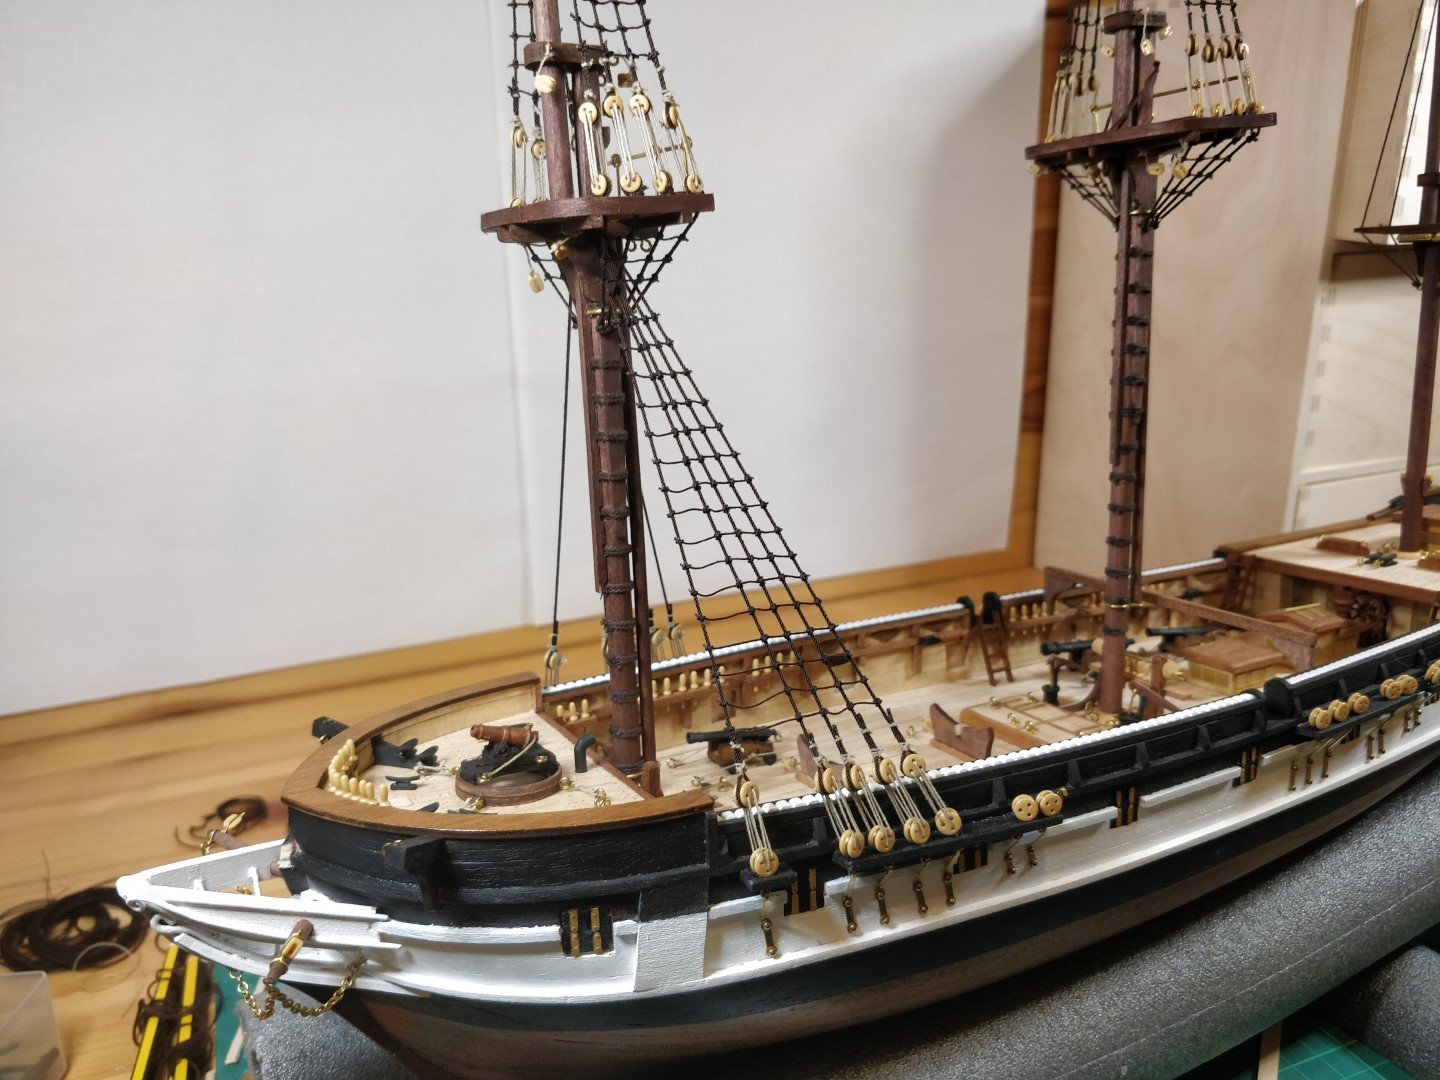
I guess I'm long overdue for an update, so here it is.
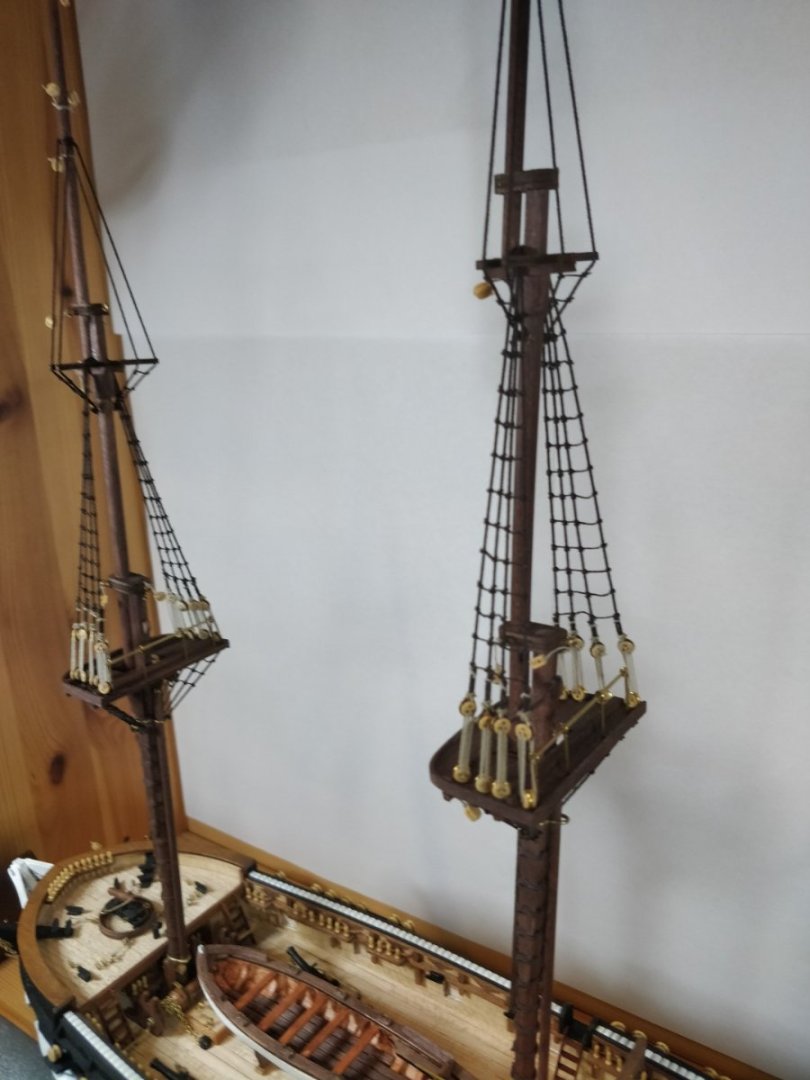
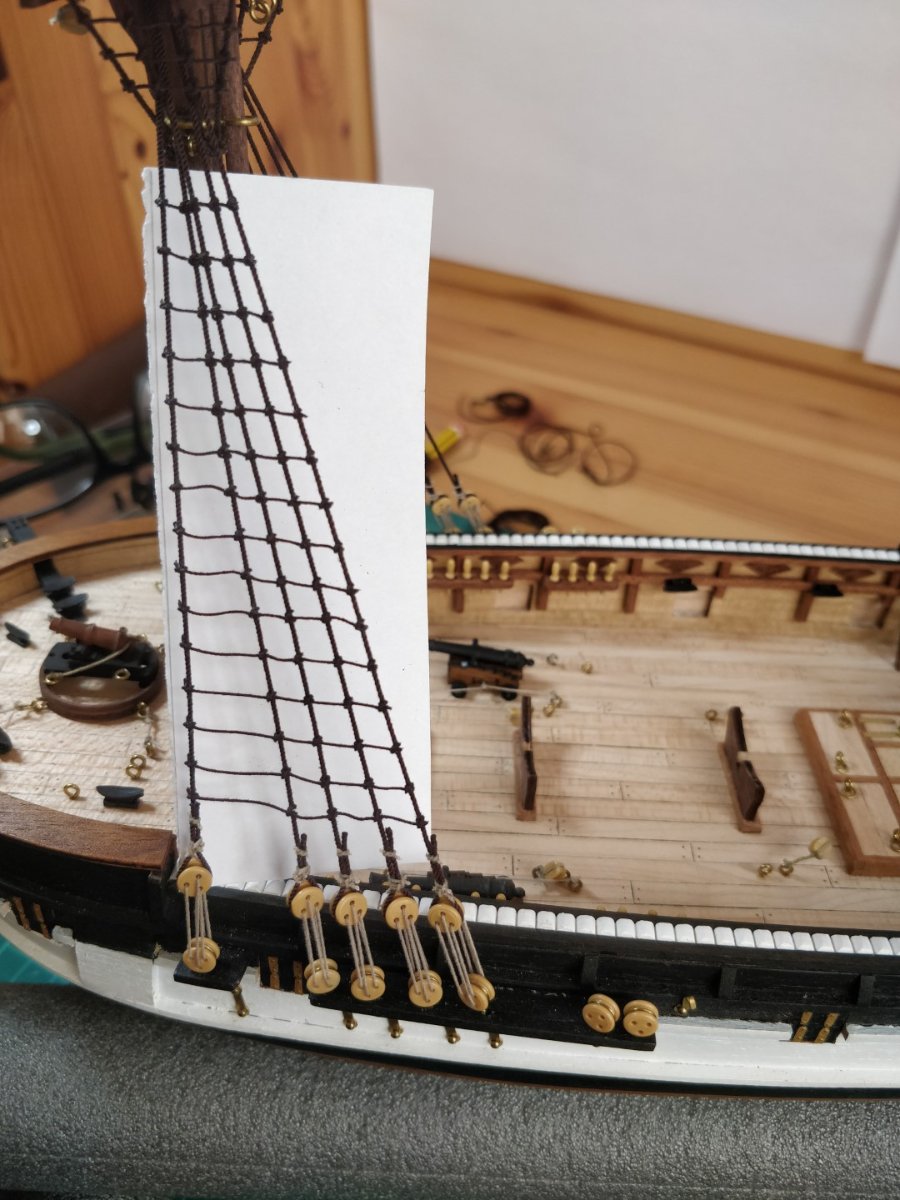
I finished the ratlines on the foremast then moved onto the main and mizzen masts. As you can imagine there's not much to say here as it's just a repeat of the fore mast. I then fitted the backstays for the three masts. This again is not the sequence shown in the instructions or the videos but I feel it's a more logical order.
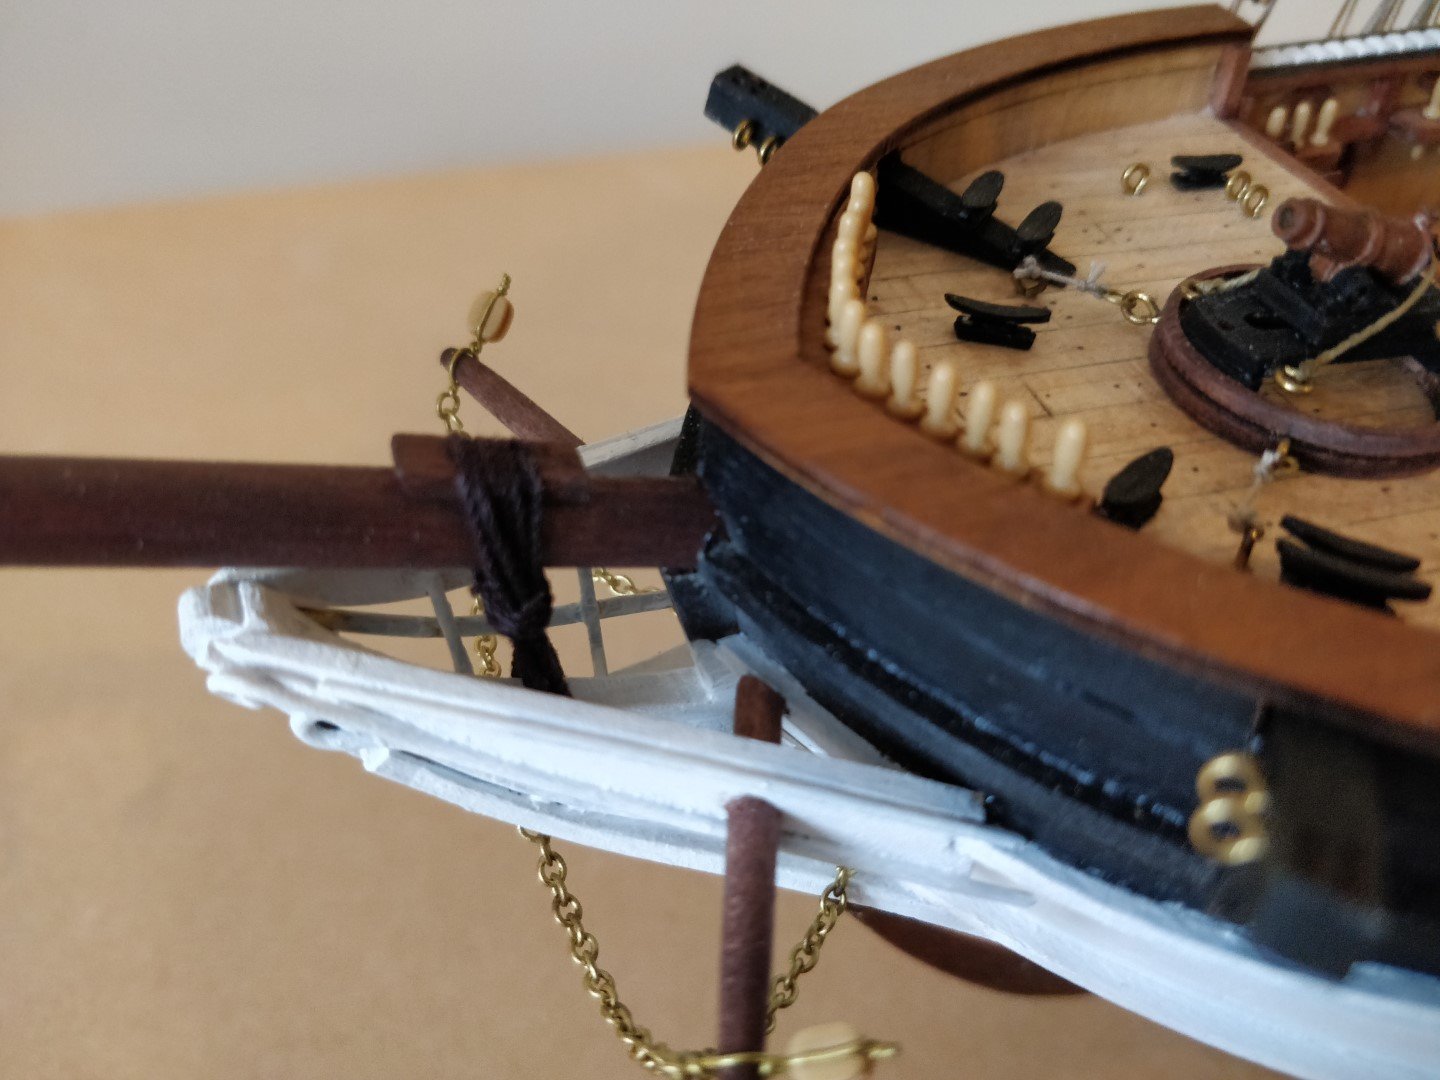
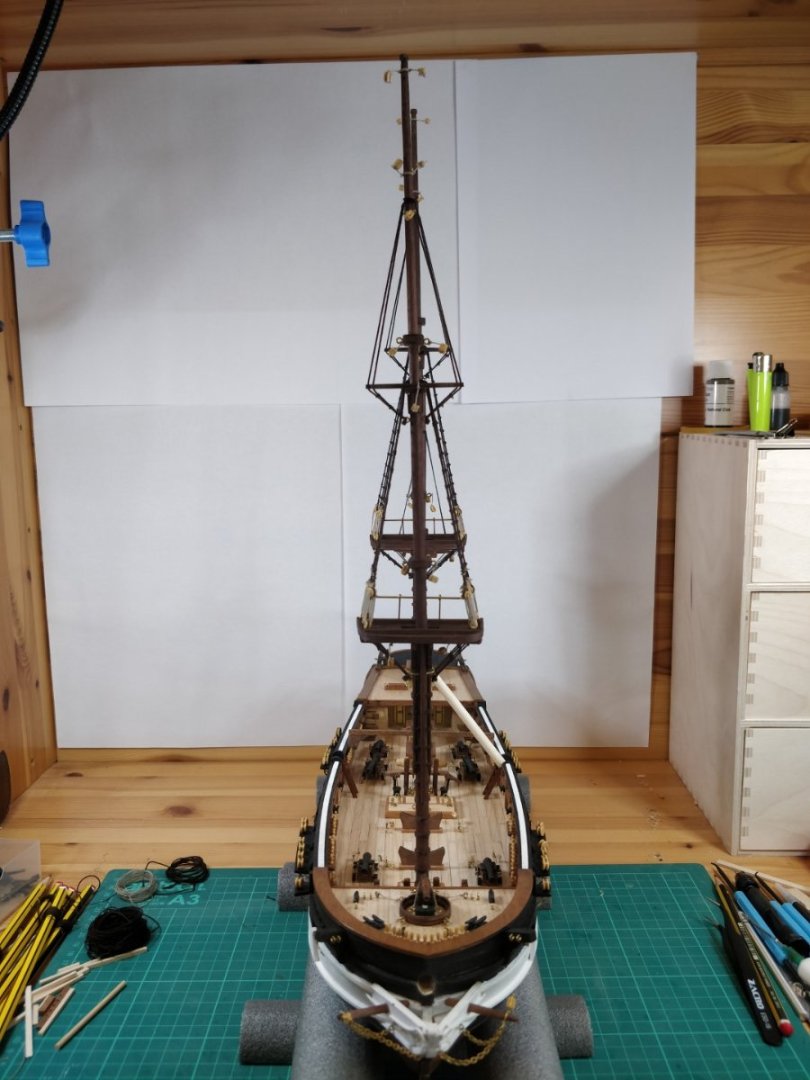
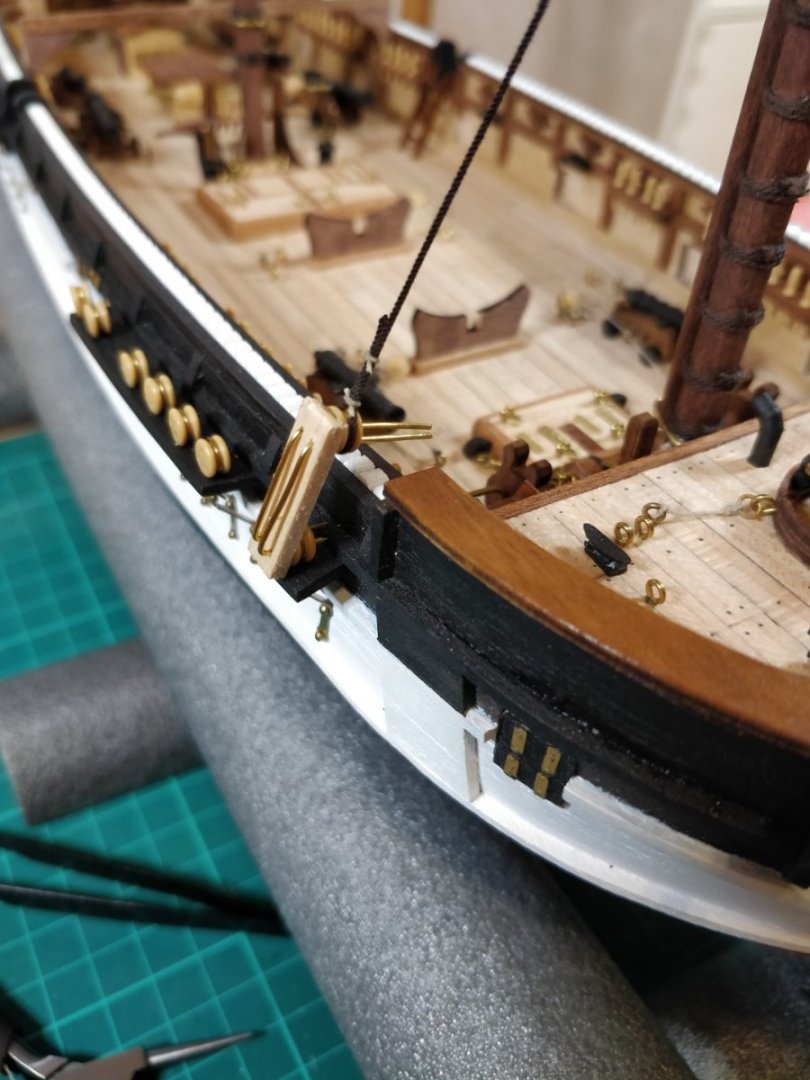
I then decided the time was right to fit the bowsprit. This was a big decision as with the bowsprit fitted it makes the ship too long to comfortably sit on my very restricted work top and would now be prone to getting damaged as I manipulate the model. However, it has to be fitted at some point in time and now felt right. The bowsprit had been made many months ago and was rigged using the kit supplied thread. I've since discarded the kit thread and make my own rope as I wasn't happy with the quality. Having said that I've decided to keep the original rigging of the bowsprit for now. If it looks too much out of place I might decide to replace it.
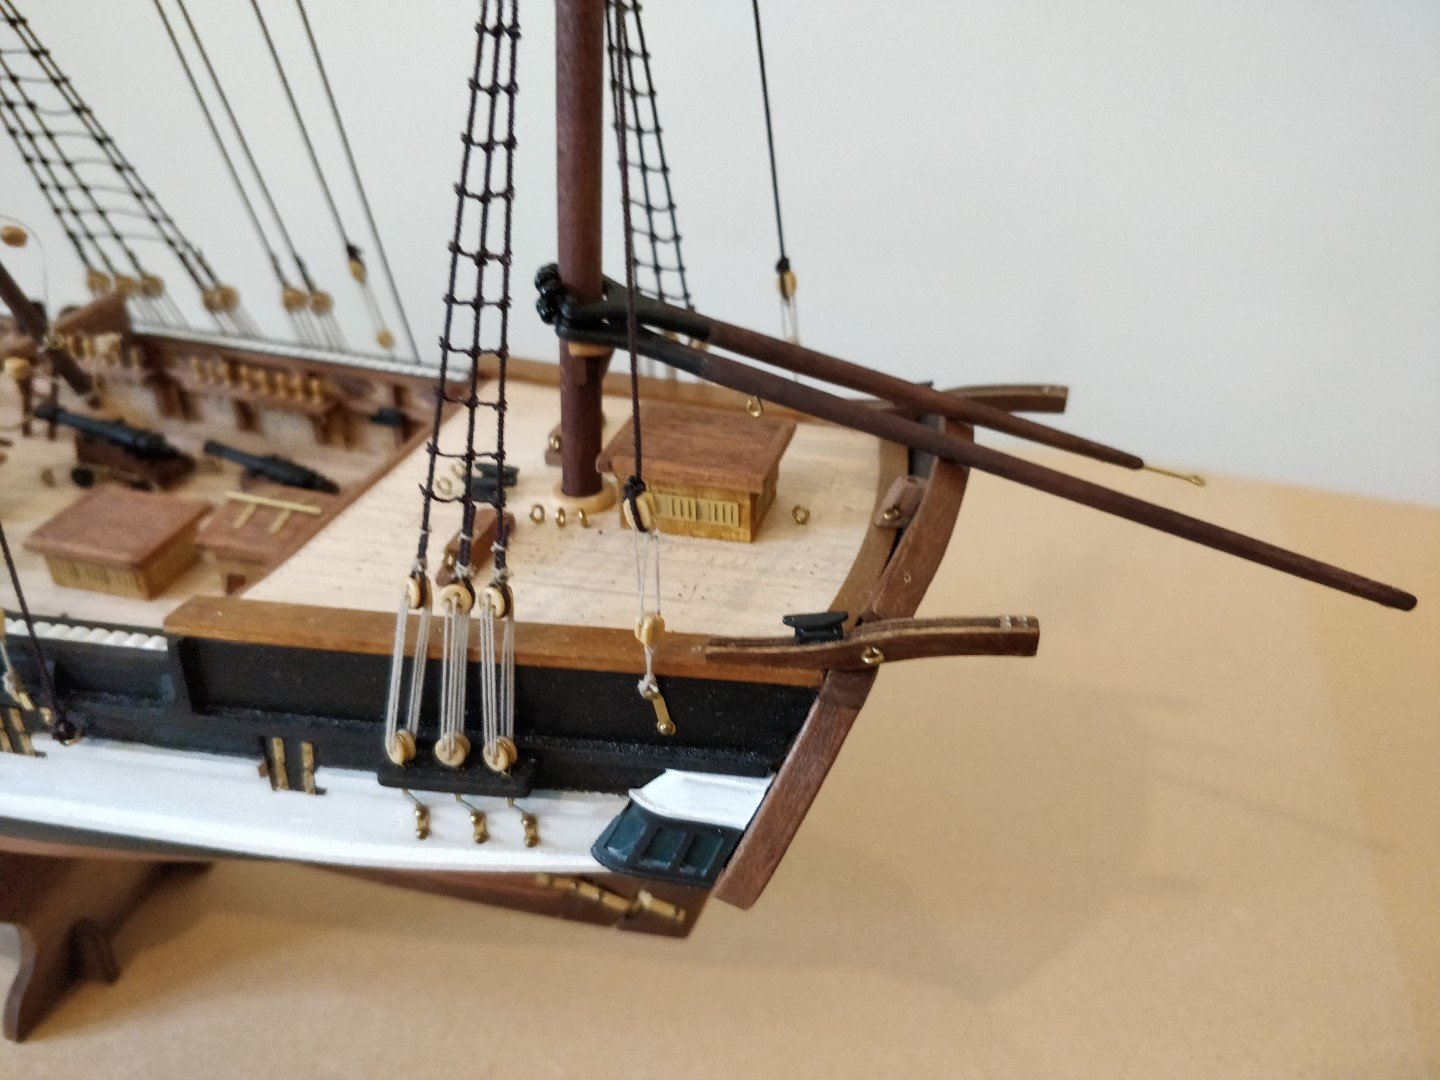
With the bowsprit glued in place I fitted the gammoning which went well.
I then made and fitted the three gaffs to the masts and the boom to the mizzen mast. These were straightforward but a word of warning if fitting the mizzen gaff and boom after the mizzen shrouds and backstays. Make sure you fit them pointing aft. I know that sound obvious and it makes me look a fool, but I fitted them pointing forward, as it was easier to tie the thread around the mast. I then realised even pointing them upwards they were both too long to spin around to point aft as they caught on the backstays. I felt such a fool and had to cut them off and start again.
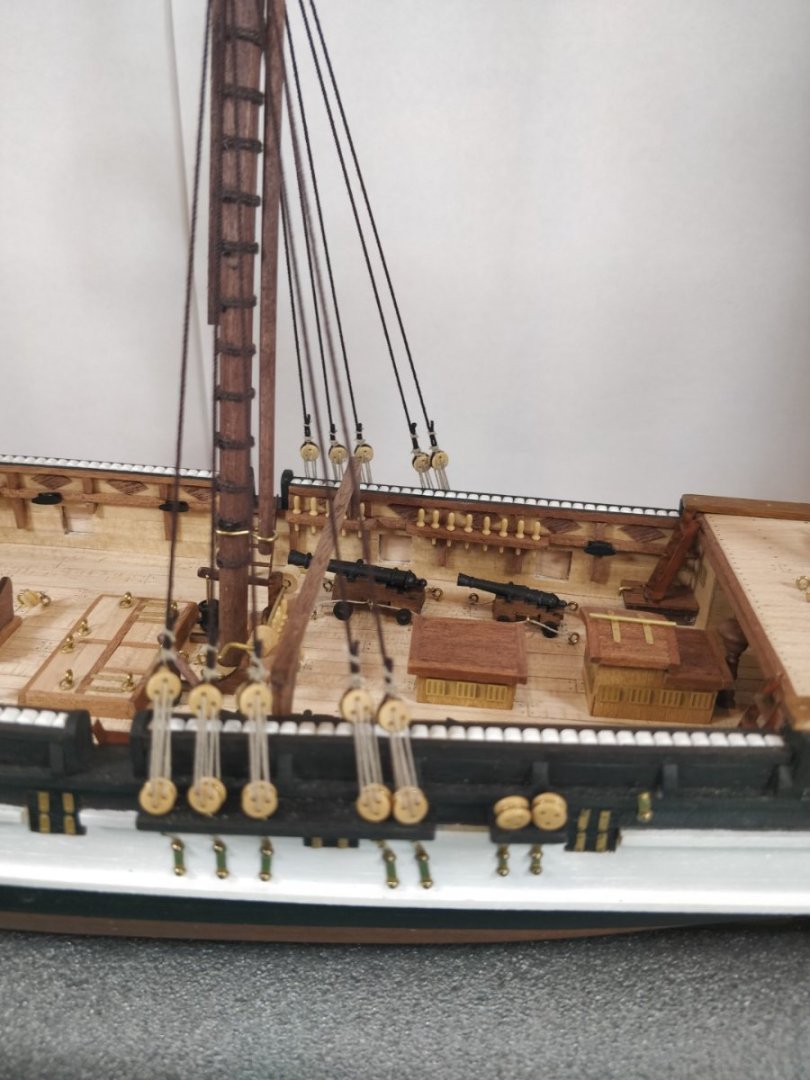
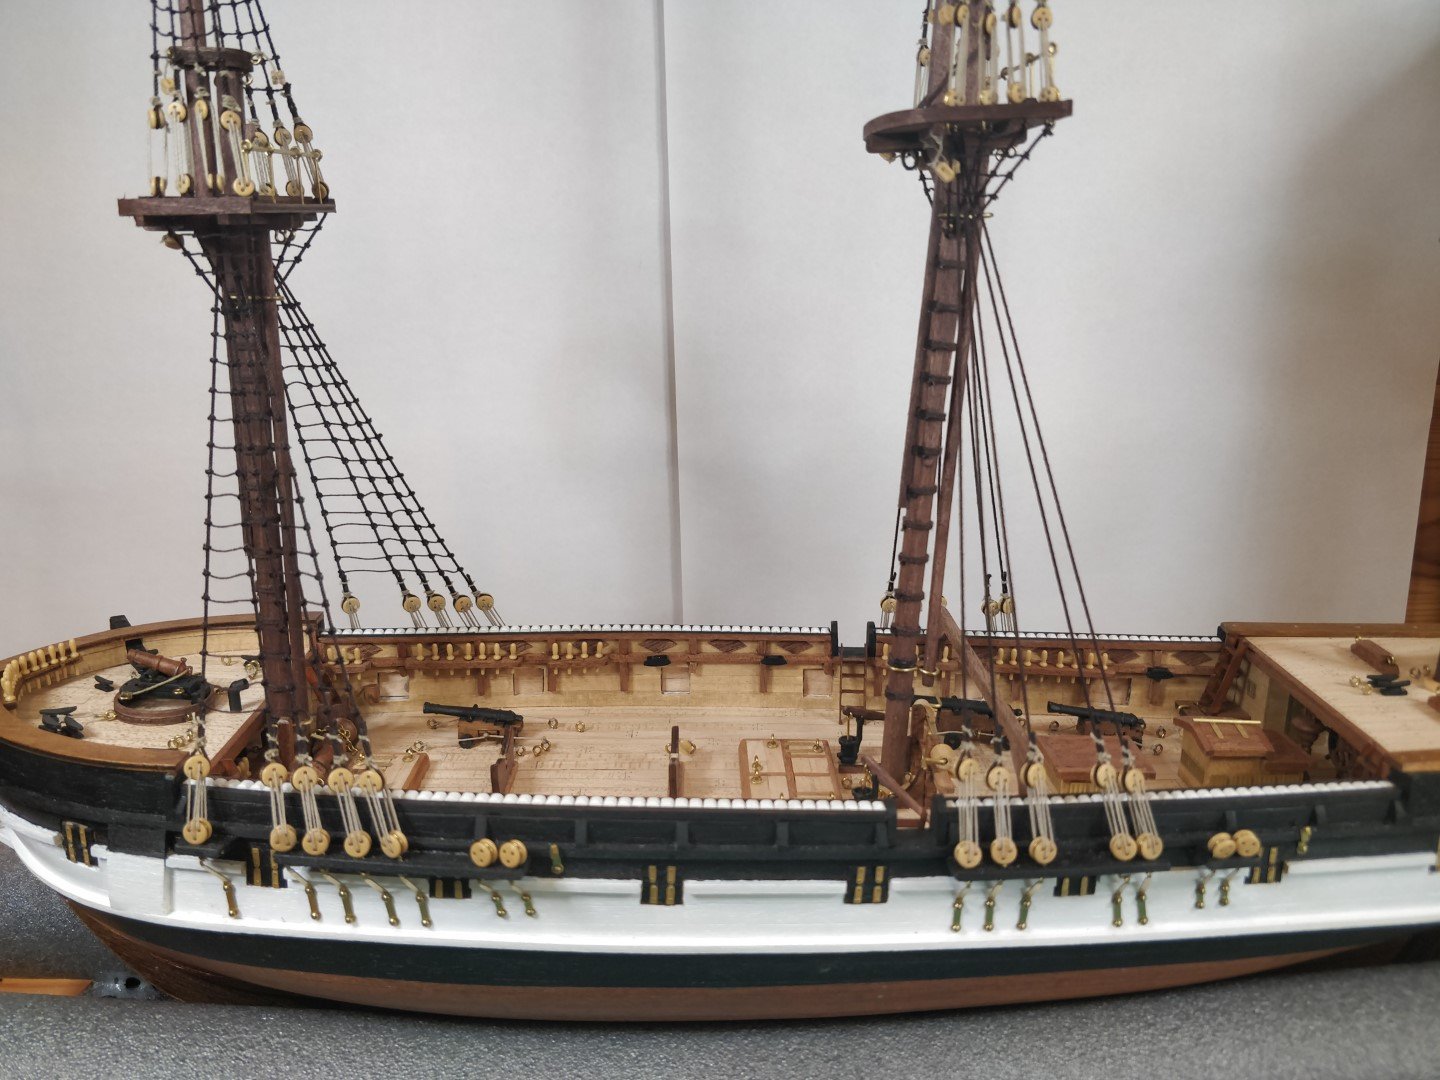
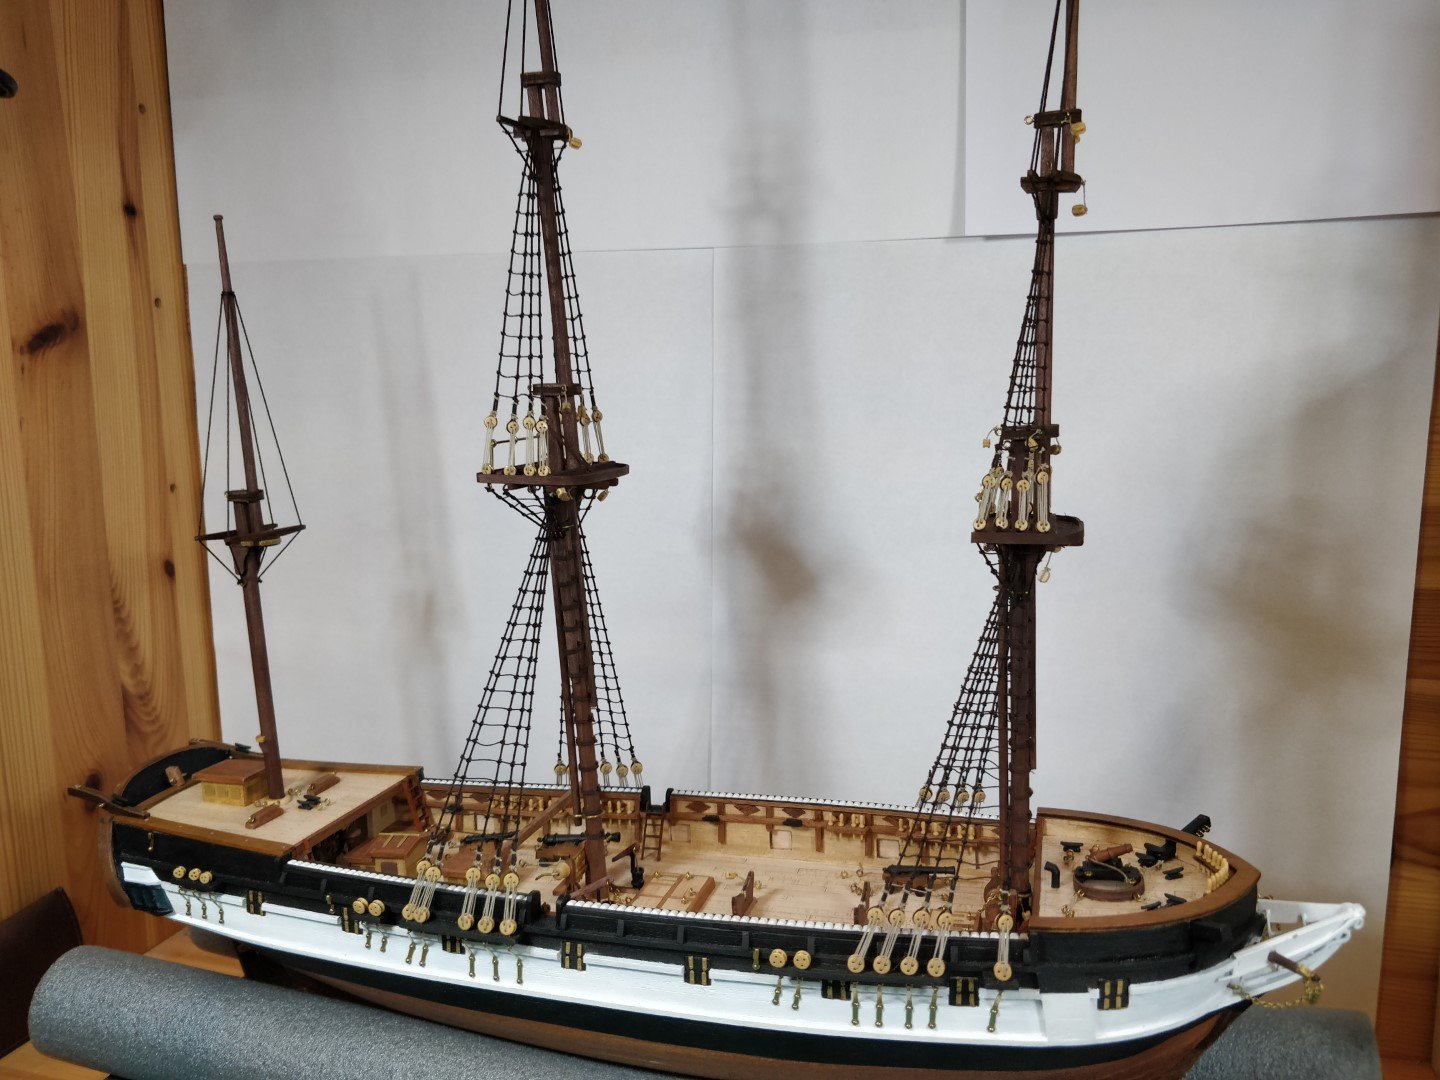
I thought I would take a couple of photos of how she is now as I'm starting to feel I might be on the home run.
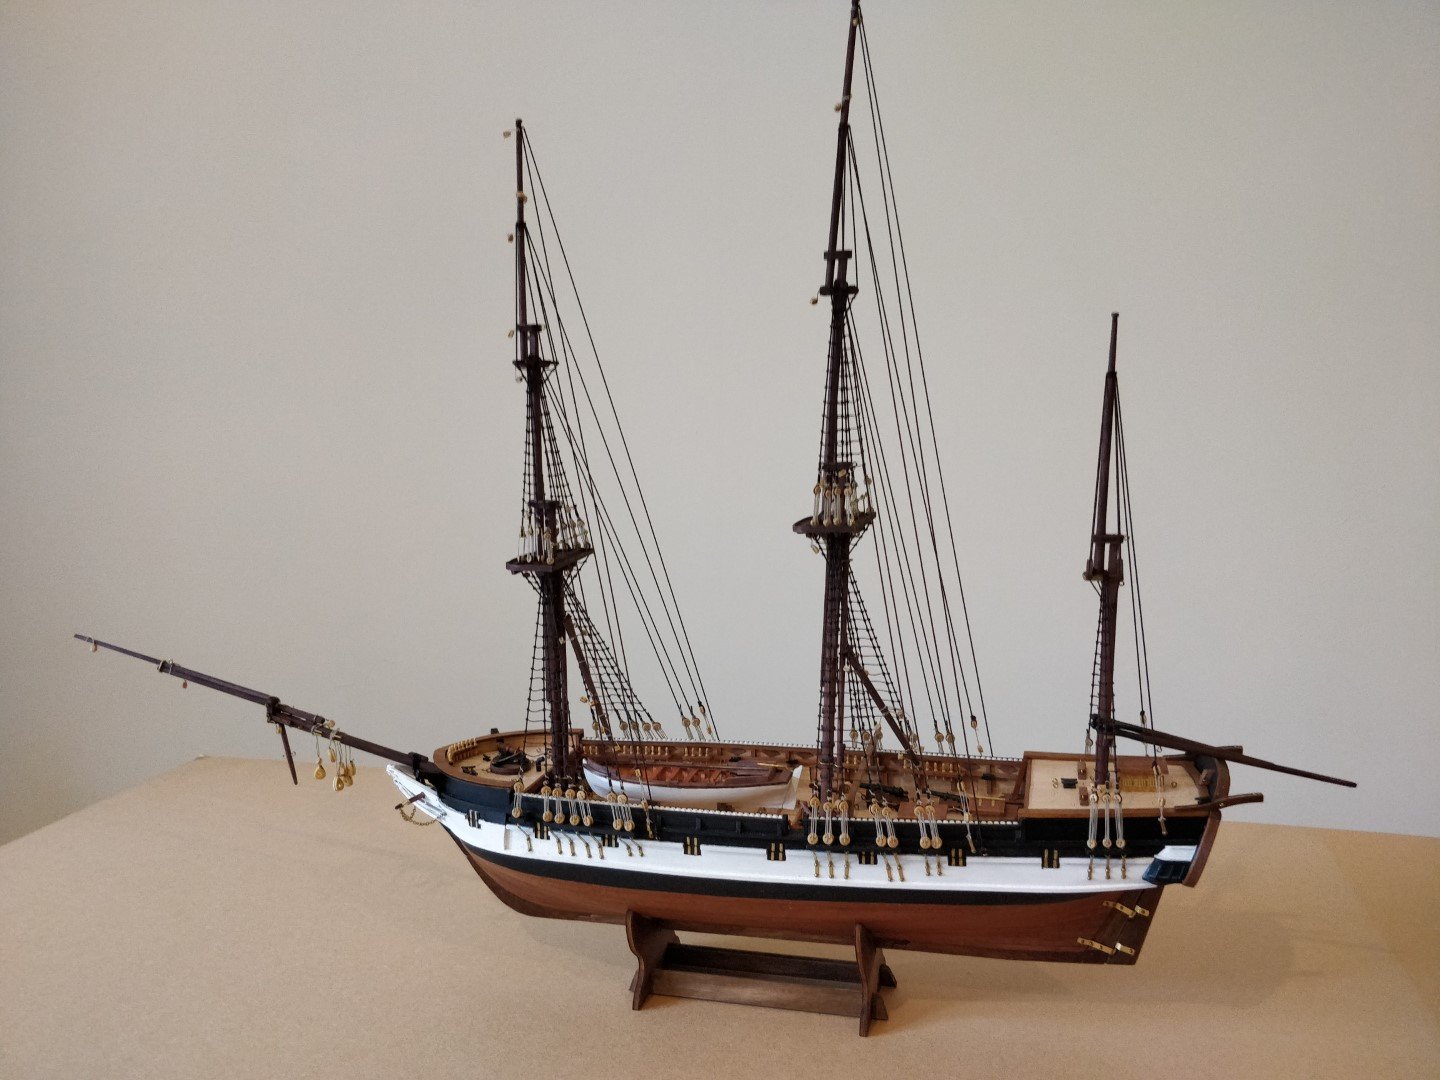
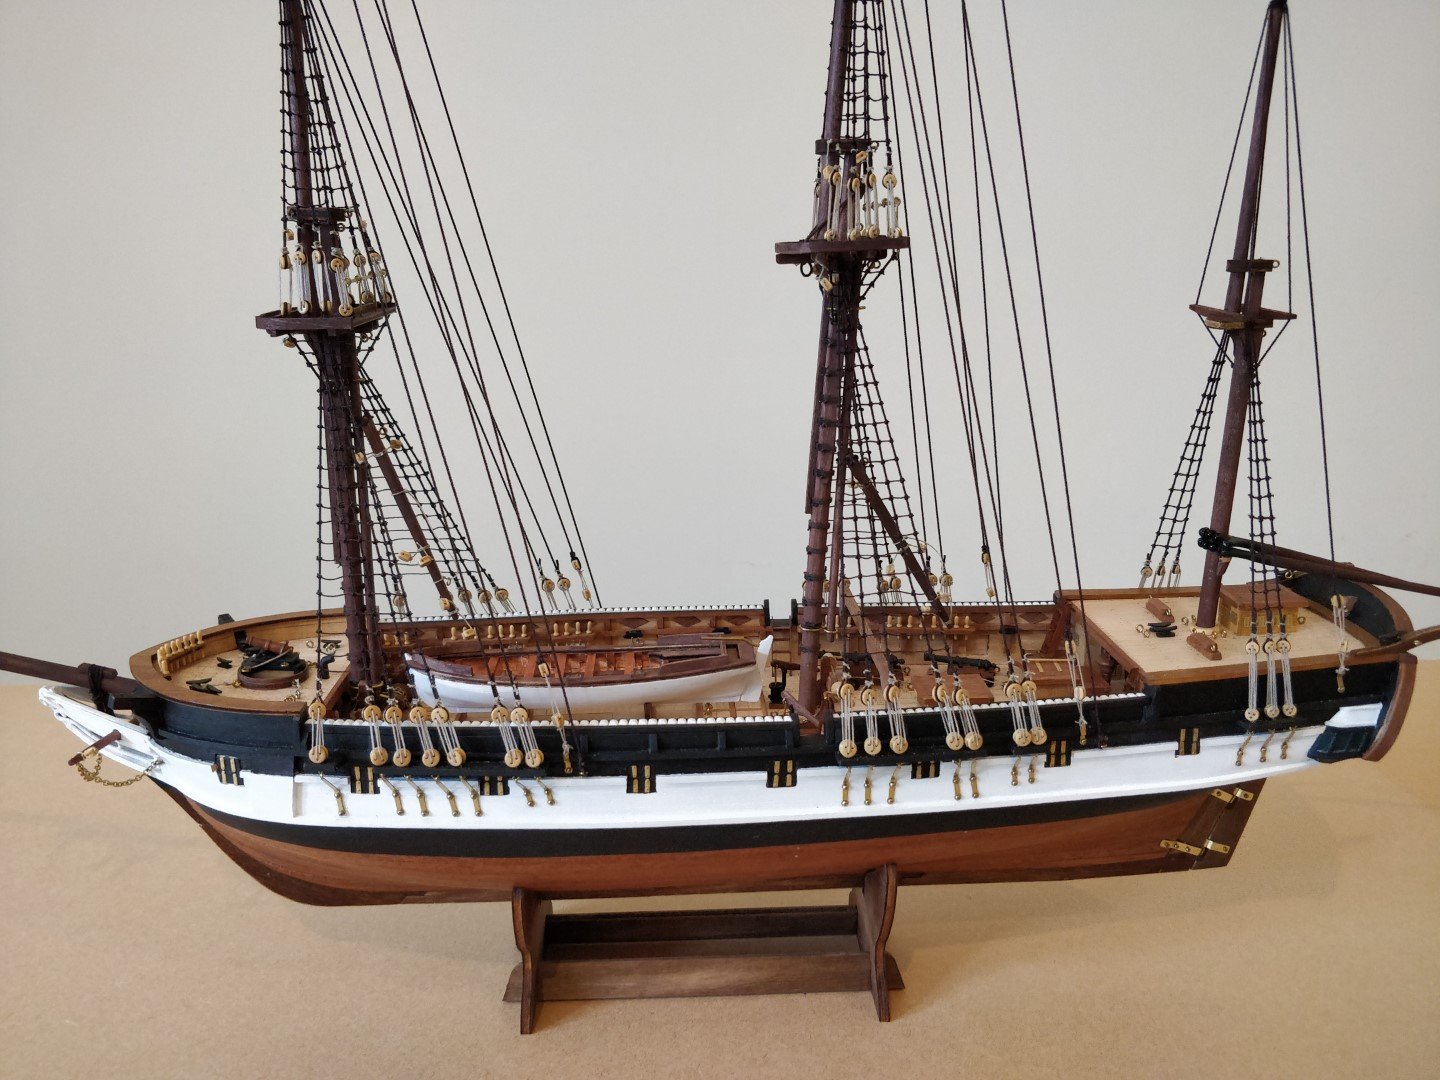

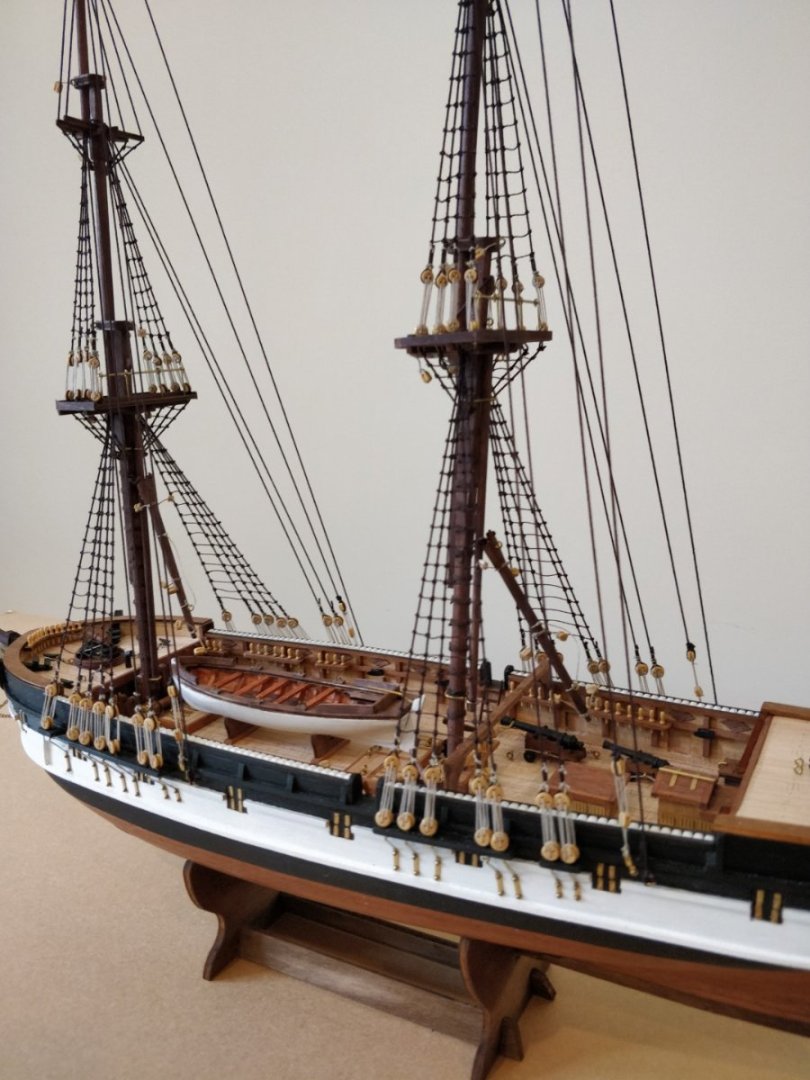
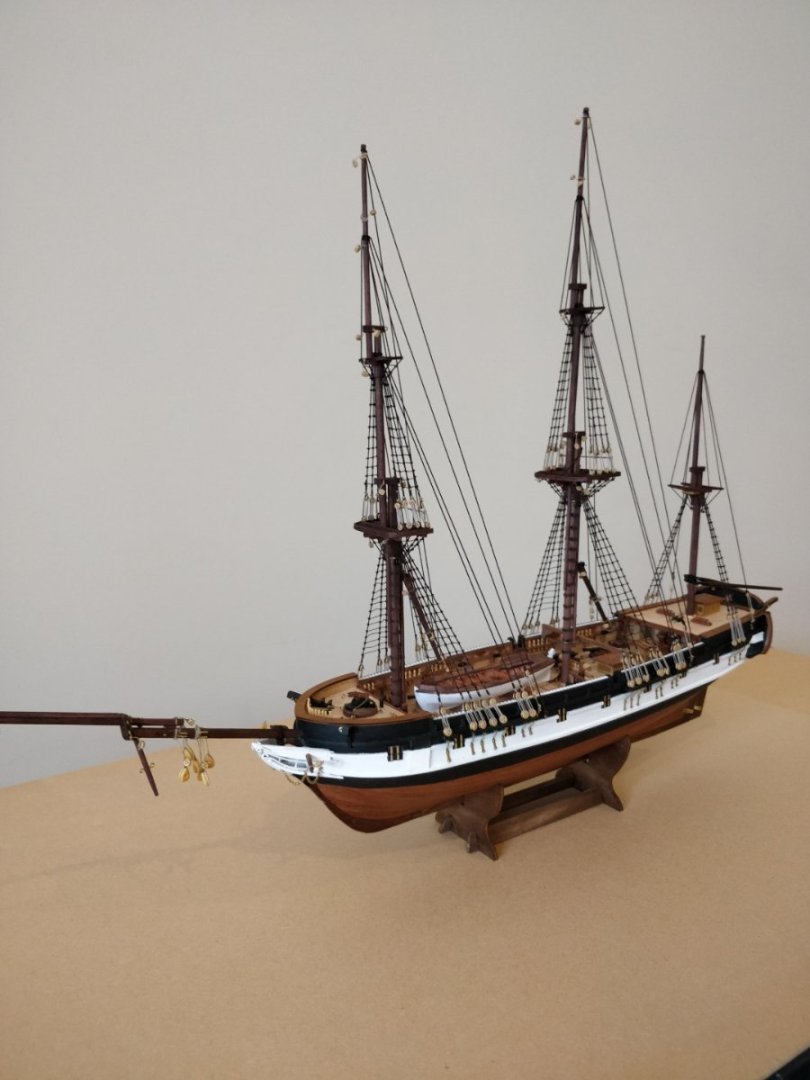
Next I need to rig the bowsprit and finish the standing rigging. With the winter months approaching I should get time to finish her off before the end of the year
Regards
Chimp
-
1 hour ago, allanyed said:
Hi Chimp
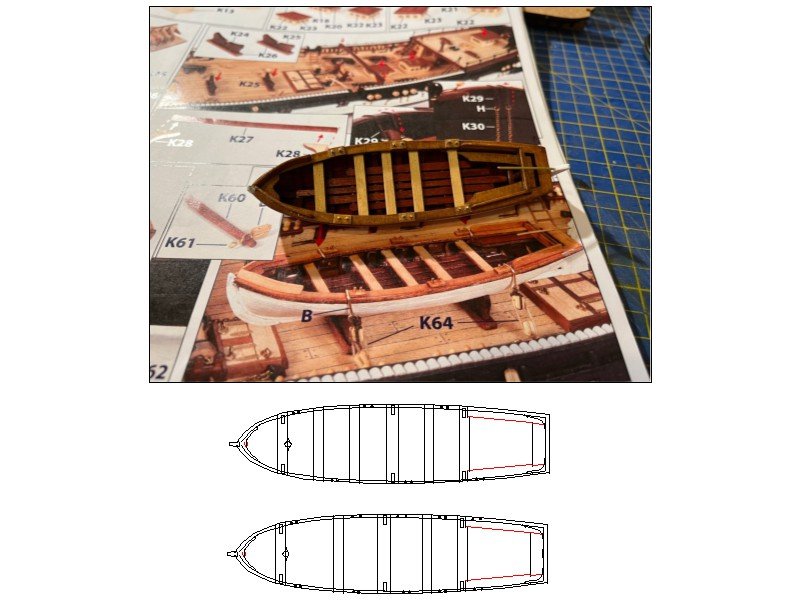
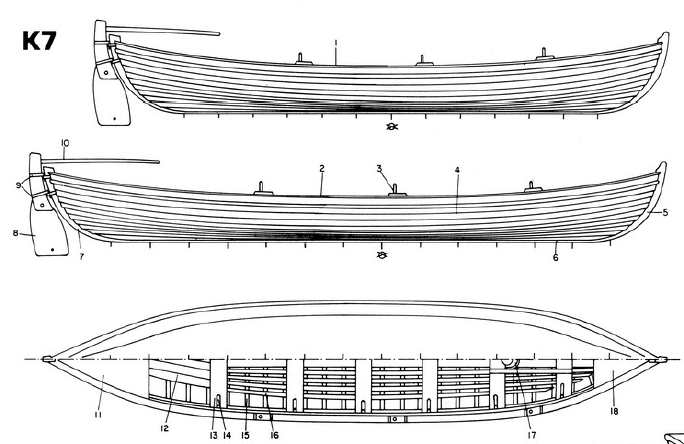
The drawings you show appear to be correct unlike the OcCre boat designs which are OcCre's own fantasy. The drawings can be a little confusing. The top view only shows half the boat so it was probably assumed by many that the tholes were the same on port and starboard which is not the case for single banked boats. There are tholes on the alternate thwarts on the opposite side but are not always shown on the original drawings. There are photos of contemporary models of ships' boats on the RMG Collections website that show how the tholes were arranged. Lavery's Arming and Fitting and May's Boats of Men of War go into these kinds of details as well and are possibly two of the very best sources of information, including scantlings on everything from the ears to the futtocks.
Allan

Hi Allan,
Many thanks for taking the time to add further clarification. What you describe makes perfect sense, it's just unfortunate that the drawings make the issue a little confusing for people like myself with only little knowledge of such things. I guess that's what we're all doing here, some teaching and some (if not all) learning.
Thanks again for clearing things up.
Chimp
-
1 hour ago, allanyed said:
Penfold,
Your workmanship continues to be very neat and solid, thank you for sharing with all of us. Just as an FYI, the tholes on ships boats did not look like the OcCre design nor were they located as shown. For double banked there would be a pair for every thwart and for single banked the tholes would alternate port/starboard for every other thwart. The photo in the plans shows neither. This is an easy fix even if OcCre got it wrong. One solution is in the sketch below as if it were single banked. As you show five thwarts, double banked would make more sense
Hi Allan,
I was interested by your post regarding tholes and thwarts on small boats, though it took me awhile to understand as I'm not very knowledgeable in nautical terms. I'm sure that what you say is absolutely correct and I don't mean to question your post, but to understand the true picture. I'm also in the process of making these boats for the Beagle and in complete ignorance followed the instructions supplied by the manufacturer. I must admit I've found the supplied instructions to be limited and lacking in many areas during my build. I also make reference to the AotS for the Beagle, which I have taken to be far superior in detail. It looks like the manufacturer has also followed the AotS of this occasion as the two appear to be consistent. Looking at the 26ft yawl it shows the following:

Have I misunderstood the drawings. It's difficult to know from the plan and side view if the tholes alternate. To me it looks like they don't but I can fully understand why they should. Has the AotS got it wrong?
The whaleboats show a single thole as follows:
This also has the problem of not showing alternating tholes.
Best regards
Chimp
-
-
When I had problems with one of their kits they wanted me to deal through the supplier. There wasn't any problems with getting replacement parts but they said it was easier for them to always deal through the suppliers.
Your build is coming along well Kiwiron. I'm keeping an eye on it as I'm thinking of adding it to my list of future builds (if I can find the space)
Chimp
-
Hi Michiel,
Looks like you're making good progress with your build and all is looking nice.
I too have found the scale of many of the items haven't been quite right, some like the pins to be well over sized. Having said that I've pushed on through with a view to completing the build. For me, I'm using my build as a learning experience and have many mental notes for my next build. I have found the kit supplied rope to be next to useless as it's very hairy. I've tried to improve it with rubbing on wax and even burning off the fuzz but now I make my own (which has been a pleasurable experience). I would suggest you consider your options here too.
Chimp
-
On 7/30/2022 at 6:21 AM, Penfold said:
Hi Chimp,
She really is coming along nicely and looking a very fine ship.
Hi Penfold,
Many thanks for your kind words of encouragement. I'm trying to keep focused but at the moment the progress is slow but at least it's steady. It's about time I posted another update.
Chimp
- Mr Whippy, Cathead and DonSangria
-
3
-
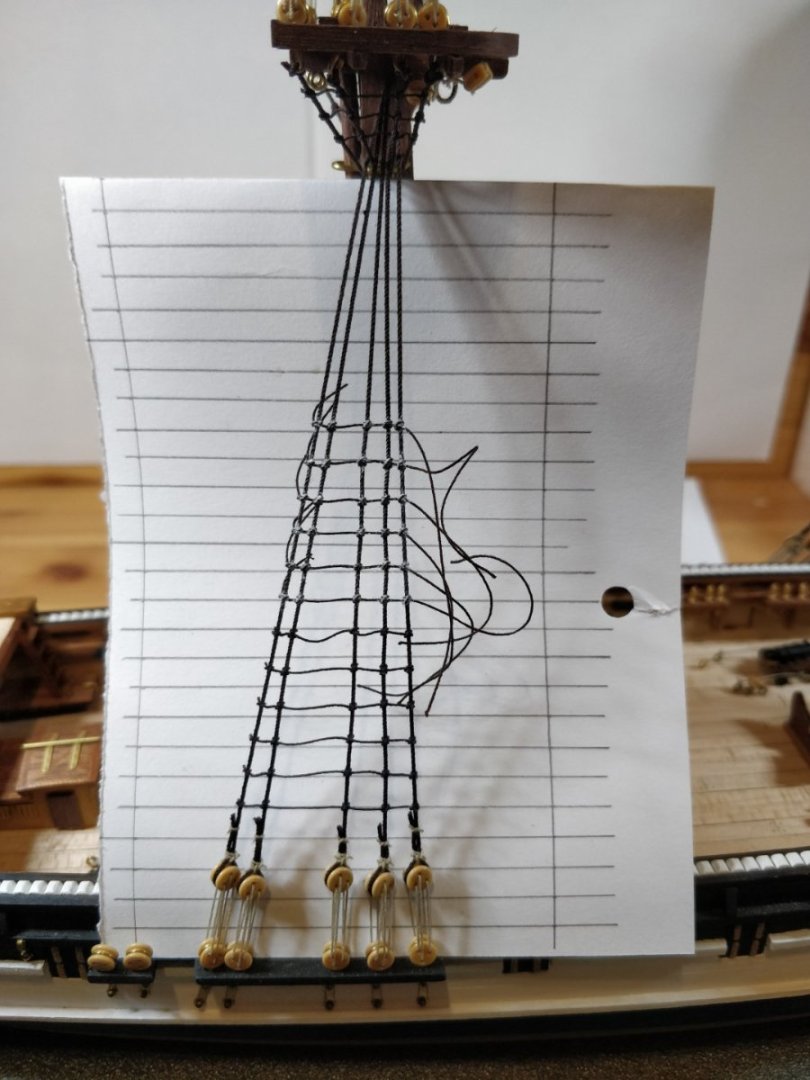
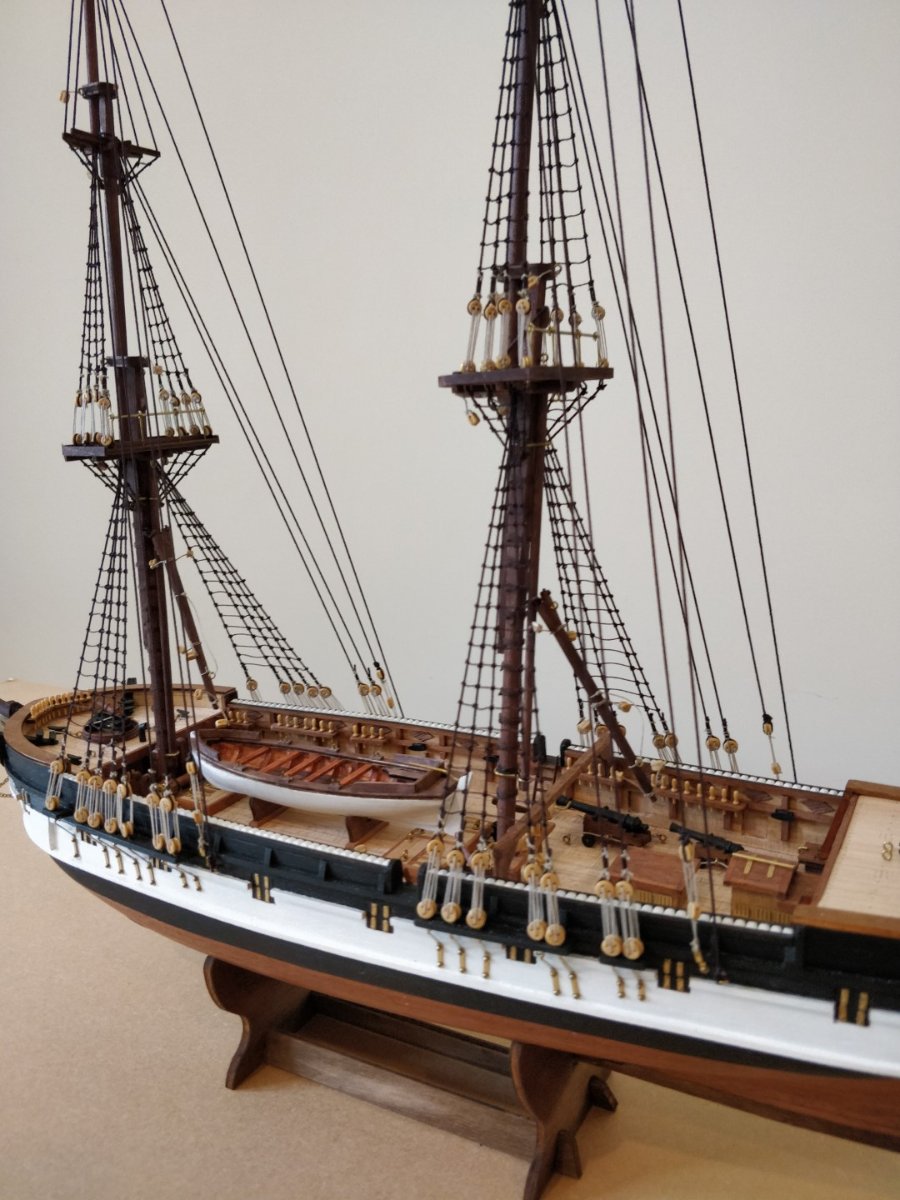
Here is the latest progress with the rigging.
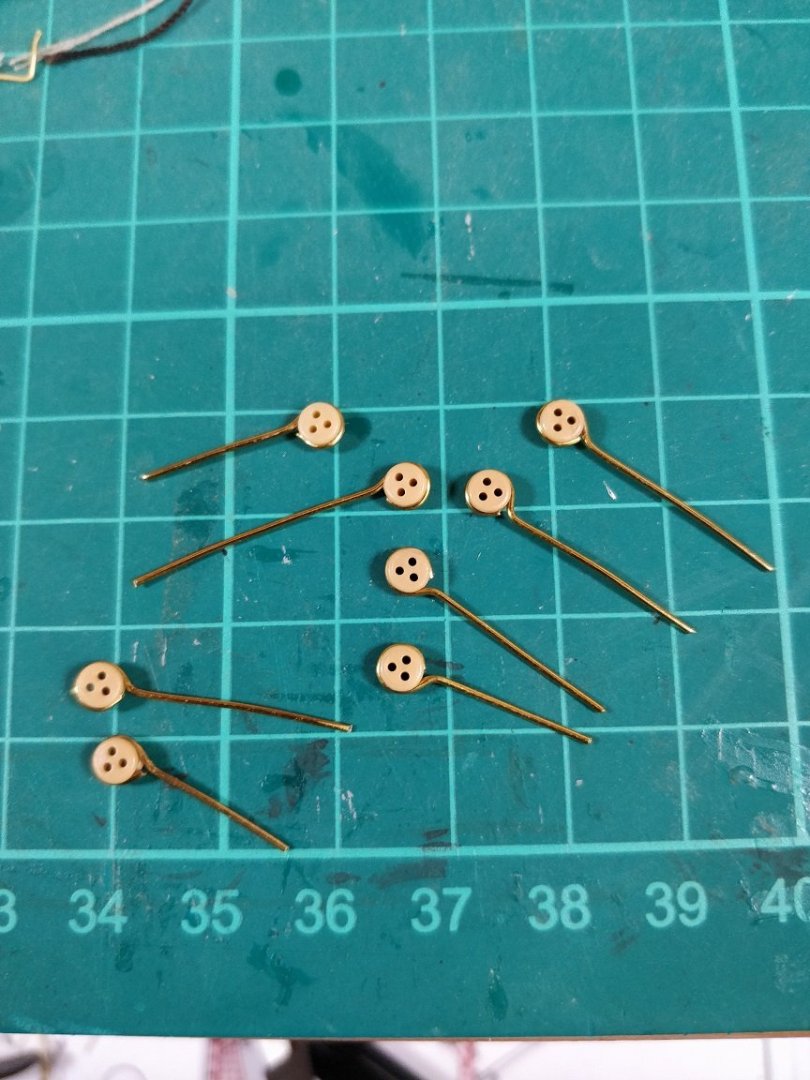
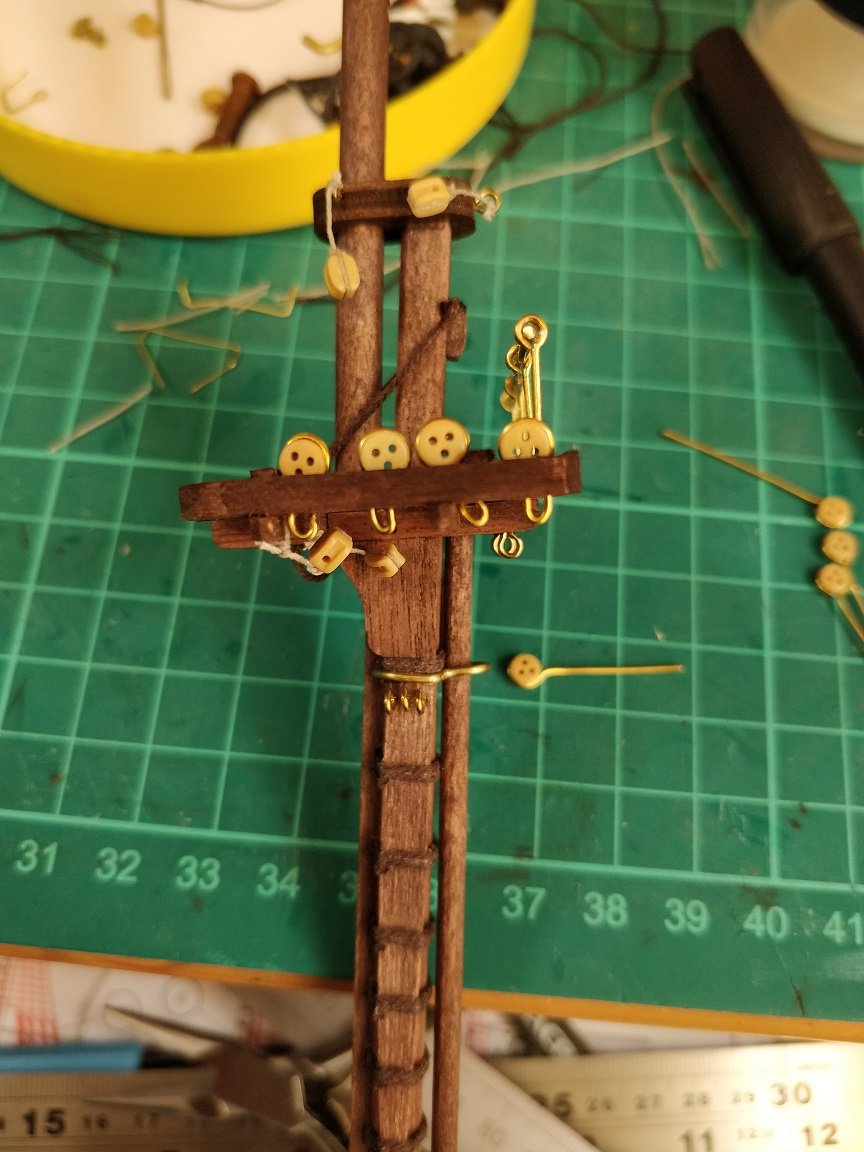
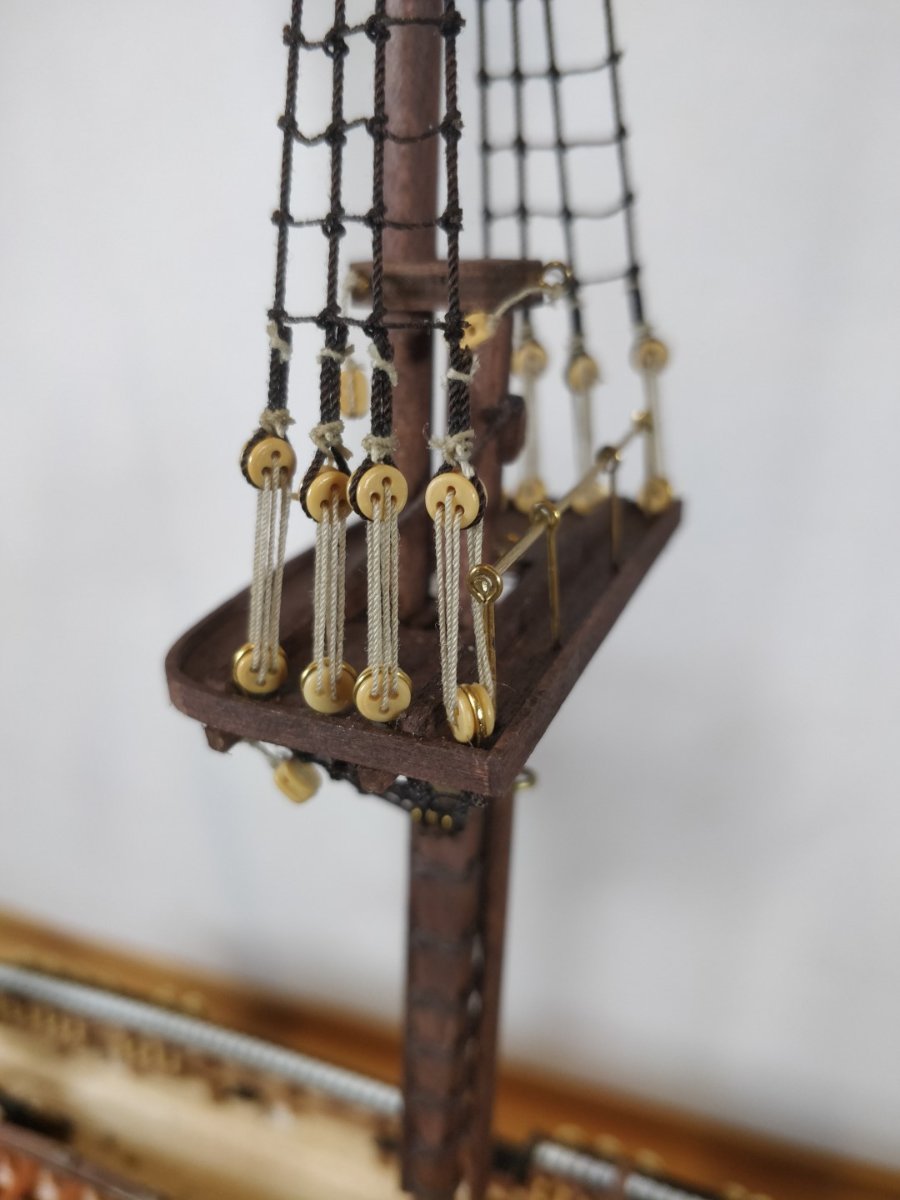
After finishing tying the ratlines on the foremast I then moved onto the main mast. This time rather than using 0.5mm thread to fix the deadeyes I thought I would change to 0.7mm brass wire, which I have plenty of. I know this inconsistency may look a little odd but I don't think it will look too obvious on the finished model and I'm keen to try different things. Always with a view to learning for the next model. As far as I can tell the futtock iron and strap should be metal anyway.
I started by making up the deadeye straps using the brass wire:
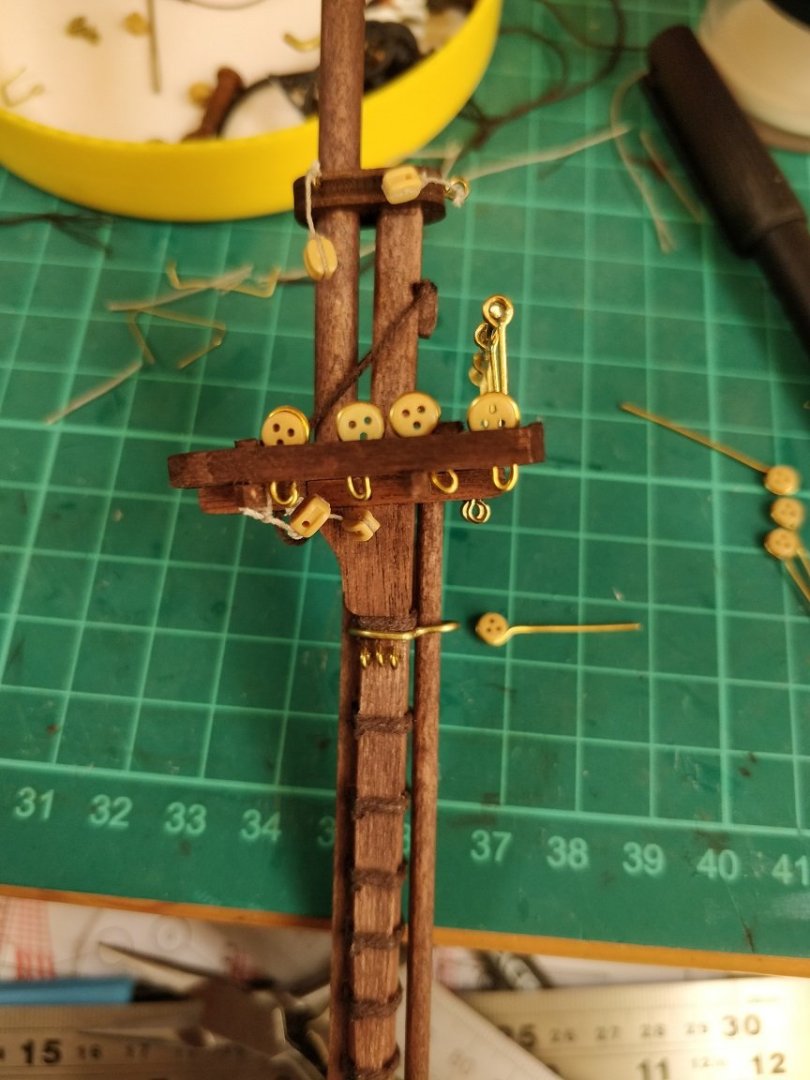
Everything worked well with the brass wire holding the deadeyes but I'm not sure the alignment of the pre-drilled holes in the mast top was quite right which meant the deadeyes and wire ended up at an angle which messed up the spacings a little. Maybe if I had used thread there would have been a little more compliance but I don't think that would have changed the effect of the spacing of the deadeyes.
With the deadeyes fitted I continued rigging the topmast.
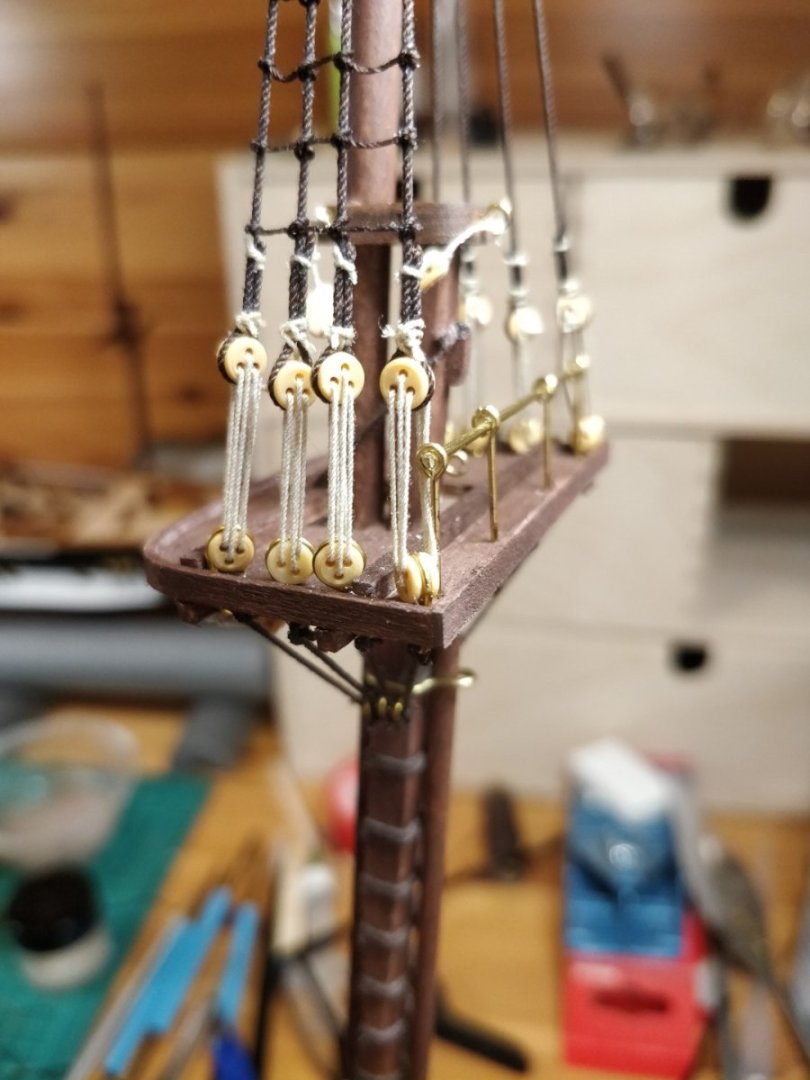
As you can see from the photo above there is another issue with the pre-drilled holes in the mast tops. The handrail clashes with the rigging. I've just had a look at the plans and it looks like the holes for the handrails aren't pre-drilled, so I could have made them a bit shorter than shown in the instructions, which would have avoided the clash..... be warned if you're looking to make this model.
So all that part of the rigging was done off the ship. Then it was time to fit the masts to the ship.


With the masts fitted and aligned it was then on with fitting the fore shrouds.
Top ensure a consistent spacing of the deadeyes I made a pair of jigs to keep the deadeyes at a set distance. I saw this on someone's build log the other week. Sorry for not having their name to hand.
With all the main mast shrouds fitted it was then back to tying the ratlines.

At this rate I should have all the shrouds and ratlines finished in the next week or two, which I know is slower than most but I work on the principle of 'Slow but sure'.
Chimp
- chris watton, Penfold, Cathead and 2 others
-
5
-
15 hours ago, Clementine said:

I think it's, from left to right, 25ft Whaleboat, 25ft Gig, 23ft Cutter and Dinghy.
Chimp
- Clementine, Mr Whippy and Dave_E
-
3


HMS Beagle by Penfold - OcCre - 1/60
in - Kit build logs for subjects built from 1801 - 1850
Posted
Hi Penfold,
They're also looking good to me, you've done a good job there")
I know there's talk about the position of tholes and seats which are all valid and interesting but as long as it looks okay and you're happy with the result that's all that counts.
On my model I've done quite a few things which may not be 100% accurate but they look okay to me. When members point out inaccuracies I try to learn from them and take it forward into my next build.
Keep learning and keep up the excellent work!
Chimp