rvchima
-
Posts
712 -
Joined
-
Last visited
Content Type
Profiles
Forums
Gallery
Events
Everything posted by rvchima
-
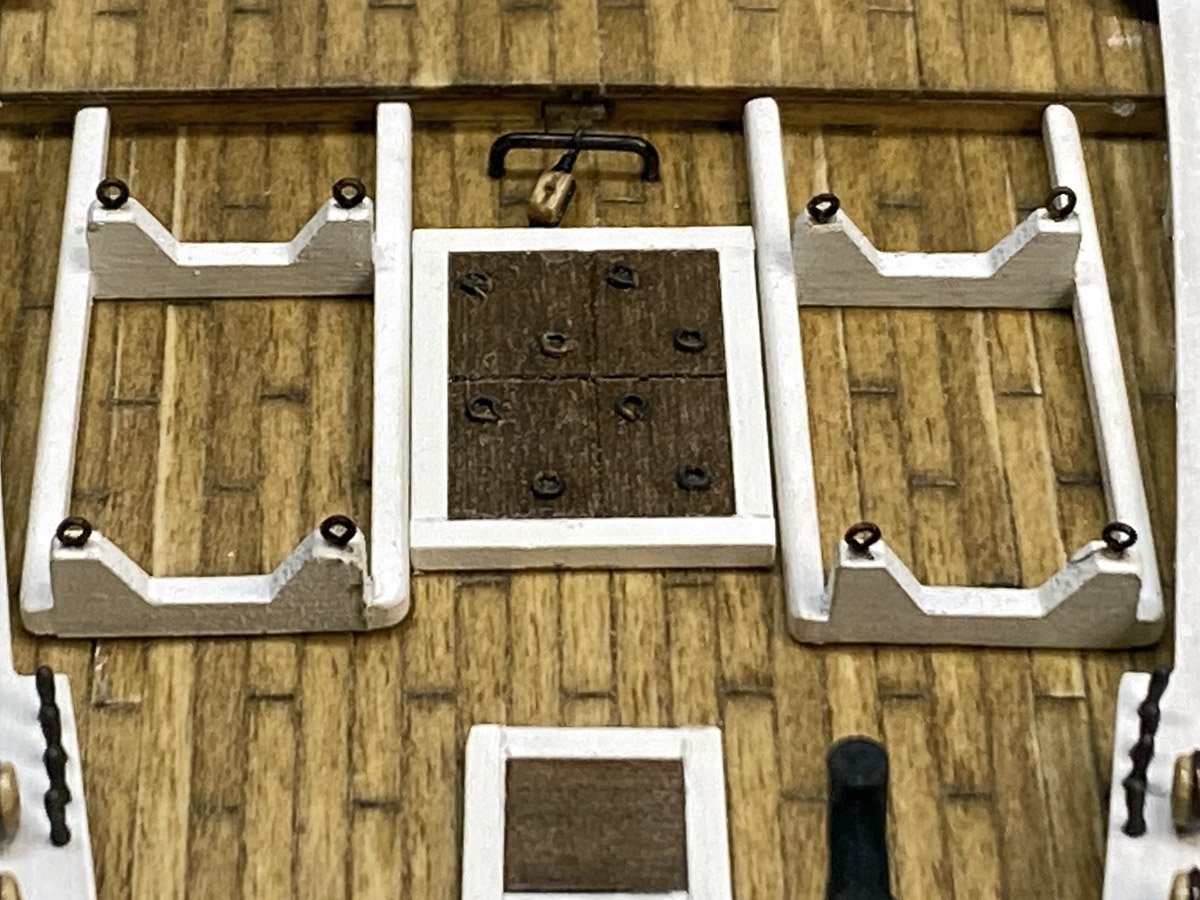
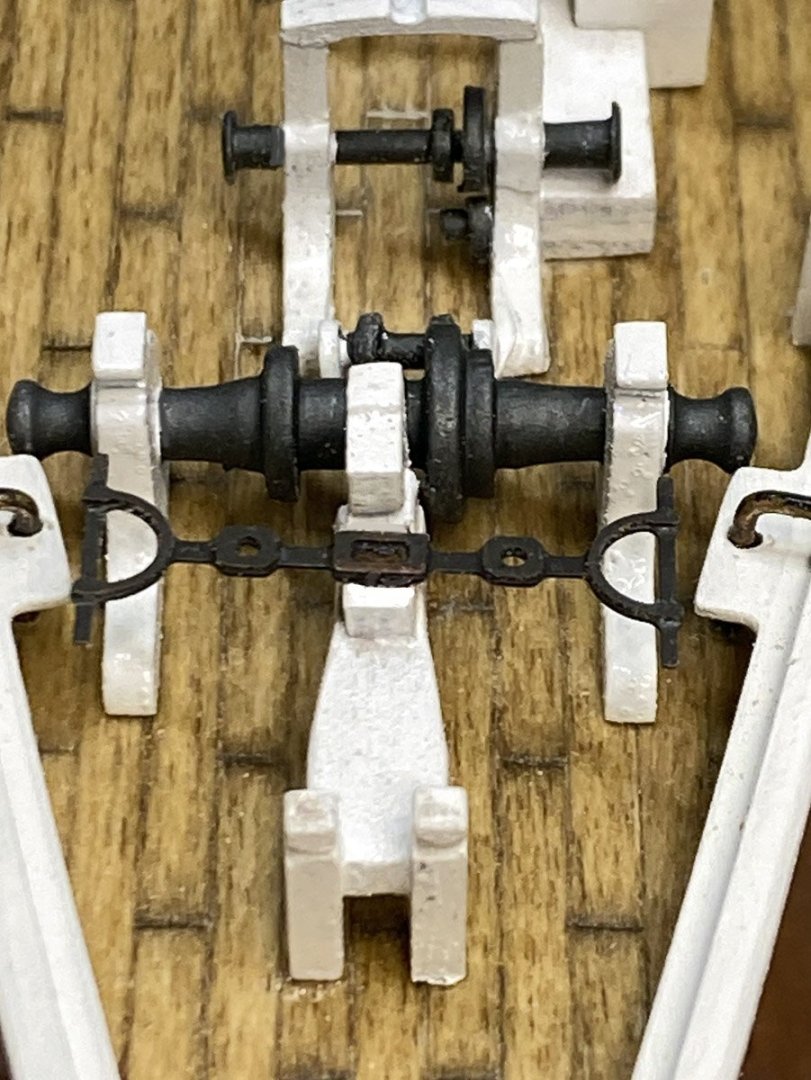
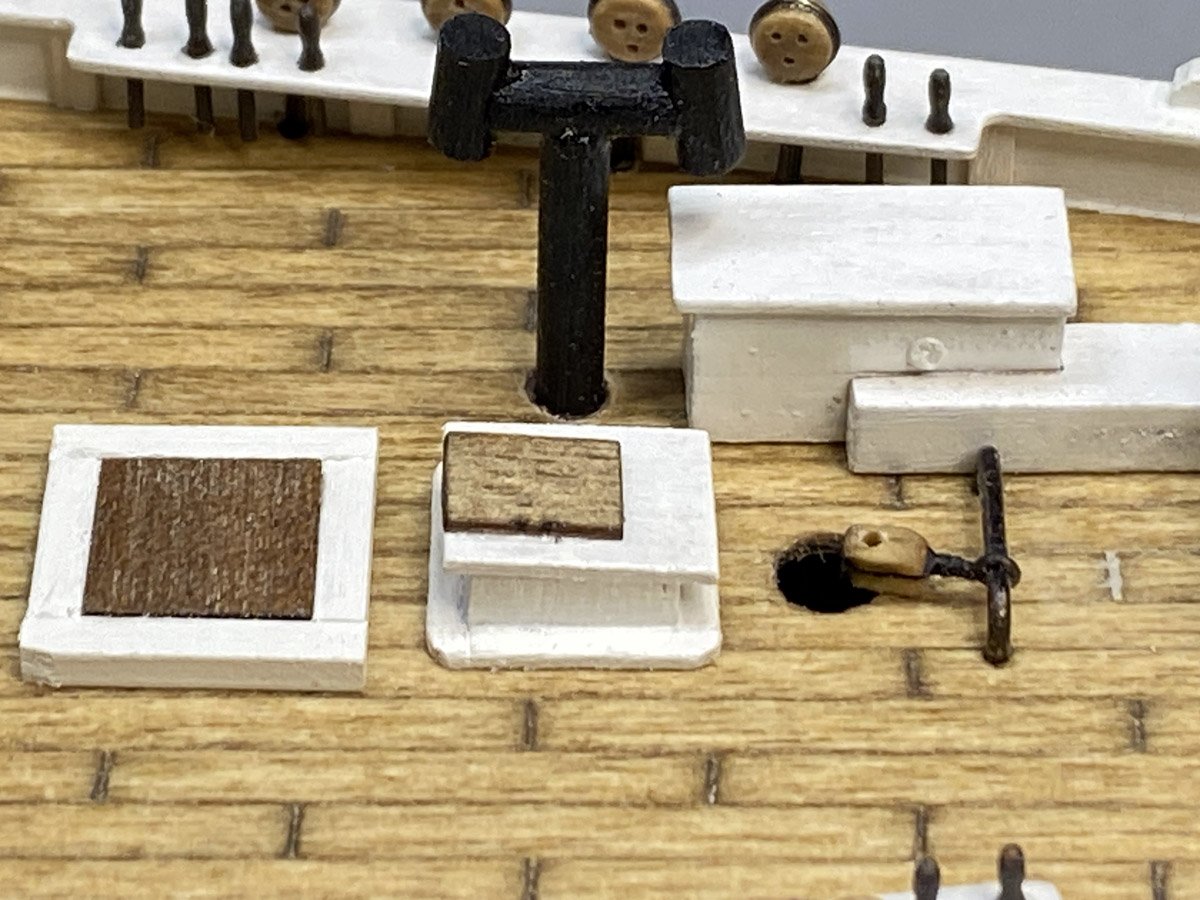
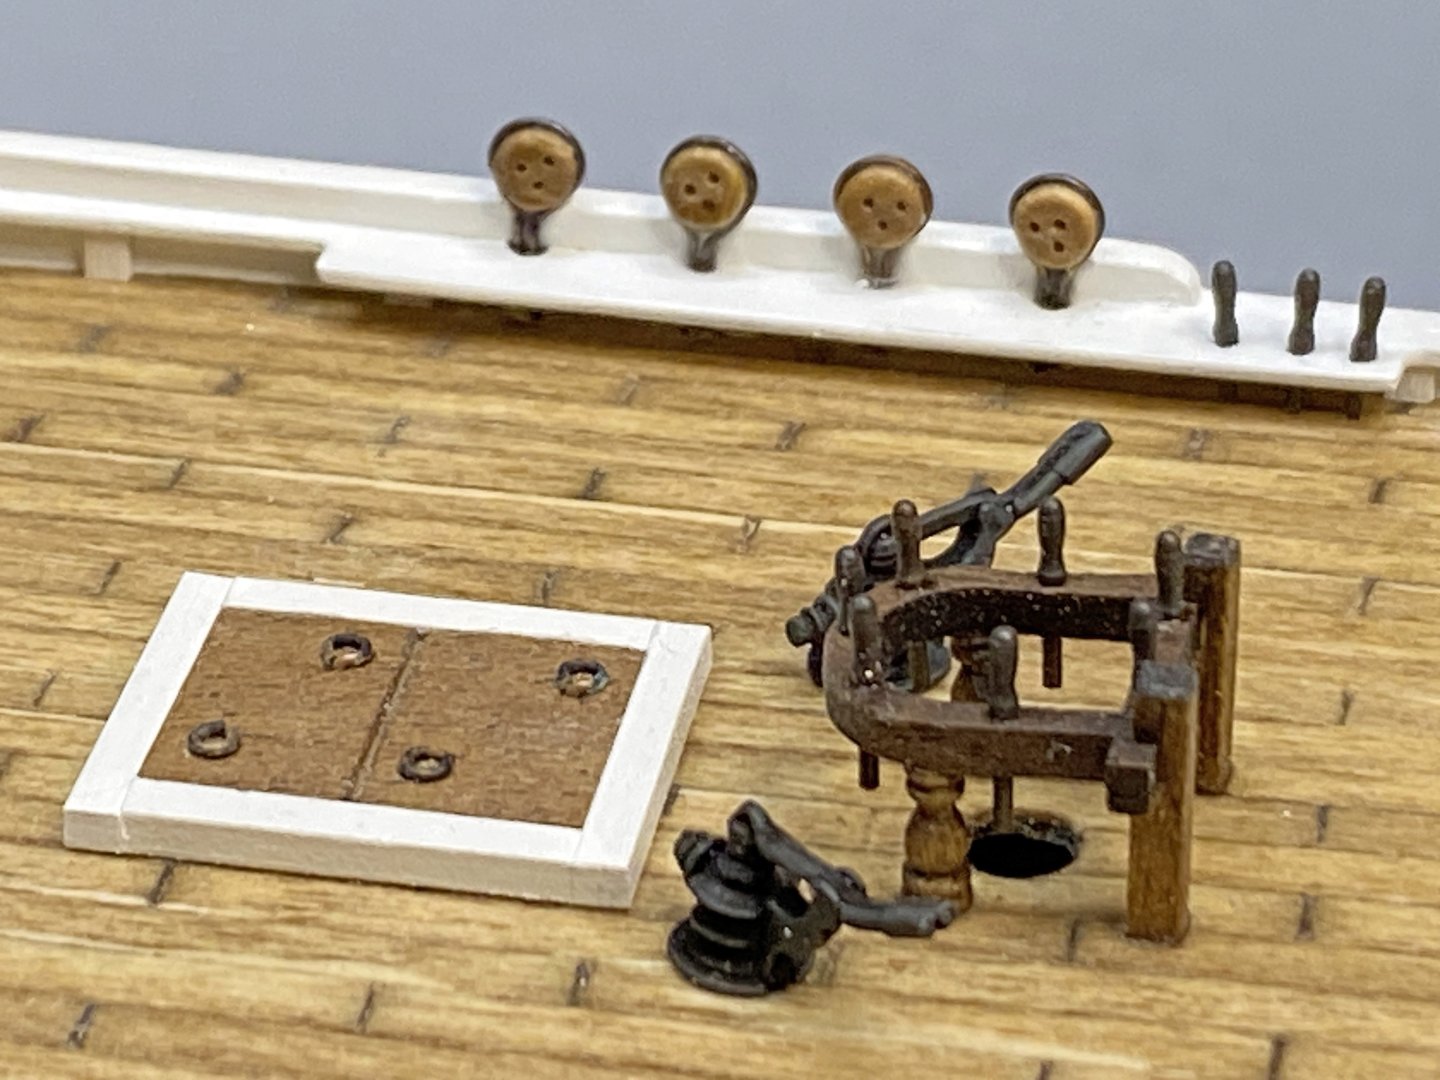
 Oops, Missing Rail I've been working on hatches, cabins, etc. and realized that I had neglected to add a second layer of railing around much of the hull. It wasn't hard to add, except where it interfered with 8 deadeyes amid ship. I had to wiggle them all loose, add the railing, paint it, and replace the deadeyes. Hatches, Cabins, etc. The tiny cabin is about the size of a Monopoly house and difficult to hold while working. The rings on the hatches are actually eye bolts folded 90 degrees and glued in holes. I did find some belaying pins. They are a bit long where the railing is a bit low, so I will have to improvise when tying lines to them. Main hatch and dory racks. The dories are built and currently being painted. The winch was made from several random pieces - aluminum tube, tiny round disks, 2 cast metal pieces, 2 turned brass pieces, and a piece of photo etched brass.
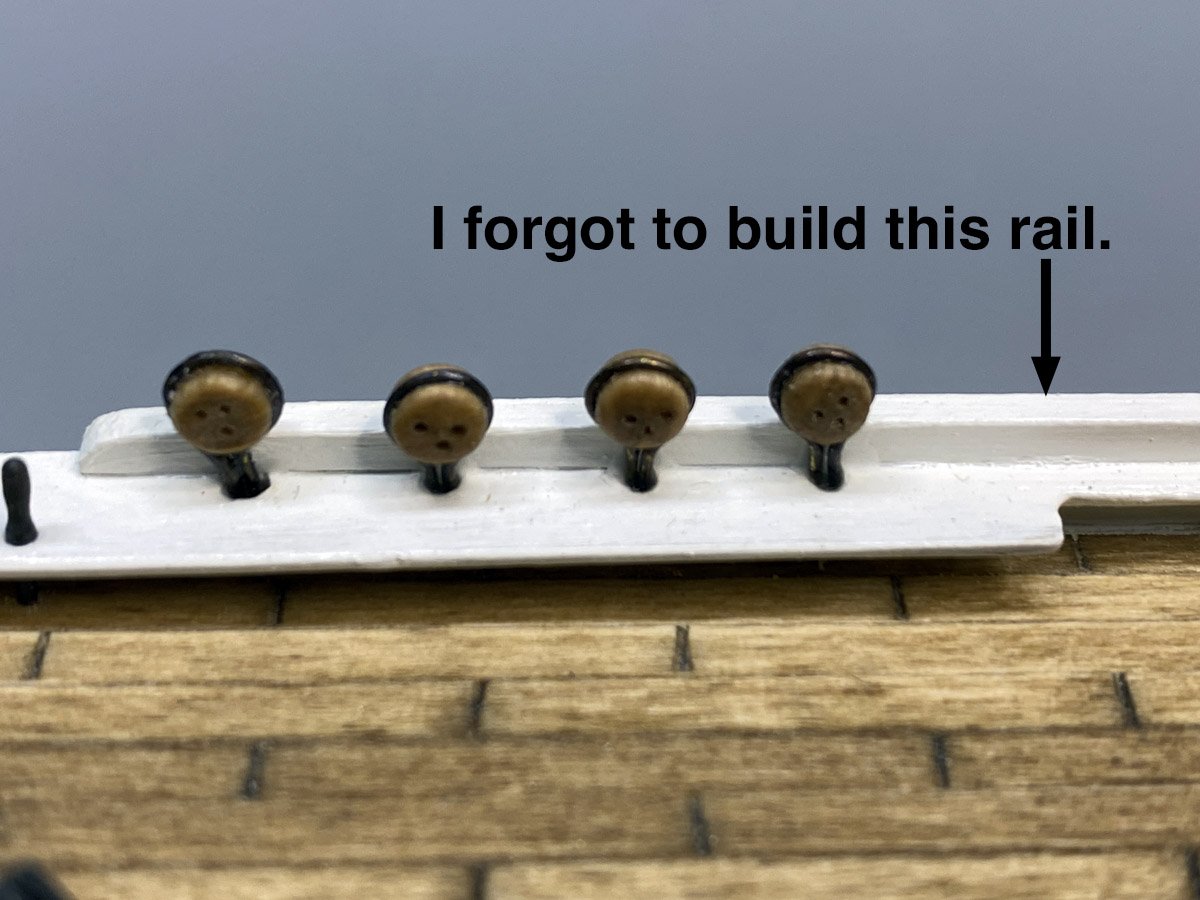
-
Back to Work I just returned from two weeks in Europe, traveling from Prague to Paris mostly on a river cruise. After mowing the grass I got back to work on the Bluenose. The Amati kit comes with a fairly ugly stand so I spent the last couple of days making a nice one out of cherry. I shaped dowels to make the pedestals. Old stand New stand The instructions say to wrap the deadeyes with fine brass wire. That seems simple enough but it took a few tries to get the hang of it. I darkened the wire with Novocan brand patina for stained glass. The wires go through the rails and into the deck, and are attached with CA. The remaining holes are for the ropes, but there are no belaying pins with the kit! The instructions just say to run the ropes to the appropriate holes. I hope I have some belaying pins in my spares box.


-
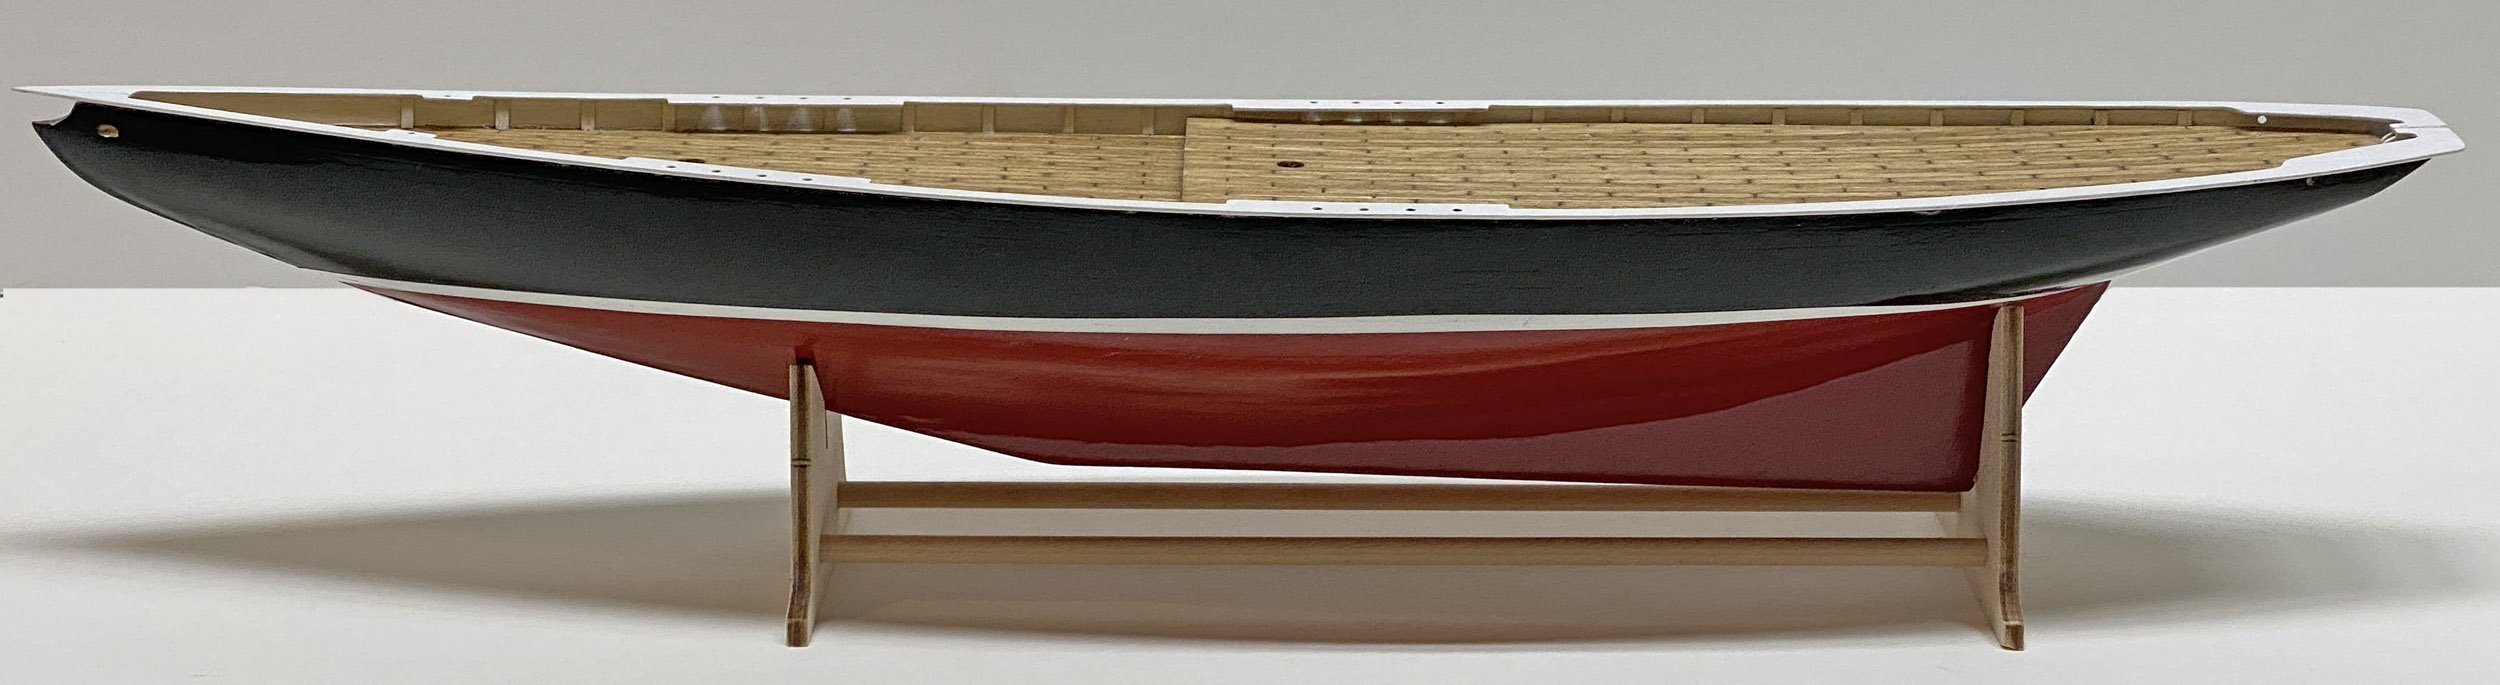
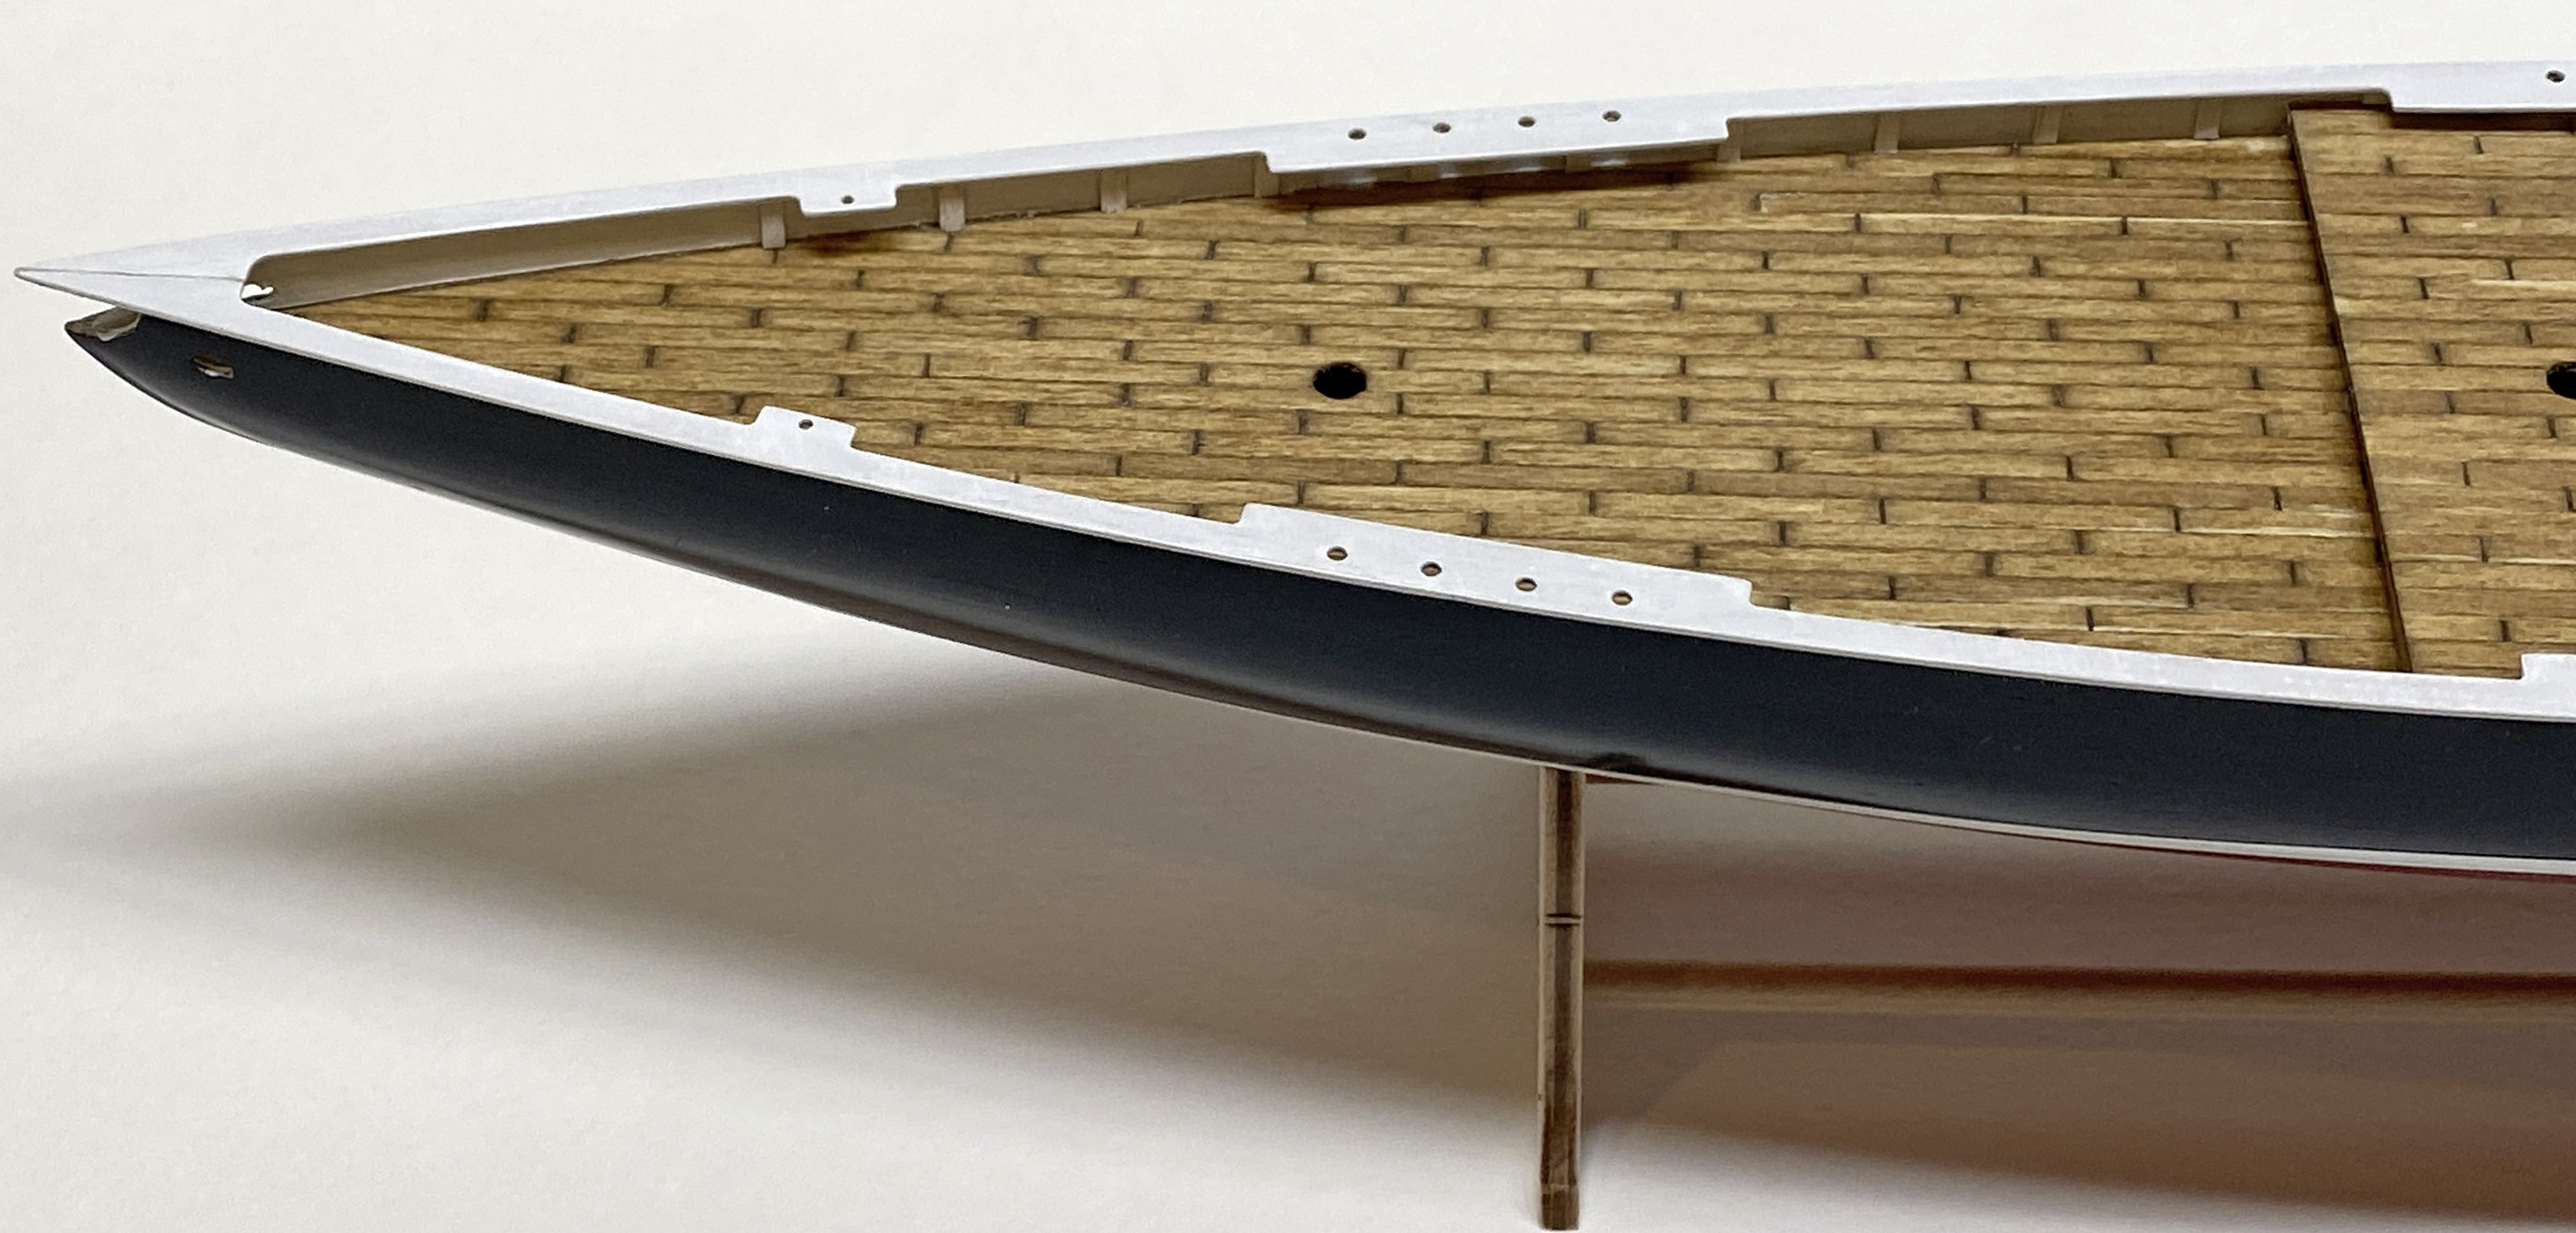
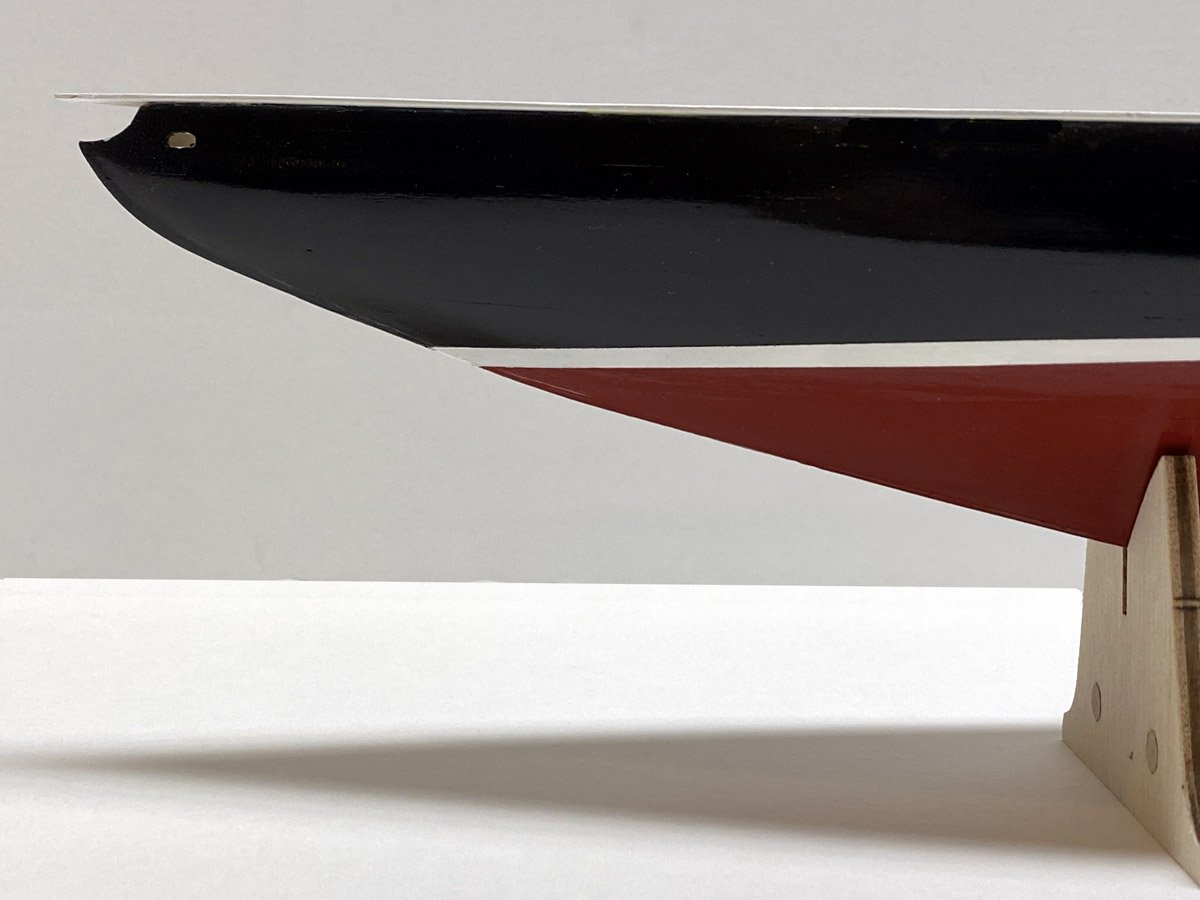
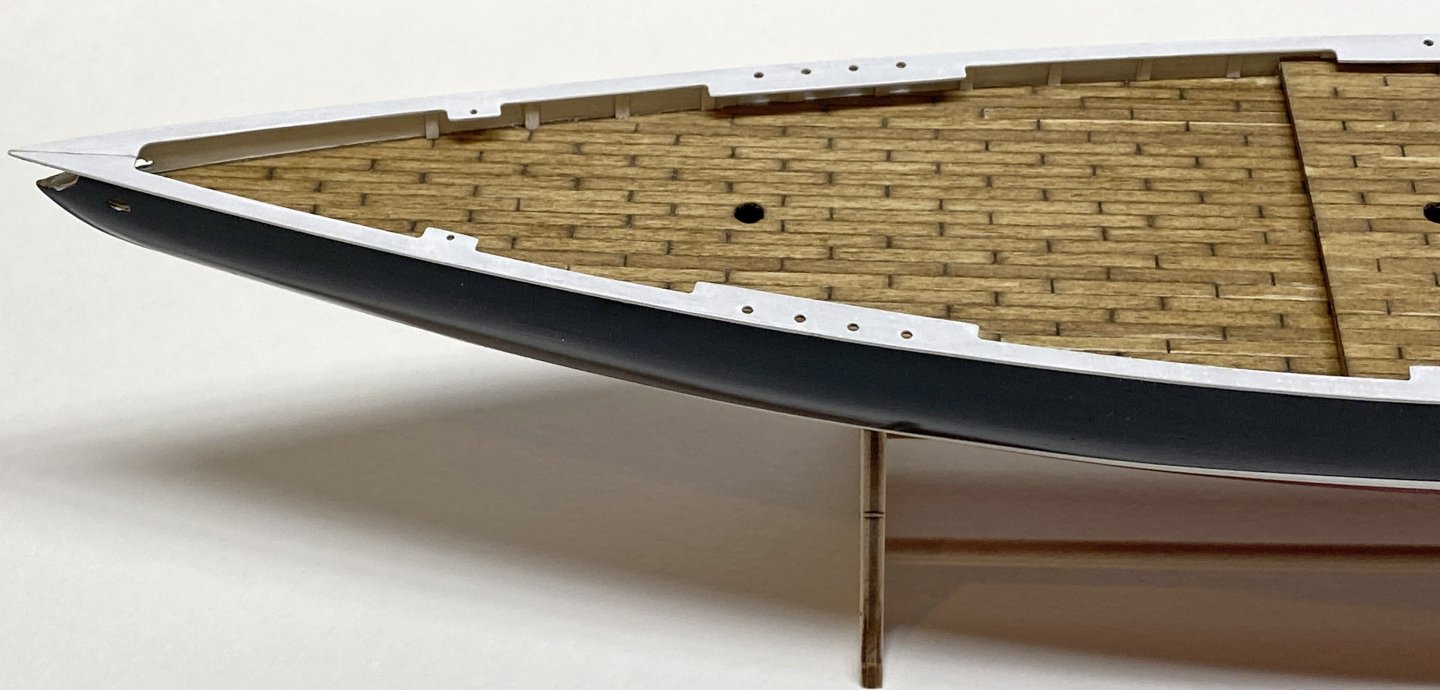
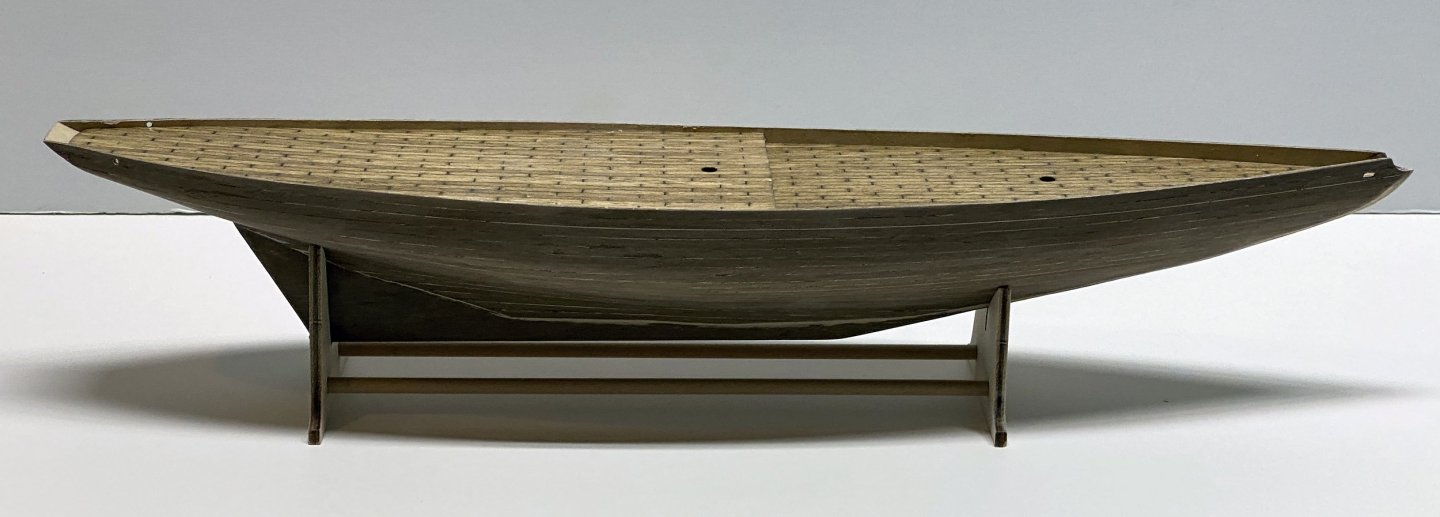
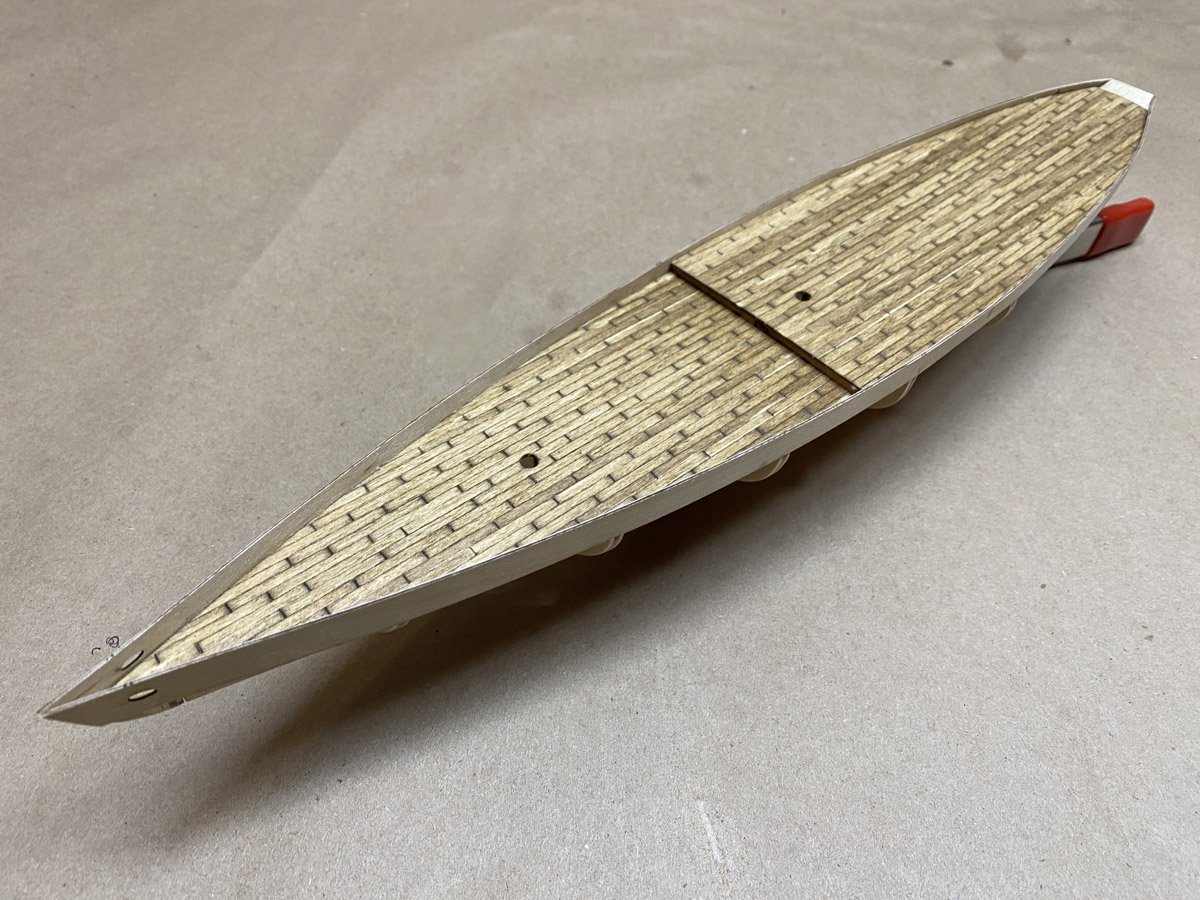
Hull Painted, Railing Installed - 23 days, 55 hours The hull was painted with three coats each of Rustoleum Colonial Red, Krylon gloss white, and Krylon gloss black from rattle cans. The rails and interior were brush painted with gloss white acrylic. I am leaving for Europe in a few days and rushed to get this all done, but probably should have taken my time. I can see a few seams between boards and a few fingerprints on the black areas. Not bad but I could do better.

-
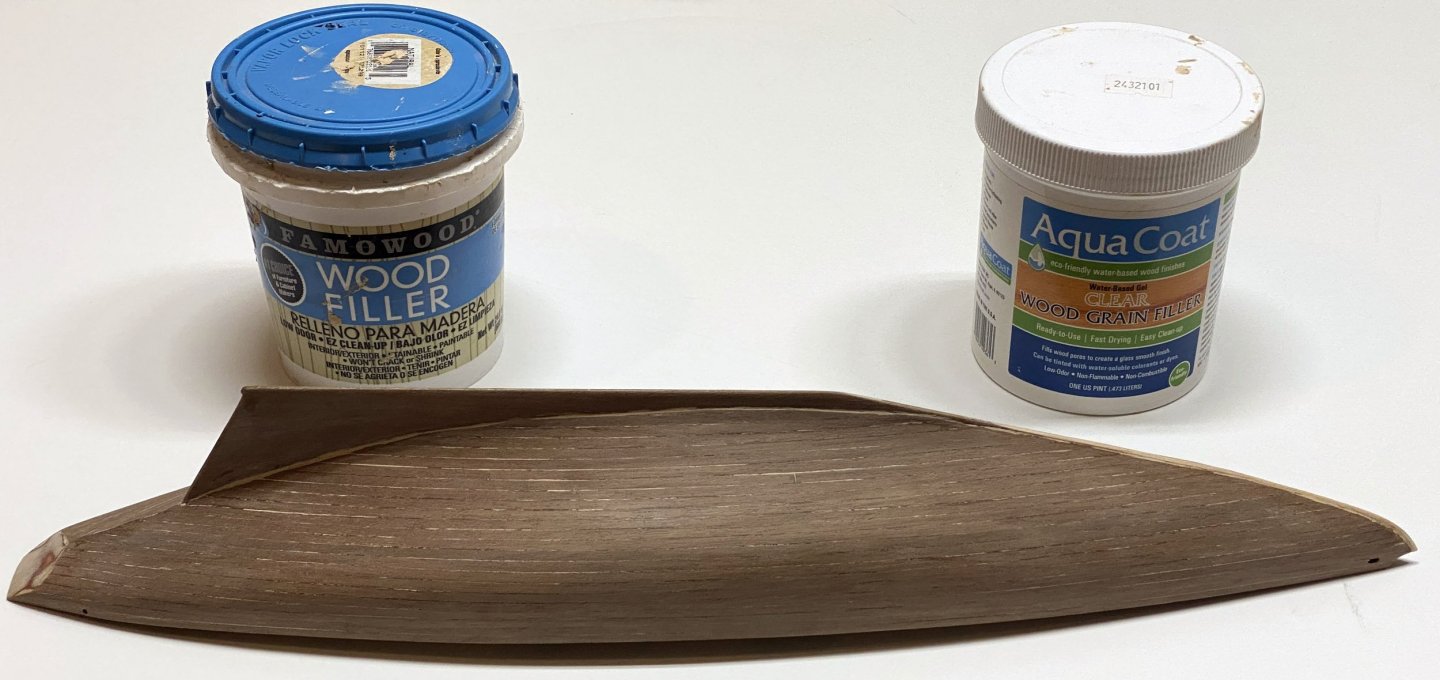
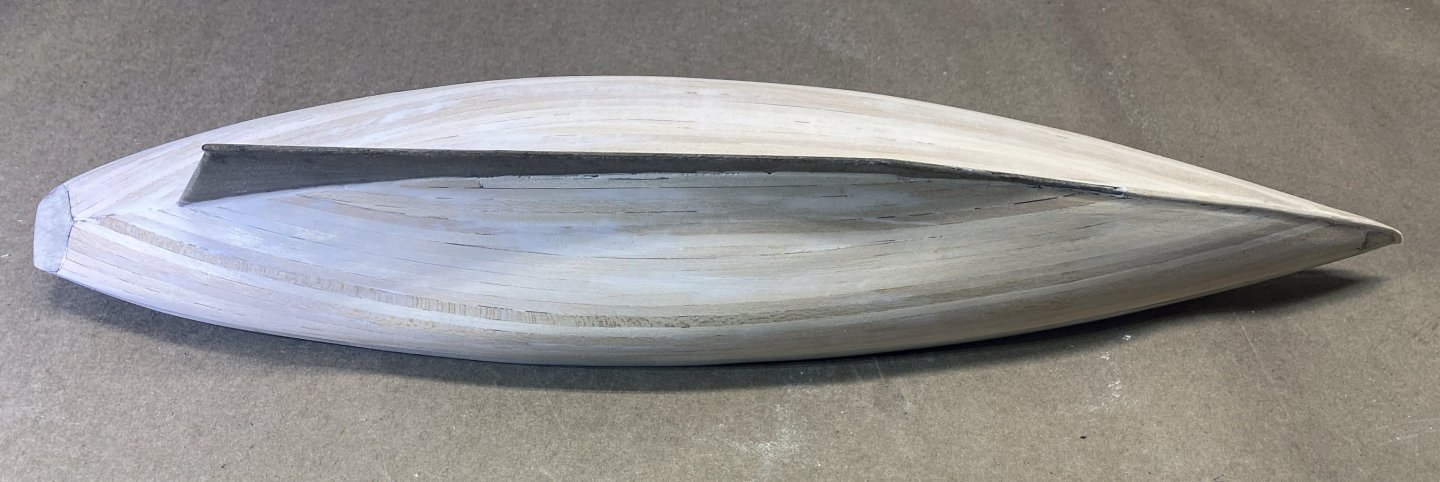
Second Planking Complete I started at the top rail and worked towards the keel. The thin second layer of 0.5 mm walnut planks were amazingly flexible. I just glued them directly to the first layer with CA. No tapering necessary. After lots of sanding, crack filling with Famowood, more sanding, two coats of Aqua Coat, and more sanding, I think I am ready to paint the hull. At least I'll see how it looks after a coat of primer.
-
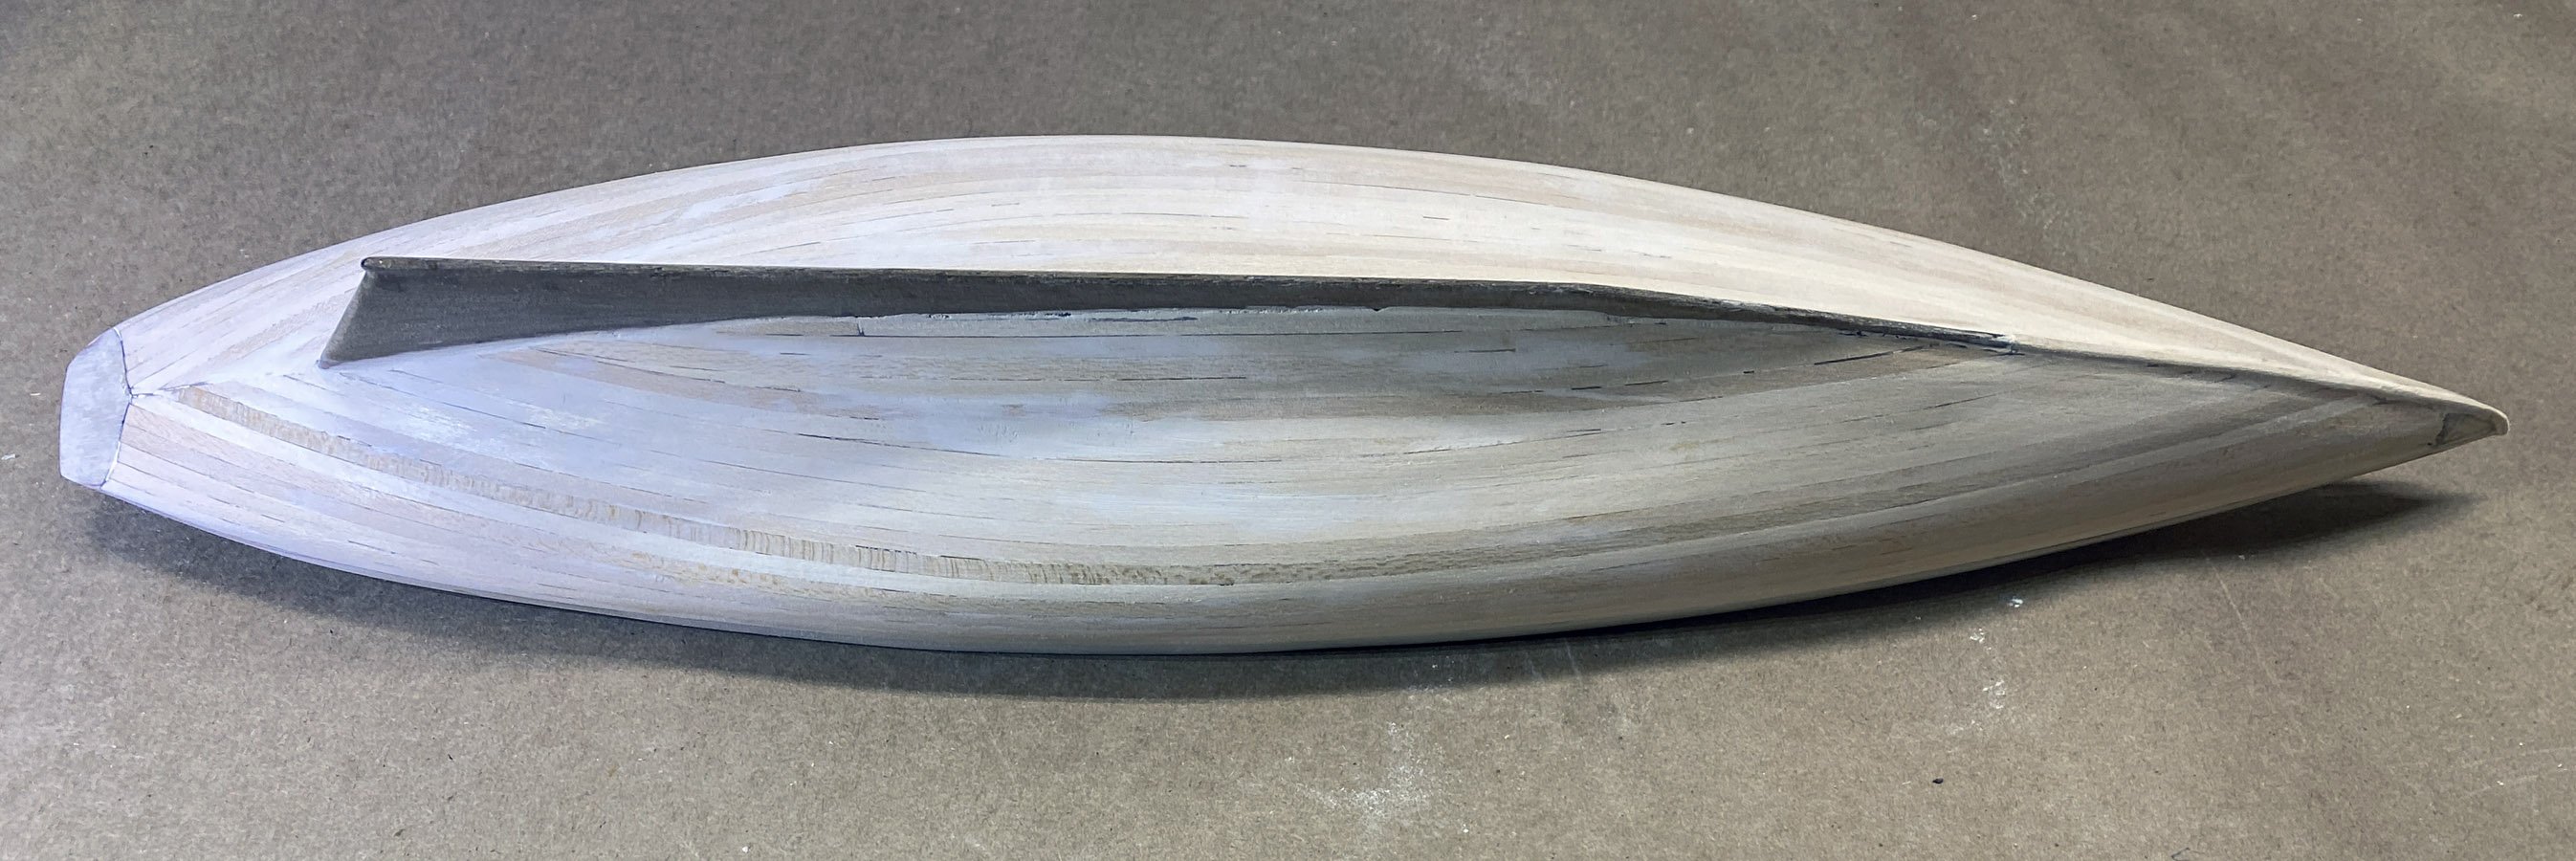
First Planking Complete - 14 days, 31 hours The second layer of planking is walnut, 3mm wide x 0.55 mm thick - not much material to sand down when I screw up. And why walnut if it's going to get painted anyway?
-
There are so many Bluenose build logs on MSW that I debated whether to add another. I am already glad that I did, since I've learned that the Maple Leaf flags that come with the kit are incorrect. However, I looked at the web sites for all the other Bluenose kits and guess what? They all have Maple Leaf flags! What gives?
-
Trevor, Thank you so much for the history corrections! I'm just repeating the text from the Italian instructions. Regardless of her win/loss record, she sure is a beautiful ship. Thank you also for the tip on the flags. I will certainly not use the ones supplied with the kit, and if you can suggest any alternatives I see what I can do.
-
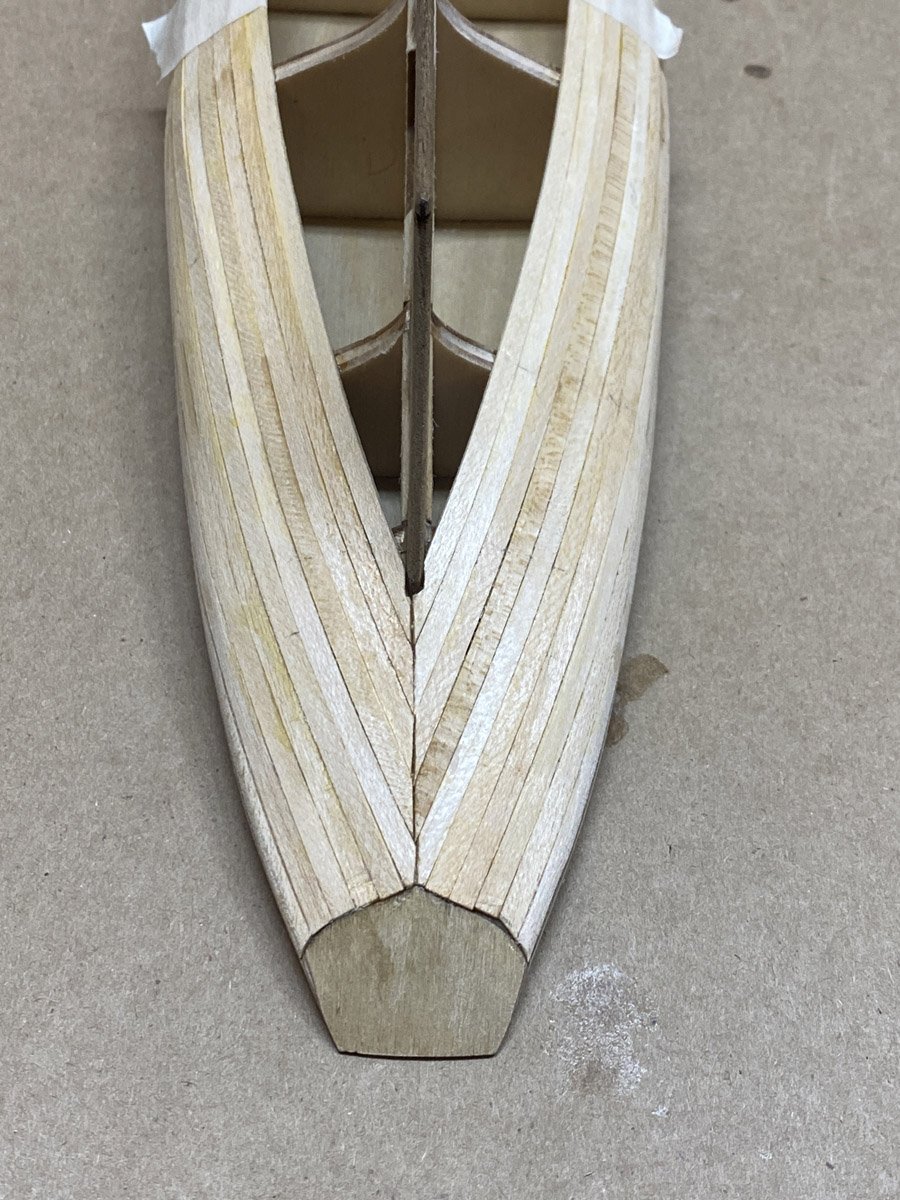
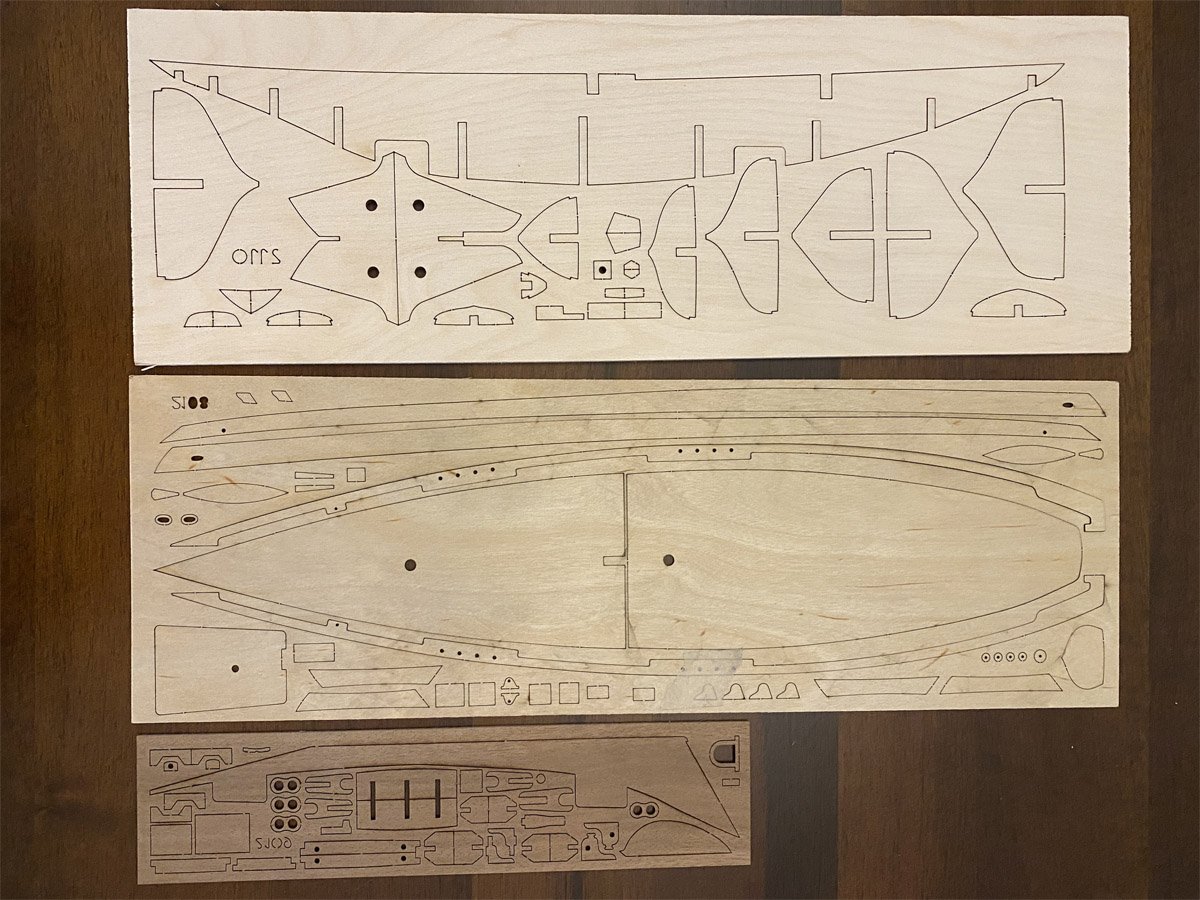
Starting on the Hull and Deck The frames popped out of the laser-cut ply and fit perfectly on the keel. I planked the two thin plywood sub decks by gluing down full-length strips and then notching them with a chisel to make individual boards. The technique is described here. I stained the decks with two coats of Minwax Golden Oak and finished them with Minwax Polycrylic satin from a rattle can. When I test fit the decks on the keel they didn't line up in the center. Low and behold, the keel was warped about 4 mm off straight. Darn, I wish I had noticed that before I added all those frames. I ended up notching a piece of poplar to go around the frames. Clamped to the keel from below it held it straight while I glued the decks in place. The decks held the keel straight afterwards. I've started the planking using the technique described in the book Ship Modeling Simplified: Tips and Techniques for Model Construction from Kits by Frank Mastini. Basically you glue the planks to the frames with CA, and glue the planks to each other with PVA (carpenters' glue.) The CA hardens in a few seconds and holds the planks in place, no nails needed. I do about three frames at a time. Oh yeah, I have a hot plank bender now and am using that to roughly shape the planks before attaching them. The kit comes with a simple stand, but I usually prefer to mount my models on a permanent base - much easier to handle during construction and afterwards. But the sub keel on this model is just 2.25 mm thick, too thin for screws. I don't know what I'll do - maybe turn some wood pedestals and glue in place later?
-
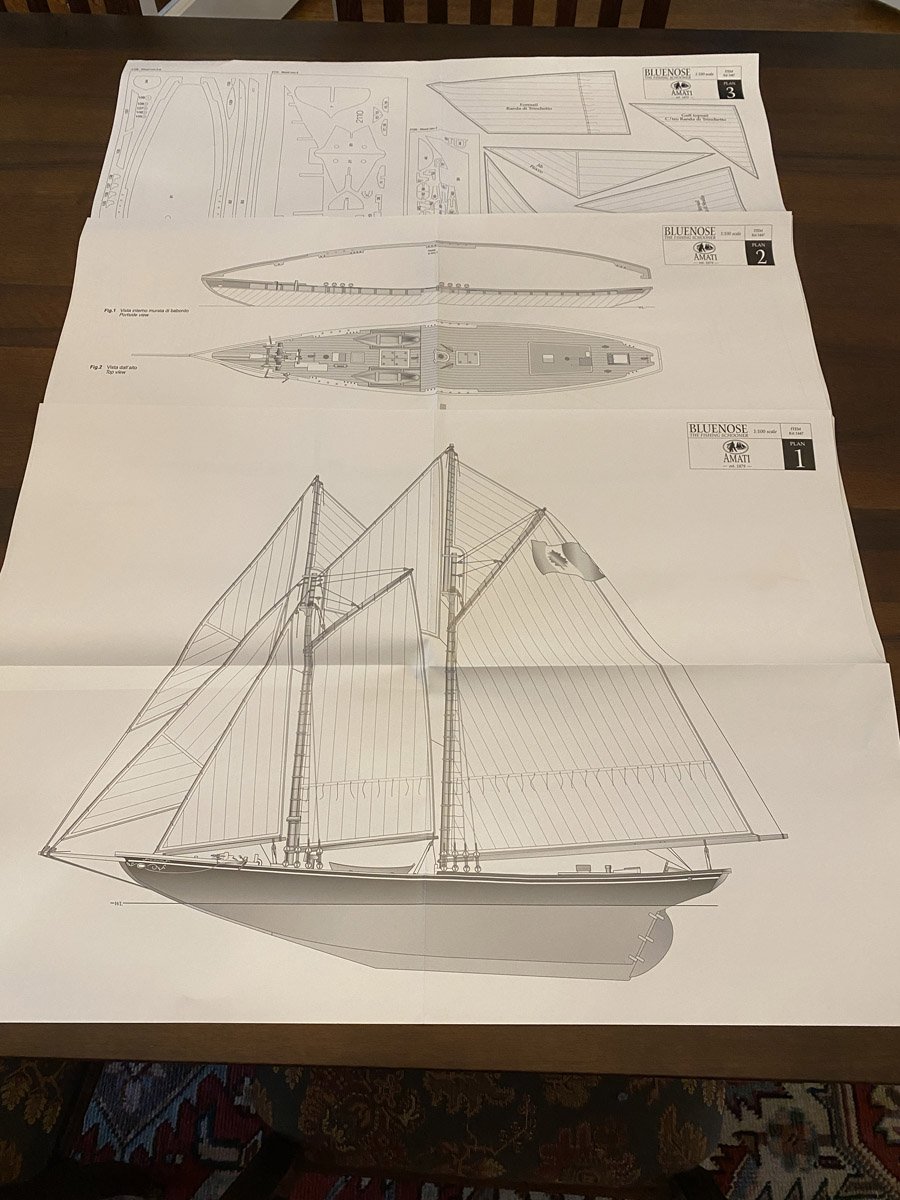
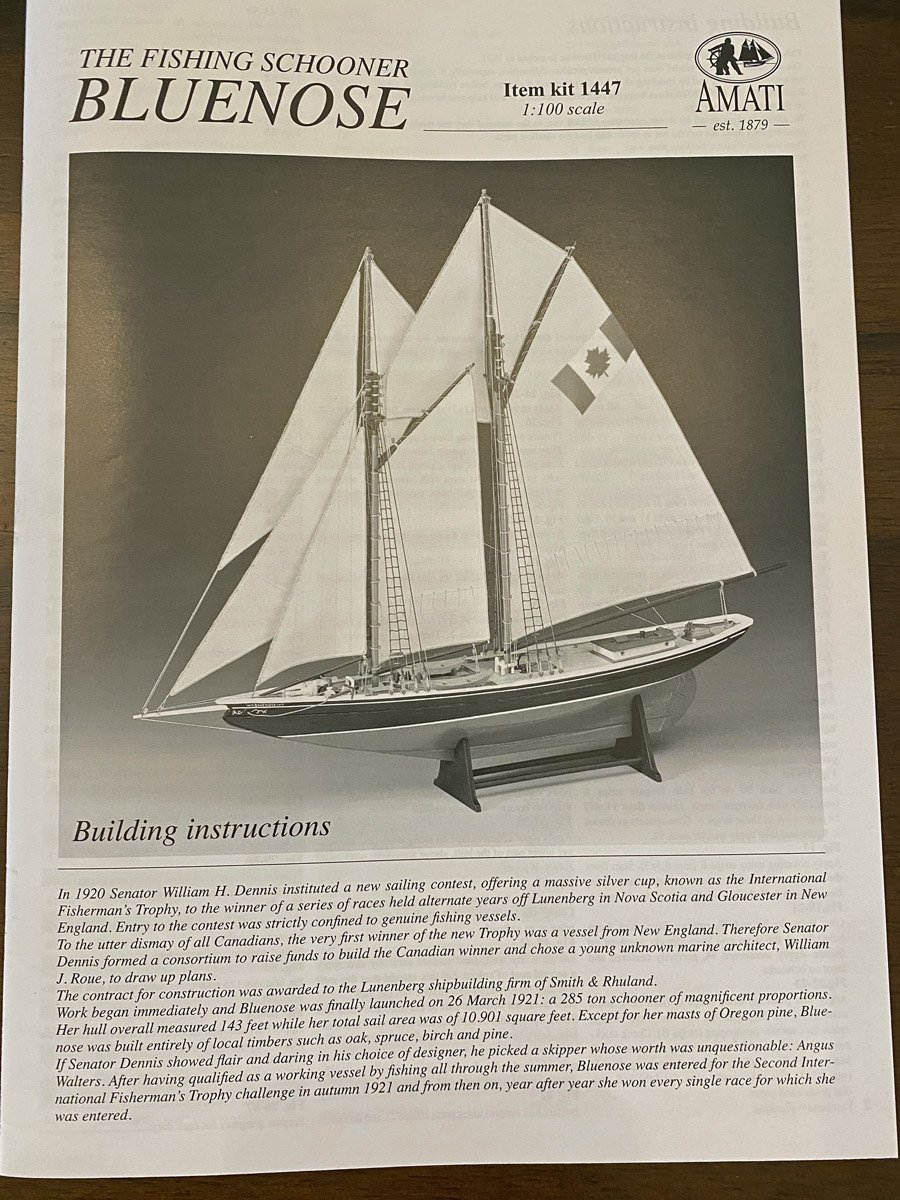
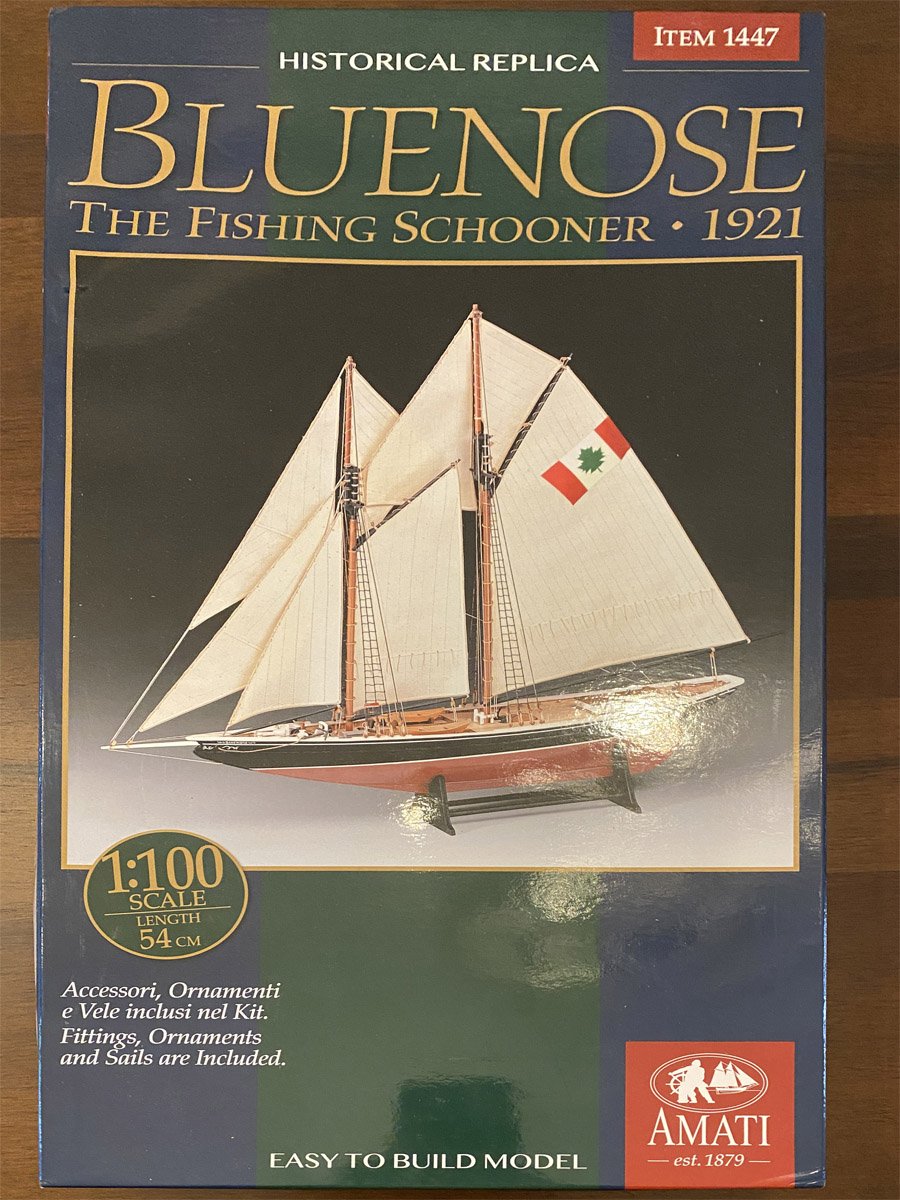
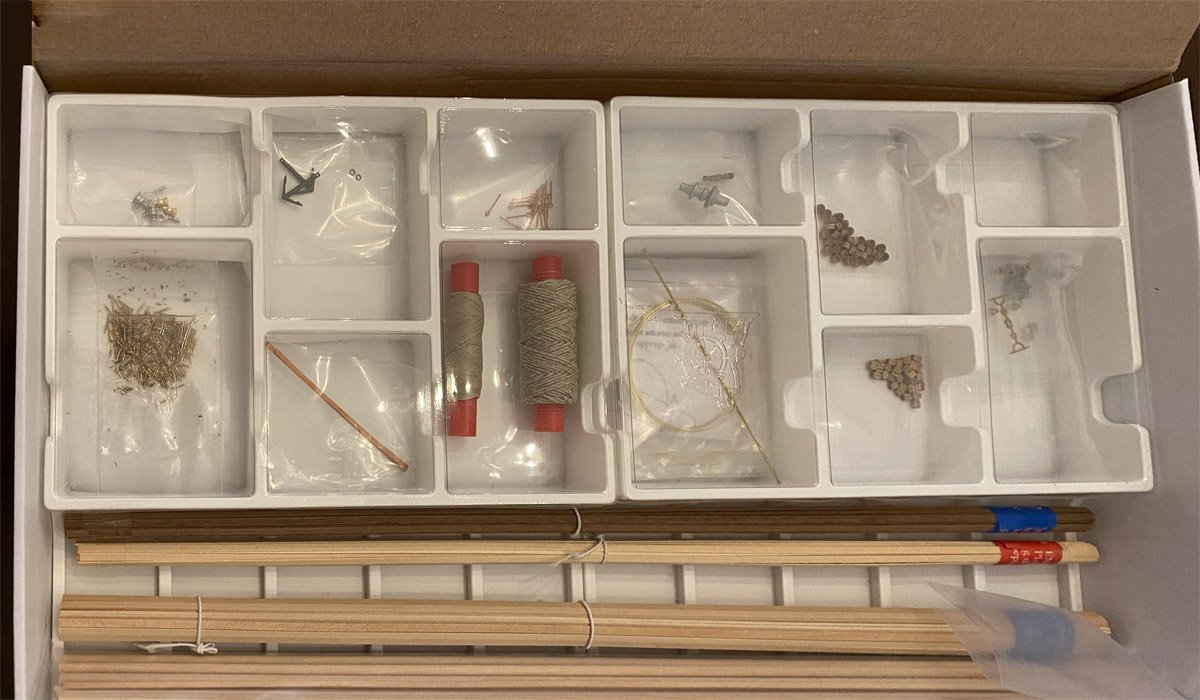
What's in the Box Seems like not much for €106.99, but that's what kits cost anymore. I love the "EASY TO BUILD MODEL" text on the box. Easier than many of the models I've built lately, but with a planked hull and full set of sails this will be anything but easy. Planks, dowels, thread, blocks, and a few miscellaneous parts. Three pages of full-sized plans. Three sheets of laser-cut parts. Two flags on adhesive-backed cloth, and cloth for sails. and a booklet with one page each of instructions in English and Italian, and about 20 pages of drawings.


-
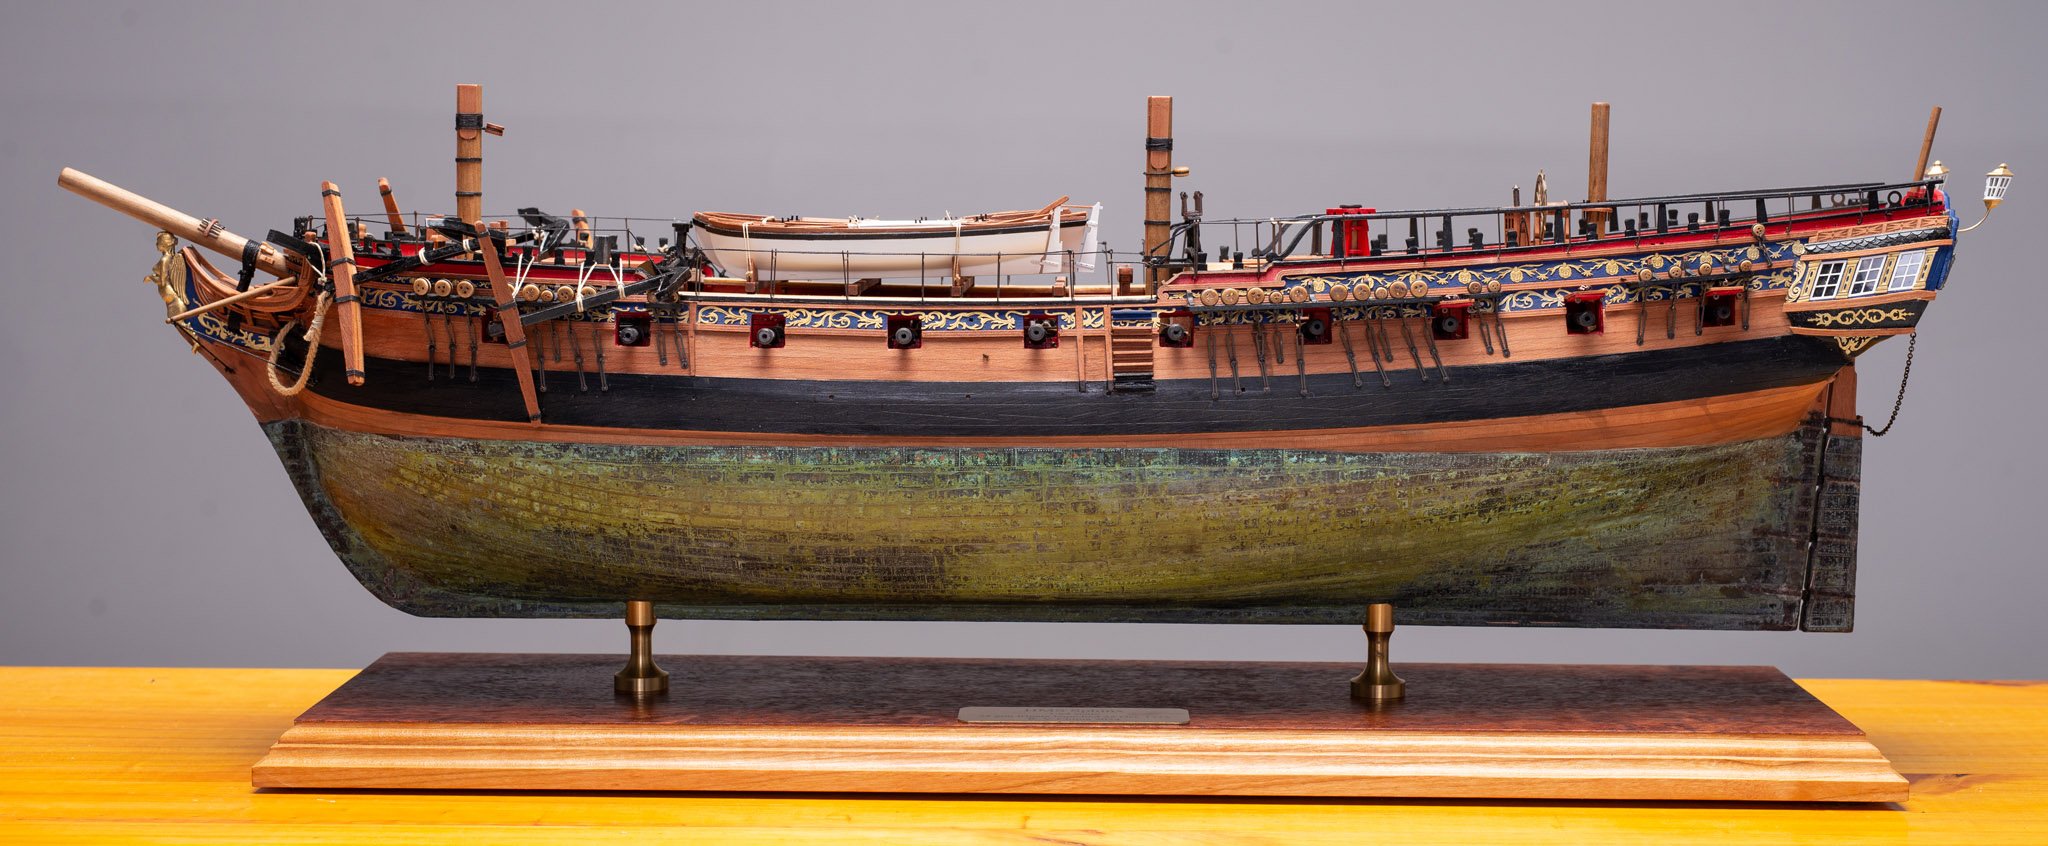
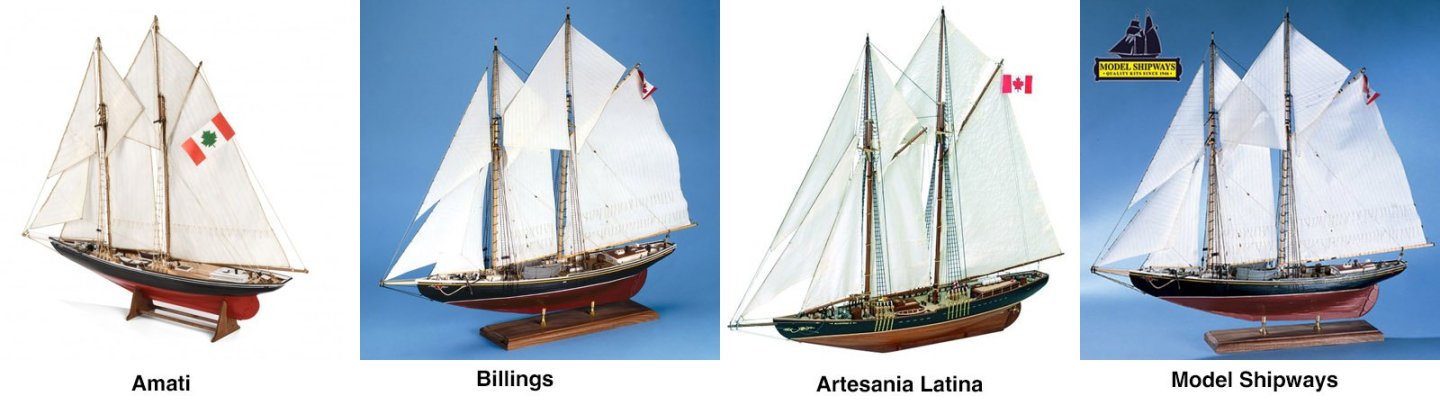
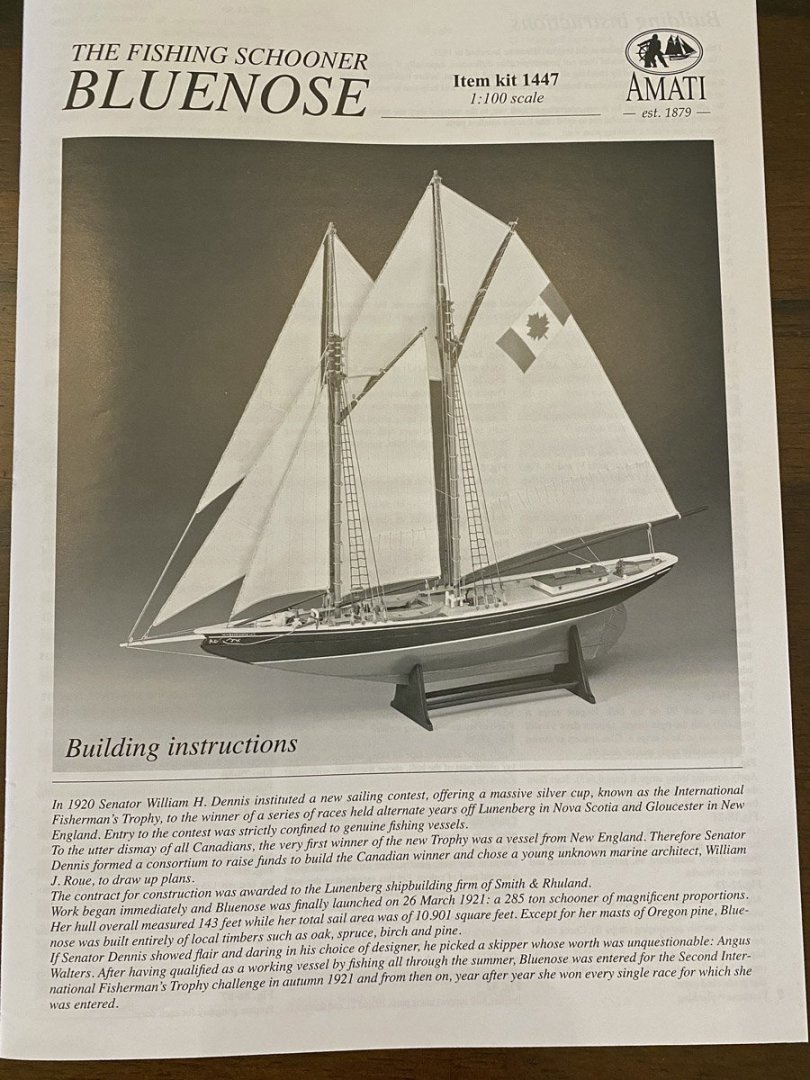
Bluenose was a 285 ton Canadian fishing schooner launched on 26 March, 1921. She was built to compete for the International Fisherman's Trophy held in alternate years off Lunenberg, Nova Scotia, and Gloucester, New England. She won the race in 1921 and every other race that she entered after that. (See corrections by Kenchington below.) She is depicted on the current Nova Scotia license plate and the back of the Canadian dime. There are LOTS of Bluenose builds on MSW, with kits offered by four companies in three different scales. I made an unofficial count of the kits listed as FINISHED. Company scale no. of logs Amati 1:100 3 Billings 1:100 2 Artesania Latina 1:77 8 Model Shipways 1:64 11 I decided to to build the Amati kit, mostly because I have built a few of their models am running out of space for larger models. Of the three Amati Bluenose build logs on MSW, only one has much detail. I will link it here so I can refer back to it later. It was completed 10 years ago, so I don't feel too bad adding another Bluenose build. Bluenose by SimonV - FINISHED - Amati - Scale 1:100 - first wooden ship build
-
I was away for a couple of weeks and didn't look in on your build. Your planking is perfect and the WOP is just beautiful on the pear wood. Congratulations on a marvelous job. If dampening the damaged area does not fix the problem, try touching the dampened area with a hot clothes or bending iron. Try it on some scrap first.
-
Thank you to everyone for the kind comments on my build. It was a challenge but also a pleasure to build such a fine kit, and always fun to share the work with people who appreciate it. Rod
- 96 replies
-
- 4
-

-
- Sphinx
- Vanguard Models
- (and 2 more)
-
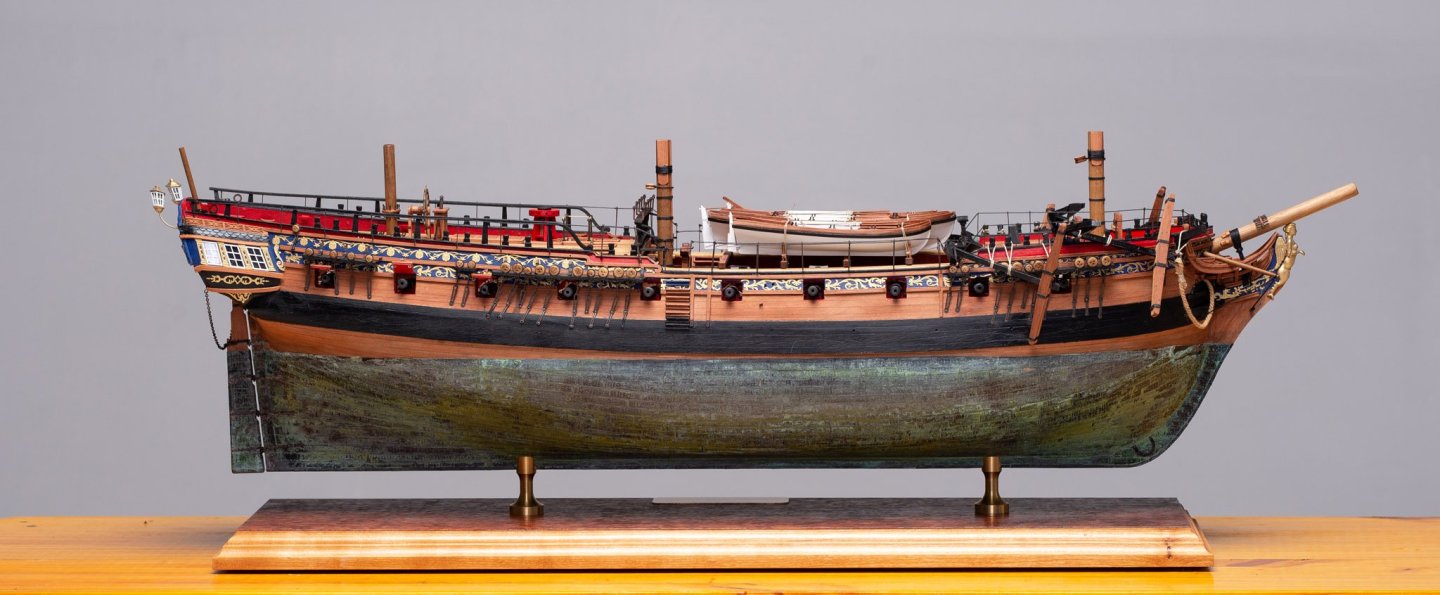
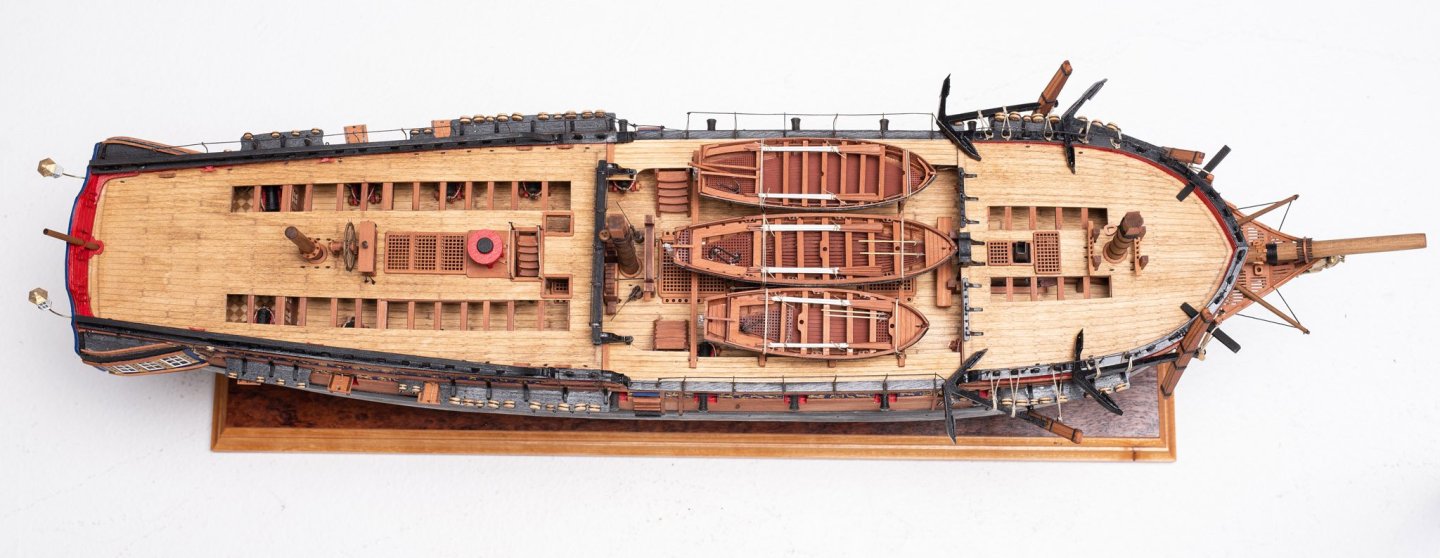
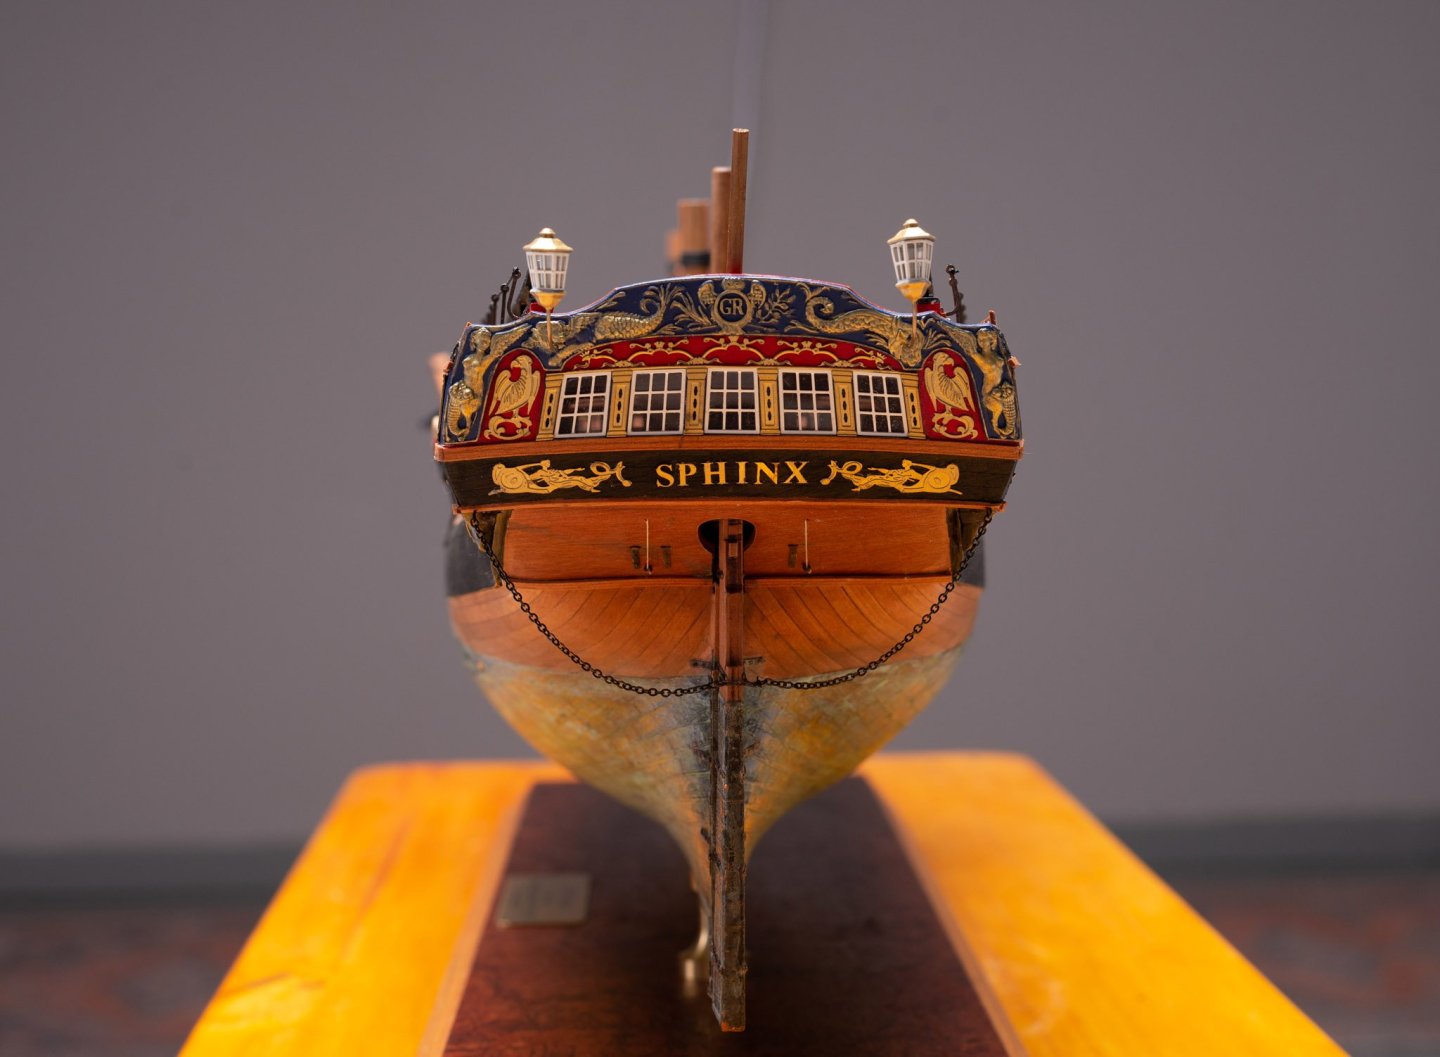
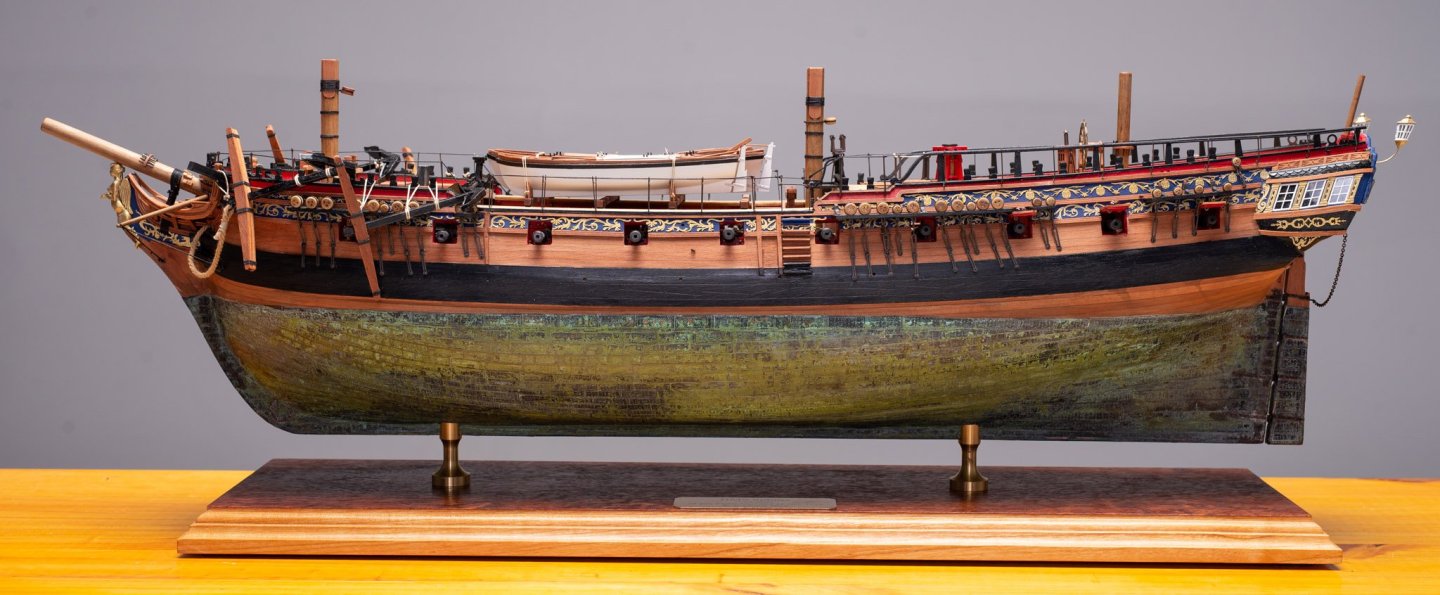
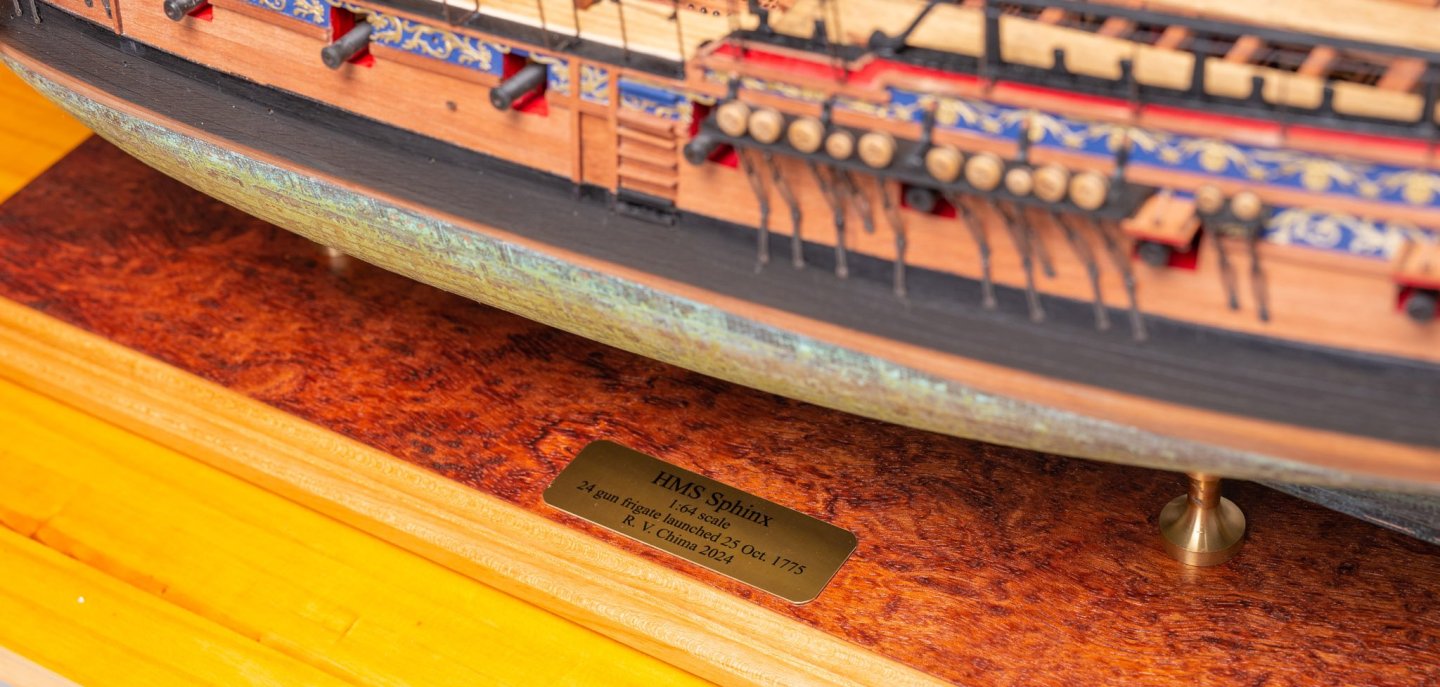
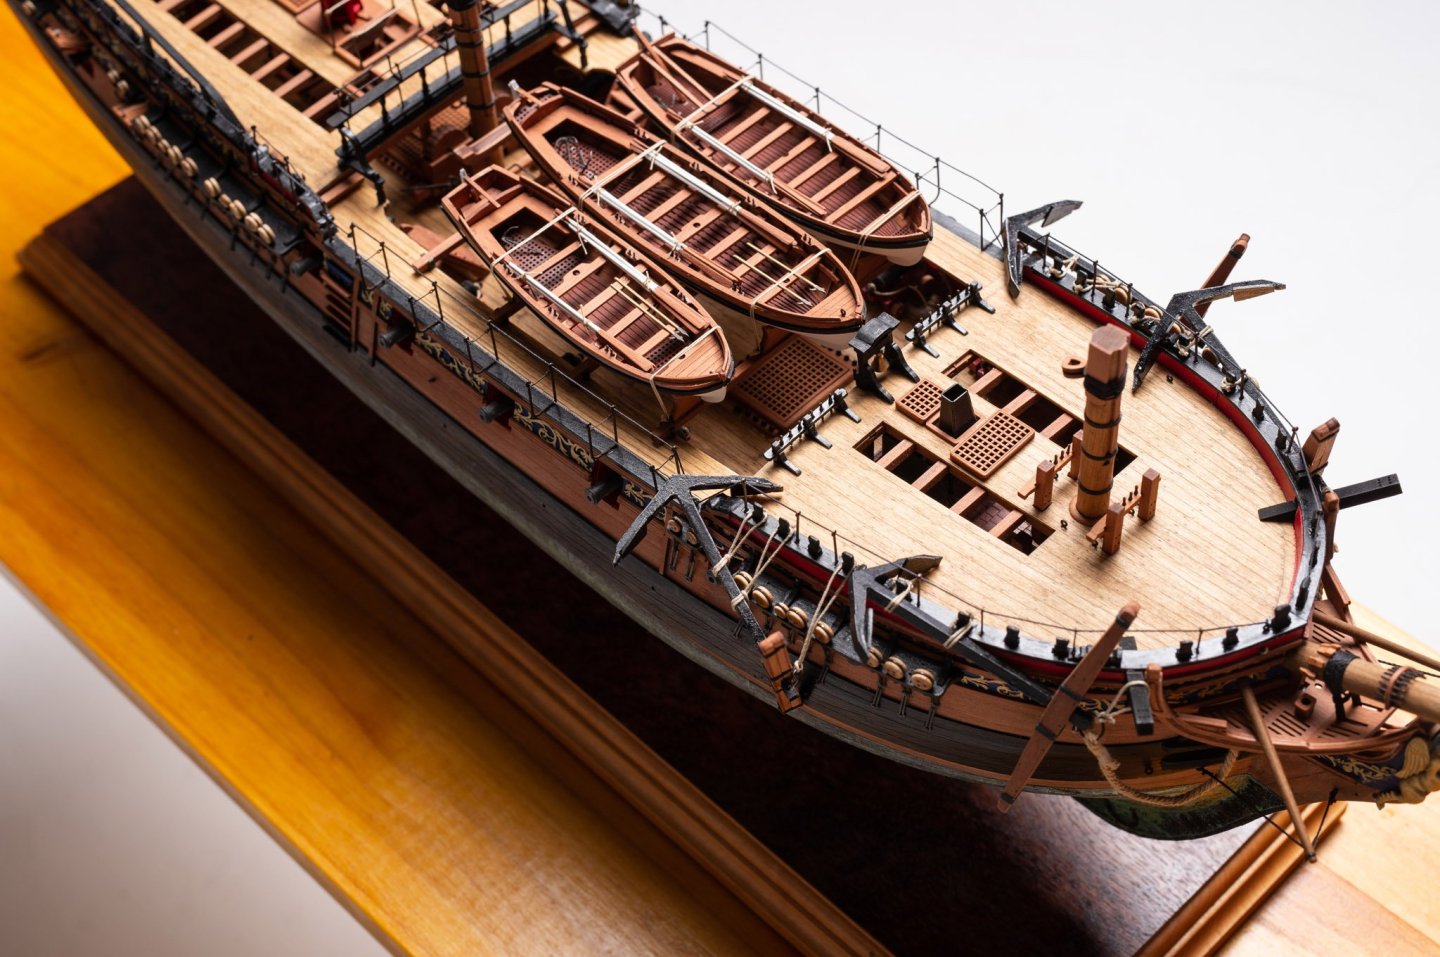
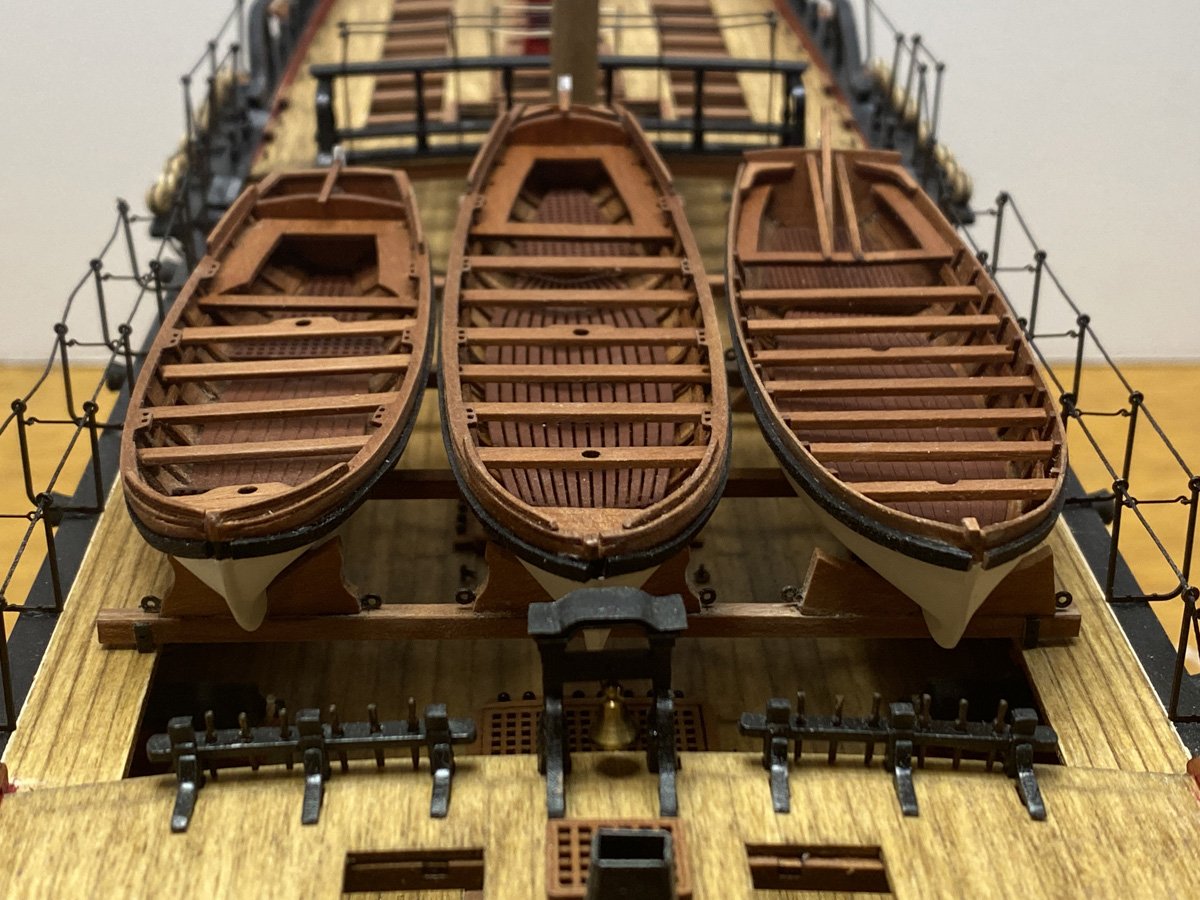
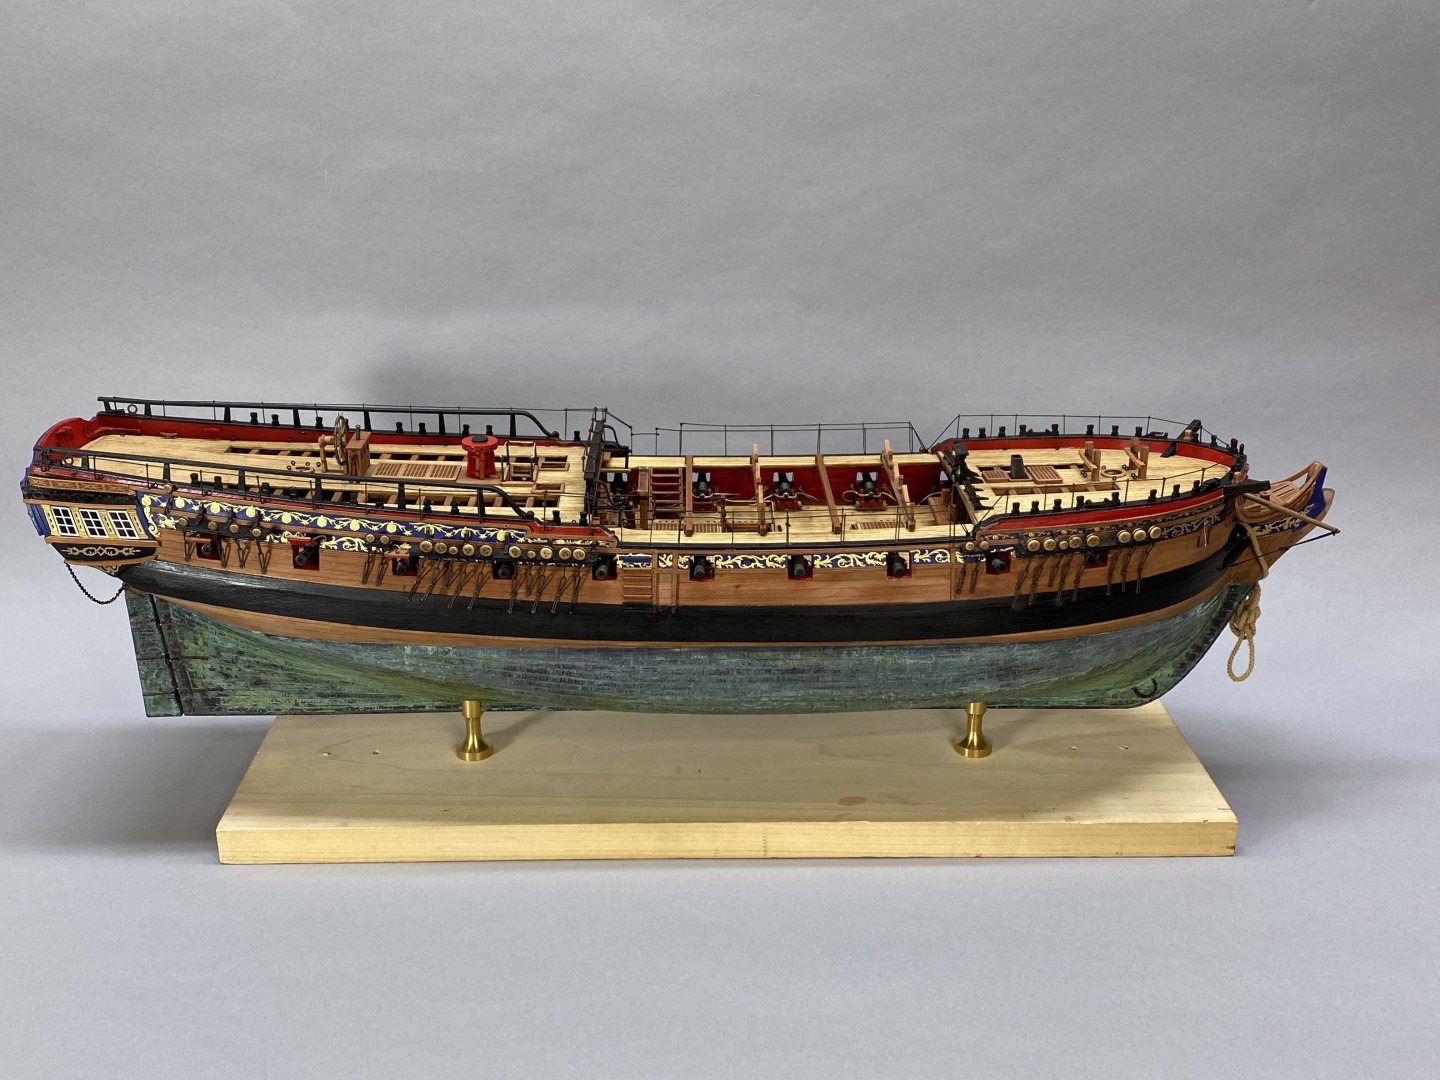
FINISHED - 441 Hours, 165 Days Since my last posts I finished and attached the ships boats, anchors, lanterns, and some stub masts. I knew from the start that this would be a hull-only model. I simply don't have room in my house for another large model. @chris watton at Vanguard Models has produced an absolutely beautiful model in the Sphinx. The materials are all excellent, the laser-cut parts all fit perfectly, and the photo-etched parts make detailing the model easy. (Well, relatively easy.) The kit uses some unconventional parts. I had my doubts about the photo-etched eyebolts and the MDF anchors, but in the end they look perfect. I do think the ship's wheel and the floors of the ship's boats would be better done in wood, but again they look fine. My finished Sphinx is so photogenic that I hired a professional photographer to take photos of her. Many thanks to Leea at Asheville Headshots for her beautiful photos. Here they are.
- 96 replies
-
- 23
-
-

-
- Sphinx
- Vanguard Models
- (and 2 more)
-
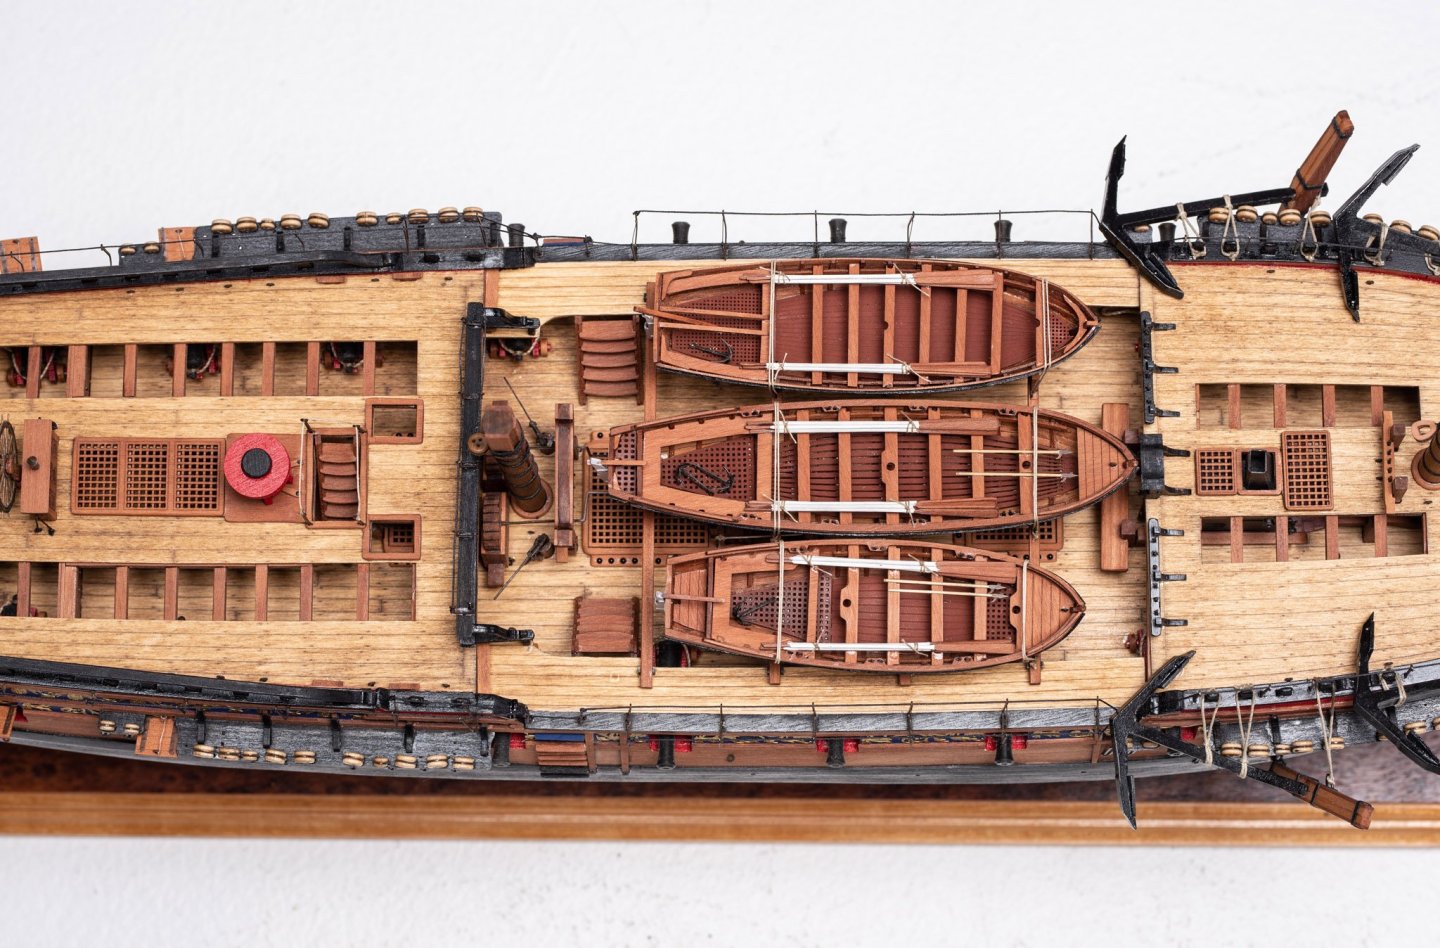
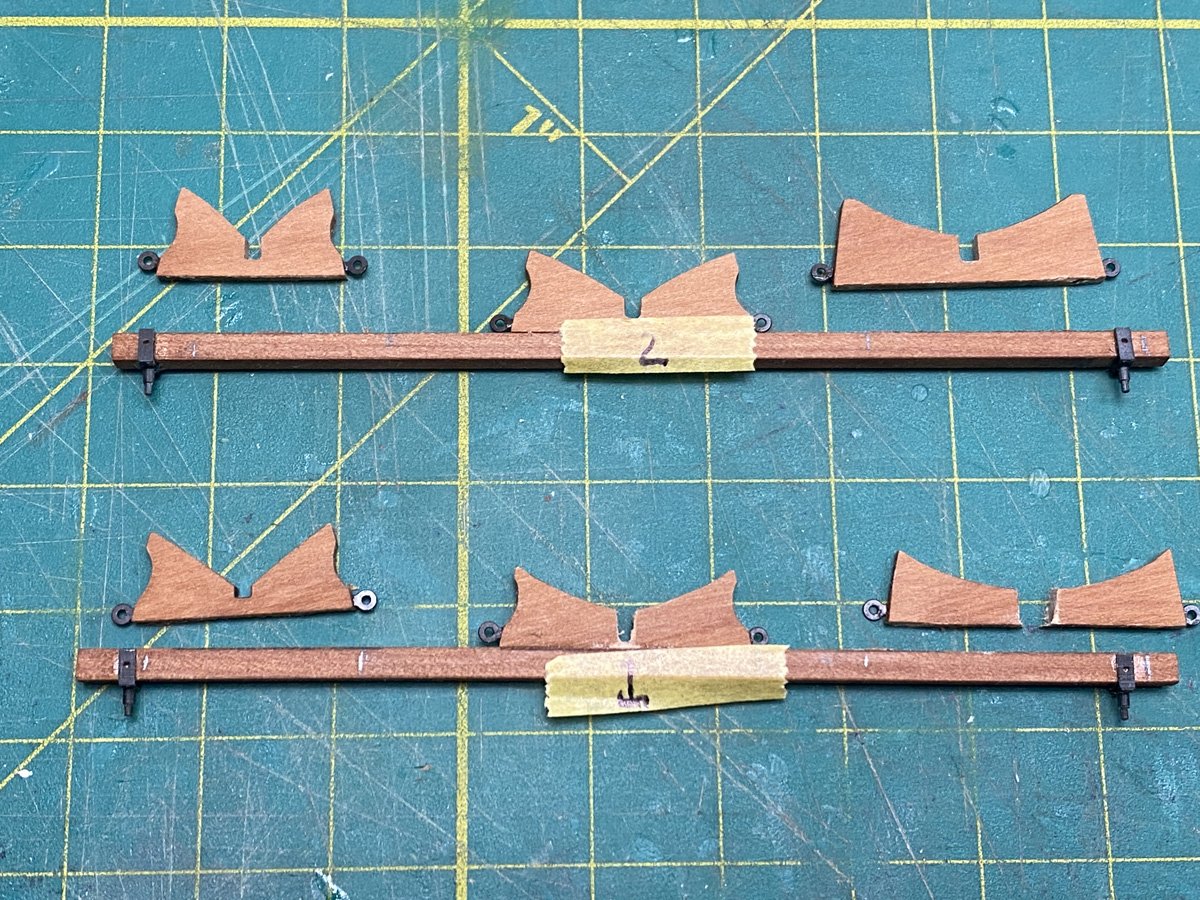
The Boats Don't Quite Fit The fit of the ship's boats has always been a bit "iffy," but after I added the wales to the their sides they were just too close for comfort. And so, deconstruction. I moved the two outer boat racks each about 2 mm outwards, and now everything fits comfortably.
- 96 replies
-
- 9
-
-
- Sphinx
- Vanguard Models
- (and 2 more)
-
That is a beautiful model Walter. Congratulations on a job well done.
- 95 replies
-
- 1
-

-
- flirt
- vanguard models
- (and 1 more)
-
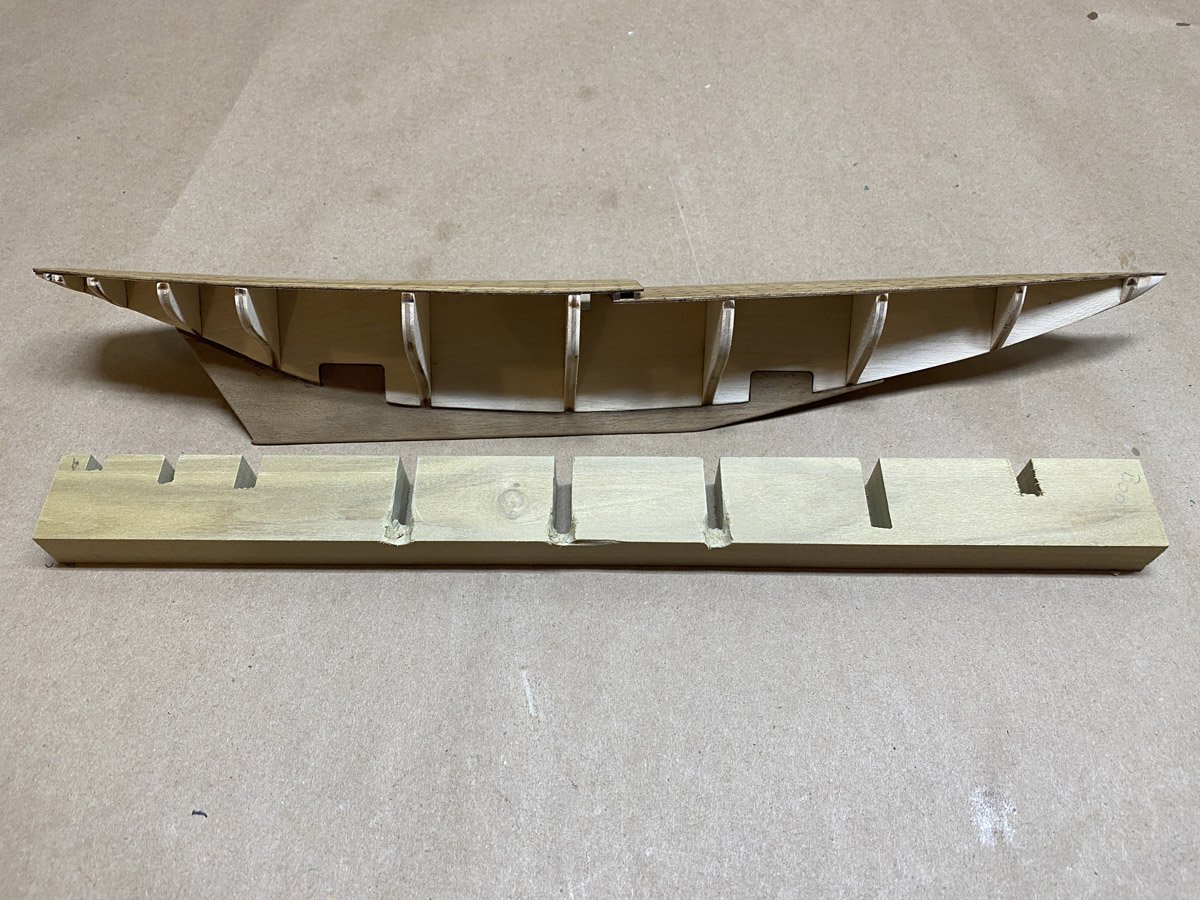
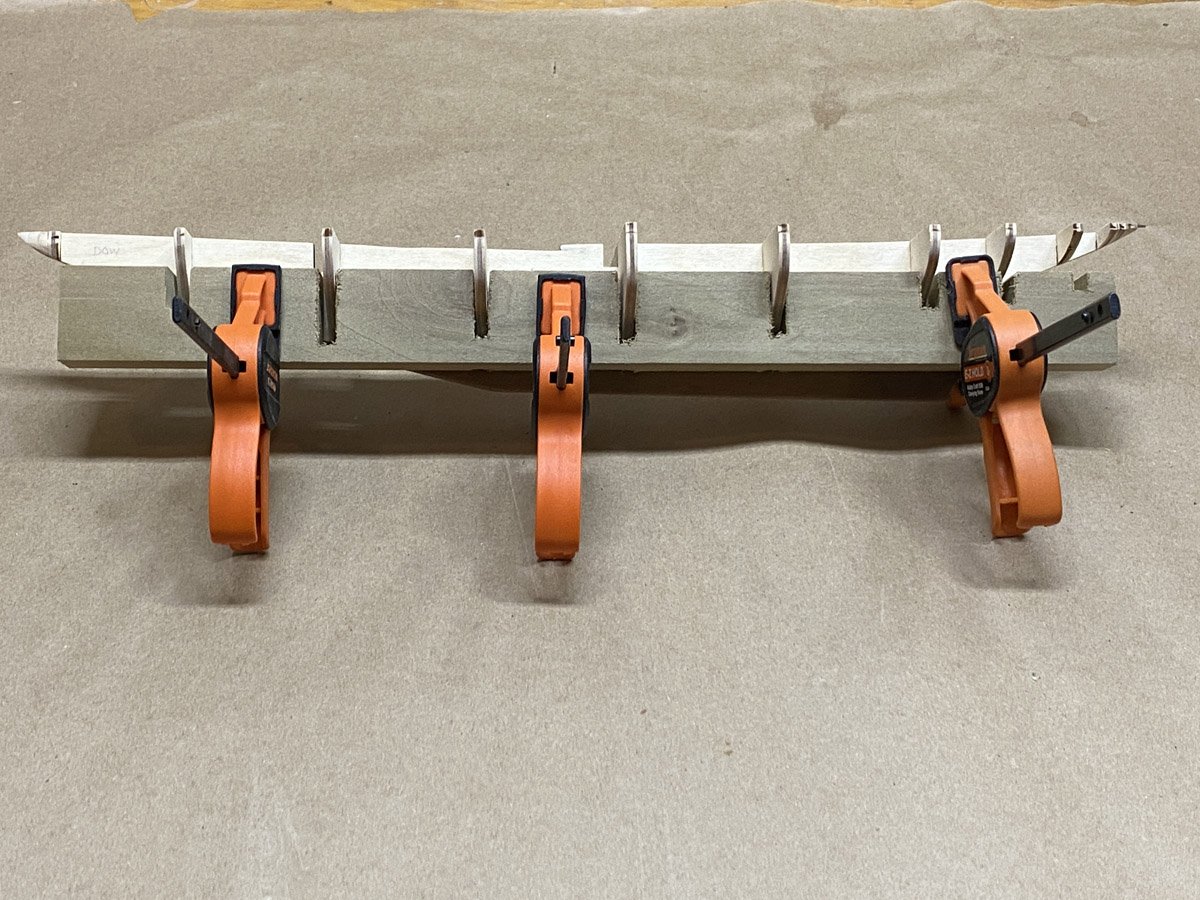
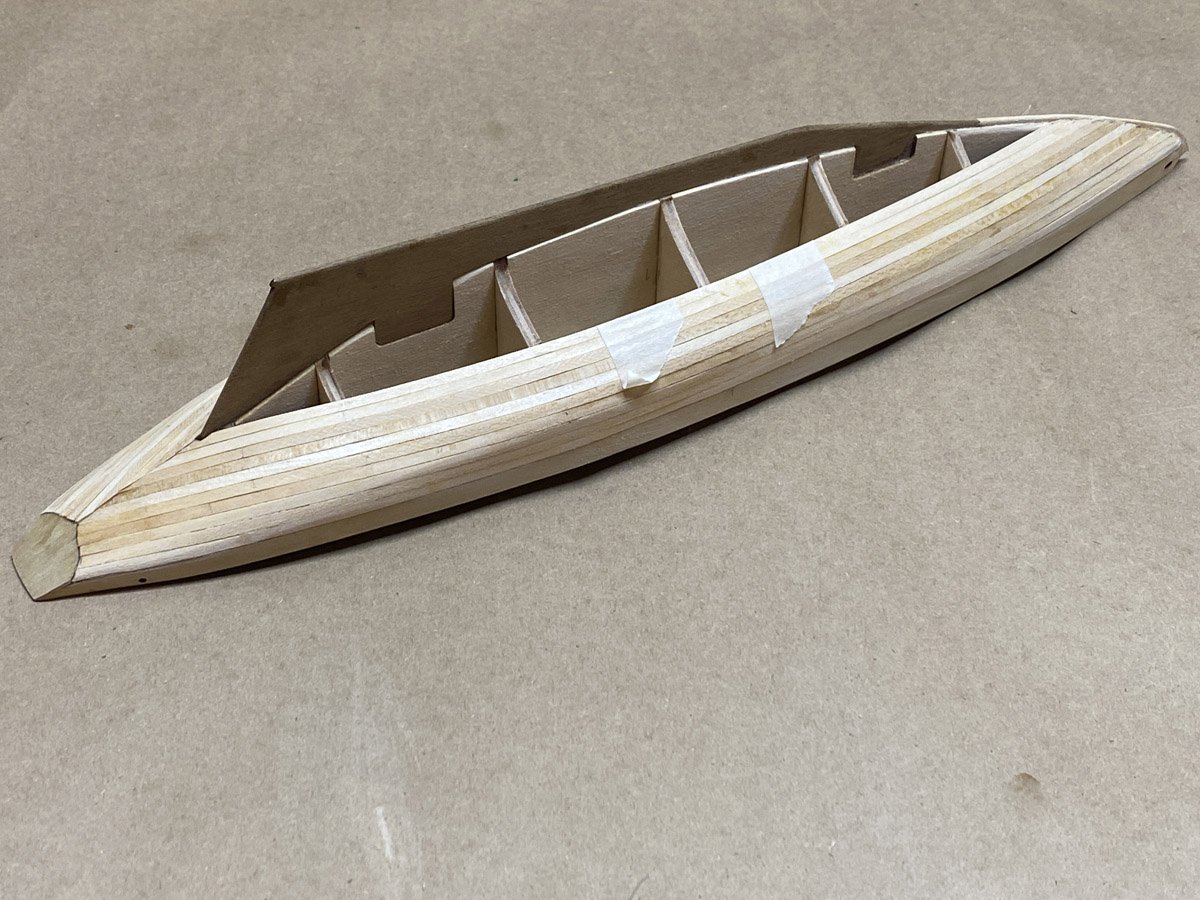
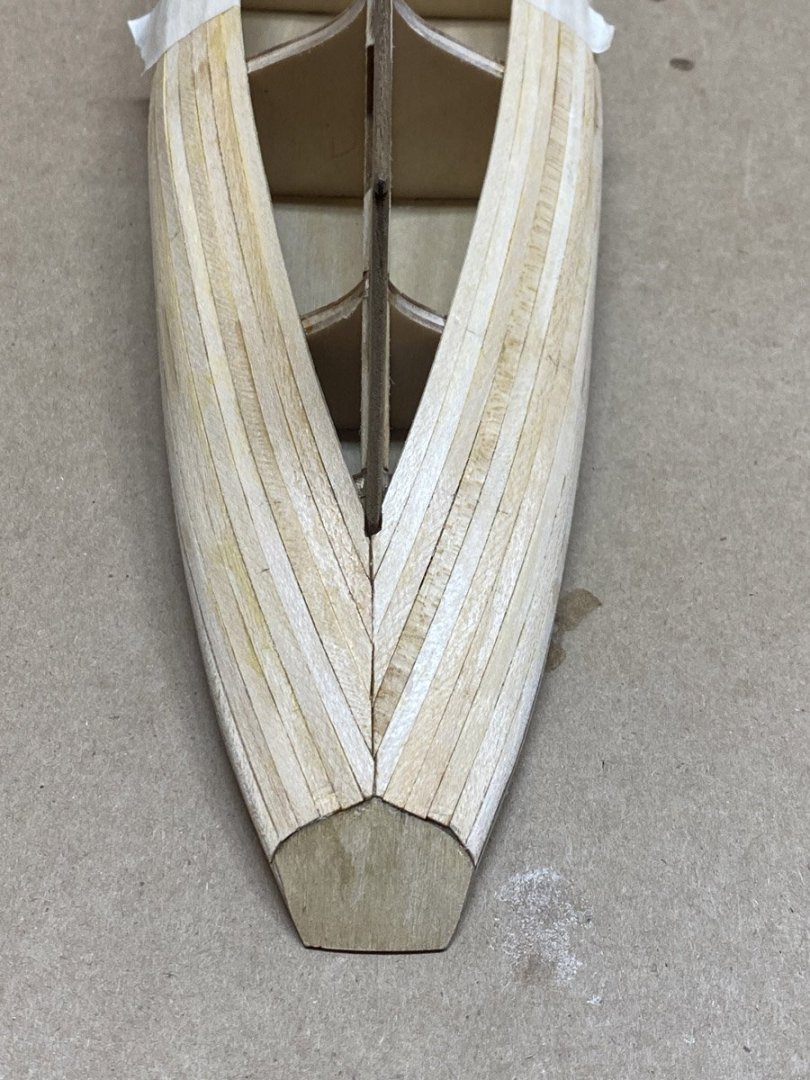
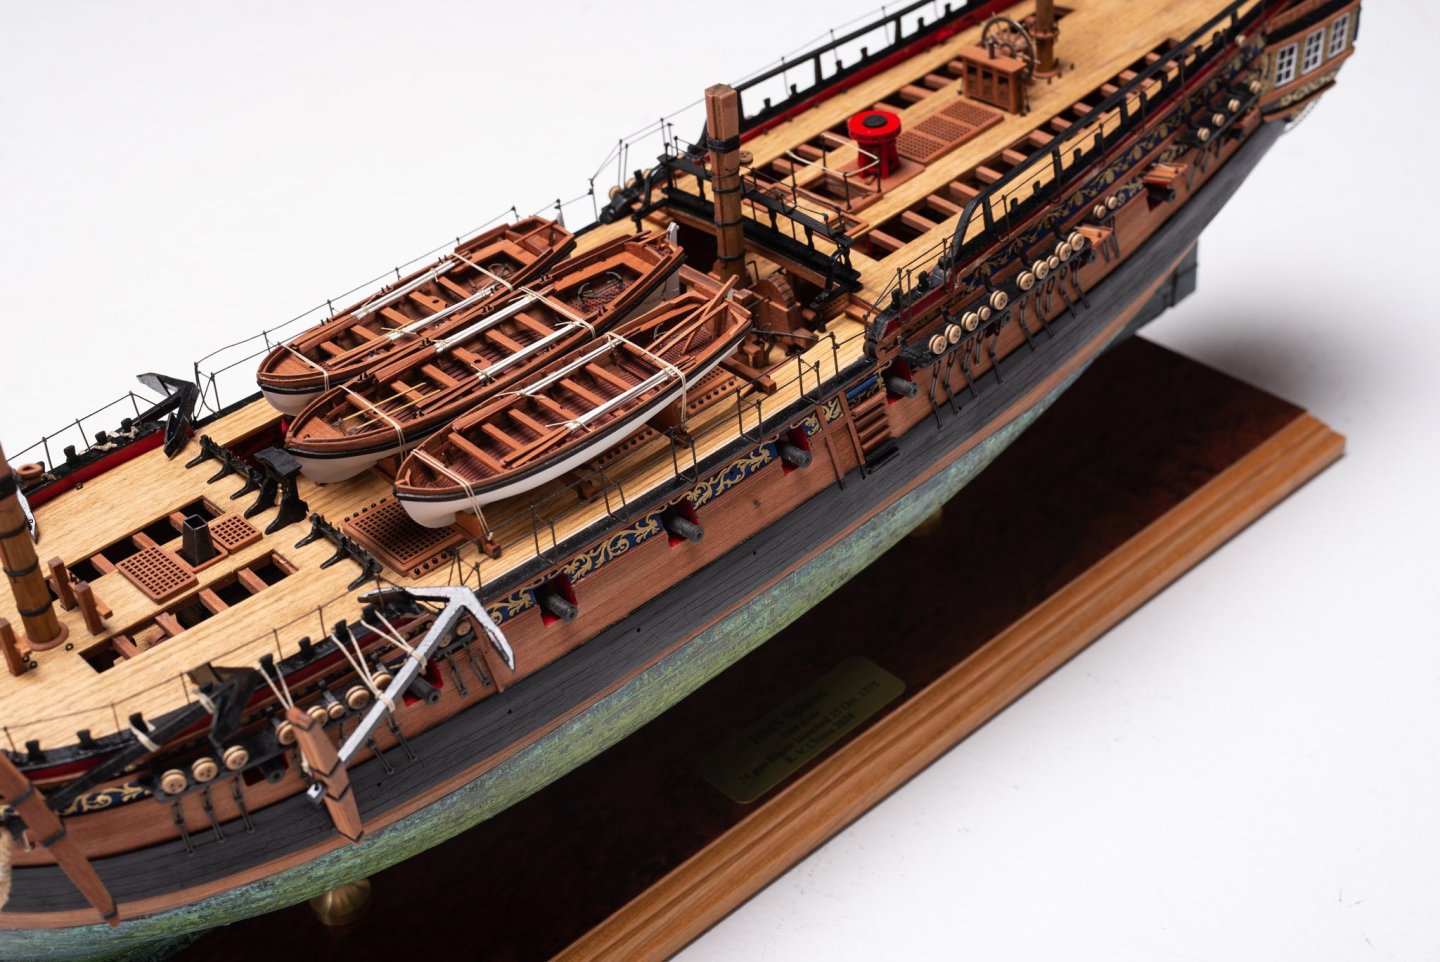
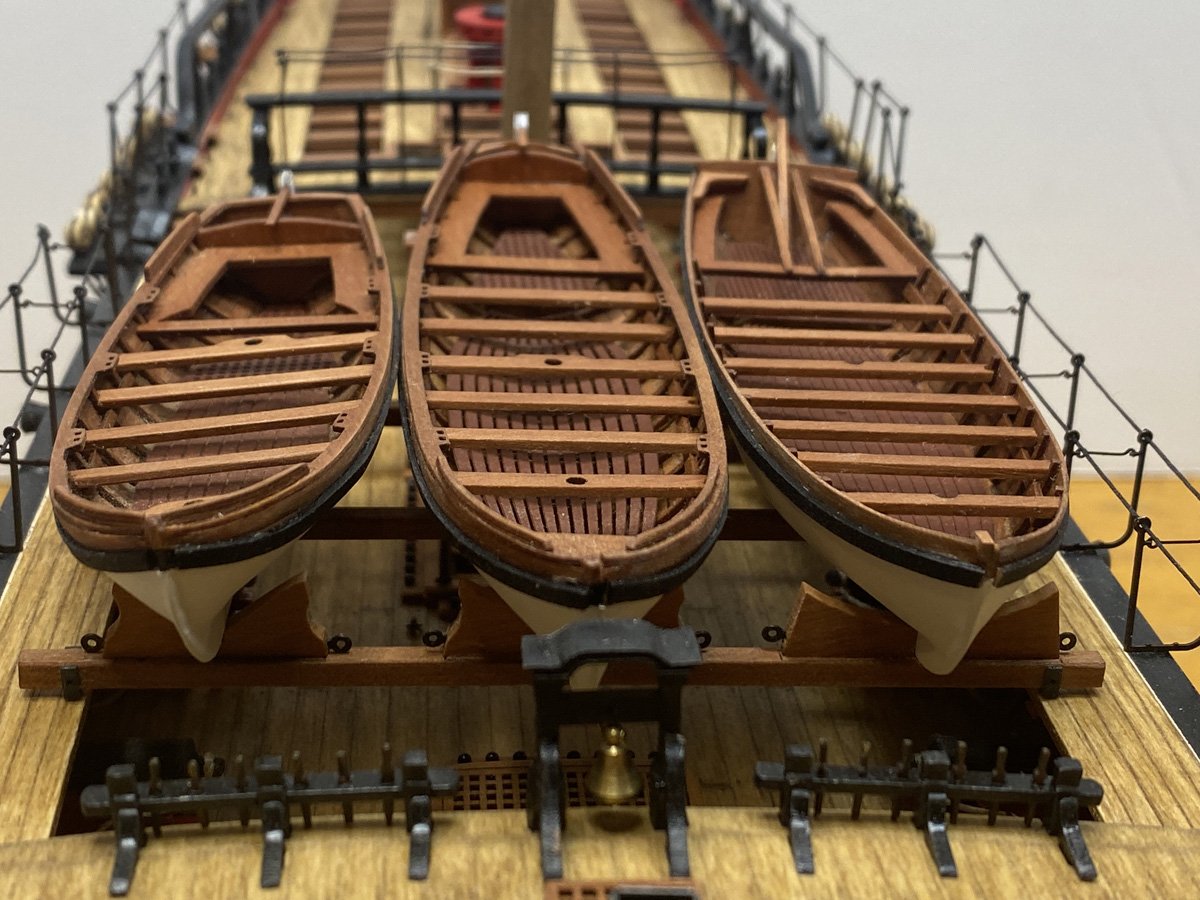
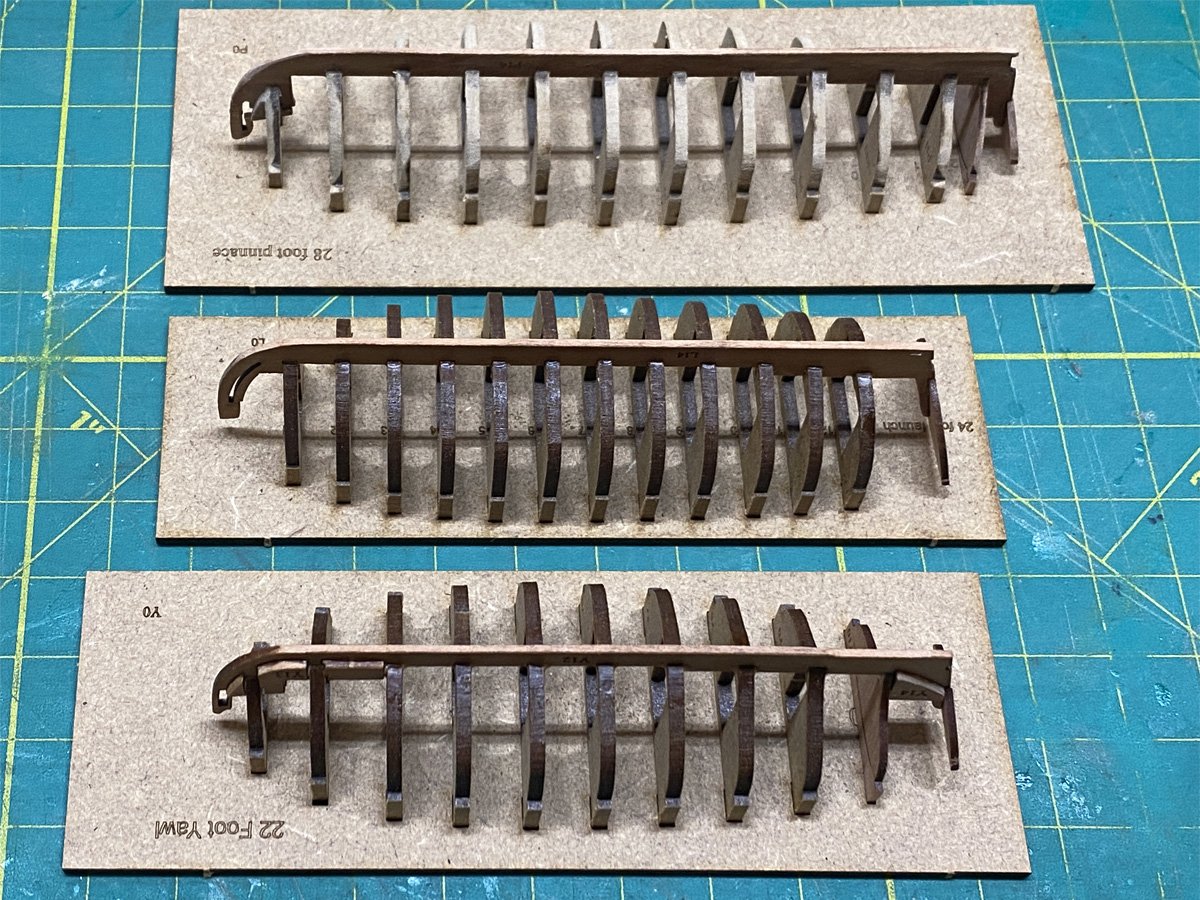
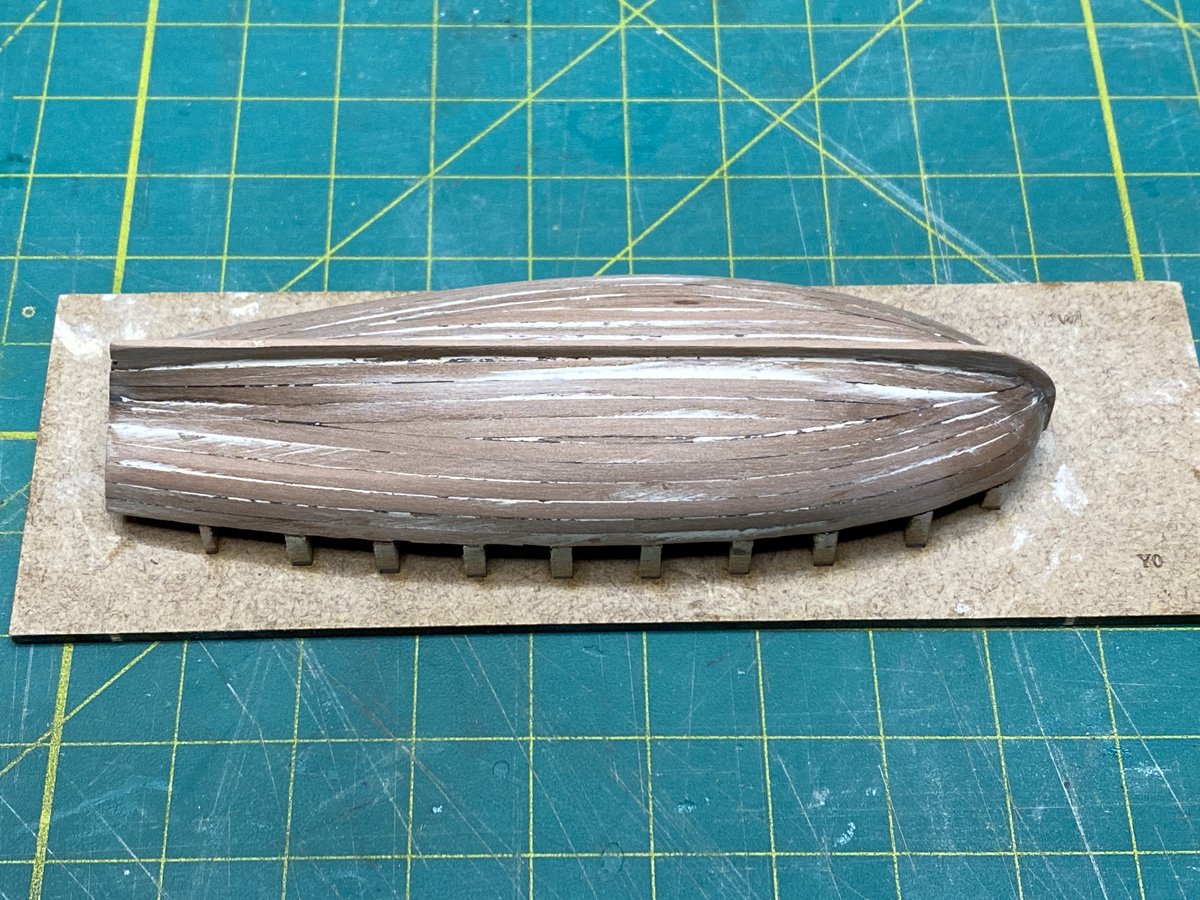
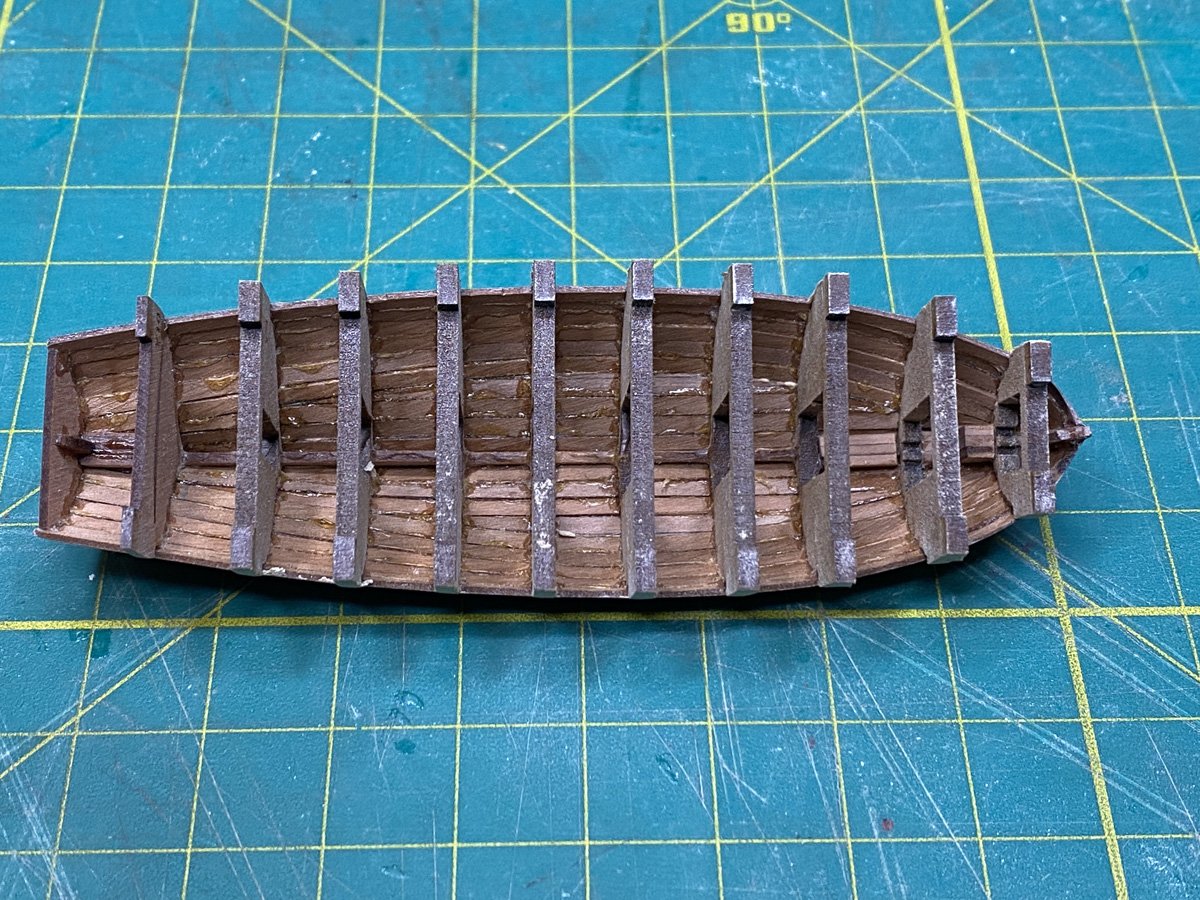
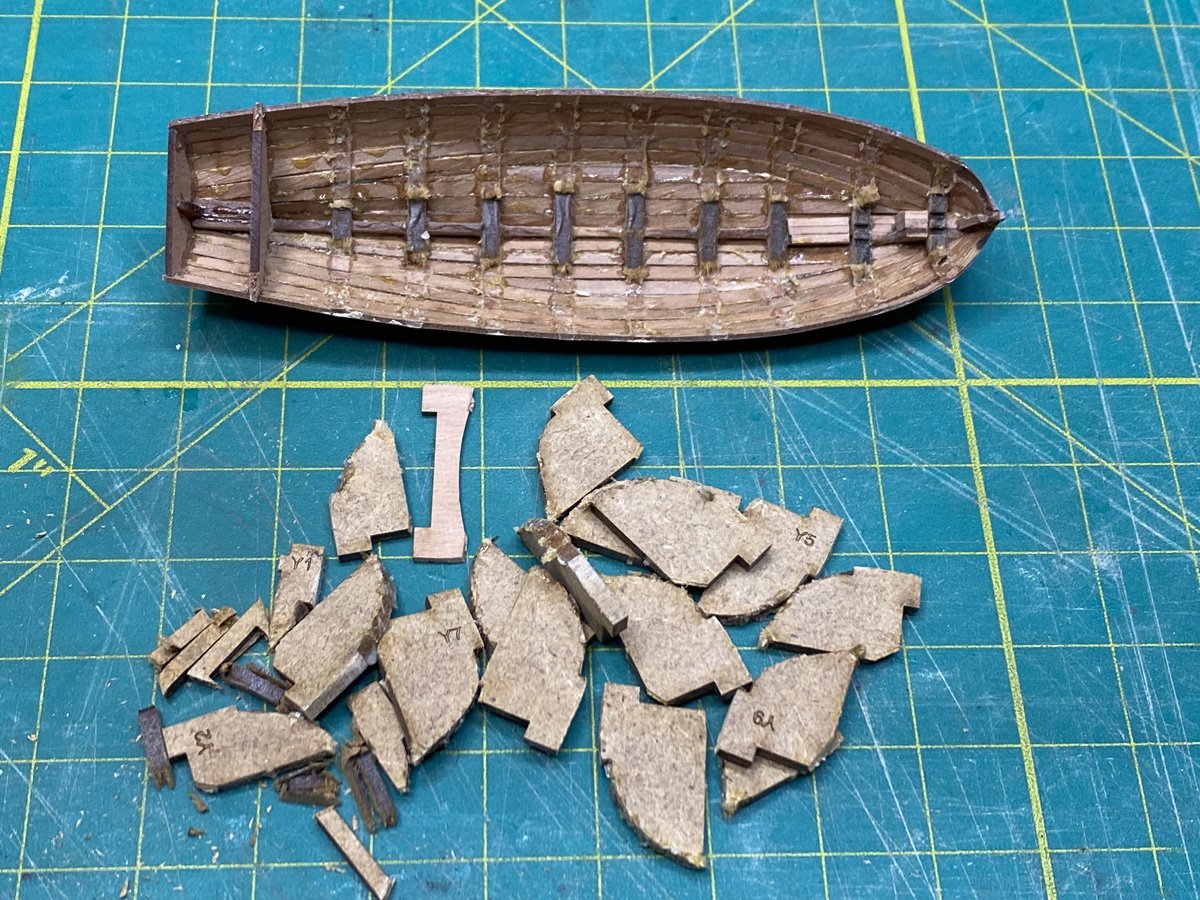
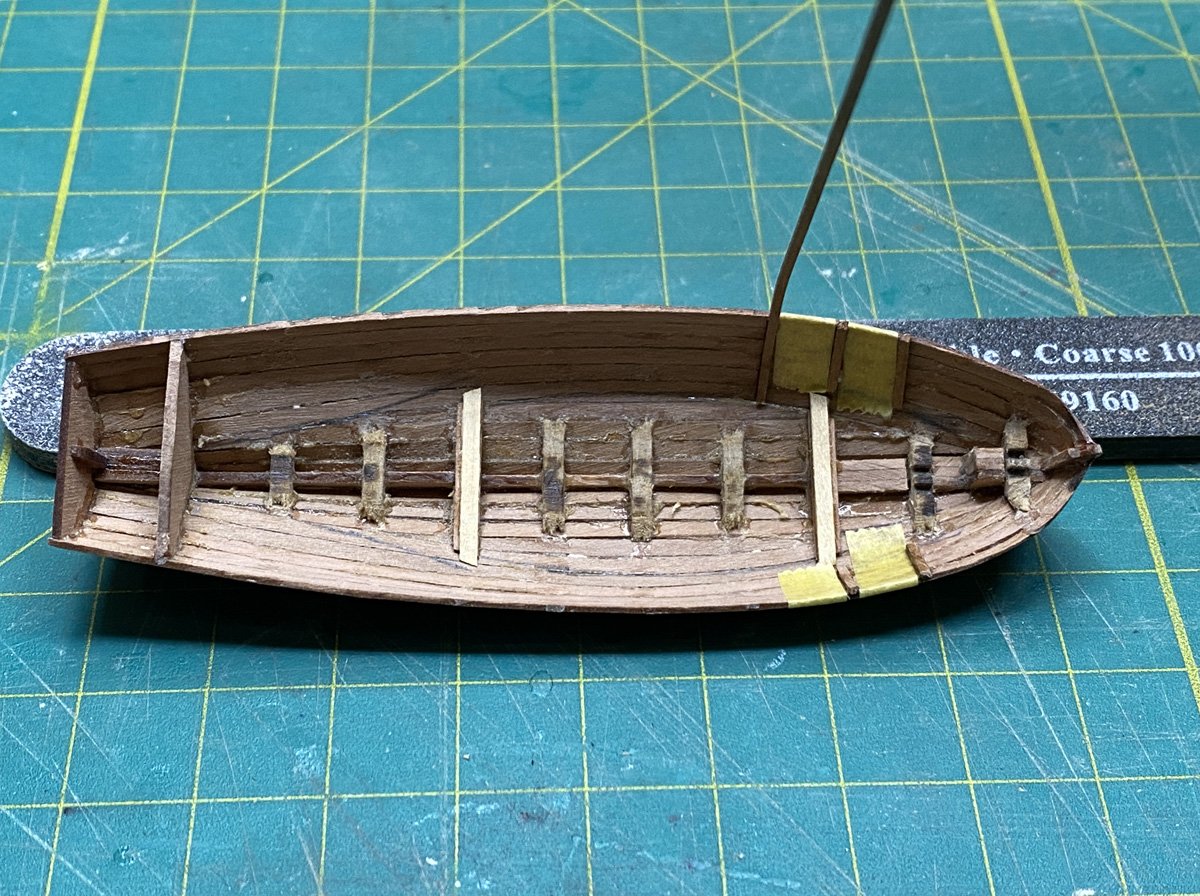
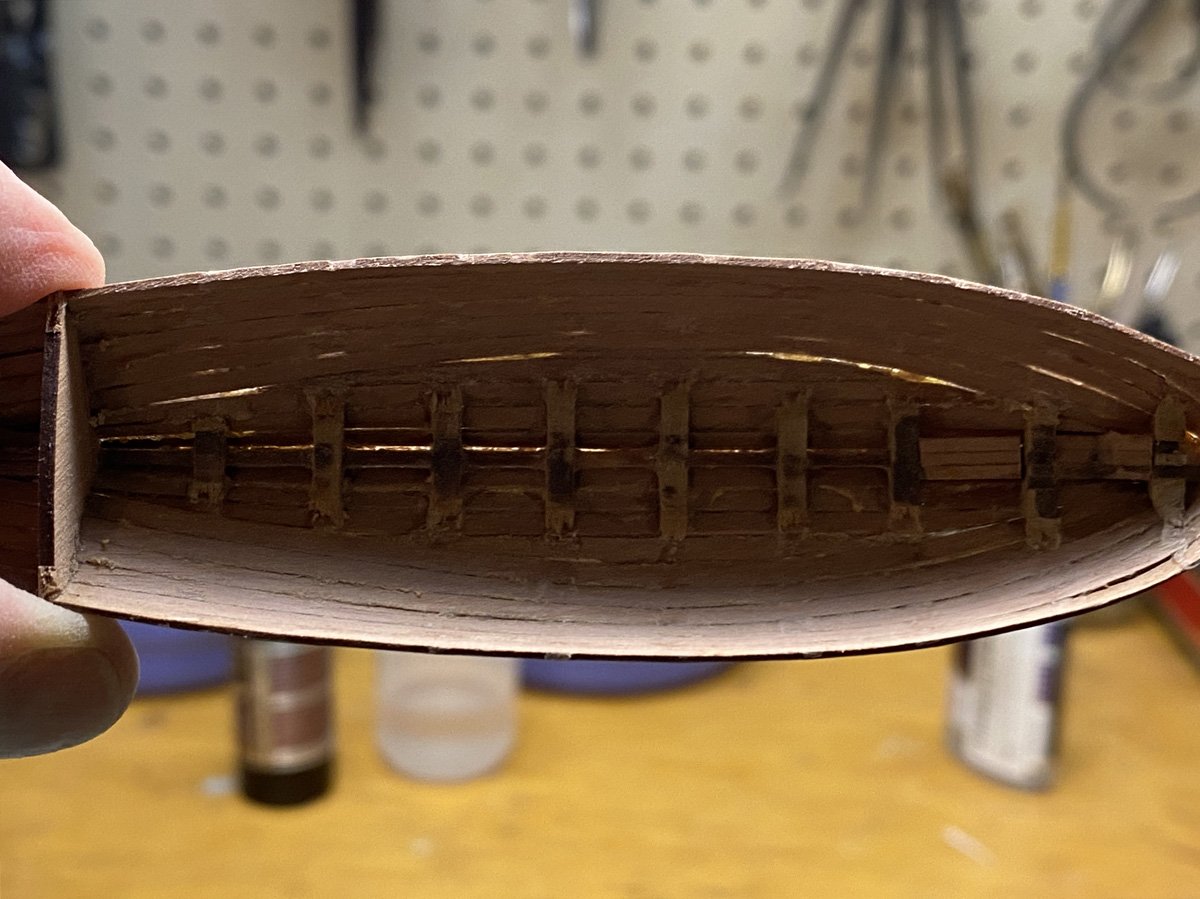
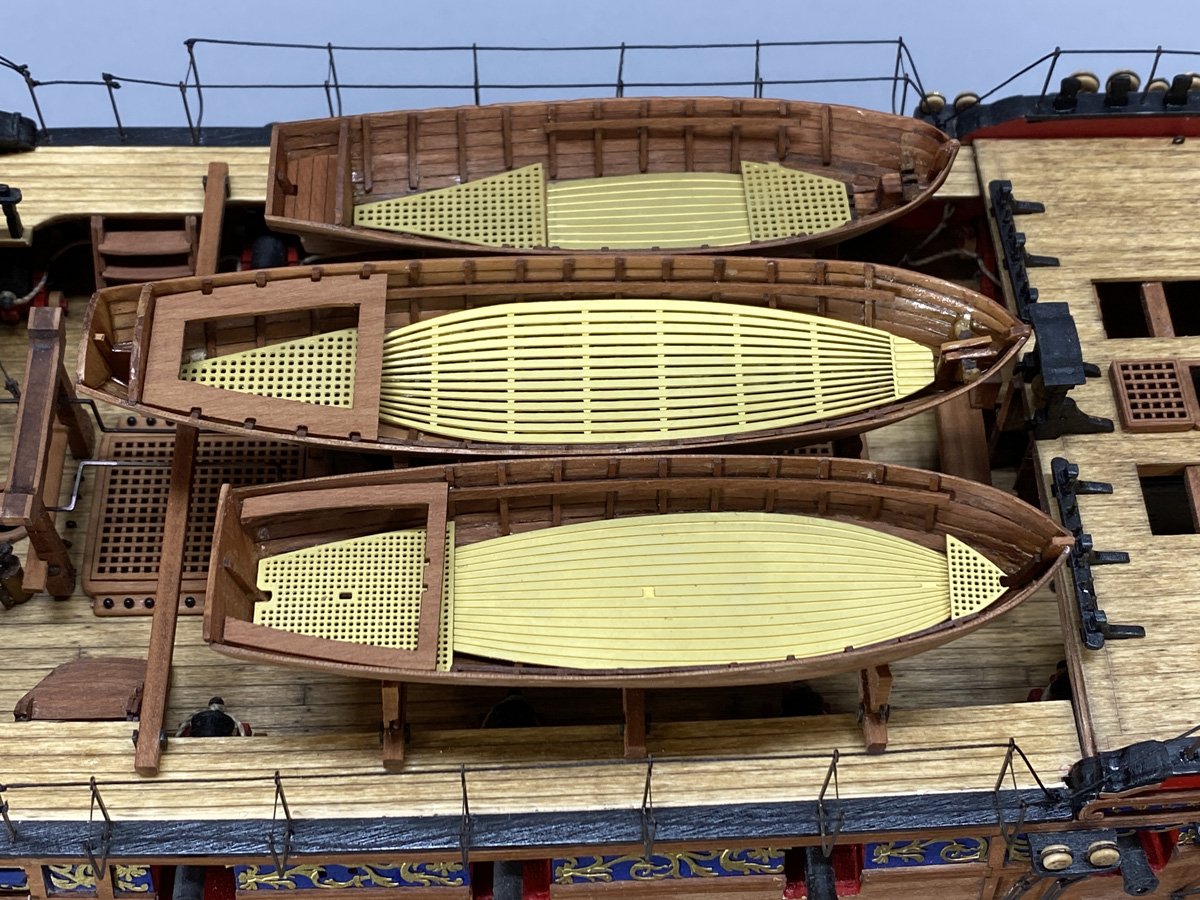
Ship's Boats The ship's boats comprise a 28' pinnace, a 24' launch, and a 22' yawl. Can someone out there please tell me the difference between the three? Is it the size, intended function, crew size, rigging, or something else? I finally acquired Lavery's excellent book, Arming and Fitting of English Ships of War, 1600 - 1815, and read the long section on ship's boats with great interest. But there was so much detail that I still don't understand the basic distinction. But that didn't stop me from barging ahead with construction. The boats are built over MDF bulkheads. They are single-planked with thin pear strips. This one has been sanded and filled with acrylic filler. Here's what they look like off the base. Then you twist the bulkheads off with pliers. VERY scary, but no damage. Sanding the inside is not fun. The interior gets fitted with thin ribs. I used Tamiya tape to set the spacing between the ribs. OK, full disclosure. The manual recommends using PVA wood glue for planking instead of CA, so of course I used CA on the first one. It went together OK, but after I filled the exterior and removed it from the bulkheads a lot of joints opened up. I got nervous and painted the interior with PVA. Big mistake - now the ribs would not stick to the interior with CA, so I had to use PVA on them, which increased construction time a lot. On the next two boats I used PVA on the edges of the planks and dots of CA on the bulkheads to act like pins. That's how I planked the main hull, and it worked very well on the boats as well. Here are the three boats temporarily in their cradles on deck. Now I have to find a way to make the PE floor boards look like wood. That's a mystery to me, why Chris decided to make all these wood parts out of PE, when they could easily be laser cut from thin pear wood and stained to match. It won't keep out water. I hope that it will keep out paint.
- 96 replies
-
- 8
-
-
- Sphinx
- Vanguard Models
- (and 2 more)
-
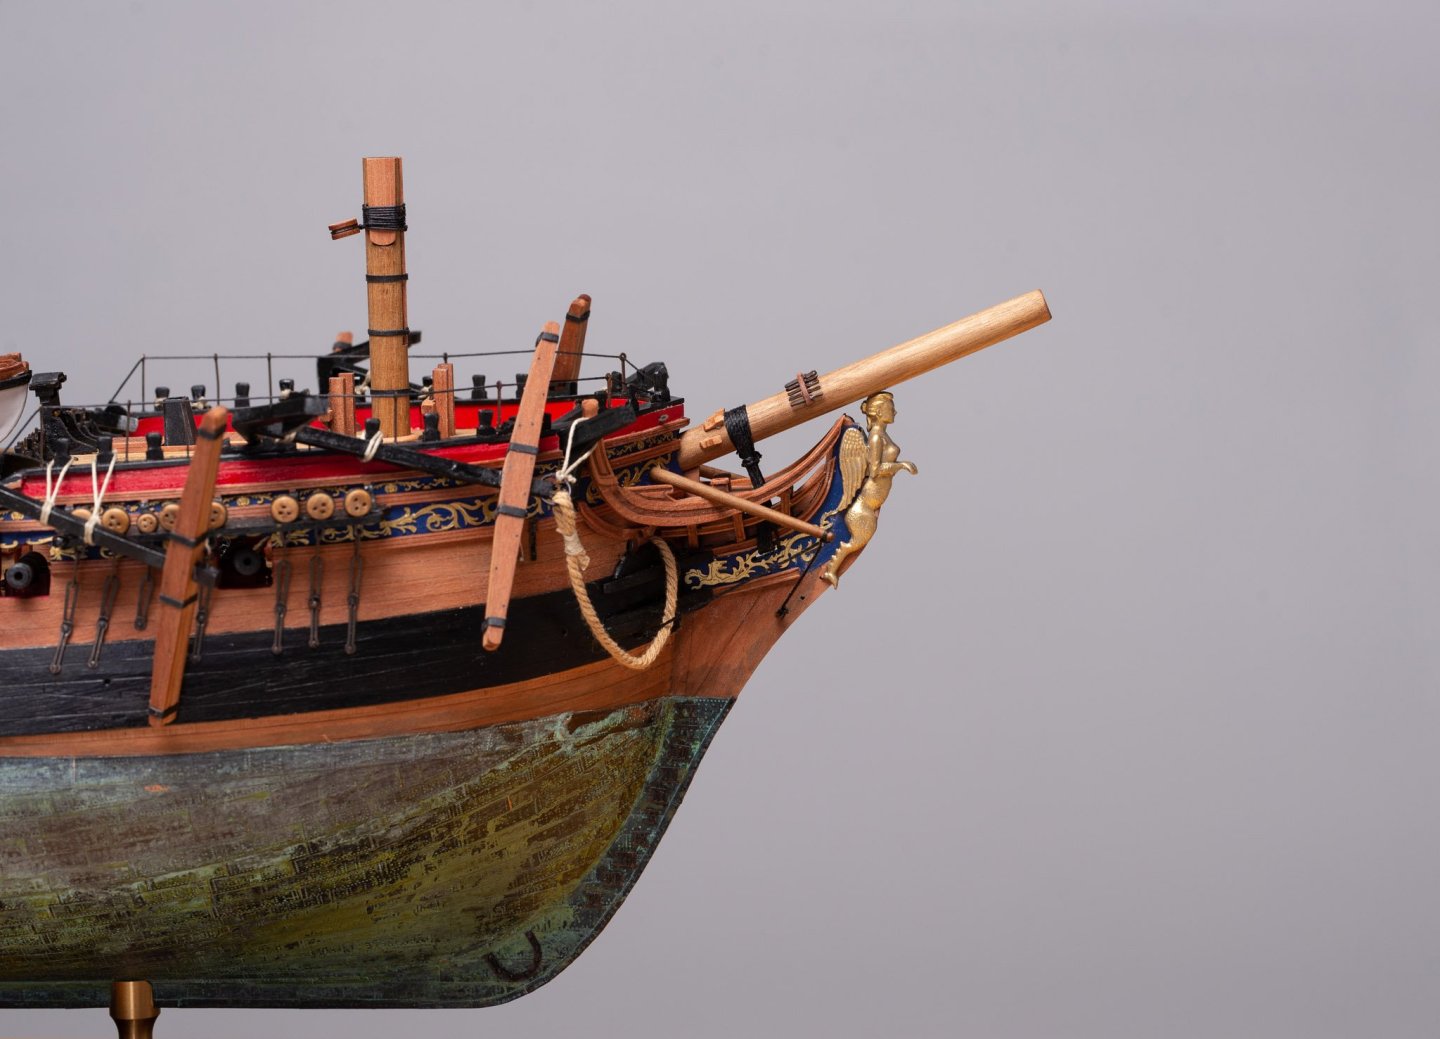
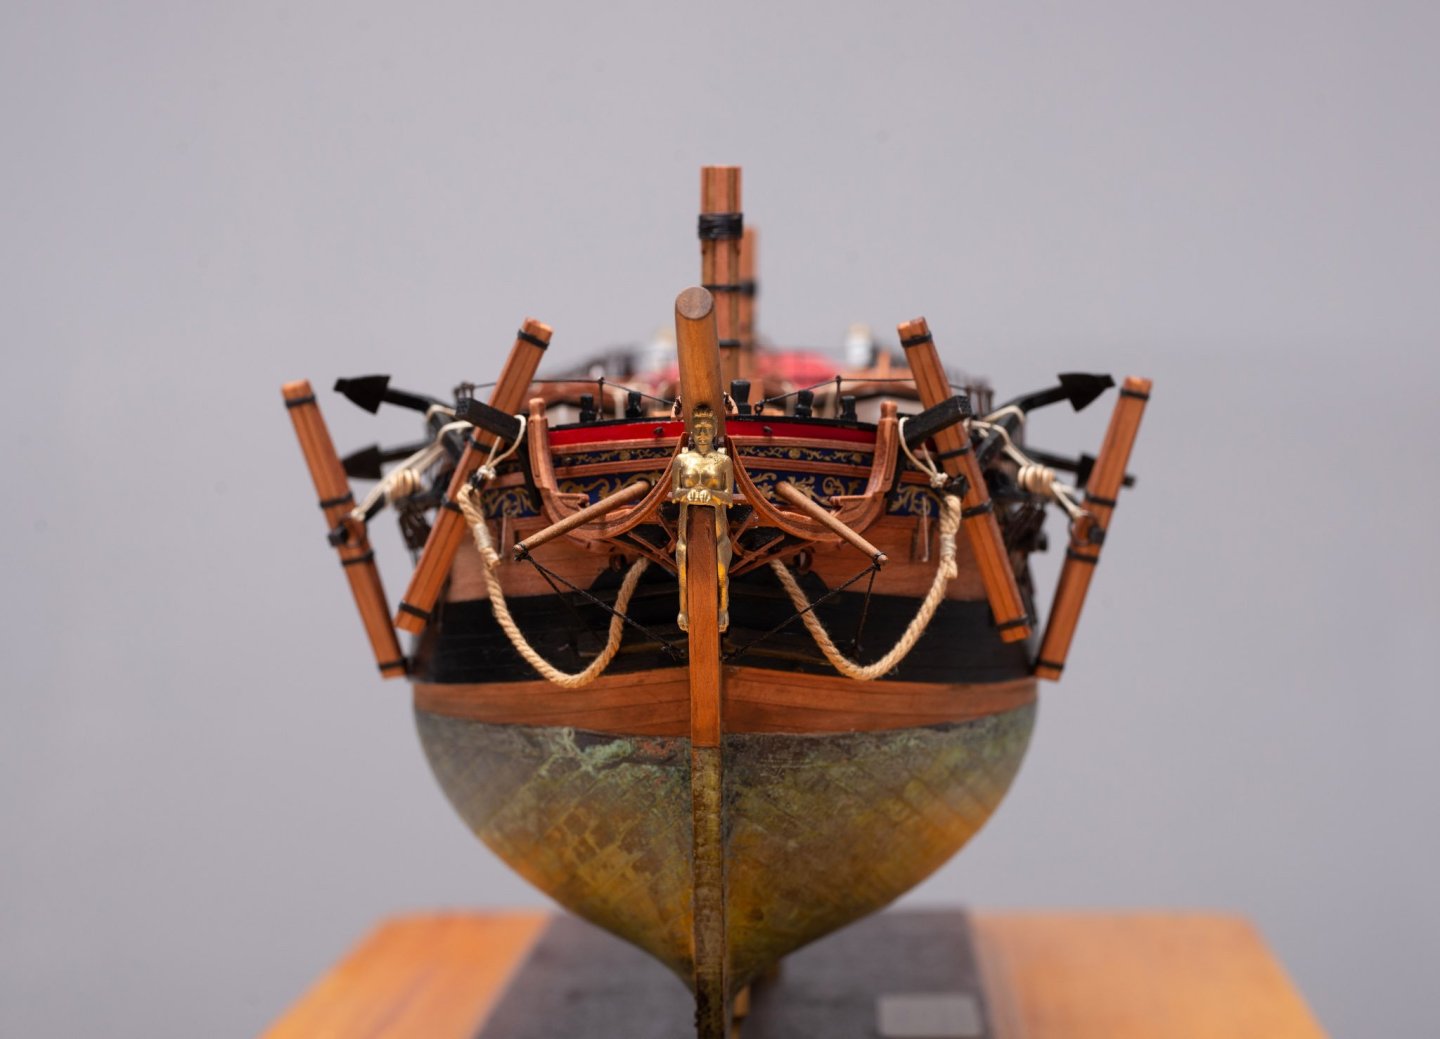
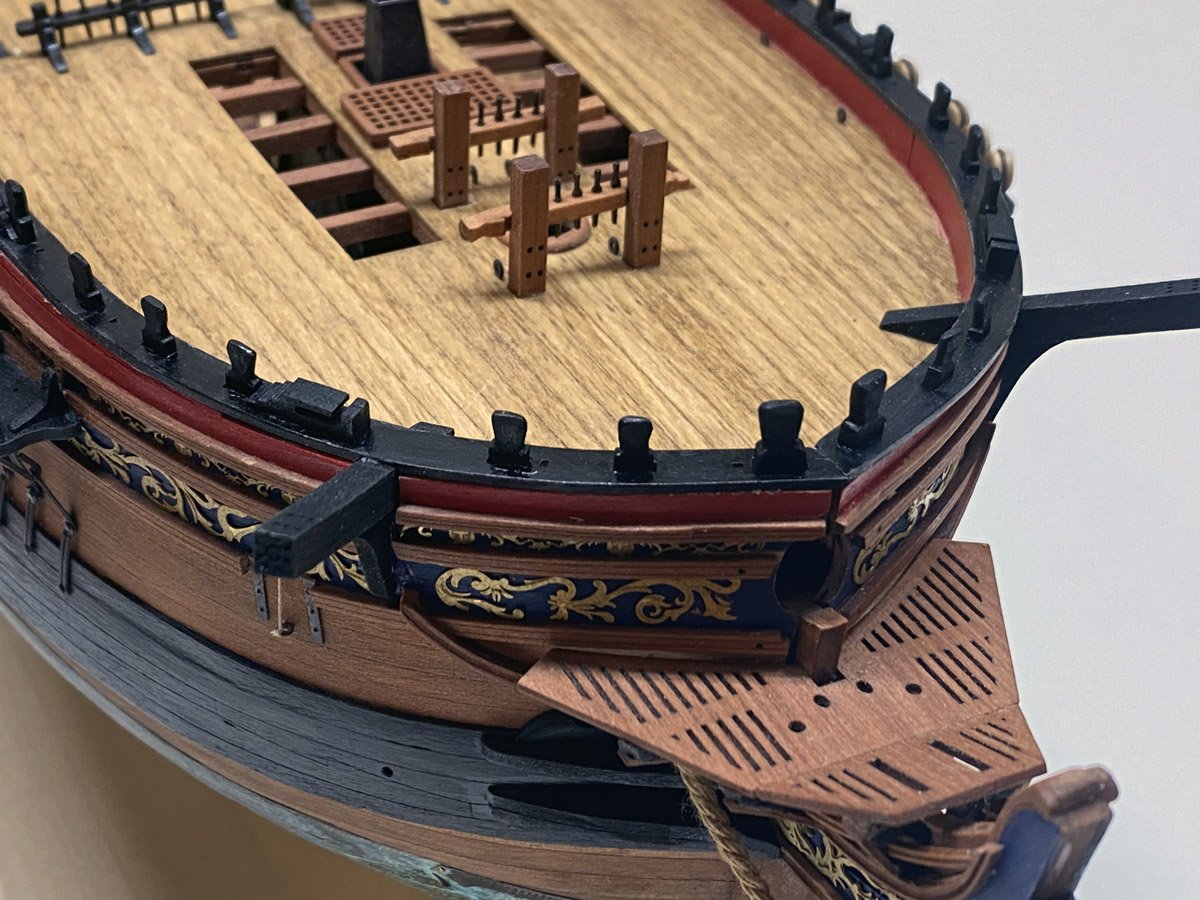
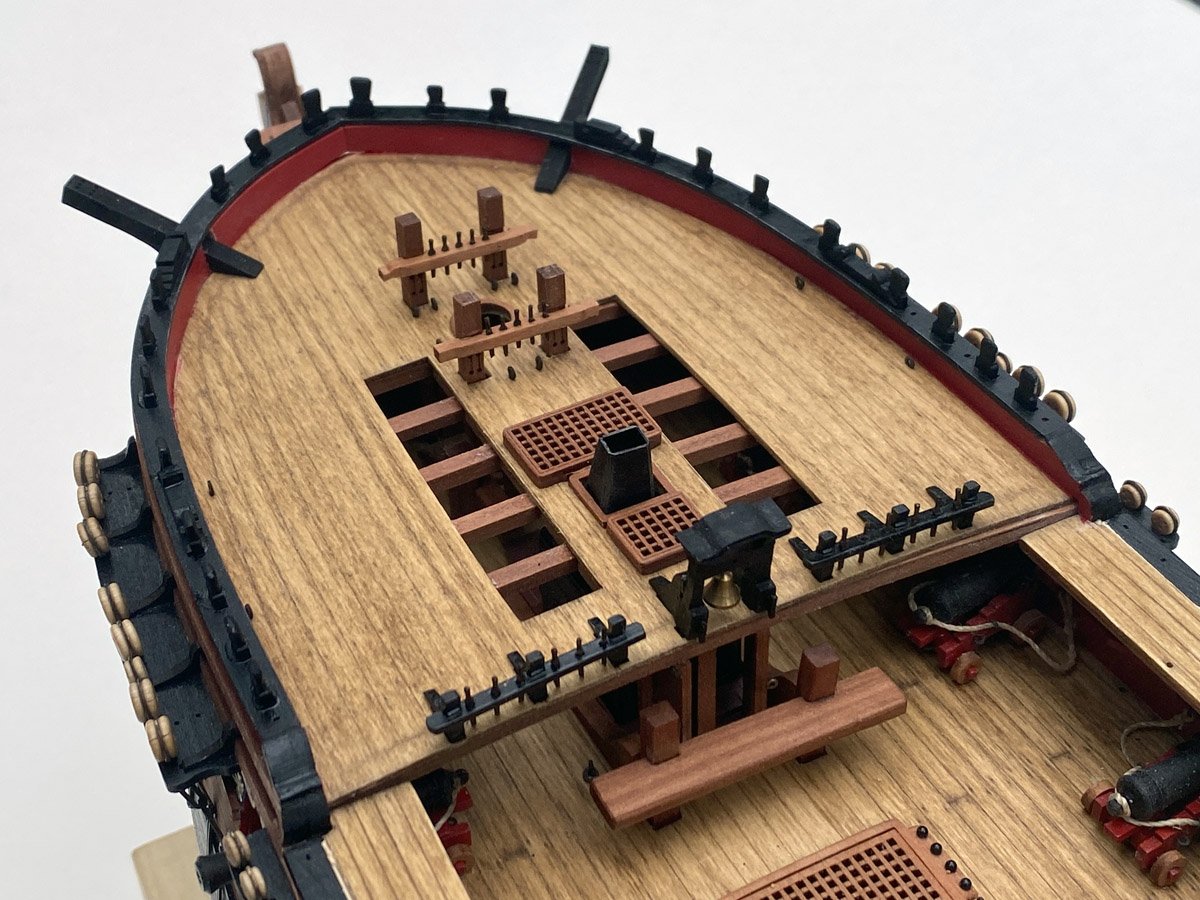
End of Hull Construction - For Now The boomkins, seats of ease, and hammock cranes are all complete. Here are a few photos. Boomkins and 2 seats of ease for 140 sailors. The manual says to skip the aft hammock cranes for now because they will interfere with rigging the shrouds. The manual never gets back to them, and most other builders omitted them as well. I won't be rigging shrouds so I built them.
- 96 replies
-
- 7
-
-
- Sphinx
- Vanguard Models
- (and 2 more)
-
I had never heard of crows' feet rigging but saw it on a model of HMS Resolution in Anchorage, Alaska. I went on to build a model of HMS Endeavour just so I could rig crows' feet, and yes, I liked it a lot too. Beautiful work on yours!
- 95 replies
-
- 1
-
-
- flirt
- vanguard models
- (and 1 more)
-
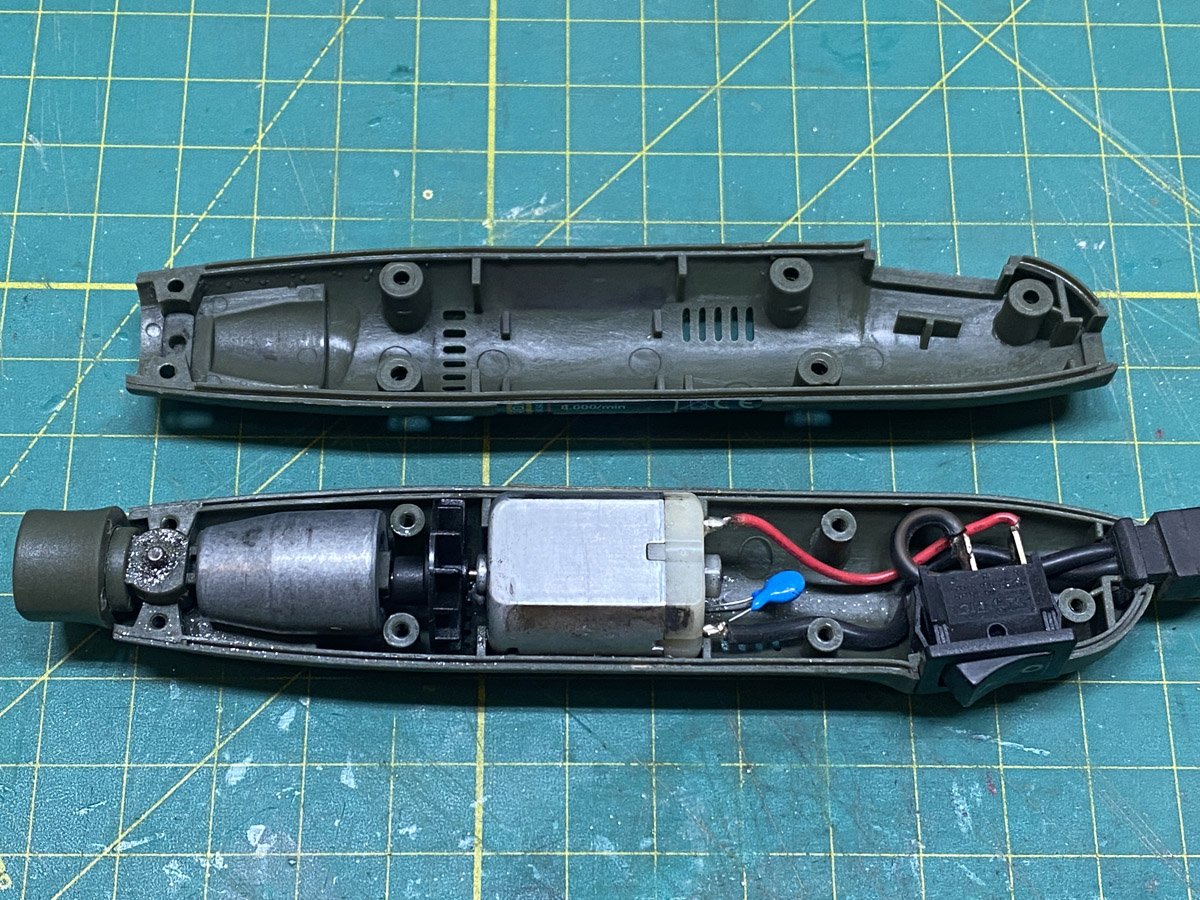
Proxxon Sander (my favorite tool for removing laser char) Ever wonder what's inside a Proxxon oscillating sander? Well mine started running erratically and making funny noises a few days ago, and it's only 7-8 years old! Can you believe it? So I took it apart (typical engineer). There's a switch, small permanent magnet motor, fan, eccentric, a big, heavy weight, and a plastic arm that oscillates the head back and forth. I cleaned everything out using my airbrush as a blower, added a drop of oil on each side of the motor and some graphite on the other parts. It should be good for another 8 years.
- 96 replies
-
- 4
-
-
- Sphinx
- Vanguard Models
- (and 2 more)
-
Boat Beams The manual says that if the rear beam hits the chain pump handle you can cut a little notch in the beam. Mine hit way too much for that so I gave it a good twist. It would never go around but no one will be able to tell. The handles definitely should be smaller.

- 96 replies
-
- 4
-
-
- Sphinx
- Vanguard Models
- (and 2 more)
-
Thanks Chris. I tried to paint the wheel to look like wood and left the PE rims and hubs blackened. A better wood color would have helped.
-
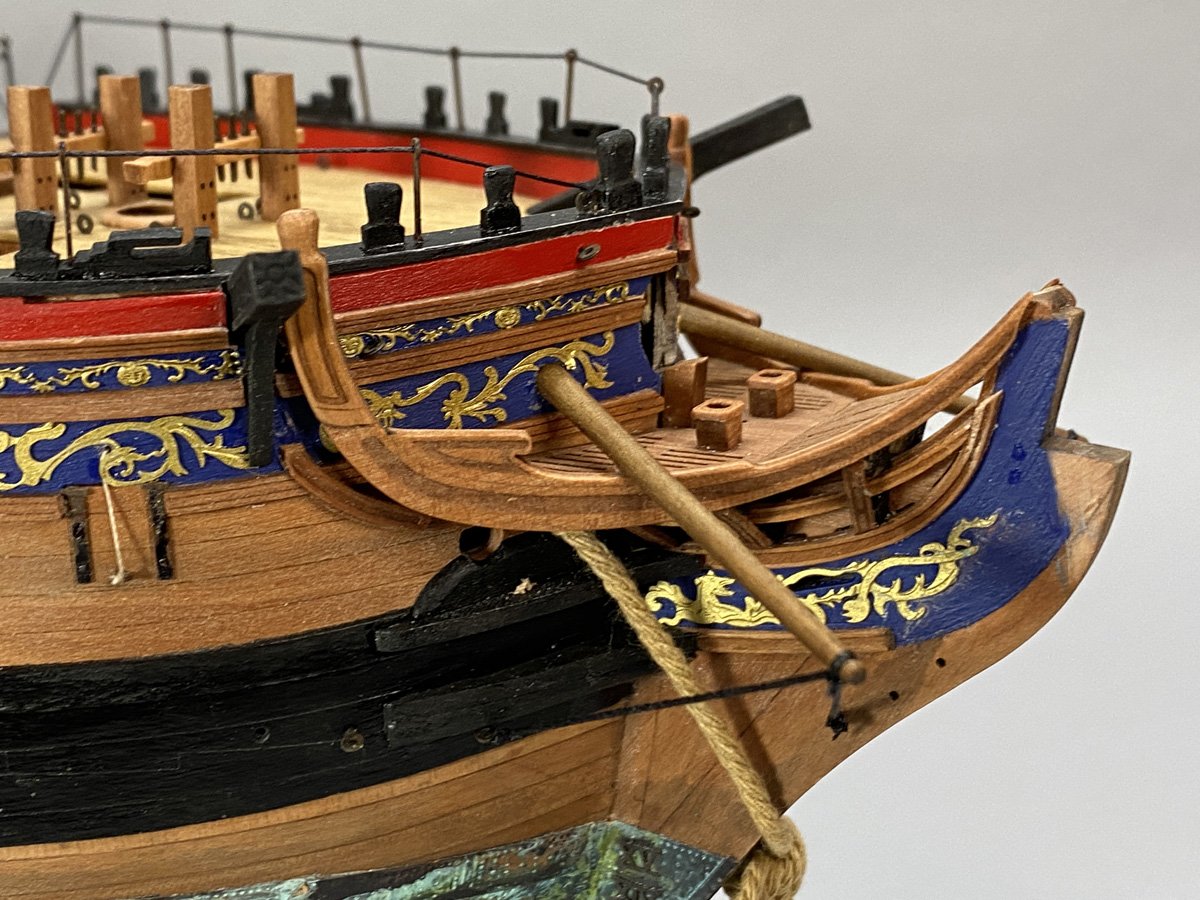
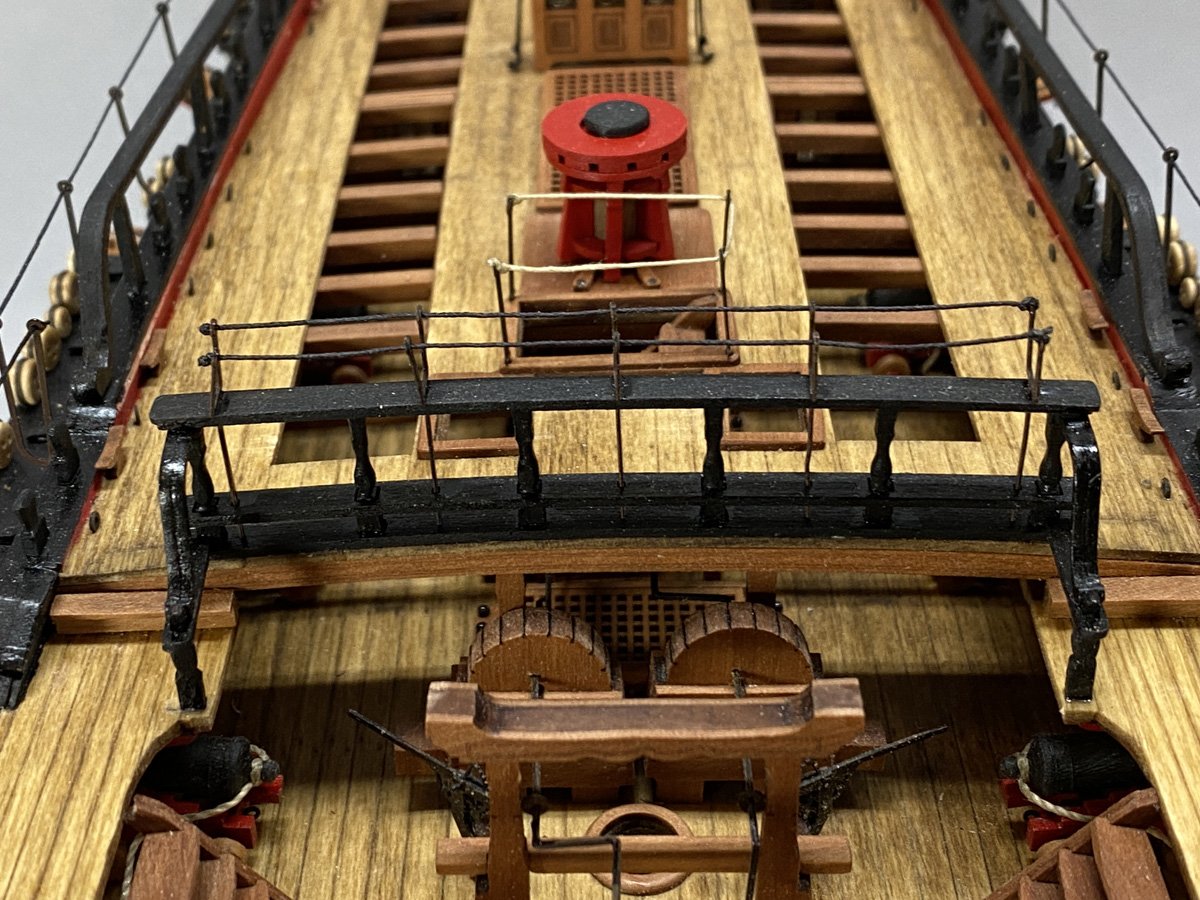
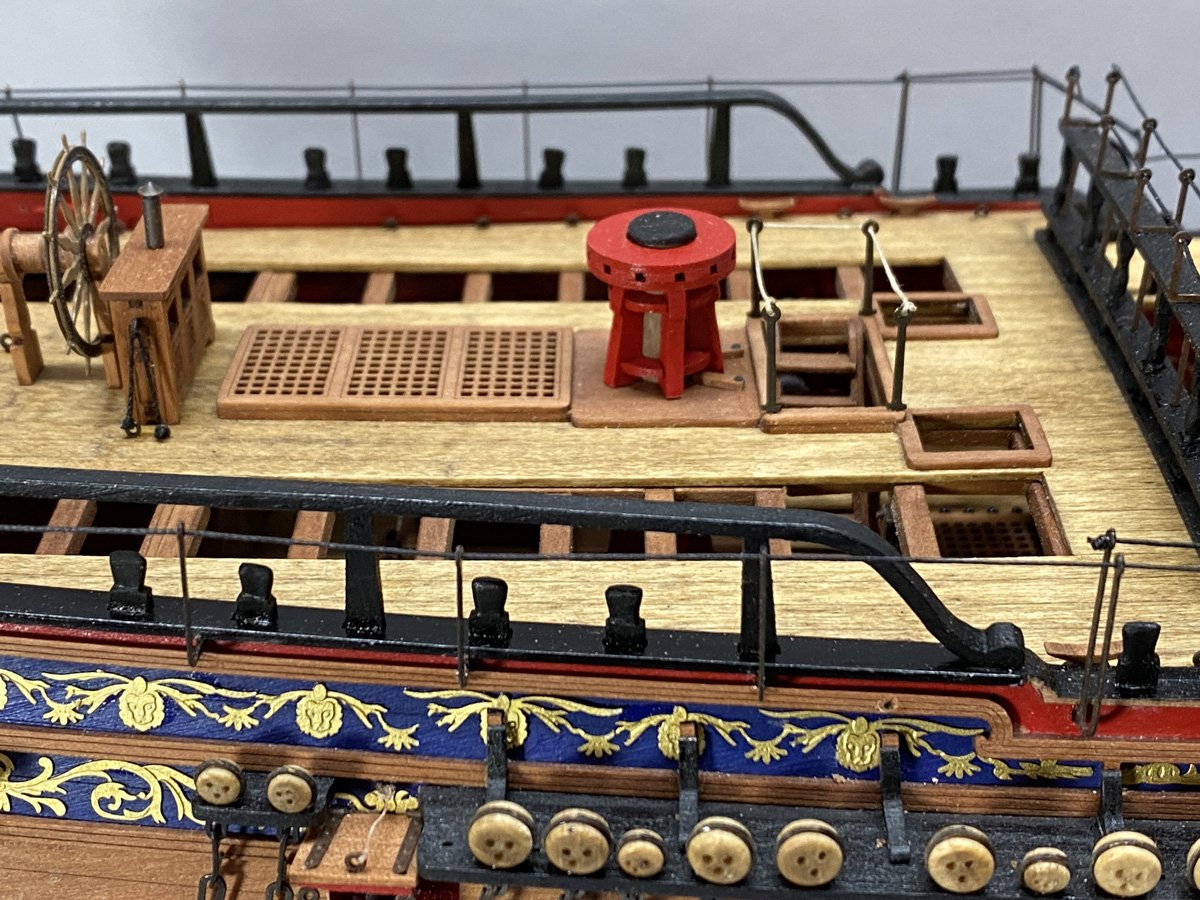
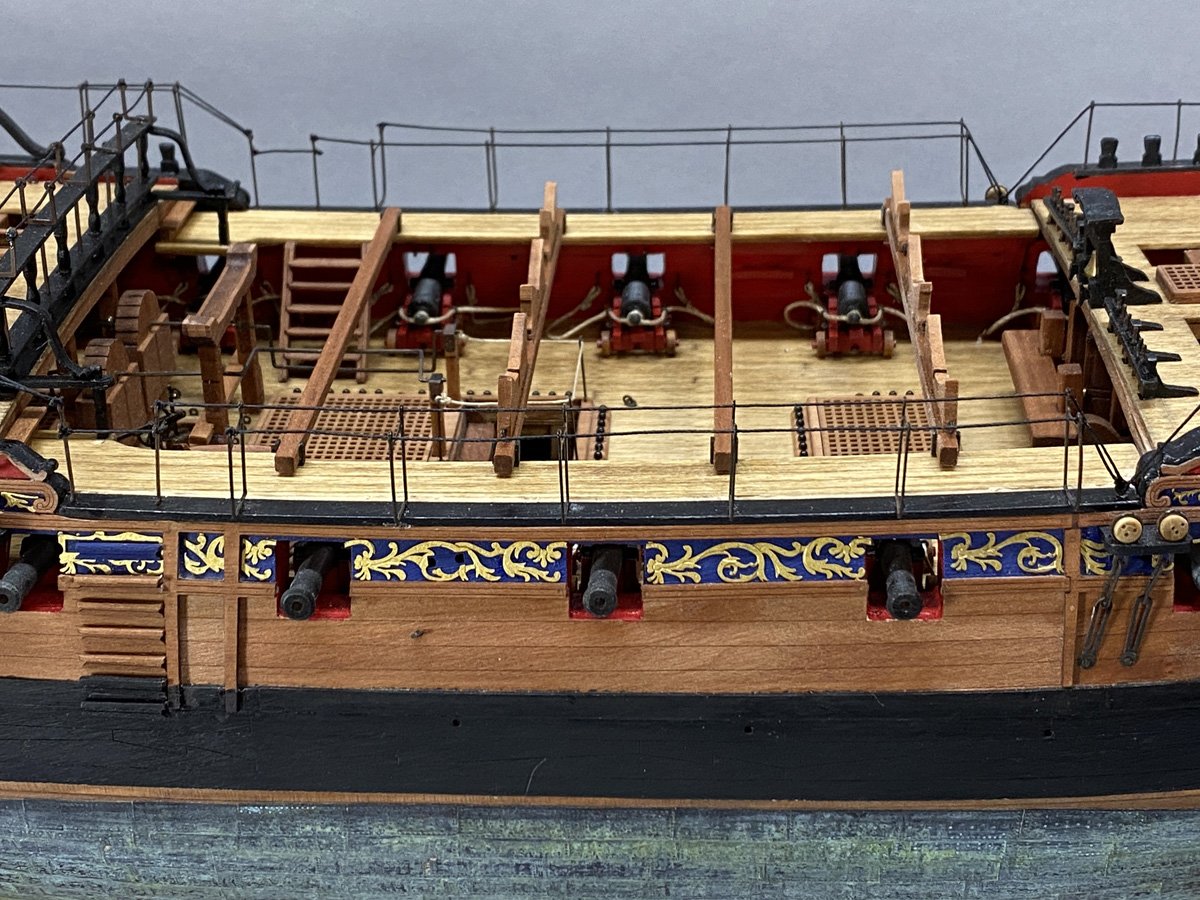
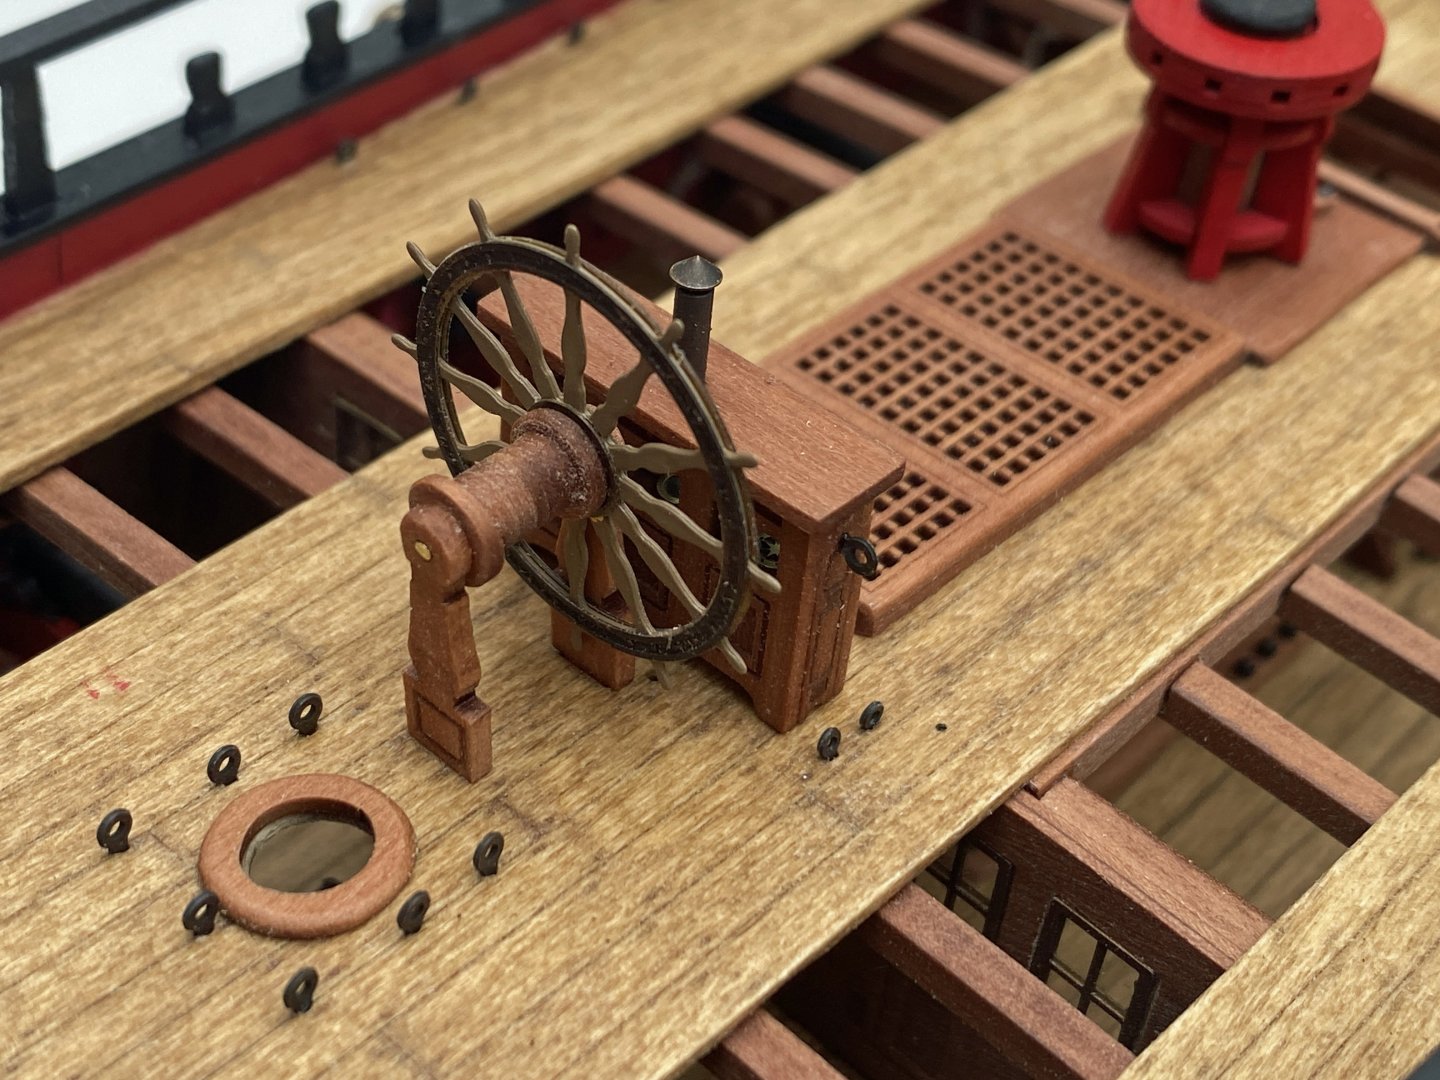
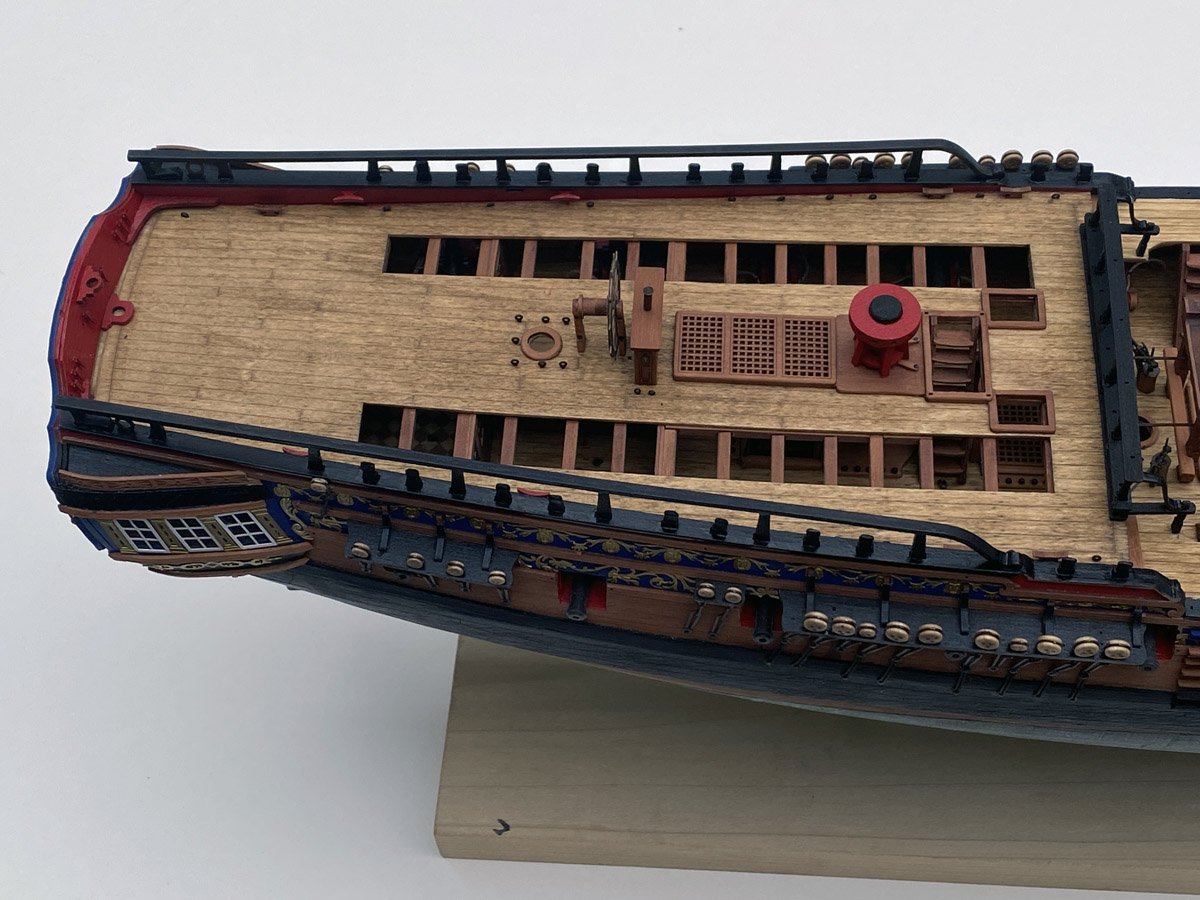
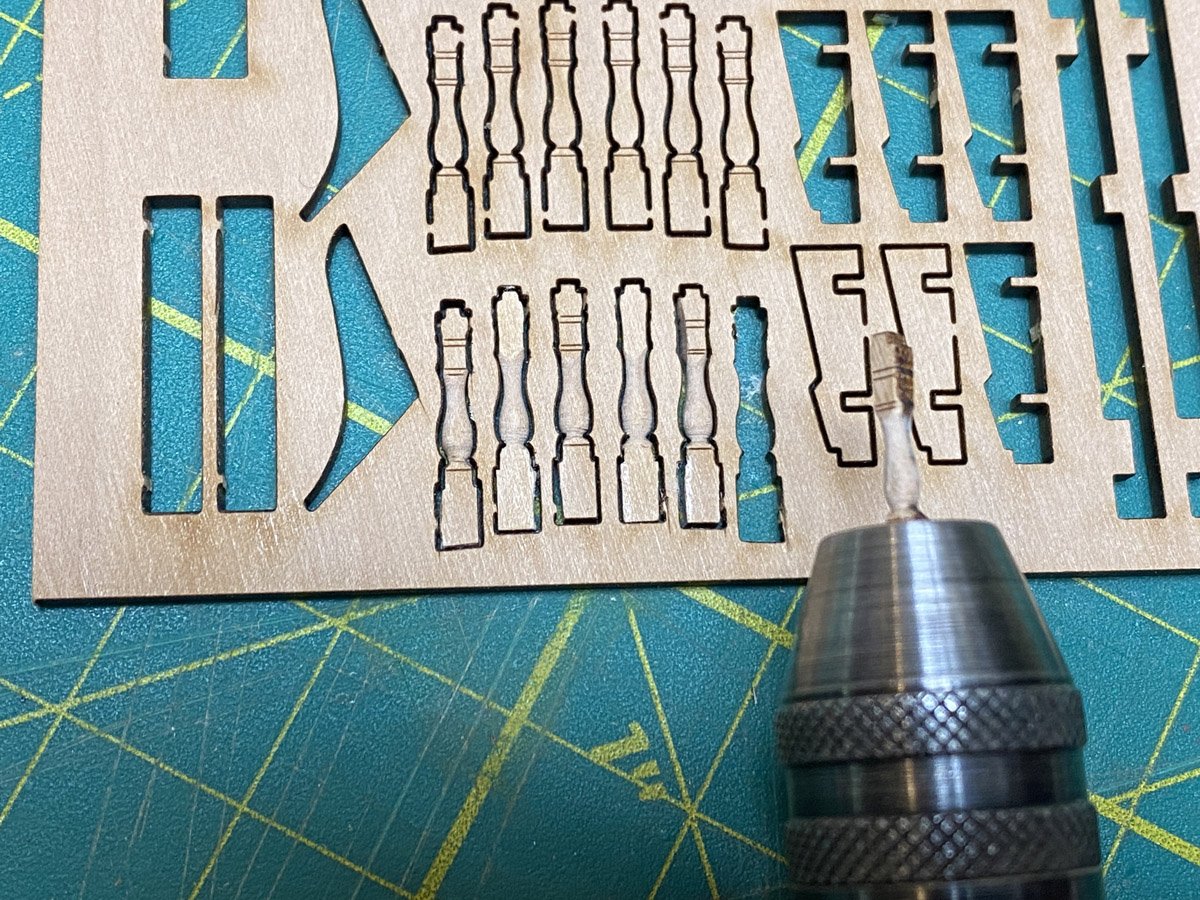
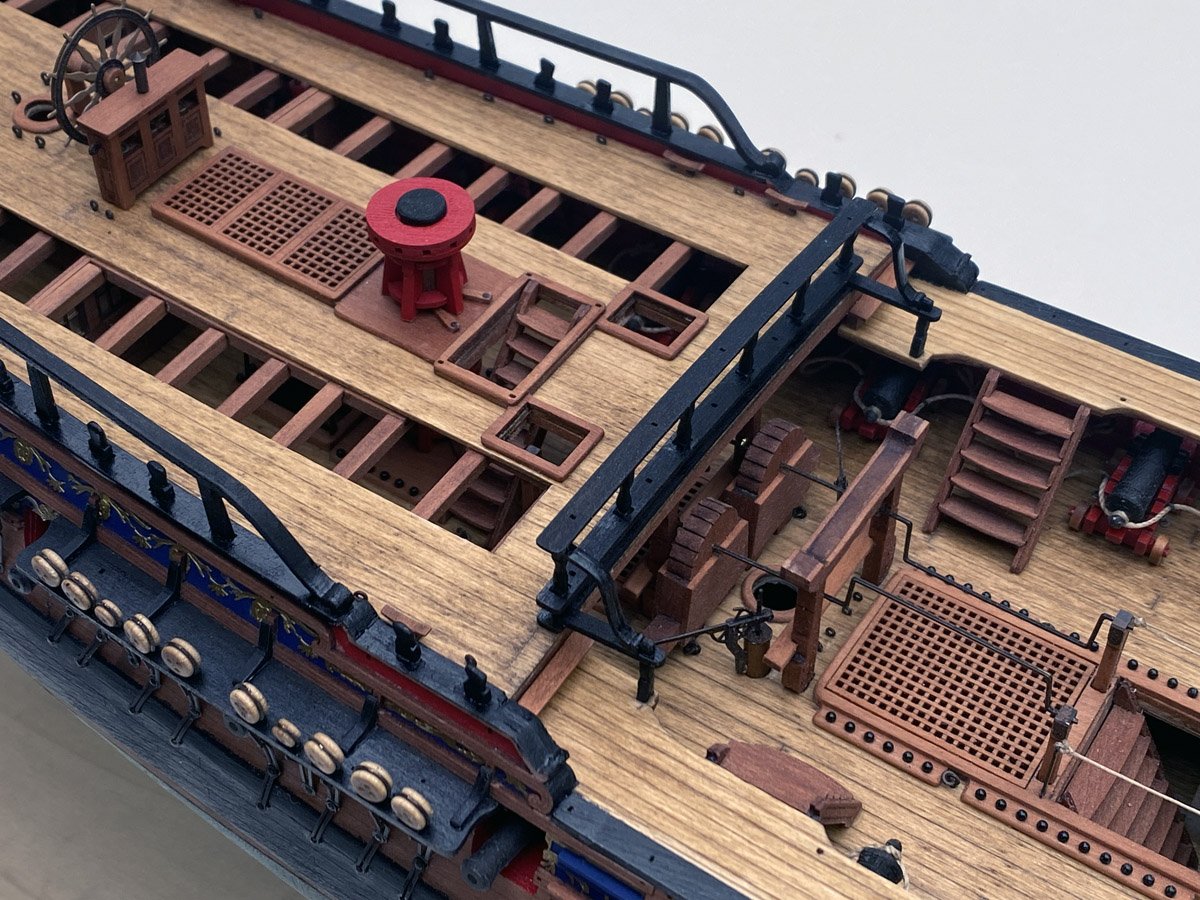
Upper Decks, Railings, Cathead, Binnacle, and Drumhead Capstan The fore and aft upper decks and railings are all complete. The aft deck took a little shaping but the forward deck dropped right into place. As before, I stained the decks with Minwax Golden Oak. The belfry, stove chimney, and some belaying pin racks are also done. The stanchions for the quarterdeck railings are flat and need to be sanded round. I chucked them in a rotary tool and hit them with sandpaper wrapped around a dowel and taped to a stick. Here's a view of that railing with the drum head capstan behind it and some more ladders nearby. A lot of parts in this kit are PE brass that are typically cast metal or wood in other kits - eyebolts, belaying pins, etc. I had my doubts about them at first, but frankly they look just fine. However the ship's wheel is three pieces of PE glued up and it looks pretty flat. I considered buying a better wheel but would have had to resize the drum to make it fit, so I stuck with the PE. The binnacle is very nice. Catheads - from the manual: "The holes in the bulwark are deliberately left smaller than required for alignment and part integrity when assembling. You will now need to open these up to fit the catheads. Use small files and a sharp blade to open these up to size." Easier said than done. I spent a couple of hours on each side filing those slots to within a hair of the railing and deck before those pieces would fit.
- 96 replies
-
- 10
-
-
- Sphinx
- Vanguard Models
- (and 2 more)
-
I agree with everyone - your planking is perfect, too nice to paint. I used my electric plank bender the other day to fit one inner bulwark, and wouldn't you know it, I burned a finger pretty bad. I like to tease my son about all his football (soccer) injuries and now he's giving me grief about yet another model making injury.
-
That is a beautiful model Walter. It makes me want to start another (but maybe no cannons!)
- 95 replies
-
- 1
-
-
- flirt
- vanguard models
- (and 1 more)
-
Forecastle Beams Installed My quarterdeck beams all ended up about 2mm too long and had to be trimmed on each end to fit. I did build the hull with the recommended jigs in place so I don't know why the parts were off. The forecastle beams dropped into place perfectly. I really hate to cover this all up.
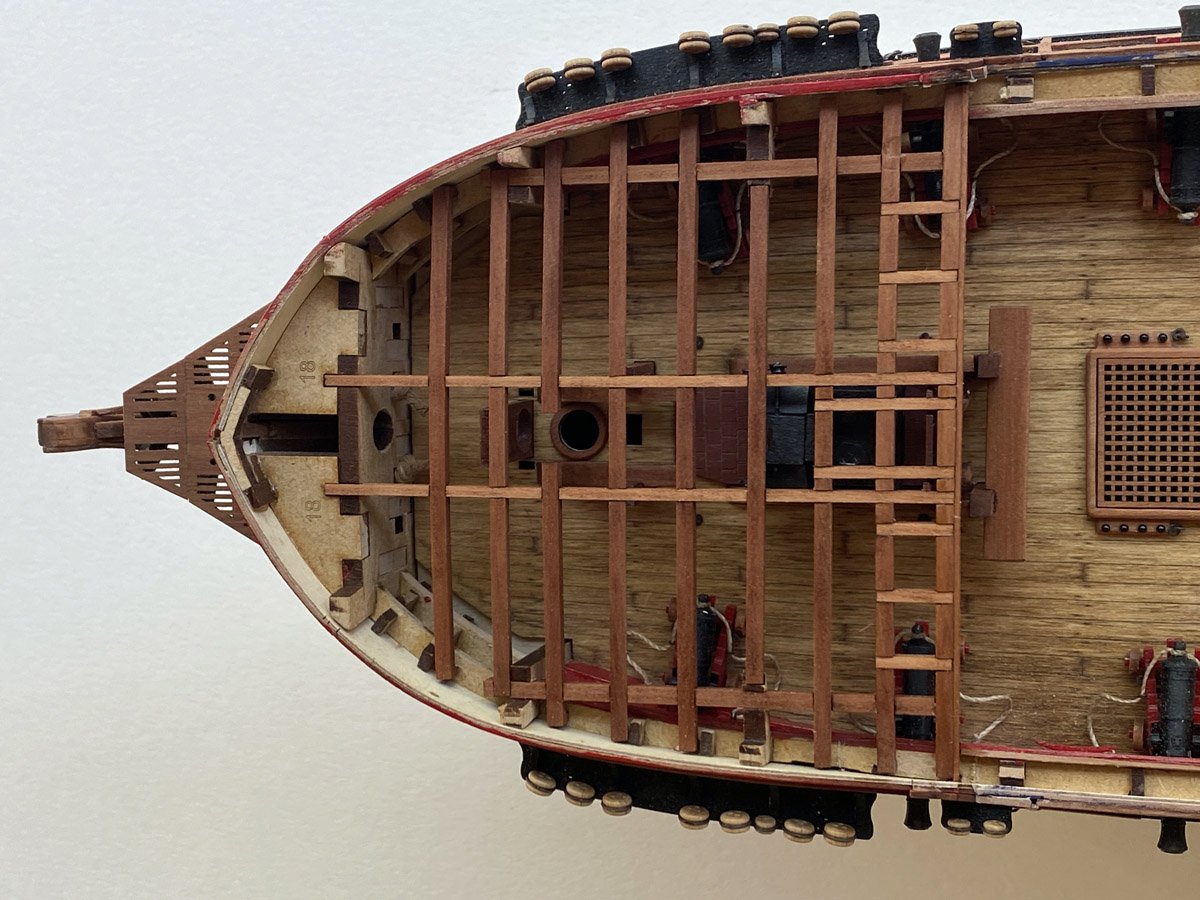

- 96 replies
-
- 9
-
-
- Sphinx
- Vanguard Models
- (and 2 more)