


robdurant
-
Posts
841 -
Joined
-
Last visited
Reputation Activity
-

 robdurant got a reaction from AJohnson in Barque Stefano by robdurant - MarisStella - 1:63
Thanks, George.
Yes the work being done now all seems to make a difference to how the final model will look, which is spurring me on.
It's startling how much sail these vessels can spread. Stefano must have been an amazing sight, even though she was a humble working vessel.
-
 robdurant got a reaction from Beef Wellington in Barque Stefano by robdurant - MarisStella - 1:63
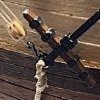
I've just finished the yards on the mainmast. It's a process of keeping the faith as you go, as it has to look like an explosion of rope before order then appears out of the chaos... Here are the footropes in process...
And then completed...
And here's a shot of the whole mast... the lower stunsails have had the stunsail yards attached to the tops, but haven't been rigged at all yet... None of these yards are finally attached, but are pretty much complete as units.
To have a bit of a break from the yards, I think I'll do some ratlines on the lower shrouds. I think I probably need to tackle the futtock shrouds (metal bars?) first, though, otherwise they're going to be a bear to access.
Thanks for looking in
-
 robdurant got a reaction from coxswain in Barque Stefano by robdurant - MarisStella - 1:63
Hi all,
Not much more to show, except the reefing points that are now stiffened using watered down PVA front and back. This was done before they were trimmed to length, by placing a small ruler behind the reefing points. Then they were trimmed to the bottom of the ruler giving a nice neat line.. The second photo is the progress on the mainmast lower-topsail yard with the footropes in progress....
.
As always, thanks for the likes and encouragement.
Rob
-
 robdurant reacted to Kevin in HMS Indefatigable 1794 by Kevin - FINISHED - Vanguard Models - 1:64 - Feb 2023 to June 2025
good evening everyone
thank you for comments and likes
day 74-2 you can blame Assassins creed Odyssey, for my lack of progress
the hull went to black as part of the preps for banding, the yellow has had about 5 coats, i will now redo the gunports before adding any more
the cheeks are now fitted, each one is 3 pieces in layers, i went for this colour scheme, as personally i think it looks better
things still need to be touched up
-
robdurant reacted to gak1965 in Barque Stefano by robdurant - MarisStella - 1:63
Absolutely amazing. It's great to see a model with all that spread canvas. It makes me think about the (usually pretty small) crew having to manage all of that sail so that the ships could make top speeds.
The finish line must be visible now...
George K
-
 robdurant got a reaction from dunnock in Barque Stefano by robdurant - MarisStella - 1:63
I've just finished the yards on the mainmast. It's a process of keeping the faith as you go, as it has to look like an explosion of rope before order then appears out of the chaos... Here are the footropes in process...
And then completed...
And here's a shot of the whole mast... the lower stunsails have had the stunsail yards attached to the tops, but haven't been rigged at all yet... None of these yards are finally attached, but are pretty much complete as units.
To have a bit of a break from the yards, I think I'll do some ratlines on the lower shrouds. I think I probably need to tackle the futtock shrouds (metal bars?) first, though, otherwise they're going to be a bear to access.
Thanks for looking in
-
 robdurant got a reaction from BobG in Barque Stefano by robdurant - MarisStella - 1:63
I've just finished the yards on the mainmast. It's a process of keeping the faith as you go, as it has to look like an explosion of rope before order then appears out of the chaos... Here are the footropes in process...
And then completed...
And here's a shot of the whole mast... the lower stunsails have had the stunsail yards attached to the tops, but haven't been rigged at all yet... None of these yards are finally attached, but are pretty much complete as units.
To have a bit of a break from the yards, I think I'll do some ratlines on the lower shrouds. I think I probably need to tackle the futtock shrouds (metal bars?) first, though, otherwise they're going to be a bear to access.
Thanks for looking in
-
robdurant got a reaction from dunnock in HMS Bristol 1775 by robdurant - Scale 1:64 - Portland-class 50-gun ship - as built from NMM plans
Not much work done on this recently as I've been on a push to get Barque Stefano completed... but we're making progress. The sails are complete, and being attached to the yards... However, tomorrow I have an exciting day planned. I'm visiting the National Archives in Kew, London, to look at the Captain's and Master's logs of HMS Bristol. I'm hoping to read the logs for a few major events in Bristol's history - in particular her dismasting during the Great Hurricane in 1780, and a few other events.
So... watch this space, and I'll try and share some of what I discover. I find this part of the process really helpful in building the desire to really dig into the design and build. The connection with the vessel drives me on to see the model completed.
Thanks for looking in.
-
robdurant got a reaction from coxswain in Barque Stefano by robdurant - MarisStella - 1:63
I've just finished the yards on the mainmast. It's a process of keeping the faith as you go, as it has to look like an explosion of rope before order then appears out of the chaos... Here are the footropes in process...
And then completed...
And here's a shot of the whole mast... the lower stunsails have had the stunsail yards attached to the tops, but haven't been rigged at all yet... None of these yards are finally attached, but are pretty much complete as units.
To have a bit of a break from the yards, I think I'll do some ratlines on the lower shrouds. I think I probably need to tackle the futtock shrouds (metal bars?) first, though, otherwise they're going to be a bear to access.
Thanks for looking in
-
robdurant reacted to Baker in Mary Rose by Baker - scale 1/50 - "Your Noblest Shippe"
Planking the lower hull, progress.
I'm kind of slow in planking, the idea is to do an update on this about every 2 weeks.
made an extra batch of planks.
Planking
transom
16th century planking is something like ordered chaos (my idea). that's why there are pencil lines and notes all over the hull
and sometimes things go wrong
a pencil line is drawn
a simple but effective solution
problem solved, the next plank will fit
Current status ( ps, the wale is not as bent and bad looking as in the picture)
And building this way gives a nice space under the model to organize all the tools
Thanks for following
-
robdurant reacted to Blue Ensign in HMS Indefatigable 1794 by Blue Ensign - FINISHED - Vanguard Models - 1:64 scale
Post Thirty
A conundrum
I have spent the afternoon sorting and checking my planking strip.
(102) 900mm lengths of 5x1mm Pear strip is supplied for the hull planking.
There is quite a colour variation which may be split into three shades, Dark, light, and medium.
0956
In my kit (37) are Dark, (24) are light, and (25) are Medium.
0955
The shorter lowest selection in the above photos is Light pear from hobbymill.eu and from previous experience the colour is consistent.
0957
There is also a fourth category (16) strips, with vertical graining, that I prefer not to use.
Mixed colour shades applied either randomly, or by design, in the planking strakes is something that doesn’t appeal to my eye, but if the intention is to copper and paint the hull then this is of little relevance.
For me it means that there is insufficient strip to complete the hull without distinct colour variation along the strakes.
As I hope to leave the hull with a natural wood finish this is a little disappointing, but I infer no criticism of the kit.
My thoughts are turning to buying a new supply of timber from hobbymill.eu, an indulgence maybe, but this is a project that has already incurred a not inconsiderable cost, and I want to make it as good as I can.
I was quite happy to have a Pear lower hull, but the situation now provides the option of replacing pear with Boxwood, and also including wider strips for spiling.
There is only a small difference in cost between Pear and Box.
One of the general downsides of kit timber is the lack of wider strips for hull planking, which is really is a bonus in planking. Fortunately, wider stuff is now more readily available from specialist sources.
Using Pear I would have a contrast below the wale and a match to the stem, sternpost, and keel.
With Box these elements would provide a contrast to the main hull planking, and Box is my favourite modelling timber.
08070
Nevertheless, I have decided to opt for Pear as demonstrated on my Sphinx build, above.
I quite fancy a slightly darker lower hull, and if my planking standard falls below what I hope, then the hull will be coppered anyway.
I now have a few weeks wait for the new timber to arrive, but meanwhile I can fettle those gunports, and mark up the hull for the planking runs.
B.E.
11/05/2023
-
robdurant reacted to newbee in Golden Hind by newbee - OcCre - 1/85 - improved version
After much head I'm scratching and pulling my hair out, I'm surprised I'm not bald now, I have completed the topsides and almost ready to plank them. However I still need to use a little filler on the lower hull before lightly sanding the entire hull. I guessed the stern would be the most difficult part but, had no idea just how tough. I had planned on having the stern plate 40mm wide at the bottom, but, this meant that the stern was too wide behind the quarter deck. I had also managed to over sand the port side by 1mm so had to reshape this as well. I have now removed the planking completely on the quarter deck so once the first planking layer is done it can be sanded completely smooth. level with the topmost plank. The starboard bulwark also needed an additional strip added to the fore part of the quarter deck as a small sliver came off as I was cutting it. I always say the beauty of a wooden kit is if you make a mistake it's easily fixed. with a plastic kit you're knackered most times.
The next stage now is to fill in some dents on the bottom of the ship caused by applying pressure while using the stand. I also need to shape the rear keel better while ensuring that the shape is correct and ensuring both sides are identical.
-
 robdurant got a reaction from Rudolf in Barque Stefano by robdurant - MarisStella - 1:63
Hi all,
Not much more to show, except the reefing points that are now stiffened using watered down PVA front and back. This was done before they were trimmed to length, by placing a small ruler behind the reefing points. Then they were trimmed to the bottom of the ruler giving a nice neat line.. The second photo is the progress on the mainmast lower-topsail yard with the footropes in progress....
.
As always, thanks for the likes and encouragement.
Rob
-
robdurant got a reaction from AJohnson in Barque Stefano by robdurant - MarisStella - 1:63
Hi all,
Not much more to show, except the reefing points that are now stiffened using watered down PVA front and back. This was done before they were trimmed to length, by placing a small ruler behind the reefing points. Then they were trimmed to the bottom of the ruler giving a nice neat line.. The second photo is the progress on the mainmast lower-topsail yard with the footropes in progress....
.
As always, thanks for the likes and encouragement.
Rob
-
robdurant reacted to Blue Ensign in HMS Indefatigable 1794 by Blue Ensign - FINISHED - Vanguard Models - 1:64 scale
Post Twenty-eight
Second planking begins
I start by taking the trouble to sort and match the Box planking strips I obtained from Hobbymill eu.
They are well colour matched and consistent in dimensions.
So, time to apply the first Box plank.
0925
The blurb indicates fitting the first plank directly underneath the outer pear bulwarks; seems simple enough, but when it comes to the bow pattern there is an inconvenient gap between plank and pear bulwark of around 2 -3mm.
0938
The second plank fitted without issue; I used ca to start at the bow but followed by using pva for the remainder. It is possible to clamp these two strakes.
Both strakes were fitted without tapering.
The manual suggests the strake that represents the top level of the Wale (in fact the Black Strake) is next fitted.
0924
The line is taken from Plan six and marked on the hull below the gunport centres. (above the ports in the case of the aftermost two) It is then a matter of running the plank along the hull.
I pinned the plank to the hull, and applied heat to form the shape. Pins are not an issue with this plank as it will be covered by a further wale plank.
I opted to plank the topsides down to it, and then glue it into place. My preference is to part clear the ports as I go along.
Fixing the planks between wale and topsides is not quite as straight forward as it may seem, if the intention is not to cover it all in paint. In that case the paint will hide a multitude of sins.
On many kits the wale line is marked after the second planking has been applied, and I suppose this could still be done. It is just a matter of marking the dots on the second planking rather than the first. This would I think simplify the topsides planking.
0937
The wale sweeps up at the stern and bow, more so at the stern, and has a slight concave curve around midships.
0934
This means the planking between the gunports and down to the wale will have to be made to fit, requiring tapering at both bow and stern.
Starting with the stern I tick stripped each gunport to determine the taper. The hull mid-section is broadly full width with tapering stating around the second gunport from the bow, and fourth from the stern.
0928
0940
Not an entirely authentic method of planking the Topsides, but the taper at the bow will be masked by the hawse bolsters and at the stern by the Qtr gallery lower finishings, so little to draw the eye.
I am using ca gel exclusively now, but take the precaution of having a container of acetone and cotton buds handy to remove any ca spillage.
0933
0926
0930
0941
After five days the topsides planking is completed on the Starboard side. A preliminary sanding has been applied, but the gunports remain unfinished at this point.
Onwards…
B.E.
05/05/2023.
-
robdurant reacted to Kevin in HMS Indefatigable 1794 by Kevin - FINISHED - Vanguard Models - 1:64 - Feb 2023 to June 2025
doing things my way, i want to get a majority of the outer painting done before working inside the hull, might avoid all the dust that i seam to create
-
 robdurant got a reaction from egkb in Barque Stefano by robdurant - MarisStella - 1:63
Hi all,
Not much more to show, except the reefing points that are now stiffened using watered down PVA front and back. This was done before they were trimmed to length, by placing a small ruler behind the reefing points. Then they were trimmed to the bottom of the ruler giving a nice neat line.. The second photo is the progress on the mainmast lower-topsail yard with the footropes in progress....
.
As always, thanks for the likes and encouragement.
Rob
-
robdurant got a reaction from BobG in Barque Stefano by robdurant - MarisStella - 1:63
Hi all,
Not much more to show, except the reefing points that are now stiffened using watered down PVA front and back. This was done before they were trimmed to length, by placing a small ruler behind the reefing points. Then they were trimmed to the bottom of the ruler giving a nice neat line.. The second photo is the progress on the mainmast lower-topsail yard with the footropes in progress....
.
As always, thanks for the likes and encouragement.
Rob
-
robdurant got a reaction from dunnock in Barque Stefano by robdurant - MarisStella - 1:63
Hi all,
Not much more to show, except the reefing points that are now stiffened using watered down PVA front and back. This was done before they were trimmed to length, by placing a small ruler behind the reefing points. Then they were trimmed to the bottom of the ruler giving a nice neat line.. The second photo is the progress on the mainmast lower-topsail yard with the footropes in progress....
.
As always, thanks for the likes and encouragement.
Rob
-
 robdurant got a reaction from Obormotov in Free Picture Resizer Application I programmed (to solve those image rotation woes) *Microsoft Windows 10 and 11 only*
Hi Shipman.
My desire in writing this software was primarily that it hard-coded the information that sets the rotation on website pages...This rotation information causes a lot of confusion to users who see a photo the right way up on their cameras but then it displays the wrong way online. It may well be that the software you have pointed to does the same, but I had struggled to find something that did that reliably for free
Glad you found an app that works well for you.
Rob
-
 robdurant got a reaction from Obormotov in Free Picture Resizer Application I programmed (to solve those image rotation woes) *Microsoft Windows 10 and 11 only*
Hi,
If you click the windows button, and type "add remove program" and select "Add or remove programs"
Now , you can search for the Picture Resizer application, select the three dots on the right hand side and uninstall it.
Once that is complete you can install the new version downloaded from the website.
Hope that helps.
Rob
-
robdurant got a reaction from Obormotov in Free Picture Resizer Application I programmed (to solve those image rotation woes) *Microsoft Windows 10 and 11 only*
Version 1.13.0 now available on https://www.durant.biz/pictureresizer now supports cropping (with the option to maintain the aspect ratio of the image) on a per image basis as you resize your photos.
Simply select "begin cropping" or click and drag to select a region of the image, then resize it until you're happy with the size. Selecting the "maintain aspect ratio" checkbox will mean that each time you resize the selection it will keep the width to height ratio the same as that of the original image (i.e. 16:9, 4:3, etc...) Then when you resize the image, it will crop the image to the rectangle. Hope it's helpful
Happy resizing!
Rob
-
 robdurant got a reaction from Dulrakk in Free Picture Resizer Application I programmed (to solve those image rotation woes) *Microsoft Windows 10 and 11 only*
Auf deutsch...
-
robdurant got a reaction from Obormotov in Free Picture Resizer Application I programmed (to solve those image rotation woes) *Microsoft Windows 10 and 11 only*
I'm conscious that many of our wonderful family here on ModelShipWorld.com are not native English speakers.
My little offering to brighten your day is Version 1.12.0 of Picture Resizer (available at https://www.durant.biz/pictureresizer/ ) which now supports languages natively for the main application window (I'll add support for the other windows soon). All you need do is install the application and it will show the application in the language your computer uses (It currently supports French, German, Dutch and English) if it can't find your language, it will drop back to English)
Languages are not my area of expertise, so "Calling all linguists"... If you speak German, French or another language, and you're reasonably au-fait with computer, and you would like this application to support your mother-tongue / preferred language natively, please could you translate the following, and I'll add this support into the application...
The English terms at the moment are as follows, and the French, German and Dutch attempts are below (with big apologies in advance for what are a mix of guesswork and google translate... please help me make these better!)
English originals
Resize Images
Image Quality
Highest / Largest filesize
Resized photos go here...
Folder with photos to resize
Maximum resized dimension (width or height)
About...
Exit
File
Help
Load settings...
Save settings...
Modify the resized photo name?
View each file individually before resizing...
Prefix
Resize all images in source folder
Resize images where destination file with modified name does not exist
Resize images where destination file with original OR modified name does not exist
Resize images where destination file with original name does not exist
Select Folder...
Lowest / Smallest filesize
Suffix
French:
Redimensionner les images Qualité d'image Taille de fichier la plus élevée/la plus grande Les photos redimensionnées vont ici... Dossier avec photos à redimensionner Dimension redimensionnée maximale (largeur ou hauteur) À propos Quitter Fichier Aider Charger les paramètres... Enregistrer les paramètres... Modifier le nom de la photo redimensionnée ? Affichez chaque fichier individuellement avant de redimensionner... Préfixe Redimensionner toutes les images dans le dossier source Redimensionner les images où le fichier de destination avec le nom modifié n'existe pas Redimensionner les images où le fichier de destination avec le nom d'origine OU modifié n'existe pas Redimensionner les images où le fichier de destination avec le nom d'origine n'existe pas Sélectionner le dossier... Taille de fichier la plus basse / la plus petite Suffixe
German:
Bildgröße ändern Bildqualität Höchste / Größte Dateigröße Verkleinerte Fotos kommen hier... Ordner mit Fotos zum Ändern der Größe Maximale Größenänderung (Breite oder Höhe) Über Photo Resizer... Picture Resizer beenden Datei Hilfe Einstellungen laden... Einstellungen speichern... Ändern Sie den in der Größe geänderten Fotonamen? Sehen Sie sich jede Datei einzeln an, bevor Sie die Größe ändern ... Präfix Größe aller Bilder im Quellordner ändern Ändern Sie die Größe von Bildern, bei denen die Zieldatei mit geändertem Namen nicht vorhanden ist Ändern Sie die Größe von Bildern, bei denen die Zieldatei mit dem ursprünglichen ODER geänderten Namen nicht existiert Ändern Sie die Größe von Bildern, bei denen die Zieldatei mit dem ursprünglichen Namen nicht vorhanden ist Ordner auswählen... Niedrigste / Kleinste Dateigröße Suffix
And Dutch
Formaat van afbeeldingen wijzigen Beeldkwaliteit Hoogste / grootste bestandsgrootte Verkleinde foto's komen hier... Map met foto's om het formaat te wijzigen Maximale afmeting gewijzigd (breedte of hoogte) Over... Uitgang Bestand Hulp Instellingen laden... Instellingen opslaan... De gewijzigde fotonaam wijzigen? Bekijk elk bestand afzonderlijk voordat u het formaat wijzigt... Voorvoegsel Wijzig het formaat van alle afbeeldingen in de bronmap Wijzig het formaat van afbeeldingen waar het bestemmingsbestand met gewijzigde naam niet bestaat Wijzig het formaat van afbeeldingen waar het bestemmingsbestand met de originele OF gewijzigde naam niet bestaat Wijzig het formaat van afbeeldingen waar het bestemmingsbestand met de oorspronkelijke naam niet bestaat Selecteer map... Laagste / kleinste bestandsgrootte Achtervoegsel
Thank you for all your help This is truly the benefit of a global community!
Hope it's of help.
Rob
-
robdurant got a reaction from Obormotov in Free Picture Resizer Application I programmed (to solve those image rotation woes) *Microsoft Windows 10 and 11 only*
More functionality. Version 1.0.5 is on the website:
https://www.durant.biz/pictureresizer/
If you check the checkbox that says: "View each file individually before resizing", it'll come up with an image preview window for each picture that's going to be resized. In that window you have the option to manually rotate the image, and/or flip it horizontally or vertically. Then you can either resize that image, or skip it, and it will go on to the next image that's queued up to be resized.
Again it doesn't make any changes to the original file. Just the new one. I haven't documented it yet, but I will when I get a moment, and I'll do a video too.
Hope it's helpful.
Rob