

mij
-
Posts
224 -
Joined
-
Last visited
Reputation Activity
-

 mij reacted to DORIS in ROYAL CAROLINE 1749 by Doris - 1:40 - CARD
Dear friends,
your words mean a lot for me and I appreciate your praise and comments very much. I warmly thank you!
Well, on the model there will be about 15 crew members from the mid -18th century. The figure of Nelson could be possible only as a very young child, but I do not plan to create him for Royal Caroline. I only answered Sjors.
No problem, it is possible to purchase here:
LINK REMOVED BY ADMIN BECAUSE THIS SITE HAS SOME SERIOUS COPYRIGHT ISSUES>>><>THEY PIRATE EVERYTHING.
Hello Robert,
I have an idea - some of my crew members could visit your beautiful ship, maybe we will meet on the sea one day...
Maybe in the future, but for diorama I need larger space. Now I have only one room, where I keep all models protected against dust and air humidity.
300 figures of men - but not for my model. It would be mission impossible for me. I am going to create only 15 figures for Royal Caroline.
Oh yes, dear Michael, the figures bring better imagination about real size of the ship and I also try to create more authentic clothes of the crew from 18th century.
************************
Here are some larger and actual pics of Royal Caroline:
Kind regards
Doris
-
mij reacted to *Hans* in Batavia by *Hans* - FINISHED
I build this model for my eldest son who is studying to become a captain. He particularly choose this ship
Carving on the head
-
mij reacted to AntonyUK in HMS Victory by AntonyUK - FINISHED - Scale 1:36 - cross-section
Hello shipmates.
Well its time for another small update.
Today while working on the topdeck I made a template for the hanging knees.
But to my horror I forgot to add then on the middle deck
So managed to cut them out and add them to the middle deck.
First time I have used super glue on a model ship.
And yes I did remember them on the Orlop Deck.
Also made up the racks.
Hope to get in another few hours later on this week.
First its the main beams and all the other timber to be cut down to size.
Will post later this week
Regards Antony.
-
mij reacted to AntonyUK in HMS Victory by AntonyUK - FINISHED - Scale 1:36 - cross-section
Hello Shipmates.
Started the planking to the sides of the main deck.
Completed deck without furniture on.
The Stain used to soak the treenails prior to installing them.
Thanks for looking in.
Regards Antony.
-
mij reacted to AntonyUK in HMS Victory by AntonyUK - FINISHED - Scale 1:36 - cross-section
Hi Shipmates.
A few more photos on my progress up to date.
Tree nails are cocktail sticks sacked on dark stain then dryed and a .6 mm hole drilled into the Tulipwood.
treenail then glued into place and when dry cut with side cutter and sandpapered.
Chalking done with Black card. All the planks steed on edge and card glued to facing edge with PVA glue.
Before sanding down and after.
Tree nailing done on far side only this side to complete now.
This middle Deck is now almost complete and now need to add the furniture.
I will add the scuppers holes and the holes for the Gunport lids ropes as I do deck by deck.
Thanks for looking in.
Regards Antony.
-
 mij got a reaction from GrandpaPhil in Xebec by mij - FINISHED - 1:60 scale
Port and Starboard Dolphins fitted.
Eagle fitted to stern.
I`m not certain if the carving of the Eagle is good enough.
I might take this one off, and re-carve another one.
mij
-
mij got a reaction from GrandpaPhil in Xebec by mij - FINISHED - 1:60 scale
Cutting brass tube for rudder hinge.
Soldering tube to brass shim
Rudder hinge complete.
Blanks cut from Boxwood of Eagle and Dolphins.
Carvings of Eagle and Dolphins.
-
mij reacted to pirozzi in Royal William by pirozzi - FINISHED - Euromodels - 1/70
Working on completing the first layer of planking below the main deck. Very slow process on a ship this size. You will notice many glue spots. I want to make sure the planks are very secure as the basis for the final planking. This will get all covered up with the pretty second layer.
Vince P.
-
mij reacted to Vivian Galad in Red Dragon by Vivian Galad - Artesania Latina - 1:60 - modified
Some more updates. Finished the cabin and closed it. As I study the AL plans, I wish they could be more acurate on their model - There are some issues with bullwarks stanchions, for there are none and I have to ask what holds the bullwarks in place? There are 2 platforms and nothing to hold them from below - even when they seem part of the deck, my instincts and knowledge say to me there should be some beams.
Have found some problems with wood, too, since some of the them aren´t the same color they´r suposed to be - for that matter, I´m using my scrapbox.
Cabin closed and planked. Still don´t know if I´ll let the wood be or if I paint it in the process - All indicates I should paint the wood, but my heart loves the wood alone. I´ll frame the windows on the outside, yet.
Oh, yes, I remade the bed. It was a little rough.
A night view from the deck. I´m still thinking if the rest of my lanterns should be functional. Maybe one or two.
-
mij reacted to Michiel in Prins Willem 1650 by Michiel - 1:50 - POB Zeeland ship from own plans
Hi guys,
I've been a bit bussy with other thing lately, and wenn I was building it was mainly replicating stuff on starboard that were already done on port, damm symmetry
Anyhow, I took some leave from that and made some details. For the interior:
a doorway from the cabin to the side.
(for the reference the planking is 5mm wide)
And some more lanterns for the gun deck:
Best,
Michiel
-
mij reacted to PMG in HMS AGAMEMNON by PMG - Caldercraft
I finally finished with the quarter galleries and am ready to begin the second planking.
My quarter galleries are not so nice as expected, but it's not their final appearance and some adjustments will be possible later.
For the second planking, I shall also make planks of 12,5 cm. I think it's a good idea and also much easier to put in place.
Thank you to all friendly "like's" and messages.
To Nils, Mobbsie and Christian,
thank you for your kind words, I try (slowly) to do my best...
To Glawen,
I hope to see you soon with an Aggie or another build.
Trappist is always helpful, but much better outsine when the weather is nice. And that's OK when you make too much dust!
To Jason,
cutting and aligning the gunports was really a long and fastidious work, but I tried to do my best using more than often the calliper square. I tried to have them right with an accuracy of 0,1 to 0,2mm, I think it will pay back in the future.
About the weather, we had here a couple of fine days. But I think it's over now. About snow, I have the impression you kept all in North America this yearand left nothing for us. I already permuted the winter tyres to the summer one's.
To Klaas,
I follow also with very much interest your buildlog full of good ideas (such as your galley floor).
Your Aggie is coming out very nicely. I started mine more than 3 years ago, and I think that you will soon pass me over...
Who is the fastest? Mobbsie or you, or , may be, Sjors? I am surely not!
Pierre
-
mij reacted to druxey in ROYAL CAROLINE 1749 by Doris - 1:40 - CARD
Um... Nelson wasn't even born until 1758. Beautiful work as usual, Doris!
-
mij reacted to the learner in Triton 1/48 by The Learner
Some more pictures!
At this point I have to mill some more wood for frames. I have already printed out and cut up the patterns.
This process is comming along quite nicely and I am enjoying it
-
mij reacted to the learner in Triton 1/48 by The Learner
Sanding angle on cant frames, the sander is homemade and way underpowered, but it works slow but sure.
Lining up and setting cant frame to deadwood
Two more cant frames and I can start the bollards and hawse construction
Progressing! couple more years and I will have it done
I have anouther project that I am working on so I am dividing time between them
-
mij reacted to the learner in Triton 1/48 by The Learner
Yes more pictures!
The work continues: At the stern
and now starting the bow
more pictures to come as we advance
Slow and sure, well almost!
-
mij reacted to michael mott in Bristol Pilot Cutter by michael mott - 1/8 scale - POF
Thanks S.os, Nils, Bob, Used to sail, for your kind remarks, and for all those who added likes.
The last two pieces of the main-sheet tackle the cleats for the port and starboard main sheets.
These were rough milled with a 1/2 inch end mill and a 1/4 inch ball end mill, then drilled for the # 0 deck screws, I also made a countersink out of some 5/32 drill rod because I had nothing small enough to get to the hole past the top part of the cleat.
A series of files were used to shape the cleats the following pictures are pretty self explanatory.
Here I am showing the large half round for shaping the top of the cleat, the flat file has a safe edge, it was handy for supporting the file with my fingers when shaping the bolt tabs
The finished rough filed cleat ready for the fine needle files and for the emery and steel wool
All mounted, I did have to reshape the heads of the #0 countersunk wood screws a little. I made them into quasi oval heads by setting up a wood mandrel in the chuck to hold the screws while a very fine file rounded the tops and reduced the diameter a few thou.
Now to deal with the rudder.
Michael
-
mij reacted to captainbob in Lettie G Howard by captainbob - FINISHED - 1:48 - POB - schooner
As I said before, “SHE wants GOLD”. Now I come to the cove that should be gold. I looked into gold leaf but not only is it expensive but I don’t need near that much. Yellow paint isn’t the same and I’ve never seen a gold paint that came close. Besides with my hands I could never paint a straight line. So here comes brass. All I have to do is fasten a strip of brass . . . but I read topics here saying how do you fasten brass to wood? There are probably many ways but here is how I did it.
The stripe goes in the cove line or in my case where the thin bulwark strake and the wide strake meet.
My plan was to solder .188” of the tip of several .024” brass plank nails to a .032” brass rod. This is still up in the bulwark area so fasteners had to be placed where the stations are. I drilled .020” holes into the stations. I measured the hole locations and soldered the nail tips at the same distances and found out that if you are off by even that little the brass rod doesn’t fit properly.
On to plan B. I placed the nail tips in the holes leaving about .06” exposed. Then I soldered on the brass rod and pushed it tight against the wood. I then filed a flat on the exposed part of the brass to catch the light.
Thanks for the help Nils.
Bob
Drilling for the nail tips.
A nail tip pressed in, waiting for solder.
Rod soldered to nail tip
-
 mij got a reaction from Archi in Xebec by mij - FINISHED - 1:60 scale
Port and Starboard Dolphins fitted.
Eagle fitted to stern.
I`m not certain if the carving of the Eagle is good enough.
I might take this one off, and re-carve another one.
mij
-
mij got a reaction from Archi in Xebec by mij - FINISHED - 1:60 scale
Cutting brass tube for rudder hinge.
Soldering tube to brass shim
Rudder hinge complete.
Blanks cut from Boxwood of Eagle and Dolphins.
Carvings of Eagle and Dolphins.
-
mij reacted to Boccherini in Harriet McGregor by Boccherini
For the moment, I have been working on the forward section, completing the structure over the starboard hatch/companionway (I have no idea of its correct name). I shaped a block of MDF then covered it with veneers, and added some hinge pins and a handle to complete the look.
The dimensions for the catheads are only best guess, the plans are a little vague. Does anyone have information regarding the diameter and width of the sheaves in catheads, also the length of the slots to accommodate them? The out board end of the catheads are 300mm (12") square.
Grant.
-
mij reacted to EdT in Young America 1853 by EdT - FINISHED - extreme clipper
Young America - extreme clipper 1853
Part 51 – Port side ceiling continued
It has been about a week since the last post. Seems longer. Work has been progressing, but most of it is similar to work covered in earlier posts, so there has not been much of interest to add. The first picture shows the bilge ceiling being installed under the lower deck clamp aft on the port side.
At this stage all of the iron strapping is in place on both sides, so now it’s a matter of keeping it undamaged until it is covered by the various internal planking and clamps. The next picture shows some of the lower strakes of the thick bilge ceiling being installed.
A fair amount of clamping is required to pull these 8” x 8” timbers into place and hold them there while the glue dries. The deck clamps have been extended concurrently with work on the ceiling. This can be seen in the next picture, which shows the current state of the model.
Below is another view showing the open areas in the bilge ceiling. Later, nine frames in each of these sections and an aft section will be removed up to the height of the middle deck clamps.
The entire bilge ceiling is complete in this picture. The thinner floor ceiling planking has not yet begun on the port side. The next picture shows a closer view of the central view port area.
All of the bilge ceiling has been leveled out and given a preliminary sanding to allow the remaining iron (copper wire) bolts to be installed. All of the bolts have been installed in the completed deck clamps.
The last picture shows the starboard lower hull.
In this picture the protruding bolts installed thus far have been filed and sanded off. There are many more to install as the inside work continues. The bolts are relatively invisible at this stage but will be much more prominent when etched black.
The next step is to plank the floor area on the port side.
Ed
-
mij reacted to kscadman in US Brig Syren by kscadman - Model Shipways - Scale 1:64 - first wooden ship build
To all thank you for the compliments. Am celebrating 2 years of work on here this month and I'm realizing how tedious the small bits can be, but I do like the results when finished.
Augie - you were right, the tiller rigging passes over it nicely.
Richard - I know how projects can keep a person away but I hope to see updates on your Syren - she's coming along great!
Thomas - Thanks as always!
Scott - I see your point, but I'd be more worried about having the tiller hitting me while manning the cannons if the ship went hard to port or starboard.
Chuck - Thank you - coming from the master I'm feeling good about my progress.
I've completed the steerage and tiller rigging and I'm currently doing the prep work (sanding, staining, etc.) for the fife rail, bitts & stack. Also I'm still looking for a smaller bell for the binnacle.
Richard
-
mij reacted to Tarjack in HMY Royal Caroline 1749 by Tarjack - 1:50 - bone model
i also rebuild some pieces of the capstan
the replaced parts
barrel; whelps; capstan bar;
Now enjoy the pic`s
Now are the pawl`s, rope and whelp-chocks still missing
about this I will report next time
have fun
-
mij reacted to guillemot in Scottish Maid by guillemot - FINISHED - 1/8" scale - Hall's 1839 Clipper Schooner
Hi, She's finished. Last bits to do were the anchors which were silver and soft soldered together from bits of copper.
here she is.
Thanks for looking!
-
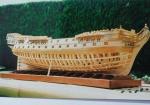
mij reacted to SJSoane in HMS Bellona 1760 by SJSoane - Scale 1:64 - English 74-gun - as designed
Hi everyone,
After many months, I was finally able to remove the jig today, and see the stern in all its glory.
I still have to trim the short pieces in the window sill area, and fair inside and out before finally gluing up and starting the transoms inboard. But it is definitely looking more like a real stern.
The whole thing is shockingly fragile. No wonder a broadside into the stern would just about finish the day....
Best wishes,
Mark