
HOLIDAY DONATION DRIVE - SUPPORT MSW - DO YOUR PART TO KEEP THIS GREAT FORUM GOING! (Only 64 donations so far out of 49,000 members - C'mon guys!)
×


Kevin
-
Posts
7,009 -
Joined
-
Last visited
Content Type
Profiles
Forums
Gallery
Events
Everything posted by Kevin
-
On Eternal Patrol -- May 8 On this date in 1942 (May , British submarine HMS Olympus leaves Malta ferrying crews from sunken submarines HMS Pandora, HMS P36 and HMS P39 to Gibraltar. HMS Olympus soon hits a mine and sinks (89 killed, 9 survivors swim 7 miles back to Malta). (WW@daybyday) The wreck of HMS Olympus will be discovered in 2011. The Daily Mail reports that a team of explorers has discovered the wreck of a British submarine that sunk off the Maltese coast during the Second World War. HMS Olympus struck a mine in the early hours of 8 May, 1942 shortly after she left Malta Harbor under the cover of darkness. Nearly 90 men perished in what was one of the worst naval disasters of the war. Only nine of the vessel's 98 crew members survived after swimming seven miles back to shore in cold water.
-
 i purchased more as a just in case, but then replaced 100, so i have spares and they are not as expensive as i thought. all the best
 -
Jerry i used medium c/a http://www.amazon.co.uk/Everbuild-Industrial-Superglue-General-Purpose/dp/B006PFN3BW/ref=sr_1_14?ie=UTF8&qid=1368014776&sr=8-14&keywords=super+glue and i purchased another 200 tiles from Caldercraft
-
happy birthday, have a nice day
-
http://www.bbc.co.uk/news/uk-22434753 70 years on: Britain remembers Battle of the Atlantic
-
May 08 1744 HMS Northumberland (70), Cptn. Thomas Watson (mortally wounded), captured by a French squadron of Content (62) and Mars (64). 1781 HMS Mentor (16), Robert Deans, burnt to avoid capture and HMS Port Royal (18) captured by the Spaniards at Pensacola 1794 HMS Placienta (6) wrecked off Newfoundland 1804 HMS Vincejo (16), John Westly Wright, captured by French flotilla of 6 brigs and 5 luggersoff the mouth of the Morbihan 1807 Boats of HMS Comus (22), Cptn. Conway Shipley, cut out Spanish felucca San Pedro from under the protection of a strong fort and two batteries in the port of Gran Canaria. 1811 HMS Scylla (18), Arthur Atchison, boarded and carried French privateerCanonniere (10), Ensgn. Jean Joseph Benoit Schilds (Killed in Action), and 1 ship of her convoy of 5 off Roscoff.
-
lol - leave the Somerset wabbits out of it
-
Jerry are you going for the kit tiles or copper tape, , yr build looks great, lol - i wish i had 5 hours a day spare, managed 4 hours during the whole of last week all the best
-
lol, in time of conflict, i guess being in a pre sunk boat - has it's advantages
-
The sinking of the Cunard ocean liner RMS Lusitania occurred on 7 May 1915, during the First World War, as Germany waged submarine warfare against Britain. The ship was identified and torpedoed by the German U-boat U-20 and sank in 20 minutes. The vessel went down 11 miles (18 km) off the Old Head of Kinsale, Ireland, killing 1,198 and leaving 761 survivors. The sinking turned public opinion in many countries against Germany, contributed to the American entry into World War I and became an iconic symbol in military recruiting campaigns of why the war was being fought. Lusitania had the misfortune to fall victim to torpedo attack relatively early in the First World War, before tactics for evading submarines were properly implemented or understood. The contemporary investigations both in the UK and the United States into the precise causes of the ship's loss were obstructed by the needs of wartime secrecy and a propaganda campaign to ensure all blame fell upon Germany. Argument over whether the ship was a legitimate military target raged back and forth throughout the war as both sides made misleading claims about the ship. At the time she was sunk, she was carrying a large quantity of rifle ammunition and other supplies necessary for a war economy, as well as civilian passengers. Several attempts have been made over the years since the sinking to dive to the wreck seeking information about precisely how the ship sank, and argument continues to the current day.
-
Thank you Augie
-
HMS Victory by Yon - Caldercraft 1:72
Kevin replied to Yon's topic in - Kit build logs for subjects built from 1751 - 1800
very nice, well done -
thanks grant, in the early stages, i wondered if i would ever get it right, continually redoing everything - gun ports wales etc, wondering if i had bitten off more than i could chew, in such a expensive kit - at least any mistakes there are - is the same both sides lol i have had to turn my plans back to front in front of a window to see through the paper to take measurements - i was finding it very strange working on the plans being back to front
-
May 07 1694Henry Every (also spelled Avery) leads a mutiny aboard the privateer Charles IIanchored off La Coruna, Spain. 1709 HMS Postillion (10), wrecked near Ostend 1765 HMS Victory launched 1779 Continental Navy sloop Providence (12), Cptn. John Rathbun, captures British brigDiligent (12) off Cape Charles 1794 HMS Swiftsure (74), Captain Charles Boyles, captured Atalante (36), Cptn. Charles-Alexandre-Leon Durand-Linois 1798 HMS Victorieuse (14), Cptn.Edward Stirling Dickson, captured French privateerBrutus (6), Cptn. Rousel, off Guadeloupe. 1808 Boats of HMS Falcon (14), Lt. John Price (act. Cdr.), captured two sail at Lundholm. HMS Redwing (18), Thomas Ussher, destroyed seven Spanish vessels and drove some into the surf from a convoy of 12 merchantmen escorted by 7 armed vessels near Cape Trafalgar. only 3 vessels escaped.
-
Keith I did 23 ½ years from 1974 starting in warships (HMS SHEFFIELD and HMS FIFE) then went into submarines in 1980 (HMS ODIN, HMS CHURCHILL, HMS REPLUSE, HMS SCEPTRE) I retired in1998 but rejoined again in2001 and did another 10 Years (HMS SCEPTRE and HMS VANGUARD) I enjoyed my time but actually don’t miss it now, home every night and weekends, no duties or guns and in a routine, lifes good
-
i realised the build name was in my nick name of 30+ years, and the signature was my real name, since i left the RN the Wilber has not been used - so i am weaning my self away from it. To save any confusion - i changed the build to both, but seams to have back fired somewhat, i wonder if Dr Pers can help me
- 1,319 replies
-
- 1
-

-
- caldercraft
- Victory
- (and 1 more)
-
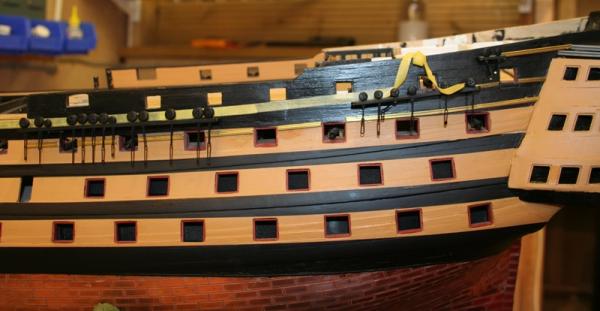
Build time 812 hours Not much to show this week, even though a long weekend (May Day Bank Holiday) only 4 hours was available to me, all the channels for the port side have be completed (2 of the 5) have been attached. All my trails and tribulations early on in the build, in getting everything set up right, are now paying off. It is making my life so much easier, as it all seams to a a refection (as should be to the stbd side)
- 1,319 replies
-
- 2
-
-
- caldercraft
- Victory
- (and 1 more)
-
after conversion
-
Another step nearer Paul, those window panes will keep the the admiral warmer on a cold winters day whilst cruising through the baltic
-
May 06 1682 HMS Gloucester (60) wrecked off Yarmouth 1709 HMS Portland (48) re-captured Coventry. 1741 Samuel Hood entered the navy as Captain’s Servant on HMS Romney (48) 1801 Nelson succeeds Parker as Commander-in-Chief, Baltic. Lord Thomas Cochrane in HMS Speedy (14) captures Spanish xebec frigate El Gamo (32), Cptn. Don Francisco de Torris (Killed in Action), off the coast near Barcelona. 1805 Boats of HMS Unicorn (32), Cptn. Lucius Hardyman, took French privateer Tape a bord (4) in the West Indies. 1814 British squadron under Sir James Lucas Yeo of HMS Prince Regent (56), HMS Princess Charlotte (42) and consorts destroyed a fort and captured USSGrowler (5) and other vessels at Oswego, Lake Ontario
-
Canoe21 Will you be starting a build log, we are always looking for more Victory builds all the best
-
Appologies - right events though
-
sail powered submarine - moved by moderator
Kevin replied to Kevin's topic in Nautical/Naval History
SS R-14 (SS-91) was an R-class coastal and harbor defense submarine of the United States Navy. Her keel was laid down by the Fore River Shipbuilding Company, in Quincy, Massachusetts on 6 November 1918. She was launched on 10 October 1919 sponsored by Ms. Florence L. Gardner and commissioned on 24 December 1919, with Lieutenant Vincent A. Clarke, Jr., in command. [edit]Service history [edit]1919–1929After shakedown off the New England coast, R-14 moved to New London, Connecticut, where she prepared for transfer to the Pacific Fleet. In May, she headed south. Given hull classification symbol "SS-91" in July, she transited the Panama Canal in the same month and arrived at Pearl Harbor on 6 September. There, for the next nine years, she assisted in the development of submarine and anti-submarine warfare tactics, and participated in search and rescue operations. 1930–1946R-14 — under acting command of Lieutenant Alexander Dean Douglas – ran out of usable fuel and lost radio communications in May 1921 while on a surface search mission for the sea-going tugConestoga about 100 nmi (120 mi; 190 km) southeast of the island ofHawaii. Since the submarine's electric motors did not have enough battery power to propel her to Hawaii, the ship's engineering officerRoy Trent Gallemore came up with a novel solution to their problem. Lieutenant Gallemore decided they could try to sail the boat to the port of Hilo, Hawaii. He therefore ordered a foresail made of eighthammocks hung from a top boom made of pipe bunk frames lashed firmly together, all tied to the vertical kingpost of the torpedo loadingcrane forward of the submarine's superstructure. Seeing that this gaveR-14 a speed of about 1 kn (1.2 mph; 1.9 km/h), as well as rudder control, he ordered a mainsail made of six blankets, hung from the sturdy radio mast (top sail in photo). This added .5 kn (0.58 mph; 0.93 km/h) to the speed. He then ordered a mizzen made of eight blankets hung from another top boom made of bunk frames, all tied to the vertically placed boom of the torpedo loading crane. This sail added another .5 kn (0.58 mph; 0.93 km/h). Around 12:30 pm on 12 May, Gallemore was able to begin charging the boat's batteries.[2]After 64 hours under sail at slightly varying speeds, R-14 entered Hilo Harbor under battery propulsion on the morning of 15 May 1921. Douglas received a letter of commendation for the crew's innovative actions from his Submarine Division Commander, CDR Chester W. Nimitz, USN.[3] [edit]On 12 December 1930, R-14 cleared Pearl Harbor for the last time and headed back to the Atlantic. Proceeding via San Diego, and the Panama Canal, she returned to New London on 9 February 1931, and through the end of the decade conducted training exercises for the Submarine School. In the spring of 1941, she moved down the coast to Key West, Florida, her homeport as of 1 June. In the fall, she returned to New London for overhaul and on 22 November resumed operations out of Key West. Into April 1945, she conducted training exercises for the Sound School and patrolled the Yucatan Channel and the Florida Straits. On 25 April, she headed north and in early May arrived at Philadelphia, Pennsylvania. R-14 was decommissioned on 7 May, struck from the Naval Vessel Register on 19 May, and sold on 28 September to Rossoff Brothers of New York City. She was later resold to the Northern Metals Company of Philadelphia, Pennsylvania, and scrapped in 1946. -
May 05 1794 HMS Orpheus (32), Cptn Henry Newcome, captured Duguay-Trouin (34) off the Isle of France 1798 HMS Badger (4) and HMS Sandfly gunbrig repulsed 52 gun brigs at Marcon. 1799 HMS Fortune (10), Lt. Lewis Davies, and gunboats captured by Salamine.
