


Beef Wellington
-
Posts
2,245 -
Joined
-
Last visited
Reputation Activity
-

 Beef Wellington got a reaction from Schubbe in HMS Jason by Beef Wellington - Caldercraft - 1:64 - Artois-class frigate modified from HMS Diana 1794
Happy New Year to all!
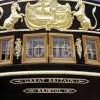
Not too much to show for a little bit of extra time in the shipyard, but have put a bookend on the work at the stern and quarter galleries for now. Basically, all I've done is glue the quarter gallery sections in place together with the various rails (Upper stool, rim and lower stool rails). This took much longer than expected as I had so many pieces of rework, either because if breakage when shaping, fitting or by trimming a little too much (despite reciting 'don't take off too much' continually under my breath) and needing to restart. It was also challenging as the quarter gallery rails needed to match as well as possible to the upper and lower counter rails. Anyway, don't think the pictures need much additional explanation - other than that some are taken without any touchup, but the extra time afforded by the site outage allowed me to get a little more done.
Suffice to say, I'm very pleased with the way the quarter galleries turned out, definitely challenging, but worth the extra time. The PE lights still require some work and these will not be put in place yet, but I wanted to get a sense for the overall look and the lines. Of course final judgement is left to others
The kit supplied console brackets proved to be a little oversized, to keep the same feel as the plans I wanted these to fit snuggly between the upper stool and the rim rails. For comparison, you can see the adjusted starboard side bracket to the not yet adjusted port side on the left.
Taking a step back to compare to the plans and assessing varied angles I think I've done as much as can be done to bash any provided parts into something a little more consistent. As always, the human eye is a little more forgiving in person. The plan profile is enlarged from the AOTS book. The quarter gallery sculptures now have a definite 'ledge' to visually support them and I'm glad I invested the extra time here.
-

 Beef Wellington got a reaction from John Cheevers in HMS Jason by Beef Wellington - Caldercraft - 1:64 - Artois-class frigate modified from HMS Diana 1794
Happy New Year to all!
Not too much to show for a little bit of extra time in the shipyard, but have put a bookend on the work at the stern and quarter galleries for now. Basically, all I've done is glue the quarter gallery sections in place together with the various rails (Upper stool, rim and lower stool rails). This took much longer than expected as I had so many pieces of rework, either because if breakage when shaping, fitting or by trimming a little too much (despite reciting 'don't take off too much' continually under my breath) and needing to restart. It was also challenging as the quarter gallery rails needed to match as well as possible to the upper and lower counter rails. Anyway, don't think the pictures need much additional explanation - other than that some are taken without any touchup, but the extra time afforded by the site outage allowed me to get a little more done.
Suffice to say, I'm very pleased with the way the quarter galleries turned out, definitely challenging, but worth the extra time. The PE lights still require some work and these will not be put in place yet, but I wanted to get a sense for the overall look and the lines. Of course final judgement is left to others
The kit supplied console brackets proved to be a little oversized, to keep the same feel as the plans I wanted these to fit snuggly between the upper stool and the rim rails. For comparison, you can see the adjusted starboard side bracket to the not yet adjusted port side on the left.
Taking a step back to compare to the plans and assessing varied angles I think I've done as much as can be done to bash any provided parts into something a little more consistent. As always, the human eye is a little more forgiving in person. The plan profile is enlarged from the AOTS book. The quarter gallery sculptures now have a definite 'ledge' to visually support them and I'm glad I invested the extra time here.
-
 Beef Wellington got a reaction from popeye the sailor in La Renommèe by Landlubber Mike - Euromodel - Scale 1:70
Yes, it should. I don't think the step should be quite so pronounced, and the right stepped section should thin gradually as well. I think you're clearer than the plans at this point so just ignore them!
-
 Beef Wellington got a reaction from rusty b in HMS Jason by Beef Wellington - Caldercraft - 1:64 - Artois-class frigate modified from HMS Diana 1794
Happy New Year to all!
Not too much to show for a little bit of extra time in the shipyard, but have put a bookend on the work at the stern and quarter galleries for now. Basically, all I've done is glue the quarter gallery sections in place together with the various rails (Upper stool, rim and lower stool rails). This took much longer than expected as I had so many pieces of rework, either because if breakage when shaping, fitting or by trimming a little too much (despite reciting 'don't take off too much' continually under my breath) and needing to restart. It was also challenging as the quarter gallery rails needed to match as well as possible to the upper and lower counter rails. Anyway, don't think the pictures need much additional explanation - other than that some are taken without any touchup, but the extra time afforded by the site outage allowed me to get a little more done.
Suffice to say, I'm very pleased with the way the quarter galleries turned out, definitely challenging, but worth the extra time. The PE lights still require some work and these will not be put in place yet, but I wanted to get a sense for the overall look and the lines. Of course final judgement is left to others
The kit supplied console brackets proved to be a little oversized, to keep the same feel as the plans I wanted these to fit snuggly between the upper stool and the rim rails. For comparison, you can see the adjusted starboard side bracket to the not yet adjusted port side on the left.
Taking a step back to compare to the plans and assessing varied angles I think I've done as much as can be done to bash any provided parts into something a little more consistent. As always, the human eye is a little more forgiving in person. The plan profile is enlarged from the AOTS book. The quarter gallery sculptures now have a definite 'ledge' to visually support them and I'm glad I invested the extra time here.
-
 Beef Wellington reacted to rafine in Halifax by rafine - FINISHED - The Lumberyard - 1:48 - semi-scratch schooner
Before moving on with the standing rigging, I made the two topmasts and mounted them. The masts were made from dowels with the lower ends filed flat, strip wood pieces added to build up a flat square and a portion filed to an eight sided section. The upper ends were tapered, a shoulder cut in and sheaves drilled in. Fids were run through the square lower section.
I then did the mainstay, the main topmast stay, the fore topmast stay, the jib stay and the jibboom horses.
The two mainmast stays run through a double block on the foremast cap and then down through tackles to eyebolts on the deck at the mast. The tackles were not tied off at this time.
The fore topmast stay is seized to the mast at it's top and to the jibboom at it's bottom.
The jib stay runs from the head of the foremast, through a traveler on the jibboom , then through a sheave on the jibboom, and ends in a tackle attached to an eyebolt on the bowsprit cap. That tackle won't be tied off until later. The traveler was made from a piece of wire, a brass shackle from my stock, and a Syren hook.
The horses were made by doing small knots in a piece of line that was then seized to the jibboom end and to eyebolts at the cap.
Bob
-
 Beef Wellington got a reaction from toms10 in HMS Jason by Beef Wellington - Caldercraft - 1:64 - Artois-class frigate modified from HMS Diana 1794
Happy New Year to all!
Not too much to show for a little bit of extra time in the shipyard, but have put a bookend on the work at the stern and quarter galleries for now. Basically, all I've done is glue the quarter gallery sections in place together with the various rails (Upper stool, rim and lower stool rails). This took much longer than expected as I had so many pieces of rework, either because if breakage when shaping, fitting or by trimming a little too much (despite reciting 'don't take off too much' continually under my breath) and needing to restart. It was also challenging as the quarter gallery rails needed to match as well as possible to the upper and lower counter rails. Anyway, don't think the pictures need much additional explanation - other than that some are taken without any touchup, but the extra time afforded by the site outage allowed me to get a little more done.
Suffice to say, I'm very pleased with the way the quarter galleries turned out, definitely challenging, but worth the extra time. The PE lights still require some work and these will not be put in place yet, but I wanted to get a sense for the overall look and the lines. Of course final judgement is left to others
The kit supplied console brackets proved to be a little oversized, to keep the same feel as the plans I wanted these to fit snuggly between the upper stool and the rim rails. For comparison, you can see the adjusted starboard side bracket to the not yet adjusted port side on the left.
Taking a step back to compare to the plans and assessing varied angles I think I've done as much as can be done to bash any provided parts into something a little more consistent. As always, the human eye is a little more forgiving in person. The plan profile is enlarged from the AOTS book. The quarter gallery sculptures now have a definite 'ledge' to visually support them and I'm glad I invested the extra time here.
-
 Beef Wellington got a reaction from hamilton in HMS Jason by Beef Wellington - Caldercraft - 1:64 - Artois-class frigate modified from HMS Diana 1794
Happy New Year to all!
Not too much to show for a little bit of extra time in the shipyard, but have put a bookend on the work at the stern and quarter galleries for now. Basically, all I've done is glue the quarter gallery sections in place together with the various rails (Upper stool, rim and lower stool rails). This took much longer than expected as I had so many pieces of rework, either because if breakage when shaping, fitting or by trimming a little too much (despite reciting 'don't take off too much' continually under my breath) and needing to restart. It was also challenging as the quarter gallery rails needed to match as well as possible to the upper and lower counter rails. Anyway, don't think the pictures need much additional explanation - other than that some are taken without any touchup, but the extra time afforded by the site outage allowed me to get a little more done.
Suffice to say, I'm very pleased with the way the quarter galleries turned out, definitely challenging, but worth the extra time. The PE lights still require some work and these will not be put in place yet, but I wanted to get a sense for the overall look and the lines. Of course final judgement is left to others
The kit supplied console brackets proved to be a little oversized, to keep the same feel as the plans I wanted these to fit snuggly between the upper stool and the rim rails. For comparison, you can see the adjusted starboard side bracket to the not yet adjusted port side on the left.
Taking a step back to compare to the plans and assessing varied angles I think I've done as much as can be done to bash any provided parts into something a little more consistent. As always, the human eye is a little more forgiving in person. The plan profile is enlarged from the AOTS book. The quarter gallery sculptures now have a definite 'ledge' to visually support them and I'm glad I invested the extra time here.
-
 Beef Wellington got a reaction from Landlubber Mike in HMS Jason by Beef Wellington - Caldercraft - 1:64 - Artois-class frigate modified from HMS Diana 1794
Happy New Year to all!
Not too much to show for a little bit of extra time in the shipyard, but have put a bookend on the work at the stern and quarter galleries for now. Basically, all I've done is glue the quarter gallery sections in place together with the various rails (Upper stool, rim and lower stool rails). This took much longer than expected as I had so many pieces of rework, either because if breakage when shaping, fitting or by trimming a little too much (despite reciting 'don't take off too much' continually under my breath) and needing to restart. It was also challenging as the quarter gallery rails needed to match as well as possible to the upper and lower counter rails. Anyway, don't think the pictures need much additional explanation - other than that some are taken without any touchup, but the extra time afforded by the site outage allowed me to get a little more done.
Suffice to say, I'm very pleased with the way the quarter galleries turned out, definitely challenging, but worth the extra time. The PE lights still require some work and these will not be put in place yet, but I wanted to get a sense for the overall look and the lines. Of course final judgement is left to others
The kit supplied console brackets proved to be a little oversized, to keep the same feel as the plans I wanted these to fit snuggly between the upper stool and the rim rails. For comparison, you can see the adjusted starboard side bracket to the not yet adjusted port side on the left.
Taking a step back to compare to the plans and assessing varied angles I think I've done as much as can be done to bash any provided parts into something a little more consistent. As always, the human eye is a little more forgiving in person. The plan profile is enlarged from the AOTS book. The quarter gallery sculptures now have a definite 'ledge' to visually support them and I'm glad I invested the extra time here.
-
 Beef Wellington got a reaction from Shipyard sid in HMS Jason by Beef Wellington - Caldercraft - 1:64 - Artois-class frigate modified from HMS Diana 1794
Happy New Year to all!
Not too much to show for a little bit of extra time in the shipyard, but have put a bookend on the work at the stern and quarter galleries for now. Basically, all I've done is glue the quarter gallery sections in place together with the various rails (Upper stool, rim and lower stool rails). This took much longer than expected as I had so many pieces of rework, either because if breakage when shaping, fitting or by trimming a little too much (despite reciting 'don't take off too much' continually under my breath) and needing to restart. It was also challenging as the quarter gallery rails needed to match as well as possible to the upper and lower counter rails. Anyway, don't think the pictures need much additional explanation - other than that some are taken without any touchup, but the extra time afforded by the site outage allowed me to get a little more done.
Suffice to say, I'm very pleased with the way the quarter galleries turned out, definitely challenging, but worth the extra time. The PE lights still require some work and these will not be put in place yet, but I wanted to get a sense for the overall look and the lines. Of course final judgement is left to others
The kit supplied console brackets proved to be a little oversized, to keep the same feel as the plans I wanted these to fit snuggly between the upper stool and the rim rails. For comparison, you can see the adjusted starboard side bracket to the not yet adjusted port side on the left.
Taking a step back to compare to the plans and assessing varied angles I think I've done as much as can be done to bash any provided parts into something a little more consistent. As always, the human eye is a little more forgiving in person. The plan profile is enlarged from the AOTS book. The quarter gallery sculptures now have a definite 'ledge' to visually support them and I'm glad I invested the extra time here.
-
Beef Wellington got a reaction from popeye the sailor in La Renommèe by Landlubber Mike - Euromodel - Scale 1:70
Mike - I think its a view from above, and it looks to be correct. The widest part is where the bowsprit sits, and the thinner part is the top of the knee of the stem. The reason for the jump rather than smooth transition is that it accounts for the difference in width between those two points. Hard to describe, but clear in my mind :-)
Nice work BTW, good to see some progress.
-
 Beef Wellington got a reaction from BenD in HMS Jason by Beef Wellington - Caldercraft - 1:64 - Artois-class frigate modified from HMS Diana 1794
Happy New Year to all!
Not too much to show for a little bit of extra time in the shipyard, but have put a bookend on the work at the stern and quarter galleries for now. Basically, all I've done is glue the quarter gallery sections in place together with the various rails (Upper stool, rim and lower stool rails). This took much longer than expected as I had so many pieces of rework, either because if breakage when shaping, fitting or by trimming a little too much (despite reciting 'don't take off too much' continually under my breath) and needing to restart. It was also challenging as the quarter gallery rails needed to match as well as possible to the upper and lower counter rails. Anyway, don't think the pictures need much additional explanation - other than that some are taken without any touchup, but the extra time afforded by the site outage allowed me to get a little more done.
Suffice to say, I'm very pleased with the way the quarter galleries turned out, definitely challenging, but worth the extra time. The PE lights still require some work and these will not be put in place yet, but I wanted to get a sense for the overall look and the lines. Of course final judgement is left to others
The kit supplied console brackets proved to be a little oversized, to keep the same feel as the plans I wanted these to fit snuggly between the upper stool and the rim rails. For comparison, you can see the adjusted starboard side bracket to the not yet adjusted port side on the left.
Taking a step back to compare to the plans and assessing varied angles I think I've done as much as can be done to bash any provided parts into something a little more consistent. As always, the human eye is a little more forgiving in person. The plan profile is enlarged from the AOTS book. The quarter gallery sculptures now have a definite 'ledge' to visually support them and I'm glad I invested the extra time here.
-
 Beef Wellington got a reaction from Martin W in La Renommèe by Landlubber Mike - Euromodel - Scale 1:70
Mike - I think its a view from above, and it looks to be correct. The widest part is where the bowsprit sits, and the thinner part is the top of the knee of the stem. The reason for the jump rather than smooth transition is that it accounts for the difference in width between those two points. Hard to describe, but clear in my mind :-)
Nice work BTW, good to see some progress.
-
 Beef Wellington got a reaction from Captain Poison in HMS Jason by Beef Wellington - Caldercraft - 1:64 - Artois-class frigate modified from HMS Diana 1794
Happy New Year to all!
Not too much to show for a little bit of extra time in the shipyard, but have put a bookend on the work at the stern and quarter galleries for now. Basically, all I've done is glue the quarter gallery sections in place together with the various rails (Upper stool, rim and lower stool rails). This took much longer than expected as I had so many pieces of rework, either because if breakage when shaping, fitting or by trimming a little too much (despite reciting 'don't take off too much' continually under my breath) and needing to restart. It was also challenging as the quarter gallery rails needed to match as well as possible to the upper and lower counter rails. Anyway, don't think the pictures need much additional explanation - other than that some are taken without any touchup, but the extra time afforded by the site outage allowed me to get a little more done.
Suffice to say, I'm very pleased with the way the quarter galleries turned out, definitely challenging, but worth the extra time. The PE lights still require some work and these will not be put in place yet, but I wanted to get a sense for the overall look and the lines. Of course final judgement is left to others
The kit supplied console brackets proved to be a little oversized, to keep the same feel as the plans I wanted these to fit snuggly between the upper stool and the rim rails. For comparison, you can see the adjusted starboard side bracket to the not yet adjusted port side on the left.
Taking a step back to compare to the plans and assessing varied angles I think I've done as much as can be done to bash any provided parts into something a little more consistent. As always, the human eye is a little more forgiving in person. The plan profile is enlarged from the AOTS book. The quarter gallery sculptures now have a definite 'ledge' to visually support them and I'm glad I invested the extra time here.
-
 Beef Wellington got a reaction from Hubac's Historian in La Renommèe by Landlubber Mike - Euromodel - Scale 1:70
Mike - I think its a view from above, and it looks to be correct. The widest part is where the bowsprit sits, and the thinner part is the top of the knee of the stem. The reason for the jump rather than smooth transition is that it accounts for the difference in width between those two points. Hard to describe, but clear in my mind :-)
Nice work BTW, good to see some progress.
-
 Beef Wellington got a reaction from JesseLee in HMS Jason by Beef Wellington - Caldercraft - 1:64 - Artois-class frigate modified from HMS Diana 1794
Happy New Year to all!
Not too much to show for a little bit of extra time in the shipyard, but have put a bookend on the work at the stern and quarter galleries for now. Basically, all I've done is glue the quarter gallery sections in place together with the various rails (Upper stool, rim and lower stool rails). This took much longer than expected as I had so many pieces of rework, either because if breakage when shaping, fitting or by trimming a little too much (despite reciting 'don't take off too much' continually under my breath) and needing to restart. It was also challenging as the quarter gallery rails needed to match as well as possible to the upper and lower counter rails. Anyway, don't think the pictures need much additional explanation - other than that some are taken without any touchup, but the extra time afforded by the site outage allowed me to get a little more done.
Suffice to say, I'm very pleased with the way the quarter galleries turned out, definitely challenging, but worth the extra time. The PE lights still require some work and these will not be put in place yet, but I wanted to get a sense for the overall look and the lines. Of course final judgement is left to others
The kit supplied console brackets proved to be a little oversized, to keep the same feel as the plans I wanted these to fit snuggly between the upper stool and the rim rails. For comparison, you can see the adjusted starboard side bracket to the not yet adjusted port side on the left.
Taking a step back to compare to the plans and assessing varied angles I think I've done as much as can be done to bash any provided parts into something a little more consistent. As always, the human eye is a little more forgiving in person. The plan profile is enlarged from the AOTS book. The quarter gallery sculptures now have a definite 'ledge' to visually support them and I'm glad I invested the extra time here.
-
Beef Wellington reacted to Landlubber Mike in La Renommèe by Landlubber Mike - Euromodel - Scale 1:70
I'm a little confused by the plans for the stem:
I get that the front-on view (the diagram to the far right) shows a slow taper transition from 7mm at the top to 4mm at the bottom. What I can't seem to figure out though is the diagram at the bottom. I'm assuming that this shows the taper from the underside of the stem (if you are looking up at the stem from underneath it). What I'm confused about is that step transition midway through does that seem correct? It's almost like the stem is full width until the stem post (Part 4), but then there is a dramatic change in diameter with the main piece (7) and figure piece (6). The stem needs some tapering to get the figurehead to sit properly, but not as much as suggested by the lower diagram.
Unless I'm reading it wrong? Anyone have any ideas?
-
 Beef Wellington got a reaction from drtrap in HMS Jason by Beef Wellington - Caldercraft - 1:64 - Artois-class frigate modified from HMS Diana 1794
Happy New Year to all!
Not too much to show for a little bit of extra time in the shipyard, but have put a bookend on the work at the stern and quarter galleries for now. Basically, all I've done is glue the quarter gallery sections in place together with the various rails (Upper stool, rim and lower stool rails). This took much longer than expected as I had so many pieces of rework, either because if breakage when shaping, fitting or by trimming a little too much (despite reciting 'don't take off too much' continually under my breath) and needing to restart. It was also challenging as the quarter gallery rails needed to match as well as possible to the upper and lower counter rails. Anyway, don't think the pictures need much additional explanation - other than that some are taken without any touchup, but the extra time afforded by the site outage allowed me to get a little more done.
Suffice to say, I'm very pleased with the way the quarter galleries turned out, definitely challenging, but worth the extra time. The PE lights still require some work and these will not be put in place yet, but I wanted to get a sense for the overall look and the lines. Of course final judgement is left to others
The kit supplied console brackets proved to be a little oversized, to keep the same feel as the plans I wanted these to fit snuggly between the upper stool and the rim rails. For comparison, you can see the adjusted starboard side bracket to the not yet adjusted port side on the left.
Taking a step back to compare to the plans and assessing varied angles I think I've done as much as can be done to bash any provided parts into something a little more consistent. As always, the human eye is a little more forgiving in person. The plan profile is enlarged from the AOTS book. The quarter gallery sculptures now have a definite 'ledge' to visually support them and I'm glad I invested the extra time here.
-
 Beef Wellington got a reaction from DaveBaxt in HMS Jason by Beef Wellington - Caldercraft - 1:64 - Artois-class frigate modified from HMS Diana 1794
Been a while since posting and felt like I needed to get up to date, and thanks all for the continued interest - and yes Carl, Mobbsie, simply making slightly wider transoms is the solution. Rather tedious which is why my fingers have been distracted as you'll see.
I feel like I should start with a "forgive me father its been 700 days since I've looked at the instructions or used a kit part" Haven't been completely idle but have got a decent start on couple of visually small but meaningful tasks that should allow of this to come together relatively quickly when the time comes. Main goal is to get items in place to allow me to give the sides a coat of wipe on poly for protection after gluing items in place but prior to touchup which will definitely be needed. I've decided that my next model will only have one side
Chesstree and fenders: These were made up to allow the sheer rail to be positioned and were cut from 3mm and 2mm sheet respectively. The Chesstree has a notable thinning in width as it goes down the hull which I tried to reflect. Felt these looked rather boring when shaped so decided to try and put a profile in these as is so apparent when looking at those on Trincomalee and Victory. These seem to ne features often missing on contemporary models...think I now appreciate why A scraper profile was made for each, the fenders proved much easier to do despite being smaller because of the constant width, the chesstrees much more challenging due to the steady reduction in width. Things are a little messy at the bottom but to the naked eye the defects are much less noticeable and these will not be redone. Chesstree sheaves will be simulated.
Photos below also show a slight miscalculation from way back nearly coming back to bite me. The sheaves for the sheets and tacks were placed a little too high and these nearly interfered with positioning the sheer rail.
Fore and Main Channels: The channels need to be placed at the same height as the sheer rail, so even though its not necessary to attach these until much later, its necessary know where these will be positioned before the sheer rail can be applied. I've decided to go with natural castello channel rather than painted black finish - the latter would at least have given me the option to use the kit part. Making my own allowed me to follow TFFM styling a little bit which is a bit more curvaceous and pleasing to the eye, it also allowed me to position the slots for the chains to reflect the positions of the gun ports - you can see small but noticeable differences in the comparison below. (Interestingly the kit fore-channel has 6 slots at the rear, where-as the AOTS plans show only 5). Holes to allow the pinning of the channels have been drilled so these just need final attachment.
Waist: As previously mentioned, I've been leaving the final position of the upper hull to be tweaked later. To be comfortable that the sheer rail was correctly positioned I needed to trim the waist height back to anticipate the position of the top deck, and allowing for a layer of planking. This was also necessary to finalise the height of the fenders and chesstrees.
Quarterpieces: These have been beveled to allow the placement of the figures, and also the quarterpieces were built up slightly to allow me more easily place and but up the top finishing molding for the taffarel when I get there. The figures with bent arms sit quite pleasingly now and there is a definite sense of depth rather than just plain bas-relief. Obviously lots of fine finishing and touch up still needed....curse you macro gods!
-
Beef Wellington reacted to Vegaskip in Ship paintings
The last one was The Searchers, this is The Rescuers. Breaches Bouy rescue, imaginary, not an actual rescue.
Jim
-
Beef Wellington reacted to Vegaskip in Ship paintings
Thanks Ken. Here's one 'hot of the easel' finished abot 20 minutes ago,
Did this today. The Searchers FAA Wessex HU5 of 771 Squadron RNAS Culdrose searches along the Cornish coast line.
Might do abit more on the cliffs.
W/C 14" X 10"
Jim
-
 Beef Wellington got a reaction from Omega1234 in Eagle of Algier 1753 by Mirabell61 - FINISHED - 1:48 - Chebec - Nils Langemann
Beautiful work Nils as always. Best of the season's wishes to you and yours.
-
Beef Wellington reacted to toms10 in HMS Leopard by toms10 - FINISHED - 1:85 scale POF/POB
Hello all,
Worked on the rudder and hinges this weekend. Made the hinges from scratch from 1/64" x 1/4/" brass strip. Cut the strip into .080" wide strips, marked and drilled 96 holes with my pin vise using a #70 drill. What a great way to develop carpel tunnel issues!!! I still need to blacken the brass hinges, pins & nails but will wait until I am ready to install them.
Tom
-
Beef Wellington reacted to toms10 in HMS Leopard by toms10 - FINISHED - 1:85 scale POF/POB
After several attempts I finally have a stern balcony... at least the center section. The ends and side spindles just attached on the side windows should be much easier, at least that is what I keep telling myself. Just need to mount the balcony to the stern, sure, that should be easy.
Tom,
Hope everyone has an enjoyable holiday season!
-
Beef Wellington got a reaction from popeye the sailor in Eagle of Algier 1753 by Mirabell61 - FINISHED - 1:48 - Chebec - Nils Langemann
Beautiful work Nils as always. Best of the season's wishes to you and yours.
-
 Beef Wellington got a reaction from egkb in HMS Jason by Beef Wellington - Caldercraft - 1:64 - Artois-class frigate modified from HMS Diana 1794
Bob, BE, Pat, Michael, Carl and the likes, thanks for sticking in there, and the kind words.
Joe - Not my idea at all on the channels, its laid out like that in the FFM which I've been referring to. More work but seems a more elegant solution but grounded in reality than the kit solutions of just attaching to the outside face which doesn't quite look right when you have the curves at the ends. One thing I realized I didn't do was to angle the slots according to the expected angle of the chains but hopefully that's not going to be too big a deal. May still have some wiggle room to something there but no need to worry about that yet.