


KenW
-
Posts
1,231 -
Joined
-
Last visited
3 Followers


.thumb.jpeg.fc5d633a7b34428fcf19419a73d56d55.jpeg)
About KenW

- Birthday 05/16/1945
Recent Profile Visitors
5,091 profile views
.thumb.jpg.62d1d69fed1f32364417cb1f9cdeb009.jpg)


-
 PaddyO reacted to a post in a topic:
US Brig Syren by Jason - Model Shipways - 1:64
PaddyO reacted to a post in a topic:
US Brig Syren by Jason - Model Shipways - 1:64
-
KenW reacted to a post in a topic:
Sloop Speedwell 1752 by Chuck - Ketch Rigged Sloop - POF - prototype build
-
Mike Y reacted to a post in a topic:
Washington 1776 by KenW - 1:48 - Continental galley from NRG plans
-
Rustyj reacted to a post in a topic:
Washington 1776 by KenW - 1:48 - Continental galley from NRG plans
-
Chuck reacted to a post in a topic:
Washington 1776 by KenW - 1:48 - Continental galley from NRG plans
-
Pirate adam reacted to a post in a topic:
Washington 1776 by KenW - 1:48 - Continental galley from NRG plans
-
JacquesCousteau reacted to a post in a topic:
Washington 1776 by KenW - 1:48 - Continental galley from NRG plans
-
 So I ordered wood and continued to make carriages. The guns of the Washington are not all the same size. They used whatever was available. The boat, according to my plans, had two 18 pounders, two 12 pounders, two 9 pounders and a combination of 6 and 4 pounders. I used the gun barrels and carriages supplied by Syren; so I used six 6 pounders and no 4’s. I attach a photo of each size. More carriages for the 6’s need to be made; and I didn’t glue the barrels to the carriages yet. The small pins stopping the wheels falling off and all made, even for the small 6 pounders. For the smallest 6 pounders, I used a #78 drill and was lucky to make the pins with my Dremel that fit into the small hole.
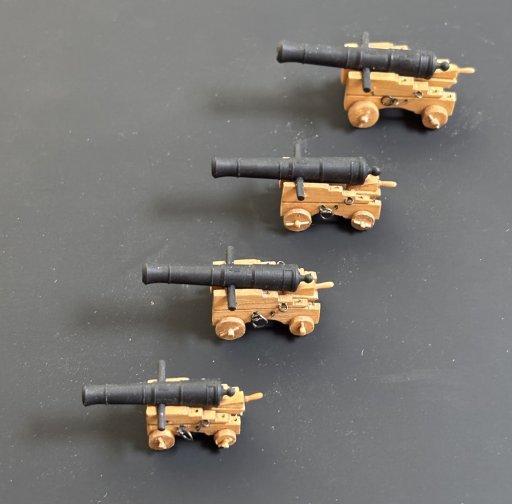
-
JacquesCousteau reacted to a post in a topic:
Washington 1776 by KenW - 1:48 - Continental galley from NRG plans
-
JacquesCousteau reacted to a post in a topic:
Washington 1776 by KenW - 1:48 - Continental galley from NRG plans
-
GrandpaPhil reacted to a post in a topic:
Washington 1776 by KenW - 1:48 - Continental galley from NRG plans
-
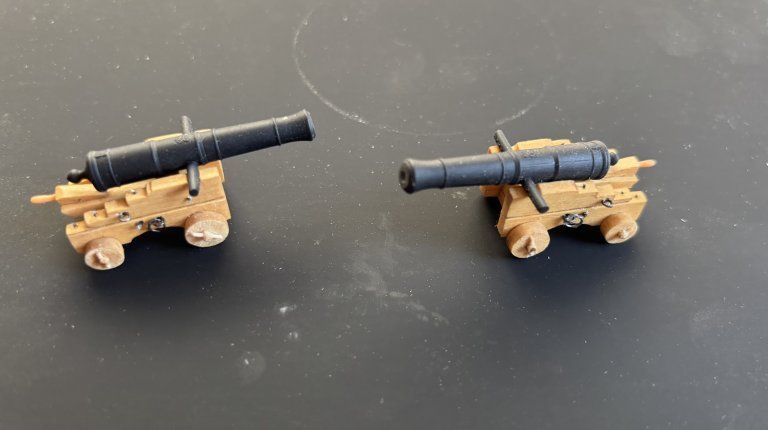
As I think about what to do with the planking of the hull and decide what wood I’m going to need, I decided to make a couple of gun carriages. I started with the two 18 pounders. I got the carriages from Chuck and followed his directions. I even attempted to make the pins holding the axle wheels in place. These are very small and provided me with a real challenge. I used a #73 drill bit to drill a hole through the axle. The pin was made from a 1/16” x 1/16” strip turned in the chock of my Dremel. The key is to make sure the axle nibs fully extend beyond the side of the carriage wheel.
-
KenW reacted to a post in a topic:
Washington 1776 by KenW - 1:48 - Continental galley from NRG plans
-
ccoyle reacted to a post in a topic:
Washington 1776 by KenW - 1:48 - Continental galley from NRG plans
-
KenW reacted to a post in a topic:
Sloop Speedwell 1752 by Chuck - Ketch Rigged Sloop - POF - prototype build
-
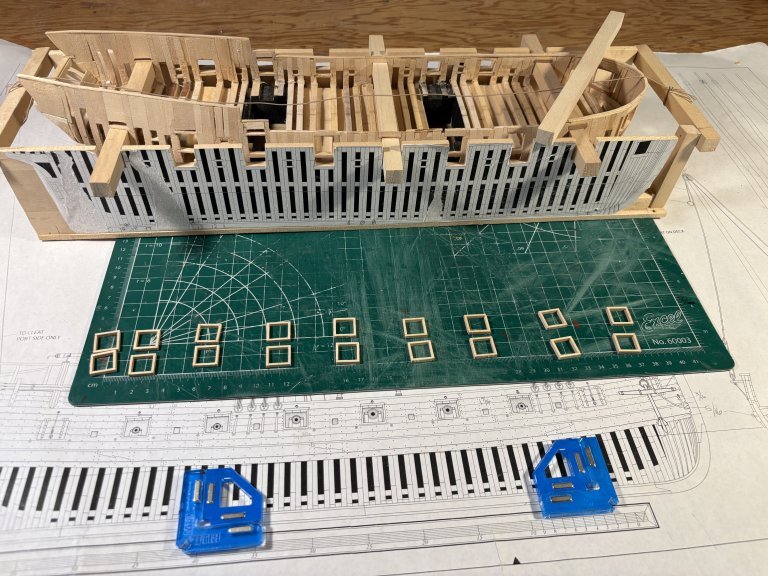
Another summer with no modeling due to an injury. But I’ve been feeling up to modeling again and my next focus will be on the quality of my work. I made frames (18) for each gun port. I think this will give a better look when all the planking is done. Also, I’ve begun sanding the hull in preparation for planking the outside above the wales. A lot of work levels and width of the bulkwarks. Still more sanding to go.
-
KenW reacted to a post in a topic:
Sloop Speedwell 1752 by Chuck - Ketch Rigged Sloop - POF - prototype build
-
KenW reacted to a post in a topic:
Sloop Speedwell 1752 by Chuck - Ketch Rigged Sloop - POF - prototype build
-
KenW reacted to a post in a topic:
Sloop Speedwell 1752 by Chuck - Ketch Rigged Sloop - POF - prototype build
-
KenW reacted to a post in a topic:
Sloop Speedwell 1752 by Chuck - Ketch Rigged Sloop - POF - prototype build
-
KenW reacted to a post in a topic:
Sloop Speedwell 1752 by Chuck - Ketch Rigged Sloop - POF - prototype build
-
KenW reacted to a post in a topic:
Sloop Speedwell 1752 by Chuck - Ketch Rigged Sloop - POF - prototype build
-
KenW reacted to a post in a topic:
Sloop Speedwell 1752 by Chuck - Ketch Rigged Sloop - POF - prototype build
-
Every time I look at your log, I am more impressed. Amazing skill!
-
After reviewing the height and placement of the gun ports, I finally decided to create the location of the keel. This keel is only for planking purposes. Once the hull is planked, this keel will be sanded down and the proper keel attached. It is not yet glued on to the hull. It’s amazing how a photo shows where more sanding is needed. Also one of the counters broke and needs to be fixed.
-
I have finally gotten the hull fully assembled and it’s almost ready for planking. I will still keep the sandpaper handy, but first I must add the keel. This is a critical step that I’ve been avoiding. But it has to happen sometime. The hull still isn’t pretty, but planking should help that as well as more sanding and adding shims.
-
Mike - Your work does look like it could've been computer generated.
-
I’ve glued the pieces to make the stern half of the galley. All the pieces had to be adjusted and sanded to make a smooth half-hull. I’m using a technique from an article by Richard Simon in the Nautical Research Journal, Summer 2023, Vol. 68, No.2. which simulates a POF scheme. I thought it would make the creation of the gun ports easier. For the stern, I’m using a POB technique. This model is using a lot of different techniques. It’s kind of a hodgepodge of different ideas from various sources. And the model requires lots of sanding. My shipyard is getting layers upon layers of sawdust; I’m going to have to spend days doing a complete cleaning up once the hull is finished. (I am doing some cleaning up each day, but not a major effort.) Included are the water boards at the rear of the deck. I made them without edge bending since the basswood wouldn’t hold the bend without breaking. I may make the board thinner towards the stern to match the plans. They aren’t glued yet.
-
I’ve spent the last two weeks creating and sanding the stern area. More sanding must be done. Also the stern is proving to be difficult. I don’t really like the way the plans construct the stern area. I still have a lot of work to do. I must make/design the counter and transom and continue the endless sanding.
-
Druxey: Thanks. Unfortunately I got them created for me by "shapeways.com" which I now learn that they went out of business. Chuck has a great source of models (from the UK, I think), but I don't know if they will create figures based on your personal requirements. Cheers.
-
I haven’t been modeling for the last few months due to my recovery from surgery. But I have acquired some 1/48 scale sailors. I added three to the boat so the model looks like the photo from the book on Pilot Boats shown in my first posting. The little men seem very small and they will break if I’m not careful. I attached some photos below.
-
Thanks Greg. I'll get in touch with Chuck.
-
Greg: I never heard of this site. Do they have a wide range of model guns at this site? I need a collection of gun sizes for my current model. It's an American boat with guns sizes that depend on what they could 'acquire'. Thanks.
-
Sorry - I can't fine the capsquares on the HMS Winchester page or the Ship Model Cannon page. Cheers.
-
I vote "yea" for 1:48 capsquares! They look amazing.
