lambsbk
-
Posts
910 -
Joined
-
Last visited
Content Type
Profiles
Forums
Gallery
Events
Everything posted by lambsbk
-
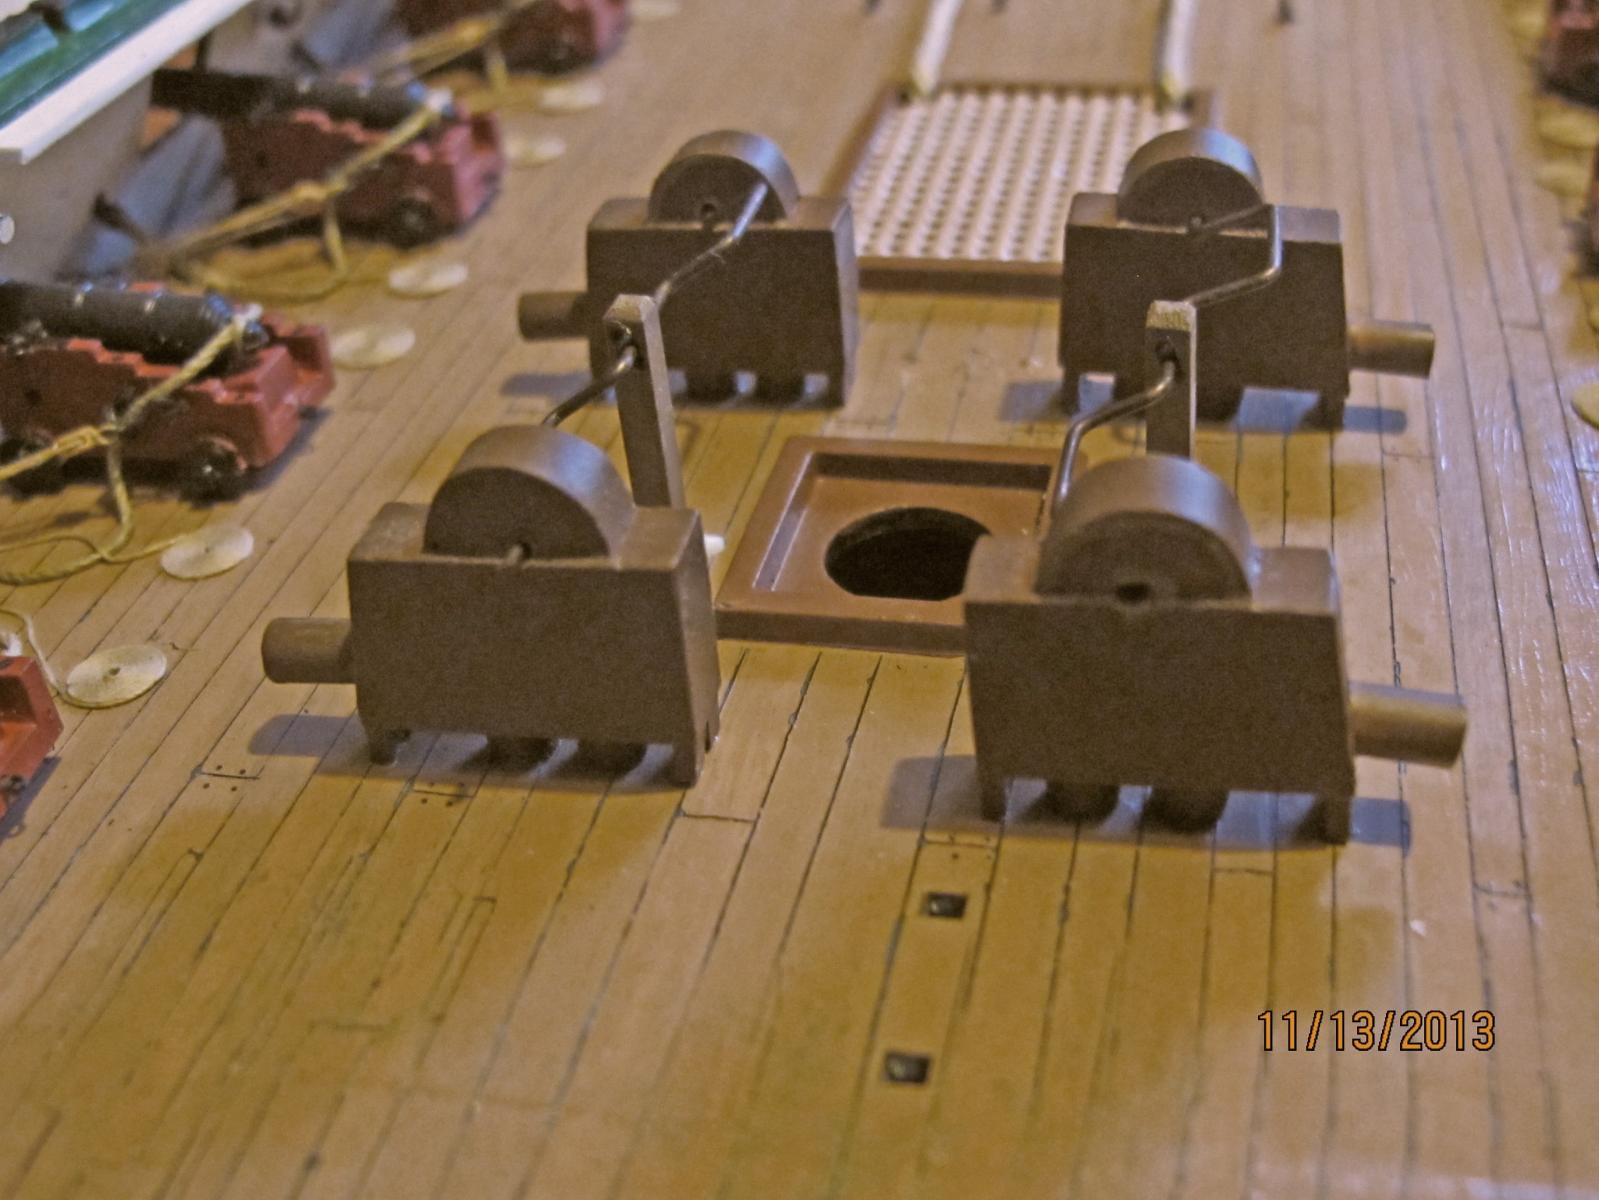
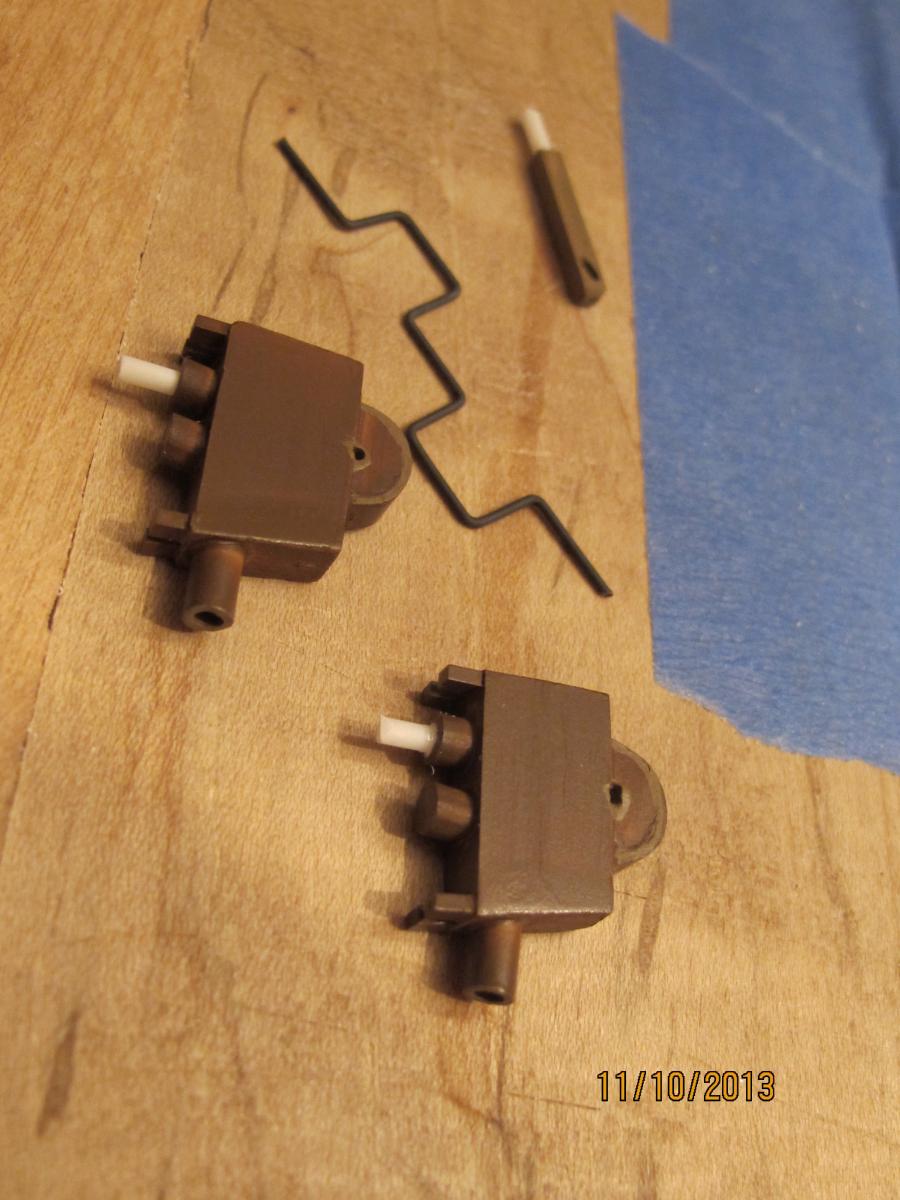
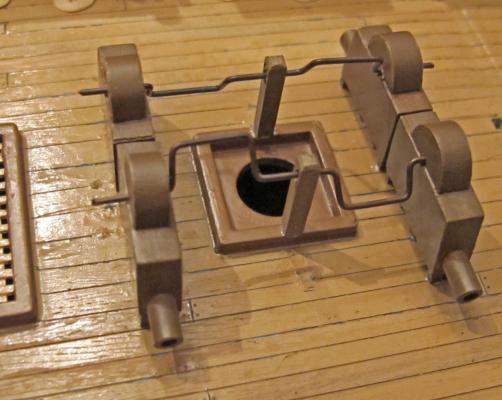
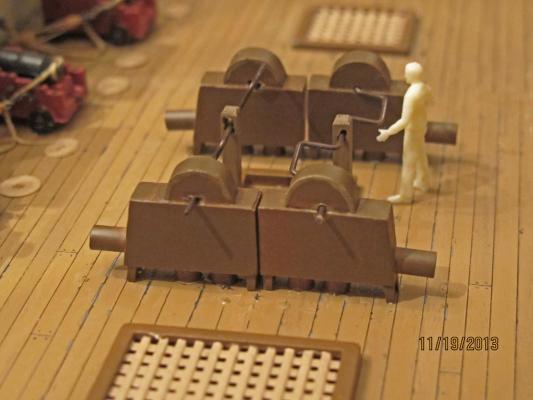
I was able to get back to the pumps the last few days. I am afraid the deck took a little beating up in the process. In addition the pumps are a little too close at the mid-deck level - but they are not so far off the mark. As a result of moving them they are now away from the gun actions. Again, I sized the pumps based on the 6" diameter in the inner tubes. I think I am close on the scaling. Although the crew will not be utilized I placed a member near the pumps for perspective. I am much happier with this revision overall. With crewman...
- 601 replies
-
- 7
-

-
- constitution
- revell
- (and 1 more)
-
I feel your 'redoing it' pain (see my chain pumps). What about brass square tube John. It is small, sturdy, and when cut can be soldered to form the frame. I used it to form the frame for the camboose floor on my Connie. I then blackened it and it could have held paint but I used dull coat instead. Would the brass hold paint long term is a question some of these more experienced guys and gals on the forum would probably know. Just a thought. On my camboose floor frame I notched the tube in a "V" shape not quite filing all the way through the tube. I then folded it over and soldered. Worked great.
-
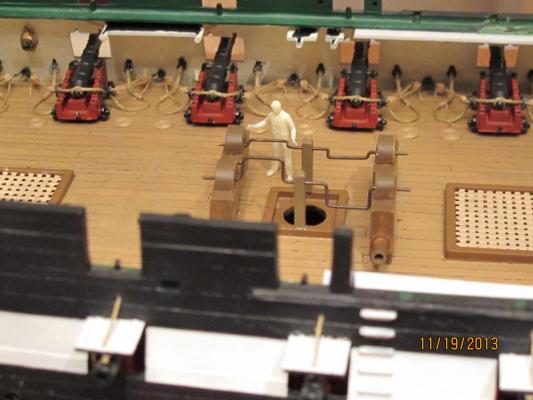
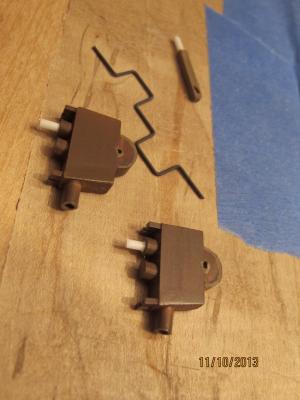
I made several mistakes today: First I was in a hurry. Second: I did not measure twice. Third: I did not dry fit...arrgghhh... Now - I have to undo and redo the pumps. I was concerned that they were too close to the main mast so I moved the handle center outward. That moved the pumps outward. Too far outward... Now they are in the way of the gun actions and they are not to scale of the drawing. My fears of their proximity to the main mast was unfounded. Since I had already drilled the 1/16" receptacle holes for the pumps I glued them anyway. I am not happy with them though. So AFTER THE WEDDING I will remove them, repair the deck, and reinstall in their correct positions. Live and learn.

- 601 replies
-
- 2
-
-
- constitution
- revell
- (and 1 more)
-
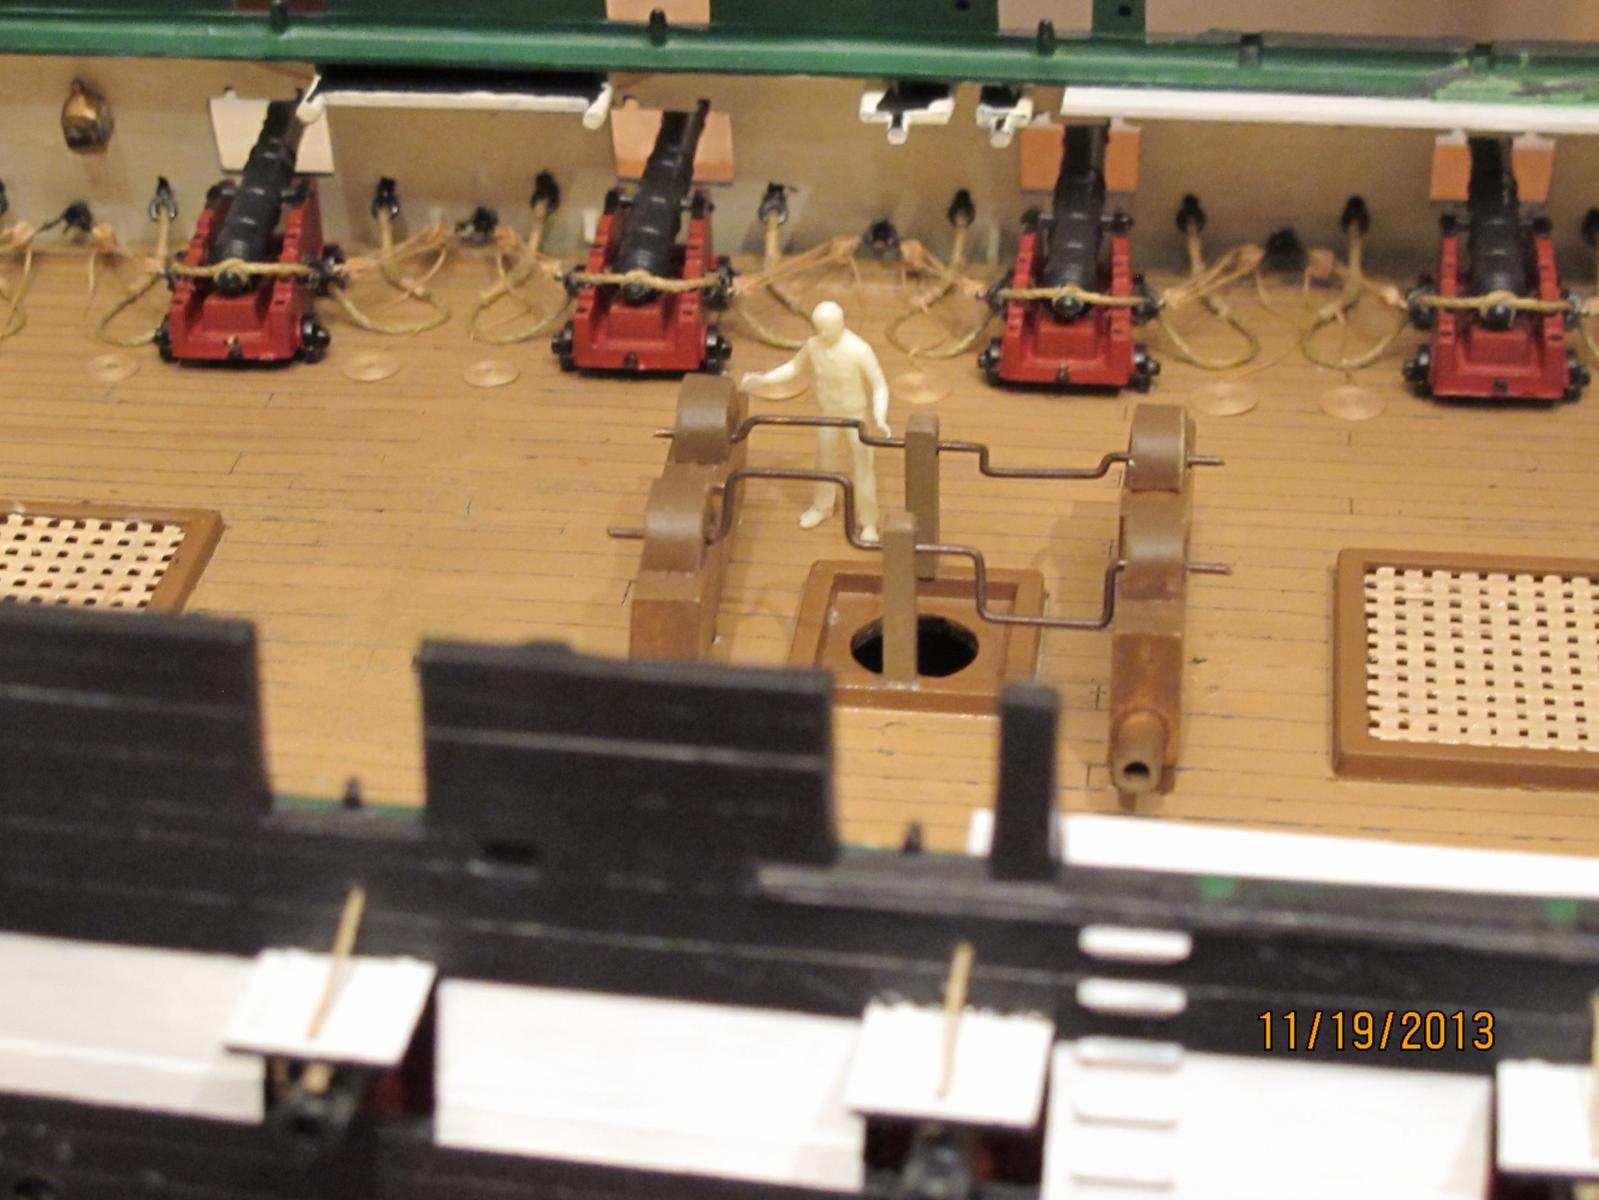
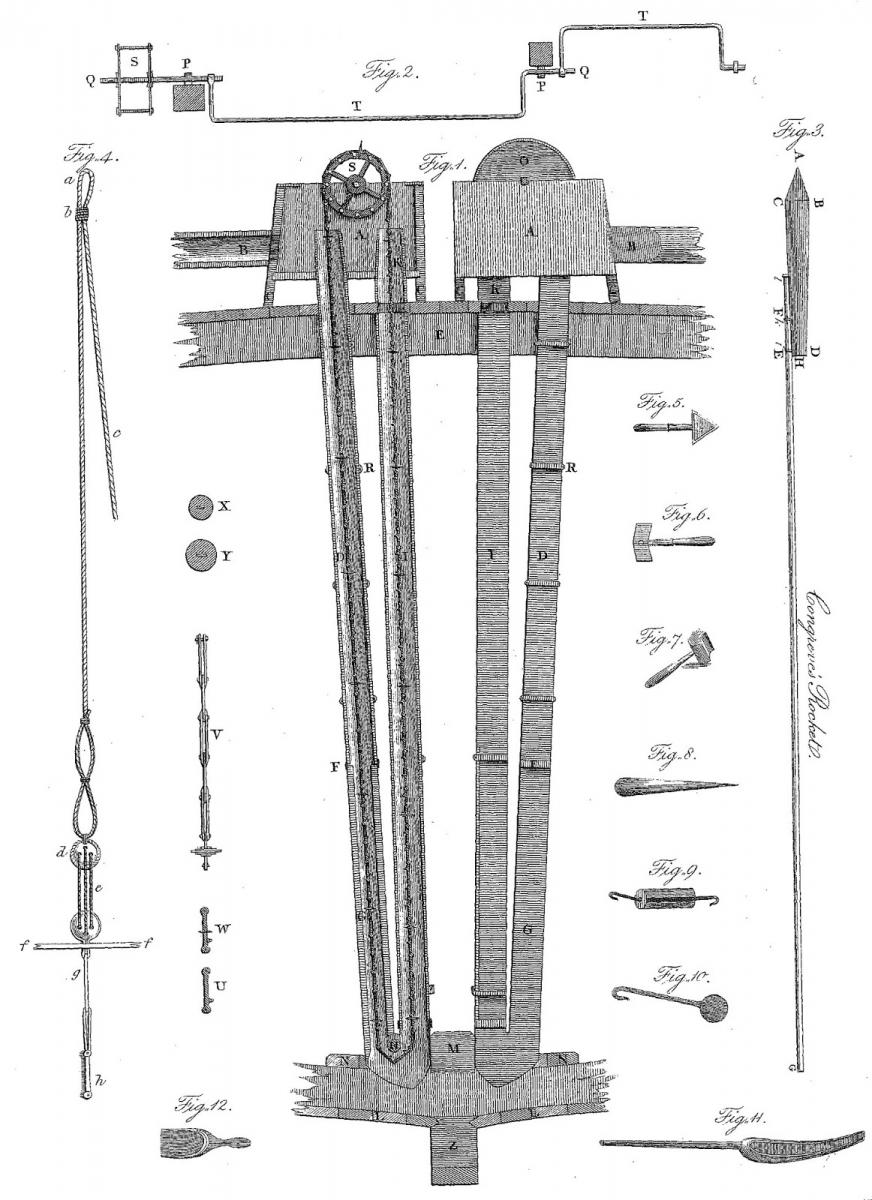
I have not had much time to work the build this week. Daughter no. 1 is about to be married this weekend and there has been very little time for ... fun. But I did sneak in a few items on the chain pumps. I used the 6" rule for their dimensions. Using the reference photo below the pipe inner diameter is reported to be 6" (an elm log hollowed I believe). This made the up and down pipe about 12". These were used to apprx. the rest of the pump size. Mine may be a little large but the plastic crew member is about waist high to the pump handle and that can't be too far off. The finished parts:


- 601 replies
-
- 5
-
-
- constitution
- revell
- (and 1 more)
-
I've used the Blacken It several times and I think the flaking issue comes from uneven distribution. In a solution you would not expect this problem but the reaction of the chemicals with the metal causes them to form gas bubbles locally on the metal. They are small but prevent the metal from having the even distribution by blocking the solution at small levels. I have had some success at correcting this problem by removing the metal for a few seconds mid-wash and then re-immersing the metal until the desired effect. The metal has to be thoroughly rinsed and dried when complete. Re-rinsing and drying 24 hours after treatment does not hurt to remove resistant residues as well. I hope that helps.
-
I like those little extra touches John. Good work.
- 2,250 replies
-
- 1
-
-
- model shipways
- Charles W Morgan
- (and 1 more)
-
Nice furniture Andy. Did you turn the barrels? They look nice on their chocks - the lockers look too. What are the hinges made of?
-
Absolutely gorgeous work Wes. I can only imagine what you and Augie can do with an erector set.
-
HAPPY BIRTHDAY Henry. And many more. Have fun my friend.
-
Popeye: If this site is for all praise what is the point? The bible says "iron sharpens iron" and so we all learn from each other and improve each other. It is a given which we all (I hope) on this forum accept in our best nature. Please don' t stop using that eagle eye of yours. It is invaluable (as are all the other eagle eyes on the forum). Dave
- 2,250 replies
-
- 2
-
-
- model shipways
- Charles W Morgan
- (and 1 more)
-
Dang. I didn't even know what a gudgeon and pintle were. If it was discussed outside of this forum I would have thought it was danish food or something (sorry Sjors). Every now and then you more experienced guys remind me that I am still in the woods without a compass...learning...slowly learning. Thanks for helping to keep my bearings. John, I have to say - when my gudgeon and pintle time comes I will appreciate this little deviance of yours here...
- 2,250 replies
-
- 1
-
-
- model shipways
- Charles W Morgan
- (and 1 more)
-
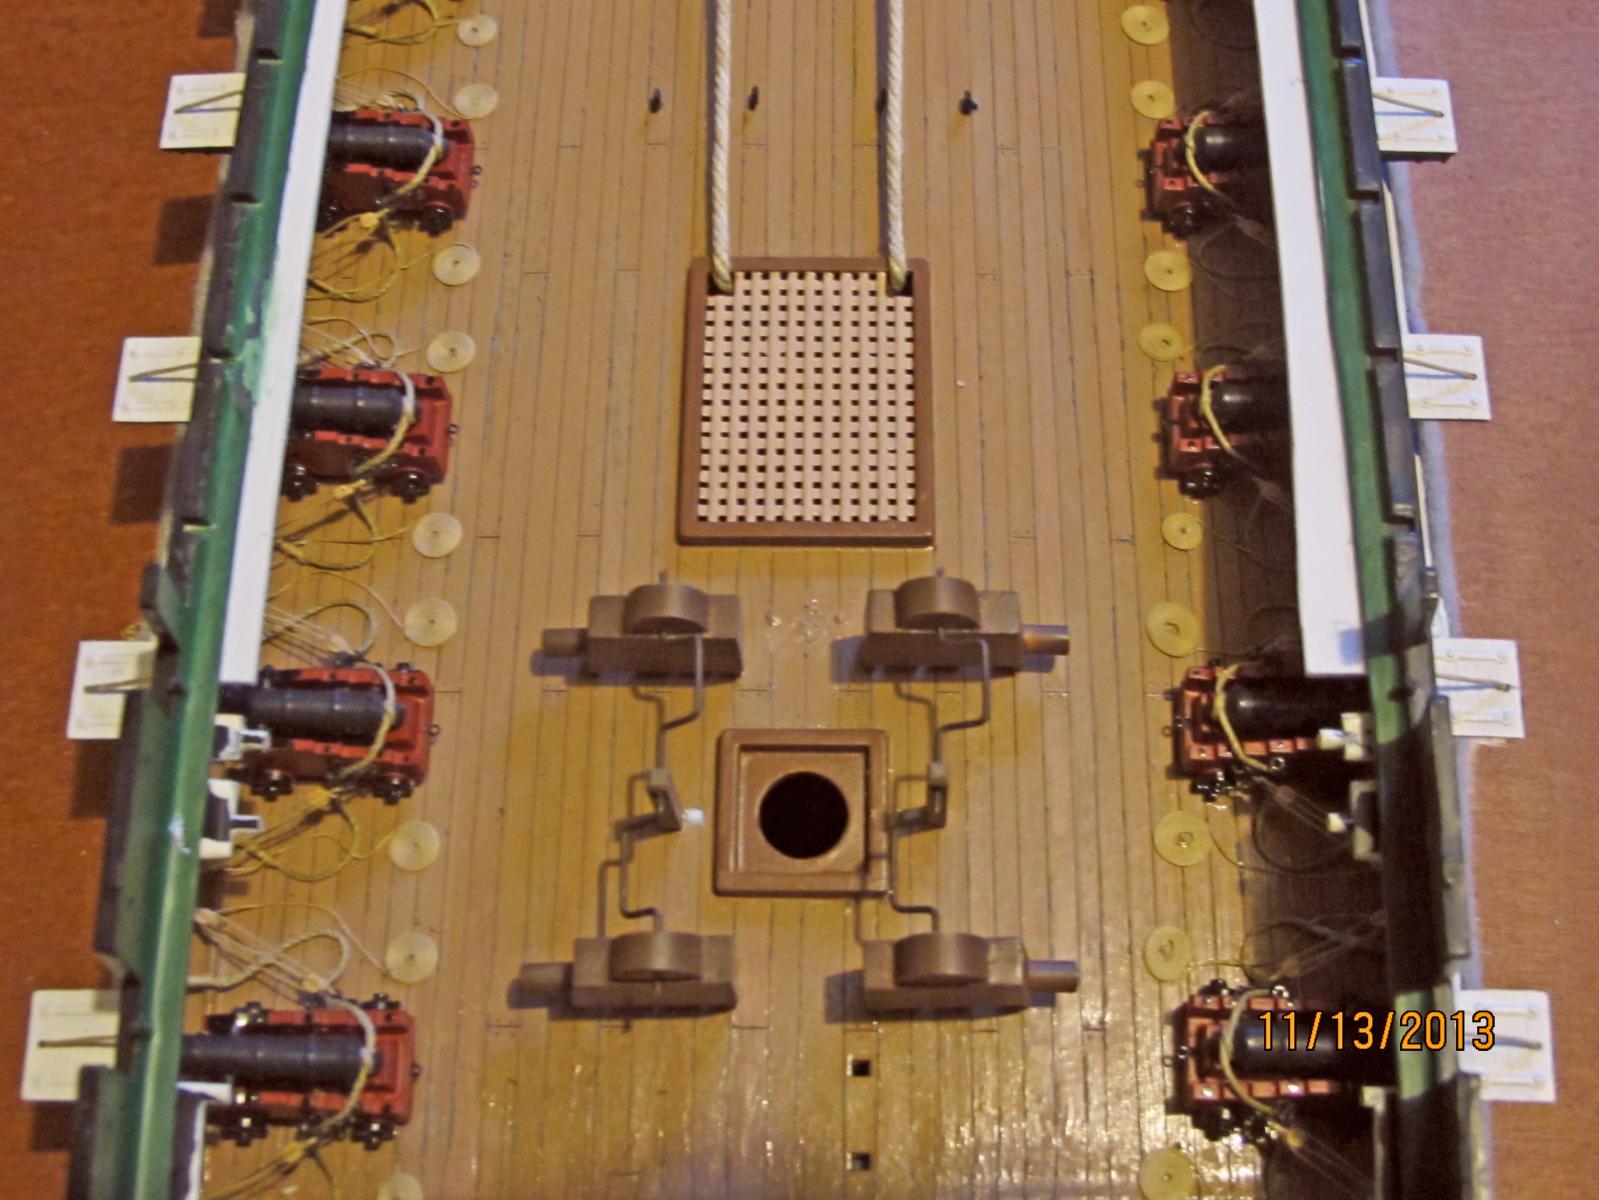
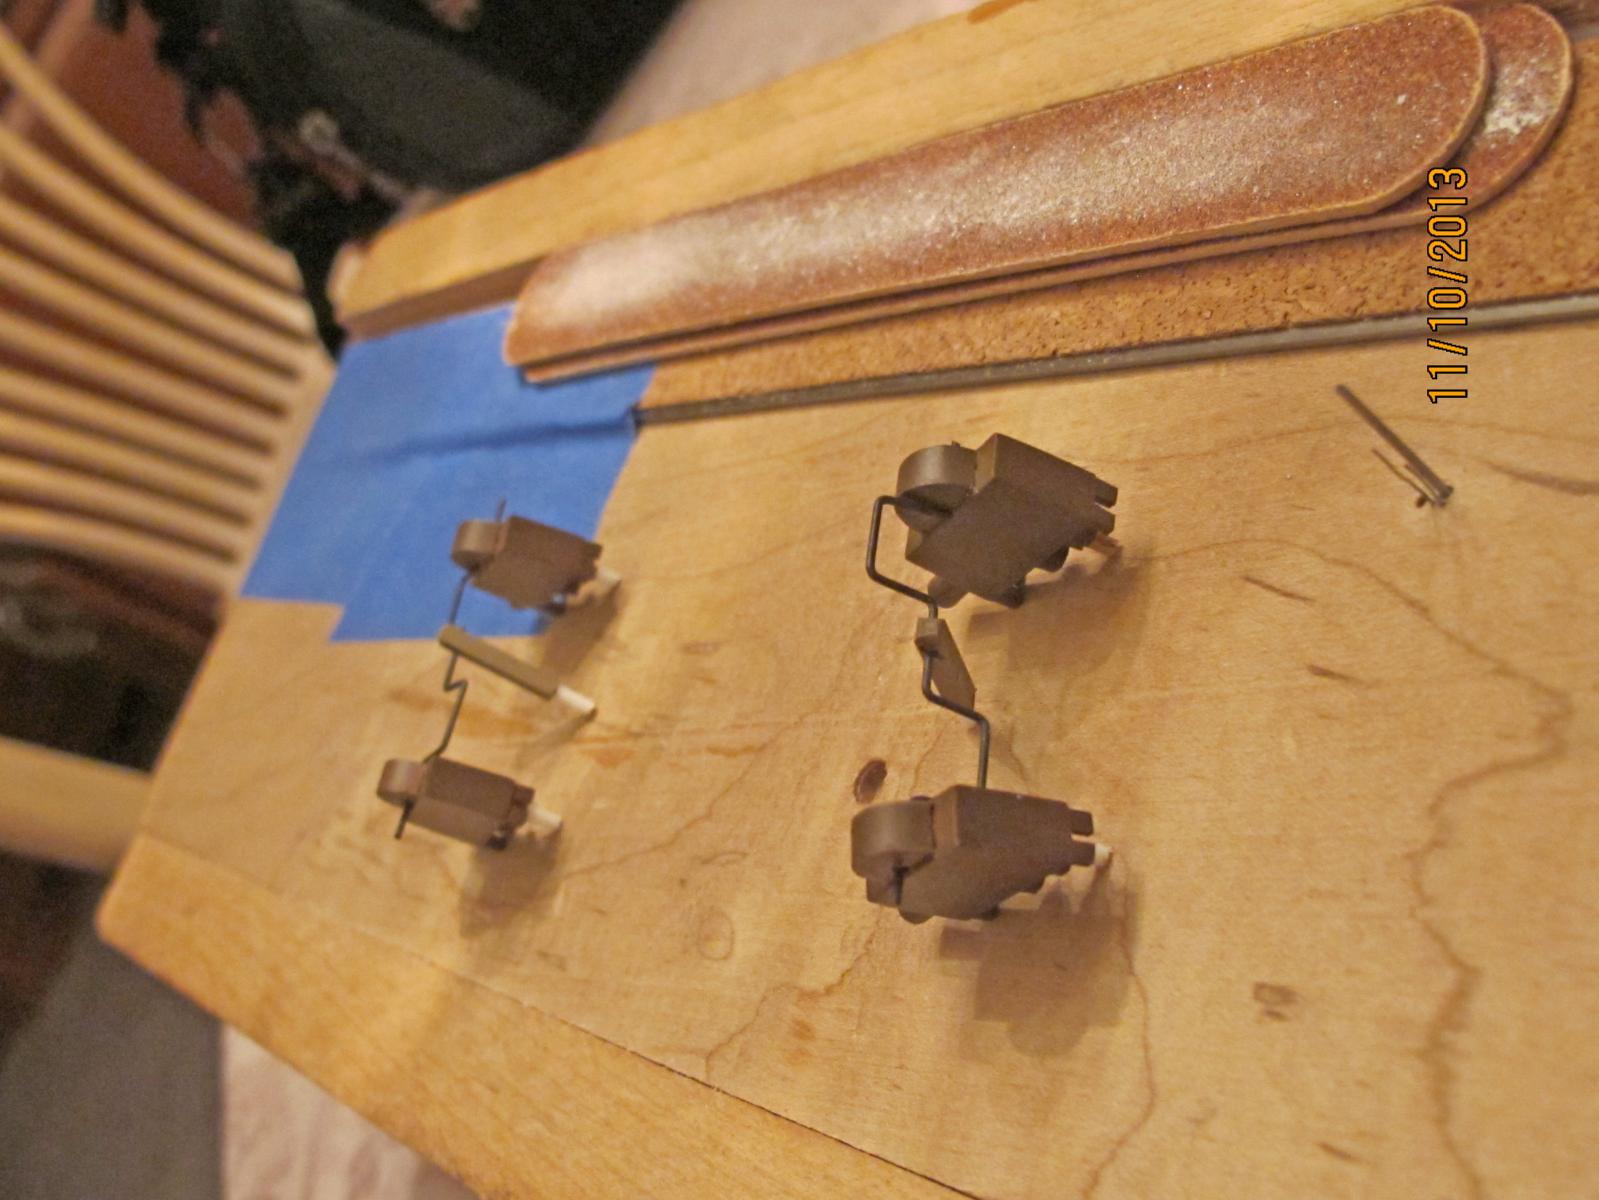
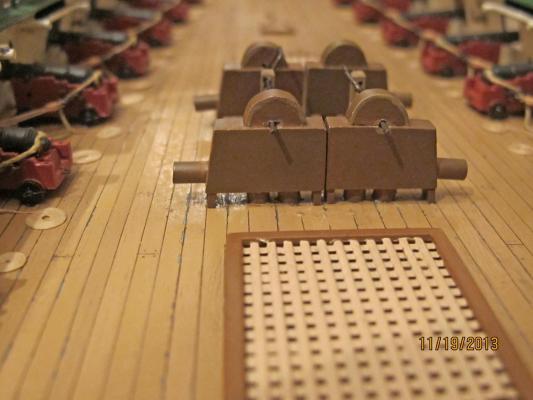
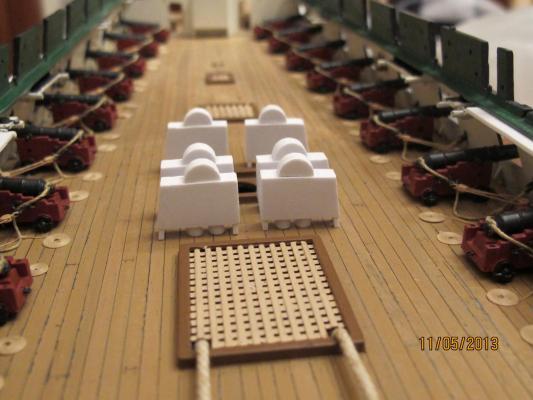
The pics below show my dilemma. The pumps are in relative position. The 6 pump pic seems crowded to me and leaves little room for the elm pumps. The 4 pump pic seems more correct to the descriptions. These are not finished yet. The outlet has to be made and glued. The down pipe should be square as well but the idea is evident from the photos. 6 chain pumps 4 chain pumps

- 601 replies
-
- 2
-
-
- constitution
- revell
- (and 1 more)
-
That's some nice progress John. What was the hurricane house used for?
-
I am currently working on the chain pumps. I have not decided how many. Some references seem to indicate 6 were installed while others limit to 4. If anyone knows with better certainty I would appreciate their feedback. Also...of what were they made? Some folks have painted them black as if of iron but my search shows them to be wooden structures with metal chain and plates internally. Thoughts anyone. Thanks.
-
Wes, I think the color and texture look superb. As I recall the current paint scheme on the Constitution is a semi-gloss slightly favoring the flat side. Nice work.
-
I suppose I can chime in as well...having used the blocks from Syren Ship Model Co. They were uniform and easy to work with and even in the very small scale looked really good. You can't go wrong with these after market products from Chuck. Hey Chuck...do we get any discounts for all these kudos? :) :)
- 2,250 replies
-
- 1
-
-
- model shipways
- Charles W Morgan
- (and 1 more)
-
Andy: I think Wes just did something in this regard but I don't know how he did it. Here is a link: http://modelshipworld.com/index.php?/topic/2862-usf-constitution-by-cookster-kitbashed-to-1812-model-shipways/page-10
-
Alas...no ventilation on the outhouse...did that ensure shorter occupancy times? Gotta' keep a crew moving.
- 2,250 replies
-
- 1
-
-
- model shipways
- Charles W Morgan
- (and 1 more)
-
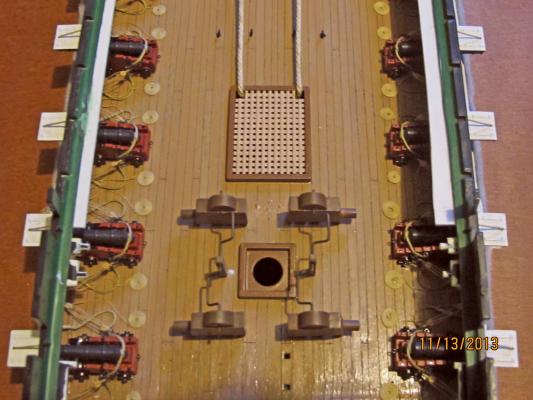
I appreciate everyone's concern and complements about the gun deck. Truth is I already knew some detail would be lost to the spar deck. But I am OK with that. I've learned a lot doing the gun deck. But just to lay speculation to rest I dry fit the spar deck tonight and fired up the lanterns. As expected the bitts and camboose are not that visible with the other deck furniture but there was a lot of detail preserved as well due to the large main hatch as well as the other hatches (which will remain open - my crew will have to be extra careful on the spar deck), the repositioning of the aft cabin doors to full open, and the bridal ports being unobstructed. In fact, the view was really cool. The lantern light produced shadow that ENHANCED the detail in many ways. It is looking like I visualized and I can't be unhappy about that at all. The work continues toward the stern. I started working on the chain pumps today. It was nice to be back into the research as well as re-dimensioning for this fitting. Next up are the elm pumps and then the capstan. I have not found any evidence of gun deck stanchions except the removable ones now on the vessel (although the Berth and Orlop decks have them.) This is curious but also fortunate as I am getting itchy to move up in this build. Thanks everyone again for your kind suggestions and thanks for your continued interest.
-
The lighting has a good chance of keeping some of the work visible. I have repositioned the aft cabin doors as well to give a view through them and the transom windows. But, you are right, some of the detail will only be a memory when the spar deck is attached. I pretty much resigned myself to that fact when I decided to re-work this deck. Thanks for watching Rob.
-
I have names for them John: 'Movedwhenglued', 'Breechingslipped', 'Ropecoilshifted', 'PITB', 'Tacklecameloose', 'Thisdidwell', and even more... Overall they belong to the group 'Tediousbutdone'! :)
- 601 replies
-
- 2
-
-
- constitution
- revell
- (and 1 more)
-
Andy I previously used a straight edge and carpenter square for the 90 degree sanding. I placed the piece along the straight edge and held a sanding stick to the square. The square could move along the straight edge and the piece keeping them true. I don't have a pic...sorry. Or you could buy another tool: this was a suggestion by Wes Cook (aka Cookster): http://www.modelexpo-online.com/product.asp?ITEMNO=NW57-4 Looking good so far...
-
Augie - a lot of folks think I made little video snippets and detailed photos to document for others how I proceeded on my build (which is the case) but truth be told I also did it so I could later remember how I did a step or two (make a rope coil, make a hook, strop a block, etc, etc, and of course, etc.....). I've had to scratch my head a few times already.
- 2,191 replies
-
- 3
-
-
- confederacy
- Model Shipways
- (and 1 more)