Gahm
-
Posts
1,217 -
Joined
-
Last visited
Content Type
Profiles
Forums
Gallery
Events
Everything posted by Gahm
-

US Brig Syren by Gahm - Model Shipways
Gahm replied to Gahm's topic in - Kit build logs for subjects built from 1801 - 1850
Hi VasaRodin! Yes, this is what the JB weld looks like once it is cured. I also sanded it in shape so that I could add some additional pieces of wood to get better handles on the print heads. It facilitates the pattern printing on the copper plates later on. Thomas -
One way of using a figurehead included in a kit could be to generate a mold out of polymer clay using the kit-provided piece, create the figurehead in polymer clay based on this mold, and then refine the figurehead to your liking. In that way you start out with a solid basis, you have the general proportions and only need to worry about the details - and if you don't like the result just remold it Thomas
-
US Brig Syren by Gahm - Model Shipways
Gahm replied to Gahm's topic in - Kit build logs for subjects built from 1801 - 1850
Thank you, VasaRodin. I just looked at your build log . . . you are doing an excellent job with your Syren! Thomas -
Your Syren looks great! Very well done! Thomas
-
Bob, I know I am repeating myself, but whenever I look at your work I have the same thought: this is absolutely beautiful! It is just a pleasure to follow your build log! Thomas
-
US Brig Syren by Gahm - Model Shipways
Gahm replied to Gahm's topic in - Kit build logs for subjects built from 1801 - 1850
Thank you for all the "likes". Russ and Dirk, thank you for your kind compliments! They are always highly appreciated. Dirk, if you have the time to wait until I am retired, which is still a few years away, I might have a chance to catch up with you . Thomas -
US Brig Syren by Gahm - Model Shipways
Gahm replied to Gahm's topic in - Kit build logs for subjects built from 1801 - 1850
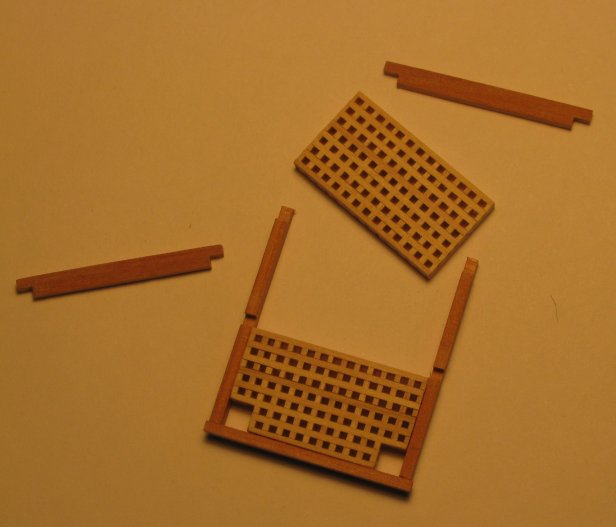
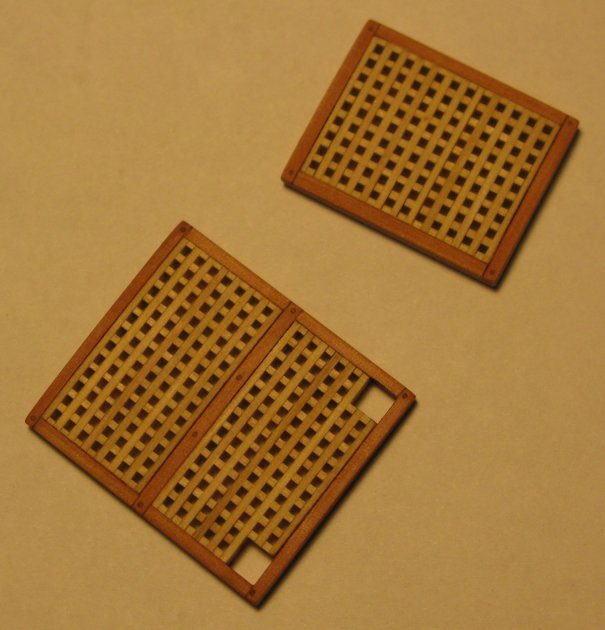
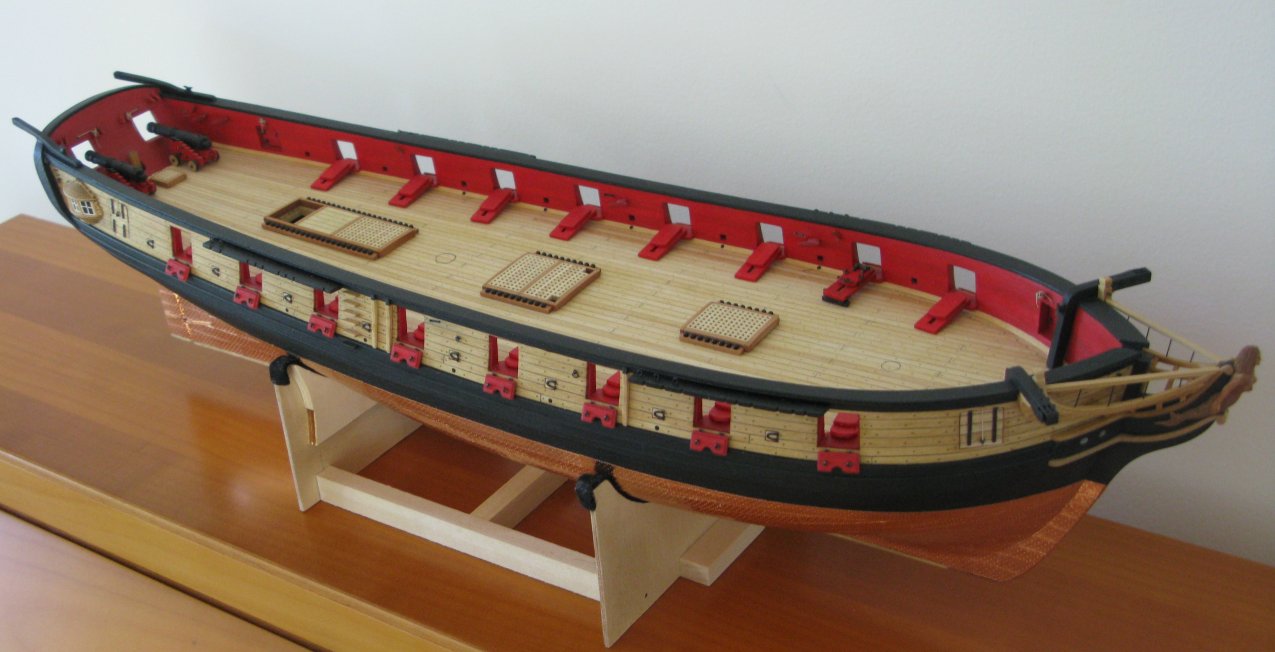
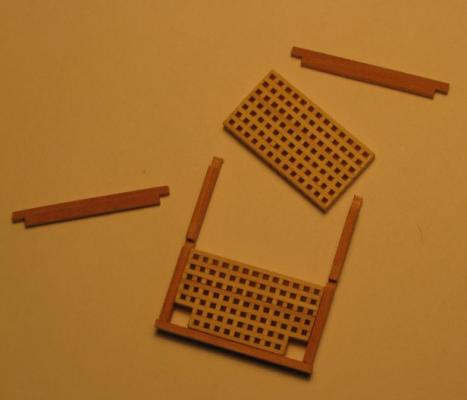
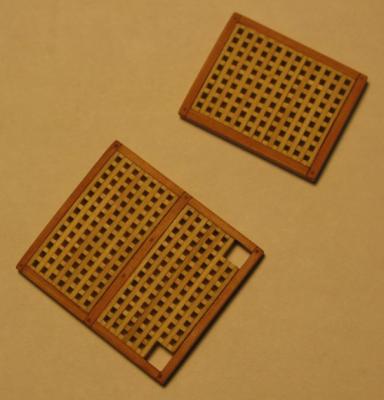
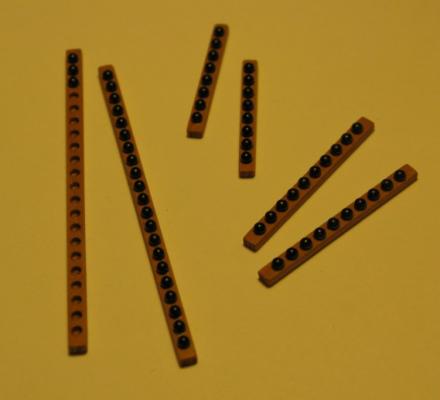
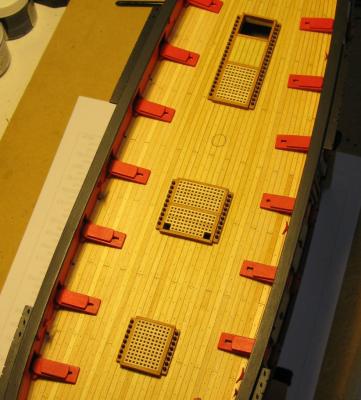
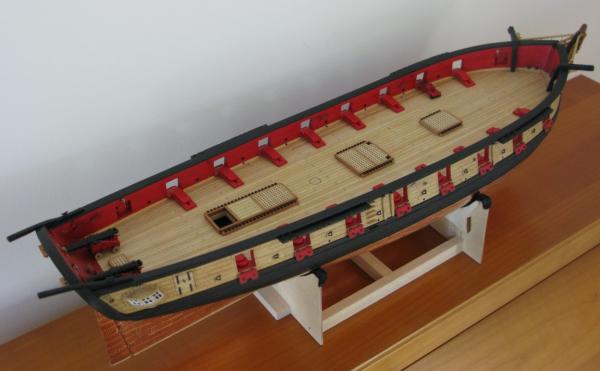
As I had very limited time for ship model building during the last few weeks I turned to the gratings as an easy target for fast visible results . Image 1 shows the openings which will receive the anchor cables, images 2 and 3 depict the building of one of the gratings, image 4 shows the shot racks, and in images 5 through 7 the gratings and shot racks mounted on the Syren can be seen.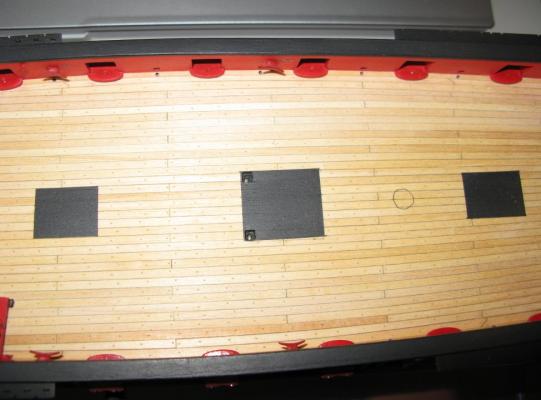

-
Excellent work, Bob! You already did an outstanding job on the head rails and timbers, the cat head support cannot be that much more difficult! Thomas
-
US Brig Syren by Gahm - Model Shipways
Gahm replied to Gahm's topic in - Kit build logs for subjects built from 1801 - 1850
Thank you, Tim. I did not find a good source for these carronades here in the US. But over the years I bought ship modeling supplies from Cornwall Model Boats in the UK (http://www.cornwallmodelboats.co.uk). In my experience they are reliable and easy to deal with. And that is also where I bought the carronades. They actually have ship model fittings from most of the leading ship model companies, including Caldercraft. Thomas -
US Brig Syren by Gahm - Model Shipways
Gahm replied to Gahm's topic in - Kit build logs for subjects built from 1801 - 1850
I added the missing images on page 10. The build log should be complete again. Thomas -
Excellent work, Bob! The head rail already turns into another highlight of your Essex! Thomas
-
US Brig Syren by Gahm - Model Shipways
Gahm replied to Gahm's topic in - Kit build logs for subjects built from 1801 - 1850
Thank you, Mike! I noticed the same thing before, also in other build logs, that images seem to loose their link and are not accessible any longer. I don't really know what is going on. This is probably something for the site administration to look into. Thomas -
You are off to a very goo start with your head! And where the figurehead is concerned I would give both methods a try. The advantage with sculpey is that you can repeat, add and change parts of the figure several times without bad consequences, which is more difficult with wood. However I ended up liking wood much better because it holds the shape (sculpey does not quite as well until you baked it) and you don't have to simulate wood color afterwards Well, in any case, good luck with it! Thomas
-
Your deck turned out absolutely beautiful! Not that I expected anything less from you Thomas
- 2,191 replies
-
- 1
-

-
- confederacy
- Model Shipways
- (and 1 more)
-
Well, from the different comments I get a slight hint that somebody had birthday My best wishes, and many years of happy modeling! You already heard it before, but your models and build logs are a real inspiration! Thomas
-
Richard, as usual, excellent craftsmanship! Your Bounty Launch really looks good so far! Do you plan to use the same building technique on your Syren long boat? Thomas
-
Excellent work on the planking, Augie! The Swiss pear fits right in to your outstanding Confederacy build! And Happy Anniversary! With my progress on the Syren I am counting not so much individual years but rather decades Thomas
- 2,191 replies
-
- 1
-
-
- confederacy
- Model Shipways
- (and 1 more)
-
Bob, I am always in awe when I see a complete view of your Essex (like your 4th image) concerning the craftsmanship and the level of details in your model! Thomas
-
Bob, this looks like the ultimate Essex build to me . . . you really are pushing the bar very high Thomas
-
US Brig Syren by Gahm - Model Shipways
Gahm replied to Gahm's topic in - Kit build logs for subjects built from 1801 - 1850
Thank you, B.E.! It is a lot of fun to build these little models. Thomas -
I just discovered your second build log. That looks like a neat little model. And you seem to be off to a very good start! If my carronades get too boring I need to do a similar thing Thomas
-
US Brig Syren by Gahm - Model Shipways
Gahm replied to Gahm's topic in - Kit build logs for subjects built from 1801 - 1850
Thank you, Richard! Can't wait to see them rigged myself . . . I only have to build another 15 to get to that point. But what are 15 carronades in comparison to 100 plus hammocks? Thomas -
US Brig Syren by Gahm - Model Shipways
Gahm replied to Gahm's topic in - Kit build logs for subjects built from 1801 - 1850
Thank you for stopping by and all the likes! It is always much appreciated. Nils, thank you for your kind comments. And no, I am not a toolmaker . . . I just love ship modeling and sometimes get carried away a little bit Thomas -
US Brig Syren by Gahm - Model Shipways
Gahm replied to Gahm's topic in - Kit build logs for subjects built from 1801 - 1850
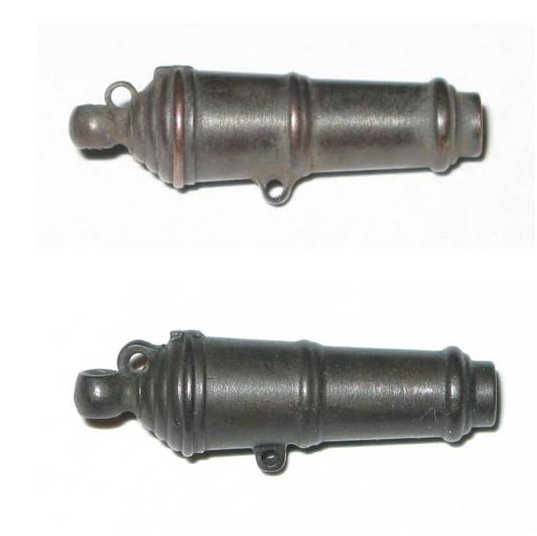
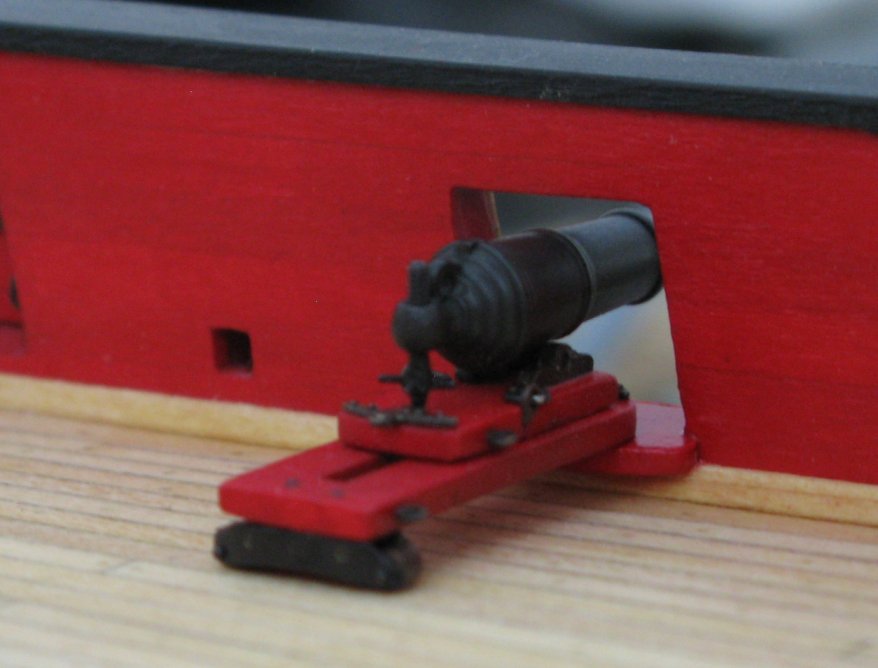
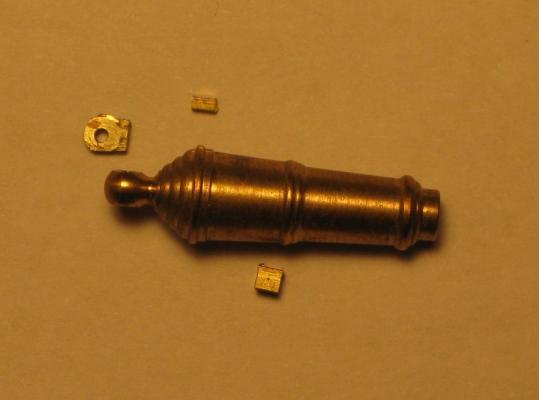
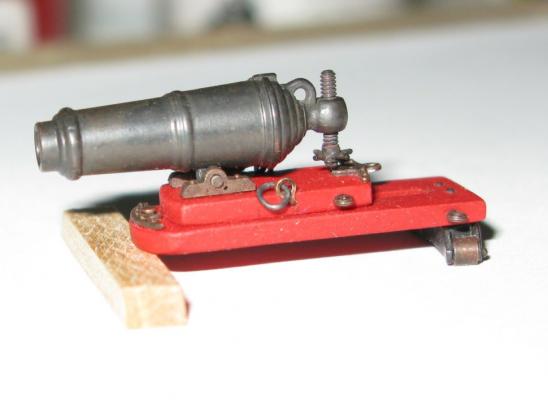
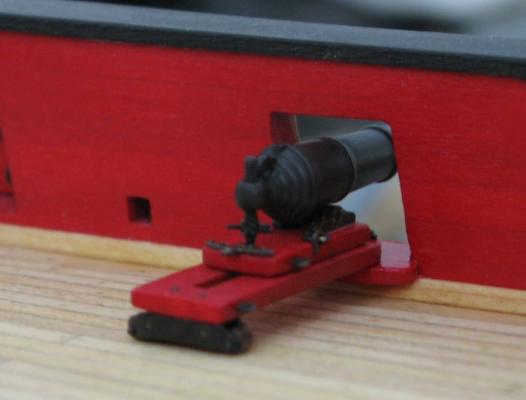
I optimized the carronade gun barrel. Image 1 shows the comparison between the prototype (upper barrel) and the final version (lower barrel). The major difference is the beefed up breech ring and an improved blackening process. To build it I use the 18 pounder carronade from Caldercraft, reduce the size of the elevation screw holder, add the 3 pieces shown in image 2, and shape them to the final form. Image 3 shows the mounted barrel with the new elevation screw. The spikes of the screw will be a little longer in the following versions. Also the position of the carronade barrel needs to be better adjusted on the gun carriage. Image 4 shows the carronade in relation to the gun port. It ends up in its upper third, which is not ideal but still acceptable imo. Well, all that remains to be done now is to build another 15 of these carronades . . . . Thomas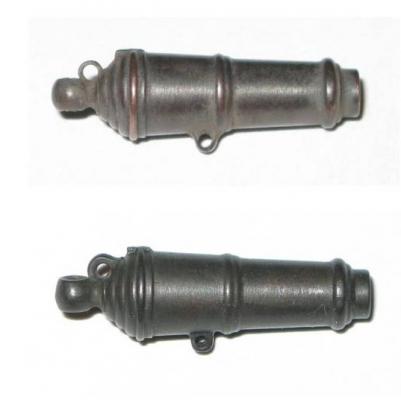
-
I think the pear planking will look great! Dirk did a similar thing with his Syren (light colored basswood on the outside, pear for the deck) and it turned out very nice! Thomas
- 2,191 replies
-
- 1
-
-
- confederacy
- Model Shipways
- (and 1 more)