HOLIDAY DONATION DRIVE - SUPPORT MSW - DO YOUR PART TO KEEP THIS GREAT FORUM GOING! (Only 66 donations so far out of 49,000 members - Can we at least get100? C'mon guys!)
×


Gahm
-
Posts
1,217 -
Joined
-
Last visited
Content Type
Profiles
Forums
Gallery
Events
Everything posted by Gahm
-
 Very nice, clean built! A pleasure to watch! Thomas
 -
Your Confederacy's stern is a master piece! Can't wait to see how the bow will turn out! Thomas
- 2,191 replies
-
- 2
-

-
- confederacy
- Model Shipways
- (and 1 more)
-
Sal, before putting on the copper plates I would recommend you make sure the hull is absolutely smooth. And if you have some low spots I would fill them out. The copper foil is so thin that you will see every uneven areas very clearly afterwards. Thomas
- 659 replies
-
- 2
-
-
- syren
- model shipways
- (and 1 more)
-
Very nice planking job! Well done! Thomas
-
US Brig Syren by Gahm - Model Shipways
Gahm replied to Gahm's topic in - Kit build logs for subjects built from 1801 - 1850
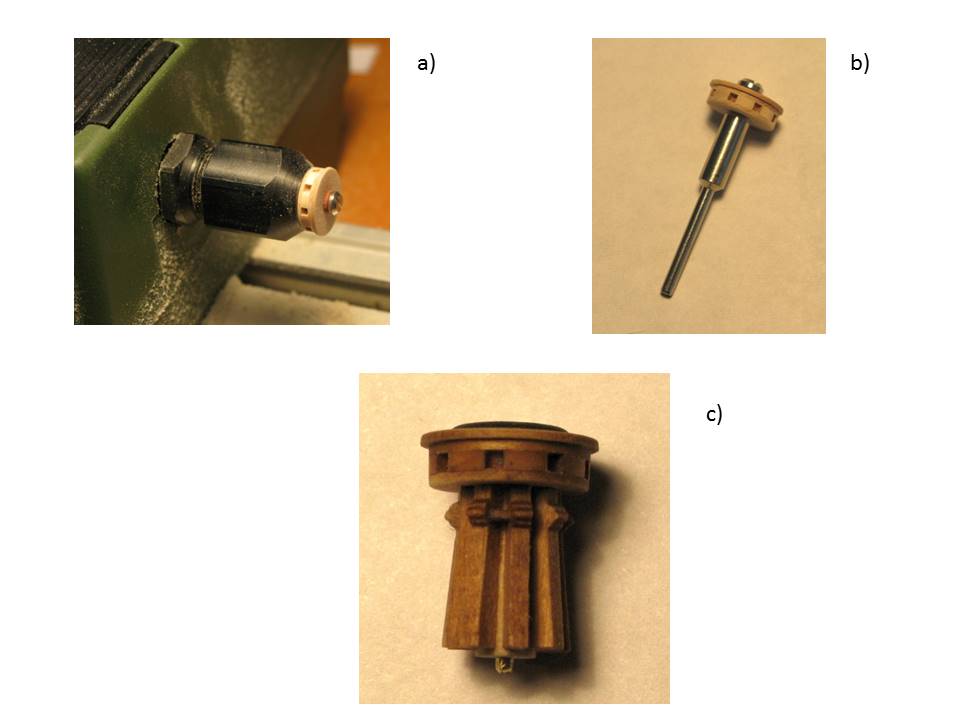
Augie, Bob, Mike, and Richard, thank you so much for your kind comments! And thank you for all the "likes"! - Augie, I guess the capstan may look familiar to you. I kind of borrowed the looks of the Confederacy capstan - Bob, I am glad that you now and again remind me to publish something. Time flies so fast that I am always completely surprised when I notice that my last published contribution lies already several weeks back! - Mike, I can return the compliment: I absolutely enjoy watching your progress with your Mayflower model! - Richard, yes, you are right. What I show in image 3b is a Dremel bit holder. It works fine on the lathe for small parts. I also tried it with a turn table and my mill. Here the cutter unscrewed the bit holder and I ended up with yet another "prototype" . Thomas -
Richard, I had the same problem. I took a copper sheet, drew lines on it, impressed the nail heads along the lines (it is far easier to do this as long as you have a sheet - strips will bend), cut out the strips leaving them a little too wide, flattened and polished them with steel wool against a thick brass sheet, and reduced them to the right width with a file. That may not be the best process, but it worked Thomas
-
US Brig Syren by Gahm - Model Shipways
Gahm replied to Gahm's topic in - Kit build logs for subjects built from 1801 - 1850
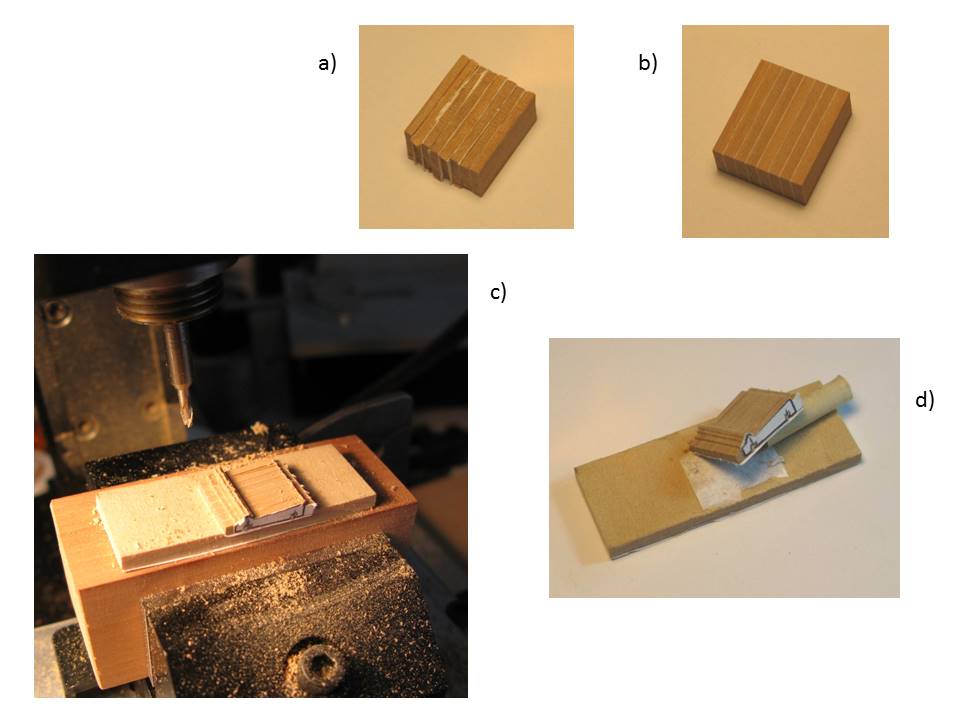
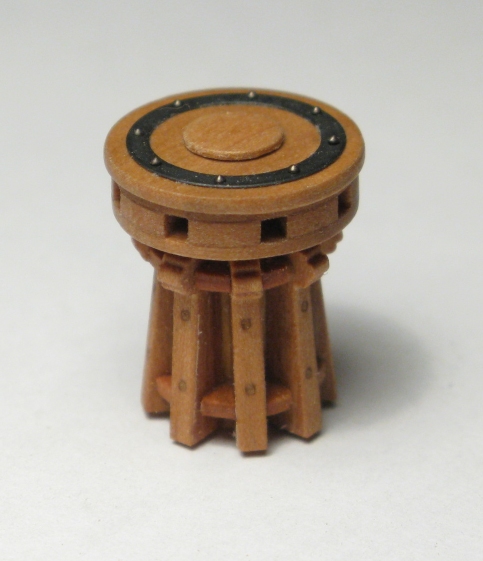
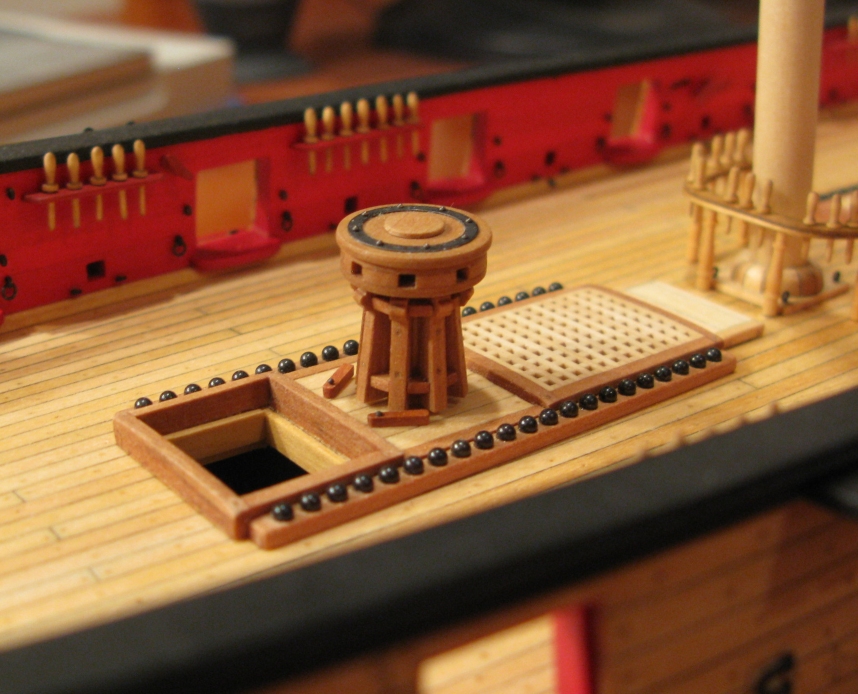
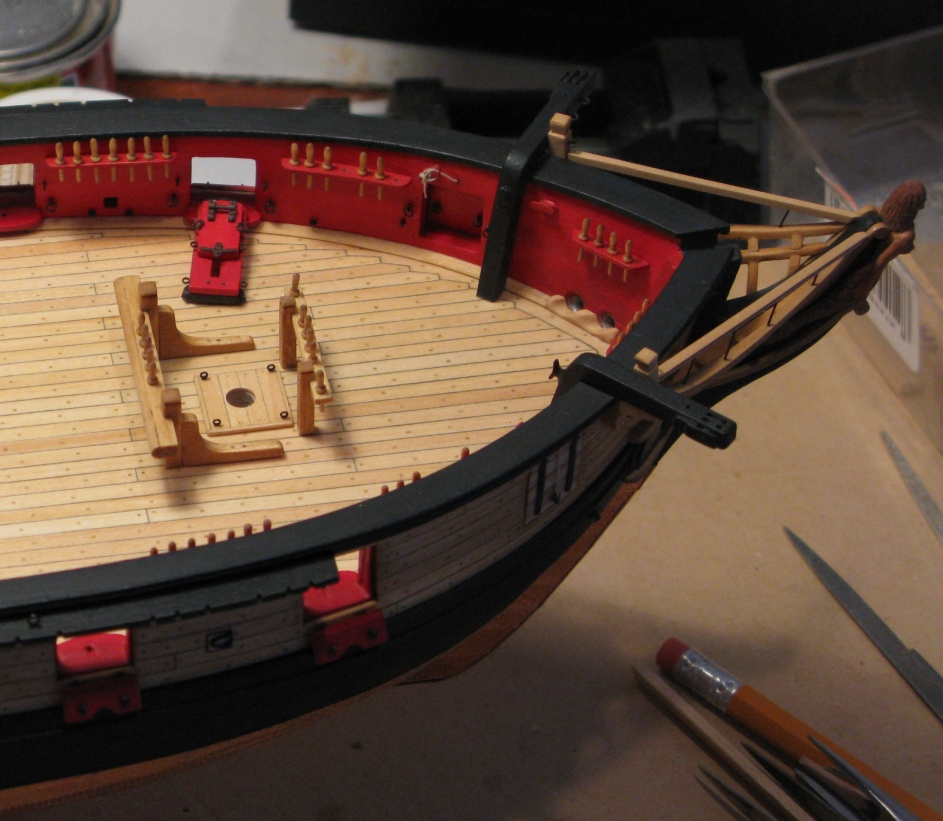
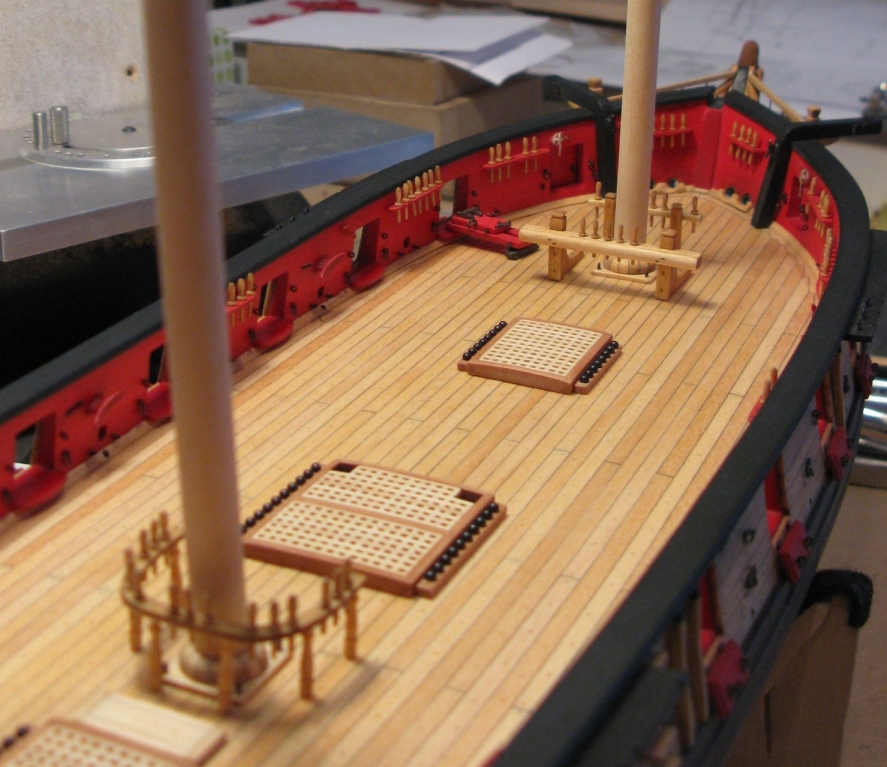
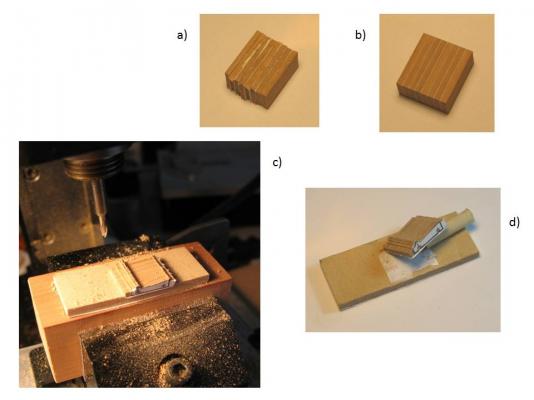
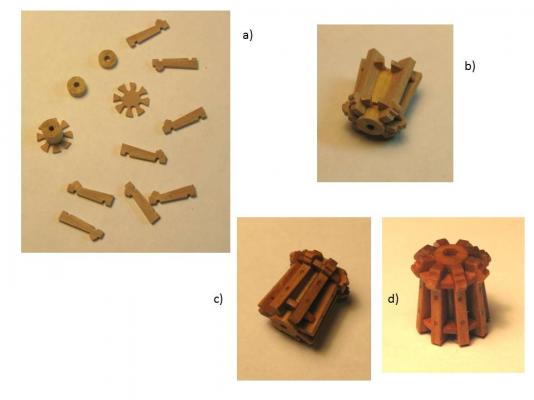
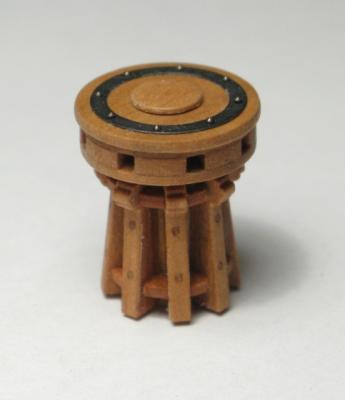
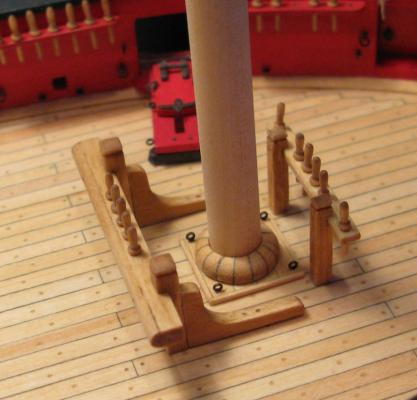
A little update: during the last few weeks ship modeling time was very scarce. Between traveling (image 1 - ) and multiple home projects I was able to finish all my belaying pins (image 2), and as a “reward” for having this highly repetitive work finally behind me I built the capstan. My first attempt using mainly the parts provided in my Syren kit ended up about 1mm smaller in diameter than what was shown in Chuck’s plans (image 3). So I considered this a “prototype” and built a second one out of pear wood. Image 4, 5, and 6 show the building process. The drum head was constructed in the same way as described in the Syren instruction book. Of course, not having photo etched parts makes some things a bit more challenging (metal ring, image 4). The capstan foot I built in a slightly different way (image 6), using 2 slotted disks instead of individual tiny chocks. This also helped considerably with the chock alignment . The finished result is shown in images 7 and 8. Thomas Image 1 Image 2 - All belaying pins are finished Image 3 - First capstan attempt Image 4 - 2nd capstan attempt: making of the drum head Image 5 - Making of the capstan foot Image 6 - Capstan foot continued Image 7 - Finished capstan Image 8 - Capstan mounted on Syren deck


-
Richard, I think you are making great progress! And don't worry about doing the same part several times until you like it. I do exactly the same thing. Most of the time I call my first (misguided) attempt a prototype . With more difficult parts it often takes me one or two attempts until I finally know how to do it. And once you have that knowledge it would be a shame not to execute on it. I guess, that's why it's called a hobby . By the way, I also used copper strips and they worked out fine. Thomas
-
Very well done! A pleasure to watch! Thomas
-
Wonderful job on the ratlines! I better mark this page for the time when I have to do ratlines on my Syren model Thomas
-
Your Confederacy is a piece of beauty! Absolutely inspiring! Thomas
- 2,191 replies
-
- 2
-
-
- confederacy
- Model Shipways
- (and 1 more)
-
Very well done - a pleasure to watch! Thomas
-
Robert, I have not built the longboat myself yet, so I cannot help you with any advice based on my own experience. But I would go back to the bulkhead profiles of the longboat in Chuck's Syren plans and compare their shape with what you are getting in your actual model. That will tell you quickly whether the top piece should be smaller or not. Thomas
-
Beautiful, clean work on your Mayflower so far! Well done! Thomas
-
What a gorgeous complement to your beautiful model! Thomas
- 1,477 replies
-
- 1
-
-
- essex
- model shipways
- (and 1 more)
-
Your capstan and oven are amazing! Beautiful work! Thomas
- 2,191 replies
-
- 2
-
-
- confederacy
- Model Shipways
- (and 1 more)
-
After 2 weeks of traveling I am just catching up with your build log again. Amazing progress with the usual outstanding craftsmanship! It is a pleasure to follow your build log! Thomas
-
Those detail shots on your Essex are mind-bugling! And great work on those hammock nets. They are very well done! Thomas
-
US Brig Syren by Gahm - Model Shipways
Gahm replied to Gahm's topic in - Kit build logs for subjects built from 1801 - 1850
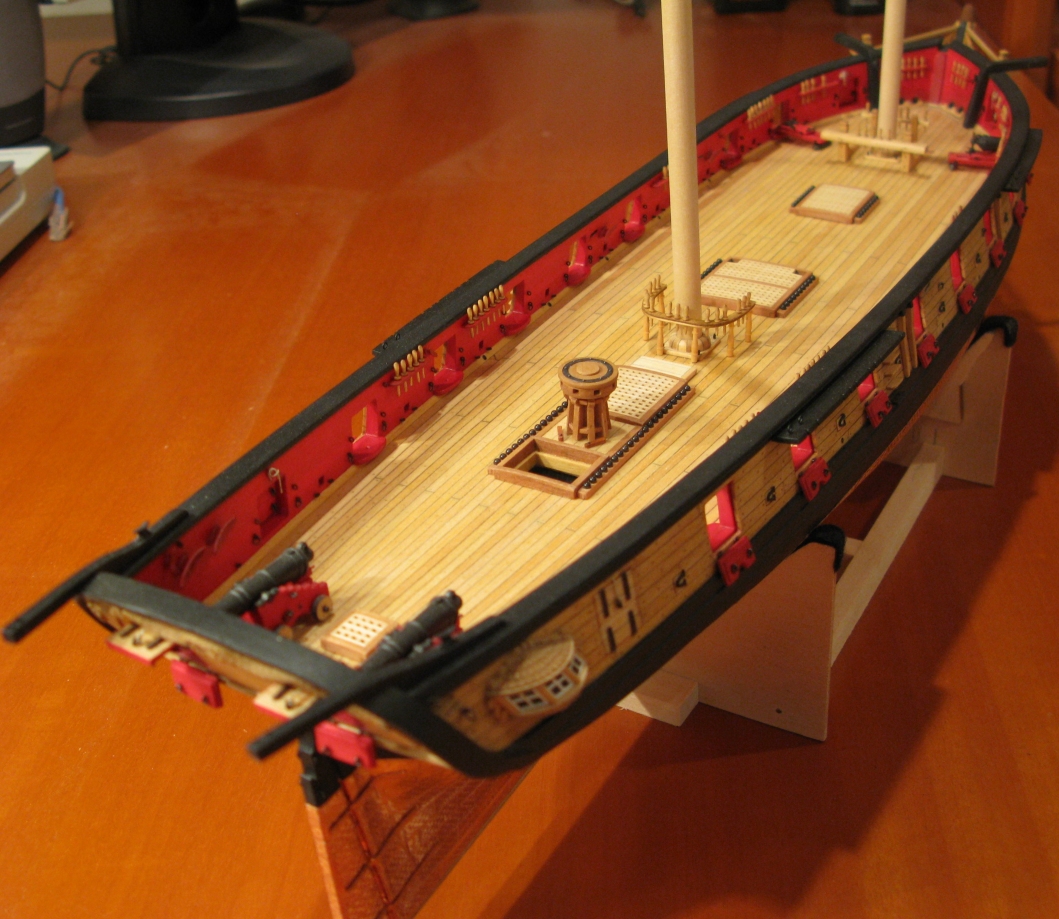
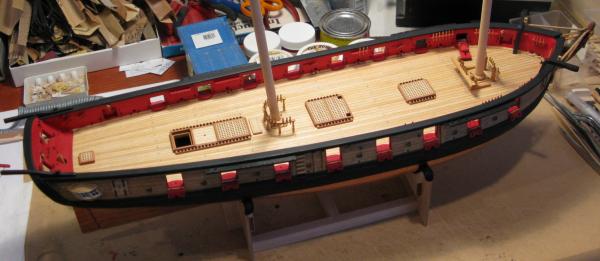
Thank you for all the "likes". And thank you, Bob, for your nice comment! At least finally the deck starts to fill up. It makes quite a difference in perception if there is something mounted on the deck Thomas -
US Brig Syren by Gahm - Model Shipways
Gahm replied to Gahm's topic in - Kit build logs for subjects built from 1801 - 1850
All pin rails inclusive riding bitts and fore bitts are finished . . . and only 24 additional belaying pins left to turn Thomas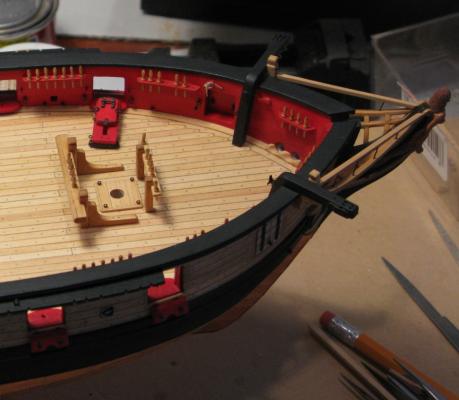

-
Excellent job on the cannons! Your Confederacy really is a beautiful model! Thomas
- 2,191 replies
-
- 2
-
-
- confederacy
- Model Shipways
- (and 1 more)
-
There is not much I can add that was not already said. Your Essex is just a fantastic sight! Thomas
-
Beautiful view . . . all these guns! And a lot of work to get there! Excellent job, Augie! Thomas
- 2,191 replies
-
- 1
-
-
- confederacy
- Model Shipways
- (and 1 more)