


Jond
-
Posts
820 -
Joined
-
Last visited
Content Type
Profiles
Forums
Gallery
Events
Posts posted by Jond
-
-
Allan
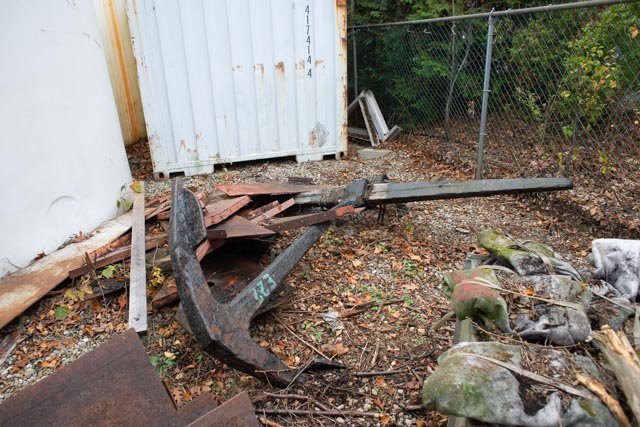
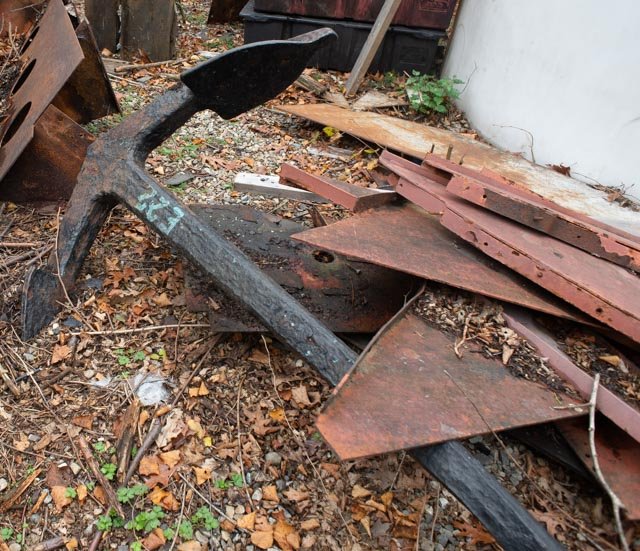
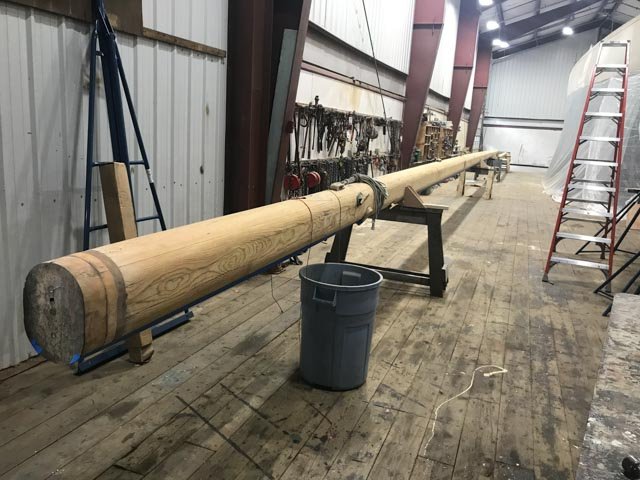
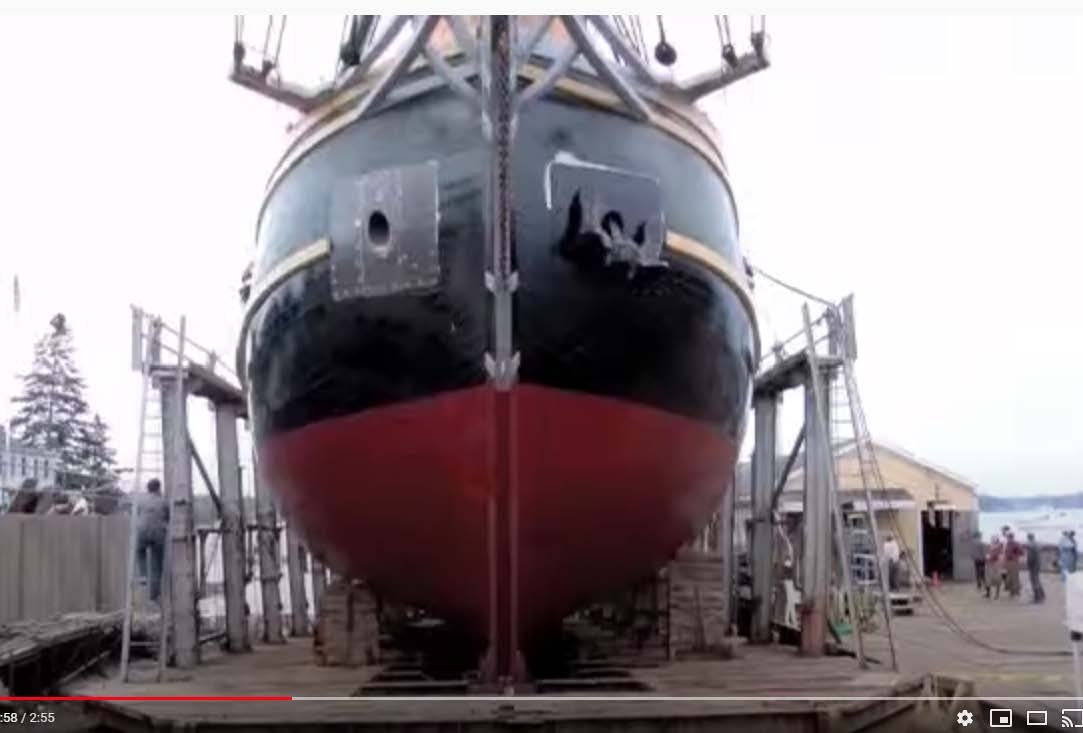
I thought you might like a photo of the recently abandoned Ernestina anchor. According to Ross, they had one of each when they showed up a few years back. A wood "banks" stock [ in photo below] and loose metal "club" stock. They will apparently be building new anchors and he is not yet sure what design. I am sure like Bluenose II it will be more about the coast guard than history.
enjoy your holiday
jon
-
Post 20
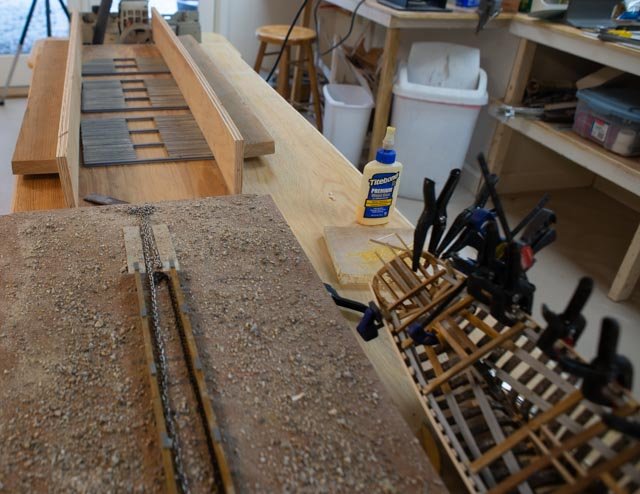
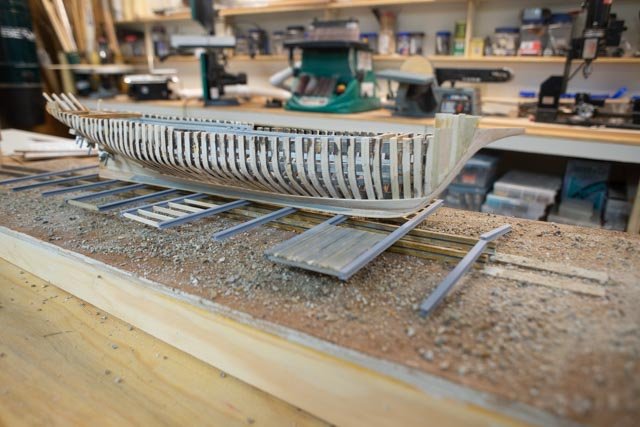
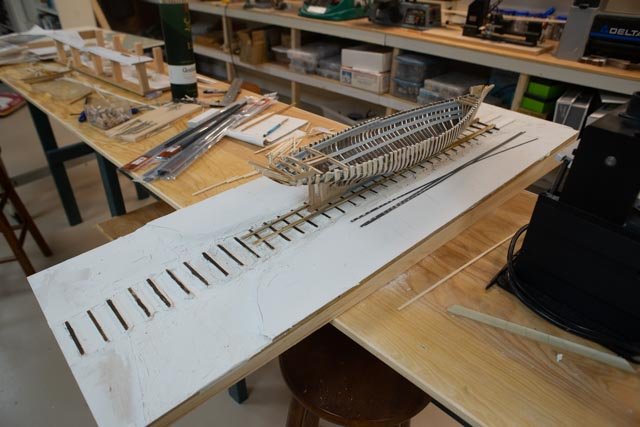
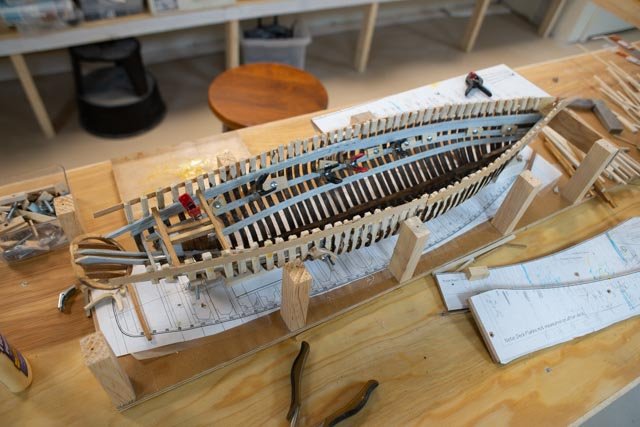
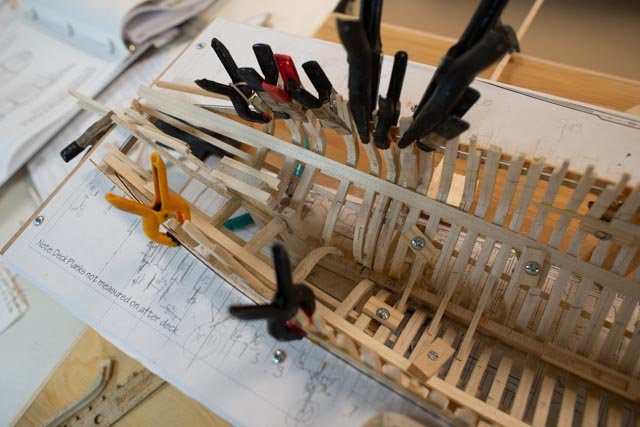
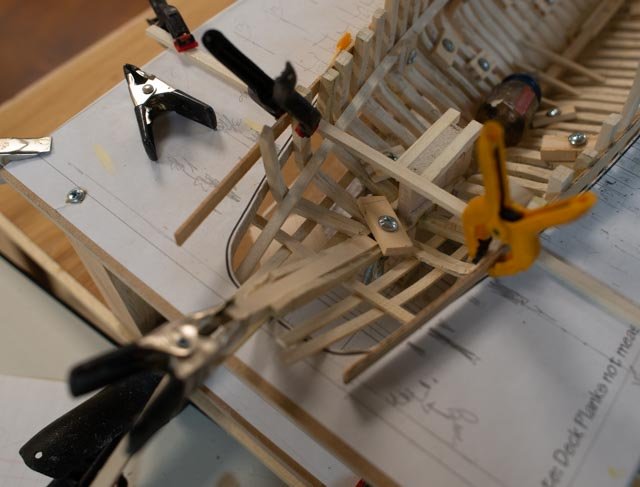
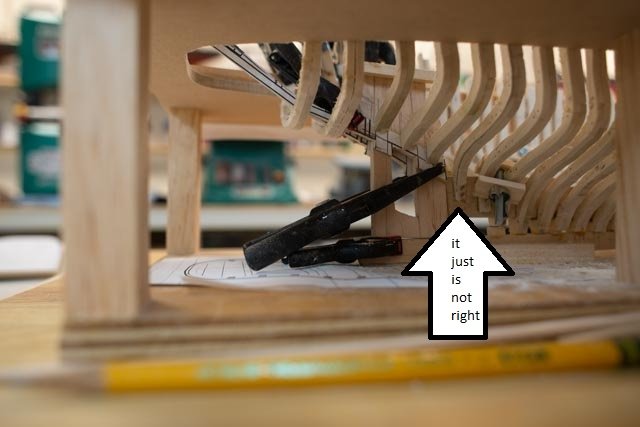
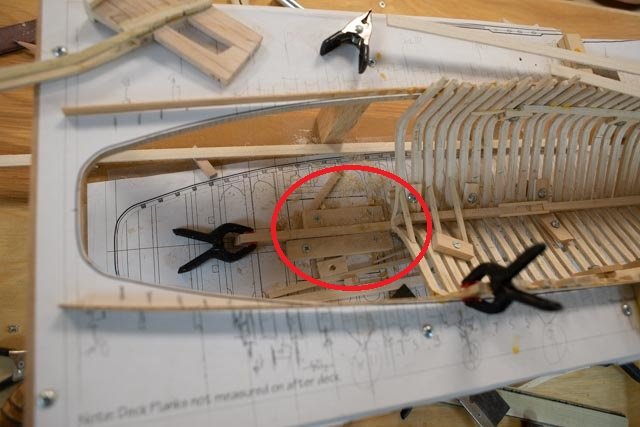
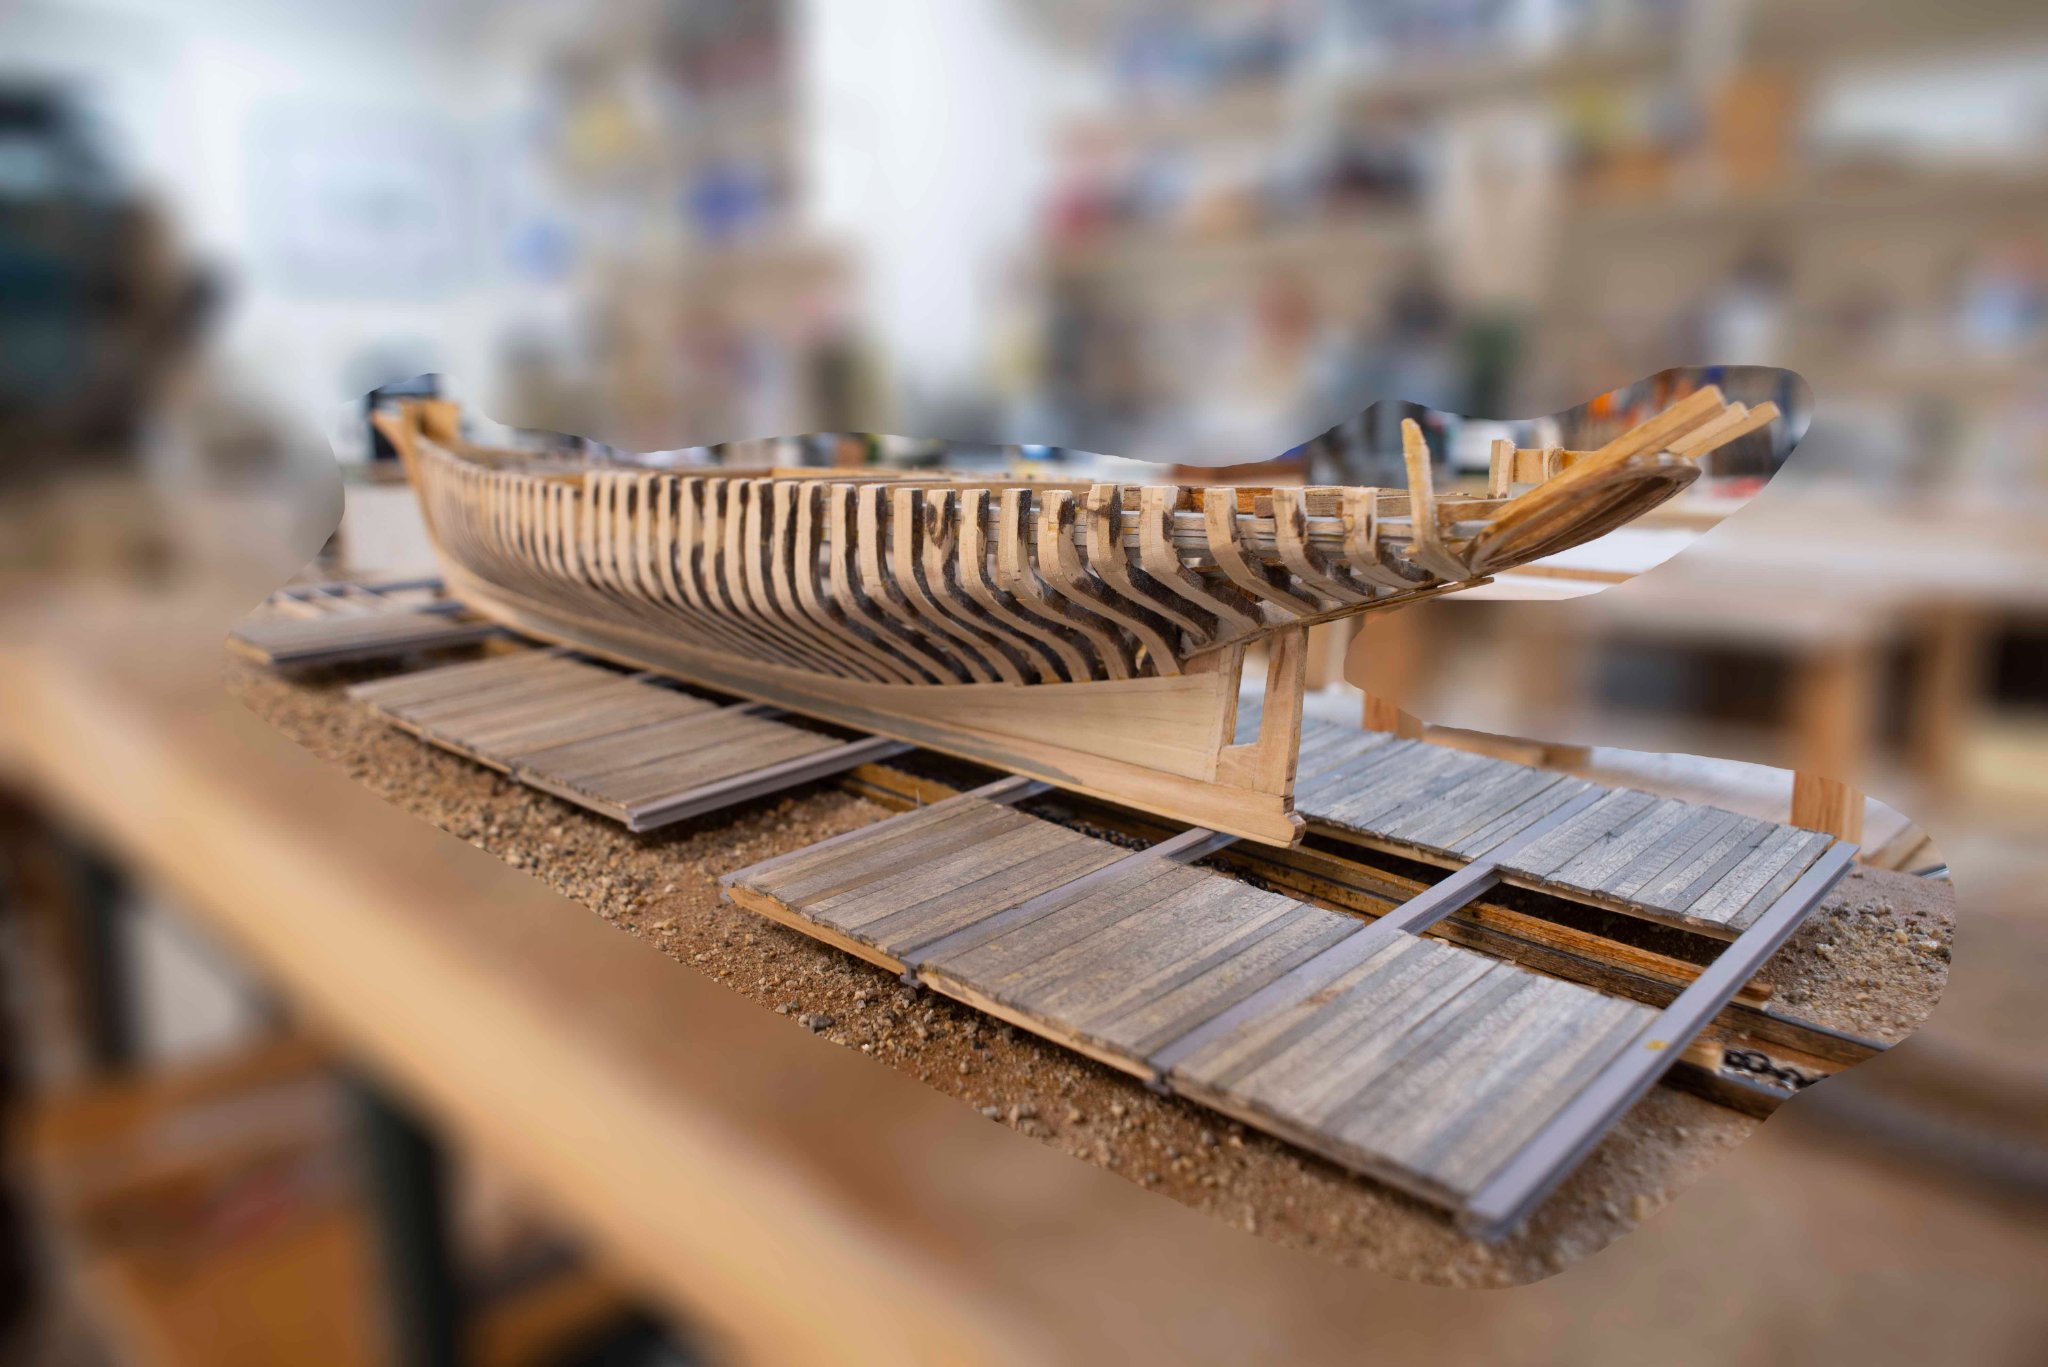
Waterway and stanchions and railway car platform planning
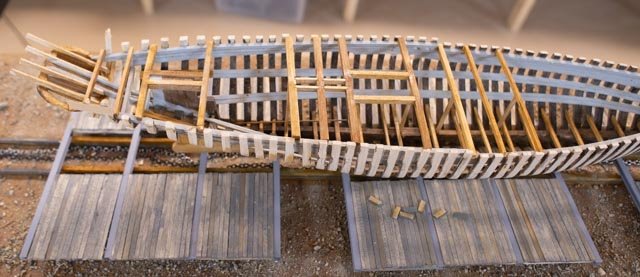
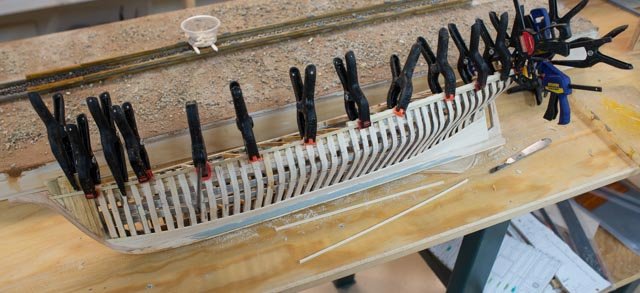
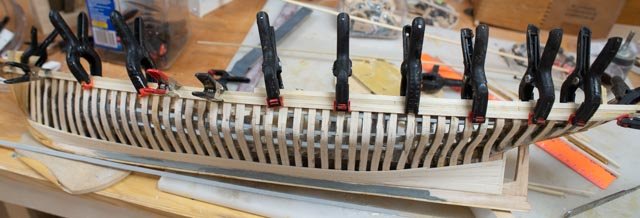
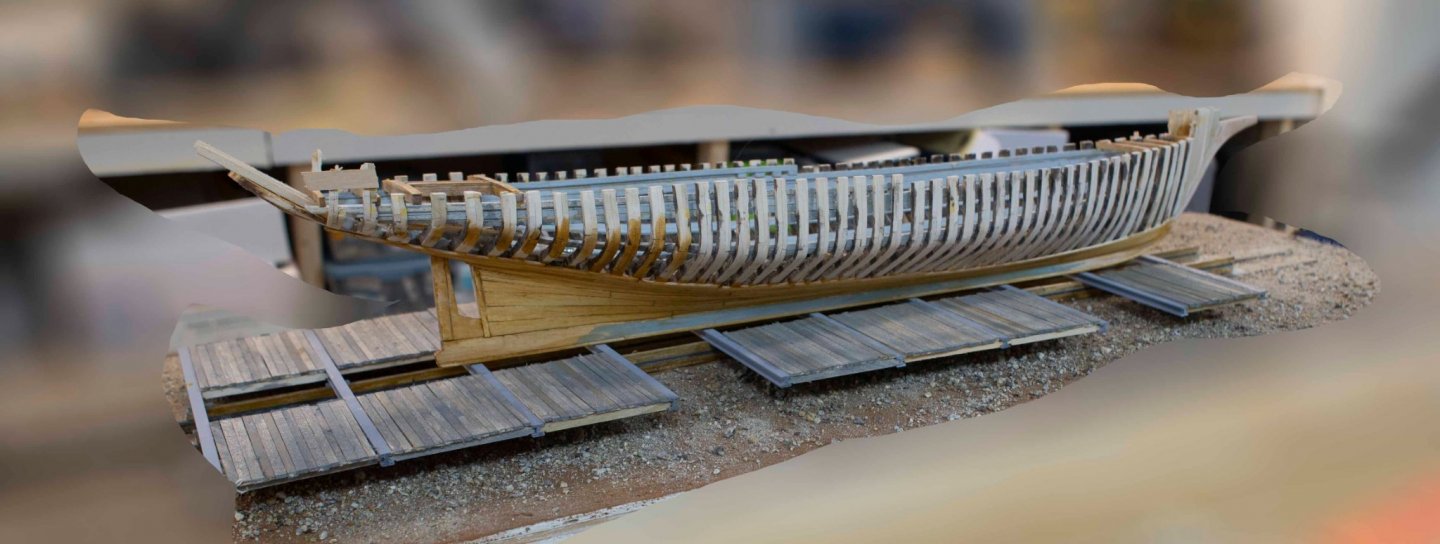
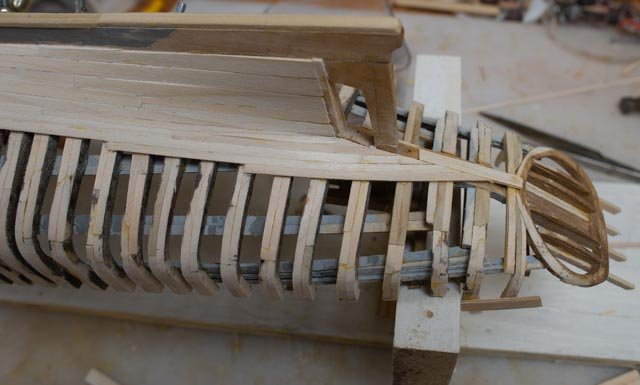
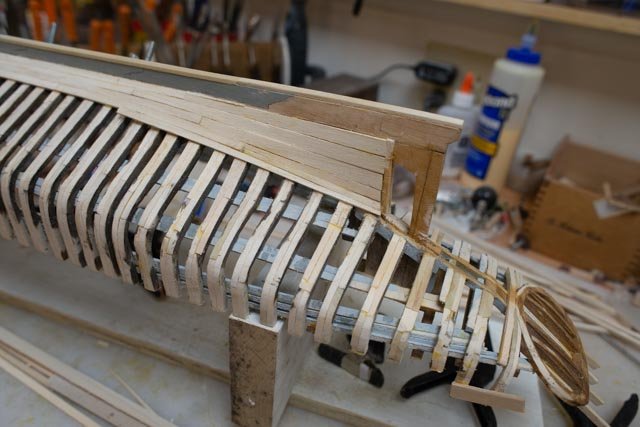
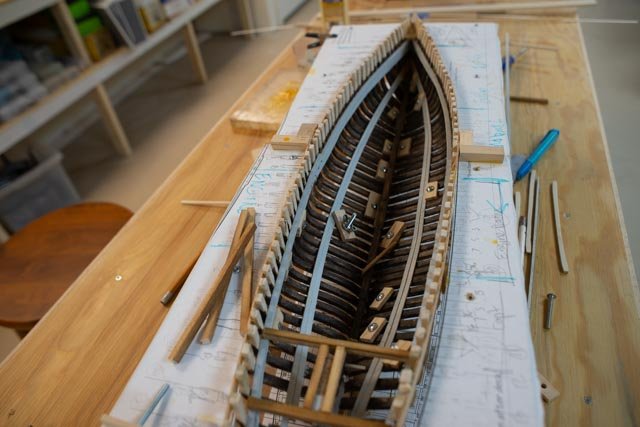
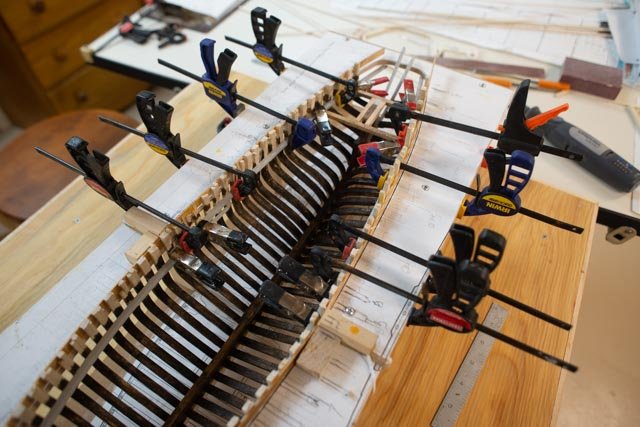
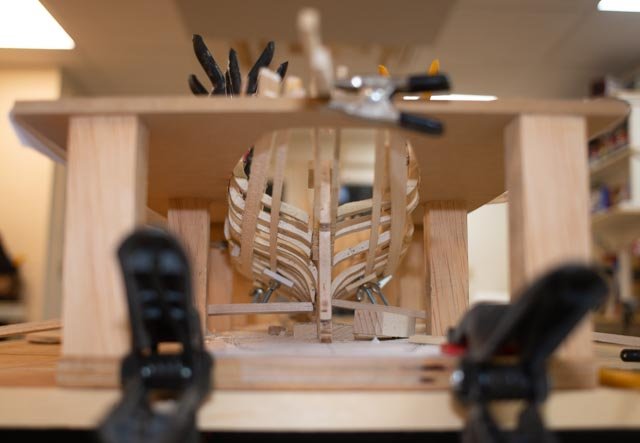
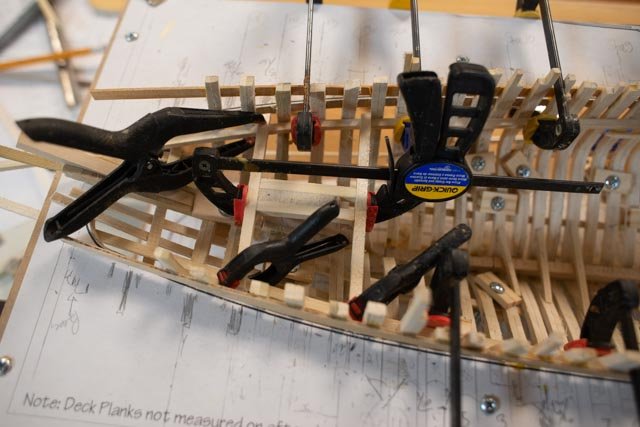
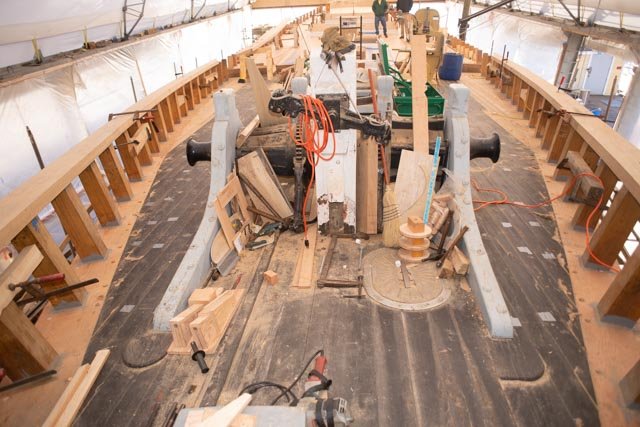
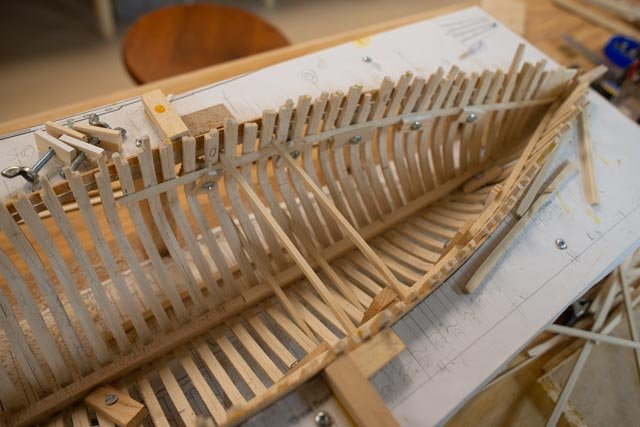
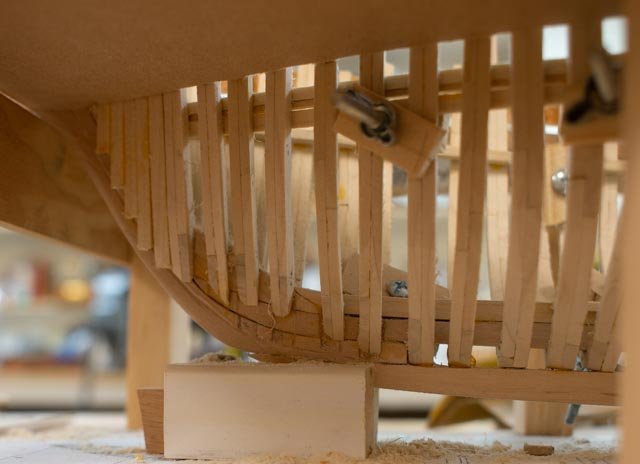
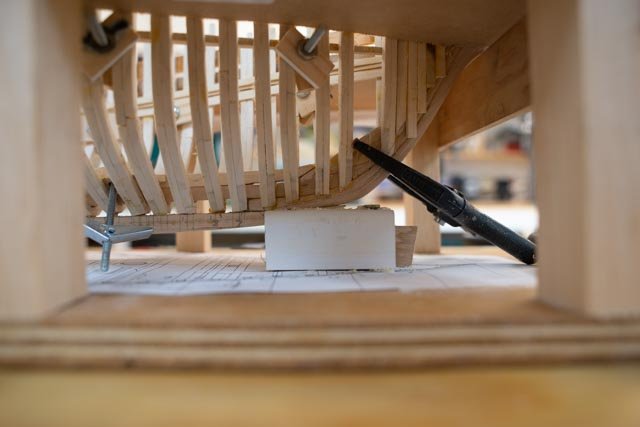
I find as I sit here to gather my thoughts and maintain some workflow that I am suddenly working on many different things at once. Some of what I am doing is jumping ahead to be sure that I do not get two blocked by sequence. Example, I had left out one top whaler on the starboard side thinking I wanted a better view through the frames. I now realize that was silly, so I luckily was still able to get it in and use the little clamps to hold it during glue up. I am also not sure if I want to add more planking. One side is more done than the other, I may revisit that one too but I need to decide before adding the inside lower deck and remaining deck beams. To this week’s progress.
Hull work
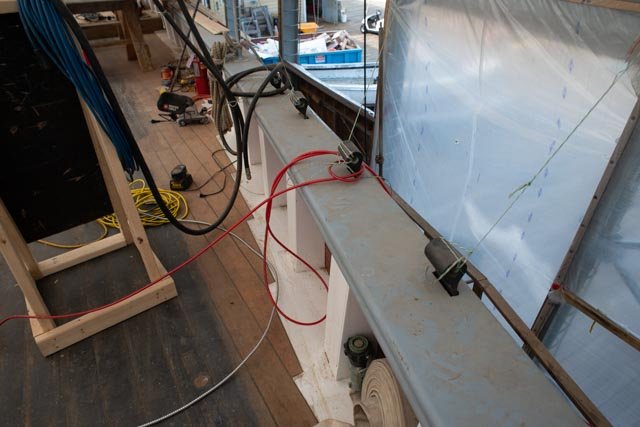
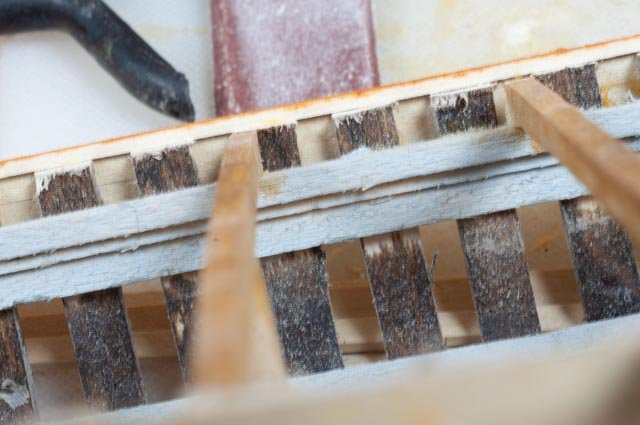
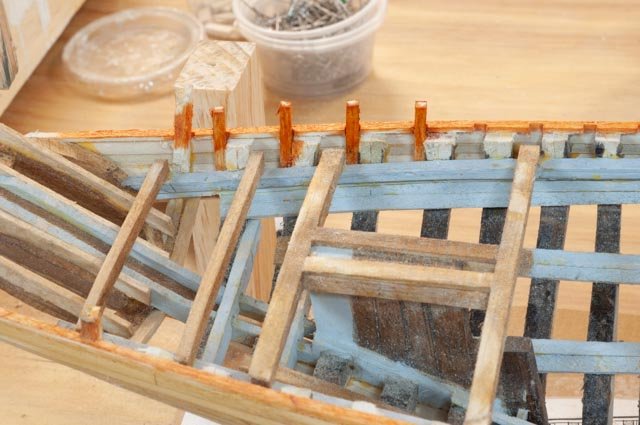
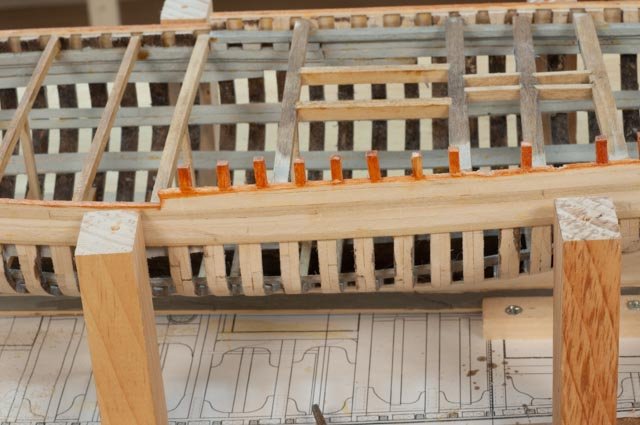
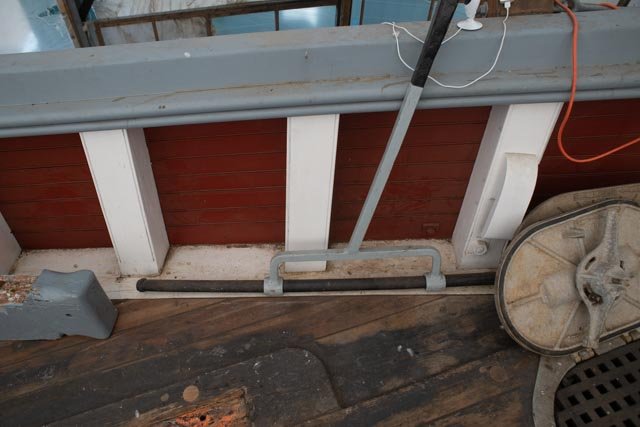
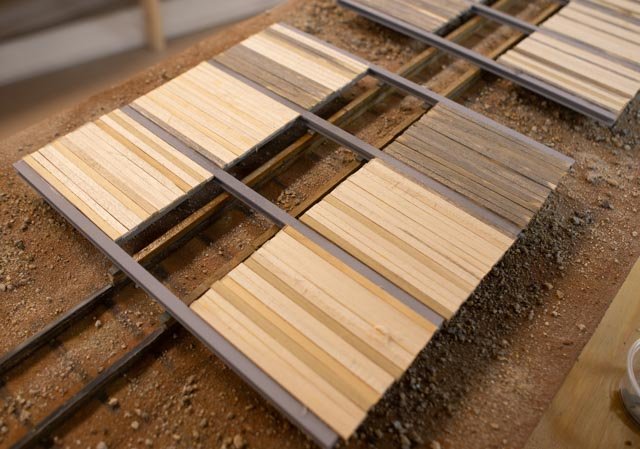
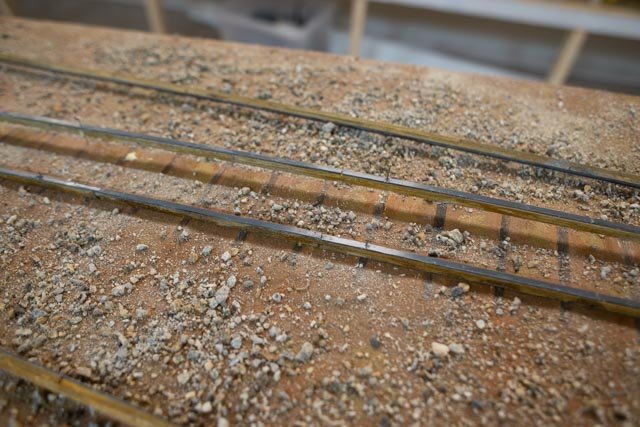
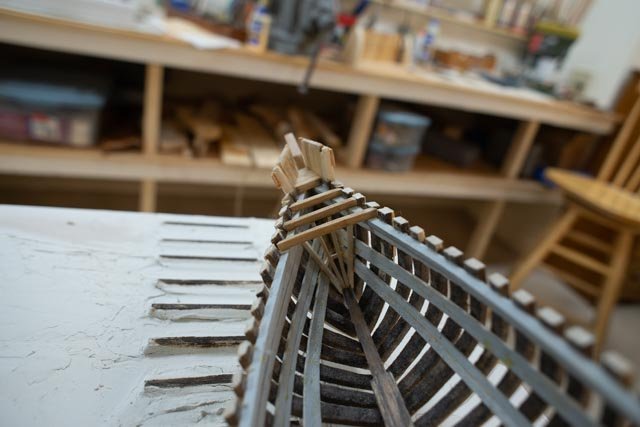
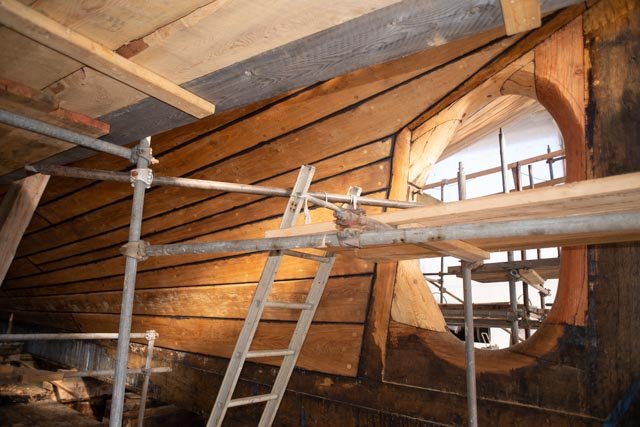
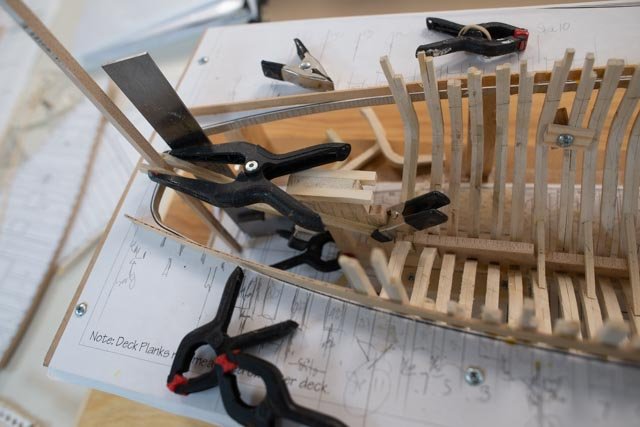
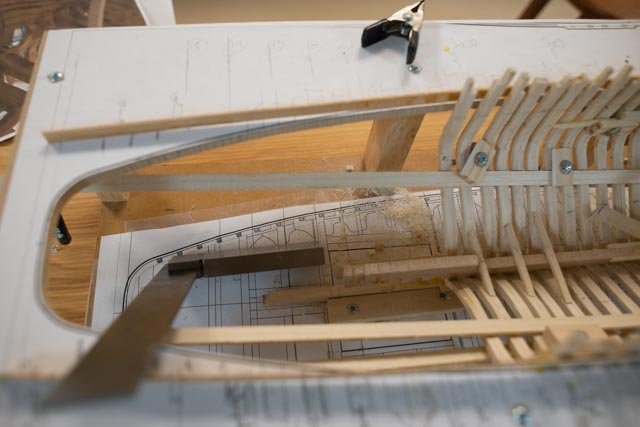
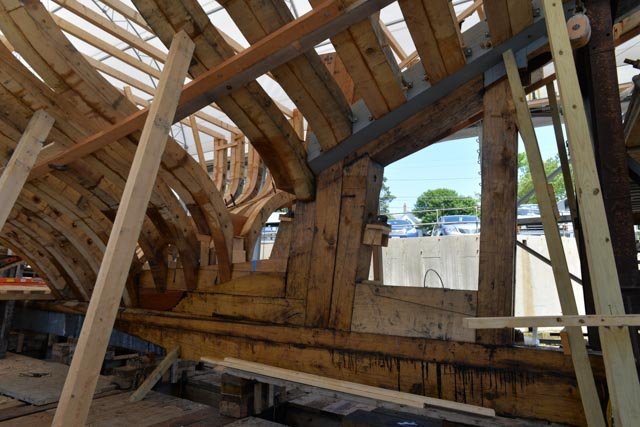
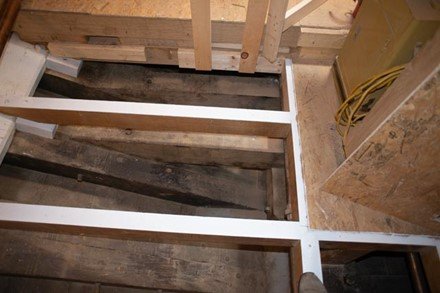
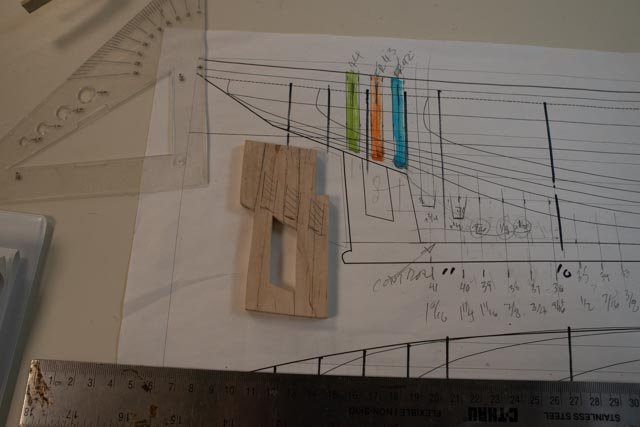
I feel it is important to complete the waterways and establish all those lines next. Seeing that in this design the stanchions are not part of the extended frames but added members, I thought about different approaches. In pictures of the real waterways, one may be amazed at the workmanship. The waterways were mortise cut and then set down over the stanchions. Wow, I am not that good. My solution is to install the waterway in parts. First the outer section is a 1/8 plank that I can bend to the curve easily. I then use a small square file for each stanchion. First let’s look at the real thing
-
199
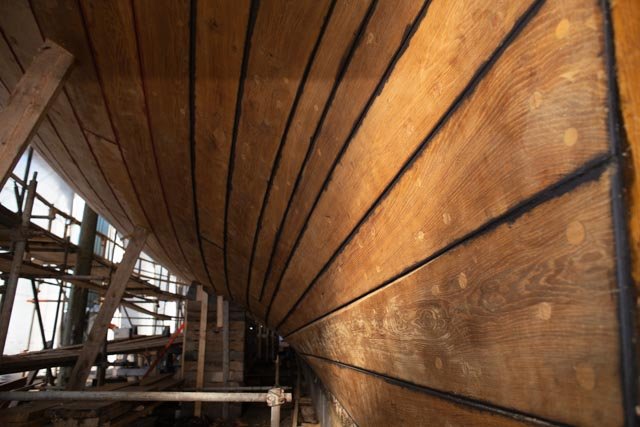
 the bow. Wow how to get this look or even close. All the wood here is Douglas fir except the tops of the knightheads. They are the Danish Oak. The fir deck is oiled.
-
200
 The waterway is 15 inches in the thin areas. I notice a slight reddish to the fir in this light. [ I will try to replicate a slight difference]. Can you imaging the care to mortice the square holes for the stanchions! Here also we see the cap rails. They have mortises with roughly 4”x4” tenons and the are bent to fit as they are three inches thick. Again I say wow
-
201
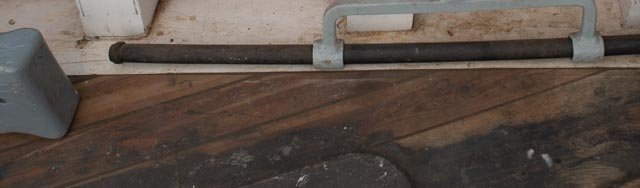
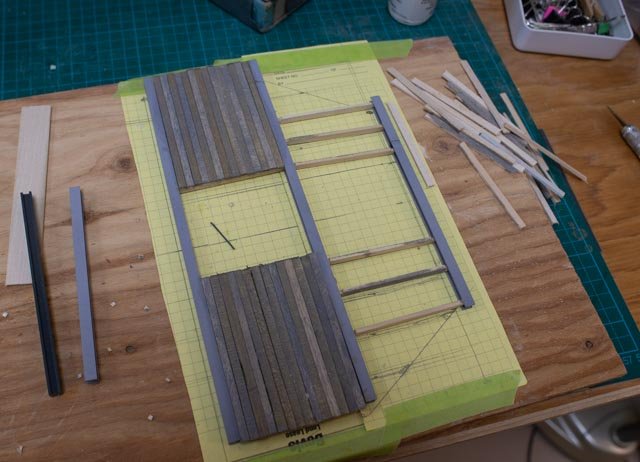
 this view is to indicate the widening of the waterway for the ends of each plank. That means wider than 15 inches. That means I need to either bend a piece greater than 3/16” or make the inside in two more pieces. We’ll see what happens.
-
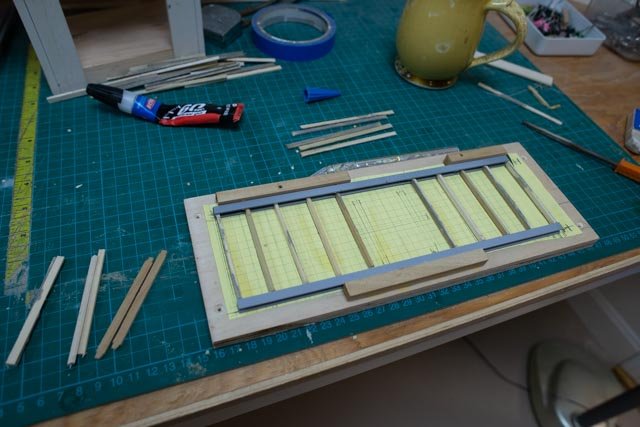
202
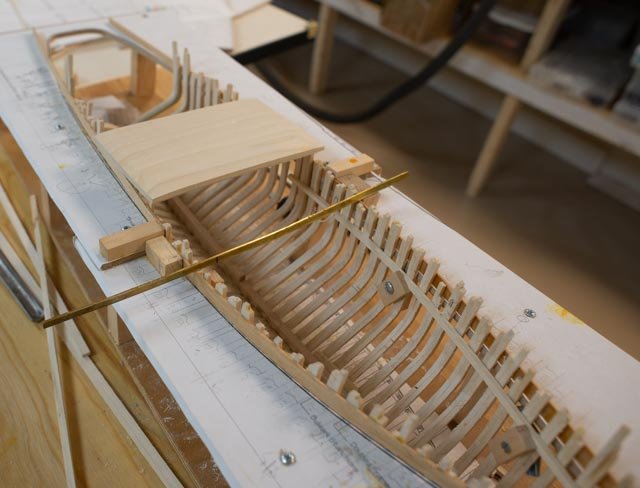
 here I am gluing on the outer peace of the waterway
-
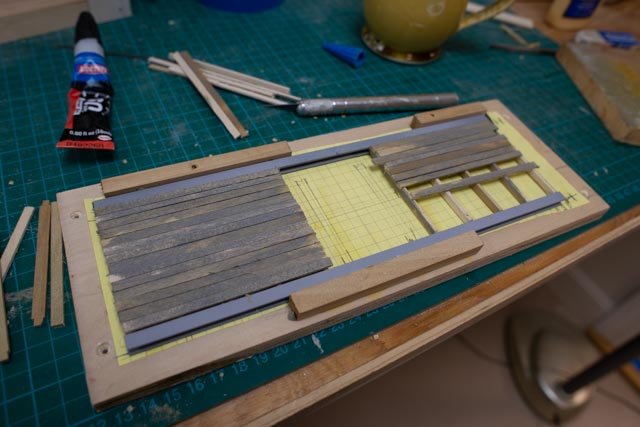
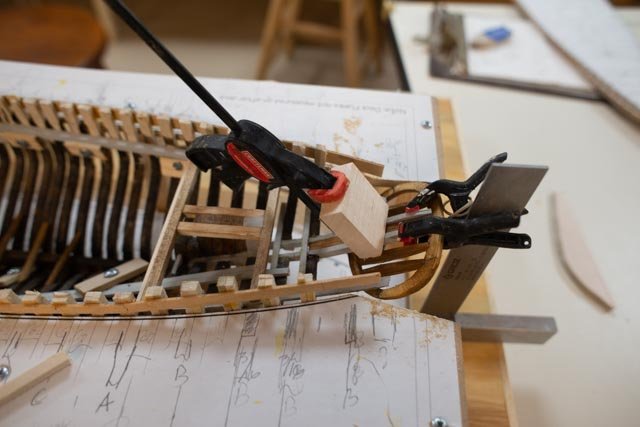
203
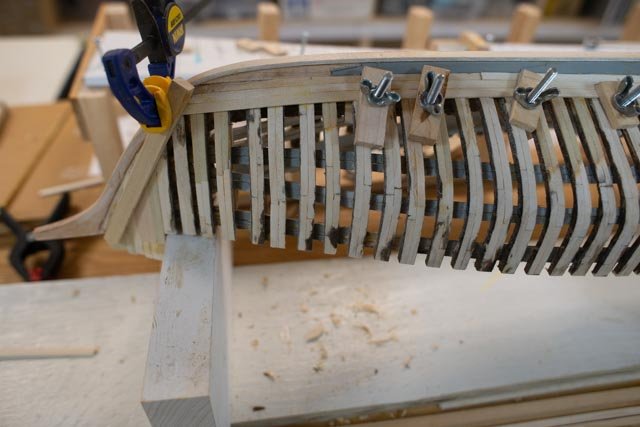
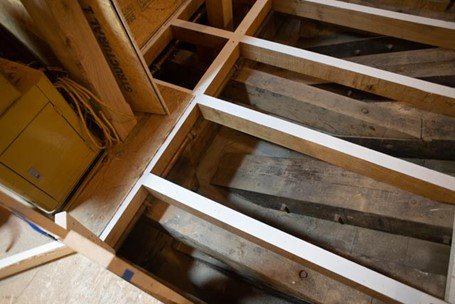
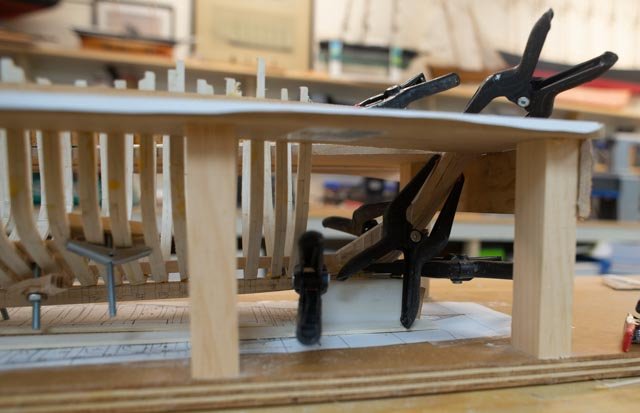
 here we see looking across to the starboard side the outer piece of the waterway. Looking down one sees only one of two gray clamps installed. I had thought earlier to leave this off for better views but have decided to install it.
-
204
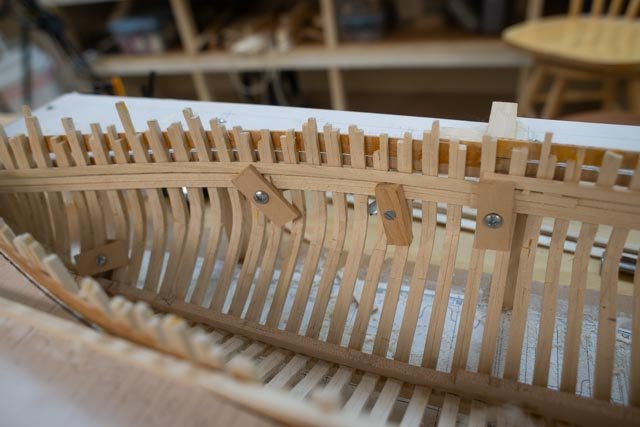
 here I am gluing in the first stanchions
-
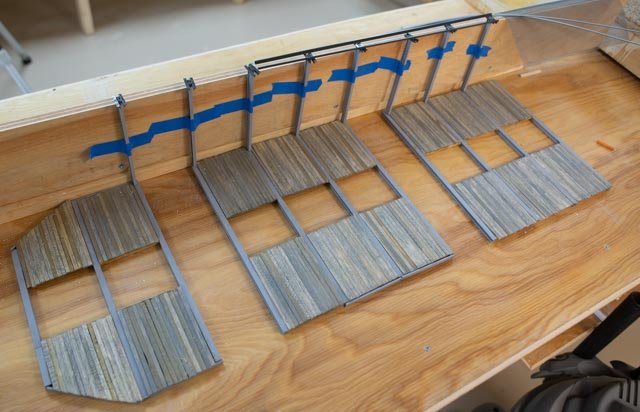
205
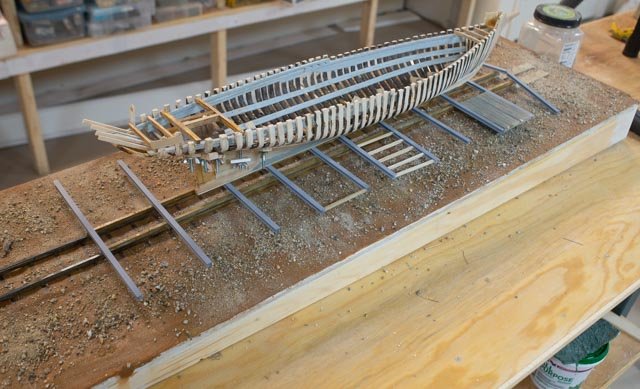
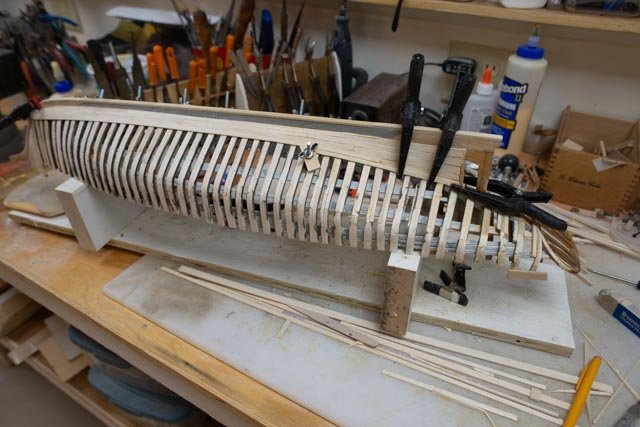
 in this view the waterway and the stanchions are in and stained with gunstock to show the redder color than the golden hue of the oiled oak. I think it is too much difference and will not try to tone it down.
-
206
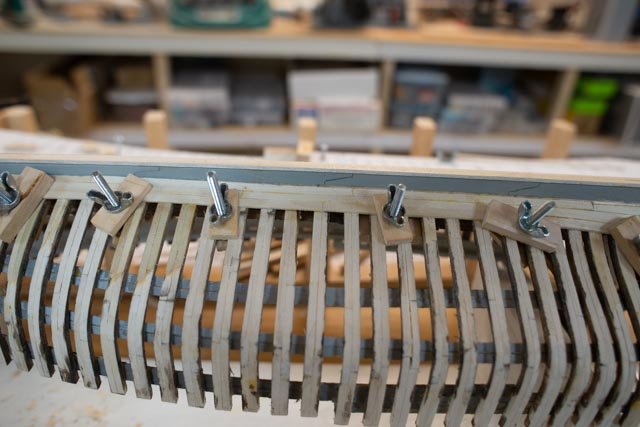
 here is the outside view. The missing clamp on the far side is also seen here as I installed it this week as well
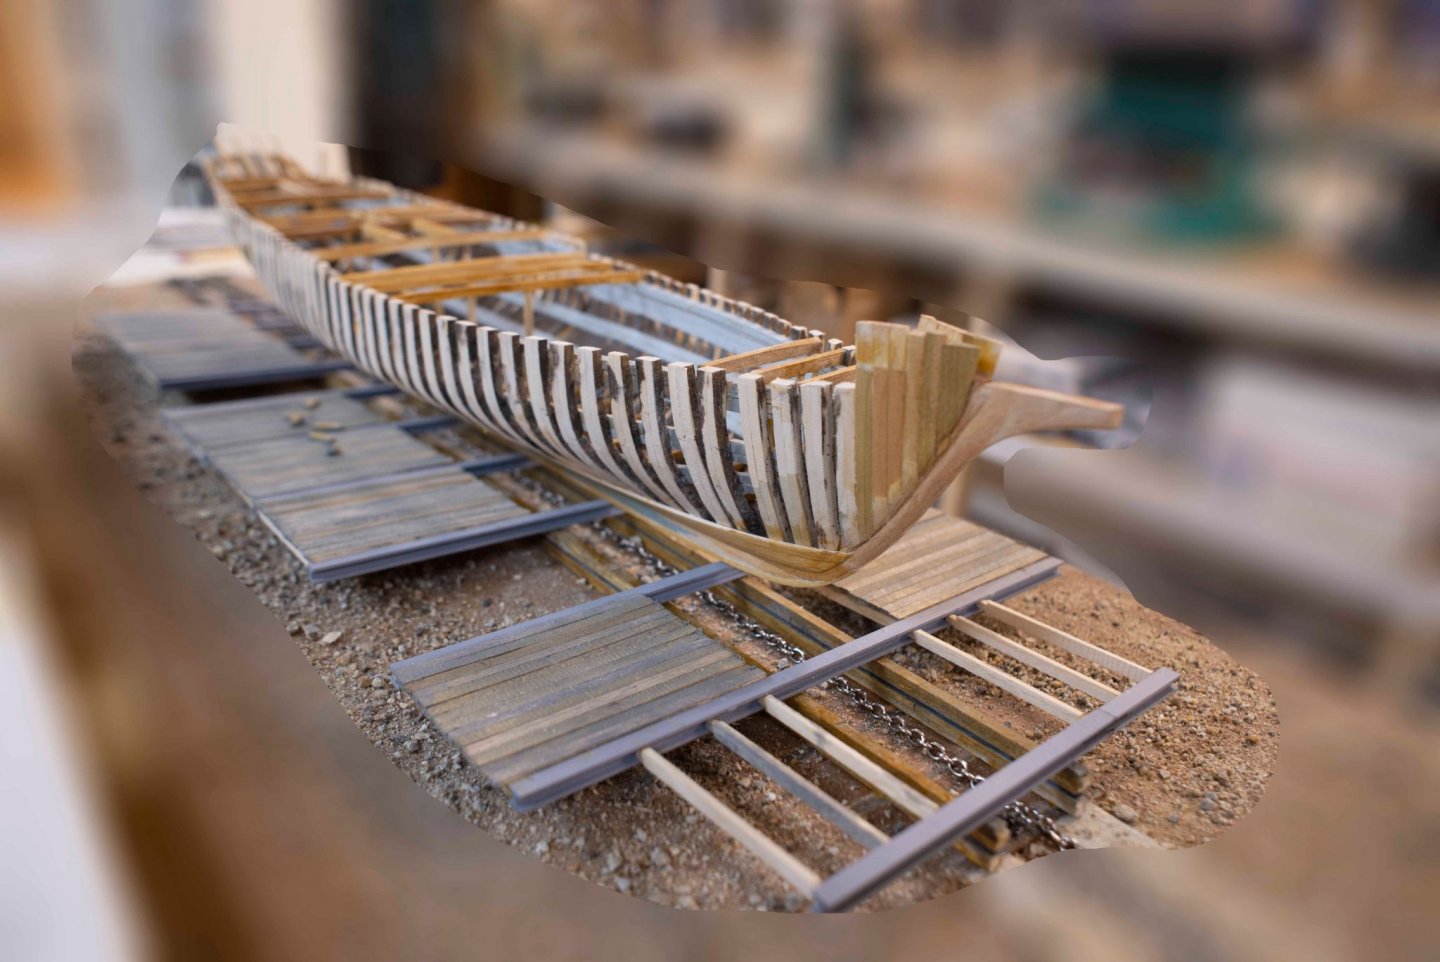
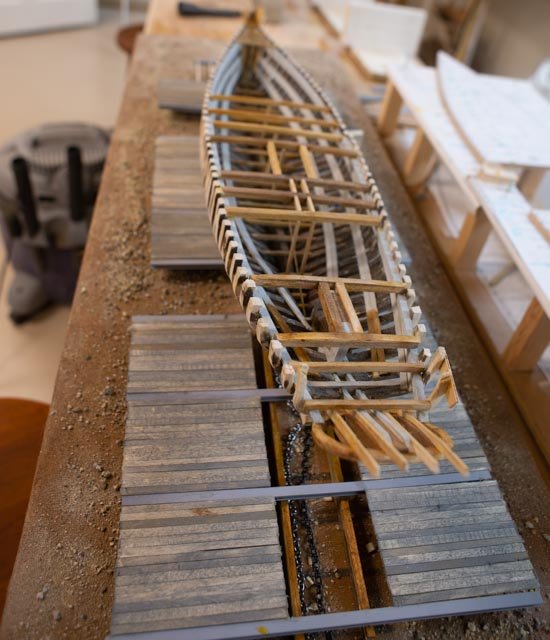
Diorama
More planning than physical progress. I need to figure out how to build the railway platforms that are canted out as about 5 degrees. I also have several items to preassemble.
-
207
 here I have ripped some 5/4 stock at 5 degrees and then screwed on a scrap piece of plywood to form a potential backboard
-
208
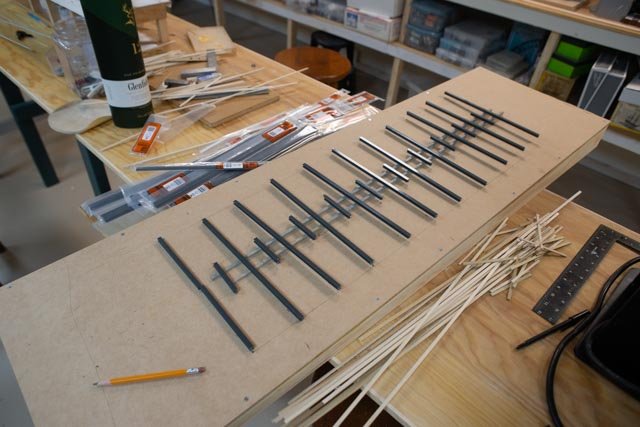
 here I am starting to assemble the columns. I have placed them where they will go to start thinking about how to make the platform. The results were to write up another order for more ABS model steel angles to better make the upper platform.
Up next is a need to figure out a plan to use the ABS members to construct the railway car platforms, so that if the process does not work out, I will still have time to think of alternative means and methods. Also do I build the car off the diorama and then take it in for placement, or do i build everything in place? stay tuned.
jon
Cheers
-
199
-
Ernestina and old schooner lovers...
I went back through some photos on the deck. This post will not totally resolve the questions, but it does shed some light.
 in this photo one orients himself as to the decking coming onto the waterway
 In this blow up one can see pegs over fasteners . Also note the linseed oil compound that blackens the whole deck.
 In this photo we see similar plugs following a pattern that is obviously a deck beam. the Douglas fir decking and plugs make it difficult to see in an unfinished condition and totally unlikely to see in an oiled condition. From my reading it is likely that the plugs are cut from the same material that make them act the same, as to expansion, and seem to disappear. Wood trunnels on the other hand would be hackmatack or other harder material than the planking and thus stand out in hull planking.
This may not be a complete answer and I will look forward to reading here the yard's answer.
cheers
jon
-
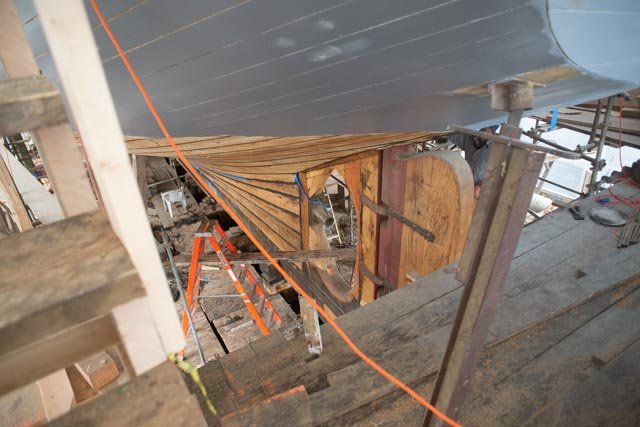
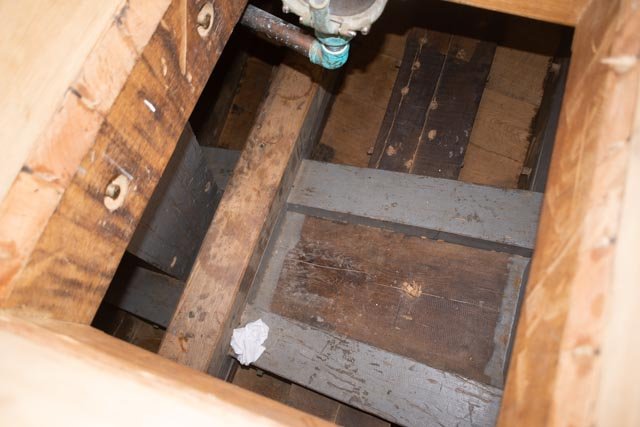
Please see photo from a few years ago of Ernestina planking. Trunnels are used throughout . as a plank crosses a frame, see the diagonal pattern. One up in one half of frame and the other down in the other half. Frames are pairs of 6 ", and spaced roughly 2 feet on center. The pattern alternates working up the frame as seen in photo.
Jon.
-
Post 19
Start deck framing and a fun look at imaging
This is a fun posting as we are a mid-point and need to start thinking about the overall look of what we hope to attain. Practically we need to get ready of upper planking as well. We need to set enough deck beams to set the elevation of the waterway. Figure out how we go forward with the stanchions etc.
-
192
 All the bottom level cross beams are in. and the main deck beams are going in. I need to leave enough access to build out the lower deck frame too.
-
193 here the top p
 lank is in glue up
-
194
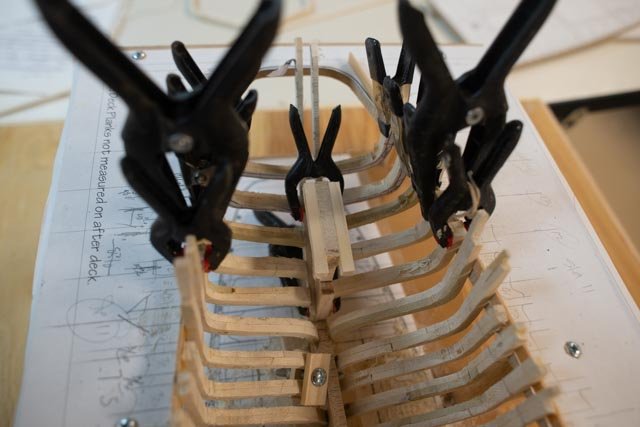
 here we have the first four top planks in place.
Just before the planking above I took some fun views. I use these to start thinking about what activities I might want to show. Do I want four men adding a plank, three men on deck, swinging a load on the crane?
-
195
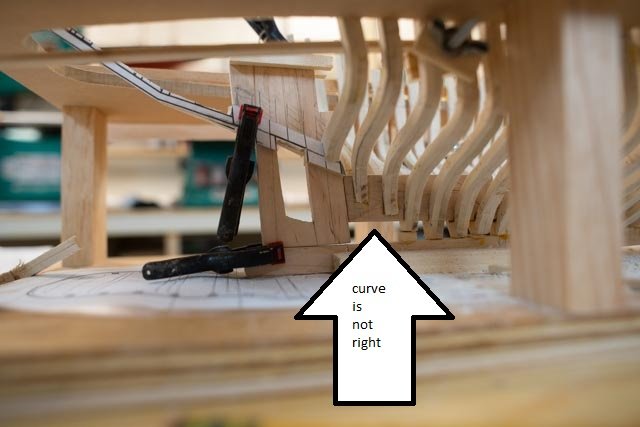
 maybe the next plank going on here?
-
196
 how much decking to have in place. Maybe the crane swinging a load of deck planks?
-
197
 how much of the upper planking goes on. Do I want to cut out to see inside? What lays on the railway car?
-
198
 do I install the rudder, have it laying there ready to go in?
Part of the review is whether to do what I am doing or not. Currently my thoughts are to try to show a little of everything and be less accurate on the what the chronological sequence that might have shown. They would not have the interior bulkhead framing installed early but it sure helps explain how the schooner is divided up inside. I also have to be careful about scaffolding that will block views.
Lots to think about
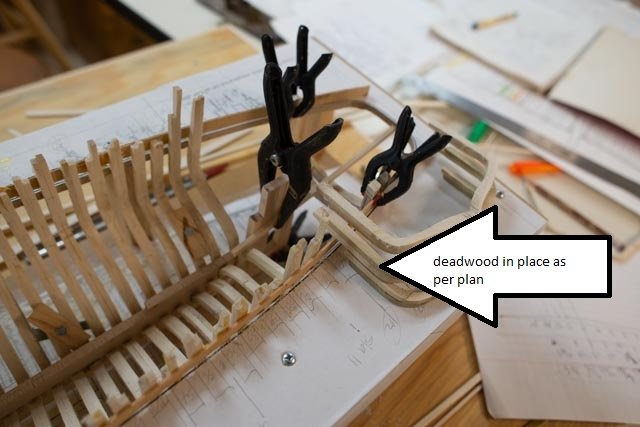
Cheers
Jon
-
192
-
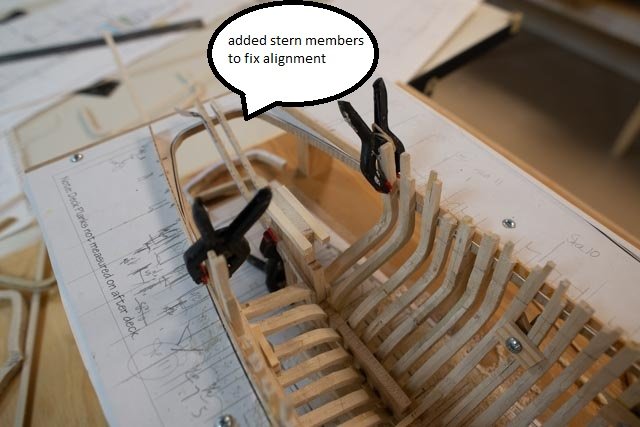
Allan
further update from the yard. some good news and some oops on me
first of all to the thicker planks
the two garboard planks are 5 inch thick and 4 inch thick respectively. all other are 3 inched thick. the two thicker planks were designed in to offset the added stress in the keel due to the 60,000 # of lead ballast. to shave them down would reduce their cross section. From my late 1960 classes on structures, that suits me fine as the explanation. The fact that my shadow line shown in the photo was due to a reverse offsets, and the second side fit better, i have sanded it off. The model will look normal with all planks smooth. oops on me. I could have used thicker planks if i went through this before the fact. I am only a hobbyist, so artistic license is all mine
Other info I got was not so good news. In reviewing the materials added to frame causing their colors, I learned the following. In the rebuild all frames below the waterline were treated with added tar. That did not come to me in the earlier discussions last summer. The linseed oil I was told then went on all frames. I combined that info with my experience from other such treated small boats, if exposed to sunlight linseed oil finishes go black. The outcome is the frames above the waterline would not all be as dark as I made them using the walnut stain. I am not darkening the outsides as they were planed and adjusted right up to the setting of the planks. tar or oil was applied just before the plank was set.
The use of stealers they advised is normal where they have an inside curve typical near the rudder post. This approach somehow reduces the carving he said. With all the computer modeling these days I assume that was all figured out well in advance.
Another bit of trivia i learned two years ago watching the Bowdoin planking was that the steam time for planks in the box before setting is one hour per inch thick. Thus those garboard planks would have been steamed for 5 hours.
cheers
- mtaylor, Roger Pellett and allanyed
-
 3
3
-
Allan and Roger thanks for jumping in. I hope to get the yard's answers by the end of the week. in the mean time as to Rogers comments.
from the biography of the Schooner;
in 1898 she was done the way Essex builders would have done. She had no special reinforcing and no engine. In 1926 using George Putnam's money, new owner Bob Bartlett made two big changes. He had the frame redone and added an engine as well as changed the fish hold to a messroom with several bunks. He then had 1.5 inch green heart wood cladding. The photos of the 1921 Bowdoin show how this was done for the same purpose. If one wants to model Effie for 1926-1948 that could be added. That cladding on Bowdoin did not go all the way down to keel though, it stopped a foot or so below the waterline.
as a foot note, my 1924 model/diorama of Bowdoin is missing the cladding...oops
jon
-
Post 18
Bottom planking continued, more on the railway and steel delivery
This past week the shipyard was interrupted to put down some new flooring. I guess COVID-19 is a stimulant for home improvement. At least the room involved is planned for the model gallery. We’ll see if I get to use it.
Some progress was made as well as a need to make a few decisions. I realized as I started a few weeks ago to put some deck beams and other internal framing pieces, that if I continued, I would not be able to use the through hull clamps to hold the planks. So last posting, I showed we were out of the jig and onto a rack for bottom work. I was simultaneously working on the railway car.
Schooner:
-
183a
 &
&
-
183b
 there are two views. As a few planks are clamped we tried out the future home. The good part of this step is I learned now and not later that the upper rail was ½ inch too short. Also, I was looking to see if I can come higher with planks without hurting the look inside. I think I will do one side higher than the other.
-
184
 back to the real thing we are looking at the planking as I hope to make it. The bottom three planks fan out to 15 inches [ 5/16” in scale]. Then there is a little complicated fitting and turning to figure out.
-
185
 This is the end of three attempts to get the planks, their turn and twist to come out close to the real thing, and that result is all I can hope for.
-
186
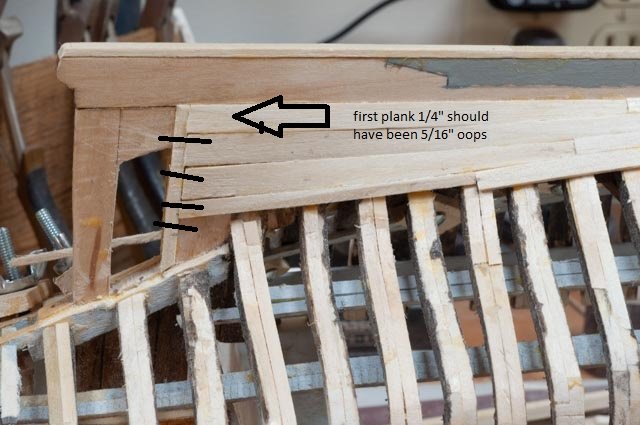 thinking the second side would be easier, I went too fast. The first plank I picked up was the wrong piece, and it was only ¼ inch wide when final sanding and installing. I did not check to match the other side until now and oops. All of this had to come off and be redone to match the other side and the real thing.
-
187
 looking the other day at he real thing, we see the first two planks were thicker and thus are not sanded smooth on the outside. The after is a line of light and shadow.
-
188
 here after sanding there is some line and will be a shadow on those joints. For the experts out there, I think they are backwards but for me that is still ok.
Diorama:
-
189
 in this detail it is easier to see the rails and the decision. The near side shows it on its pins for gluing down. The far side is glued. To be perfectly accurate I needed to install dumbbell looking rollers. The outer wheels 3 inch [ 1/16th in scale] and the shafts one inch or [ .020 In in scale} I decides not to include the scale rollers but to perhaps get one from the yard to include in the display if they are willing.
-
190
 here we are with more assembly of the car in sections
-
191
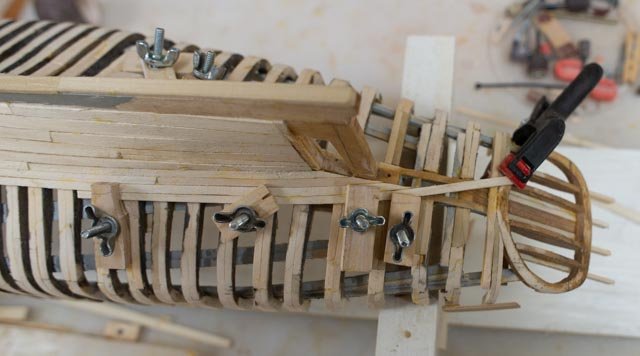
 now that I received my second order from Plastuct, I have the correct glue for ABS-to-ABS welding. Now I can figure out how to assemble the ‘steel to steel’. First up is the end of the car that includes a needed splice for the last cross beam and next will be channels for the sides to weld to those beams.
Cheers
Jon
-
183a
-
post 17
start the railway ‘Car’ and planking the hull
We are working on three areas at the same time. This process keeps me bouncing around, which is good for me. Also, we are putting down the wood floor in the area next to the shop now that leaf blowing is done.
The hull work is slow and tedious. My inexperience with designing frames shows through as I keep scabbing on and sanding back strips. I hope it works out.
-
173
 here we are experimenting with strips of Poplar planking. So far, all the wood in the model comes from one 1”x6” plank of poplar 8 feet long. We will see if it is enough.
-
174
 here we are on the first attempt of the stern area planking. It did not work.
-
175
 in the mid-section we also have the false keel added.
-
176
 I share this view. It is the second attempt at the stern and it failed too. The lower two planks had to come off and go a third time. I hope I get it next time.
-
177
 hopefully this third time will work. It is the next plank that turns into the propeller hole that is the tough one.
The diorama
This work is more experimental. We went off to Michaels, a one-hour drive north, to seek out materials, paints etc.
-
178
 I covered the whole think with what was left of the Vallejo earth texture brown that I got for the last Pinky Schooner diorama. On the right is a collection of new acrylics for highlighting and spray adhesive to hold on sand and stones and things, I also bought some chains to experiment with. I have no idea what the material is, but I will try to blacken it. There may be more procurement needed here as what I got is not long enough either.
-
179
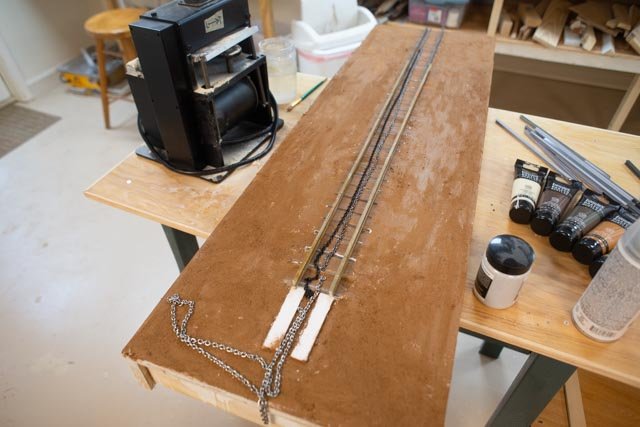
 here have added the several highlights colors to the base as the terrain is not just dirt but a combination of sand, rocks, gravel and seaweed. I then added spray adhesive and an application of sand and pebbles. In this photo I am gluing down the first of the lower rails.
-
180
 In this view the second rail is suspended on pins for gluing before being lowered to the base. I had masked off the run before adding sand to make the rails sit firmly. I used normal Loctite glue to hold the ABS strips to replicate the steel plates on the rails.
The car
I needed to make up the first jig for the ten sections. I am also experimenting on how to glue wood to ABS.
-
181
 the car is made up of ten twelve-foot sections. The steel [ now ABS with gray primer] spans 40 feet. The locktite standard glue works well so far in this application. I like it also as I can abuse it [ leave off the cap] and it still works days later. …unlike CA.
-
182
 here I have added planking with gray stain. I will have debate with myself. If I start down a rabbit hole and try to age all of this stuff, is it smart? Much to think about.
All for now. Next more of the same. I need to complete the lower planking because after I add the insides, I cannot clamp though the frames.
-
173
-
Alan
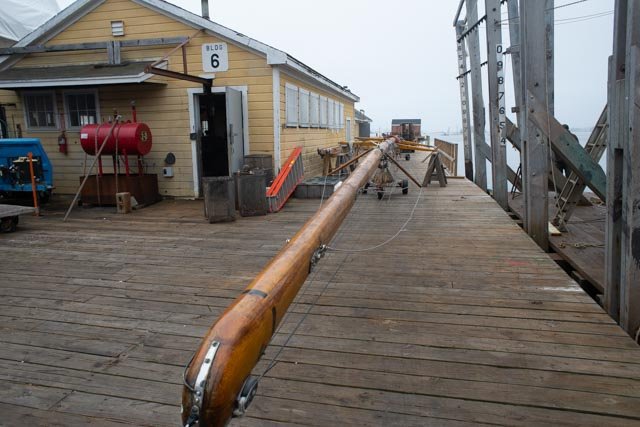
it is a true joy to now be building my second diorama of a schooner that was redone in Bristol in recent times. I was lucky to completely tour both. I like to learn the history of the schooner, her crew , what she did and then tell a story. For Bowdoin who was actually built here in 1921 it was the summer of 1924 in the Arctic. For Ernestina who had an equal record of Artic exploration, there remains a story to be told with a model of the Effie in her older form. My story is based on her 5 year life in Boothbay. Her whole life is well told in the book Phoenix of the Seas . We are now looking forward to the fifth reincarnation.
I thought I would share some images of an incredible mast. Gleam as I mentioned in an earlier posting is here getting a partial refurbishment. Below I share photos of her mast as she came off a few weeks ago and last week set out in 95 feet of prime Sitka spruce ready for her redo. Please google Gleam the 12 meter and enjoy the images. I hope you do come next summer. You may get to see her too as she will be back in water racing again.
Thanks for dropping in. I am enjoying your build and look forward to seeing your model here as well.
-
Post 16
complete the basic frames and get going on the diorama.
There are always few more things missing or hidden things that need attention from letting us be completely done with one thing before the next thing begins. Today I went out to the garage to spray paint the black plastic steel members gray. For that to take and dry in 50-degree garage [ 28 outside today] means that is all for today on that item. So back and forth we go. I also keep learning things. I dug out 6 photos that I took one day a few years back when I was in the middle of the Bowdoin diorama job. Ernestina was next to Bowdoin as Bowdoin was replanked. These few views show a few details that I think are helpful, and I want to include them.
-
163
 here is a view of the 6 lower planks at the aft termination, that as of now I plan to install at least on one side. This view shows the second application of caulking before painting.
-
164
 this view allows me to calculate the size of these planks. They flare to 5/16” which is 15 inches in scale. I have milled out two pieces to play with, so over the next few weeks I need to get ready and start to install them. It is one of three views that later will help me build the rudder too.
-
165
 Now it is time to fair the hull. As I am a true amateur as to calculating all the bevels in 3 d, I need to scarf on planks to bring out the plank to fair to a better profile. I must admit I had to add twenty or so fixes. We all have a lot to learn. A lesson here is if you are a beginner at plank on frame, as I surely am, leave more wood on. One can always sand it off and look like a pro.
-
166
 here I have painted the first coat of gray to match the steel ballast. Four sections each weight 15,000# are bolted to the bottom of the keel. This process cuts the inside ballast needs by half. After another coat, I will use a sharpie [ I think} to create the outline of the members.
-
167
 here one can see the real steel ballast. The false keel under it is something I need to add.
-
168
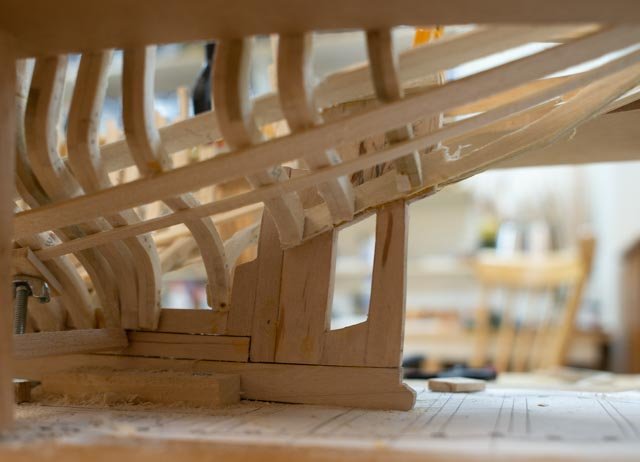
 here is a milestone as I start to cut off the extended frames to the level of the top of the deck beams. On this design the stanchions are all new pieces installed between the frames. The top of the frames then support the waterway.
-
169
 now we start the deck framing. here at the transom is the first beam. I need to sort out the stanchions before I cut away the last of the extra frame material as there is so little to tie off to back here.
-
170
 here I have completed the forward lazarette framing. Once the planks are on; I will try to put a little concrete in and then photo compare with the real thing.
-
171
 I completed setting out the stained rail ties and the first coat of joint compound. I found joint compound so easy to work with last time on the 1816 Schooner diorama, that I am moving right ahead again. I have set plywood to fill the grade, so only a coating of compound will be needed along the sides. All the rail material is on the near side. I am working on a combination of stain and will need some "slime green" paint for those in the water.
-
172
 here we are for our once a week look at progress.
The next few weeks will see more obvious changes on the diorama and the schooner is now into the long clean up and preparation for the limited planking as well as the lower deck framing and bulkhead framing .
Cheers
jon
-
163
-
-
Post 15
Complete stringers and start the diorama
I think I finally got to the milestone of getting the frame done fore and aft. Getting the transom is place and the stringers in means I can get out for the gig and turn her over and see what the outside is like. Before we go too far, I want to think through where I will go on planking the outside vs completing the inside.
-
148
 here the transom is in place for a glue up.
-
149
 it is hard to work this way. I believe it will be easier to visualize and get the final pieces in place when I can turn her upside down. I hope it works.
-
150
 the two low-level stringers in this picture have been pulled out and just laid there for the photo. I realized I was too high going into the bow. I thought it easier to cut the glue and carefully pull out the old, mill a few more planks and reinstall the new to get them closer to right.
-
151
 here all the new stringers are in and the final glue up is underway. It feels great to start removing the gig. I still set the pieces back as they have all the layouts, I will need for building the internal framing. What is holding back on that work is the need to get the garboard and maybe one more plank in place so I can show at least a little of the concrete before I build the lower deck. More on that as it comes
The diorama planning what to do and getting material
-
152
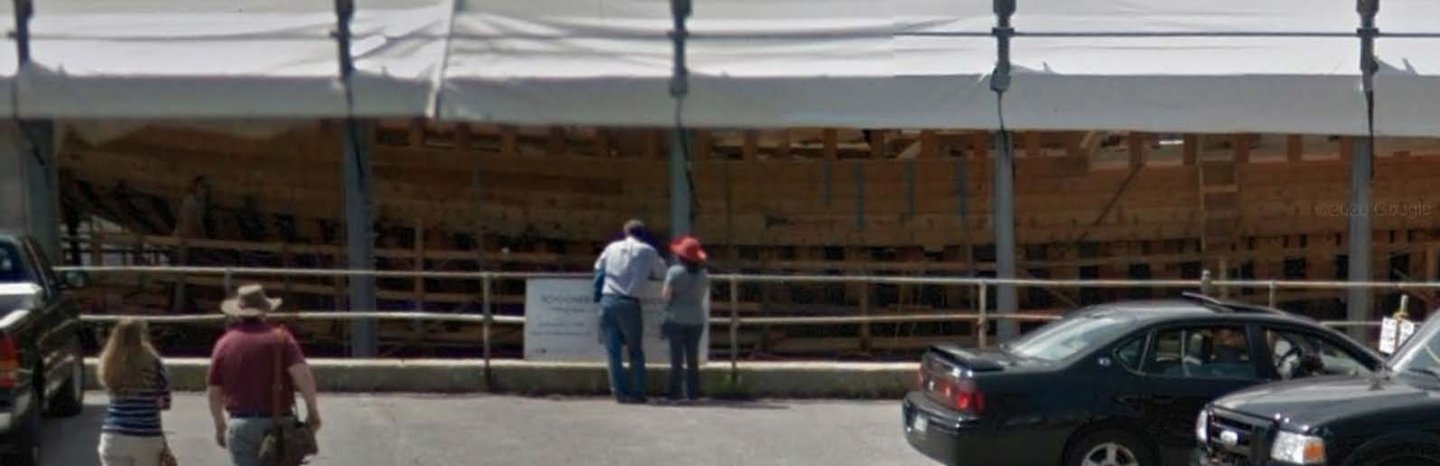
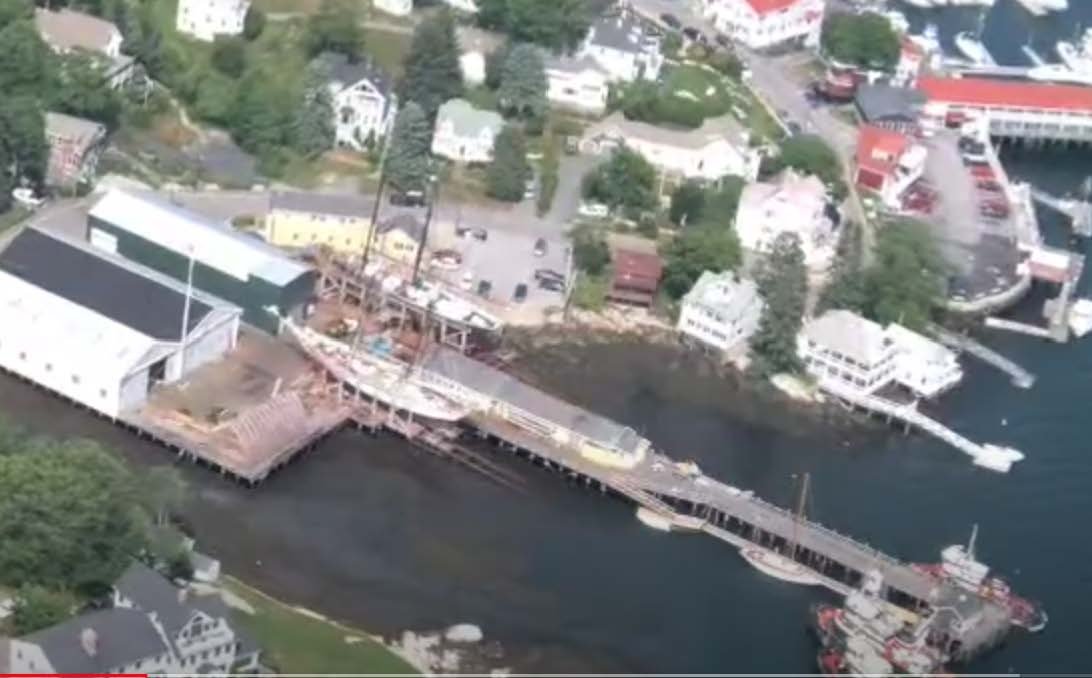
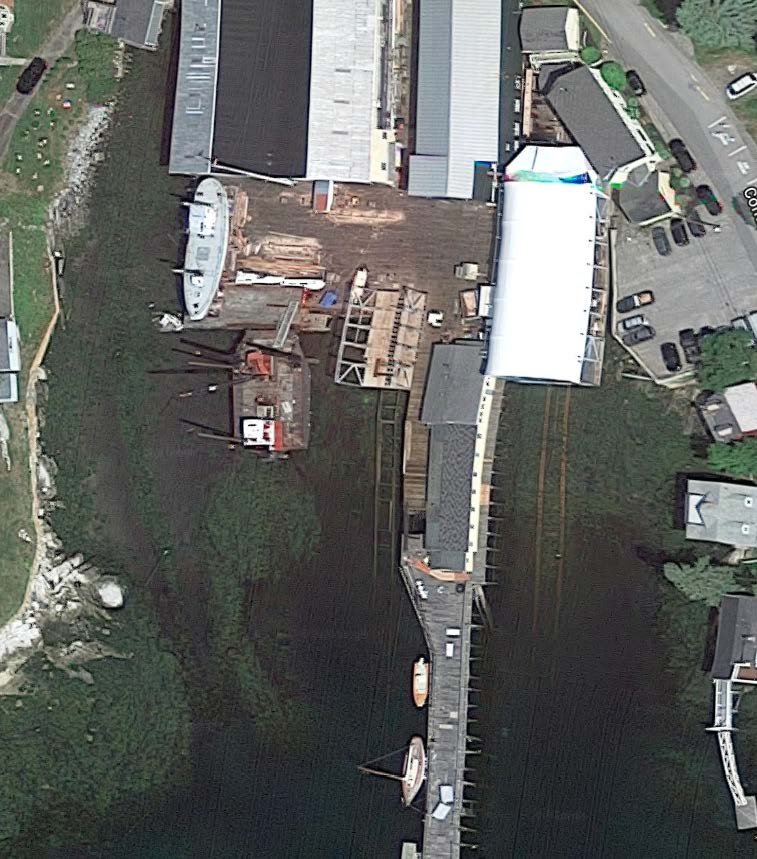 if you go to google map for the Boothbay Harbor Shipyard this is what you get. The big tennis tent is over the schooner.
-
153
 if you orient yourself and tilt this is what you get. the tent is open in summer months for the tourists
-
154
 in this cropping of the view, we see a sample of what stage I think I want to model. The planking is on covering the outside of all the sheves and clamps and make the model stable. Below is a see through and maybe even a cut away.
-
155
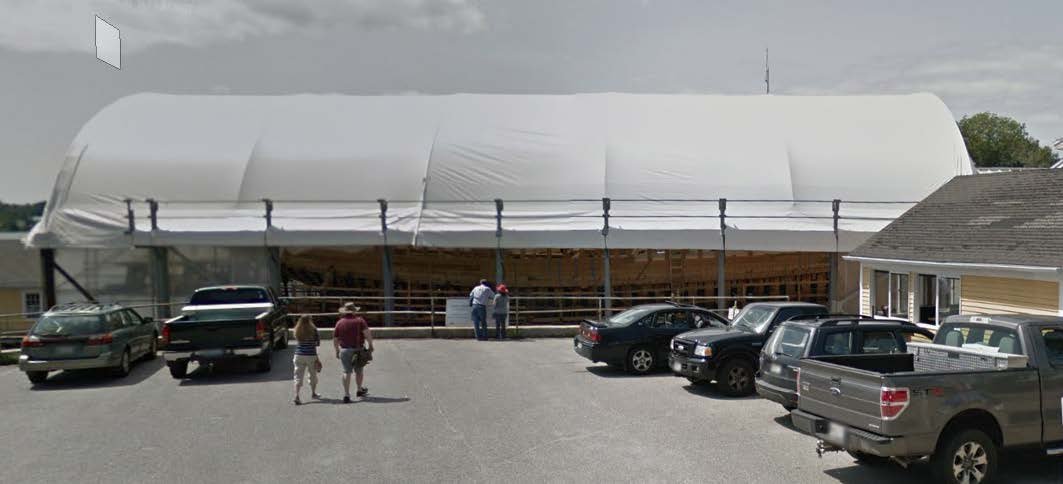
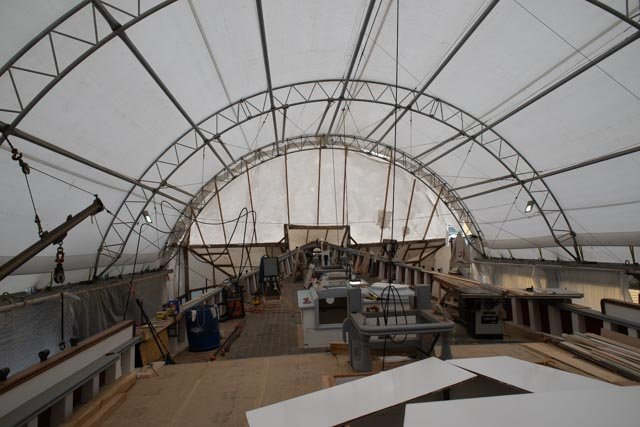 if you go inside the tent here we look forward [ north or inland].
-
156
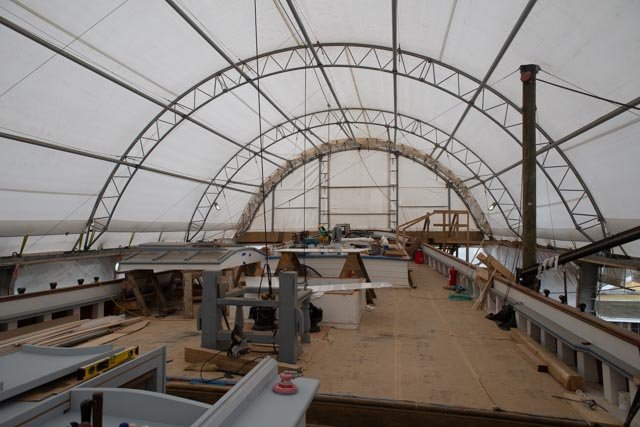 looking aft [ south or Water view] we see the crane set up. Even today they will use to set water tanks etc. so the crane is a needed feature.
-
156
 here is the inland end. The “car” as it is called in the yard, is a bit narrower to fit the buildings. The end of the rail is really at the end of the car. These stops are the planned limit.
-
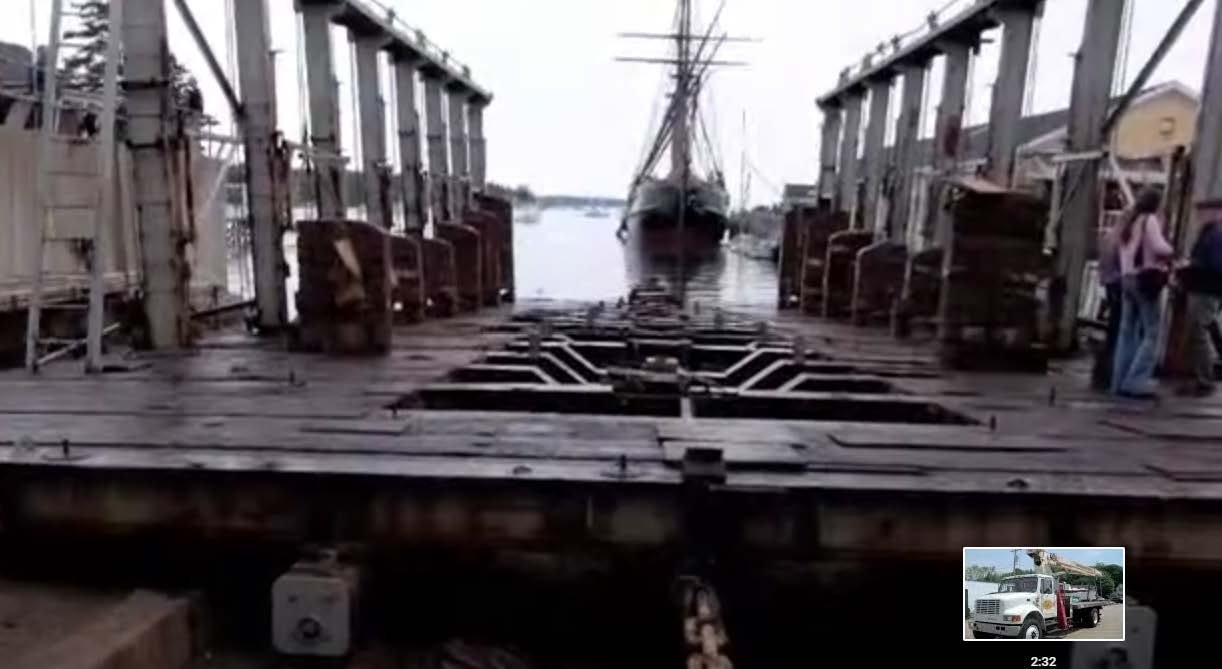
157
 Here is one of the options of the water end. This give a clear view of the rail construction. High tide comes up over all of this end every day and really high tides cover the steel at this end. The whole car is on a slope that is very close to the keel slope in the schooner.
-
158
 this inside view of the rails and the internal structure explain a lot about what is needed to build. The two laminated rails are resting on slap at the inner end and on ties at the outer end and some 100 yards beyond into the harbor. The little rollers are fun but at 1:48 I hope I don’t need them. Another day to discuss that rabbit hole.
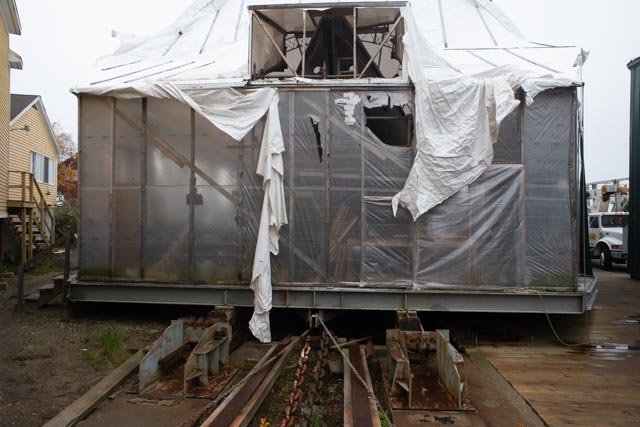
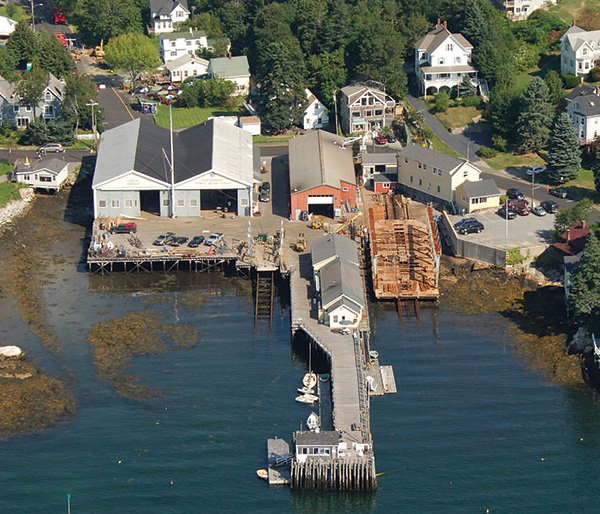
Before starting I want to say I will not attempt to have anything to do with the tent. I believe what I am looking for can be seen in the last post photo 146. I also bought the Alamy Photo last posting photo 139 that is very high resolution and that will help as it shows the empty car.
Start work
-
160
 I built the base by using the available piece of ¼ MDF that was used for the gig. It is roughly 48” x 14.5” and I think will work well. itis on a slope to match the keel which is very close the actual slope. I milled wood for the lower rails and penciled out the frame of the car.
-
161
 I milled out lumber for the structural beams that span from steel bean to steel beam and support the decking. I also milled some planking.
-
162
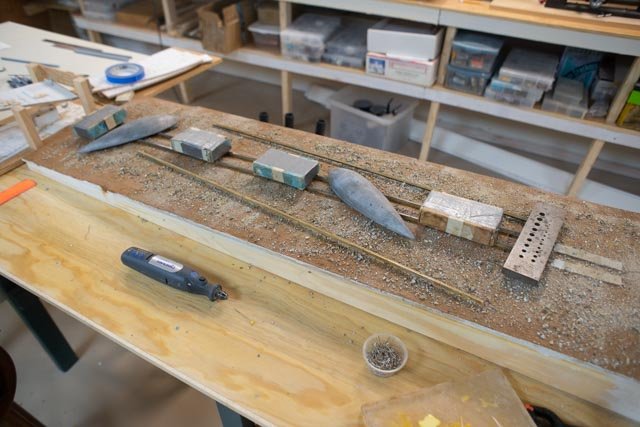
 and here is the ABS structural steel that I got from Plastruct. This photo shows the logic. The 40-foot steel beams rest on the upper rails. 3"x9" wood beams span between them at 12 feet length and 3-inch planking 15 feet long rests on the outer edge. The midpoint steel beans are 10 feet long, same as the hole and give added point of bearing for the support of the schooner or other boat being worked on.
There is a lot more detail to the car and then the mechanics of how it works and supports the schooner and lets her go when launched. I hope it is not too big a rabbit hole, but I will try to something fun with it.
All for now
jon
-
148
-
Post 14
Time to think about the diorama
Now that the decision is made and we are off to make the story about Ernestina in Boothbay Harbor, I went back to the yard to take more pictures and learn more about the Railway. I will learn a lot more about its history and bring that forward in time. For now, it was built in 1869 to service coasting schooners. Most schooners in the market at that time were 2 and 3 masters and ranged up to 150 feet on deck. Schooners could overhang both ends, but the basics were a box 40 feet wide and 120 feet long. The inland end is a little truncated to fit the dock arrangement.
Boothbay Harbor Shipyard
The original yard was know as Sample's shipyard during WWII and up to more recent times when it was renamed Boothbay Harbor Shipyard...from the internet…
- ...was originally established in 1840, by Cyrus McKown. It later became the Townsend Marine Railway and, in 1917, the Atlantic Coast Company. Sample acquired it in 1939. It was sold in 2004 and is now the Boothbay Harbor Shipyard.
To most locals it is and will remain Samples despite recent ownership changes, Bristol Marine is “from away” as is often said here. They are from way down in Rhode Island. if you call the yard up in google images, many will appear. A few below quickly share the understanding of what is happening here.
-
138
 here on the yard webpage we get a great overview.
-
139
 here is an Alamy image that shows the railway ready to go .
-
140
 here is EM on the railway. I believe it was 2009 and she had the bow fixed.
-
141
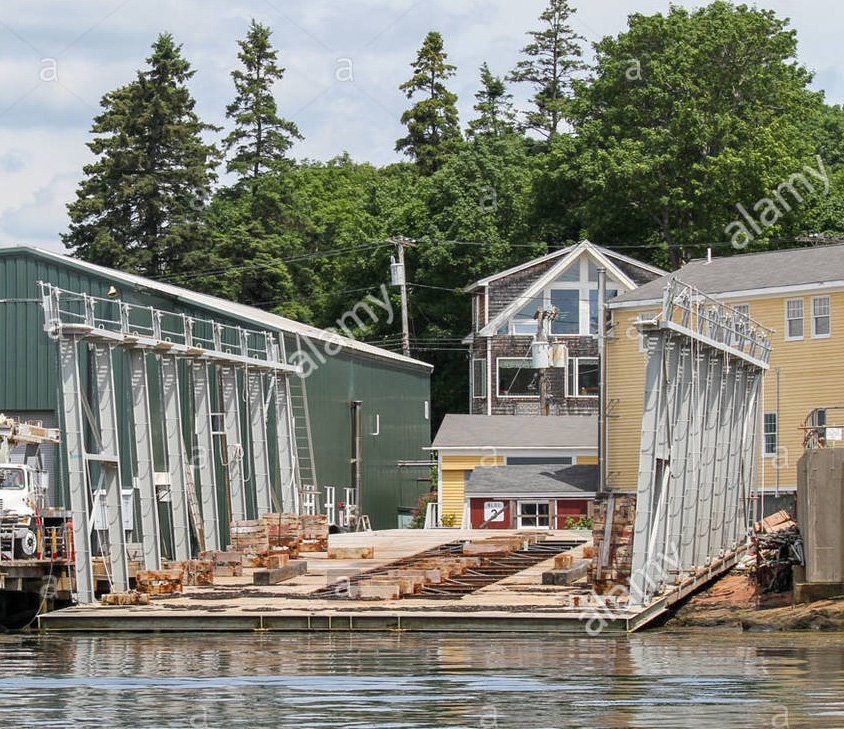
 the Hollywood commissioned bounty was built up in Lunenburg. She came to Boothbay years ago for a fix up. Here she is ready to launch. The railway is listed as 700-ton capacity
-
142
 Bounty was launched and then here they posted a good view of the railway
-
143
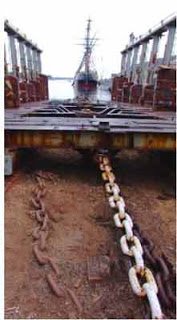 here is fun shot; better for me as it shows the detail of the chain under load
Ernestina arrives for the rebuild
I just finished the book telling her whole story. Wow. The short version of the final chapter leading her to Boothbay goes something like this. In 2008 then Governor Romney was looking to cut cost. Having come from Utah he had no time for the state paying yearly stipends for a Marine Schooner giving hundreds of schools kids a great educations experience. Fortunately, a few of the long time Bartlett Boys [ they were the high school through college age boys that went to the arctic pre world war II] and their connections had the financial ability to get involved. In 2009 they sent her to Boothbay for a refurbishment of the bow section. They then commissioned a complete survey by the Essex Schooner team. They then raised matching money, got the state involved as well as the merchant marine school and awarded a three-year contract for the first phase of the rebuild here in Boothbay Harbor. I recommend both the book and the WoodenBoat magazine article listed early on in this log to fill in the story.
-
144
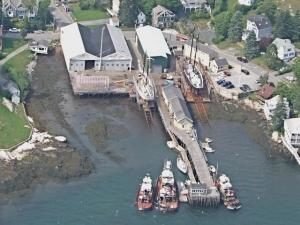
 Ernestina arrives and is set up on the railway ready for the operation.
-
145
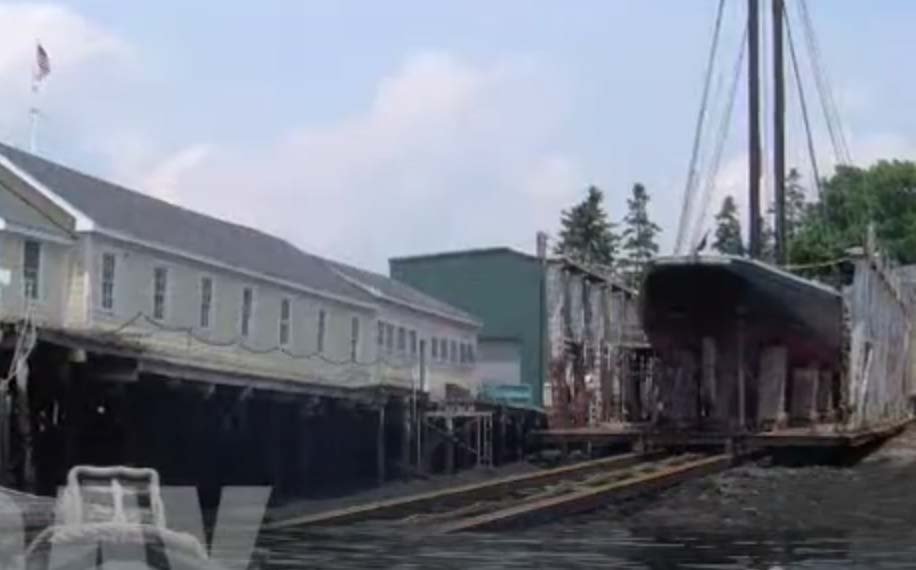
.jpg.db0b5aa8162eb2177bbbe5e3df3f0852.jpg) here we are looking aft at the old hull. She needed a lot more than paint.
here we are looking aft at the old hull. She needed a lot more than paint.
-
146
 masts are off. in this view we really see the railway that I need to figure out how to build. My son told me to go to Plastruct and buy readymade ABS gray structure to scale. I went to the yard, photographed many details, made a cut list, and ordered the material.
-
147
 I end this introduction with a fun photo of Bowdoin on the 150 ton second railway and Ernestina on the 700 ton railway. This photo I believe shows Bowdoin just having a haul for under water inspections etc. When she was pulled for replanking in 2018, EM was much further along in here work. I love this photo, as grainy as it is, because I will have modeled both schooners when this one is done.
Up next is to build the diorama base and set slope and lay out the railway. Oh yes and that stern that needs to be framed.
All for
-
dear Jim lad or is it John. thanks for dropping in . I appreciate your note on Homework. That research is what I love about this and some past efforts. The reading both technical and historical is such a joy. Now that I have decided to include the railway on which she rests, there is a whole new avenue to study. The railway was built in 1869. there are many photos of schooners and other vessels on board.
anyway thanks
jon
-
Post 13
Now we know what are building let’s get moving
In this posting, I have gone through the decision of what to build. It will be a diorama of the partially built schooner and include the Ship builders Railway car. I will explain that in another posting. In the meantime, we need to progress the structure. The three breakdowns in my mind remain the difficult stern first, the bow and mid-section stiffing of the hull. Since some of the work will be visible and the main point of this build is for me to better learn how to build a schooner this may go a bit slow. I have also started top include finish of woods as we go though the build and I start to loose access.
The stern
-
129
 here we are gluing up the deck shelf back to the stern. One can see I have stained all the inside of the frames to replicate the blackening of the linseed cocktail applied to the real frame members. Also, the shelves and other items that get finish painted we primed gray as I saw the progress.
-
130
 early on I cut out this part of the deck frame to create the gig. Now it comes in handy for lay out of the future deck beams. I had marked up the starboard side of the deck plan on the gig to mark location of the frames, and now I will use the portside for control of the beams.
-
131
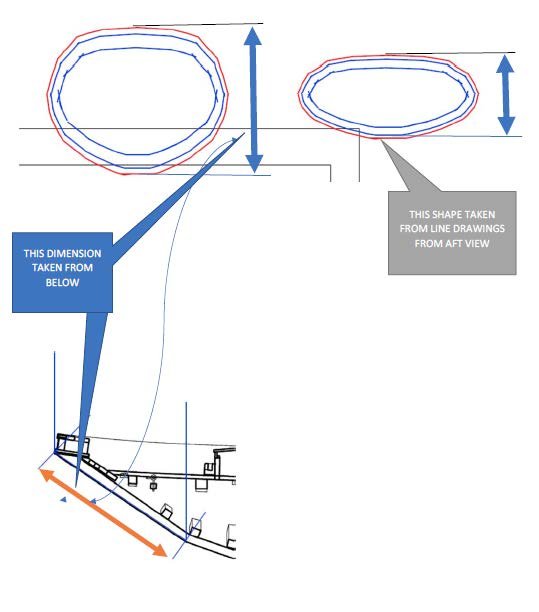 Next up is to figure out the large transom. I went to the plan and laid out the station line provided. I pasted it separately in the model with a second copy next door. I then measured the height of the transom on the section drawing. Finally, I scaled the transom to achieve the correct height. I hope!
-
132
 let us see if is even close. Not bad but how to set the right height where it ties to the rail
-
133
 The beam location is fine at deck level but for the right flare out to the cap rail, I took that plan and applied it to 1/16inch plywood. In past ventures I ended up using this plywood as the cap rail if it were to be painted. I will either use it for a form or see what is better when I get here. For now, it will help alignment of the stern where the transom reaches up to his level.
-
134
 now I have laminated, as if making a frame and roughly cut it out. Getting close
The bow
-
135
 a more detailed photo shows what I need to do in the inside. There are three sets of stringers that all come here. Strangely only the top port side one is painted. That is directly under the lazarette, so maybe that is why. I painted both… oh well. There is a hook pegged into the lowest stringer. The tough one is a bit of concrete at the bottom to the left of the dark stem.
-
136
 here we see I had to scape off paint and then stain the mid level stringers forward of the bulkhead line.
Mid-section
-
136
 Here is a valuable view that I took a long time ago. It took me several minutes to confirm its location. We are far aft i the engine room bilge. The start of the bulkhead separates the captain cabin from the engine room. I have now added the gray cross members. I note that at this early time under the engine room these stringers [ that are all under equipment and not exposed] were not painted. I may need to scrape the ones I just put in. What is also interesting is the lower level stringer pair drop to a single aft of the engine room.
-
137
 here is the first continuous mid stringer. I already scraped it in the forward area and must think about the engine room. It is clearly painted where it is ultimate a finished surface.
Next up is to get that old transom frame sorted out and to do the study of the plan to include the railway as part of the diorama that this build will become.
All for now
-
129
-
I wanted to upload some of the reading for this build.
 Sitting on my reading table is the Phoenix of the Seas . It is a wonderful Biography of the Ernestina Morrissey nee Effie Morrissey. I have finished the early parts and leaned many details that are relevant to the schooner herself. I will list some of them out as they apply to the story.
The second book is one of those coffee table books that is joy to slowly work ones way through. It starts in antiquity and carries up through about 1914-15, the beginning of the first war. Part of the finale tale is another version of the heroics of Captain Bob Bartlett in his early days on an old ship named the Karluk . They were wrecked near Wrangle island, northwest of Alaska, and he made a long 100 mile crossing into Siberia. After that he made it to Alaska in time to take a new boat and rescue the crew who had remained on Wrangle Island. This saga helped propel Bob into the society of New York City. In the 1920's he was backed by NY Yacht Club Commodore Ford to go buy a Schooner. There is a connection taking one back into the Phoenix story. Ernestina was in Canada, done with fishing and for sale...more to come
jon
-
Richard
Thank you for your kind words. I am reading the biography of Ernestina Morrissey nee Effie Morrisey and loving the connections. in around 1925 when Bob Bartlett at mid career was looking for a schooner in Gloucester, he met up with captain Ben Pine and dropped a few other common names as he looked at Columbia and turned her down. Too much of a racer he thought. There are many connections and I hope to feed a few in as I prepare to tell the story to go with the model next year. Anyway I love building historical boats especially if there is a way to see the real thing.
cheers
-
Post 12
Figure out the ends ..almost
Before moving to the staining and painting I needed to at least figure out both ends. I think I am almost there
The bow
-
119
 I have reset all the frames. There is enough material for Mr. sandpaper to fix us up when we get out of the jig.
-
120
 looking down at the deck. How best do is how the forward lazarette.
-
121
 looking down through the forward lazarette we see several interesting details. The dark colored frame the medium dark cherry colored hook, the concrete and the inside of the golden oak planking. Something to think about
The stern
-
122
 I rebuilt the dead wood assembly more like the photo.
-
123
 here from the side.
-
124
 I reset the frames 42-44.
-
125
 here from the side we see we are getting a better fit.
-
126
 from the end we see what we have yet to figure out. How to build the transom. Ross told me there is a frame in the shape of the transom that creates the flat portion. Now I need to figure out how to make that shape considering the limited drawing information. I think a little trigonometry is required
-
127
 here I am taking the major deck frames that let me tie together the deck shelves with eh dead wood structure.
-
128
 here I have dry fit the shelves and the beams
This was the point I realized I had to stop building until I sorted painting and staining. Next up I will stain and paint for a while and then install these components to complete the basic alignment. I will then solve the transom, bow hook and other internal frame members before starting the decks
All for now
- KeithAug, mtaylor, Retired guy and 1 other
-
4
-
119
-
Larry
i am so glad you posted this update. I got to go through your log and enjoy your experience and applaud the results. I too love our Maine coast and the history of Schooners. Several three masters were built here in Boothbay and I know I will build one one of these days.
your model and the case are really inspiring. Thanks for sharing
Jon
-
Post 11
What color is right
I have progressed with the rebuild of the stern, but before I take this log there, I came to another big issue. It involves the process to determine what I am trying to model and therefore what color should the components be. I realized before I carried on with gluing in the frame that it will be exceedingly difficult to color parts after assembly and I need to consider what to do before installing.
First question is what am I building
1. If I am going to build a schooner ready to launch, I need not worry about the innards. In fact, I can relax when I get to planking because putty and paint are friends. However if that is what I am doing, why did I not just build the hull with bulkheads. I would be on deck by now. This version is out
2. If I am going to build a masterpiece of art representing the structure, I should have used box wood or swiss pear and walnut and plan on Alaskan yellow cedar etc and perhaps tung oil if not wax. Anyone who has seen my work knows that is not in my wheelhouse, so this version is out. I am about trying to make it right, she will unfortunately not become a masterpiece but hopefully a learning tool as we try to record what we can of the history of Maine shipbuilding.
3. If I am going to build a diorama showing some stage of the work, there are many decisions. As of now, and considering my recent builds, I am leaning in that direction. the huge 120 x 40 foot car on the railway is something in itself. much to ponder but that is what winter is for,
Therefore, as a partial built craft, I need to take what photos I have and more if needed to understand what is the wood, and what was its color as milled and fastened, and then how has it been treated thus far and ultimately what will it get. To that end I have taken some photos and went to the site this week to review with Ross Branch what materials were used and got myself ready to choose. So here we go on what is there at an intermediate stage of construction where:
- The structure is affectively complete and coated if indeed to be coated. [ mid cabin posts are still natural]. The frame itself is oak with linseed oil combination that blackens, though some are clearly less affected .
- Some members of the structure are painted. The clamps shelves and stringers by example. The undercoat seems to be universally gray.
- The deck is Douglas fir and will be partially in place to see through to the structure. Some of the deck natural and some as treated [maybe?]
- Waterways stanchions etc. were all Douglas fir. Quite reddish in hue before treatment.
- Planking was golden European oak, some to be on, one side more than the other, but one must be able to see inside [ or what is the point?]
- Planking is natural until painting. Caulking was white filler then black pitch [ bitumen] before painting.
lets look at some photos:
-
112
 this image shows several things; the lower part of the frames and the keelson are very dark. The 6x6 beams resting on the keelson are lighter. The vertical posts are natural. the concrete is dark gray but granular. the most recent framing would not be there at the time of this scene.
-
113
 here on deck we see the reddish tint to the waterway. the untreated deck was the same but has the linseed oil that has blackened considerably. another photo show the painted out stanchions.
-
114
 here the planking, a golden oak, has the first part of caulking that is white.
-
115
 here the final black bitumen was applied shortly before painting.
-
116
 looking at the stern framing we see key members are painted. The rudder enclosure [ part of the deadwood] and members headed aft. Also see in Photo 111. These need to be painted before assembly, almost a serious oops as i glued them n last week.
Now we need to figure out how we plan to do colors. Gray paint ; I usually use acrylics are they are easy to use and give a flat finish. Also they are easy to scrape off if I am all thumbs.
-
117
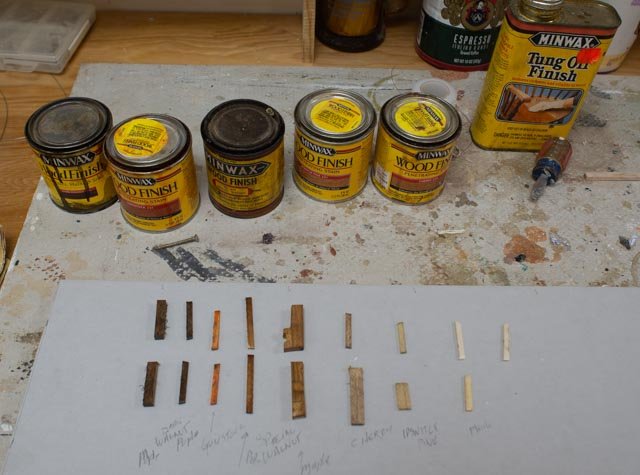 here I have taken out my weapons of choice. Five stains and tung oil. I then took two samples of poplar and for the dark co9lors maple and applied the stains. On the lower samples there is also a coat of tung oil
-
118
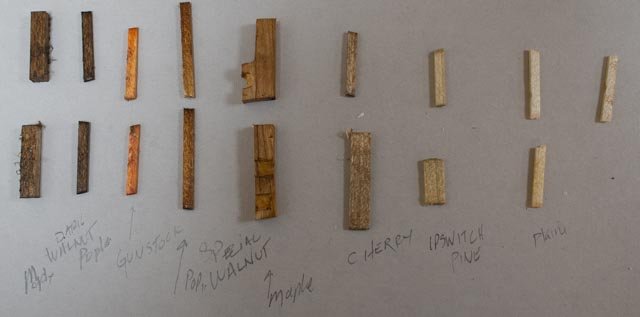 working right to left we have plain, Ipswich pine, cheery, special walnut, gunstock, and dark walnut. There is no apparent change with the tung oil and that is good. I like to add it at is stabilizes the stain finish and makes it easier to clean. I will have a difficult time if I choose to add concrete. It will be some type of paste that I need to be able to remove from nearby members
I cannot go much further without getting these things done. I know there is more fairing to do, but that is just an issue. Also I need to figure how to get all the pencil marks out. And because this is me building this, glue is apparent and will impact me some.
I believe for a start, the darker frame members will get dark walnut, and the others special walnut. Of course, gray gets grey, so I need to divert and prep for painting the inside at least. I believe this weakens the glue value for tight bond but not painting the members now is worse. In fact, what do I do about the back side of the clamps and sheves already installed? Something to ponder. I think I will cover those with planks and avoid the issue. Yes I need to think about what to cover and what to leave if one is to see inside.
All for now
- mtaylor, oneslim and Retired guy
-
3
-
Allan
Thank you for kind words I appreciate your comments. Yes my focus is typically to try to get it right, I know that sometimes it means scratches or bumpy paint and stuff, but is is a joy to learn how these schooners were built and how they worked. thanks for any advice along the way.
 I was on site last week when Gleam, easy to google, came up the car and was moved into a building to be refit. She is a 1937 12 meter from Newport RI. Ernestina is on the main railway. this second railway in the photo brought up Bowdoin a few years back and she was a joy to study and model as she was replanked in the same building . Gleam apparently will get new planks this winter.
cheers
- mtaylor, allanyed and Retired guy
-
3
-
Post 10
First attempt to frame the stern
This post is a saga of trial and error then ended is a good lesson. Starting off I used the 2008 park service plans for the transition through the aft section of the keelson and rider to the vertical deadwood that was modified for the added propeller many years ago. I then checked by looking as best as I could at the innards of the transom framing on site of the current rebuild.
-
99
 here as we look down the hatch near the rudder post and see a frame notched out to rest on a major 6x6 member that goes aft from either side of the dead wood.
-
100
 here is a better view of the two main members headed aft up to the transom.
- With all this information available off I went.
-
101
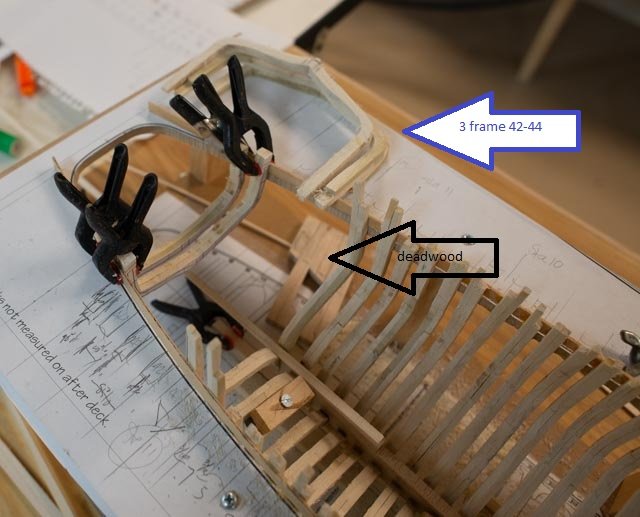 here are all the parts. The deadwood assembly at this time is only what was shown on the plan.
-
102
 here I have set the deadwood as is and frames 36-38 are in place as discussed before with notches.
I was having trouble visualizing elevation so with a little study I added the deck frame members to the top of the dead wood. Also as pointed out in the visit of 2016 I added the “gray’ member doubling the deadwood to receive the three frames 42-44
-
103
 the assembly is reinstalled.
-
104
 here from the side we can see I copied the member from the drawings. I was incredibly happy the top of it aligned nicely 5/8 of an inch above the projected deck frame elevation. yippee
-
105
 now a dry fit of all the frames. I have split them and accounted for the thicker center assembly.
-
106
 from below I am disappointed with the setting of the two frames 38 and 39 that I notched into the keelson.
-
107
 more adjustments, cut out frame sand clean and reglue into position hoping it fits.
-
108
 nope we are not going to get there. I take out the offending frames.
-
109
 it still won’t work and I take out the assembly. Something extremely basic is wrong.
Eureka!
I went back and relooked at the visitation pictures from 2016. That is when I made the recent posting. This is the issue that got me there. The solution is at hand
-
110
 this is same picture I showed before in the visit page. The design of the framing around the big hole for the propeller answers all my questions from the 2008 plans. The keel is fully built up higher and more complete to fit the frames. Thank you.
-
111
 there I have cut out the offending members and will start from there to fix it.
Two steps back but I feel better already.
- Retired guy, KeithAug and mtaylor
-
3
-
99
-
Post 9
Bow and stern part 2 of more
I was right. I was too optimistic that I would figure this out and move along. The bow is sort of straight forward. I will be able I believe to get it close. The stern, well that is another matter. The writing of this post helps me pull together my scattered thoughts and seek a direction to get through the next challenge. How to build a stern frame that reflects the recent rebuild and keeps the shape. We’ll see how this goes.
I mentioned my recent revisits to the real schooner this week. I was able to spend the lunch hour while all the crew were at lunch wandering through the innards and took my time to photo what is my record and basis to build this frame. I am thinking more and more that this build will indeed become another diorama of the rebuild, so I will need to have some of this work visible and I need to have it close to right.
I start this diversion with three subjects and will share a few of my photos. the issues are
1. What is the new clamp and shelf combination that eliminated the myriad of knees and has been used that is different from original design? The reason I do this now is I realized I need to get this part done to extend the necessary frame controlling elements aft to align the stern.
2. How is the bottom inside finished including the mast steps? This area is affecting the work going aft, and I need to be sure things are ending up in the right place. It also affected the bow as I found the rider keelson goes all the way forward as does the concreted inner base. Worse I found the after section that is empty on the drawings as the keelson rides above the frames is not totally correct.
3. Get the bow and midsection down to set up aligning the stern.
1 How and where the deck attaches to the hull
-
83
 here we see the lower gray stringers [ 3-inch-thick inner planks in lieu of ceiling] that go at the turn of the hull. Above them acting and are the clamps are two more. A 6-inch larger clamp rests below the 9 inch shelf. This assembly is for the forward section of the deck
-
84
 this is the transition at the step up on deck, it is a raised shelf on spacers to get up the one-foot rise. The photo is further confirmation of the 9-inch nominal size of the keep shelf members. We are in the main hold.
-
85
 looking at the bulkhead in the last picture we confirm then end of the doubling of the shelve. We ae now in the engine room looking forward at the same bulkhead. These clamps and shelves need to extent aft for the right alignment of the aft frames
2 how does the bottom inside finish
-
86
 Trying to pull together what happens at the mast step involved learning about a lot of things that go on in the bottom of the hull. We are forward of the main mast looking down. What we learn there are 6x6 beams on every other frame resting on the continuous keelson. We also see the concrete ballast that comes up partway on the keelson. [ about three inches exposed here] under the lower deck we see another of the beams and parallel to the keelson a member bolted to the side creating the needed dimension for the main mast step.
-
87
 looking forward at the same area we can better see some of the details
-
88
 Looking at the mast bottom we can assume there is a tenon on the keelson between the members to receive the mast
3 So let’s try progressing using this information and get ready to start the stern
-
89
 fitting in the bow stem at the bow seemed to be going well
-
90
 here were doing a glue up
-
91
 here we are using the plans to build out what we thought was the stern structure. On the drawing I was inventing frames that were shown on the deck plan but not the frame drawings.
-
92
 time to get the shelf in place.
-
93
 I made up a bunch of blank deck beams. there are more sizes to make s but a start.
-
94
 I needed top put in the clamps so I could extend them aft for better alignment at the step up.
-
95
 i added to the forward keelson to maintain the level through out. this is shown on all the model arrangement drawings but not the framing plan.
-
96
 now the test. I rested some 6 inch beams on the added forward keelson and allowing for the rise to the lower deck we have the right clearance to the underside of the beam.
Now my next oops
-
97
 setting the bow frames. I went too quick,. the three frames are clearly too high. As a result of this error I got a lower step stool to sit on for a better view when working this low. That’s right blame the tool.
-
98
 on the mend.
Next up I will try to set up the stern
- KeithAug and Retired guy
-
2
-
83


Ernestina Morrissey by Jond - FINISHED - 1:48
in - Build logs for subjects built 1851 - 1900
Posted
post 21
I solved my plan for ABS structure and started interior work on the hull.
Christmas week always knocks us off schedule. This year was no different. After the last posting, I decided to build the car in place and make it secure. I will then somehow get the ABS structure built and set-in place once.{ I hope] So, for the holiday pictures we made a little progress
Now to work on the ABS steel structure. I have now made three orders to Plastruct and I probably will need a fourth. I started over sizing members and now think I have the right combination. I also figured out how to connect pieces. It is just like soldering…..so
The hull
All for today