


Jond
-
Posts
763 -
Joined
-
Last visited
Content Type
Profiles
Forums
Gallery
Events
Posts posted by Jond
-
-
Post 6
Copper Hull experiment…the patina part 2
I think I ‘m going to proceed. I can always come back and change. Here is my rationalization.
-
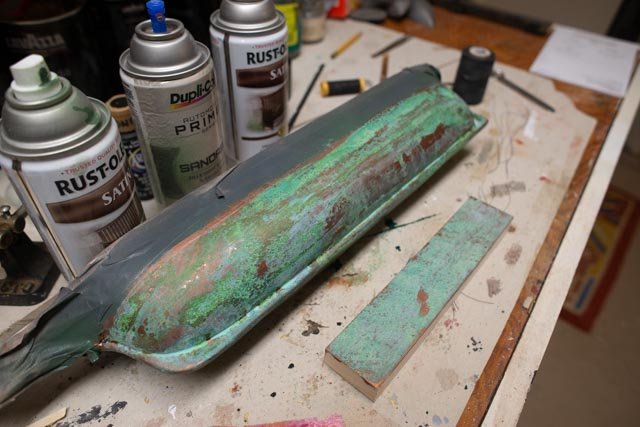
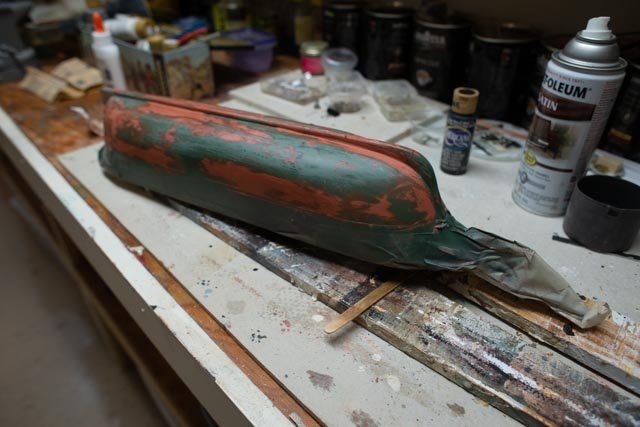
 Ap-33 I turned her around and tried the other side. This image shows we are on side two with coat two ready for treatment.
-
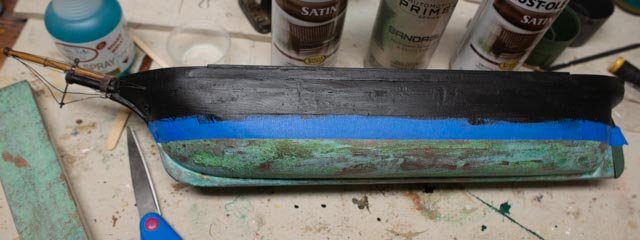
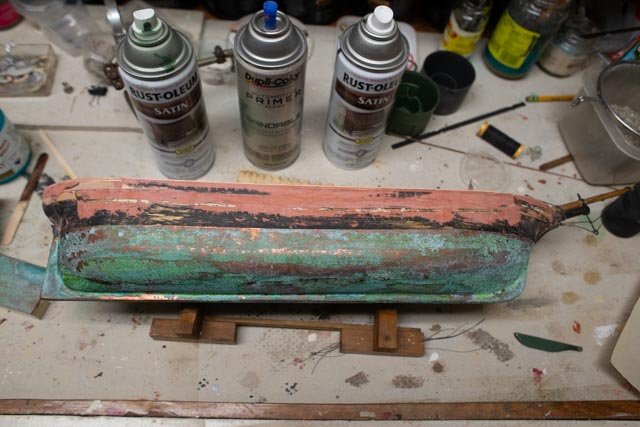 Ap-34 here we have the same issue as the other side. I only did two coats so three coats as an issue is eliminated. I was very careful on application, and the bare spots still came up. They are consistent on the roundest part. Before removing the masking tape, I did a second application. There is improvement but some green is getting too green.
-
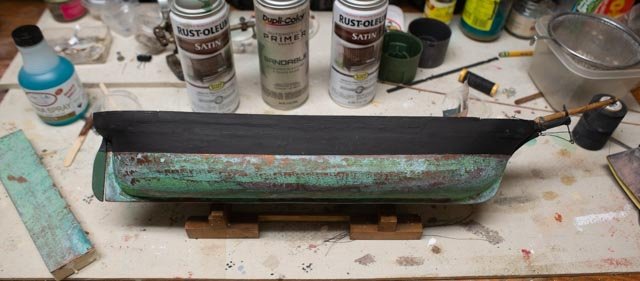 Ap-35 another issue is which black to use. I started with this coat as an experiment. It needs another cycle of filler sanding and another coat anyway. This trial is the ink black that is so perfect for flat iron work. It is flat, I mean really flat. The debate is ..was paint in 1853 ink black or oil and other pigment. Should one use flat or satin. I just don’t know the evolution of paint. If tar it is a bit shinny and I like to use ebony stain for that of ratline slats and things. All the books say is black. I will do each side different and then decide.
As to the look …….I mean when the model will be displayed how does this patina and paint look…
-
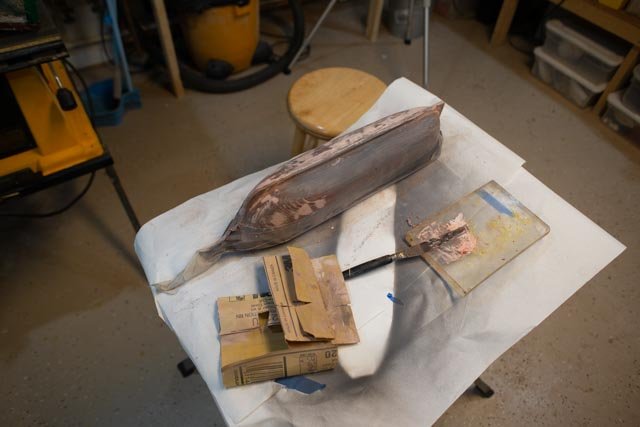
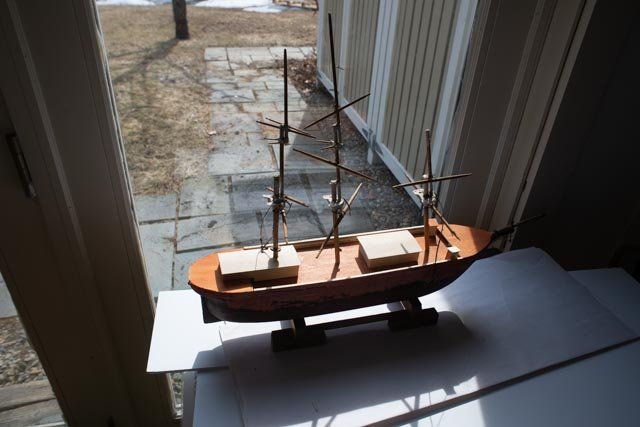
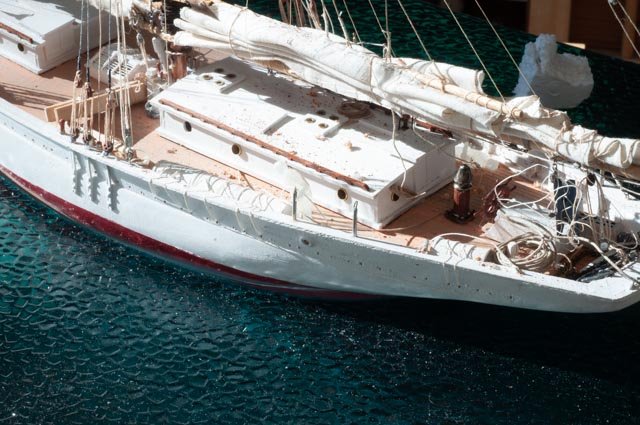
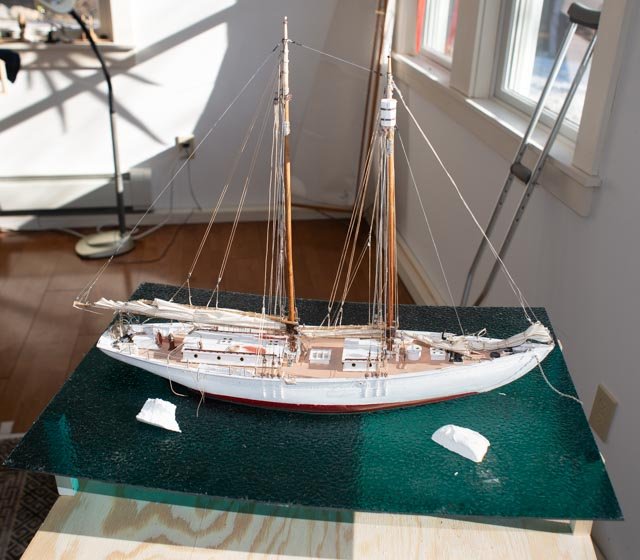
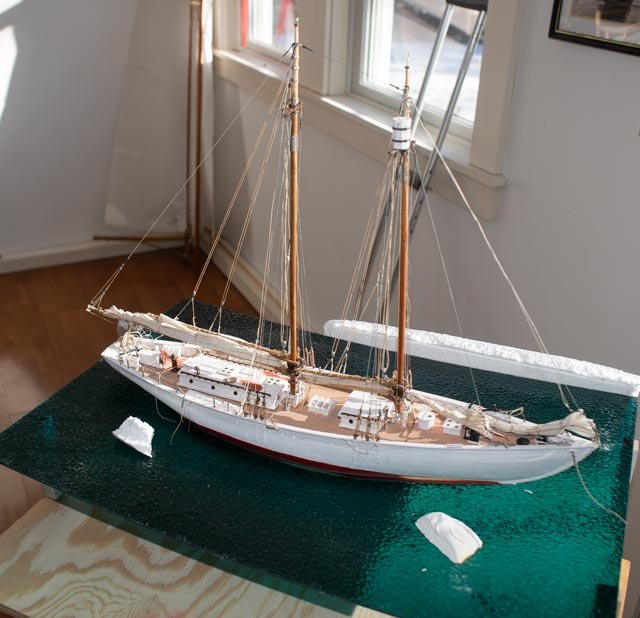
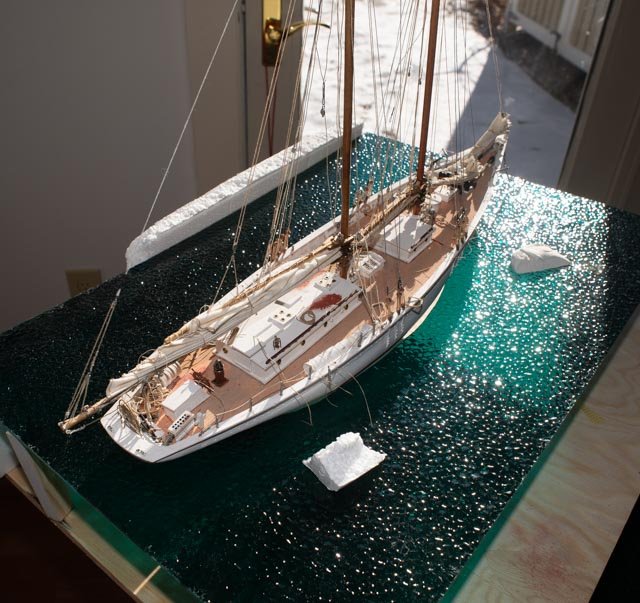
 Ap36…This image fairly shows it will be low and not under bright light on the lower hull.
As to the message…. I am trying to depict what things were, how they worked and focus more on that. I am not the fine workmen to focus on the beauty of the wood or the skill in finish and carving and the like.
-
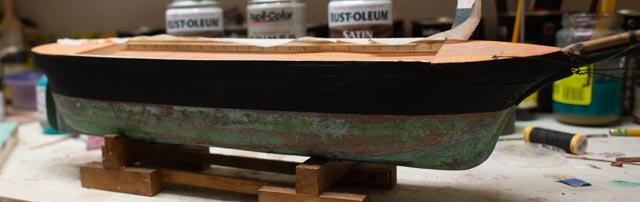
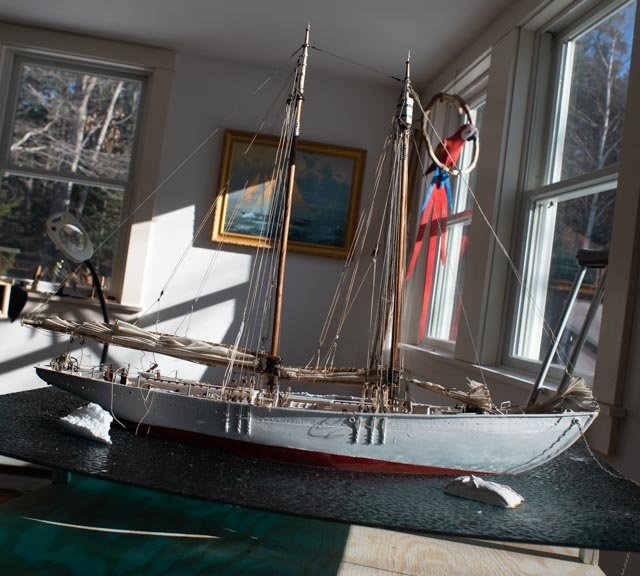
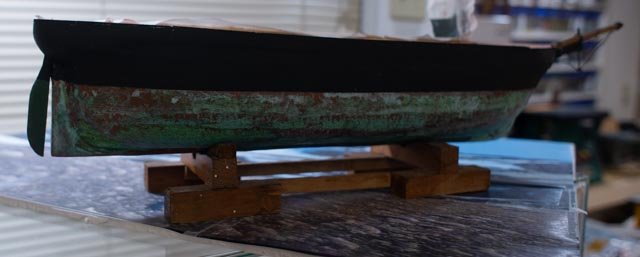 Ap37 a glance of the hull at eye level as one walks by… I want one to look at the model and sure like what they see, but also understand from the glance what things are made of. That bottom says I AM MADE OF COPPER AND I TURNED MOSTLY GREEN. The green paint did not.
-
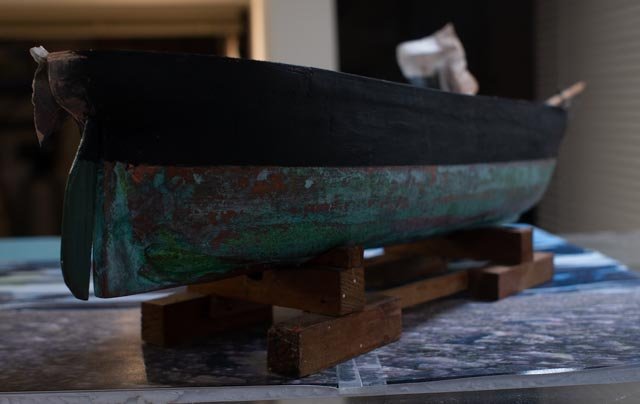 Ap 38… I have read the copper plates under water did not change to all the same green. The copper near the water line that saw air was the greenest, some boats saw more time in dry dock, Some areas where fast water kept the copper hue longer[ maybe??]. All these things are perceptions. And we have no copper in our lifetime to look at.
-
 Ap-39 I went ahead and painted the opposite side with the satin finish black. In the write ups on 1850 paint, Crothers discusses the mix of ink black with red lead and “paint Oil” [ other reference said linseed oil]. If they were painting yards black, they added turpentine to the brew as it... "gave a gloss". [ Therefore, without adding turpentine it may have been flat. I have a different issue. This hull is caved spruce. Despite three treatments of putty and sanding the satin finish highlights every little defect and takes the eye the wrong way as to scale. The spruce grain that I have filled and sanded three times is still there and ruins the concept that one inch of model is eight feet in life. On the flat iron side, there are defects that I can eliminate with another round of fill sand and paint to the result of the back ground is non discernible. That is the look I need for this repair. Once I replace the plank sheer and the channels, I want them to be what is seen not the grain that despite my effort lives on.
Conclusion…that is better said my conclusion
What I have may be out of scale and to some will be awful. Perhaps I should do copper plate and then acid etc. This test shows my attempt to clearly explain the bottom is copper patina. I spent only $40 on material and having used just 10% of it means that supply could do many more models. I feel it is better to use on the larger hulls meant for RC sailing and someday I shall treat my large 1853 Pilot schooner, I showed in the last posting, that is currently just green paint. I have a friend building a 6-foot Flying Cloud and maybe he will like it. I believe the results are better than green spray paint. ..The option to install thin Copper plates to this hull would have been easily $100++. The market plates are meant, I believe, for larger scale 3/16" and up, so I am not sure what to do. Then I still would have the issue of how to treat to get patina. As to scale with the tape option…..would one punch the nail holes at 1:96? I think not……and unpunched tape just is not worth the effort to prepare the hull.
Regardless there is always so much to learn. Years from now, I may laugh at this conclusion. This model is not a fine piece to have any great value. It is chance to salvage an old model and end up with a decent replication of a ship built at the time, so people can see what was built in our harbor.
With that logic or at least opinion, it is time for me to move forward. I will do more touch up on the Dixie Bell copper, as handling will cause some damage and I need to address the “too green” spots. I also need to do the rudder. I tried sanding with 400 grit, and it improved the look by removing the roughness and blending colors some. That helped reduce the scale issue. I will use the Ink Black super flat paint for the hull and then a satin when I get to the painted yards. I will re address this when we are really done with the hull.
on to the bulk head
Cheers
-
-
Posting 5
Copper hull experiment
I always like to try something new. It does not always work. I am setting myself up for big oops, so let’s follow the bouncing ball, as I attempt a craft approach to copper patina paint.
-
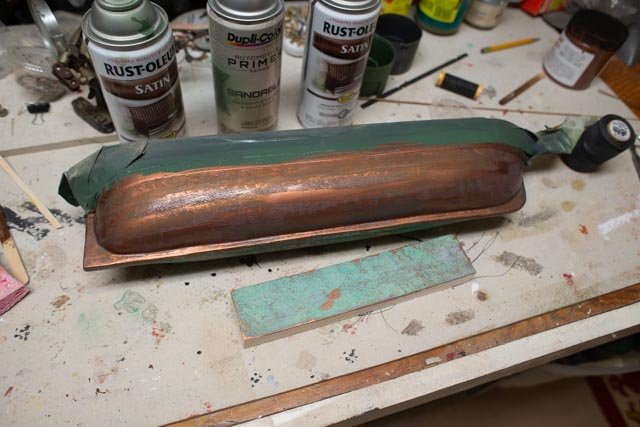
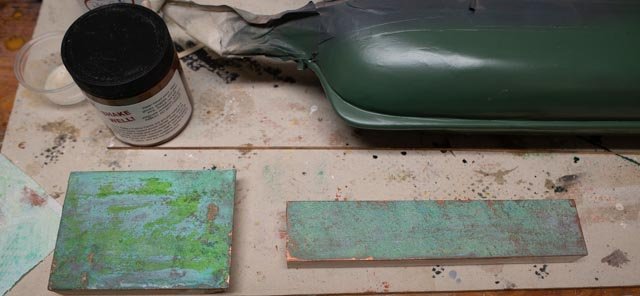
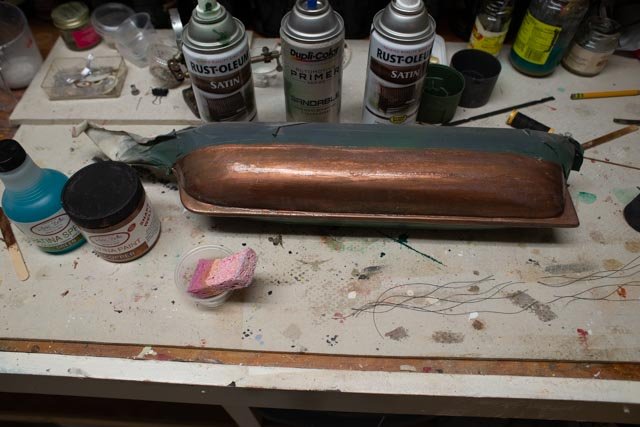
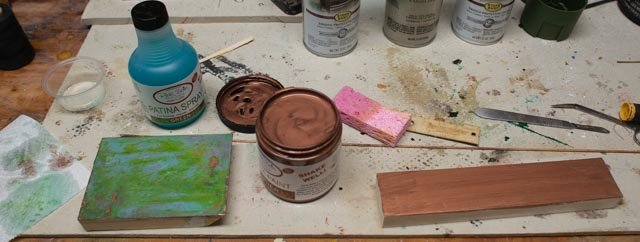 Ap-25 the secret supplies arrive. On the net I found many choices but was most intrigued with the Dixie Bell paint procedures. Here I have chosen the copper patina paint [ in the jar] and the green [ vs optional blue] patina spray. They show applications to vary from the spray to sponge.
The sample on the left I did not like. It was too much liquid which over treated the paint and retained a chartreuse green. On the right we have the second sample. One paints a copper layer and lets it dry. One then applys a second coat and added the liquid to the wet paint so like blackening agent for copper and brass fittings, the metal particles suspended in the still wet paint can turn color.
-
 Ap-26 here the second sample looks ok
-
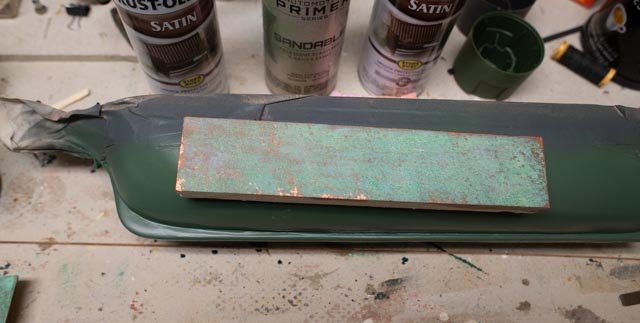 Ap-27 the test. Setting the second sample over the green hull I decide to go for it.
-
 Ap-28 first coat per instructions….let it dry
-
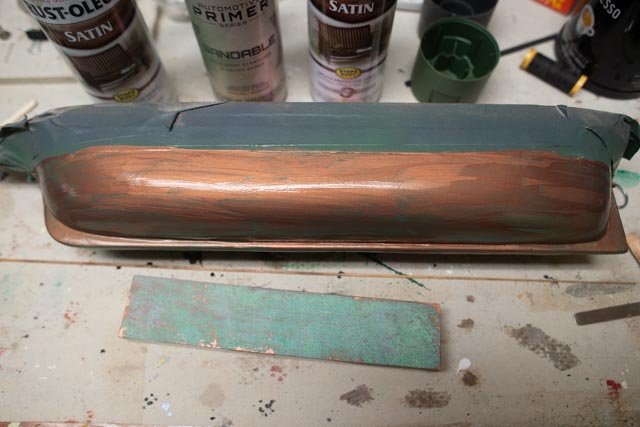
 Ap 29 I was not satisfied with the cover of one coat over the green so I added a second coat….maybe oops.
-
 Ap-30 Here as the third wet coat gets sponged, I am optimistic!
-
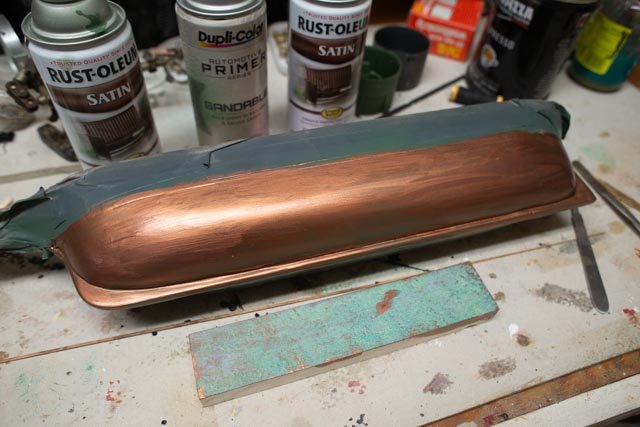
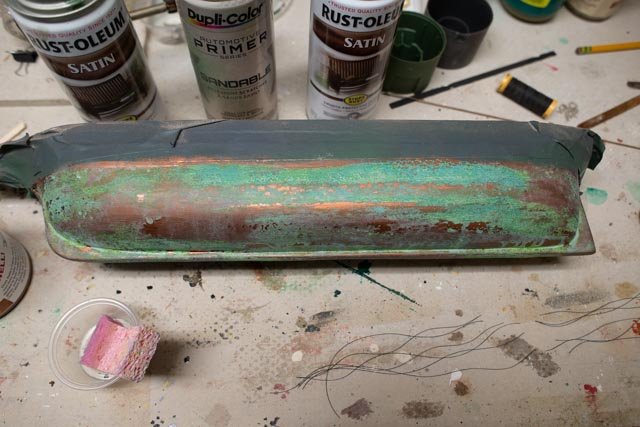 Ap 31 hours later I am perplexed. Why so different than the flat surface. This may be great results for life size plaster bust that I want to look like old brass but for the scale it may be wrong.
-
 Ap-32 here if you compare closely I have put dabs on where the copper showed the most and added more treatment. It’s better but the green if hit twice seems to get too green. What to do.
Stand by I am trying side two
Jon
- mtaylor, GrandpaPhil, KeithAug and 3 others
-
 6
6
-
-
Thank you Keith
Now I am ready for some real comments on my next two posts.
-
Post 4
Hull part 2
Ok it is time to move under water line. This carved hull of spruce had large grain, two knots etc. That is fine if I strip it and varnish it as a novelty. I am trying however to depict what a ship was like that was indeed build here, and not what the model is made o. Therefore a crisper cleaner look is needed in this area. The process is routine, the issue becomes do we do three times through or keep going. How are we going to depict the copper?
-
 Ap-018 this view is after the first full cycle of bondo, sand 220 grit, putty, sand prime and sand 400.
-
 Ap-019 second time we delete bondo and go with smoother glazing putty. Then gray auto filler primer. Sand that 400 grit and spray the green finish. Now we add more glazing putty and sand…yes a mess but we all know it well.
-
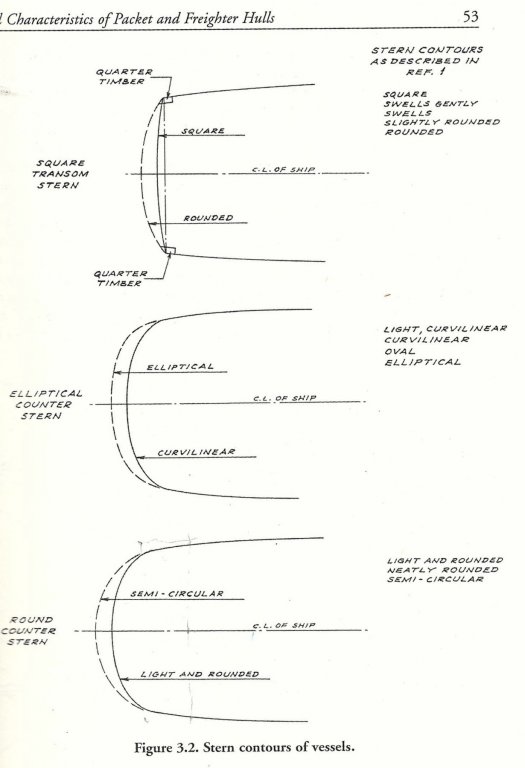 Ap-020 the transom. Here is the discussion on different transoms at the time. Alna was the bottom one, Lightly rounded as per this scan from Crothers book. Well our model is defiantly a semi-circle. Looking back to the photo ap-015 we see that if I cut the transom to the right shape shown as pencil on masking tape, I would uncover the rudder. The other alternative would be to cut out a block and set a larger one in its place. Then I would need to carve the transom to extend cheeks and create the correct “lightly curved” profile. I decided to leave as it is and simply record the finding.
-
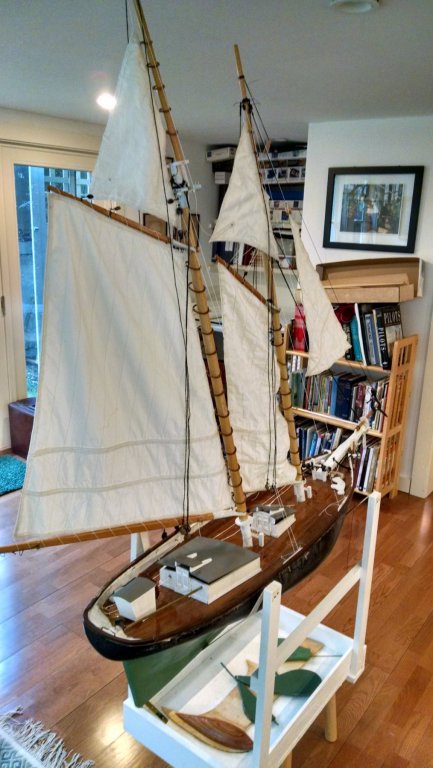 Ap-021 in this photo one sees the first sailing schooner I built. It is large scale and meant more to sail than to replicate any details. I used rattle can soft green paint to replicate the copper bottom. This is my starting point
-
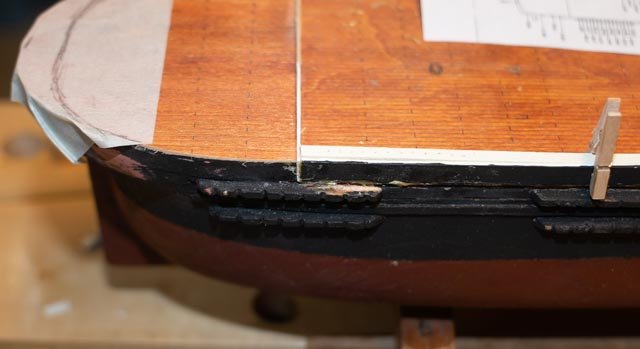
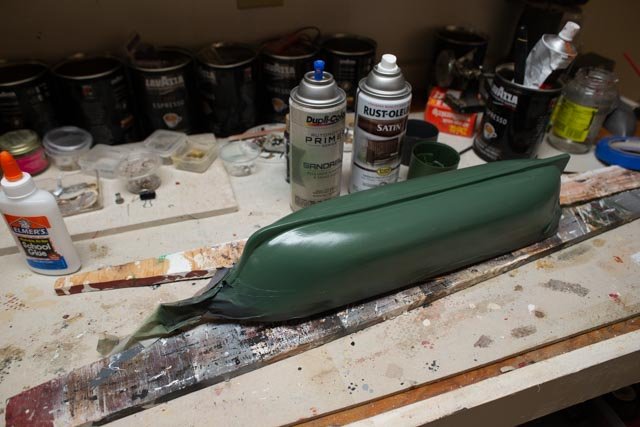 Ap-022 well here we are as we stand if this level is good enough. This is the third green paint cycle of paint and patch and repaint. As a sign, the can ran dry, so perhaps it’s a signal that we reached enough.
Stand by because I am going to try an experiment before leaving the process as is [ loose interpretation of patina] material is on its way.
In between coats and other jobs I found a need to rebuilt the standing rigging channels.
-
 Ap-023 Here I use the mini saw to try to make them the same length. I found some scrap hard wood similar in color to maple. I find bass wood to"frayey" if there is such a word for this type work. I have a big block of pear someone gave me to mill down but that is a winter project in itself.
-
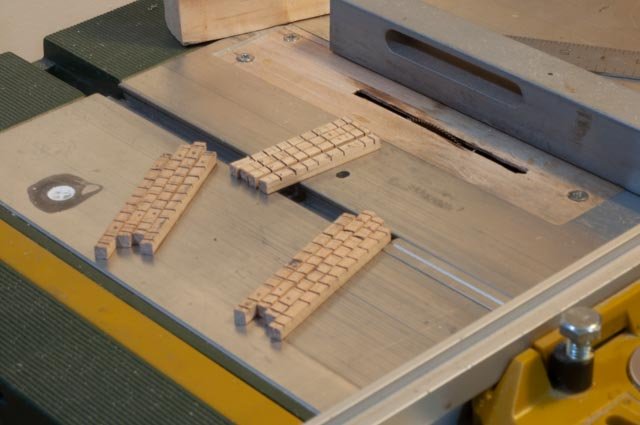 Ap-024 here I sliced out the groves, again to make them look a like. After this step, they were filed with triangle to get to a groove. I chose to make the lengths and slices based on the Crothers plan which was a little different that the old model. i will be doing the standing rigging on this plan so the groove count will match up.
Cheers
Jon
- EricWilliamMarshall, mtaylor, Tom E and 2 others
-
5
-
-
Post 3
How about those channels
I studied the drawings for building the bulkheads and pin rails. First up I decided was to cut and place the stanchions. Because of the tight scale, I decided to cut them short [3/16”] to come under the pin rail. I then added a 1/16” x 1/16” strip to increase the height properly to the main rail. I want the main rail to end and tied to the waterway on both the focsle deck and half poop deck to follow the Crothers drawing. I have some compromises here. As I said before the focsle is a good 1/16"+ low and I chose not to raise it. I am trying to replicate 4’6” total rail as per Alna but I won’t quite get there. We’ll see.
-
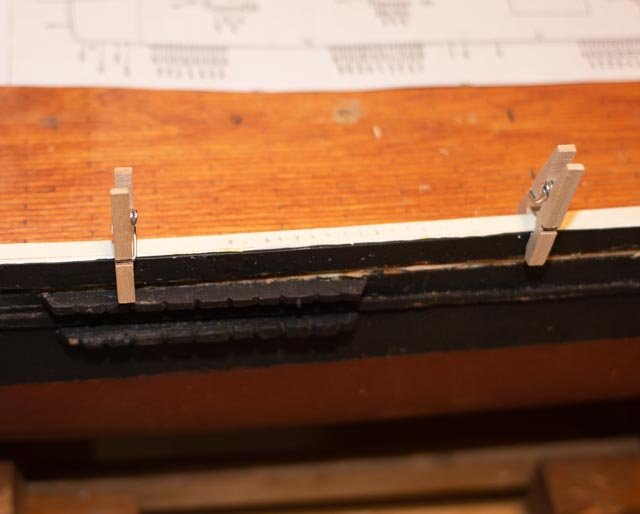
 Ap-011 here we are holding down the main rails for the shear.
-
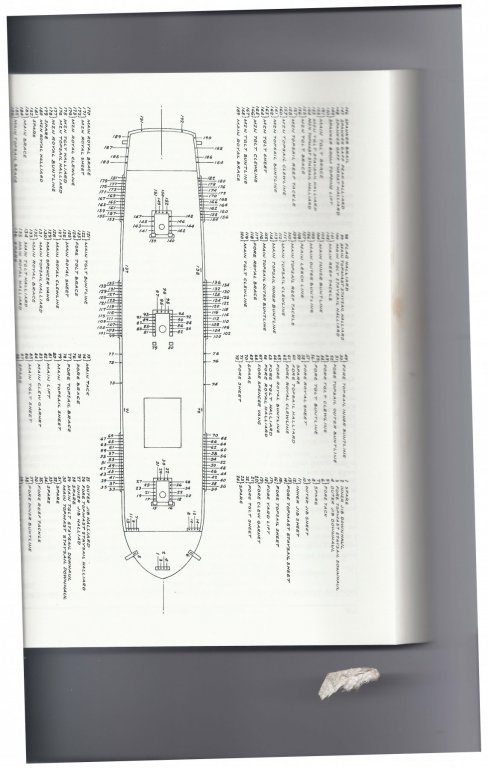 Ap-011a I scanned this page for Crothers book just to show the slippery slope of models ships. This is the pin layout and there are 198 pins…….OK maybe on the next one.
-
 Ap-012 I cut it out and looked to see how the existing channels are located. Surprisingly after finding he masts correct, I was surprised to see how poorly they are located.
-
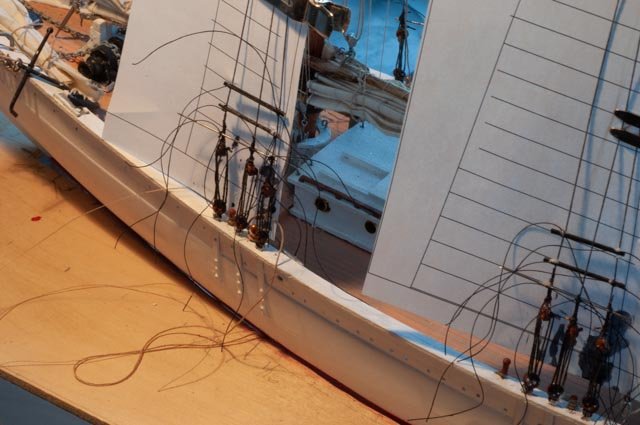
 Ap-013 Here is the foremast. I have light pencil lines where the pins go, and the channel location is way off.
-
 Ap-014 Here on the main mast we see they are off and awful looking I am happy I get to replace them as it will make fixing up the hull much easier than to try to work around them.
-
 Ap-015 here is the mizzen. I also found I need to raise the half poop deck to meet the main rail 1/16". I like this as there was small damage to the first applied deck sheet. The tape and pencil line on the transom I will discuss in the next posting; they represent the proper shape of the stern.
-
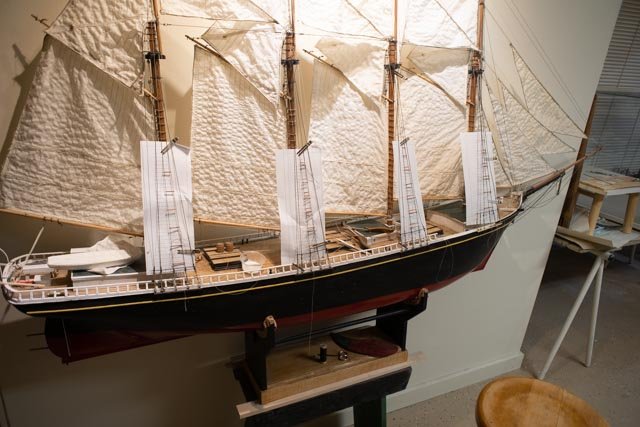
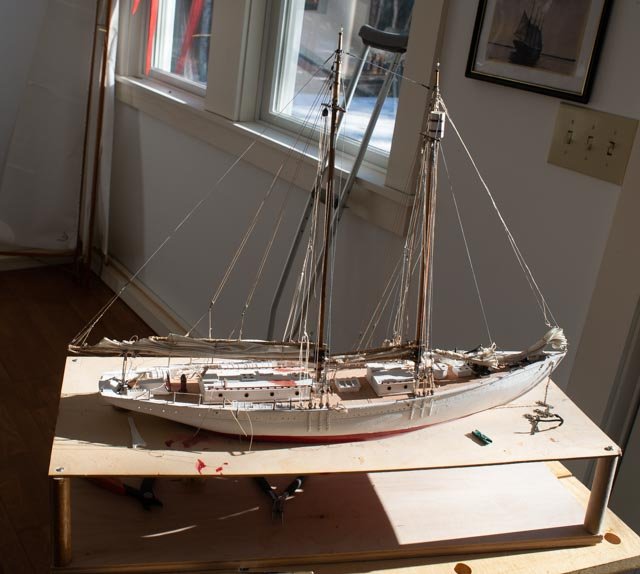
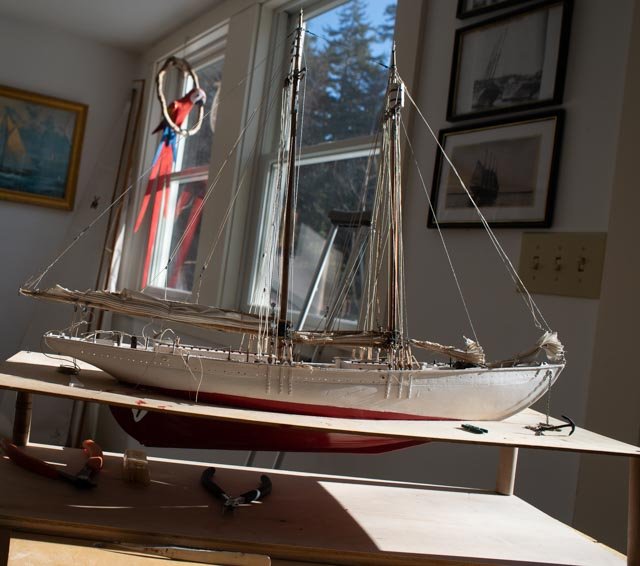
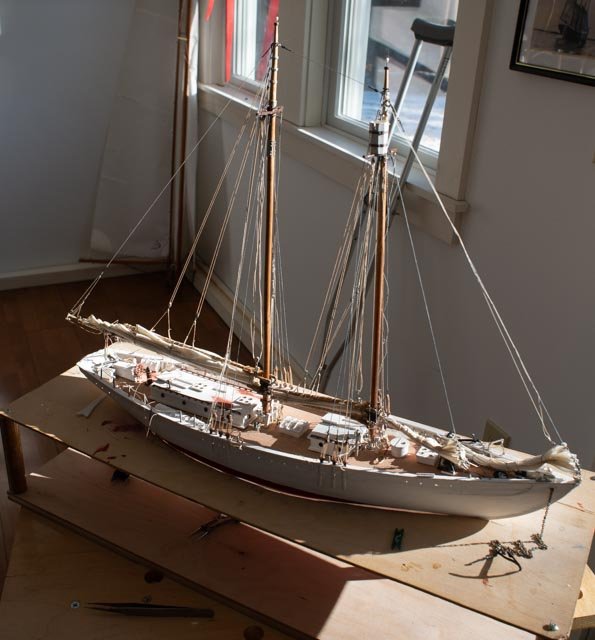
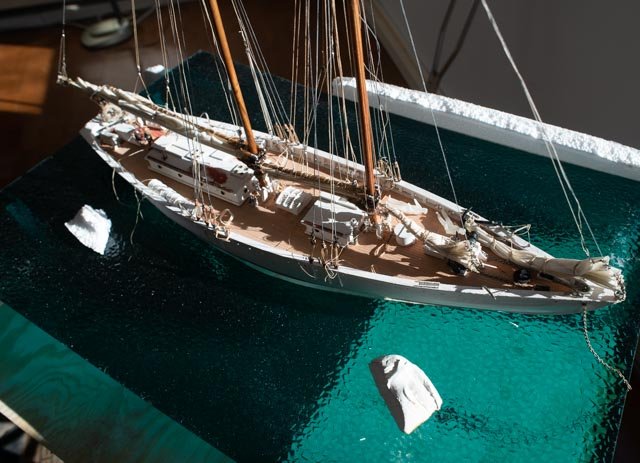
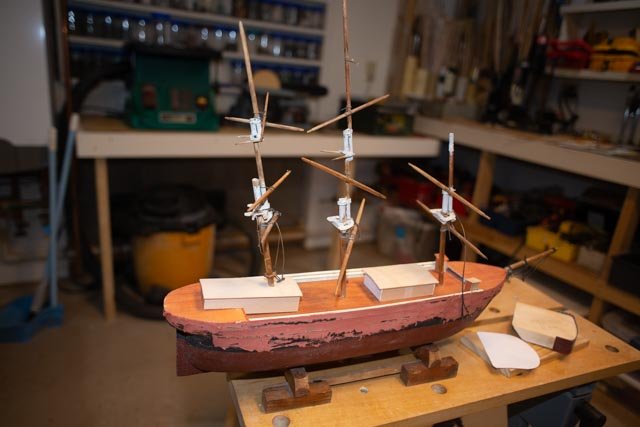 Ap-016 So for fun here I have stuck the old masts in to take a look. I have started the hull rebuilding above the water line. About three times through the filler, sand and cleaning process. I want to get this done before working below the water line, but also before the more delicate monkey rails.
- I need to think about how much rigging so I can plan on pins. I assume at this small scale they are about 5/32”… I guess I set up and cut a bunch of coper wire with black coating to contrast with the ivory [ off white] color scheme of the bulkheads.
-
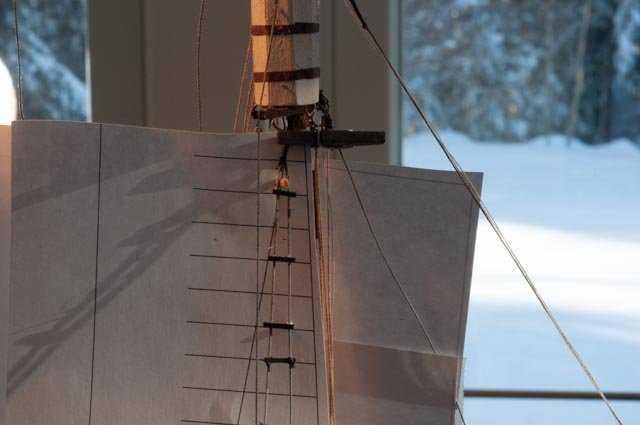
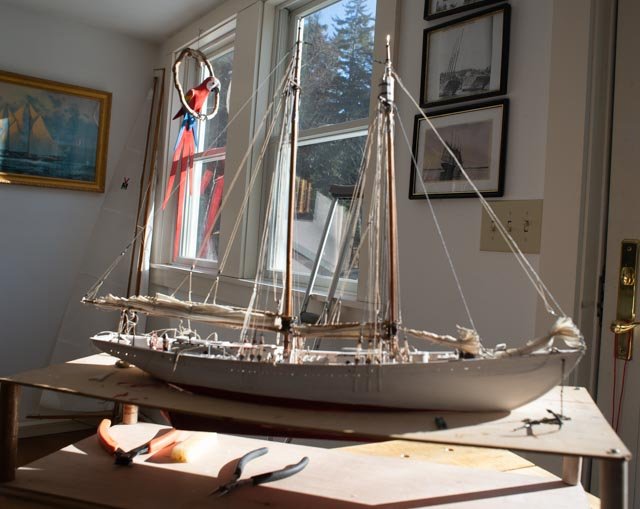
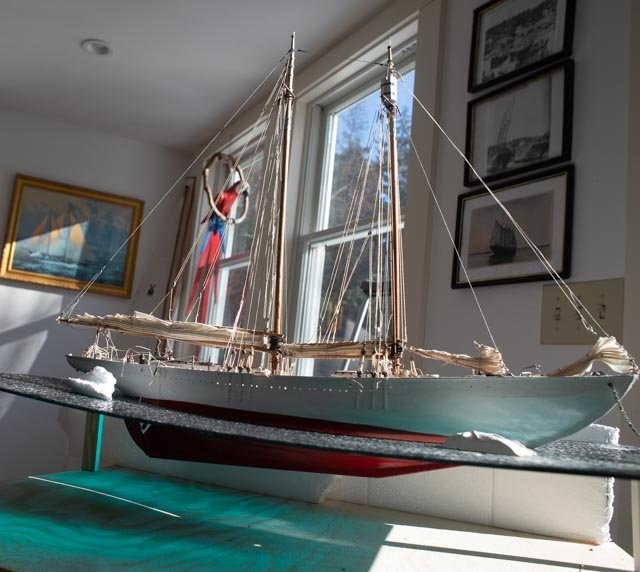
 Ap-017 I love to play with side and back lighting when planning a display.
All for now
Cheers
- GrandpaPhil, mtaylor, KeithAug and 1 other
-
4
-
-
Post 2
The hull part 1
I am feeling my way here so I am not sure how far we may go. There is a lot this hull needs but if I go crazy one might ask….as Roger already did ask…..why am I using this old hull, it seems more work than carving a new one........I can attest Roger is right. So let’s try better to stay with the basics
Easy ones
The red paint must go! Then the decision to add either yellow metal / copper plate as was in vogue according to Crothers on most ships / freighters of the time. He also said that some yards sent them out painted and the owner then added plating and other items in dry dock before her first outing. We shall try to do more research on whether copper was part of the Boothbay Scope, but for now I have no reason not to include it. So for the choices, we will first clean up the rough spruce log look and paint a simple light green to simulate patina copper/ yellow metal [ contained more tin I read]
I will share a fun experiment that I thought I might try when it comes. The teaser! lets look a a little progress on the hull
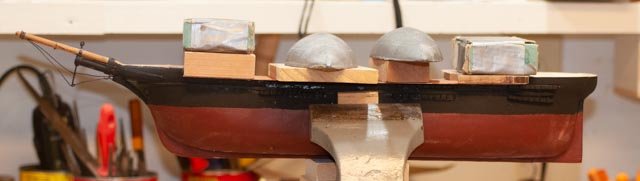
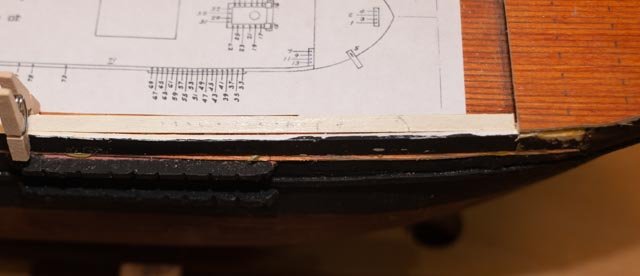
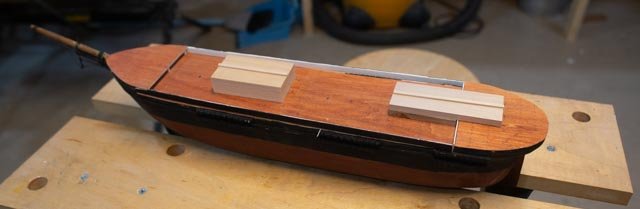 Ap-006 So the first thing I did was to cap off the hull with a simple sheet stock decking. I hemmed and hawed about stain colors and ended up with gunstock. A bit too red for some but with sheet stock the grain comes through and blows the scale, so I went dark. I then after one coat of poly added pencil lines on the joints and cut all planks to be 12 feet on three alternating rows. I say all this hoping someone says right or wrong. Please note the added 1/2 poop deck that matched up with e focsle deck on height. The block cut outs are for cladding the deck houses again as per the Alna deck layout plan
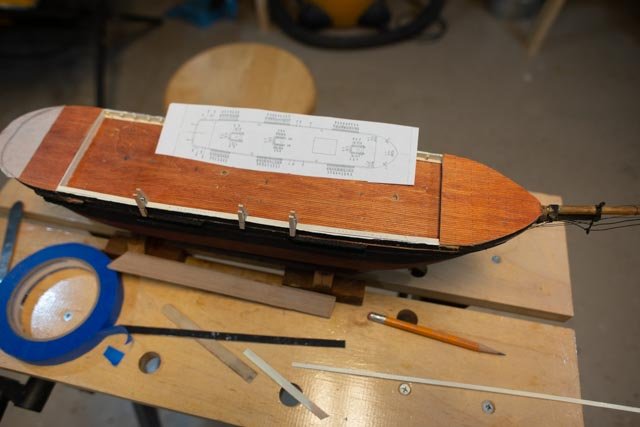
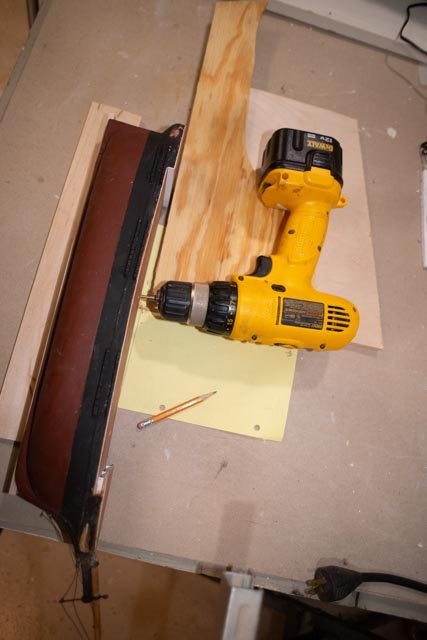 Ap-007 The second thing is to get the masts laid out and drilled. I want to try to reuse the old ones and their methods was a minor countersink [ 1/16”] at full diameter and a pin. Here I laid out the rake per Crothers on the yellow graph paper and aligned/ shimmed the drill and hull to be square for the pin hole.
 Ap-008 Here is the first bulkhead. It is ¼[ 2 feet] with waterway inboard. That is 1/16 too low but here I am compromising to fit the preordained low focsle deck. More on that later
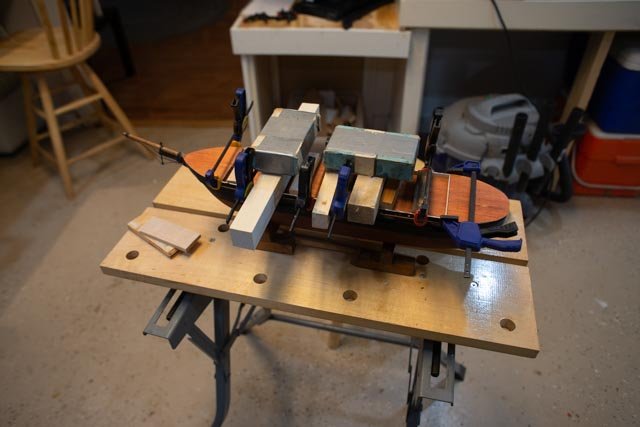
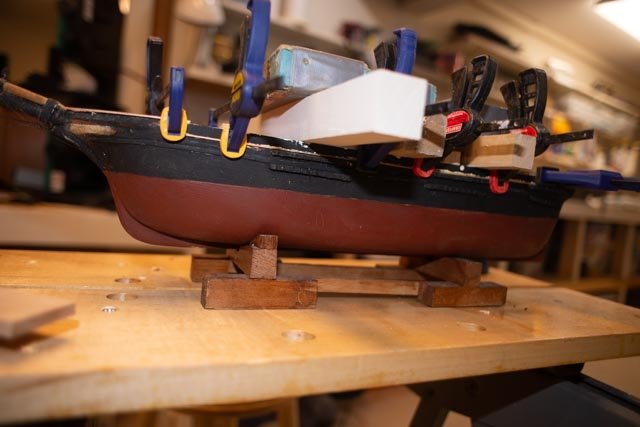 Ap-009 I had to use lead weights to bend the bulkhead to the existing shear. i wanted to get it in place before fixing the hull...that has several problems
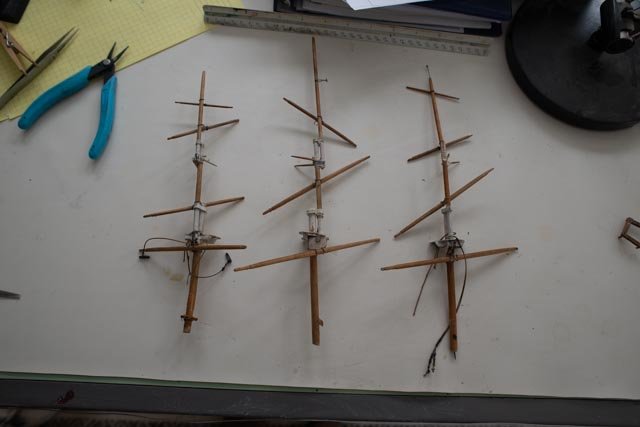 Ap-010 just as an import glance I want to share the existing spars that we need to study. I want to rescue them but there are a few dimensional issues. The good news is when I took Crothers dimensions to locate them, the fore and Main mast feel in the same hole almost perfectly. The mizzen was a bit aft but that makes perfect sense as there was no poop deck on the original model, and the rake of the mizzen mast moves the opening on the poop deck right back to the right place. this is good news.
All for now
Jon
-
-
Thanks Tim
Bertha Downs is incredible . Please consider buying the very complete book on the anatomy of that wonderful schooner
One might note that more than 10 days to reply shows I have too many irons in the fire.
 here I am trying to keep a pace of slats per day. i will get there but 15 a day is tough as there are to many o days. I am also fixing up two schooners, and completing the Bowdoin diorama all for may. then I started another ship! i must be nuts...spring clean up is around the corner and we need to get so much done
cheers
jon
-
Thanks for the comments.
first to Roger.........Thanks for the question because to answer it helps me form my rationalizations and think ahead. This old model was being thrown out by the Maine Maritime Museum. I am trying to give it new life and along with other builds refocusing all to replicate what was built here in Boothbay. I agree that there are several issues with this hull like:
- the shape of the stern. It should be a "round counter stern' per Crothers. I did some minor sanding to reshape to simulate but not yet achieve even a symmetric curve . I am considering using my oscillating belt to also bring in the end to achieve the counter, but it will not be perfect. The rest of the hull however looked good to me other than two bulges at the bow that I knocked down.
- the height of the focsle deck is definitely too low. It is only a few feet up and I believe it should be a bit more. the data says the top of the combined bulkhead should be 4'-6".. I will be pushing the monkey rail to get to 4 feet. I want the main rail to tie into the water way for the upper decks as that seems to be the way in the Crothers drawings. the monkey rail then just flows all around.
- I chose to build up the half poop to match the low focsle, so it comes together in the rails. The cabin I built is therefor also low on the main deck. the correction might have been to carve main deck down, but I felt I am recusing a model and need to relax a bit.
my intent is to openly declare what I determine is wrong. I plan to try to breath new life into he model and help a friend who owns it. I also have much to learn from the build and that is big for me. I will spend a few months learning how to work at a new scale for me 1:96 and to do square rigging. I am truly a schooner guy but a little ship learning could help.
thanks for following and please help me when you see stuff i miss
Kieth
i appreciate the help i have gotten following you builds and the few exchanges on upper sails. I have a pair of Canadian 5 foot schooner models in my shop for repairs for our little museum store opening in May. One is Bluenose and the other the Zwicker [ formerly of Boothbay ], both built in Lunenburg. I will post some views , likely on the Bluenose log, for fun and it's a place for me to record them. Like this model they are "Folk art like"
cheers
jon
-
Boothbay Maine 1853 ship Aphrodite 1:96
Post 1
The beginning
A friend has been rebuilding his Bluenose schooner in my shop for three years. The other day he came over with a broken-down old ship model given away by the Maine Maritime Museum. So it stayed on a shelf since last fall. Now that we are on a quest to build up models of the schooners and ships built in Boothbay, I got an idea. Do some research and come up with a Boothbay ship or bark that in a known scale would be the same size as this model.
There is a wonderful book called Shipping days of Old Boothbay. It is available at the Boothbay Region Historical Society. Not only does is follow families that sailed out of the harbor it lists in several sections much about interesting ships, barks and schooners built here.
On the chapter about barks there was one candidate that at 800 tons could have worked. It was however not typical. Of the 6 barks built in the main period of the 1850’s listed in the book 5 were all 400 tons or less. The Charles Lewis was 745 tons and built in 1875. She had a long life too…maybe next time
On the chapter about ships, again there are about 6. The first one, built in 1853 was the Aphrodite. She was 680 tons and 147 long, 31 wide and 15 deeps. She was built by a well-known builder Stephen Sargent. She sailed far a way and then was lost off the Azores. Perfect size as we took the measurements and found a match with our derelict hull at 1:96
Next up is to find some design. I was very impressed years ago buying a book by William Crothers on Clipper ships. After a little search I found he published a book…American Built Packets and Freighters of the 1850’s How perfect!! Oops it was pricey, but the hull was free so why not. I am so glad I got it…wow what would you like to know.
In the index they identify Alna a ship of the same size built in Maine in the same year. So why not that is my data base. So off we go. This will not be a long build but a fun learning experience. We shall reuse what we can, but I suspect most above the deck will be new.
Unfortunately, we forgot to take a picture of as is. Trust me it was ugly. The hull is a carved soft wood with minor applications. The cabins were just blocking and the rails 1/8th thick, so as the queen said, off with their heads.
-
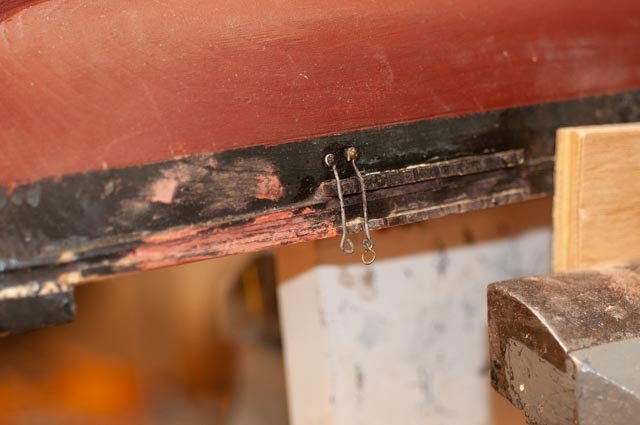 Here you see the dead eyes wire loops were wrapped with like No 17 brads.
-
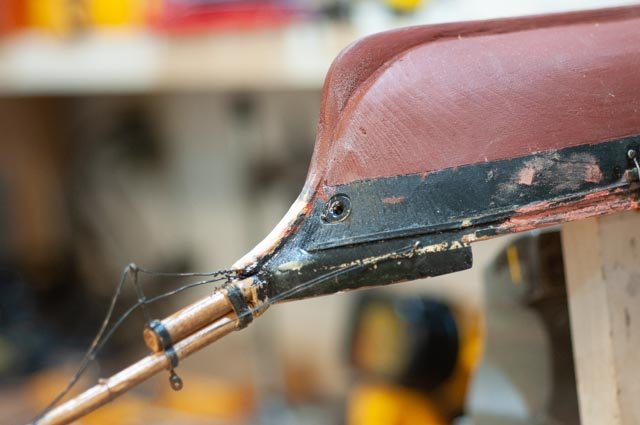 The figure head was a large clown…yes a clown… goneso. The record of Alna only listed the carved and gilded Billethead. so I will thicken the stem to form a billet and add some stick on tape with gold filligree
-
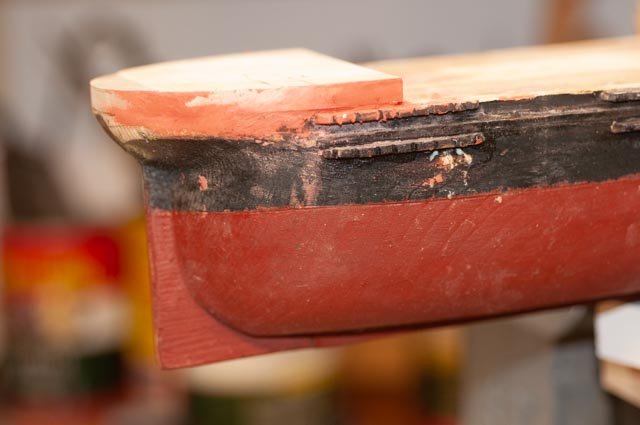 The stern was sort of round. Looking through Crother's book, there is a rounded stern that was typical of the era and listed to be on Alna. Also there was no poop deck. So after days of reading and thinking, we are adding a ½ poop deck based on Crothers findings.
-
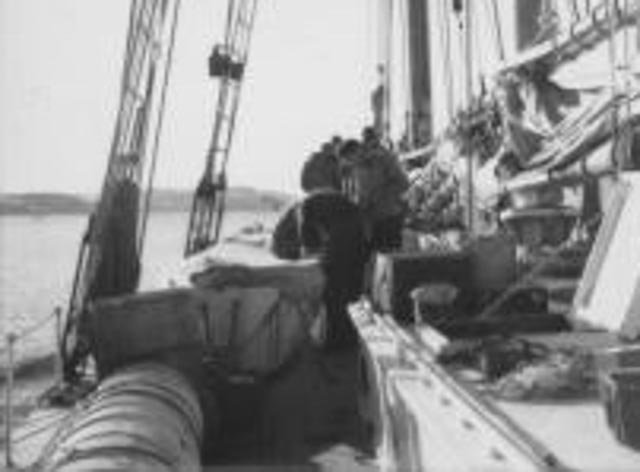
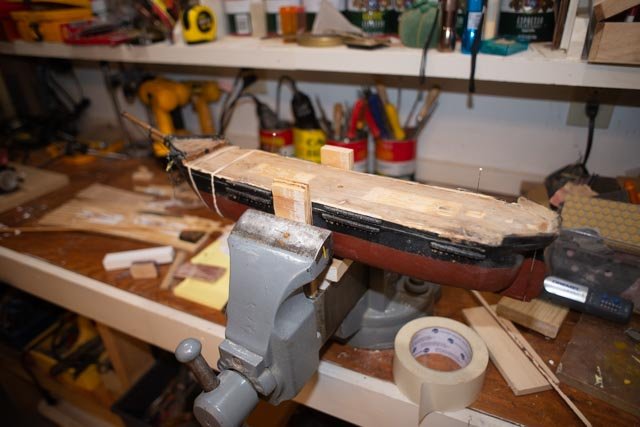 Here we have removed most everything and are cleaning up an under-deck. You can see the crudeness of the remaining bow and taft rails removed after this photo
-
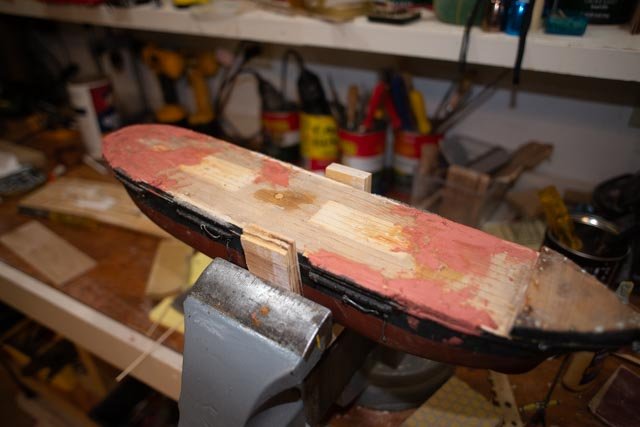 Here a little of the glazing putty to try to smooth out an under deck. there are at least 40 toothpick tips glued into old large brad holes to be sanded as well. When I laid out Alna masts, two matched perfectly an the mizzen within a 1/16. adding the half poop pushes the hole aft so we match there too. the fore deck extends aft and that is good because we gain an overhang
All for now
jon
- mtaylor, michael mott, rek and 3 others
-
6
-
-
It's time to bring Charlie out again. I plan to record this as the final chapter in Charlies build and use. Maybe then I will say...completely finished
This summer I plan to give a few lectures on the four masted schooners of Boothbay. Although Charlie was built in Bath in 1894 she is right there as to the size of the last several large schooners built here. The boom years were 1919-1921. During that spell, 10 Schooners were built right here.
Next fall and winter I plan for trying to organize a diorama showing one of the yards and two of the schooners. We shall be celebrating 100 years since the launching. That yard has been a great lobster wharf for many years. i will start that as a new post later this year and hope to get other folks to build buildings and the lay out.
Here I will update the repairs and completion activities to get Charles Notman ready to show off, and some of the highlights of the history of these schooners here in the harbor. If you go back to the first few posts in this log, i built Charlie to be a prototype. I had hoped to build two sailing versions and get them to sail in the harbor. The problem is they really do not sail well as RC. Therefore I will move on and try to get some normal two masted schooners to sail as there are many examples of the success they have in RC. Boothbay had many pinky schooners and a large sardine and off shore fishing fleet to chose from
My punch list consists of the need to:
-
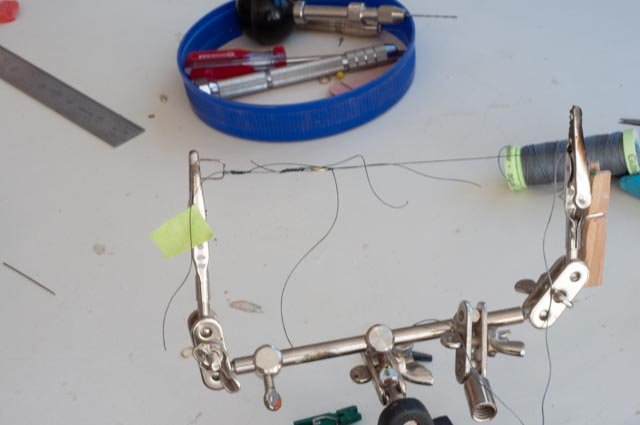
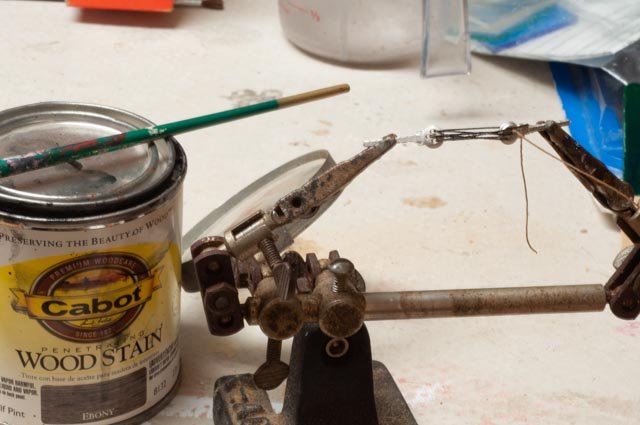
 complete the starboard side shrouds.here i am splicing the first two of six to go.
- complete starboard ratlines..ugh lots of them
-
 repair yawl boat and its broken support
-
 clean and clean.. wow the dust
- try to coil and hang lines.
- add a few missing windows and cabin details
- repair several lose lines and broken chains
- figure out transport.
- complete some graphics for the display
-
complete power point lecture
In conclusion I will include a few visuals of a few schooners i am fixing up for the new museum store.
I believe just a little each day and it will be OK . I need to complete all by May
cheers
jon
-
-
post 35
dories part 2
I was determined to succeed where I have failed so many times before. Or better said ... I wanted to get the dories closer to what they should be. I remember being told by a master modeler that each time we start a new venture, we should expect to need to make 14 tries before getting a keeper. I am somewhere in the middle of that, so I do ask for some slack. The goal here is to spile some thin enough planks to bend at this small scale to make 16 foot [4 inch] non lapstrake dories. Let’s see how I did.
-
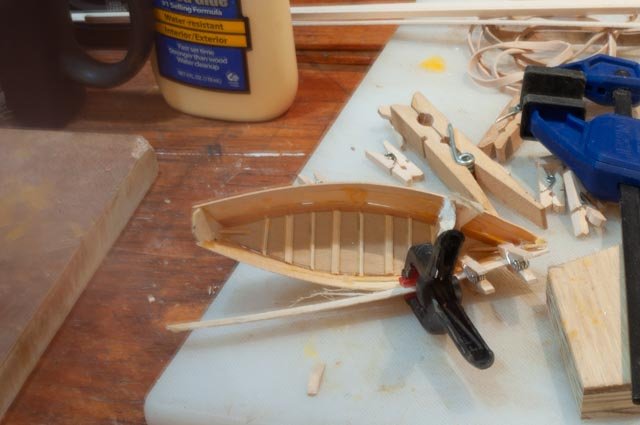
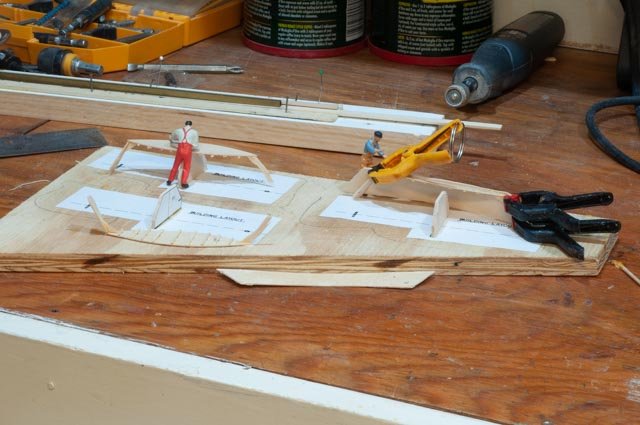
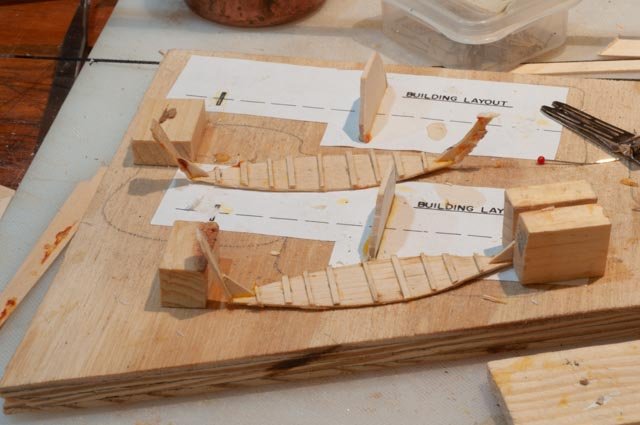
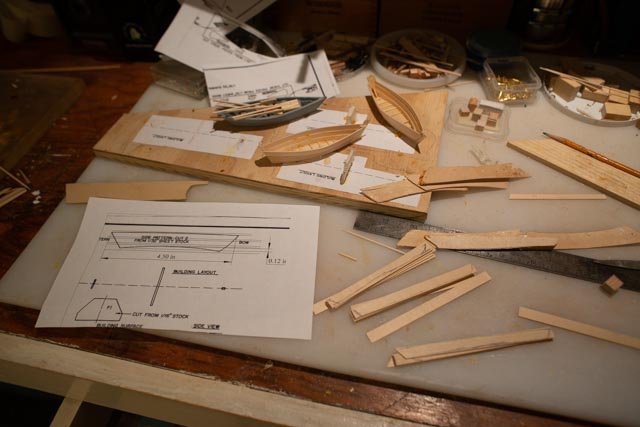 First of all, we look at the boat yard where the first dories in part one were made. We need to complete them for at least a stacking opportunity on another schooner. Second, we need to work around the shop to find planks that are thin enough to bend. the bass wood cut in this photo is just too stiff.
-
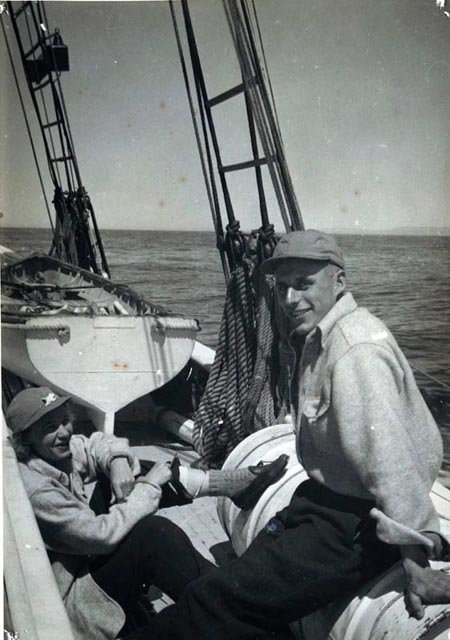
 Here we see a friendly BRHS archive cropped photo showing clearly the later 1920’s dories. They were smooth and white with dark gunnels.
-
 So back to turbo cad to lay out both midpoint molds and to figure out the spiling curves as best as I could. The third point molds ended up being simple dimensions to make up. I printed out a strip on the bottom of the sheet to lay out on a ¾ inch strip to make them all at once. All the horizontal lines on the top gave me a clew to figure out how to get planks just more than ¼” wide that would work.
-
 As I laid out all the molds, I added gunnels to the old dories and made up new bottoms and parts. I used 1/16” plywood to make them strong.
-
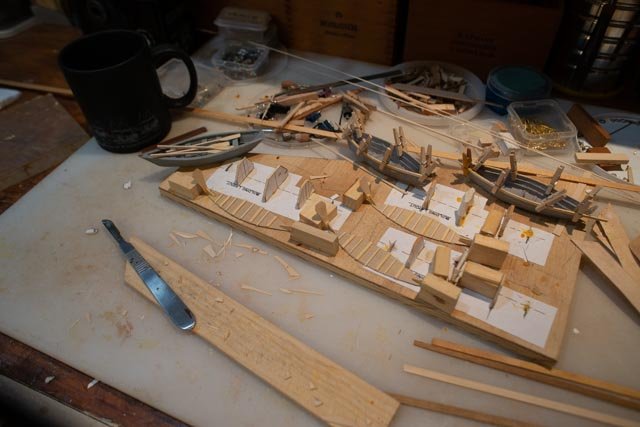 Here I am gluing up the transoms and stems as the gunnels set up on the old dories.
-
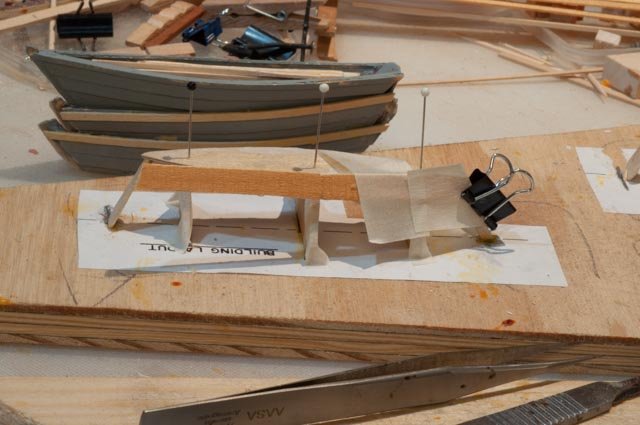 To make the proper flare we need to force the lower planks around the molds. Glue on the bow and let it set , then bend it around.
-
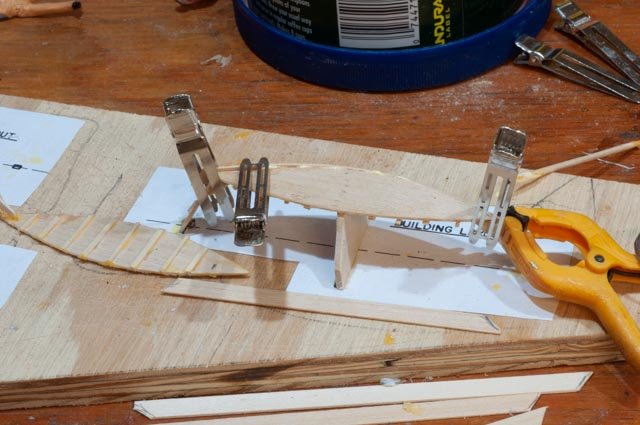
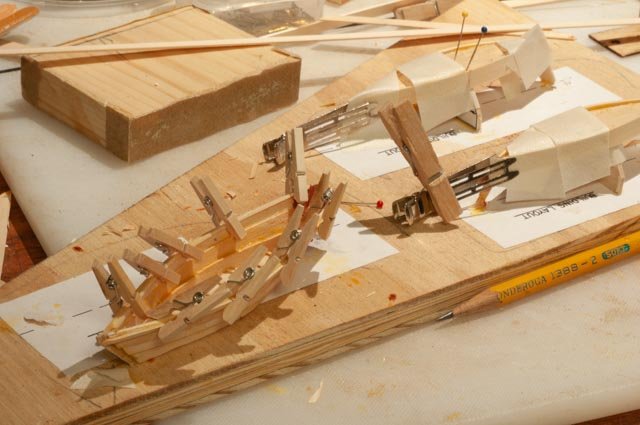
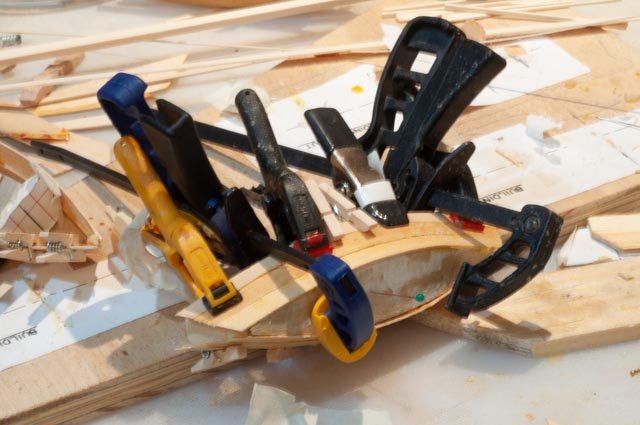 After setting two planks, I learned to remove the partially build dory from the molds [ this time using masking tape to allow breakaway. Then using every kind of clamp, I could work the top planks keeping the flare and making up the smooth[ish] joints.
-
 Here we glue to the bow stem before the bend
-
 Another clamped third plank.
-
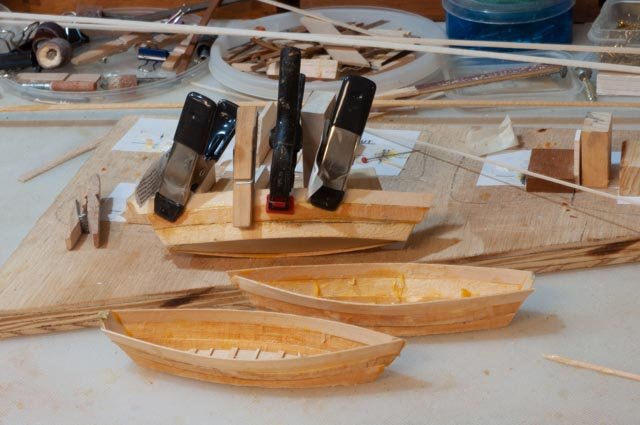
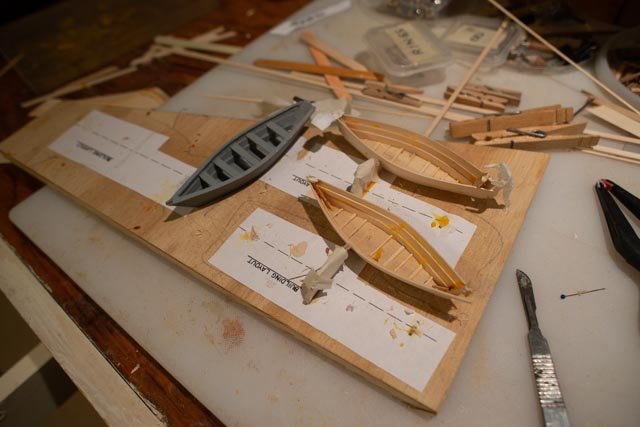
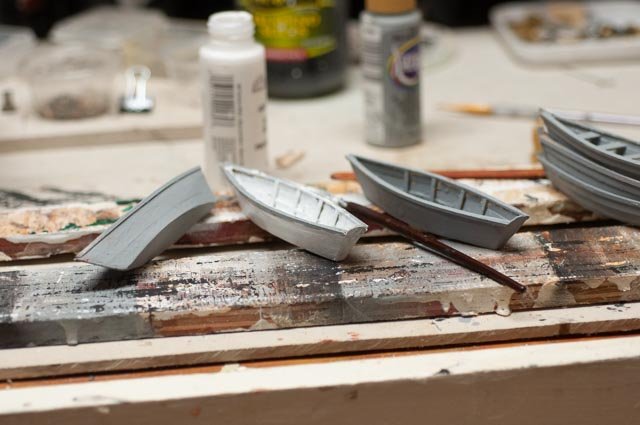 After glazing putty and sanding and setting the four ribs on the insides, we get a coat for gray for priming. Then more light sanding. The first one gets its first coat of white.
Diorama
-
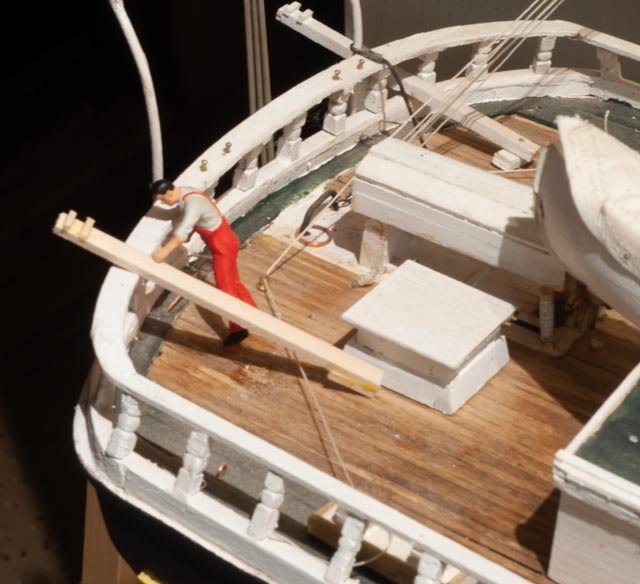
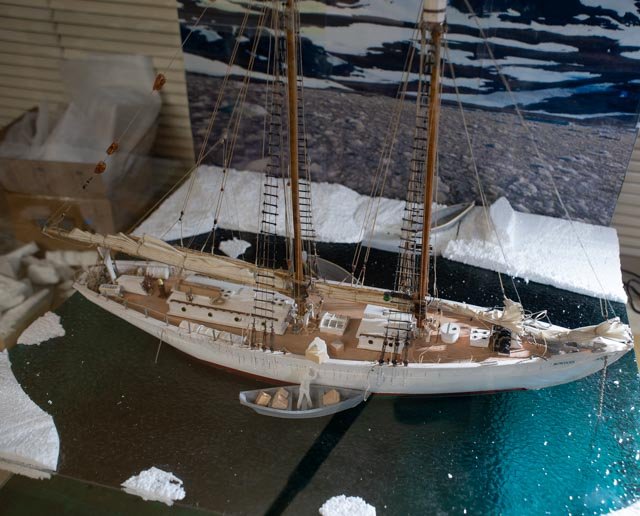
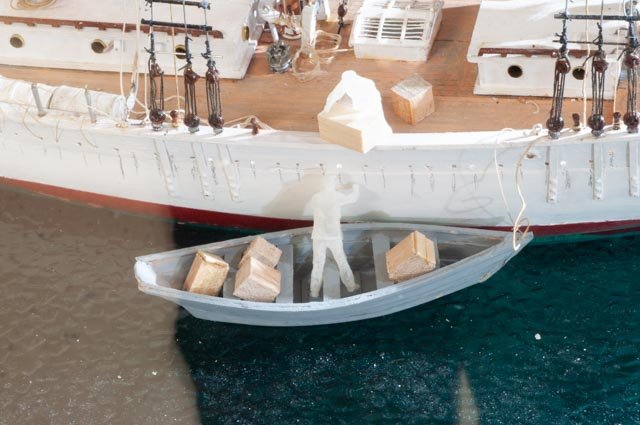
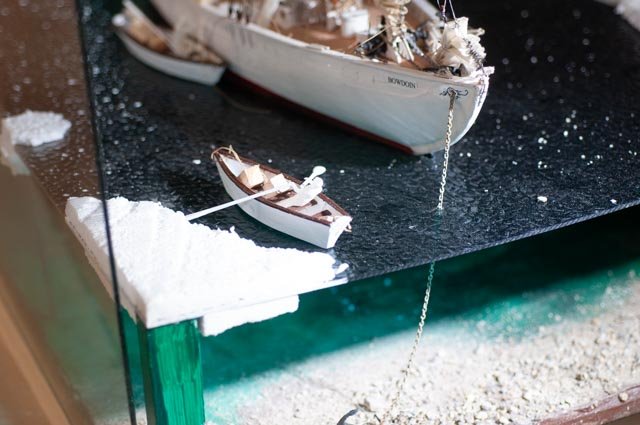 I have added a second dory under way to bring the last of the winter gear back aboard as we are a day or so at most from sailing. My figures only stand so I am figuring how to make his action reasonable.
-
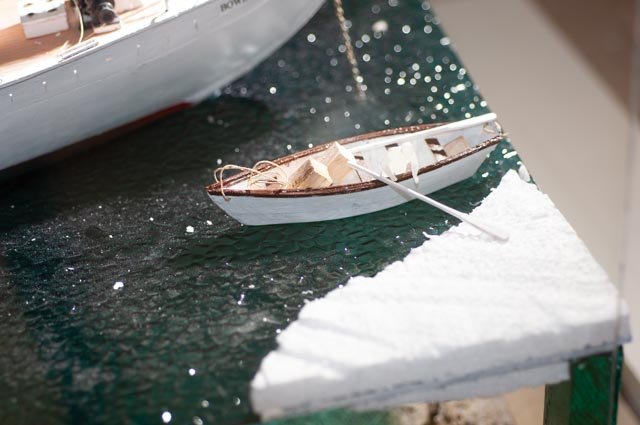 I am thinking of either a small line and anchor on the ice or just use the oar to hold position.
-
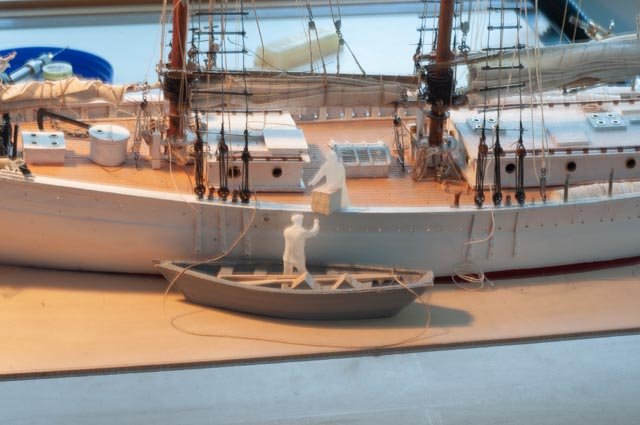
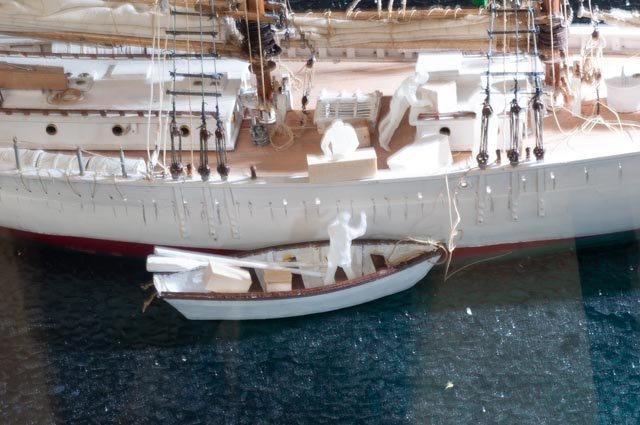 Here I have re staged the offloading of boxes and added two more figures. as of now i am not going to attempt to paint the figures. One reason not to paint them is their costumes are the correct period, but they are not sealskin, bear skin etc. I hope to encourage more support for opportunities like figure for the next diorama. There were 6 crew plus the Greenland and Labrador Inuit and dogs all getting ready to sail.
There is more cleanup and punch lists to do, lines to coil and hang and surely repairs between now and the show in May. I am already working on three other projects…so the beat goes on.
I will add a few more posts as we go to the show and I prepare the inevitable lecture. There will be some tours and review down at the Bowdoin college campus, where the MacMillan arctic museum display is always available. I still plan to visit the John Gardner model at Maine maritime and will add photos here. Finally i want to get the skipper over here and then find a way to ride on Bowdoin next summer.
Next up is back to an old build…Charles Notman to get ready for other summer shows.
All for now cheers
-
-
Andrew
I love the look of the finished sheathing. The paint job is really crisp.
Cheers
-
Post 34
Diorama update
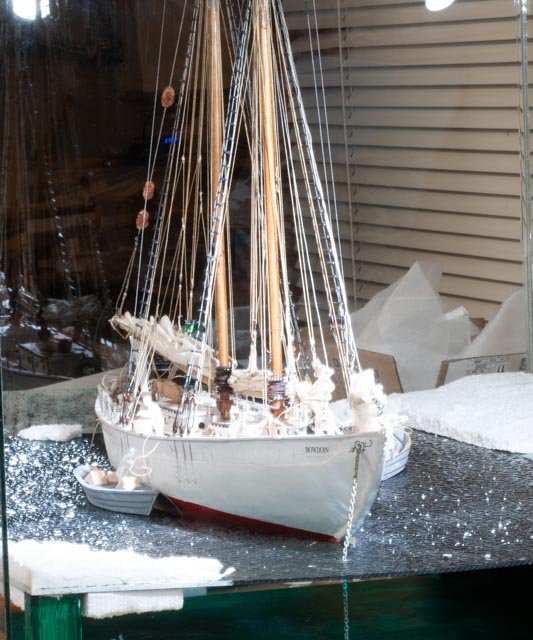
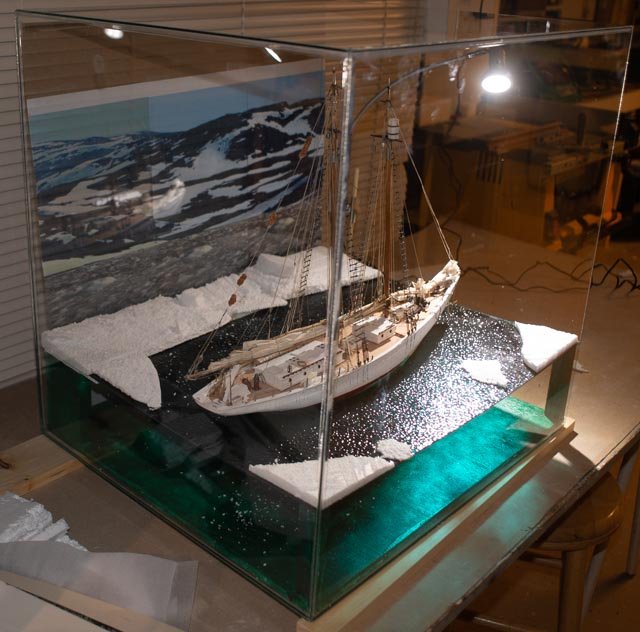
I was supposed to complete the dories by now but have had too many distractions. Working down the punch list I now have Bowdoin sitting in the glass box [ sideways so I call pull it out etc.] Here are some views showing where we are.
-
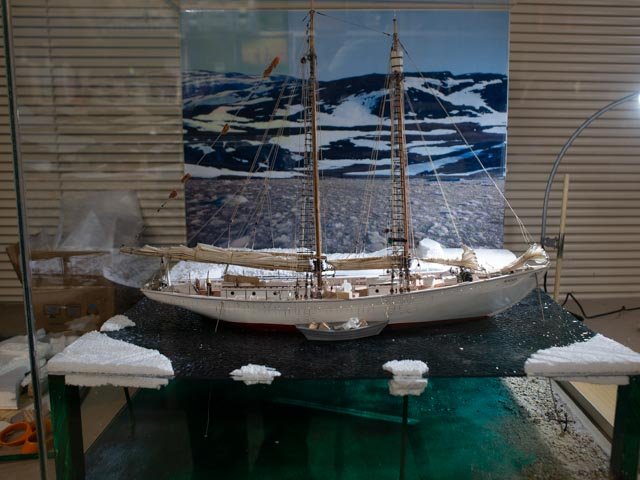 Here I fixed up the collage print to fit the box. It is just six sheets of normal printer paper scotch taped together. I am trying not to just add another $40 to go get it blown up , but may loose that argument
-
 Here we see under water. The bow anchor on the beach [ poetic license as it would have been further forward] also there is an aft anchor line that runs down through the open water to water below. The ice is both above and below the water. I have learned that I should do ice differently underwater as it is different. I hope to visit the Maine Maritime Academy soon to see john Gardiners model where he did work on accurately depicting different types of ice. I hesitate to add more mixed blue color to the water. I hope to learn form artists this summer what to do to make it better next time.
-
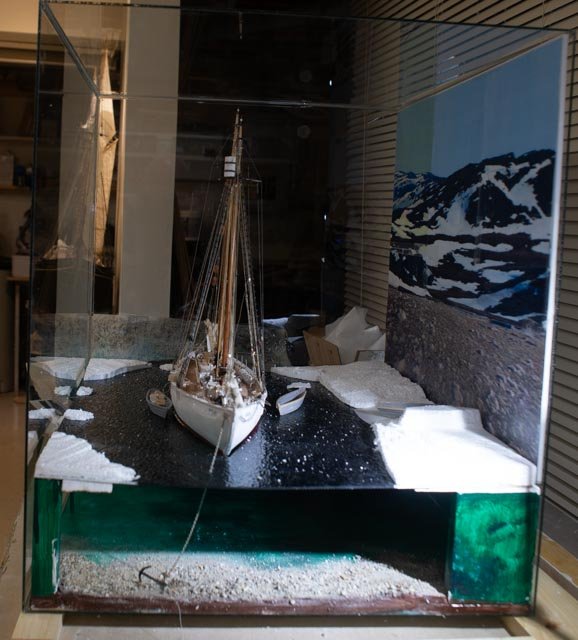 Here is the bow shot. Again, see the dark water looking down light. The anchor shows up well.
-
 Now looking back into the light, we have active sparkling water
-
 Here is the scene. This will be the story line. I talked about it before. As to the figures I am at a point where I have in the past used unpainted figures and believe I shall here too. The reason is the eye will go to the people if they are painted out and to the schooner if they are just there. How about that for a forum discussion. It is also another hobby area I have not yet entered, and I fear is a very slippery slope. Poorly painted figures may be worse than unpainted figures. I bought ten and there are only a few that will be on board. I may try one to see what happens, but later.
-
 Here I add a close-up bow shot just because it is fun. With all the water and things, one might not notice there still is a punch list. All Lines are now on, but several are yet to the coiled and hung.
-
 Here we have the proto-type dory for the last time. The replacements are now planked and in a week should be ready to launch. These lapstrake proto types will go to an early 1902 sardine schooner I built a few years ago in the same scale or to a friends 3/16 scale Bluenose where due to scale they are the right length.
cheers
-
-
Gary thanks for the encouragement. experimentation is actually fun. It is amazing to try something and have it actually work. I am struggling but will succeed in making the dories correctly.
stay tuned
cheers
-
Post 33
Weekend update…getting near the end
As suggest in recent postings, there is a light at the end of this tunnel. A few more things are done, and we are now getting diverted into other items needed for the museum opening. Two large schooner models are coming next week for a quick clean up and discussion on casings. So, for the three or four outstanding areas of Bowdoin we have a little progress.
Hull and overall
During the travels many dogs lived on deck. The photos show obvious impacts out side of swabbing season.
-
 Here I have used soft pencil to show staining under the scuppers. Also I have complete the light brown under coat on all the blocks, dead eyes and pins. I will come back now with the dark brown cover up. The missed spots again showing some ware.
-
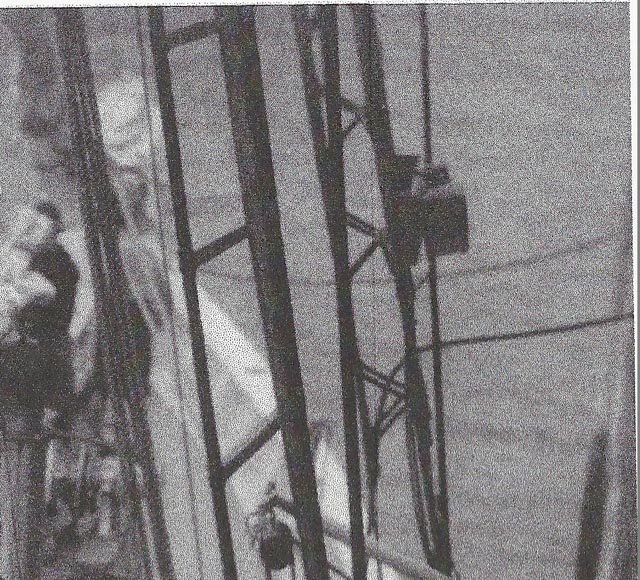 I studied the running lights and found they are not like the standard fishing schooner. In this BRHS archive photo [ and a few other views] , there was a single board about 8 inches wired up high between the 15-inch ratlines to allow feet to find there way. The lamps were then suspended. Talking with Bluejacket, they sent me some lanterns to try out.
-
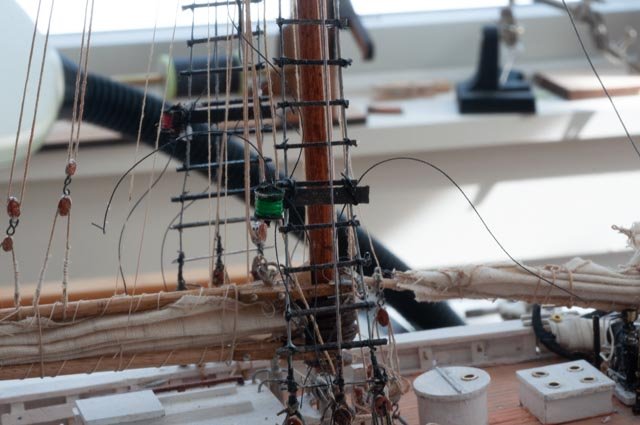 Here we see the results. The sewing lines still setting up and ready to trim
Deck and rigging.
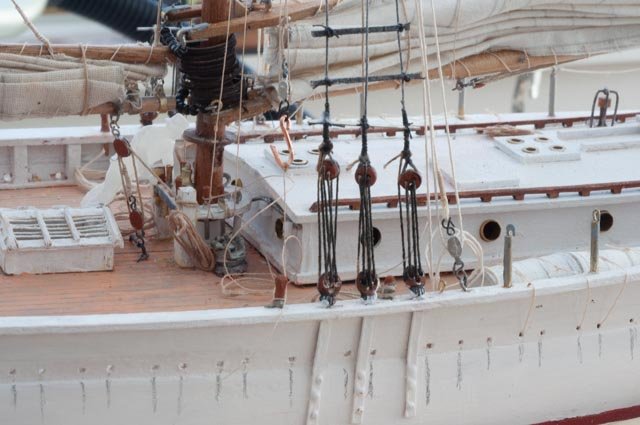
I met again with Capt Will and we went over more details and suppositions. He supported that they would have had the turnbuckle and chain on the boom until they first sailed. I like that because making turnbuckles can be easier that getting lines through those tiny 1/8 block beckets.
-
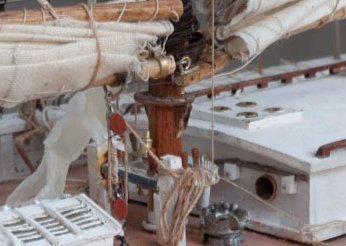
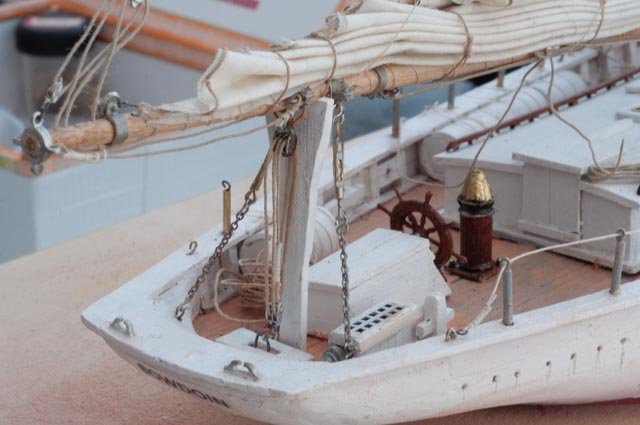 Here we see chains in place hold the boom rigid against the crutch. Also, a little brass paint to brighten up the binnacle in honor of the ready departure home.
-
 Here we in final inspection I really needed to get one more slat in the ratlines. The dory oars were handy to make the spread in the shroud. Lesson learned on the length of the splice. Oh well those who read this will know.
-
 Here I have installed the pump handles. I made them once and lost them, so a quick remake was needed. Also, the bell is in place. I chose to remove the crutch because it would be very hard to see and the bell crowds the crutch. ....my excuse is weak......they are about to sail.
Diorama
-
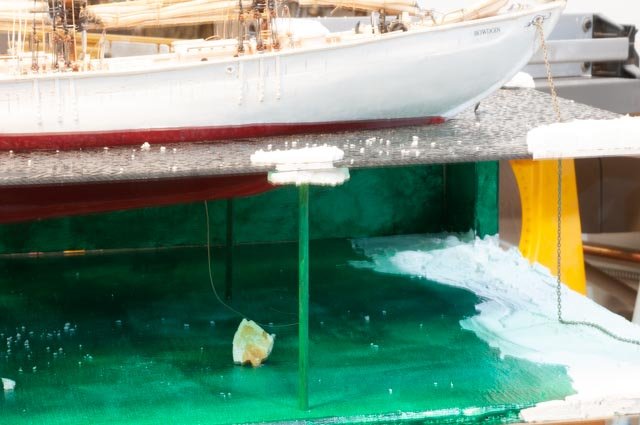 I need a few supports to keep the acrylic flat. I chose to paint out some small dowels the same color as the water. I then buried them in a small ice formation. I am not sure if that highlights them, so some artist advice may suggest I move them to be less noticeable.
-
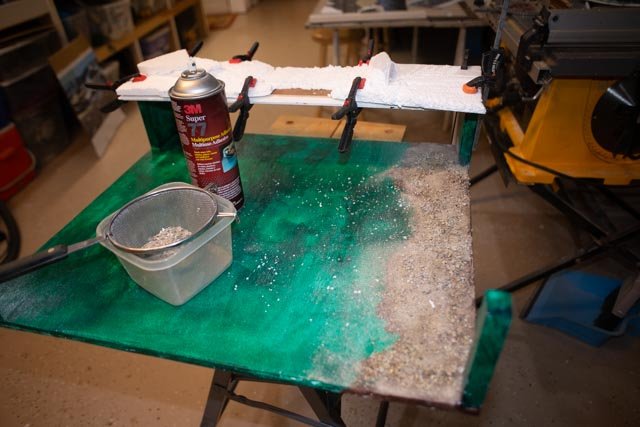 The Bowdoin was in close to the beach. There was a ten-foot average tide. In this view with the added beach they are in 18 feet of water. I felt that was reasonable enough to replicate their position in Refuge bay. Here you see the result. I dabbled with two brushes, medium gray and dark brown to create the background color. I then sprayed adhesive and dropped in separate sand and small pebbles. I did two layers and it looks OK to me. My critics say I need to sink the anchor in…..I think if it sits on top, it is easier to see.
Dories update next time
Cheer
-
-
Post 32
Getting names on the hull
Naming is always a fun area. Thank goodness for computers and peel and stick. On previous builds I did all the work in Turbo Cad and then using layers could print white on black for black hulls. This time the hull is white so all I need is font and size.
For the filigree [ or what ever it is called] around the the anchor hawser pipe, I used the Bluenose method. I took a photo and pasted it into Turbo Cad. I then scaled it to full size. I then locked it and added a layer. I traced all the lines. Before I got to the formatting, I went through the names and figured it would be easier just to switch to MS Word. I transposed the fine line filigree to word and just covered it over with thicker lines. That smoothed out the curves. The whole thing is small at this scale, so I did not get carried away. The lettering was a little harder. I wanted to stretch the spacing just a bit but word does not seem to do that[ or better said I do not know how to do that]…I found a font that was close and printed out a few sizes
-
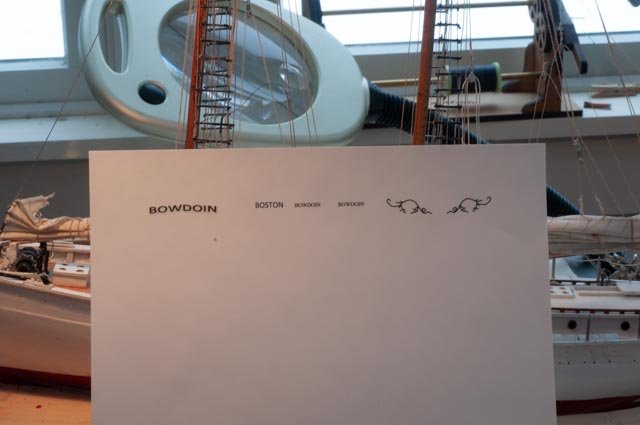 Here is the first attempt. The filigree was the right size, so I went ahead and printed it on peel and stick
-
 Here the filigree is on and the anchor chain re fitted. The name was to small, so I decided to put it on aft of the right location and then do some samples.
-
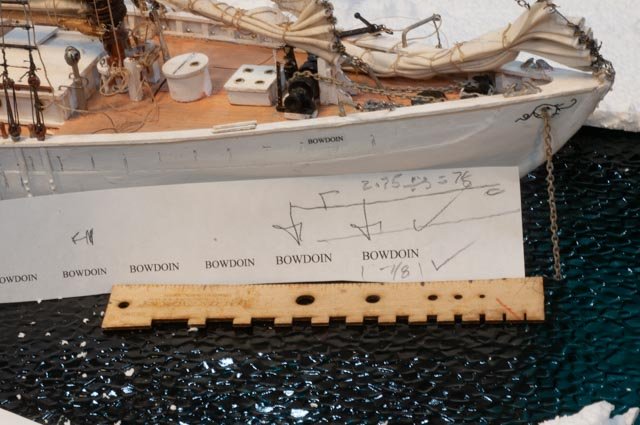 Here I am choosing the right size for the forward name board
-
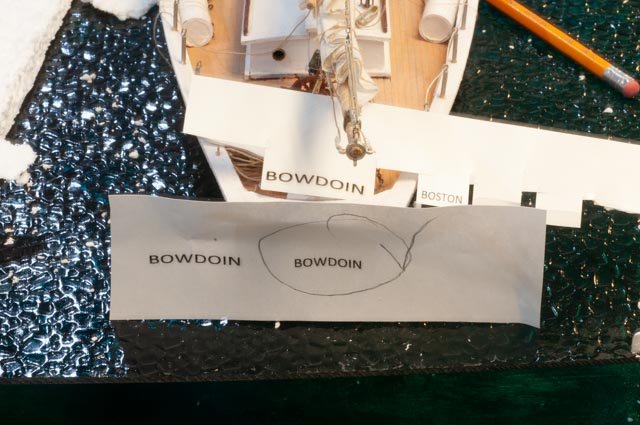 Here we are checking it out for the transom.
-
 Here is the forward name board. I would love to be able to stretch it with out thickening the letters. even it cad it did that to me. You can see i have drilled the acrylic for the anchor
-
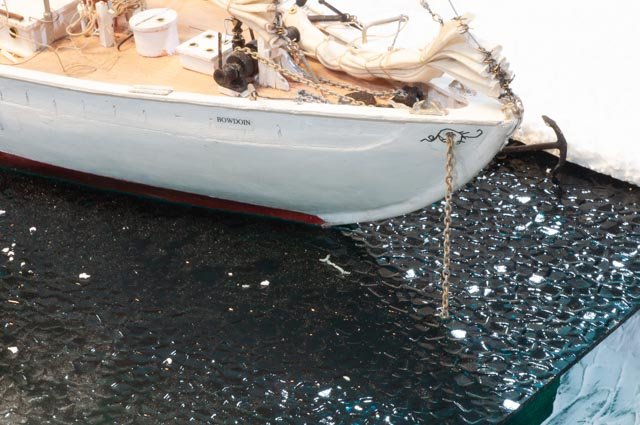
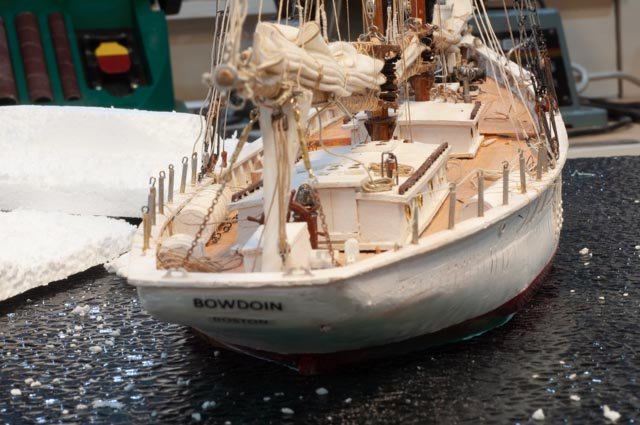 Here is the transom. In the early days she hailed from Boston.you can see the pencil lines of over winter drain stains under the scuppers.
all for now
Cheers
-
-
Post 31
Diorama : the first look…..time to decide
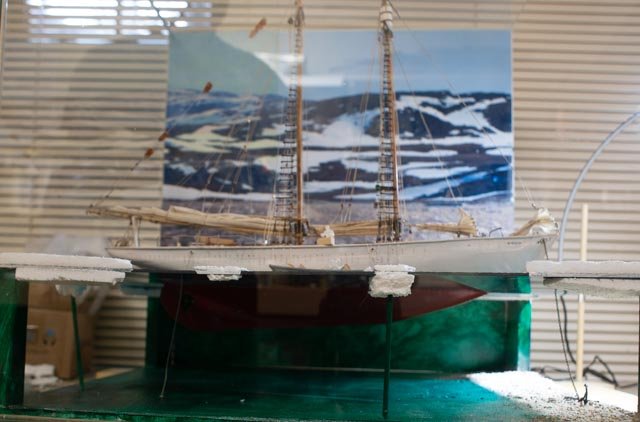
I put everything together to see what I have and if I think I can make it work. I bought a glass box with ID to be 24 wide, 21 deep and 24 high. I set it on its side so I could slide things in and out to experiment. I set some trim planks under as I shall attach them to the ply wood base to receive the glass. I will likely put weather striping all around to soften the glass seat. On the exterior I have an extended plank with a dowel to hold the display lamp [ our morning sun]. We laugh at that a bit as the sun is in its 24 hour mode this time of year , so morning sun is a concept. I have the schooner facing east, the beach, so I guess it all makes sense.
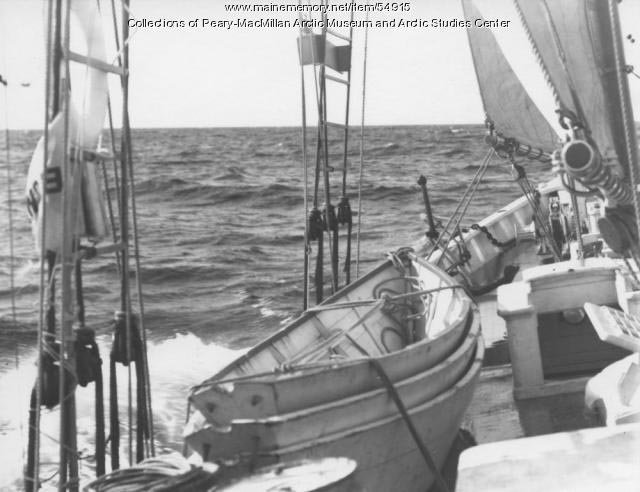
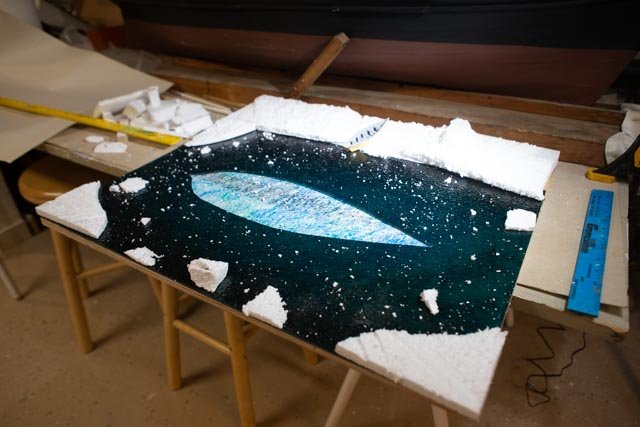
 As a reminder this is the view from which our diorama is based. I bought this image on line. The story will be posted with sequential pictures. For the diorama we state:
- BOWDOIN in morning light in July 1924. Using ash from the wood stove and sand from the beach on the ice, the sun melted around the Schooner as well as a way out of Refuge bay where they had just spent over 300 days frozen in ice, the crew readies her to go home.
- All fuel and most supplies were taken about fifty yard off the bow to the beach for safety. As part of the expedition, a structure was built primarily to set up equipment to measure the changes over time in the magnetic pole. A Marconi aerial was set on the mast tops and a radio was set on board to have transmitted the first arctic radio to talk to the world. The crew enjoyed listening almost every day.
- Before melting the ice, the crew had to fill the hold with stone ballast from the beach to replace the weight of the supplies brought north for the long winter. Some fifty dogs and several Inuit helpers will be taken home as Bowdoin sails south.
let's see it......
-
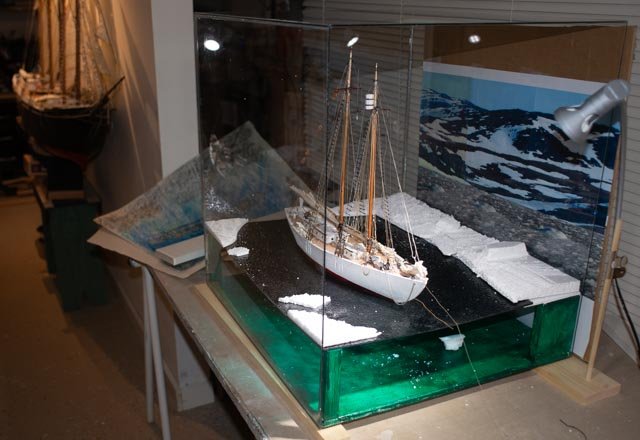 So here we have the first of three views if one is walking by the display. You are looking down sun, so the water is flat and the hull and rigging picking up direct light. The box is all painted out a dabbled green at the moment. I bought some blue but want some artist advise as sometime leaving it simple is the best advice. Whwere you see the light green strip of about 3 inches is now spackled out and becoming under water shore line holding the anchor.
-
 Walking on center we shall see the crew using the dories to ferry the last of the supplies on board before sailing. They should be properly on the port side [ dory tackle location if needed] . I believe I will move them around to the starboard viewed side s in last dory post. Future postings coming as I need to paint up a dory to check it out.
-
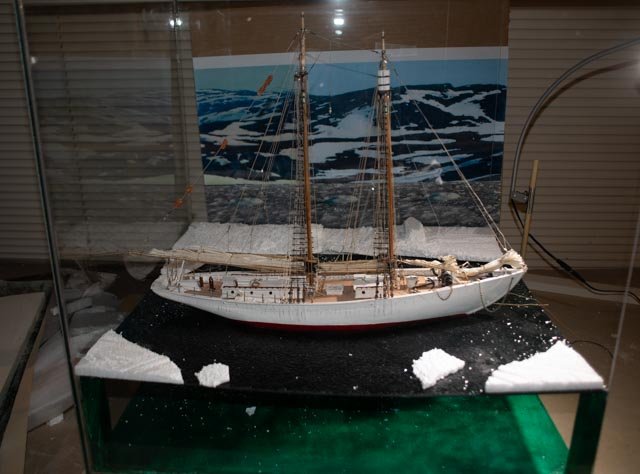
 What I love is this changing light as we move aft and see the effect of sun sparkling on the water, dark shadows on deck and back lighting of the rigging.
You can see my amateur collage in the back ground. The two photos are cropped arctic views to try to depict the far shore as see in the first over view, taken from a comparable hill top on the south side of Refuge Bay.
Coming up
Getting names and things on the hull
Completing about ten more lines in the rigging
The bell and running lights, the anchor through the water
Completing the box and its base.
Building up the underwater shore near the beach, making the ice look better and adding supports to flatten the water.
Resizing the collage on foam core to site inside the glass.
And the dories
cheers
-
Post 30
Ratlines and anchor tackle
This is a very brief update to record a good weeks work on tying ratlines. First of all , I went back to sit with Capt Will McLean and clarify a few things. The anchor tackle is inded two lines. The heavy line is made to the rail pin and hold the double block. The second line is made off to itself and include a three part lighter line to rig the anchor.
-
 Here I made up the becket to lash the formats above the shroud loops and hold the double block.
-
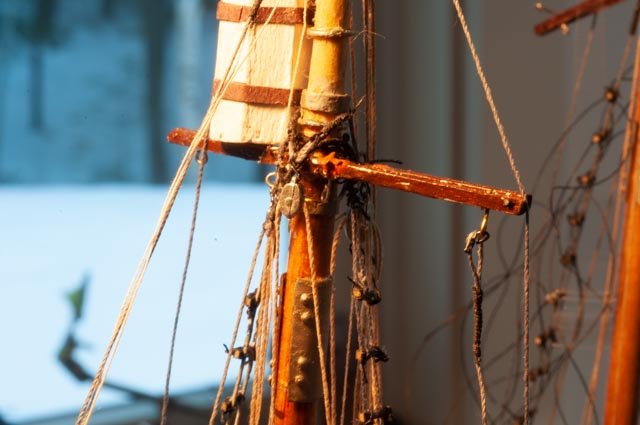 Here we see her in place. This explains the three blocks I saw in an old photo. Topping lift, halyard and this anchor tackle. I need to get these painted out as they were all dark wood.
-
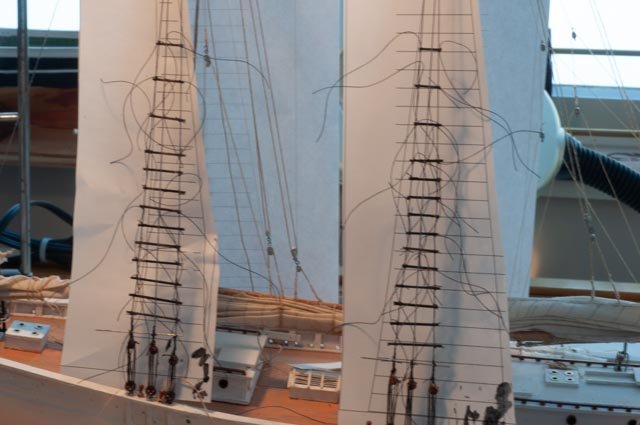 Here we see the production line for the ratlines. I worked on all four at the same time.
-
 Here at the top I found that the splice on the shrouds came a bit too far down to allow enough spread. I put a cut tooth pick through to spread the lines and get a top slat in place.
I have ordered another batch of blocks, and lanterns to make up running light assemblies, so I can make up the last of the rigging.
All for now…..I am working the diorama.
Cheers
-
-
Post 29
Dories part 1
I do this in two parts because it is a story. The first part is everything up to date on building dories for Bowdoin. The next chapter shall include whatever I do to either rebuild or rehab and complete the dories.
I have struggled with mini dories and yawl boats since I started some 6 years ago to build them. When I solve it, I shall have several rebuilds to do. The two key issues for me are first with a 3 to 5-inch build, unlike a 12-inch-long and up build, the wood at 1/32” is the same strength. Therefore, bending twisting and more importantly clamping becomes a real problem, at least for me. Secondly its exacerbated with my continued difficulties with the magic touch of CA instant glues. They just don’t work for me in wood.
So, forgetting previous builds I approached this one with an open mind. I even read the instructions and tried to follow them.
-
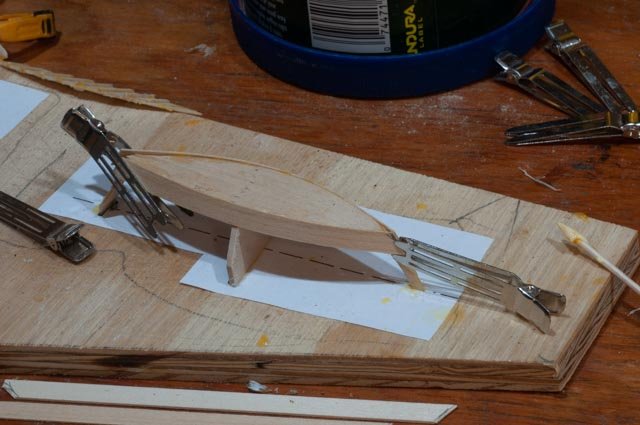
 Here I was on the way. The crew is setting up the assembly of bottom, stem and transom.
-
 Here after several unsuccessful attempt to use the full side 1/32” by about ¾”sheets……I even soaked them and pre-bent them to no avail.
- So, for attempt two, I figured why not make them with three ¼” wide planks, the way they really were built, and see if the bending and clamping is easier with narrower pieces.
-
 Here I recovered the bottoms etc. and set them up again.
-
 Here we go with the first plank…so far so good
-
 Here goes plank two. As this is a trial run there is no attempt to spile the planks. Also, patience is needed as I used wood glue and waited an hour or more for each step.
-
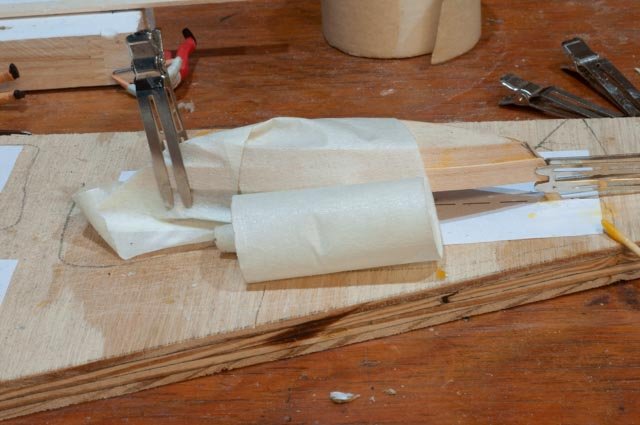 Here we bend it around. The force is almost reduced to where masking tape can hold it. There is struggle here to clamp, but we eventually get it.
-
 Here we got the 3rd plank on. T’was a bit messy, so let’s see if we can use it.
-
 Oops…not enough masking tape on the mold so we must cut it out. Not good for shop efficiency if we want to reuse the jig and make more dories.
-
 I was encouraged enough to make up the material and make the other two.
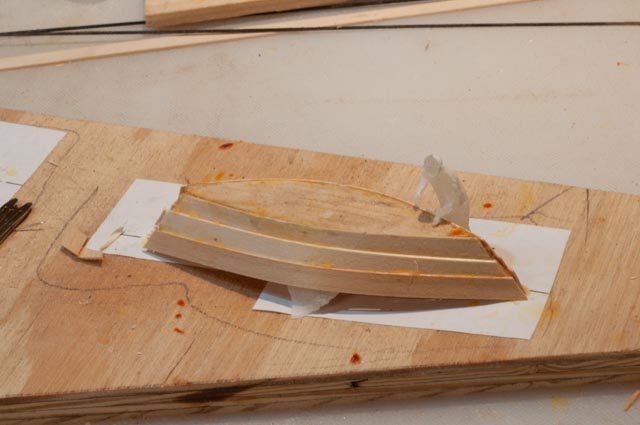
-
 Well let’s get the gunnels on. Here the inner gunnel is glued as hull planking for dory 2 and 3 trial runs are coming along.
-
 Here we see with masking tape the molds came right out for dory 2 and 3. The first dory has seats and grey priming. I will paint it out white with dark gunnel and make up some oars. The dories will be afloat, so they will all get finished.
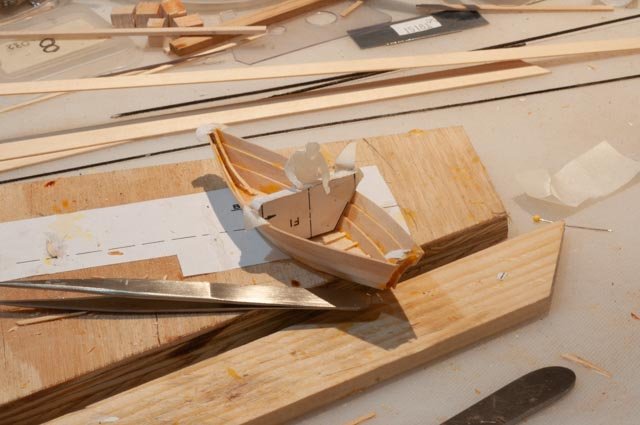
-
 Finally, we see for the diorama, one dory will be transferring the last supplies on board before leaving Refuge Bay northern Greenland in late July 1924.
Thoughts about a part 2
This is part one because I need to decide. I have a dead line so I will finish these to have them ready. I need to do two things in part 2. Learn to create spline lines for these or other dories so the planks are more proportional. Second reconsider the lapstrake method I chose because it was so prevalent in the 1920’s and easy to build. Dories obviously came and went. In the 1930's photo I have shown for other details in a recent post, including the white color, they were not lapstrake but butt jointed. So, what to do. As of now I plan to use lapstrake because they we so prevalent in the early days of Maine and other New England fishing schooners. These dories though were only 16 feet long so maybe. I suspect they bought them from one of the many shops around Boothbay. All the more to study
We’ll see what comes with an attempt to do both types, butt or lapped. To do the butt [ i already tried and failed] I believe I will need two more molds
All for now
Cheers
- Tom E and Captain Poison
-
2
-
-
Post 28
Working deck rigging and starting the diorama parts
Here are a few more things getting done as we move along trying to get to a completion list. I see three more areas, the deck including dories, completing all rigging and the non-schooner diorama.
Deck…
Remember the barrels….
-
 Here we see a cropped BRHS photo showing the lashing goes over the barrel, then over the cap rail and logic says back through the scuppers to the ring on the deck. There is another photo from the side where with a magnifying glass, one sees little vertical lines going from the rail to the scupper. Therefor this way I believe is the right way. It makes sense because it was easy to do and the barrels came off and on regularly. They were all stored ashore over the winter. The barrels were counted as ten on the first voyage and here they line up right to the shroud.
-
 In this cropped BRHS photo we see two barrels turned up. More important we create the mystery. I have 1947 photo of white dories. This non sunlit photo makes it unclear they were white. The gunnel is clearly dark
-
 In this cropped BRHS photo the mystery is solved. The sun lit dories are clearly white
-
 In this cropped BRHS photo we see small manila line on the barrels. We also see the yawl / whitehall type launch. This is taken in 1930’s. Confuring with Capt Will, we both agree the early fit out was bare bones , so I will only do three dories
-
 So here on starboard I have three barrels lashed.
-
 Here on port we see I have four barrels installed and lashed. A question might be ..did they take all barrels round trip?. I only made seven. I am, thinking after all else is done I may make three more, along with some boxes. Lube oil and other materials were on deck, but the hold storage would have been much reduced so either way I am OK I believe. i also do not want to block hawse pipes.
As to the dories, let’s say I am working on them. I will tell that story another day
Rigging,,,
remember the need to tar the dead eye lashing and ratlines.
-
 Here I put up a dummy lashed dead eye with the same cotton line and dabbled the ebony stain that I like for its oily look. It seemed OK so I went ahead and did the ones in place
-
 Here we see them on one side with the started ratlines. They are always tedious and tough on the back while sitting so still on a stool. If I do two all around each day that is roughly two weeks…we’ll see . I have 100 more to do on Charles Notman as soon as i finish Bowdoin..
Now the diorama
Just a teaser…for me to as I am making this up as I go.
-
 Here we see in a cropped internet photo of July 1924 in refuge bay. I bought this image on line. I will be showing a view from the side. In other photos we shall explaining the winter set up, the shore was perhaps 50 yard off the bow. It would be too complicated for me at this stage to try to replicate the camp…….maybe in the future. We shall have several photos around explain the camps in Baffin island 1922 and here in Greenland 1924. The point is ice is melting and the crew are thinking about going home
-
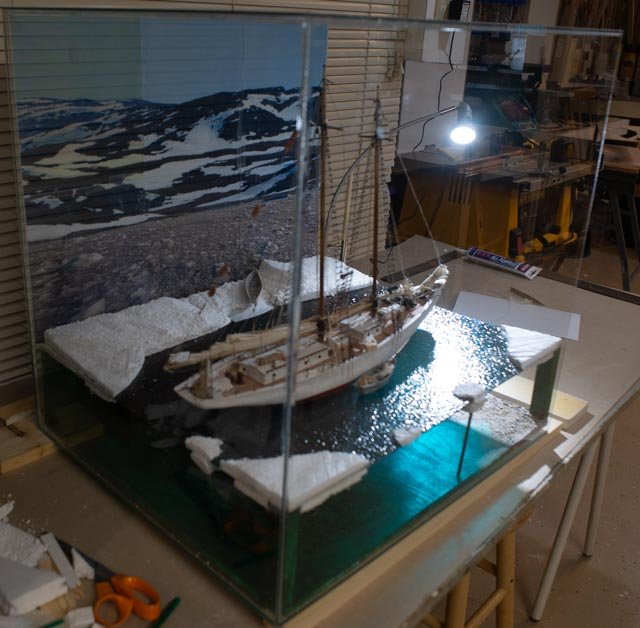
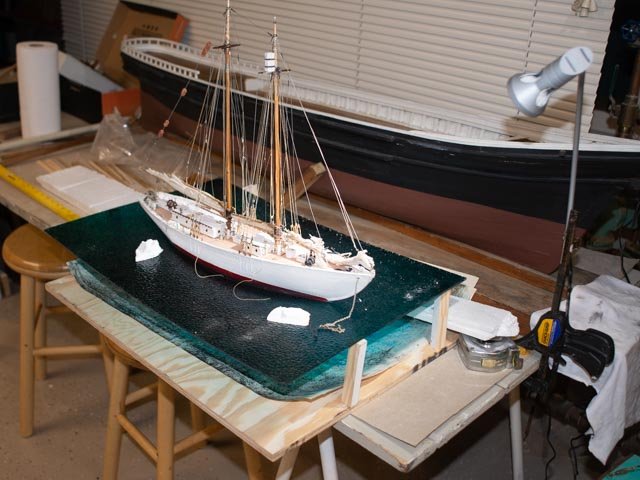 First up we need to remove the schooner and start cutting and carving Styrofoam to look like ice. See the brand new just out of the amazon box portable LED light giving us morning sun. too much back ground light to see now. You can see a friend 1:48 scale Flying Cloud behind.it is great to get more people into this wonderful hobby. His grand father built a normal 1:96 and started this model years ago.
-
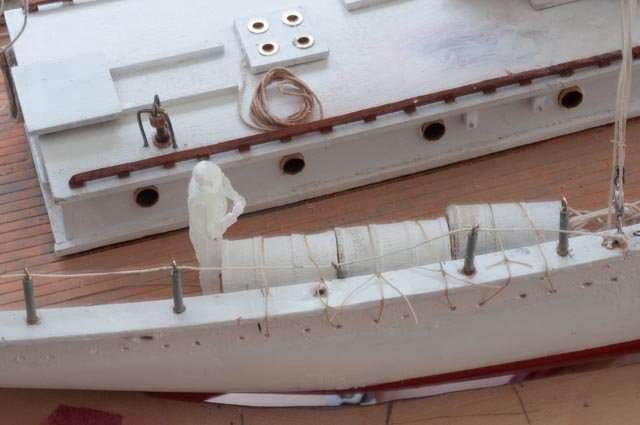
 Here is general lay out. I pulled the acrylic to the fore ground and have about 5 inches of flat ice beyond. You can see my first dory sitting on the ice. To prime it i had fun and chose yellow. I will do gray like the inside and then lightly paint the white over so it looks a little more used. I assume one dory aboard one on ice and the third???
-
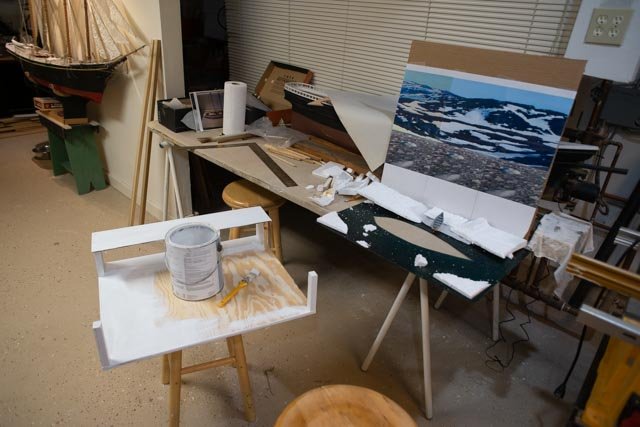 In this view, I have built up the bottom. It is a fraction under 24" by 21" deep and the ice is 5 inches up. that means about 20 feet of water. so the bottom will be painted as water. My practice collage of practice cropped photos tries to show the remaining frozen harbor running to the shore line. This is my place holder
I ordered and received a LED portable spot light and ordered a glass box that is ready to pick up tomorrow. Not sure how to manage with my cast…. Next, I need to paint out the wood stand to look like water.
Much to do
Cheers
-
-
Post 27
Lighting for diorama display
I came down the other day in the morning to use our friendly winter sun to try to figure out what to do for the museum display. The following process is hardly scientific, but it helped me figure out where I may be going.
I started off with the plywood base, as one option remains [ but unlikely] to do Bowdoin in solid ice. To me there are a few lighting options. I think I want to depict morning light. The question then comes to angle.
-
 First up is straight into the sun. There are indeed shadows on deck, but it is very regular. Rigging looks fine.
-
 Bending down for the onside look to pick up the hull below water, we have an oops. The sun is hitting the hull. I would have to diffuse that somehow.
-
 Turning roughly 45 degrees, meaning the light to be at the back corner of the display box, we have interesting shadows. More shadow over the water and I believe more striking on deck focused on one side.
-
 Bending down there is no sun on the hull on this side
Now let’s try the acrylic.
-
 Looking with the bow headed into the sunrise, i think it looks ok from this angle
-
 Bending down I find the soft light interesting.
-
 Turning 45 degrees again I prefer the shadow on deck.
-
 Bending down we see how much fun this acrylic sheet can be to see both above the water and the hull below. Maybe we add a seal!!! The side light is not quite as interesting as above.
-
 Now going forward as if approaching the exhibit, we are looking a bit down sun. The water is alive but flat. i can sort of see through it. That is OK because as one walks by the exhibit the water changes.
-
 Going past the stern we are looking into the sun and wow the sparkle is just exciting. I also like the back lighting in the rigging. In the earlier post the added rigging of lazy jacks and baggywrinkles, and they all picked up more light.
So yes, I am over my head but onward we go. I think somewhere between dead on sun and 45 degrees off line sun will work. I need to sort out the box and the fixture to achieve this. I must say in simple research I was taken back to learn the cost of a display box for all this. wow. I am not sure I am ready to build my own but $400 including shipping is a bit much for just one model. I found a local glazier who is building me a box in clear glass for about $100 and I just orders a small sun... LED exhibit spot light that is.
now I need dories.
All for now
jon
-
-
Post 26
Baggywrinkles
These little guys have not yet been solved on my watch. I am determined to figure something out.
First of all, where do they go.
After some time researching I have pulled together 4 views and put them on a sheet at approximately the same size. Sorry for the pencil, its not very dark , but here are the results. Comments are for each photo top to bottom.
-
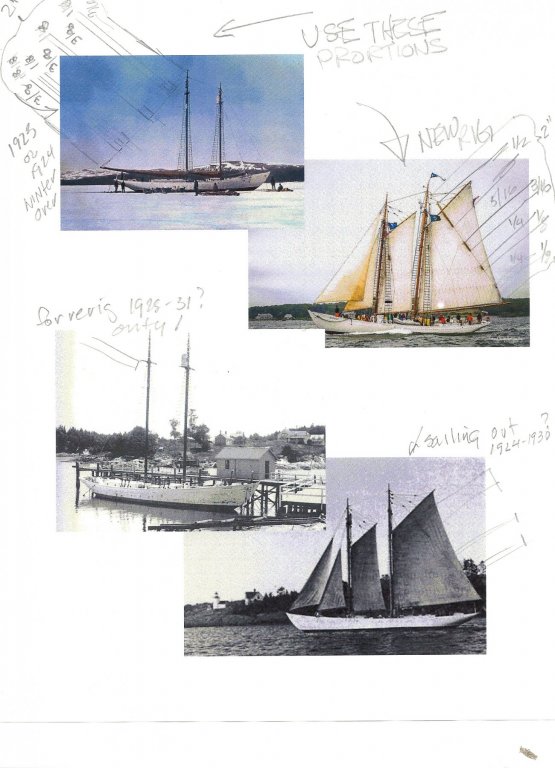 Photo 1 from BRHS archive 1923 on Foxe Basin I believe. The projections are two inches and the marks are either 3/8’ spaces or 1/8”baggywrinkles.
- Photo 2 my photo of Bowdoin sialing in windjammer parade a few years back. Here we see the same pattern and get a good feel for the color
- Photo 4 from BRHS sometime in 1930 [ I need to go back and try to see if better dated] set up for rigging refit. Looks like only one is left
- Photo 4 from BRHS named Bowdoin sailing out of Boothbay mid 1930’s the pattern respects what is more clear in forst two photos
So, in conclusion, the topping lift is about 15” long. Therefor the 1/8” is about 7/8”. That sets up the spacing for three single and one double about 7/8’ long
Now How to make
Some one told me that pipe cleaners would work, but I have no idea where to buy and then how to remove material and keep intact.
-
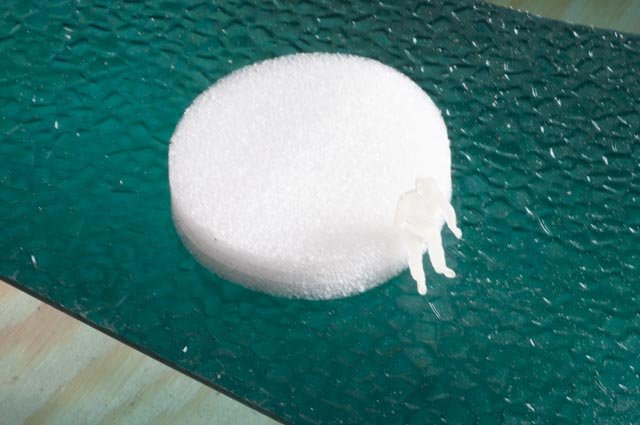 So here I have a bubble wrap disk. I set it on the acrylic for a better view. Our crew is curious too…and he walks on water?
-
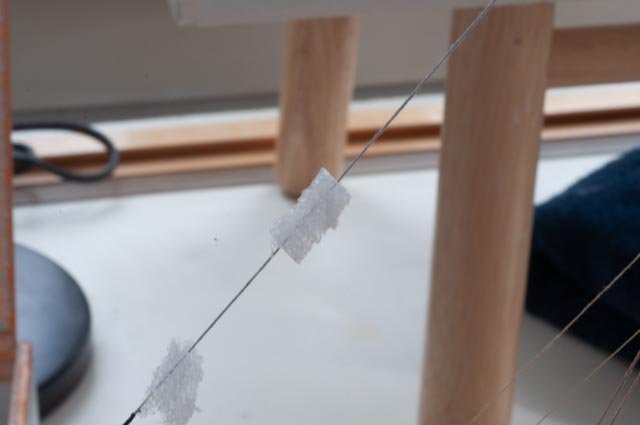 Here I cut and split and put in place to see concept. they are 3/4 long which i feel is close enough as they are likely baggier than scale. tough to match perfectly.
-
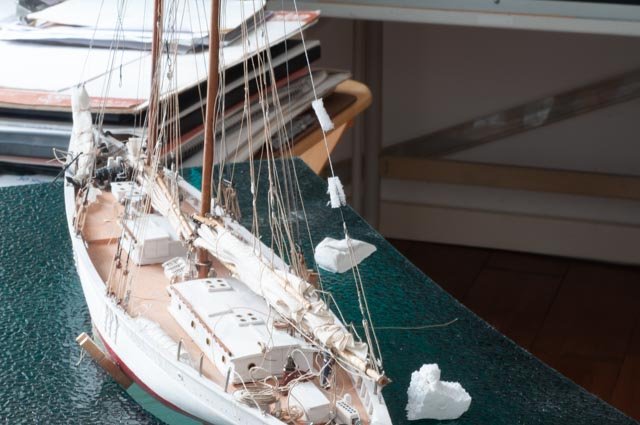 Here we look form behind. Perhaps just a little post trimming maybe and we can get there, but first to get the color.
-
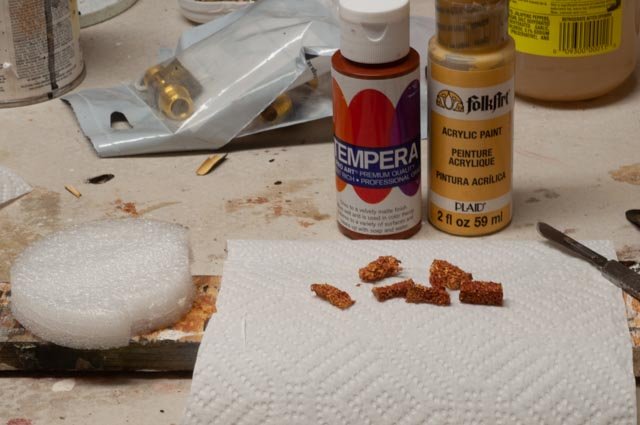 I took a dark yellow undercoat and while still wet painted on a brown
-
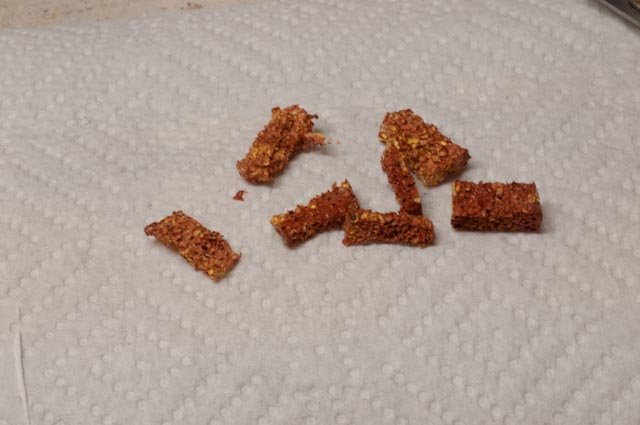 Not bad?....well perhaps good enough
-
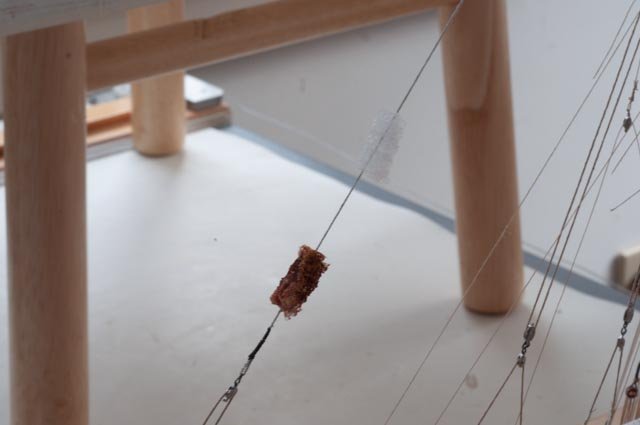 Here I have set one in place using “ super fabric glue” before making them all.
-
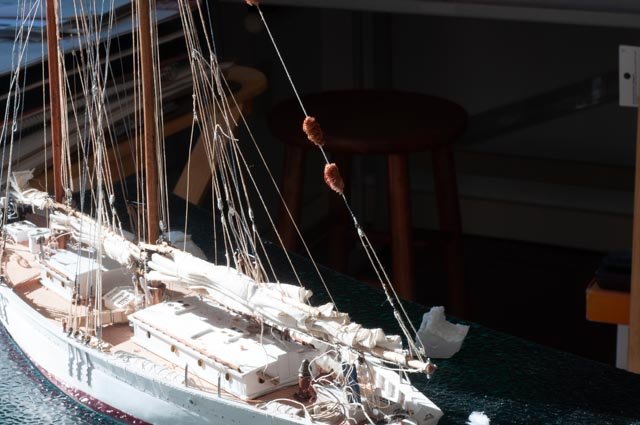 Here we have the bottom two on, dry trimmed, and touched up. the lazy jacks are in place now and add a lot to the rigging look. i have some trimming and making off of lines to complete the image.
-
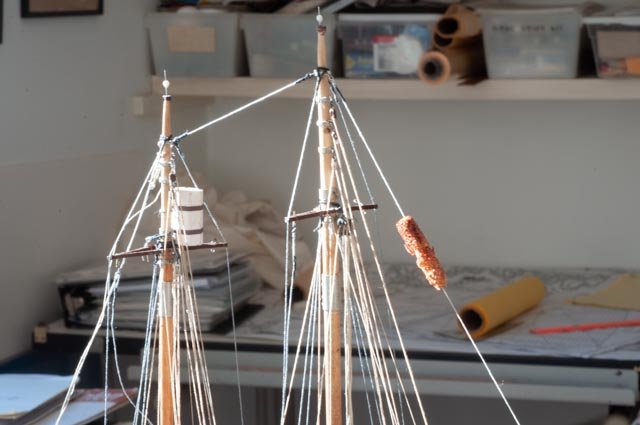 Here the top double may need another effort to trim and touch to round the edges.
-
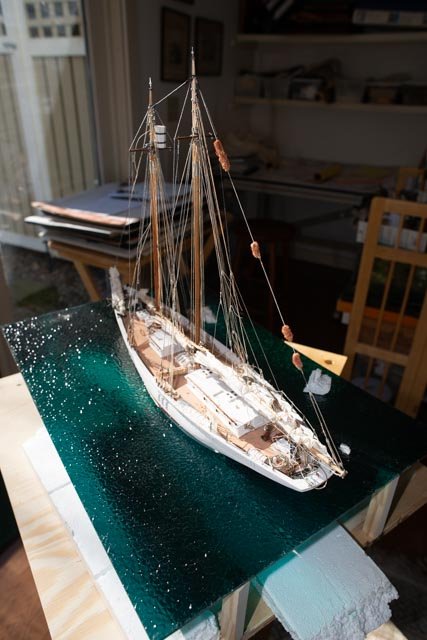 All in all I think we have baggy wrinkles. I am still interested in learning more methods. An advantage of this bubble wrap type material is it added so little weight to the topping lift there is no sag.
All for now cheers
-
-
Post 25
Working on things
We never get done fussing. I share here a few things going on.
-
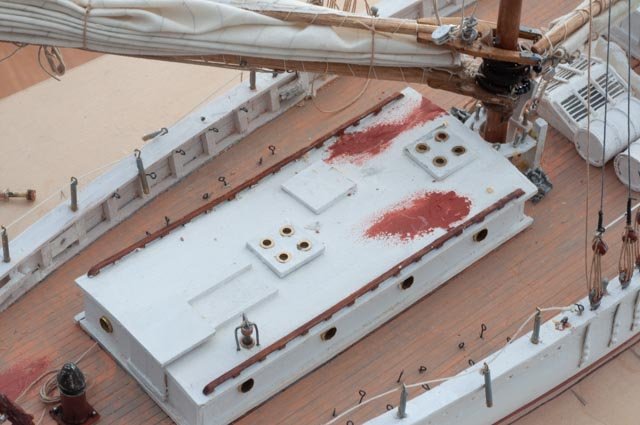 Time fix up the cabin roof minus ventilators for the age
-
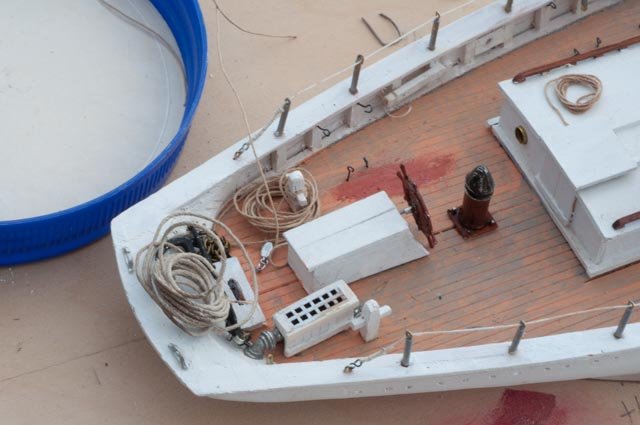 Time to try to patch the deck where I removed the kit box that was not evident in the photos. The little eyes in the deck are for the oil drums that go there instead. The started eyes in the cap rail were a mistake as I found the barrels were just lashed.
I find the exhaust pipe interesting. I have a photo in a book that shows no exhaust pipe even at the bit in 1928. I can not in=mage not having the loop on deck to keep following seas from flooding the engine. The 1089 phot shows the exhaust further forward than to day. Thus, this pipe have moved several times I suspect. I am glad that the piece in the kit is as short as it is because just like other fishing schooners of the era this is quite realistic in size.
-
Y
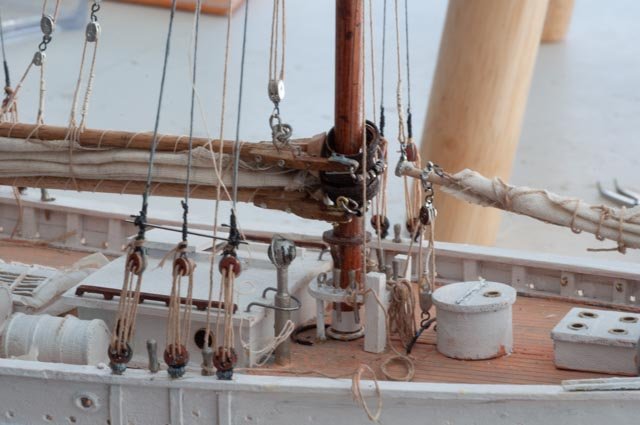 ou may recall the foresail gaff jaws are too low and into the rings.
-
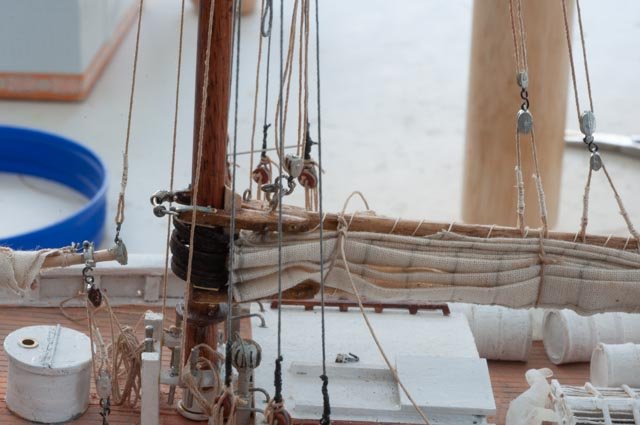 Here we have fixed the alignment bringing the shoe [ flapper not sure the proper name] into contact with the mast.
-
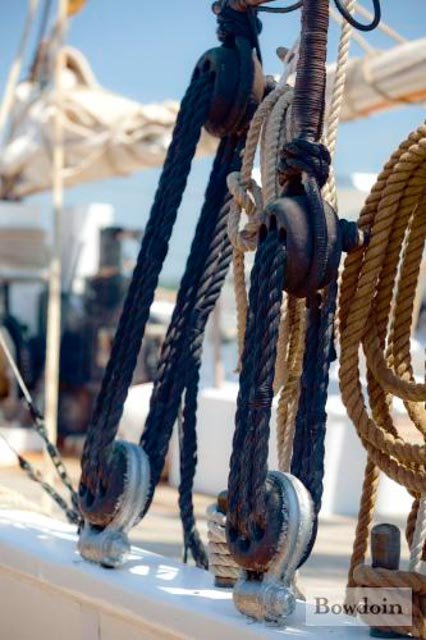 Here we have my next area. The shroud lashing lines are clearly hemp and tar in this internet photo. Will McLean told me that even to date the ratlines are all tarred too. I will get out my favorite ebony stain and do some damage here.
-
 Now the quandary. Those that followed me on Charles Notman may remember my failures to sew 1:48 scale baggywrinkles. So here one the images that comes up …. perhaps some sponge and then paint it???? Any ideas would be appreciated.
All for now
Jon
-
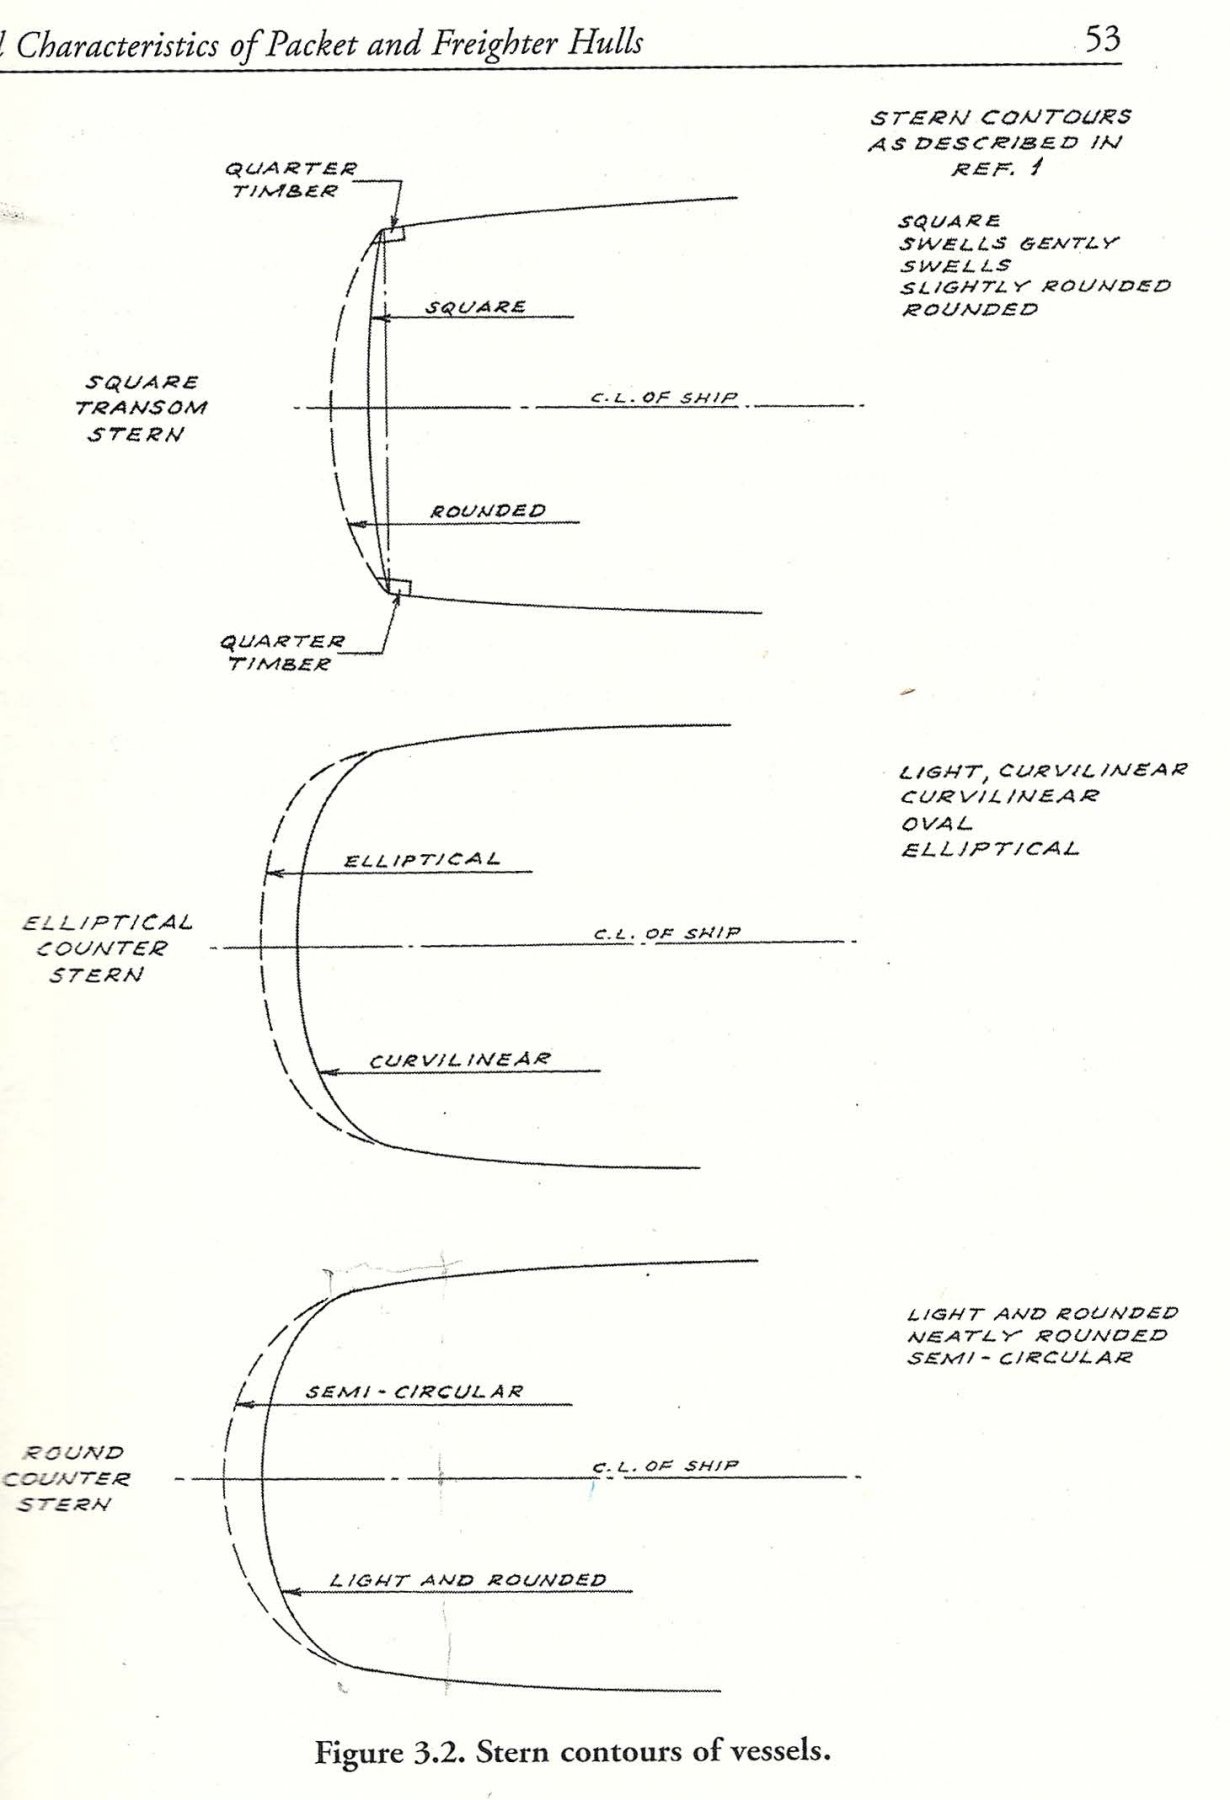

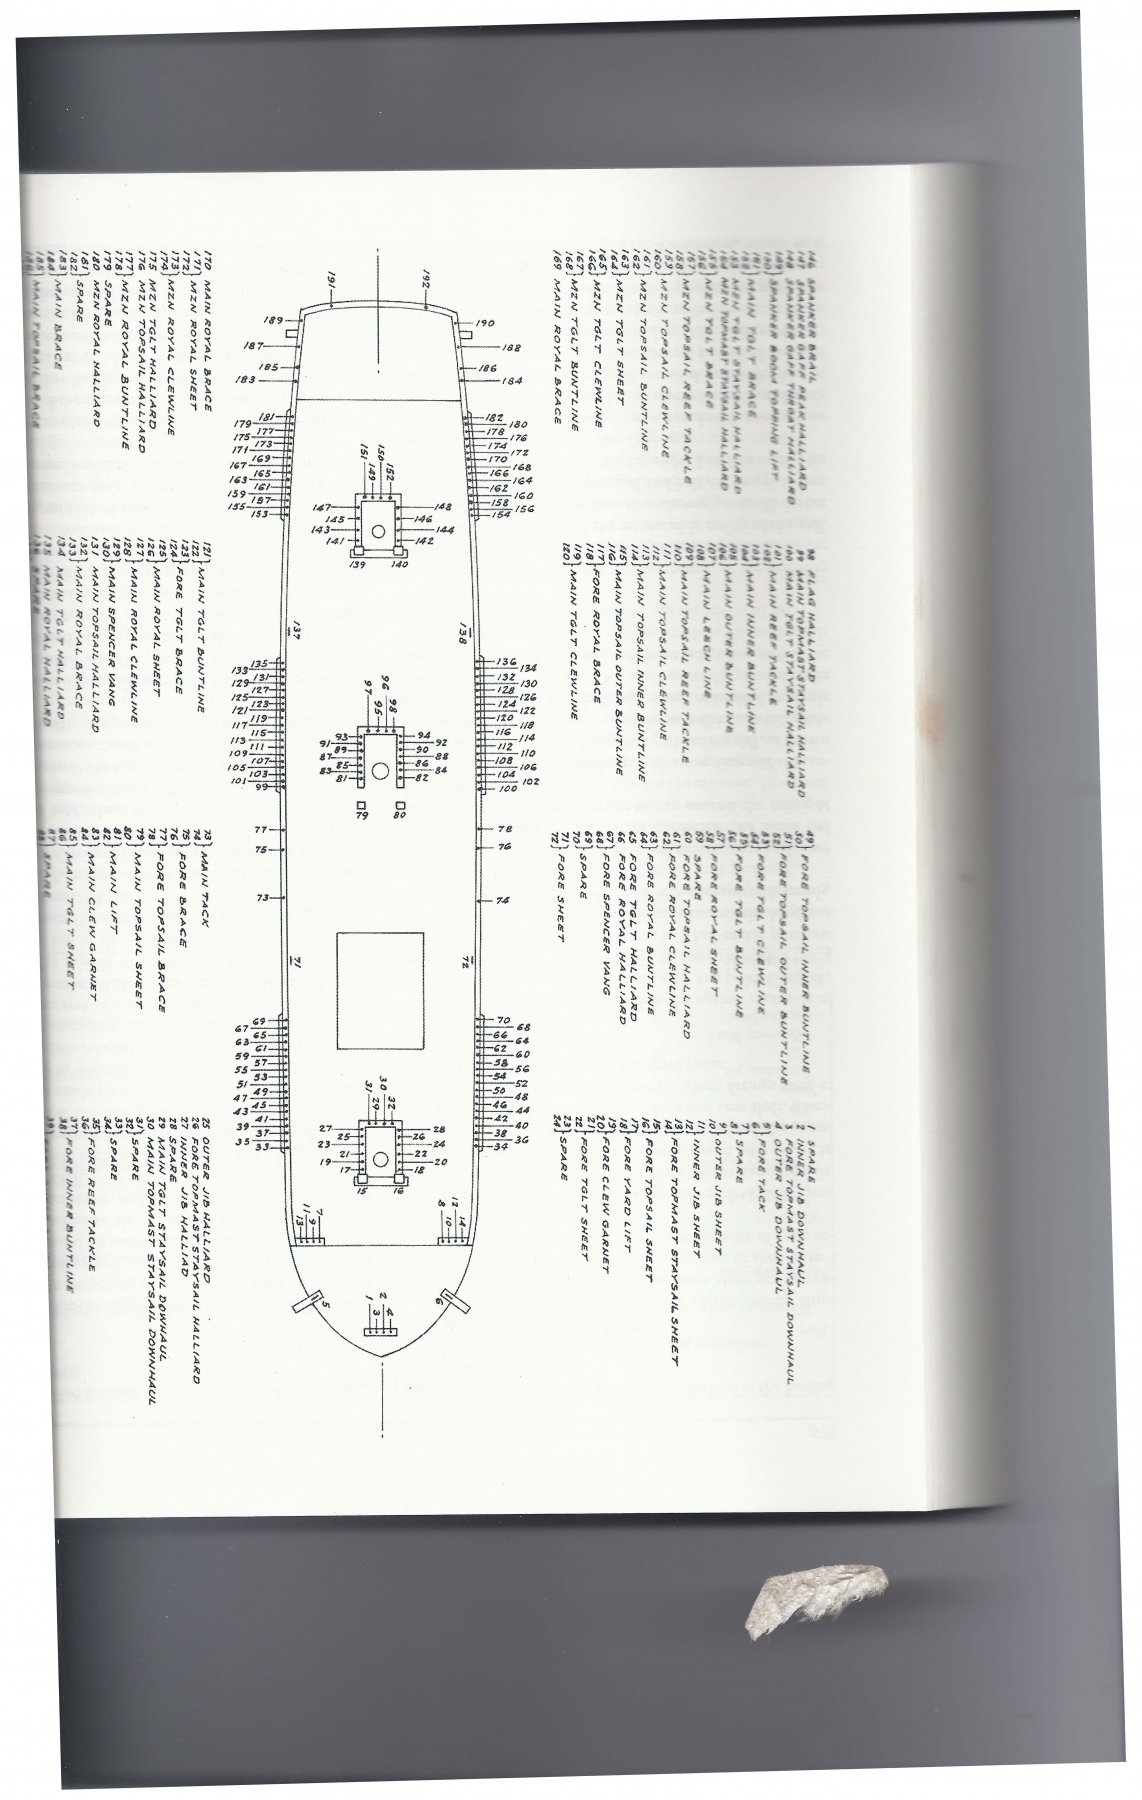
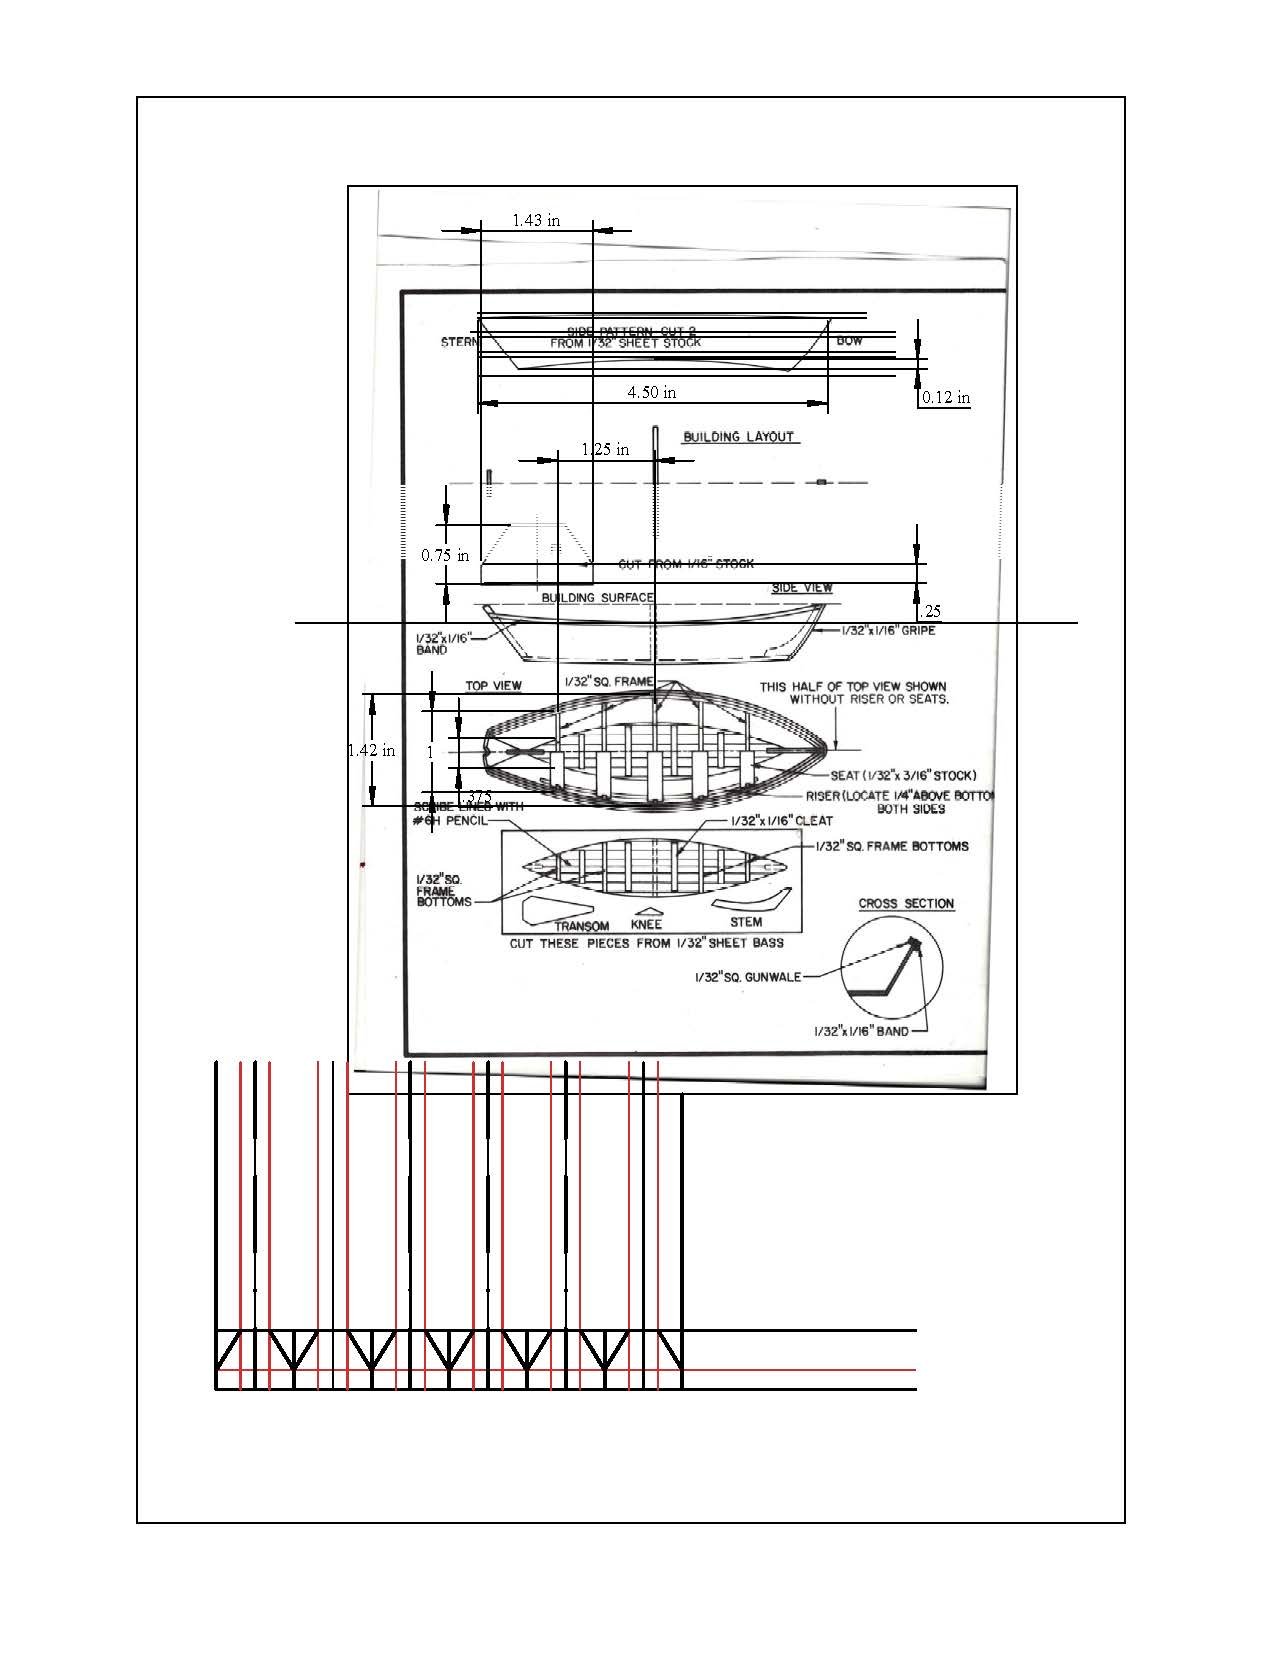


Aphrodite 1853 by jond - 1:96 - RESTORATION - Boothbay Maine ship
in - Build logs for subjects built 1851 - 1900
Posted
Kieth
there are two types ...one is two part and very hard etc and the second that I love, is one part and forgiving. It is called Glazing Putty
Bondo...Glazing & spot putty
it is red
cheers