HOLIDAY DONATION DRIVE - SUPPORT MSW - DO YOUR PART TO KEEP THIS GREAT FORUM GOING! (89 donations so far out of 49,000 members - C'mon guys!)
×

alde
-
Posts
1,028 -
Joined
-
Last visited
Content Type
Profiles
Forums
Gallery
Events
Everything posted by alde
-
 When Constitution was built there were 5 other frigates commissioned with her. Would the stern decorations be similar on all the ships of a class? Were they influenced by the style of the time or the design of the actual builder? Would the Constellation, Philadelphia or United States be much different than Constitution? There is probably less known about the other ships but it might be something interesting to explore.
 -
Steve, When I was bending the tween frames into the hull I found a technique that helped with the breakage problem. The ribs were soaked in water with a bit of amonia for 5 or 6 hours. When bending I would put the bottem end against the keel then slowely start bending very close to the keel and work my way up very slowley stopping for a few seconds every few mm or so. Once I felt the wood relax a bit I would move up the rib. If you try to force them down close to the center of the rib they will snap like the brittle little sticks they are. Al D.
- 625 replies
-
- 1
-

-
- bounty launch
- model shipways
- (and 1 more)
-
Thank you CaptainSteve. I was anxious to get the hull off the mold and I may have rushed that part but now that it's free I find myself slowing down and taking more care. It's hard to break from the habit of wanting to get things done but that doesn't work well with this hobby. I look down the road at some of the ships I would like to build and can see they could take a couple of years or more and they are kits. I would ultimatley like to scratch build a British Light Frigate or a Swan Class Sloop or something similar. The Model Shipways Constitution is in my sights though. It may not be the next one but after 2 or 3 smaller kits it may be time to jump in the deep end of kit building.
-
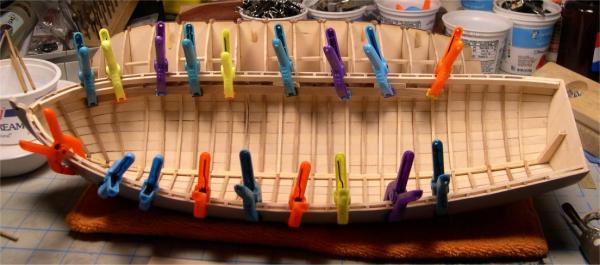
The Sheer Clamps have been installed and the Thwart Risers are clamped in place for forming. They will be installed tomorrow. No Treenails on this one for me. At this stage in my building experience I just want to get one under my belt. As I learn more and gain more confidence I will strive for more detail. Right now it's just learning the basics. I have to say that this is a whole lot more fun for me than plastic. Al D.
-
Patrick, you might also look for a book called "Six Frigates" by Ian W. Toll. It's an inexpensive book but a good read. You never know what tidbits you can find.
-
Patrick, I know that contemporary information for early US Navy ships is pretty thin. Have you found much in the way of early paintings? I am probably 5 years or more out from the time that I tackle Constitution but would like to build it in a Barbery Wars configuration. Yours will probably many times more difficult to find information on. I am always looking for information on her and if I find anything unusual I will pass it on. Al D.
-
Ill be hanging out in the peanut gallery trying to learn something. It will be fun seeing an early configuration Constitution come together. The research will be almost as much fun as the build. Al D.
-
We have a stain available here by Minwax called Weathered Oak. I tested it on some scrap and it's quite grey. Would the real boat have been built from oak? Wouldn't it have been well maintained while still on the ship and not look too weathered? That tropical sun and salt air probably would have been harsh on any wood. I may have to experiment with the Weathered Oak and some other colors on my launch. I didn't want to go too dark.
-
Is this Aussie Rules Football the game where they leave the injured players on the field and keep playing with no substutions? If it's the game I'm thinking of there is blood involved. The only sport I really follow is Ice Hockey.
-
That should be a great model. The latest Ships in Scale magazine has an article about the ship and it's history. It's great that you are close enough to the real thing to take pictures and get a feel for her. I was aboard her on a visit to Vancouver a few years ago.
-
It looks like you put a lot of attention into fairing the frames. It looks great.
-
CaptainSteve, your launch is progressing well. You do have quite the pile of broken sticks though. I see no reason not to substitute the wood as long as you are able to get the color fairley close. The Cherry they supplied was way too brittle for the sharp bends of the frames. Is the football you speak of what we Americans would call soccer or rugby? I had a niegbor who was a professional rugby player from Scotland. He moved to New Zeland to join a team. He was a good guy but I could only understand about half of what he was saying. He was married to a lady from Austrailia so the move to New Zeland put her closer to her family. She was much easier to understand. That was 20 years ago. Where do the years go?
- 625 replies
-
- 1
-
-
- bounty launch
- model shipways
- (and 1 more)
-
Thanks for the heads up on the with expanding Keith. I will keep a watch for that. So far it seems to be holding.
-
I agree with David. Furled sails would look great. You are doing a fantastic job. I would also fix the keel lift bar. At least you will know it's right.
-
Thanks Bindy. It can be hard to make the decision to take apart a couple of days of work but it's worth the effort to at least try to do it right.
-
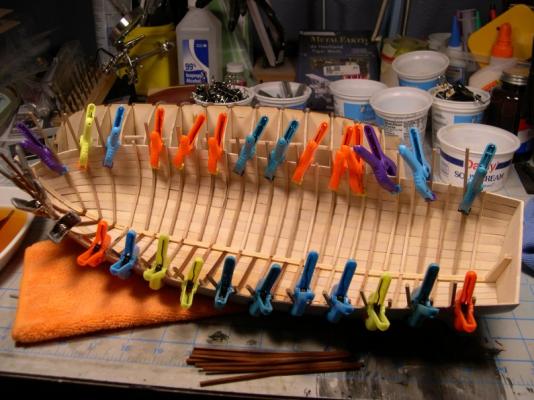
Now that was close. When I ordered extra cherry sticks I asked for 5 or 6. The sent me 6 and I used a full five. These seemed more brittle than the ones that came in the kit. The sticks in from of the boat are breakage. This also again illustrates the need for more clamps than you think you need.
-
Model Expo is the best. The mailman just dropped off my extra cherry sticks.
-
Steve, I don't have enough cherry wood to complete the tween frames and had to request some from Model Shipways. They did send the order out within a couple of days of the order but you being in Australia I'm sure it would take a while for you to get them. You may want to put in a request sooner than later unless you have a good local source. I don't think you will have any trouble the the hull springing wider as long as you bend the frames tight to the forms.
-
The cherry wood is yielding to your superior prowess. You can go forth with much pride in having vanquished your foe.
- 625 replies
-
- 1
-
-
- bounty launch
- model shipways
- (and 1 more)
-
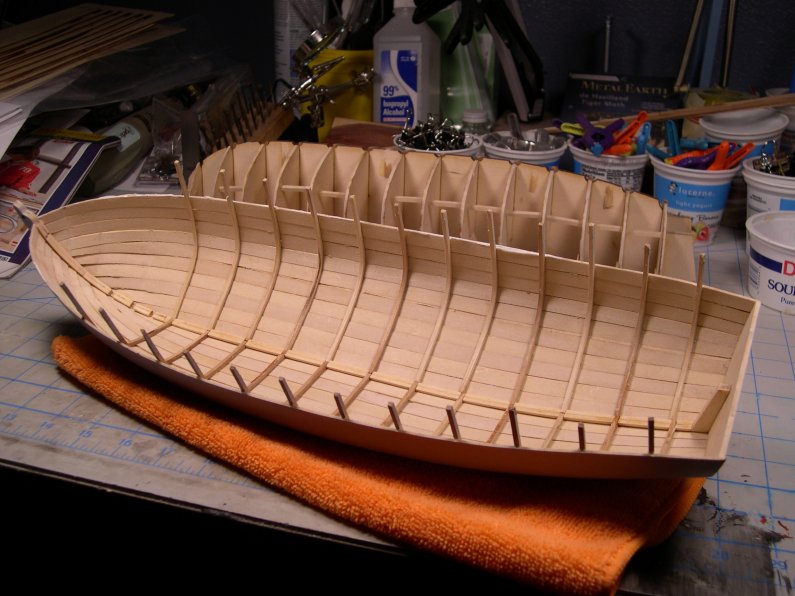
She came right off the mould with no problems. It inside looks pretty decent without too many weird spots. There is no excess glue to speak of and it feels really solid. I also didn't notice any tendency to spring to a wider dimension like some others have reported. I think the people that had this happen used one cherry stick for one continues frame.

-
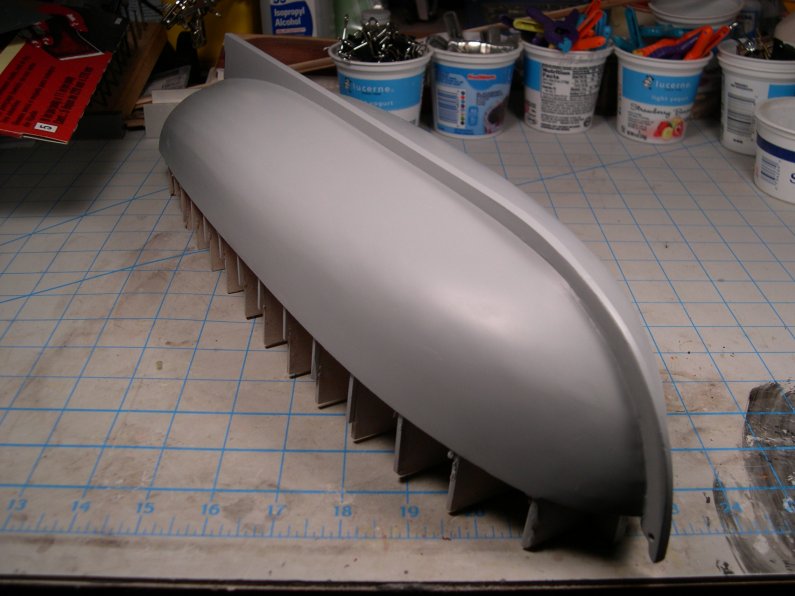
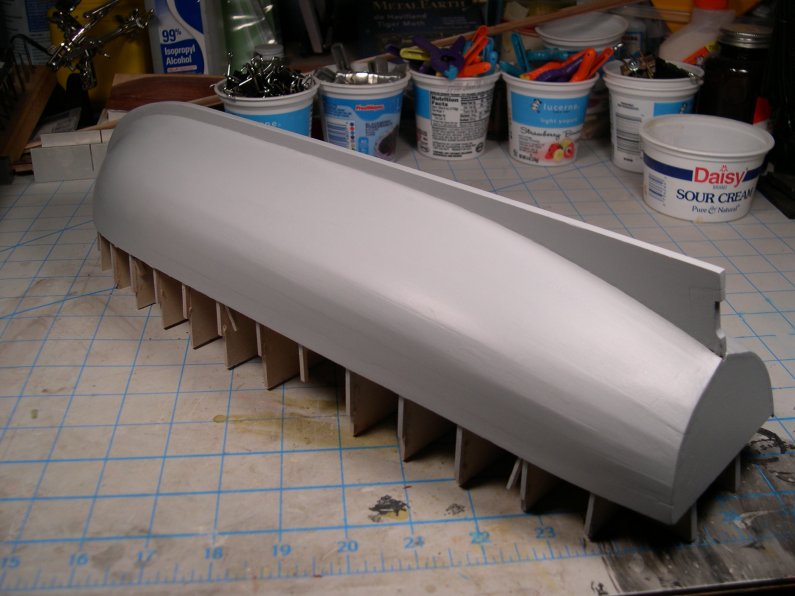
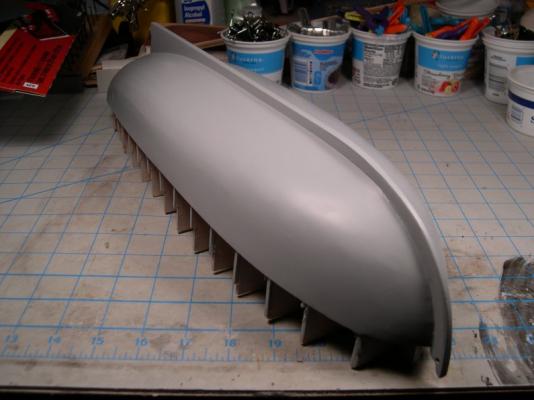
I made a bit of progress on the hull. With a bit of filler, some sanding and a bit of primer it's looking better. I'm not sure I want to go much further on the sanding and such. It could be better but I'm happy with it so far. Al D.

-
I did mine in 4.5 inch lengths as suggested in the instructions. I think with this method the hull is less likely to spring to a wider dimension when removed from the mold. I don't know this for sure yet but it's my theory. Al D.
-
Oh no, not the frames. I broke so many I had to request a few extra from MS. I had enough to bend over the form but do not have enough for the framing that goes into the hull after it's poped out of the form. I only have 3 sticks left for that job. I soaked mine overnight in plain water. I will use some amonia on the tween frames and see if that works better. They sure did burn TRANS deep enough. They really do need to put it next to the part.
- 625 replies
-
- 1
-
-
- bounty launch
- model shipways
- (and 1 more)
-
Mike, They sure don't tell you any of this in the instructions. They need to be re-writen. This was the first planked hull that I tried and before I was a member on MSW and got frustrated with it. I didn't know anything about fitting and bending the planks. Soaking and pinning will go a long way to getting your planks right. You may also have to bevel the plank edges so the sit next to each other tight. Also, try a little amonia in the warm water when you soak the planks and give them a few hours to soak.
- 18 replies
-
- 1
-
-
- maine peapod
- midwest products
- (and 1 more)
-
Fantastic looking whaleboat. They sure carried a lot of gear in these boats. Not much room for the crew.