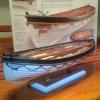
shackybracky Posted June 8, 2014 #1 Posted June 8, 2014 Hi everyone. This is my first attempt at planking this way so I've been doing lots of reading and trying to figure out the best way to approach the challenge and it's left me confused. Hopefully someone can help. The plans show to lay the first plank at the top and to work down towards the bottom. The first 4 planks are full length and then the 5th is supposed to curve up into the 4th plank. It says to lay each plank against the frames and let the lay of the plank guide me where to trim each plank. But online tutorials show to split the hull into bands and use tick strips. I don't know which way to go. Is the method shown in the instructions an accurate way to plank or should I ignore it and use bands and tick strips? The planks included in the pack are 3x1mm basswood and 3x0.5mm walnut for the second layer. I've attached a photo of the planking layout shown on the plans and a couple of pictures of where I'm at so far. thanks in advance Kev
mtaylor Posted June 8, 2014 #2 Posted June 8, 2014 Kev, Basically, it's your choice on how you plank it. The tutorials here on MSW will give a more historically correct planking. The kit plans.. well, it is a kit. Kit are not necessarily correct historically. pete48 1 Mark "The shipwright is slow, but the wood is patient." - me Current Build: Past Builds: La Belle Poule 1765 - French Frigate from ANCRE plans - ON HOLD Triton Cross-Section NRG Hallf Hull Planking Kit HMS Sphinx 1775 - Vanguard Models - 1:64 Non-Ship Model: On hold, maybe forever: CH-53 Sikorsky - 1:48 - Revell - Completed Licorne - 1755 from Hahn Plans (Scratch) Version 2.0 (Abandoned)
shackybracky Posted June 9, 2014 Author #3 Posted June 9, 2014 Hi mtaylor, thanks for the reply. I would prefer to build closer to historically correct so I'll go with the tutorial method. Thanks again.
augie Posted June 9, 2014 #4 Posted June 9, 2014 I'd say you've made a wise choice, Shacky. mtaylor 1 Augie Current Build: US Frigate Confederacy - MS 1:64 Previous Builds : US Brig Syren (MS) - 2013 (see Completed Ship Gallery) Greek Tug Ulises (OcCre) - 2009 (see Completed Ship Gallery) Victory Cross Section (Corel) - 1988 Essex (MS) 1/8"- 1976 Cutty Sark (Revell 1:96) - 1956
shackybracky Posted June 9, 2014 Author #5 Posted June 9, 2014 Thanks Augie. Will it be ok to start the bands from the 4th plank down or do I need to remove all but the top plank and start there?
fnkershner Posted June 9, 2014 #6 Posted June 9, 2014 Kevin - It may be comical to see me giving planking advice. Since it is not one of my best skills. But let me give it a try. From the blow up of your pictures I can see that it looks like you have done ok so far on your planking. So I will leave what you have and go from there. If you look at your plans you will see a big no no in planking. There are quite a few planks that do not make it all the way to the bow and terminate at the bluff bow. This should be avoided. I would go ahead and divide the bulkheads into planking bands and then into individual planks. once you have done this on each bulkhead then you can step back and decide what needs adjustments or not. at that point it might be necessary to remove some of the planks already laid. but hold off until you get to that point. Tjalle58 1 Current Builds - 18th Century Longboat, MS Syren Completed Builds - MS Bluenose, Panart BatteStation Cross section, Endevour J Boat Half Hull, Windego Half Hull, R/C T37 Breezing Along, R/C Victoria 32, SolCat 18 On the shelf - Panart San Felipe, Euromodel Ajax, C.Mamoli America, Its a sailor's Life for me!
shihawk Posted June 9, 2014 #7 Posted June 9, 2014 if your double planking use the first layer to practice and figure out the best way to run the final planking HMS Victory by Shihawk. Billing 1-75 wood finish
shackybracky Posted June 9, 2014 Author #8 Posted June 9, 2014 Thanks Floyd and Shihawk, very helpful. I'll leave the 8 planks on and have a go at the bands and strips. The kit plans just don't look right structurally and I want to learn how it's done properly so I will take my time and see how we go. I've just received a 2 disc planking instructional dvd tonight when I got home from work so i'll watch those tonight too before I do anything on the model. Thanks for the help so far.
S.Coleman Posted June 9, 2014 #9 Posted June 9, 2014 Your model looks great! And yes the kit plans for planking never look right. The best thing you did is ask on this site! Hope all goes well. mtaylor 1 Regards, Scott Current build: 1:75 Friesland, Mamoli Completed builds: 1:64 Rattlesnake, Mamoli - 1:64 HMS Bounty, Mamoli - 1:54 Adventure, Amati - 1:80 King of the Mississippi, AL 1:64 Blue Shadow, Mamoli - 1:64 Leida Dutch pleasure boat, Corel - 1:60 HMS President Mantra, Sergal Awaiting construction: 1:89 Hermione La Fayette AL - 1:48 Perserverance, Modelers shipyard
augie Posted June 9, 2014 #10 Posted June 9, 2014 I'm with everyone on this. I generally plank from the wales on upward before I do the lower sections. It's there that I divide into belts. So leave what you have. Your first layer of planking merely serves as a solid underbase for your final planking giving you a smooth, evenly flowing base. So don't be afraid to use some filler if you need to....and sandpaper is your friend. Between the dvd's and the tutorials on here you'll master the technique that's best for you. Every one on here learns with each new build and (hopefully) gets better. Start that build log and don't be afraid to ask questions if you're unclear on anything. MSW can be a great resource. mtaylor and edmay 2 Augie Current Build: US Frigate Confederacy - MS 1:64 Previous Builds : US Brig Syren (MS) - 2013 (see Completed Ship Gallery) Greek Tug Ulises (OcCre) - 2009 (see Completed Ship Gallery) Victory Cross Section (Corel) - 1988 Essex (MS) 1/8"- 1976 Cutty Sark (Revell 1:96) - 1956
shackybracky Posted June 11, 2014 Author #11 Posted June 11, 2014 Thanks S.Coleman and Augie. I watched the dvd on how to plank a bluff bow ship, after googling what a bluff bow was, and learnt that there was a lot more fairing to do than the kit instructions said there was. So I've done the fairing and taken a couple of measurements of the bulkheads. The biggest one mid ship is 70mm and the rest around it get smaller, apart from the very last one. The planks run all the way down the keel stopping about 5mm short from the bottom. So the measurement at the rear of the ship is 79mm. I guess that means I'm gonna have to add some filler pieces at the back? The kit shows triangular pieces and so did the dvd tutorial but that would reduce the plank to less than half it's width so I think I need to add fillers with an arrow shape on the end. Does that sound right?
fnkershner Posted June 11, 2014 #12 Posted June 11, 2014 The fillers pieces are called Stealers. and yes this is fairly common near the stern. the stealer often begins at approx. 1/2 the width of a plank and widens towards the stern to a full width. Current Builds - 18th Century Longboat, MS Syren Completed Builds - MS Bluenose, Panart BatteStation Cross section, Endevour J Boat Half Hull, Windego Half Hull, R/C T37 Breezing Along, R/C Victoria 32, SolCat 18 On the shelf - Panart San Felipe, Euromodel Ajax, C.Mamoli America, Its a sailor's Life for me!
shackybracky Posted June 12, 2014 Author #13 Posted June 12, 2014 (edited) Thanks Floyd and garym. As this is my first attempt at planking like this i'm gonna use the first layer as a practice run in the hope it will make the second layer as good as I can make it. But once I know what i'm doing I won't focus as much on the first layer on future ships. I made a start last night on the tick strips and marked some of the bulkheads. Once I get to the stage of fitting the planks do I shape the top or bottom edge of the planks? Edited June 12, 2014 by shackybracky
HIPEXEC Posted June 12, 2014 #14 Posted June 12, 2014 Good luck with this difficult planking project. The best advise I ever got from this site was.....treat each plank as if it is its own model. Basically, that's correct since no two planks were or are ever the same. . Rich Rich USS Constitution by hipexec (Finished build) Virginia Pilot Boat 1805 (gallery - first build) USS Syren (USS Argus) by Hipexec Joshua Slocum's Spray by HIPEXEC
fnkershner Posted June 12, 2014 #15 Posted June 12, 2014 I suggest you taper the edge of the plank that will be glued to the previous plank. Here is my reasoning. when you go to lay the next plank having a smooth straight line on the previous plank will help ensure there are no gaps. It also gives you a easier reference line for the next plank. So if you are planking from the deck down you want to taper the top of the plank. Current Builds - 18th Century Longboat, MS Syren Completed Builds - MS Bluenose, Panart BatteStation Cross section, Endevour J Boat Half Hull, Windego Half Hull, R/C T37 Breezing Along, R/C Victoria 32, SolCat 18 On the shelf - Panart San Felipe, Euromodel Ajax, C.Mamoli America, Its a sailor's Life for me!
shackybracky Posted June 12, 2014 Author #16 Posted June 12, 2014 ok that's great help, thanks. I finished the tick strips tonight and marked each bulkhead, except for the front two and rear one because I'm not really sure how many planks will hit them as they cover a much smaller distance than at midship. I'm hoping that by using the rest of the bulkheads as a guide I'll find where the planks finish front and rear. We shall see tomorrow when I start planking. Definitely a challenge this planking business but enjoying it.
shackybracky Posted June 14, 2014 Author #17 Posted June 14, 2014 (edited) I've planked the top band on the starboard side. I put a full width plank at the bottom of what I've done so far and filled in the gap. There's a bit of clinker effect towards the bow but nothing I can't sand out. I'm gonna do the same on the port side next. I haven't worried about scribing the planks into keel at the bow but I will on the second layer. When I plank the second layer i'll have to be more accurate with plank widths at the bow because there's quite a difference as you can see on the photos. But if I can get this layer smooth i'll be happy. Any opinions and advice on how to improve would be great. Edited June 14, 2014 by shackybracky
shackybracky Posted June 15, 2014 Author #18 Posted June 15, 2014 Thanks Gary. The reason for the gap was that I was clamping a small piece of wood tight up to the planks at the bow to keep it held in until the glue had set and so I couldn't see that the plank wasn't actually touching the keel. I've planked down to the same place on the port side and it's much better. I don't think the planks are of great quality because they don't have smooth edges or surfaces and are of different thicknesses and widths so a bit of a battle but I'm looking forward to getting the first layer on and sanded smooth.
fnkershner Posted June 15, 2014 #19 Posted June 15, 2014 Another solution to remember for the future. Is that some models have a rabbit carved into the stem and keel. At the bow this allows you to recess the ends of the planks so that the rough end does not show. I learned this one late when I was double planking one of my kits. Current Builds - 18th Century Longboat, MS Syren Completed Builds - MS Bluenose, Panart BatteStation Cross section, Endevour J Boat Half Hull, Windego Half Hull, R/C T37 Breezing Along, R/C Victoria 32, SolCat 18 On the shelf - Panart San Felipe, Euromodel Ajax, C.Mamoli America, Its a sailor's Life for me!
NMBROOK Posted June 15, 2014 #20 Posted June 15, 2014 Whilst you still have access from below,clothes pegs on the inline joints between bulkheads can help to reduce clinkering.This does mean one plank at a time though whilst the glue dries,but it reduces the amount of sanding and filling required.You can't use this method when you get close to the bottom as the pegs won't go in. Kind Regards Nigel Currently working on Royal Caroline
shackybracky Posted June 16, 2014 Author #21 Posted June 16, 2014 Thanks for the tips. Floyd..do kits normally come with the rabbet already cut out or is that something we do ourselves? If so how do you go about it?
fnkershner Posted June 16, 2014 #22 Posted June 16, 2014 Well unfortunately the answer is "it depends". If the kit is designed by Chuck Passaro, it is designed into the kit and you do not need to cut it. Each kit manufacturer does it differently and some don't even bother to mention it. I don't know your specific kit so I don't know the answer with this model. Current Builds - 18th Century Longboat, MS Syren Completed Builds - MS Bluenose, Panart BatteStation Cross section, Endevour J Boat Half Hull, Windego Half Hull, R/C T37 Breezing Along, R/C Victoria 32, SolCat 18 On the shelf - Panart San Felipe, Euromodel Ajax, C.Mamoli America, Its a sailor's Life for me!
Tyrnac Posted September 11, 2014 #23 Posted September 11, 2014 Hi Shacks! I'm building this kit as well (my first build) and your questions look awfully familiar. If you want a rabbet on this one, you have to cut it yourself. I worked out the run based on the bottoms of the bulkheads, and used a #11 blade to cut the bow and bottom and a small chisel to cut a smooth run in the stern. Basically, you want a notch that the plank will fit into nicely, and at the stern I cut away some of the ply so that the planks would end up more flush with the back. Sorry if this is not making sense, it's a bit hard to describe in just words. I too used my first planking to work on the technique, and on the second planking did my best to taper the planks at the bow so as to have a nice run (more straight than straight up) and not clinker too much. Have you started a build log yet? I'd love to see more of your ship in progress. I started mine a few years ago, but had two kids since and each time a child came along the Racehorse got shelved. I got up to the deck furniture this past year but moved countries over the summer, so I have to enjoy other peoples' build logs until all of my stuff gets here. There is a nice log from ZyXuz, and sooner or later I'll have to start one myself. In the meantime, welcome aboard! Tony
medic Posted December 26, 2014 #24 Posted December 26, 2014 Hey all, I to am working on the Racehorse, and felt a little sick until I come across Shacks initiated forum. Having seen the planks run full length has helped me decide to go the same way. Tony I know what you mean about ZyXuz build log (most impressive) I don't have the skill or intestinal fortitude to go that way just the same. I hope to put some planking pics to my build log this Christmas weekend. Cheers Mark

Recommended Posts
Create an account or sign in to comment
You need to be a member in order to leave a comment
Create an account
Sign up for a new account in our community. It's easy!
Register a new accountSign in
Already have an account? Sign in here.
Sign In Now