mike Posted March 6, 2013 Share #1 Posted March 6, 2013 I am a member of the San Diego Shipmoddelers Guild community build. I am behind in posting my progress so will post photos to try and catch up with minimum dialog. I have followed the kit instructions and used kit materials up to this point with a couple of changes. One thing I did before planking was to stack all the planking material face to face and tack glue the ends together. This gave me a block that I could feed through my thickness sander. When seperated this gave me planking material of equal width and with nice square edges. One of my deviations was to leave off some of the planking on one side to show off the frames. I made a special tool for sanding the inside of the frames. It consisted of a section of dowel with sandpapper glued to it and a handle added. The length of the dowel was just wideer than tghe distance between frames. Chuck 1 Quote Link to comment Share on other sites More sharing options...
mike Posted March 6, 2013 Author Share #2 Posted March 6, 2013 The following photos will bring my build up to date. One other deviation from the kit was painting on the friezes instead of using the printed ones. My wife did the painting. Mike CaptainSteve 1 Quote Link to comment Share on other sites More sharing options...
trippwj Posted March 6, 2013 Share #3 Posted March 6, 2013 Absolutely beautiful job - boat and painting! Trussben 1 Quote WayneNeither should a ship rely on one small anchor, nor should life rest on a single hope.Epictetus Link to comment Share on other sites More sharing options...
st george Posted March 6, 2013 Share #4 Posted March 6, 2013 Hi Mike, What Kit is this? Looks really nice and I do like the painting. David Quote David Current Build : HMAV Bounty - Amati Next Build : 18th Century Longboat Link to comment Share on other sites More sharing options...
mike Posted March 6, 2013 Author Share #5 Posted March 6, 2013 Wayne Thanks David This is Model Shipways kit of the 18th Century Longboat in 1:48 scale, that our group (San Diego Shipmodelers Guild) chose as the subject of our community build. We have several under construction (maybe 10). Mike Quote Link to comment Share on other sites More sharing options...
42rocker Posted March 6, 2013 Share #6 Posted March 6, 2013 Always have liked the idea of leaving part of the hull unplanked to show off some of the work that would normally be covered. Good Luck with your build. Later 42rocker Quote Current Build -- Finishing a 1:1 House that I've been building for a while Current Build -- Triton Cross Section Link to comment Share on other sites More sharing options...
CaptainSteve Posted March 7, 2013 Share #7 Posted March 7, 2013 Beautiful work there, Mike. And of great interest as I am currently building the ship's boats for my USS Constitution. Thanks for the pics. Quote CaptainSteve Current Build: HM Granado Bomb Vessel (Caldercraft) My BathTub: Queen Anne Barge (Syren Ship Models) Log: Queen Anne Barge (an build log) Bounty Launch (Model Shipways) Log: Bounty Launch by CaptainSteve Apostol Felipe (OcCre) HMS Victory (Constructo) Check It Out: The Kit-Basher's Guide to The Galaxy Website: The Life & Boats of CaptainSteve Link to comment Share on other sites More sharing options...
Chuck Seiler Posted March 7, 2013 Share #8 Posted March 7, 2013 Mike, Welcome back! Looks great. Quote Chuck Seiler San Diego Ship Modelers Guild Nautical Research Guild Current Build:: Colonial Schooner SULTANA (scratch from Model Expo Plans), Hanseatic Cog Wutender Hund, Pinas Cross Section Completed: Missouri Riverboat FAR WEST (1876) Scratch, 1776 Gunboat PHILADELPHIA (Scratch), John Smith Shallop Link to comment Share on other sites More sharing options...
mike Posted March 7, 2013 Author Share #9 Posted March 7, 2013 Thanks, Chuck and Cap Steve. Mike Quote Link to comment Share on other sites More sharing options...
BRiddoch Posted March 8, 2013 Share #10 Posted March 8, 2013 Looks good Mike. Glad to see you made it onboard. Bob R Quote San Diego Ship Modelers' GuildNautical Research Guild USS Constitution Ship Modelers GuildUSS Constitution - Model Shipways - 1:76 scale. 18th Century Longboat - Model Shipways - 1:48 scale Higaki Kaisen - Woody Joe - 1:72 scale Link to comment Share on other sites More sharing options...
Trussben Posted March 8, 2013 Share #11 Posted March 8, 2013 Wow, your wife is a hell of a good painter, nice idea leaving some of the hull unplanked, haven't seen that before on this kit. Ben Quote Current builds: HMS Pegasus TFFM. HMS Winchelsea. Completed builds: ECHO cross section.18th C Longboat.QA Barge. Medway Longboat. Link to comment Share on other sites More sharing options...
Chuck Seiler Posted March 12, 2013 Share #12 Posted March 12, 2013 Mike, I like the 'sanding mallet' for the interior of the frames. I look forward to trying the concept. Quote Chuck Seiler San Diego Ship Modelers Guild Nautical Research Guild Current Build:: Colonial Schooner SULTANA (scratch from Model Expo Plans), Hanseatic Cog Wutender Hund, Pinas Cross Section Completed: Missouri Riverboat FAR WEST (1876) Scratch, 1776 Gunboat PHILADELPHIA (Scratch), John Smith Shallop Link to comment Share on other sites More sharing options...
the learner Posted March 29, 2013 Share #13 Posted March 29, 2013 Mike the build is looking great. Good progress since you brought it in to an SMA club meeting Quote Cheers, GuyThe LearnerCurrent Member NRG,SMA Current Build: HMS Triton 1:48 on line Link to comment Share on other sites More sharing options...
mike Posted April 14, 2013 Author Share #14 Posted April 14, 2013 Have finally made some progress on my longboat build. The windless has been completed and installed. To this point I have used kit materials for the build, but decided to use boxwood for the windless barrel. I think I got much sharper edges with the boxwood. The rails that mount the windless are not vertical , so I added mounting pads to the rails. I have seen this feature in photos of contemporary drawings and models. The handle is made from a piece of 3/64 inch square pear. Next the mast was made so the final seat with mast support hardware could be completed. I wanted to install real sheavs in the mast so the three slots were cut. The mast was then tapered to final size. The next photo is of the mast with the block support bands installed. The bands were created of kit brass strip. The strip was annealed and formed arround the mast. The ends were silver soldered together and the hole fof attaching the block drilled. They were then epoxied in place. The final seat with mast support hardware was completed and installed. The seats will be colored with some very dilute golden oak stain to help accent the scribed lines. Mike dvm27 and Chuck 2 Quote Link to comment Share on other sites More sharing options...
BRiddoch Posted April 15, 2013 Share #15 Posted April 15, 2013 Looks great Mike. I'm looking forward to getting home and working on mine. Bob R. Quote San Diego Ship Modelers' GuildNautical Research Guild USS Constitution Ship Modelers GuildUSS Constitution - Model Shipways - 1:76 scale. 18th Century Longboat - Model Shipways - 1:48 scale Higaki Kaisen - Woody Joe - 1:72 scale Link to comment Share on other sites More sharing options...
Chuck Seiler Posted April 15, 2013 Share #16 Posted April 15, 2013 Mike, Looks great. Looked even better in real life. You did not say, but based on your past work, I am assuming you blackened the brasswork rather than paint it. Correct? Quote Chuck Seiler San Diego Ship Modelers Guild Nautical Research Guild Current Build:: Colonial Schooner SULTANA (scratch from Model Expo Plans), Hanseatic Cog Wutender Hund, Pinas Cross Section Completed: Missouri Riverboat FAR WEST (1876) Scratch, 1776 Gunboat PHILADELPHIA (Scratch), John Smith Shallop Link to comment Share on other sites More sharing options...
mike Posted April 16, 2013 Author Share #17 Posted April 16, 2013 Yes I use the blackening solution from Bluejacket. It seems to blacken the silver solder as well as the brass. Mike Quote Link to comment Share on other sites More sharing options...
Chuck Seiler Posted April 16, 2013 Share #18 Posted April 16, 2013 Mike, Will you be making your own sheeves or buying them? Quote Chuck Seiler San Diego Ship Modelers Guild Nautical Research Guild Current Build:: Colonial Schooner SULTANA (scratch from Model Expo Plans), Hanseatic Cog Wutender Hund, Pinas Cross Section Completed: Missouri Riverboat FAR WEST (1876) Scratch, 1776 Gunboat PHILADELPHIA (Scratch), John Smith Shallop Link to comment Share on other sites More sharing options...
mike Posted April 16, 2013 Author Share #19 Posted April 16, 2013 Chuck I will turn the sheaves for the long boat. I have some Lignim Vitae that I have been wanting to try. Failing that I will go back to boxwood, which has worked well in the past. To make them I turn a up a dowel in the proper diameter. I put the dowel vertically in the vise of the mill. The sheaves are then cut off using a dremel saw blade in the mill chuck. I can move the saw blade down a known amount and cut off very thin sheaves as required. Mike Quote Link to comment Share on other sites More sharing options...
BRiddoch Posted May 13, 2013 Share #20 Posted May 13, 2013 Can't wait to see those sheaves. Bob Quote San Diego Ship Modelers' GuildNautical Research Guild USS Constitution Ship Modelers GuildUSS Constitution - Model Shipways - 1:76 scale. 18th Century Longboat - Model Shipways - 1:48 scale Higaki Kaisen - Woody Joe - 1:72 scale Link to comment Share on other sites More sharing options...
Chuck Seiler Posted May 13, 2013 Share #21 Posted May 13, 2013 I think Mike is too busy working on FLY. We may have to strong arm him. Quote Chuck Seiler San Diego Ship Modelers Guild Nautical Research Guild Current Build:: Colonial Schooner SULTANA (scratch from Model Expo Plans), Hanseatic Cog Wutender Hund, Pinas Cross Section Completed: Missouri Riverboat FAR WEST (1876) Scratch, 1776 Gunboat PHILADELPHIA (Scratch), John Smith Shallop Link to comment Share on other sites More sharing options...
mike Posted May 13, 2013 Author Share #22 Posted May 13, 2013 OK! OK! I,m working on the longboat. Added white rails under friezes,restained seats to accentuate molding and am working on the rudder. No time for pics now-off to SDSMG meeting. Will have rudder finished tommorrow and then will post photos. Mike Quote Link to comment Share on other sites More sharing options...
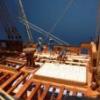
mike Posted May 19, 2013 Author Share #23 Posted May 19, 2013 Rudder finished sans paint. I am not sure yet how I want to decorate the stern and rudder. Here are some shots of the model as it stands now. Mike Quote Link to comment Share on other sites More sharing options...
mike Posted May 19, 2013 Author Share #24 Posted May 19, 2013 I have completed the sheaves for the mast and bow sprit. The mast required two small ones, .080 dia x .020 thich, and one large one, .125 dia x.020 thick. The bow sprit only one of the small ones. I made these of ebony. A square blank was rounded on one end to fit the chuck of the lathe. The free end was then turned in two steps to the required diameters, leaving a short square section for clamping in the vice later. Since I only needed two diameters I did them at one time to save setups. The blank was then clamped in the mill vice and using a saw blade in the mill arbor the table is advanced to cut off the sheaves. Using the vertical feed any thickness can be cut. The hardest part of this operation is capturing the sheave before the floor monster gets it. The followinf photos should help show the process.The bow sprit in the photo has a sheave installed. Mike Quote Link to comment Share on other sites More sharing options...
BRiddoch Posted May 22, 2013 Share #25 Posted May 22, 2013 Looks great Mike. I guess I need to get busy. Bob R. Quote San Diego Ship Modelers' GuildNautical Research Guild USS Constitution Ship Modelers GuildUSS Constitution - Model Shipways - 1:76 scale. 18th Century Longboat - Model Shipways - 1:48 scale Higaki Kaisen - Woody Joe - 1:72 scale Link to comment Share on other sites More sharing options...
TBlack Posted May 22, 2013 Share #26 Posted May 22, 2013 Well, Mike, don't leave us in suspense! How DID you catch the sheave before the saw spun it off to eternity? Nice photography, by the way. Tom Quote Link to comment Share on other sites More sharing options...
mike Posted May 22, 2013 Author Share #27 Posted May 22, 2013 Thanks for the comments guys. To capture the parts I advance the saw blade very slowly. As it nears the end of the cut the part will start to raise up. I stop the blade at that point and then turn the saw by hand to finish the cut. There is always a burr, but a stroke across some sandpaper gets rid of it. I still seam to loose a bunch of them. The hull is back in the paint shop for decoration of the stern. Photos when complete. Mike BRiddoch 1 Quote Link to comment Share on other sites More sharing options...
mike Posted May 23, 2013 Author Share #28 Posted May 23, 2013 The longboat is back from the paint shop, where the stern decorating was completed.. I have completed making of all the parts and will start the rigging. I intend to follow the example of the contemporary longboat posted by Chuck P. with the rigging attached to the hull with hooks for easy removal. Mike Chuck 1 Quote Link to comment Share on other sites More sharing options...
Chuck Seiler Posted May 24, 2013 Share #29 Posted May 24, 2013 Mike, Looking good. I see Hewitt talked you into putting the horse below the tiller. Quote Chuck Seiler San Diego Ship Modelers Guild Nautical Research Guild Current Build:: Colonial Schooner SULTANA (scratch from Model Expo Plans), Hanseatic Cog Wutender Hund, Pinas Cross Section Completed: Missouri Riverboat FAR WEST (1876) Scratch, 1776 Gunboat PHILADELPHIA (Scratch), John Smith Shallop Link to comment Share on other sites More sharing options...
BRiddoch Posted May 24, 2013 Share #30 Posted May 24, 2013 Looks great Mike. Bob R. Quote San Diego Ship Modelers' GuildNautical Research Guild USS Constitution Ship Modelers GuildUSS Constitution - Model Shipways - 1:76 scale. 18th Century Longboat - Model Shipways - 1:48 scale Higaki Kaisen - Woody Joe - 1:72 scale Link to comment Share on other sites More sharing options...

Recommended Posts
Join the conversation
You can post now and register later. If you have an account, sign in now to post with your account.