James H
-
Posts
6,142 -
Joined
-
Last visited
Content Type
Profiles
Forums
Gallery
Events
Everything posted by James H
-
 🤣 It is definitely happening. The company who do the laser cutting for Amati have changed their board sizes, so the sheets had to be rejigged to accommodate this, plus there were a few technical questions that are now resolved. As far as I know, the parts are now due to be cut, if they aren't already. The PE is being sorted this next day, so production shouldn't take too long.
 -
It really is a lovely kit and you can make your own adaptations. This, with other stuff, is on hold because I'm shortly due to start Amati's 1:64 HMS Victory prototype.
-
GasPatch turnbuckles are excellent, but a little pricey. The make a big difference to the appearance though. I use elastic EZ-Line for the rig wires, so you can stretch these out and then just twist the turnbuckles into line with the 'wire'. I think the whole model took just a couple of hours to rig and adjust....including making coffee and picking my favourite music to listen to.
-
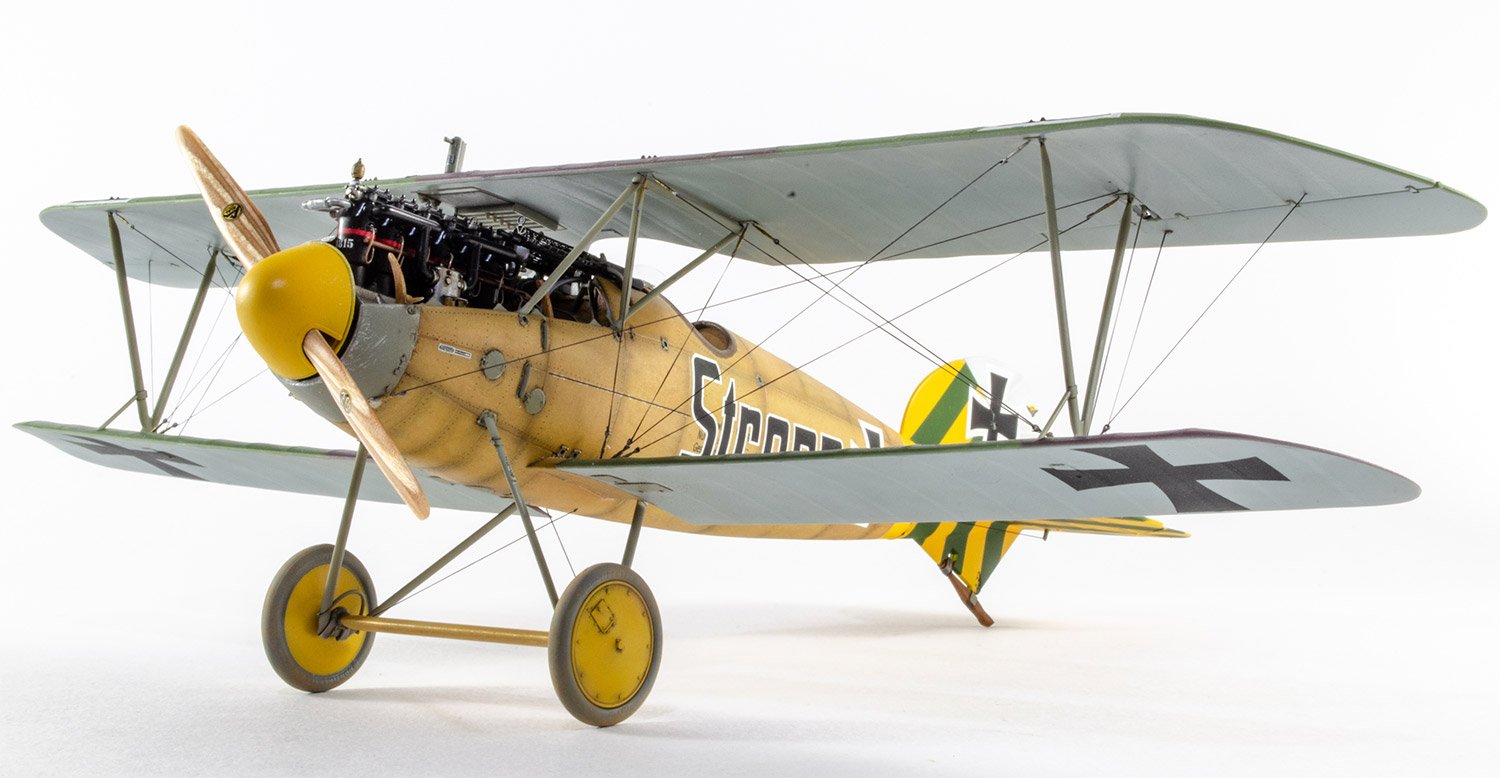
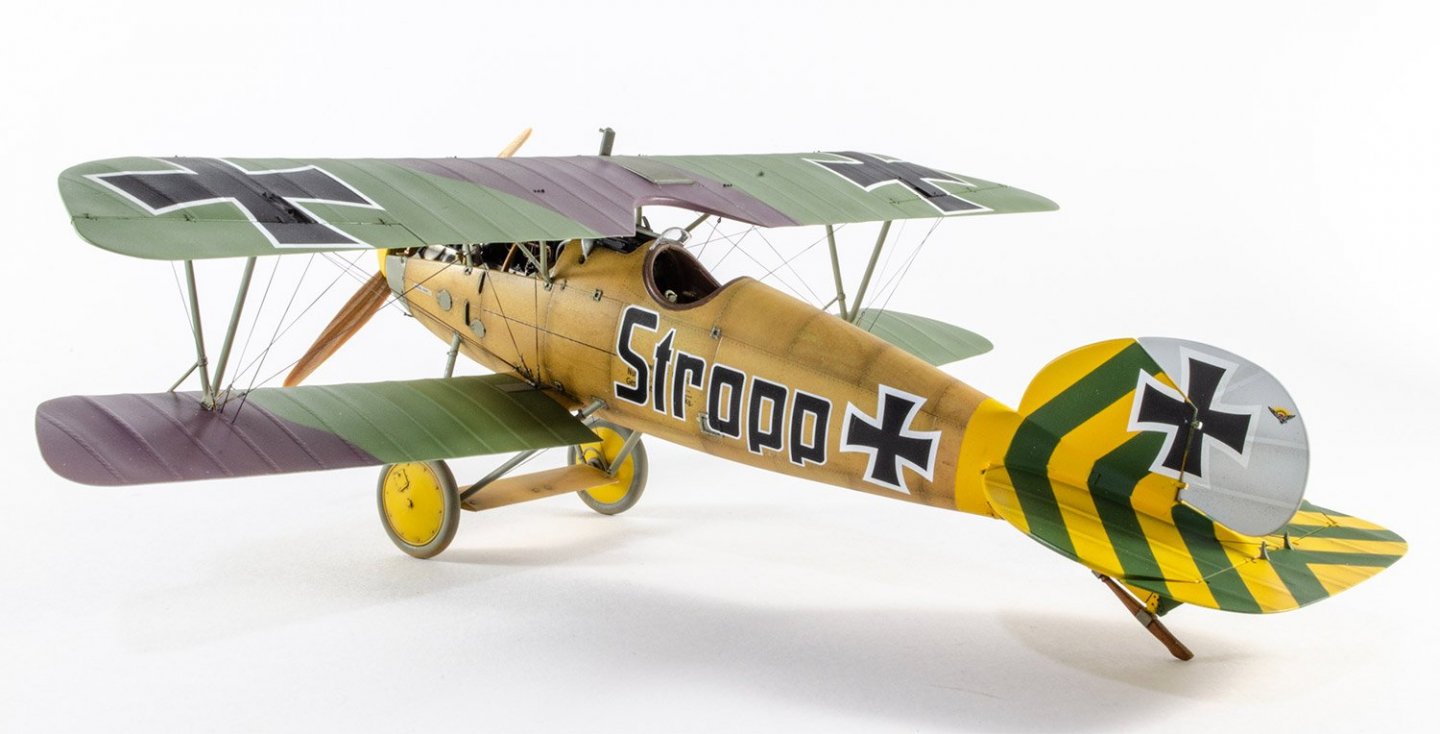
Hi all, My latest magazine work is complete. This is the Wingnut Wings kit, with plywood decals, wooden prop, resin wheels, metal exhaust by Proper Plane. Also wood nail decals and resin set/seatbelts from HGW, as well as metal turnbuckles from GasPatch. This one will be published in Military Illustrated Modeller, and also Japan's World Scale Modeller title. So pleased my time in plastic is coming to an end so I can get back to ships. Just waiting on Amati to send the Victory prototype parts over.

- 19 replies
-
- 25
-

-
I still tend to drill a smaller pilot hole, depending on the material being used before using nail driver.
-
ICM 1/48 Spitfire MkIX Scrapped.
James H replied to Old Collingwood's topic in Non-ship/categorised builds
Eduard design their plastic so the resin is usually a drop fit. Where it isn't, the surgery is very basic. -
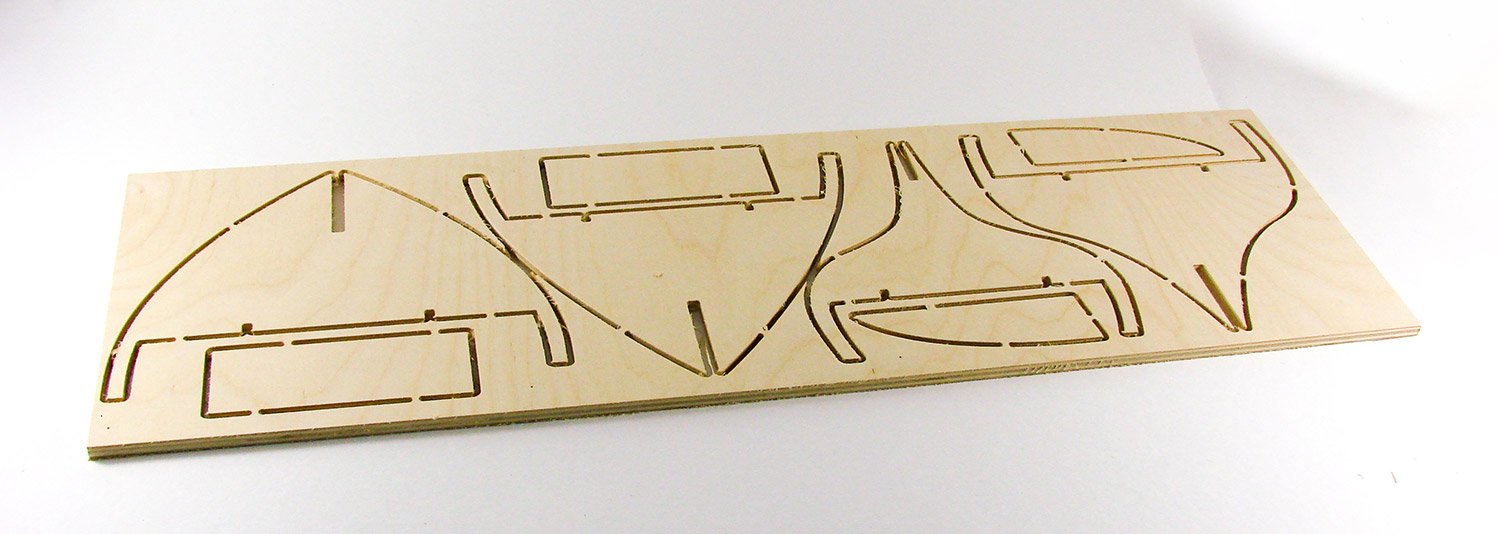
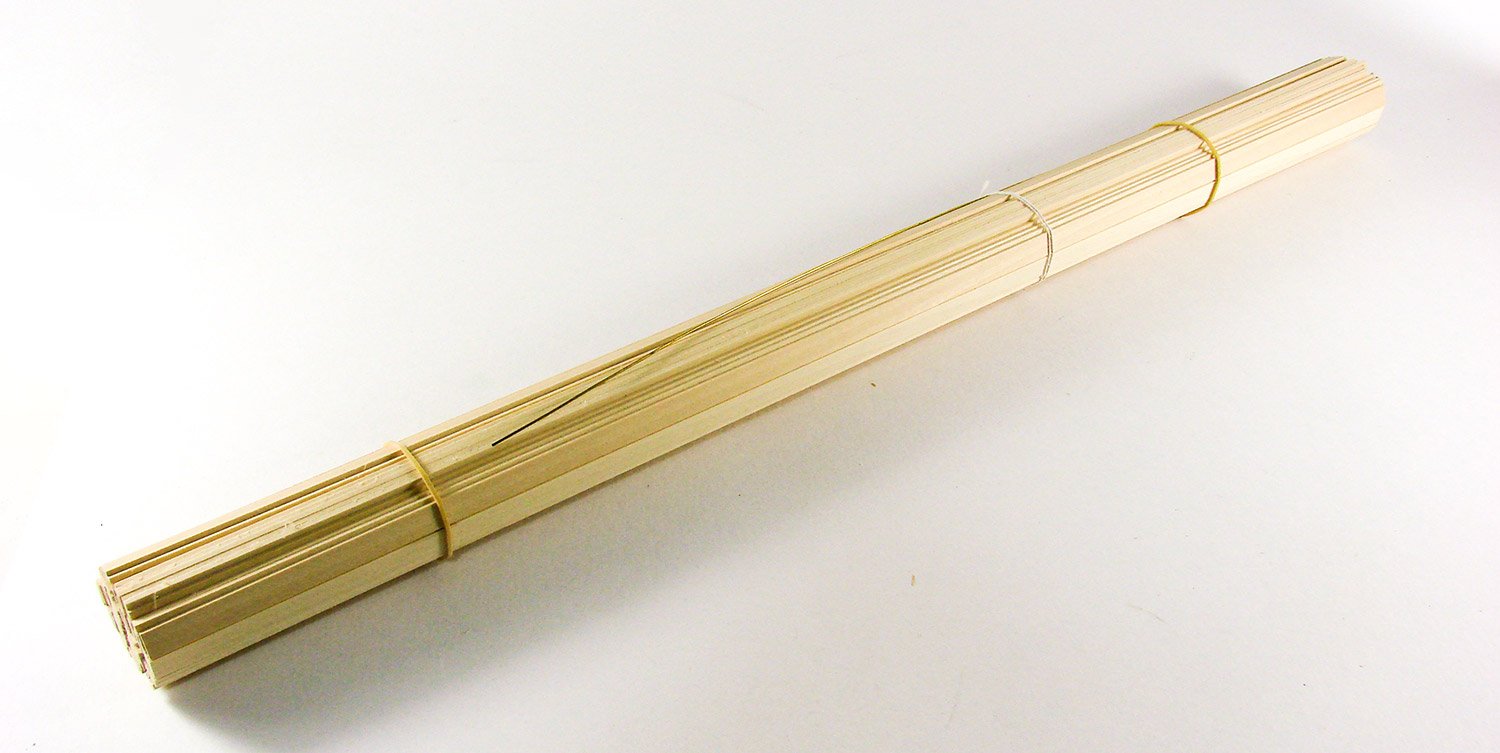
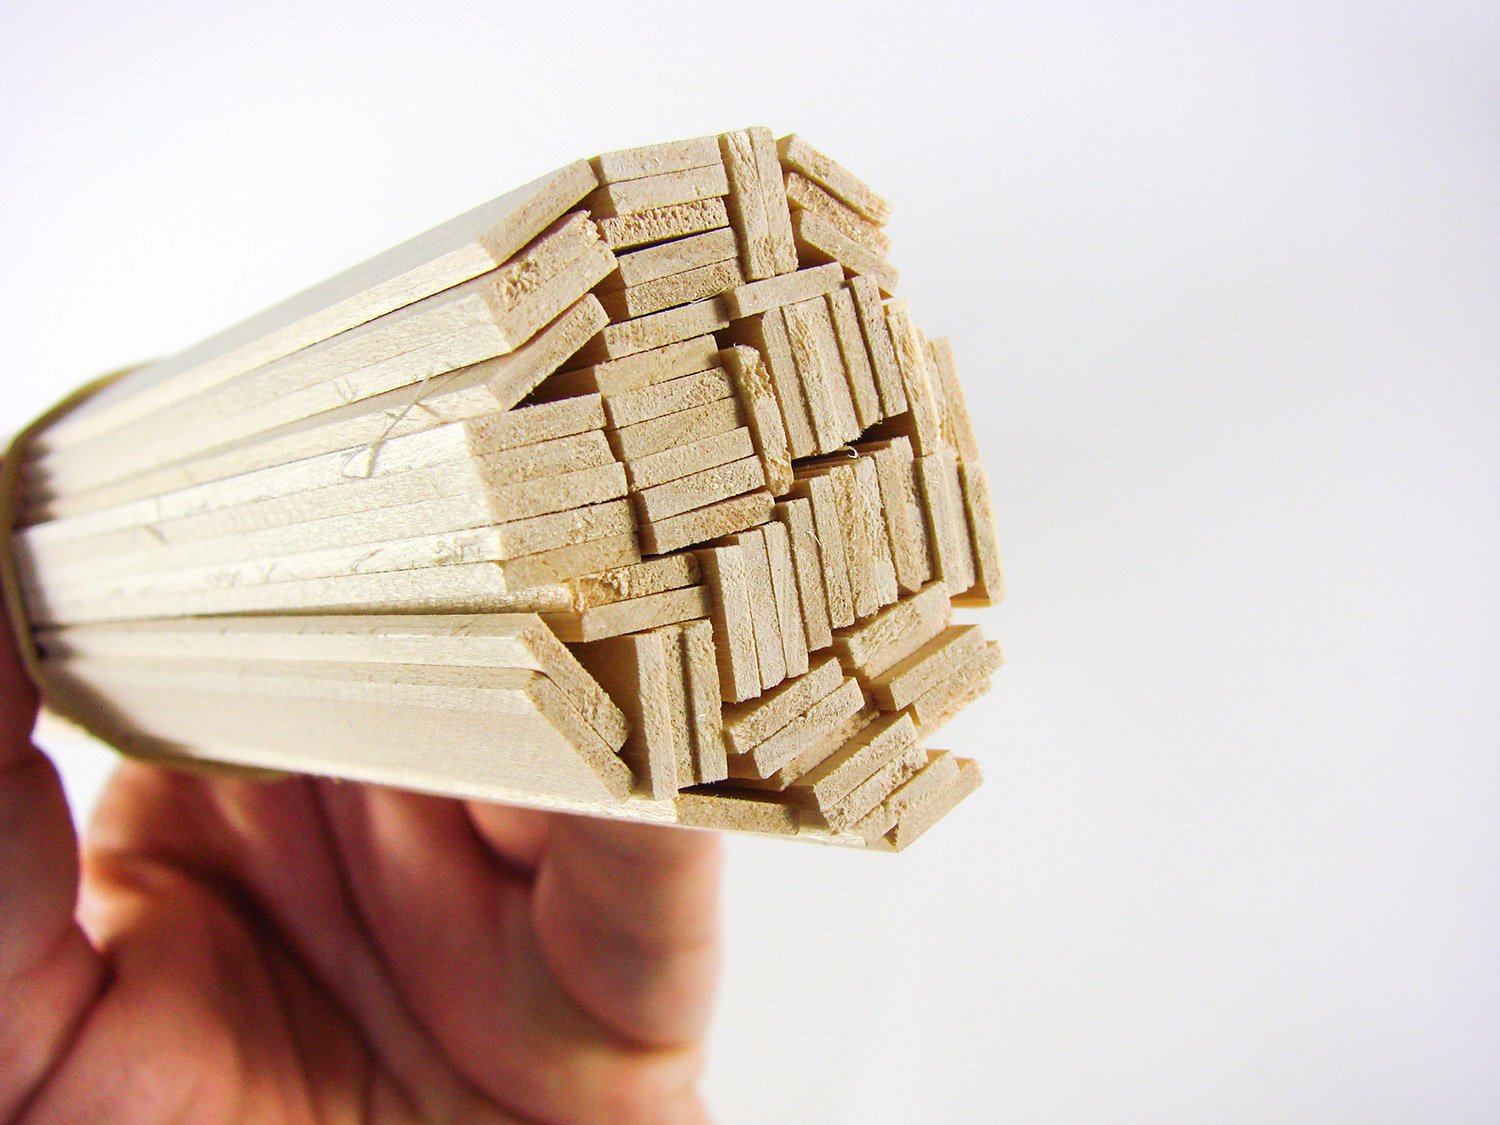
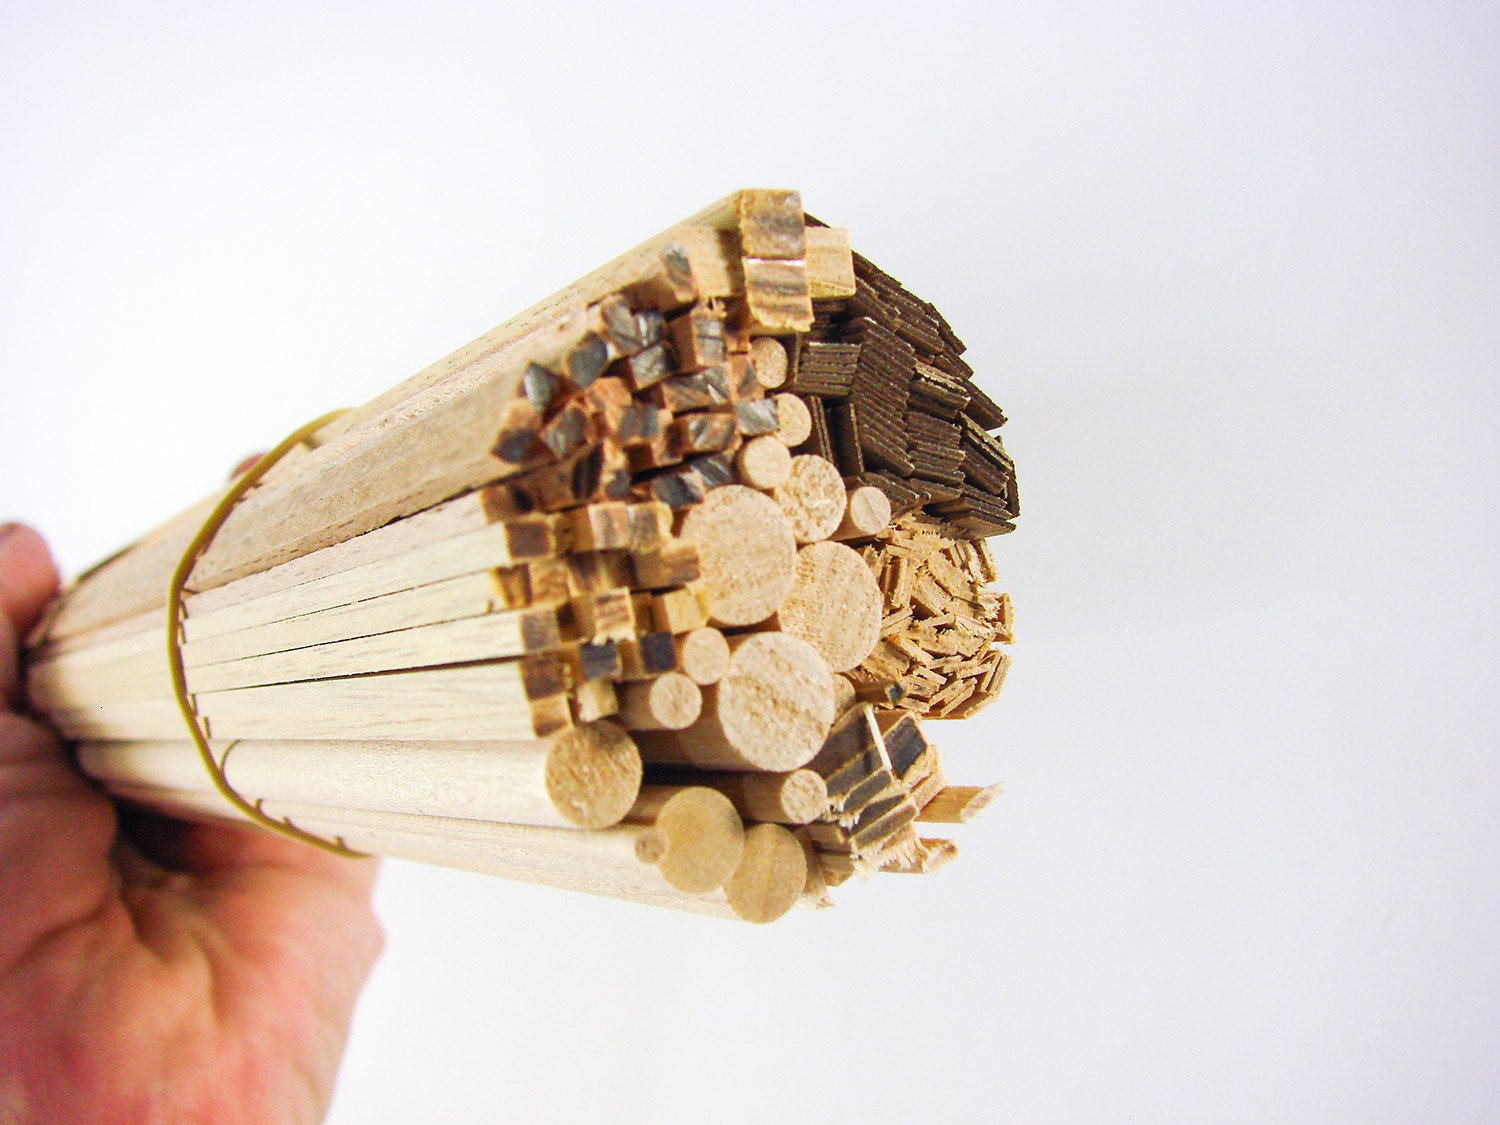
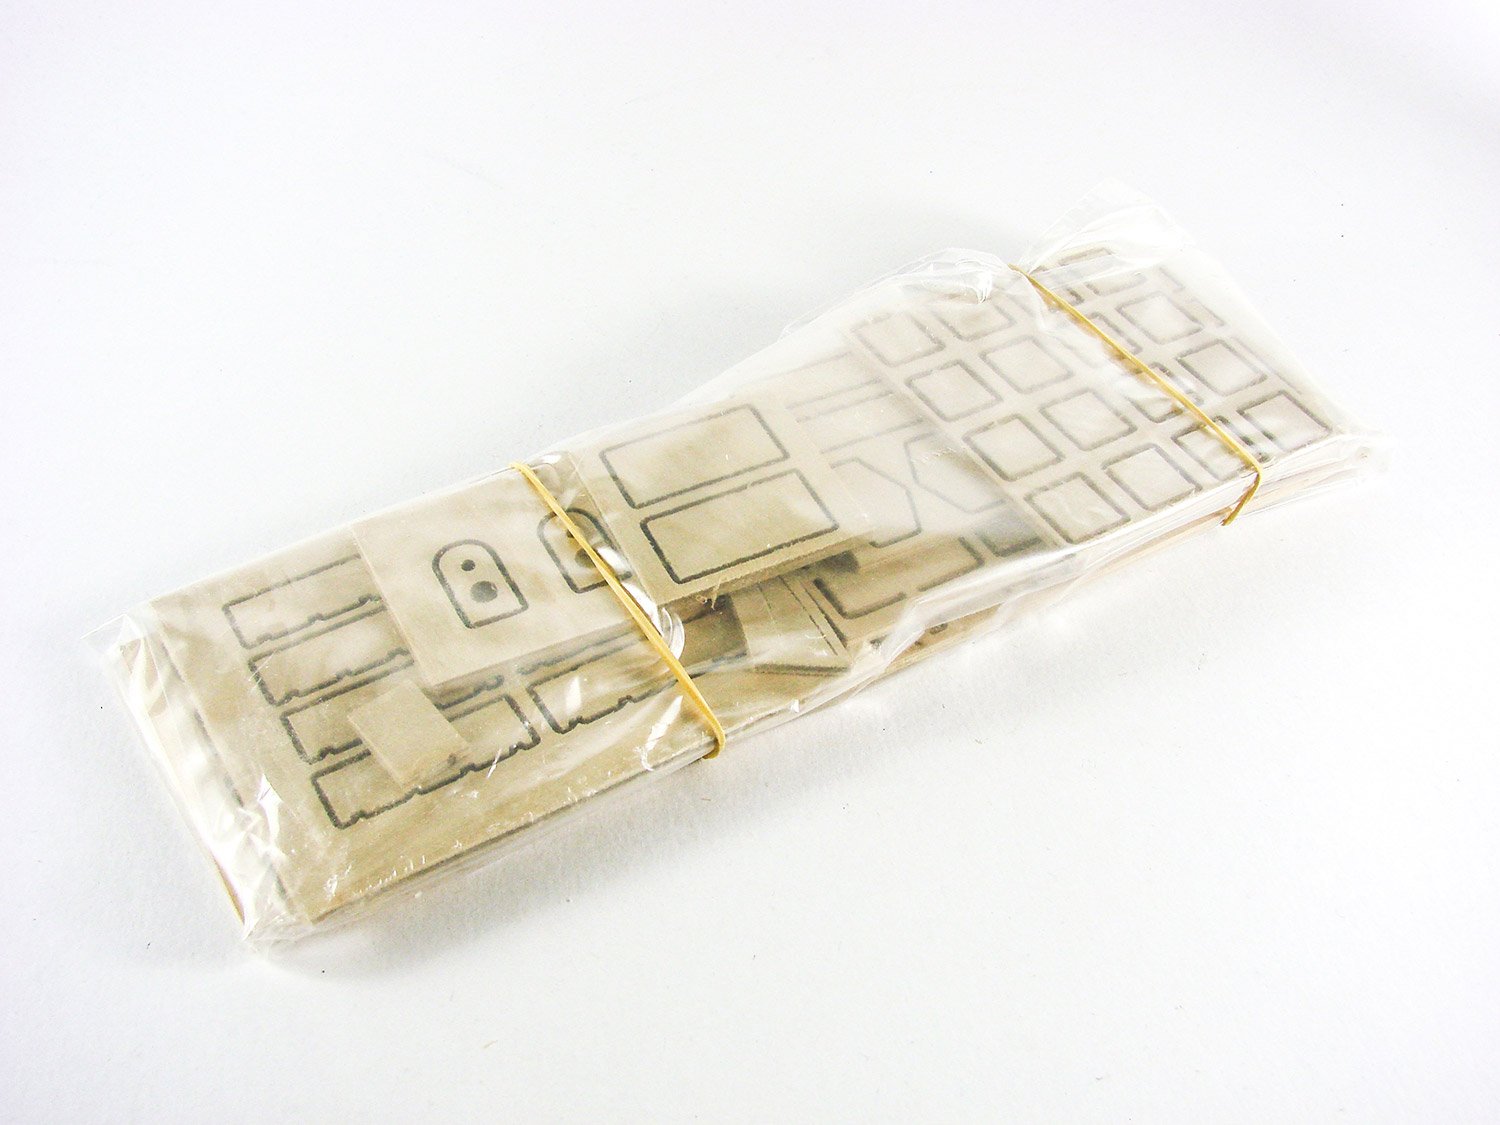
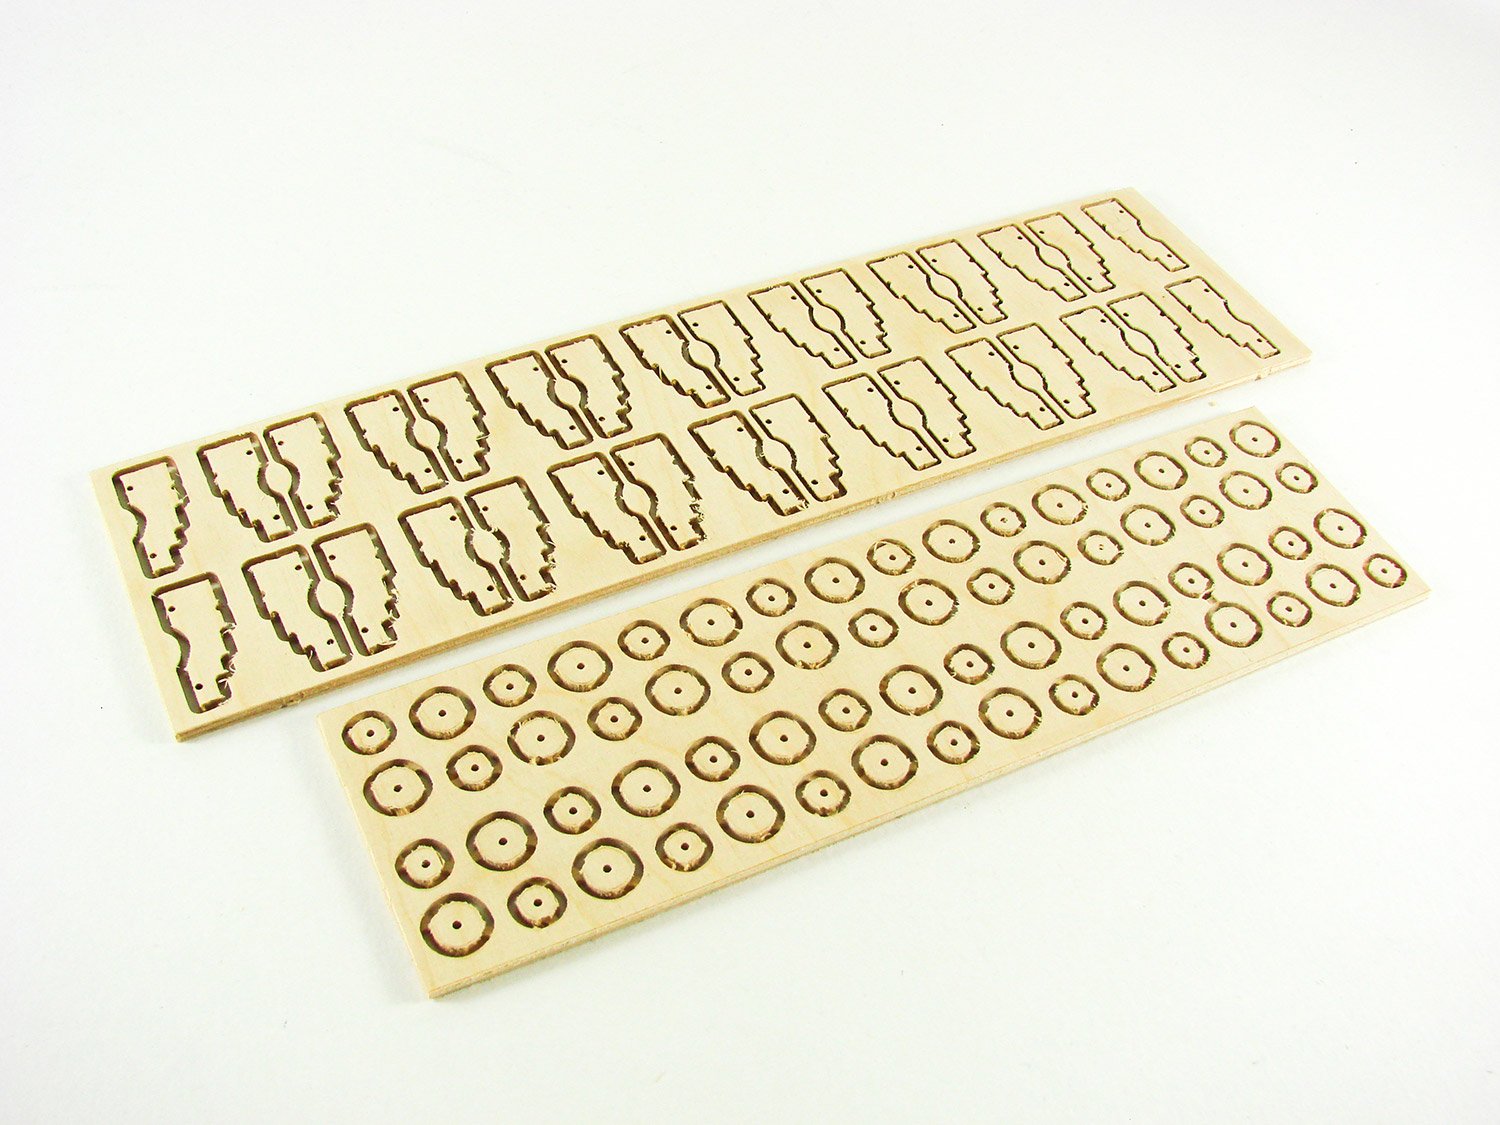
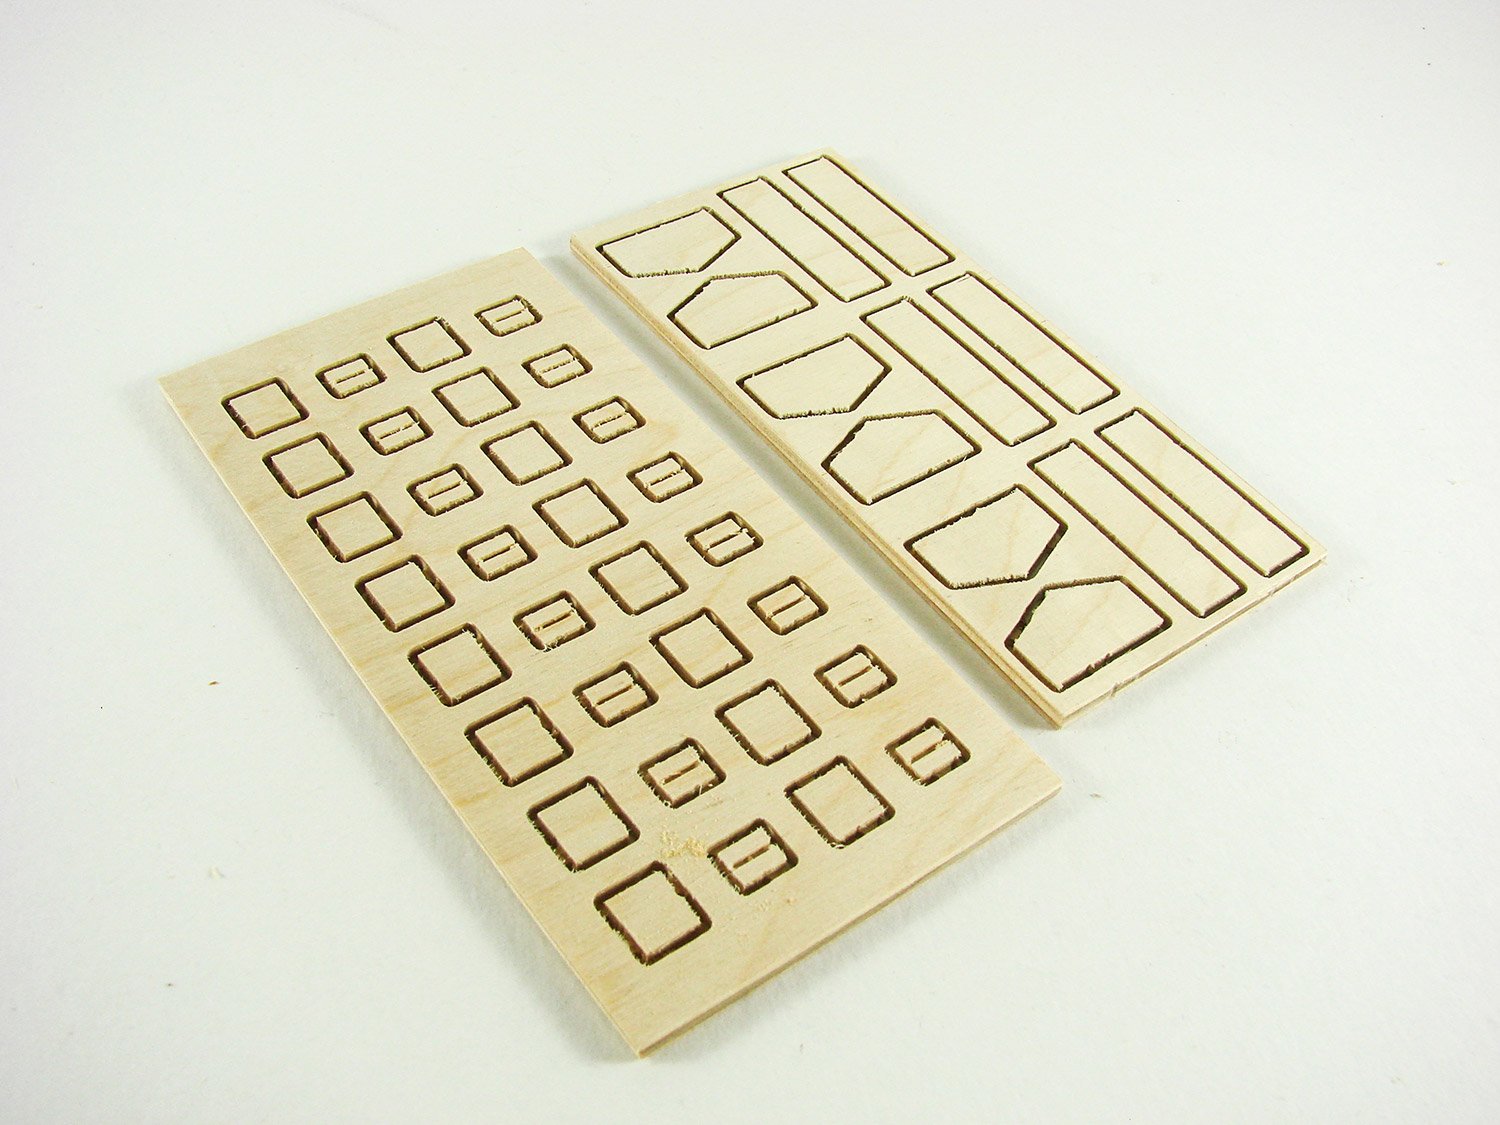
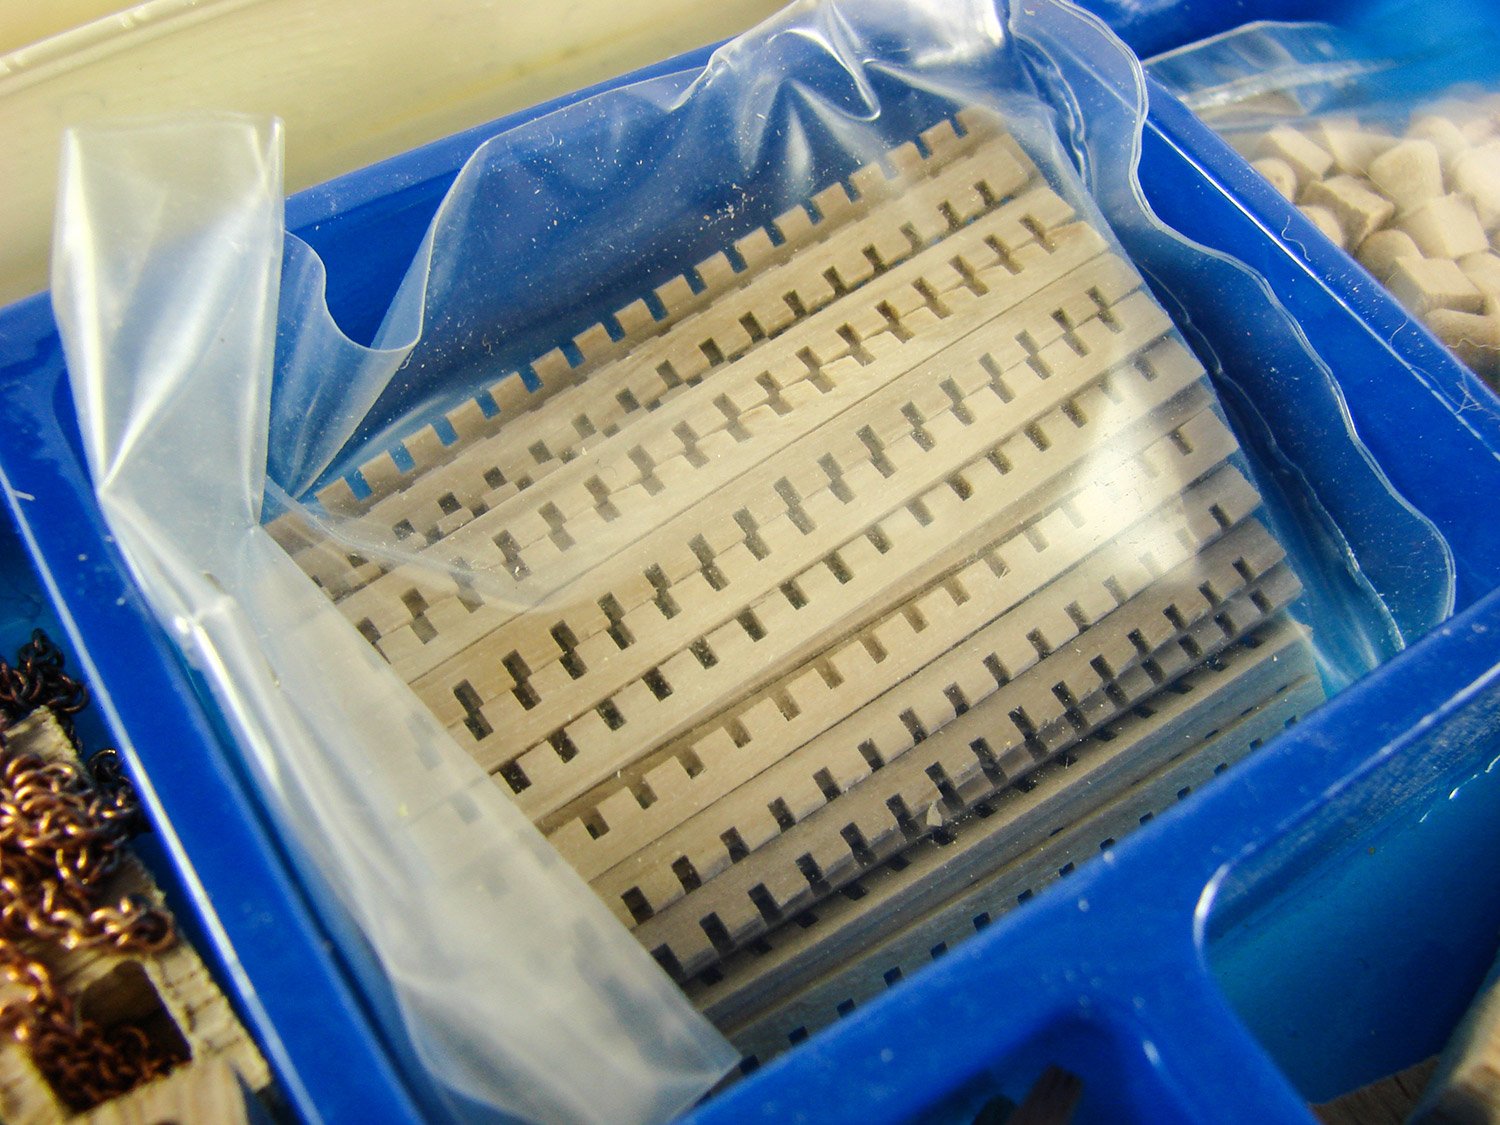
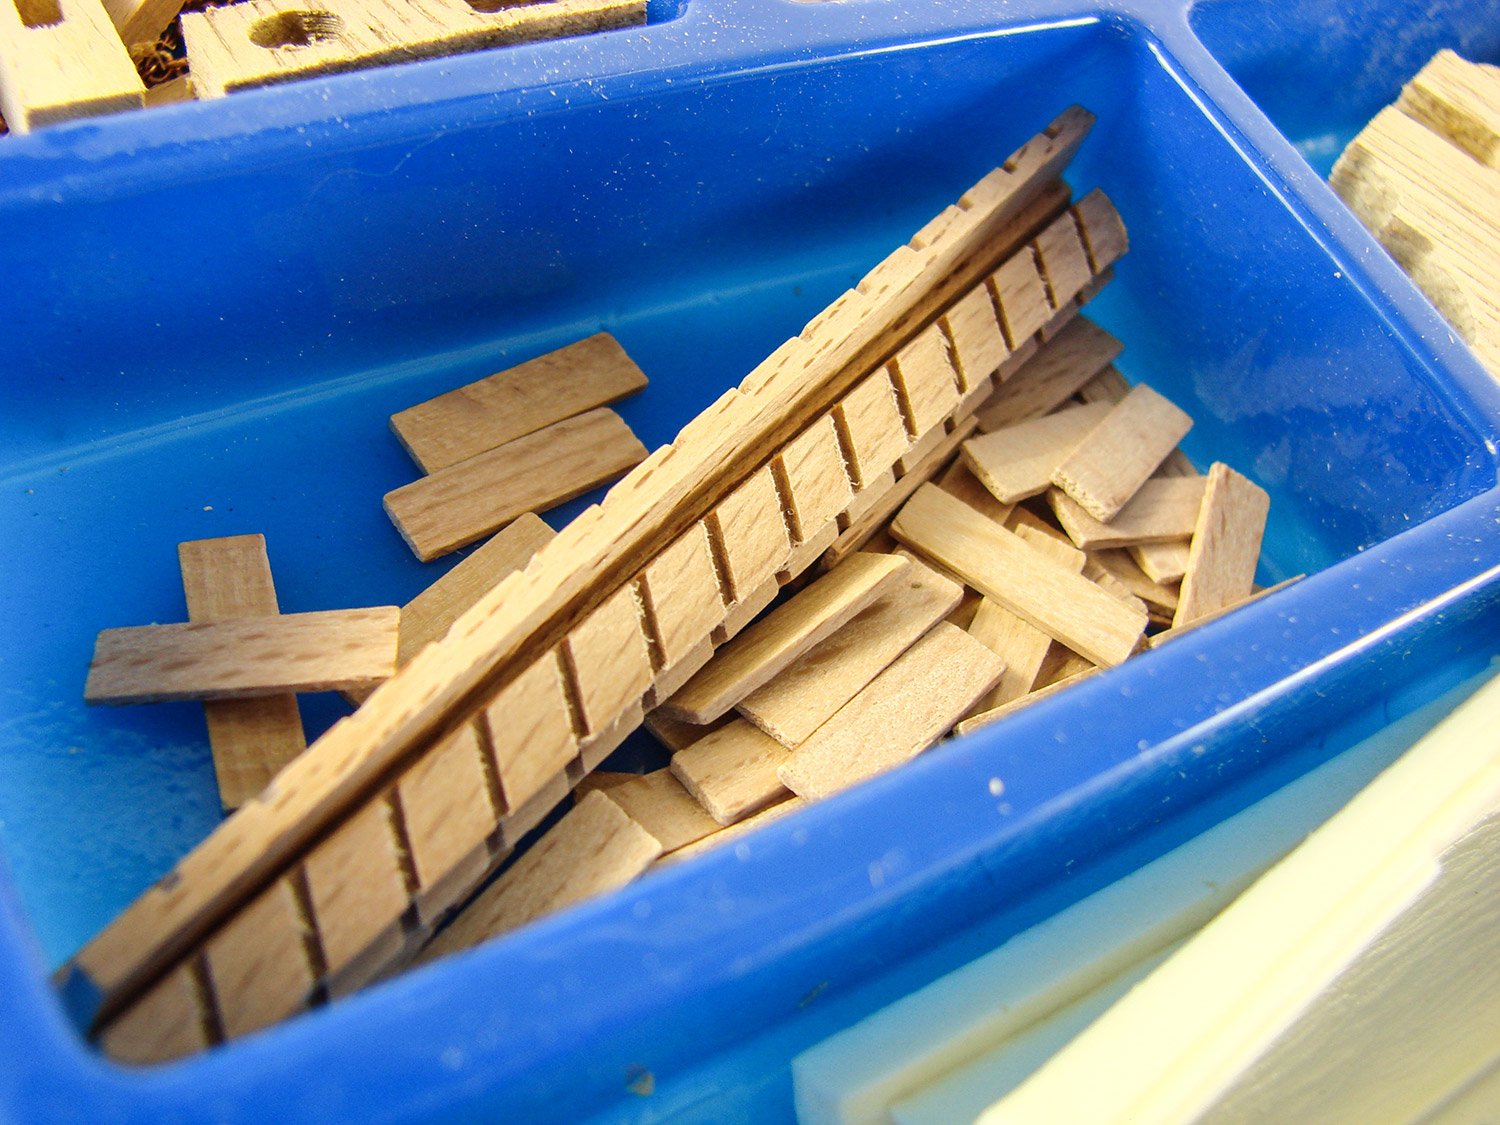
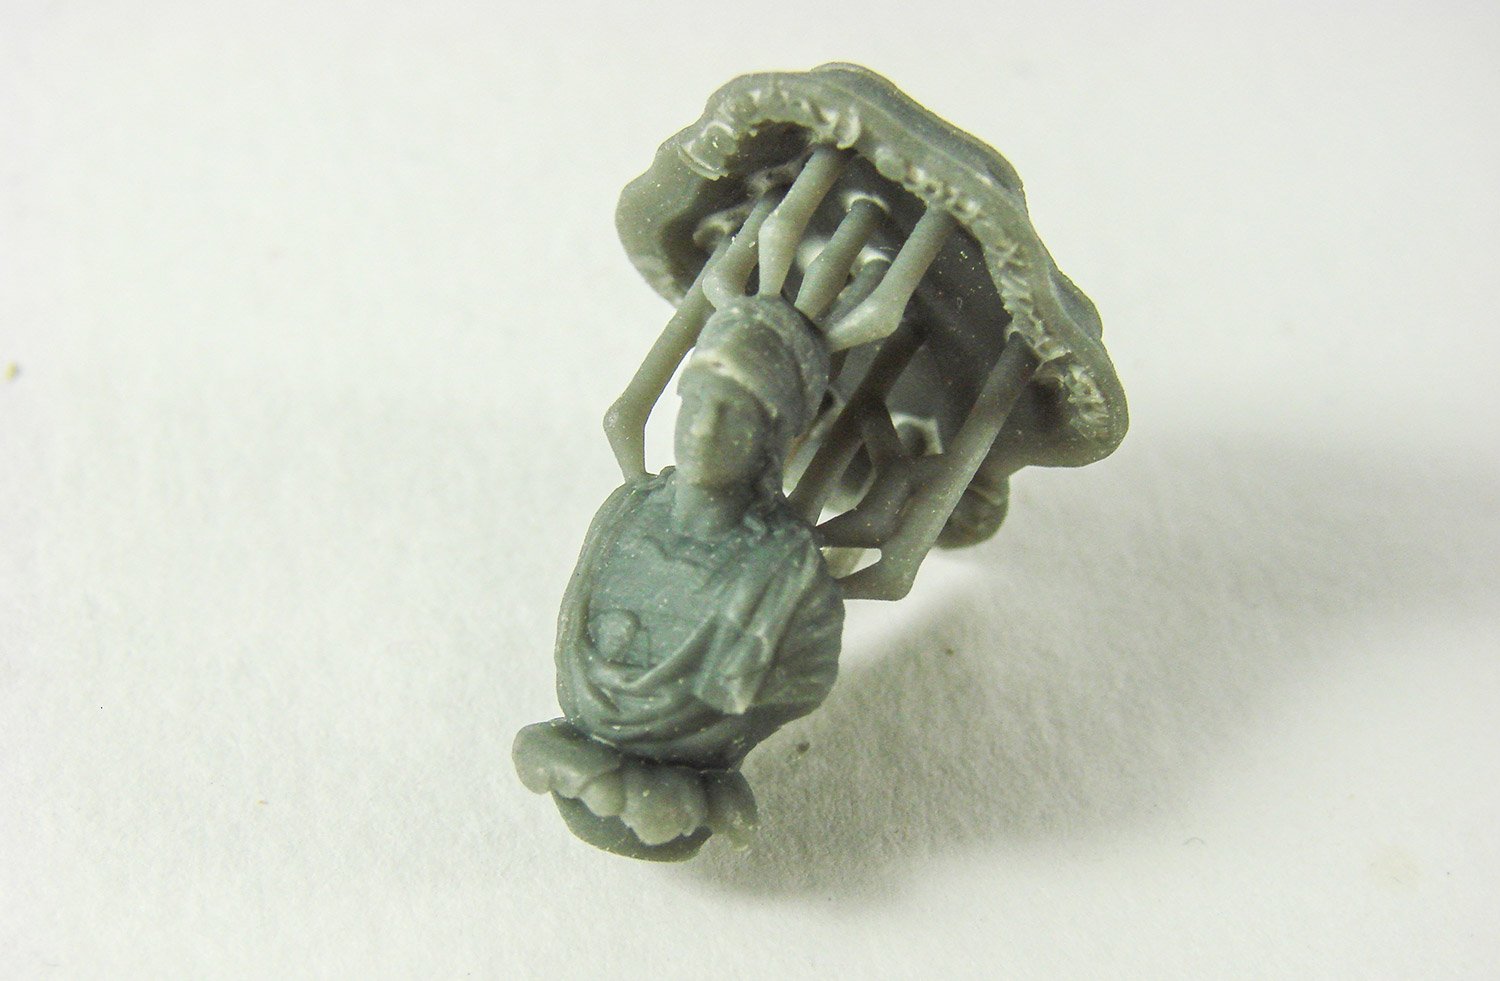
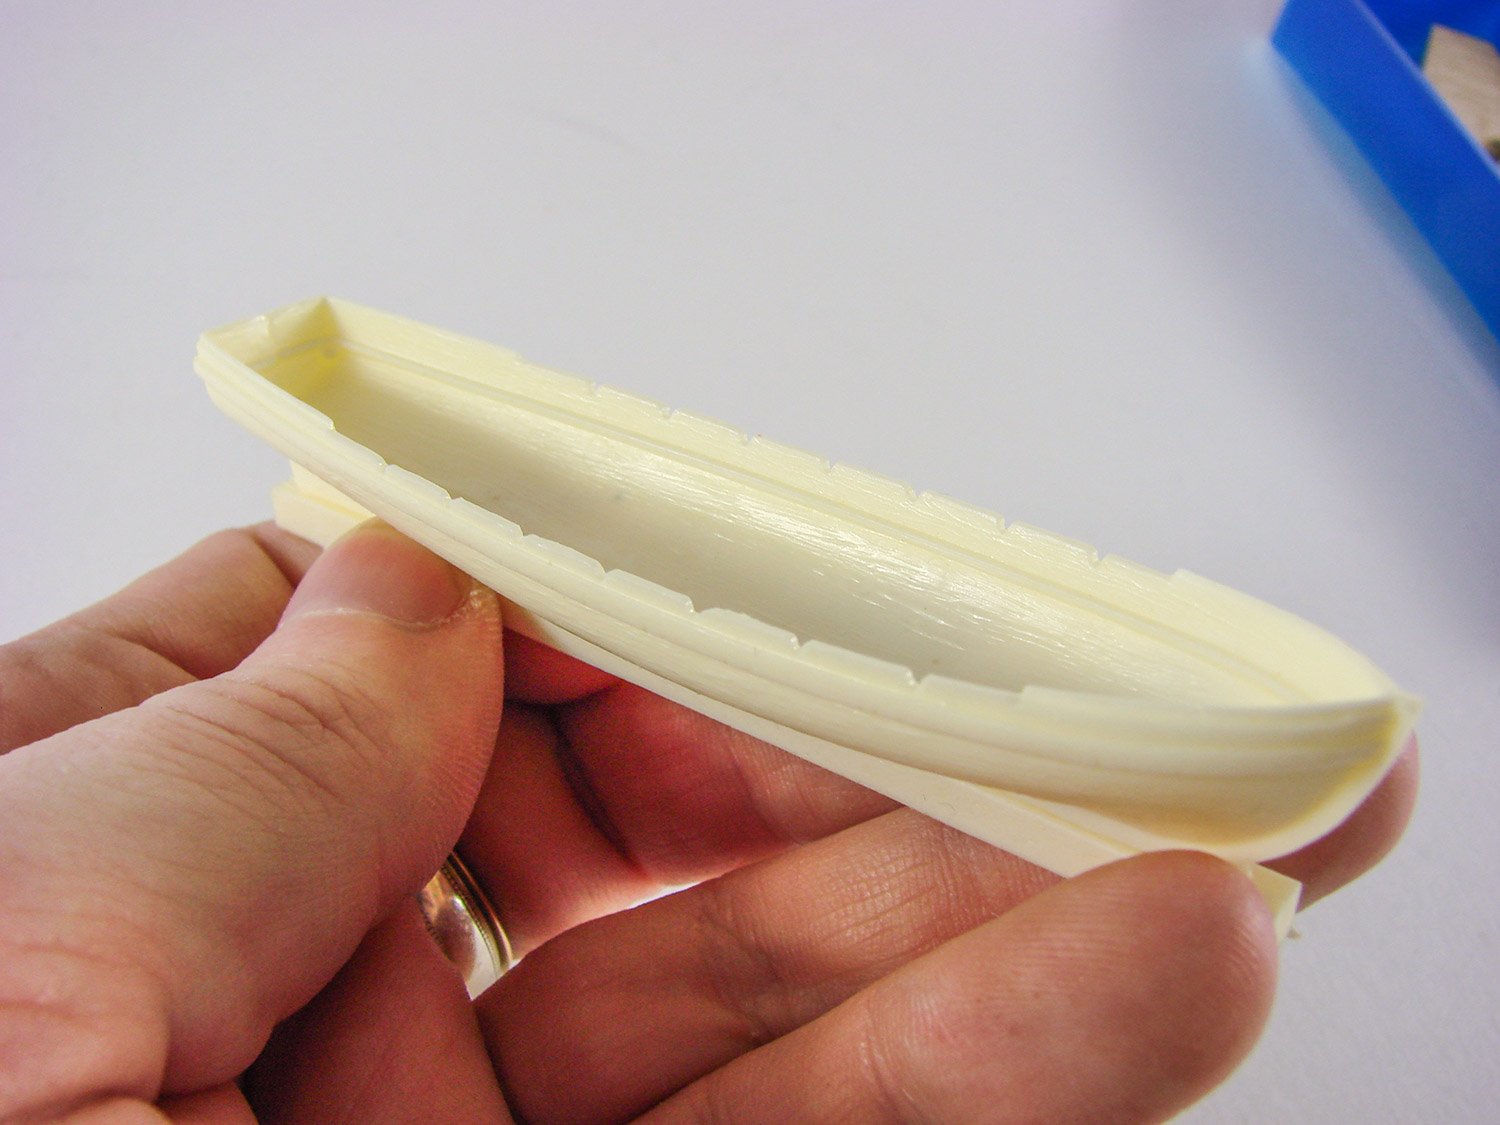
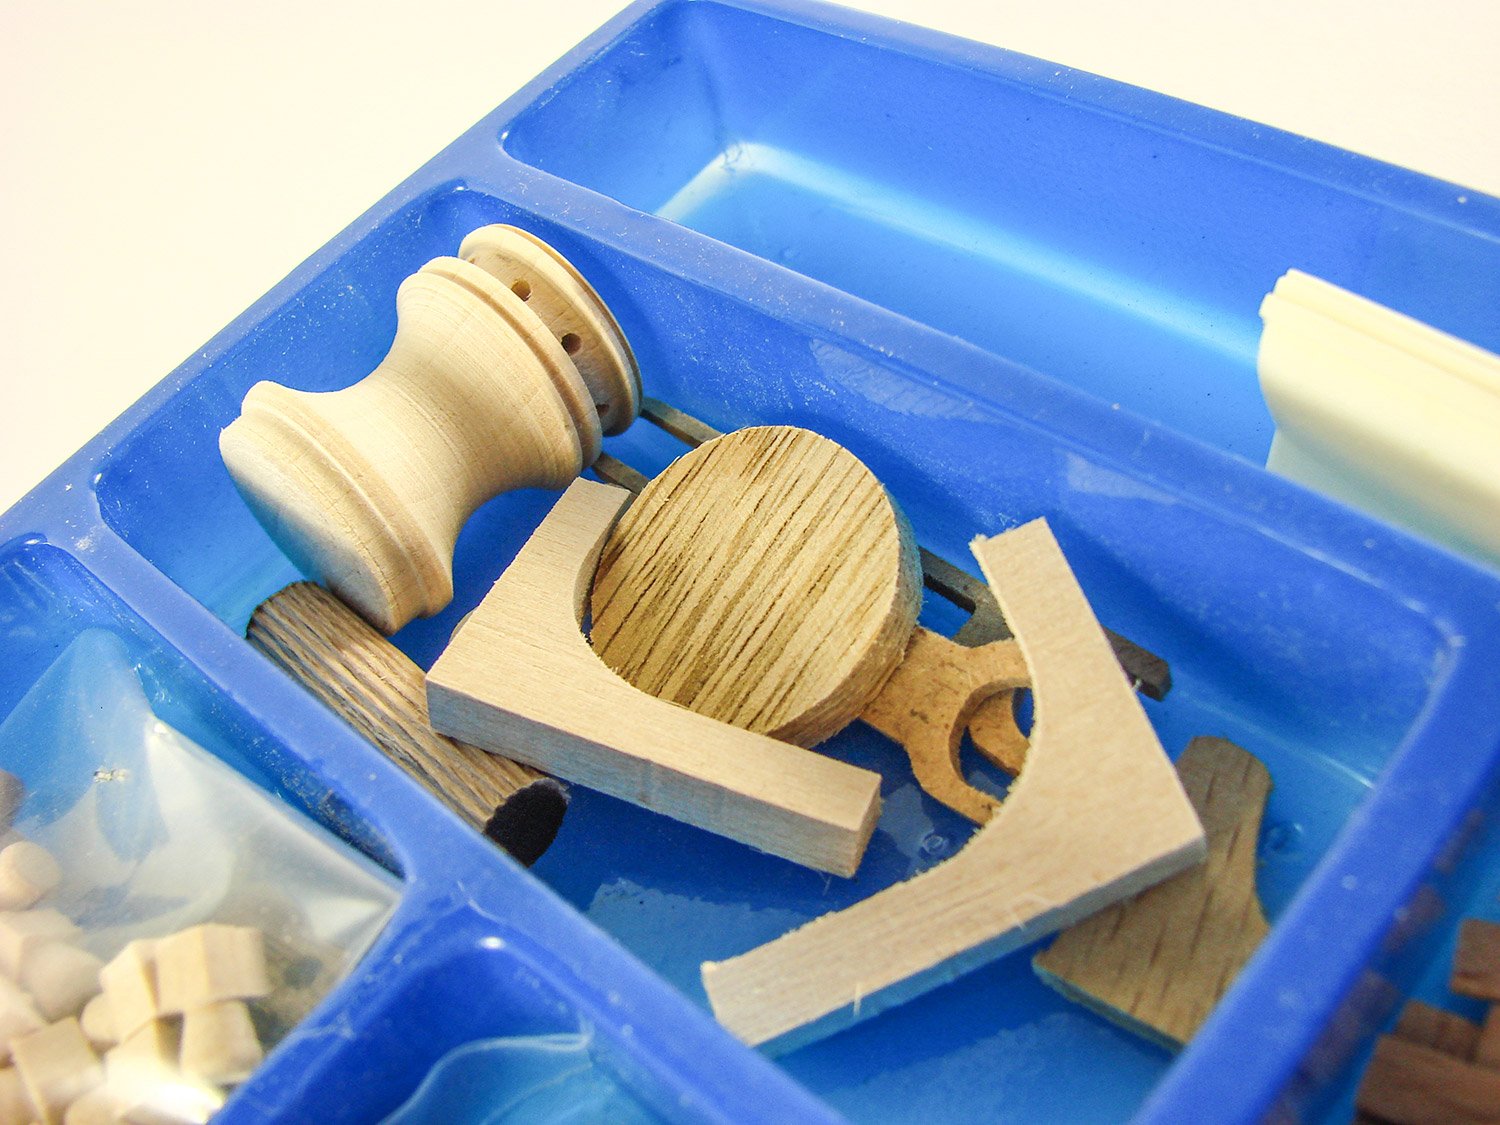
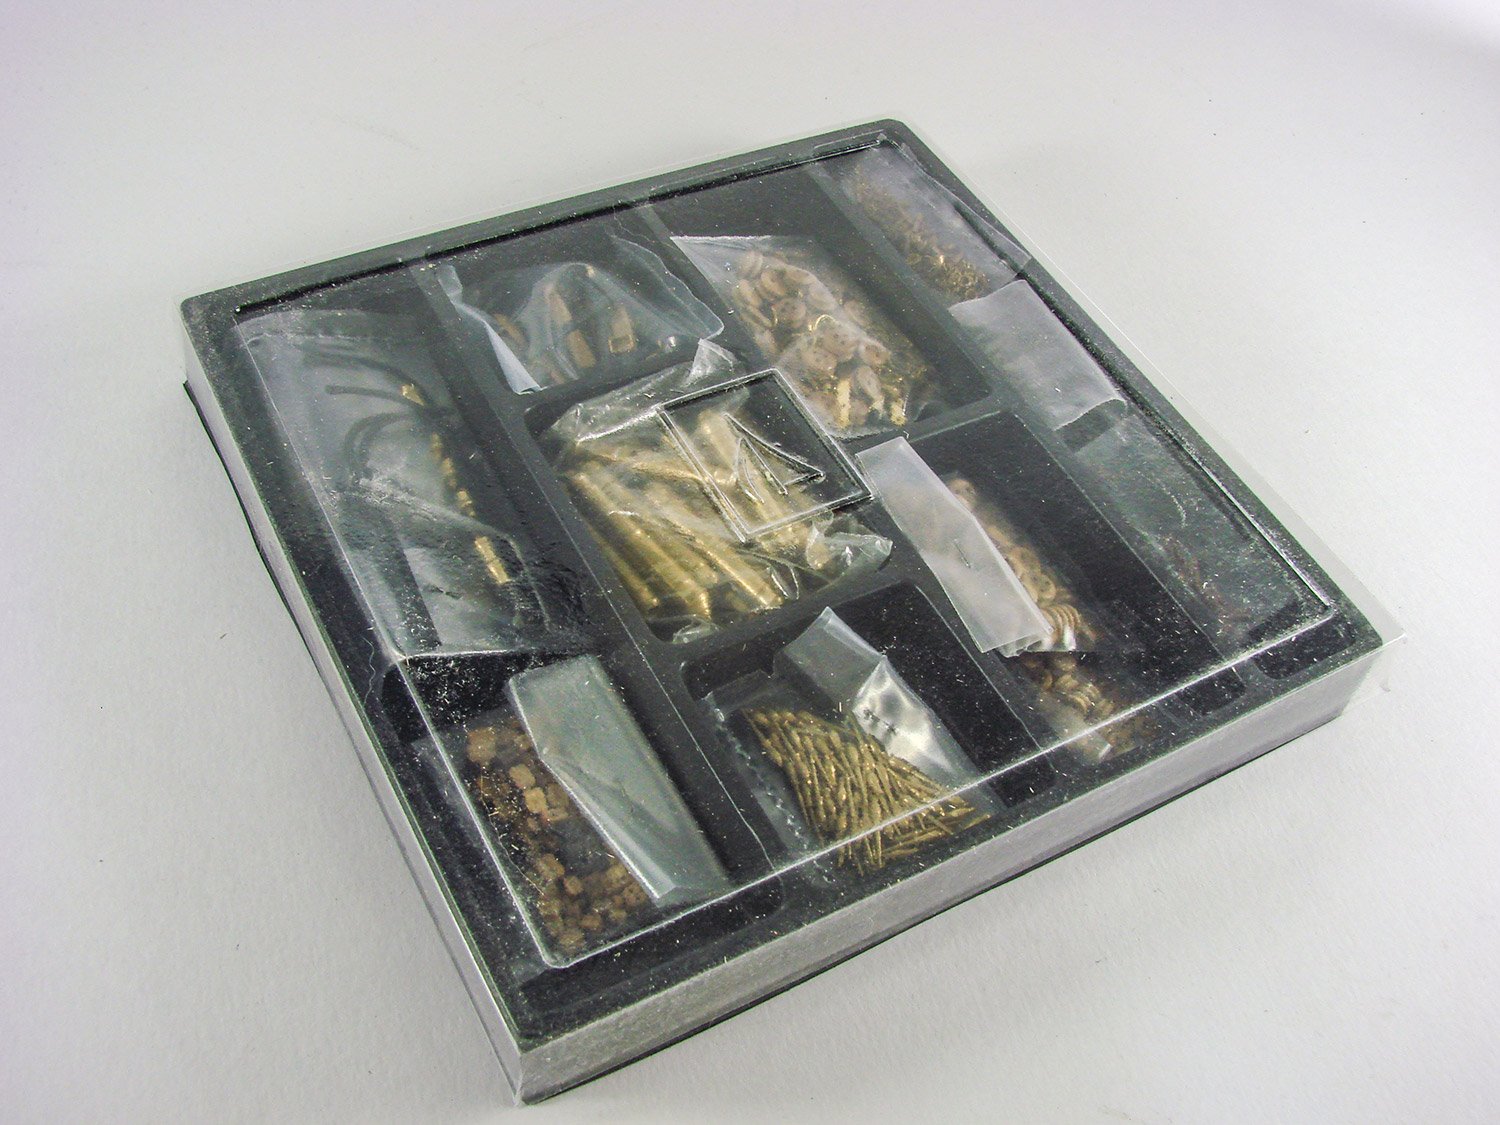
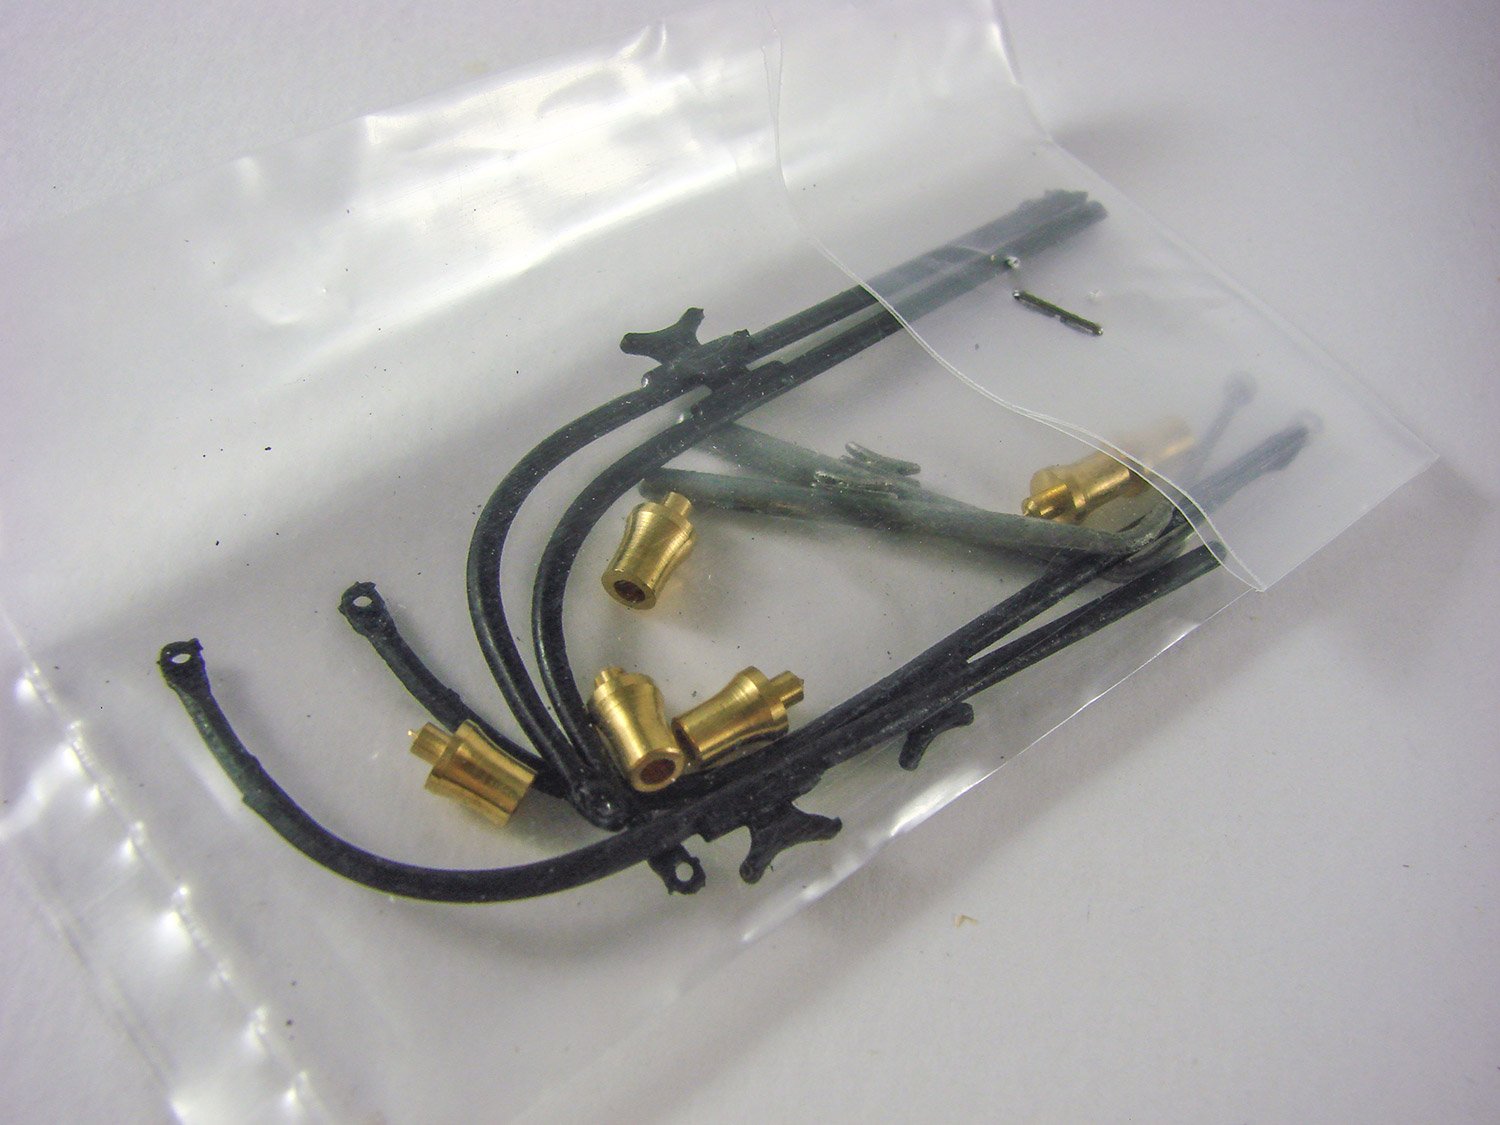
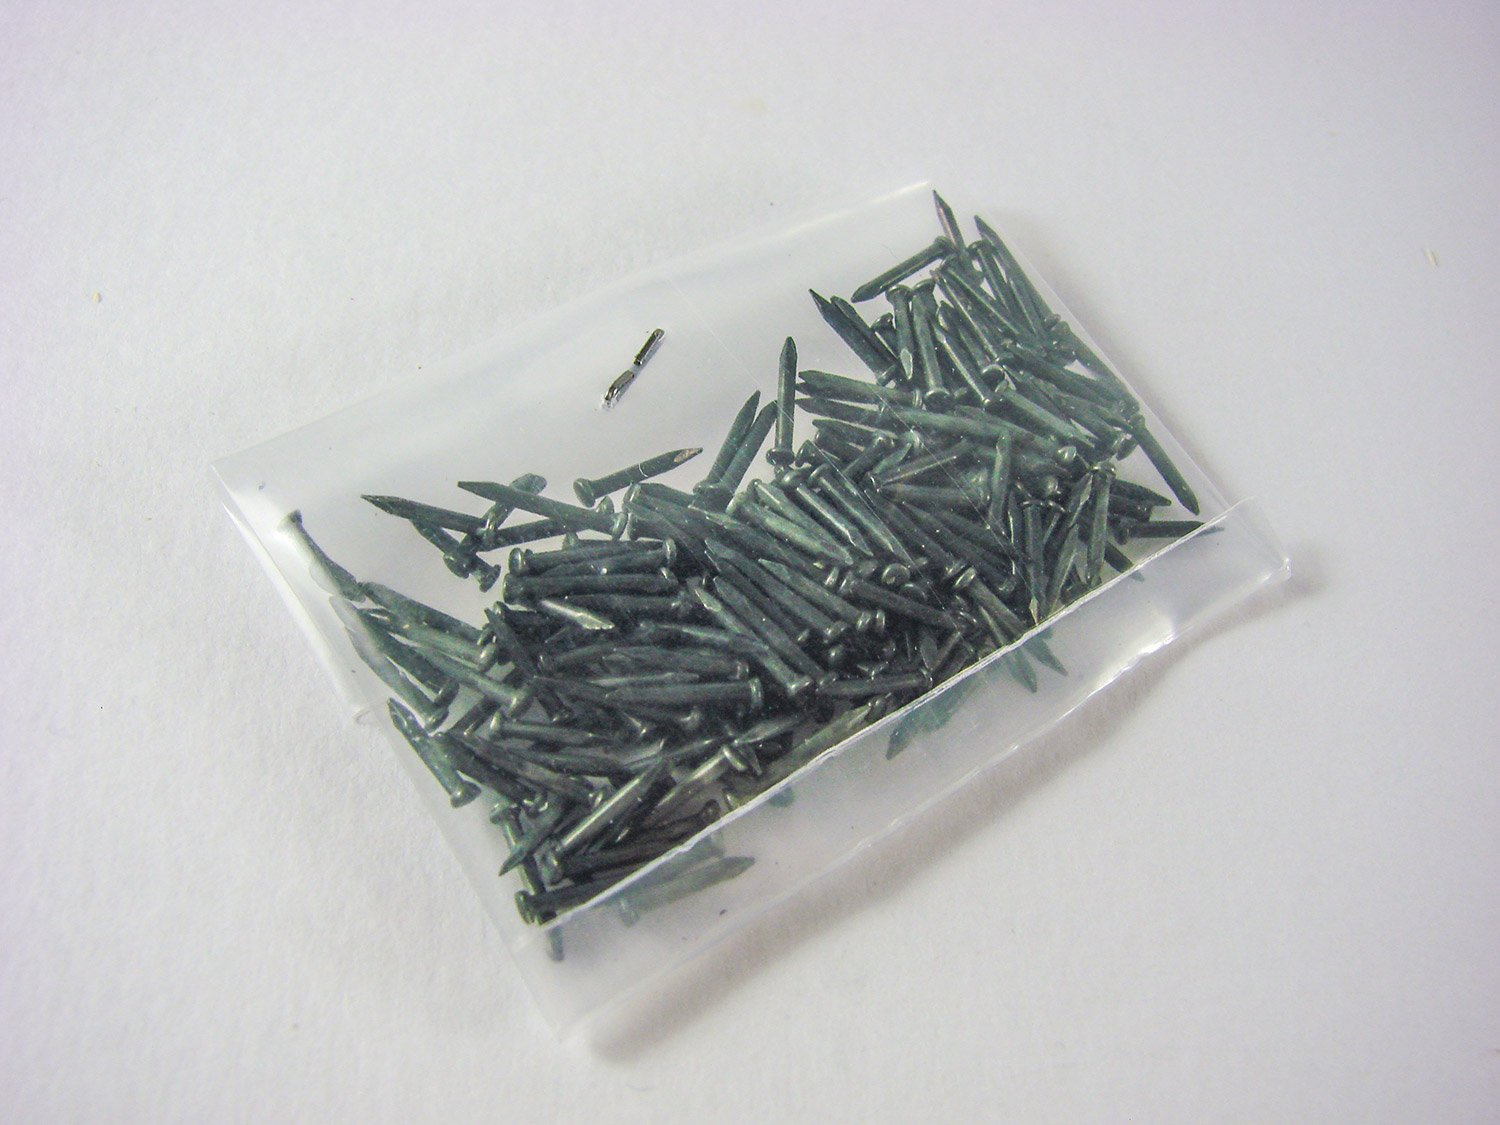
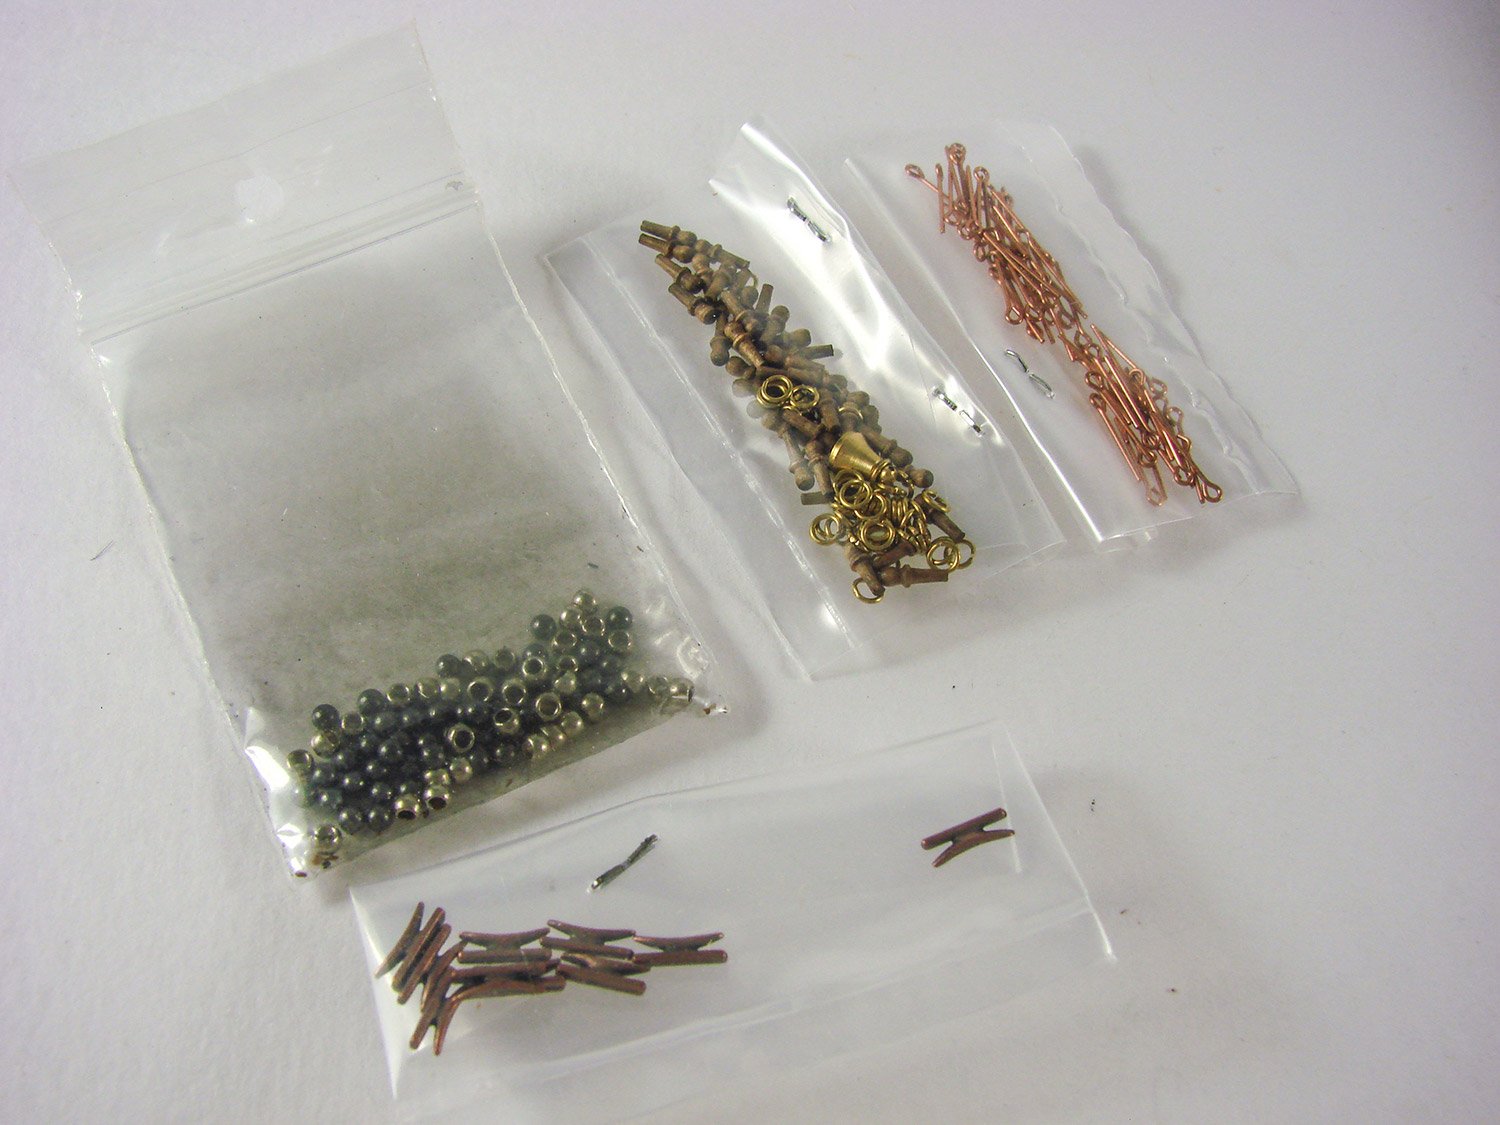
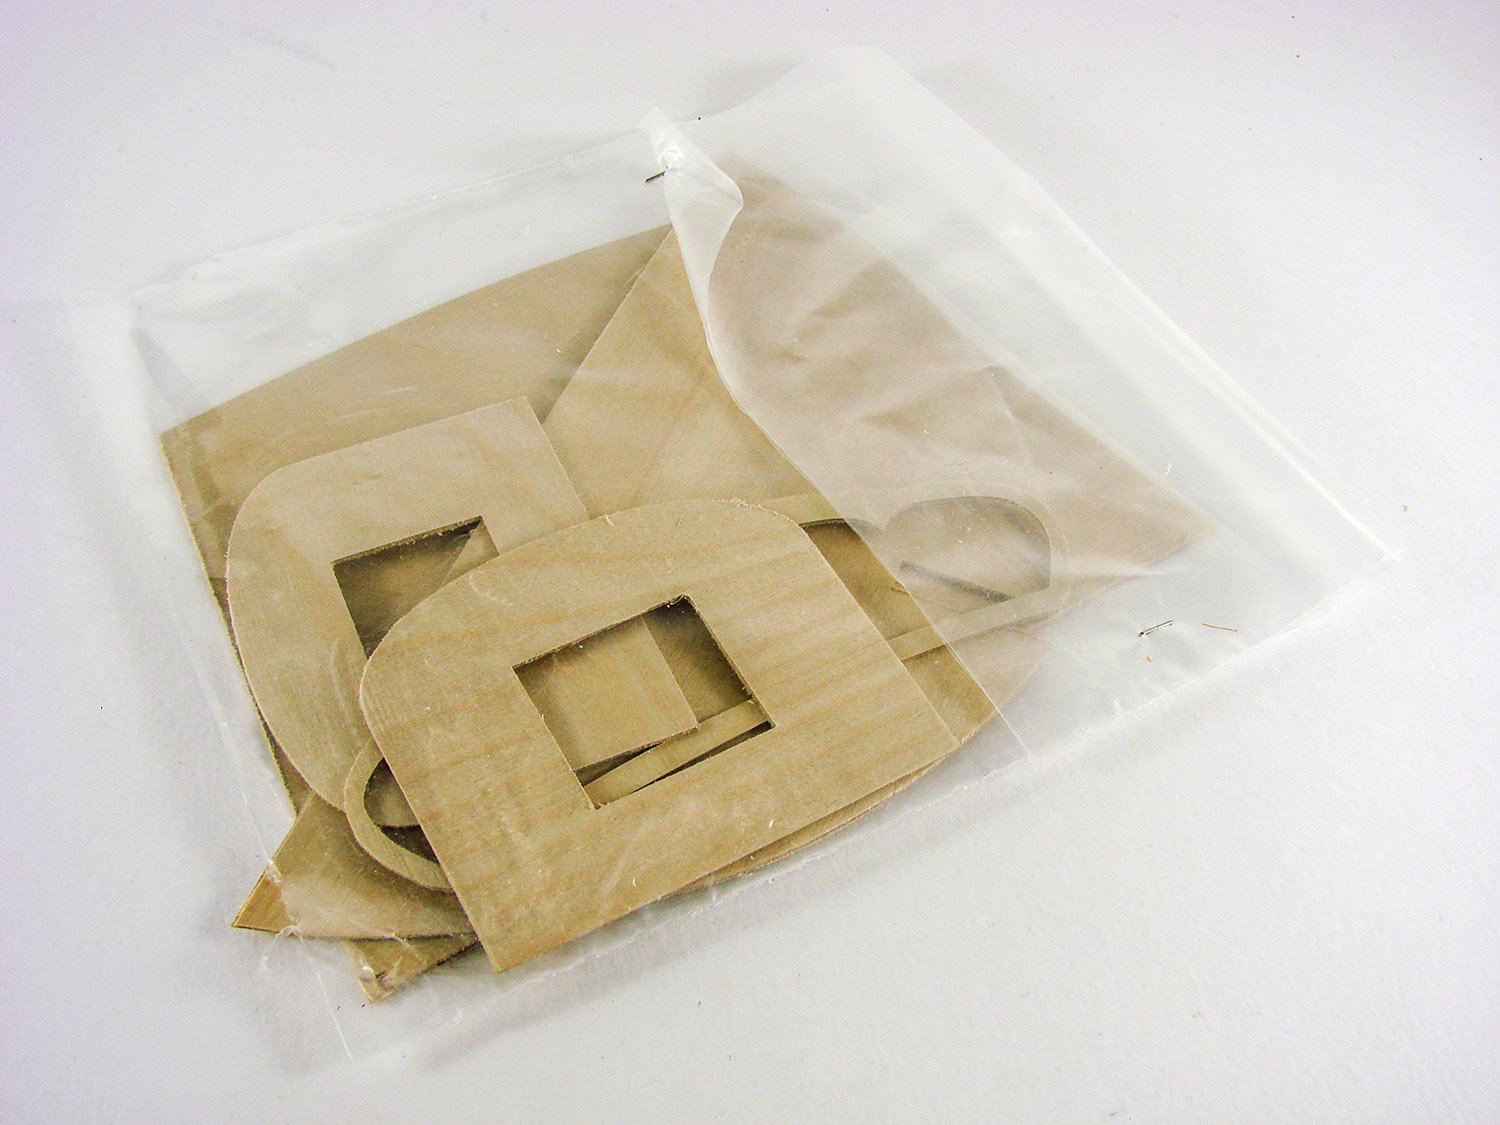
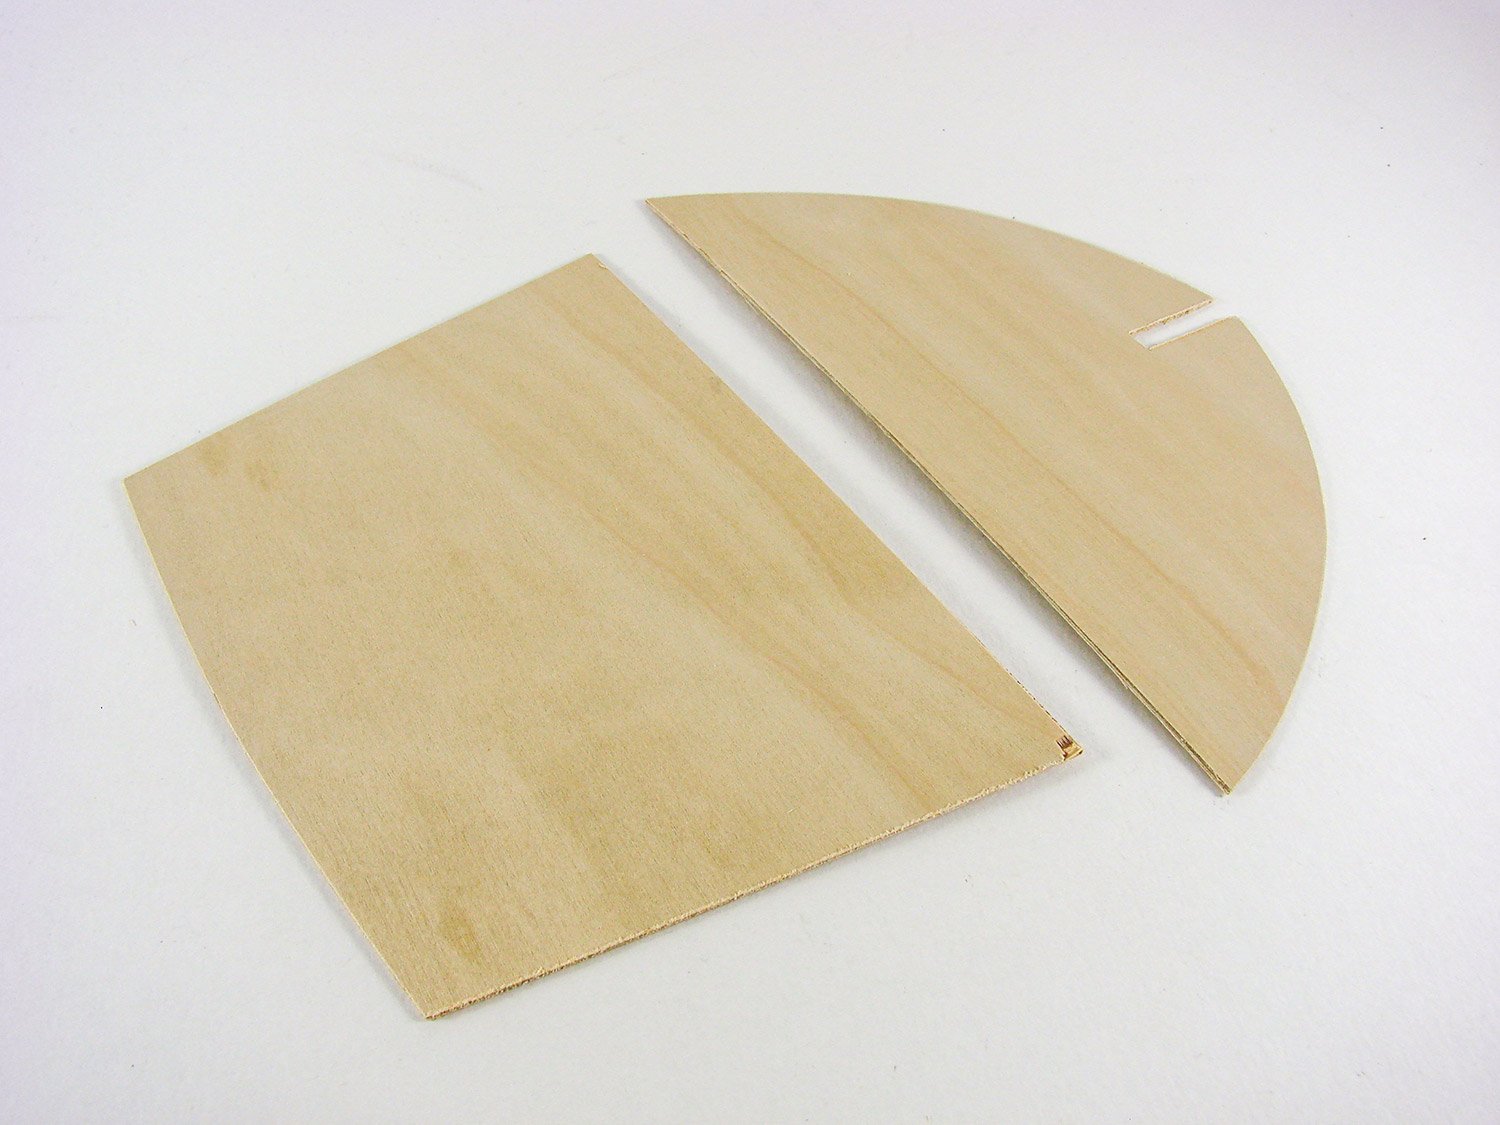
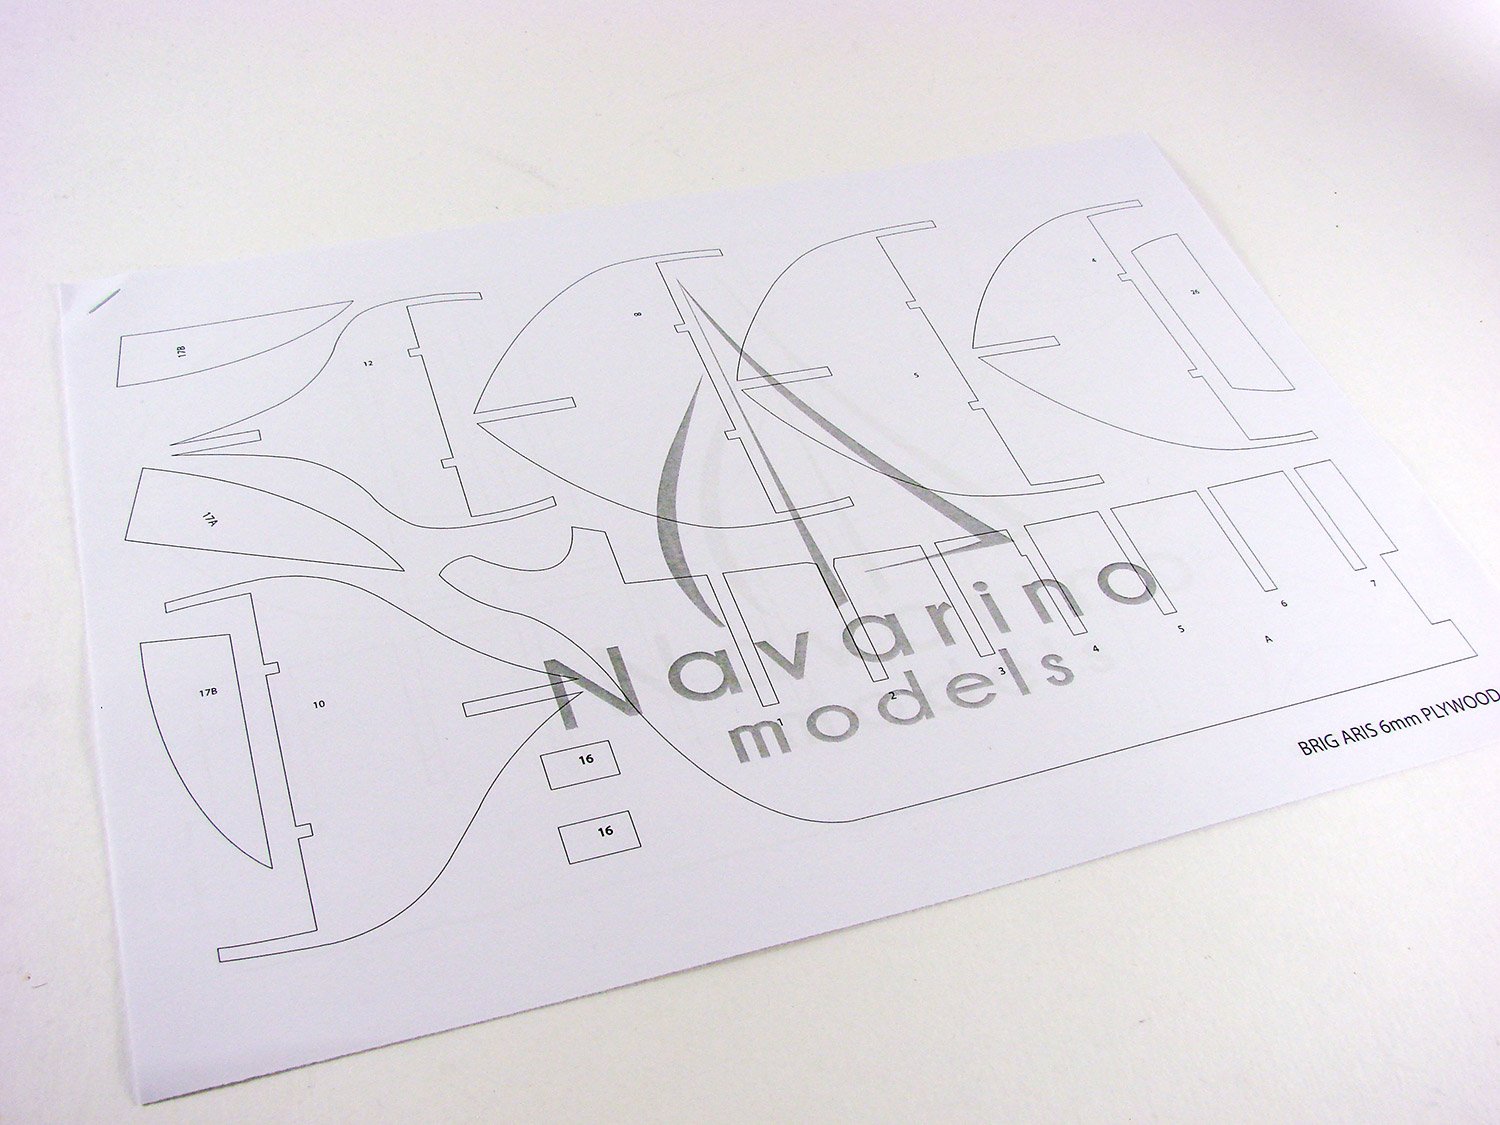
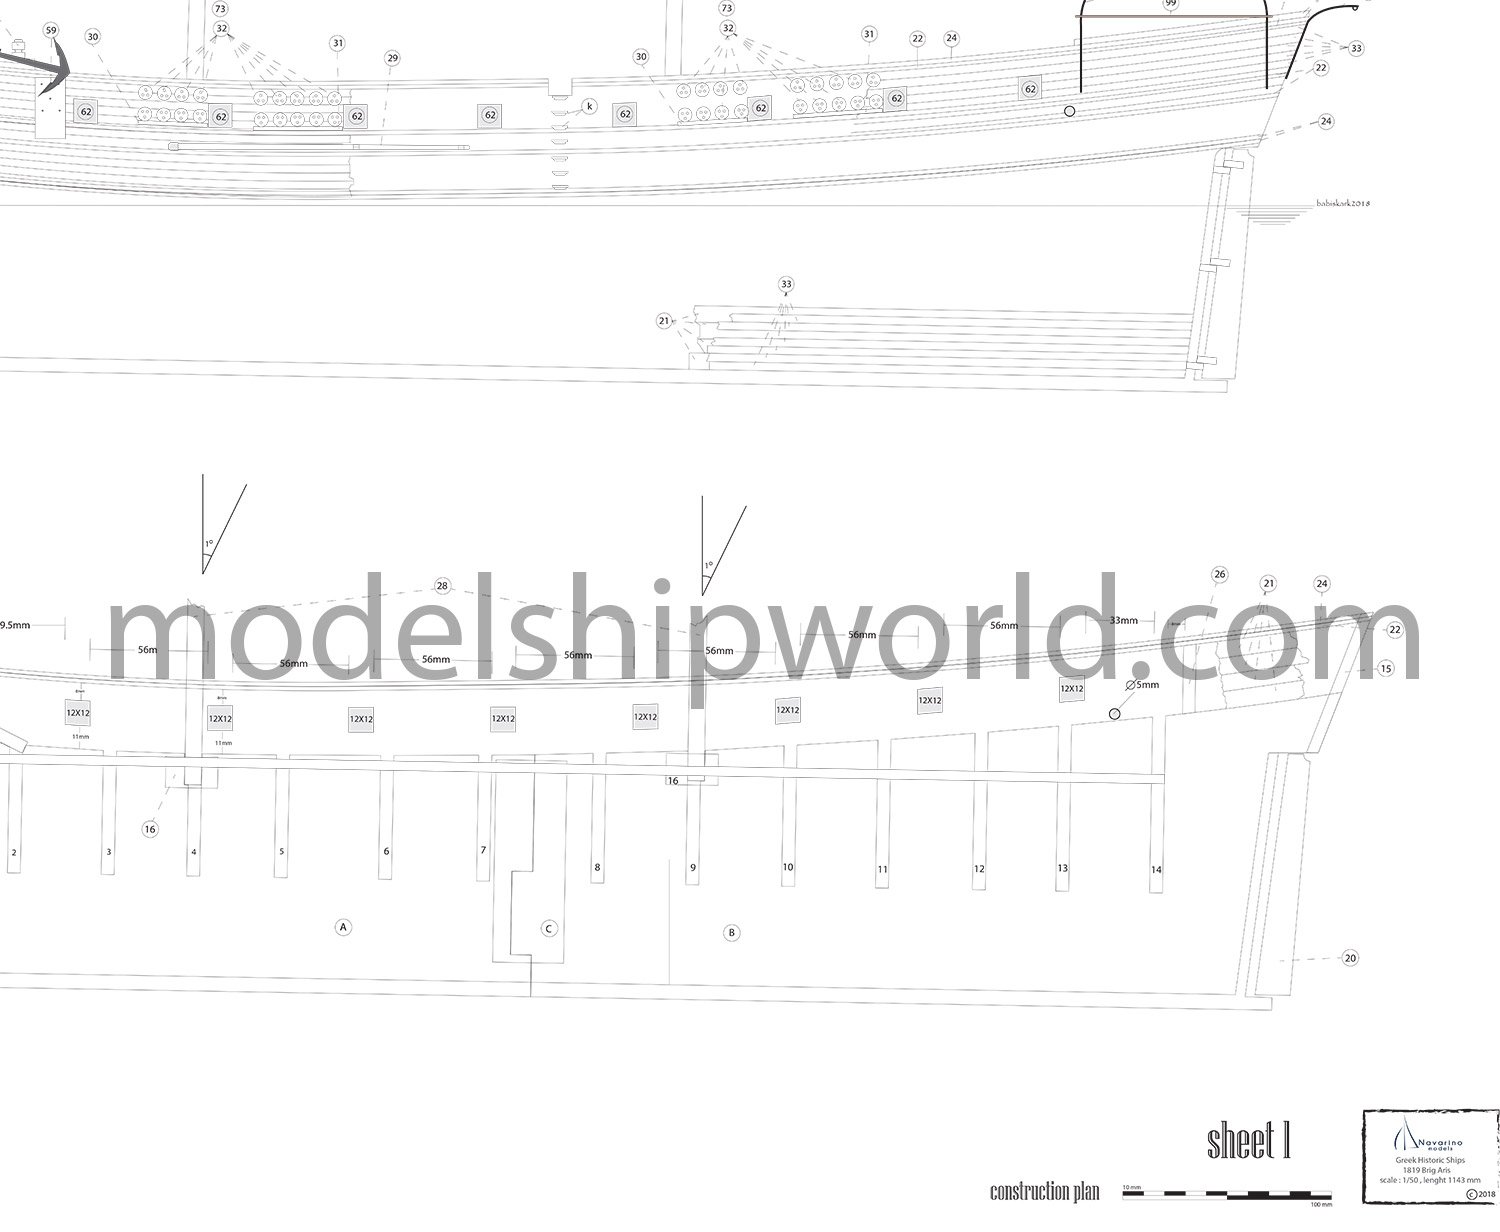
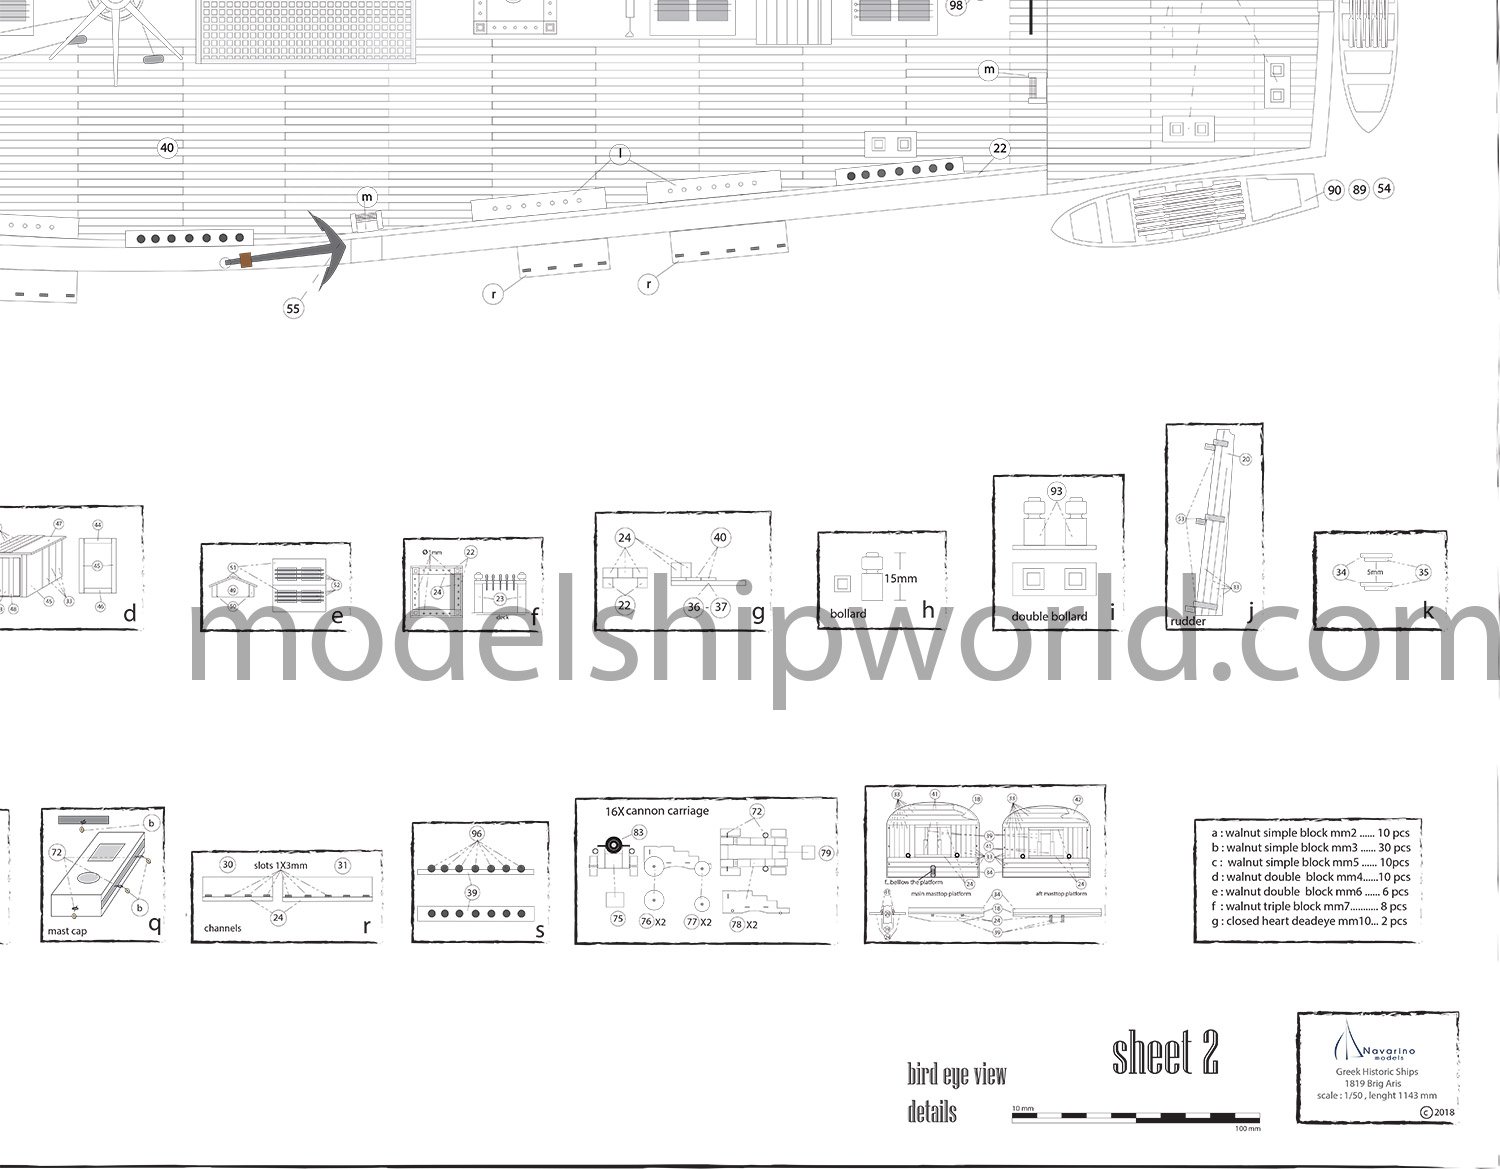
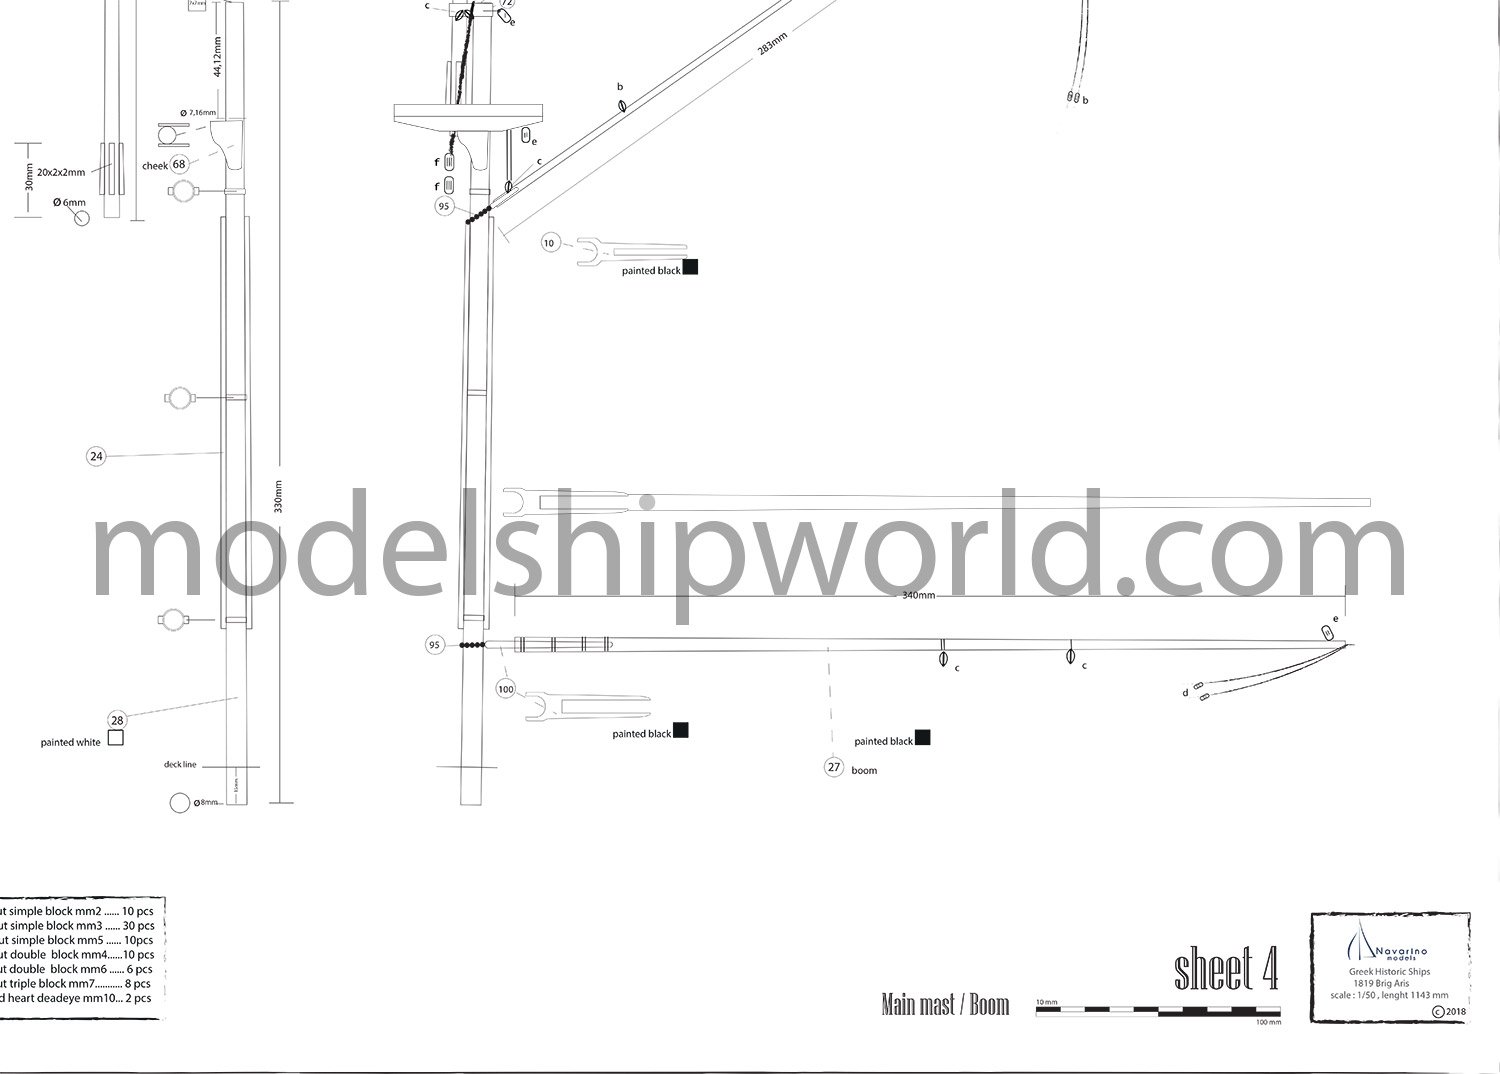
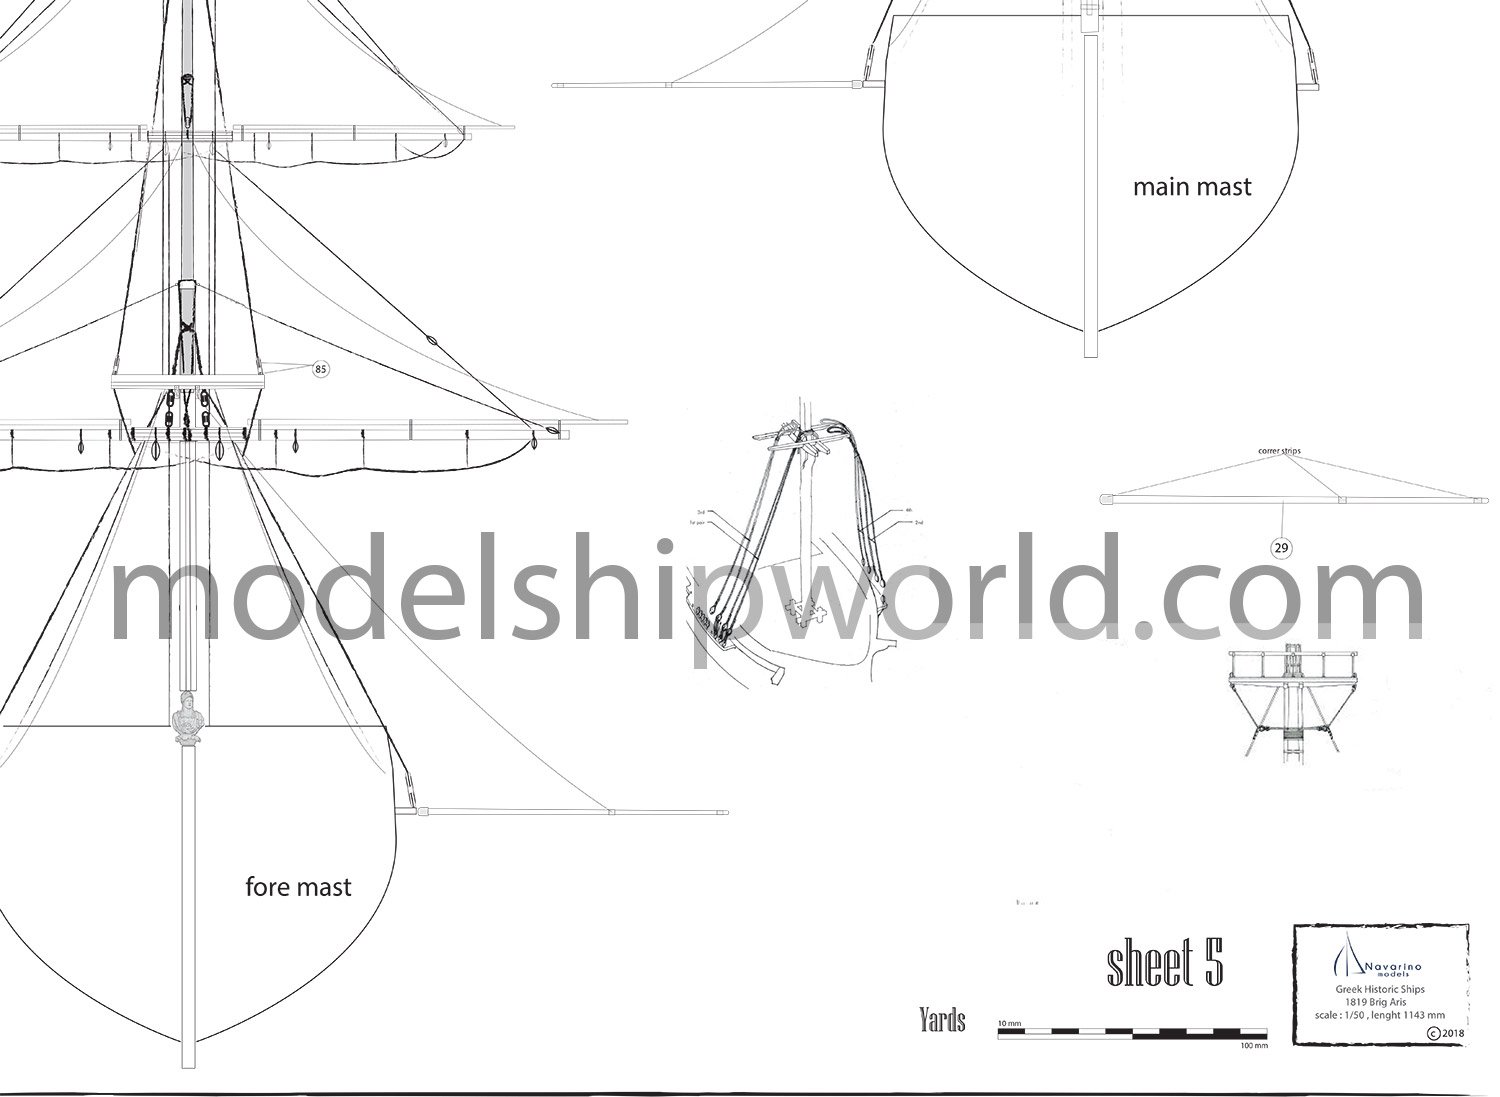
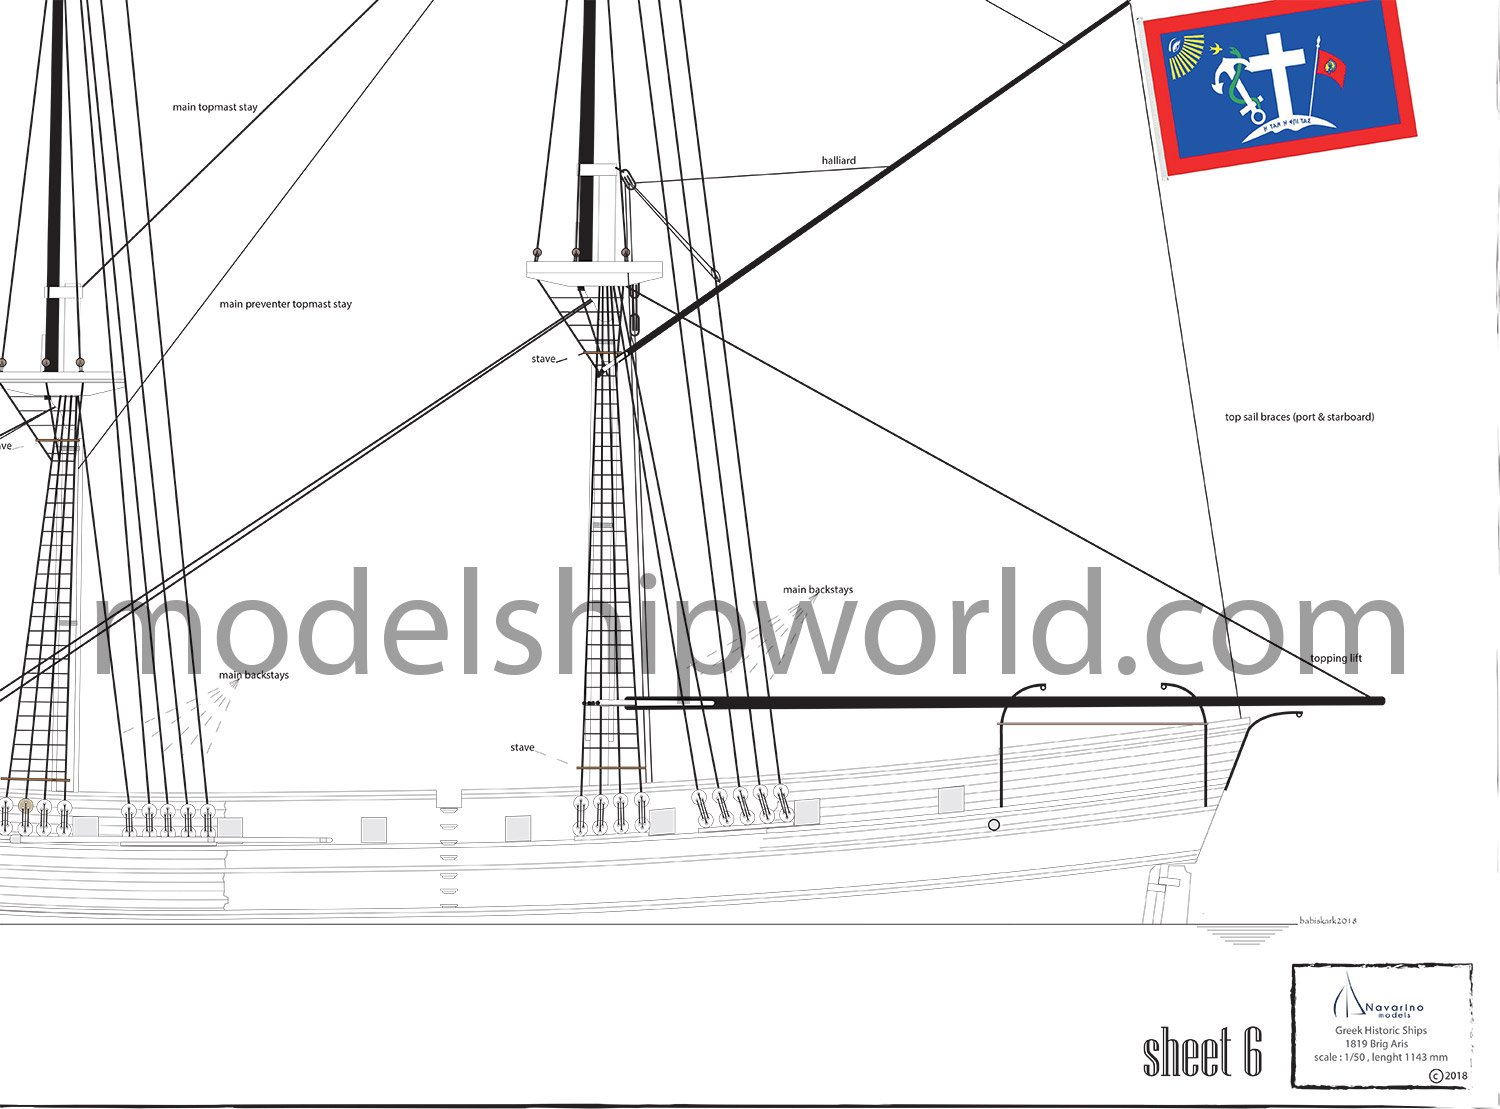
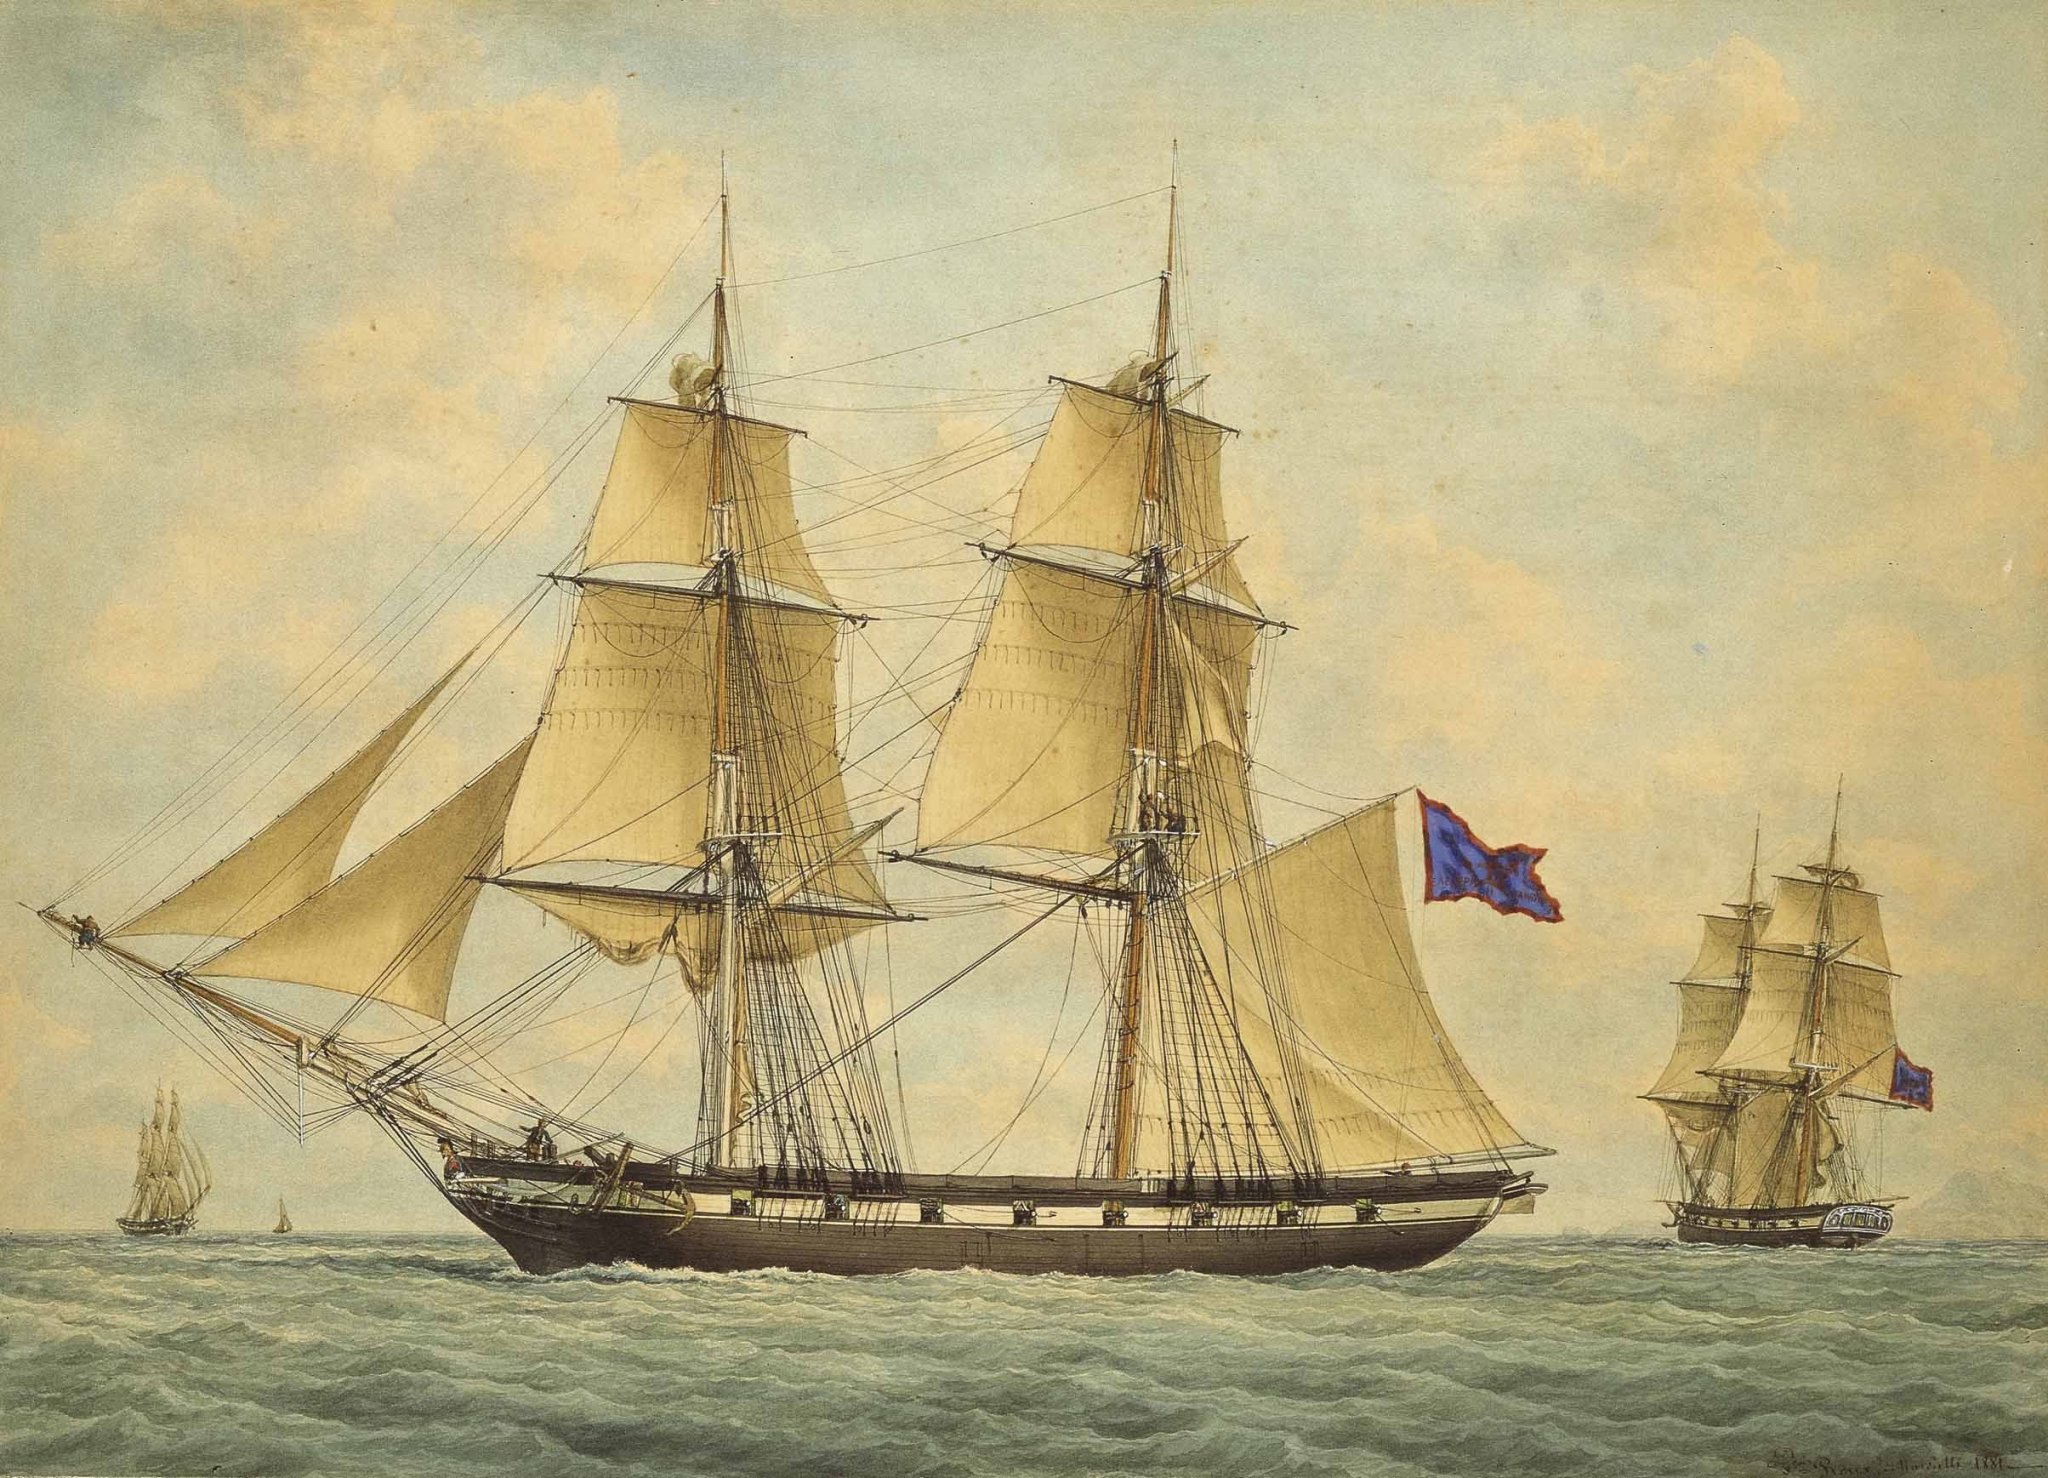
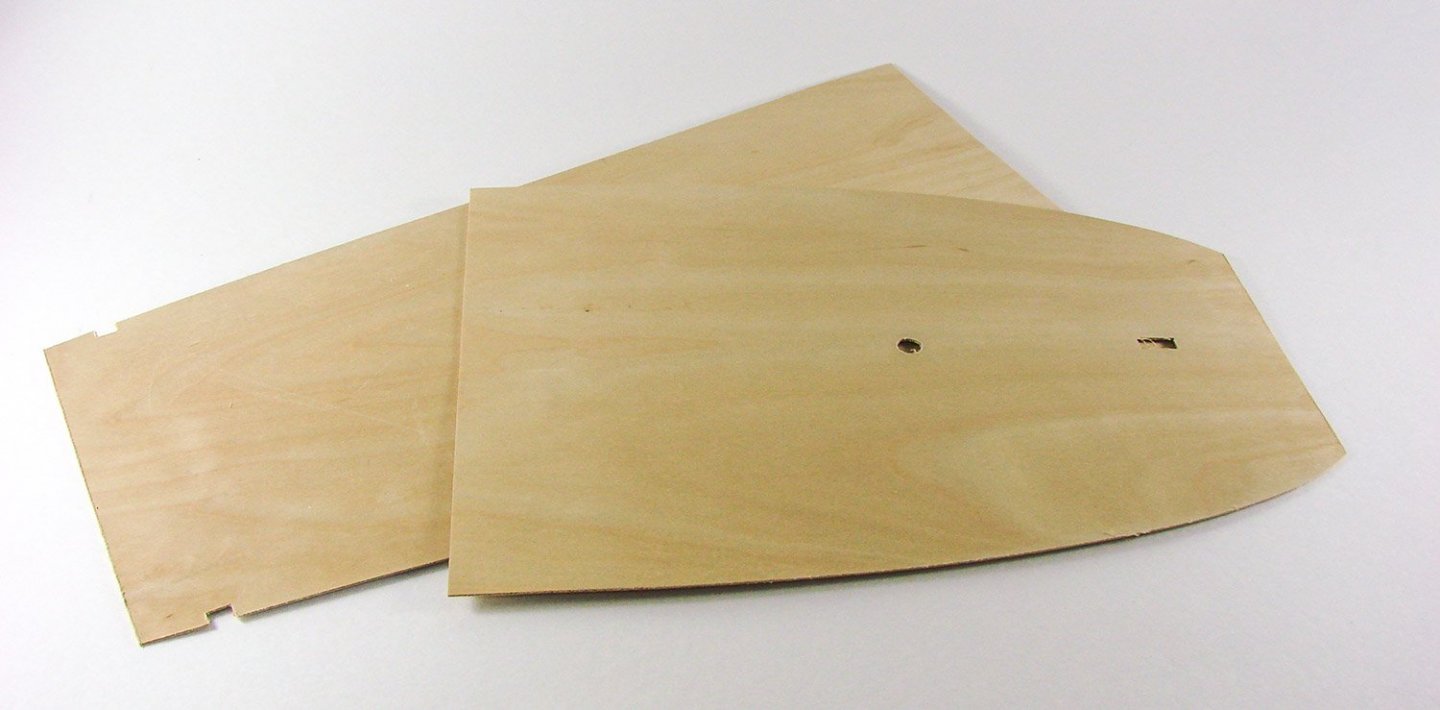
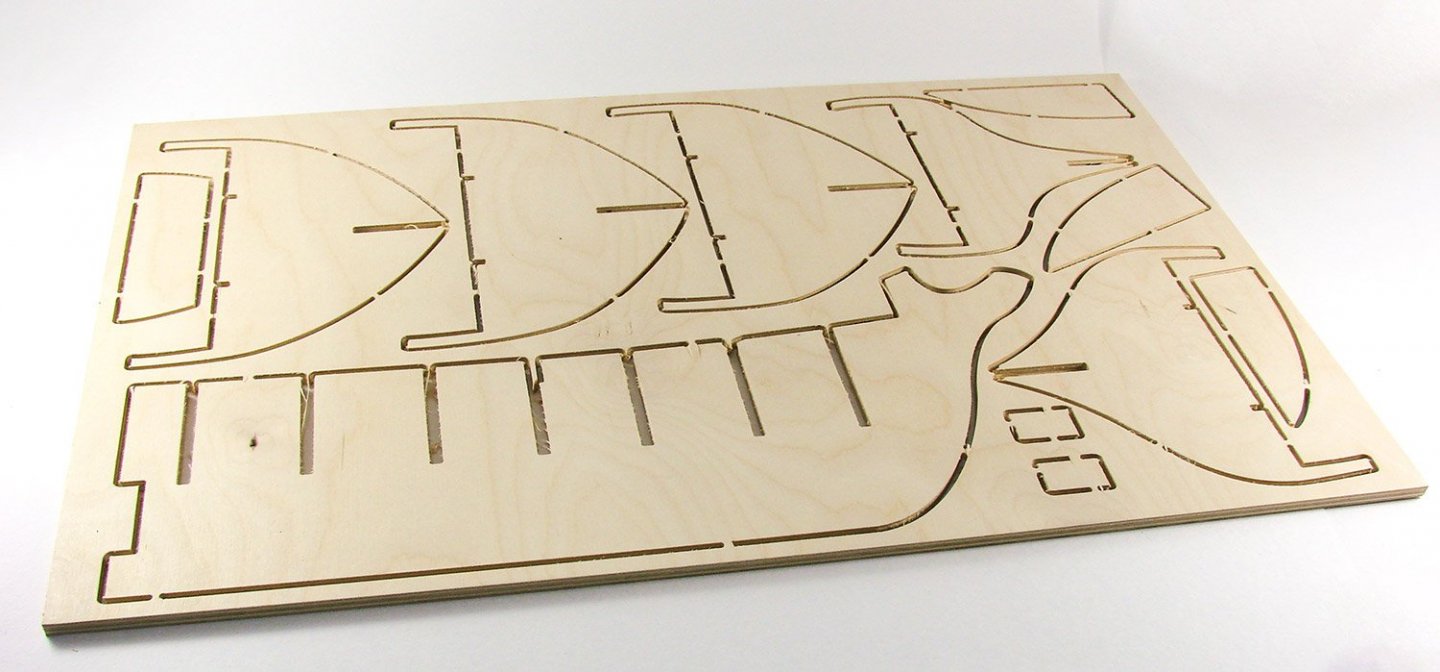
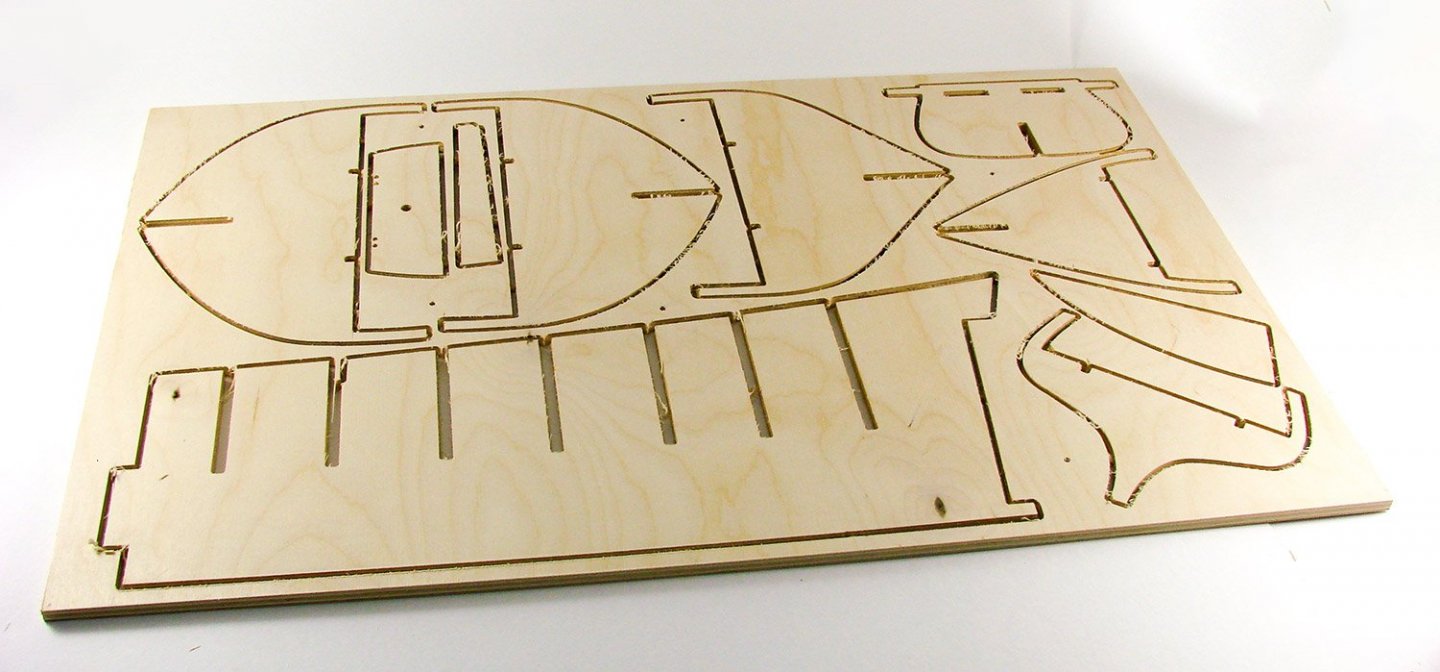
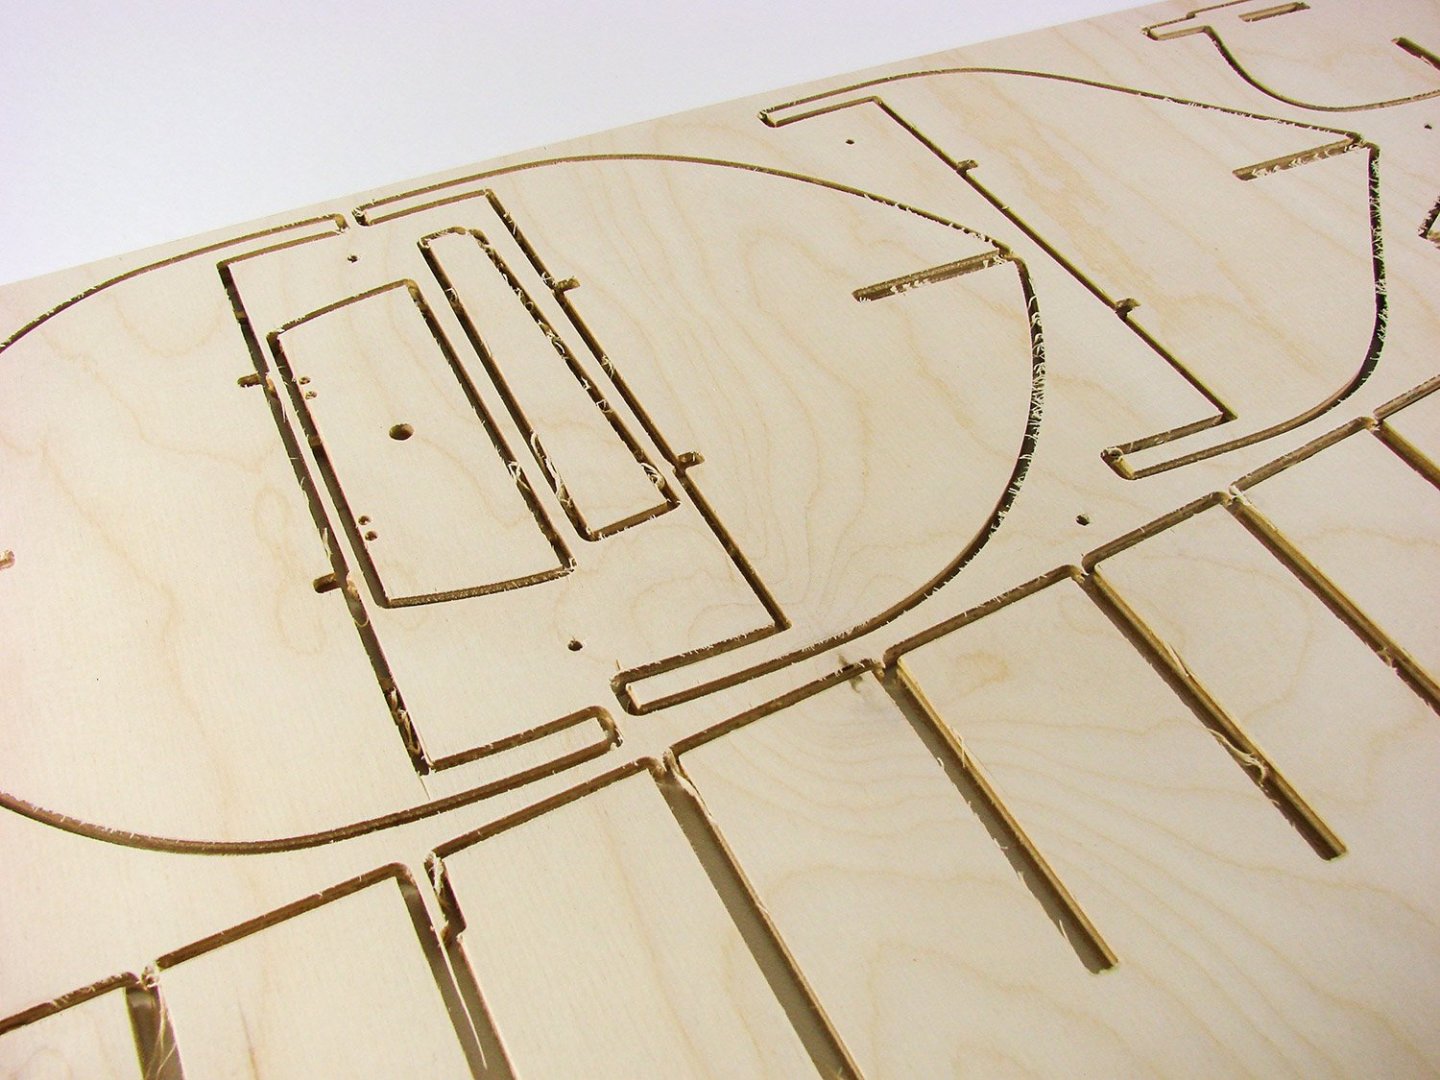
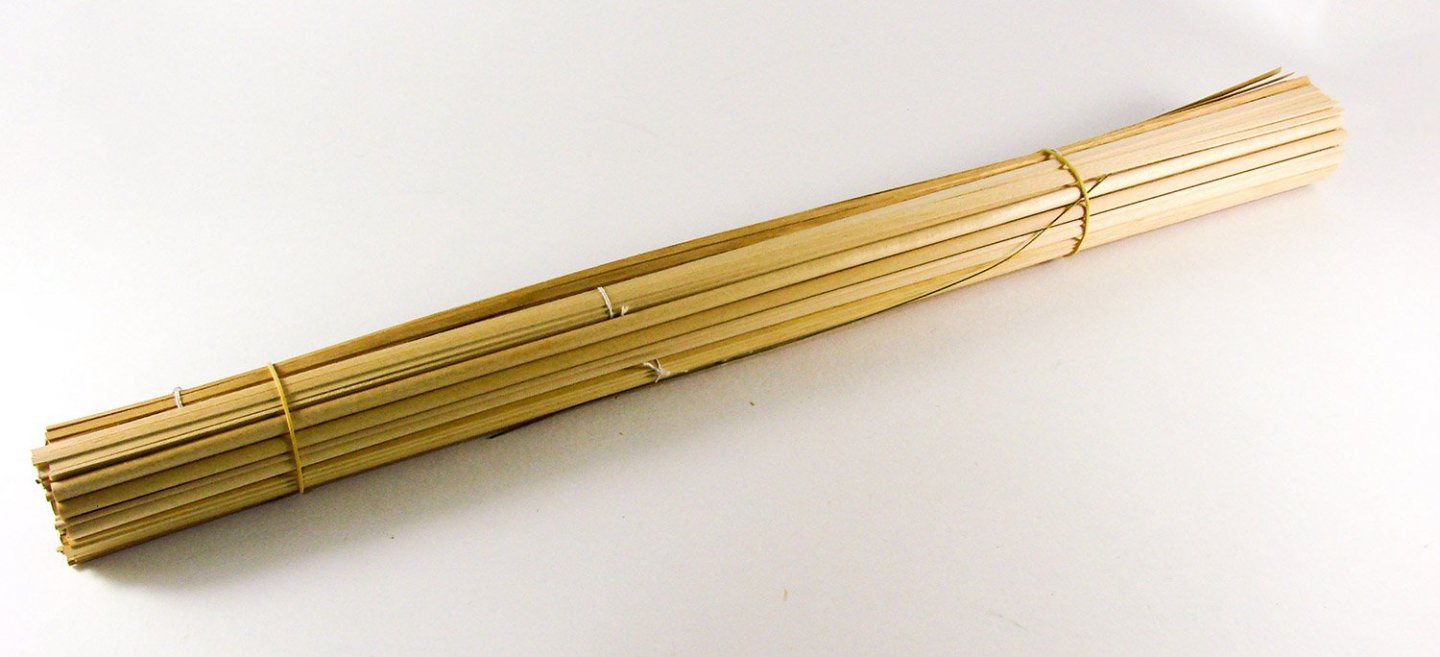
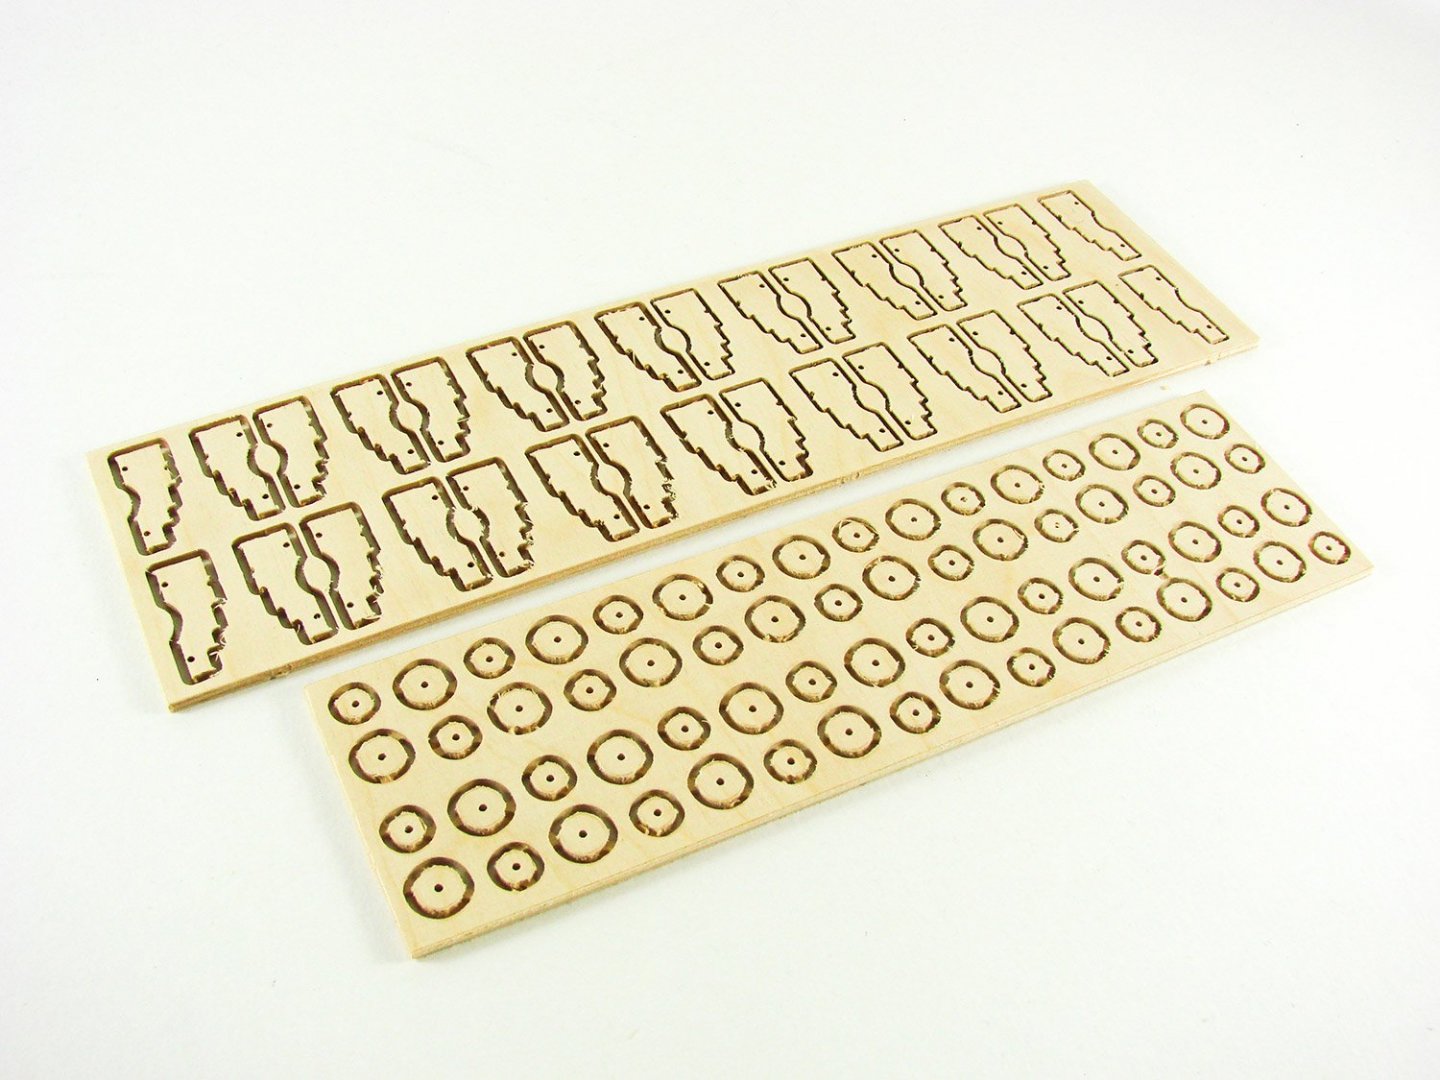
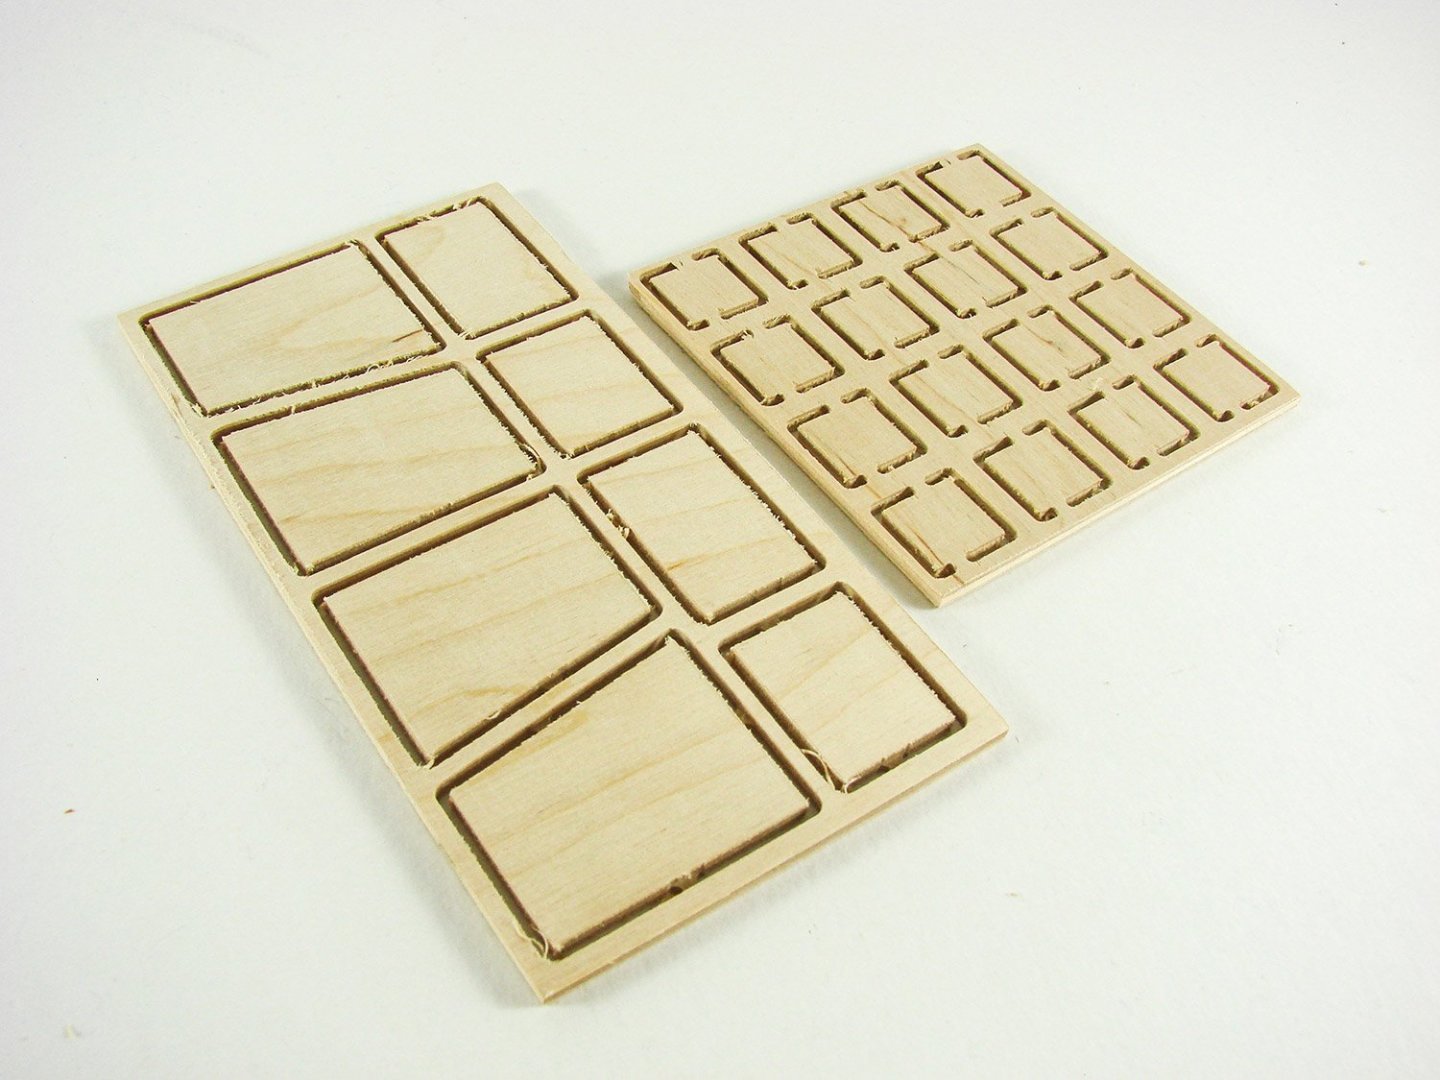
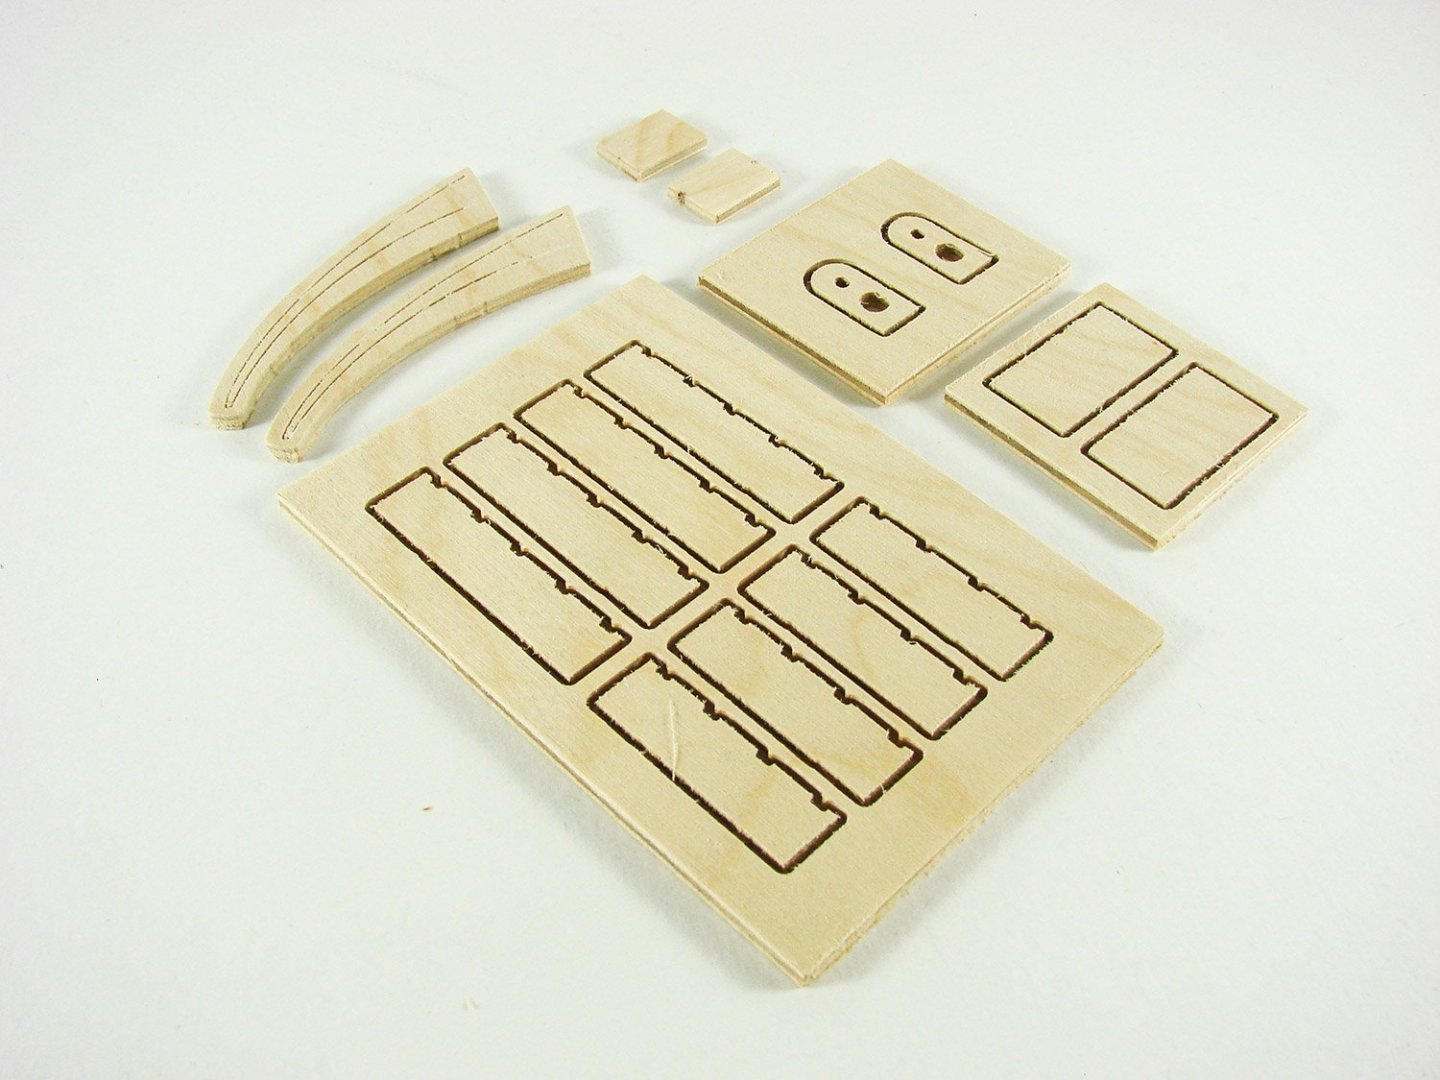
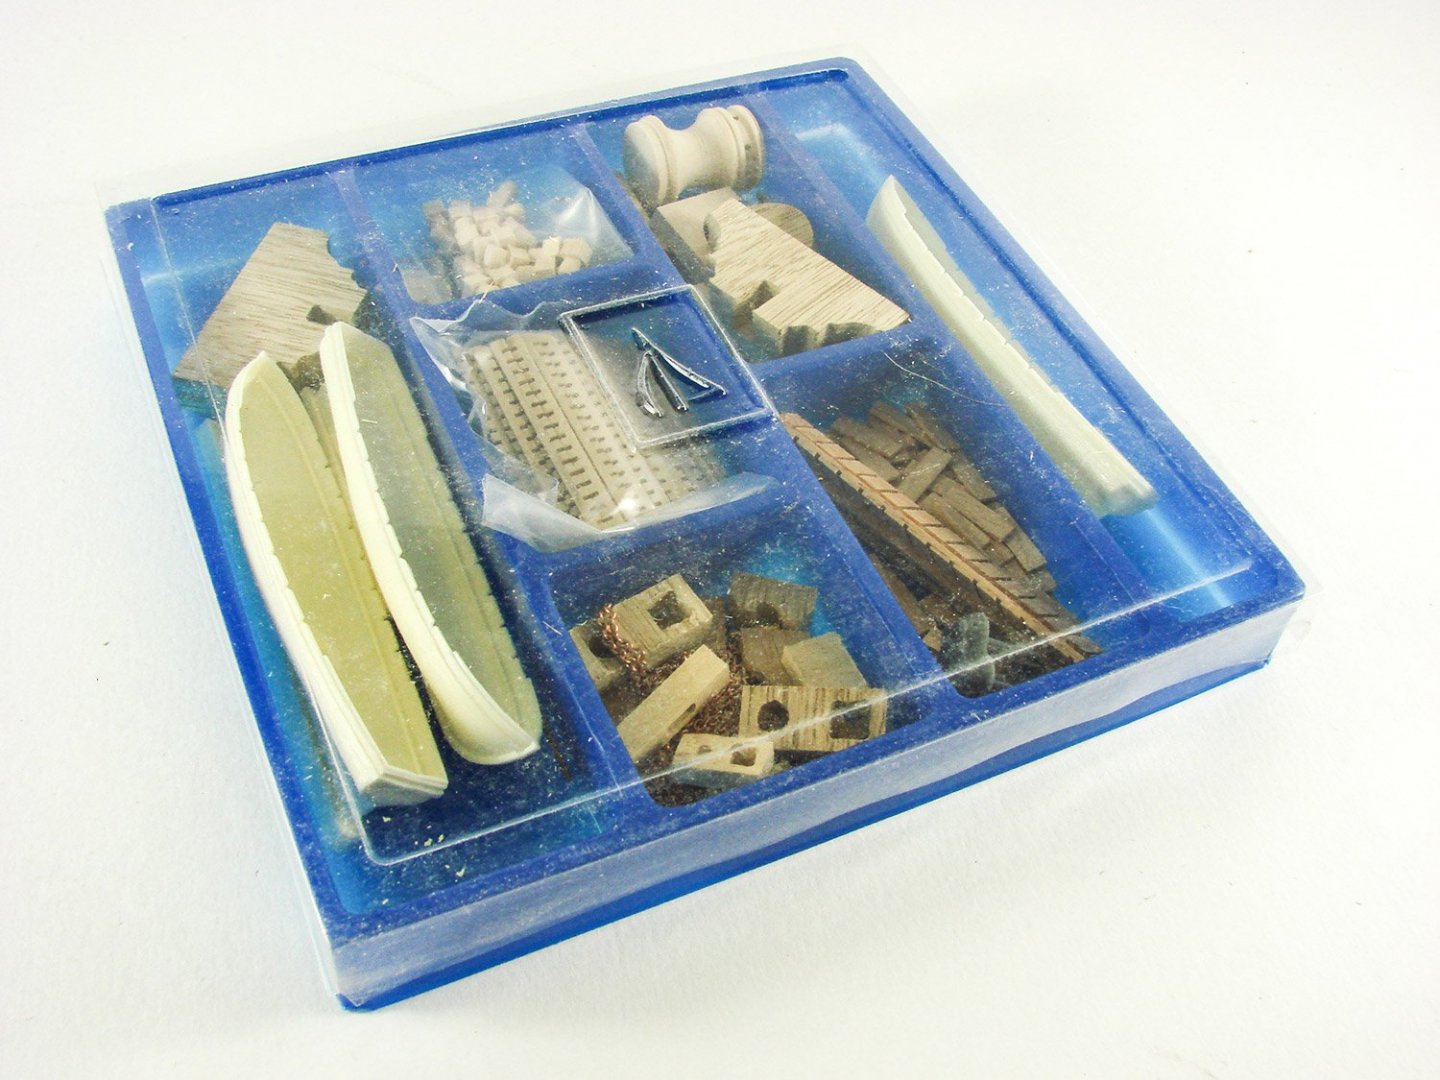
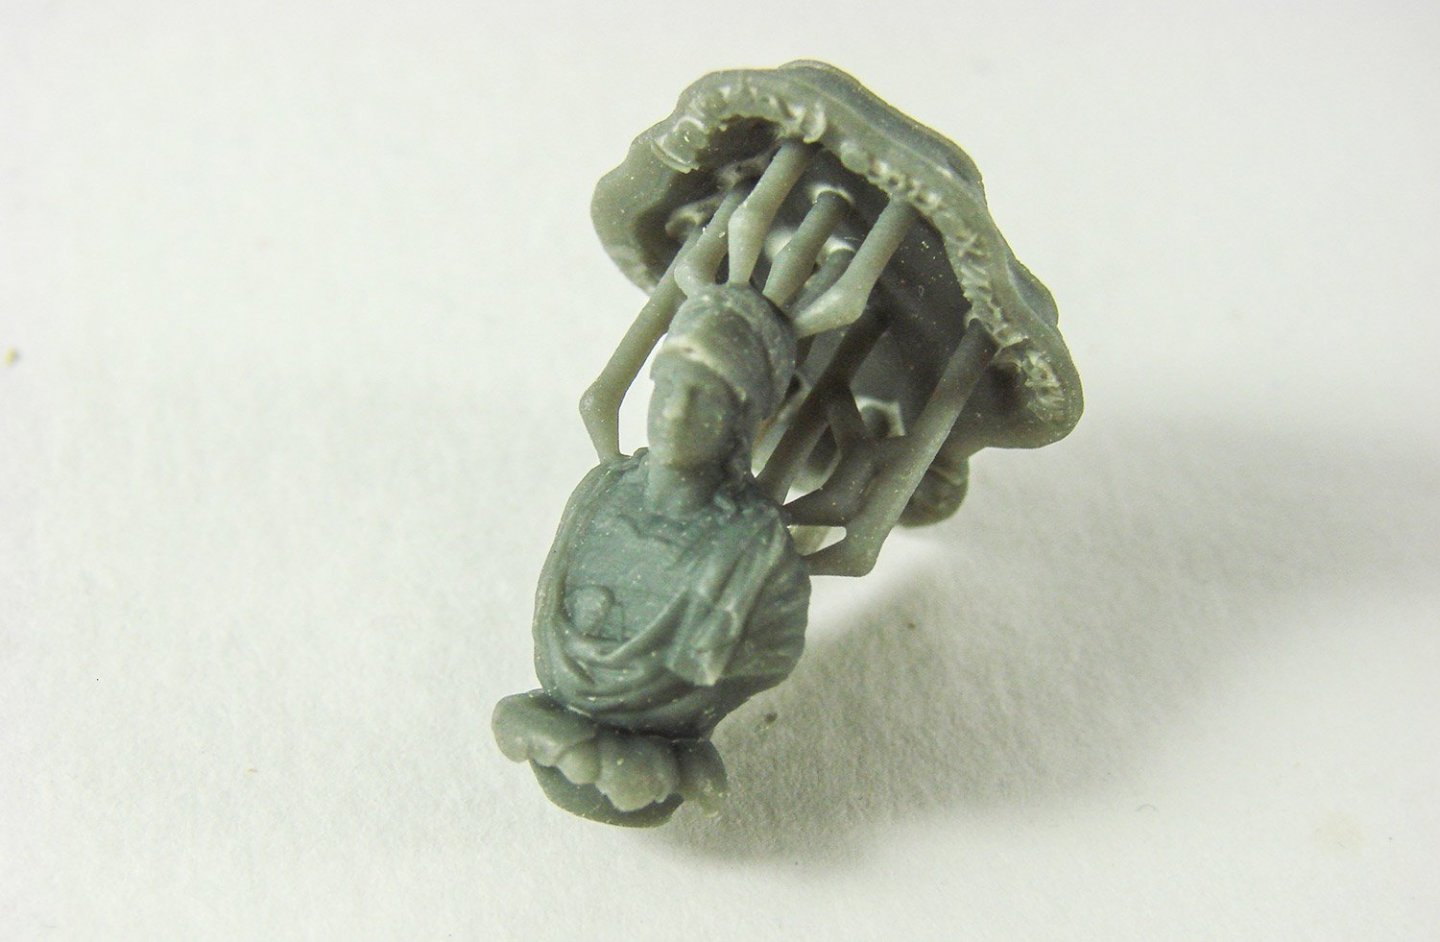
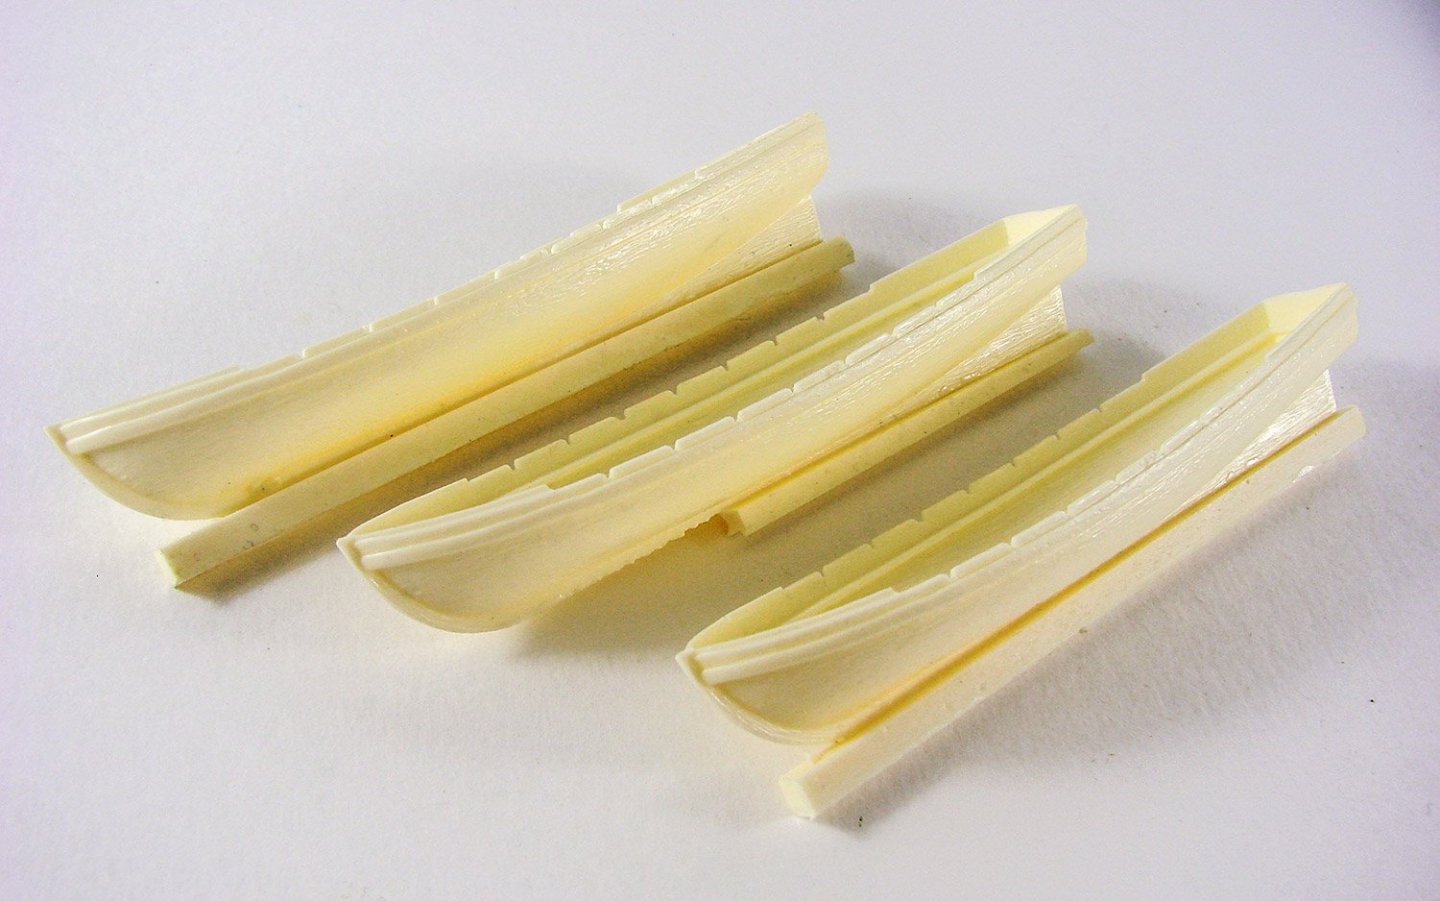
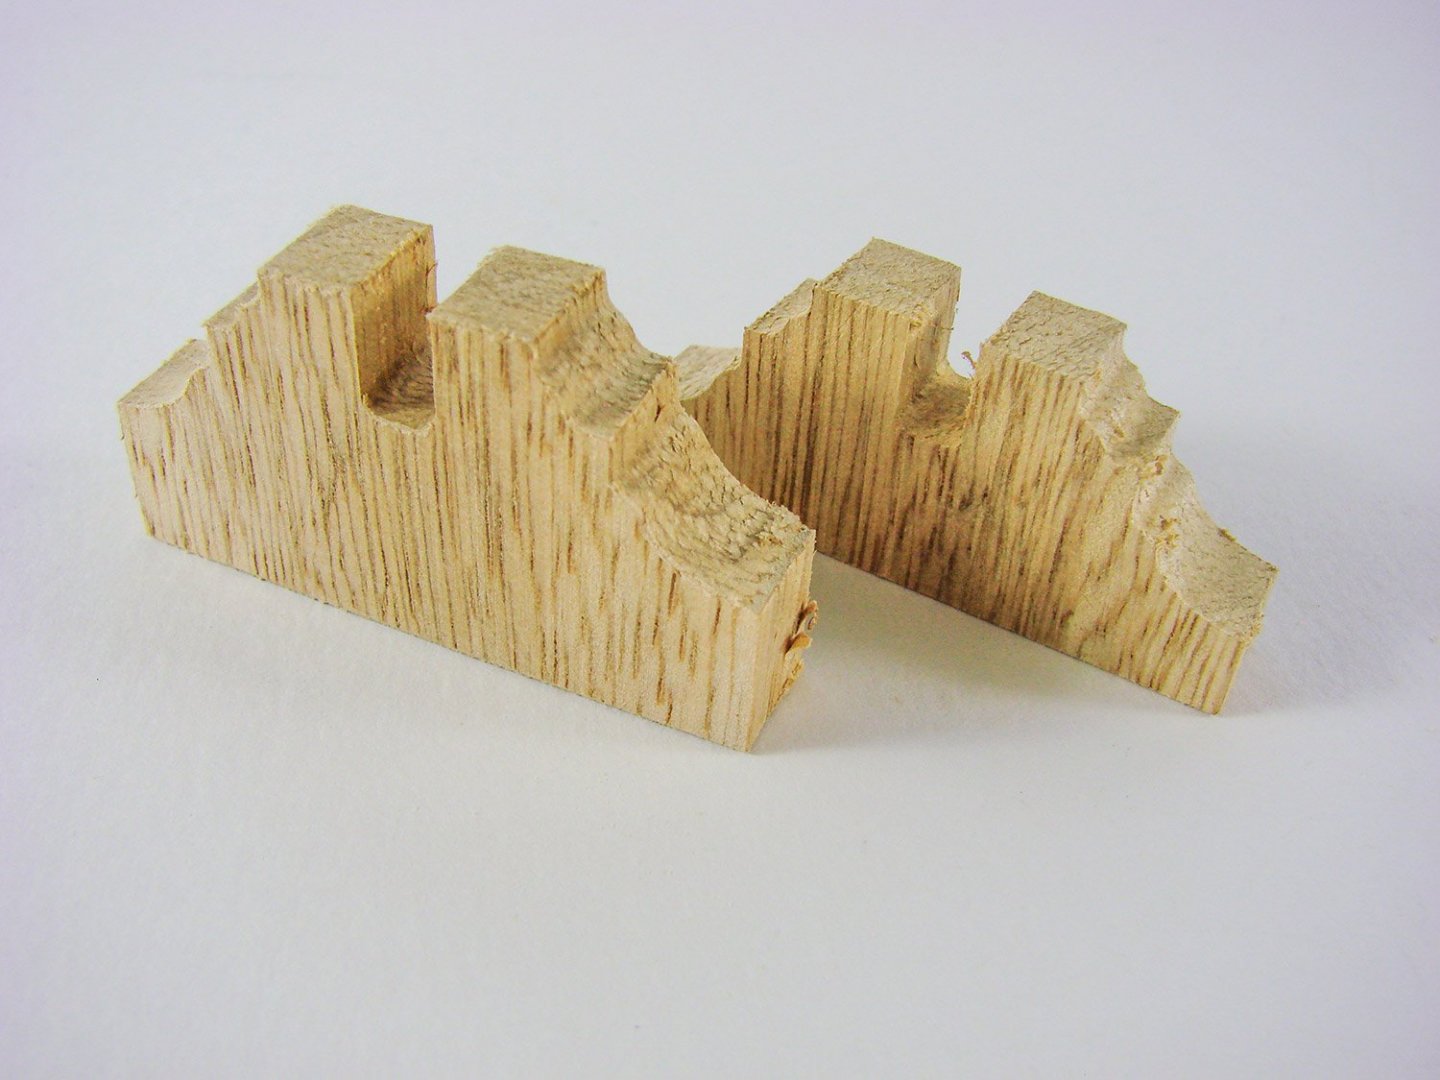
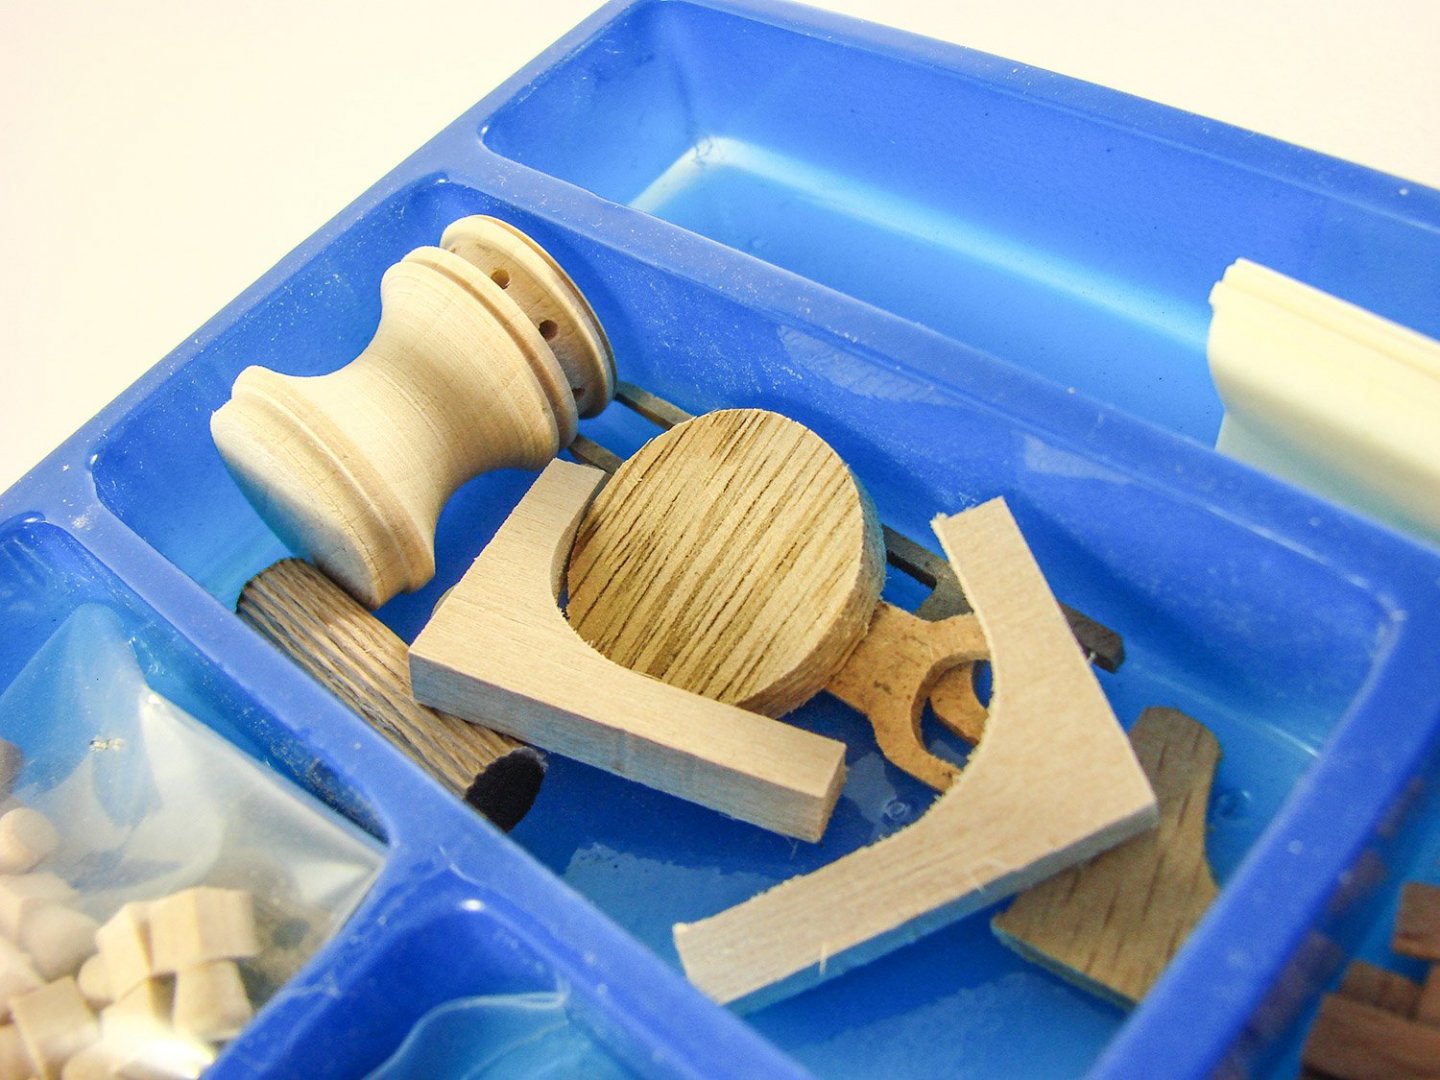
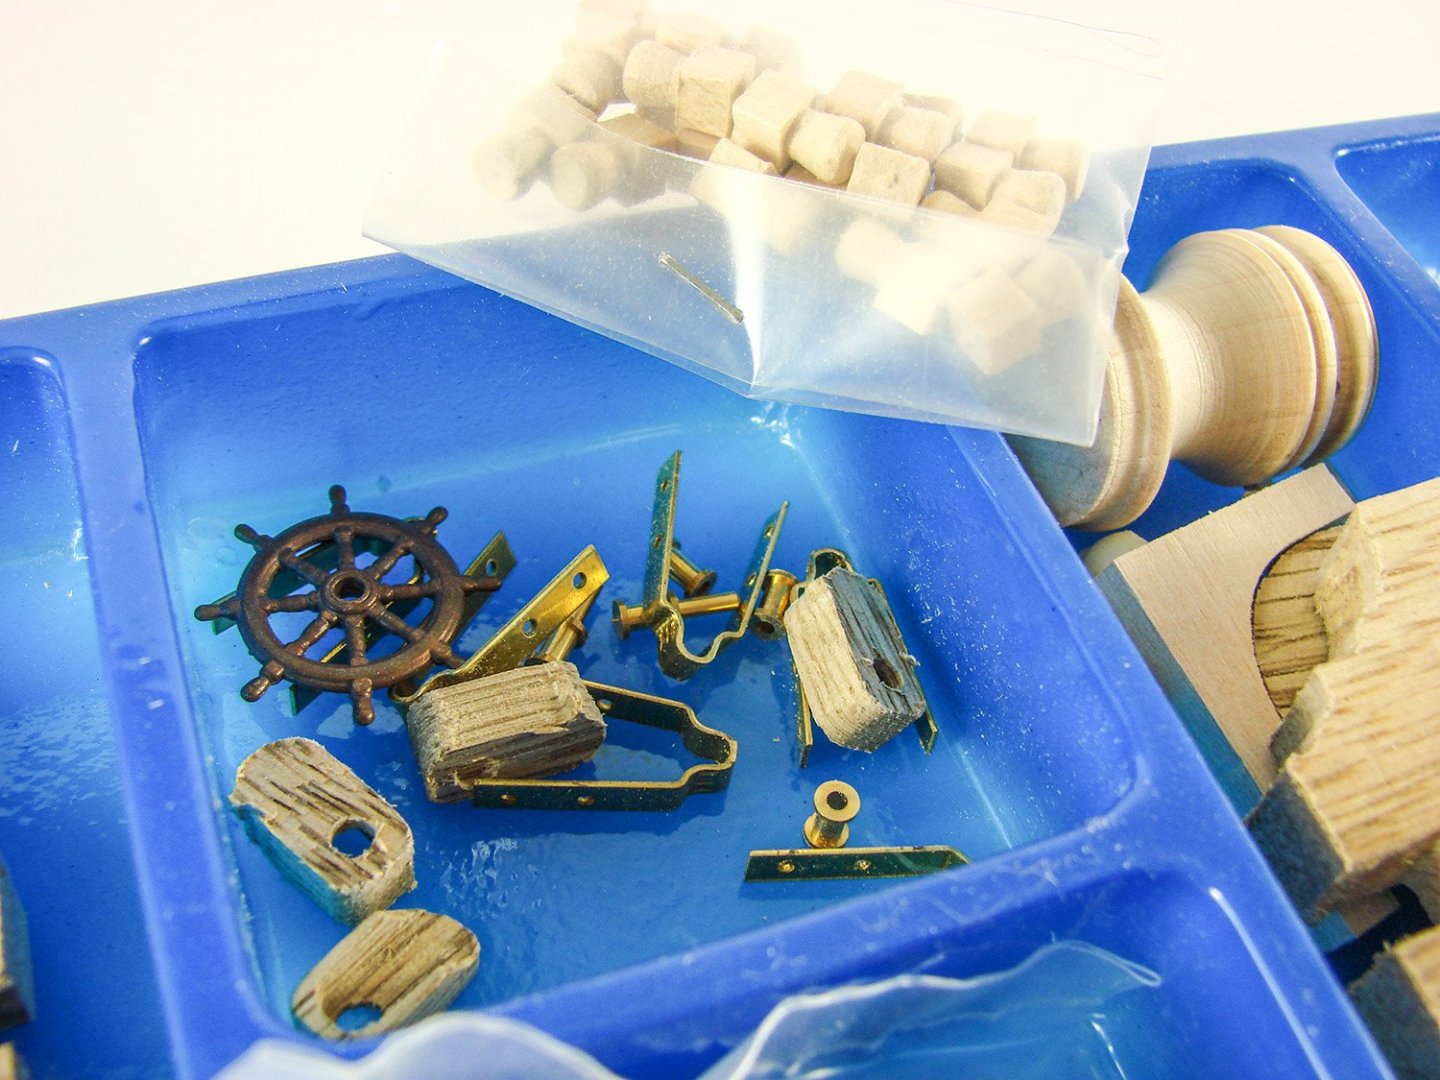
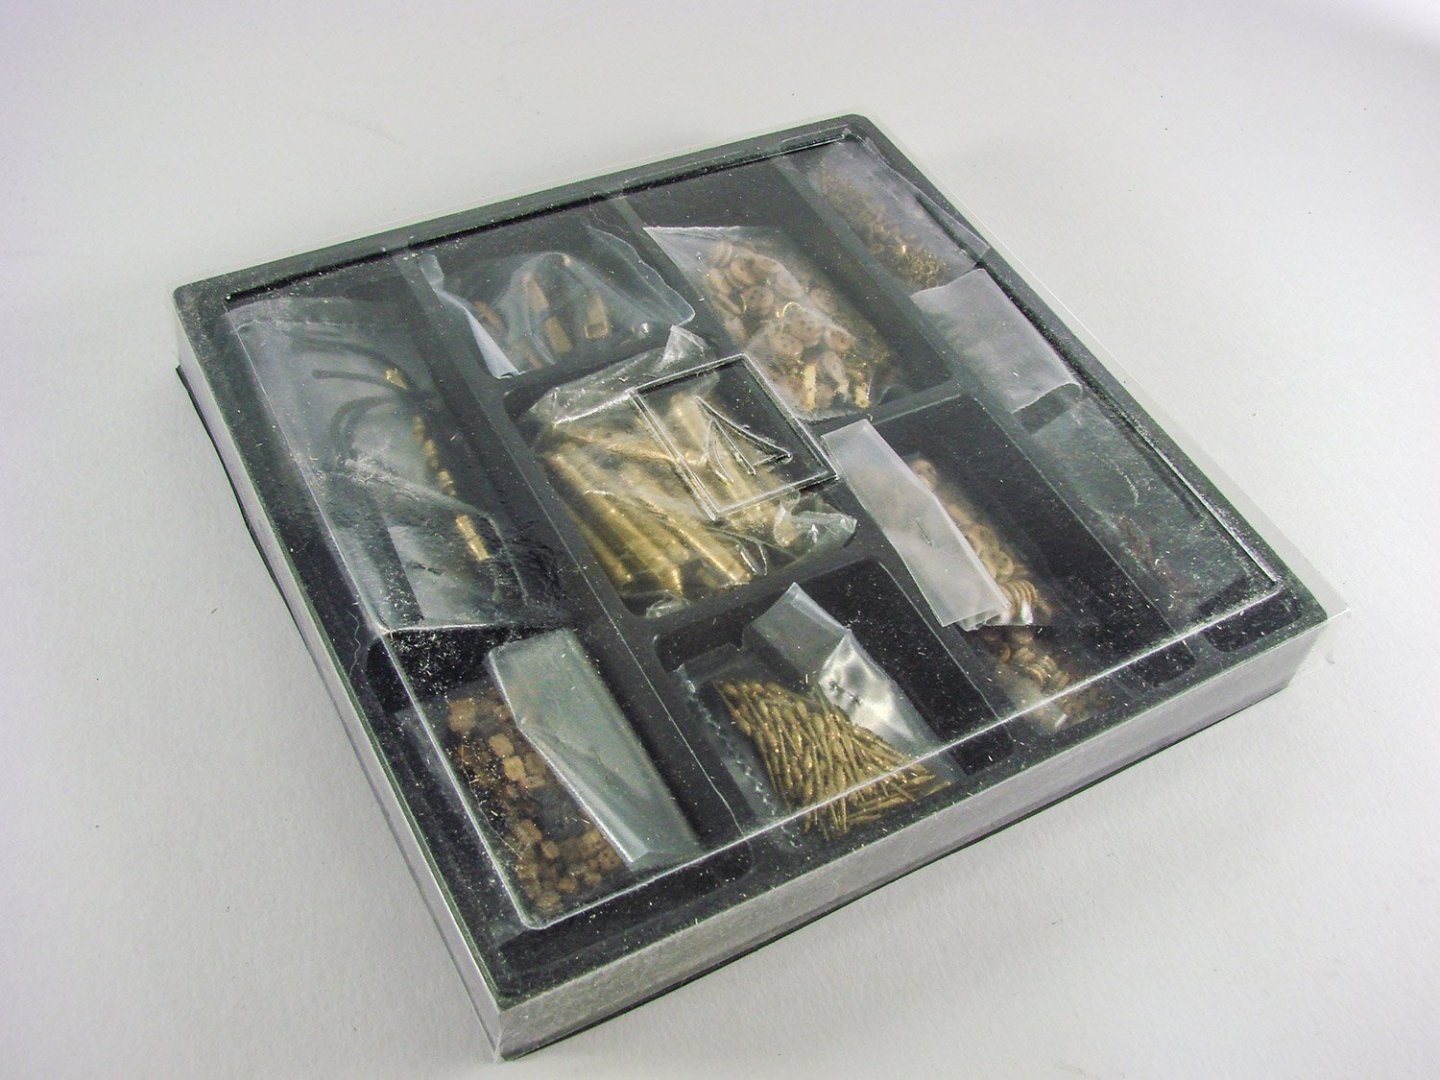
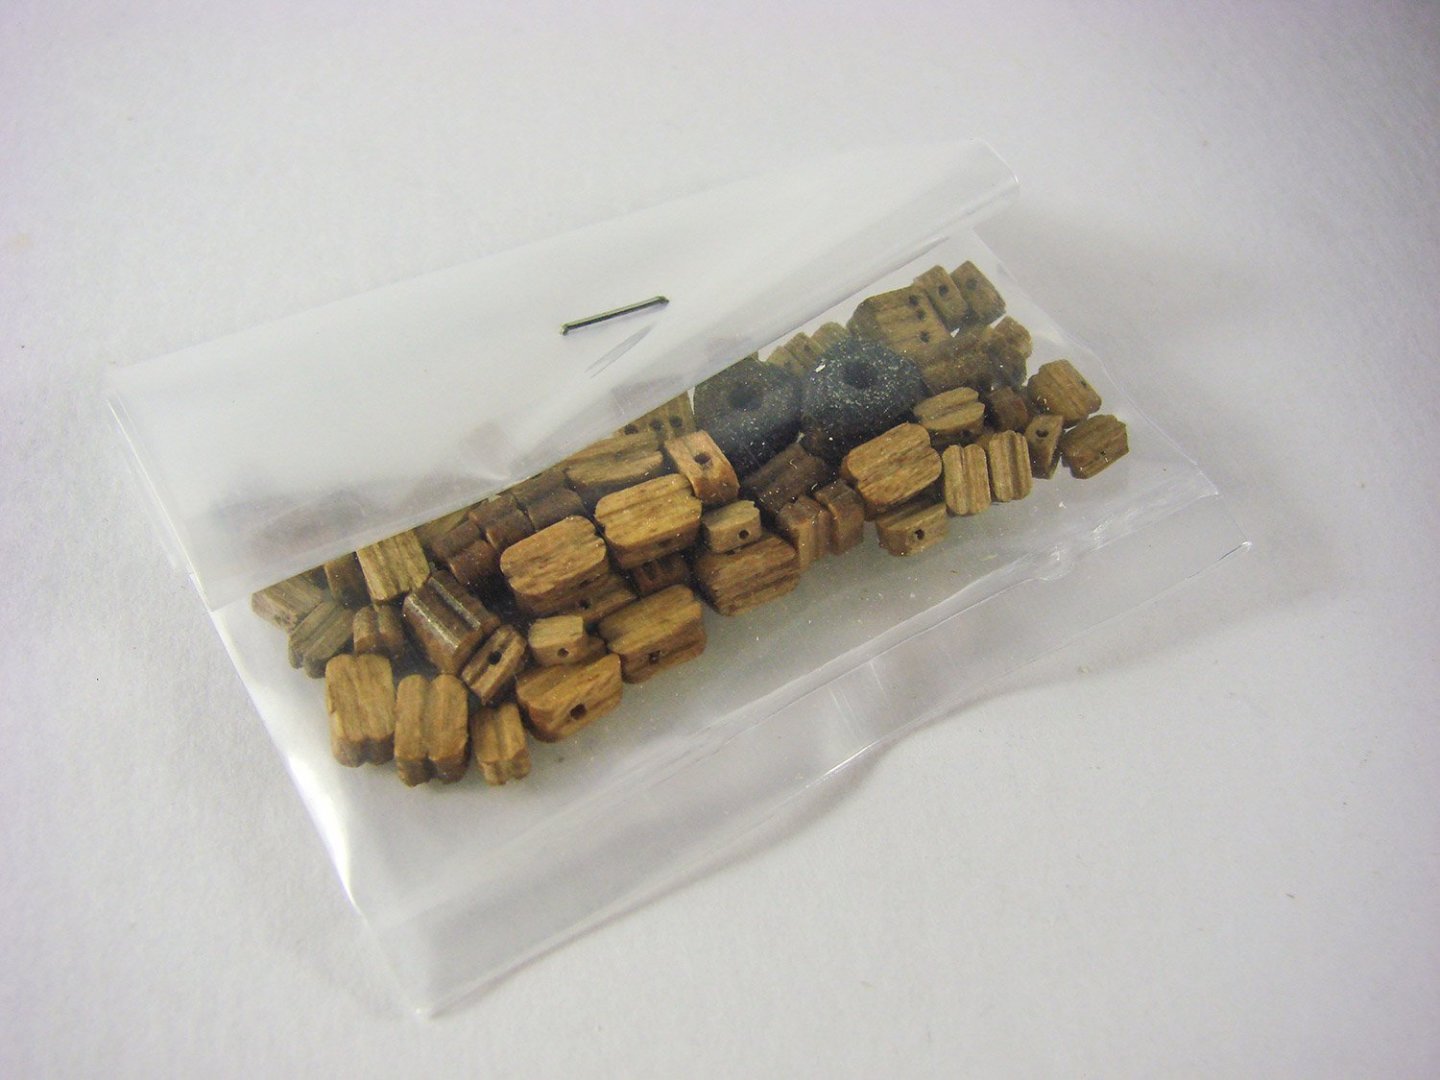
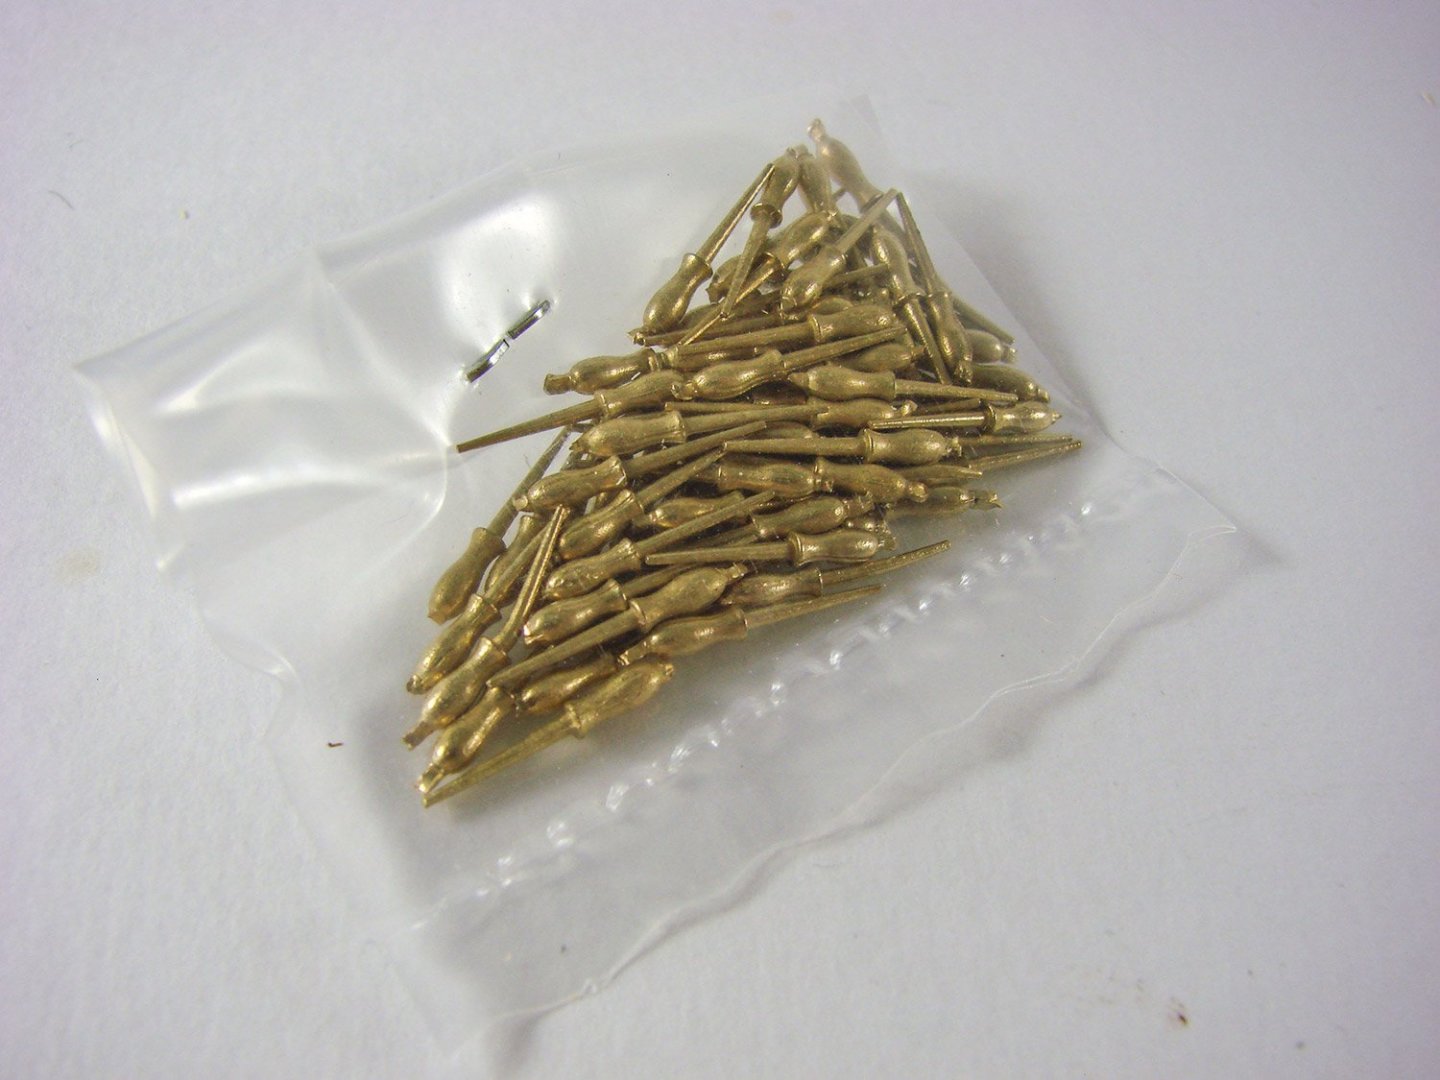
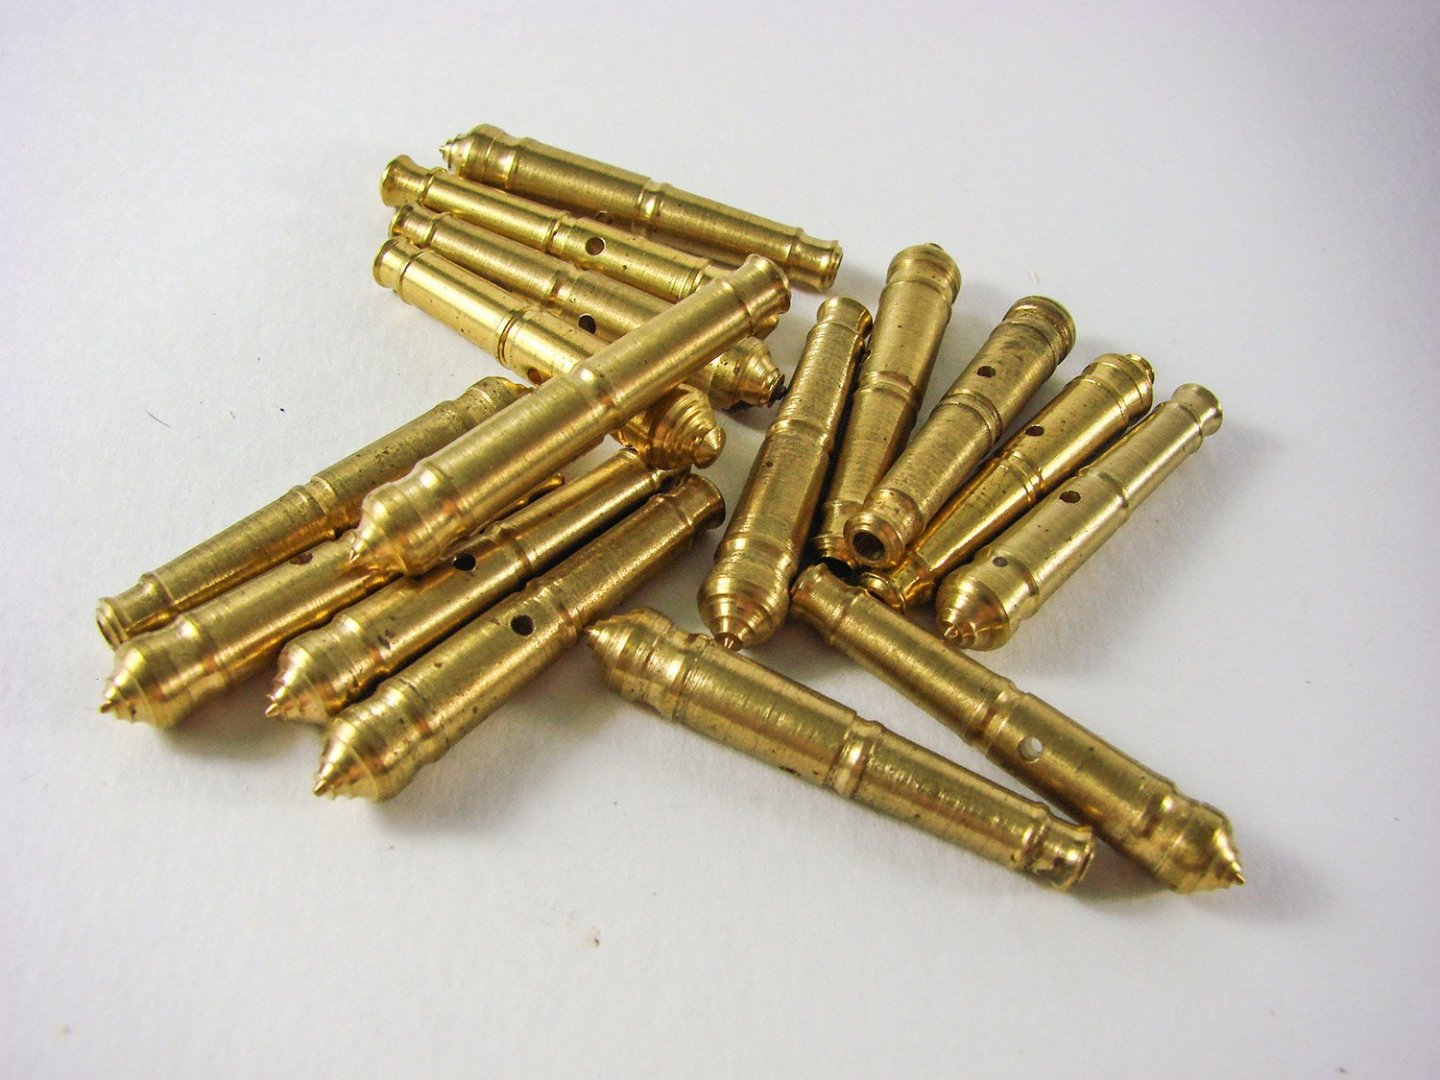
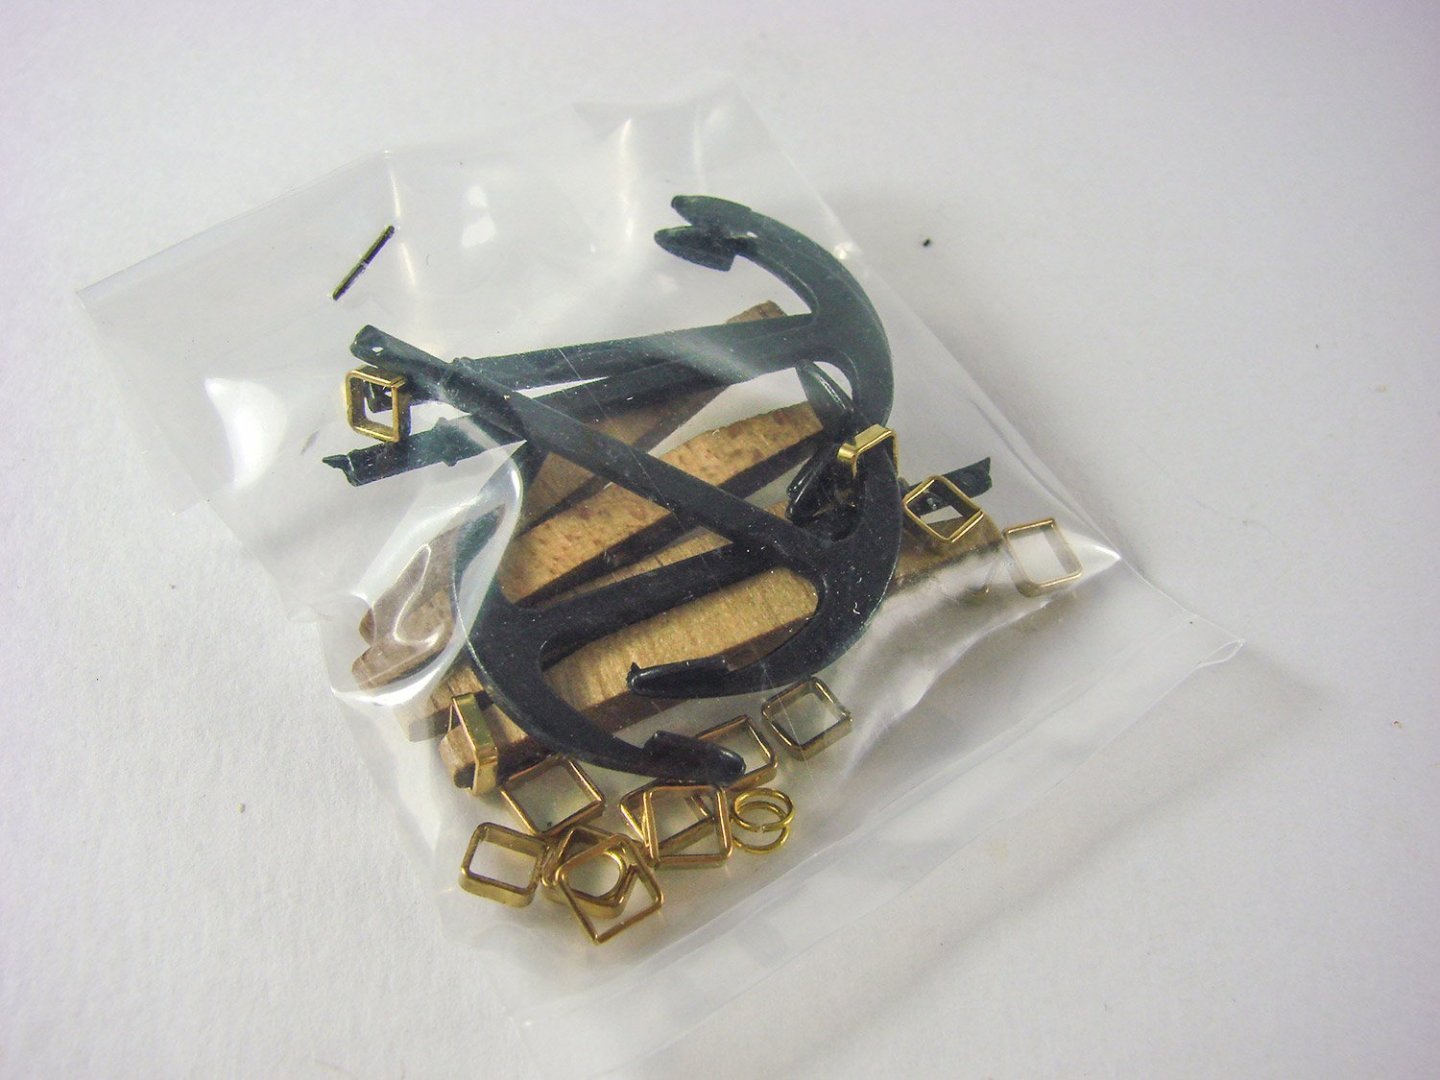
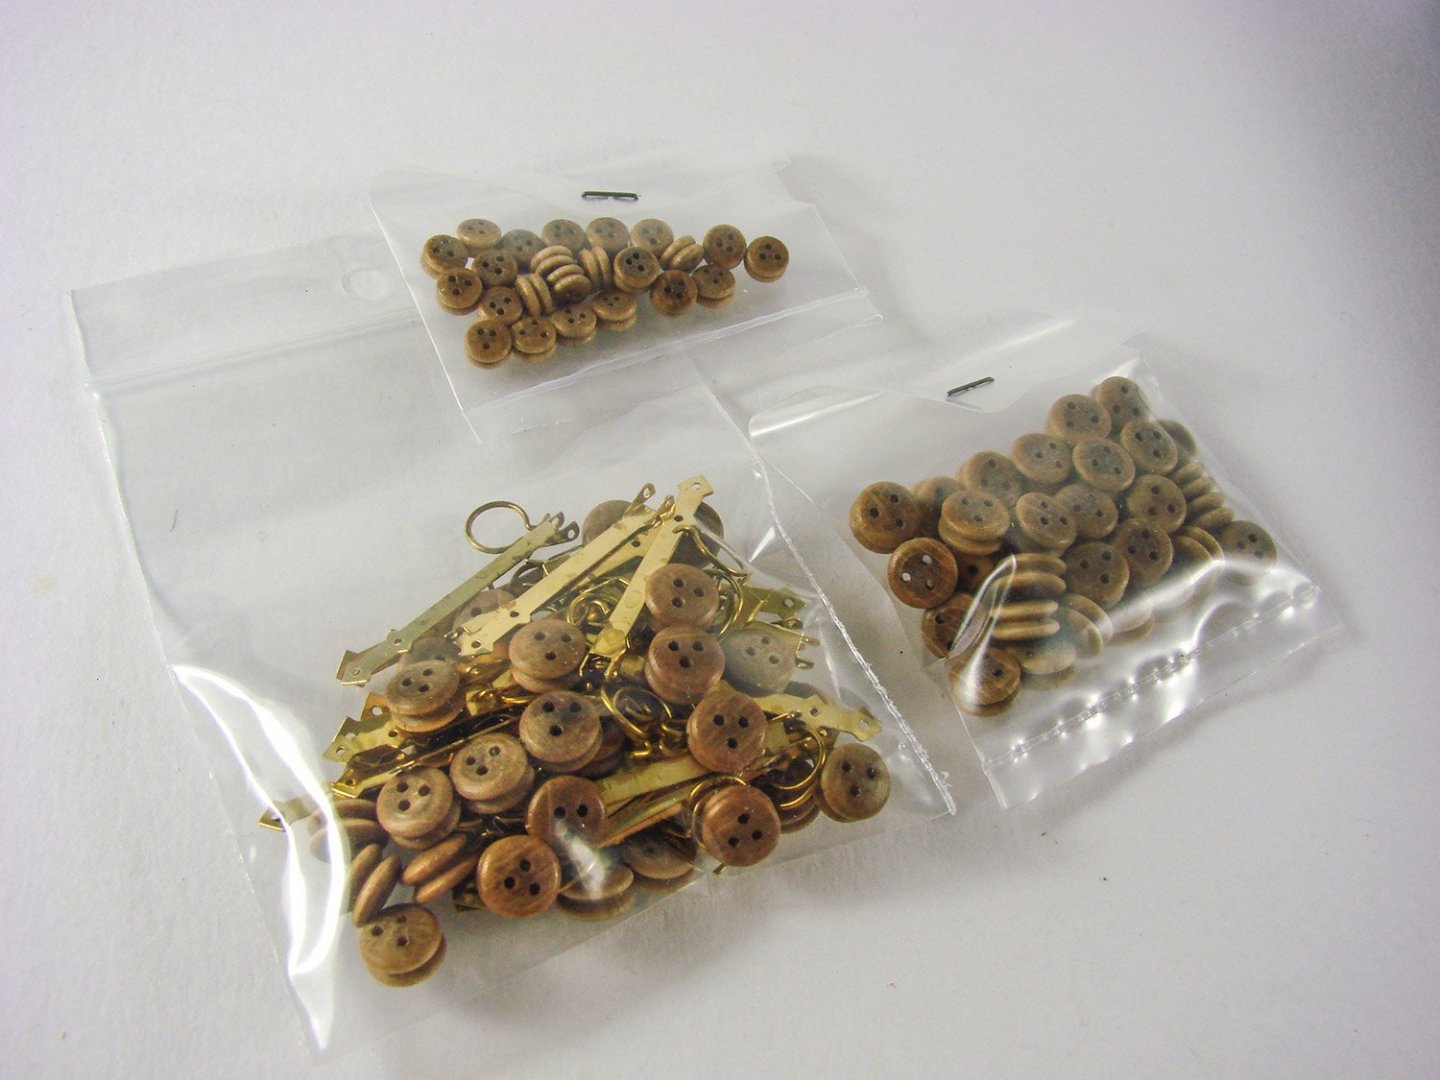
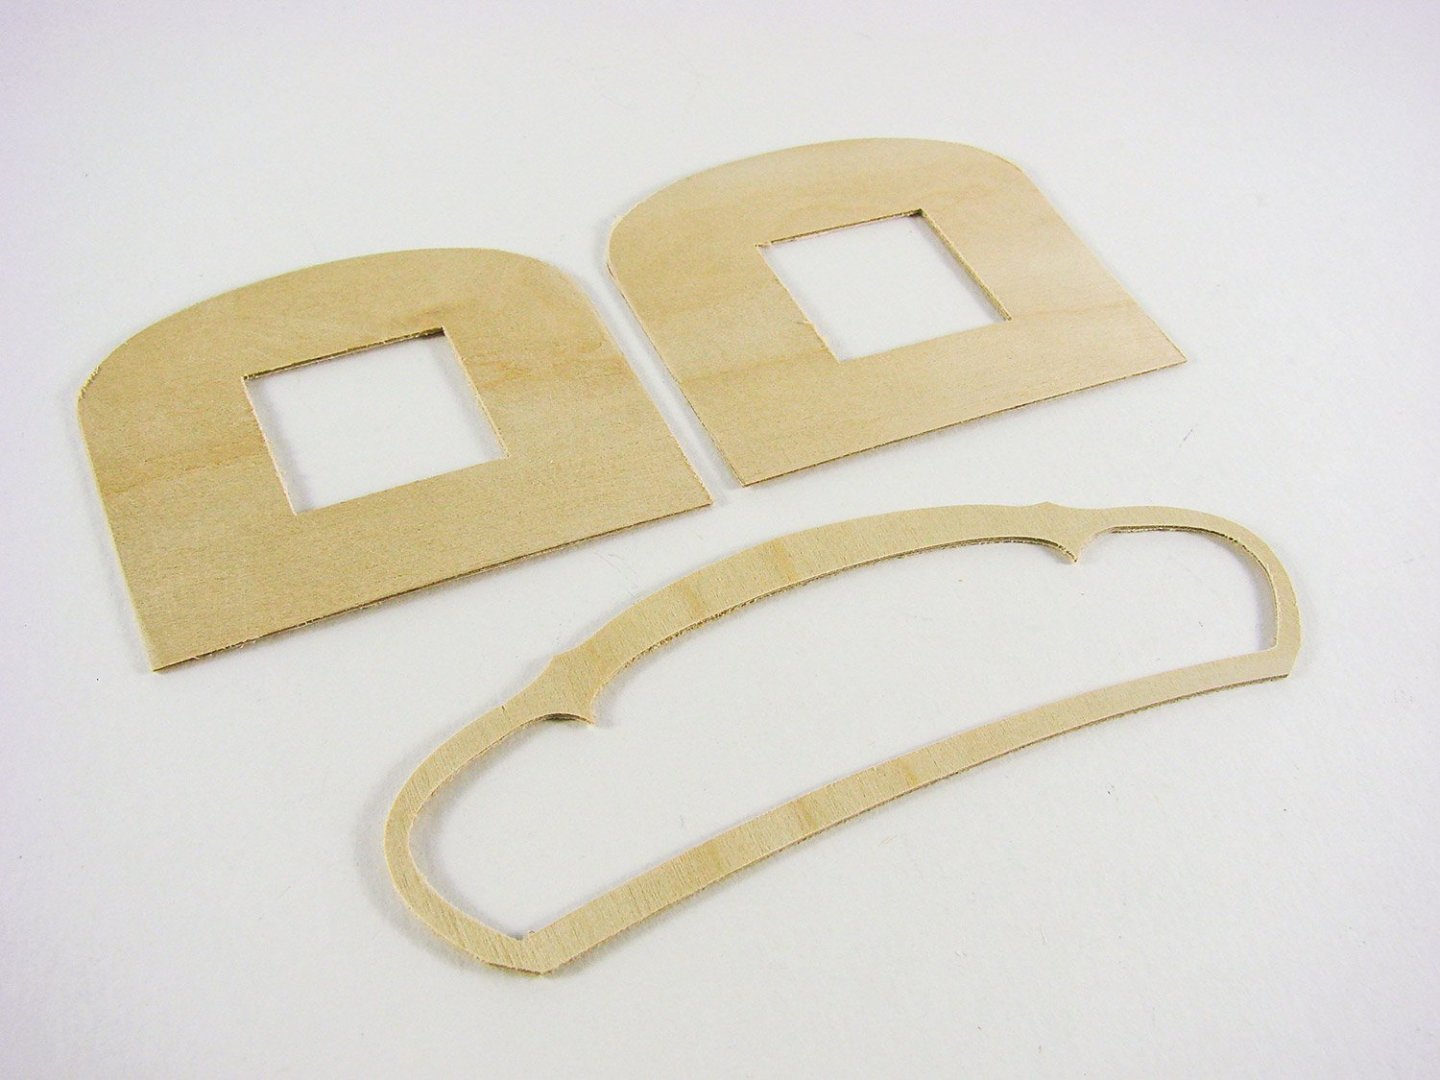
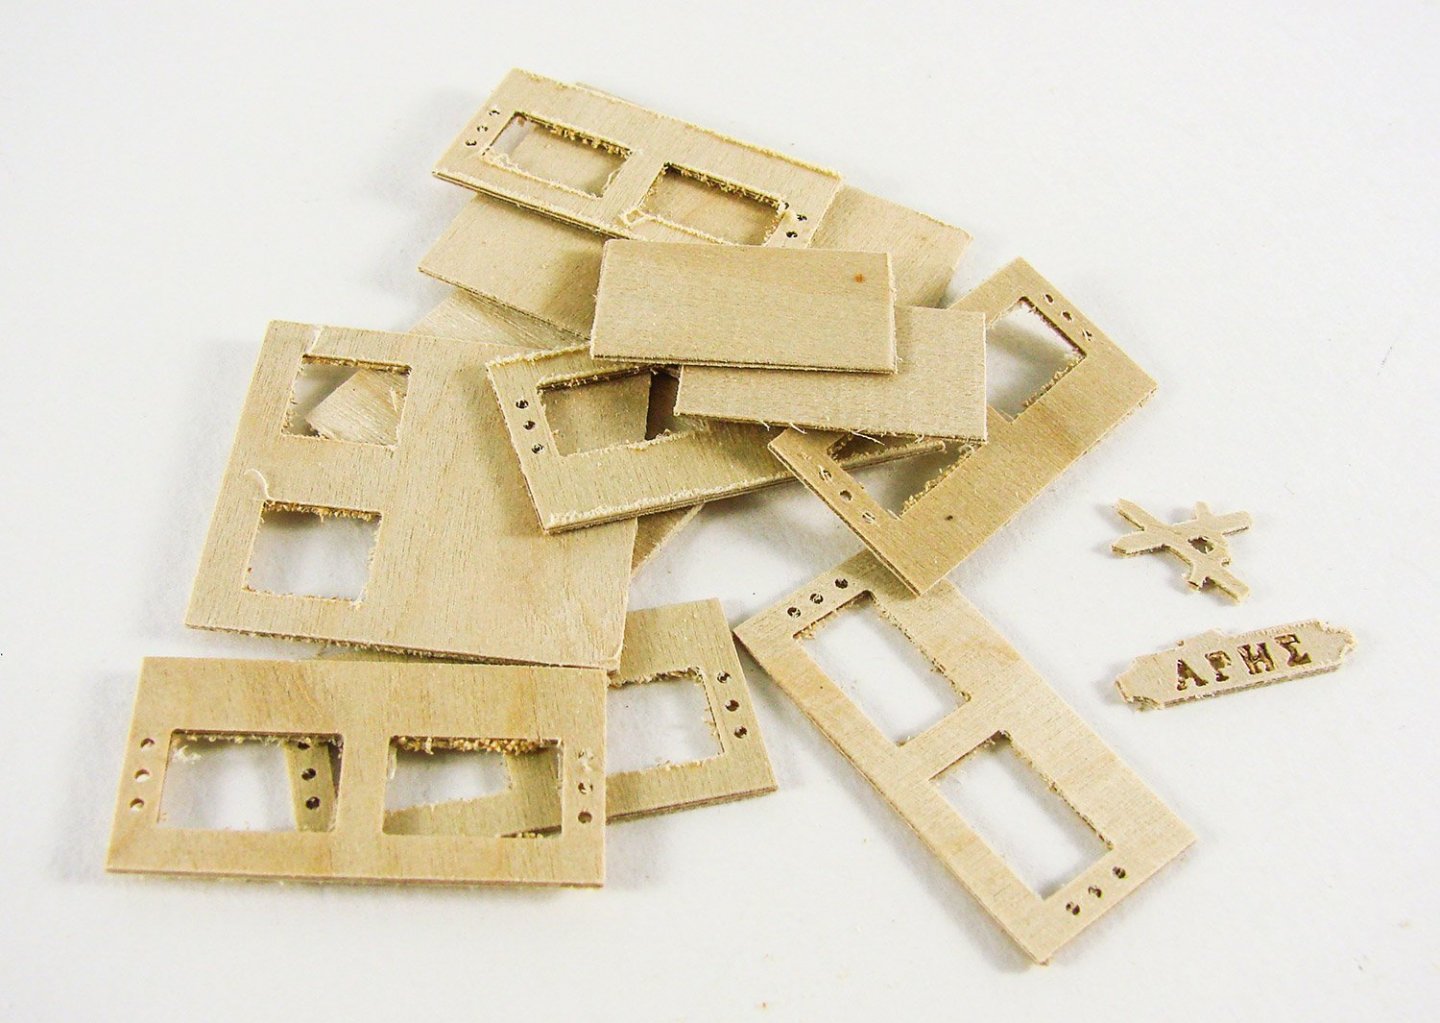
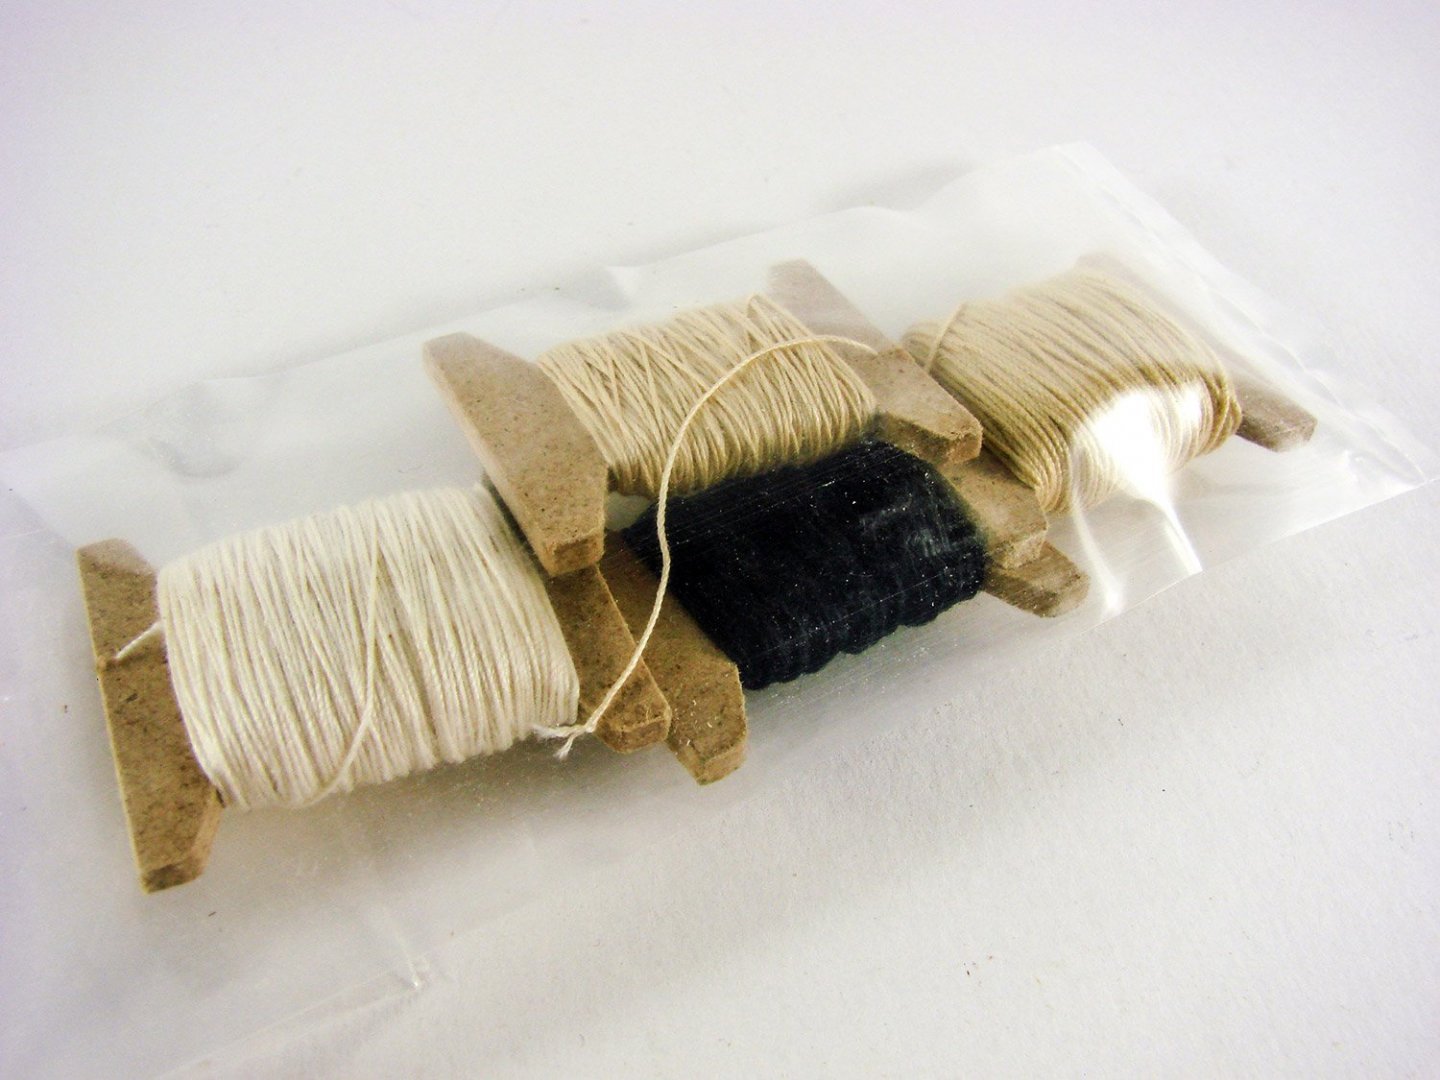
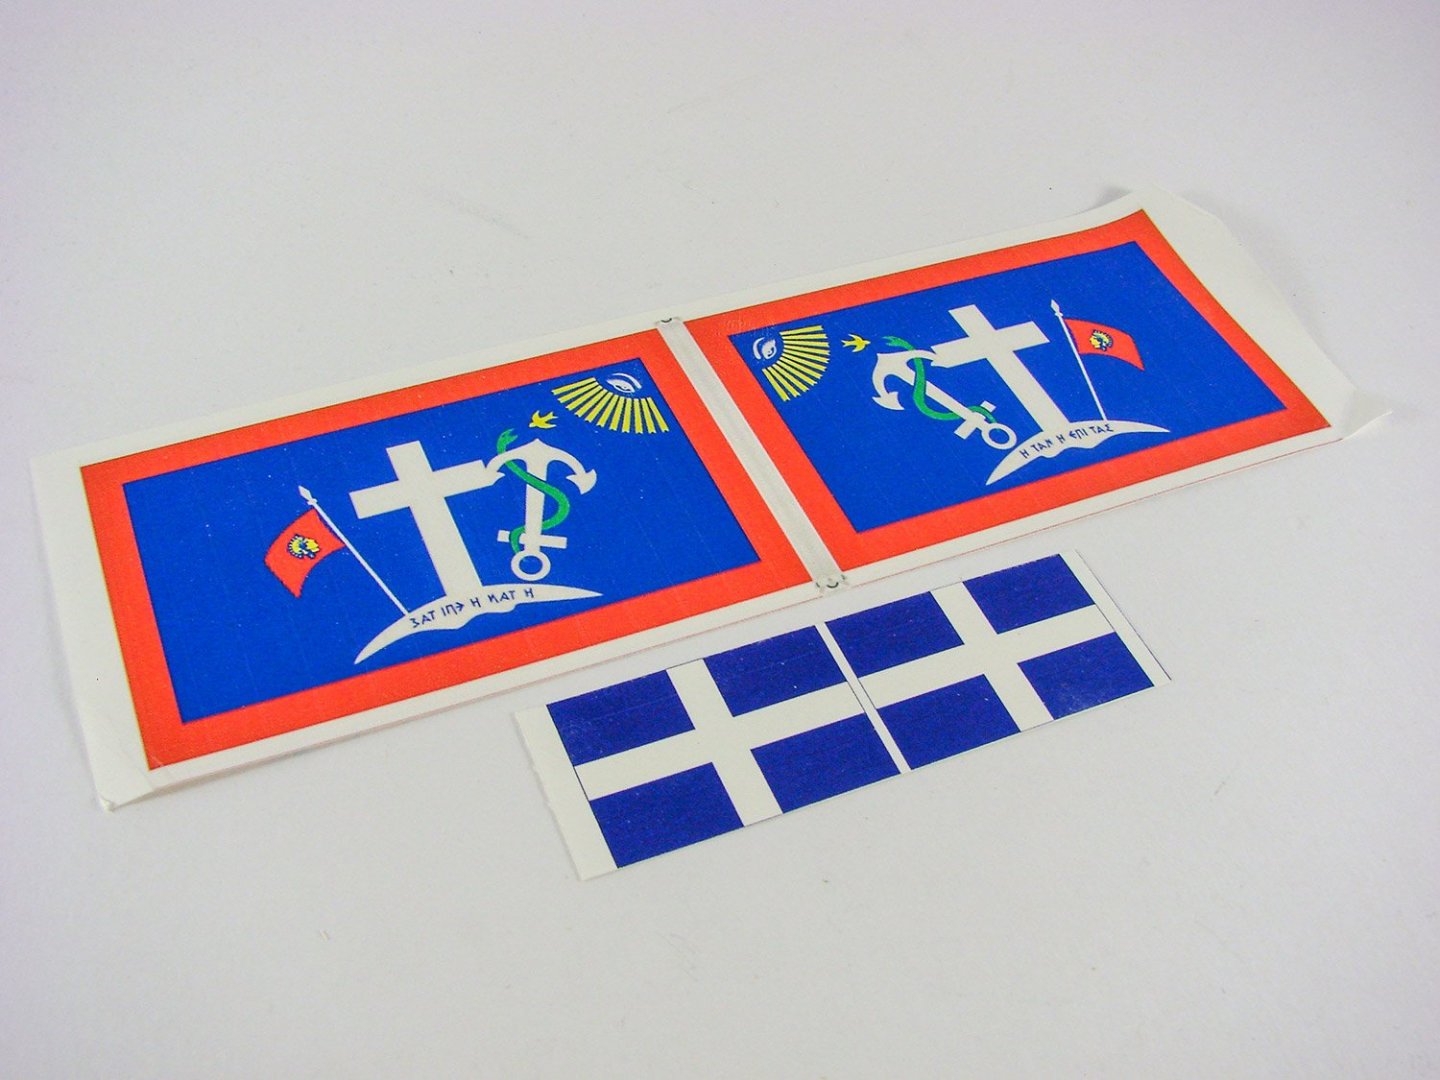
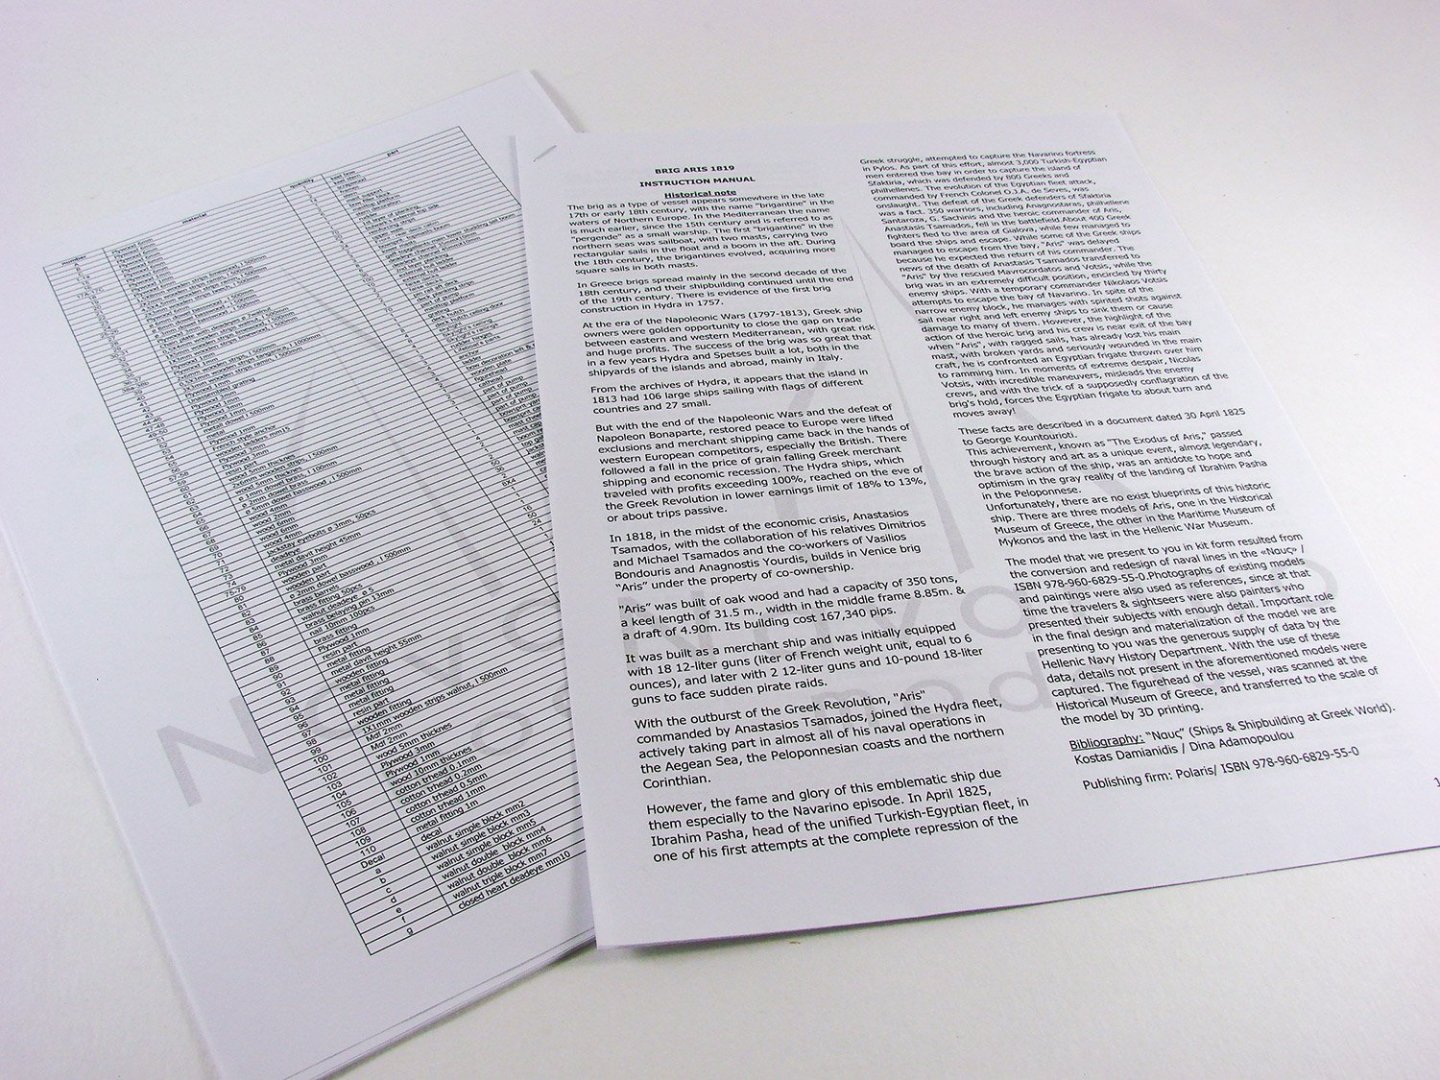
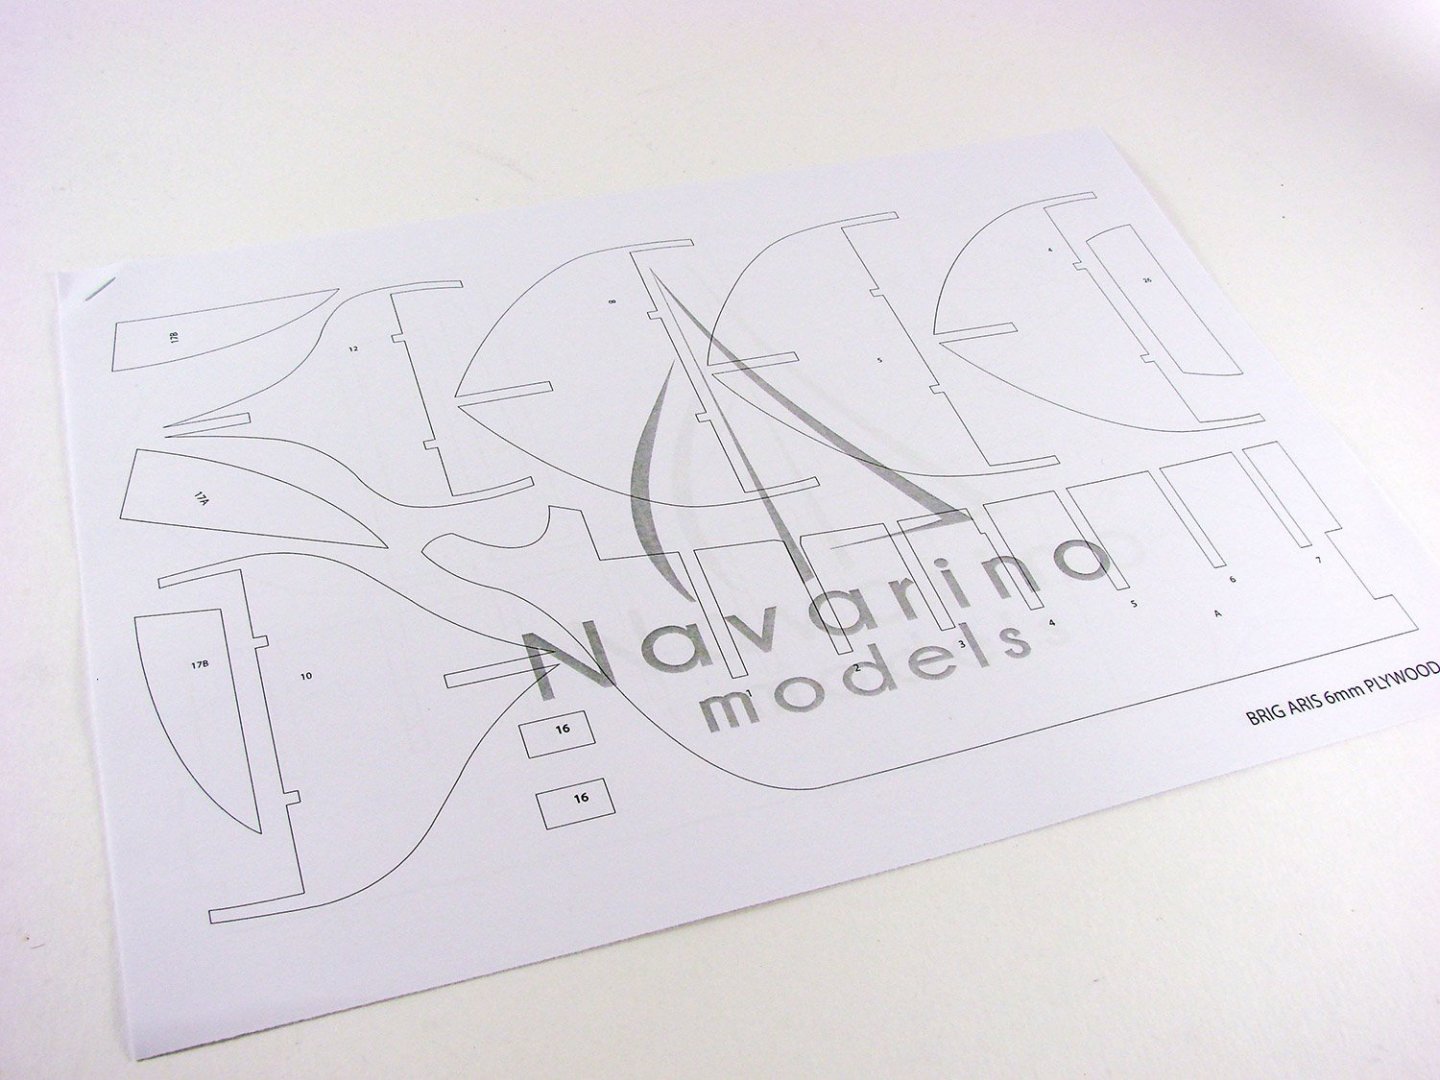
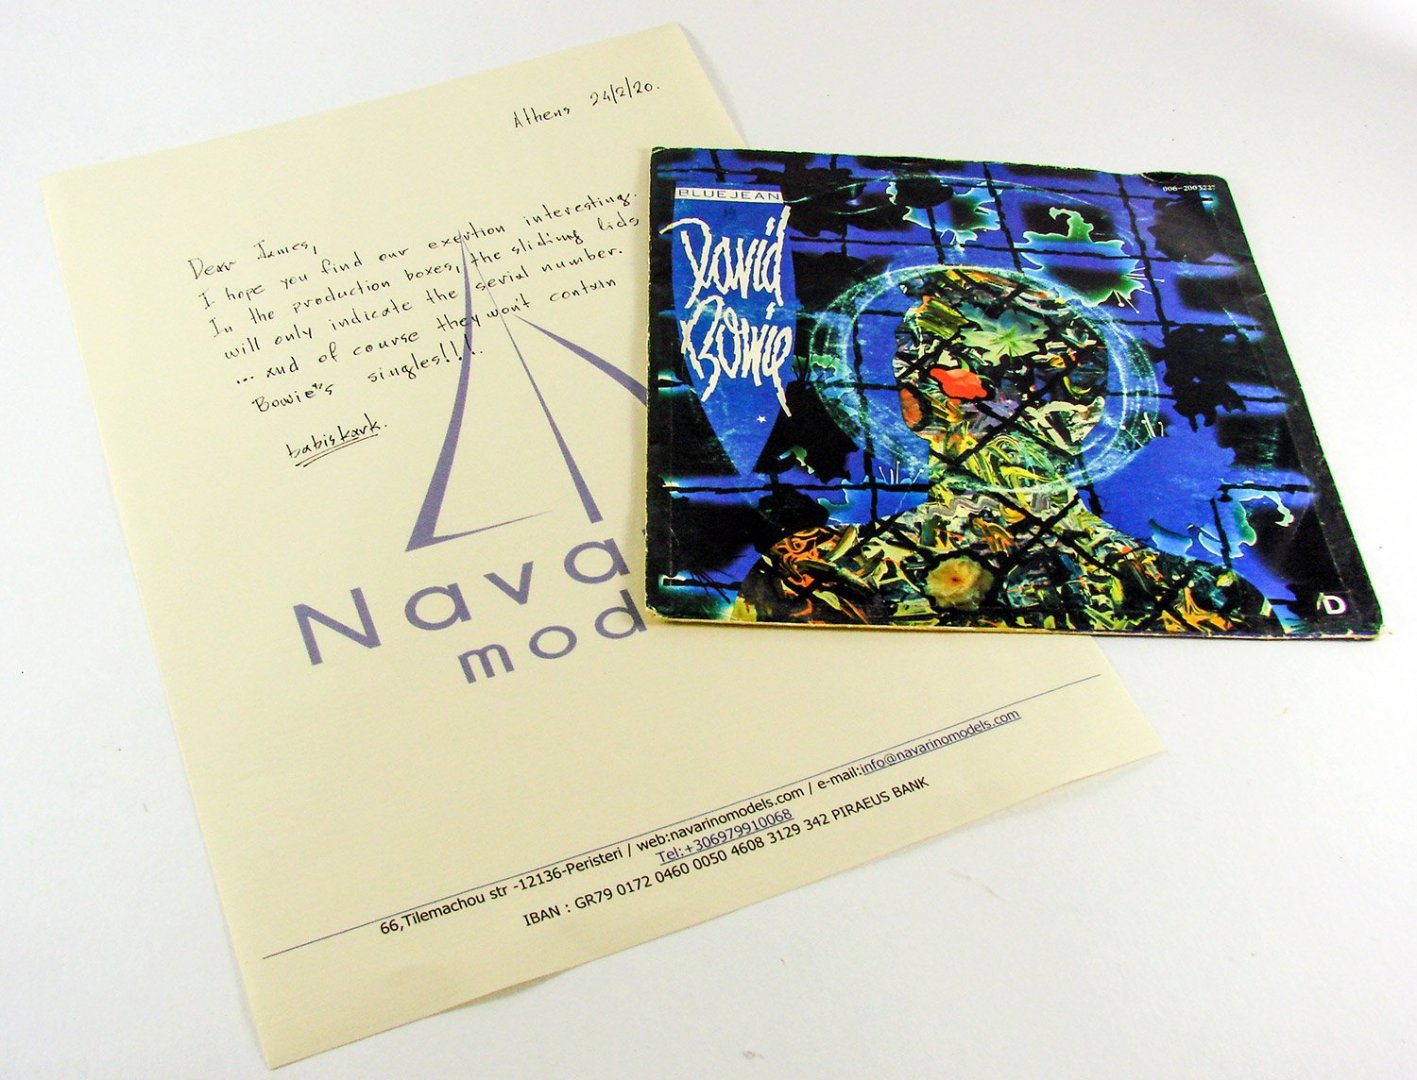
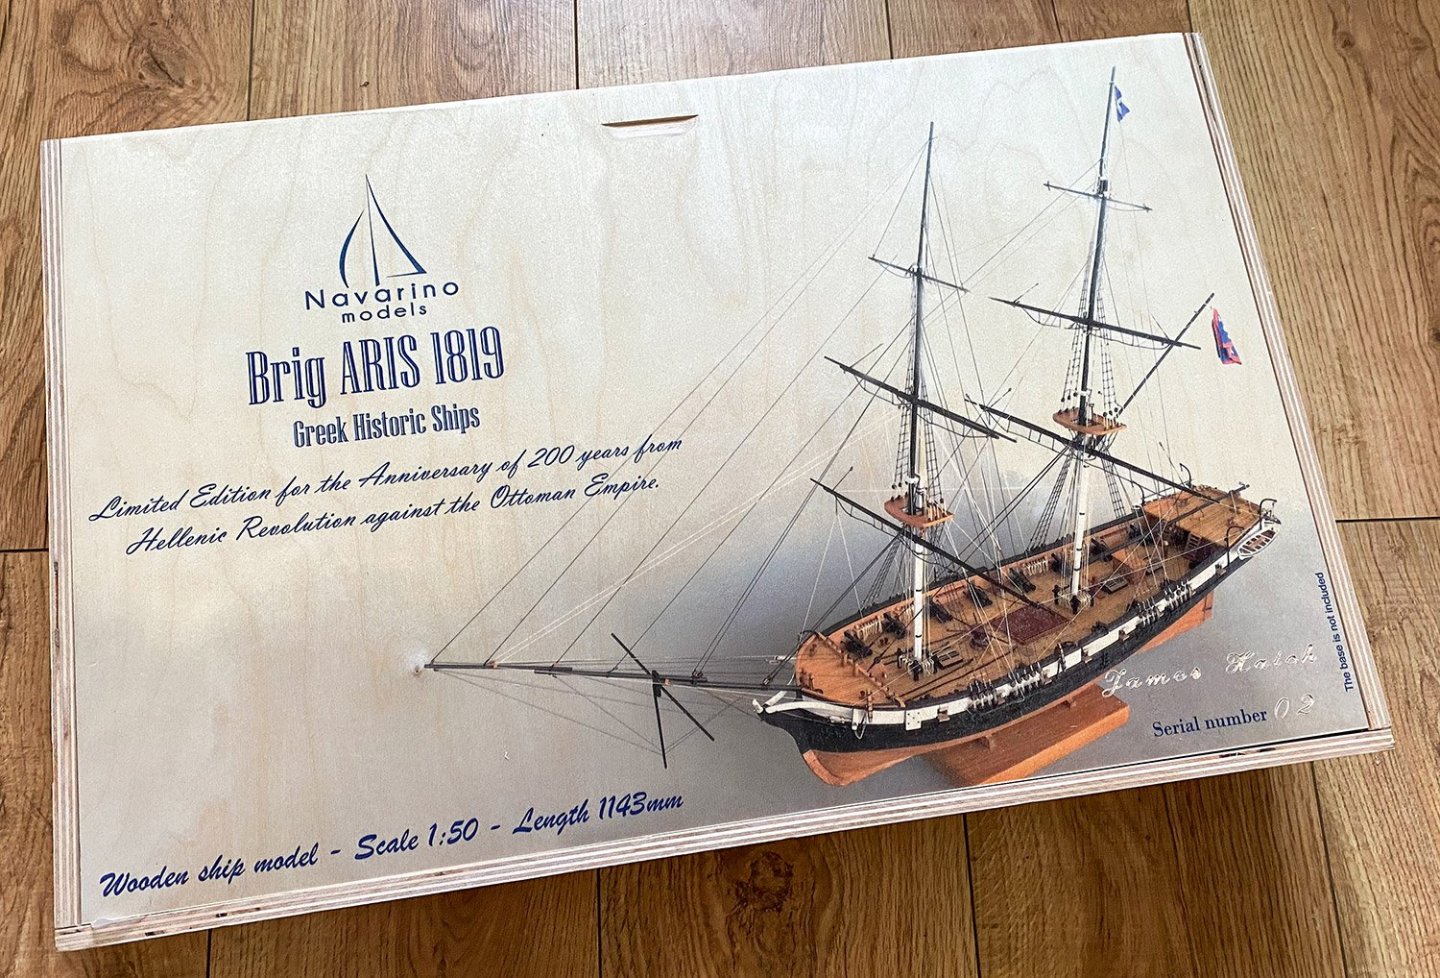
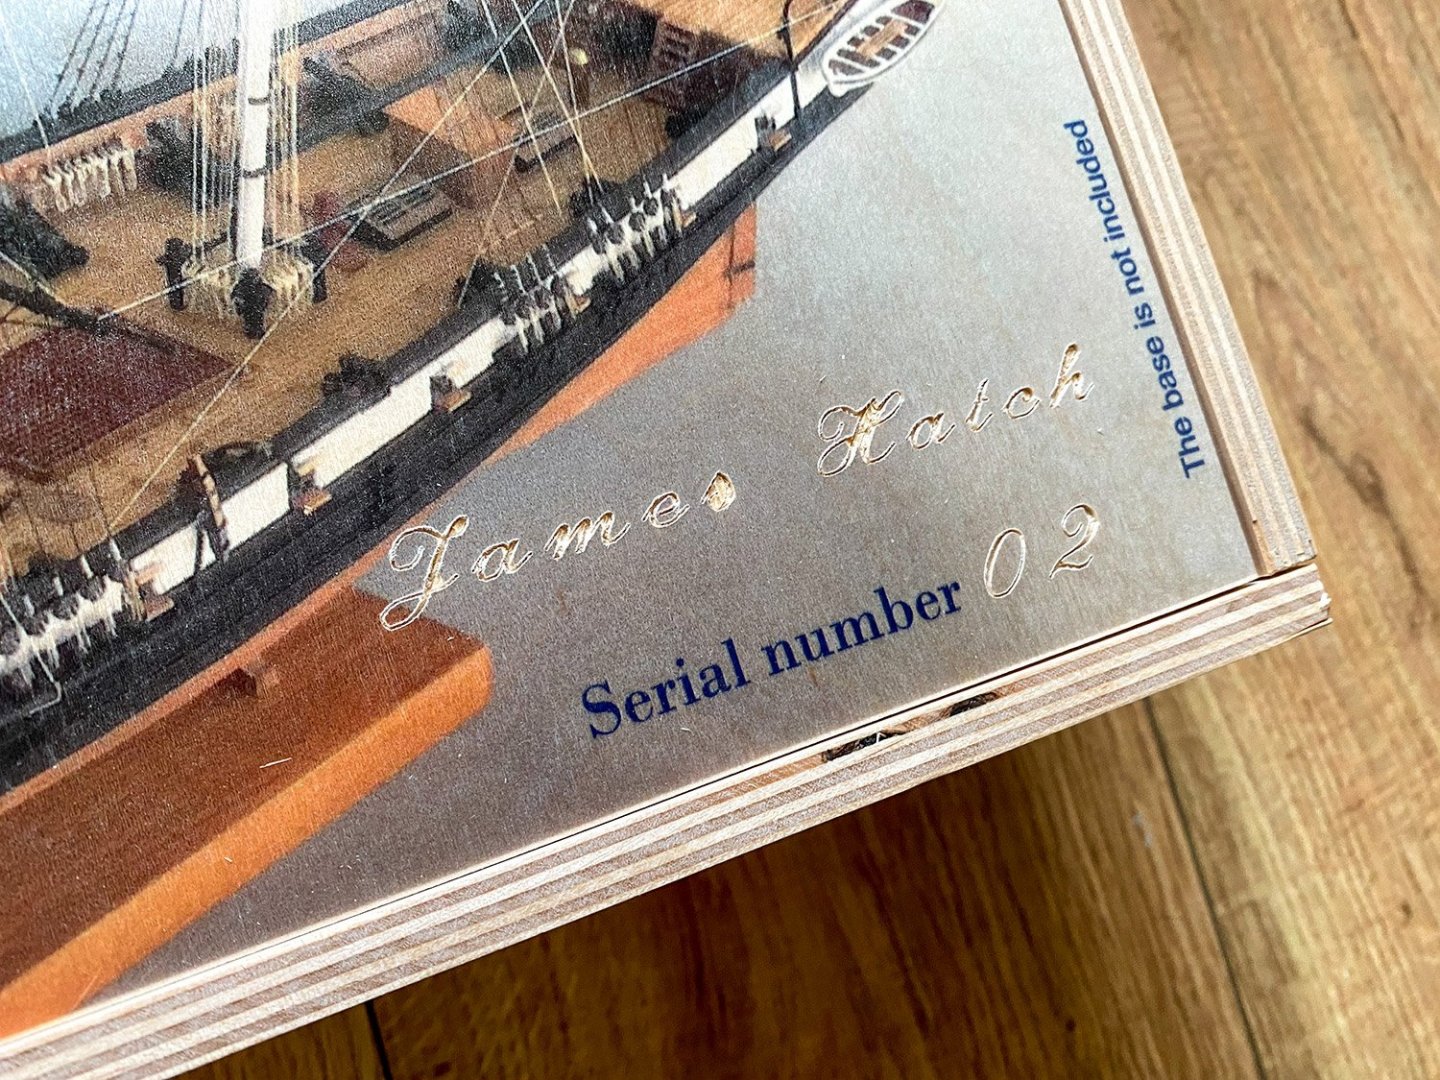
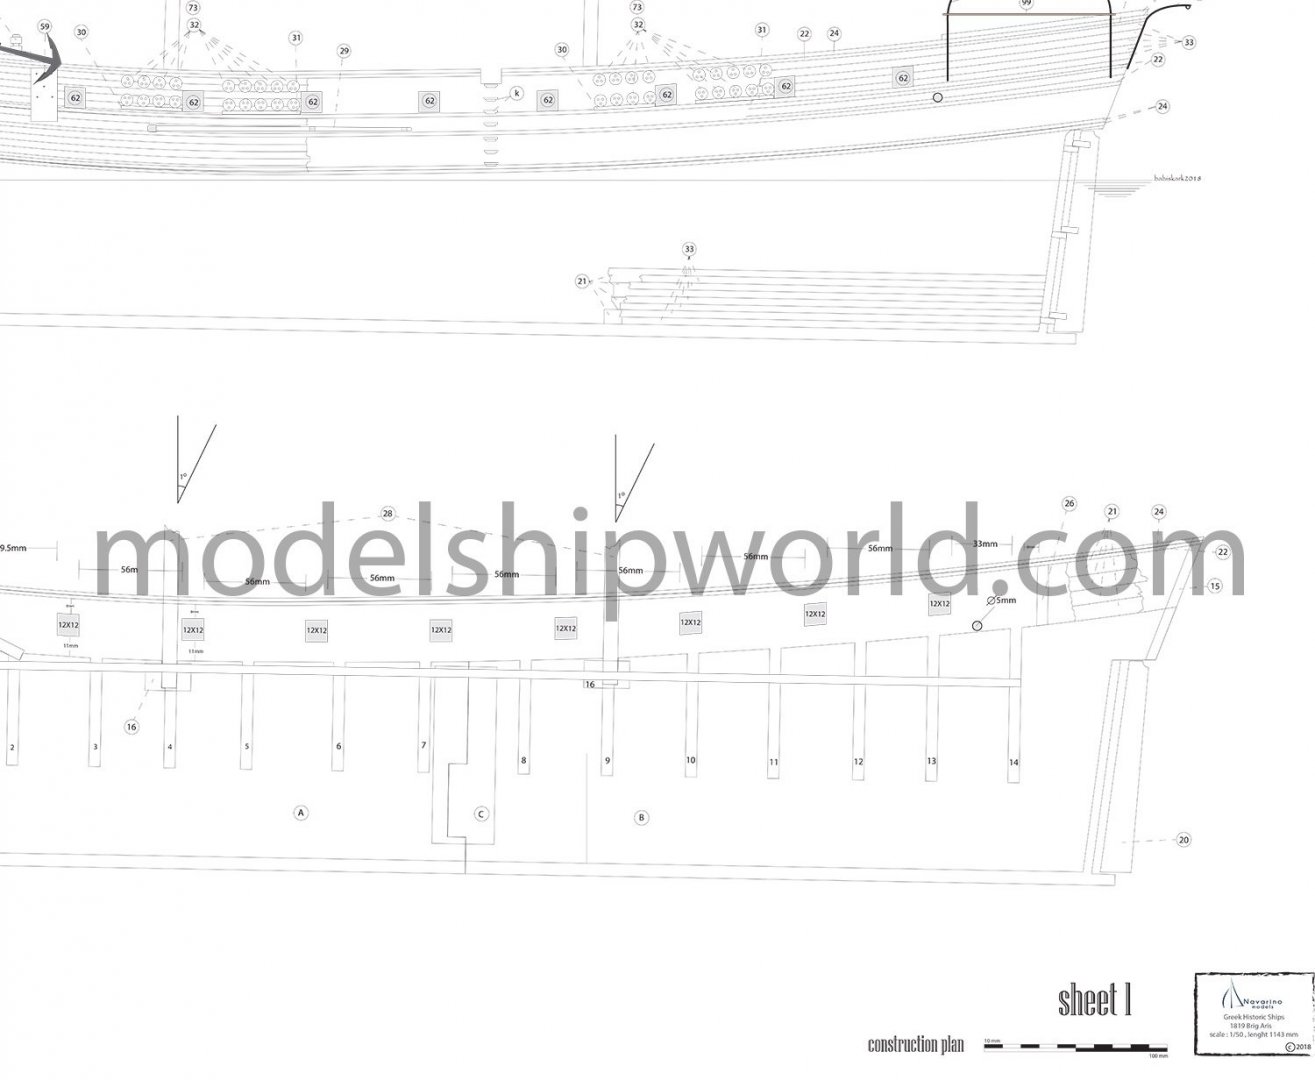
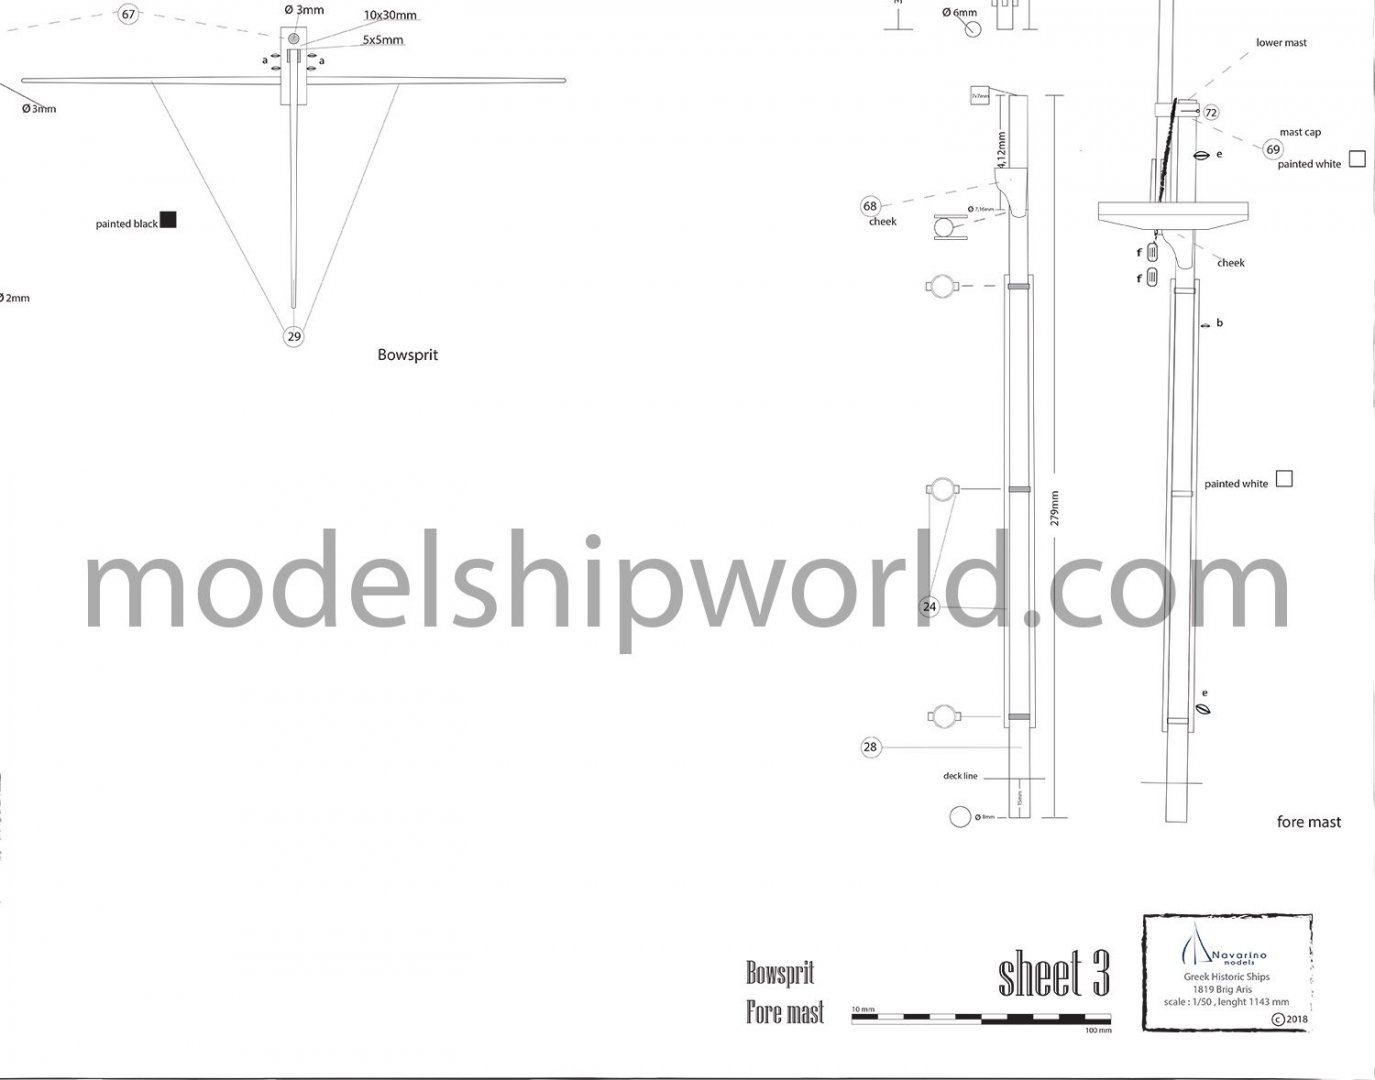
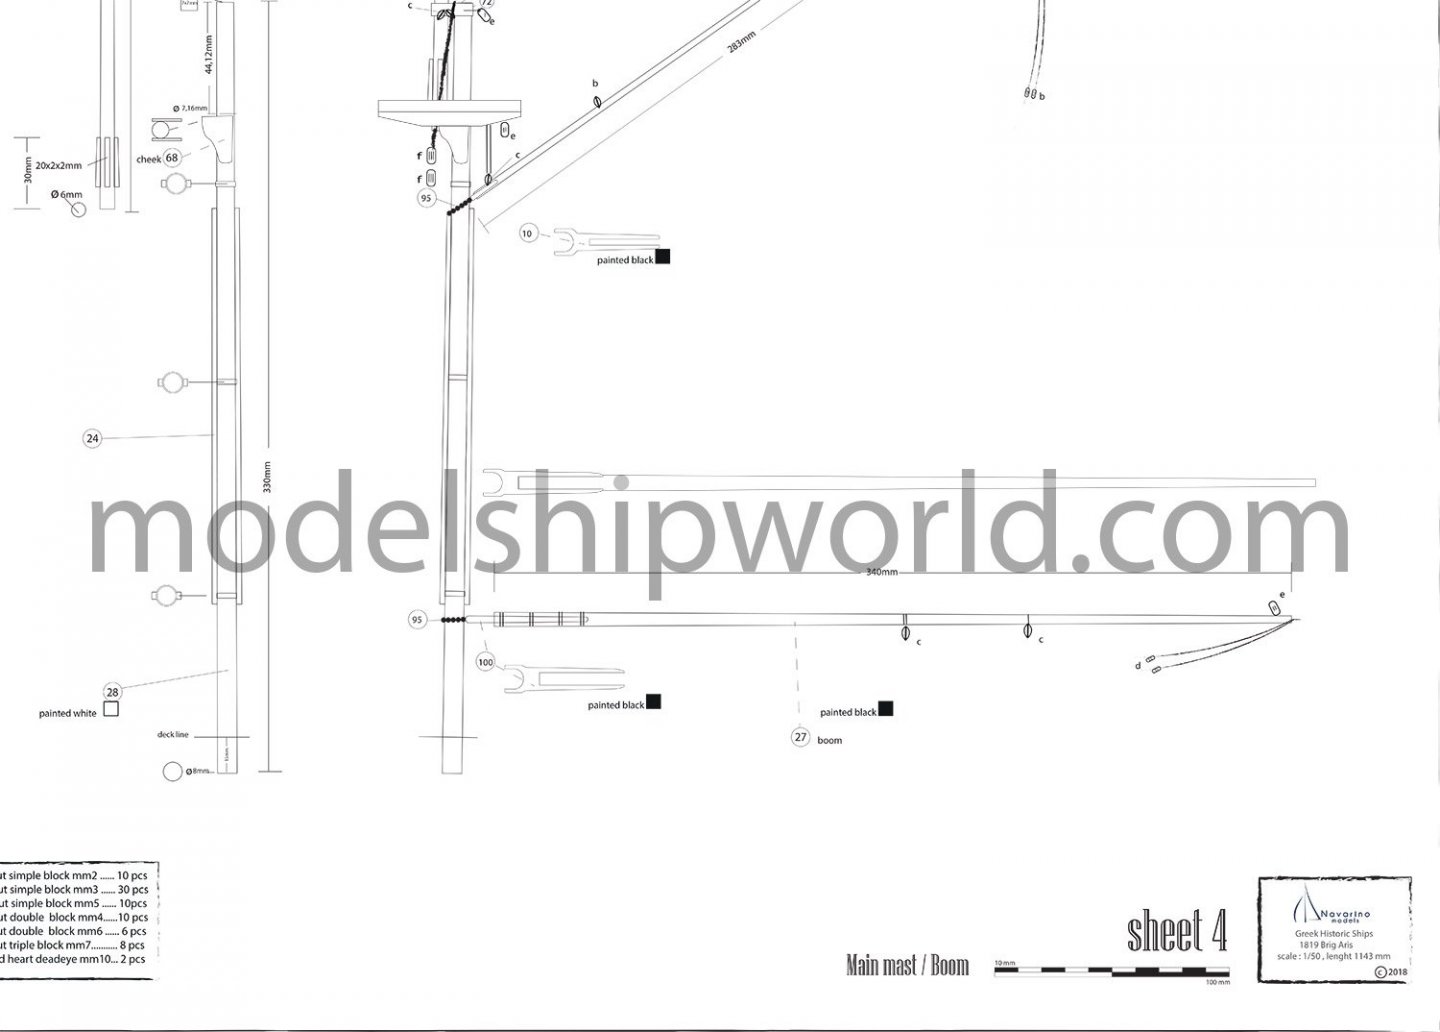
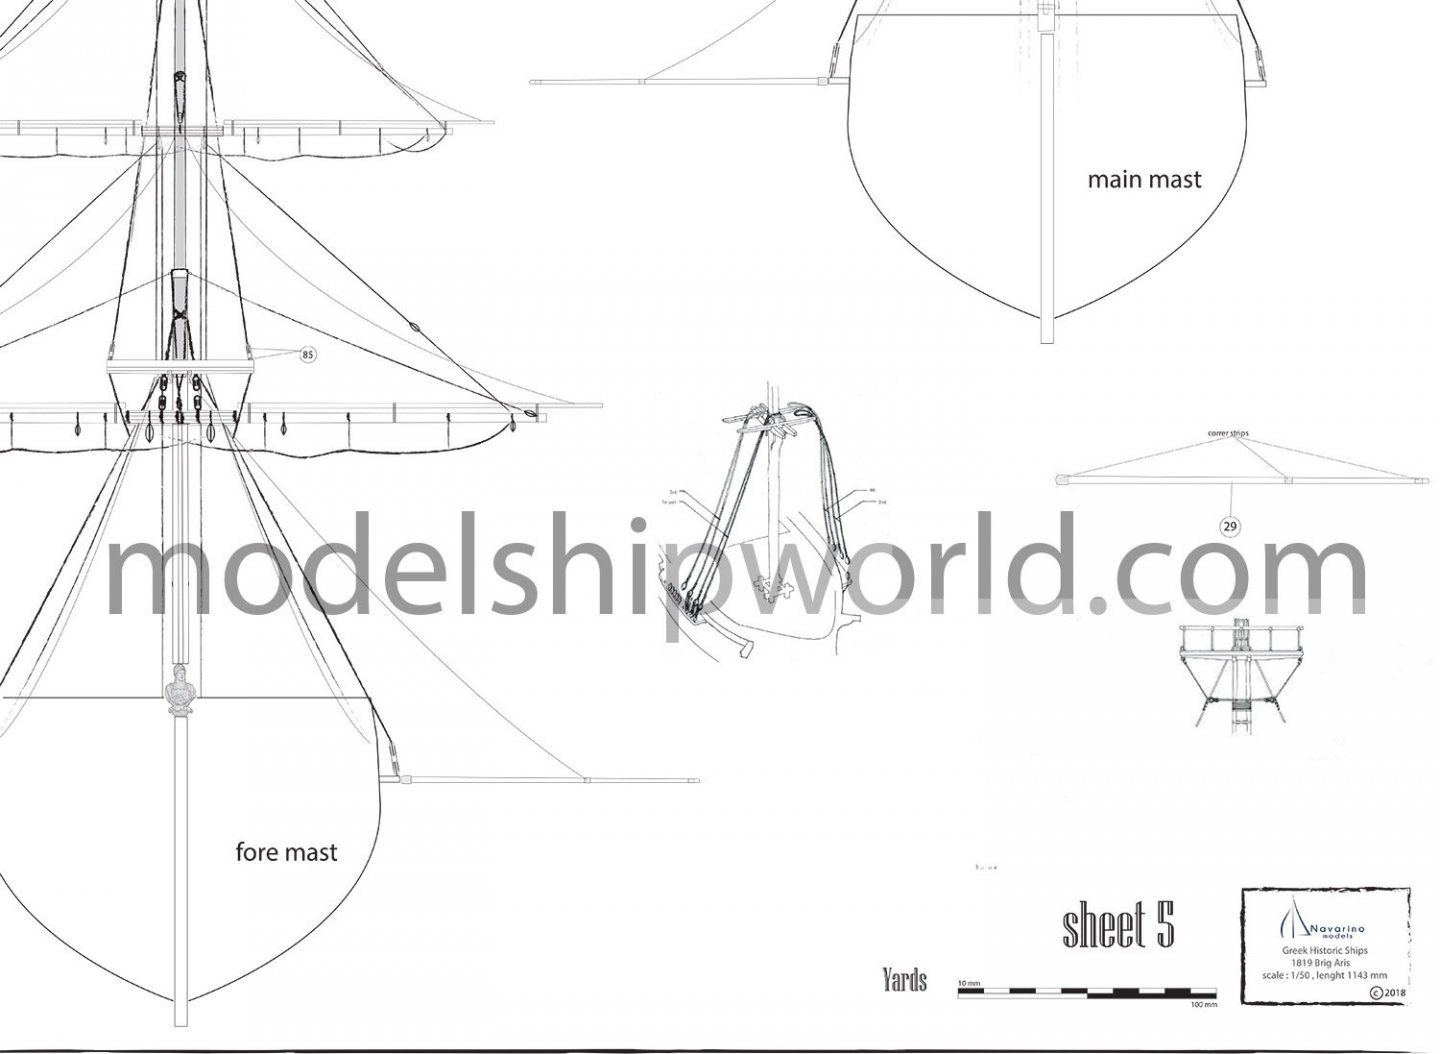
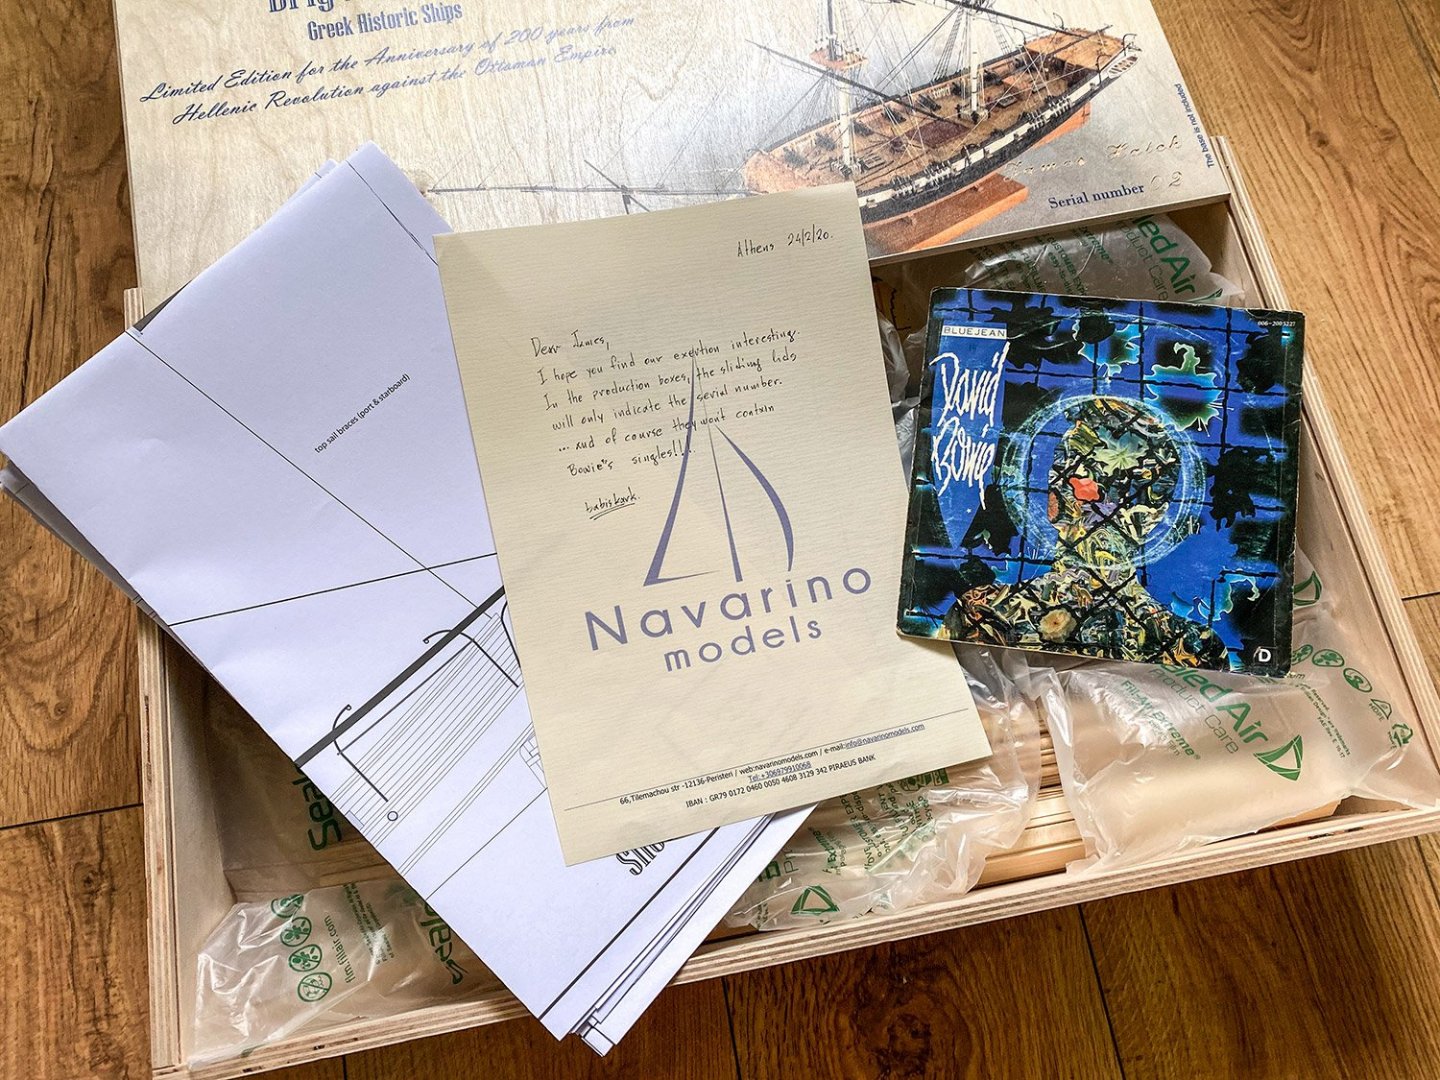
1:50 Brig Aris – Historical Ships range Navarino Models Catalogue # C502 Available from Navarino Models for €549,00 The 350-ton Aris was constructed as a merchant vessel in Venice in 1807. Upon the outbreak of the Greek Revolution in March 1821, her owner, Anastasios Tsamados (1774-1825) from Hydra, armed the ship with 16 12-pounder guns and joined the fleet of his home island. Aris participated in many of the early naval clashes with the Ottoman Navy but became famous after the action fought at Navarino on 8 May [O.S. 26 April] 1825, which became known as the "Sortie of Aris" (Έξοδος του Άρεως). At that time, a Greek garrison was quartered at the island at Sphacteria, which controlled the entrance of the excellent natural harbour of the Bay of Pylos (Navarino). Ibrahim Pasha of Egypt, tasked by the Ottoman sultan to suppress the Greek revolt, needed to take the island in order to use the bay for his own purposes. Aris, along with 5 other brigs, were anchored at Sphacteria when, on the morning of April 26, the combined Ottoman-Egyptian fleet arrived and started its attack on the island, bombarding the Greek positions and disembarking numerous troops. Most captains of the ships were on land, along with part of their crews, who were manning the island's cannons. The other ships sailed before the Ottoman fleet could seal off the bay, and after fighting off the Ottomans, were able to escape. The crew of Aris however still awaited their captain, who had been killed. Instead, Nikolaos Votsis, the captain of the Athena, which had already sailed without him, and Dimitrios Sachtouris, the commander of the Navarino fortress, came aboard, fleeing the advancing Egyptian soldiers. Votsis took over as captain, with Sachtouris as his first mate, and set sail. Also present on the ship was the Secretary of State, Alexandros Mavrokordatos, who was sent to the hold for safety. Aris sailed through the midst of the Turco-Egyptian fleet, being attacked on all sides for several hours and facing in total 32 ships one after another, before reaching the open sea. Casualties among the crew were just two dead and six wounded. After the end of the War of Independence, the ship was bought by the Greek government for the new Royal Hellenic Navy and renamed Athena (Αθηνά). It reverted to its old name in 1879, and was in service, mainly as a training vessel for the Hellenic Naval Academy, until 7 April [O.S. 25 March] 1921, when it was ceremonially sunk off Salamis with full honours on the 100th anniversary of the Greek Revolution. The action, justified on the grounds of the expense involved in the ship's maintenance, caused much criticism at the time from those who favoured her retention as a naval monument. Today, only the ship's figurehead is preserved, at the National Historical Museum of Athens. The kit This is our second Navarino Models review, with me taking a look at their Brockley Combe back in 2018. This time, Navarino have done the subject they always wanted to tackle, and that is a ship that was a belligerent at the battle from which the company named itself. And they’ve not done this by half either, with this release being presented in a high-quality birch ply box with a sliding lid that has a little trough for your finger to gip when you open the lid. The lid is also colour-printed with the box art, and each box is engraved with a serial number. Mine is kit #2! Navarino also asked if I’d like my name engraved, and they did this for me too. Now, this is a HEAVY box, so some care is needed in opening this up to take a look inside. Sliding back that lid uncovers some layers of bubble packing that stop anything rolling around whilst in transit. Hang on a minute...what is this I see? Well, Babis, the owner of Navarino Models obviously spotted my Facebook avatar and knew I was a Bowie fan, so he popped a 7” single in there of Blue Jean! That has surely got to be the most original item I’ve ever received with a kit! The covering letter explains a little too. Ok, back onto the subject. Underneath the protective layers, we have six sheets of plans, some sheets which form the plan identification, and also a set of English language instructions. Remove this and we see two clear plastic trays of fittings, a bag of rigging material, two bags of plywood components, three sheets of 6mm ply parts, two bundles of strip timber, and two large ply deck sections. Before I jump into the contents, here’s a great little video made by Navarino, highlighting their new kit, with some finished images of this famous brig. Suggested Tools Navarino supply the following text to recommend tools for the project, but you may of course have your own alternatives: Pliers, hammer (a small one), saws, chisels, knives, files, drills, electric plank bender or a mini travel iron, rasps (flat & half round), needle threaders, tweezers, rulers, squares, compass, awl, clamps, sanding blocks (small wood blocks, ice cream sticks), sandpaper (aluminium oxide is best), hobby plane, vice, scissors, pins, drills. For painting Again more suggestions from Navarino Models: Colour selection: Initially it is advisable to choose to use model paints on this model. They are produced exclusively for modelling use. The choice of the company is yours. You will also choose whether to be acrylics or enamels. Another alternative is oil painting, but these require more time to dry. Varnishes: These can be applied by brush or spray. Matt or satin or satin are preferable for use, but not gloss as this is more likely to be used on a sailing yacht! Brushes: Use good quality brushes with round, pointed and flat bristles, depending on the surface you are painting. Clean them thoroughly and after a painting session, wash them with a mild detergent to condition them. Main deck sections Two large, thin ply parts, pre-cut to size with CNC, are supplied for the main deck sections. Minimal clean-up is required around the mast positions, to remove a little furriness from the machining process. These deck sections give a pretty good idea about the size of this brig in 1:50, and just how fat she was in the beam. At 1143mm in length, this is definitely a large model when complete. False keel, bulkheads, cheeks etc. Three sheets of high quality 6mm birch ply are included which contain Aris’ main hull construction elements. As with all cutting on this kit, the parts are machined using CNC, and some very minor clean-up of some edges will need to be done with tickling the edges with a sheet of abrasive paper. All machining is excellent, with small tabs (not full sheet depth) that you will cut through to release the parts. Due to the length of the hull, the false keel is provided in two sections. Two stiffening parts are included to encapsulate the joint area and provide extra strength. There is no engraving of part numbers on the sheets, so you will need to refer to the parts maps that is included with the kit’s paperwork. All ply sheets are nice and flat with no visible warpage. Strip wood Two substantial bundles of strip wood are supplied, in 500mm lengths. One bundle contains the lime planking material for the first layer of planking. You are advised to cut these so as to maximise the material usage during planking. All of this is hidden, or course, but you still need a good solid base to work from. A length of brass wire is tucked in there too for later use. A second bundle of the same length contains both strip, and dowel for the masts, yards and bowsprit etc in ramin, and beech for strip and basswood for dowel. You will also see the material for the second planking, and also for deck planking etc. Some of this timber is dark on the end cut, presumably through the machining process. As before, all timber is excellent quality with no fluffy edges or defects to be seen. More ply parts A pack of smaller, CNC-cut birch ply parts is included. Here you will find cannon carriage and wheels, channels, etc. Parts are nicely machined, but some clean-up will be required to remove any fluffy edges from the CNC cutting process. There are also another two packs of thin ply parts. One of these contains the poop and forecastle decks, stern décor trim and parts for the tops. The other pack holds parts exclusively for the three launches, namely the internals, rudders and oars. These are very thin ply and the internals in my kit had broken in almost the same place on the rear third of the part. These are repairable though. These parts will also need some clean-up before they can be used. I think if the ply grain had run the other way, they would perhaps have not broken. Components tray #1 Two blown plastic trays of parts are included in this kit. The first one contains a whole range of detail parts in various materials. Here you will find copper chain, deck grating comb set, boxwood ladder sets, 3D-printed Aris figurehead, hull mounting pedestals (no base included), boxwood capstan, rudder pintles, cast ship’s wheel, three launch boats etc. The latter are realistically thin and made from cream coloured resin. These will need a gentle wash in some soapy water to remove any mould release agents that may be lingering on their surfaces (although mine look very clean). There is a casting block on the lower keel, and this will need to be gently sawn away and cleaned up. This is standard practice for resin. As always, wear a mask when sanding resin parts. The 3D-printed figurehead, created by scanning the surviving one from the real ship, has a series of connection points what will need to be trimmed off and cleaned up. Again, this is normal for such parts. Components tray #2 Another plastic tray chock-full of detail goodies for your model. In here we have numerous packets of rigging blocks and various sized deadeyes with chain plates, launch davits, steel pins for first planking (remember to remove these before sanding!), brass belaying pins (casting point needs removing), turned brass cannon x 16, anchor set with wooden stocks and metal hoops, parral beads, metal cleats, copper eyelets, ships bell etc. Rigging block quality is very good and the drilled holes are nice and clean. Rigging A single pack of rigging cord is included, consisting of two natural threads, one bleached, and one black. These look high quality with no fuzziness present on my example. Flags Two flags are included, printed on paper. Printing quality is very good. You will need to possibly dampen these when assembled and form them into a natural sag that you would expect to see. Paperwork Several sheets of A4 paper are included, listing all of the kit parts by name and quantity included. More paper is supplied, forming the kit’s written instruction manual. No photos are given here, but they are unnecessary anyway as all illustration regarding assembly details, are supplied on the plan set. The English is clear and easy to understand. Plans SIX sheets of plans are included, printed at 1:1 so you can take measurements straight from them. Sheet 1 shows two profiles of the hull in profile form, depicting skeletal structure and illustrations showing the double-plank nature of the hull. Measurements are also supplied for gun port spacings etc. A very clear, easy to understand drawing. Sheet 2 shows the model in plan elevation with a montage of small illustrations depicting construction and details. Easy part number reference is supplied for various fittings. Sheet 3 & 4 concern the construction of the masts and bowsprit Sheet 5 illustrates yard construction and some elements of rigging, whilst the last sheet is purely for rigging. Conclusion This is an ambitious project for Navarino Models and is the first fighting ship of this period that they now have on their catalogue. For a Greek, and a ship enthusiast, it was a subject that Navarino’s owner, Babis, simply couldn’t ignore, and he’s done a wonderful job of recreating it in 1:50 for us. The whole package is a delight to see, from the quite extravagant but unique packaging, through to the use of the more expensive birch play for parts. Strip wood is also high quality and the fittings are well above average too. The only small niggle for me is perhaps the use of ply on the gun carts and channels, instead of solid wood, and the timber boats parts need some clean up. It’s by no means a deal breaker at all though as this is a well thought out release of a subject that I’ve never seen in kit form before. This is a bonny brig and quite a size when built too. If either historically significant vessels or Mediterranean ships are your thing, then give this kit a look over! Definitely a very different subject to tackle. My sincere thanks to Navarino Models for the kit you see reviewed here for Model Ship World. To purchase directly, click the link at the top of this article.


-
ICM 1/48 Spitfire MkIX Scrapped.
James H replied to Old Collingwood's topic in Non-ship/categorised builds
It's a wonderful kit. You'll enjoy it. -
ICM 1/48 Spitfire MkIX Scrapped.
James H replied to Old Collingwood's topic in Non-ship/categorised builds
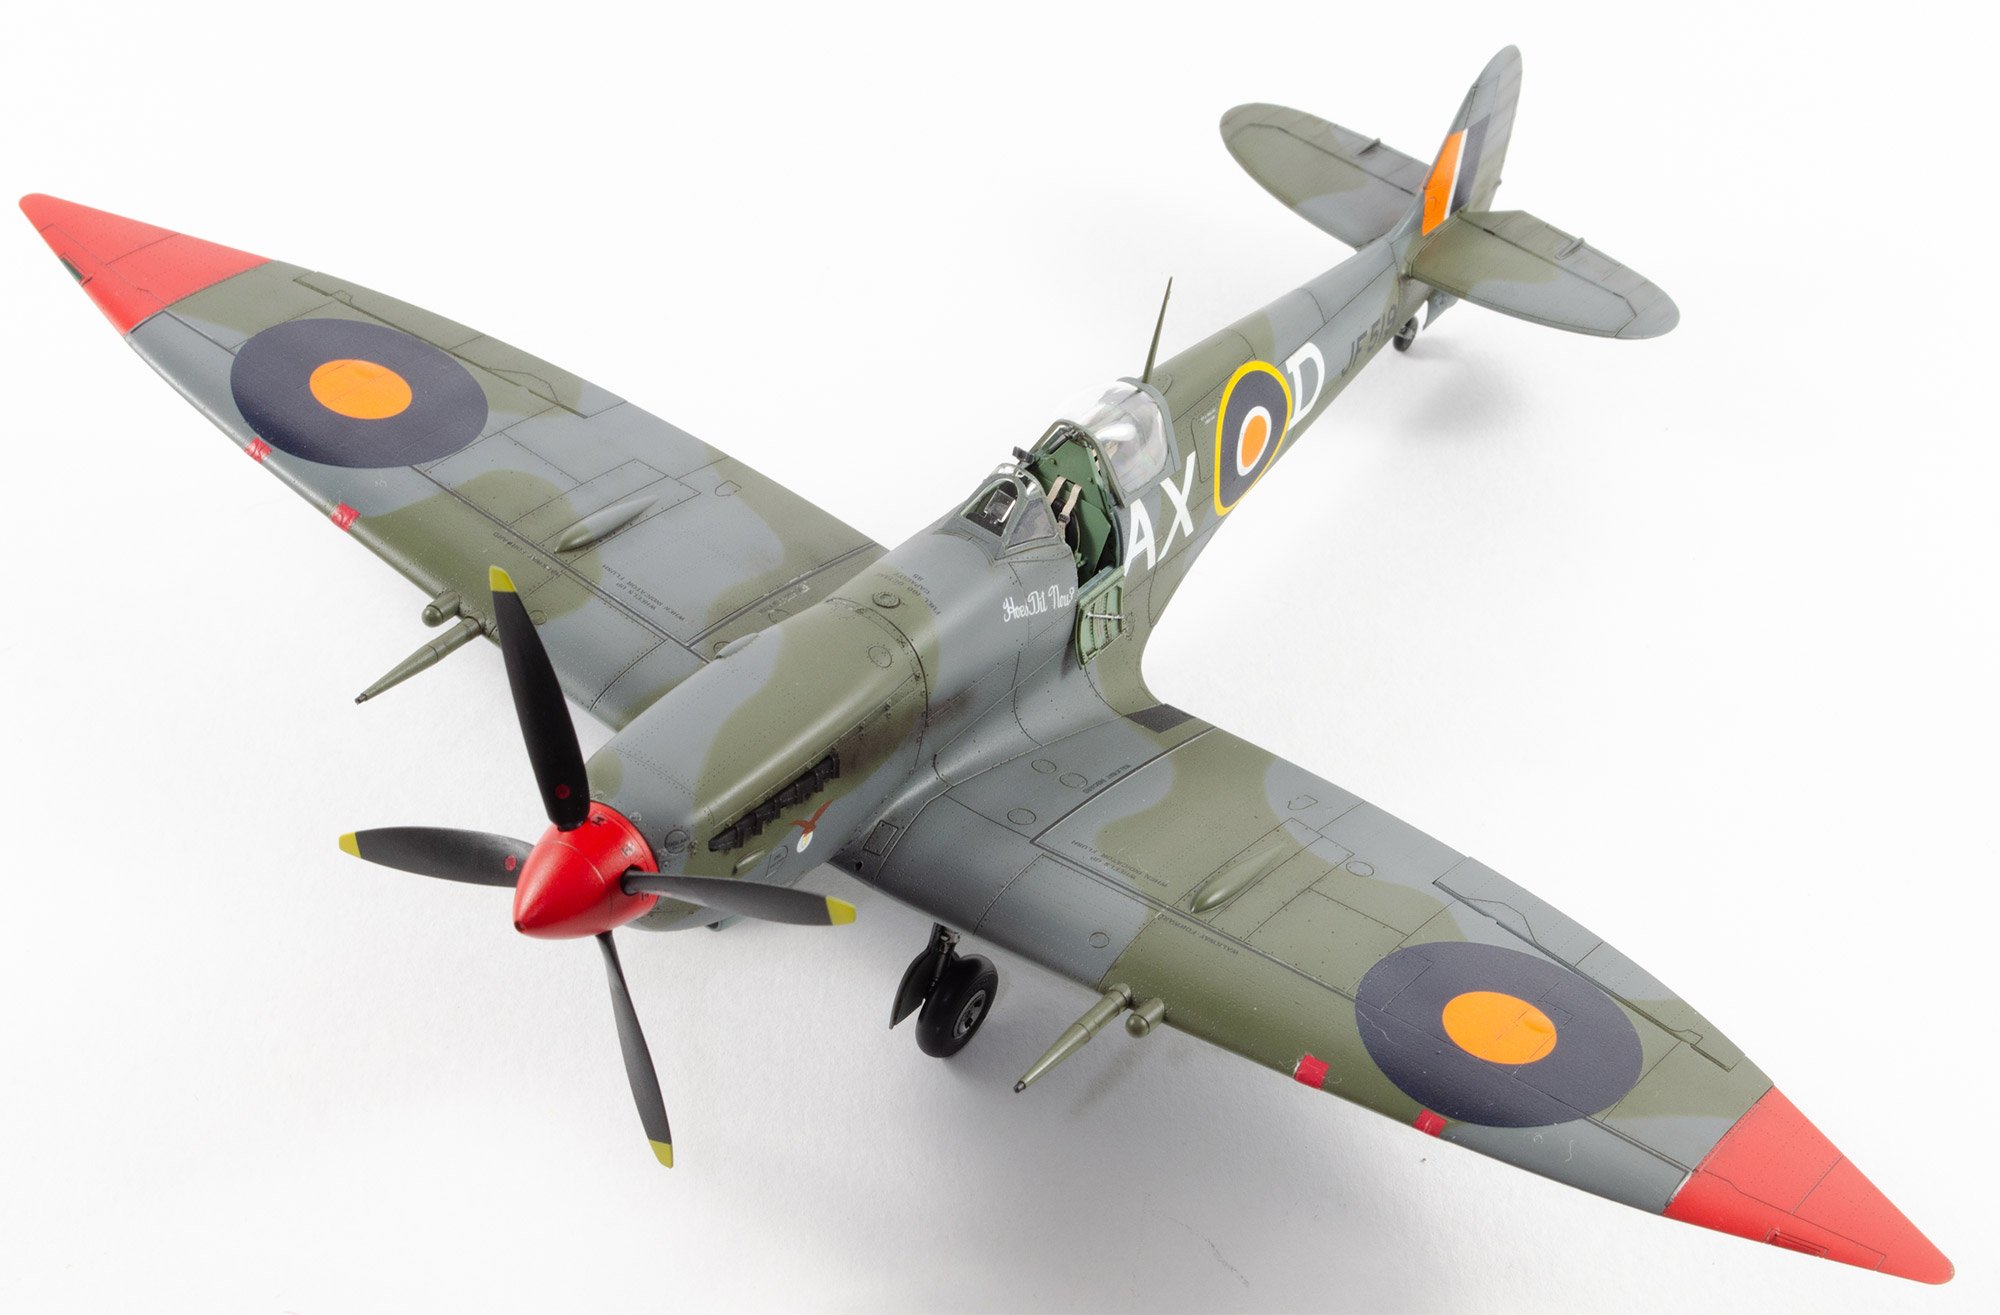
Eduard's own Spit kit range is superb, and of course, their PE and resin is designed alongside it and needs (relatively) minimal surgery to add it. As you have now abandoned this one, I'll show you an image of the Eduard Mk.VIIIHF I built with a resin cockpit etc. No engine of course, but I have built one previously, and know they fit superbly.
-
I've loved your work since San Felipe. This is just beautiful.
- 122 replies
-
- 1
-
-
- caldercraft
- agamemnon
- (and 1 more)
-
HMS Terror by Mish - OcCre - 1:65
James H replied to Mish's topic in - Kit build logs for subjects built from 1801 - 1850
Looking real good. Just take that planking nice and slow. -
HMS FLY by cafmodel - 1/48
James H replied to cafmodel's topic in - Build logs for subjects built 1751 - 1800
Those look great. Will the whole kit be boxwood? -
Hobbyzone building slip for wooden ship models
James H replied to aydingocer's topic in Modeling tools and Workshop Equipment
Welcome to MSW. Are you dealing directly with Poland or the US stockist? -
1:48 Seaman
James H replied to cafmodel's topic in CAD and 3D Modelling/Drafting Plans with Software
Those look superb. I just wish my painting skills could match that standard of figure. -
If you want some top quality scale measurement tools, check these out: http://www.radubstore.com/index.php?main_page=index&cPath=77_111&zenid=8d43037bafaea0b8b78286ade4153cc9
-
Remember, particulates aren't generally the worst offender. You need to look at fumes. Not all acrylic paints are created equal. The carrier substrate can be a factor on how you should tackle exhaust materials. Some acrylics have a water base, but some have a lacquer base. In any respect, you don't want to breathe any of this crap in. At the very least, use a face mask with an active carbon filter cartridge. You get one set of lungs. Don't risk them.
-
HMS FLY by cafmodel - 1/48
James H replied to cafmodel's topic in - Build logs for subjects built 1751 - 1800
Some nice, clean machining there, Tom. I'd love to see more of this. -
No, what I'm simply saying is that when you want to insert a photo within your post/topic, and definitely within your build logs, it just makes more sense to attach/upload them when you are making your post. It's easier than using third-party hosting sites. This topic isn't referencing use of other images and whether you have the right to use them. That is an entirely different subject and we have other topics here discussing that. This isn't a thread about copyright.
-
Welcome to MSW. I have total admiration for anyone who can build these in plastic and realistically finishing them. Some real skills there. Hope you'll share some of your stuff with us and perhaps open a build log too?
-
Hello Algirdas, Great to have you with us, and that is a beautiful finished model! Do you have some photos you can share of it? Maybe in a build log here?
-
Revenge 1577 by Asat - Amati - 1/64
James H replied to ASAT's topic in - Kit build logs for subjects built from 1501 - 1750
Your maple deck planking looks immaculate. I really do like that very much, and those hatch coamings really set it off nicely. I'll be following this one. -
You're off to a very good start, and of course, learning. You'll never stop learning. Those are very nice kits too. I reviewed them here on MSW. Your work is looking very good. Look forward to seeing the first planking layer sanded down.
-
That's correct! Dead simple to use. Easier than copy/pasting links from 3rd-party hosting sites.
-
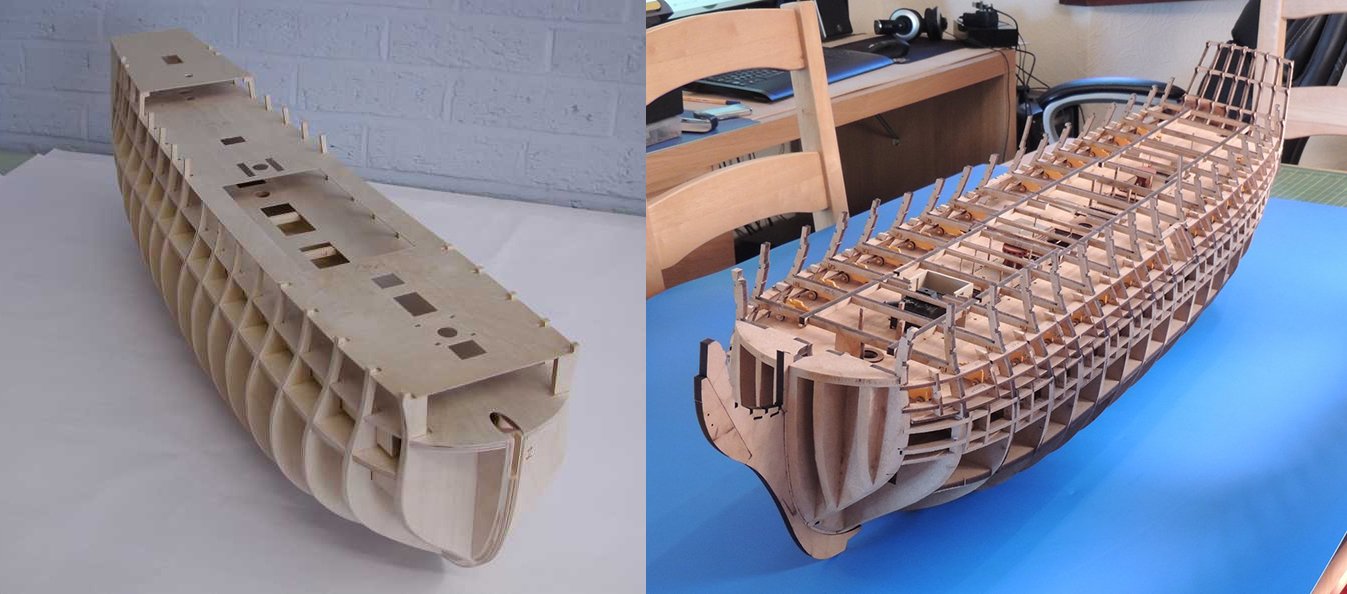
It does look pretty impressive. I still can't believe the design of the new kit with cannon ports built into the frames, so no worry about alignment. This is the Facebook group I help to run: https://www.facebook.com/groups/amativictory/ Also, look at these two hulls. Both designed by the same guy (Chris), but over a decade apart. On the left is his 1:72 Victory from Caldercraft, and the right is the 1:64 Amati. The Caldercraft kit is just stunning, so I can't wait to see the Amati when it soon lands here.