


TBlack
-
Posts
1,305 -
Joined
-
Last visited
Content Type
Profiles
Forums
Gallery
Events
Everything posted by TBlack
-
 I believe Greg has used mica on his model. Thoughts? Tom
 -
Keith, I thought I would leave them as they are. This is a pretty simple craft without much embellishment, like Fair American?
- 341 replies
-
- 3
-

-
- Sophie
- Vanguard Models
- (and 1 more)
-
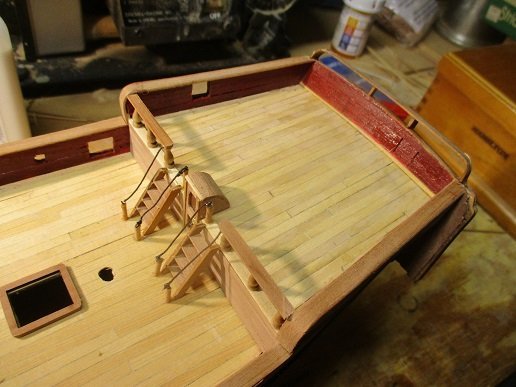
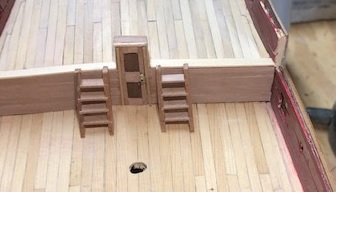
Keith, I decided to use your idea on the rope lanyards for the ladders: You'll also notice that I have installed the cap rail, the top rail on the transom and the gratings. The overall photo: At this point I need to install the aft davits. Then the rest of the construct is pretty much the same as the kit with the exception of an elm tree pump in the bow (I have no idea why, but it's in the book.) The book also mentions royals which I am not going to include, having decided that O'Brian made a mistake.

- 341 replies
-
- 7
-
-
- Sophie
- Vanguard Models
- (and 1 more)
-
nice metal work. Invisible seams!
-
Mike, Interesting setup, but you do have to trust the angle gauge to be accurate Any way to double check the angle? Tom
-
Nick, I have a Unimat SL1000 lathe, which is not made anymore, but is available from time to time on EBAY. Also, I have a Sherline mill which is very well made and the company provides great customer service. I would assume their lathe to be of the same quality. You'll need to think about what kind of cutters you'll need, as well as a dead/live center, self-centering 3 jaw chuck. Maybe nice to have is a DRO setup, and a compound slide. Tom
-
Wonderfully detailed description, with product links; fabulous!
-
Spooky, I saw this comment, and I thought, "Well, I'll just buy it down here and send it up there for him". Amazon has a used copy for $154.00! That was the end of that idea. The other option is to scan the build logs of Ed Tosti, David Antscherl, as well as Hollowneck. Probably others that escape me right now, but they all show you both what to do and how to do it. Tom
- 542 replies
-
- 3
-
-
- Sphinx
- Vanguard Models
- (and 3 more)
-
Tom, I hope you’re going to bring your creation to New London. Tom
- 200 replies
-
- 1
-
-
- Whaling Bark
- Charles W Morgan
- (and 1 more)
-
Ooh! Much better solution, but I can’t see how the rope is secured at the bottom. BTW, this is why mom always liked you best. She recognized your perspective and precision, not to mention your good looks!
- 341 replies
-
- 2
-
-

-
- Sophie
- Vanguard Models
- (and 1 more)
-
Keith, you mean the baluster at the top of the ladder? your bro
- 341 replies
-
- 1
-
-
- Sophie
- Vanguard Models
- (and 1 more)
-
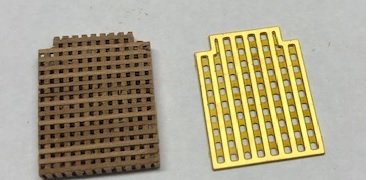
I've gotten the balusters installed: Before I put the rail on them I thought i would install the cap rail. I can't use the ones provided in the kit, because they are not the right shape. I need sheet stock 1/32" thick - not in my inventory. Which to buy pear or cherry. Pear is $12.50 per sheet and cherry is $5.00. I'll let you guess which one I've bought. While waiting for its arrival, I started working on deck furniture, specifically gratings. The metal etched gratings provided in the kit have openings that are 3"+ which I thought rather large, so I made my own: My openings are 2" which is more to my liking. Tom

- 341 replies
-
- 7
-
-

-
- Sophie
- Vanguard Models
- (and 1 more)
-
I've also found the slitting saw most helpful, especially if you have the DRO capability. Tom
-
The other interesting thing is the side table under the forward windows. Apparently the top comes off to reveal various piloting controls. Tom
-
So, the Cangarda was restored in California, is currently in Maine, being sold by an English broker, and priced in Euros. Quite an international achievement! Tom
-
Keith have you seen this? https://www.yachtworld.com/yacht/1901-custom-pusey-$-jones-steam-yacht-8030108/ Tom
-
Keith, You've got a good idea. I'll need around 10-12. They are 11 mm high. Model Expo has what I need, I think. Anyway, ordered a bunch of their stanchions. Thanks TB
- 341 replies
-
- 4
-
-
- Sophie
- Vanguard Models
- (and 1 more)
-
Keith, I tried that approach with a razor blade attached to the tool post of my unimat lathe. The height is wrong and the blade flexes too much. Got any suggestions?
- 341 replies
-
- 2
-
-

-
- Sophie
- Vanguard Models
- (and 1 more)
-
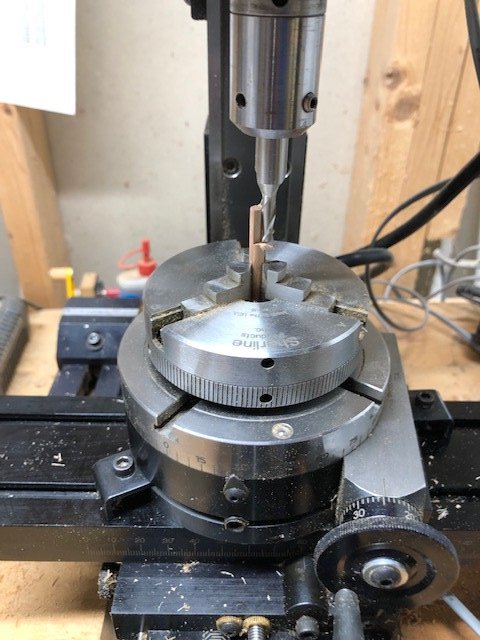
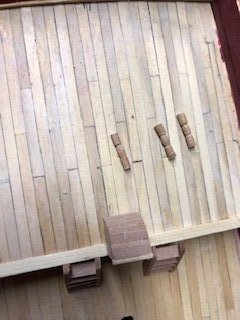
Thanks to you all for the support and the "likes". The box at the top right says there are 27 folks looking over my shoulder. I don't want to disappoint. I have always maintained that there are 2 kinds of logs: those that show what the builder did, and those that show what the builder did and how it was done, sorta like what Keith Aug does for us. I think this log has fallen into the former category, and in an attempt to up-grade let me describe my method for building ladders: I use my mill (equipped with a DRO) and that the ladder will be the hypotenuse of a 30-60-90 triangle. I set the vice at 60 degrees to the X axis (such that the vice is pointed NE/SW) and, using a 1/32" end mill set to cut 1 mm deep inscribe (in this case) 4 channels in the stile held in the vice, moving the work along the X axis 4.33 mm each time. Flip the vice around so it's now pointing NW/SE and repeat the 4 cuts again at 4.33 mm separation. Turns out that the pear used to plank the hull is just the right size for the treads. I'm onto balusters now. I have no dowels small enough to suit so I take what I have and make it smaller. Again using the mill and a rotary table: center the rotary table under the spindle. The offset the table by the desired radius and turn the crank. That's the easy part straight round dowels are boring so to add a some feature I put the dowel in the lathe and tried filing in some profile: They are close in appearance. Maybe I'll make twice the required amount and pick the best. Any suggestions? Tom
- 341 replies
-
- 7
-
-
- Sophie
- Vanguard Models
- (and 1 more)
-
Tying stays and shrouds to foremast top
TBlack replied to Scotty W's topic in Masting, rigging and sails
Scotty, Why not just make a couple of wedges glued to the sides of the mast? Takes 10 minutes. TB -
Brian, A 0.5 mm drill is, what, about a #75 or 76? You can get carbide or steel bits. The carbide will be sharper, but more brittle and break easily. The steel are more flexible and forgiving. The latter are available in packs of 5 from Micro-Mark for not too much (certainly not $300, that's ridiculous). Drill Bit City sells the carbide bits, again in sets of 5. I use a pin vice for what you are trying to do. Hope that's helpful. Tom
-
Tying stays and shrouds to foremast top
TBlack replied to Scotty W's topic in Masting, rigging and sails
Scotty, You got it. The mast actually flairs out at that point, creating a shoulder for the stays to rest on. You can see the continuation of the shoulder indicated by the horizontal line on the mast to the left of where your 25 mm dimension stops. At this point, if you glue a couple of wedge shaped pieces on either side of the mast, you should be good to go. Tom -
OK. Two ladders, now two balustrades to finish it off. These will be hand made with some stylist form, so may not exactly match. We'll see.
- 341 replies
-
- 12
-
-
- Sophie
- Vanguard Models
- (and 1 more)