HOLIDAY DONATION DRIVE - SUPPORT MSW - DO YOUR PART TO KEEP THIS GREAT FORUM GOING! (Only 13 donations so far - C'mon guys!)
×


JPett
-
Posts
881 -
Joined
-
Last visited
Content Type
Profiles
Forums
Gallery
Events
Everything posted by JPett
-
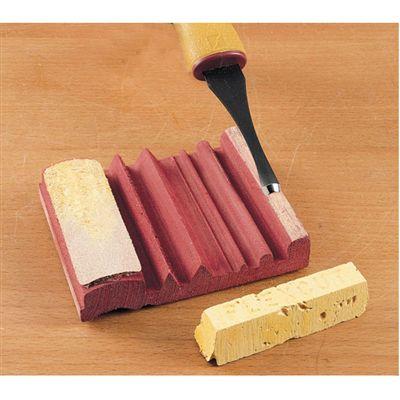
Ahoy, Mates This has become one of my most used tools. It has completely spoiled me in that I can no longer tolerate anything less then a razor shape blade. There is a slight learning curve but once mastered it only takes a few seconds to use. I use it on all my cutting tools and have not replaced my xacto blade in over two months. For more info and a video follow this link http://www.woodcraft.com/product/2004364/8962/flexcut-slipstrop-sharpening-kit.aspx Highly recommended
-
- 2
-

-
 Ahoy, Dominik I know I said it once, but I will say it again I love the chairs I also really like the functioning doors on the poop bulkhead. Something I might attempt on my build. Thanks for sharing
 -
Ahoy, Brian Thanks for posting. I love the detail. Always nice to see another Rattlesnake build. I am currently planking the Model Expo take on this same ship. I find it interesting to see how different manufacturers handle the construction and what they prioritize in a build.
-
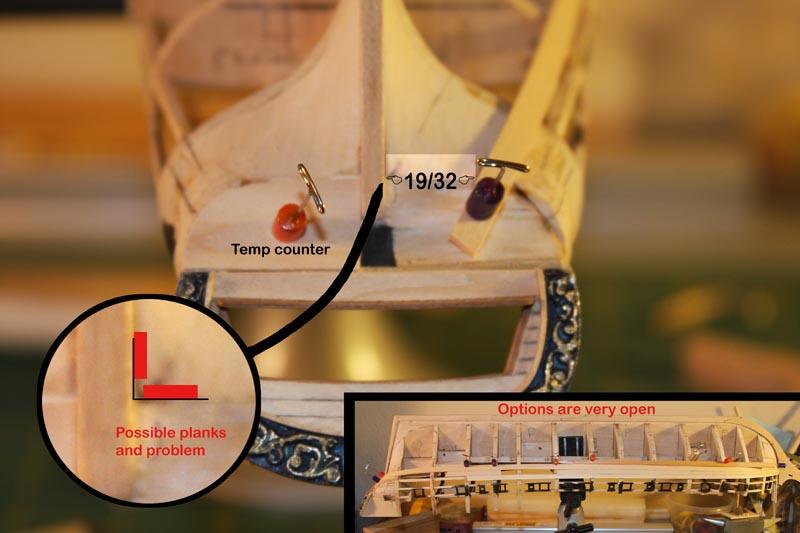
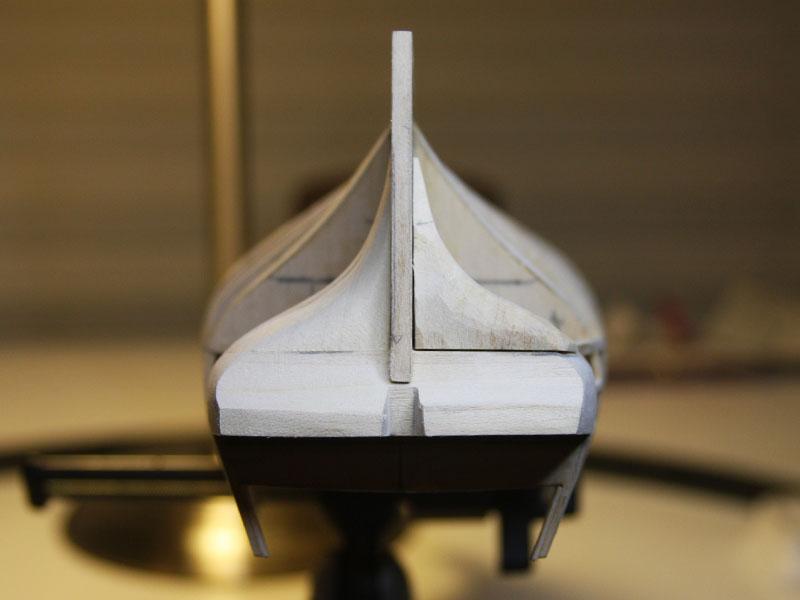
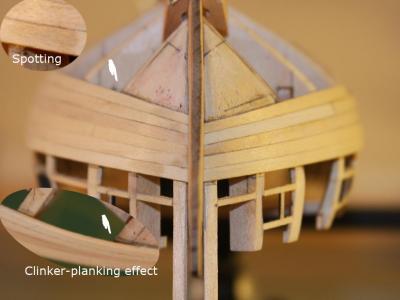
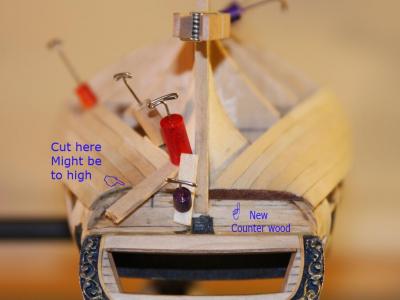
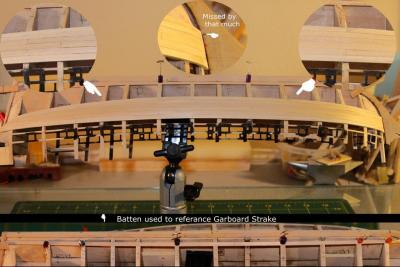
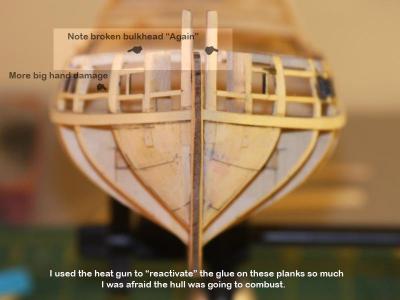
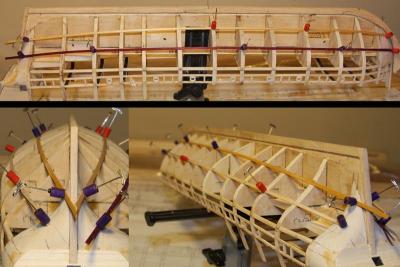
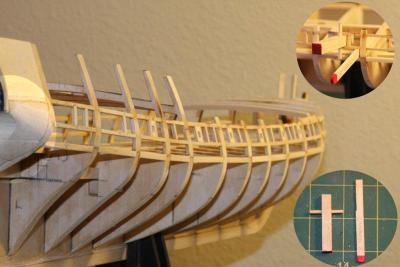
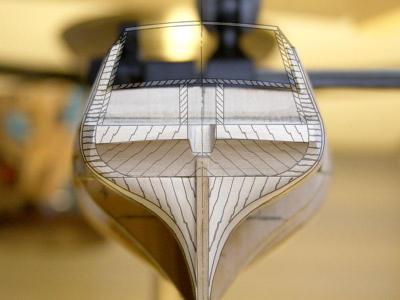
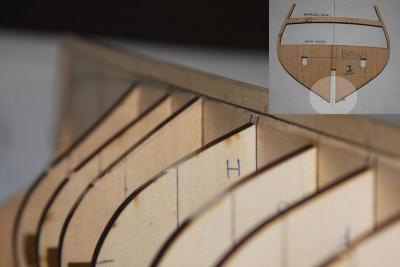
Ahoy, Mates Patrick: Thanks for the comment. I will continue to upgrade that portion of my log over the next few weeks. I know I will never be able to replace the fun we had but hope to still create something helpful to others. I felt it important considering the past events to get something up ASAP Back to the Build With my log now "current" I am back to planking I have completed my first belt, the starboard side is not too far behind. I did start to see some Clinker-planking effects on the bow (see pic). I came in about a 32nd to high on this belt on the bow. The stern and midship were right on. I also see that unsanded wood seems to be slightly darker (see Spotting in pic). I hope this will not cause problems when it comes time to stain. I really love the bright white plank on the starboard too. Where did that come from. With Belt "C" in the horizon the Garboard plank will be my first attempt at Spiling. I have to be honest here; I have no idea what I am trying to do here. To help my brain assimilate this I re-purposed the plank I used as a batten on belt "A" and formed it to the hull where the plank that follows the garboard plank would be. My hope is that this will provide me with a reference as to the shape of the garboard plank. You can also see in the pics that the "ars end of Belt "A" on the Starboard side is nearing completion. I have installed a test piece of the wood I would like to use on the counter. It is Model Expos Mahogany. Unlike any mahogany I have ever seen and very difficult to work at this scale. Looks great though. I also have some concerns regarding where I cut the third strake on the starboard side. Thankfully the counter fashion piece should be able to cover this should it prove a little short. The stern of this ship has proven to be quite a challenge and has lead me to re-evaluate my planking strategy. For this first belt I took all the required measurements but did not transcribe them to the hull. I just used them to cut the planks, rechecking them as I went along. For Belt "C" I will transcribe them to the hull. I can now see how this will give me a better idea of the run of the planks allowing me to make adjustments beforehand which I am sure will be much easier. As always, your comments and opinions are welcome and appreciated
-
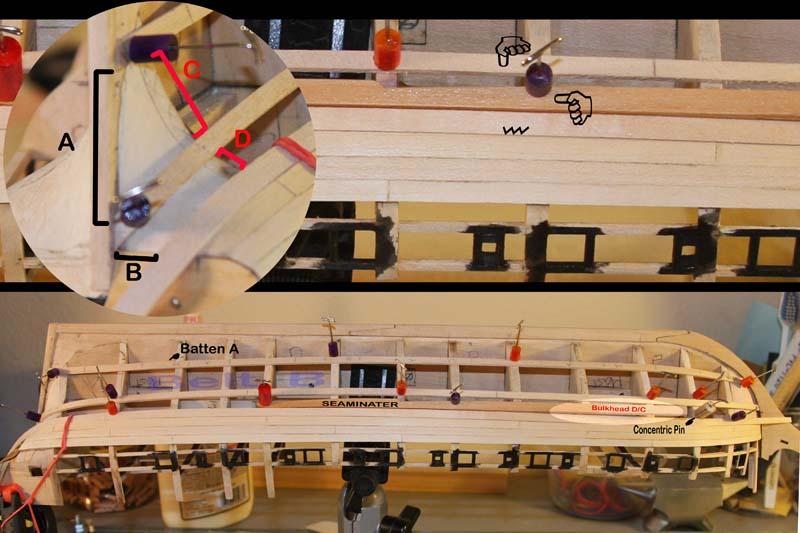
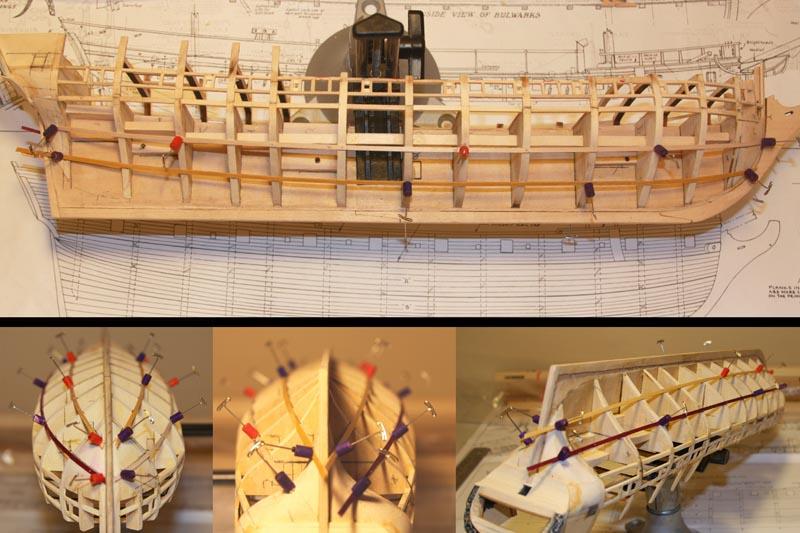
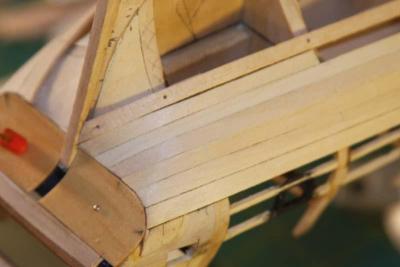
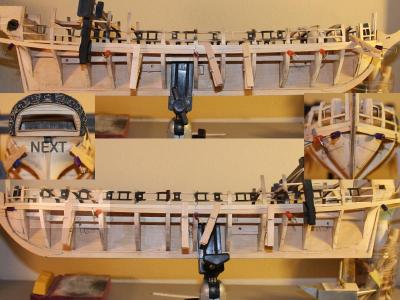
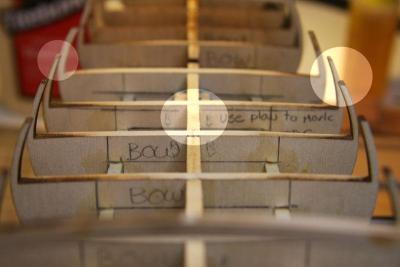
Ahoy, Mates After gaining some confidence with my first strakes, I spent the next few weeks, yes weeks filling in my first belt. I ran into some trouble on the stern or "ars end" as I like to call it. I "again" made some small errors, this time in the layout of the planks and found myself in a bit of a tight situation. After much consideration and help from my friends here on MSW I was able to resolve the issue and move along. The fix was taking a little bit off Strake 3, 4, and 5 to make room for 6. Matching the starboard side will be interesting and I am sure "fun". I have found planking to be very challenging in a good and enjoyable way. In the pics you can see my temporary counter. I ripped out my first attempt and am hoping this new approach works out. You can also see some pics showing measurements. These were used so the MSW community could advise me on solutions to the issues at hand. I have also re-re-re-posted my pic showing the Seaminater and concentric pin to show the problem I had at this point. The Seaminater is a wedge that has been painted with CA glue to harden it and prevent the wood glue from adhering it. It has been very useful for planking. The concentric pin is just a pin in a dowel with the hole drilled off center. Insert it and turn it to apply pressure. I now use a piece of wood between it and the plank to disperse the pressure and reduce damage to the plank. This post concludes the 're-post" of my forum and future post should be current. Thank you. I will apologize now for all the edits that will be popping up as I clean up this part of my log. Looking forward to moving ahead.


-
Ahoy, Mates Mark: Welcome aboard and thanks for looking into the emoticons. Back to the build After many hours of playing in the shipyard, the day had finally arrived. I should note that I would not have ever come to this point in my build had it not been for all the help I received here at MSW. Thank you all I carefully took my measurements, checking them multiple times and with great care shaped, bent and installed my first strakes LOL, Then I ripped them off After reviewing my situation and rethinking what I had just done, I re-installed the first strakes. LOL, Then I pulled out the RC heat gun and fudged them around for about an hour.

-
Ahoy, Patrick Glad to see your log is back. Looking forward to your progess
-
Ahoy Augie Welcome back, The new log looks great.
-
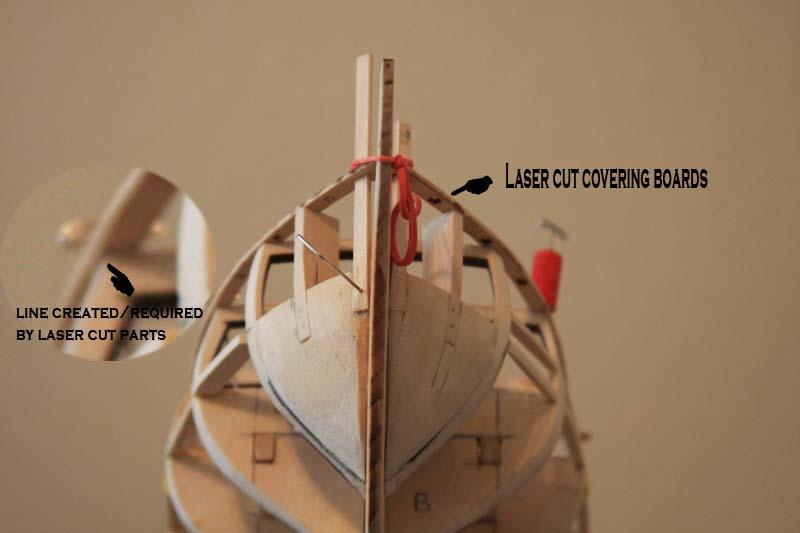
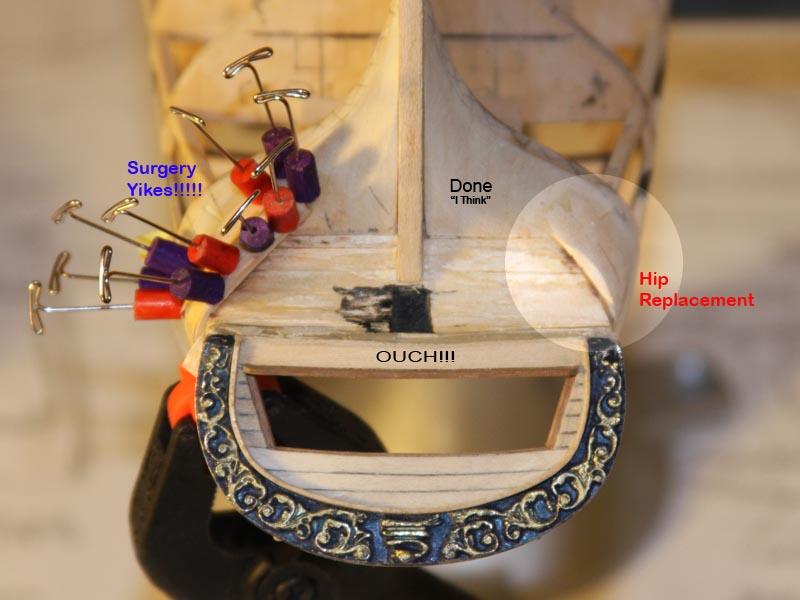
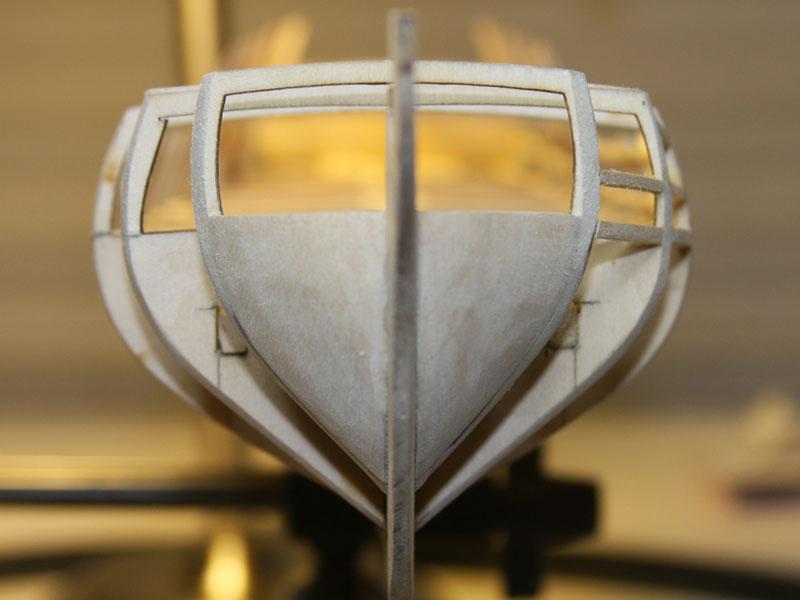
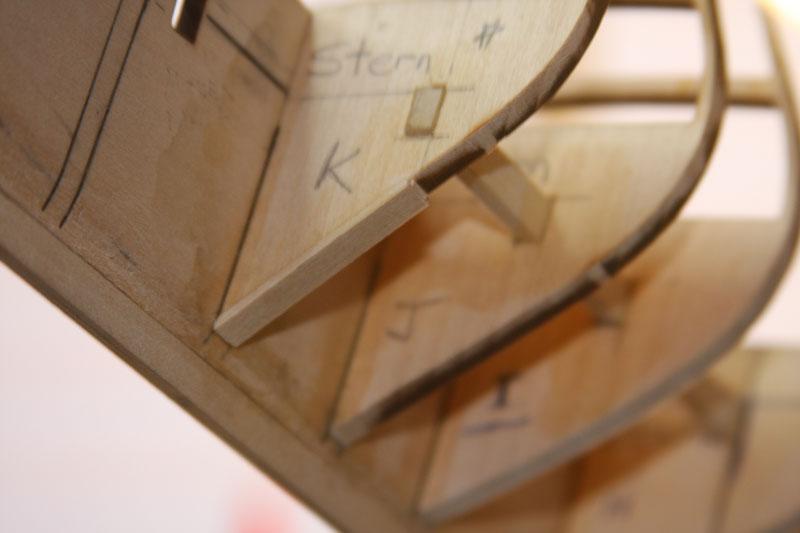
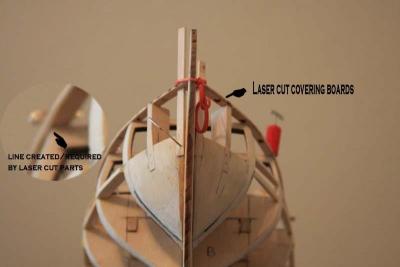
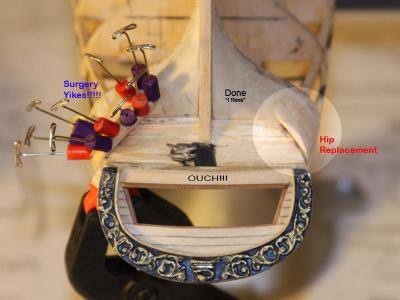
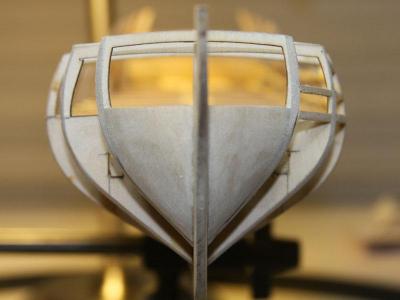
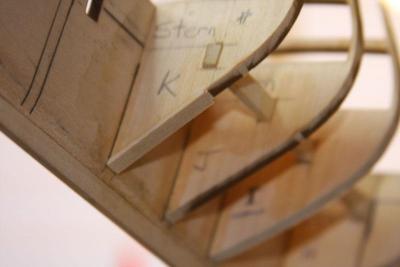
Ahoy Mates Trussben: Happy to be back Russ: Always a pleasure to see you aboard Back to the re-work of my log As there is currently no option for those rebuilding there logs to “drop in a post’ HINT, HINT, I am posting this here which is out of order. This was done around the time of the gunports I used the laser cut "covering boards" to align the Knightheads and Timberheads. I also put my Timberheads on steroids. At first, I thought that I might have overdone the dosage but after breaking the deck supports on all the bow bulkheads of my build during planking. I highly recommend this to anyone following this log “not installing cannons here”. I am also throwing in a pic post "Hip surgery"
-
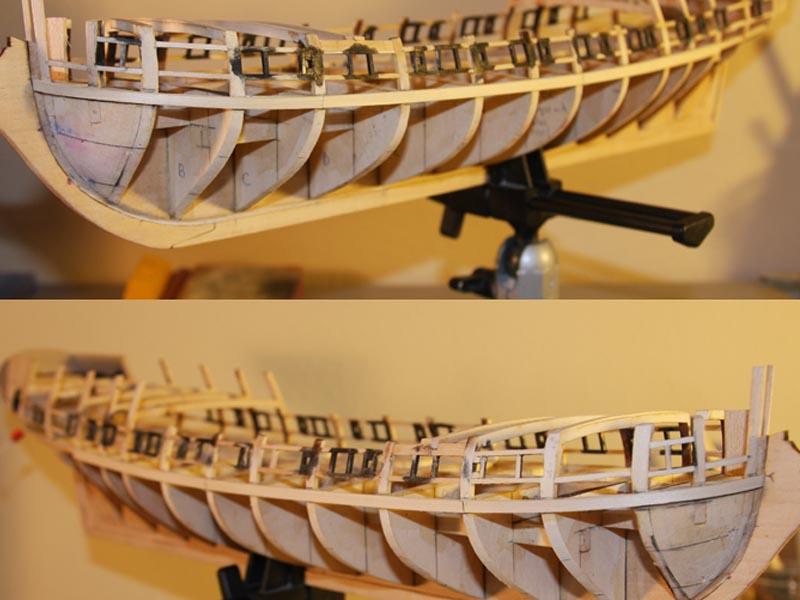
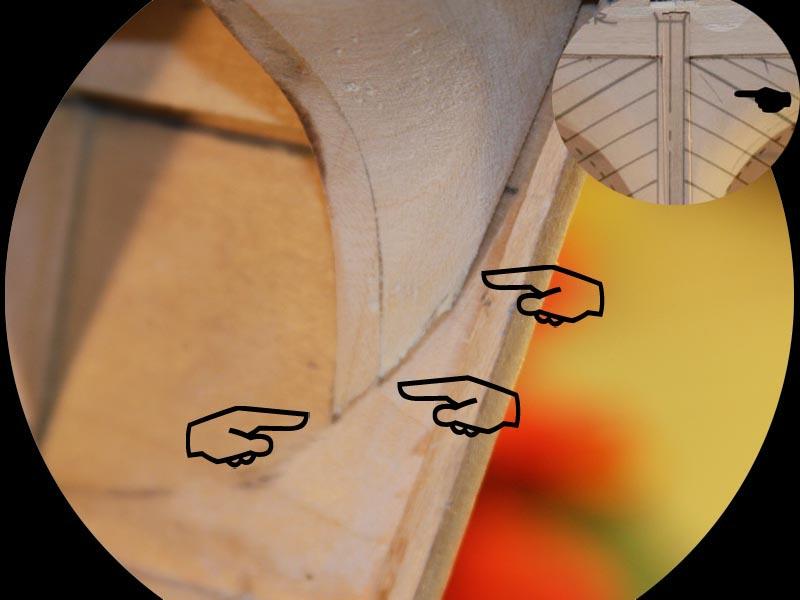
Ahoy Mates While prepping for planking it was discovered that I had made some more mistakes along the way. It was at this time I considered changing my user name to "redo". As discussed earlier, I had not properly faired my hull. Using battens as guides, I carefully confirmed the position of the three belts on each side and re-faired my hull. This was a long process and after many posts and much help from the community was finally accomplished. The key here is the battens need to follow the hull contacting each bulkhead. Forcing them to conform is not the answer. Listen to the wood “grasshopper”. In the process I oversanded (ME?) the transom fillers while trying to correct a problem relating to a pair of jeans (It is a long story now lost in cyberspace). Needless to say, I had to add some weight to my honey's hips. To top this off I also under sanded the transom fillers. Yes I under sanded them, while at the same time over sanding them. The little hands show that the planks would have to make some tough curves had this not been caught. The fillers need to taper so the planks will run into the counter and stern post, not make 90's into them. I understand that brute force and superstition can over come this but sandpaper is much easier ("Sorry" I could not resist).


-
Ahoy Mates Augie; Glad to be back. This whole mess has reminded me that nothing in this life is a guarantee. If you are fortunate enough to put on your pants, make something of that day. Patrick: Glad to see you back too. Cog: Welcome aboard: Thanks for stopping by. Has anybody seen the emoticons?
-
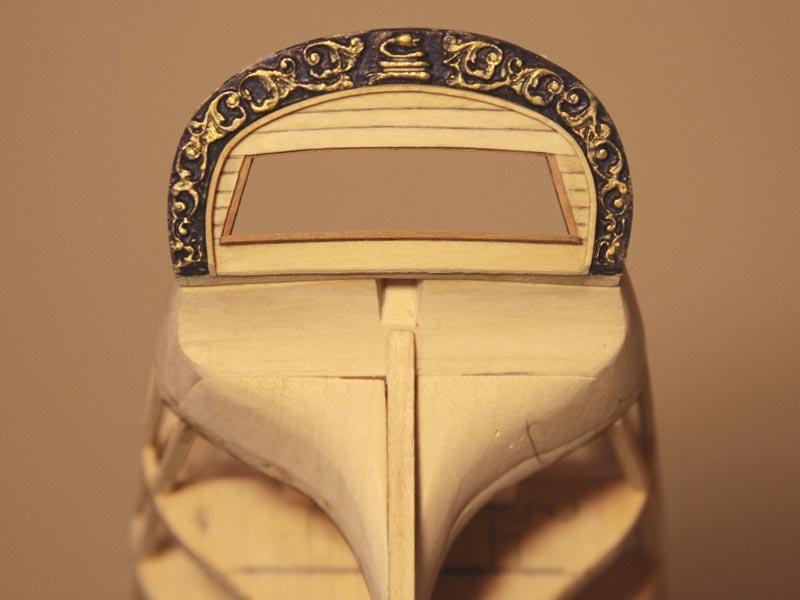
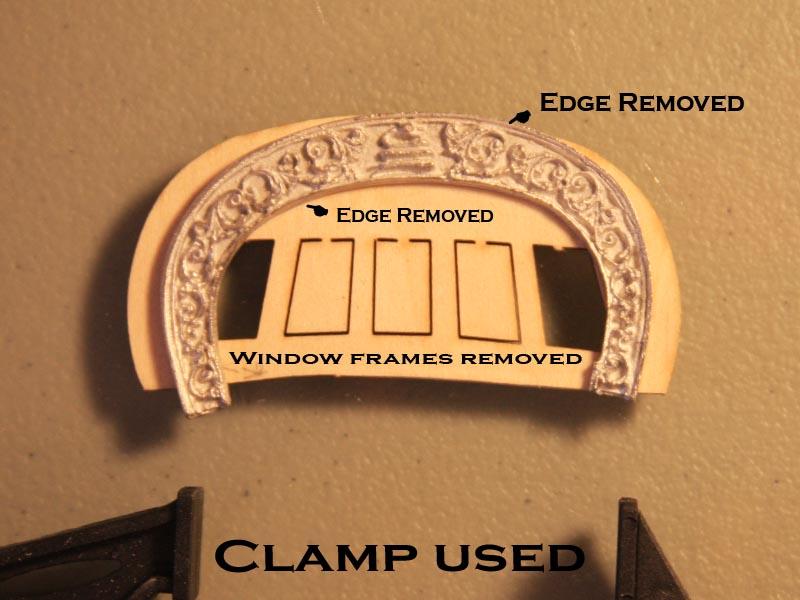
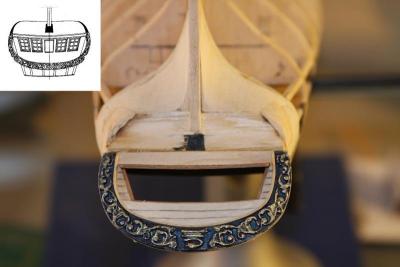
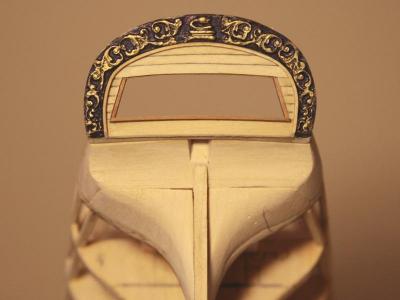
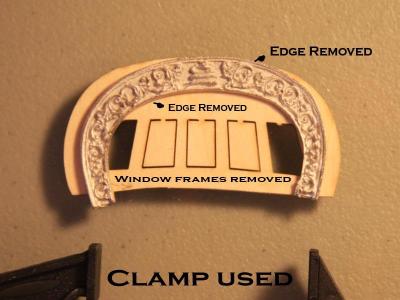
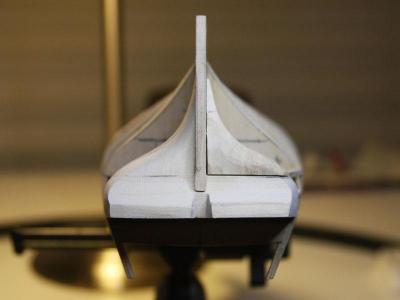
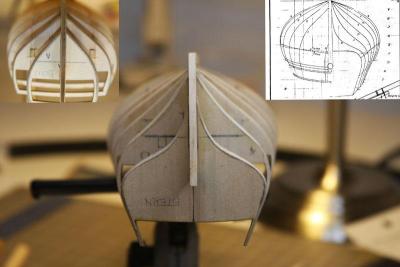
After looking at Harold Hahn’s plans I decided I would reduce the width of my Kit supplied transom. “It seems the Rattlesnake may have had an enlarged transom to deceive enemy ships as to her size, Hummm, this never happens in warfare". I felt this aspect to be slightly overdone on my kit. I heated the Britannia fashion piece in some boiling water and used a clamp to reduce its diameter. I also needed to cut out the windows and will replace these later on in the build. I am hoping to improve my skills before attempting this. After bending the Fashion piece, I decided to replace the trim with wood. To paint the Britannia, I first primed and then using Brass enamel, I painted the whole piece. The blue followed in Acrylic again painting the entire piece. Next, I used Acrylic thinner to expose and clean up the Brass.
-
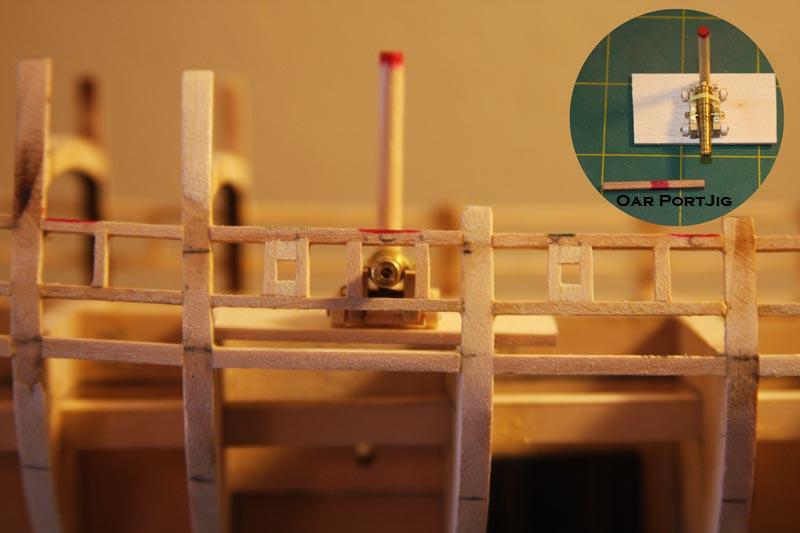
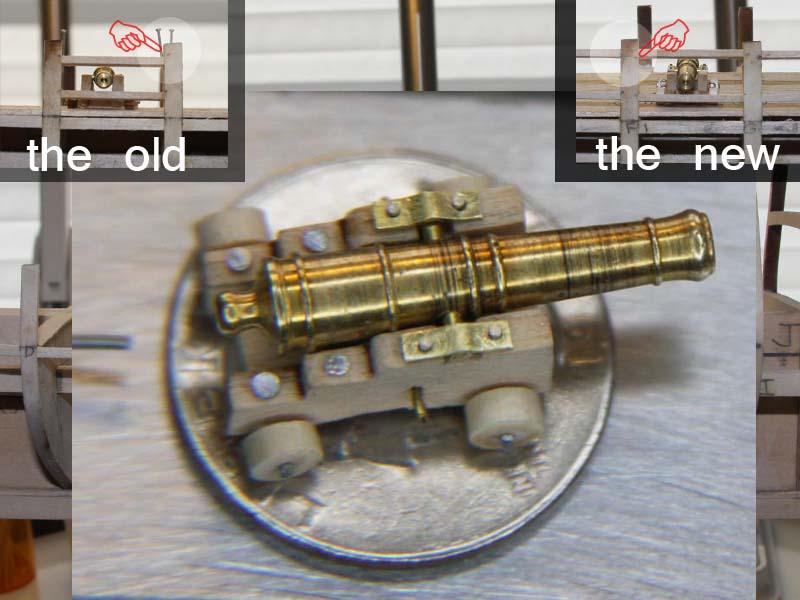
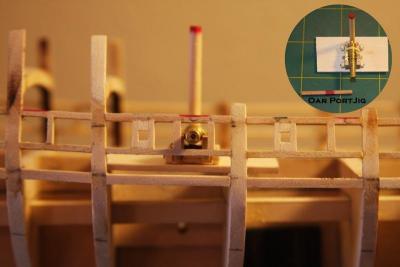
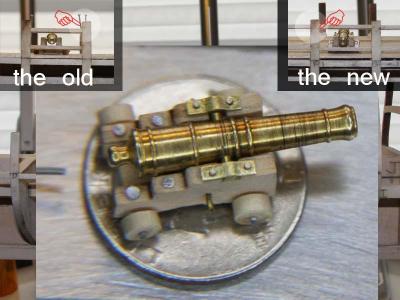
I made up one of the kits cannons to test the gunport heights and installed them along with the oarports I found jigs very useful to keep all the ports the same and in line. I will need to make some small corrections but will wait untill after some planks are installed to do this.
-
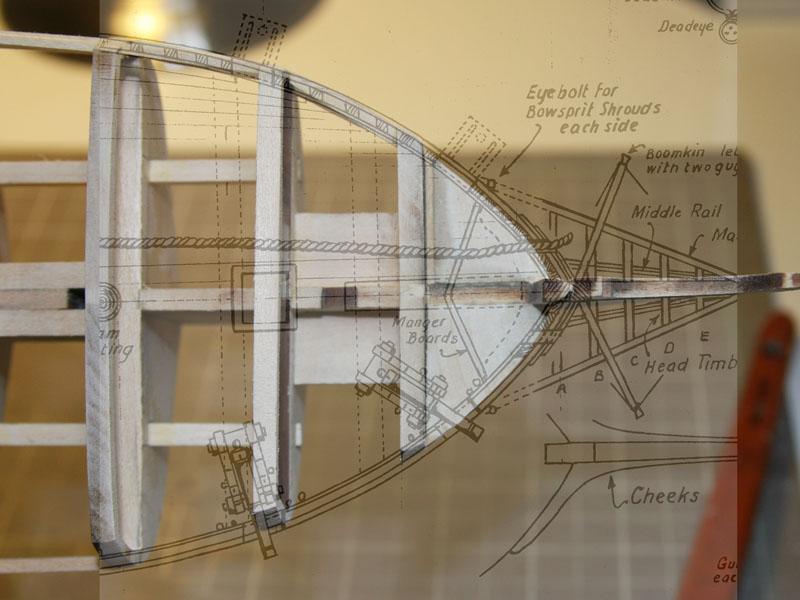
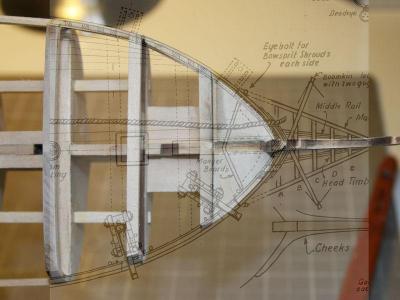
The filler blocks were next. I used a scroll saw to first cut out the blocks, finishing them with a carving knife and lots of sandpaper. I found that gluing sand paper to a piece of 1 inch PVC made contouring the curve in the transom much easier. I superimposed scanned images of the plans on pictures of my work using Photoshop to check my work.
-
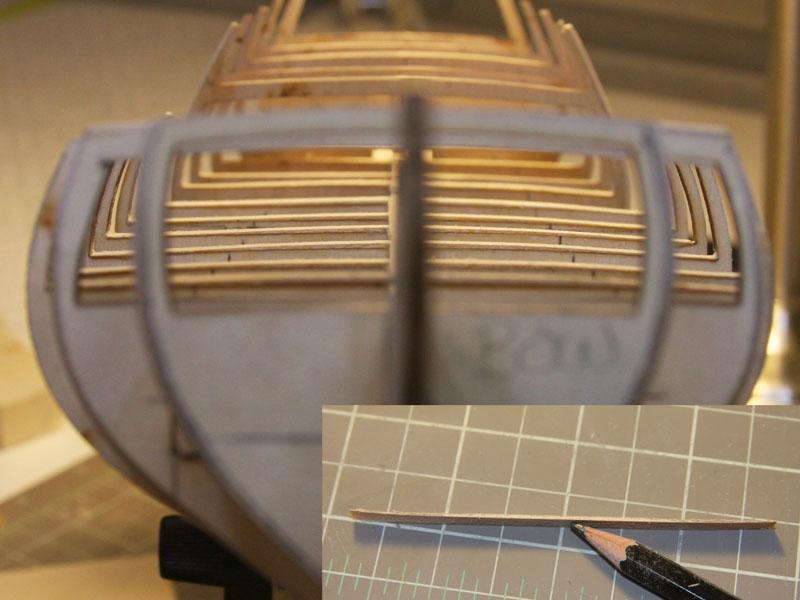
The Next step was to fair the hull or as the instructions refer to it as "Shaping the Bulkheads. Needless to say and there was great fun on the forum as I screwed this up in royal fashion. With a heavy hand and a sanding block I flattened my deck. It took me a while to come up with a fix for this but in the end I found that I could taper strips of wood and glue them on top of the bulkheads to correct the problem. The repair ended up being easy. At this time, I had thought that I did a fairly decent job of fairing the hull. Later in my build, I found this not to be the case. My mistake: Not making sure that battens when placed on the hull contacted each bulkhead and ran the length to the hull following a path similar to the planks. I was new and in a hurry to get to the next step (the real mistake here). In hindsight I should have spent considerably more time on this step. I ended up spending twice the time correcting my mistakes when I laid out the belts to prepare for planking. One of the nice things about wood is "almost anything is repairable". The only penalty is time.

-
After I installed the bulkheads, I found that some did not line up. Minor errors in the kit were exacerbated by my inexperience. Some fell short of the rabbet, others showed gaps when a batten was used to check the contour of the hull. This was easily corrected by the addition of some shims

-
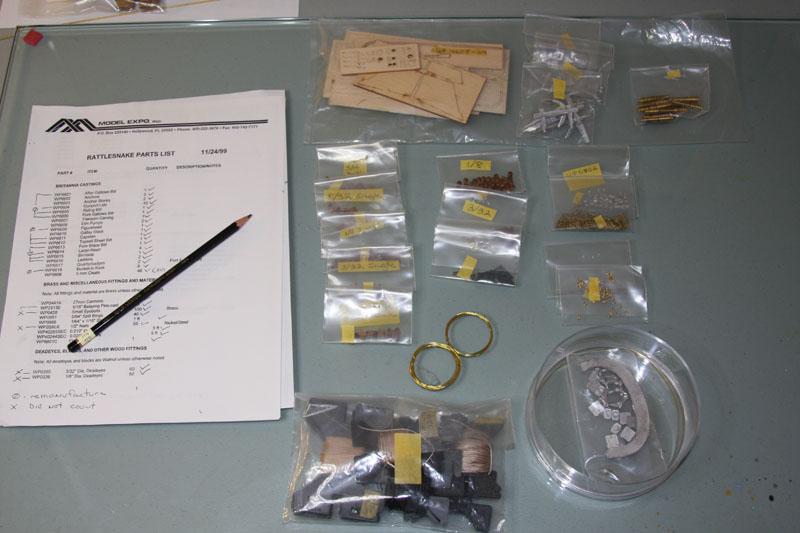
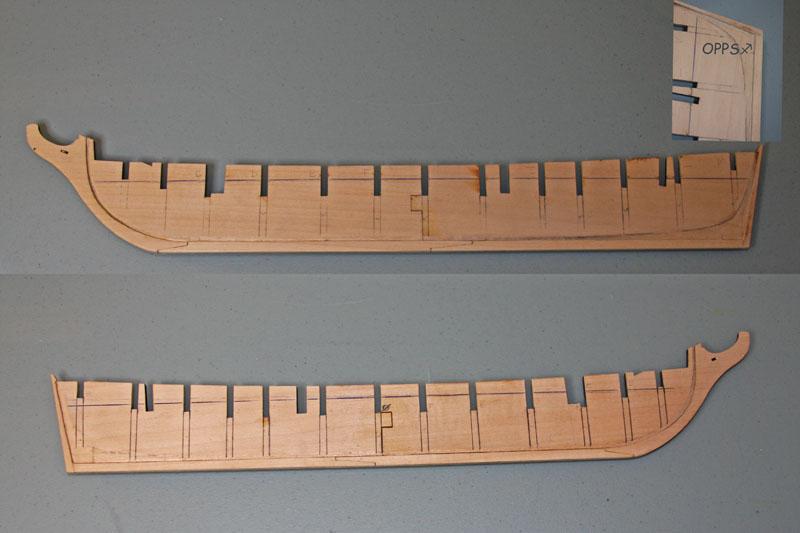
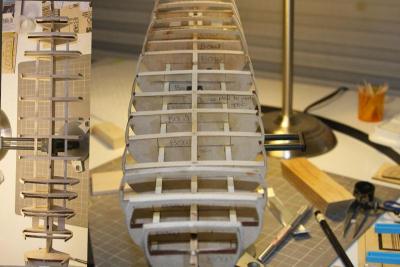
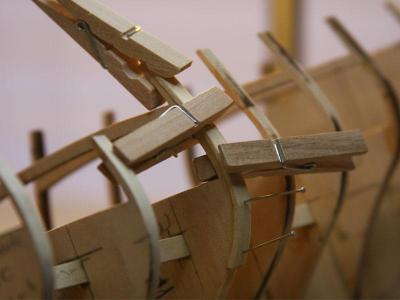
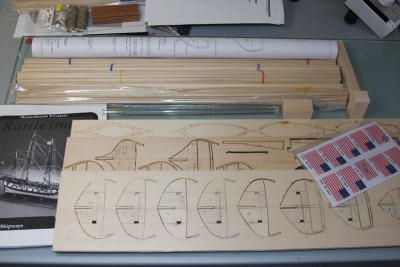
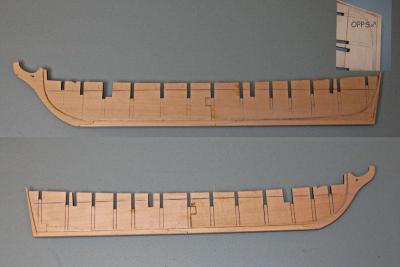
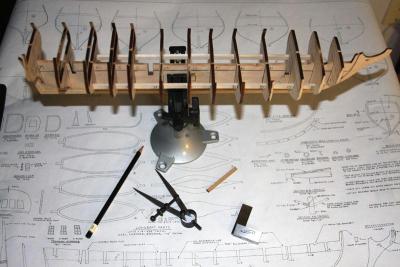
A brief summary of my build up to its current state First the kit was inventoried. I found this very helpful. Seeing each part and the wood gave me a good perspective on the project head. After assembling the Center Keel Pieces, the Rabbet was cut. This was a slow and slightly "unnerving" experience for me. I took my time, using a chisel blade to slowly cut into the wood. I found a light very useful to check the thickness of the wood The bulkheads were installed on the “Center Keel Pieces”. I added the two stringers to better support this assembly for planking.

-
Static: Rattlesnake 1780 (Model Shipways MS2028) 1:64 Note: The first section of this log is a repost originally created in 2012 First, I would like to thank all of those who have taken the time to create or re-create thier logs on Model Ship World. Your efforts have been invaluable to me and I am sure will be to many others. Thank You All As for my story: I purchased the Model Shipways Rattlesnake kit around five years ago from a local hobby store. After assembling the false keel, I realized the magnitude of this endeavor and decided it best postponed for another day. The box sat on my shelf until recently when I found the Model Ship World forums. This is where I discovered the build logs, like great sagas, some taking years to complete, they inspired me, renewing my interest in ship modeling and giving me the confidence to restart this project. Kit Review/Preview: According to the manufacturers website http://www.modelexpo-online.com/product.asp?ITEMNO=MS2028 The kit is an Intermediate Level build. Originally, a solid hull kit, it was converted to plank on bulkhead with updated instructions in 1994 by Ben Lankford. The rigging, hull details, and original kit were done in 1963 by George F. Campbell based on Admiralty draughts and an earlier reconstruction published by Howard L Chapelle. The manual is informative and judging by comments posted regarding other manufacturer’s attempts, seems to be above average. It is not however, as clear as some of the other manuals provided by this same manufacturer. All of instructions for the Model Shipways kits sold on the Model Expo site are available for download at no cost. As are some very helpful practicums. These were very useful to me, either clarifying the steps in the manual, or elaborating on tasks in which I have no experience. The parts in the kit are, again to my untrained eye seem to be of good quality. The wood contained in the kit is primarily Basswood and this I am sure is to maintain an affordable initial cost, allowing the builder to add wood upgrades at his own expense, and choosing. Castings seem OK, only requiring minimum cleanup, and a generous supply of additional hardware is included. Two double-sided sheets of plans round out the kit. I picked up some inexpensive wood for the optional second planking and recently purchased a few additional lengths of Cherry plus a sheet of Walnut. Overall, I am very pleased with the product Model Shipways provides. I would like this log to be as open as possible. I will attempt to post pictures, comments, questions, and any information I discover on the way as I have seen others do. I will also try to accommodate any request for additional pictures or responses so please feel free to ask. My goal is to create an atmosphere encouraging feedback, especially those pertaining to any corrections/improvements regarding the methods needed to complete this model. I enjoy writing so I will apologize for my wordiness from the start. My main priority however is to just have fun and enjoy the hobby and this blog. Comments, criticisms, or suggestions, are always welcome and appreciated! Please note that I have very little or no experience in model shipbuilding. I have built some RC aircraft, rockets, and if I can use the phrase “a boatload” of plastic.