JPett
-
Posts
881 -
Joined
-
Last visited
Content Type
Profiles
Forums
Gallery
Events
Everything posted by JPett
-
 Ahoy Augie Glad to hear it wasn't too bad and something I am sure you will repair. Still sorry to hear of the mishap. When I first found the post I thought maybe she went flying.
 -
Ahoy Caroline Thank you for taking the time to repost your build. It was the first log I read after discovering MSW. I will always remember the fun I had reading it late into the night on my tablet. It was quite inspiring and I found it almost ‘story like” in its trials, tribulations, and of course, happy ending. It’s nice to see it back
- 122 replies
-
- 1
-

-
- finished
- artesania latina
- (and 1 more)
-
Augie, Never Did you not see the pic LOL
-
When did you build that Augie I missed the log "LOL"
-
Coloring Basswood
JPett replied to JPett's topic in Painting, finishing and weathering products and techniques
Ahoy Sam Thank you -
PS Congratz too; I would be very proud to display that build in my home and can only hope anything that comes from my shipyard looks half as nice.
-
Ahoy Patrick I agree with your statment regarding other kits. I also like the fact with shipbuilding it seems anything can be corrected. With plastics you can not just go out and shape another piece of wood. I found myself buying two or three kits which can be expensive. I do like you fix though. Will have to remember that one
-
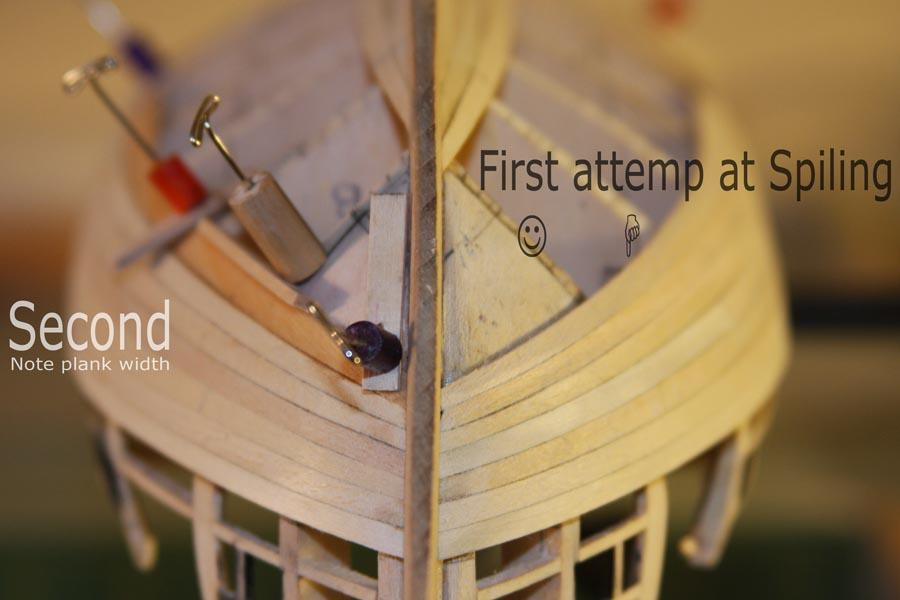
Ahoy Mates Mario: So happy to see you back and building. I am looking forward to the “when” in your reply. Martin: Glad to see you back in the mix. I looked into that deck. You were right. Aldo: Thanks for coming aboard. Sometimes it feels like 10 miles. LOL Dida: No just “home made”. I cut dowels, color them with a sharpie depending on how long the point is going to be. Then I use CA glue to secure the pins in them, filing the pin where it goes into a predrilled hole so the CA gets a good bite. Next, I paint them with thin CA glue so the sharpie does not bleed onto my work and the PVA glue I use does not stick to them. Back to the build; I cheated and used shims to correct for the previous problem where my “spiling attempt met the last of my brute force and superstition attempts. I am posting my current procedure and some pics of my Spiling for review First, I use a compass to transfer the curve of the last plank to a piece of paper pinned to the hull. Then I find the curve on my French curves. Next, I start with a very wide piece of wood so that once I have my curve I can cut a more planks, one right after the other. This helps me to speed up the “redos” and one day with the next plank. Using a very hard pencil (4H) I trace out the cut as this creates a groove in the wood, which I find helpful. It also confirms I am on the tick marks I have measured for the plank width. I also use the edge of the French curve to guide my knife. I cut the plank much wider then required, soak it, and then form it to the hull “wide”. The wider plank makes it easier to make corrections. I can sand them to shape verses edge bending them to fix any errors in my curve. These errors coming from me trying to transcribe tick marks to a flat piece of paper on the curved hull. The hardest part. Your comments are appreciated and welcome


-
Ahoy B.E. Looks like a really nice kit. Great build and post. Thanks for sharing
-
Coloring Basswood
JPett replied to JPett's topic in Painting, finishing and weathering products and techniques
Ahoy Adam Thank you for responding Abysmal meaning "really bad" When trying to get a rich dark "even" tone on Basswood. Sorry I did not make that clear in my first post. With stains; even with the conditioner (zinseer sandseal) I could not control the color. It would be too dark here and to light there creating a very unappealing uneven look. With the oil based paint this was a still a problem but it seems I might be able to correct it. With lighter colors I found it was not too bad but trying to achieve something nice with a rich darker tone "for me" still proves to be quite a challenge. So I posted Thanks B.E. So I am on the right path -
Coloring Basswood
JPett posted a topic in Painting, finishing and weathering products and techniques
Ahoy, Mates As the time is nearing for me to add some color to my build I have started testing, would like to post my findings, and hear from others Basswood does not seem to like darker stains. My first tests were abysmal. After I started using a sanding sealer they improved greatly, but not to a point where I would use them My experience with plastic showed me that you could “create” a wood grain using paint, so I decided to try this on basswood Using a water based oil paint I first applied it with a brush to a piece of wood, treated with Zinseer Sandseal. It came out blotchy as darker stain did. The difference was the oil paint could be worked. Using a Q-tip I stippled the paint on the lighter areas balancing the color getting much better results. My test is far from perfect but I think it shows possibility. I will do more tests and post but would be interested in hearing from others Note: Anyone following my bleach test, Yes it is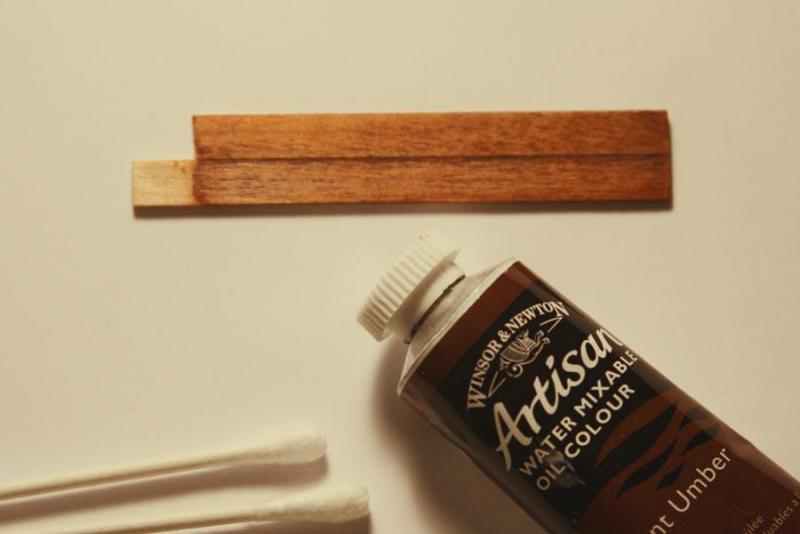
-
Ahoy Dominik Great link. I found 2 more Ratts on that site with photos of some very impressive builds I like the mount too, might consider it for my build, Thanks No lights or smoke for me though, 30 years in the entertainment industry, I have seen enough of that
-
Bleaching your wood
JPett replied to JPett's topic in Building, Framing, Planking and plating a ships hull and deck
Ahoy Augie Professional ME??? I did that already, its over rated I thought that statement covered it well "LOL" -
Welcome back Mario Looking forward to following your build "again"
-
Ahoy Mario Glad to see the her make land fall again. Seeing you back ain't so bad either
-
Bleaching your wood
JPett replied to JPett's topic in Building, Framing, Planking and plating a ships hull and deck
Ahoy Mates I ran a test bleaching some wood and then treating it to see if there were any adverse effects. I actually just dipped the wood in my jar of 25% beach solution, let it dry, not even wiping away any excess and then clear coated it with Zinseer Sand Seal If I hold it to the light a slight difference can be seen by turning the wood in the light. I think it might be more water stain then any effect of the bleach. I will do another test using a colored stain before trying on my hull. Please do not try this at home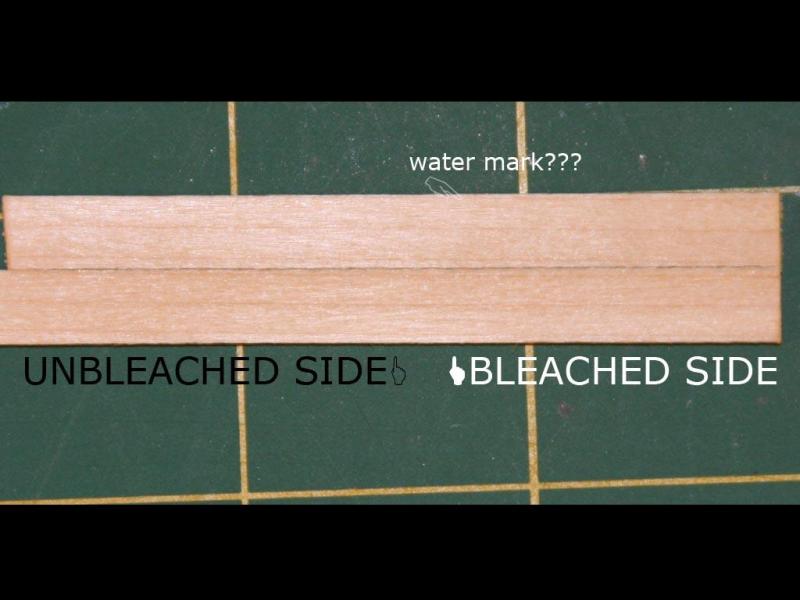
-
Ahoy, Mates Thank you all for your posts. Augie: Always a pleasure to have you aboard. I shimmed it. I know, I know. BTW, it was me who remembered the magic, “LOL” Ben: Trying to lift? I think I would go with “mission accomplished” for that one. If you recall my old log that plank was the subject of at least two posts. I edge bent it, then soaked it again, and then immediately bent it around the hull. I was really fighting the spiling. Was it “twisting, bending and forcing”? I forget. B.E. Thanks for coming aboard. I get my inspiration from logs like yours (Augie’s, Ben’s, Patrick’s, Mario’s, and quite a few others here who have taken their time to help others). Thank you all. Just trying to follow your lead. No surrounds. going with the toothpics Sam: I sent you a PM, thank you for the compliment. Use bleach, ME??? “LOL” Patrick: I tried hard not to: The spiling is not hard. It adds about two more steps. Looks much better and well worth the time. Getting a smooth flow while fitting the plank was the hardest part for me. I would always “not touch” one side of a plank so I had a good reference. With spiling, I had to go solo. I also found that just because you're spiling does not mean you can’t still edge bend em a bit. I will post some pics in my next post. Aaron: Thank you for the compliment, It must be my newbie-speak. There are many logs here on MSW that are much more detailed then mine. How I learned.
-
Ahoy Klaus I find much inspiration in your post, thank you taking the time to show it. Could I request a photo highlighting the klinker planking at the poop? If it is not too much to ask
-
Ahoy Patrick It has been a while since you have posted a pic of her in all her glory. Are you saving this, teasing us till the very end. LOL Beautiful work, thanks for posting. It must be a quite a feeling to be at this stage and have done such a great job. Congratz
-
Congratz Augie She looks magnificent. Thanks for posting the full image. It really shows what a great job you have done on the entire build. I am presuming that you used the magic cam for those pics, Only cause thier flawless “LOL” Thanks for posting
-
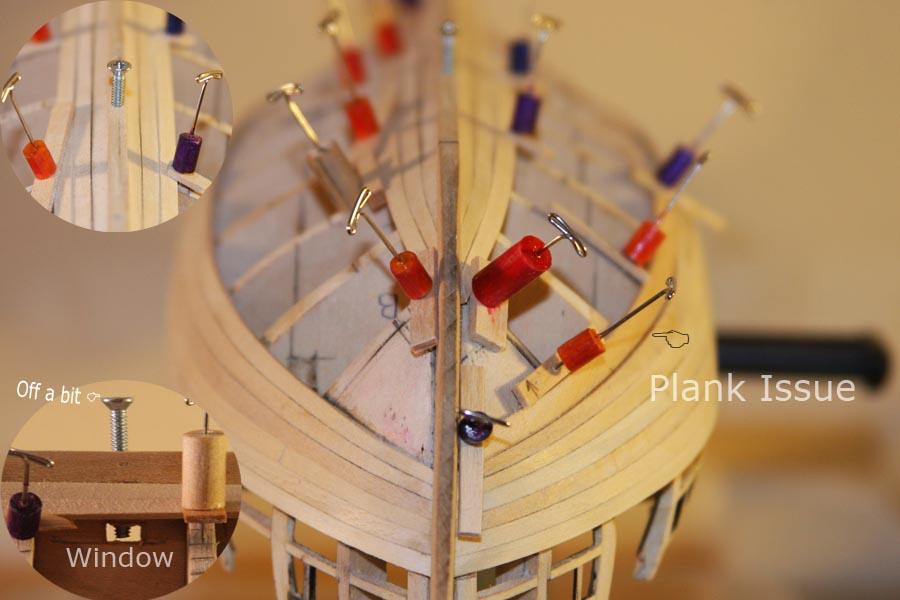
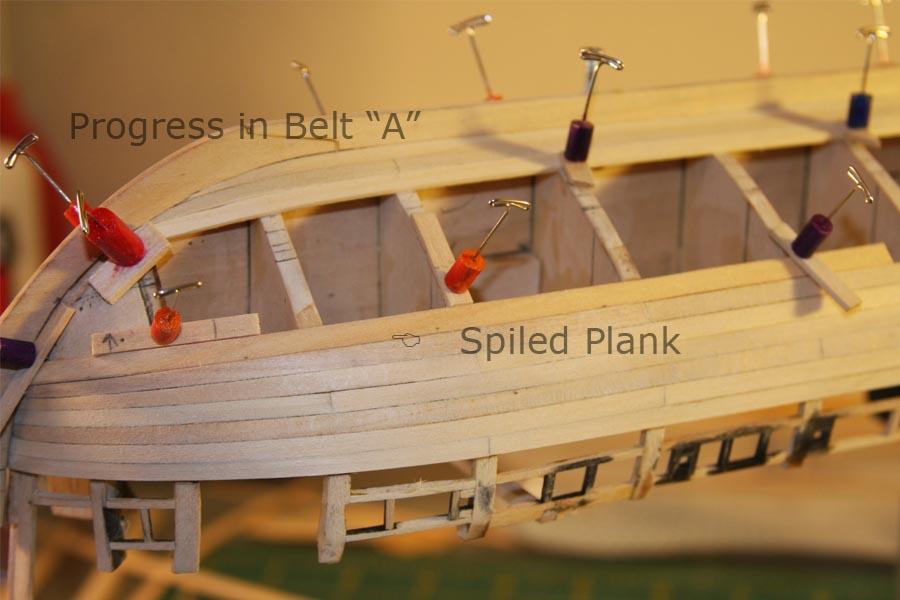
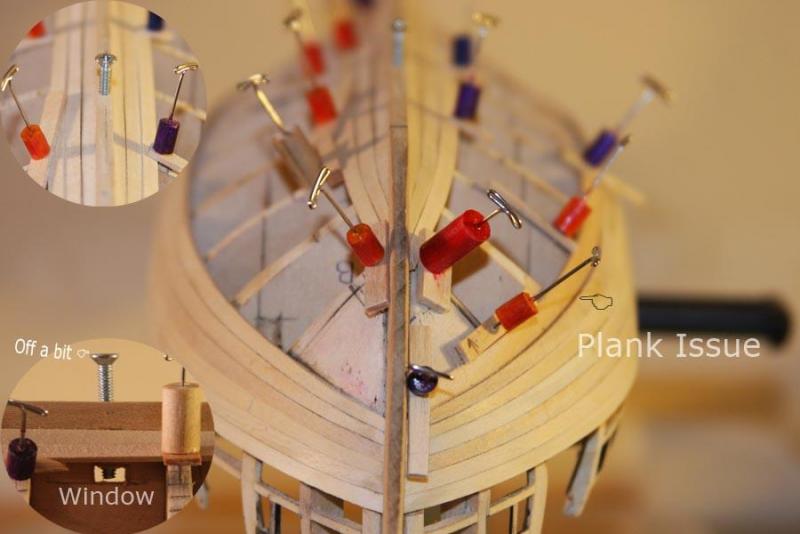
Ahoy Mates Martin: So glad you could attend the party, welcome , looking forward to the pics Back to the build Planking on belt “C” is progressing, slowly but surely. While perusing the forums I found a pic of someone who had installed a captured nut to mount their hull. This got me thinking as I had so far not made any arrangements to mount my build and am closing up the hull, Hummmm. I decided to address this finding a pedestal base could be used to hide my “OUCH”(see previous post) and located my first mounting hole there. I cut small windows in the main keel to facilitate some hardware and carefully drilled into the keel. I started with a very small diameter bit and drilled to the window. Of course I was off a bit and used the next size bit as a file to make a small correction before moving up to the largest size bit I felt I could use. Using my drill bit as a reference I found 4-40 hardware would work. It was very tight so I made the hole slightly larger again using the drill bit file method. Once I could thread the bolt into the hull, I did, “very carefully”. Now that the wood is threaded a bolt might could just cause a problem (nixed it). The window did serve as a reference and most importantly a place for pressure and wood to be relieved when I threaded the bolt in. I believe this may have prevented any splitting or cracking of the keel I have also been experimenting with SPILING. I found it easiest to mount paper to the hull as described in my instructions but instead of tracing the adjacent plank I just put tick marks and then matched them to a French curve using that to cut the plank. It did take a few tries but once you learn how not to make bony fingers its not so bad. The image does show that there is a problem needing attention regarding the last plank in belt “A”. I will try the heat gun one more time and if I have to; will either space it with a shim or rip it out and "redo" that plank.

-
Ahoy, Bob Just wanted you to know how much I appreciate you taking the time to restore your log. I am enjoying the new log as much as i did the original THANK YOU
-
Bleaching your wood
JPett replied to JPett's topic in Building, Framing, Planking and plating a ships hull and deck
Ahoy Mates Augie: I am up on the air on this, or should I say floundering. Look at the pic. That area is all nice, clean and bright. It almost sparkles, not to mention the lovely lavender smell. LOL. A quick wipe with the bleach solution might be not be a bad idea before treating basswood considering how difficult it can be to stain. Adam: Thanks for posting. Very interesting. Don't digress, test and post -
Bleaching your wood
JPett replied to JPett's topic in Building, Framing, Planking and plating a ships hull and deck
Ahoy Mates I decided that I would rip the plank out if the bleach did not work It did. I used a Q-tip to apply it, let it sit until dry and then nuked the whole area with water Now I will not know it there will be any adverse effects on the finish until my hull is complete, but for now it looks good I am wondering if I should wash the whole hull with some bleach before I seal it up I used a 25% solution of Clorox concentrated bleach "lavender scented" LOL and water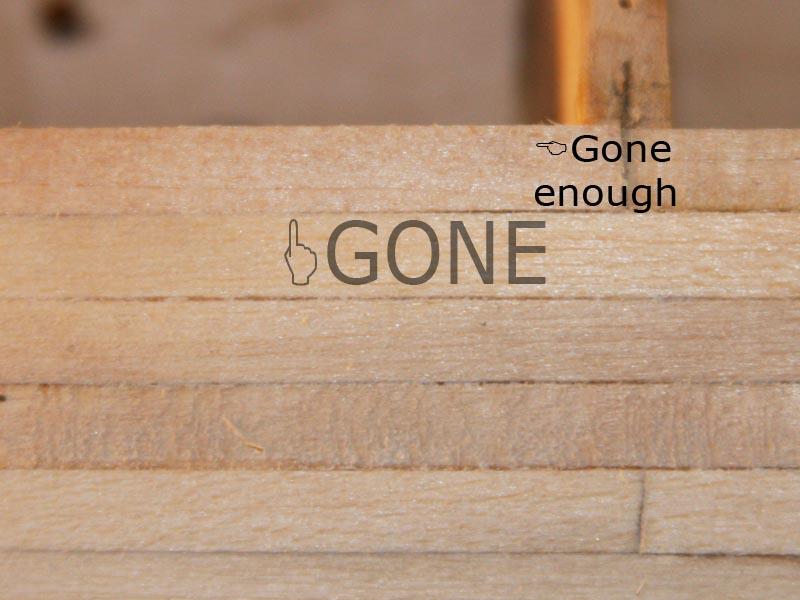
-
Bleaching your wood
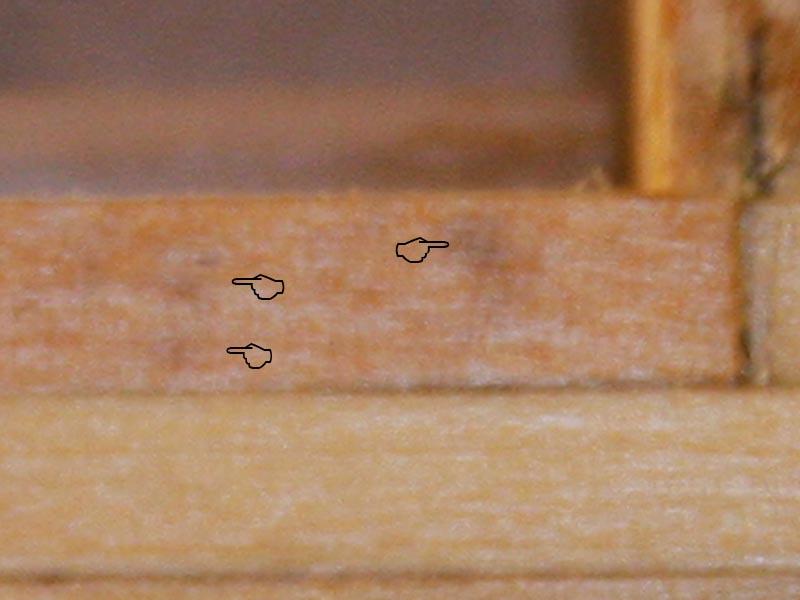
JPett replied to JPett's topic in Building, Framing, Planking and plating a ships hull and deck
Ahoy, Sam Thanks for stopping by and your post Please do not use that "G" word. I am so glue paranoid when I put on a plank it is thoroughly washed and then wiped with alcohol after the installation. "LOL" GLUE The patches in Pg 2, planking 11.jpg on my log sand right off. I actually double checked after reading your post "LOL" I am curious as to where they come from however. They show up everywhere but because they come off I am not very concerned about them. Might be oil from my hands. In the pic you can see some dark spots. These do not sand off and seem to be inside the wood. This plank was soaked three time and then bathed after being installed so its been swimming alot. Looks like mold to me.