HOLIDAY DONATION DRIVE - SUPPORT MSW - DO YOUR PART TO KEEP THIS GREAT FORUM GOING! (Only 13 donations so far - C'mon guys!)
×


JPett
-
Posts
881 -
Joined
-
Last visited
Content Type
Profiles
Forums
Gallery
Events
Everything posted by JPett
-

Bleaching your wood
JPett replied to JPett's topic in Building, Framing, Planking and plating a ships hull and deck
Ahoy, Augie I might be looking for someone to help with some experimentation I believe you have a ship that is made of Basswood Interested “LOL” I really miss those Emoticons -
Ahoy, Mates I have noticed some dark patches on my basswood planking. I sanded them thinking they might be pencil dust but they are not. I am wondering if they could actually be mold. I noticed that they get much darker when I wet the area telling me that should I decide to go with a natural finish these might not be very attractive. Has anybody seen this and if so could I use a solution of bleach and water to remove them. I really don't like the thought of ripping this plank out but am not sure how Basswood will react to bleach. I have used it on other woods with no negative effects.
-
Ahoy Domink, Are you going to have a switch for each light or just one for all the lights and another for the smoke. If I may make some suggestions If you go with just one switch for the lights, you could reduce the number of wires to four. Two for the smoke and two for the lights. You could still put individual rheostats for the intensity of each light on the ship to adjust the brightness of each light. I also am curious as to how you were planning to mount the finished ship. I ask because should you choose the pedestals you could use three. Two to mount the ship, one as a dummy using the hole for the bolt as a place to hide the wires. Nice work on the rudder too. I am sure what ever you choose you will do it well.
-
Ahoy, Sarah Thank you for posting and most importantly pointing out a few mistypes in my posts regarding the correct code for the #2 pencil. I have gone back and corrected these in my posts as not to confuse others.
-
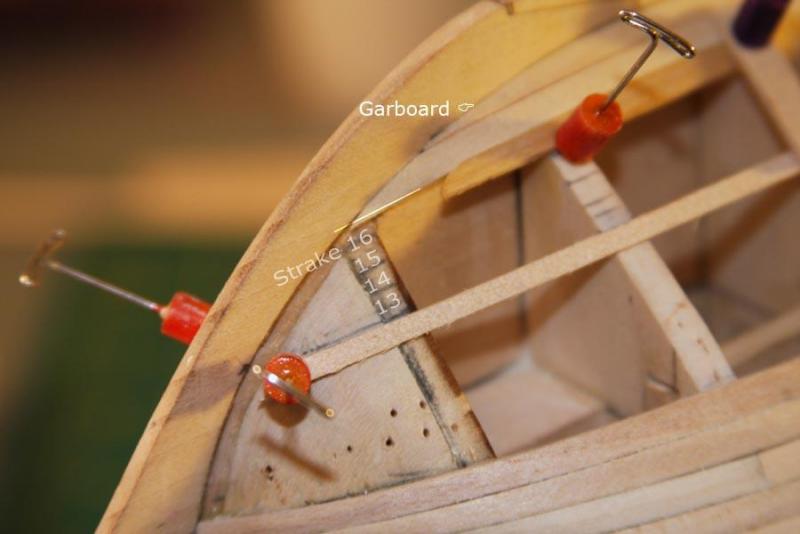
Ahoy Mates Ben and Cog: "OK" the little light bulb lite up after I pulled strake 17 off. It was only being held by the pins to shape it. By carefully shaving back the garboard I was able to create room for 16 I was really nervious about cutting the garbaord "LOL" but it was what was needed. Thanks guys Dida: Thanks for stopping by. No laser cutter, just a very sharp knife, and some beer.
-
Ahoy Mates:D Russ: TY, your two cents is worth a buck to me Augie: Thanks for stopping by. I know its not the Berlin but I still love her. LOL Patrick: LOL As the builder we will always be able to find every flaw. I agree though that once complete anyone looking at these small discrepancies is missing the picture. I will always know where they are and they will "for me" be very nice reminders of fun I had building this ship. Considering how bad that was, the picture really doesn't show as I gouged out a nice chunk there, the repair came out to me "very good". Ben and Cog: I am posting another pic showing the position of the next strake (17). I have high-lighted a line showing where I need to bend in this plank in and the pic does show it is running into next strake (16), but only by a little, (see pic, the number #16 is posted on its line. It should be above that line). The pic also shows that to my "untrained eye" there is room for the remaining strakes without any "bunching" after a minor correction to 17 I will wait for some replies before gluing anything Thank you all for stopping by and your help
-
Ahoy JP Thank you, I will check into purchasing that book. As for the deck, I have no ill feeling regarding Corel's choice to supply a piece of wood to be scribed for the deck. It is of very a good stock and will, I am sure find a home in another form. Manufacturers must make choices to maintain price points. Had Corel supplied precut lumber for the deck this additional expense may have increased the cost to the consumer. Pricing the kit in a market slot it would struggle to succeed in. This is the dance and a misstep here has been the cause of many a failure in the business world. What I do not appreciate is when a manufacturer uses garbage to maintain or increase their profit margin as some do, to supply the required parts.
-
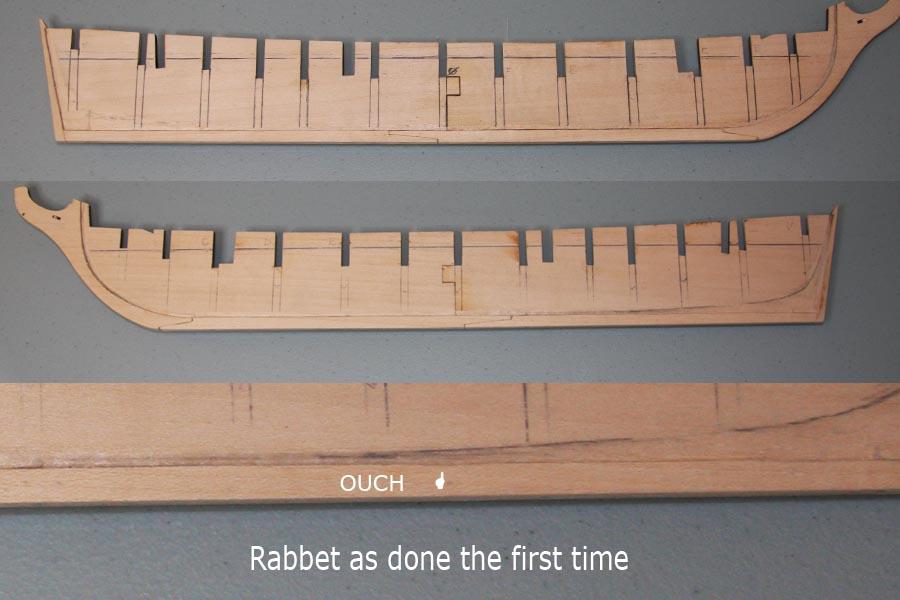
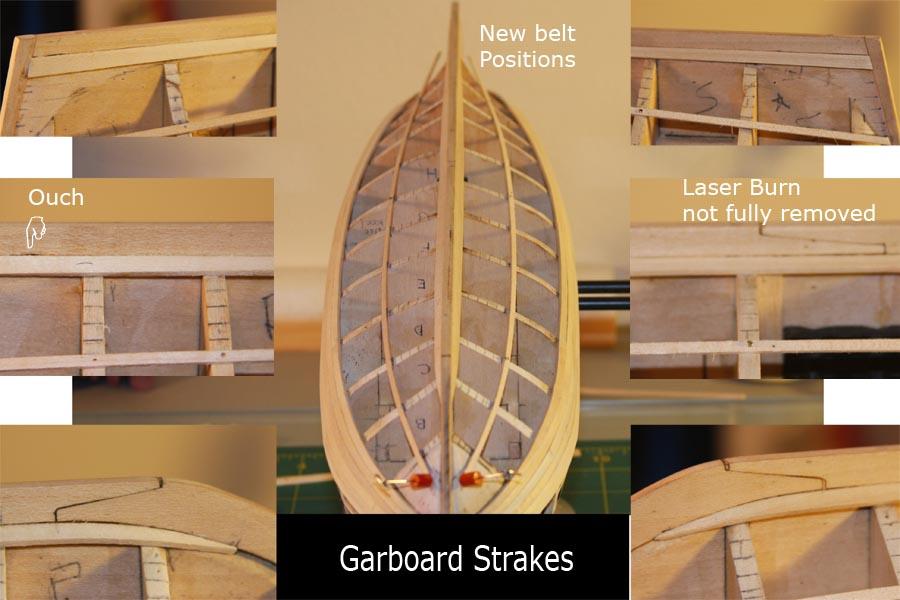
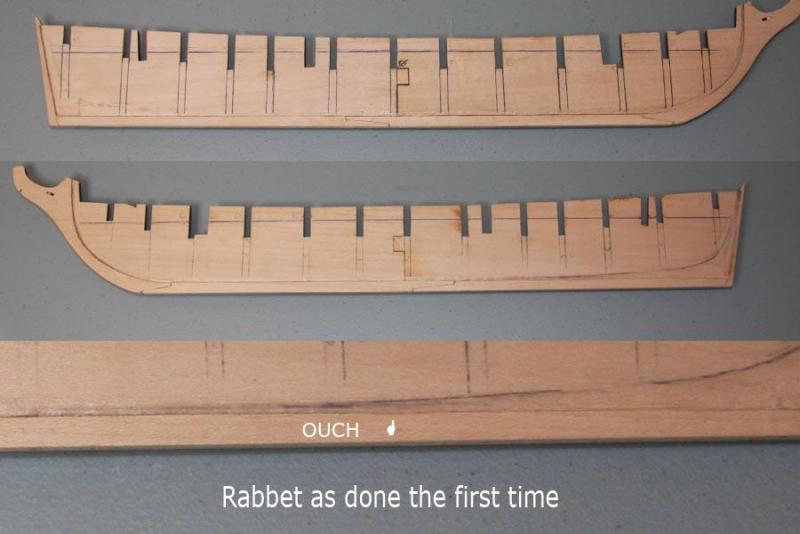
Ahoy Mates Thank you all for stopping by and your posts. There is a big difference when proceeding with confidence compared to doubt. Back to the build: Well the Garboard Strakes are in and all I can say is “WOW” For me this was, again a very challenging process. First, I marked all the strake positions for belt “C”. Something I should have done for belt “A” but did not. As a result, I paid dearly in the extra time to it took to complete this belt. It was a learning experience but one I think best remembered, not repeated. As for the marks, I did them twice, actually the port side three times. In the plus column I did learn that a 4H pencil is much better then your standard #2 which is really a 2B for this job. What I did was cut small pieces of paper that fit between the last plank of belt “A” and the keel. I found this much more accurate and the reason for one of my “redos”. Following the planking tutorial, here on MSW I used the Planking fan http://modelshipworldforum.com/resources/Framing_and_Planking/plankingfan.pdf To determine the plank widths and transcribed these marks to the hull: I ended up moving my batten twice. As for the garboard strakes, I decided I would stay my course keeping all the uncut sides facing up. My thinking was that this might help prevent waviness in this belt. This meant that the changes in the strake width needed careful execution, they would meet the rabbet. The rabbet that I cut out, back at a time when “clueless” would have been a compliment describing my shipbuilding skills. I carefully redid the entire rabbet correcting many past mistakes, like the infamous “ouch” and not removing all the laser burn (I was not able to completely correct this) then formed my garboard strakes. Cutting them first, then soaking and bending them finally sanding them to fit. After five attempts, I managed to get it. It should be noted that I used a regular plank width. I had purchased some wider lengths and after my third attempt found they were not needed. Let me know what you think.

-
Ahoy JP Thanks for sharing. I googled Keith Julier. He has been a busy man. You wouldn't happen to remember which series? I completely agree with your statement regarding Corel. It is really nice to see some of the manufacturers have stuck to their guns regarding the quality of their products.
-
Ahoy Mates Brian C: Thanks for your post. My thoughts right now were to add Basswood (American Limewood) fillers and single plank over those. Right now, my only planking experience has been with the Basswood. It there something I need to know about the Walnut. I have also found a European Forum and in it, an interesting comment about this ship having Clinker style planks on the aft end. Need to do more research on it and perhaps planking with walnut. Captain Scott: Thank You and I look forward too building her Augie: No Log, I have to get past the brute force and superstition phase of shipwright 101 before commencing on this project. I bought the kit on a whim. It was on sale, I had a small nest egg for a saw that I will now not be getting any time soon, and I wanted to see what a higher quality kit came with. I also loved her lines and all things Italian LOL. I actually have one more kit in storage (HMS Pandora by Constructro) that I might finish before starting this one. It was my first ever attempt and I barely glued on a few bulkheads before relocating to TX. She did not make the move but I think its time she joins the party. Sometime next year after the Ratt is rigged and sitting pretty. " of course"
-
Ahoy JanV Your build is coming along very nicely Those are some very high standards. "WOW". I wish you the best and look forward to your progess. Thanks for posting those pics and your log.
-
Ahoy Mark I was not sure what to do. I will not be starting this build for at least a year, maybe two. The forum was listed as Kit Discription. Your call
-
Ahoy Mates Thank you all for your responses. Mark (SJ) I will keep my eye out for the 9H After spending the last two days marking my basswood hull for planking, yea I am slow and had quite a few "redos" but I did find "for me" the harder pencil (4H) to be much better for the task then a standard #2 (HB). I did find uses for the #2 but the work was much easier with the 4H. The fine line was easier to maintain and there was considerably less smudging. It was also easier to erase and for me that was a big deal. I will post some pics in my log.
-
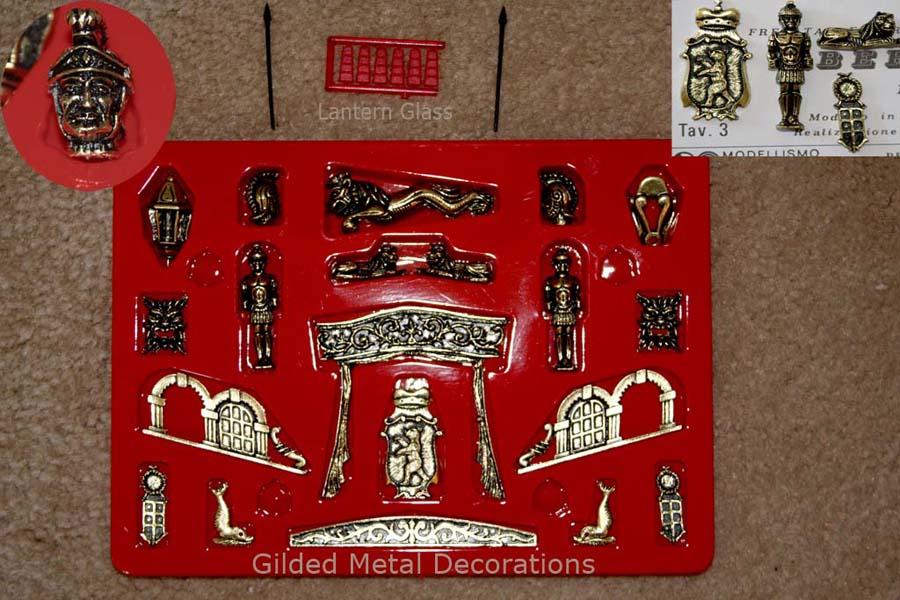
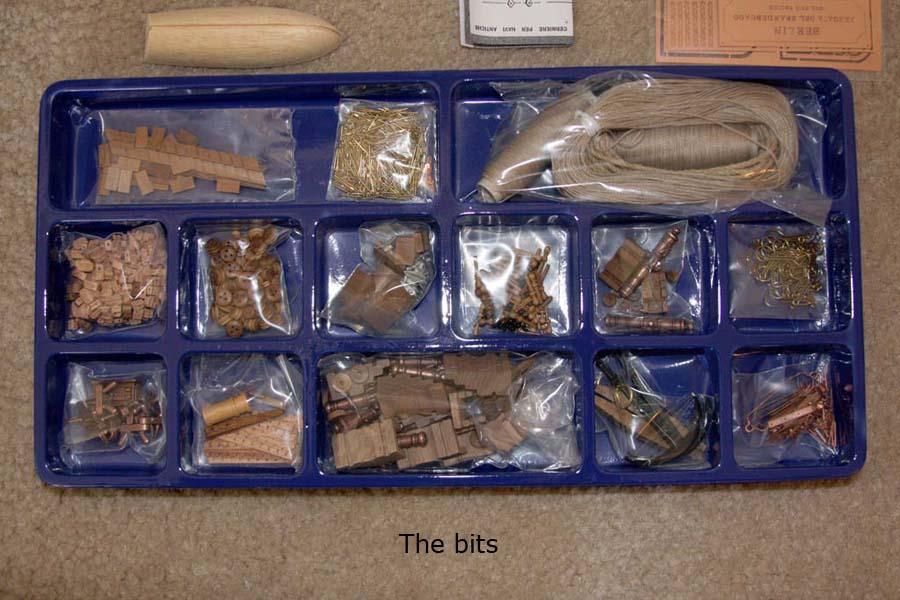
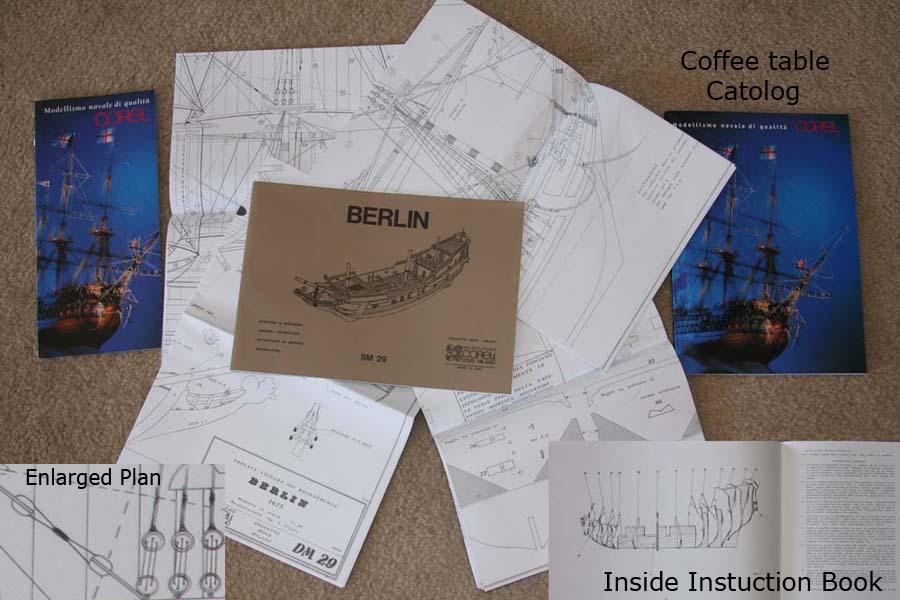
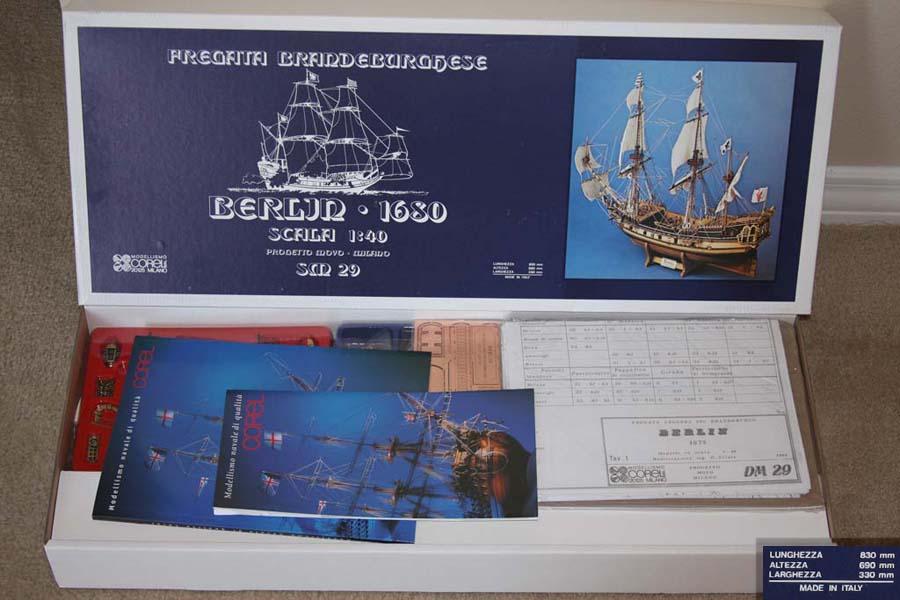
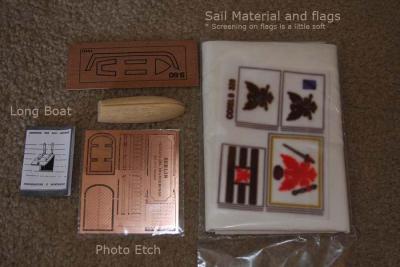
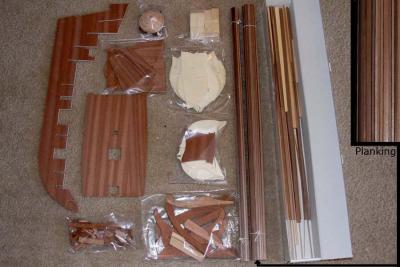
Ahoy Mates Please find my initial “out of box” review of Corel's Frigate Berlin. Please note that I am relatively new to this hobby and "easily impressed". I found the quality of the parts in this kit to be of a very high standard. The kit includes four sheets of single sided plans, an instruction manual, a vacuum formed plastic organizer of bits, another containing the gilded metal fashion pieces, canvas sail material and of course some wood. Also included was a very nice “coffee table style” book/catalog of Corel’s products and a small wooden bending jig. In the future, I will do a full inventory all of parts and post any issues or changes. The wood supplied in this kit was "gorgeous". There was no trace of any laser burn on any of the parts, bulkheads and keel parts were all precut, packaged in bags. The plywood bulkheads and hardwood keel items were impressive in their size and the thickness of the wood used; this is a big kit. The planking and other lengths supplied were clean, straight, and rich in color suggesting pieces were individually selected. There were very few dowels leading me to believe that I will be making masts from "scratch". The only disappointment so far in the kit supplied wood; the instructions suggest scribing planks for the deck. This leads me to believe I will be purchasing some additional wood for this kit. The long boat is a pre-carved “plug” style build and again; nicely done. The four sheets of plans or plates were crisp, highly detailed, and very informative; including images showing systematically how to complete some of the steps. The two dedicated to rigging were clean, well organized and gave the reader a very good understanding of the task. I cannot attest to the accuracy of these plans however. Although very well thought out and clear, there is no sheer plan, half breadth views, or planking layout on any of the included sheets. The plan notes are all in Italian too, and 'for me" will need to be translated. Overall I found the plans to be very good and of exceptional quality. The rigging plot is the best I have seen to date. I will use the word “included" to describe the instructions: They only convey an order to the build and not much more (It is listed as an advanced kit). On a plus, the index in the back of this book was very informative providing an excellent resource/appendix to the plans. Images and print quality were top notch. English translations were understandable and at times humorous. The bits were well packaged and again of a high quality. Quite a few are boxwood (Blocks, deadeyes and belaying pins), all are either hardwoods or metal (brass, copper, or the gilded metal). I found no Britannia or plastic except for the lantern glass. The photo etch was copper and much thicker then any I have seen before and well done. Five types of rope are included. In the minus column, the instructions state that the kit does not contain any blocks for the cannons. The cannons themselves are "gilded metal"; a milled piece of hardwood creates the carriages. The Gilded metal pieces are all nicely detailed. They are cast and quite heavy. I am uncertain of their make-up but can tell they will need to be securely mounted. I have a small reservation regarding how these parts will handle any tuning, changes, or touch ups. The construction of this kit will require some additional tools and skills for me to work the harder wood. Look for my build log sometime in 2014/15 here on MSW. Please feel free to post any questions you might have regarding this kit. I will do my best to answer them. For now I have re-sealed all the packages (less the plans and instructions) and stored the box in what I hope will be a safe location. I purchased this kit on sale from Model Expo (Presidents day sale). I feel I received much more then I paid for.


-
Ahoy, Sinan Very impressive first build Looking forward to your next post
-
Ahoy Mates Thank you for your responses I went out and purchased a few pencils similar to what has been recommended and ran some tests. What I found was that for the thinnest (neatest) line the 4H was the best. I could get the finer line with the HB (standard #2) but it was more work to keep the pencil that sharp. I used a regular pencil for the test and applied Marks tip to shape them on some paper.
-
Ahoy Russ After the last episode I had with battens I can assure you this one has been "eyeballed" I did have to edge bend it in the bow (see previous post). It was that or deal with the pinch at bulkhead "L". Time will tell if it was the right choice.
-
Ahoy, Bob It is a great pleasure to see your log again on MSW. Looking forward to future posts. I too will file that paper trick, or should it be called "paper mache" trick. Thanks for posting.
-
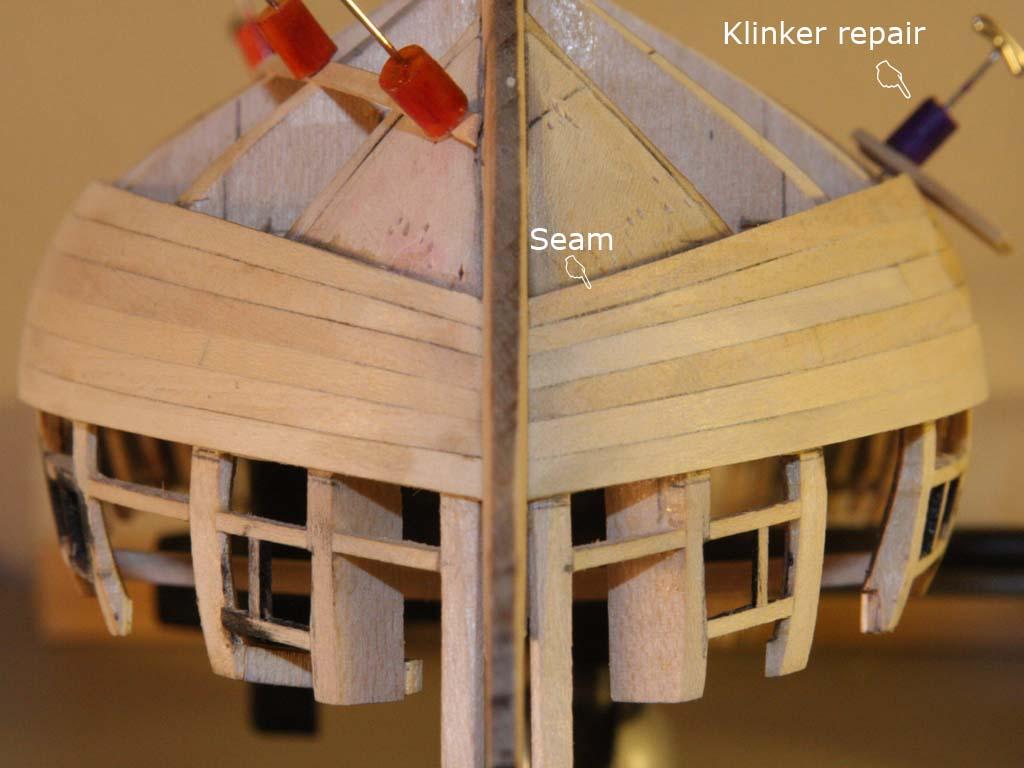
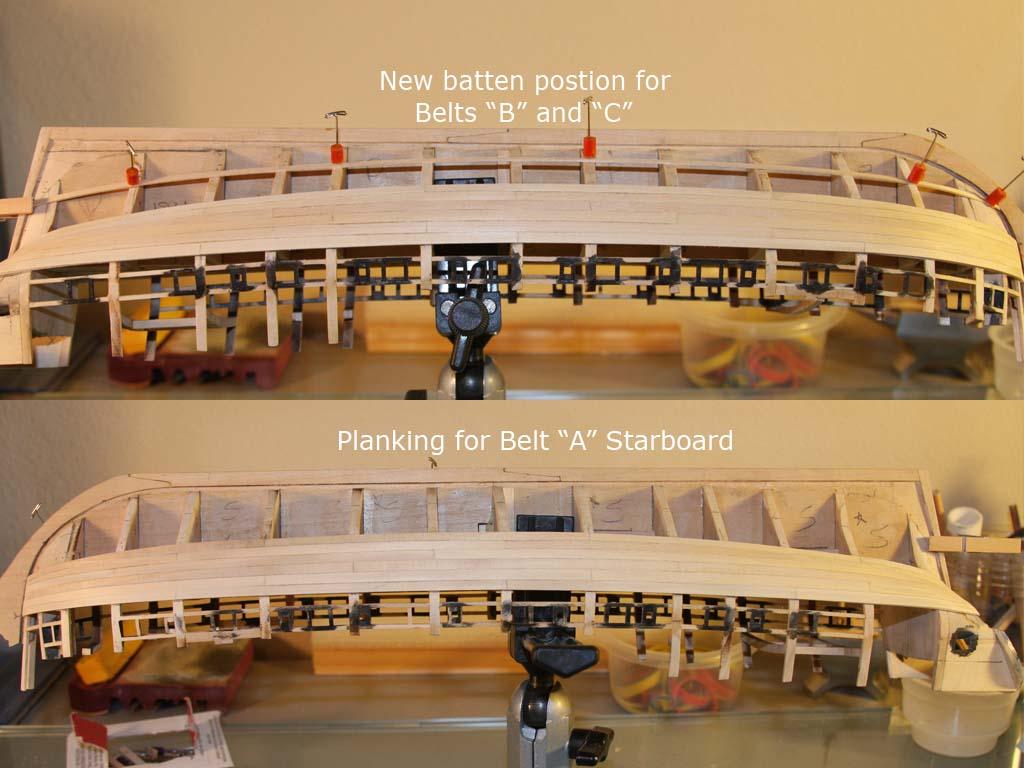
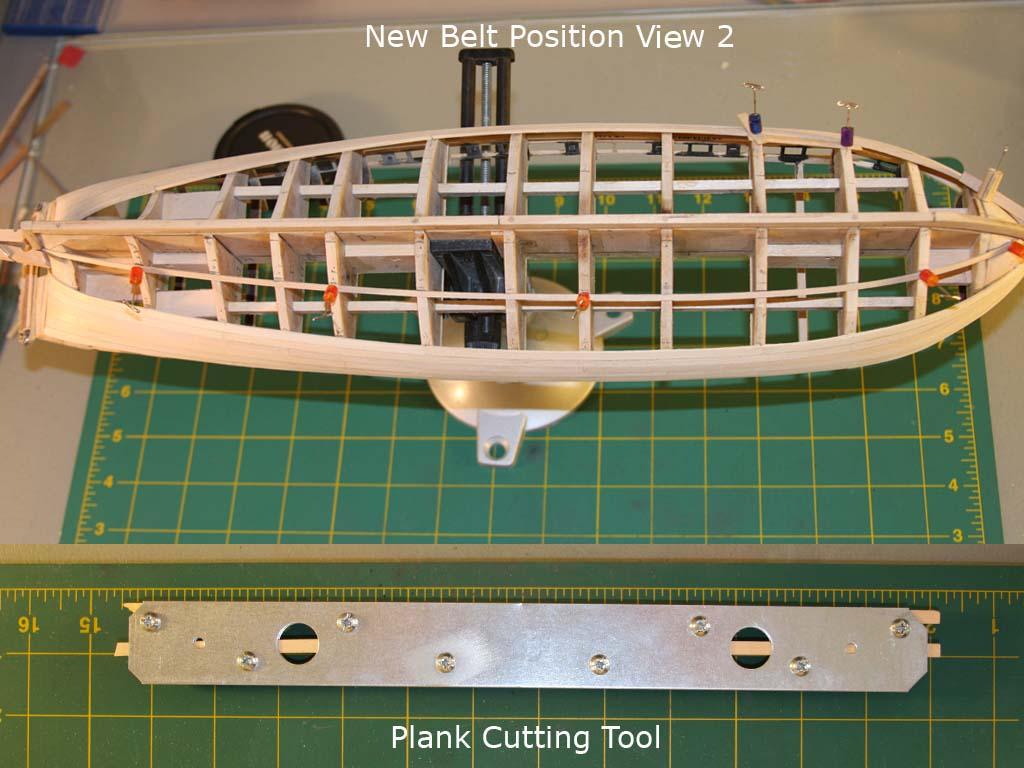
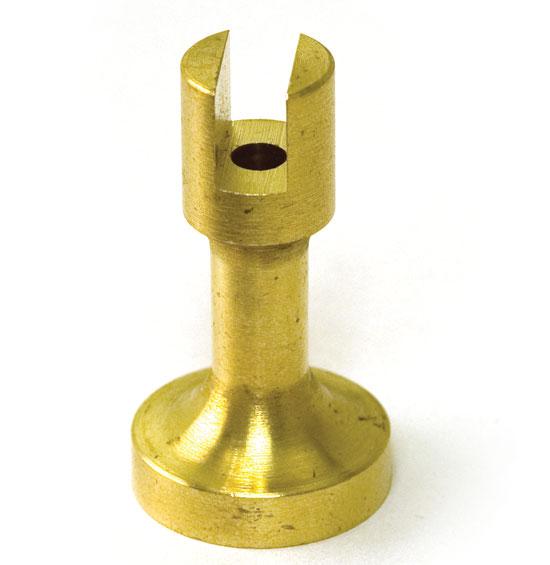
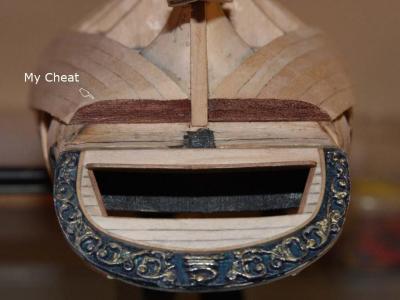
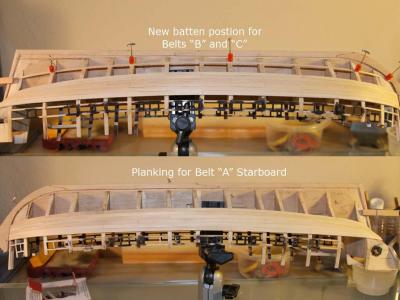
Ahoy, Mates Thanks for stoping by An update on my build Belt "A" starboard is now complete. This includes a fix for the "short-cut" on the third strake in the rear and some planks on the counter. I really like the look of the Model Expo mahogany on the counter but would like to warn anybody considering using this product. It is "VERY" difficult to work. Consider 400% for waste. I am hoping to get mine this low. I found to cut it I had to tape both sides with painters tape to prevent splintering (still a 50% failure rate). To form it I used a fine file. Sand paper tore it to pieces. If that isn't enough it is so porous that glue weeps through it everywhere when attaching it. I really like the look so the extra work is worth it. In the pic is my fix (My Cheat) for the bad cut I made on the third strake. (see earlier post). I can see it but once the rudder is installed, it should be barely noticeable. Planking has been a challenge. I have concluded that I need to move the location of the line separating belts "B" and "C". "B" was too narrow at bulkhead "L" and too wide towards the bow. I will also be marking every strake location on the bulkheads and confirming the run of each plank before I proceed. Something I only did on paper with belt "A" and the cause of many issues during planking. I posted a pic of my plank cutting guide, Found the parts at Home Depot in the hardware section, They are used to hold tile and come in 3 different sizes. I bought the medium length. Cost was under two dollars. Works great. I am considering sanding belt "A" to a 220 grit. My thoughts are that if I oversand (ME?) or cause additional work it will be easier to repair now. I had some issues with the shorter planks not bending at the ends. When I used full length strakes and formed those to the hull the curve of all the planks was consistent. This was not the case when I form individual planks and considerable sanding was required to correct this. I now use longer lengths when making single planks and cut them down to the correct length after forming them. The klinkering effect also required modest sanding to remove. The seam noted in the pics can and will be removed using the concentric pin and RC heat gun. Currently I am trying to get my head around the garboard Strake. I can see that this plank will determine the flow of all the planks right up to belt "A". I am on take 2 and will hopefully have these done for my next post. In the mean time I would greatly appreciate if those with planking experience could review my new belt position and confirm I am not "opening another can of worms" Thank you


-
Ahoy MJD Thank you for the reply. Your attention to detail and craftsmanship on this build is impressive. Thanks for sharing
-
Ahoy, Mates I am curious to know what the best product is to transcribe measurements to wood. Currently I use a refillable lead pencil with a 0.5 refill. I find the line to be too wide for my needs. I usually measure in 32nds occasionally splitting them (64ths). I also tend to make a lot of corrections and erasing with this pencil is just not working. Thank you
-
Ahoy, md1400cs Beautiful work. I especially like your treatment of the "gilded metal". Can I ask your overall opinion of the Corel kit? I am looking into purchasing one.
-
Ahoy, Mates rdsaplala: Thanks for stopping by. I do agree that some edge bending is in my horizon. I am hoping to save the full on spiling for my next build. I have corrected (almost) the issue on the bow plank in my last post with my trusty heat gun. After actually burning a few planks (yes; there is a limit) I found if I applied water during the heating process the planks could be manipulated even more and did not combust. I was able to completely secure the plank on bulkhead "B" but found if I did the same for Belt "A" it had an undesirable effect on the run of the plank. I might cheat and go with a shim there so the next plank butts up. Trussben: Ahoy, I wish I could agree with your statement but after planking belt "A" I have come to the realization that my plan was flawed. I am very happy with the results but have regrouped after reading a link jcoby sent me on the old forum reposted by Chuck on the new. The process was educational but I think I need to move forward, Link to planking practicum http://modelshipworldforum.com/resources/Framing_and_Planking/Lining%20Off%20your%20hull%20for%20planking.pdf Back to the build I have two more planks to install and Belt "A" Starboard is complete. I will be attempting to edge bend the bow plank and will post some pics once complete (I hope). On the port side I have relocated the batten between belts "B" and "C" edge bending it on the bow end. I can only assume this will mean the same for all the following planks. As I stated earlier I will be following a new plan and some pictures should follow shortly for review. Thanks for stopping by.
-
Ahoy Patrick Your craftsmanship is amazing. Thanks for sharing
-
Ahoy, Mates While researching a build I came across this link. Thought I would share it. 17th Century rigging image with discriptions http://www.hendrick-hamel.henny-savenije.pe.kr/ship.htm