-
Posts
4,521 -
Joined
-
Last visited
Content Type
Profiles
Forums
Gallery
Events
Posts posted by Blue Ensign
-
-
-
She's coming together very nicely Richard, the Bowsprit colour looks good, I didn't care much for the Walnut finish either.
B.E.
-
Hi Andy, I seem to have missed your last couple of rigging photos a few pages back, she looks very impressive.
I also like to rig in stages from the deck up starting with the lower masts, so much easier to make a decent job of seizing the shrouds. I make the shroud pairs up off the model on a dummy masthead and then transfer them.
Cheers,
B.E.
-
Neat job on the mast Bob, but I think you will be disappointed if you go to Plymouth to see Victory

Enjoy your trip

B.E.
-
A great series of photos Michael, I just love the work you do.
A point of curiosity about the grating, was it a 'fixed' feature on Vasa, it doesn't look like it could be taken up and seems to have quite some depth to it?
Cheers,
B.E.
-
Your copper plates look excellent Nils, and nice work on the rudder.
Well done

B.E.
-
I'm with Dirk, your clinker planking looks splendid, and I love the colour combinations you have achieved.
Regards,
B.E.
-
-
Sorry to disappoint Peter, but this is a tricky problem. Logic to us would dictate that some sort of chock arrangement would be fitted across the spare topmasts to seat the boat on.
My books contain a few photos of contemporary models with boats stowed on the booms and these don't seem to support that theory.
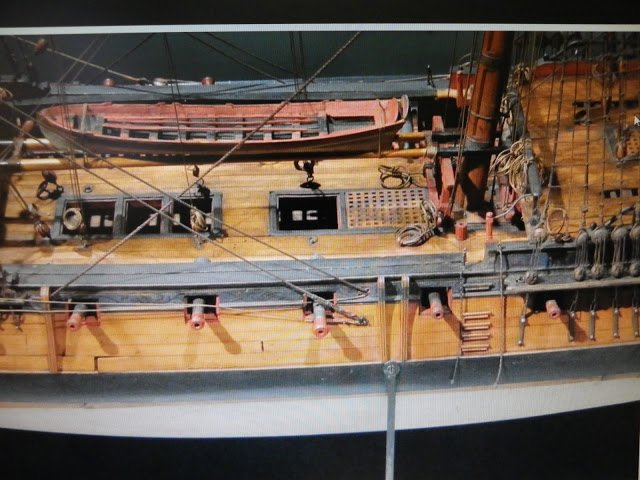
Here's a sixth Rate from 1745.

You can't see all the boat, which I have seen in a book, but the boat sits down slightly between the booms and appears to simply be lashed to the booms.
Here's a shot of the Lowestoft model

Again no indication of any sort of chocking, the beam of the boat is supported by the booms and is held down by lashing.
You only tend to see one boat on the gallows on contemporary models, possibly because the larger one was towed?
Nesting of boats again seems to be a logical solution to a problem, but according to Lavery (Arming and Fitting of English Ships of War)
This is unlikely to have been done in the eighteenth century or before. Although boats often had some removable thwarts, these were intended to allow the carriage of casks, and there were enough fixed thwarts to make nesting very difficult. At least one thwart was fixed and kneed in midships to support the Mainmast.
He goes on to cite the case of a ships Pinnace which was often longer and narrower than the Longboat, making nesting impossible.
I'm dodging the problem by only showing one boat on the gallows

Cheers,
B.E.
-
Neat work Timmo, looks excellent.

If you don't like the finish of the Belfry roof you could always simulate a 'lead' covering using tape which would not be out of keeping.
On Peagsus I applied a 'copper' roof using self adhesive copper tape.
Cheers,
B.E.
-
-
-
Its down to personal preference I think Nils, the Amati plates are quite easy to apply using thick ca and again the set can be purchased separately. Any misplacements are easily removed sometimes with the assistance of a little acetone.
Pegasus was coppered from the outset, but with neat hull planking and given your particular approach to your build there is no reason why you couldn't leave one side uncoppered, perhaps even applying plates to the 'open' side only to show the effect or vice versa.
Whatever, you decide I'm sure you will achieve a good result.
Cheers,
B.E.
-
Good day B.E.
here just a quick Illustration how I meant it with the space, the stairs and clearance to 1st and 2nd gun. The gangwayplanks you provided are still going roun in my head, because I really like them. What do you think about my stair Version in combination with your G-Plank Version ? The swivel gun attendants would not interfere with the heavy gunner Crew one deck lower in battle....
Nils
Hi Nils, I suppose if you go with gangplanks the ladderway is not needed. Having a ladderway in that position does solve the practical problem of gun fouling, but doesn't the deck beam foul access to the Fo'csle? - or are you intending to modify the beam by the addition of ledges and carlings to form the hatchway?
The swivel gun modifications are looking good, those hooks I modified for the mountings are available as a separate purchase so you don't need to use up the kit supplied ones.
Regards,
B.E.
-
-
Nice work on the rigging Peter, and the cutter is looking pretty neat. I think some sort of chocking is necessary, but I've not been able to identify the how or what from contemporary models as yet.
Cheers,
B.E.
-
Love the Figure Christian, she has a very classical look.
B.E.
-
Beautiful looking gun Gary, nice work on the carriage. What size line did you use for the breeching? 7" circumference rope was used on a 32 pounder. I'm not sure that was the way the breeching rope was secured on a non Blomefield pattern gun. I think the breeching was either taken a turn around the neck of the cascable from one side to the other, or was spliced around the cascable.
ps On this side of the pond we call those plugs that fit in the muzzles 'Tompions', and the iron work that secures the trunnions the Cap Squares. The key is secured through the Joint Bolt over which the hinged cap square fits.
I would need to think a little about the messenger cables and its getting late. Daniel (Dafi) has done extensive research on the messenger set up and a visit to his Victory build may be beneficial.
Regards,
B.E.
-
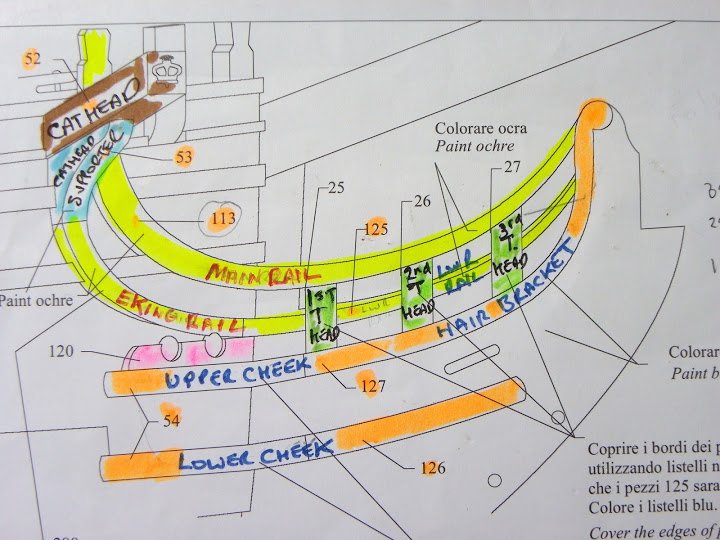
Hello Nils, re the English terms used in shipbuilding - here's a little schematic I did on the plans to help me sort out what was what.

Hope this helps.
B.E.
-
She's coming together very nicely Nils, a neat little jig you have made for cap squares.
I think the Eking / lower Rails and Main Rails could do with a little more fining and tapering as they run to meet the the Hairbracket at the head, but the main thing is to get those tricky little rails in place, they then can be fine tuned.
One of the reasons I fitted gangplanks on my Pegasus was because I couldn't accept the strange fit of the Foc'sle ladders, but does your new ladderway foul the first gun position?
As you are leaving half the deck open do you intend to fit a galley stove, they are quite straightforward to make out of any old bits of timber/plastic and do add interest to a build. There are designs here on MSW and plenty of examples to follow.
Cheers,
B.E.
-
-
Hello Nils, what a fascinating approach to building Pegasus working up the full frames from the Amati bulkhead drawings, no mean feat.
What did you use as reference for the internal fittings which of course are not given in the Amati plans? but which add such interest to your build.
I note that you have added metal rims to the trucks of your gun carriages and lifting bars (Dolphins) to the guns. You may of course be adopting a stylistic approach to aspects of your build, which is fine, but those features were not actually fitted to British naval guns of the period, if you are seeking an historical approach.
An appealing build Nils, I will follow your progress with much interest.
Regards,
B.E.
- zoly99sask and davyboy
-
 2
2
-
Beautiful work and a fine build log, love the headworks and stern decoration.
Regards,
B.E.
-
Fine looking build Kester, I love the furled sail, great natural look to it.
B.E.


Sherbourne by Stockholm tar - Caldercraft - 1/64
in - Kit build logs for subjects built from 1751 - 1800
Posted
I just love it Kester, a model with enormous appeal for me.
That's a sweet looking little cutter she's carrying.
Regards,
B.E.