HOLIDAY DONATION DRIVE - SUPPORT MSW - DO YOUR PART TO KEEP THIS GREAT FORUM GOING!
×


Chuck Seiler
-
Posts
1,876 -
Joined
-
Last visited
Content Type
Profiles
Forums
Gallery
Events
Everything posted by Chuck Seiler
-
 Mark, This is looking good!!! I know what you mean about taking notes. Building the model is easier than documenting the build. I agree with rigging the gun carriages and mounting them to the model without the guns. I did not do that on my PHILLY 1 build and I regretted it. Before you get too far, don't forget to build/mount the cook stove. As I was reviewing the instructions, I noted the cook stove construction was never mentioned. (oops!!!) It probably should be installed before the mast partner is installed, but I think it can be fitted in after...but before anything else is installed.
 -
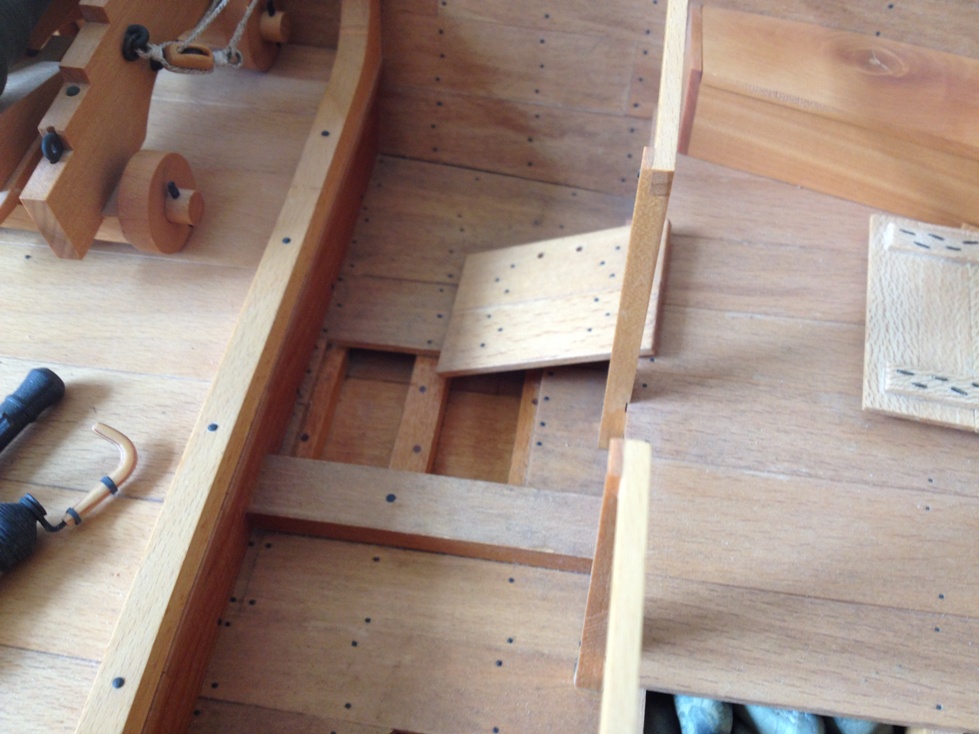
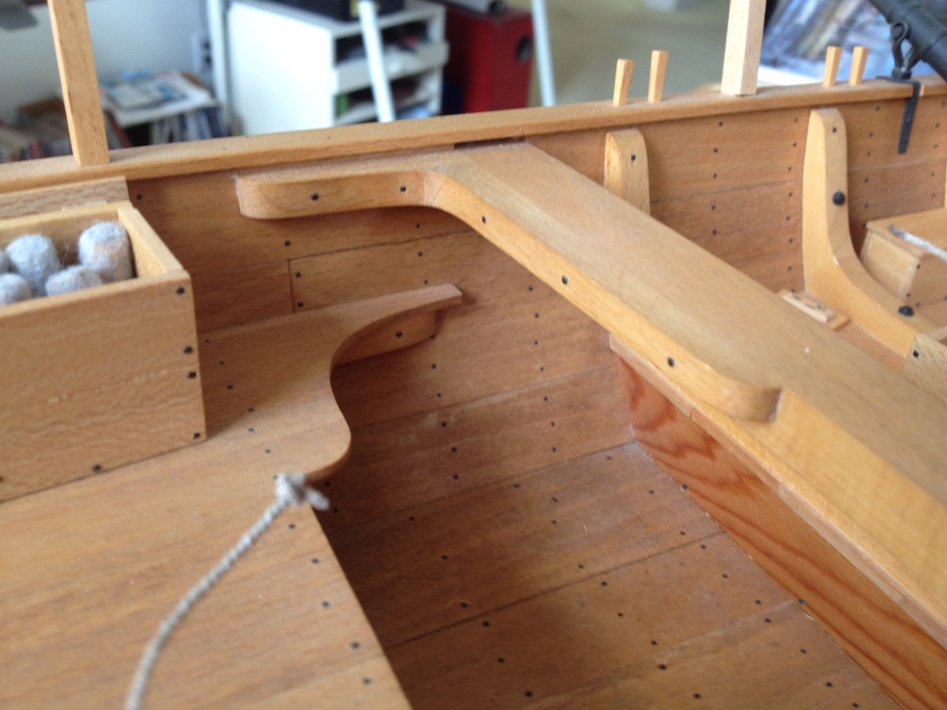
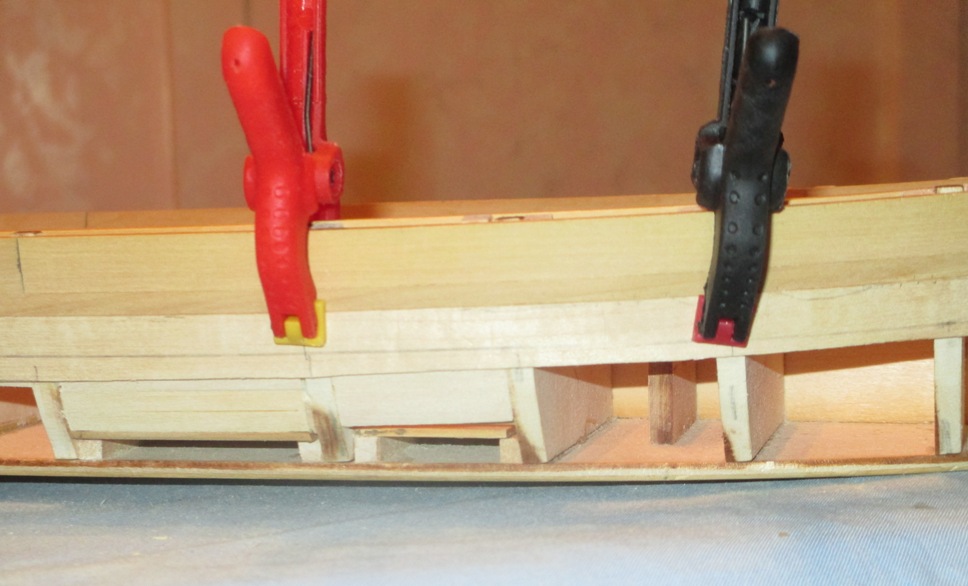
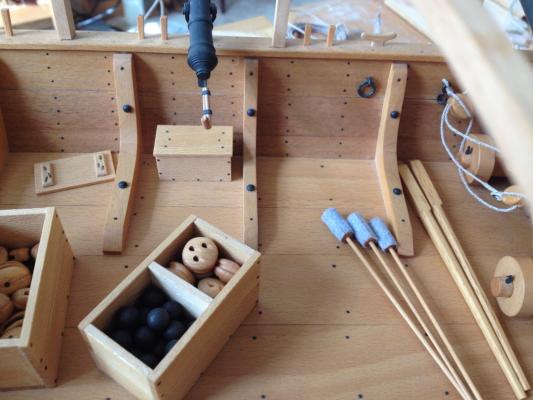
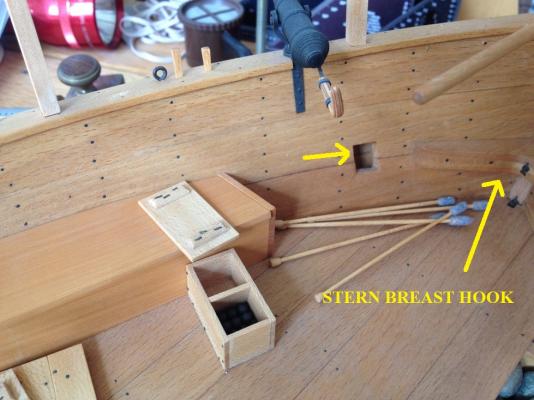
Forward platform decking and 12 pounder gun slide. Dave used Beech to plank his model. Beech is a very good scale oak. PHILADELPHIA was planked in white oak. Midships gun platform. He doesn't use as many nails per plank per frame here...not sure why. Note support knees-single bolt through hull and deck (each) with a nail at each end. The bolt through the side will pass thru the hull and be visible on the model exterior. I don't think the model has these, but I am adding them to mine and will discuss it as it arises. Note thole pins and bits on the cap rail. Aft cockpit. Aft platform, starboard arms locker, stern breast hook (not shown on model). Note square hole under the swivel gun. That was originally where the deck beam for the after platform ran. Arnold intended a mortar to be placed back there. After the mortar exploded during testing, the deck was lowered but the holes remained. The other holes are covered by the arms locker. Breast Hooks One breast hook of naturally-curved white oak was placed at each end of the vessel. Both are approximately 5-1/2 inches thick and positioned about half-way up the stem and stempost. The bow breast hook has an arm length of approximately 3 feet, while the opposite member spans a distance of 2 feet. (I think that means the one on the stern.) Forelock bolts were used to secure these timbers to the stem and sternpost and nails were used to fasten them to the ceiling. The model doesn't appear to have breast hooks. I am still thinking about whether I want to include them or not. Thought? Exposed floor beams, frames and deck support beams. Rocks were added under the after platform deck to add ballast to compensate for the mortar that was removed. Note: The deck support beams appear to follow side frames/knees rather than the floor beams.


- 259 replies
-
- 6
-

-
- Gunboat
- Philadelphia
- (and 1 more)
-
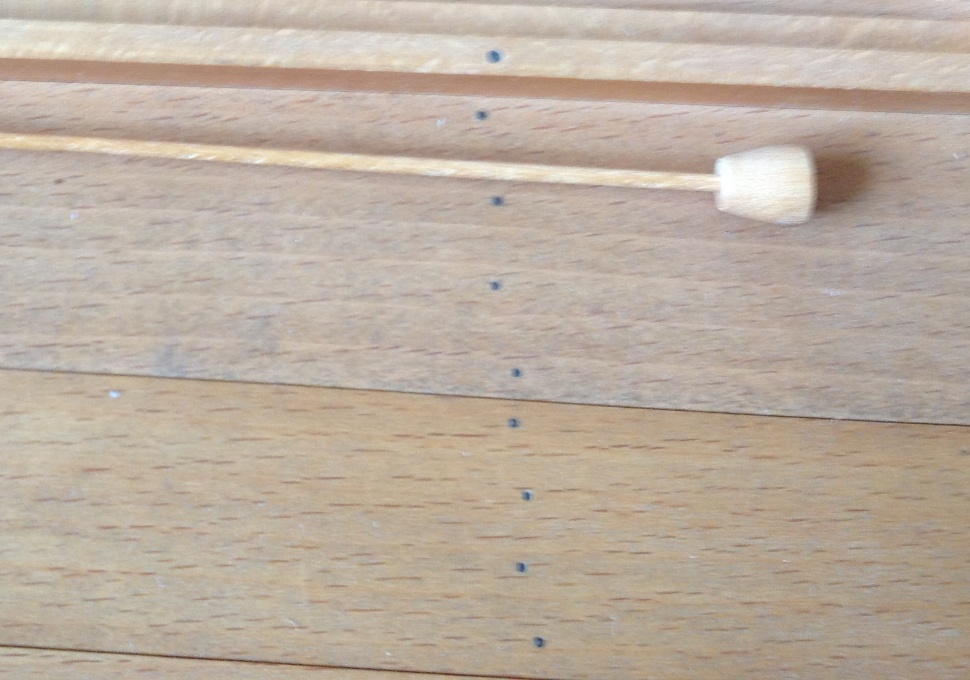
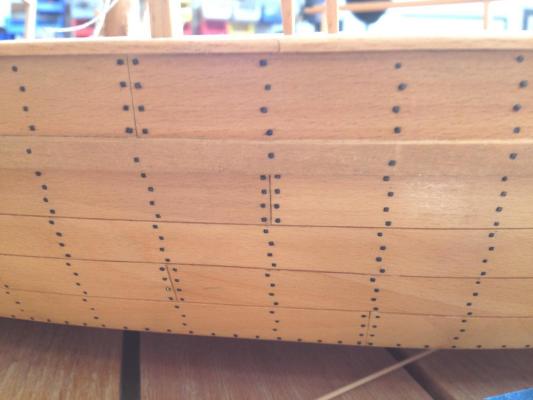
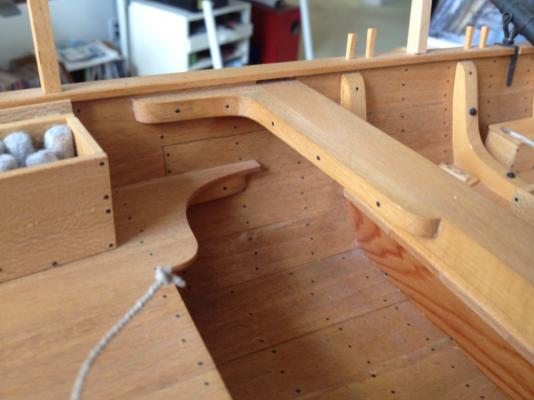
While I continue with my hull planking, I am going to break from protocol here and post photos of somebody else model. Anguish not. I have asked permission from and received same from both the modeler Dave Yotter and site administrator Chuck Passaro. The primary purpose is to pictorially demonstrate the nail patterns (etc) for PHILLY in conjunction with the narrative from BRATTEN. It also demonstrates some building items from the original plans NOT incorporated into the kit. Finally, it lets you see some really fine craftsmanship up close. My thanks to Dave for these pictures. A note regarding my discussion of building measures and items from the original plans but NOT from the kit. I realize this is a beginner's level kit and may be the first or second model a reader may be working on. By including the information, I am not inferring that the builder SHOULD include these items, only that they COULD include them, or at the very least know about them. Organization: Where it makes sense, I will include the information quoted from BRATTEN, followed by the photo(s) that relate to the narrative, followed by my own comments. The BRATTEN narrative will be in one font. My comments, another. The full text of BRATTEN (with diagrams) can be found at: http://nautarch.tamu.edu/Theses/pdf-files/Bratten-PhD1997.pdf Exterior Planking. Philadelphia is planked with five 1-1/2-inch-thick white oak strakes. The lowermost strake is spiked directly to the outside edges of the bottom planking the latter had already been beveled flush with the outer face of the frames. Individual strakes are composed of three to four planks that butt each other on the center of a frame. The planks are fastened to every frame with a minimum of four iron nails. Strake ends were secured in their rabbets with seven or eight nails driven into the stem or stem posts. The edges of the planks were probably beveled to receive caulking material. Wale. Philadelphia has one rectangular wale 3 inches thick and 4-1/2 inches wide running directly below the sheer strake. On each side of the vessel the reinforcing member is made from two pieces of white oak fastened by a simple flat scarf over a span of four frames. The wale is attached to the vessel with one spike at every frame position. Three iron nails and one spike were used to secure the timber to the stem and stemposts. Hoffman notes that the l-inch-diameter bolts for the midship deck knees also pass through the wales. Reminder: The top strake is actually two strakes in the kit. Since kit-strake 1 is the same width as the wale, it would probably get 1 nail and the kit-strake 2 would get 3 nails. Basically 4 nails per plank per frame. Kit only has 16 frames while Philly had 39. I am putting a 'frame' between each of the kit frames except at the cockpits. They will have two extra. This will only give me 34 frames...close enough. It looks like the bottom strake is nailed evenly across the bottom. Ceiling Philadelphia has two types of internal planking or ceiling, side ceiling and what Hoffman refers to as flooring. After the keelson was installed. 1-1/2 inch thick ceiling was installed over the rectangular floor timbers in a fore-and aft-direction. Floor ceiling is white oak of varying width (10 to 18 inches). The planks closest to the centerline of the vessel butt against the keelson while the outboard planks are beveled to fit around the frames. The ceiling is attached to each floor timber with two or three iron nails. A well area, approximately 2 feet 5-1/2 inches by 1 foot, 9-1/2 inches was created in the stem (???) by cutting out a rectangular portion of the flooring on each side of floor timber twenty-five. Hoffman suggests that a bailing cover may have been present but was not recovered, presumably floating away when the vessel sank. Side ceiling was also fashioned from white oak, but 1/4 inch thinner than flooring. Four ceiling strakes of varying width (10 to 12 inches) are present on both sides of the vessel. The uppermost ceiling plank is placed at the same height as the corresponding external plank, effectively covering the frames up to their tops. The lowermost ceiling plank sits directly on the flooring. Side ceiling was secured with three nails at every frame position. The ends of every strake were beveled to butt against the stem and stem posts and are fastened to each post with seven or eight nails in staggered pattern. Floor and side ceiling plank nailing. Also noted is some deck planking and mast support knees.
- 259 replies
-
- 4
-
-
- Gunboat
- Philadelphia
- (and 1 more)
-
Steve, You are quite welcome. I am happy to help. When I first started about 15 or 16 years ago, I remember a respected veteran builder (it may have been Ben Lankford) said it took him a day a plank...or maybe a strake. At the time I thought he was crazy...that's absurdly slow. Now I know better.
- 259 replies
-
- 3
-
-
- Gunboat
- Philadelphia
- (and 1 more)
-
Basswood? I'm impressed. I am not happy working with basswood in many cases because it doesn't seem to hold a good edge and fuzzes easily. Your edges on the DRUID look very crisp. Do you prep it in any way?
- 172 replies
-
- 2
-
-
- druid
- sloop of war
- (and 2 more)
-
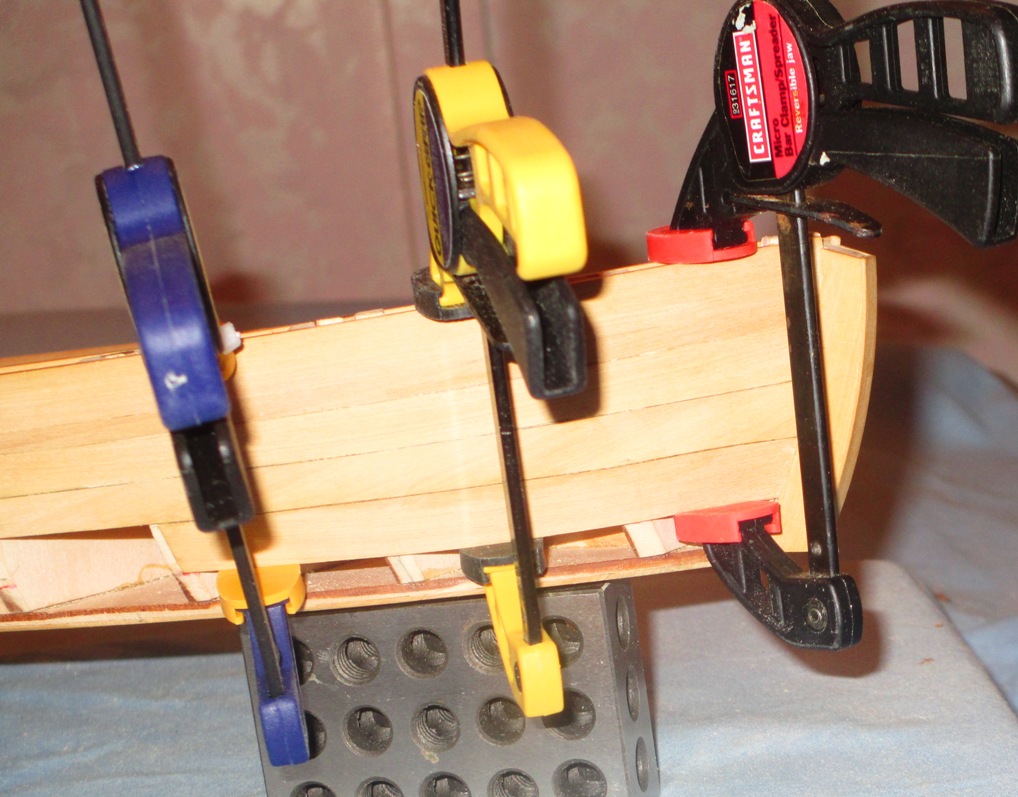
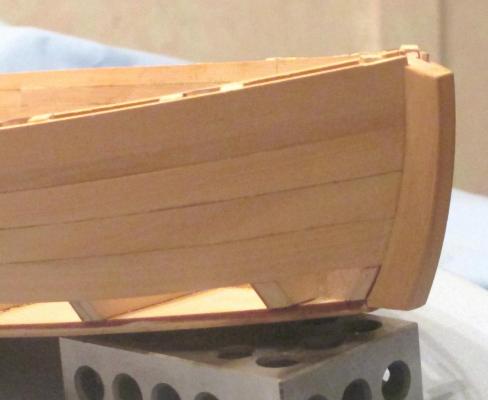
I had some time off this weekend and had planned on doing alot of hull planking. It was 80 degree here yesterday and crappy weather has started to move it. I decided to spend some time outside while it is still summer....ooops sorry. My apologies to those getting snow. Here is a shot of the bow section after a little smoothing. I am happy with the hull, but not the photo. I tried several times to get a good, clear, closeup shot but was unable. I'll fire the photographer and see if I can get something better with good lighting. Same section previously...closer up....before smoothing.
- 259 replies
-
- 6
-
-
- Gunboat
- Philadelphia
- (and 1 more)
-
Do you have a build log? I am unable to find.
-
I wholeheartedly agree with Kurt. Rough-fitting the top curve, then smooth-fitting the top curve while leaving a little wood at the bottom just in case is the way to go. It may be a little wasteful in the use of wood, but it results in a better looking model. It wasn't all that long ago that I would cut off a x/y inch wide plank from an x/y inch thick sheet and attempt to edge bend it into place. Most of the time I found the bow sections of the planks are narrower than amidships, so by tapering the correct side of the plank and some creative edge bending I could get close. I would just make the plank extra thick and sand paper would take care of the rest. ....but it showed. My friend and mentor, Mike Lonnecker, showed me what he was doing with his planking for his HMS FLY. I originally disliked the idea because it seemed a waste of wood. Now that I am doing, I love the results. Fine tuning the fit takes awhile, but is well worth the effort. The bevel: The angle IS important, but there is no rule of thumb. You just have to ease it in. If the angle is too severe you end up with a gap if you sand away too much of the surface wood, leaving the bevel exposed. I usually start by taking the inside corner off a little. Also I look at the angle where one plank meets the other and go from there....a definite SWAG. Make sure to go in and clean out any debris and glue as well. This could be the reason why you have gapping as well.
- 259 replies
-
- 1
-
-
- Gunboat
- Philadelphia
- (and 1 more)
-
Steve/CHB, I think this is a GREAT model to learn spiling and planking. The small number of large planks helps...I think. That first one is a doozy however. That, and the width of the planks can be overcome as long as you aren't too worried about historical accuracy; make the planks shorter and thinner. Obviously by looking at the we see that they were not adverse to short planks*. Personally, I would be more comfortable with plank W+1/1 going only as far as frame 11 or 12. Similarly, placing 5 instead of 4 strakes below the wale would make the plans narrower; not historically correct for PHILLY, but not unreasonably narrow as planking goes. Again, the caveats here are (1) it will not be historically correct, (2) you will have to re-line the hull yourself and (3) you will have to plan a little to avoid overlapping butt joints. (1) The planking for this model is already historically incorrect. As discussed elsewhere, the two strakes above the wale in this model are only really one on the real ship. Unless you are familiar with the PHILLY plans, you would never know that there are 4 strakes below the wale instead of 5 and plank 1 is overly long. If the benefit is that you can plank better, you learn the process and you end up with a great looking model, it is worth it. (2) Easy. Measure the length of each frame from wale to bottom and divide by 5. * Historically, they planked the gundolas from bottom to top-just the opposite of the way we are doing it. I find it interesting that the FIRST strake (in their case) has alot of short planks and finally at the top the planks get longer.
- 259 replies
-
- 1
-
-
- Gunboat
- Philadelphia
- (and 1 more)
-
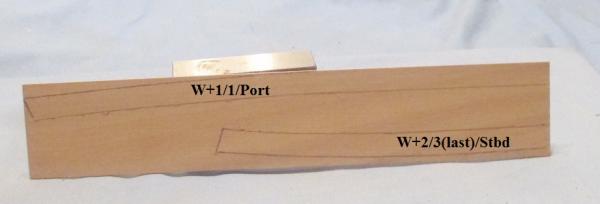
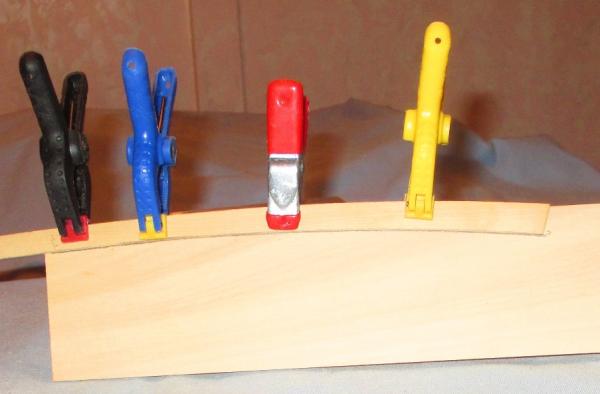
W+1 and W+2 are the same as the markings. Because the bottom planking added some distance, that bottom plank is going to be very wide. After W+2, I split the difference (I hope) on all frames and remarked. My W+3 is a bit wider than the others and. frankly, a bit f a pain to work with. Not curving the bottom? Maybe that makes sense when you first cut the plank. When you initially fit the plank, soak/clamp/dry, etc, the bottom doesn;t make any difference. Once you mark the desired plank width, however, I don't see whee it WON'T have a curve. It may not be the same as the top curve due to widening or narrowing of the plank, but there will be a curve.
-
Extra wide planks drawn out on boxwood sheet.
-
Steve, I don't think you will regret your decision.
-
Steve, If you make your plank slightly wider ( I usually go about 1.25 the final width) than the desired finished width, you can micro trim the top without having to trash the entire plank. It definitely takes practice, particularly in the curve, since taking a wee bit from any area can impact the entire lay of the curve. Once all the planks are snug in place, sand until even and beyond...sand until baby butt smooth. I usually get down to 400 grit sand paper.
-
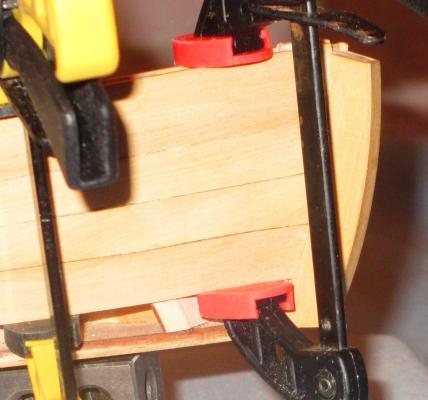
Mark, How do I get the planks to butt up against each other???...alot of practice and alot of reworked hulls. Bottom line is that it is a matter of 'attention to detail'. You have to plan where everything is going to be. The first strake sets the tone for the rest of the hull. When fitting the next plank (under), once the basic form/curve is achieved and it has been soaked/clamped/dried, it is a matter of micro-fitting the plank and mating it to the one above. The inside bevel is important as well, or else you will ALWAYS get that gap. It takes time. It took the better part of a day to get W+1/1/S (1st strake under the wale, plank 1, starboard side) fitted in. The rest are coming a bit faster...but by no means with blazing speed.. Chborgm, Ya gotta be kidding me? This has got to be WAY easier than CONFEDERACY. There are only 3 strakes below the wale and the hull is pre-lined. That first plank below the wale is a *&$%! because it is so long. In mind, that allows problems to creep in. Once that one is done, the rest are much easier.
- 259 replies
-
- 1
-
-
- Gunboat
- Philadelphia
- (and 1 more)
-
Mark, Looking good! That exterior planking is harder than it looks, eh?
-
Once you get that first curve, it becomes easier. My starboard template ended up fitting the port side fairly well once it was soaked and clamped properly, so I should be able to crank that out today. The aft-most plank being shorter, looks easier to form as well. Things should speed up from here.
- 259 replies
-
- 1
-
-
- Gunboat
- Philadelphia
- (and 1 more)
-
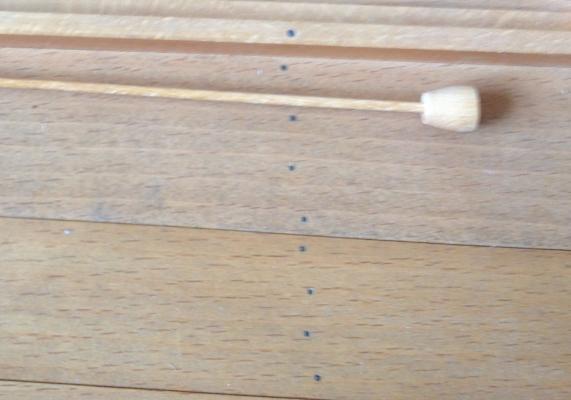
Progress Continues..... I transferred the upper curve to a piece of boxwood sheet. I measured about 1/8 of an inch over design plank width and cut it out. I didn't get a picture, but you probably don't need one. I will need to plan my layout so as to avoid too much wastage. Once the uber plank is cut out and sanded to the lines, I fit it in place. It was nearly perfect. Soak, clamp in place and let dry. Once dry, dry fit it into place. little touch up here and there and bevel the top inside....fits like a glove. Now I have to come up with the finished width. I had previously marked the plank at the frame locations. With a compass, I now take the plank width measurement from the hull (from the lining off process) at frame 9 at one end of the plank... ...and mark it on the corresponding spot on the plank. I do this at each location all the way to the bow and the 'hood ends' marked on the rabbet. Now connect the dots. It is actually pretty easy. The plank is the same width from frame 9 to frame 14 so I can just run the compass down the plank to that point. After that it widens. I sued a ship's curve to connect those dots. A French curve will work as well. We are not quite ready to glue in place yet. Remember, the bottom curve of the plank is the same as the top curve of the plank below it. Rather than have to do the whole song and dance previously done with the tape and the card stock to get the curve, I just lay the plank on a piece of boxwood sheet and trace the curve. Ta daaaaa!!!!

- 259 replies
-
- 5
-
-
- Gunboat
- Philadelphia
- (and 1 more)
-
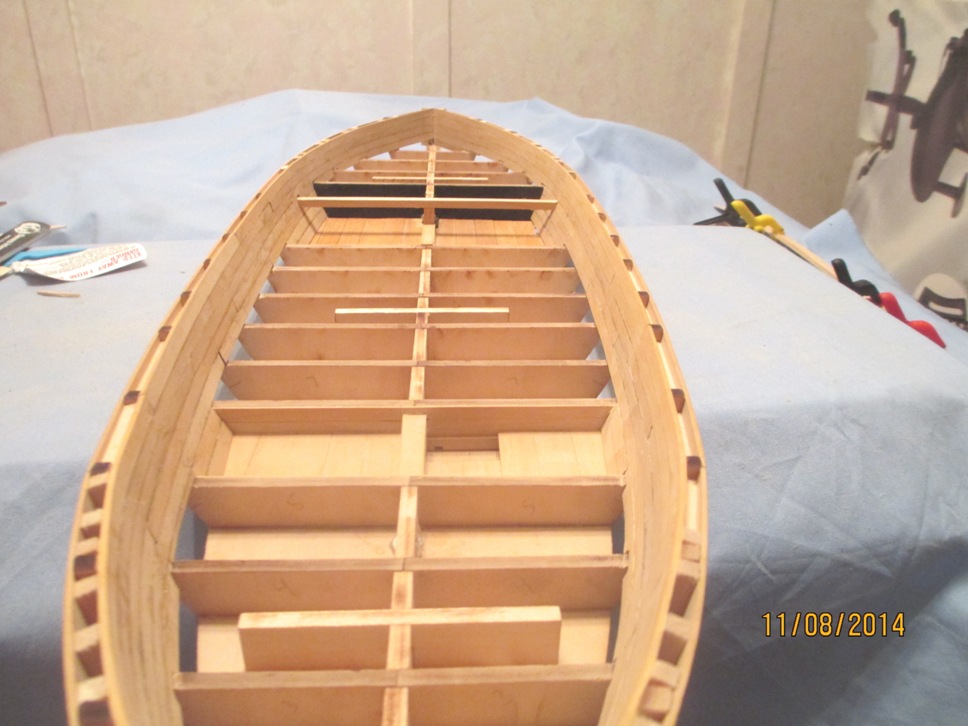
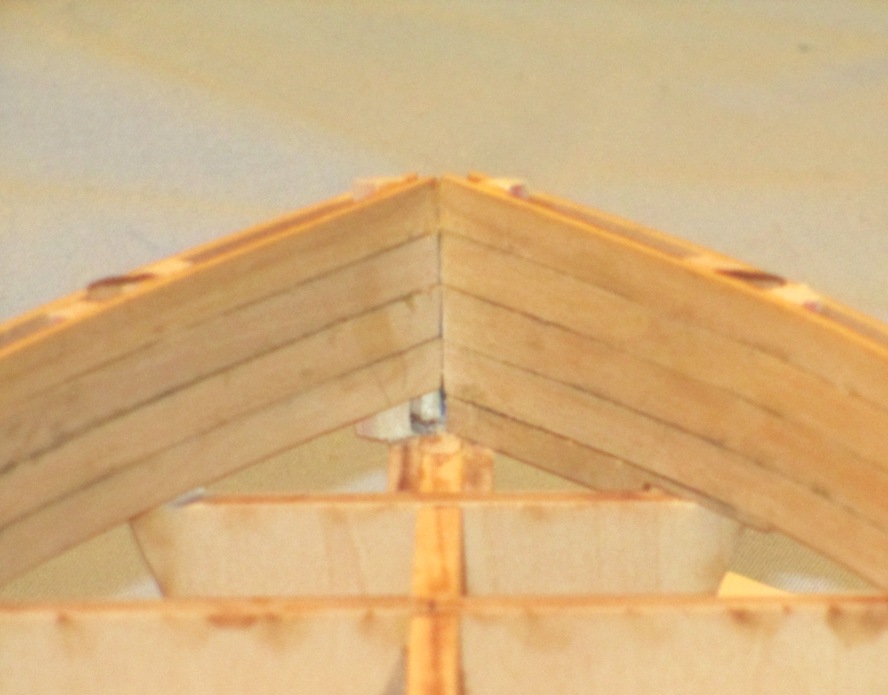
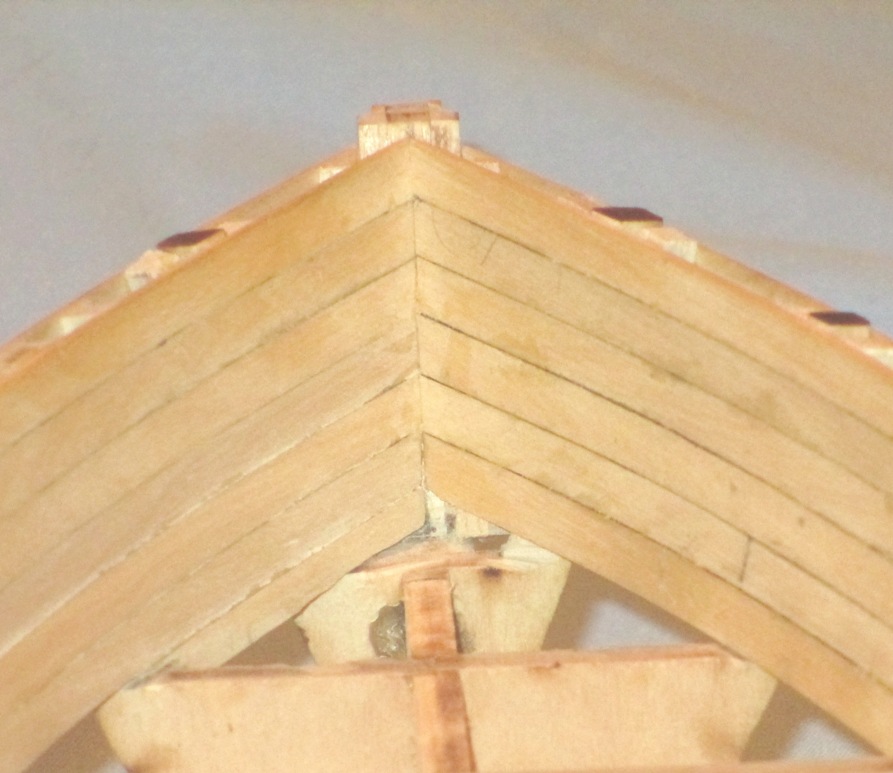
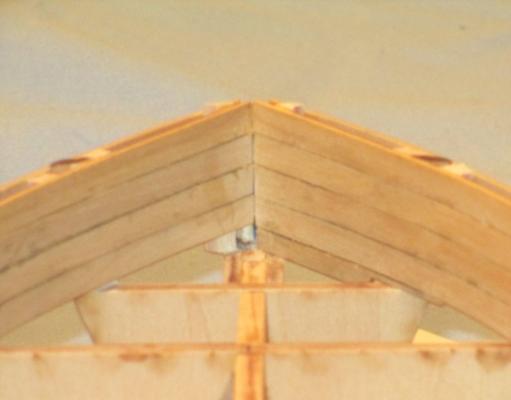
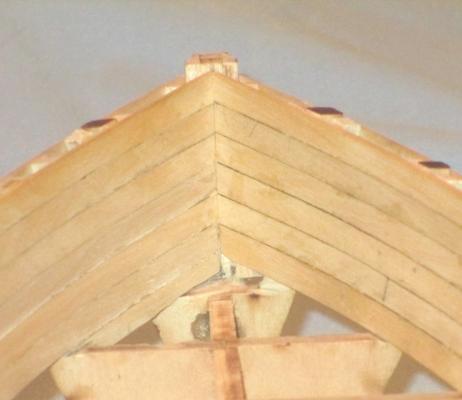
With the exception of a couple short planks low in the bow/stern, I have completed planking the interior ceiling planking. Length view of the interior. Close up view of the bow where the planks meet. Note missing plank on lower left. This turned out pretty well, but there is room for improvement. It looks alot better in real life and this portion of the planking will be pretty much obscured by the forward gun. Close up view of the stern where the planks meet. This turned out much better, mostly because I found the right and to start off with and miter cut (rather than sanded) the angle on each piece before wetting and clamping. There is still much fine sanding to be done. I want to hold off on that until the exterior planking is done so that any clamp marring can be removed at that time.

- 259 replies
-
- 5
-
-
- Gunboat
- Philadelphia
- (and 1 more)
-
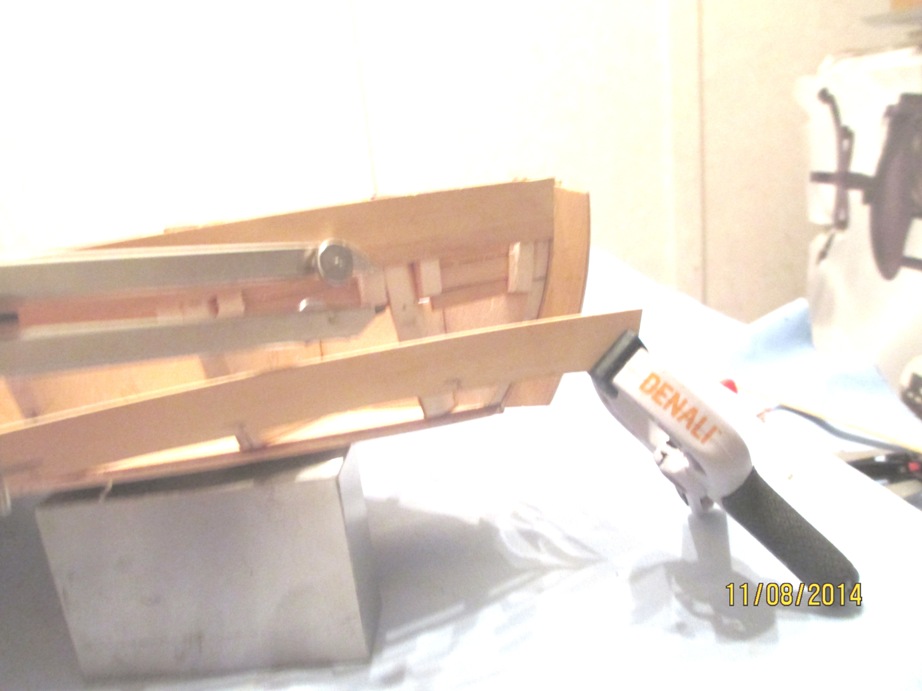
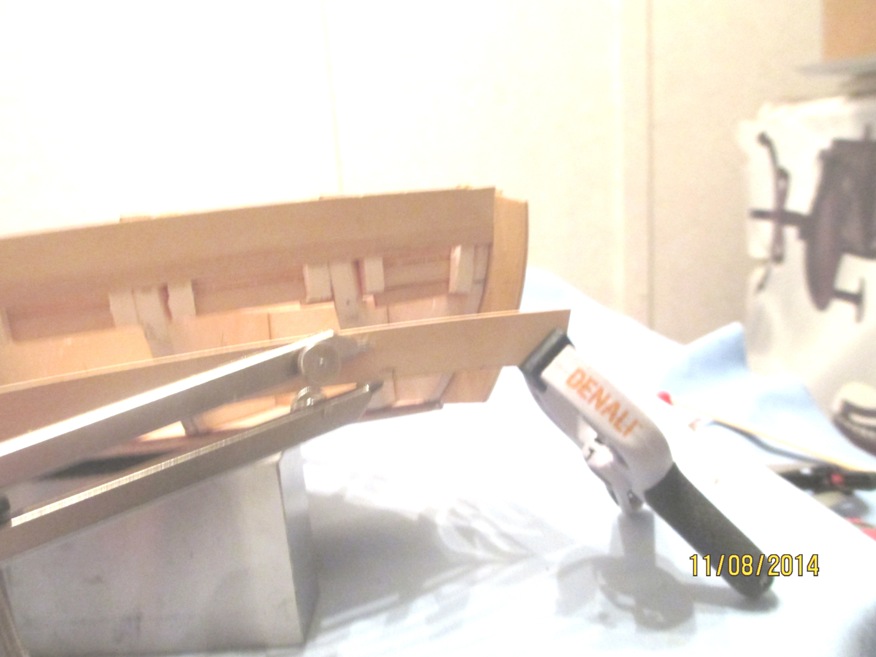
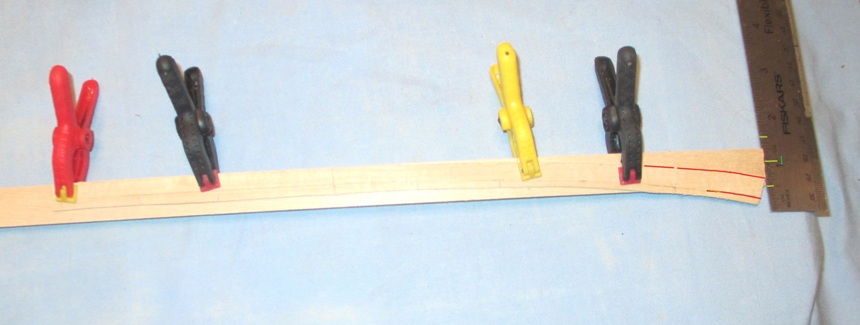
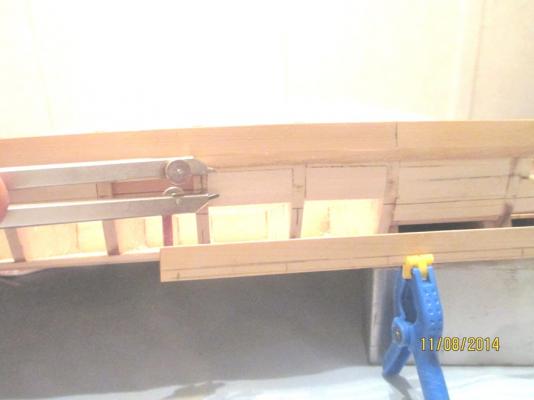
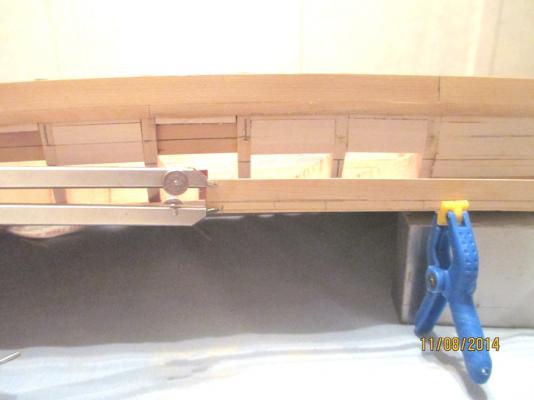
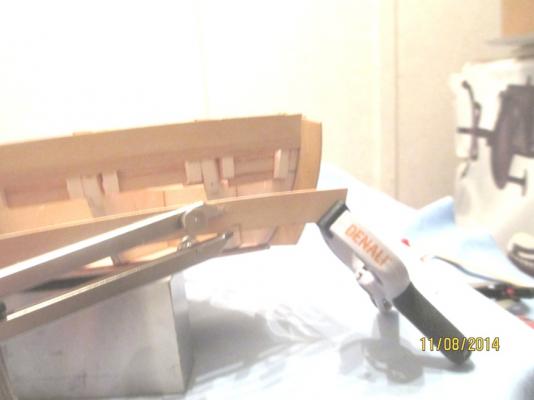
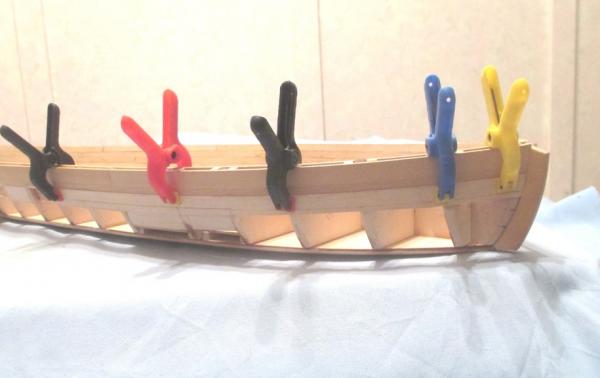
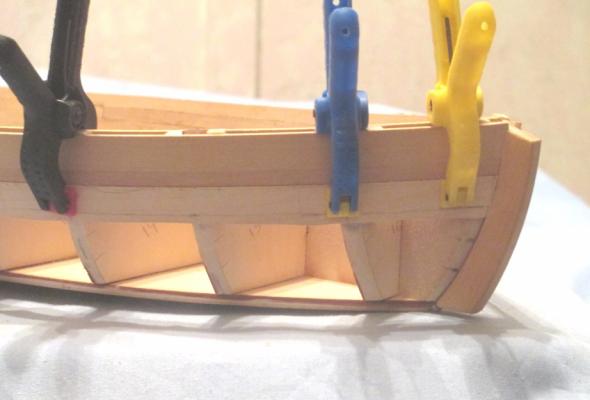
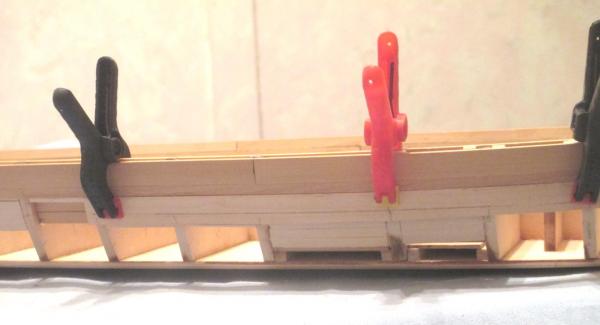
Most of this was done a week ago...it just took time to get around to posting. Here is the faux plank/template fitted its entire length. I show the template because I still have not cut the final plank. I plan to do that this weekend. This shows a closeup shot of the bow/forward portion of the plank. Note tight fit. The final width of the plank is marked but I did not cut because I want to use this as a template on the other side as well. Middle portion of the plank. Aft portion of the plank. Here is the plank mounted on one of the 3/4" thick basswood strips. The ruler increments do not show well, so I marked the 1/2", 1" and 1 1/2" points (green) as well as the limits of the plank (red). Once the plank was smoothed, fitted and sitting correctly, the bend was not as severe as originally thought, but much greater than 3/4"...slightly over 1".


- 259 replies
-
- 2
-
-
- Gunboat
- Philadelphia
- (and 1 more)
-
I'll be happy when I can get to the shorter planks.
-
You are correct...the curve is a bit too severe, by 1/8 inch. Easily fixable. I could edge bend it into place, but that defeats the purpose for which intended. The bottom strake does, indeed, have a butt at frame 9, but checking the planking diagram I see that there are joints also at frames 12 and 15. The only plank close to that same length is the after most plank on W+1 at 10 inches. Checking the planking diagram, I had previously checked to see if maybe a joint was obscured by the anchor (sheet 5). However, if you check sheet 6 you see that it does not. Plank 1 of W+1 IS 13 inches. Pressing on..
- 259 replies
-
- 1
-
-
- Gunboat
- Philadelphia
- (and 1 more)