Chuck Seiler
-
Posts
1,879 -
Joined
-
Last visited
Content Type
Profiles
Forums
Gallery
Events
Everything posted by Chuck Seiler
-
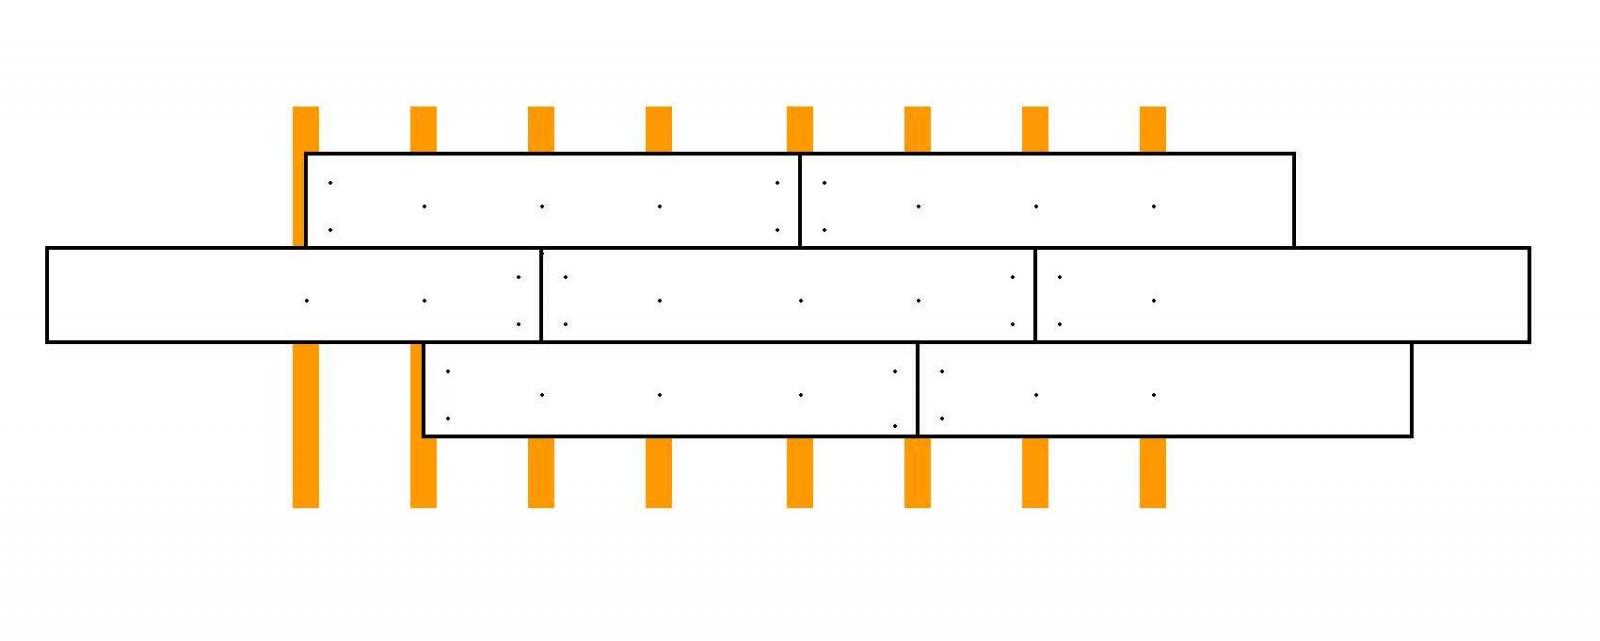
 Bob, Looks pretty good. One flaw I see is that you don't have the butt ends trunneled. Since they necessarily fall on a frame, they should be trunneled. I prefer using 2 nails on the ends and one everywhere else (see attached). This protocol would vary from time period to time period and nation. People smarter than I can tell you more on nailing patterns.
- 44 replies
-
- 5
-

-
- Sultana
- Model Shipways
- (and 2 more)
-
It gets more interesting when you have a real live ship to look at.

- 44 replies
-
- 6
-
-
- Sultana
- Model Shipways
- (and 2 more)
-
Bob, The deck planking looks good. Some might say it is unrealistic because you don't have any butt-ends in your planking. In truth, there are none. If you look at the replica SULTANA, there are no butt ends on deck. Th eplanks are short enough that they can go single plank per strake. Do you have any pics of the hull planking?
-
SOS, A 1 page sail plan was in the book.
-
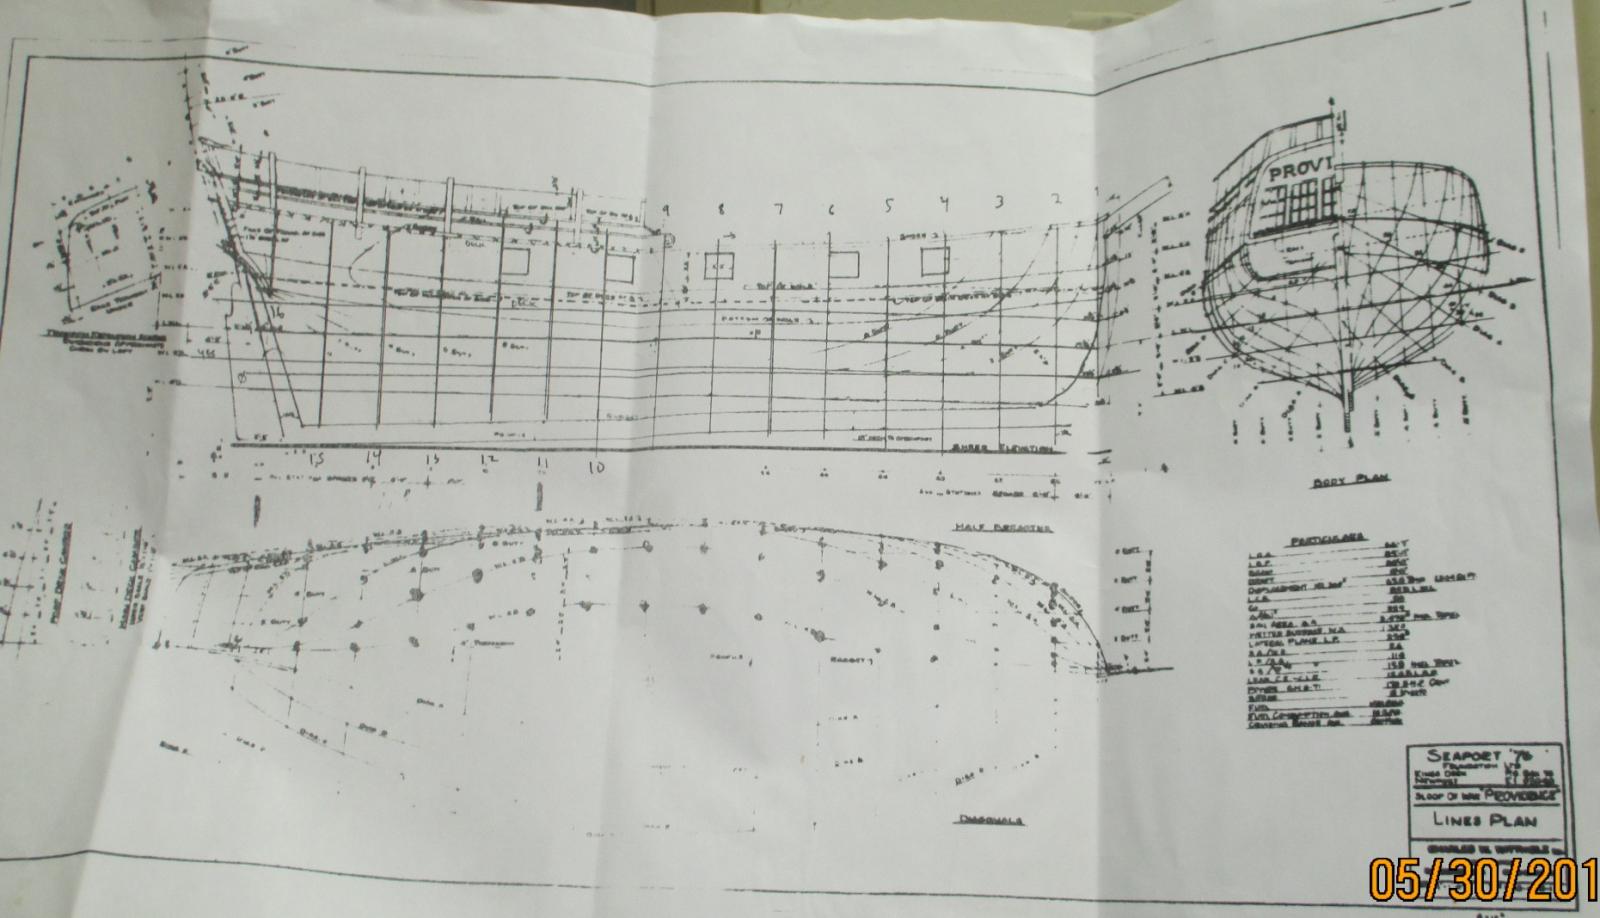
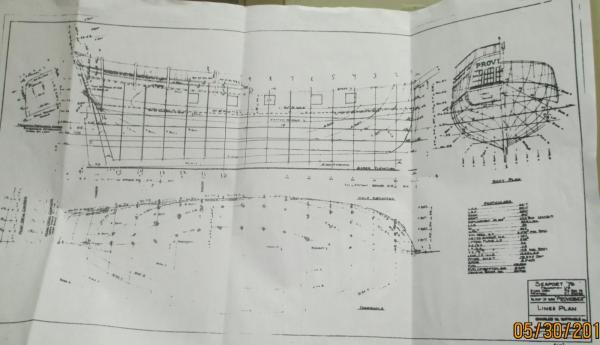
I couldn't read the station numbers, so I just numbered them 1 thru 16. I was a bit dismayed when I only found 15 stations on the body plan. ...until I realized that #9 and #10 were (virtually) identical.
-
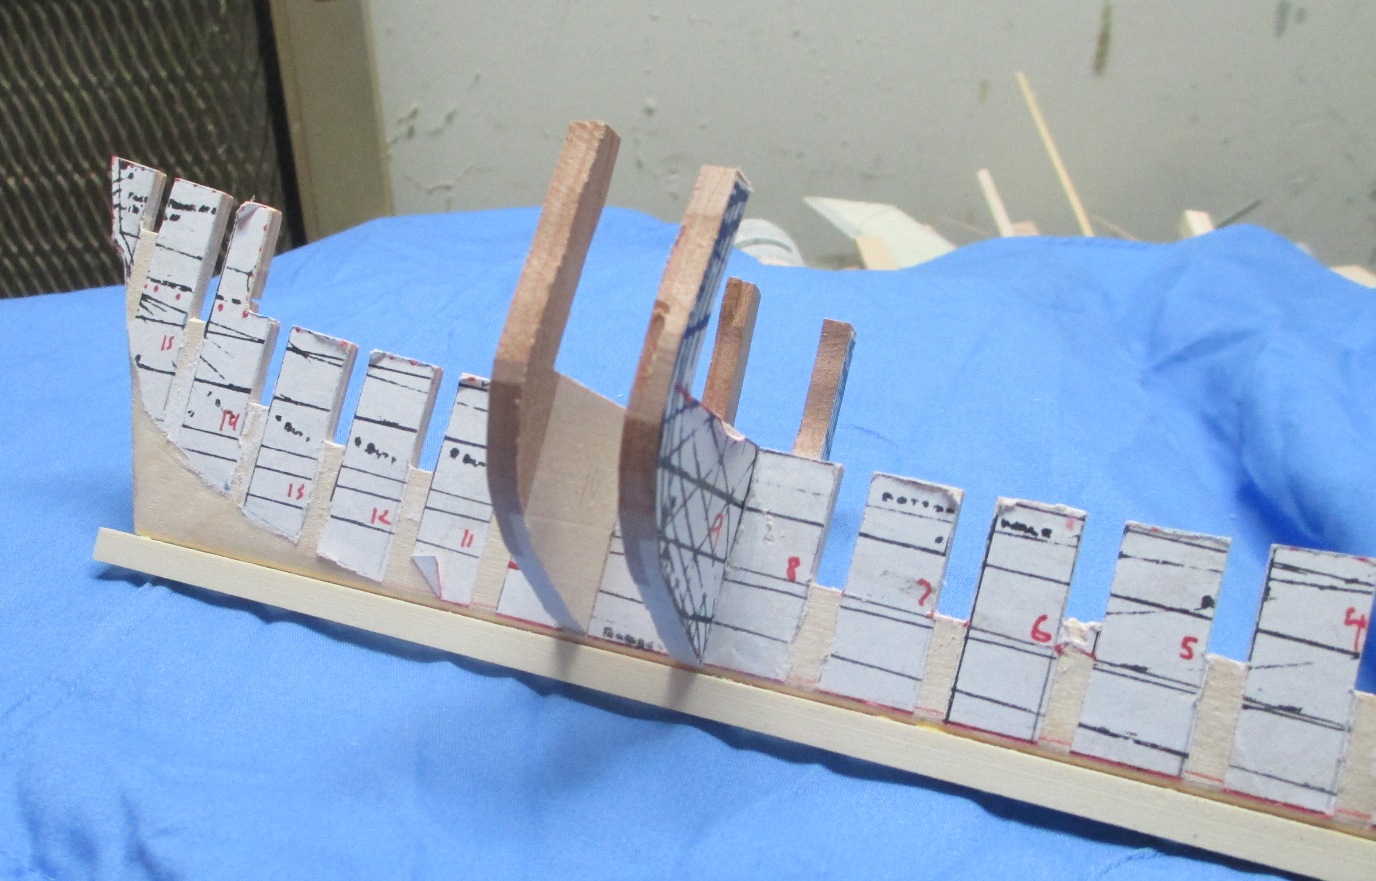
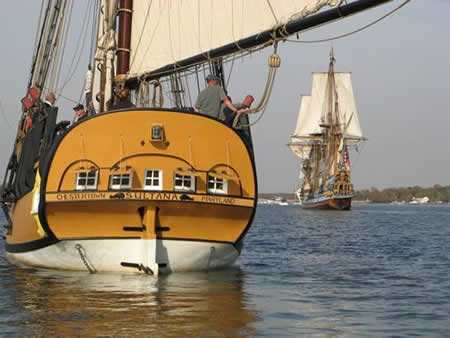
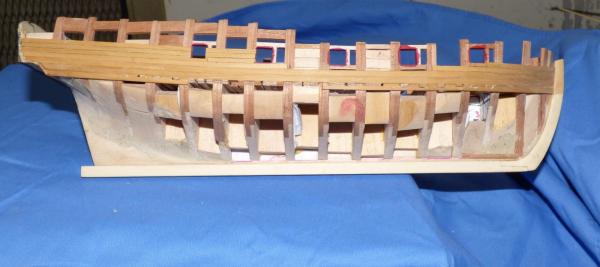
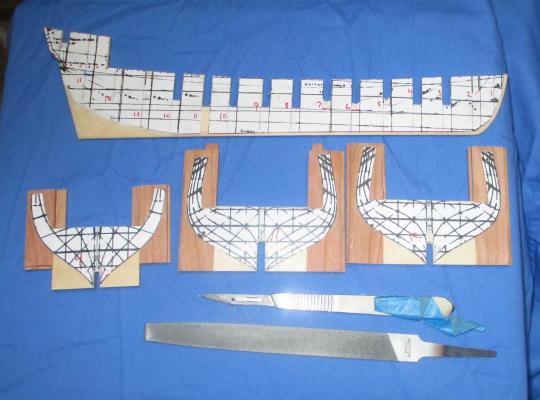
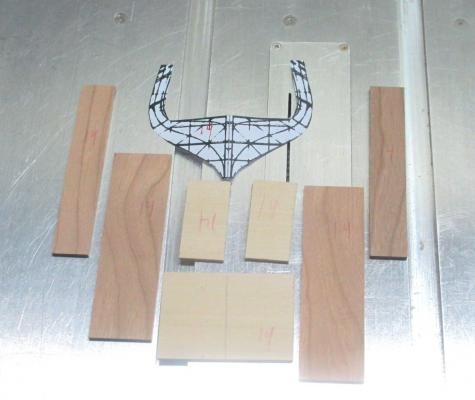
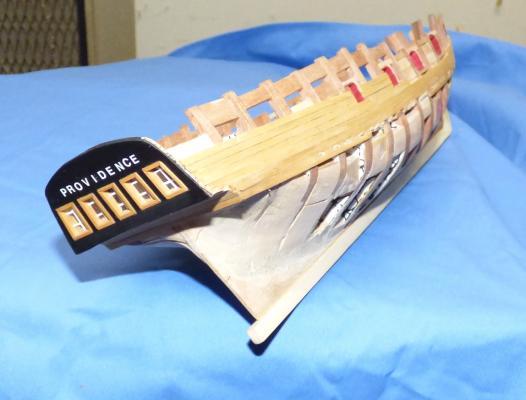
SOS, You have stumbled upon a subject close to my heart. I am currently building the self-same PROVIDENCE from the same plans. I hope you will allow me to post my stuff...I have not started my build log yet. If you object, I will delete. I am using the same plans as you have, except I got them from the book "Valor Fore and Aft". I attempted to get permission to reproduce the plans, but there seems to be nobody left around to approve same. I scanned the plans in the book and took them to get blown up to the proper scale. I am building in 3/16" scale. The resulting plans are not that great. Some portions of the lines are missing or too light. Some lines are thicker than I would like. No worries. The sheer plan was used to make the center false keel/center support, while the body plan stations were used to make the bulkheads. I have previously tried to make these using modeling plywood, but it turned out to be a disaster. I ended up using basswood and cherry to laminate together a two ply bulkhead that is turning out to be quite strong. Here are the bulkheads being placed. The hull frames out. Planking started. ...and the transom. I am using this painting as inspiration. Once I get the hull completed, and the deck arrangements made, I will use the plans from Model Expo ARMED VIRGINIA SLOOP to fit out and set up masts and rigging.


-
Bob, SULTANA is a great model. It is sufficiently basic so as not to bog you down, but includes all the stuff you will eventually have to learn; planking, rigging, swearing and throwing things. I don't recall if Chuck's practicum discusses planking the hull, I believe it does, I know the original kit instructions do not. I would strongly recommend planking the wale (the thick planking right around the waterline) and above the wale. This part is a lot easier than the area below the wale and makes for a very nice model. I did this while leaving the area below unplanked but painted a cream white color. I am very happy with it. You can't go wrong following Chuck's practicum. I think you will enjoy the build.
- 44 replies
-
- 2
-
-
- Sultana
- Model Shipways
- (and 2 more)
-
Sam, There were several PHILLY builds going at the same time. Sometimes the discussions shifted from one to another. I believe I discussed both books in my log. I also covered them as well as "Benedict Arnold's Navy" in my scratch PHILLY build log. All excellent resources.
- 308 replies
-
- 3
-
-
- finished
- model shipways
- (and 1 more)
-
American sailing warships with no plans or records
Chuck Seiler replied to CharlieZardoz's topic in Nautical/Naval History
Dr. Clay Feldman is a master modeler in his own right and former owner/publisher of Ships in Scale. He has done work/research on Fair American as well. He has done extensive research into LEXINGTON. He has discussed the Davis model and why it is not correct. Several years ago (maybe 10, by now) when he first came out with the LEXINGTON model, he had an online information about the building...it was a group project. I believe most of that info is included in the Feldman package on LEX available from SiS. If you are interested in LEX, it is a must.- 401 replies
-
- 3
-
-
- John Adams
- Alliance
- (and 3 more)
-
Ken, What did you use to letter your transom?
-
Be sure to clean it up afterwards...a little wire brushing...some time in a vinegar bath.
- 308 replies
-
- 3
-
-
- finished
- model shipways
- (and 1 more)
-
I'd be happy to take the credit, but they are actually Sam's guns.
- 259 replies
-
- 2
-
-
- Gunboat
- Philadelphia
- (and 1 more)
-
I agree with those above that do the pencil method. For me, it provides a hint of color but is subtle. Living in San Diego I have the opportunity to see caulked deck planks on real sailing ships. Even at the distance I can get above them, which is about 6 or 8 scale inches, the caulking is not overwhelmingly dark.
-
Nenad, I disagree. If you have the opportunity to display it where people will see it, at least ONE other person will see it and say "Holy cow!!! Will you look at that!!!!" ...and that makes it doubly worthwhile, because that person will talk about it for years. "....I remember one time, I was looking at a ship model. The guy made actual working sheeves THIS SMALL."
-
Sam, Your swivel guns look great. I particularly like the brackets. Is that thingamajig in picture 3 the jig for making them? If you are a mind, I would be willing to send a few bucks in your general direction to purchase some of those guns. I will PM you on this.
- 259 replies
-
- 2
-
-
- Gunboat
- Philadelphia
- (and 1 more)
-
You can't go wrong with white. That was the common color on the Mississippi and Missouri.
-
There is hope for us all!!!
-
Personally, I am a 'red snob'. I seldom like the red most people use...too bright in my opinion. I like the barn red or caboose red type color for internal bulwarks and appropriate deck furniture. I am currently experimenting with artist acrylics. Using "Windsor and Newton Galleria" paint, I mixed a large gob of crimson red and a wee dot of Mars Black...and alot of water. I am going for the consistency of olive oil for right now. I think I have the color I want. The secret (if, in fact, this works) is to start off with the gob or red and add VERY LITTLE dots of black until you get what you want...or what I want. Now, I will do a test paint to see what it looks like dry, on wood.
- 452 replies
-
- 3
-
-
- cheerful
- Syren Ship Model Company
- (and 1 more)
-
Speaking of Kurt....his article in the recent Ships in Scale is terrific. Excellent pics.
-
Small, yeah. One problem with cleats is/are that unlike some pieces of the model, they may have to take a strain....and will pop out. For Philly 1 I used some brass cleats from Blue Jacket. They are flat, but in that scale you don't notice. Also, they have a longer stem so they sink into the wood further. I used a glue, can't recall the name but I will get it. It is not quite an epoxy, but stronger than regular wood glue. For Philly 2 I am thinking of using some of Chuck P's wood cleats. The plan is to drill a small hole down the center and use a small dowel to give it more depth. I usually use bamboo, because you can get it real small and it is still strong. I turn it down with my dremel and sand paper.
- 308 replies
-
- 3
-
-
- finished
- model shipways
- (and 1 more)
-
Keith, I have used Elmer's stainable wood filler with much success. On one of my first projects, I gave it a couple coats of sanding sealer. On later projects I have gotten lazy and did nt use the sealer, but it still worked.
-
As most have said or alluded to, in the end, it depends on what you are comfortable with. I, for one, will admit that I have omitted some details I originally intended on including because, try as I might, I couldn't get it looking very good. After numerous attempts I resolve to leave it off but try again will my skills improve (and/or I get better tools).
-
Better now than when you have the mast on. So, the catheads broke but the flimsey railing in the back didn't? Hmmmm.
- 308 replies
-
- 1
-
-
- finished
- model shipways
- (and 1 more)