


Landlubber Mike
-
Posts
4,467 -
Joined
-
Last visited
Content Type
Profiles
Forums
Gallery
Events
Posts posted by Landlubber Mike
-
-
There's a booklet on realistic looking sailmaking now available from SeWatchBooks, or as a chapter in the new edition of Swan IV.
Wow, thanks for the info! I used Swan IV to help me with the sail sizes, rigging, etc. for my Badger, but the sail construction update would have been nice to have as well. Since I'm going to add full sails to my Pegasus, this supplement seems to be a great resource.
-
My other hobby is bird carving, and the carving is done using rotary tools. I use the flexible shaft Foredom for rough carving, then use bench-top rotary tools for the fine carving. This type of carving requires a level of precision and control you just can't get with a Dremel or similar tool. I use these tools in my ship modeling and find them very useful. Here's a link to a tool which is an excellent choice and costs much less than the tools that I have. Admittedly it's more expensive than a Dremel, but as in all tool choices you get what you pay for.
Here's a link to my bird carving web site:
Frank, I just went to your bird carving website and was blown away. The green heron is absolutely incredible as is the rest of your work.
I've been thinking about getting into small carvings for my ship models (figureheads, etc.). I have a Dremel, but was thinking about something for more detail work. Those Gesswein tools seem very interesting...thank you for the recommendation. I went on eBay to see if any were for sale, but it looks like there are lots of knockoffs of that tool being sold from China. I would definitely stick with the real deal.
- JesseLee and Landlocked123
-
 2
2
-
If you're furling the sails, it's not as imperative to use very thin sail cloth. If your cloth is thicker, you just have to use less material. That's the beauty of adding furled sails.
Hopefully I'm not mixing up my lines and blocks, but looking at my Badger, for some sails, I added clew blocks (or a tackle of blocks) to the end of the dog eared part of the furled sail, and others, the line was started at the clews - essentially, I think it depends on the sail. Here was an "a-ha" moment for me about clew blocks in trying to translate the kit's plans which didn't like most kits, didn't call for sails but had clew blocks just kinda hanging out there on their own:
-
Hi Randy,
I haven't thought about sails since I finished my Badger. I'm probably going to add a mix of full and furled sails on my current Pegasus and Lyme builds though. I would say try to find the thinnest high quality cloth you can for better scale, workability, etc. I'd also consider making the sails a tad bulkier, but I've heard conflicting views. Some like zu Mondfeld say that furled sail should be about the size of the yard. Others say the furled sail should be bigger. Artist's choice would be my response

As for lines, I didn't include bowlines or reef points. I'm fairly certain that I added all the blocks - with the caveat that given that the Badger was a brig and a therefore a smaller vessel, I often went with simpler tackles using single blocks, as opposed to tackle arrangements with double blocks.
One more thing to consider is that the Golden Hind was from the 16th century. I'm not sure how much, if at all, rigging differed from rigging used in later periods. Beautiful build by the way - looks gorgeous and I bet would look nice in sails, furled or otherwise.
Hope that helps. Good luck with your build!
-
-
-
Here's a quick update. I marked the waterline, and have been marking the hull for the location of the wales, as well as one of the rails. This has literally been hours of work for me! I don't know if it takes others this long, but I really want to make sure that I get the wales right for not only a smooth line, but also because accuracy is key as the rails, planking, stem and stern items, etc. will flow from how the wale is placed. I used 3mm blue tape. The bottom two tape runs mark the upper and lower boundary of the wales. The upper tape marks the top end of the waist rail (the waist rail will be 2mm in width, so the tape is a bit wider).

Placement of the wales is tricky. I had to look at logs from BE and others to see how it should end up at the stem and stern. The wales are 12mm wide - I plan on using 4mm straight planks for the top part of the wale, and top and butt planking for the bottom two rows of wale planking. As you approach the stem, as noted in TFFM, there is a slight reversal of the sheer curve of the wale where it flattens out a bit. At the stem, there is sort of a tuck in under to the stern counter by the lower piece. So you essentially go from having a rather flat wale for most of the ship to more of a curved portion at the stern. Martin's Fly log shows how he carved a custom piece of planking for the aft-most, bottom-most plank of the wale to very good effect.
Thanks to everyone for their thoughts on how to plank the wale. I think I'm going to attempt planking it as one layer. It just seems easier, but If I run into trouble, I can switch over to a laminate approach like Chris mentioned. I'll mark the boundaries in pencil, then add a temporary batten along that pencil line to help me run the wales in a smooth line.
I plan on staining/dying the wales and the planking (both in pear) down to the copper line in black. Things will get tricky from there. Above the wales, I plan on planking the area just under the waist rail in pear, and stain it a darker brown. The area just above it is the area with the friezes. Again, to avoid paint, I plan on staining the planking there using blue stain. I got a nice dark blue color on pear, while it was too "french blue" on maple. I might test the stain on boxwood to see if I can get more of an in between color. The waist rail will cover up any seams, etc. between the two stained areas. I haven't decided whether to go with separate planking runs for the two areas, or run the planking, stain the areas as mentioned, and hope the waist rail covers up any stain runs. To be safe, I'll probably go with the former.
After the two frieze areas, there is another decorative rail that I will plank in redheart. It seems like a number of the Swan class ships used red in this area, and I think it should tie in nicely with the redheart I'm using in the rest of the build.
This is quite ambitious and a lot more complicated than what I had to do on my Badger, but I think I have a game plan. Now I just need to execute

-
-
-
Hi everyone, I've been stuck on a big project at work that finally wrapped up last week, so finally have some time to get back to the shipyard.
Executing the different stained areas is going to be a bit tricky, so I've started by lining off the hull with respect to the wales and some of the sheer rails. At the suggestion of some on here, I also picked up the Jim Roberts pamphlet "Planking the Built-Up Ship Model" from Model Expo which was on sale for $2.65 or somewhere around there. It's a nice pamphlet on the topic and so I wanted to thank people for the recommendation. The pamphlet says to start with the wales, and the run the planking above and below it using the planking bands. This seems like a very good approach to me.
Question: Should I do the wales using thicker planks so that I'm just using one run of planks for the wales on top of the first planking layer? The kit (and other kits) generally have you do all the second planking, then add another layer for the wales. It seems like it might just be better to use 2mm thick planks, which would give me a cleaner line around the stern counter (but would require a slight modification to the rabbet at the stem). It would be a little harder using thicker planks, but I'll be using swiss pear so I'm not anticipating too much difficulty.
Any suggestions or tips on which approach is better and why? Thanks very much in advance!
-
-
Hi, I hate to hijack this log, but Keith, do you mind sharing how to build the gun carriages? I'm close to building them on my Pegasus and would love a simple tutorial (by PM is fine too). Thanks!
-
-
Hi Joe,
Really nice progress. This hobby certainly makes you think about things a few steps ahead. I really liked doing the rigging generally, but the coils were a real pain. I think we may have talked about this earlier, but I've seen some start the lines with the coils before the masts go up. I can't figure out how they ultimately got the lines run to the ultimate terminal points. Seems like either way, you have a tricky task at hand.
Anyway, really nice job. It's always a treat to see your updates.
-
-
-
Thanks Martin, would love to see your progress too. Have you decided on your color scheme yet? I'm thinking of going black from the wales down, pear stained a darker brown for the area from the wales to the friezes, pear stained blue for the friezes, and redheart just above the friezes. The upper area is going to be tricky to avoid the stained areas bleeding over, so I'm taking my time planning things out.
-
-
Thanks guys.
SpyGlass, thanks for the tip. I'm thinking about going with printed laminate lettering (I forget the actual term), rather than the kit supplied photo etched letters. I think I can get a more accurate lining up of the letters than if I try to individually position the photo etched ones.
-
A little more progress the past few nights. I planked over the stern counter, which I think makes it look a little better than just going with the walnut ply piece. The planks are curved to match the top and bottom curves of the stern counter. So, what I did was cut the planks a little wider, then use the bottom of the counter as a guide to shaping the planks, Lots of hand sanding to get the planks to sit tightly against one another, but not too bad when all was said and done.
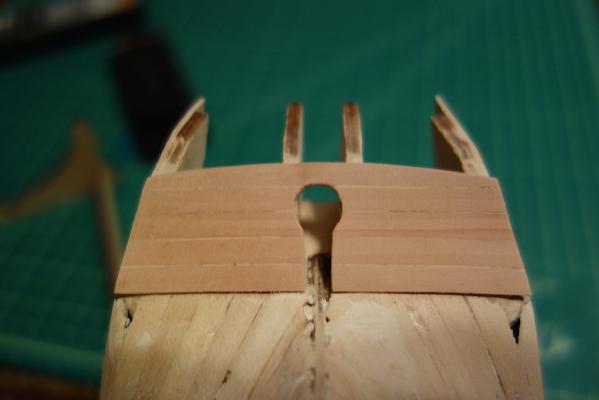
TFFM has a slightly different shape to the stern counter opening. Rather than a circle like in the kit, it's more of a flatter, wider head to it. I thought about tweaking the stern counter in that way, but since I'll be adding the rudder coat, I think that will all get hidden eventually so I kept the shape as is.
I'll probably plank the section above the stern counter next, and start lining the hull for the second planking. I'm super excited to get the planking going.
-
Hi Ian, incredible work as always. Really fantastic work with those elm pumps.
For what it's worth, if I remember correctly, the Pegasus plans represented the elm pumps using the symbols marked by your blue arrow. Maybe that's why the pumps are not visible in SLR0497 (i.e., the pumps would be far back under the quarterdeck near the capstan).
I just took a look at the AOTS Pandora plans, and it looks like the pumps were a touch forward of the main mast. So, it seems like the pumps can be in a number of places.
-
-
Beautiful model Nils. I've been thinking about dressing my Pegasus in full sails, and after seeing your model, I'm definitely going that route. Hopefully I can pull it off half as nicely as you did.
Congratulations on your really amazing work. You are a true artist!
-


HM Bomb Vessel Granado by jwvolz - FINISHED - Caldercraft - 1:64
in - Kit build logs for subjects built from 1751 - 1800
Posted
Gorgeous build Joe, thanks very much for sharing with us. I really liked the "Aged White" you used for the white stuff. Congratulations!
I like others are wondering what your next build will be...