


Landlubber Mike
-
Posts
4,467 -
Joined
-
Last visited
Content Type
Profiles
Forums
Gallery
Events
Posts posted by Landlubber Mike
-
-
-
-
Beautiful work Nils, those sails are gorgeous. Seeing the Pegasus in full sails has made me decide to put mine in full sails as well

-
Martin, good question about the bleeding and using polyurethane. That might actually work quite nicely. I'll have to check ChrisLBren's Confederacy log, as I think he did something to mitigate the effects. I think taping helps, but isn't perfect. I was originally thinking of pre-staining planks, and then touching them up very carefully if necessary, but that might be not be foolproof. For seams between planks that will be covered by the rails, I was thinking of leaving a very small gap between the planks using very thin brass sheet. The gap might help the bleeding, particularly if I leave the brass sheet in while applying the stain. Then, I can just cover the seam with the rails and call it a day.
Thanks for looking in Mobbsie. I plan on using the push pin method for the second planking for sure. I thought it was going to be a little tough on the first planking as the bulkheads are in MDF and pretty strong, so my push pins won't work unless I drill holes (which I didn't want it to do). To get it to work with the kit pins, you need to push the pins all the way down so the head sits on the plank - I wasn't sure how easy it would be to pull the pins once the glued dried.
Thanks for the tip on Chuck's tutorial. I'll have to take a look, thanks!
-
I needed a good camera for indoor kid shots, but wanted a point and shoot. The problem is the small cameras have a very small light sensor. Some of the newer cameras (more expensive) put a much bigger light sensor in, which improves picture quality considerably. I bought the Sony RX-100 a year or two ago, and it's been great.
-
Thanks Joe and Martin, I'll have to check that book out. I'm always amazed at people that can perfectly plank with one layer, and not use an under layer. I didn't mark out battens on the first planking, but certainly plan to on the second.
The second planking is going to be interesting for other reasons. I am planning on four colors for the upper hull planking - redheart for the red strip at the top, pear dyed with General Finishes "Blue" for the blue area, pear dyed brown for the natural area, and black for the wales and possibly the section between the wales and the coppering. I have to think about bleeding effects, so I might pre-dye some of the edge planks. I think I also have a little safety with the rails which will cover up the seams between colors and any possible bleeding. Fun times

-
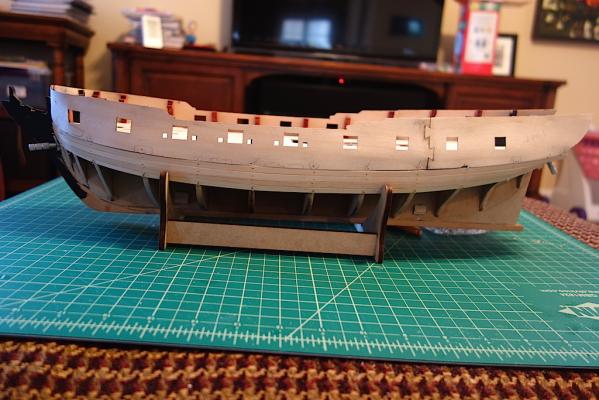
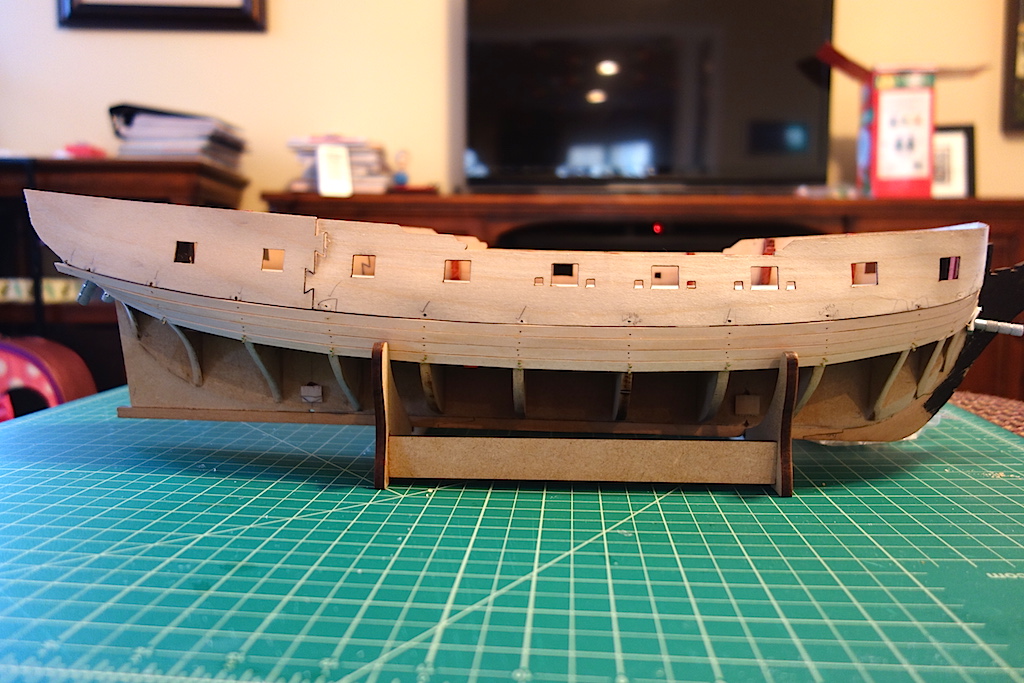
I've managed to get some planking time in, and have 12 rows in per side. The ship probably needs about 16 per side when all is said and done. The kit lime strips are very good to work with. They are straight, and take bends well. The only tricky thing is that it can split if you try and pin it towards the ends, as you can see in the bow and stern shots. Man, the close-ups make things look really rough and messy, so it's a good thing that this will get covered up
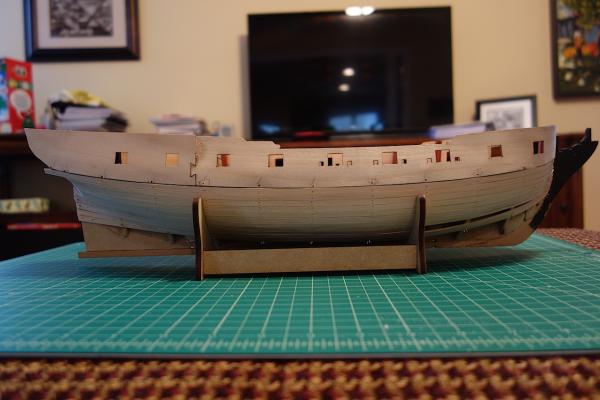

It's been a while since I planked my Badger, but a few things from that build are coming back to me. This time around, I decided not to use CA, as it just made a mess and sometimes it seemed to adhere, and most times, not. For this build I am only using PVA with pins, the planking screws I showed earlier, and clamps. That has gone much better. It also reminded me to lay the planks as naturally as possible - but, with the upturn into the stern counter, I forced the planks a bit leading to a bit of a sharper edge and clinker effect. The lime is 1.5mm thick, so plenty of material to sand back to a nice curve.
The planks at the bow need to be tapered starting with the second plank, and probably the first. I probably didn't taper them enough in the beginning rows, so the planks started to turn upwards at the second or third bulkhead without forcing and clinking them. Since I'm trying to get the planks to lay as naturally as possible, I am going to have to add a drop plank/joggle plank as you can see in the picture below.
I'm a little confused as to whether stealers and drop planks are "permissible" in models. I might try to spile the second planking, but I need to sit down and try to understand exactly how that technique works. Since the the bottom of the hull will be coppered, I might try it out since it will be covered up
-
-
Thanks, that's very helpful information! Looking forward to your update!
-
-
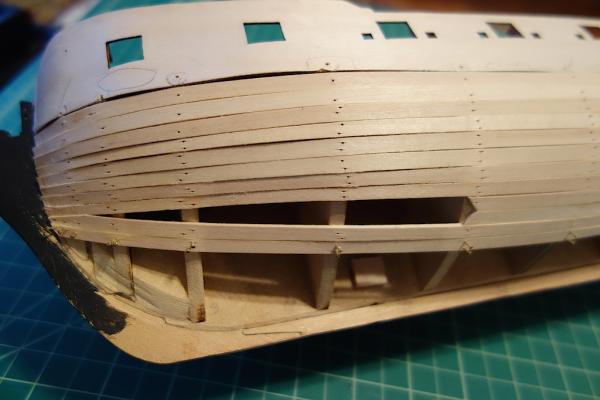
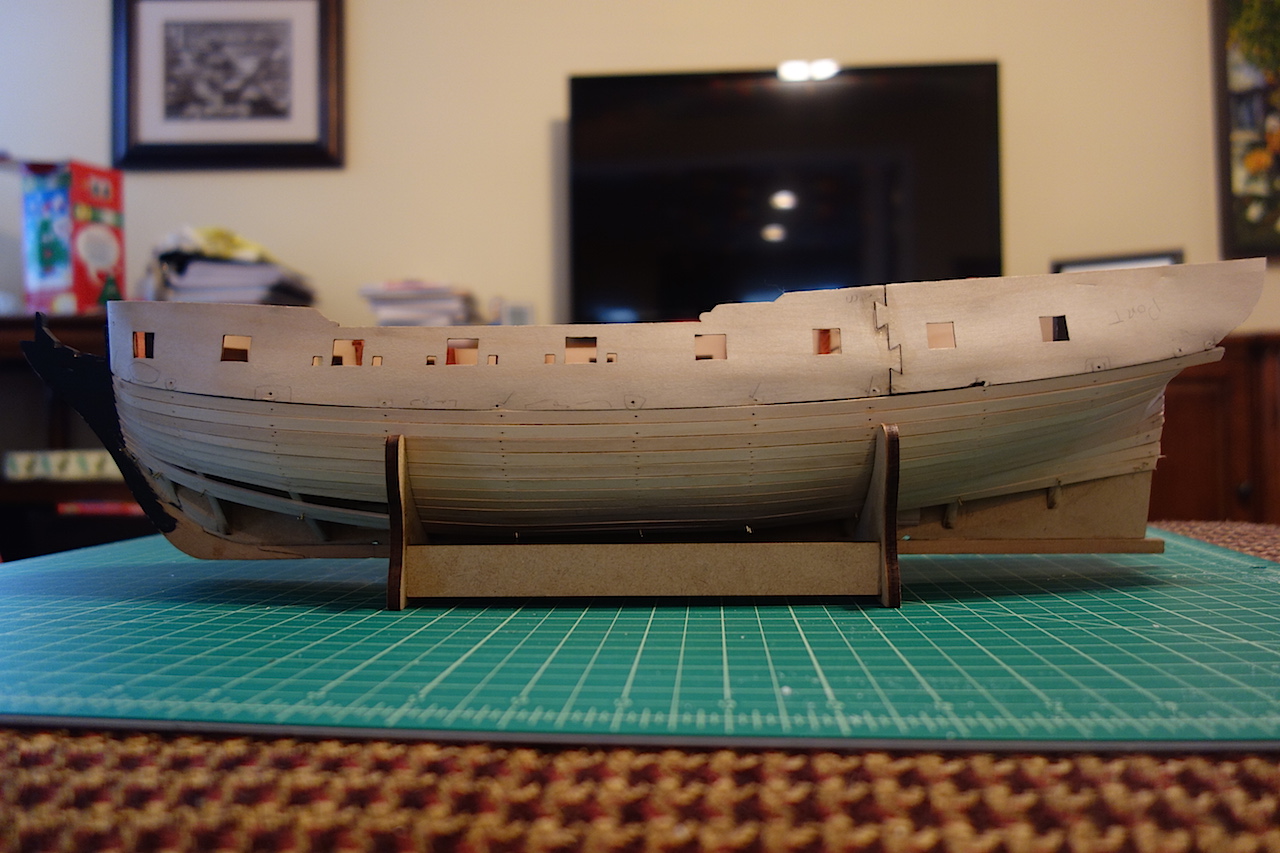
I started the first planking, and got four rows completed per side. It's going pretty well so far. There are some areas between the gunport pattern and first plank that will need to be fixed with filler and sanding, but overall, the time I spent fairing the bulkheads to get a smooth run seems to have been well worth it. The nice thing about this kit is that the lime planks are 1.5mm thick, giving you plenty of material to work with when it comes to sanding. The lime takes soaking pretty well, and even at this thickness, the planks do bend and twist pretty nicely.

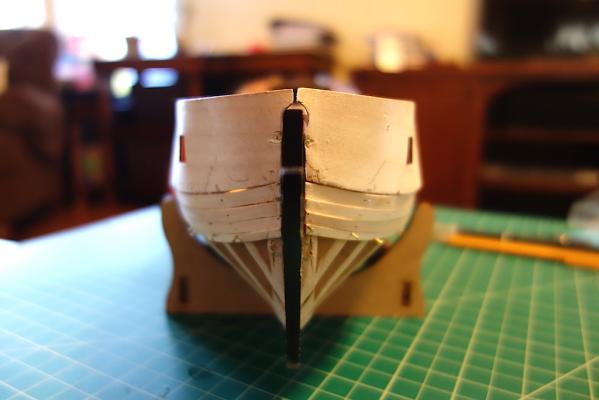

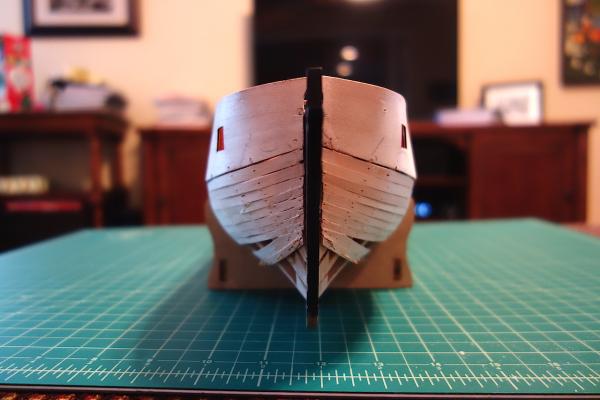
The planking at the stern is always the tricky part. The first plank seems to run relatively vertically, and then the next plank starts the horizontal twist up to the stern counter. I don't know that I faired the last bulkhead appropriately, but I figured I would get the planks on and then use filler to get the proper transition between the two planks. I think there is a slight rounded curve to the bottom corners of the stern counter, but once I get the planks on and start fitting the stern counter, I'll have a better idea of what work needs to be done.

It's great to get the planks on and see the nice curves of this class of ship come together. The planking screws have been very helpful to get the ends of the planks to sit at the bow and the last bulkhead. Otherwise, I have only been using PVA and two nails at each bulkhead to fix the planks to each bulkhead - I have flashbacks of trying to use CA on my Badger, which was a real pain.
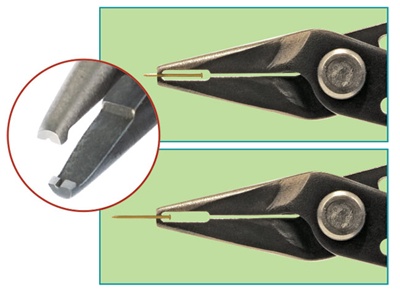
I just wanted to share one thing I'm using that has made the pin work very easy. It's the pin insertion plier from Micromark, which is model number 85282. On my Badger, I used the Amati pin pusher (which only lasted that build), but these pliers work much much better. I forget whose log recommended these, but they are fantastic. You have much more control, and you don't need much force to push them through the lime planks and into the MDF bulkheads (no starter hole in the MDF is necessary). A picture of them is below.
-
-
I'm only on my second build, but I kinda agree that in some cases, using the filler blocks seems overkill. As Pete says, two big considerations are the widths between the bulkheads in the more difficult areas, and whether you are planning to double plank or not. I can certainly see at the very front of the bow though that you might need something to attach the planks to.
I forget whether I used filler blocks on my Badger build, but for my current Pegasus build, I decided not to. The kit has a fair number of bulkheads, with a good number spaced closely together at the bow. The kit also had inserts that went between the bow bulkheads (and between the first bulkhead and the stem) to help give you something to rest planks on. Since I'm planning to double plank and use filler, I think I can get away with not using them. I also spent many hours fairing the bulkheads, constantly checking and rechecking things as I went along. If you have the bulkheads faired appropriately, it probably lessens the need for filler blocks.
-
Hi John, happy new year! Wow, that's really great work, nice job! Very clean build, and love the improvements. Looking forward to what you decide on the quarterdeck. I'm hoping to get through the first planking on my Pegasus, and will turn back to my Lyme - your pictures are giving me an added push to get that planking done!
-
Thanks SpyGlass, if you happen to have the pictures handy that would be great but don't kill yourself looking for them. If not, I think this gives me enough to go on that I can take a stab at it tonight. The stern is definitely one of those places on the ship that is important to get right!
-
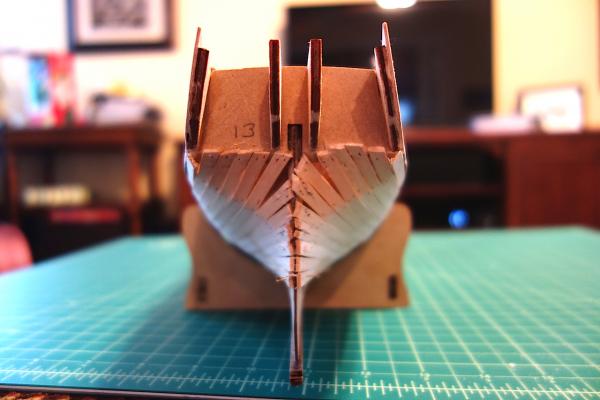
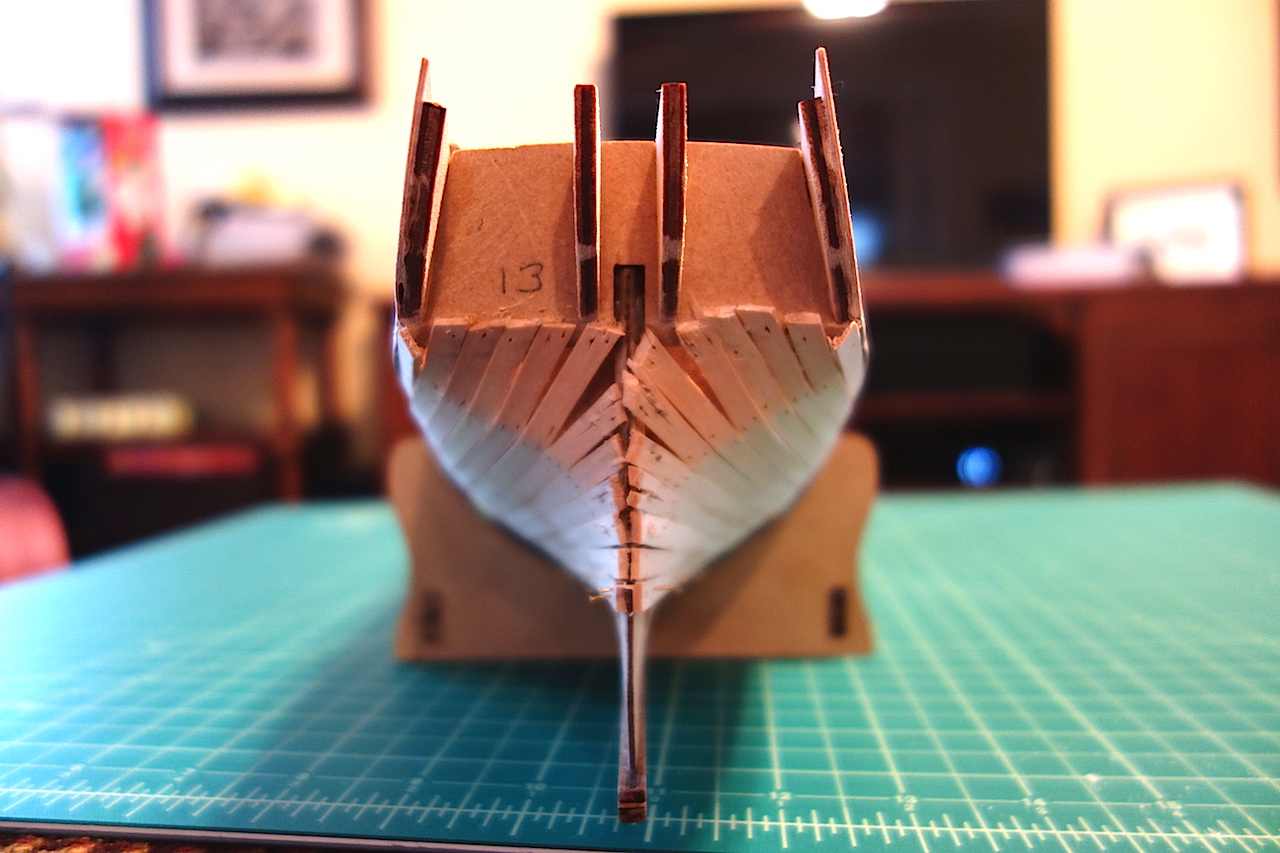
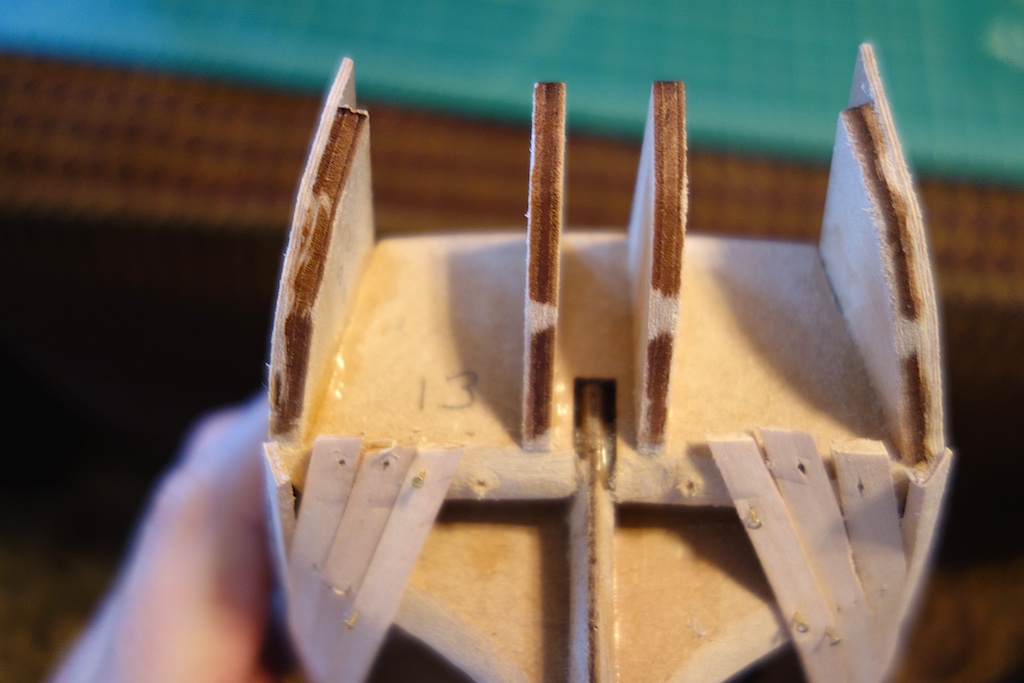
Thanks for looking in SpyGlass. When you say "the last bulkhead needs to very steeply faired, are you referring to bulkhead 13 (on which the stern extensions sit) or bulkhead 12? From my tests, it looks like bulkhead 13 needs a good bit of fairing, especially close to the stern post. At the outer edges, however, it looks like there's sorta a rounded curve as the hull planks move from vertical to horizontal.
-
Hi Martin, thanks for looking in. I probably have at least 8 solid hours of fairing the bulkheads. It's an easy job to do while watching TV at least. I've been using a dust mask, as that MDF dust can be some nasty stuff. To fair them, I've been using these carbide files from Micromark which have worked fairly nicely (I think i'm using the coarse set, and not the fine set):
http://www.micromark.com/5-piece-carbide-needle-file-set-coarse-80-grit,7526.html
The stern on my Badger was a bit nerve-wracking process, but eventually I just went with it and it turned out ok. The tuck up and into the counter seems to be a lot more acute than I originally thought. I need to play around with the test planks a bit more more, but it seems like I need to fair bulkhead 12 some more, and then put in a pretty decent bevel onto bulkhead 13 so that the planks not only run into the stern counter ok, but also so that there is enough area to fix the planks to it. Right now my planks seem to hit the fore edge of bullhead 13 ok, but I think the planks on the bottom of the bulkhead need to follow the curves of the planking run leading up to it.
-
-
Very nice build Caroline, glad to see you are back. I was following your log during my Badger build to get ideas for my future Pegasus build. It's looking really great.
-
Not much to update. I had to refit the bottom of the gunport patterns in a couple of spots where the pattern separated away from the bulkhead. I used a cut-off wheel in my Dremel to remove any globs of dried glue, then used the planking screws again to get the bottoms in those sections nice and tight to the bulkheads. I'm glad I did so as the work improved the curves in the hull very nicely. I also had to shave back some of the forecastle and quarterdeck deck patterns a bit. The redheart had a bit of flex to it, so I maybe had to shave the patterns back 0.5-1.0mm on each side. Thankfully, keeping the original bulkheads 1 and 12 kept the patterns from pushing the other bulkheads in too much more.
I've also been spending time fairing the rest of the bulkheads. This is a process I dreaded, mostly from my Badger build where I only used sandpaper and needle files - so, I only faired the top portion to fit the gunport patterns. I'm using heavier duty files this time, and the work is going a lot easier on this build. Still, the fairing is taking me many hours - thankfully it's an easy task to do while watching football. I used my Dremel a bit for the upper portions, but want to be a little more careful on the rest of the hull to get the curves just right so am working them by hand. A few more to do and then I can start planking. I've decided not to do the bow and stern filler blocks, as there are plenty of bulkheads grouped tightly together in those areas. Plus, in really taking my time in fairing the bulkheads to ensure a smooth run, the test planks are sitting very nicely.
I still need to fair bulkhead 13 (the last one where the stern extensions fit), and am trying to figure out the relation between the bulkhead and the stern counter, and where the run of the planks ends. I'm assuming that there is a pretty good bevel that needs to be worked into the bulkhead, and that the stern counter sits against the aft edge of the beveled bulkhead?
-
Thanks BE, hope you and your family had a wonderful holiday and best wishes in 2015! I had a gun setup for my Unicorn build, and used that to test out the gunport heights - I think/hope the gun carriages are roughly the same size.
I'll have to cut out the window space on the quarter badges - that's a very good suggestion, thanks guys!
-
The Lady Nelson looks like a really nice kit. Even if it does not match a particular ship, as Aldo says, you could always find a cutter you like and modify the kit to build that cutter. I found I got a lot more interested in this hobby when I moved from just building the kit out of the box like when I started my Badger, to researching ships and trying to improve their historical accuracy. Good luck if you decide on this model - and post a build log
Just as a first look, I noticed the frame is built of MDF, not plywood. This means everything is absolutely flat and will not warp any time soon. I think that's a huge improvement over plywood.
The Pegasus kit uses MDF as well - I think Amati really does builders a great service in moving the MDF for the keel and bulkheads, as the MDF (at least in my kit) was perfectly flat. I had plywood keel issues with my Corel Unicorn kit, and even had a hard time sourcing perfectly flat 5mm plywood to replace it. Hopefully more kit manufacturers move to MDF.
-
Hey Martin, the two shades of red seem quite close. It's too late for this build, but depending on how the redheart ends up looking on the Pegasus, I've been thinking about using it on my Lyme build. Of course that means removing some of the bulkhead extensions (thankfully, there are fewer as Corel just has extensions every 3 or so bulkheads), but maybe I'll stain the more hidden bulkheads to avoid some of the issues I had on the Pegasus. I have a pint of Cranberry stain that from your pictures looks closer to redheart than the Cinnamon and Empire Red stains.
I wanted to get in my final wood order to Jeff for my future Charles Morgan build, and so I played around with the General Finishes Whitewash stain last night to see what wood I'll need to replace (there is a lot of white on the Morgan, like the masts, railings, whaleboats, etc). I don't think the GF stains are pure stains - instead, I think they are almost like a hybrid between stain and paint, as they go on thin like stains but do have much better coating power like a paint. I even tried it on some brass left over from my Badger's photo etched sheet - even without priming the brass, it went on very nicely. The Morgan's white masts have rings and other items attached to them that are metal and are also white, so the GF Whitewash will work perfectly. Just thought I'd pass that along in case you are thinking about using white on your build.
-


Charles W Morgan by texxn5 - FINISHED - Model Shipways - 1:64
in - Kit build logs for subjects built from 1801 - 1850
Posted · Edited by Landlubber Mike
Looking great John. Did you color the chains at all? I love the bronze look on some of them.
How do you like the serving machine? I was thinking about getting one, as doing the serving with tweezers and clips on my Badger was not very fun at all.