


Martin W
-
Posts
1,412 -
Joined
-
Last visited
Content Type
Profiles
Forums
Gallery
Events
Everything posted by Martin W
-
 Ahoy JPett -- Good to see you've come back from the houseguests to your true calling. As with everything else in your build, the planking here at what you once called so delicately the Ratt's **** looks good. And if you want my opinion, that is the trickiest, most frustrating, part of the process, and that leads to the most redos. I can't spot the wave you mentioned, though, is it in the broadside view? I think I'm less talented than you are, so I would worry about skipping 2 or 3 planks, since very precise measurements could lead to spaces that are too big by just enough to be noticeable once you went back and put the skipped-over planks in. And how did you figure out how to make treenails with a Dremel? Do tell, do tell. I'll be looking forward to more of your work. Cheers, Martin
 -
Hi Eric -- Fairing really is tedious work, and especially because you really want to get to the stage where it looks like you're working on a ship. But as Russ says, it will pay off -- the worst thing that can happen is to find out you've got a bulge or dip in your hull when it's too late to go back and redo it. Cheers, Martin
-
That looks like a good fix there, Brian. A lot of times it's those "patented" devices that test a modeller's ingenuity and that end up being just as fun as the build itself. Martin
-
Hi Eric -- I think your fairing looks good! That was a place that I found pretty tricky on my R-snake because of the severity of the curves. In the end I sacrificed a few strakes by soaking & bending them in place without actually gluing, just so I could see how they would end up moving. JPett is right that little variations can have a surprising effect that you don't know about at first. So slow and steady wins the day. Cheers, Martin
-
Yeah, I like the result too -- you've got some interesting colors. Martin
-
Hi Mog -- looks good, and I agree, a Hobby is a Hobby, and if it ain't fun it ain't a Hobby. What kind of wood are you using? The hull looks like walnut. Cheers, Martin
-
Hey Janos -- That is one excellent figurehead. It's a terrific variation on the one shown by Hahn, and you've solved the major problem of what to put into the guy's hand. Good work. Martin
-
That looks really good, Eric. Do you plan to put filler blocks in the bow? I found that helped a lot when it came to bending the planking. Keep at it, Martin
-
A serving machine that serves you well
Martin W replied to dafi's topic in Modeling tools and Workshop Equipment
Dr Dafi -- A nice machine, nice illustrations. And your wife should definitely be delighted that you've made such outstanding use of those Fischer Technics. But what's she going to say when you start buying more to build serving machines for all your admiring friends? Martin -
Question on use of crowsfeet on ship rigged vessels
Martin W replied to Beef Wellington's topic in Masting, rigging and sails
Thanks Blue E -- Your summary really helps. And the references to Antscherl as well. I've read his description, but somehow it didn't all come together until read your account. Cheers, Martin -
Wow, Peter, this is a good description. Thanks for the pictures as well as the clear description of your technique. I'm definitely going to be looking back over this as I start working on my running rigging, and probably seeking your advice. Martin
-
Question on use of crowsfeet on ship rigged vessels
Martin W replied to Beef Wellington's topic in Masting, rigging and sails
Hi Jason -- You might also take a look at David Antscherl's book on rigging the Swan Class, since it gives a good account of making the euphroe. As far as I've been able to determine -- and I'm not sure it's that far -- the line of the crows feet is much finer than most of the other standing rigging -- on a 1:64 model it would be .025mm, I think. The biggest question I have is just exactly where and how to connect the crowsfeet/euphroe to the forestay. Any clue? Martin -
JPett -- Good luck with the house guests. We'll all be looking forward to your return. My shipyard happens to be in a smallish storage room/safe room, and as "luck" would have it is also the room where the beer is stowed. Cheers, Martin
-
Hi JPett -- your conjecture about the transom is very interesting. I've wondered about why it should be so oversized, especially enemy fire would surely damage it. Your build is looking great -- an inspiration to us all! Cheers, Martin
-
Hi Eric -- in my vast experience of, ahem, TWO models, I had to do a lot of adjusting with just about every bulkhead. In fact with both kits, at least one bulkhead came broken, and I had to cut a new one. Sanding and dry-fitting at this stage is probably simply a necessity. But care will pay off. I'll be keeping track of your progress -- it's looking good. Martin
-
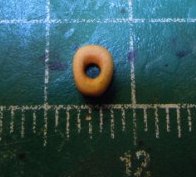
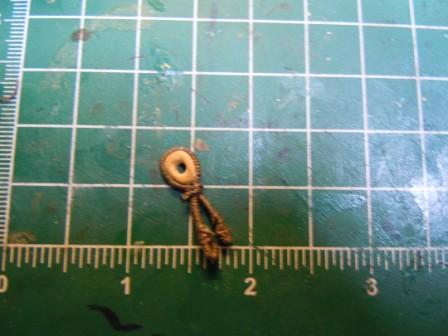
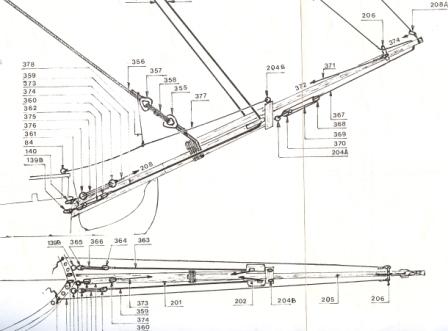
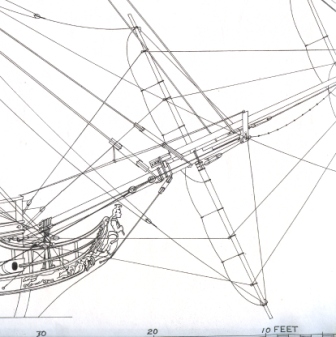
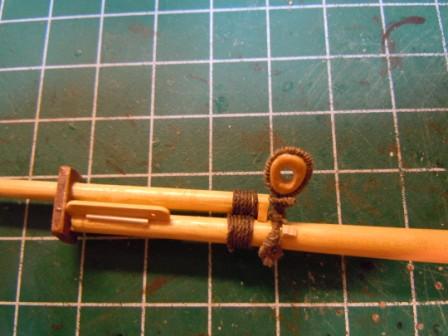
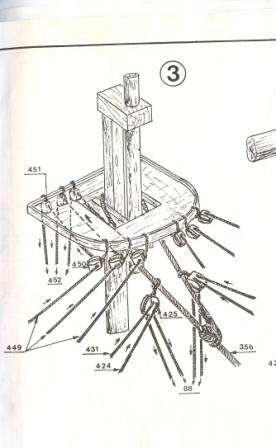
So, despite the fact that I haven’t posted anything, I have not been entirely idle. In fact I’ve mostly been trying to line up everything to get something posted – no fault with the site, just my own deep and wide ignorance about using MS Photo editor. The progress I have made is with the heart and collar that will attach the forestay to the bowsprit. Following Bob Hunt’s instruction, I carved the heart out of boxwood. Then, after reading David Antscherl’s account of the collars being seized, I thought I would give that a shot, even though I don’t have an actual seizing machine (yet). What I came up with looks ok, though once the seized line went around the heart, I could see that the seizing could have been tighter, something I hope will be corrected with the machine. Now, here is where I ran into an interesting dilemma. There seem to be two separate theories about where this collar & heart should go. The plans from the kit show it just fore of the saddle, on the jibboom, like this: And Harold Hahn’s rigging plan show it just aft of the saddle, on the bowsprit, like this: After looking at some of the usual other authorities, Antscherl, Lees, & Petersen, I’ve decided that the more likely position would be that shown by Hahn. And so that’s where I’ve put it. And I lashed the jibboom to the bowsprit, even though Hahn does not show that – I did it because it seems to make sense, and it is shown in Petersen (if I recall). Here’s mine: And this discrepancy raised another question. Once I started comparing the 2 sets of rigging plans with each other, and with the sort of generic plans of the Big Three books, I saw that the Rattlesnake kit plans (and this is from Mamoli – I haven’t seen the Model Expo plans) has no crows feet but instead a row of blocks seized for the stays, like this: This arrangement doesn’t show up anywhere else. Here’s the foretop from Hahn for comparison. So, I guess what this means is that I’ll be looking over all the plans as I proceed, and figuring out (or trying to figure out, trying to unravel) which arrangement is the best. Instead of happily following someone else’s instructions, I’m (gulp) going to have to work things out myself. I predict that I’ll be spending plenty of time staring blankly, holding plans in one hand and rigging line in the other. Comments and suggestions are more than welcome. Cheers, Martin

-
Hi everyone, thanks for your comments. Dominik, the deck planking is holly. Aaron, actually the wood came from Lloyd Warner, of Warner Woods West, which no longer supplies the wood for this kit-bashing practicum. So, yes, nowadays it would come from Hobby Mill -- and I have gotten plenty of stock from HM, and can say that Jeff Hayes is wonderful to deal with. I bought the kit and wood from someone who decided to go to 1:48 scale and gave me a good deal. As I said above, I have learned a heckuva lot from this practicum. Onward! Martin
-
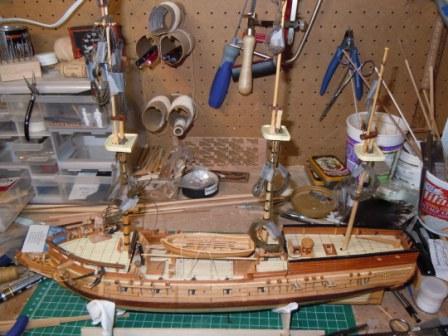
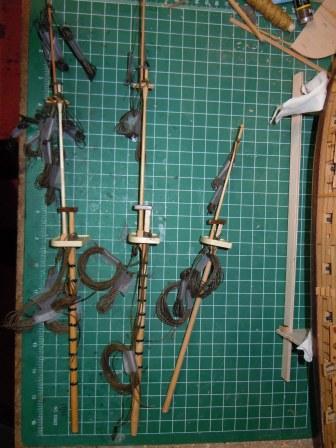
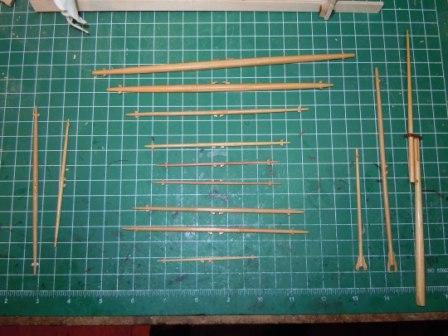
Ahoy everyone – After benefitting so much from reading other people’s build logs, I finally came to the realization that I should participate by doing more. And so, after talking with a few of my fellow Rattlesnakes in Pms, I’ve decided to take the plunge and post a log of my own build. I’m about 2/3 through the standing rigging, so this is where I’m starting. First of all I have to give credit where it’s due, and say that I’m bashing the Mamoli kit with the guidance of Bob Hunt’s practicum. I came across Bob’s practicum when I started rigging my previous (and first) square-rigged model, The Prince de Neufchatel – the kit’s instructions left me utterly baffled, and so I bought 2 of Bob’s practicums, the one on rigging, and the 2nd half of the Rattlesnake practicum, which deals wholly with the rigging of that model. Because those helped me out beyond what I’d even hoped for, I decided to do the Rattlesnake as my next build, following his kit-bashing instructions. This was a big step, and pretty much over my head, since I’d only built one other model. But I decided to go SLOWLY and to treat the build as another learning experience (and lots of little learning experiences). The first photo shows the masts sitting in the hull with the standing rigging attached (don’t mind the clutter in the background, please). The second photo shows the masts lying on the mat. The mizzen mast is raked slightly, and I tried to accommodate for that by angling the top and the cap – and I was sure I’d gotten them parallel before the glue dried, but found after the glue dried that I was off pretty noticeably. That’s one of numerous errors. The third photo shows the spars. The 2 on the left are another couple of errors – when I was laying them out for the photo, I realized I’d put the cleats on the wrong side in relation to the chocks. But I think these will be a lot easier to fix than the top & cap. The masts are spruce. The spars are boxwood. For the caps I used walnut, since I had that on hand in the right dimension. The tops are holly planking over a sheet of thin plywood; they’re too thick, especially with the edge I put on, but the other alternatives of just using plywood or cutting big lap joints in the planking didn’t seem satisfactory for different reasons. I might mention that I started off shaping the masts & spars with the method described by Frank Mastini using a drill as a lathe. That method has the advantage of enabling you to get the taper down pretty fine at the ends of the spars, and of keeping the tapers symmetrical. The drawback is that you have to add about 1/4 inch to each end of the stock to fit into the drill chuck, and even then when the taper gets thin the spar breaks easily, and you can’t get a good fit in the chuck with a tapered piece of wood (and the chuck will leave grooves in the wood). After the first couple of spars, I switched over to the method described by David Antscherl in the Rigging volume of the Swan Class series. I like that method because it uses hand tools – a chisel & a jig. I used an exacto knife and set the stock in the groove in the jaws of my vise. Since 99% of my aim is to learn and improve my skills, forcing myself to take the time and care to cut and shape the spars by hand will payoff some time. I could not get them tapered as finely as I wanted, and keeping them symmetrical also proved more of a challenge than with the drill method. But – this is the mystical part – I felt closer to the wood, and got more satisfaction from working that way. Next up: although Bob Hunt doesn’t include crow’s feet, I’ve decided that I’m going to give them a shot – again, I want to learn how it’s done, and they are shown in Harold Hahn’s plans. I’m also really intrigued by Antscherl’s use of served line, and I think I’m going to do that for the collars on the Bowsprit. Cheers, Martin
- 104 replies
-
- 1
-

-
- rattlesnake
- mamoli
- (and 1 more)
-
Dominik -- Your new captain shows how lonely the life of the leader can be! Cheers, Martin
-
Hi JPett -- It really is looking good. I just want to add my cheers to everyone else's here and say that your attention to the decking now (when it probably seems more exasperating than satisfying) will definitely make you happier as you move farther along in the build. Y'know, there are those moments when you have to take a break, let the glue dry, open another beer, or whatever, and then you look at the work you did well and remember why you want to take your time. Onward! Martin
-
Hi Dominik -- It's good to see how you're progressing. Like JPett, I also appreciate that link. The wooden mount shown in the picture is the one that comes in the Mamoli kit, I believe, since I have all those short pieces of wood. Your planking on the quarter deck is off to a good start. One challenge I faced on the quarter deck is that I'd already cut the hatches and installed the capstan, so getting that center plank exactly right proved a trickier than I'd expected. Yours looks pretty doggone good to my eye. Cheers, Martin
-
Hi Sport -- It's always good to another Rattlesnake build. I'm working on the rigging of mine, which is a Mamoli kit, and I've bashed it (at least somewhat). It's nice looking model with really good lines, and the quarter deck gives it the appearance of a small frigate, so as you progress you'll find it taking on a very impressive appearance. And you'll also find MSW to be a great place for help and support. I second what Dave says about the rabbet. If you get as close to 1/16 as you can, AND keep it consistent, you'll have a much easier time when you're planking. I'll be looking forward to your progress.. Cheers, Martin
-
Ahoy JPett -- Thanks for the link, I've been looking for your log, and now I've been able to do some catching up (though I'm supposed to be working, so I'll have to do the real catching up later). As you requested I'm sending a few snaps of my build. Cheers, Martin
-
Hi Brian -- The best tutorial / practicum for carving is the one by Bill Short, "The New Carving Ornamentation for Ship Models." You can order it from this site: http://carvingbook.weebly.com/contact-me.htm I used it to carve the figure head and the stern decorations, and it REALLY helped. I went from just wishing and dreaming I could actually carve something resembling a recognizable form to actually getting something I'm proud of. And it's always good to do research. The 2 Chapelle books, along with Hahn's book, plans, and photos (on CD) have not only been interesting for their information, but also have guided me countless times in figuring out how details fit together or how they're actually supposed to look. Cheers, Martin
-
Dominik -- It's good to see that you've restored at least some of your log. I'll be checking in on your progress. Cheers, Martin