
kirill4
-
Posts
910 -
Joined
-
Last visited
Content Type
Profiles
Forums
Gallery
Events
Everything posted by kirill4
-
 Good day, Agree, they looks nice !!! But strange, when read those stories about SOS lanterns - when a few people were able to be accomodated inside??? - for one person may be there is sufficient room, but for more?
- 324 replies
-
- 1
-

-
- Sovereign of the Seas
- Airfix
- (and 1 more)
-
Good afternoon Michael ! It looks between good and very good !!! :))) You know, there are miniature plastic nets with rhomboid cells that can be borrowed for the manufacture of models lanterns - such nets are used for packaging garlic in vegetable stores, or a mosquito net also often has suitable cells ... household stores could be checked. I also saw on classic models such lanterns have an imitation of glass - black imitation glass with hand -drawn drawings of the framework inside like You presented now? I saw You used such net with diamond shaped cells in your smaller windovs? Or big lantern should have big glass panels? All the best!!! Kirill
- 324 replies
-
- 3
-
-
- Sovereign of the Seas
- Airfix
- (and 1 more)
-
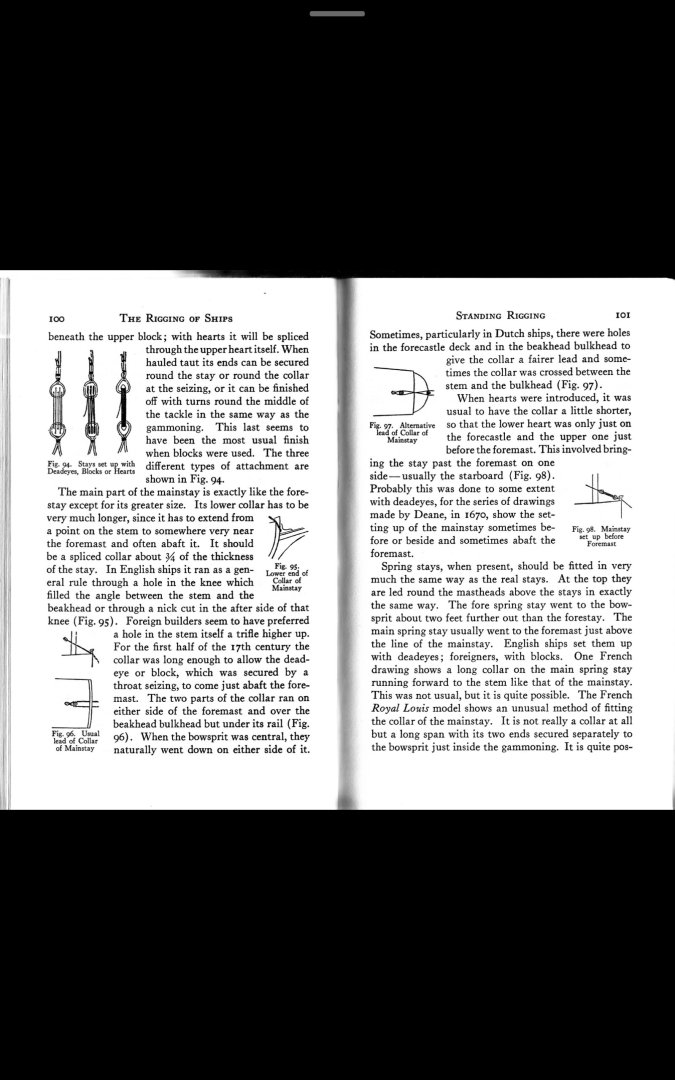
I don't know, but if You don't have this book, than I would strongly reccoment to have it and read it carefully :))) ...it is of grade "must have" when busy with 16-17th model rigging ... section by section,standing and running , each rigging line described in details
-
Yes, indeed, he is very talanted person!
-
please check lashing of your boat on deck - lashing should be run from one side to another and tight by tackles , but not like cross each other as You shown on yours ... it should be done smthg like this 128.tif.tiff
-
on your model, running end of mast tackles lanyards - they need to be secured somewhere at its own gear, but not away somewhere in other palce, as I understood... pls check it
-
a few examples of rigging details - golden level if I could say that ... both works in a Dutch style(the work of Ab Hoving need to read at lest one time very carefully! , especially section of making model at least :))) , yes , but most of the rigging tips , tricks and details could be used for rigging english galleon of the period and, moreover... model of Pinnace Papegojan 1627 - 1/48 [COMPLETED BUILD] by mati.n- it's just pure fantastic work :)))... and there are a few pictures of famous model of galleon Elizabeth Jonas ... Het_schip_van_Willem_Barents_-_A.J._Hoving.rar Papegojan 1627 — копия.rar Elizabeth Jonas 1588.rar
-
Good day Patrick, Watching your building reports with great interest!!! She is groving up nicely !!! :))) All The Best ! Kirill
-
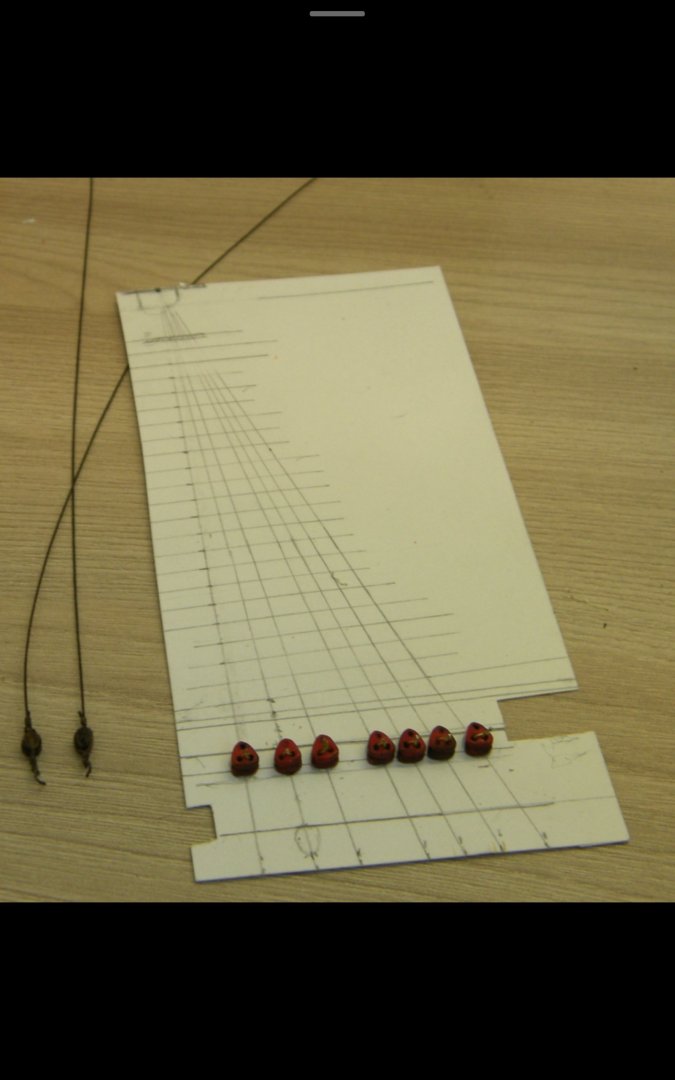
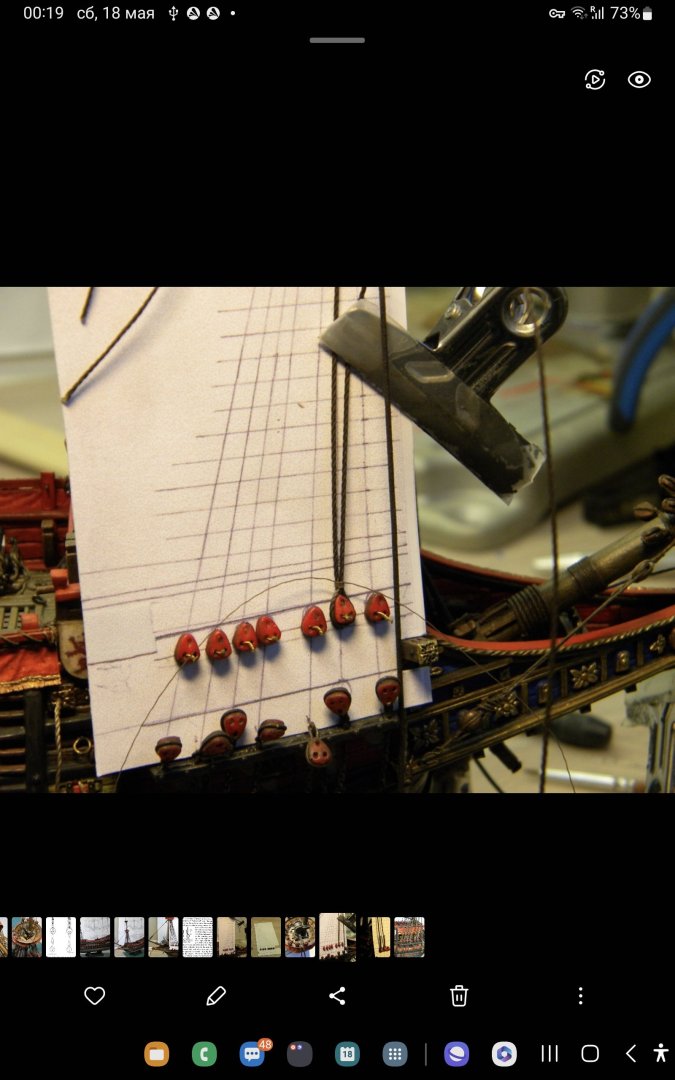
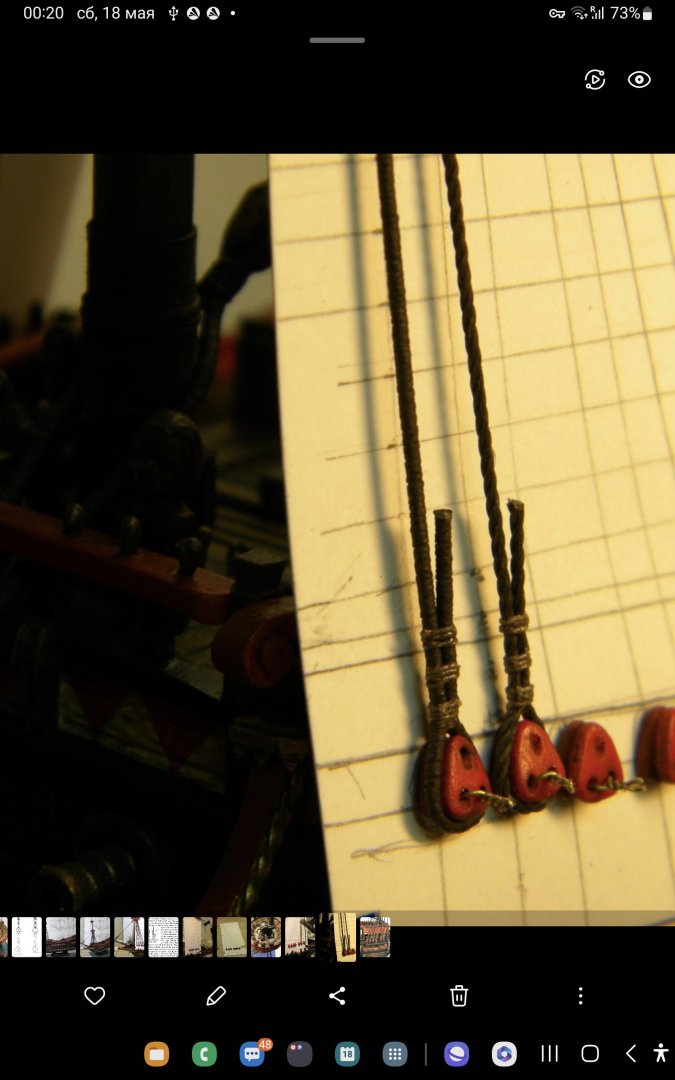
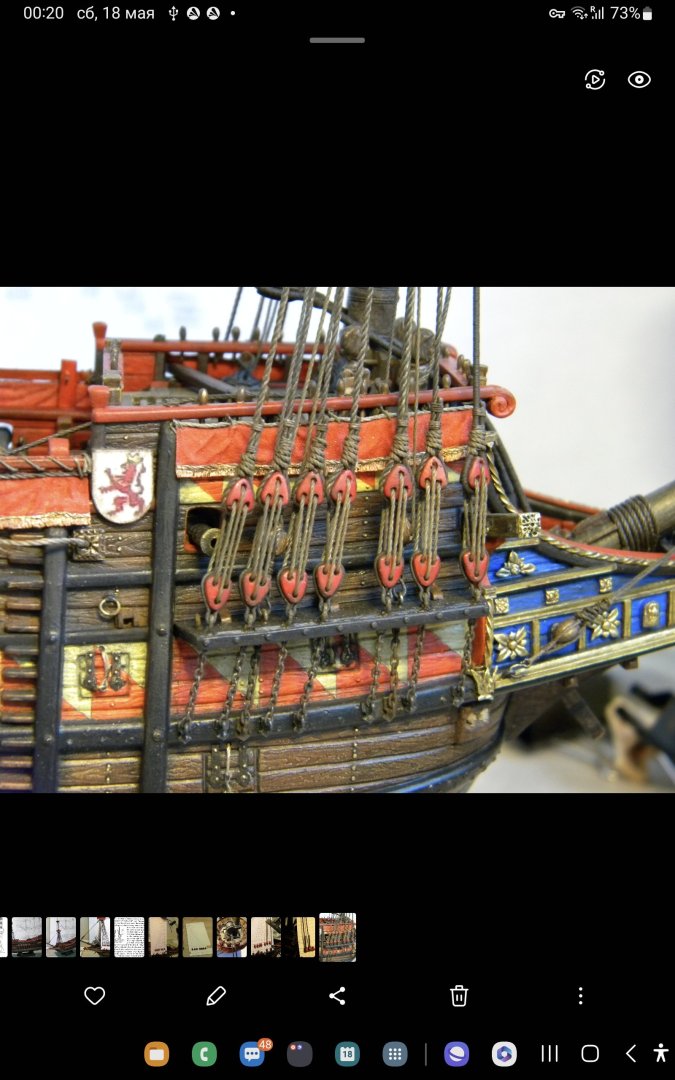
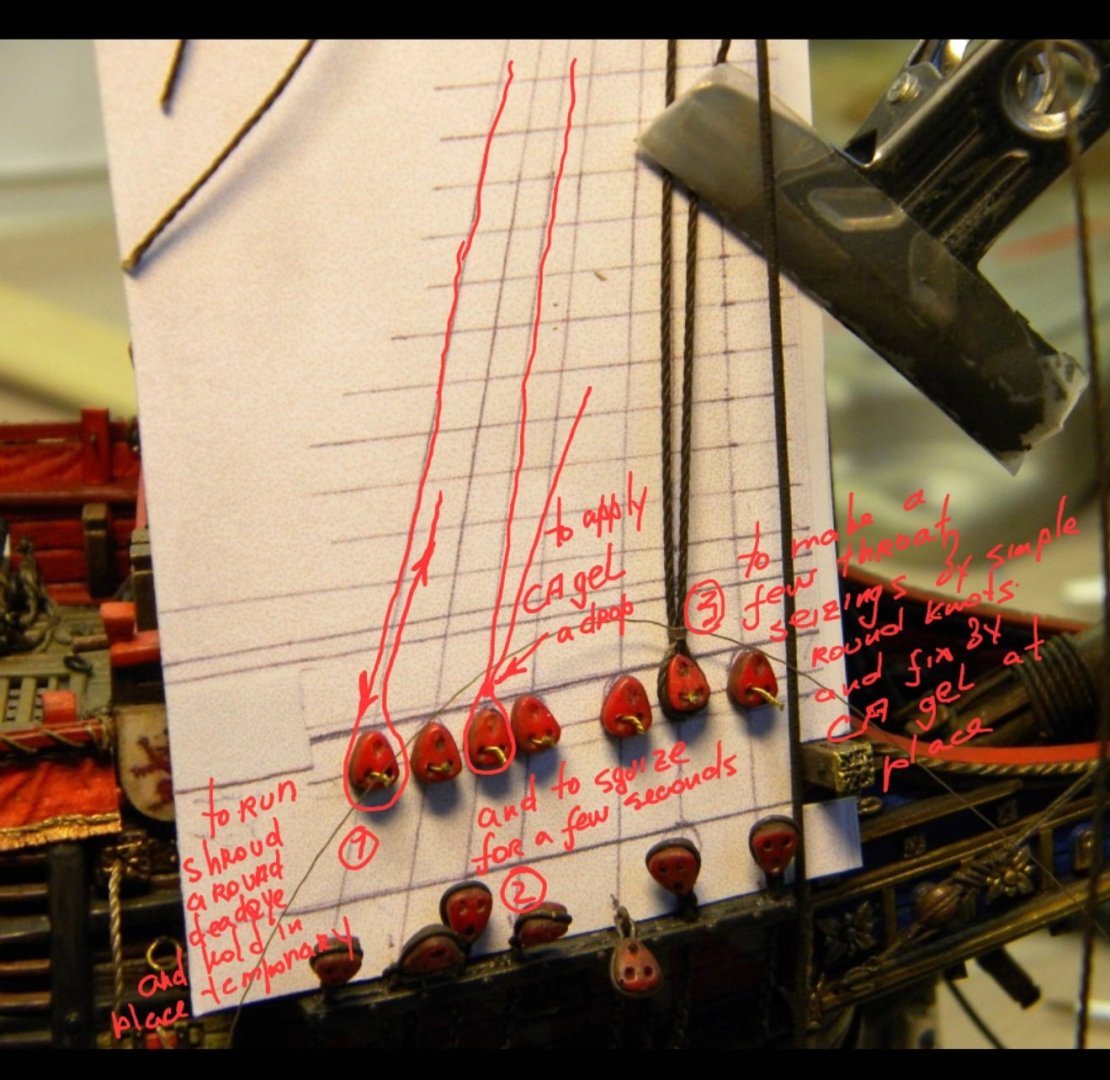
Good day , there are a few more tips and pictures if You like ... sometimes it is difficult to simulate seizing when we are busy with rigging blocks or try to end up other rigging lines in small scales, using ordinary , even thiniest threads for these purposes often gives not nice but some bulcky and rough visual results, after a few experiments I 've found these Gutermann threads seria Skala (they are different in sizes, than bigger No than thiniest thread) which gives more nicely results ,by my opinion,for imitation seizing ... for imitation seizing I used simple round knots apllied one after another on the thread and final drop of "CA liquid"... for making fine cut off the thread I use good nails cutter which gives fine and clean cut...

-
Good day, There is very interesting and lot of usefull information! build log of GH by Patrick
-
Good day Michael! Looks Great!!! Follow your build with great interest! All The Best!!!
- 324 replies
-
- 3
-
-
- Sovereign of the Seas
- Airfix
- (and 1 more)
-
Good day Stevinne, Your plan sounds good! Don't forget to reinforce top construction, perhabs need to install some wooden or metal pins in some critical points to create reliable connection of top elements ? When I did my rigging, I don't remember issues with shrouds twisting, but I try to avoid as much as possible to create any tensions or load on shrouds and other standing rigging( due to plastic masts and spars of my model)... all were done with applying minimum "forces" if we could say that, moreover, as I mentioned early, do better to paint all threads You use for rigging befor use... it could be painted by mix of artistic oil paints deluted in tick oil and thinner or by acryl artistic paints of suitable colors... actualy we need two colors for our purposes, bright for running rigging and dark for standing... There is a receipt from one of high level modeller , how he paints his rope: "...for coloring white threads with artistic oil paints, you can dilute the composition in half a liter container, for example - a tube of paint is mixed with liquid oil - teak, for example (you can add more white spirit - to make the composition more liquid) Natural umber is used for standing rigging. On running, ocher is added to this paint. It is dyed by pulling a thread through a can or a poured puddle of paint. Then the thread is pulled several times through the cotton glove and hung out to dry. Can be used in a day. One of the Model of Dmitry Shevelev https://www.shipmodeling.ru/phpbb/viewtopic.php?p=370243#p370243 Before painting or even when threads were painted and still wet and hanging for drying, it could be loaded a little with weight of some steel bolts or nuts which will release internal tensions some times remains in thread ... that also will help to avoid twisting effect... All the Best!!! Kirill Ps There is sence to check which kind of thread used for shrouds - right or left hand made and how it passes around desdeyes - clockwise or counterclockwise direction when fitted? Details You could found in Anderson book.
-
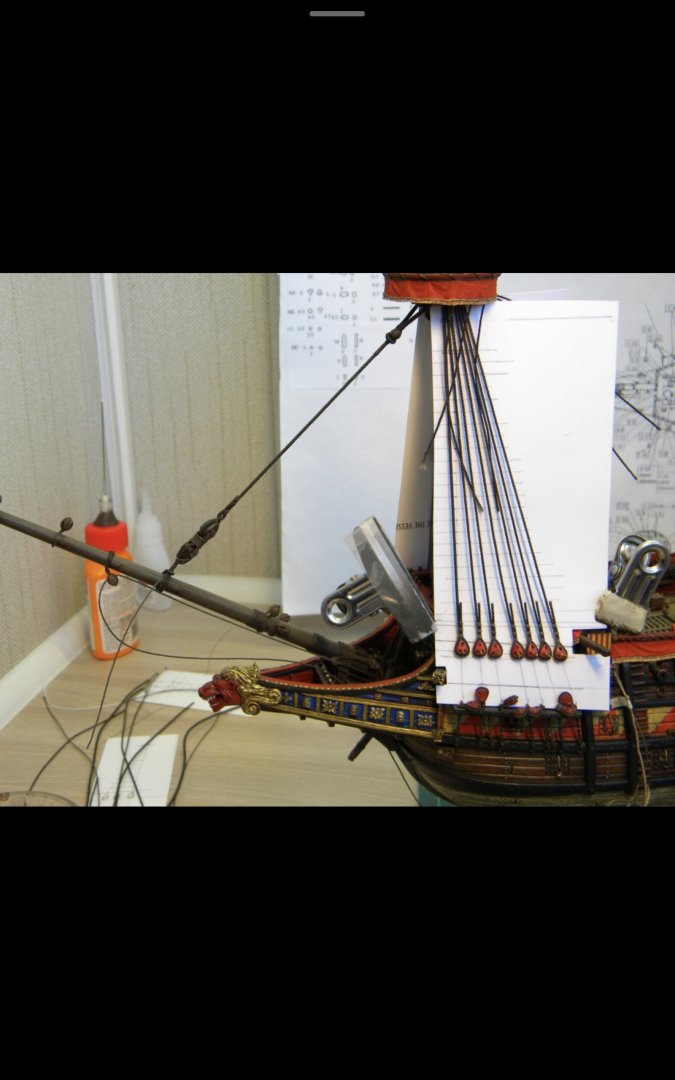
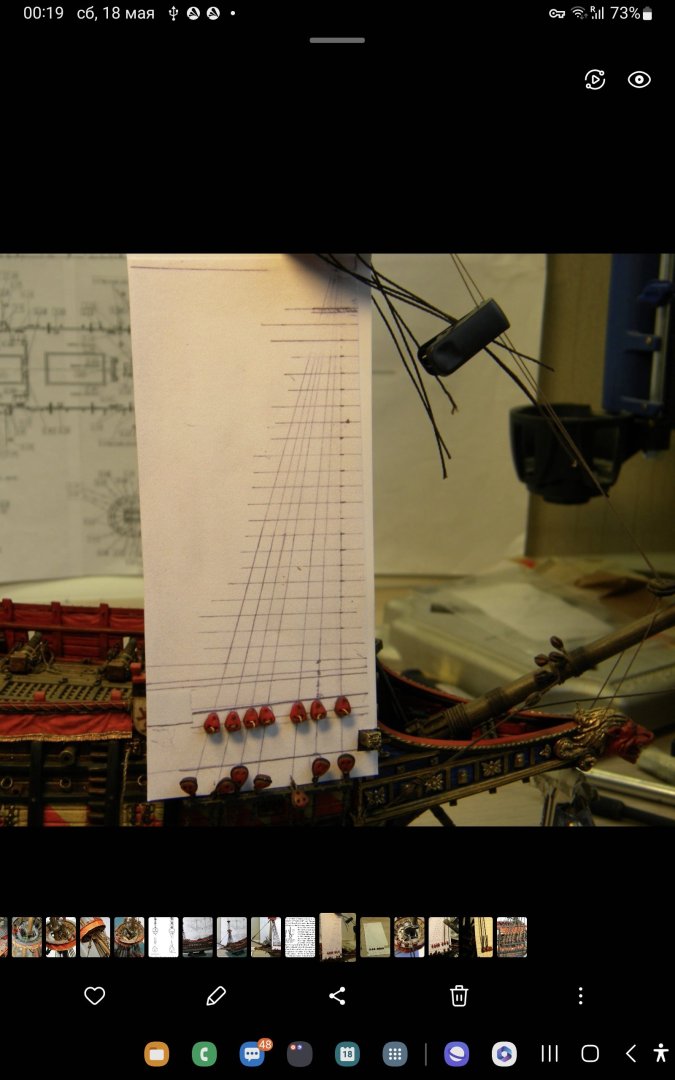
Good day, It is very sad to see this troubles with topmast platforms... lacky Younare still in that stage when a few jobs for reinforcement could be done with small looses , but not like this kind of trouble could happened when all rigging completed and sails installed as well... that will be a real serious trouble What I could guess, may be there is sence to undone upper shrouds, to reinforce entire tops construction and made them more reliable secured to the masthead? Actually rim of the tops shouldn't be loaded by topmast shrouds and teared off the place, for that forces of the topmast shrouds transfered to the mast shrouds by means of futtock shrouds which are pass trough the holes in the top... looking at your photo I see topmast shrouds but no fitted futtock shrouds...hm... this is not right way to rigg topmast shrouds, may be this provoked troubles which You expetienced?
-
Good day Dave, Your model is growing up very good! I don't have wooden models building experience at all. Rigging questions , for me , it is always like some kind of a pazzle in some extend, which is just allways interesting for discussion :)))... may be there are some points for improvements in the kit , or not , it all depends on of your intentions of couse, but the kit is quite good in common , as I could see, watching those fragments of kits drawings which You posted above... Wish You all the best! Watching your building reports with great interests!
-
Good day, There are a few ideas, which could be found usefull, how to fitt shrouds in simple way by using cardboard patterns and thin brass wire and CA gel to fix shrouds when they passed around upper deadeye... Pls note , *upper deadeyes temporary secured to the cardboard by thin soft wire , sometimes necessary to apply a drop of CA glue on the other side of the cardboard to make wire less moveable... *than assembled piece of cardboard need to be precizely fitted in pozition between mast top platform and chainplate. * shroud need to pass around upper deadeye by means of strong pincet with a very ,very little force just sufficient to keep shroud thread straight but no more! and to secure its running end temporary in such position by any convenient way * than apply a small drop of CA gel glue a little above upper deadeye and to squieze both branches of the shroud together in this point by means of long nose plears for a few seconds with redonable force to allow CA work and than apply one throat an two round siezings above deadeye and to cut off remains of running end of the shroud. * all standing rigging threads were painted ( in necessary color by using mix of acrylic paints and matt varnish in free proportion You like) in advance before installation, it made them flex like soft wire which,by my opinion, makes them much handy to operate with... Ps There are a few other methods which make shrouds lanyards installation more easy...someone used to use a distance / calibrated piece of wood of certain length with metall pins in both ends which is fitted between lower and upper deadeyes, than running end of the shroud passing and fixed around upper deadeye and procedure repeated with another pair of deadeyes and so on, than lanyards of all shrouds could be fitted...

-
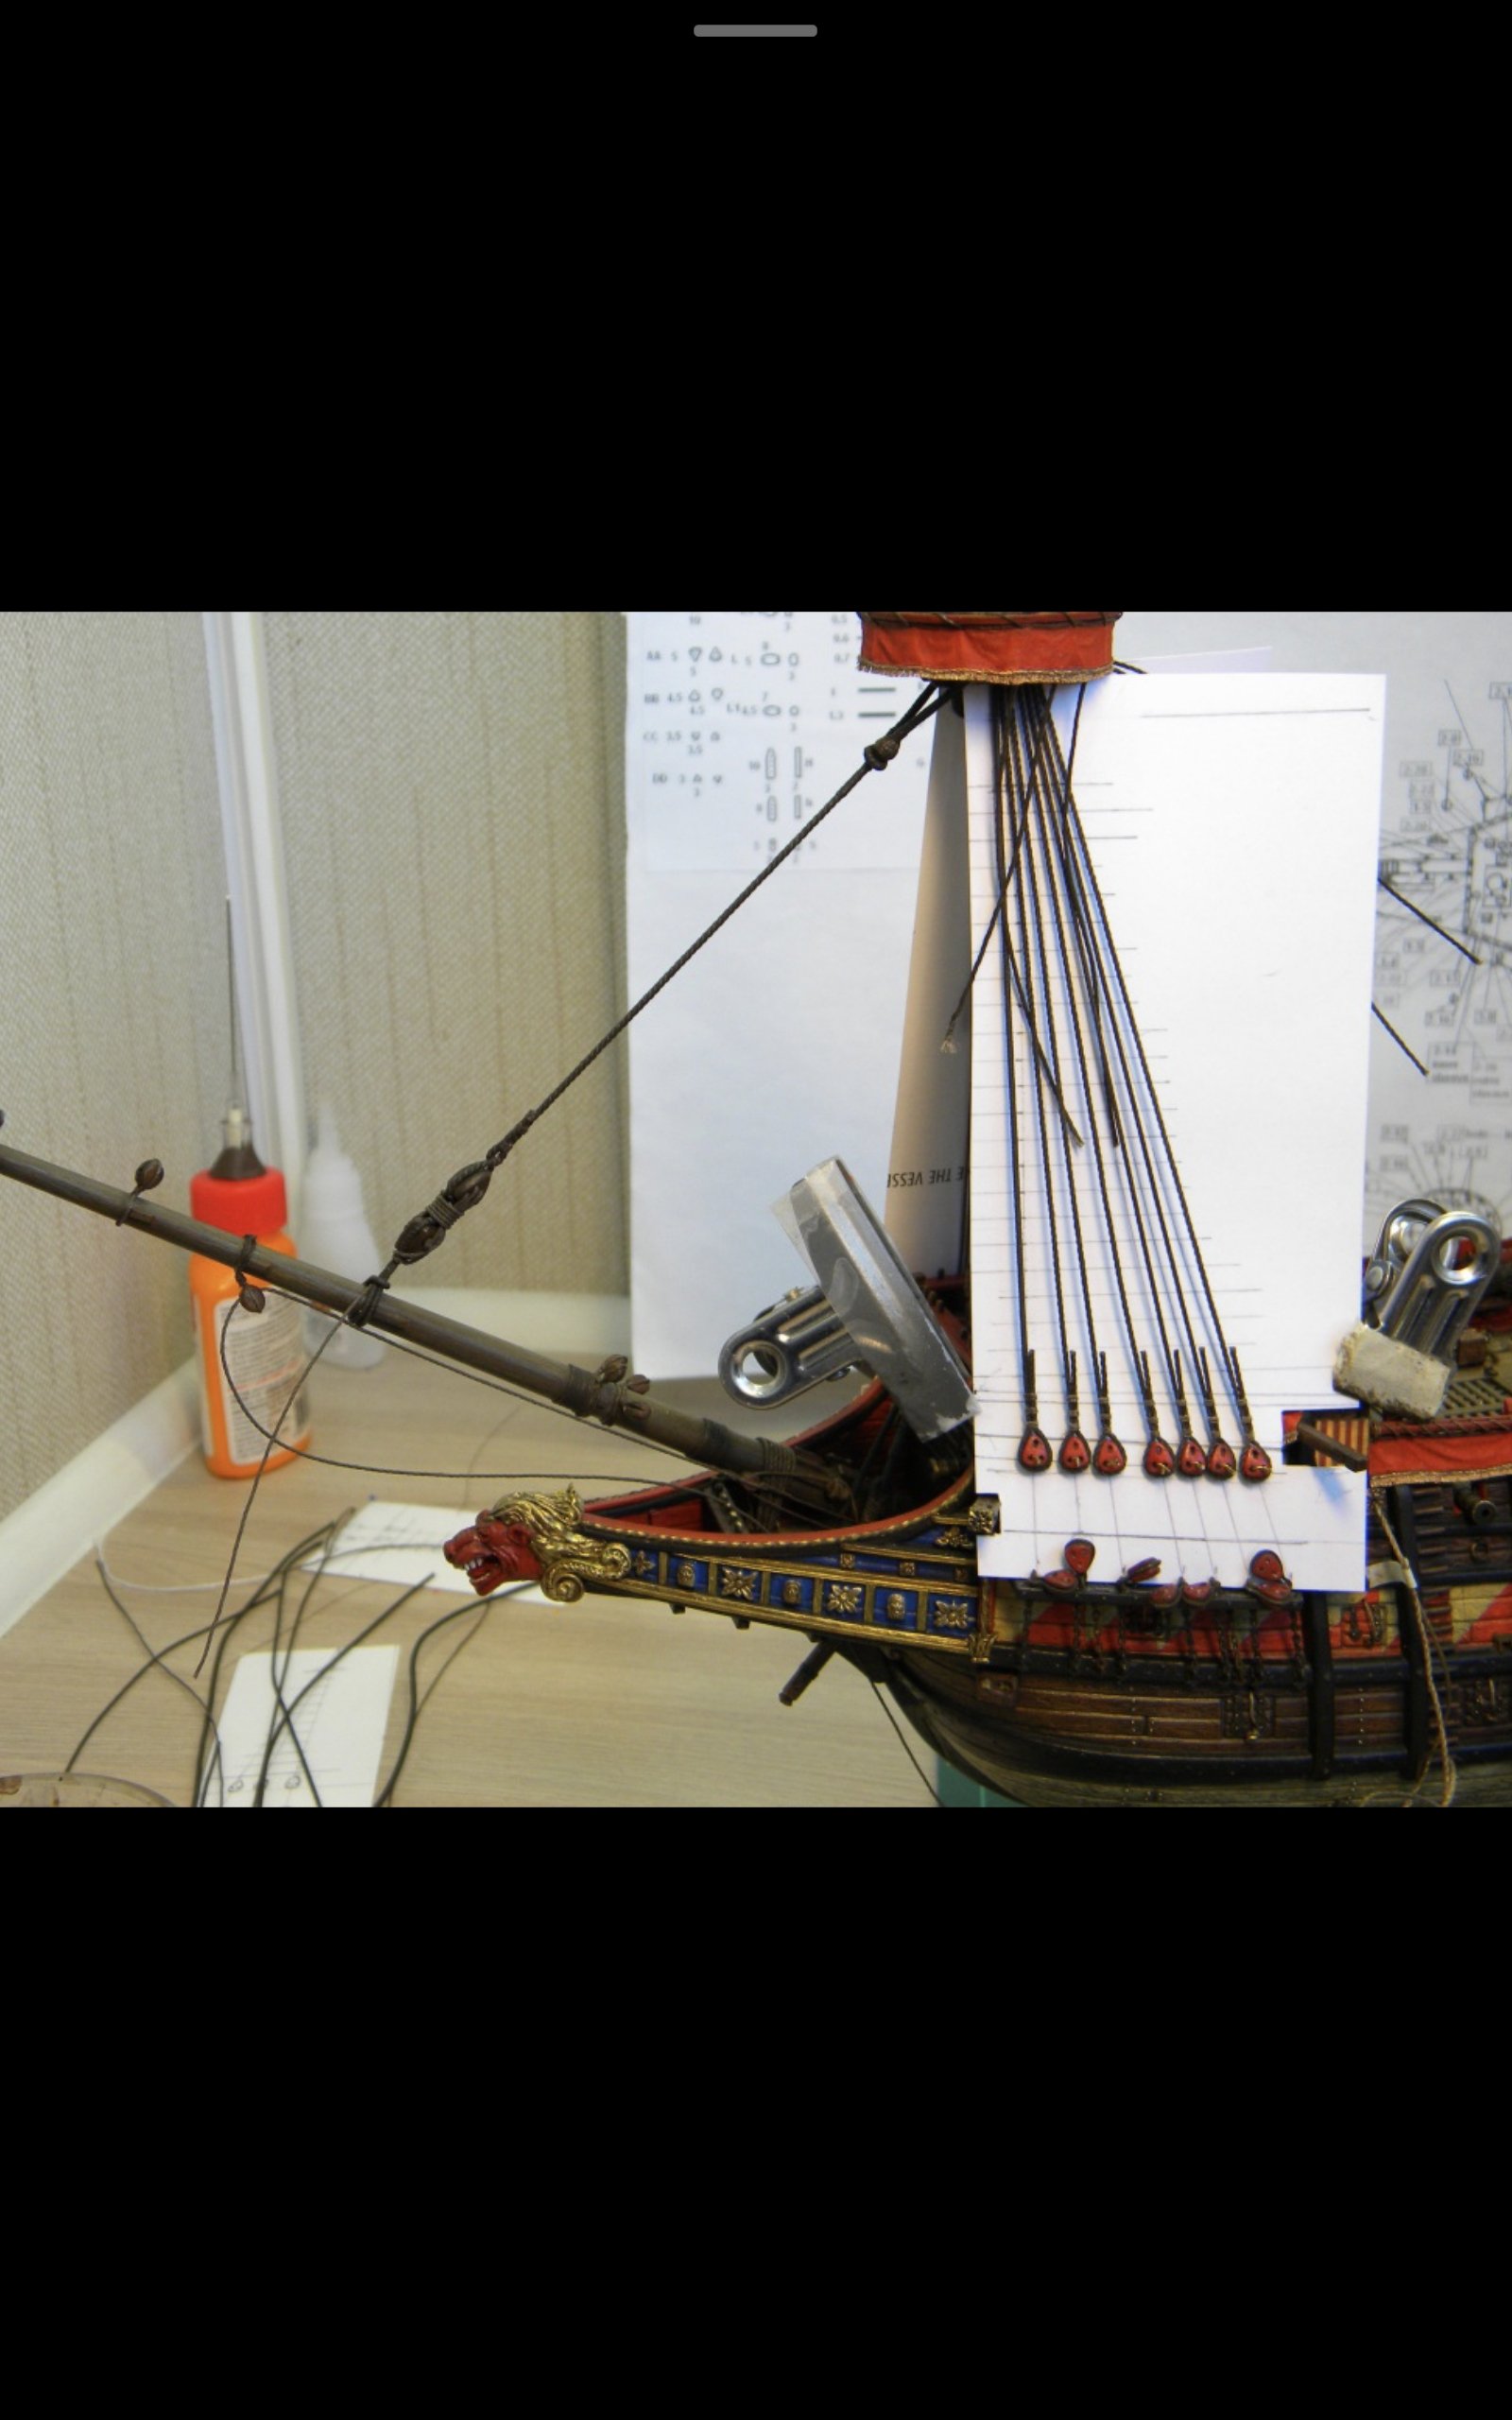
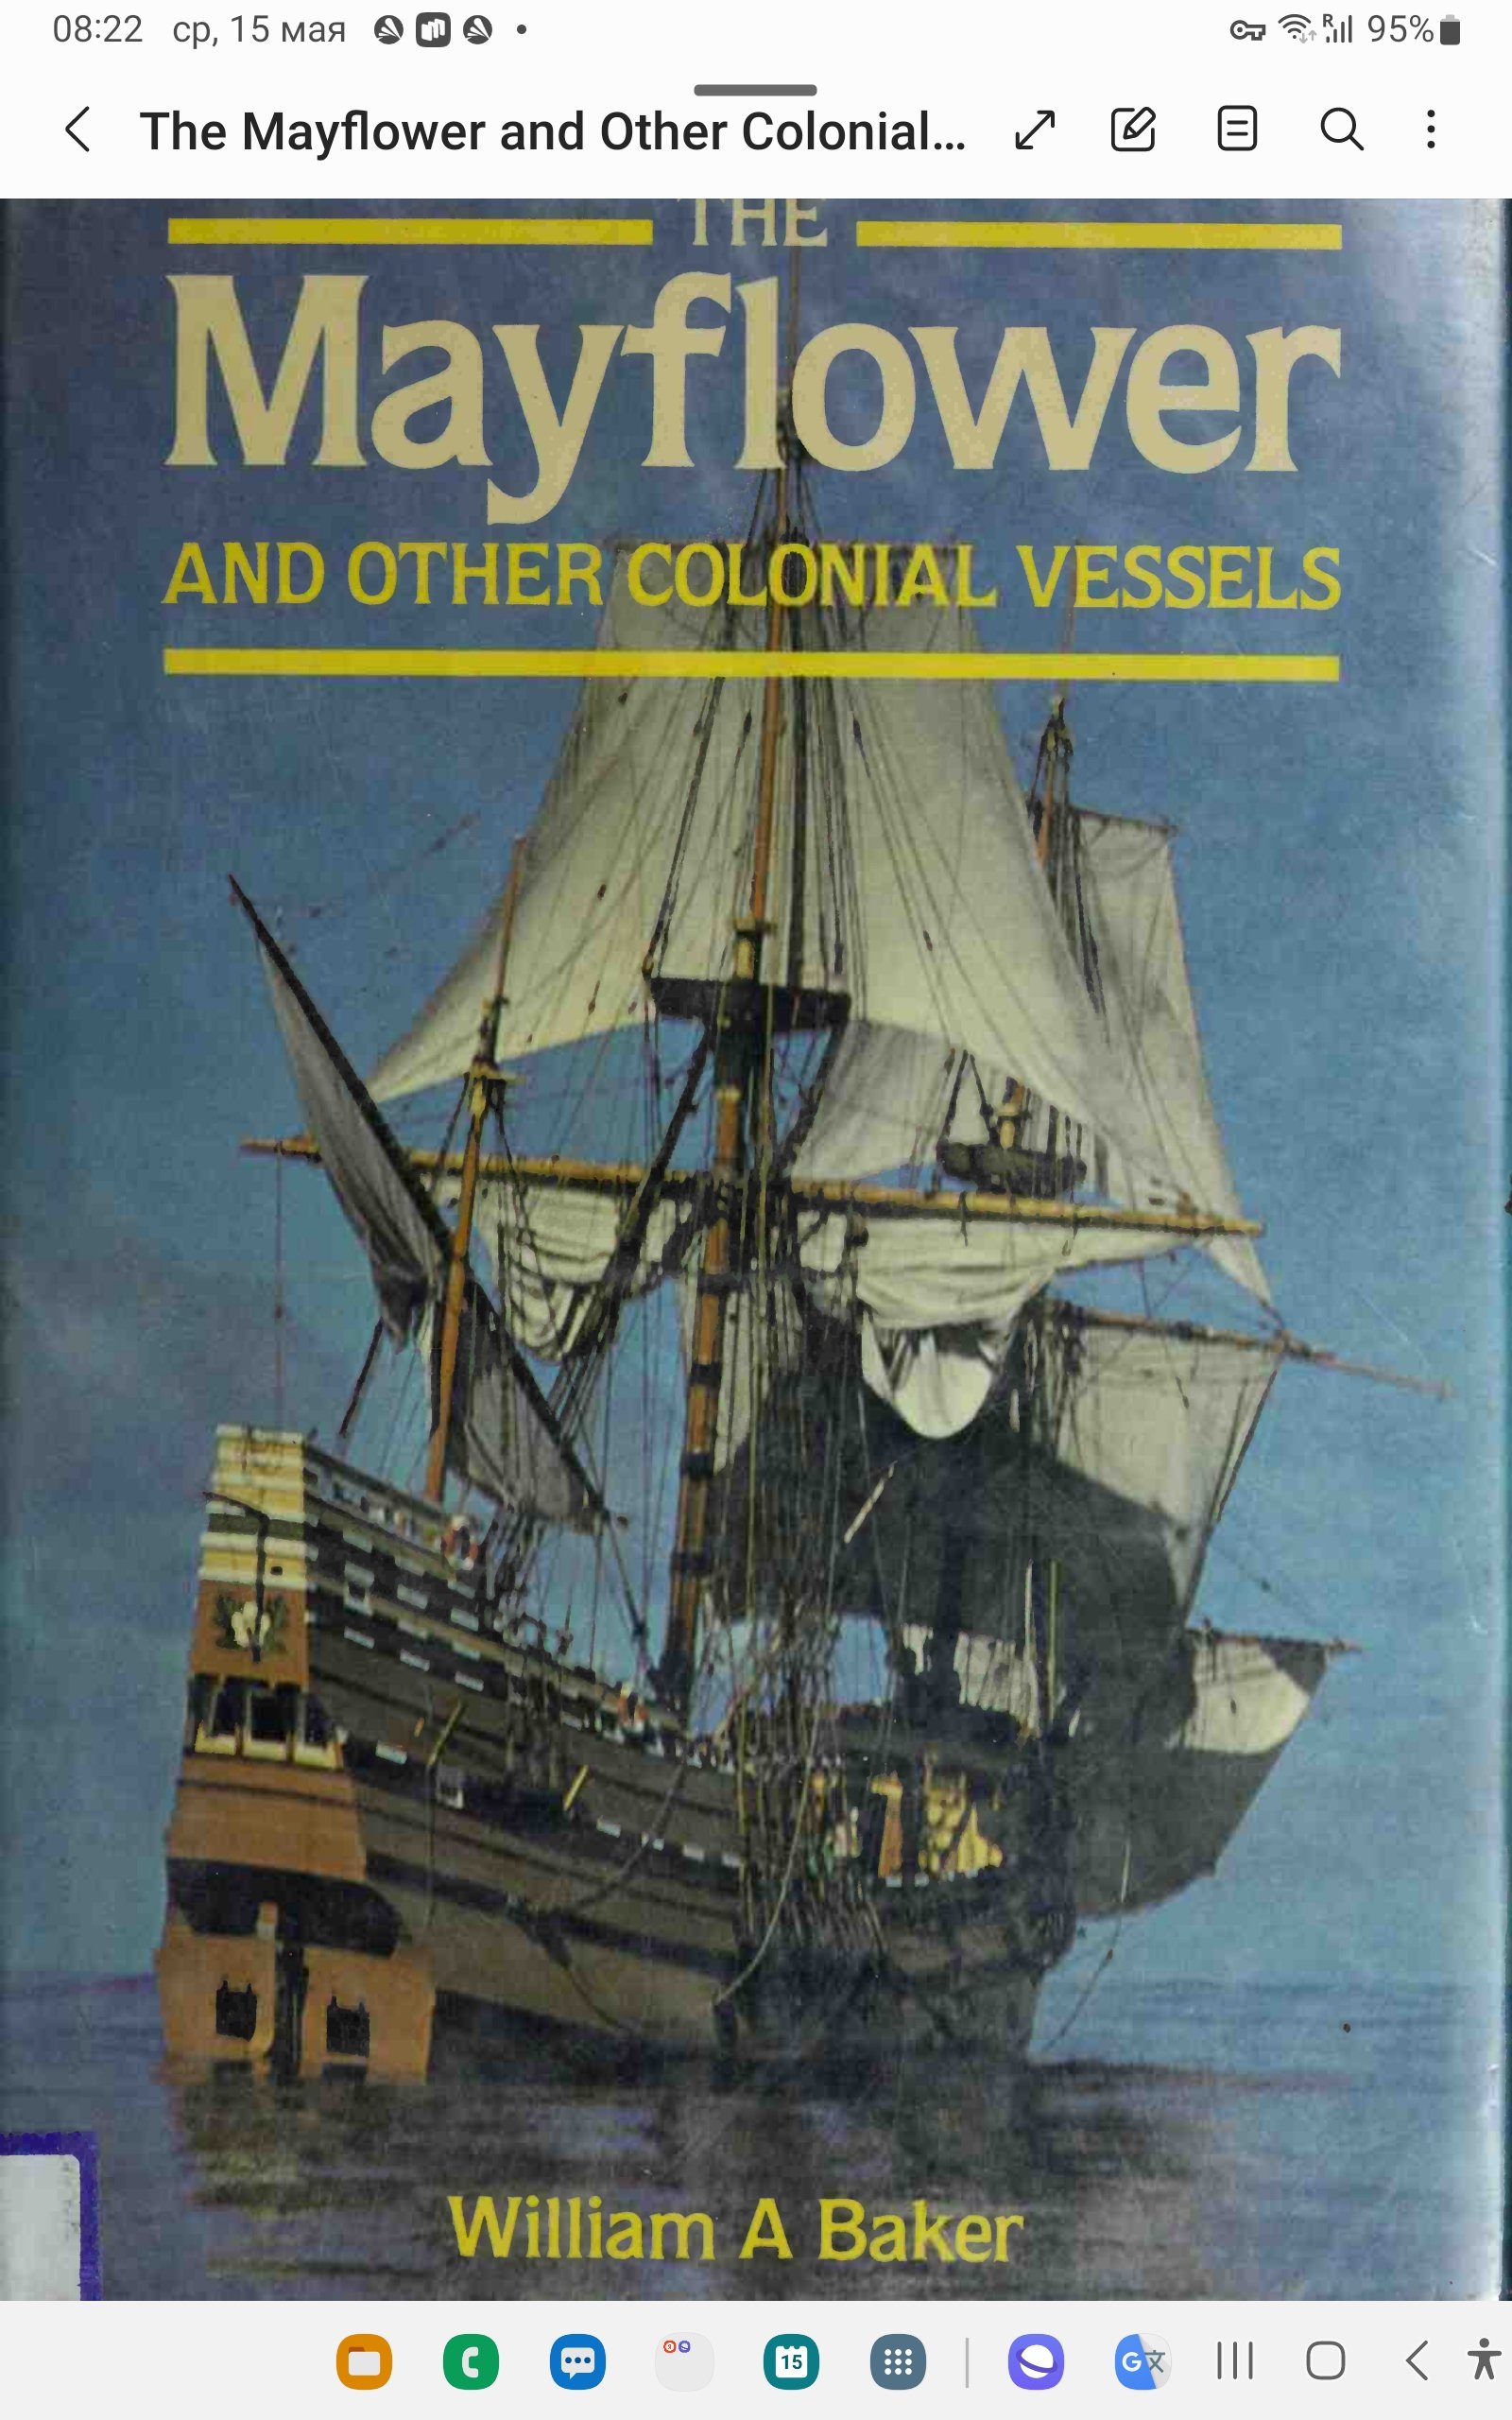
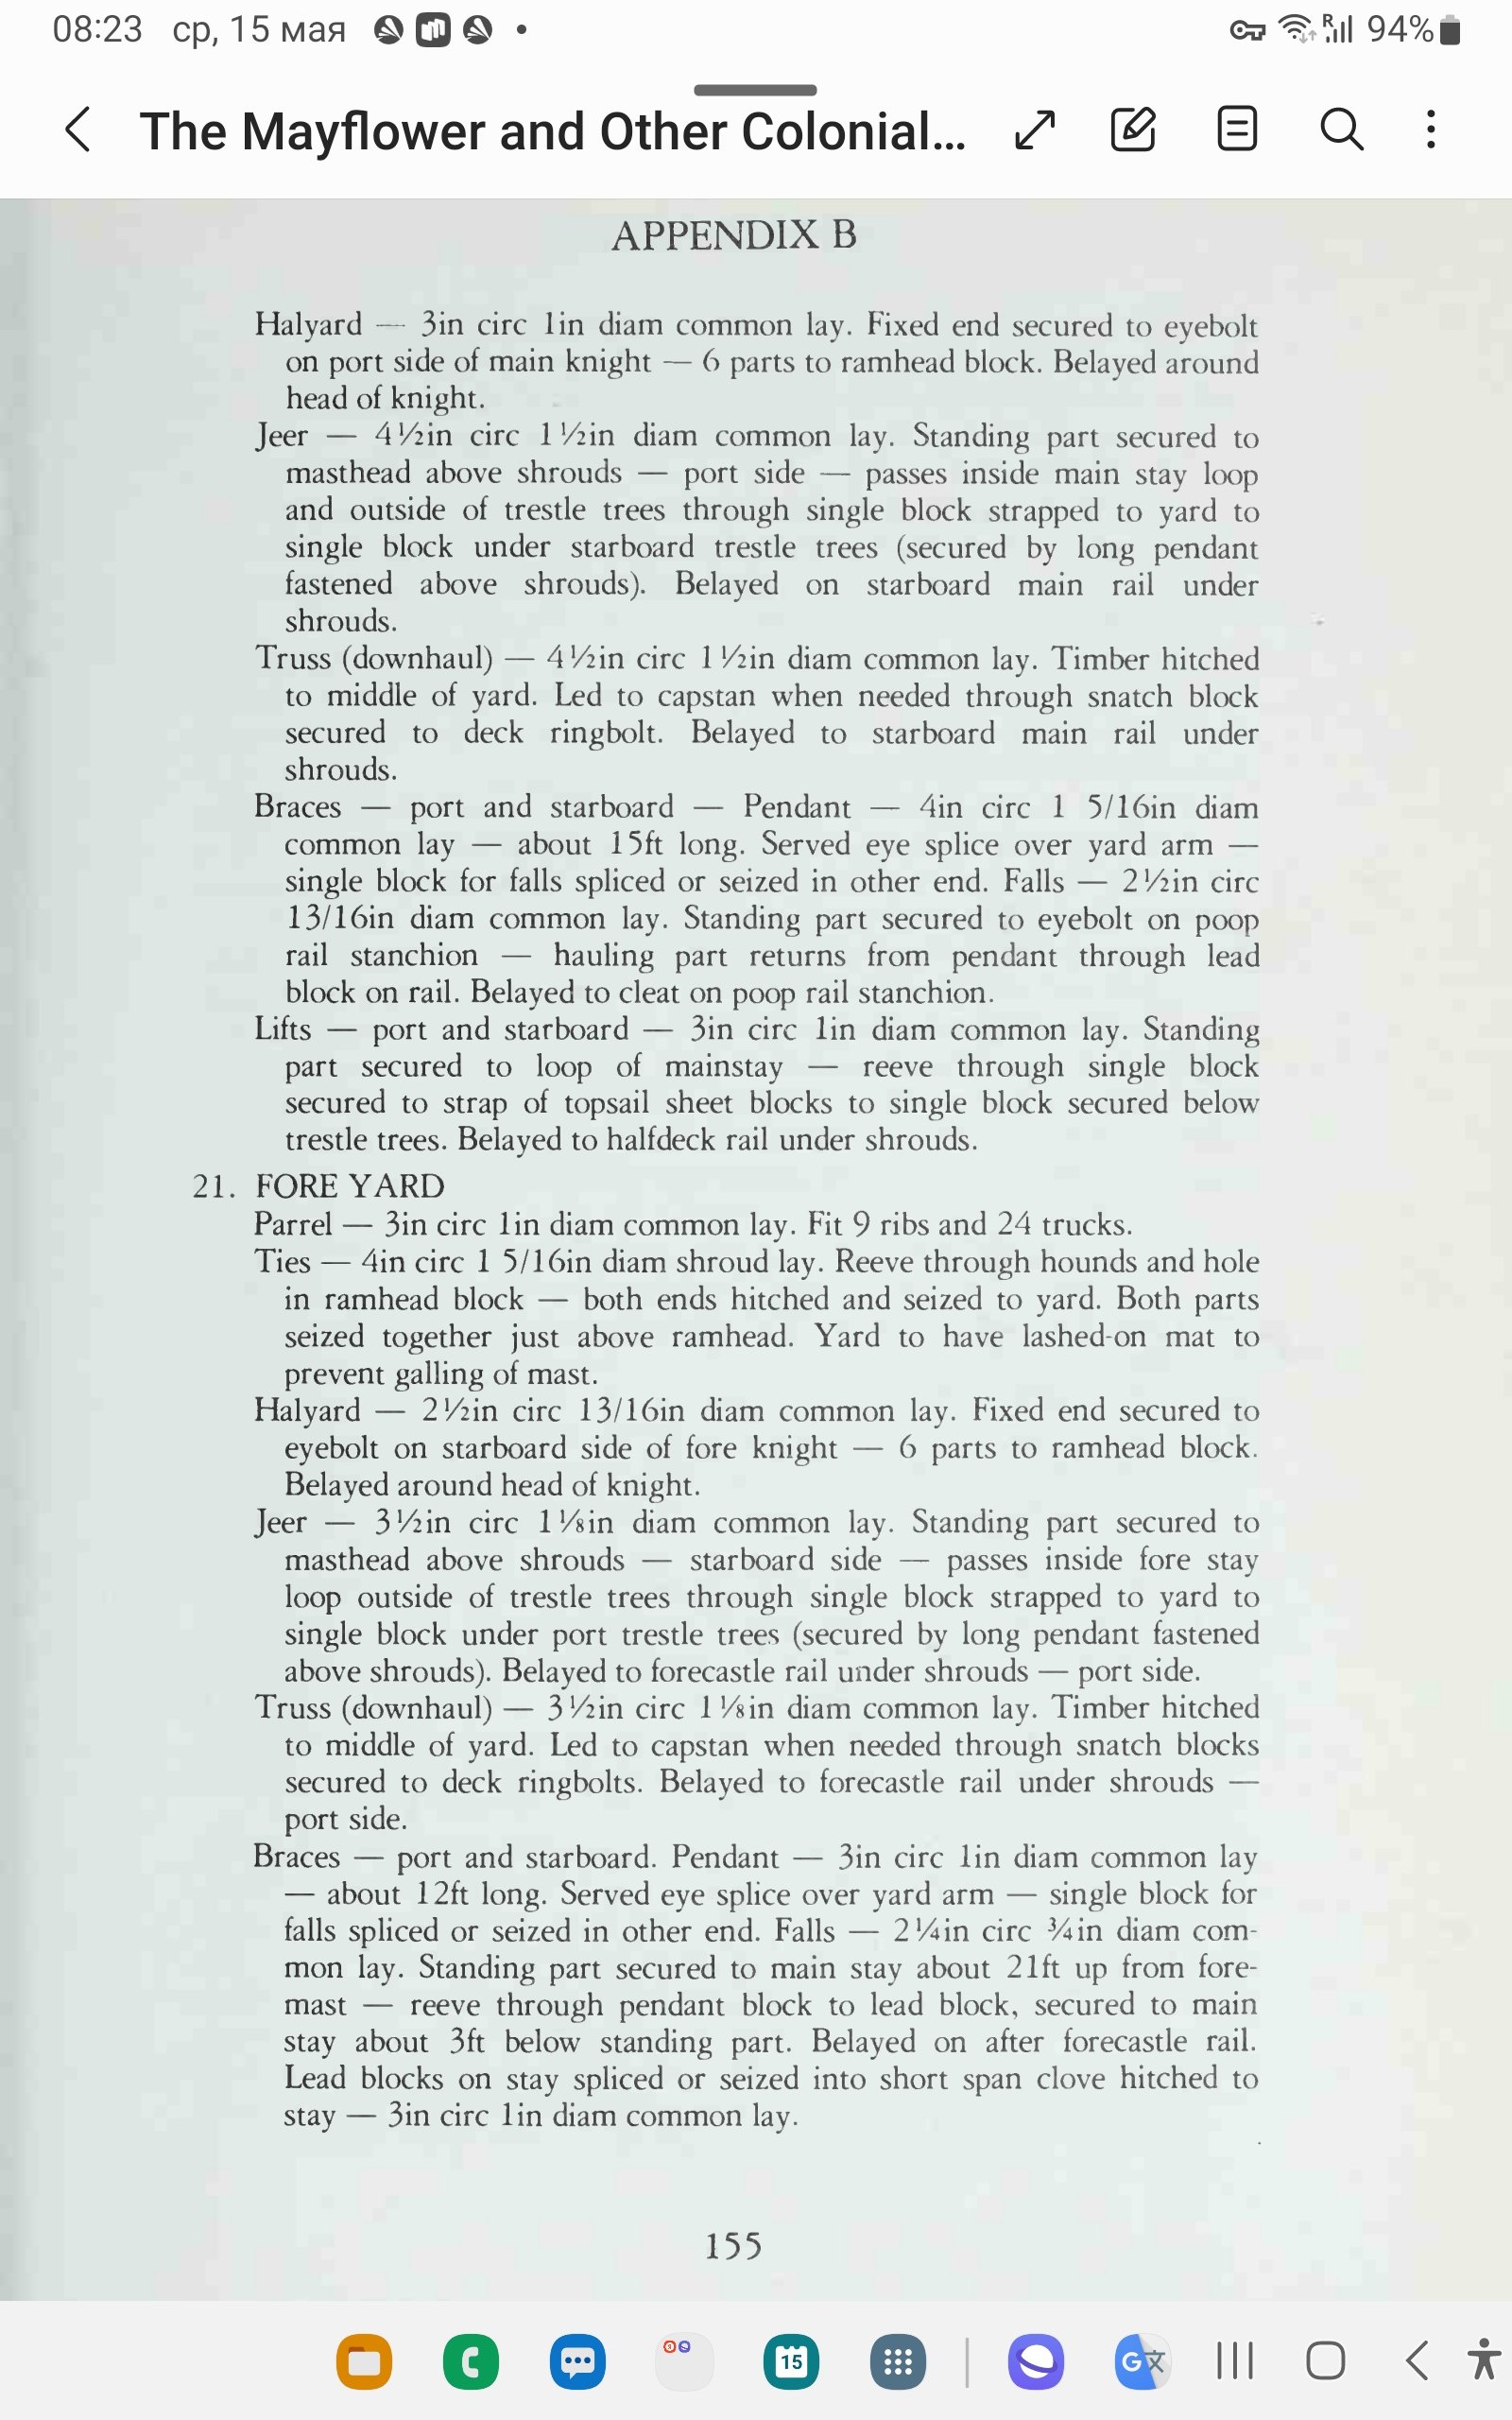
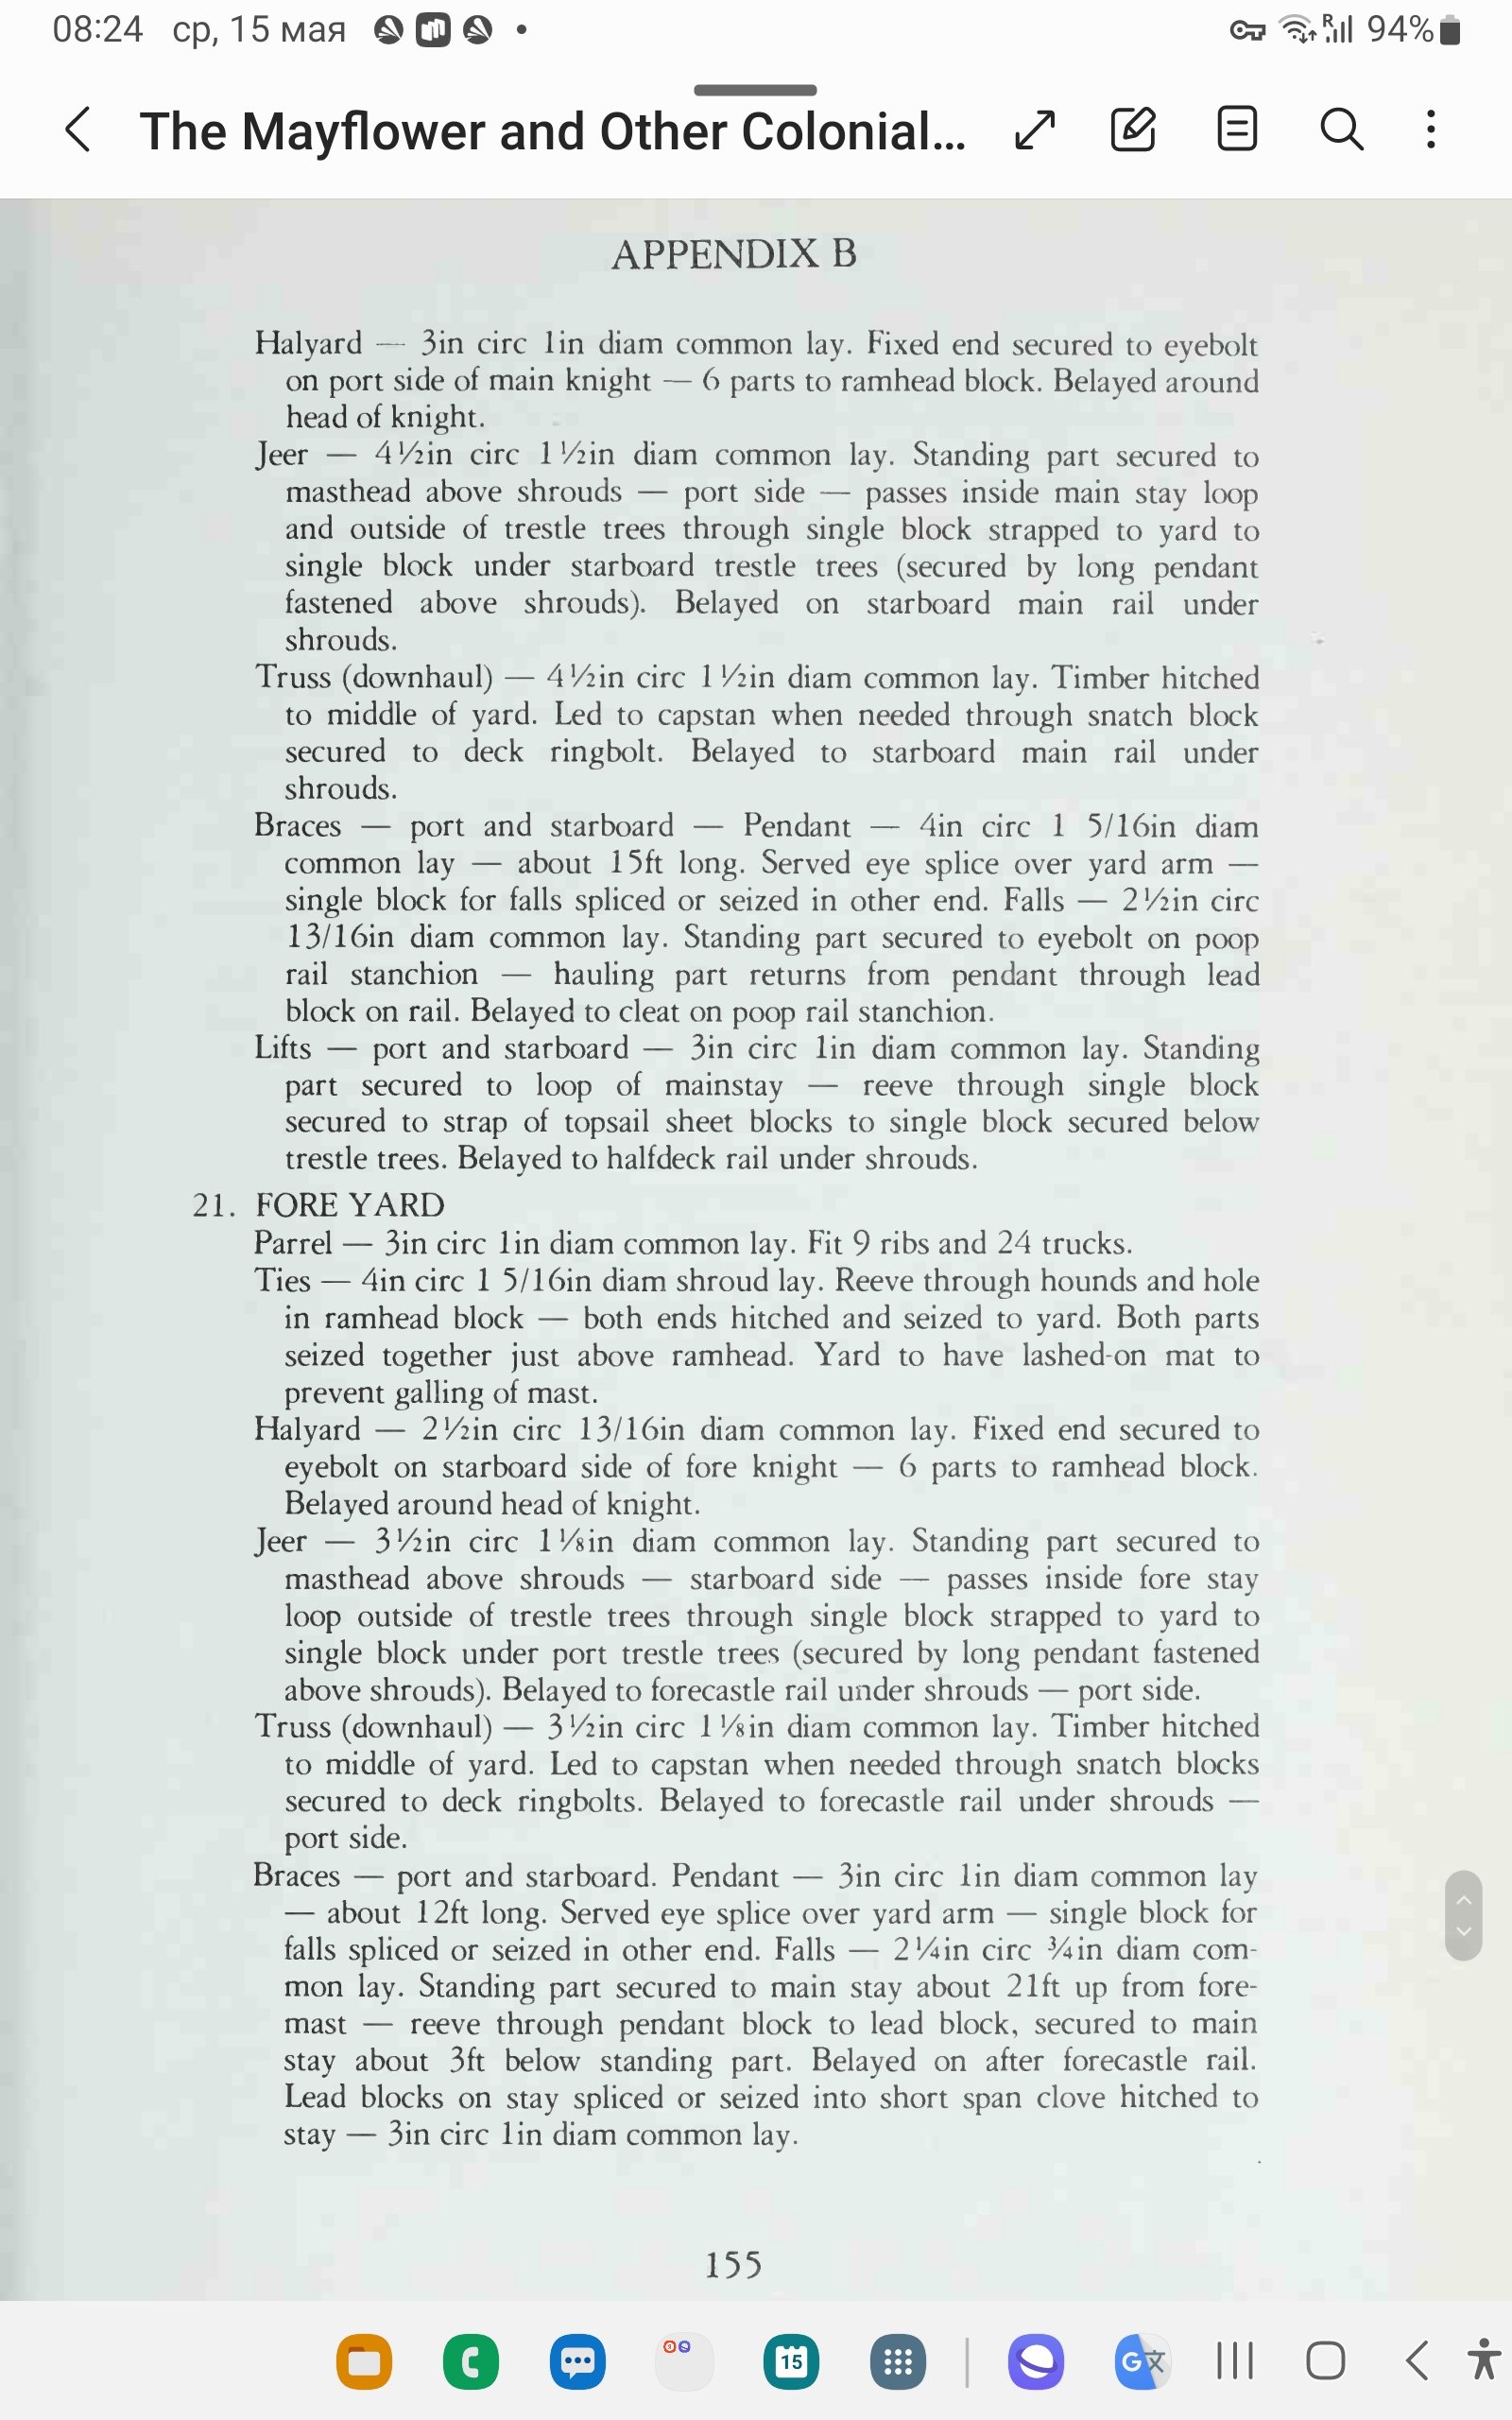
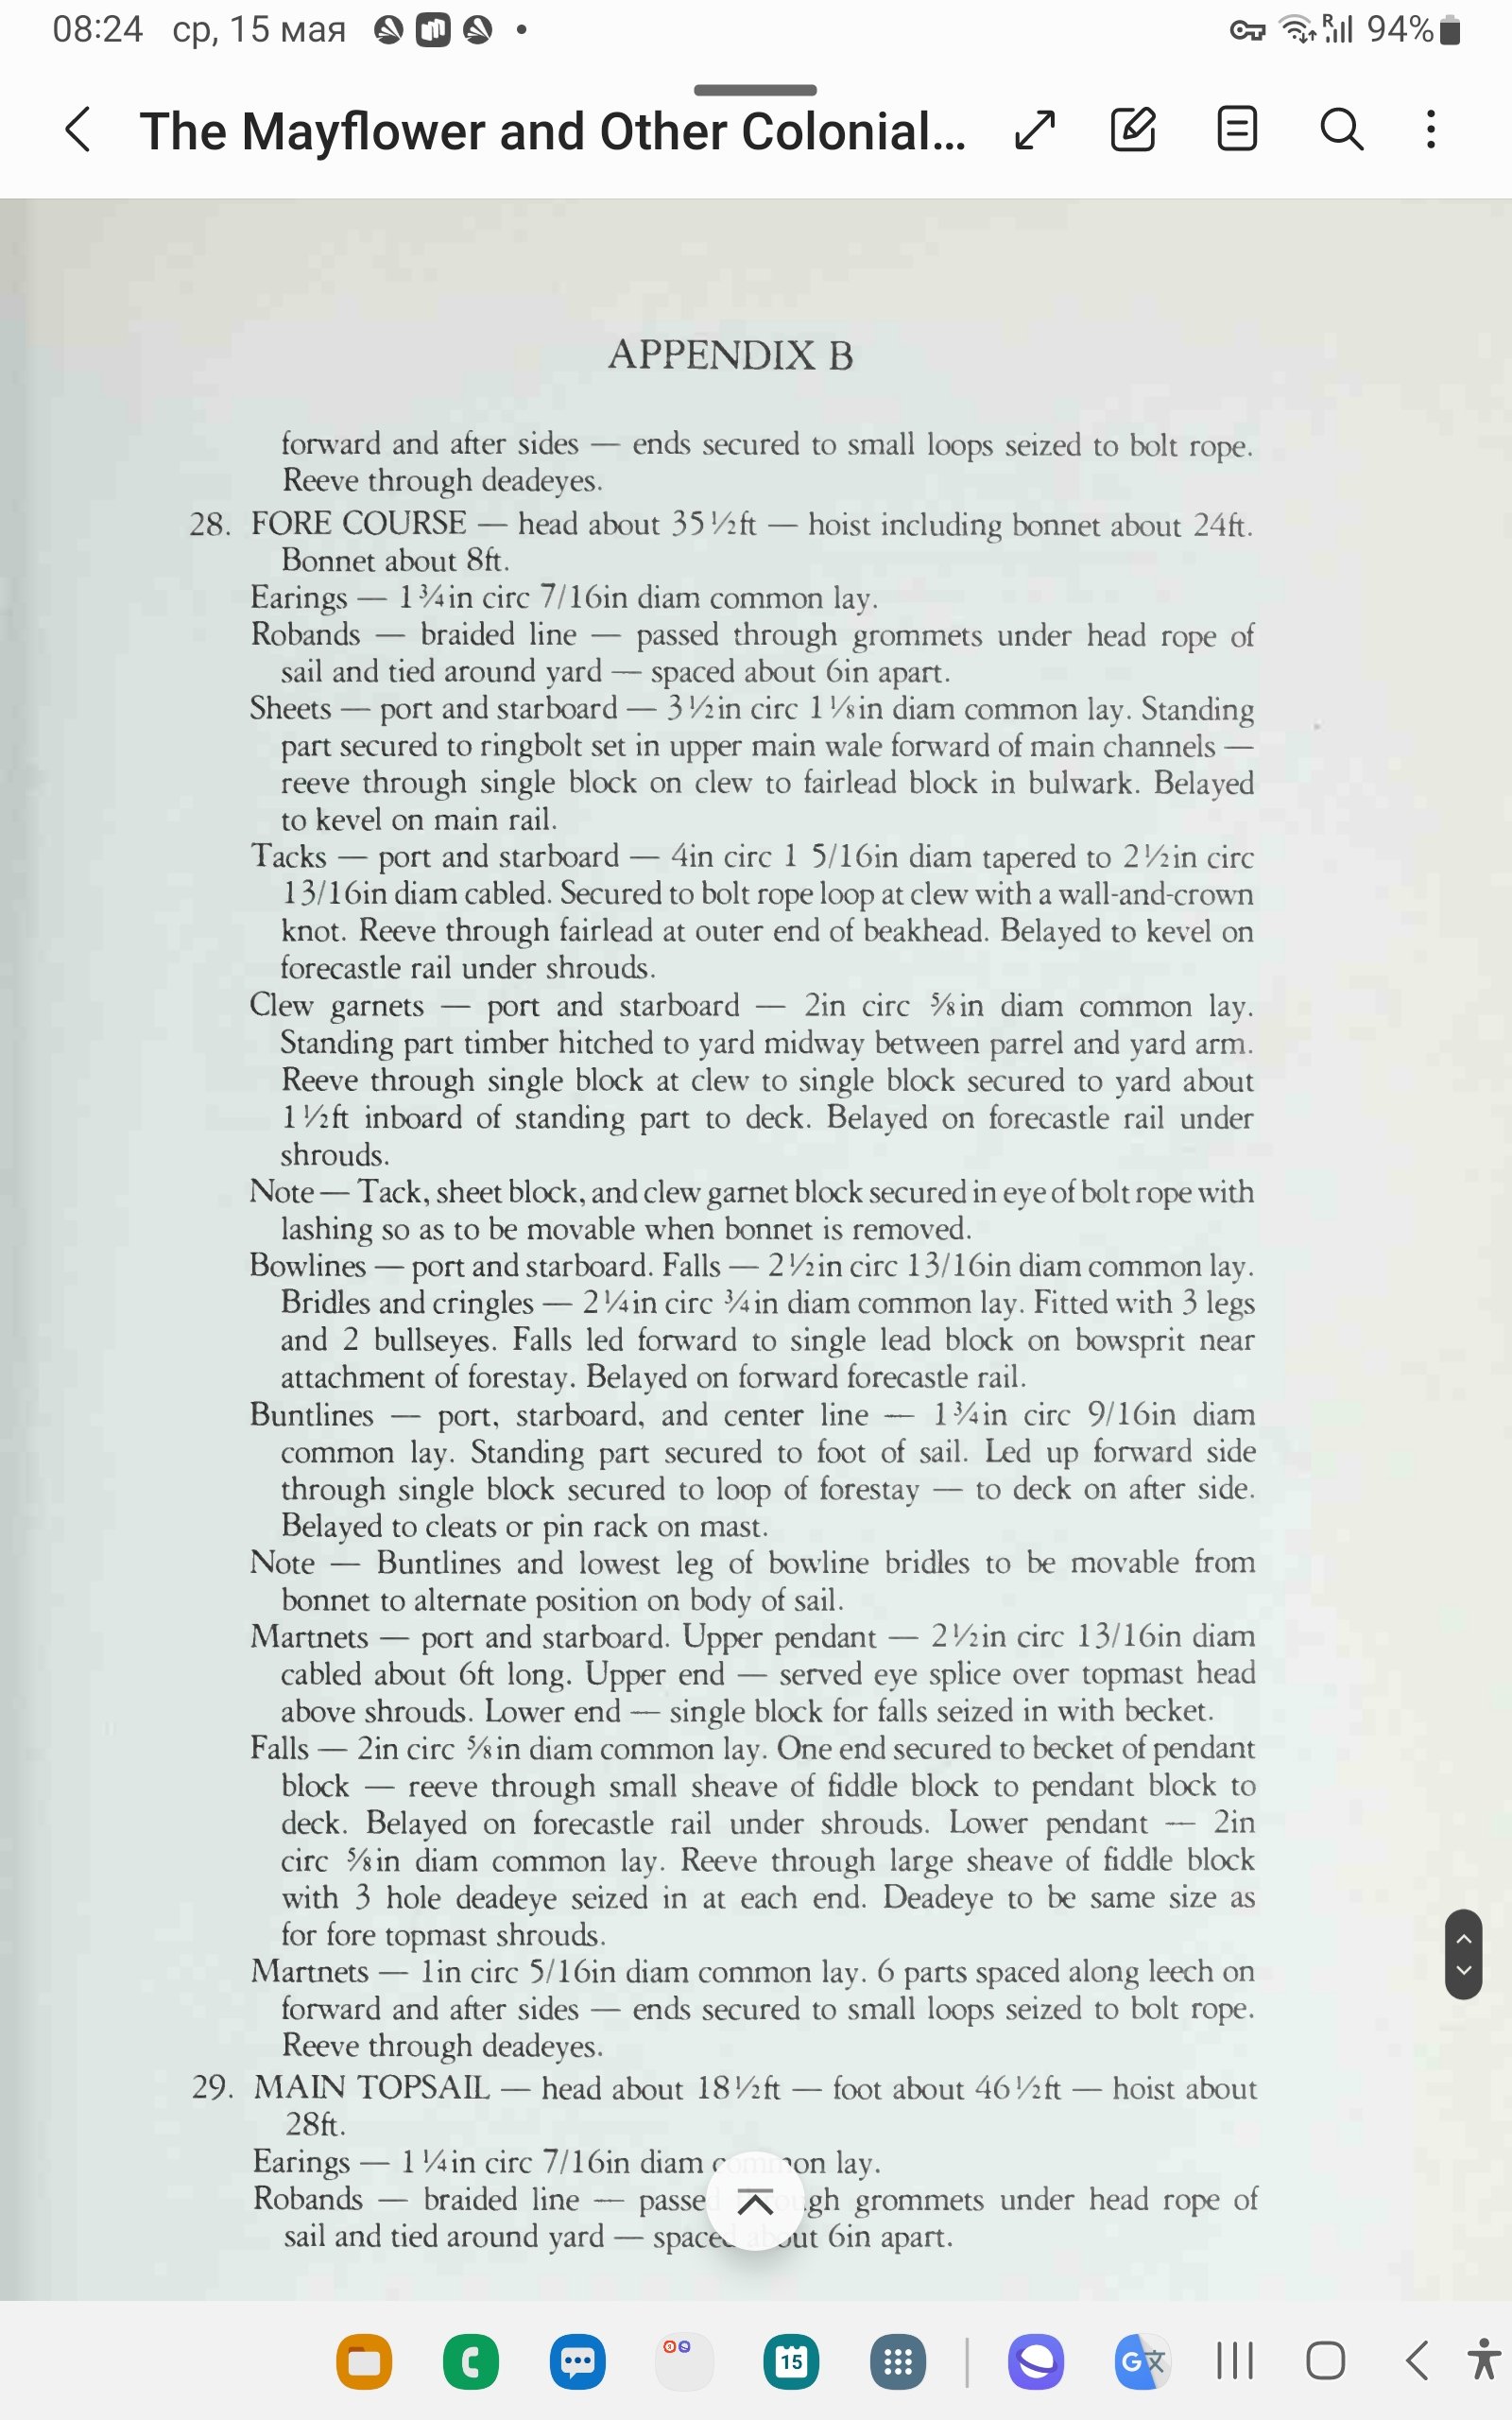
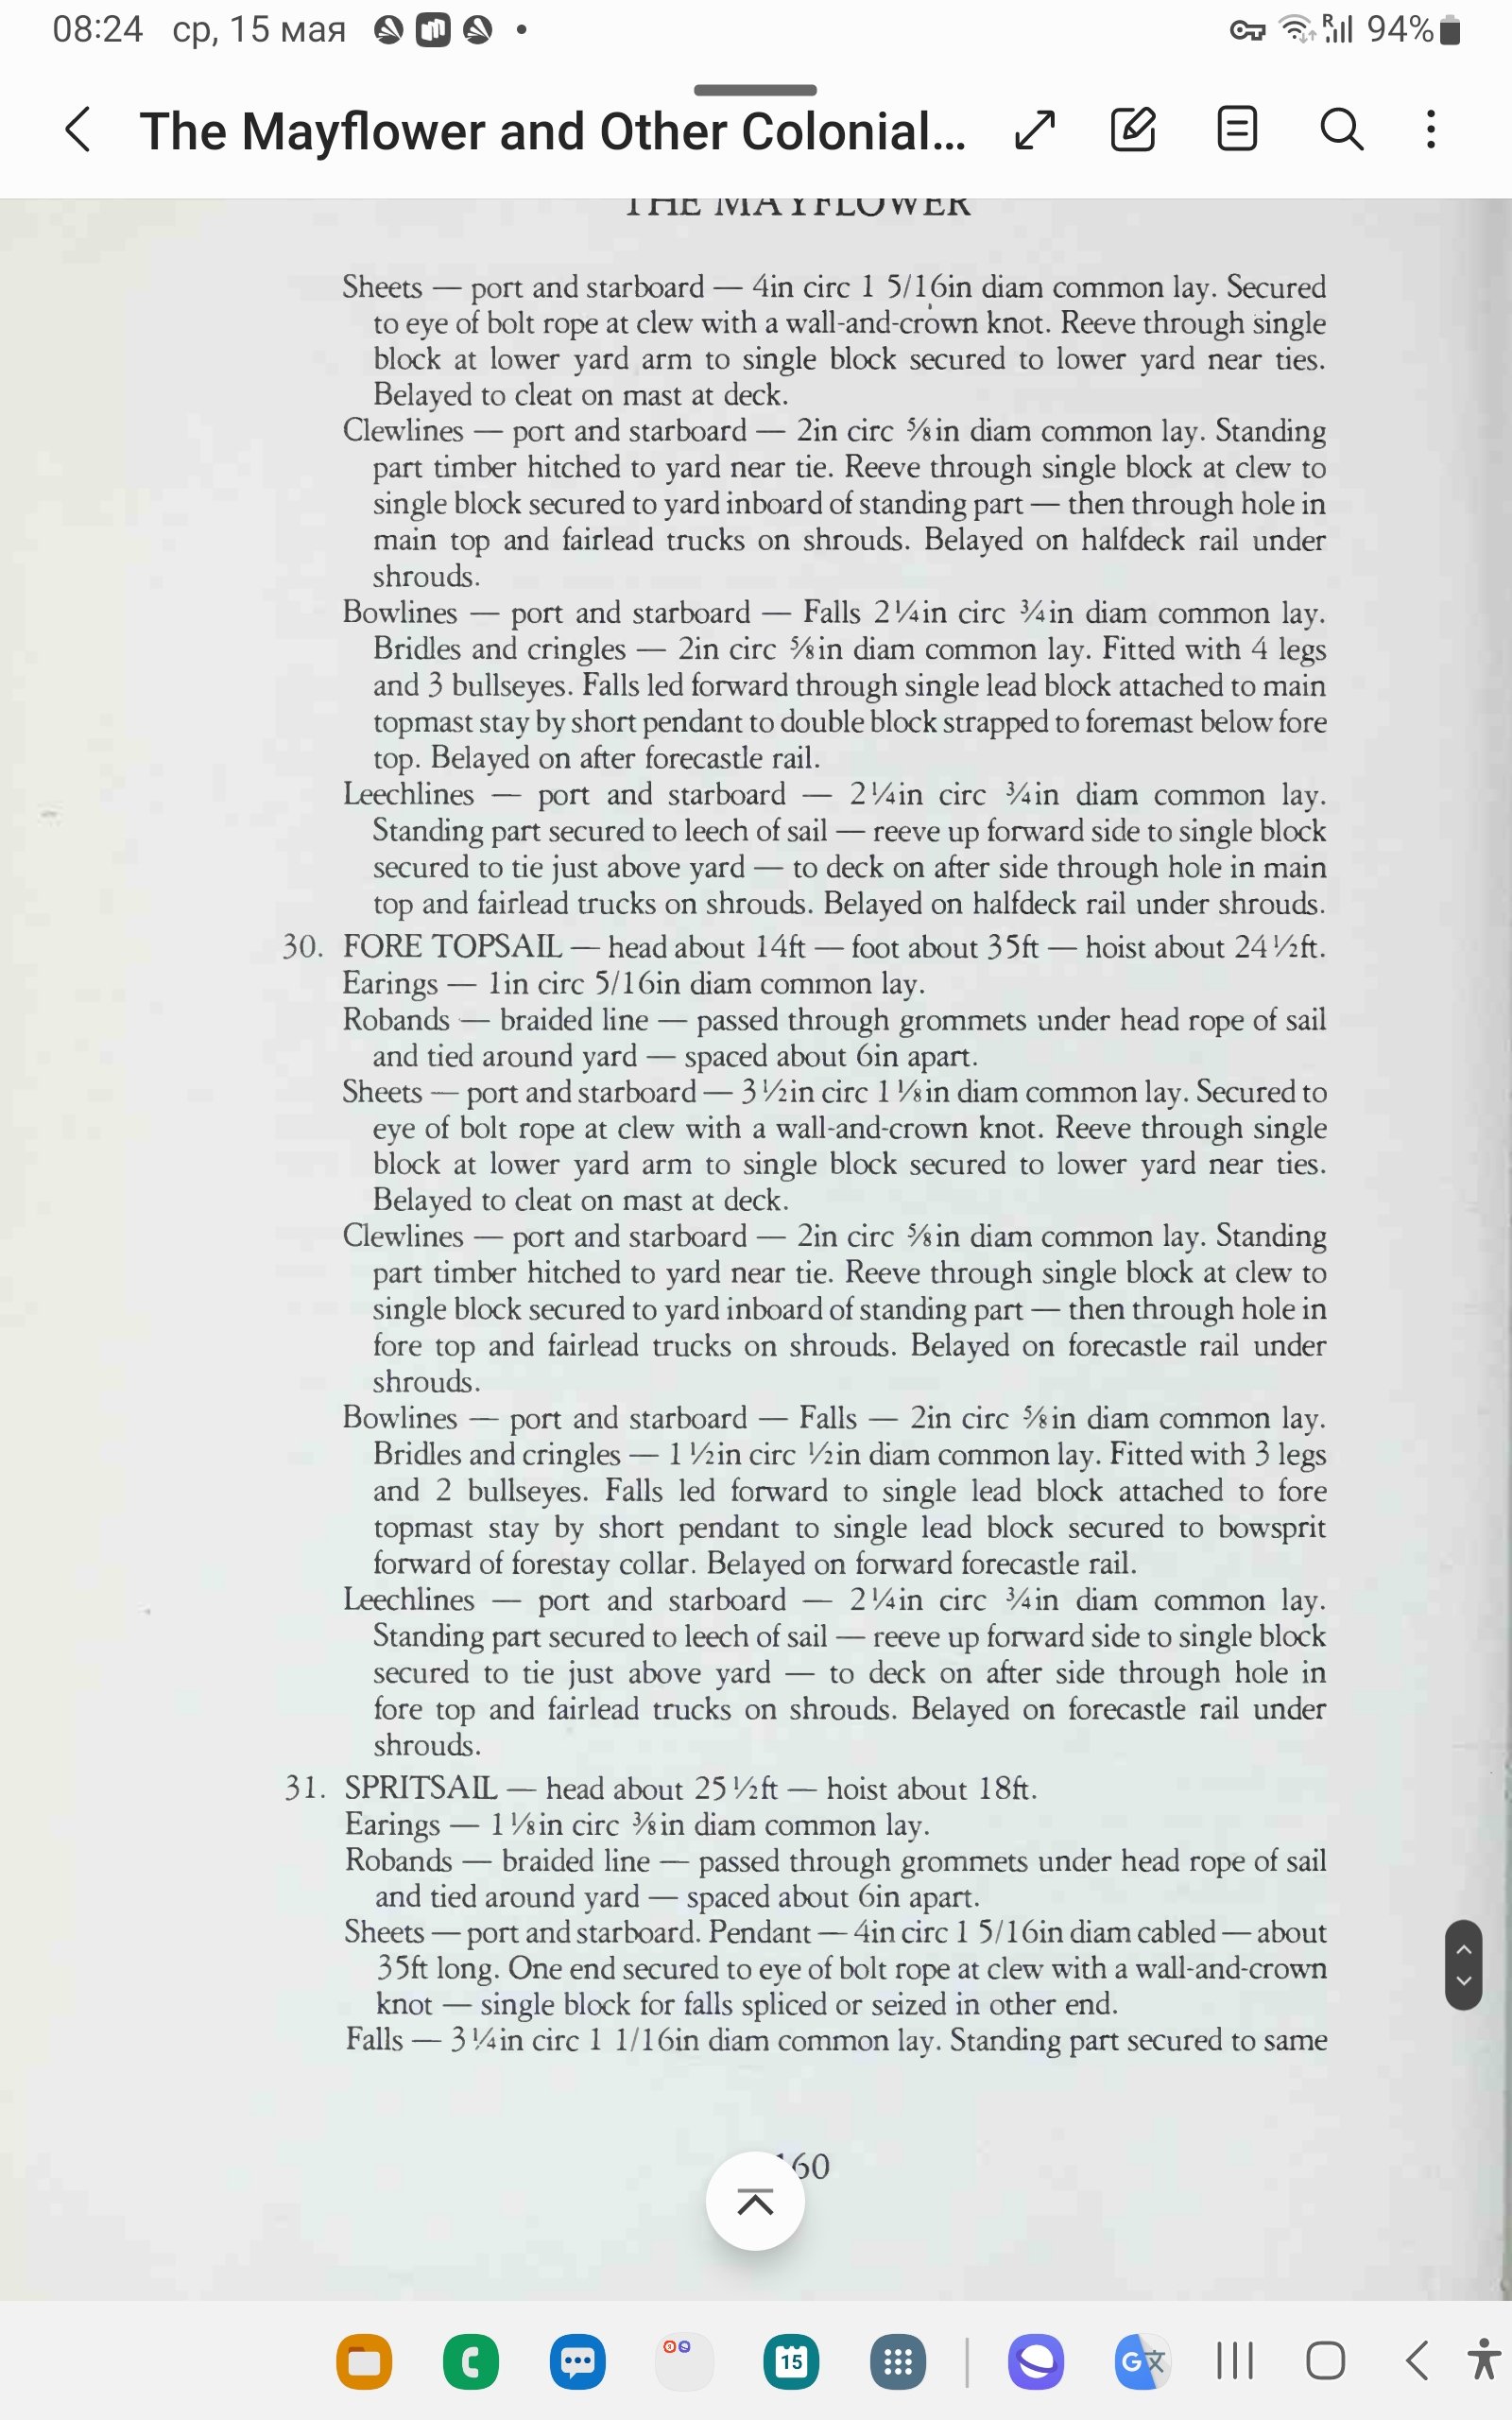
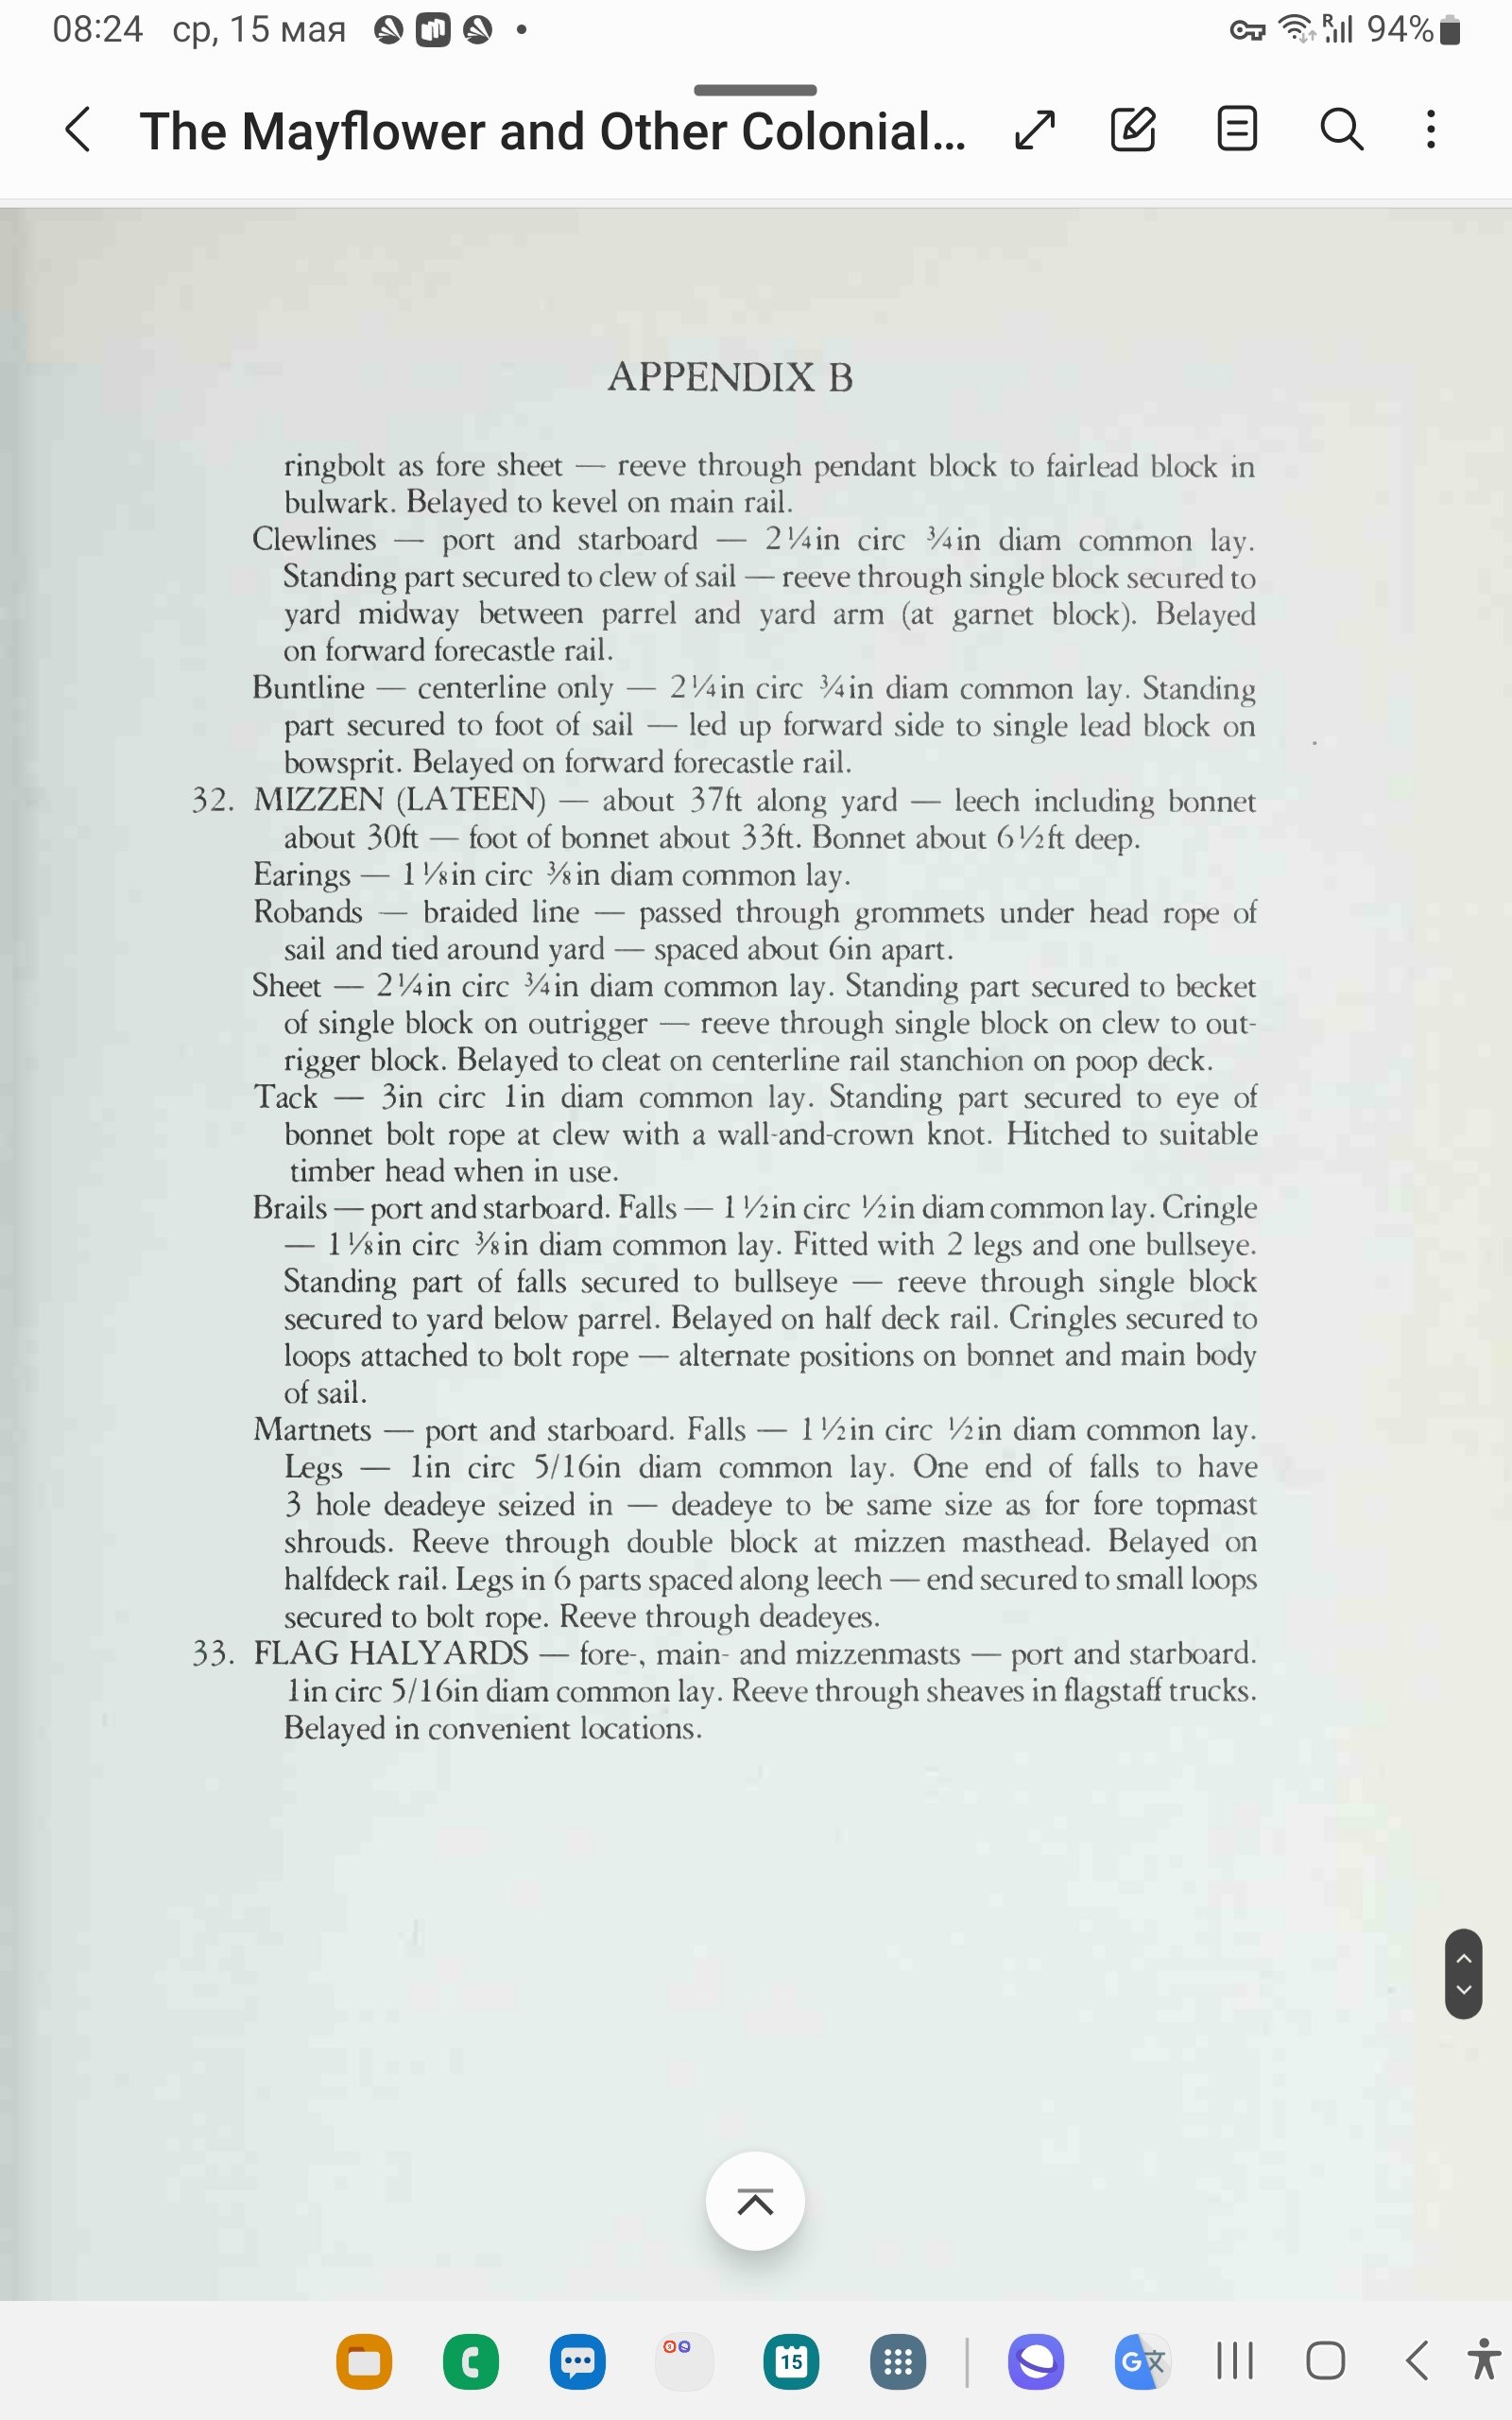
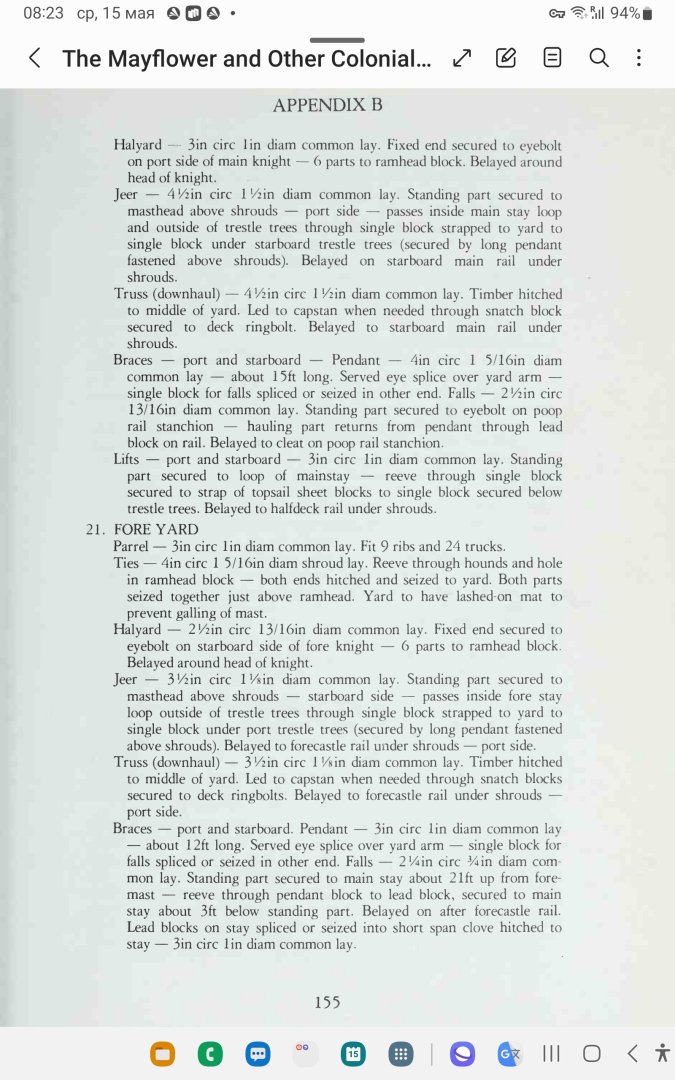
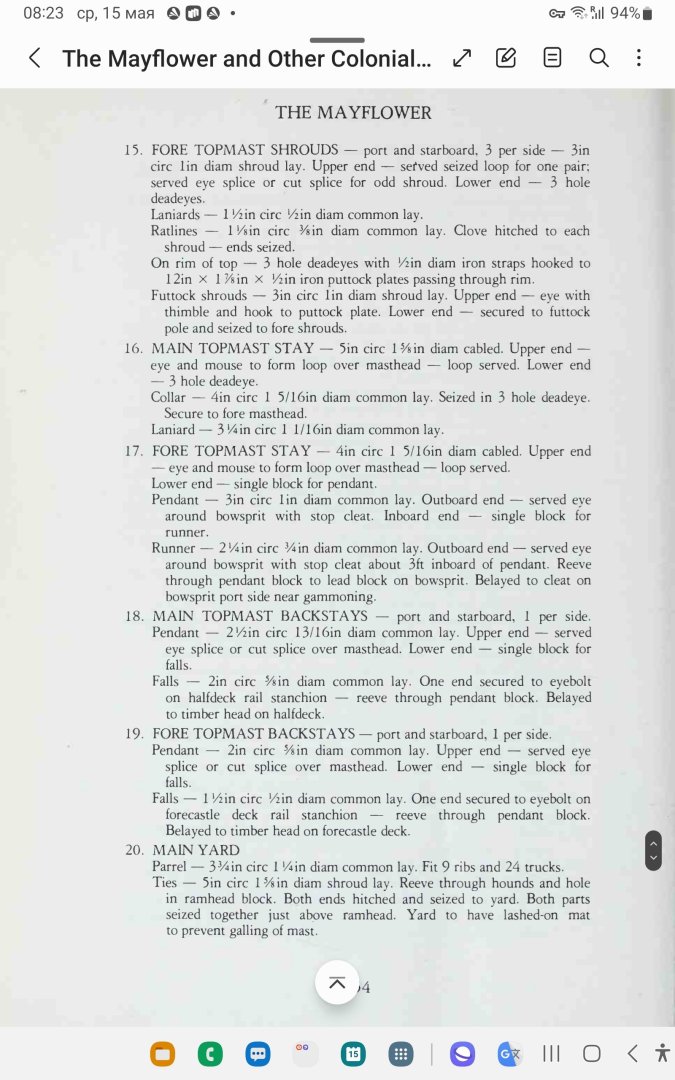
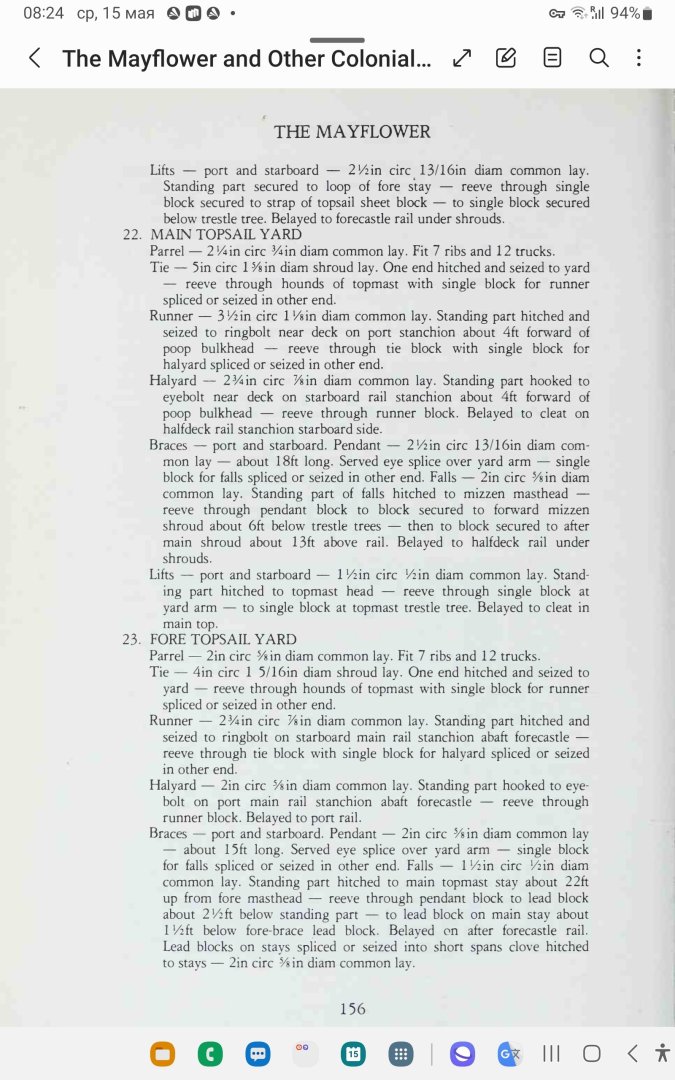
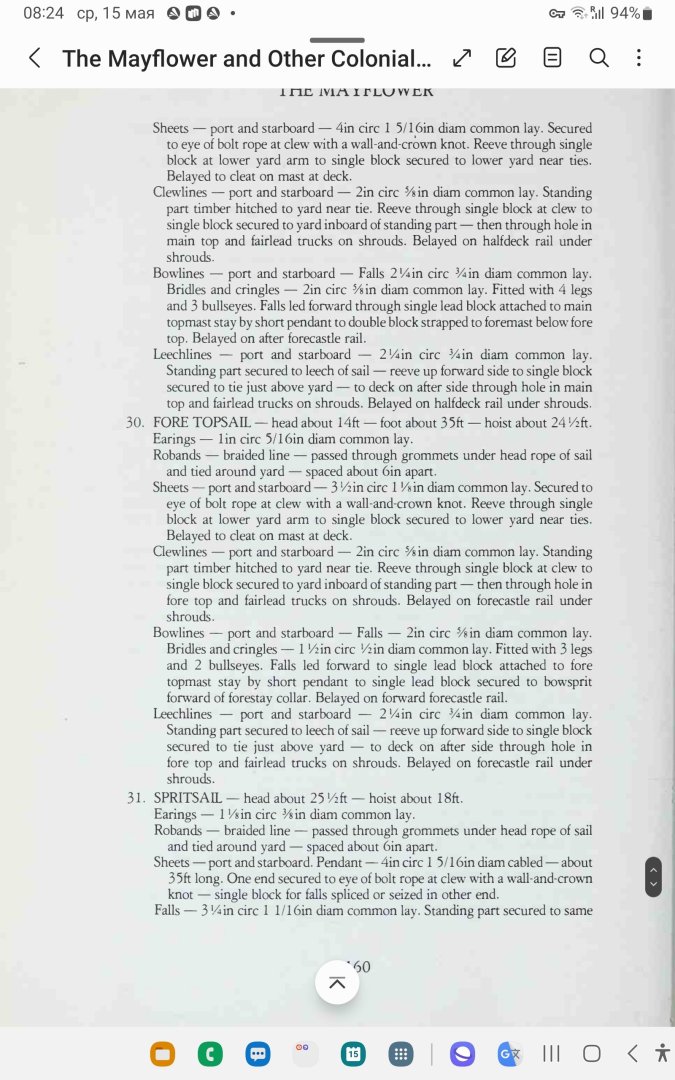
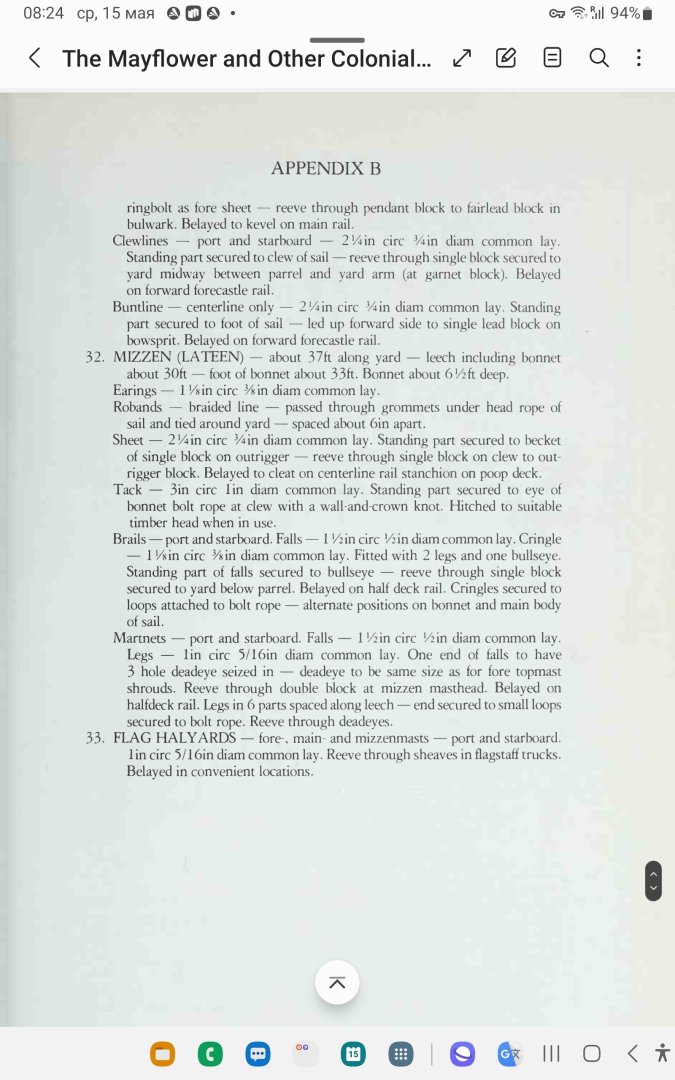
I don't remember, did I mention the very nice book about building MF replica written by its designer - it is just briliantc work about this vessel, there areca lot of information about MF replica bulding ,english 16-17 shipbuilding traditions with reach historic background, there are a few more articles about other colonial vessel of MF period, good set of drawings and excellent appendics tables with reach data of MF rigging as well... Ps I ve purchased it a few years ago - perfect book! There are a few scans where He gives sises of MF replica rigging...knowing your model scale You could recalculete sizes for your needs.. pay attention, sometimes in the book mentioned outside length of a circle of the rope but not a diam. of the rope, which need to he calculated


-
Good day Dave, There are a few exell tables from different authors exists in the net for free download. Tables for automatic calculation diameters of all rigging lines of your model, all You need to do just to feel in the cells a few basic parameters as scale, year of build, diam.of main mast , maybe a few more... and than You will have all sizes of your rigging, standing and running... You could simplify a little calculated results, and join them to the group of similar sises of the ropes which You will really use on your model. Knowing that You could manage threads of all necessary sizes for Your model. The matter I mentioned these tables -I saw on the photo, that probably You used too thick line for gammoning, and size of the gammoning and main stay collar looks the same?... which shouldn't be like that... You could also calculate all basic sizes of your rigging by hand , knowing diam.of main mast in the base/ where it penetrates main deck... first You need to calculate diam. of main stay and than all other rigging lines sizes as proportional of main stay size. There are good instructions and tables for such calculations in the Mondfeld book, but easyest way to use excell tables for automatic calculation... I think I saw such tables even in this MSW resource in section about rigging... I could advise before You start rigging of any lines on Your model first would be good to read relative sections in Anderson book ,which You have as I understood, as usual He gives all necessary details of the matter - purpose,functioning,location and often even sises of the ropes... All the best! Kirill Ps There are a few scans from Mondfeld enciclopedia


-
Good day Dave, Probably there is sence to shift lower collar of main stay to the aft a little, and to secure it as described in Anderson book? Main stay lower collar and bowsprit gammoning norm. used to be positioned in different places , not in the same spot. All the best ! Kirill
-
Roter Löwe 1597 by Ondras71
kirill4 replied to Ondras71's topic in - Build logs for subjects built 1501 - 1750
:))) and... how many people could exists on 1 m 2 !!! Unbeliveable! What is the matter of high cooperation, coexistance , and so on ...!:))) Good example for us , modern ... :))) -
Roter Löwe 1597 by Ondras71
kirill4 replied to Ondras71's topic in - Build logs for subjects built 1501 - 1750
Found a picture of some small Dutch galleon...visual addition ,could be considered as artist vew to the question of rigging proportion...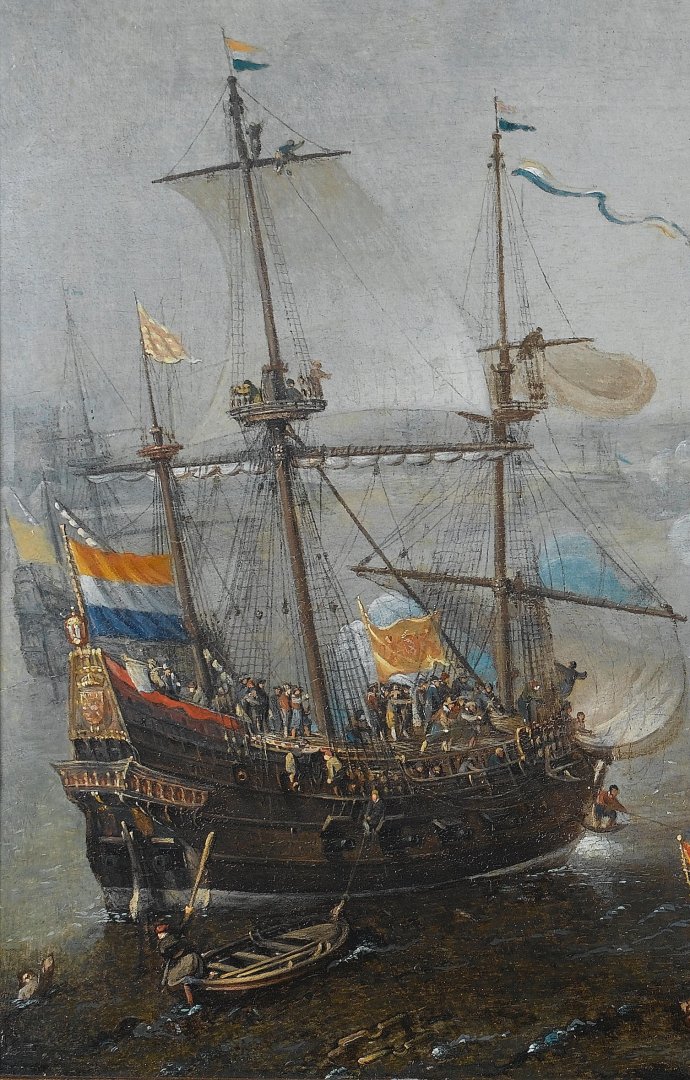
-
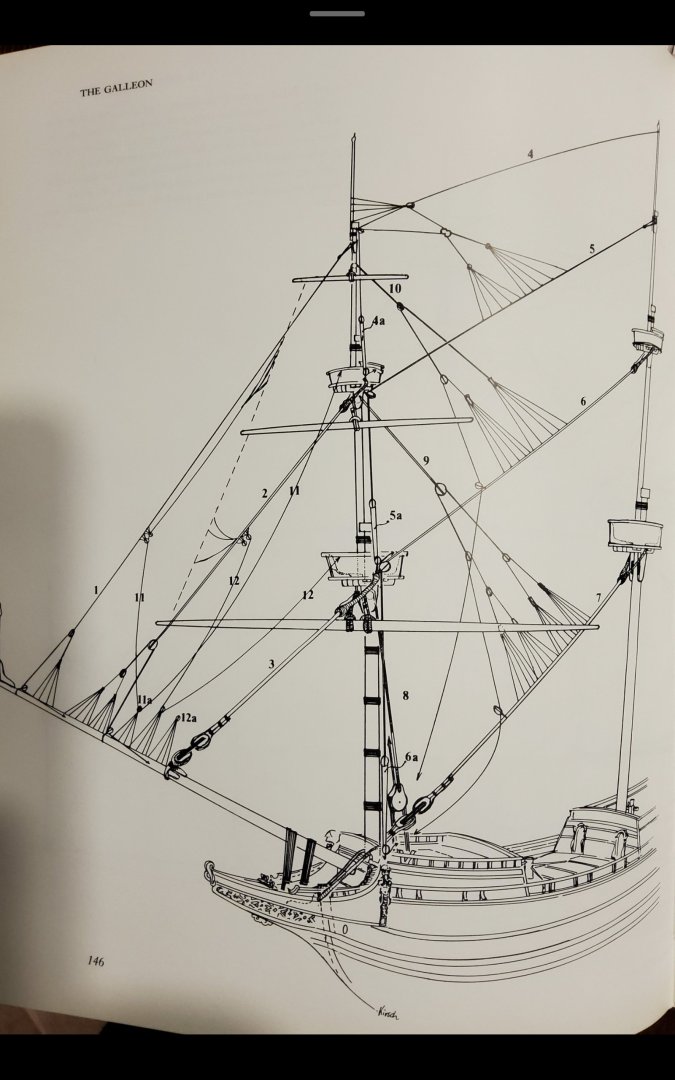
Good day, #90 Main and main top stays probably should be arranged in a little bit different way...? Lower loop of MS used to be secured to the upper part of the stem or to the fore mast or to the bowsprit and run on the right side of the mast as a rule, and MS tackles in form of pair of 5 holes deadeyes or 3 sheeves blocks need to be placed very close to the fore mast ... main top stay used to be passed trough the lead block which is secured under the "mars" or above it, in both caces lead block stropped very close to the mast top, main topmast stay passes trough this lead block and runs to the deck and secured near the mast base...or main topmast stay could be secured to the fore mast top by means of tackle formed by deadeyes or pair of blocks... Ps Standing and running rigging ropes are all of different diameters , there are a few exel tables free for download to calculate your own ropes size, when model has all ropes of the same size it doesn't look nice and right...


-
Good day, Very nice work! Anchor 's rings are coming?
-
Roter Löwe 1597 by Ondras71
kirill4 replied to Ondras71's topic in - Build logs for subjects built 1501 - 1750
Good day Ondras, Now overall appearance looks much more proportional! Nice job... follow your building with great interest! All the Best! Kirill -
Roter Löwe 1597 by Ondras71
kirill4 replied to Ondras71's topic in - Build logs for subjects built 1501 - 1750
Good day Ondras, Lovely model and hjgh level craftmenship !!! Like it very , very much!!! Could it be happened that designed "masts" happened to be too small ( kind of proportional issue) for the size of the hull ? of couse it is just my private opinion /impression after watching photo of your build log , I understood that everything made as per original drawing , but... :))) All the best! ps Could it be played in some comp. drawing programms , how general rigging plan will be ooks like , if masts , top- masts , etc...all will be increased in length of approx 5 to 10 % of original drawing size ? -
Good day Dave, I'm glad that You have it, a few years ago when I was busy with making my own rigging plan and assembling my galleon model, it gave me great support, even now if some qiestions arised or I forgot something I know where to find answers :)))... However if some questions remains unclear people here will help You to find right unswer. All the best! Kirill