


Jack12477
-
Posts
5,454 -
Joined
-
Last visited
Content Type
Profiles
Forums
Gallery
Events
Posts posted by Jack12477
-
-
-
Wow ! Nice !
- Edwardkenway, Canute, CDW and 3 others
-
 6
6
-
-
1 hour ago, Old Collingwood said:
"We want more - we want more - we want more"
OC.
I have 3 more armor and 1 Infantry figure set in my stash to do. But they probably will not be dioramas. I am out of space to display dioramas; this one will probably wind up in a clear plastic storage box in the cellar.
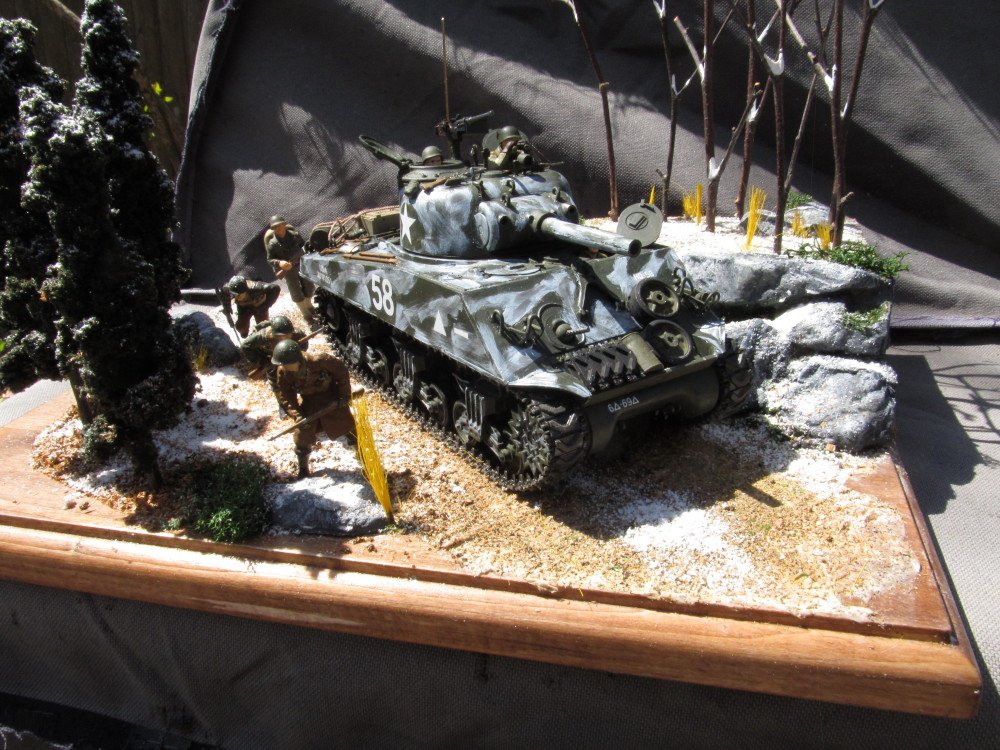
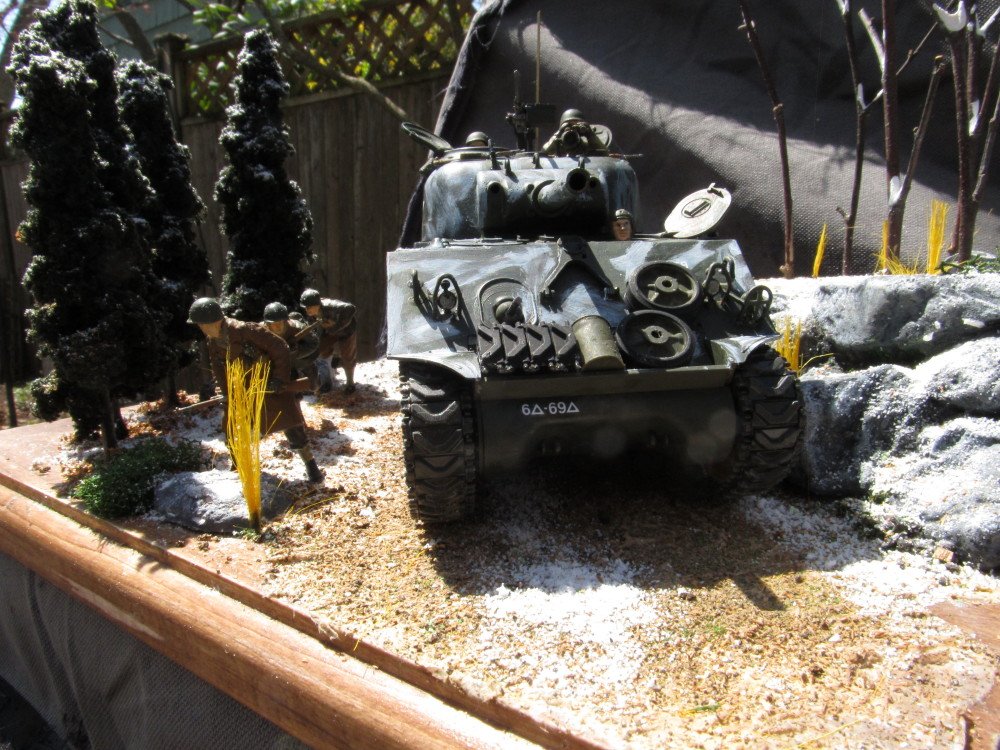
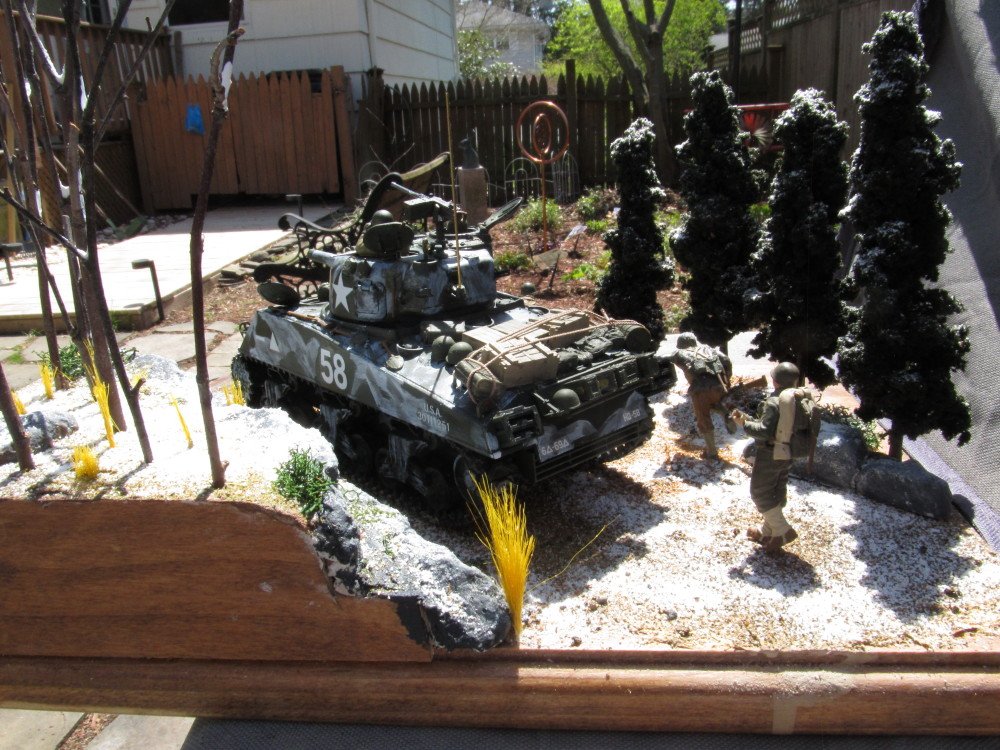
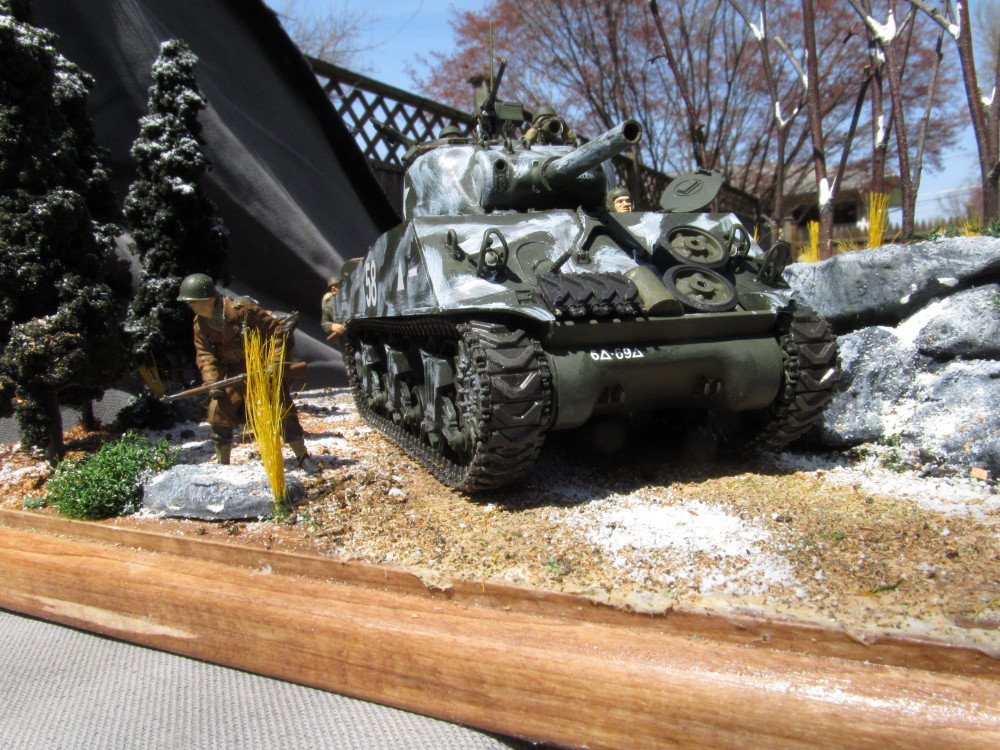
This diorama is 9 inches by 11 inches or 22.86 cm by 27.94 cm; the M16 was 10 inches by 12 inches or 25.4 cm by 30.48 cm. I can put 4 to 8 tanks side by side in that space.
I love doing dioramas, just wish I had the space to display them.
- Old Collingwood, Egilman, lmagna and 4 others
-
7
-
-
-
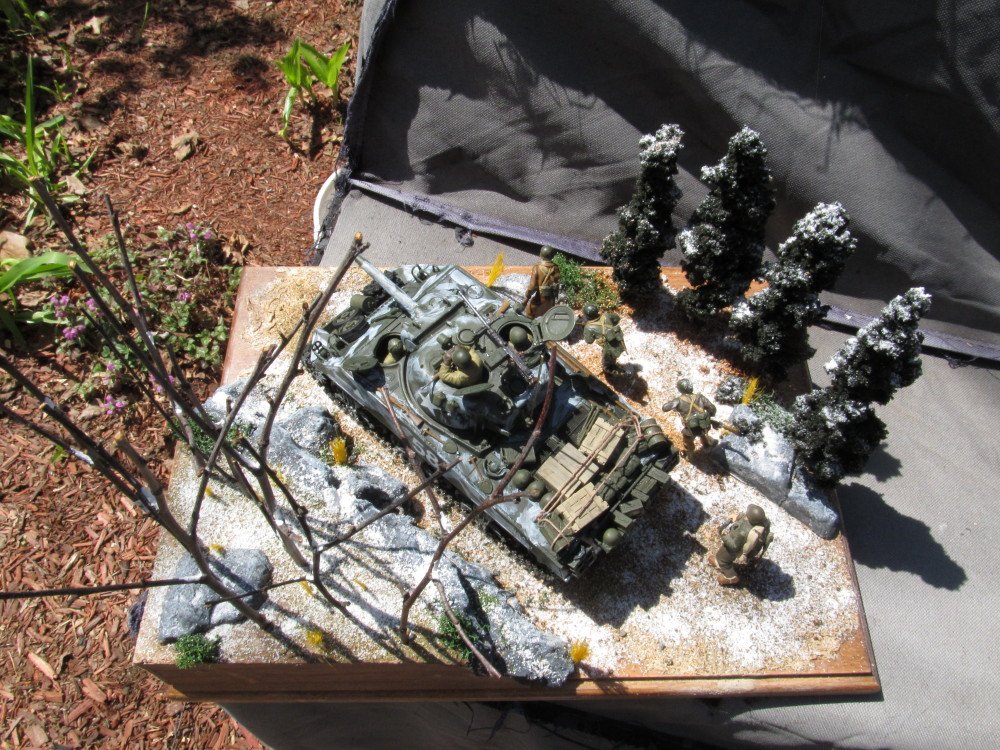
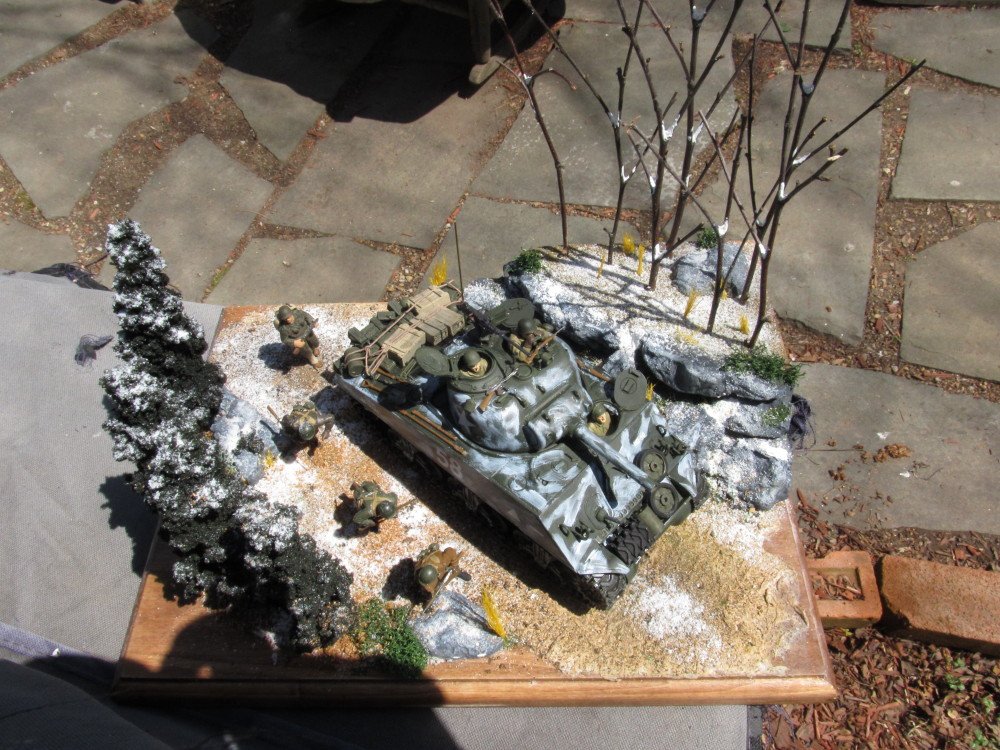
I took the model/diorama outside in the early afternoon direct sunlight to get some better lighting - the one I took this morning had too many shadows and this digital camera I have doesn't compensate well. So here's the same photos with a little better lighting.
-
Thank you gentlemen for your comments
- lmagna, mtaylor, Edwardkenway and 4 others
-
7
-
Continuing on:
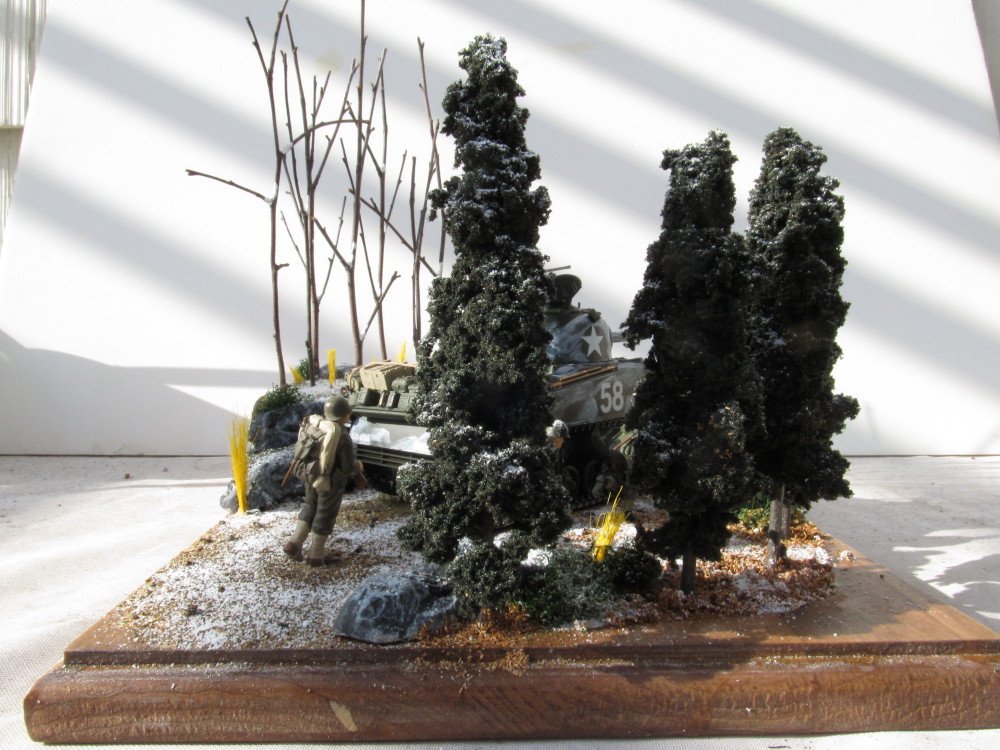
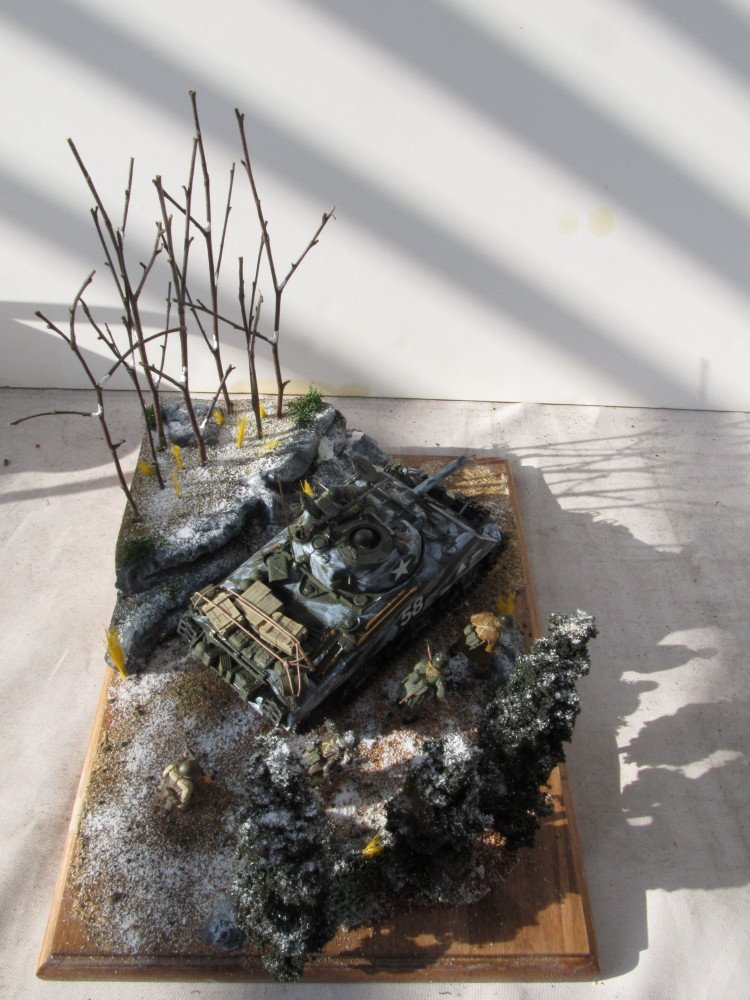
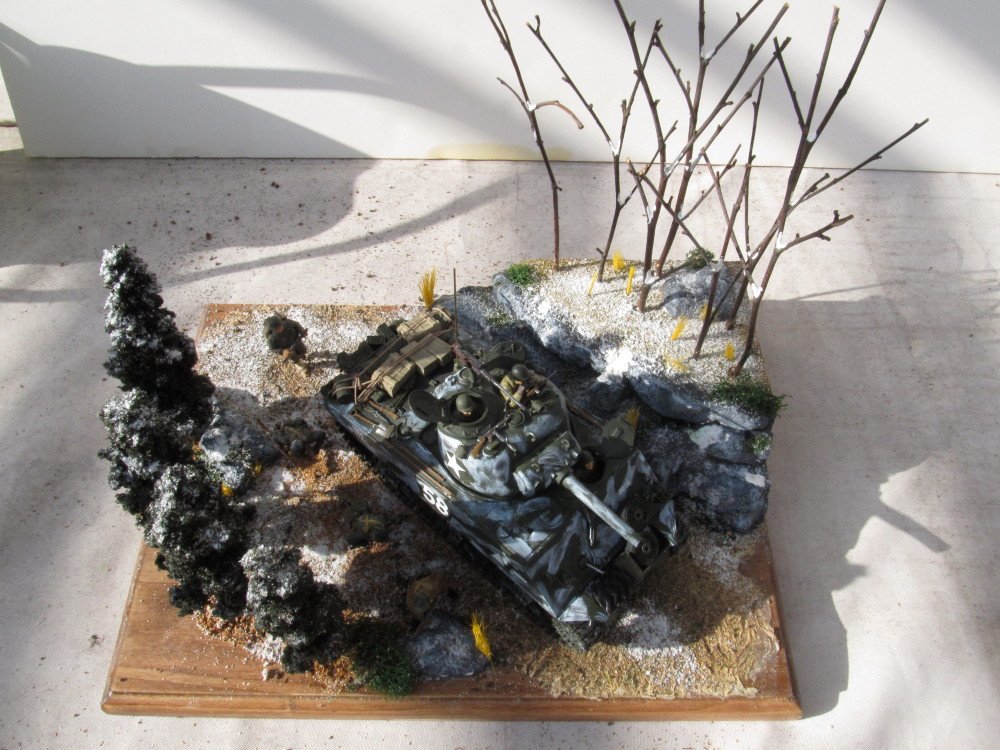
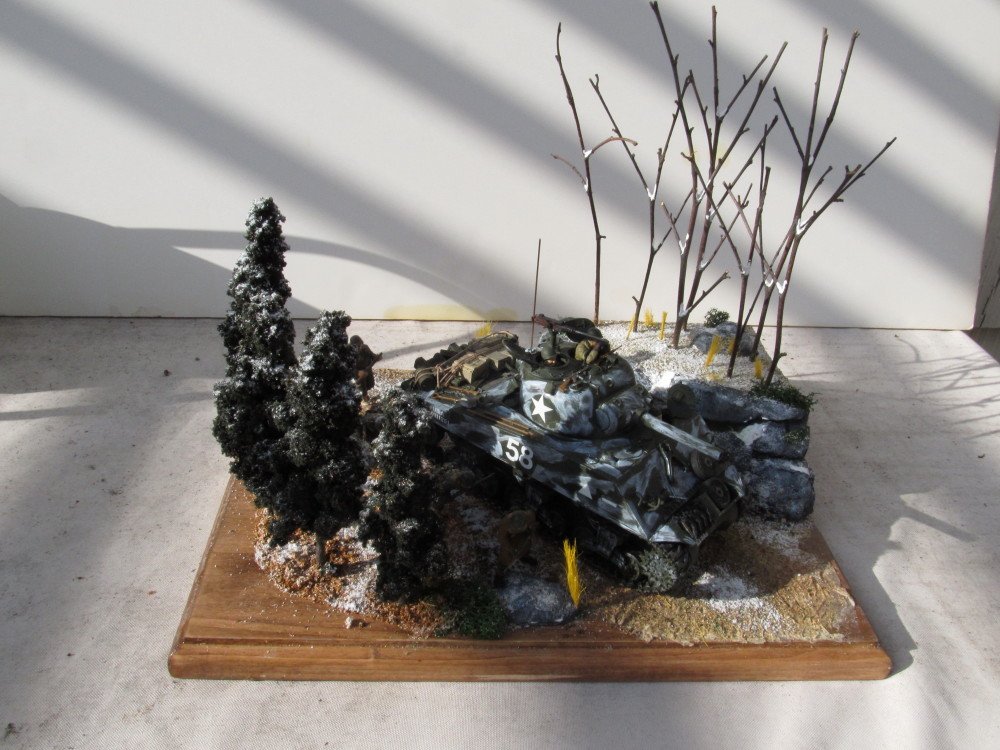
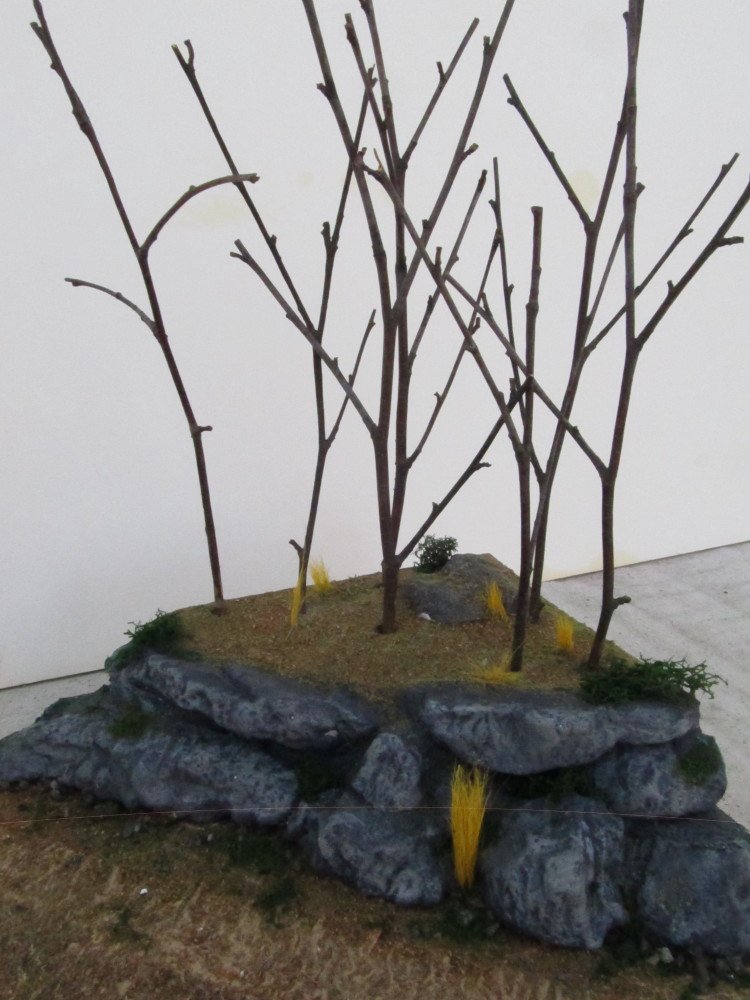
After ordering some more of Woodland Scenic;'s trees and snow I was able to continue on, test fitting the soldiers and tank and trees before gluing them in place.
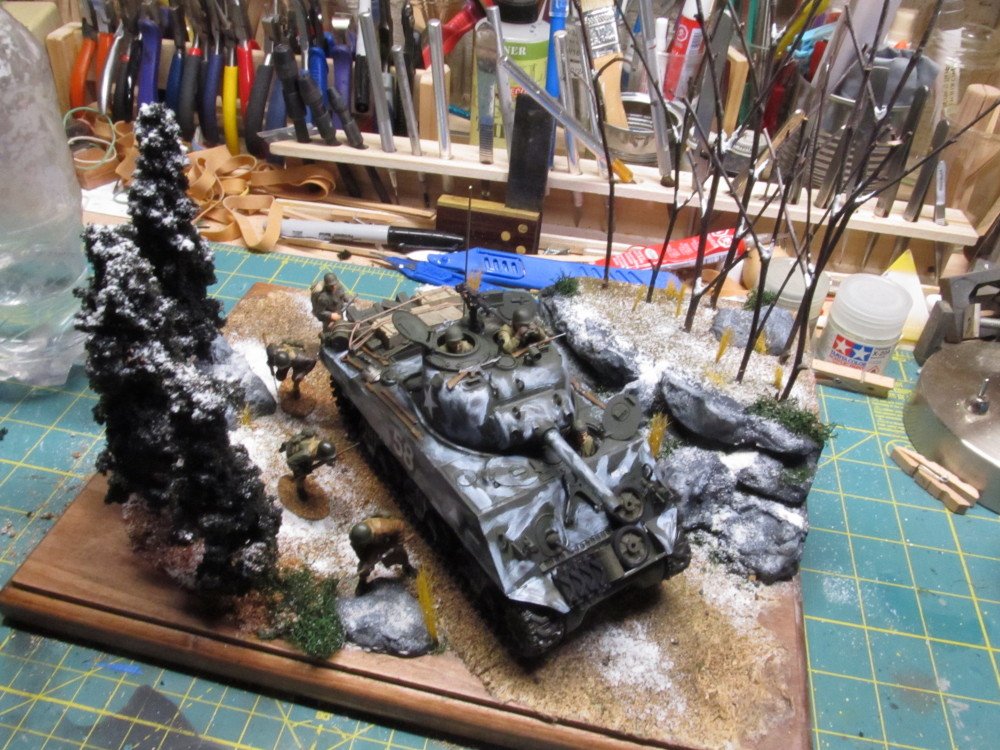
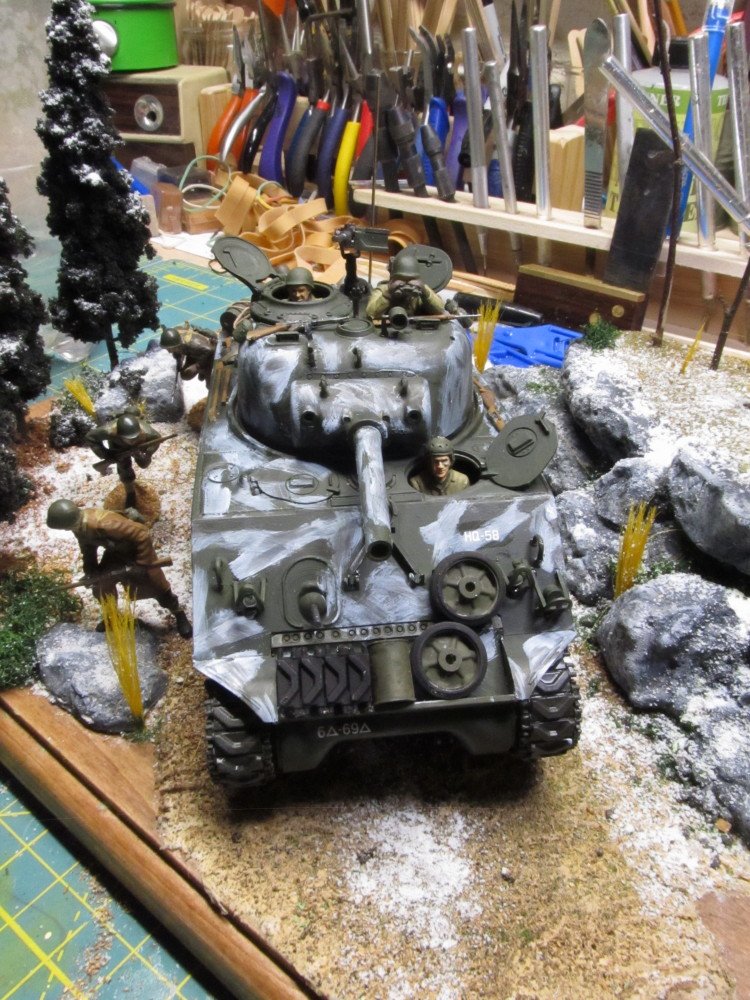
And now the FINISHED model and diorama.
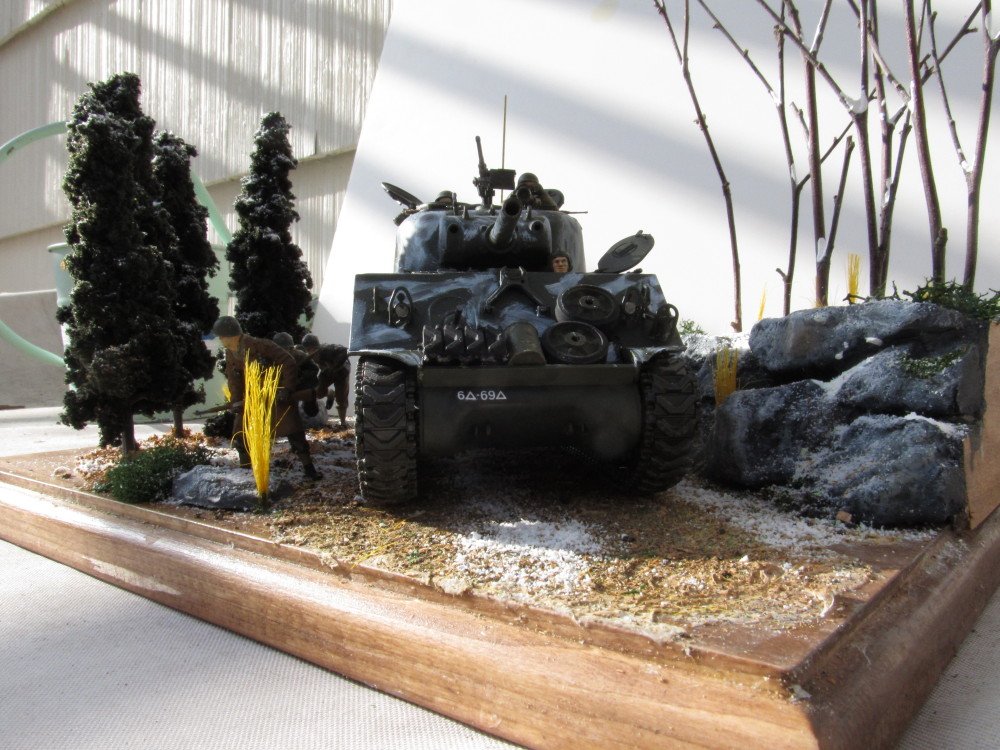
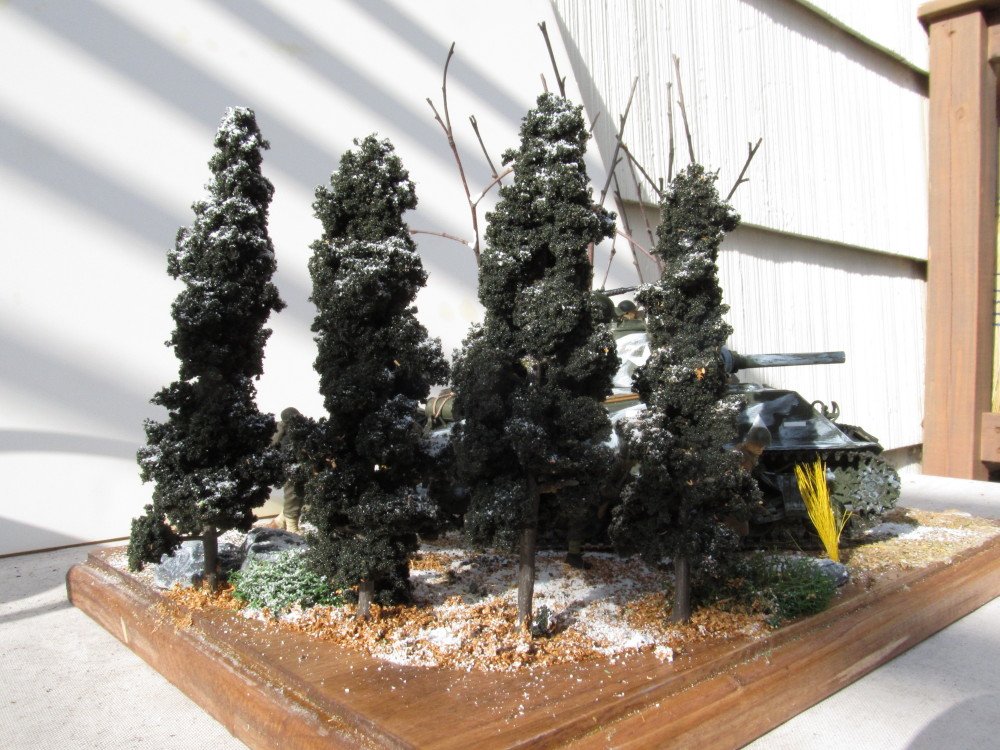

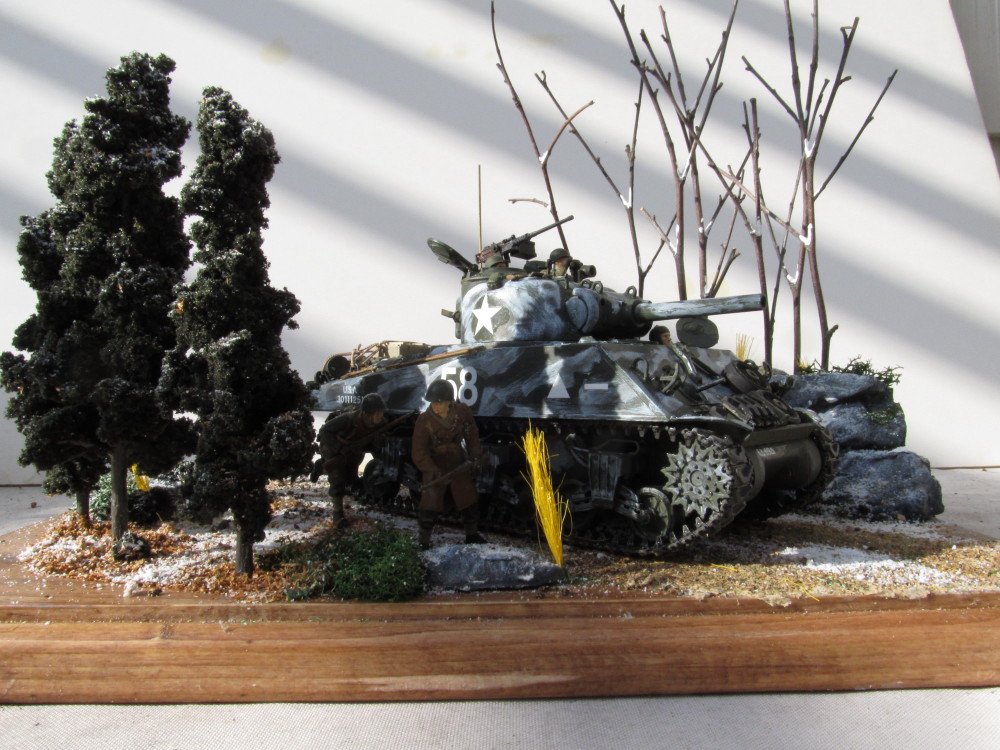
Thanks for following along.
-
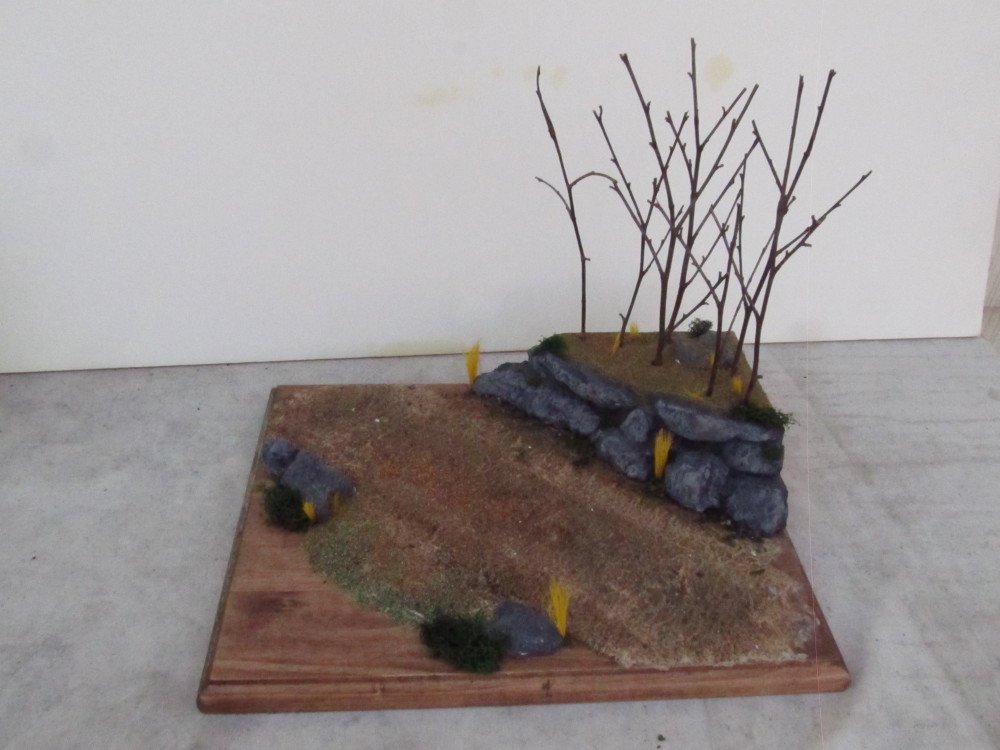
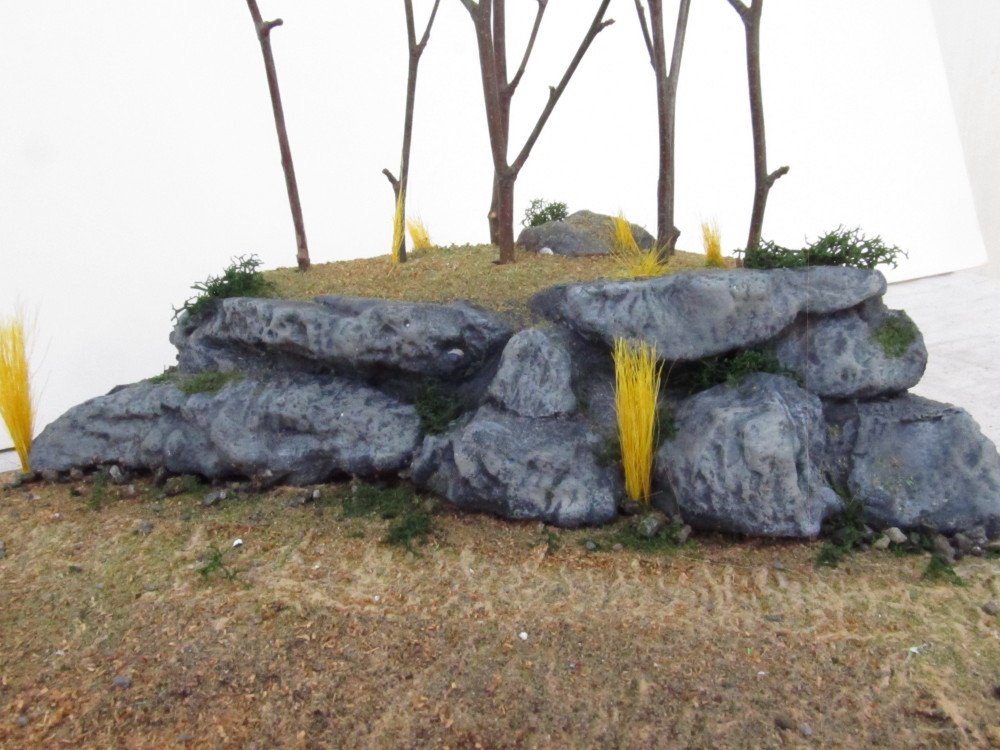
Building the diorama:
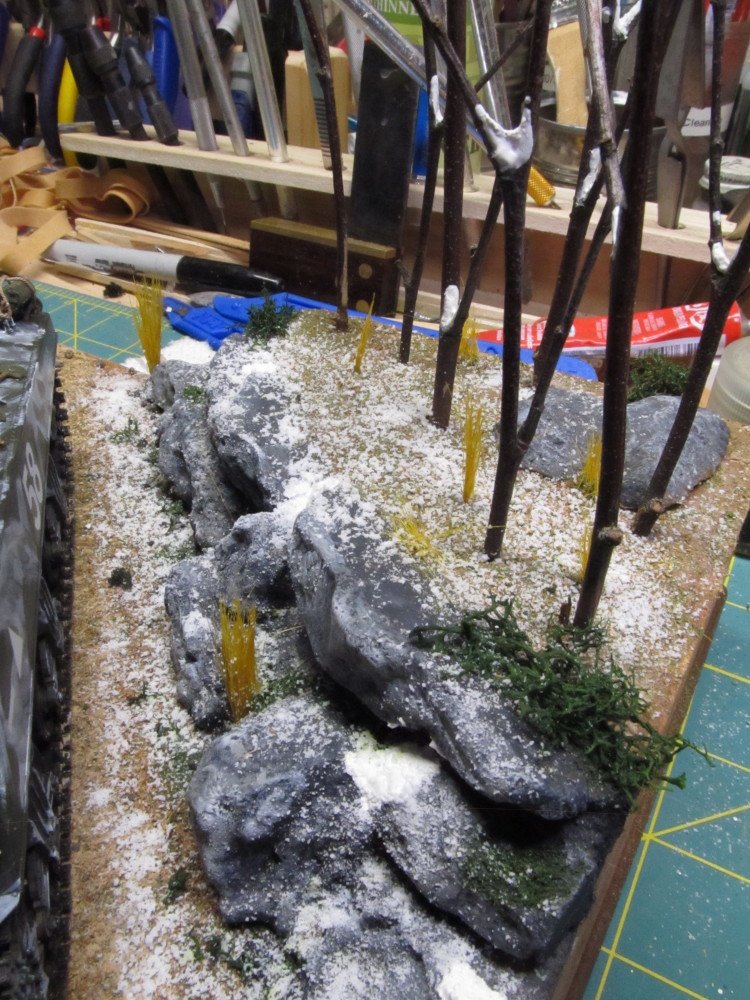
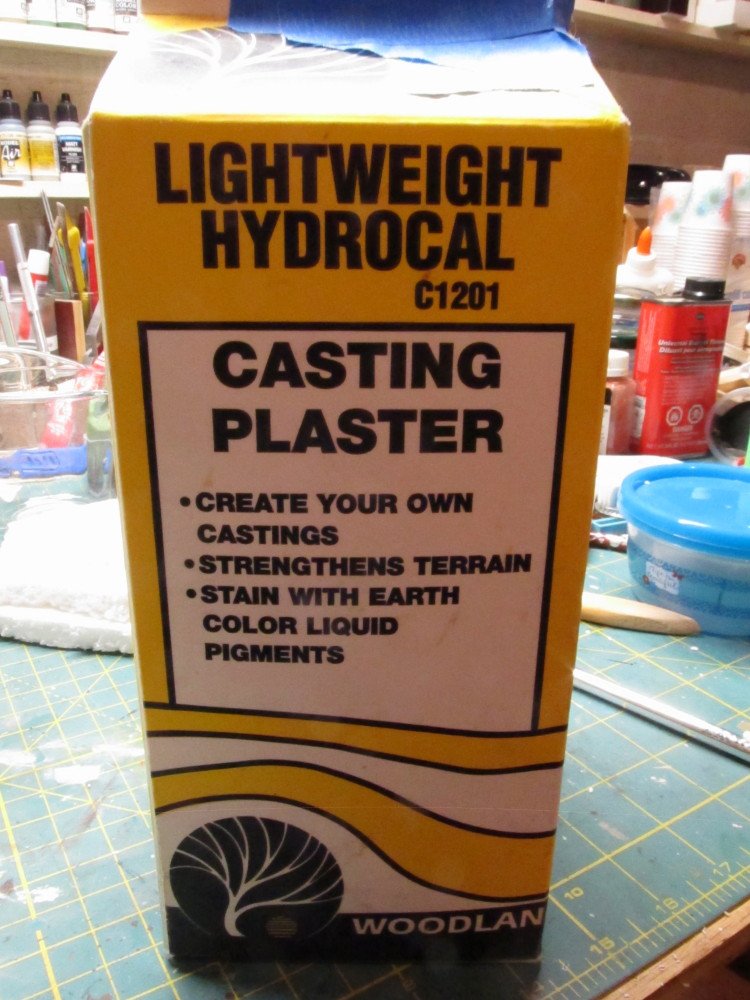
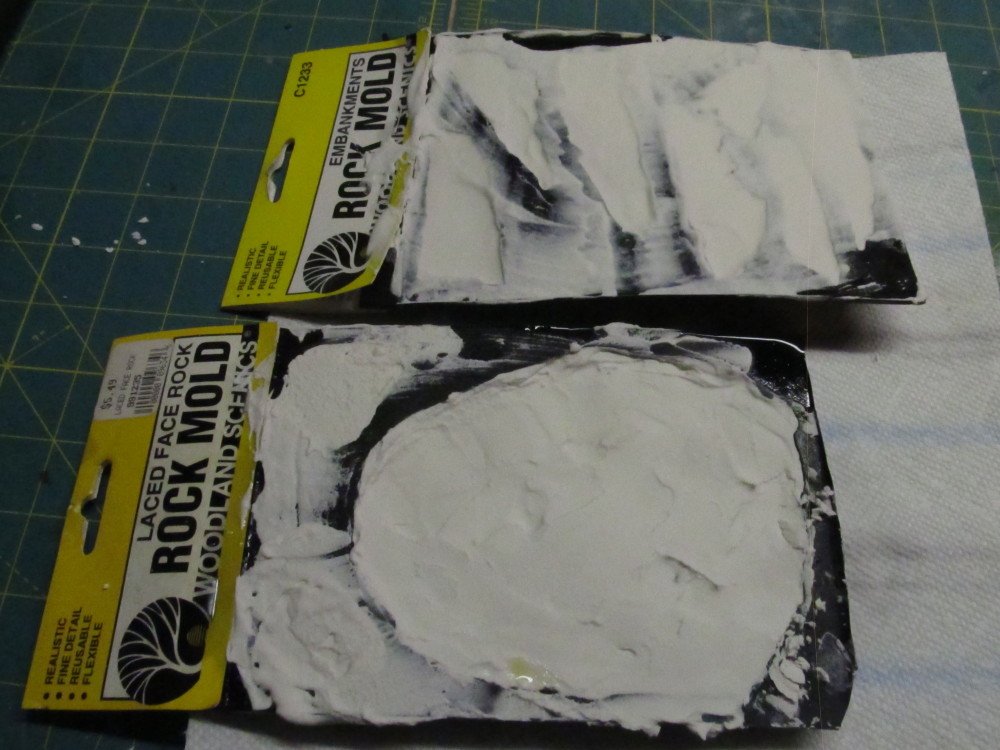
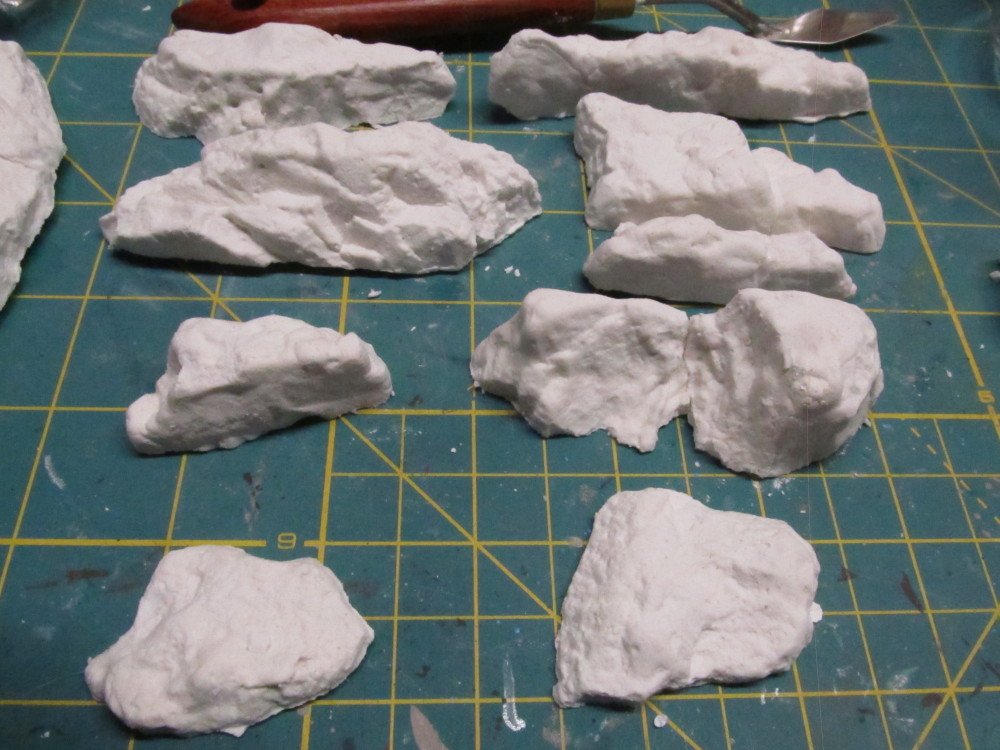
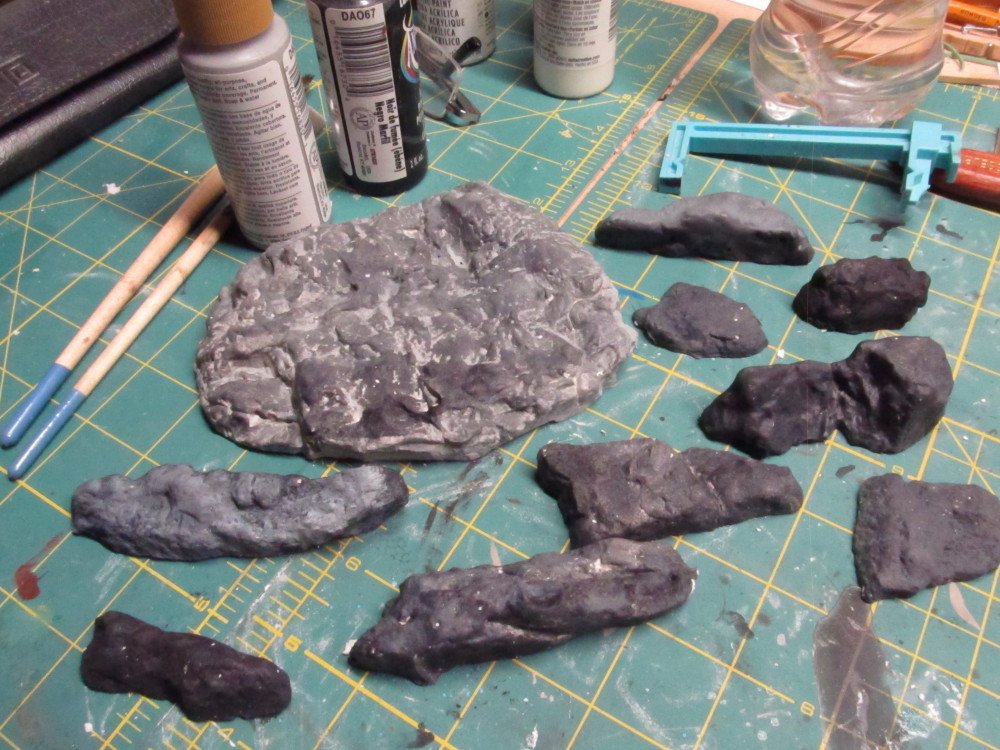
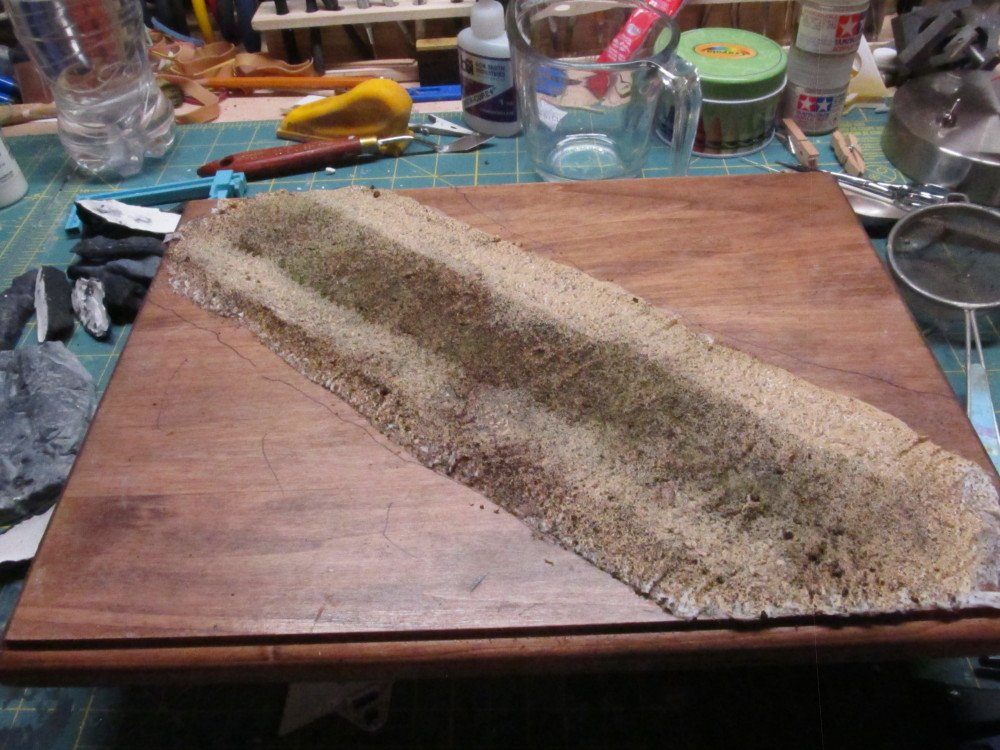
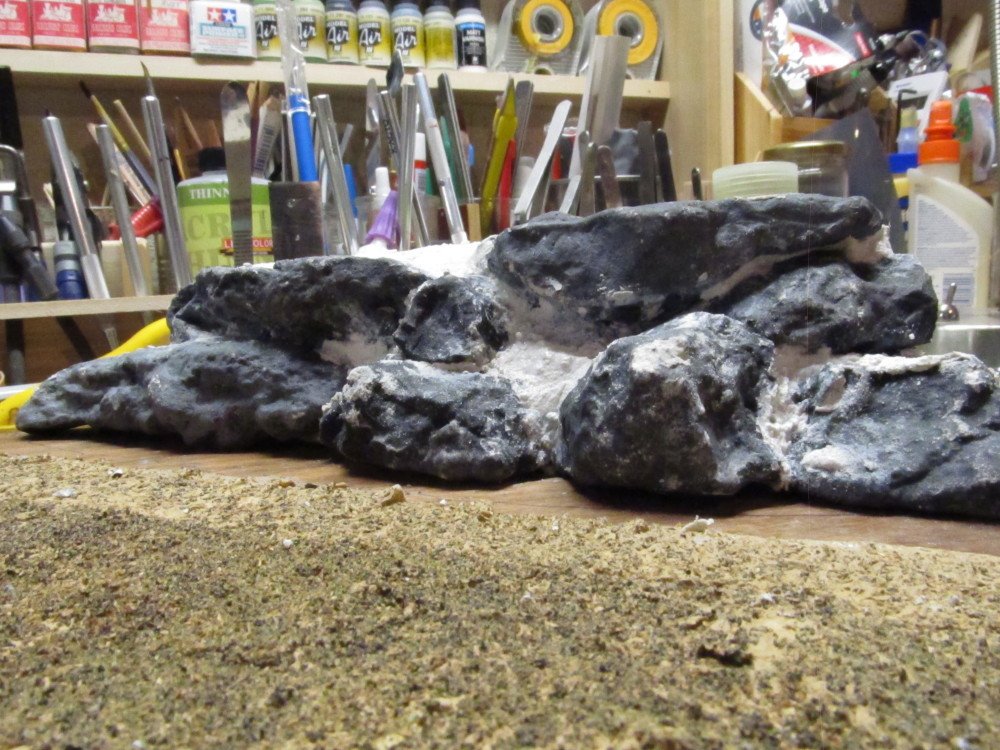
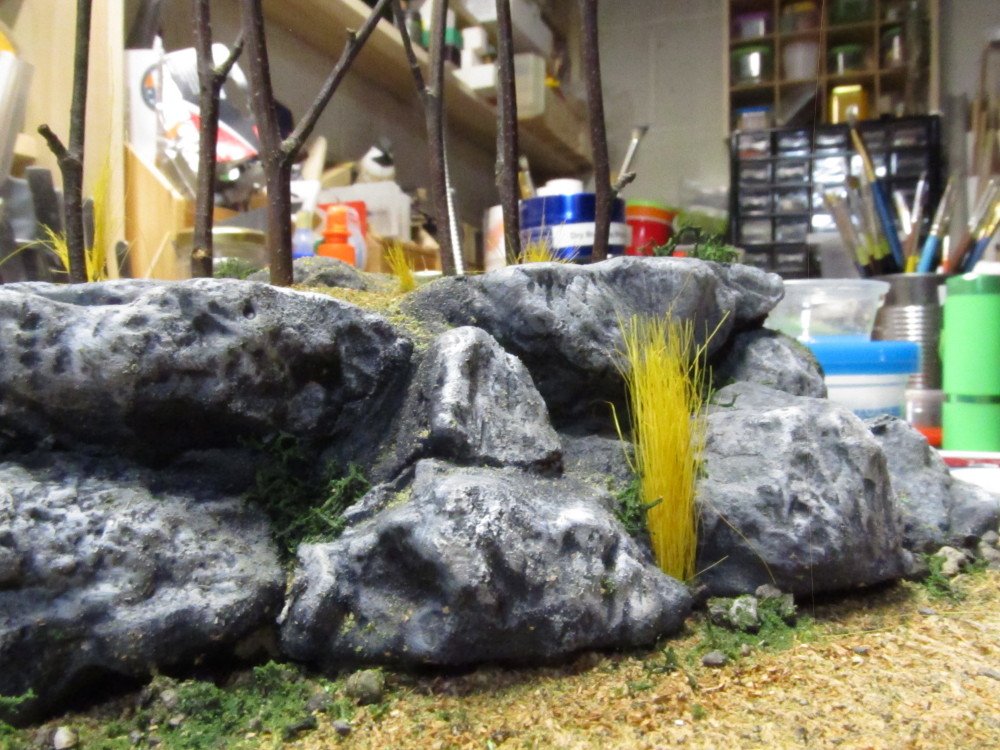
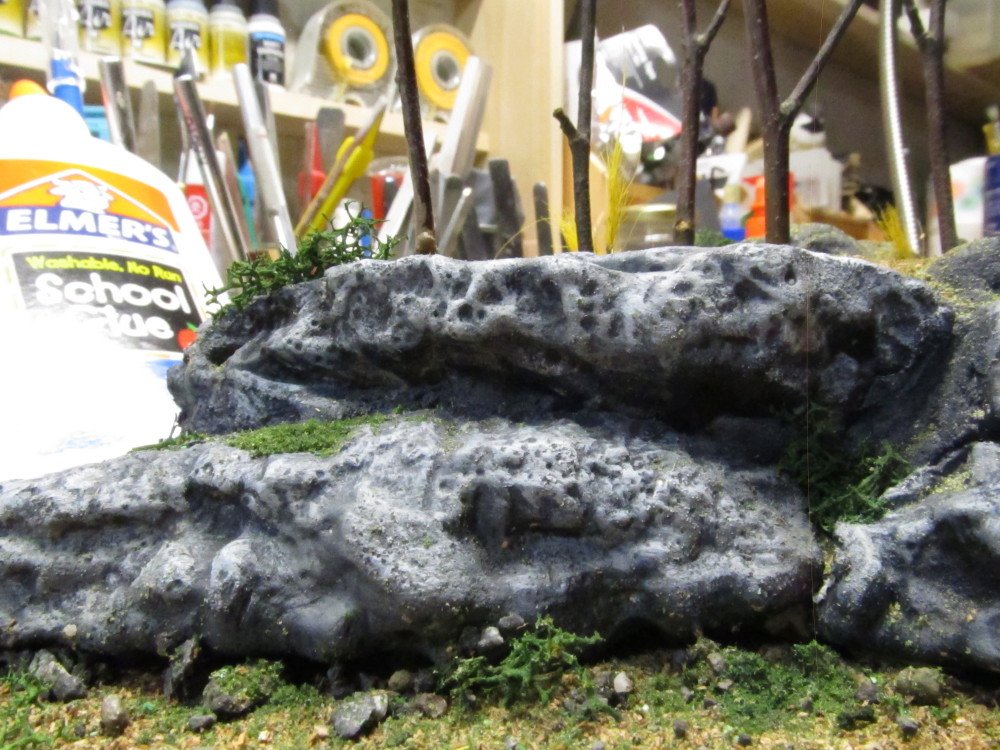
For the diorama display I chose a 9 inch by 11 inch basswood plaque to which I applied 2 coats of Minwax Cherry stain followed by 2 coats of Minwax Clear Satin poly. For the scene I decided to show the tank and crew moving thru a wooded area with a rock outcropping on one side with a stand of hardwood trees atop the outcropping. First step was to get out my Woodland Scenic rock casting rubber molds (shown in photos below). I mixed up a small batch of Hydrocal casting plaster, poured it into the molds and let setup overnight. After removing the castings I gave them a base coat of lamp black paint, followed by successively lighter shades of slate gray, and dry brushed with titanium white.
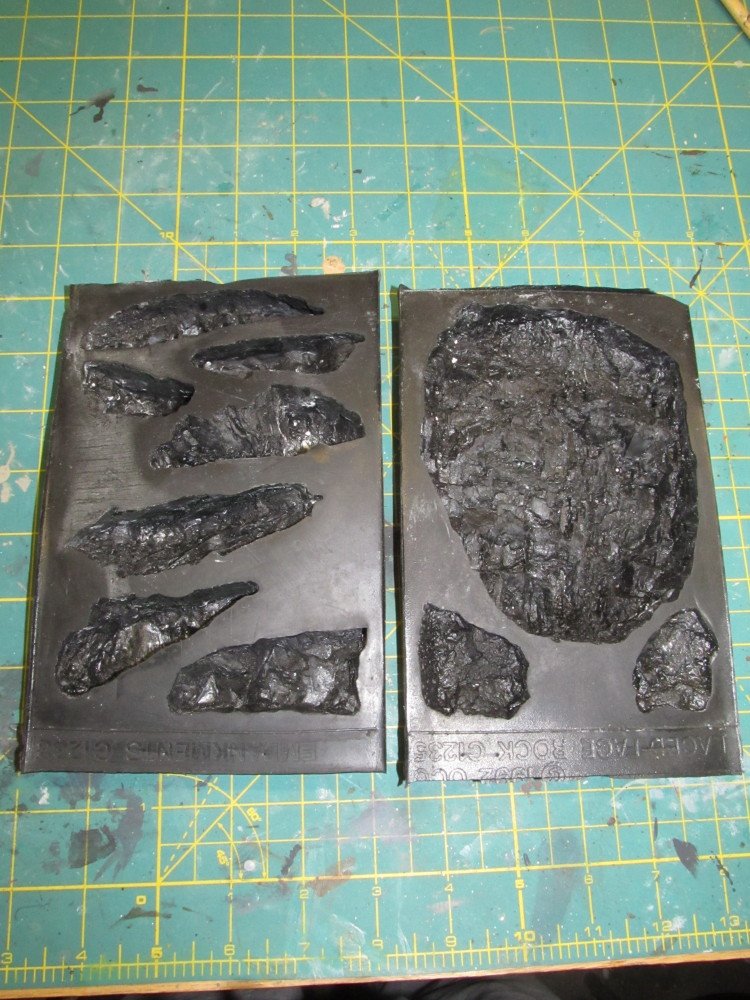
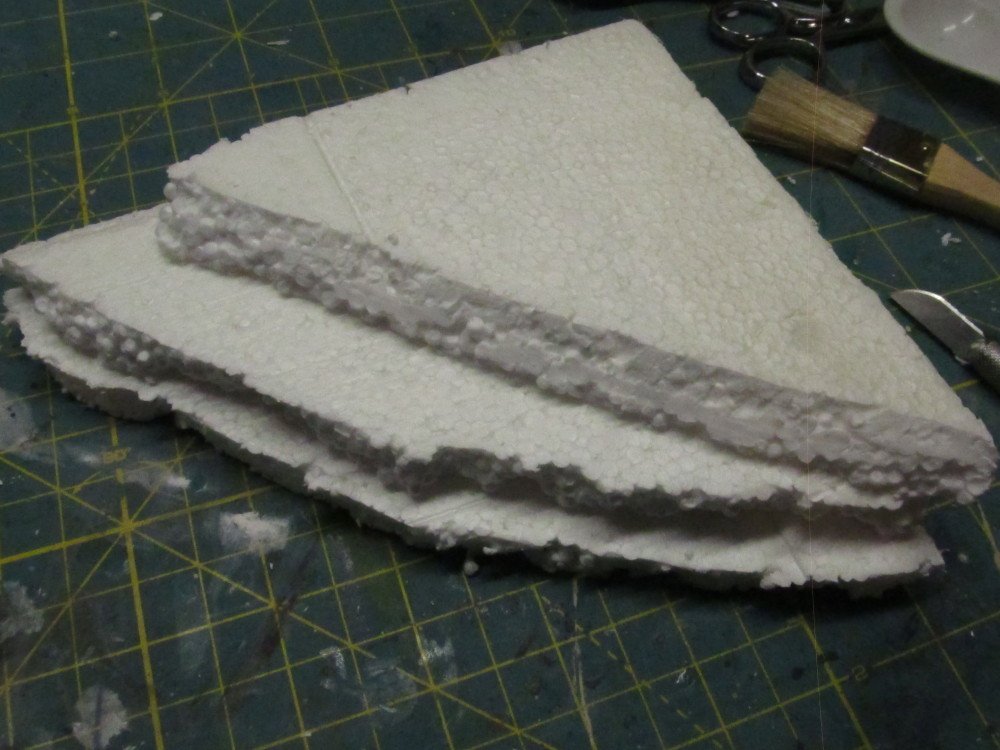
To make the raised area for the rock outcropping I used some sheets of hard packing styrofoam (the really stiff kind that they use to pack small appliances and the like) which I stacked 3 high in a triangular shape to fit onto one corner of the plaque. I then attach the rock molds to the Styrofoam using pre-mixed ceramic tile cement & grout, working the rocks into the face of the the "cliff". But before I did all that I had to lay down the "road". I did this by applying dilute white glue to the plaque surface, then lay successive layers of toilet paper/bath tissue over the glue, pressing it down with a brush. Following this I mixed some Fawn Brown paint into the dilute white glue, sprinkled it over the tissue and then dusted it with "dirt" of various shades.
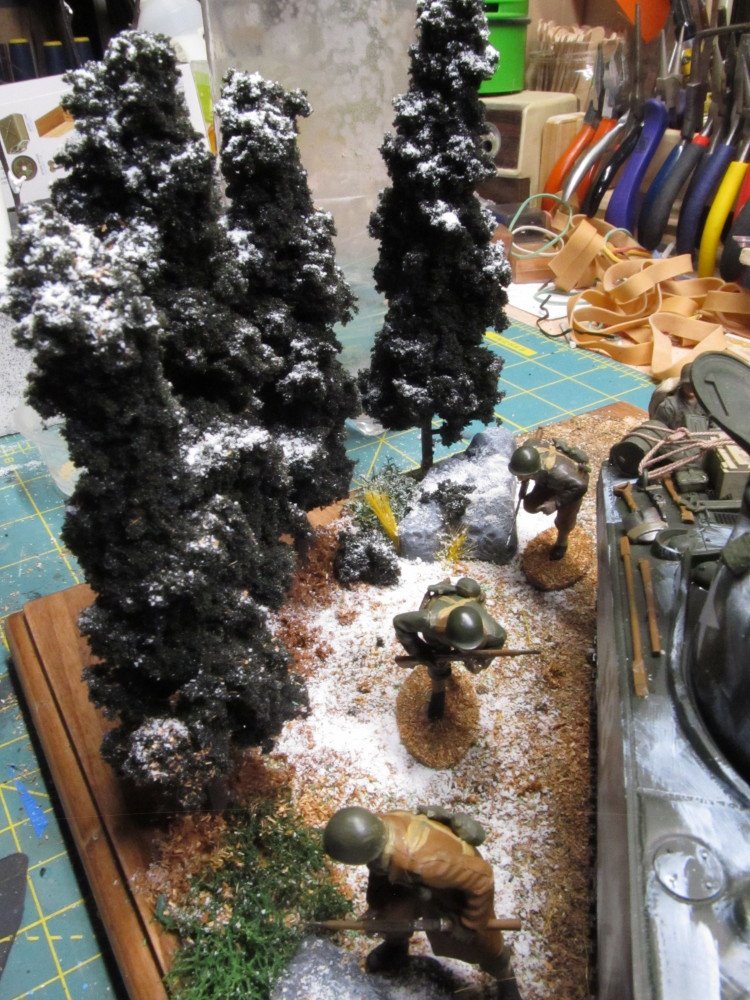
After the tile cement/grout set overnight it was on to making the hardwood trees. For this I chose to use the many twigs that my River Birch (Betula nigra) trees constantly drop onto my yard. They are in a sense miniature trees.
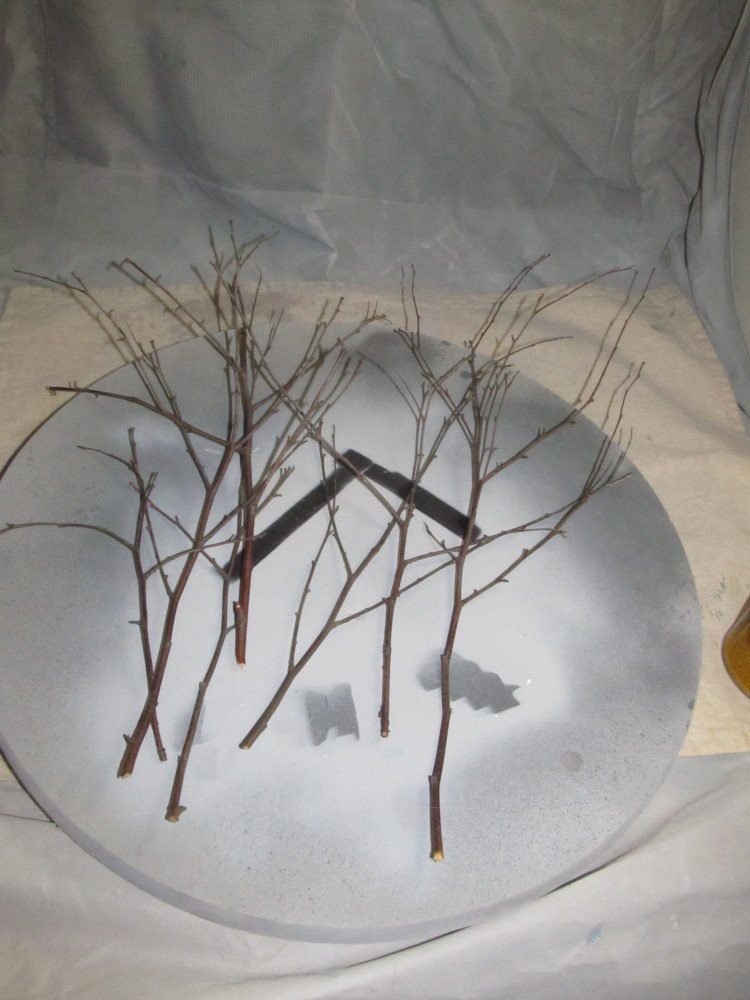
Adding them to the foam was easy just make a small hole in the foam with a common nail, apply a few drops of white glue to the hole and insert the twig. Then applying some grasses to the mix and dry brushing the rocks a little more increases the effect.
Continued in next post
-
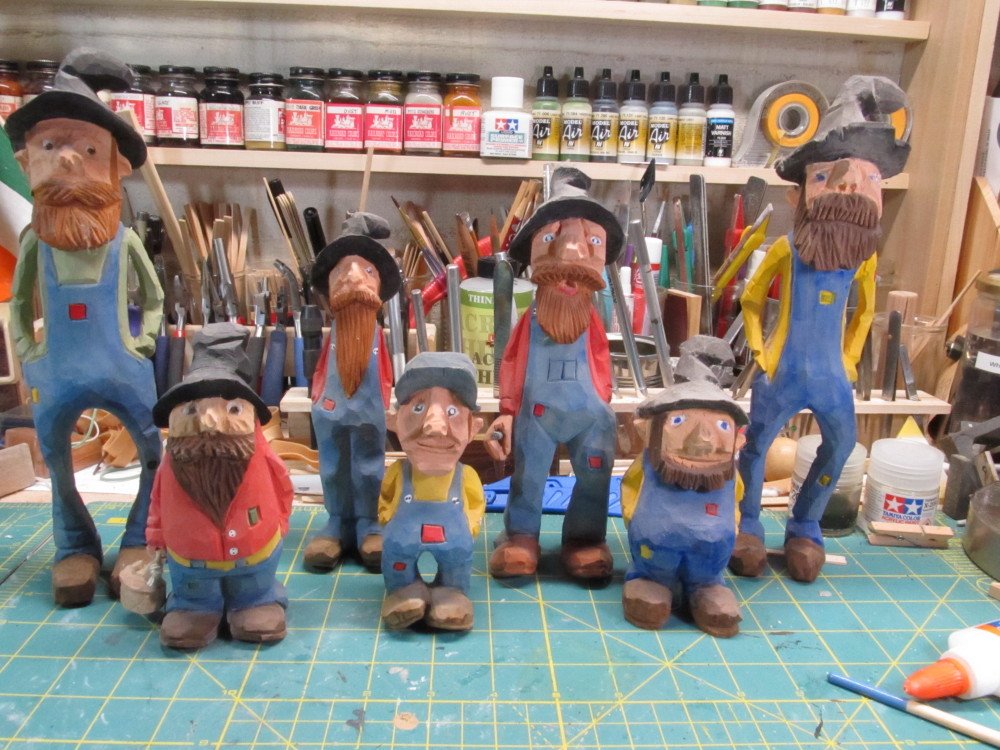
And usually loaded with lead from the solder they use to hold the pipes together on their still
- lmagna, Old Collingwood, Canute and 4 others
-
7
-
Well everytime ole Bennie opens that jug he's carrying, the smell will knock you over. Don't know what he's got in there but it is darn potent even at 20 paces. And Uncle Howie makes me real nervous with that shotgun he keeps twirling like a baton.
")
- Canute, Edwardkenway, lmagna and 4 others
-
7
-
7 minutes ago, lmagna said:
Interesting looking fellows though.
Thanks Lou. If you haven't guessed, they are my other hobby. Woodcarving Caricatures
- Canute, Old Collingwood, mtaylor and 5 others
-
8
-
Then this family of Ozark Mountain Hillbillie Moonshiners drops in from time to time with their jug of white lightning (Lead based). You do NOT want to drink that stuff unless you want to go blind.
My shipment is somewhere in the Midwest near Indianapolis - how it got out there from New Jersey is anyone's guess.
- Edwardkenway, lmagna, GrandpaPhil and 7 others
-
10
-
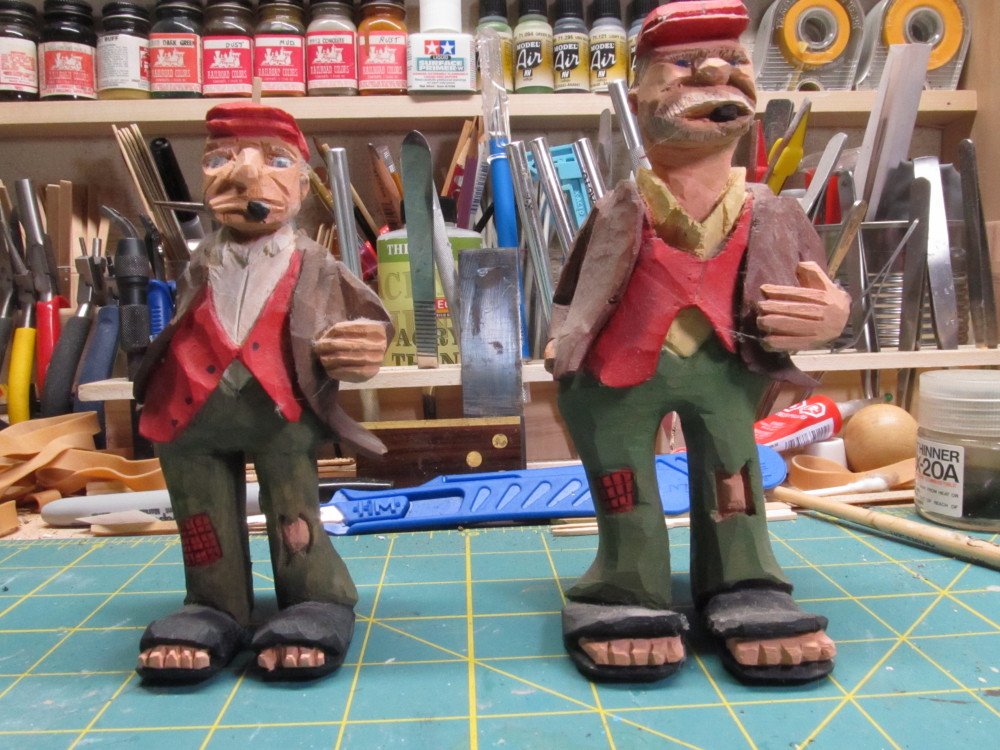
These two bums, Pete and his brother RePete, keep wandering over from the woodcarver's shop next door to see if my shipment has arrived. Guess they expect a bottle of hootch to jump out at them.

- CDW, GrandpaPhil, Canute and 7 others
-
10
-
You can also do that to a painted surface to give it a high gloss finish, like on model cars.
-
Beautiful Yves ! But I have a question. How much of this exquisite detail will be visible when the model is complete? Is one side going to be clear plastic. Would be a shame to hide all of this interior detail.
- mtaylor, popeye the sailor, Canute and 3 others
-
6
-
So far so good, Lou! Looks nice.
- mtaylor, popeye the sailor, Egilman and 4 others
-
7
-
Congrats, Jesse, great looking ship !
- Canute, popeye the sailor and JesseLee
-
3
-
Nice ! I will pull up a stool and watch
-
I hope to receive the remainder of my supplies by the end of this week so I can finish the display and post the results. Stay tuned. In the meantime enjoy some popcorn from Mark's popcorn maker
- mtaylor, lmagna, Ryland Craze and 6 others
-
9
-
Dioramas are not that hard to do. Today in the digital age, there are dozens of How To videos on YouTube that will show you the basics. And a lot of the raw materials you need to build one are in your backyard.
- Old Collingwood, CDW, lmagna and 5 others
-
8
-
25 minutes ago, lmagna said:
there is a considerable gap between what I see in my head and what is sitting on the table in front of me. It is obvious from the pictures posted in the builds here that most of the people showing their work do not have have the same problem.
Not necessarily true, Lou . I have the same problem translating what appears in my head into what sits on the work table in front of me, especially when it comes to doing dioramas. Eventually I get there but oh the journey can be rough at times.
-
28 minutes ago, Egilman said:
I hope some of it helps you in rescuing yours.....
Yes, it does. I bookmarked this for later reference. Thanks
- mtaylor, Old Collingwood, lmagna and 5 others
-
8
Fokker Dr.I triplane by cog - multiple - 1:72
in Non-ship/categorised builds
Posted
Is that a flying zebra ?")

Nice painting, Carl.