HOLIDAY DONATION DRIVE - SUPPORT MSW - DO YOUR PART TO KEEP THIS GREAT FORUM GOING! (Only 13 donations so far - C'mon guys!)
×


Piet
-
Posts
3,568 -
Joined
-
Last visited
Content Type
Profiles
Forums
Gallery
Events
Everything posted by Piet
-
 That looks really, really, REAAAAALLY very nice JesseLee! You could try washing the copper with diluted dishwashing soap and rinse with clean water. Use a sponge - - a little stray water on the wood won't hurt a bit, as long as you allow it to air dry. Cheers,
- 1,306 replies
-
- 5
-

-
- syren
- model shipways
- (and 1 more)
-
Hello John and welcome back! Wow, those boats look splendid on the Morgan, love the different colors on them. Say hi to Diane for me and cheers,
- 2,250 replies
-
- 4
-
-
- model shipways
- Charles W Morgan
- (and 1 more)
-
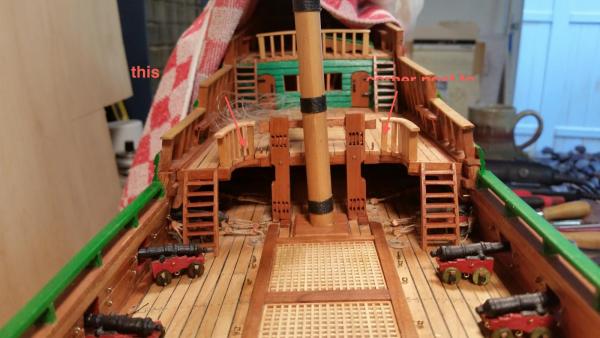
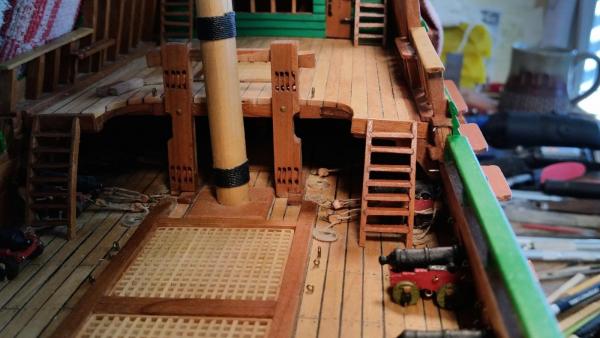
I asked Gwen to scrutinize the railings after I stained the corner posts and put some poly on them. She only found some fault with one of the middle stanchions not having the same width as the rest and the corner post is a little out of plumb. She measured a few items and found that it was acceptable to her and not worth the effort to rip them off the deck and remake them. So then, for now I'll leave them alone and continue with the cannon tackle gear. That'll keep me occupied for some time putting the straps on the pulley blocks with their hardware hardware. 64 pulley blocks! There are plenty other things to do to break the monotony. This is what it looks like as of this afternoon. The right arrow is pointing to the corner post that's not quite plumb to the deck. I'll rework that one. The left arrow is pointing to a stanchion that's also not quite plumb but that one is not cemented to the deck - yet. Gwen said it was also thinner then the rest. This might also be an optical illusion due to the light and shadow playing tricks. As far as i am concerned I leave that one alone but cement it to the deck. I little heavy CA works wonders, Cheers,
-
Hi Nils, Yes, painting can be a real challenge. Not only the choice of colors to "match" the original but the application as well. A good paint job is all preparation and not the least is masking. The most troublesome are around rivets and seems. I must have painted over 50 airplanes in my career and spend many painstaking hours in making sure that all the rivets and lap seems would not allow paint to seep under the tape. I used of course production masking tape and paint guns that supplied 17 cubit feet of paint at about 45 to 60 PSI. No matter what kind of paint, could be lacquer, acrylic, enamel, epoxy, I put first a thin coat of paint over the area of the masking tape at 90 degrees to the tape at low pressure and volume. Checking again for areas where the tape came undone and pressing that doen again. For the enamels, acrylics and epoxy paints I let this get sticky then follow-up with another thin "dust" coat of paint over the entire area to be painted. Let this get sticky as well then a full coat. Let this setup and follow with a final coat if needed. For lacquer, well that's another story and method. Hey, I painted a car once with that stuff, 18 coats!!! Hand-subbed between the last 8. Too labor intensive and expensive - - - for the customer. I also hope that painting the finish coats on unprimed metal will be successful for you. No matter how good the "stickiness" of the paint seems to be a metal primer is chemically made to adhere to metal best AND also give the finishing paint a better medium to stick to. But, then again, your model will not be subject to any wear and tear. Cheers,
- 2,625 replies
-
- 7
-
-
- kaiser wilhelm der grosse
- passenger steamer
- (and 1 more)
-
Thanks so very much for all the likes and your helpful hints. @ Hans: Yeah, the Spanish and Portuguese were a bother in those days of yore but with the armament on this ship she was no match for them. It was the English whom to be watchful for @ Jan: Yup, that's a picture I can use to try and match the green. The red eh - - I used the red paint for our front door of the house (that still needs to be painted). Looked good at the time I'll be going to the craft / art store tomorrow on my back from the doctor's office. No, nothing serious, just a visit prior to my 3 month cancer check to see if it's still gone. Now comes the fun in mixing and matching @ Nils: Thanks for dropping in and your kind words. Temporary set-backs are part of the game and I really didn't expect the glues and cement not wanting to adhere to brass. This morning I found one pintle popped of - - arch . @ Amazon: Hey Dirk, good seeing you back in my shipyard! How have you been, I missed you my friend but often thought about you. Yes, the round stanchions have crossed my mind several times but when I use them here then the railings don't match the rest of the railings on the ship. Would it be noticeable? Most likely not and it would simplify my work. I need to sleep on it for a while before I makeup my mind what to do. This morning I took a second look at the railings, ready to rip them off but started to work on them with a small file and some sandpaper. I begin to think that the closeup setting of the camera distorted the image giving me a false sense of reality. I looked at them again as one would when just looking from arms length, then through my high-powered magnifier and they are not all that bad - - - after I worked them over. This doesn't mean that I'll leave them as is. The round stanchion spindles do look attractive and is a good possibility. So who knows. I'll let Gwen (who doesn't want to be called Admiral) take a look at it and get her opinion on it too. In the meantime I'm working on the cannon rigging, which should keep me busy for some time. Cheers,
-
Beautiful work Nenad. Cheers,
- 4,152 replies
-
- 3
-
-
- cutty sark
- tehnodidakta
- (and 1 more)
-
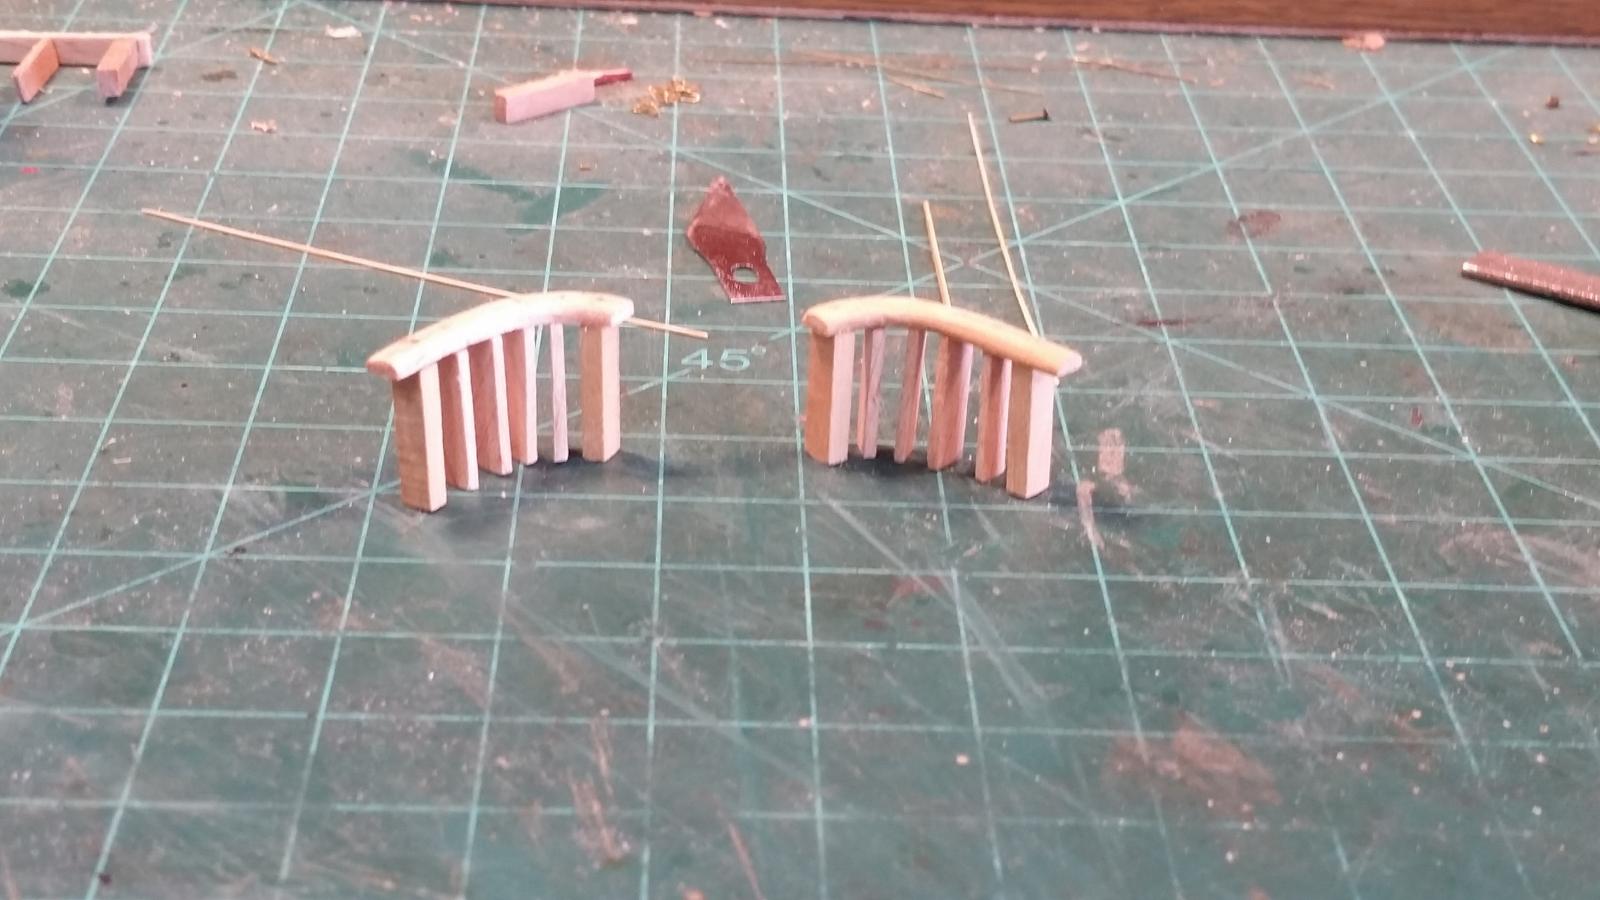
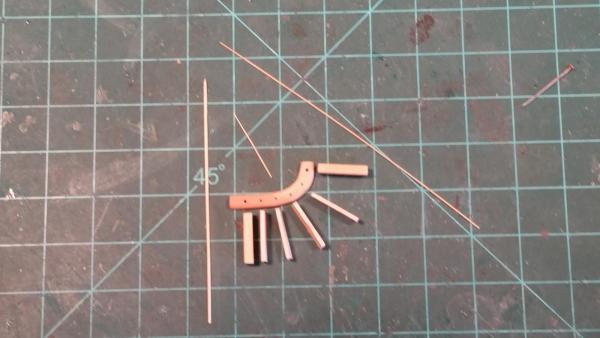
Here I thought I would be done with these small pieces of railing but I have to remake them. When I dry-fitted them to the deck I could already see that it would not work. So, back to cutting more food and doing it a little different as far as mounting the center four stanchions. I have to match the rest of the railings, i. e. making them flat instead of round, otherwise it would not look good. What I did, thinking saving some time, is to assemble the railings in the workbench and that to the deck. Good thought but it didn't pan out that way. What I'll do is to cement the reworked railings to the deck with only the two outer stanchions. Then fit each new stanchion to the space between the deck and railing cap and use only three of them. Oh well, just a few days of a set back. I cemented the pins into the railing cap first with CA and after they are secure enough I was going to cement the plank-like stanchions to the cap. Even after I painstakingly filed all of the stanchions to the same height - - - oh well, you'll see that things didn't pan out that way. This shows the assembled railings. The inner four can still be manipulated for the final cementing to the deck. All of them were close enough to the same height but - - - NOT Here I have dry-pinned the railings to the deck and you can see it is one big fiasco. The inner stanchions are a mess and to close together at the bend. I may wind up with only three inner stanchions. Cheers,


-
Thanks everyone for visiting and your likes. Thank you Hans for your input. I'll have to visit the not so local art and craft store to get me some more acrylic paints and try to create a suitable green. A real ship Mark? Hardly my friend but thanks for liking her. Too many redo's though, ran into another one today. At this rate she'll never be finished Thank you David Cheers,
-
Looking good Dave. Yeah, darker woodsy colored trucks would look real nice. That'll make 'm pop otherwise the ship would resemble a "candy wagon." Cheers,
- 209 replies
-
- 6
-
-
- cheerful
- Syren Ship Model Company
- (and 1 more)
-
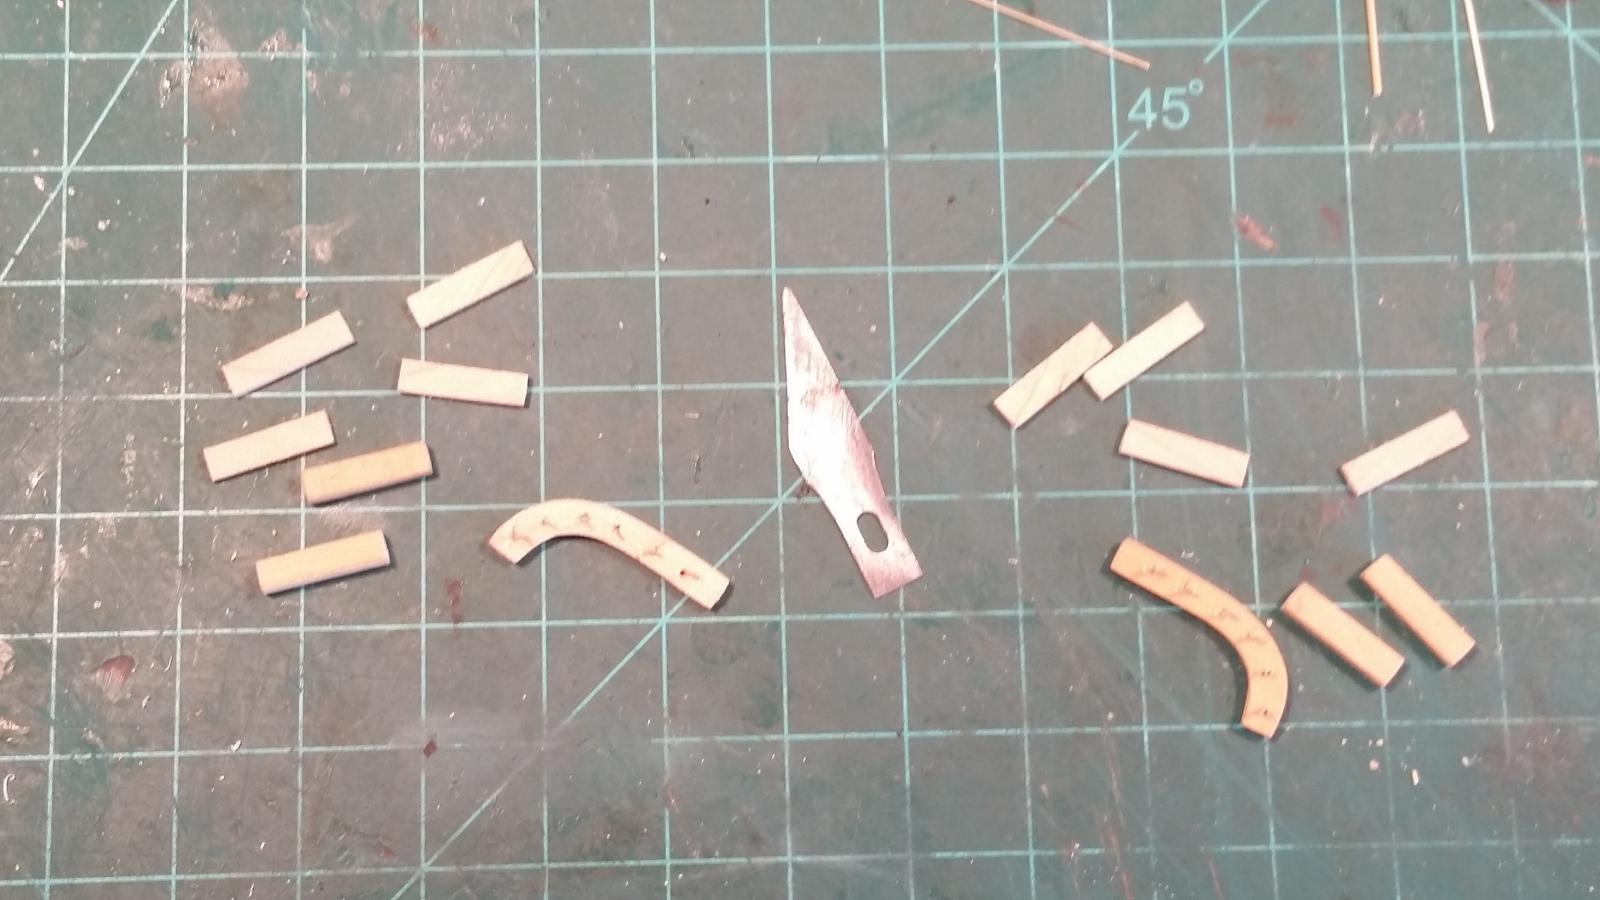
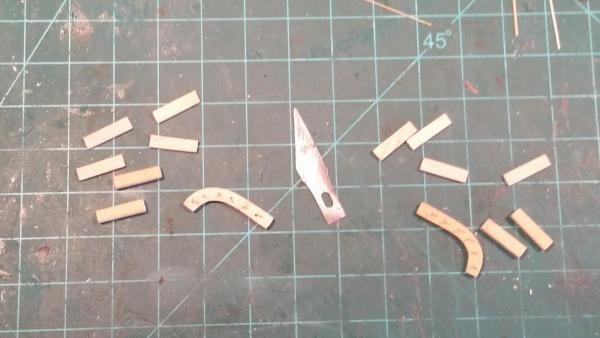
Thanks for the input on stain matching George. Yeah, I was contemplation doing that but I wasn't about to go out and buy another can of stain slightly darker then the "matching" cherry stain I have. I figured that with the door on it'll be less visible. However, I'll certainly look into it at a later date when I start cleaning up and "patching" a few nicks and scratches. Thank you Lawrence and Anthony for your very nice comments. And also my thanks to all who clicked the like button. It's all appreciated. A few things got in the way of ship building but managed a few hours anyway. Now that the gunport lids are done on both sides I can spend some time on other items on the hull. As stated a few posts ago I am working on the small railings between the stairs and the main mast. I made all the parts and pieces, drilled the holes for the reinforcing pins and made the pins. I am now ready to cement it all together and place them on the upper deck where they belong. Next will be the anchor cable capstan and rig the cannons. That should kinda complete all the deck stuff, except for the ship's boat. The thoughts are also on the many carvings yet to be done. Here are a few pics of the railing pieces. This shows all the pieces for the railing. I made the reinforcing pins from bamboo skewers, the thinnest ones for the inner stanchions are 0.3 mm thick and the pins for the outside stanchions are slightly larger to 0.4 mm. These will also have brass pins to support them to the deck. This shows where the railings will go. Having seen the form of the cap in the pic above they'll go where the rounded part is on the upper deck. With the camera lens this close the pic is slightly distorted and the mast is not yet permanently glued in place. I still need some access below the deck. Cheers,
-
Rouse Simmons by JesseLee - FINISHED - BOTTLE
Piet replied to JesseLee's topic in - Build logs for subjects built 1851 - 1900
Hope the new globes work better for you Jesselee. it certainly is a very ambitious project. Cheers,- 56 replies
-
- 4
-
-
- rouse simmons
- bottle
- (and 1 more)
-
Panel is looking real nice Nenad and love your new toy. I am still using the one I bought in 1952 when starting trade school. It's strictly analog / direct read-out in mm and inches. I have to guess at the 1/100 though. Cheers,
- 4,152 replies
-
- 4
-
-
- cutty sark
- tehnodidakta
- (and 1 more)
-
She's looking great JesseLee, and that al the way from Florida CA to cover fingerprints? Don't give thieves any ideas now Cheers,
- 1,306 replies
-
- 4
-
-
- syren
- model shipways
- (and 1 more)
-
Great news Dave and congrats. Model is looking splendid indeed! Like the nibbing in the deck planking. Cheers,
- 209 replies
-
- 7
-
-
- cheerful
- Syren Ship Model Company
- (and 1 more)
-
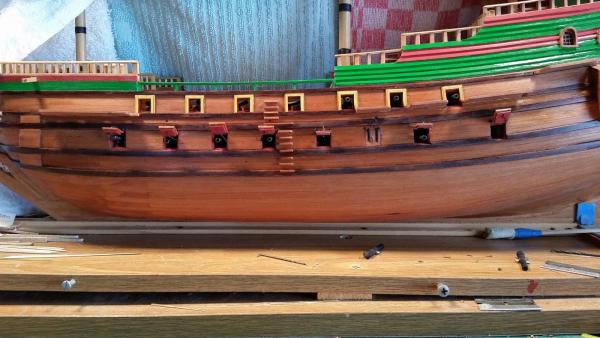
This is the stage the ship is currently in. I haven't worked on her for two days due to other commitments. I managed to install all the gunport lids and did have to re-glue one "gudgeon" with CA. They don't take much handling and as you can see in the pic there are a few that need some adjustment. I alo have to do some cleaning yet and reinstall a few of the guns. I plan to leave the lids below the deadeye channels down to allow some access for mounting the deadeye chains. Cheers,
-
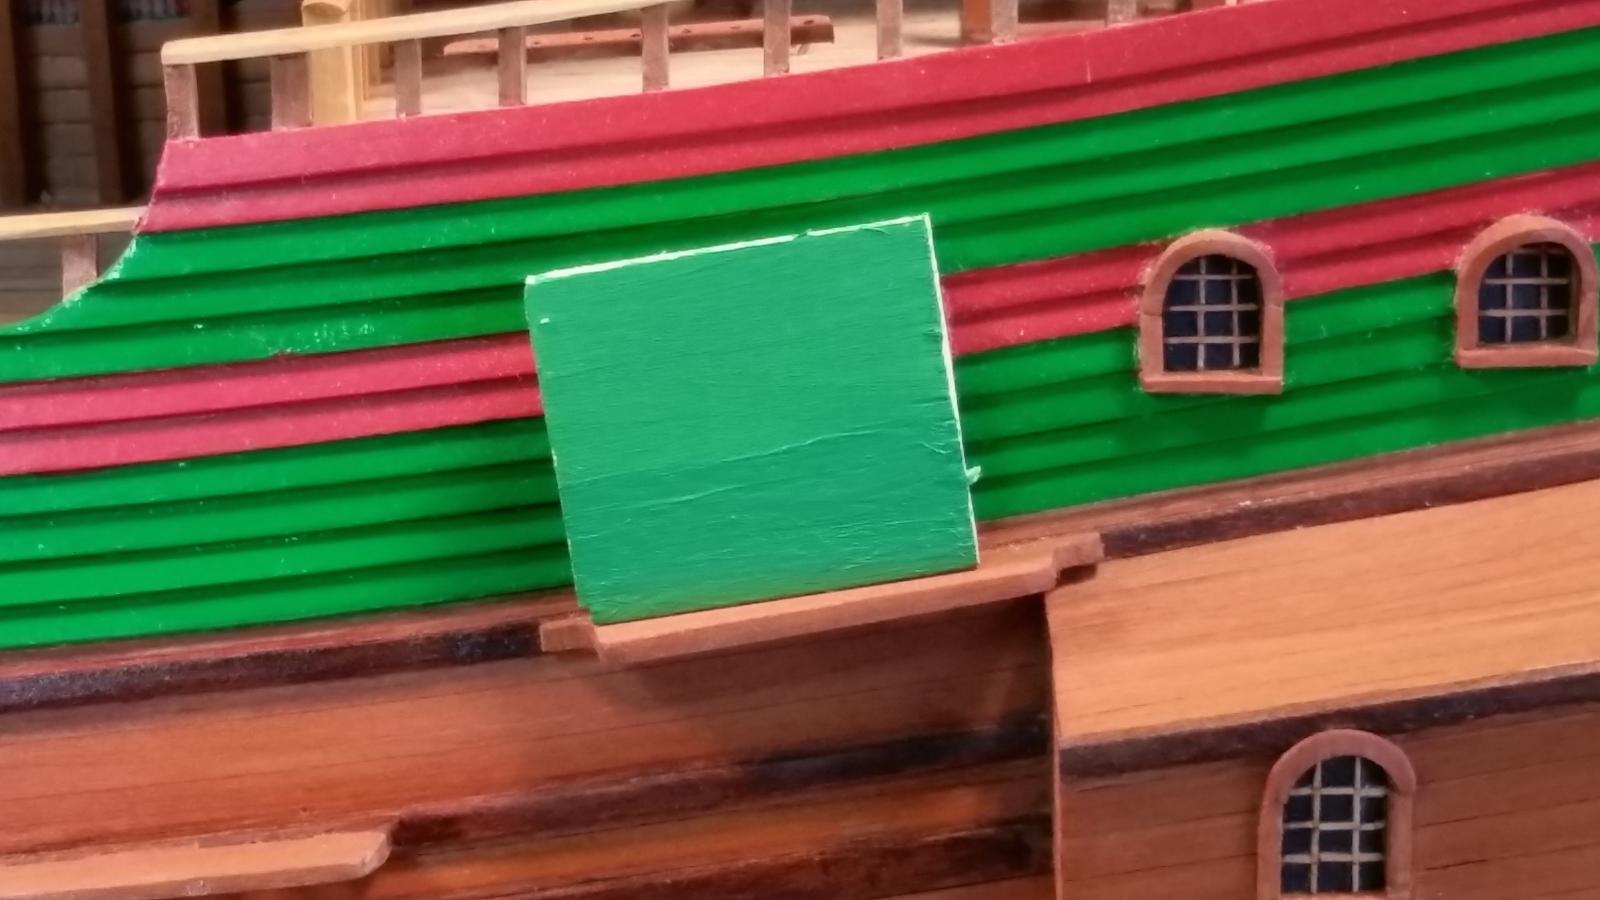
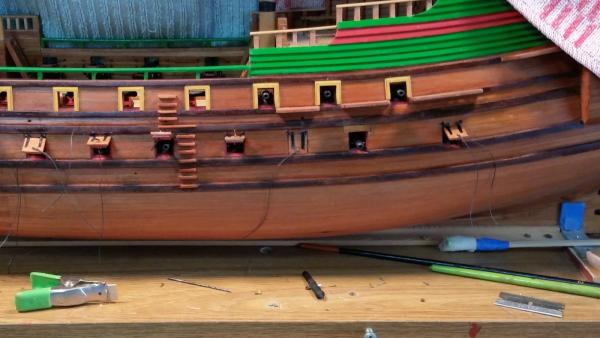
This post is directed to Hans and Amateur Jan. I have mixed some paint to change the bright green color to some more subdued green. I mixed light green with some dark green and then "deadened' it by adding some red. Here is a patch set on the gallery next to the original green. This is from the paint I ave in my studio. I don't have much in acrylics anymore, don't like to paint with it. See what you fellows think. If you have a sample for me to go by that would be helpful. There are two different mixes as you can see. I can always make a trip to the craft store 25 miles north of us to find a better match. Cheers,

-
Thanks to everyone who clicked the like button and to those who commented, it's all very much appreciated. @ George: Yup, having problems and screwing up is the nature of this hobby. No matter how careful we try to be be there are bound to be problems that we have to deal with. But on the other hand it sharpens our skills. @ Captain Steve: See comment above @ JesseLee : The problem was unforeseen. Remaking the hinges with the smaller pieces of brass tubing was rather simple, it was the problem with the cement not wanting to stick to the brass. No matter what I tried from cleaning, sanding, a mild acid bath, nothing seemed to work. It's now a few days after my last post and I managed to install a new piece of planking in the cut I had to make. I used the same kind of wood but it does'n match too well. I put some wood stain on it to darken it some but it still shows. I'm figuring that once de lid is put on most of it won't be visible. On this particular day I quit work on the model to take care of other business. So, just one pic of how the repair looks like before the gunport lid goes on. Cheers
-
Rouse Simmons by JesseLee - FINISHED - BOTTLE
Piet replied to JesseLee's topic in - Build logs for subjects built 1851 - 1900
Very nice project JesseLee. Looking forward to the how to. I love miniatures. Cheers,- 56 replies
-
- 4
-
-
- rouse simmons
- bottle
- (and 1 more)
-
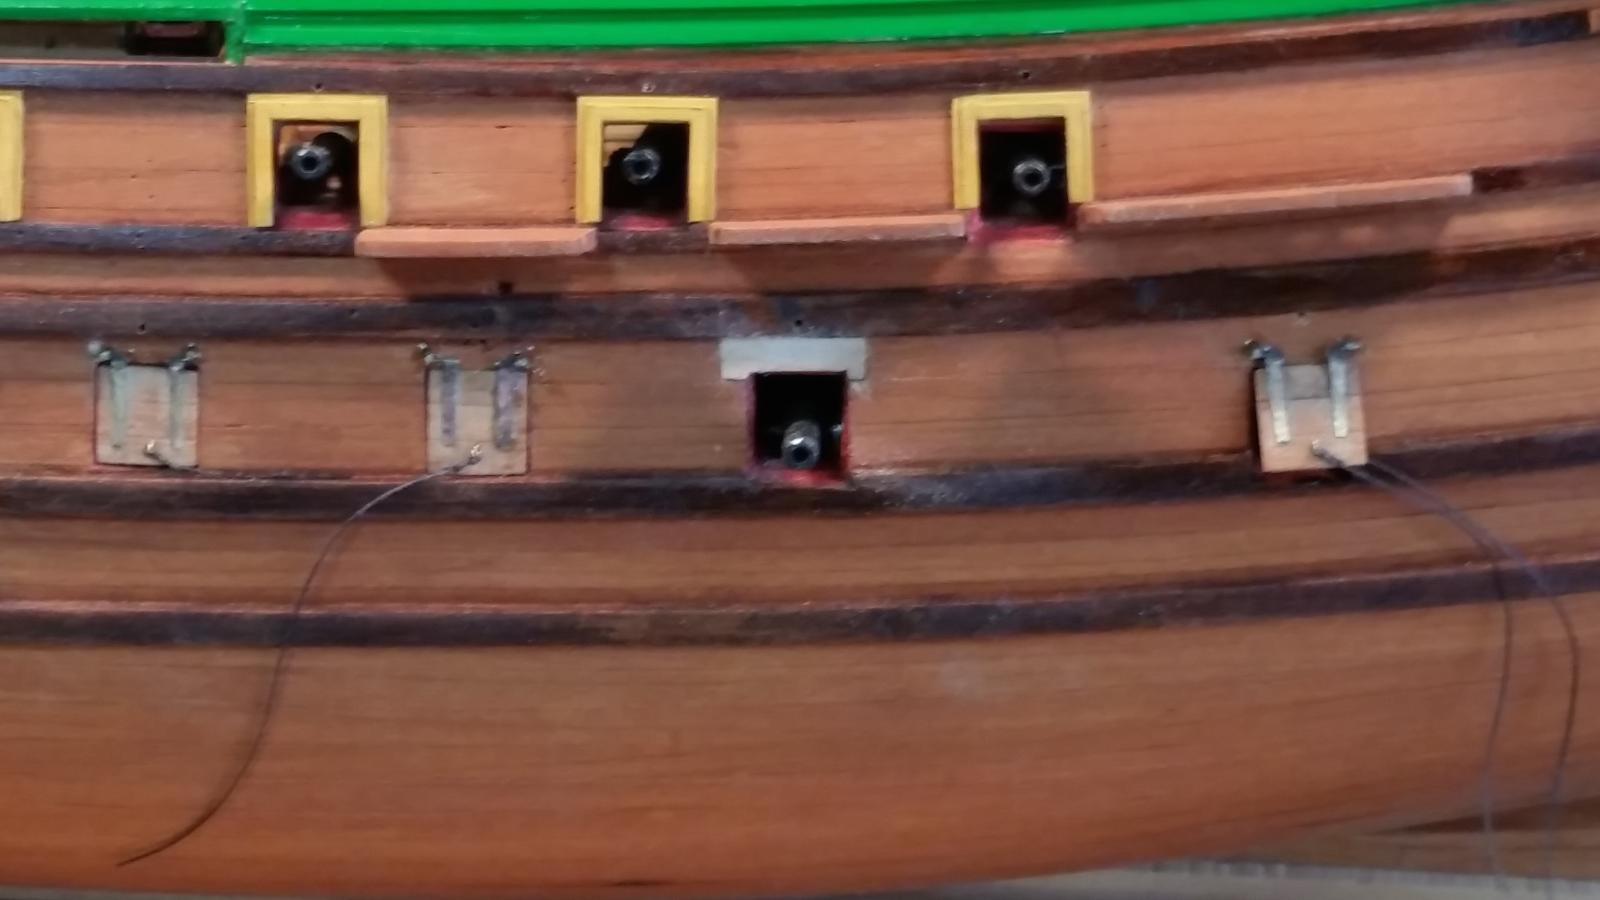
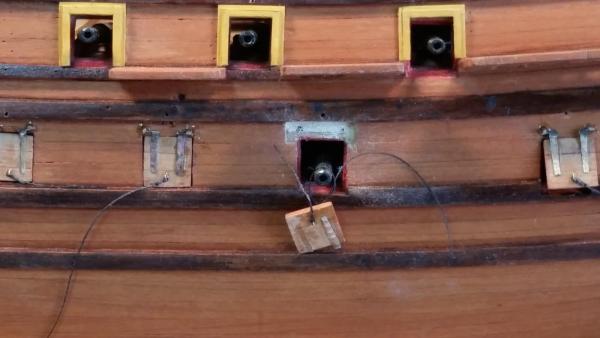
Today was wrought with frustration. Installing the remainder of the gunport lids proved to be a real headache. The two part epoxy cement I used didn't hold the "gudgeons" to the doors. Just the slightest twist or pressure popped tem off. I could rescue most of them by putting some CA under them and then holding them with a pair of tweezers. After they were all installed I started to remove some the extra cement and everything went fine till I got to the one next to the end. Disaster struck! Not only did one "gudgeon" pop off but also the hinge bushing on the other one. So, I had no choice but to remove the door with all the hardware. No problem with the door, the epoxy cement didn't hold them but when trying to get the "pintles" out was another story. They were too close to the hull to get a good grip on them and in trying the hinge pin bushes collapsed, of course. I started to dig around each pin with a small (0.3 mm) drill bit to get some room for a needle nose plier, figuring I can put plugs in the large holes but ended up breaking the drill bit and still not having enough grip on the pins. At this point my frustration level came to the boiling point and had do something else to calm down. I started a few days ago making two small railings for the upper deck between the mainmast and the stairs. That was still a project I had to do so this was the right time to do some simple woodwork. After I calmed down I decided to remove a small part of the planking above the gunport to get a better grip in these pesky pins. Not an easy job because the gun that is already secured there was in the way but I managed okay. Pins came out and I made two plugs from toothpicks and glued them in the holes. Next I made a fill-in plank piece and glued that in. I had to make two new "pintle pins" and a new hinge pin bushing for one of the "gudgeons" and solder everything together. The repair looks passable but is still in the raw unfinished state. I'll get to that hopefully tomorrow. My biggest concern is cementing the "gudgeons" to the doors. I could use some of that very thin brass wire I have to use as bolts but that means that I have to remove all the gunport doors and redo all of them also. The crazy part is that the epoxy holds on to the wood okay but not the metal. Well, we'll see, I have a night to sleep on it. This shows a part of the planking removed and the pintle pins removed. The white looking "stuff" is the remainder of TiteBond glue. There is still some cleaning to do and the pin holes to be plugged. You can also see that one of the "gudgeons" came off and the other one is just barely holding on. Here you see where I have made a new plank plug. It still needs to be dressed some more and blended in with te rest of the planking. Cheers,

-
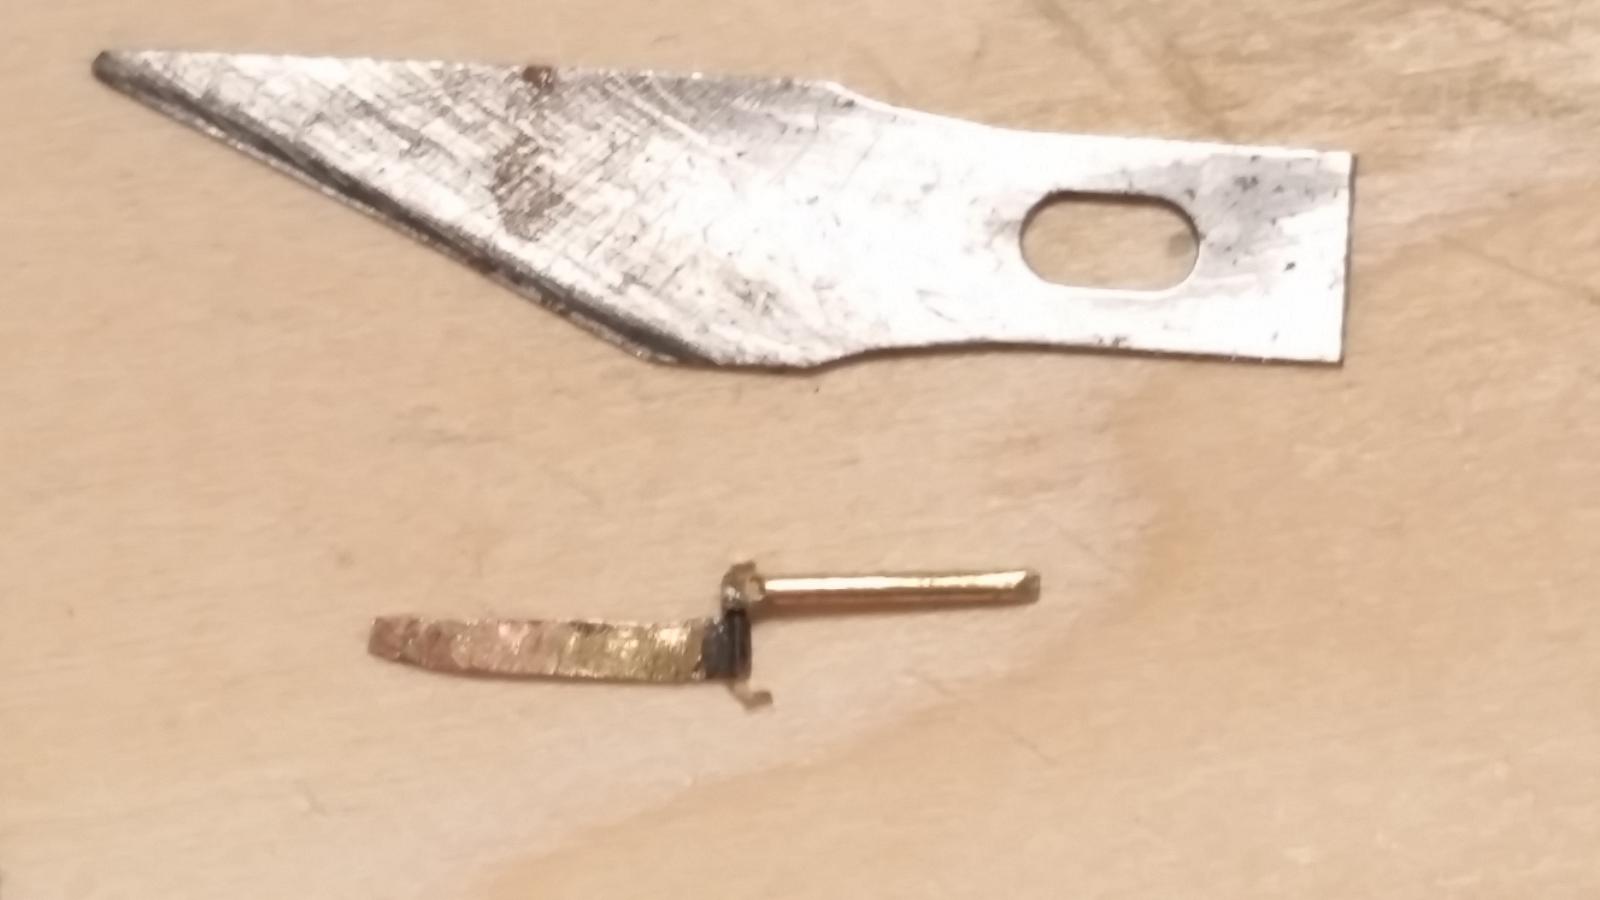
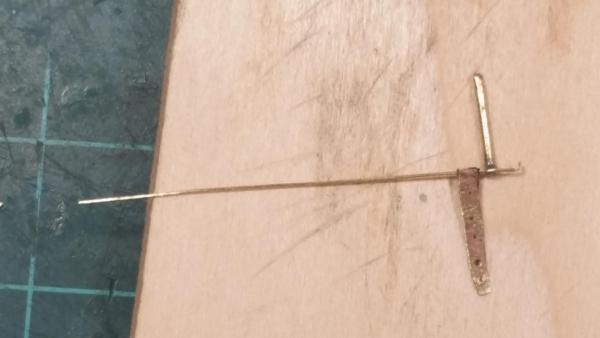
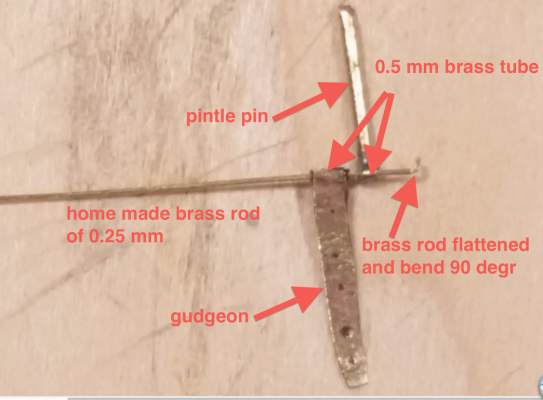
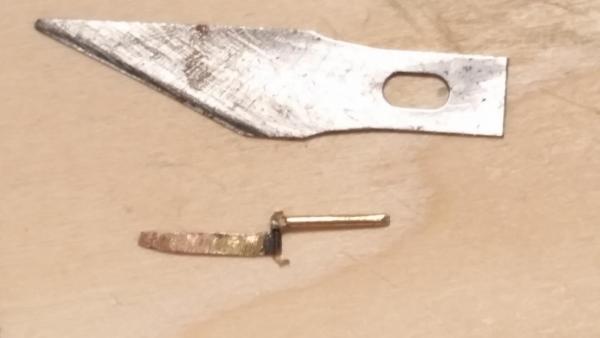
Hello all, Been busy with extra curricular activities, i.e. yard work and other chores. However, I have also found a few extra minutes to devote on the Surabaya. I spend a lot of time making the hinges and wanted to have a record for my own files so I made a few pics, thinking to share them with you. I meant to post this a few days ago but something else came in the way. The actual cutting of the 0.5 mm brass tubes for the hinges and the soldering was not much of a problem, except that I had to keep cutting new pieces of the tubes because when picking them up with the tweezers to solder they"twanged" away to who knows where But finally I managed to solder all of them to their respected parts, the "gudgeons" and "pintles." Instead of dabbing a drop of solder to the ends of the hinge pins to prevent them from walking out I decided to just flatten the ends and then bend that up 90 degrees. This proved to be extremely time consuming because i needed to file the upturned ends a little. All in all it worked out okay but in retrospect I should have just left the ends with the small flats. No way they can come out of the hinge tubes. Oh well, an exercise in patience. Here are the pics of my efforts. This shows the gun port lid hinge assembled. Everything is still in the crude stage, hinge pin still needs to be cut to size and ends flattened and bend. I used a pair of small duckbill pliers to squeeze the ends and then a pair of tweezers to bent the flattened part up. As you can see it needs some trimming. I used a nail clipper which did a splendid job. This is a close-up with annotation. Yup, they are small and a challenge. This is the completed hinge assembly still in the rough state. Still needs to be cleaned and dressed. Cheers,
-
Glad to hear mother in Law is feeing better. Taking short cuts are not always the fastest way but glad tou came home safe. Deck house is looking good. Cheers,
- 4,152 replies
-
- 6
-
-
- cutty sark
- tehnodidakta
- (and 1 more)
-
Hi Lextin, bummer on the Masters Commission but a great score with the 83. Wish you the best. Cheers,
-
Thanks Hans, fully understand how hot it can be below deck's in the tropics! Yes, I'll have the lids filly open but won't be too picky about the angles though. A degree or two difference would seem to me more of a random position like the sailors really wouldn't care one way or another just as long as they are "fully" open. I blackened the "gudgeons" today and they are looking really good. I had to use the straight stuff because my previously diluted mixture was not doing much. I guess I was just a little impatient but after 5 minutes in the blue liquid I had some fine black hinge parts. Now comes the fun in cementing tem to the lids. Cheers,
-
From me as well - all the best wishes for your mother in law and hope the antibiotics help. Keeps trong my friend. Work on the deckhouses are progressing quite well, experience helps with the redo Cheers,
- 4,152 replies
-
- 6
-
-
- cutty sark
- tehnodidakta
- (and 1 more)
-
Thanks everyone for visiting and your likes. Hi George, yeah, once I have all the pieces made soldering the brass bushes goes rather quickly. I reused the old "gudgeons" but had to clean them up and a bit. The blackening liquid I have is called "BLACKEN-IT" by A-WEST of Woodstock, Georgia. It's a light blue colored liquid. In one of my previous posts some others were suggested that may have additional metal uses. I'll try this one first and see how it works. Cheers,