HOLIDAY DONATION DRIVE - SUPPORT MSW - DO YOUR PART TO KEEP THIS GREAT FORUM GOING! (Only 13 donations so far - C'mon guys!)
×


Piet
-
Posts
3,568 -
Joined
-
Last visited
Content Type
Profiles
Forums
Gallery
Events
Everything posted by Piet
-
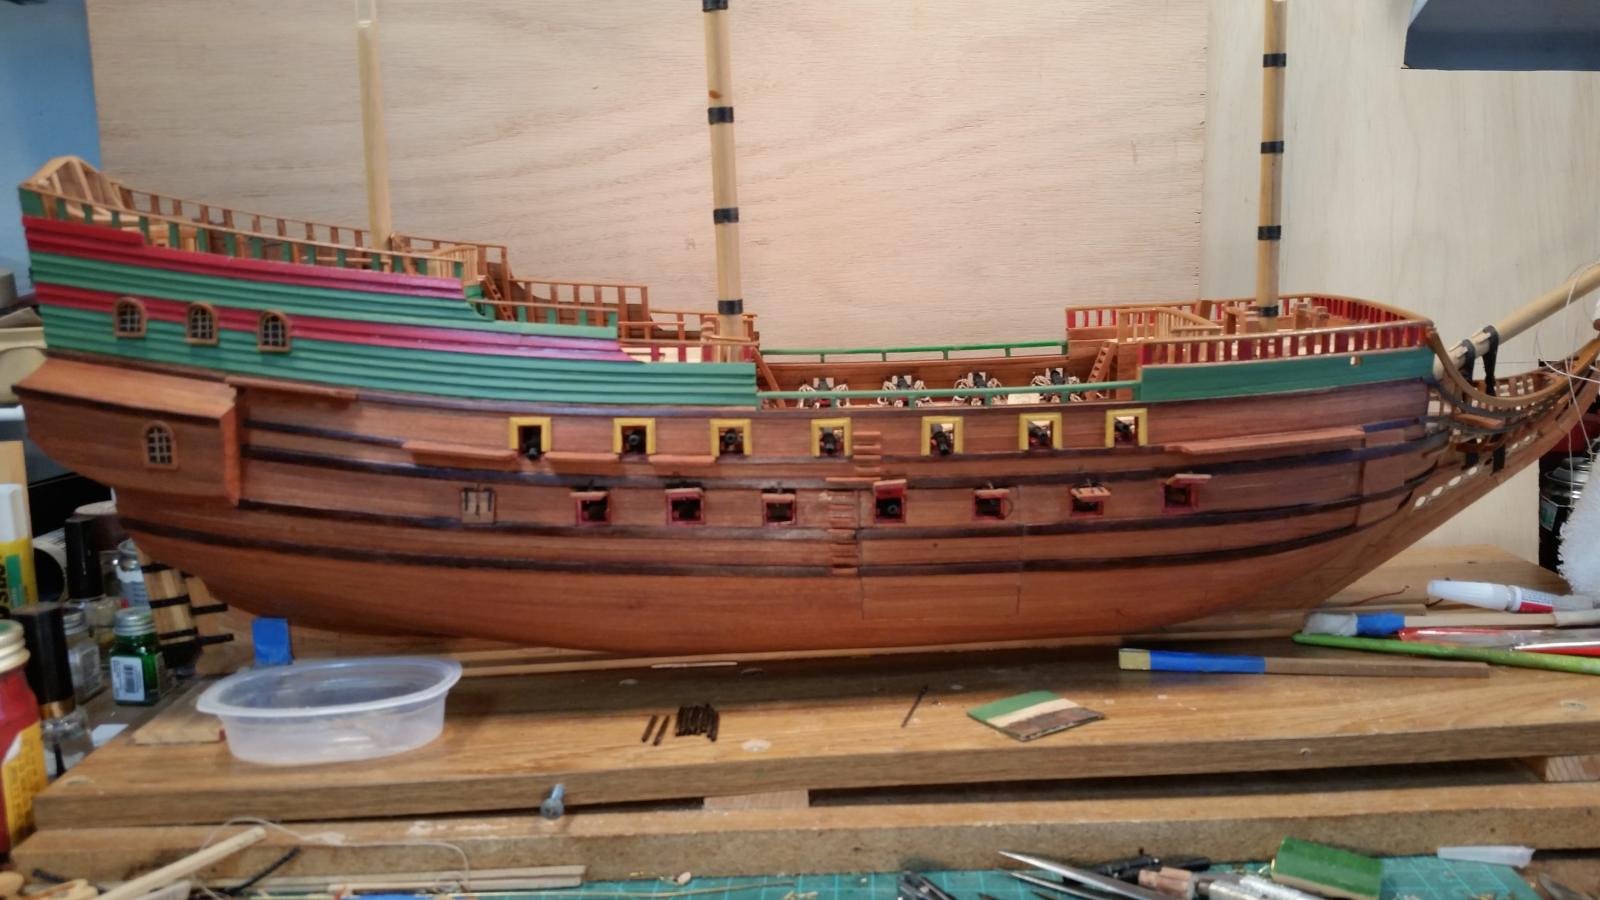
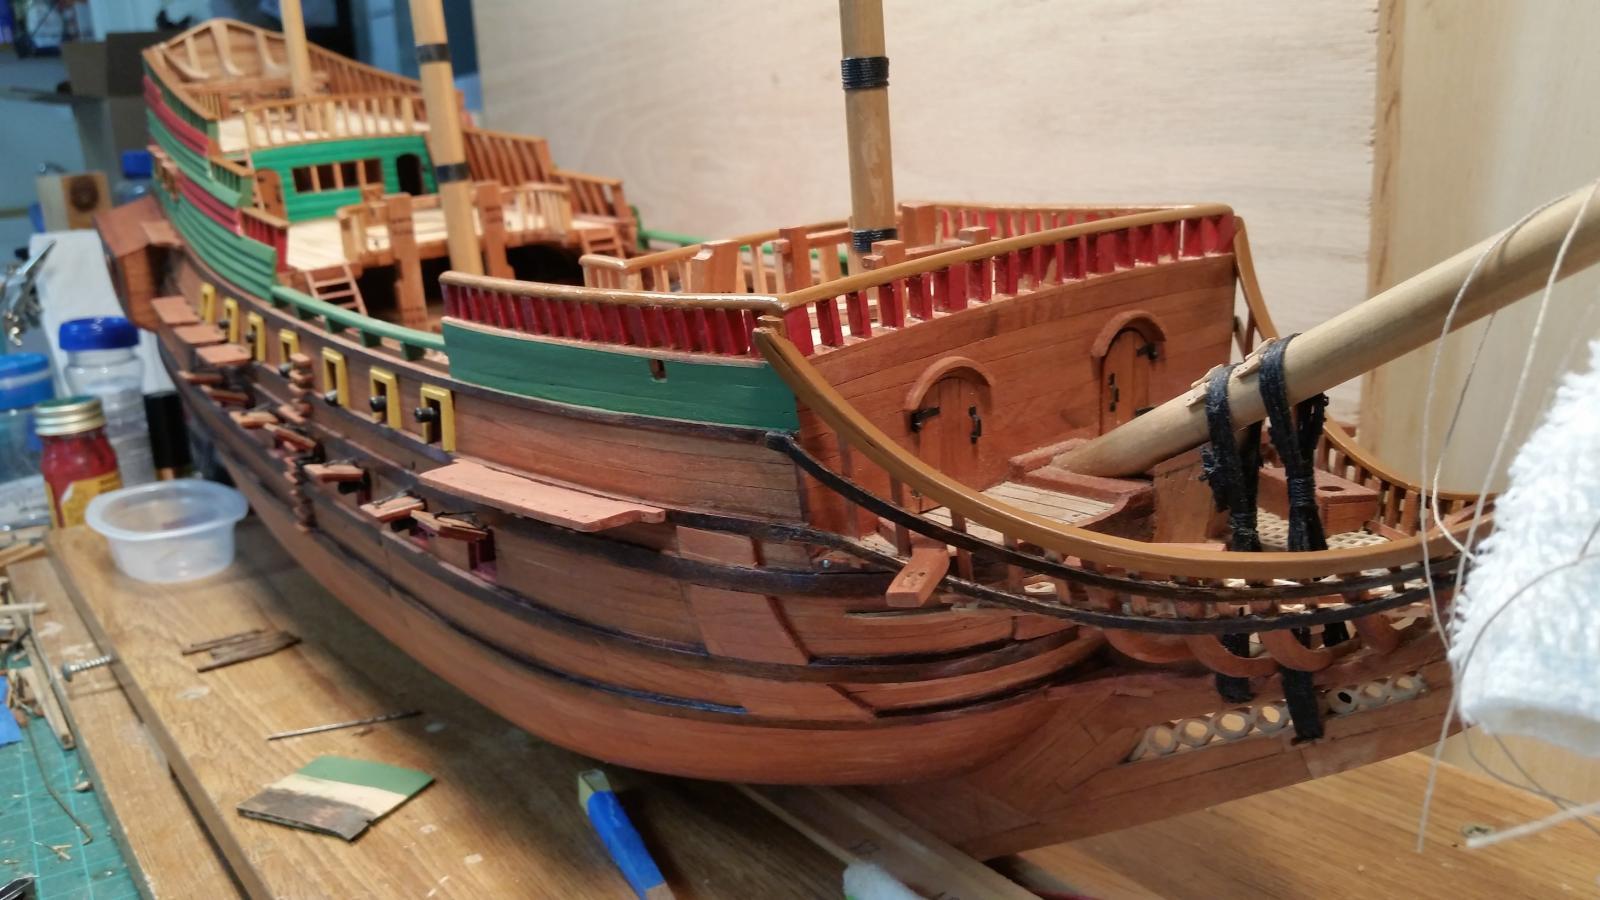
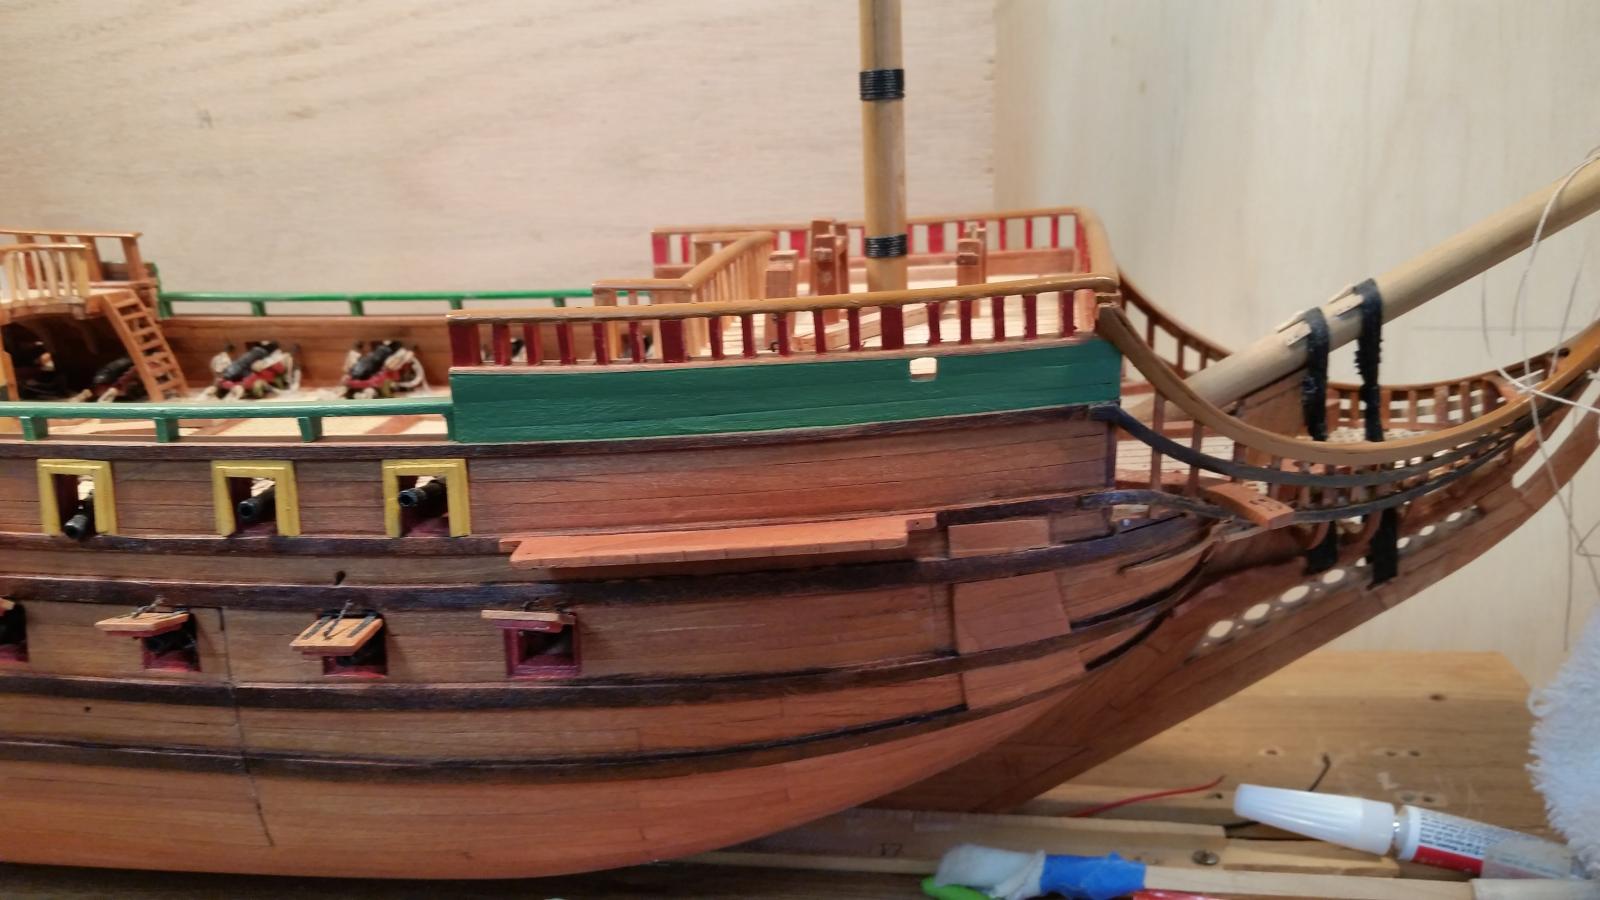
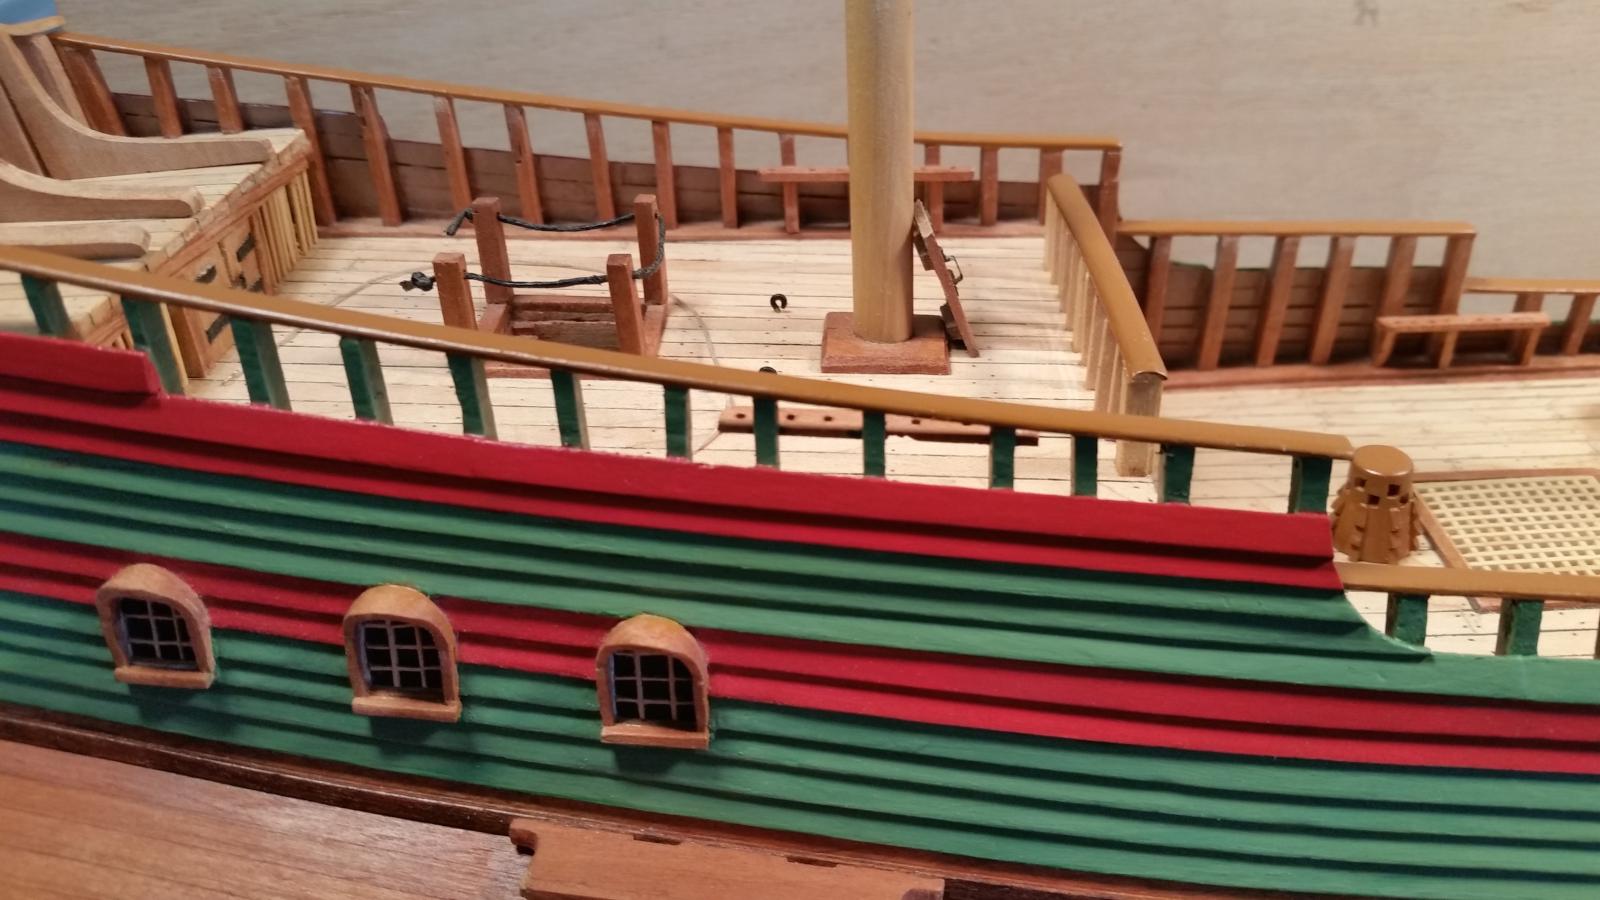
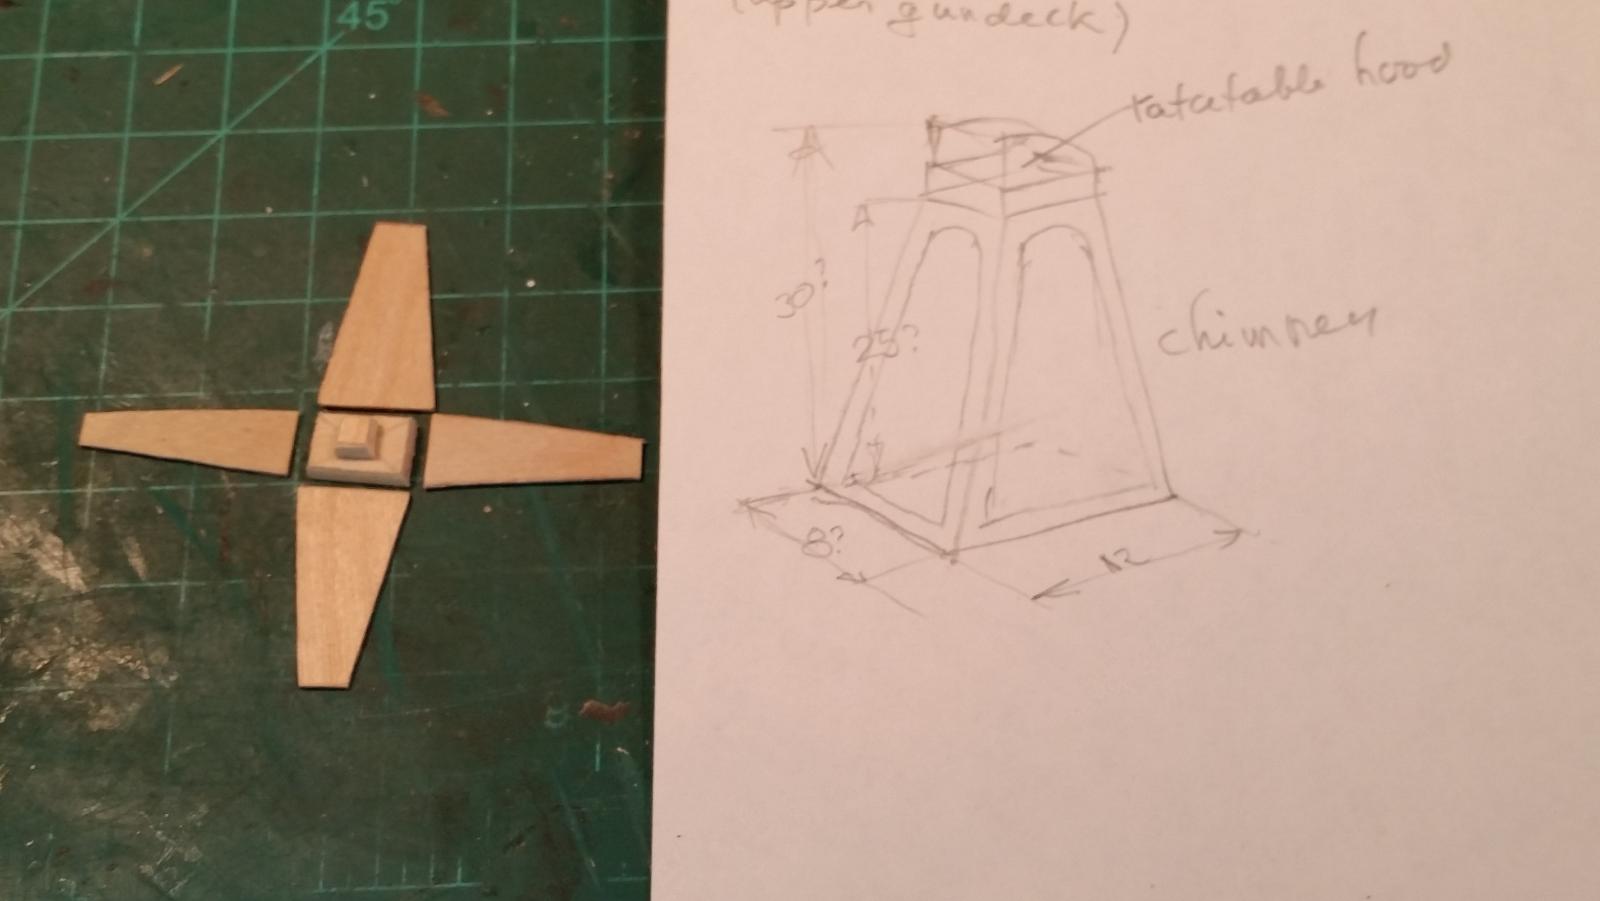
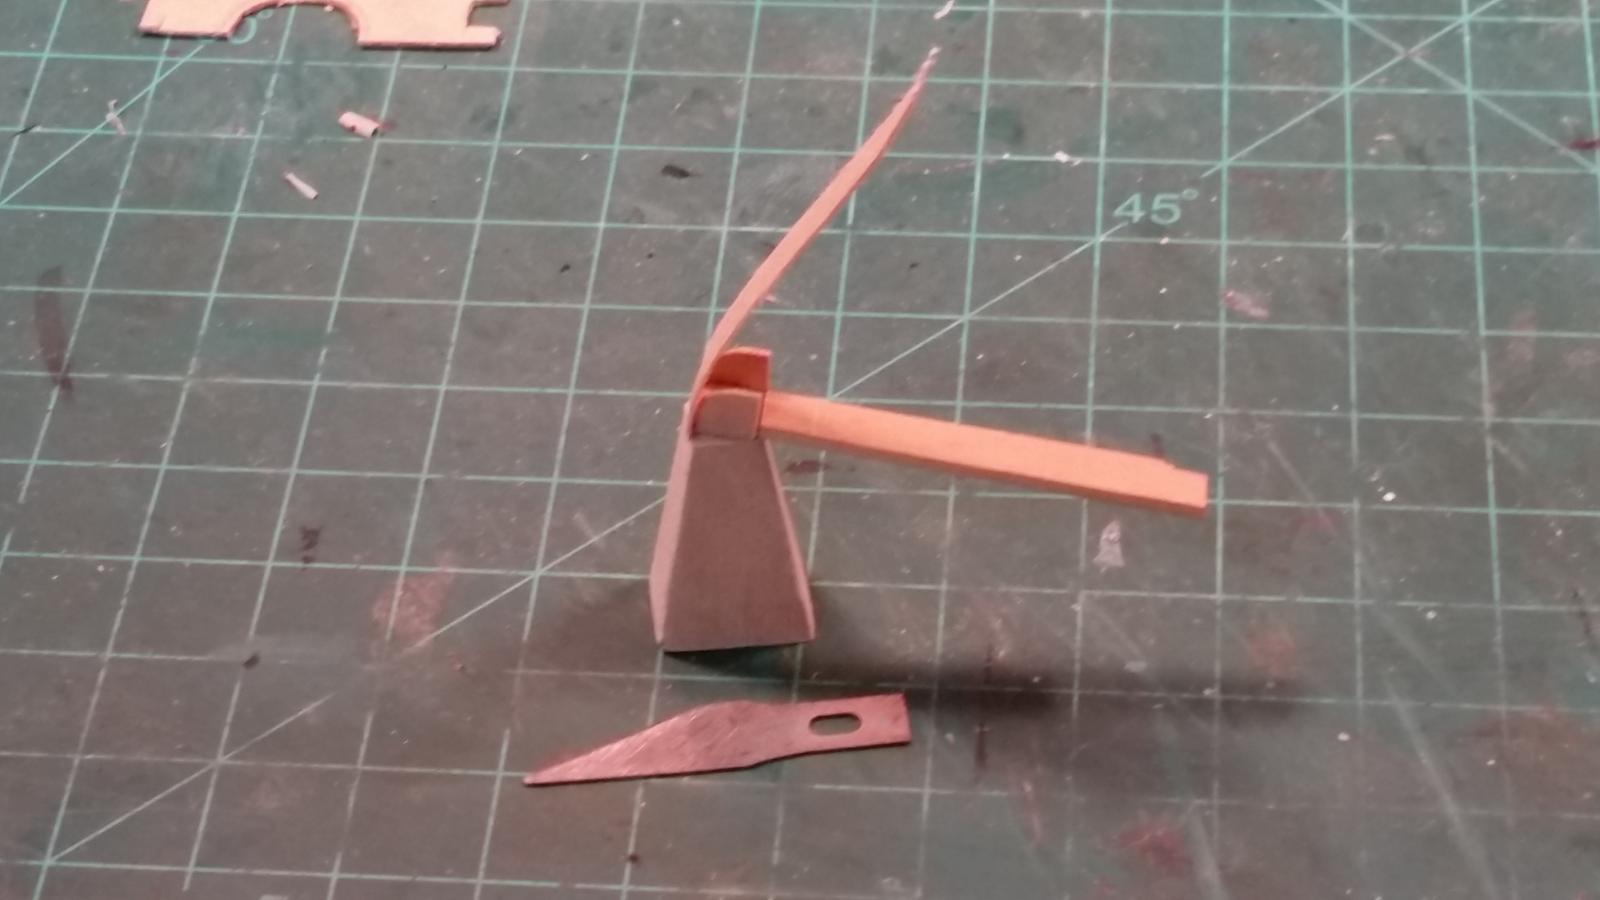
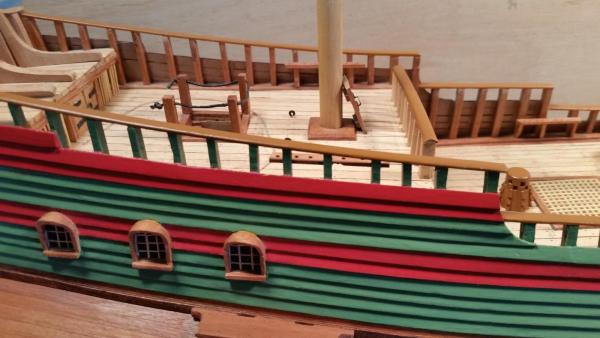
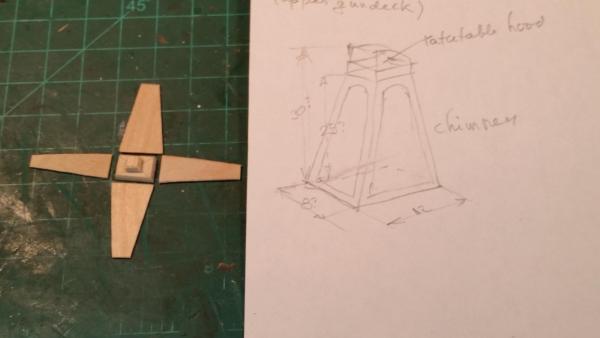
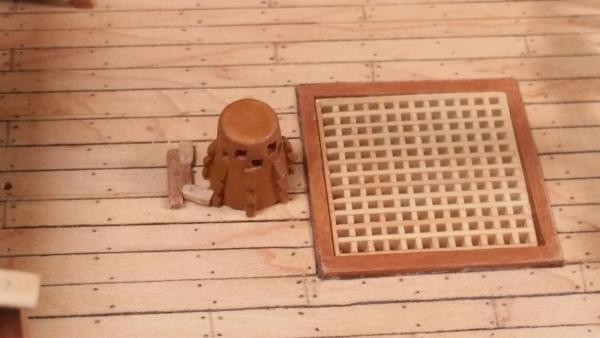
 Thank you Patrick, George, Cees and Anthony for your very kind words and thanks to all for clicking the like button. Picturesque eh Patrick, well yeah, it livens it up a little They did use paint and a lot of carvings all around that were also painted. I kinda want to make it look like how these ships were painted in the mid-17th century. Okay, I finished painting the starboard side, except for a few touchups that side done. The greyed-down green looks pretty good on her. I have to agree with Jan and Hans, it looks much better then before. It even matches pretty close to the color chart I got from Ab Hooving. Now on to the port side. But before I turn the build dock around I wanted to make the galley chimney. That'll be placed on the quarter deck against the port side bulwark, it's easier to reach it from the starboard side. I first made a rough sketch with the measurements and proceeded to cut me some wood parts. I used small pieces of basswood for the base and top with 1 mm birch plywood for the sides. The swivel hood has also a base of basswood with 1/2 mm plywood for the sides. The curved top is some shaved down pine to 1/4 mm. The 1/2 mm plywood is just too stiff to make the curve. These chimneys were removable and a water tight hatch closed the hole in the deck. I'm just going to cement this thing to the deck and forego cutting the hole in the deck with the coamings and the hatch - - at this stage o the game. It'll be painted with the cherry like color paint I used for the railing caps. No fancy carvings on this thing, I'm cheap So, this is as far as I got in the last few days. I don't know If I can do work tomorrow though, it's gotten very cold here the last few days. We'll see. Gwen looked at it and liked it very much. Of course she also looked for errors an found a fe spots I missed - - - on the underside of the railing caps. Those are the tough-ups I mentioned. I couldn't get the starboard door off and may have to use some stronger persuasion methods. Oh well, in that case I'll most likely have to re-cement the hinges. This shows the sketch with the parts I cut. That little pyramid like thingy in the center of the base is for the top of the chimney where the sided are cemented to. There'll be another thin square piece of wood cemented to that for the cap to rotate on. This shows the chimney base all cemented together with the rotatable cap in progress. I left the cap base attached to the strip of wood for easy handling. The top part of the cap is cemented only to it's base. I'l' have to gently persuade it to lay down nicely on the sides. I'm using CA gel glue for this. Cheers,


-
Fantastic looking interior Kees, really love it. Cheers,
- 434 replies
-
- 3
-

-
- pelikaan
- beamtrawler
- (and 2 more)
-
Congrats Nils on completing this most excellent build. Very impressive with all the sails set. I really enjoyed the visits to your shipyard. Cheers,
-
Looking really good Popeye Denis. Cheers,
-
Your wife is right Denis, you are crazy - - - but, but, but in a very nice and creative way. Stained glass windows on a boat, who would have thunk that Cheers,
-
Enjoy the warm weather while you can Sjors, it's bound to change. Nice channels and juffers Cheers,
- 1,616 replies
-
- 5
-
-
- caldercraft
- agamemnon
- (and 1 more)
-
Congrats with the camera John and very nice pics. You and Diane have a great Christmas and a very healthy and good 2016. Cheers,
- 2,250 replies
-
- 3
-
-
- model shipways
- Charles W Morgan
- (and 1 more)
-
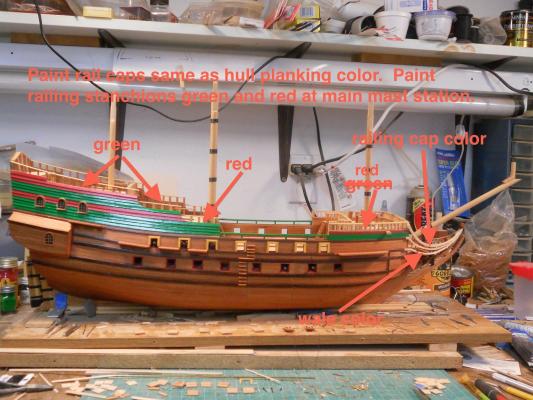
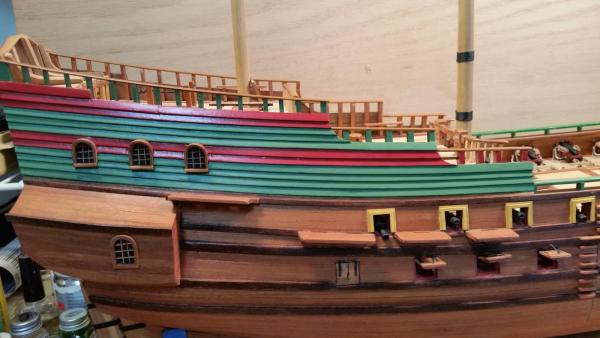
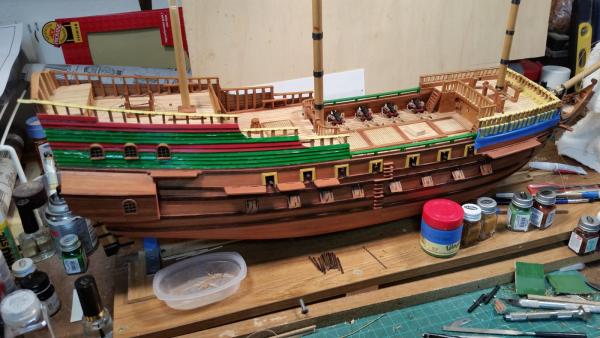
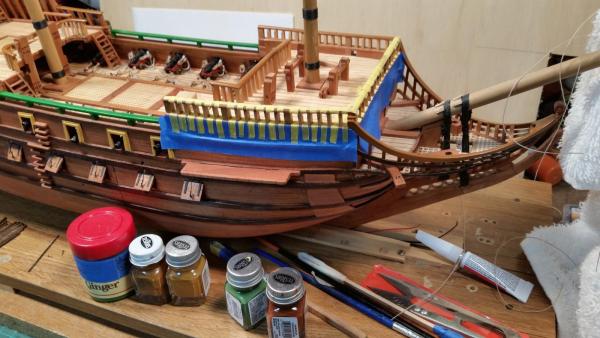
Thanks everyone for visiting and your likes. Kees and Pete thank you for very kind comments. I completed the capstan backlash pawl assembly. Mixed some Testors "rust" with black to get some sort of an iron look and painted the pawls with it. It so happened that when I was browsing through a few books, looking for the galley chimney, I came across the drawings of the "William Rex." According to these drawings and also photos of the interior of that model, the anchor capstan is exactly the same as what I have done. I guess luck is not only with the irish but also with this dumb Dutchman I proceded to prep the starboard side for the repaint job. I managed to slice two rather thin roles from that wide rol of Frog tape. It clogged up my bandsaw though and had to spend half an hour cleaning all the gum of it For this particular masking job I could have used the regular blue tape. I may just do that for the port side. The sticky stuff on the Frog tape makes it slide, it's difficult to tack it and then pull on it. Oh well, everything that I wanted to protect from paint is now masked off and I started applying the red at the forward part of the ship - - railing stanchions only. One more coat and that should be it, hopefully. I can then remove the masking tape and hopefully the fresh paint on the railing caps didn't suffer. When I started laying one coat of the green on the waist railing it dried up much darker then I wantd. Sooooohh, I added a little white to it and a touch of red because it was not gray enough. I think I now have the correct color match from the chart. We'll see tomorrow. On the pics below you can also see that I have painted all the railing caps. Gwen thinks it looks very spiffy and I'm happy with it as well. I would have rather used the cherry wood but alas I didn't think the light colored wood would be this distracting. Okay, here are the pics as she sits today. Cheers,

-
All left brain work Dave, let the mind wander off and reach for the stars with the decoration ideas. Nice going my friend. Cheers,
- 962 replies
-
- 7
-
-
- sovereign of the seas
- ship of the line
- (and 1 more)
-
The mock-ups will indeed be very helpful to sort things out. Now we can see how she'll look when done. Great job! Cheers,
-
Wow Chris, you have been busy! She's really looking beautiful - - - like all Dutch ships do. Sorry Markus, I borrowed your line - - - another biased Dutchman And tha6's why I am also building one. Cheers,
-
Happy to hear that you survive the heart attack and other things Robert. Most assuredly glad to see you back at the shipyard. Stay in good health my friend. Cheers,
- 241 replies
-
- 1
-
-
- royal caroline
- yacht
- (and 1 more)
-
Thanks everyone for the likes and Patrick and Jan for your comments. Ah Jan - I must have read your mind because this morning I made the capstan latching pawls. They are still rough but plan to doll them up tomorrow. I think I'll paint them blackish to simulate iron. I also painted most of the railing caps and am rather pleased with the result. It does cut back on the whitish glared and looks more believable. Still needs to paint the underside - - - in case somebody checks Looks like I'm close to start with the green and red paint. I bought a roll of "Frog Tape" but it's 2 inches wide I'm planning on cutting a 5 mm piece from it on the bandsaw other wise I have to resort to scissors. Hope it works. It's no concern with brushing some "maple" color paint to the railing spindles, they'll be painted over with the green or red anyhow. I don't want green and red on the underside of the caps I do have steady hands but this is ridiculous, the tape will prevent that, I hope. The push poles have received another coat of stain but they look kina blotchy, not too bad though. The good part is that they'll be stowed away. I started to pre-make the hardware for it. This shows the rough layout of the capstan backlash and pawl assembly. I epoxied tho brass bolts through the deck serving as pivot pins for the pawls. They'll be trimmed down a little at the capstan ends, made into a point to fit properly against the rope guides and capstan center body. This shows the pawls in action. Cheers,


-
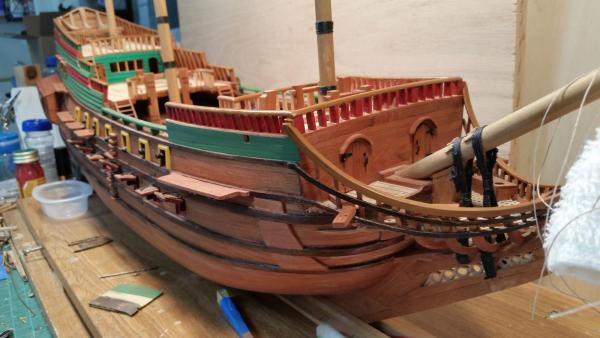
Thanks again to all who clicked the lik botton, much appreciated. Thank you Mobbsie and Ian for your kind comments. Yeah, they were quite limited with pigments, the more reason I am in awe at the artists of those days who produced such beautiful work with a rather limited palate. I think that I have mixed a decent match for the green. It took two kinds of green with some red to grey it out. I may still have to add some more red but at this point - - - hmmmm - just thinking, I am so close. The color for the railing cap is also coming closer to the maple, when you stand 50 feet away it matches quite well I agree Ian, on the vermilion. Too light and too bright. So okay, my roasted pepper red may not be authentic but then my model is just my own design and not a model of an existing ship. It's also a hybrid, a heavily armed merchant. Originally I planned on many more cannons but - - - well you know, I thought better of it. I love the looks of the British steam engines, so much different from the US ones. Yesterday and today I completed the anchor capstan, although they are still in the rough state. Hopefully tomorrow I can finish that up. This ship being a hybrid I made the poop and quarter decks a bit larger then shown on like the Prins Willem but again, the thought was to have a few 12w pounders there. I plan to not placing the push poles in the capstan because i am putting about three sails up with the rest reefed to the yardarms. It would look odd otherwise, ships under sail don't have the poles in the capstan. I plan to build a stowing rack on in the starboard bulwark. I also need to make the galley chimney and that one will be placed against the port-side bulwark. I also need to do some more research to see if I need to add more eye bolts in the quarter deck and perhaps two small knight heads. It'll be a heck of a job adding stuff later when the standing rigging is up. Well, here are a few pics of the capstan work. In the meantime i have shortened the push poles a little and are now also staines dark. You can also see the small railing cap painted. When you squint you can see the extension post of the capstan going down to the orlop deck capstan. I'm happy with the solution and it adds some more busy stuff on the quarter seck, like it needs it Cheers,


-
Nice work on the Mast Pete. Yeah, I kinda like to rough my small tapers first with an x-acto followed with sandpaper. On the VOC ship I did use a mini block plane first, then in the drill press and sandpaper. It all depends on the diameter. Cheers,
-
Beautifully done Mark, congrats. Anxiously awaiting your stern deco carving. Cheers,
-
Very nice work on the frames Pete. I sure like the alcohol method, beats the tar out of water, takes too long to dry. Cheers,
- 258 replies
-
- 3
-
-
- buzzards bay
- herreshoff
- (and 1 more)
-
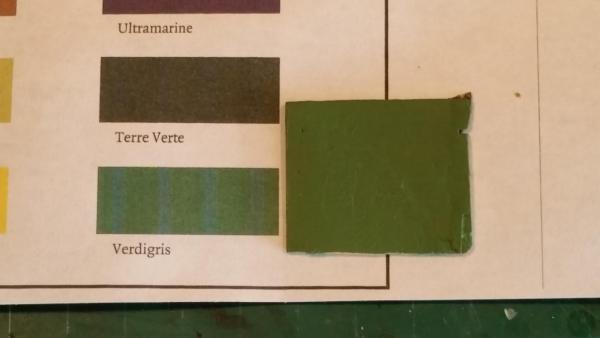
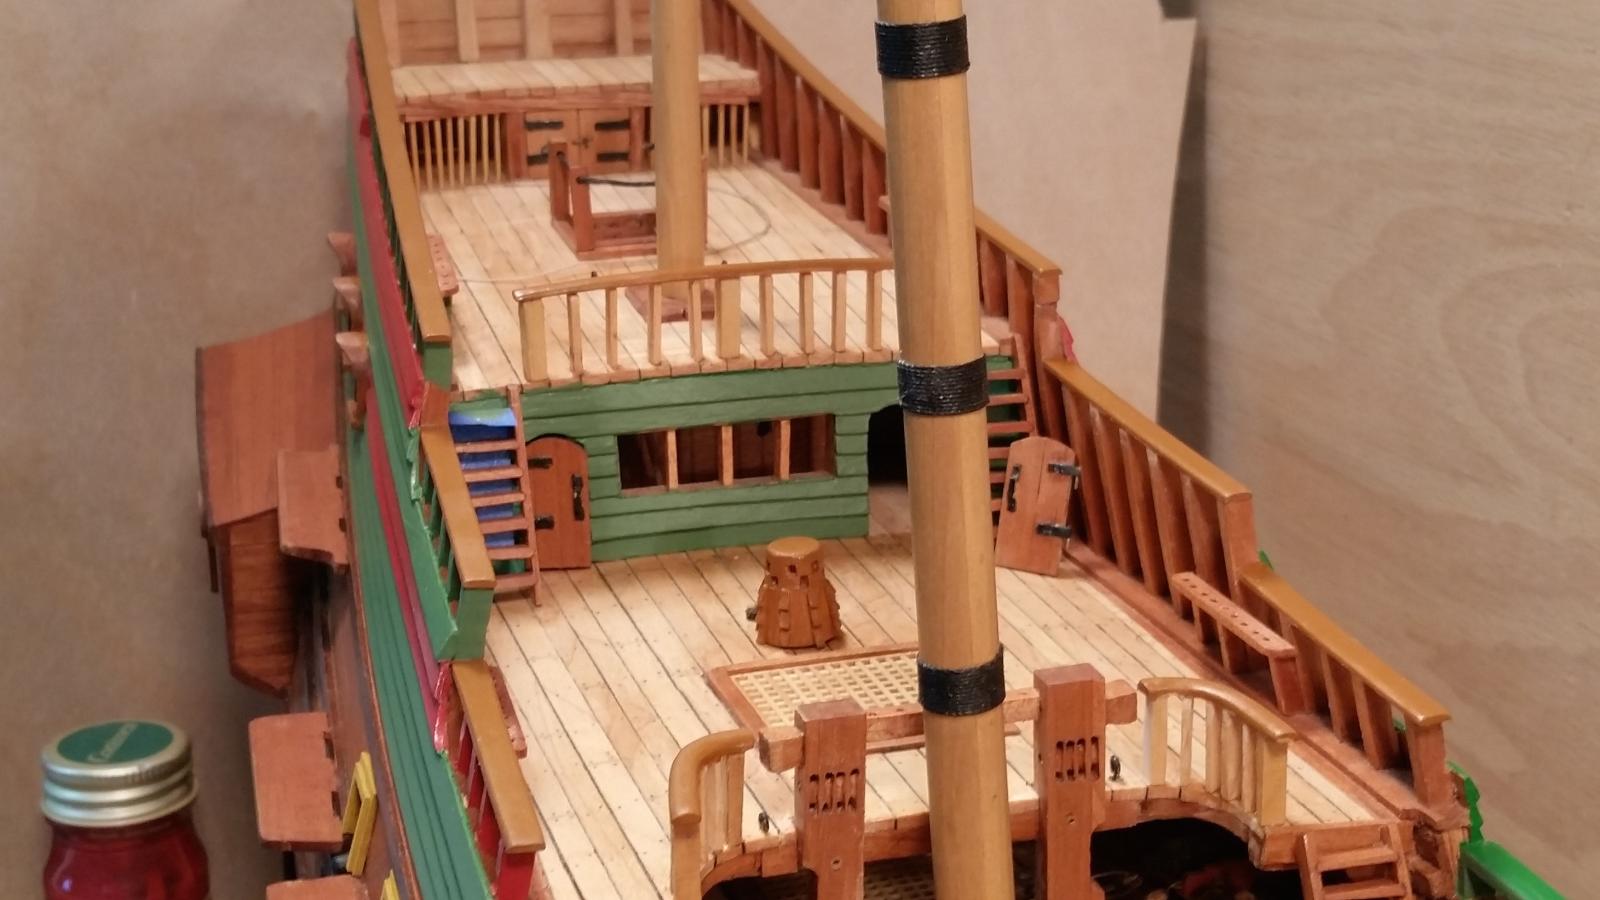
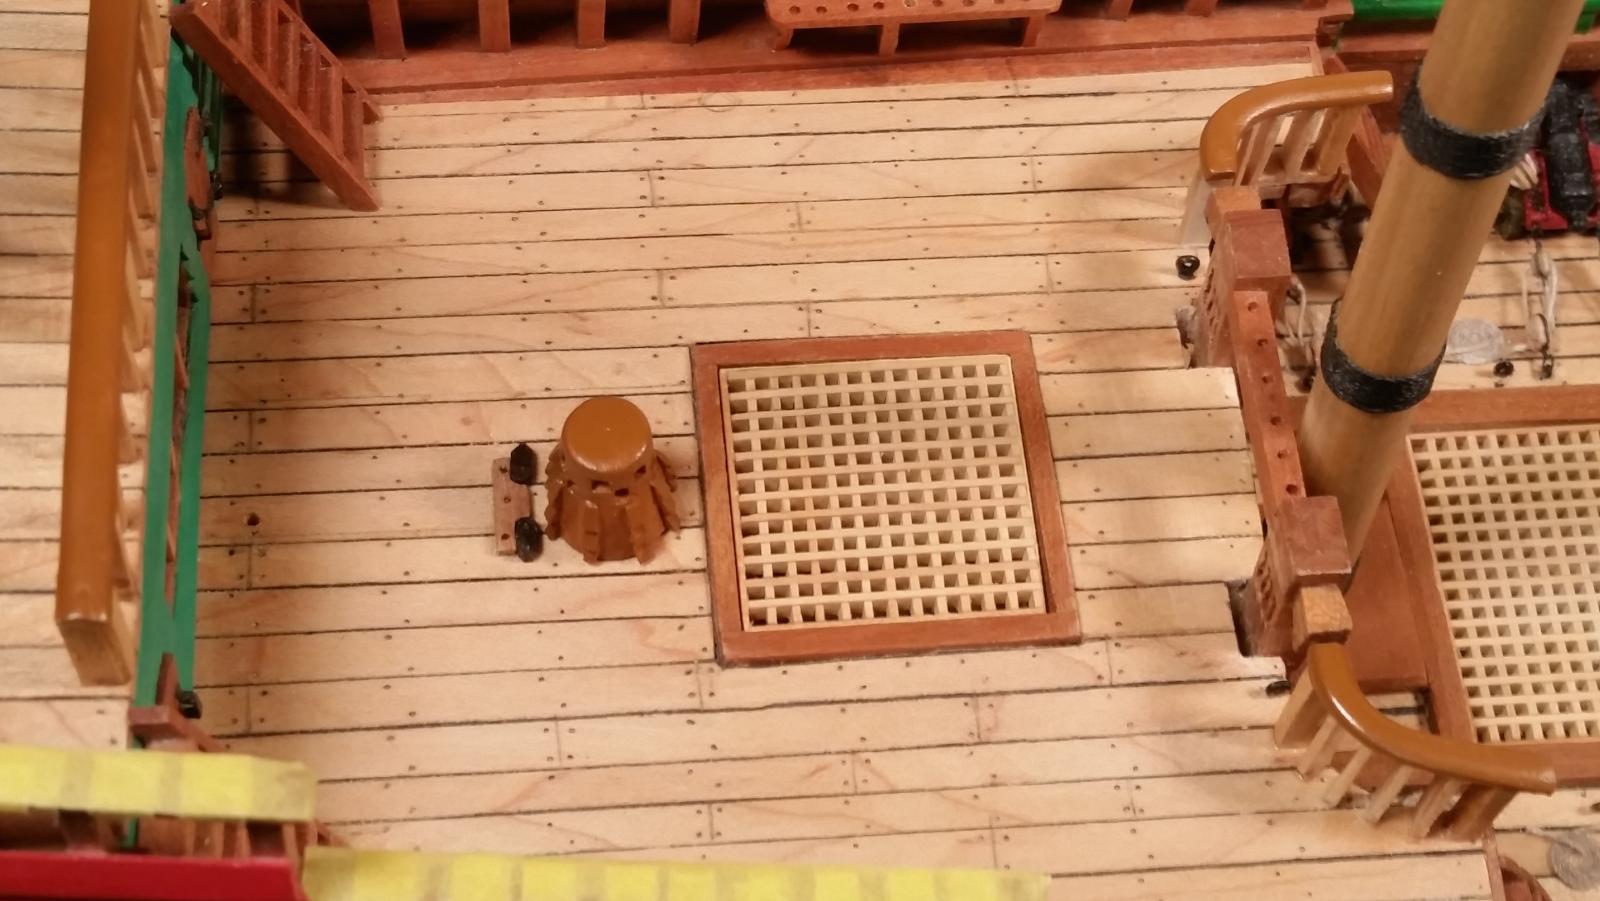
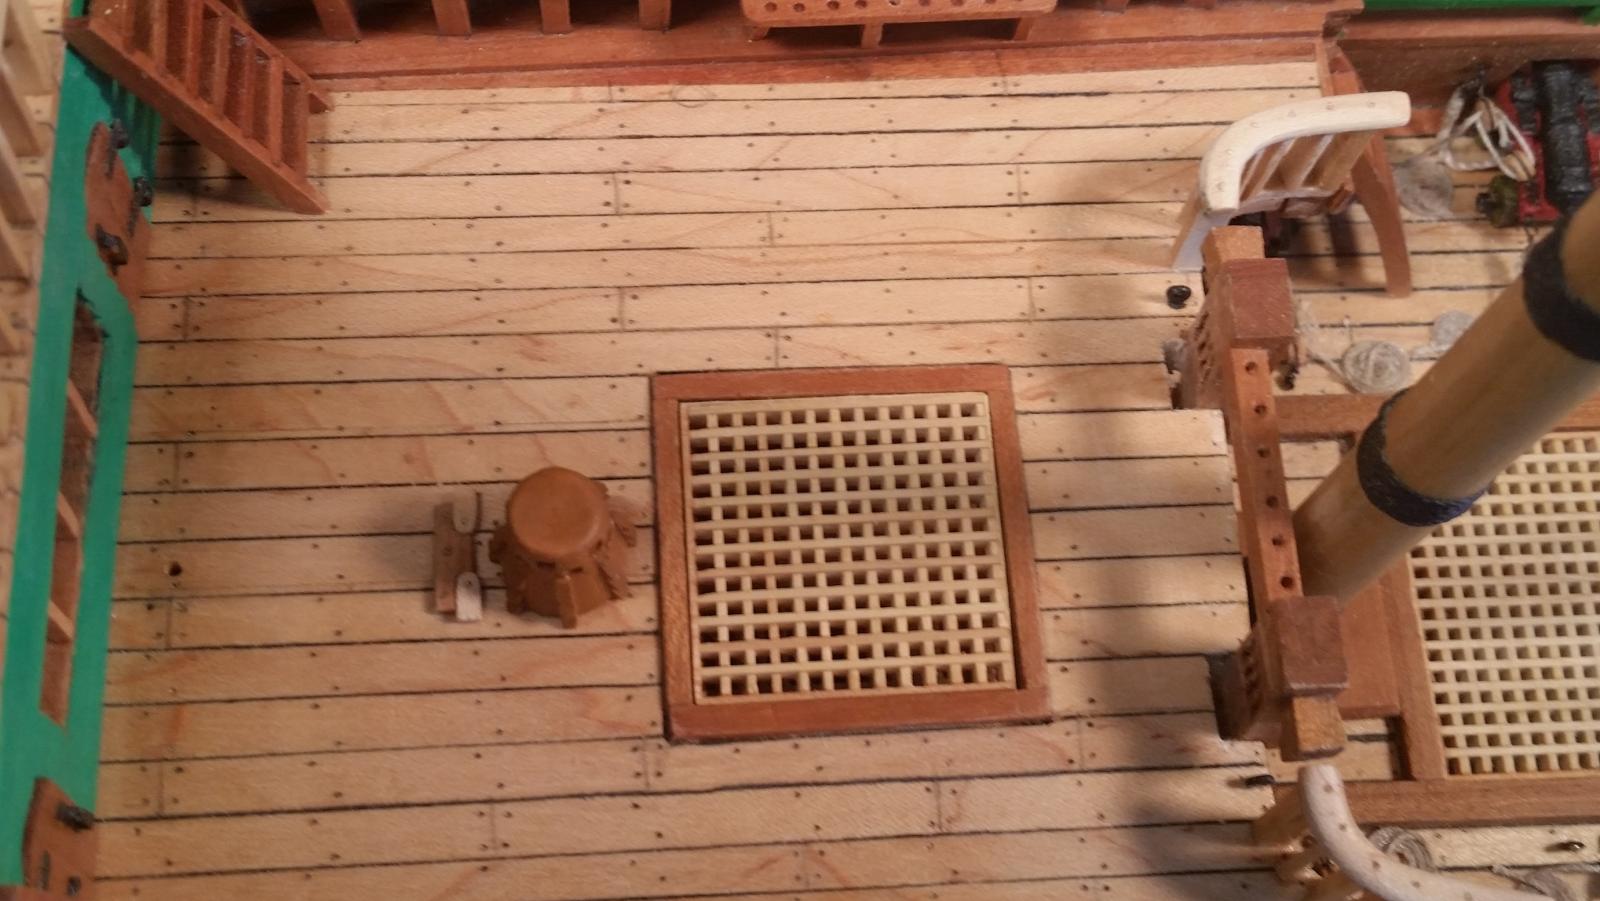
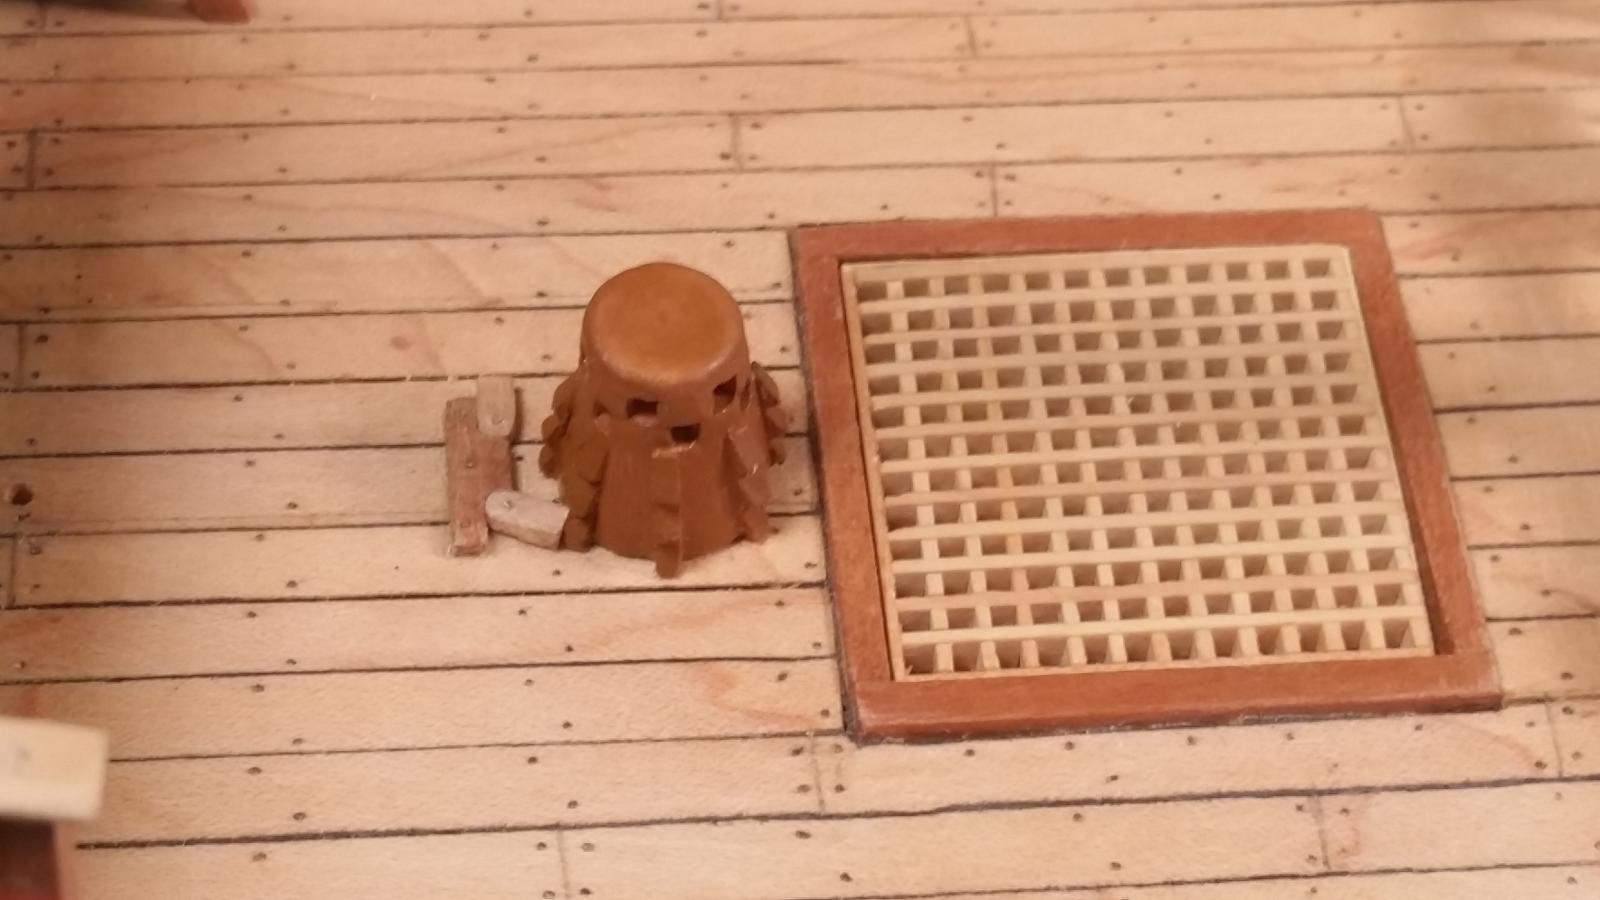
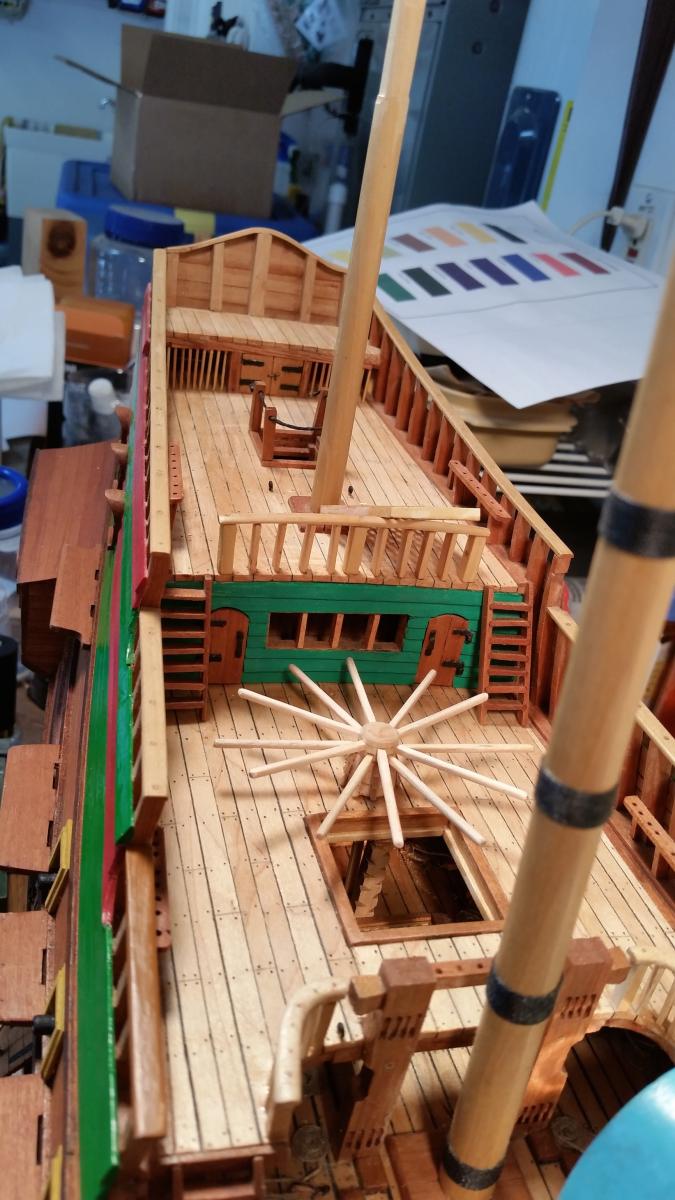
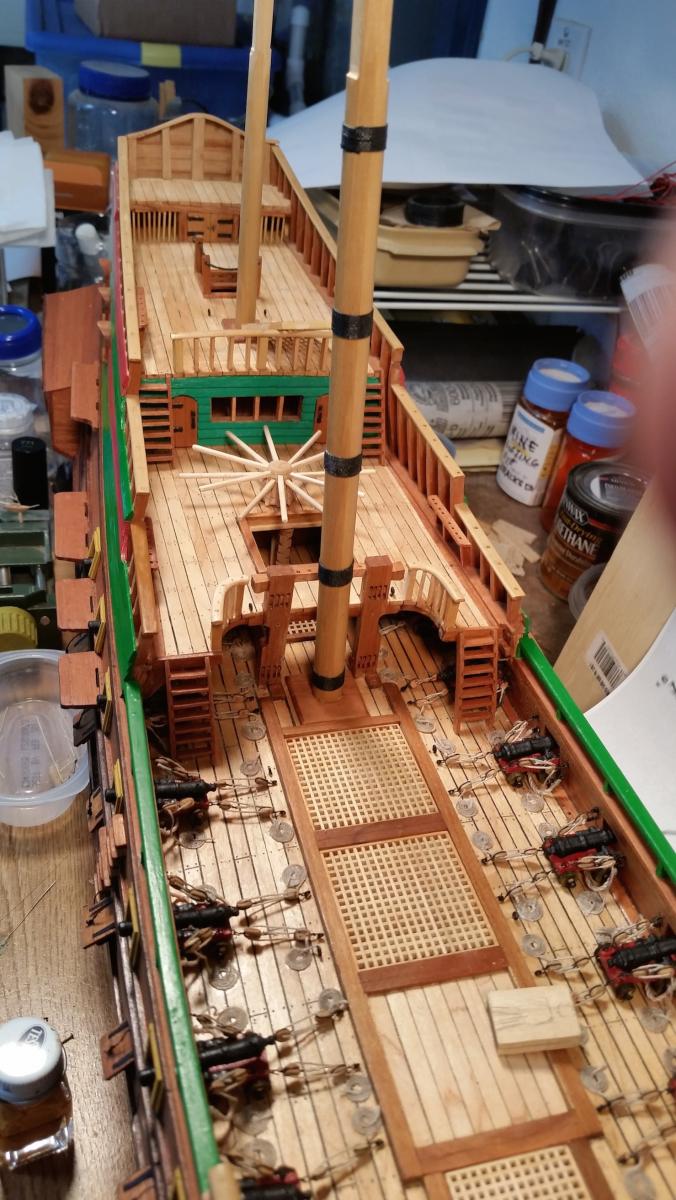
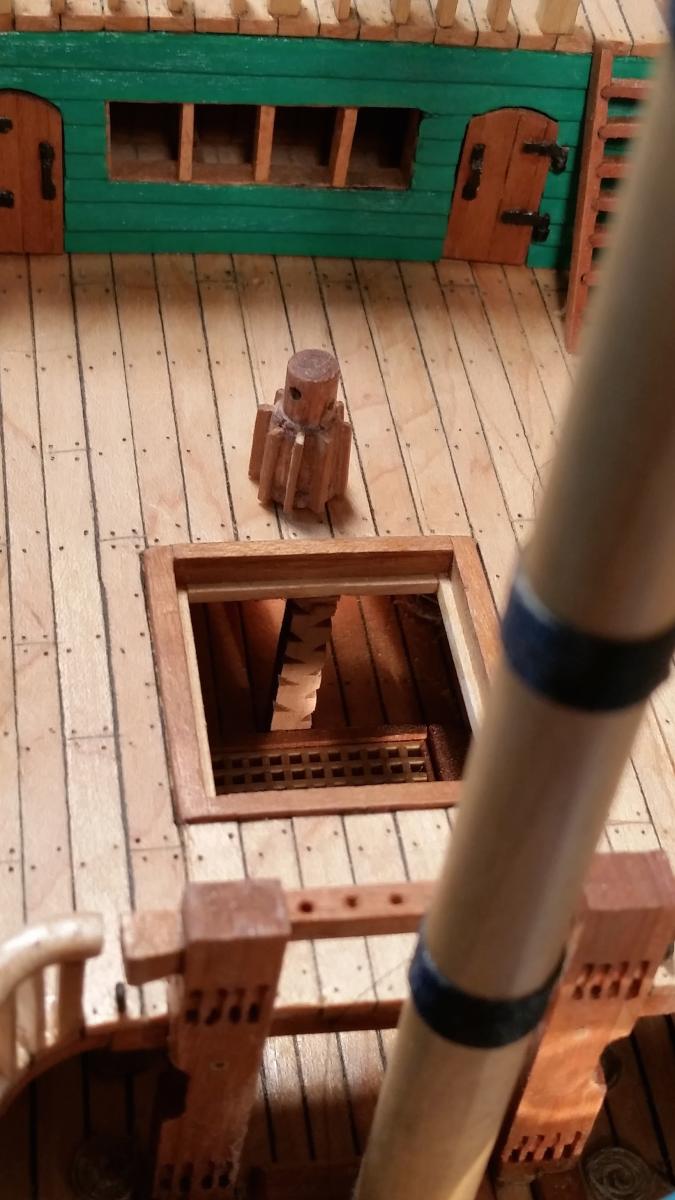
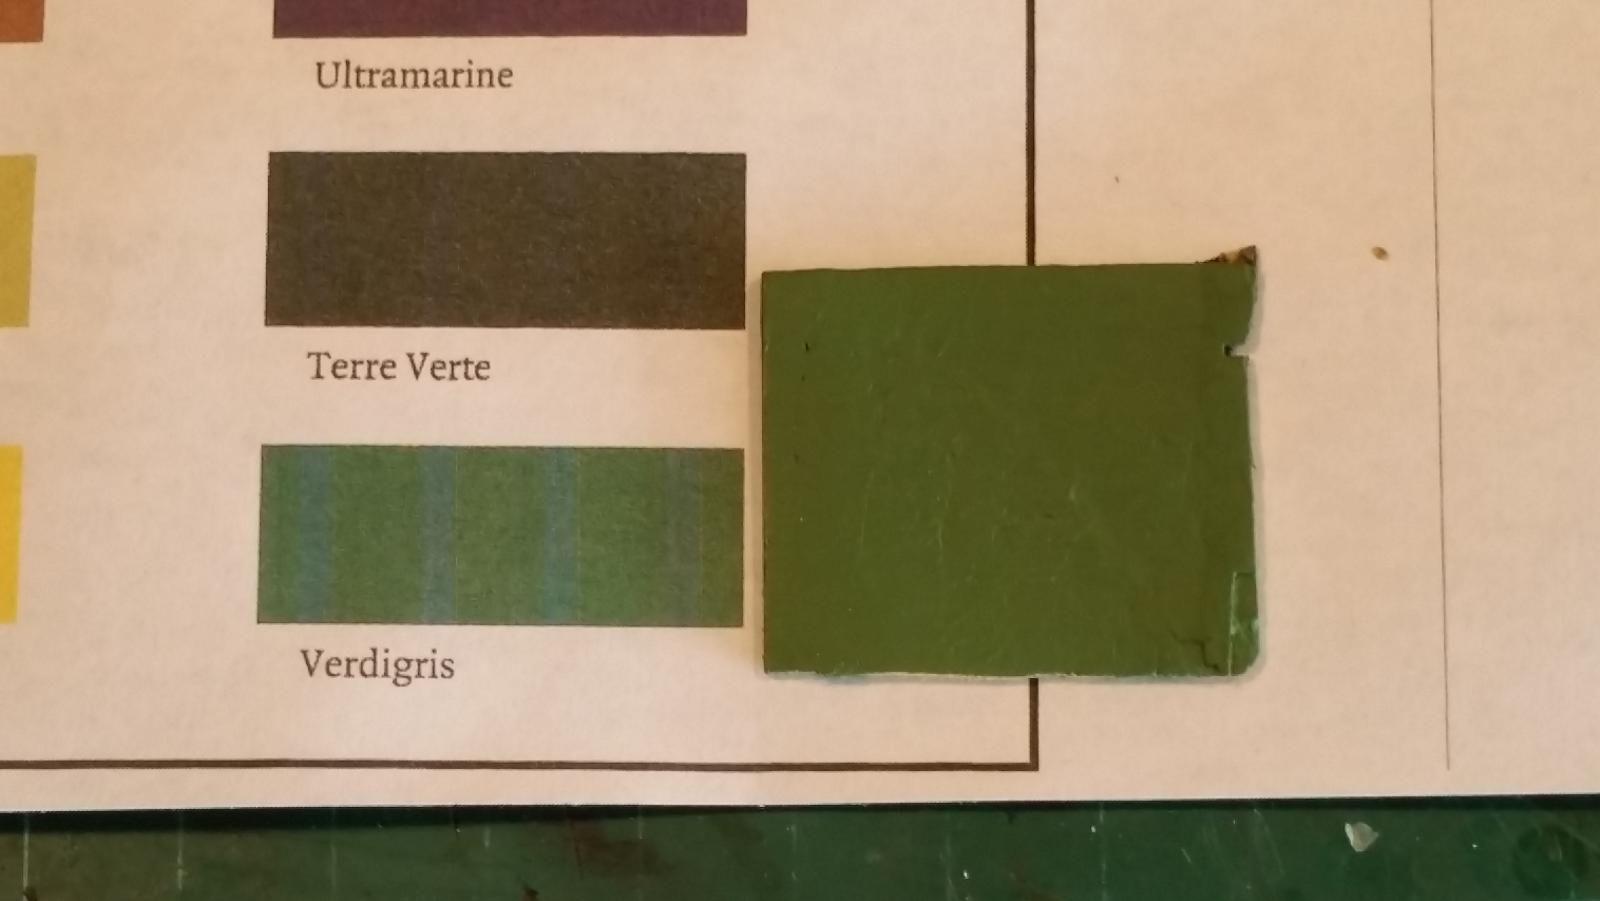
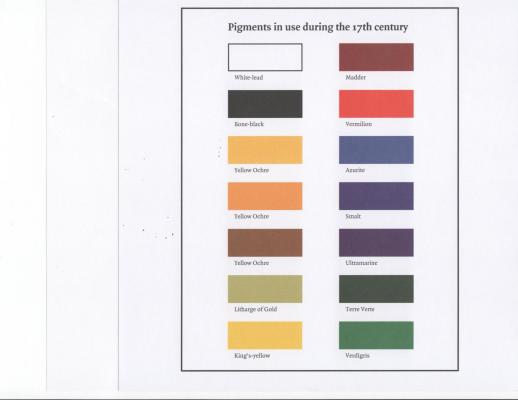
As I mentioned I'm working on the anchor capstan right now. The actual capstan is coming along quite nicely but did not take a picture of it yet. The push poles are made but not stained yet. I'm finishing up on those thingies on the side of the capstan that keeps the rope from creeping up, that'll be finished tomorrow, I think. I really need to do some yard work though. I have a ground cover vine creeping into the front lawn I need to get rif of. The problem with the capstan is that the only two places are either on the upper gun deck below the quarter deck or on the quarter dek. If I put it on the upper gun deck it'll be mostly hidden from view except when we remove the grating. I'll also have to relocate the climbing pole to make space for the push poles. Removing the climbing pole may induce damage to the grating moulding and other parts. There is then also the issue with the capstan rotating shaft that goes down to the orlop deck. To drill the hole in the upper gun deck I'll have to go through the quarter deck planking that'll leave an ugly hole that need to cover somehow. Unless I just cement the capstan to the upper gun deck. Needles to say I'm going to put the capstan on the quarter deck. That way everyone can see it. We'll just have to imagine the shaft going down do the orlop. Actually, the shaft is going down to the upper gun deck now and is just behind the climbing pole. Perhaps not as it was in the mid seventeenth century but again, I'm the shipwright, owner an captain. The design of this ship is such that for me this is the most logical option. Never thought about it when I started this project, besides, I didn't have much in reference material. Regardless, it'll look okay to the novice. Here is a picture I took earlier in the week when I started on this project. The capstan on the pic is something I quickly put together a few years ago and is NOT the one I'm working on so hold your horses and stop laughing You can see my dilemma here. That's the climbing pole for the crew to get from the upper gun deck to the quarter deck. Yes, I probably could have removed it and placed it at the forward part of the hatch opening and then just cement the completed capstan to the deck aft of the grating. That way I don't have to drill a hole in the quarter deck. But I think that my solution is the best way out, in keeping with the KISS principal And we can play with the capstan too This is the color chart from Ab Hooving's book. Cheers,

-
Thank you George, Pete, Dave B, Remco, Mark and Jan for your comments and support. Also my thanks to everyone who clicked the like button. Well Dave B, it may be true that we don't have paintings or photos of that era and believe me I looked at many copies of paintings and models to come up with something. Jan send me a copy of the replica in Holland and Hans send me some pics as did Tadeusz. The Dutch do know about the colors though. As I mentioned before, I now also have a color chart from a book Ab Hooving and Cor Emke, which is helpful. Yes Jan, in many ways I try to take Gwen's input under "advisement," she does have a sense in color combination. The green seems to match Ab Hooving's provided chart pretty close. The red is another thing. I don't like the two choices of red on the color chart - madder and vermilion. The madder is to dark, flat and dead and the vermilion would be acceptable but a little too much on the bright side. Gwen also likes the red that's on the ship now, it's a warm red she says. So I'm going to stick with the red that's on it now. It's not really correct for that era but as the stubborn, hard-headed Dutchman and the shipwright, owner and captain, that'll be it. It's a premium outdoor semi-gloss enamel our front door is painted with. It's called "roasted pepper." I like it and Gwen likes it and when Gwen likes it everybody likes it Only you and I know it's not era correct but the rest of the world don't It'll be a while yet before I repaint the ship. First order o business is finishing the anchor capstan. So perhaps sometime next week I'll tackle the paint. I'm just as anxious and curious to see how this will turn out. Stay tuned, same place, same station - different time. Cheers,
-
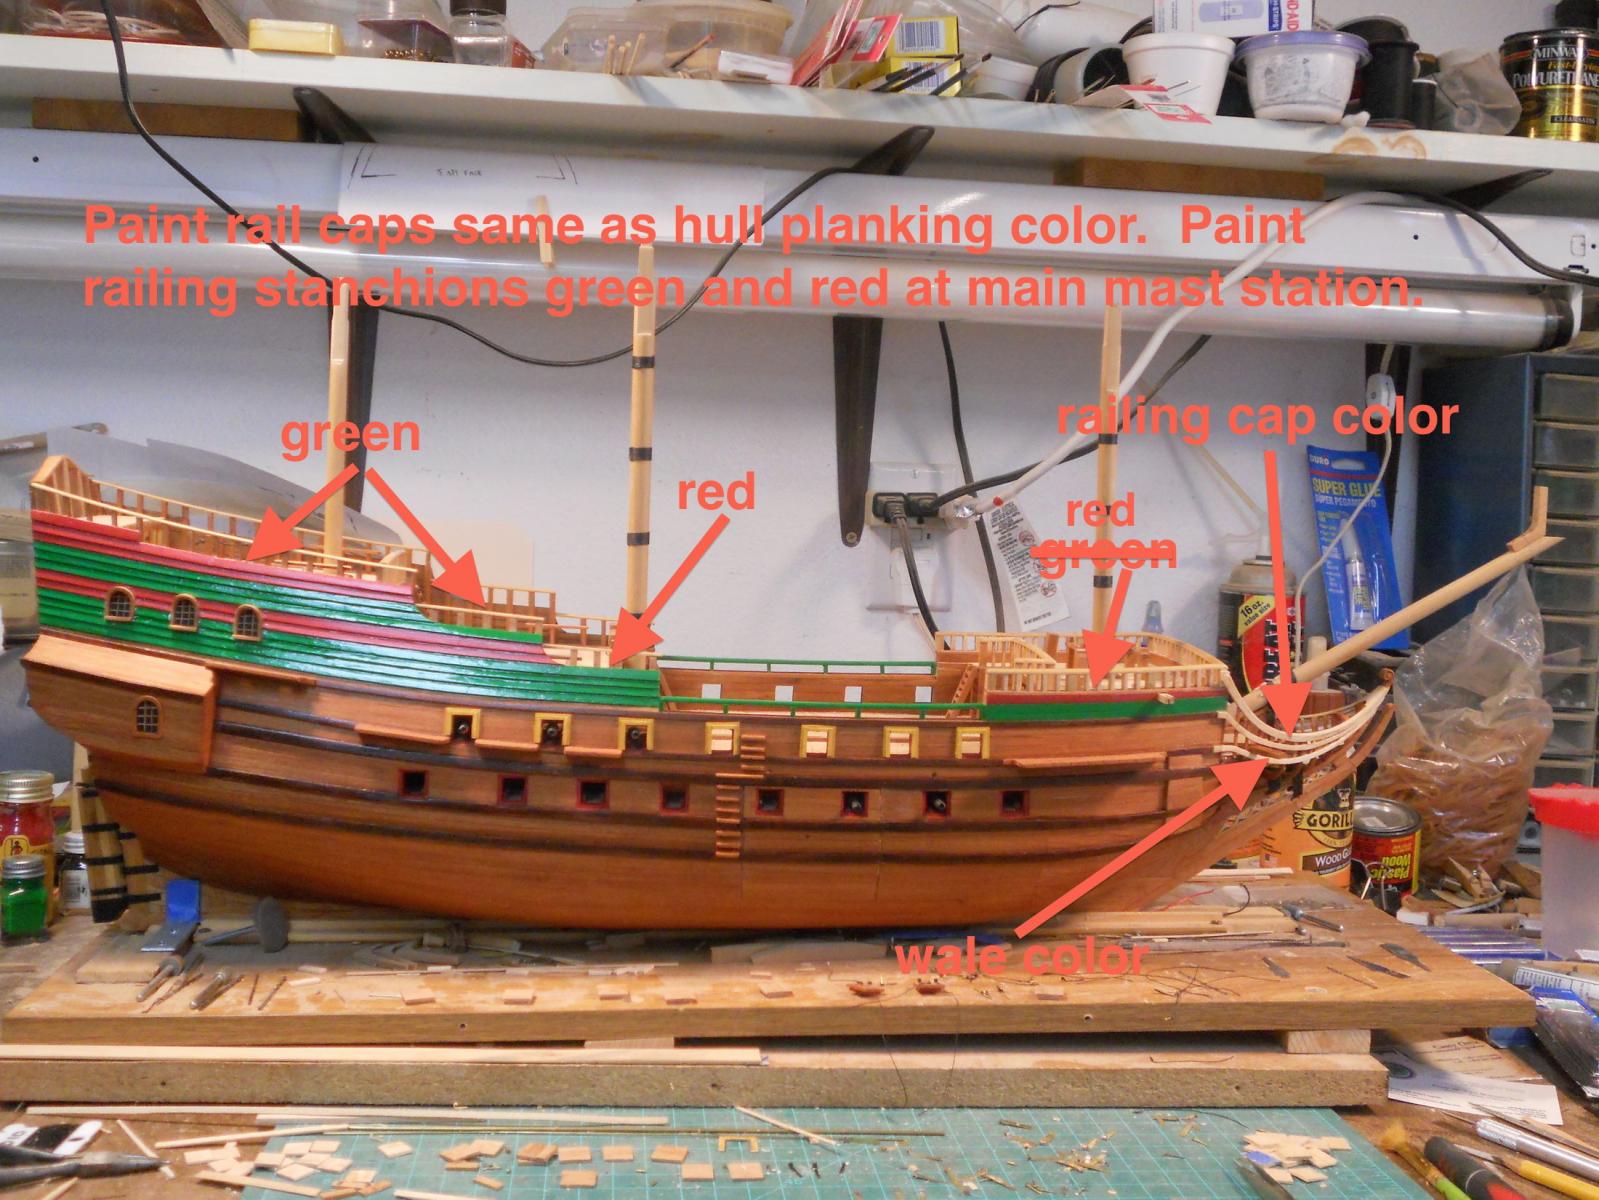
Again I thank all of you for the very helpful input and also to those who clicked the like button. Now you tell me Tadeusz - - - if I had known that I could have purchased these pigments in Holland I was in koog aan de Zaan last June and visited the mills there. Unfortunately the paint mill was closed I have a color chart from that era from a book that was recommended by Amateur Jan, "The Ships of Abel Tasman." This book comes with the drawings for two ships and a color chart. I have used the green on that chart to match the pigments from two tubes of green paint. I think I am close enough to call it acceptable. I'll show the results below. I have discussed thie paint scheme some more with Gwen and we have come to a final decision, good, bad or otherwise. Out of the several possibilities I'm going to paint the rail caps a maple like color. The rail stanchions will be part green where it contrasts with the red and red where it contrasts with the green. The top rail of the galion will also be the same color as all the railing caps and the two lower ones will match the wales. I think this'll look quite nice and finished. Not too austere and not too gaudy, just a little reserved in keeping with the frugal Dutch mind I'll add a picture with the clarifications below. This is a copy of the color chart from the book. My mix here seems a tad darker and I could possible add a touch of white but as far as I am concerned it's close enough to leave it alone. This is what we have come up with. We (Gwen and I) think it'll look rather spiffy. I hope all of you concur. Cheers,