Piet
-
Posts
3,568 -
Joined
-
Last visited
Content Type
Profiles
Forums
Gallery
Events
Everything posted by Piet
-
 Ah, great to see back in the shipyard Popeye and you are really steaming ahead there. Curious to see how all this will eventually turn out. Keep plug'n at it my friend. Cheers,
 -
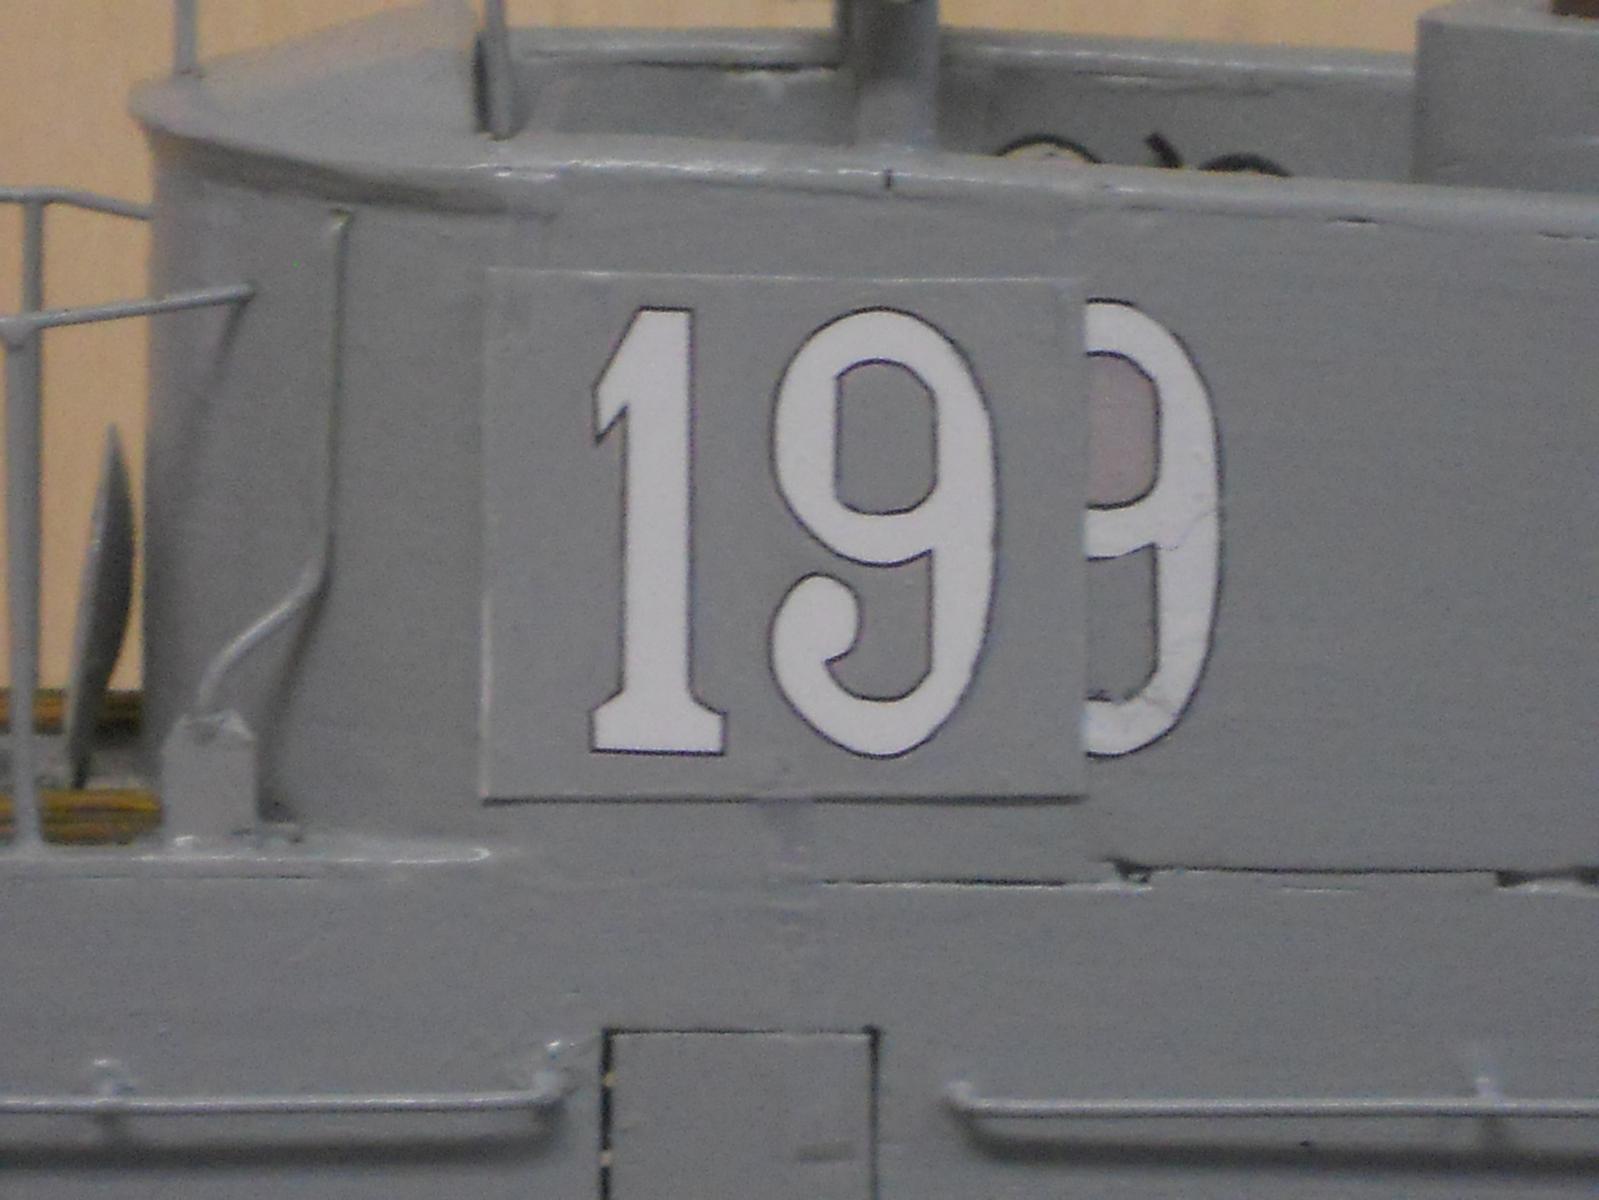
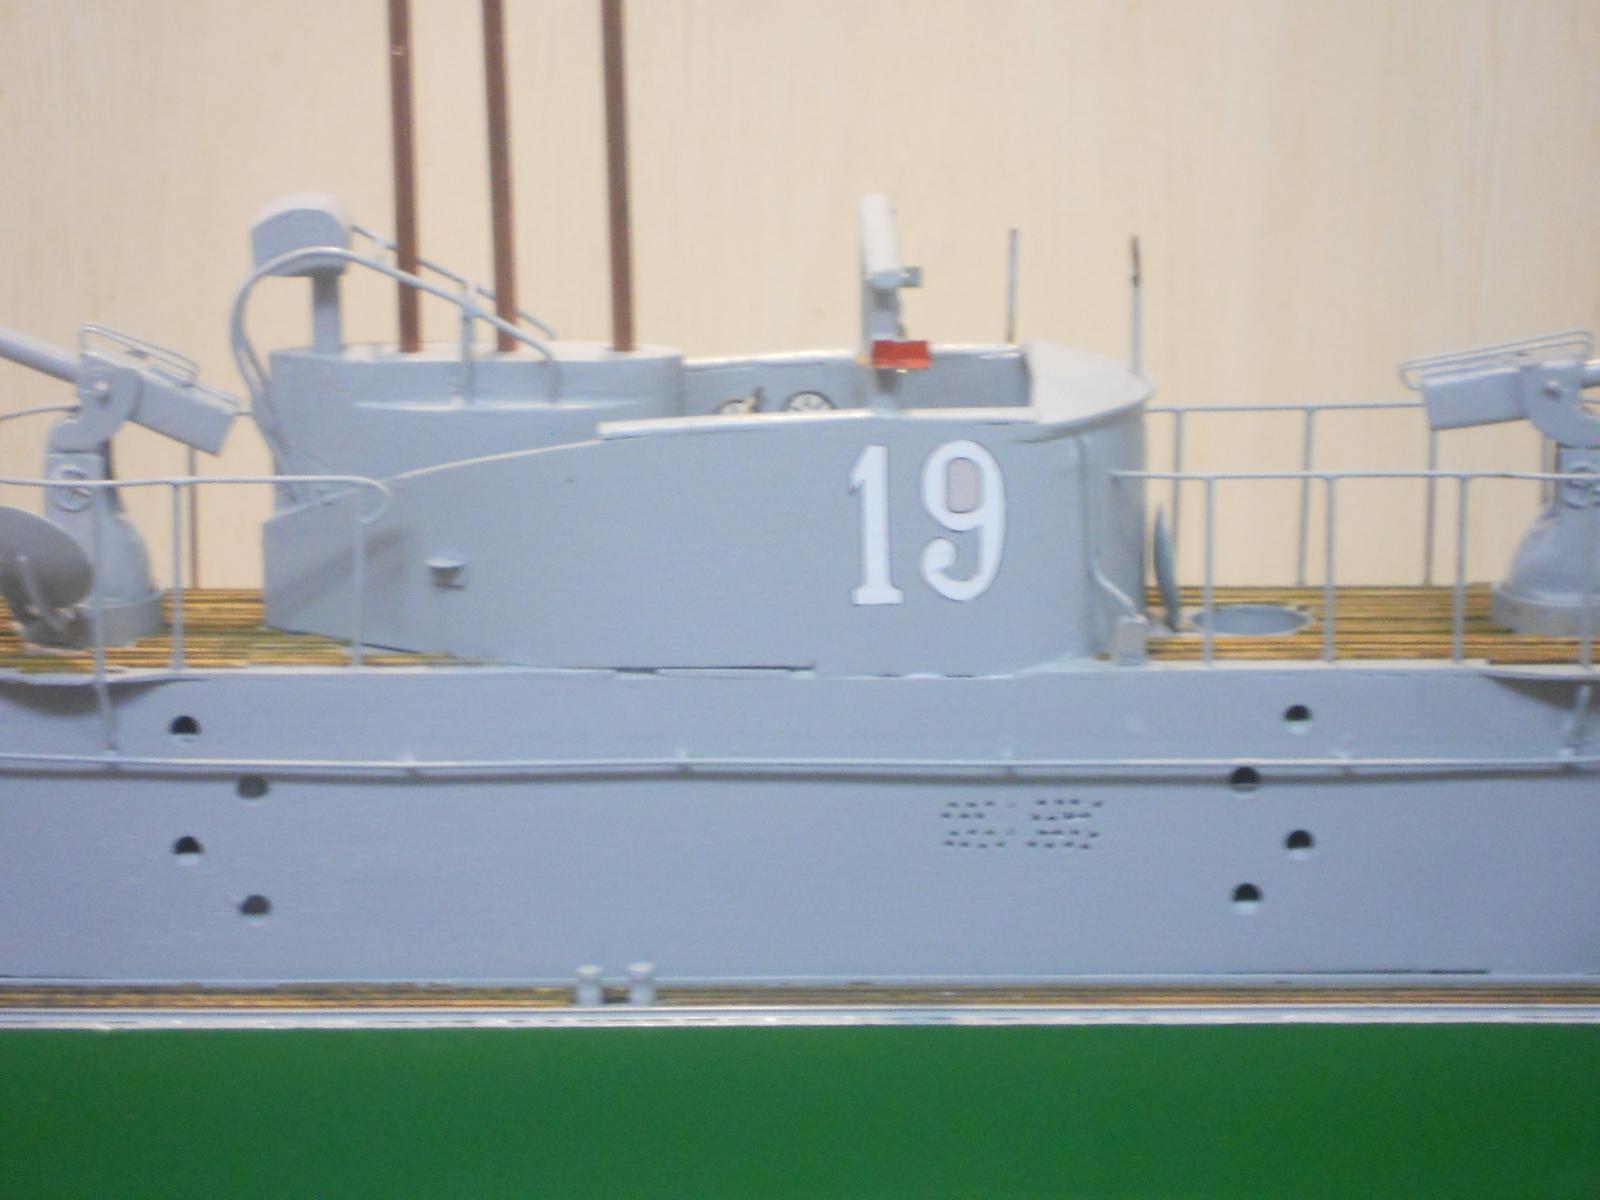
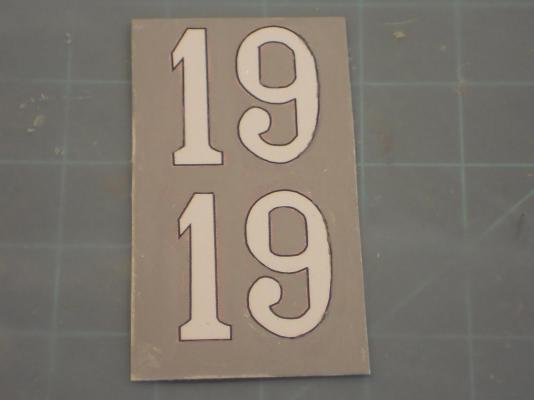
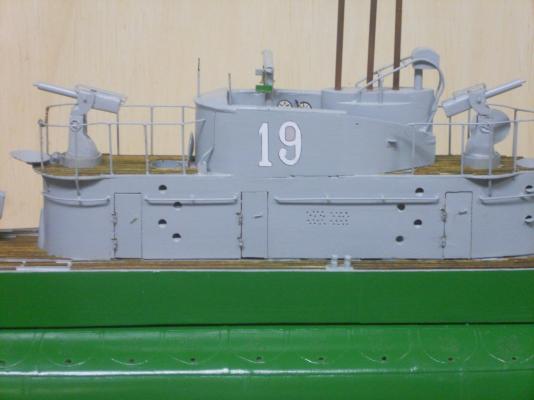
Hello folks, while Remco is brooding over a solution for the con numbers I futzed with them a little to see if I could apply paint over the off-color grey on the decal. Not easy to do, they are very slick and the thin paint doen't cover it well. I guess it was a good try on my part and could work in a pinch with a lot of extra futz'n. I told Remco that I'll be very patient and wait for his brilliant solution. I sprayed some of the grey into a small cup and used a tiny 00 brush to carefully apply the paint around the numbers. It took two tries and is still not covering the of-color gray. Not a very respectable job but not only a feeble mind but also jittery hands. Here I taped the decal to the con. The grey matches good and you can see how far off it was when you look at the center of the 9 on the right. Cheers,

-
Hoi Sjors, six boats????? Wow, what makes you rate that high that you can have six boats? Oh yeah, I almost forgot - - - drum role - - - you are the king of the ratlines! Well, before we come for a visit you'll let me know how big these boat hooks have to be. With my luck the security at the airport will confiscate them as dangerous weapons I just couldn't resist throwing in that barb about Narcis Plein, you left that one wide open for me, love it and No, the O19 won't be done yesterday or tomorrow. Hopefully in the next coming weeks though. She's very close, just the railings, antennas and flags. The dingy will have to come when all that's done. I also nood to make the permanent mounting dock and cover. Oh yeah, the con numbers too but Remco is "brooding" over that, can you smell the braincells burning???? btw, I love you coppering or coopering as Nenad would say. Looking good. Cheers,
-
Mayflower by SawdustDave - Finished
Piet replied to SawdustDave's topic in - Build logs for subjects built 1751 - 1800
Very nice looking bilge pumps Dave - - - hmmmmm - - - I need two for my VOC ship Fortunately the O19 sub has electric ones Cheers, -
Hey Sjors, that's a deal. Just let me know how many boat hooks you need and what sizes Hmmmm, sight seeing tour sounds great, can we also stop at Narcis Plein too?? I need to have a photo of number 3 for memory sake. Cheers,
-
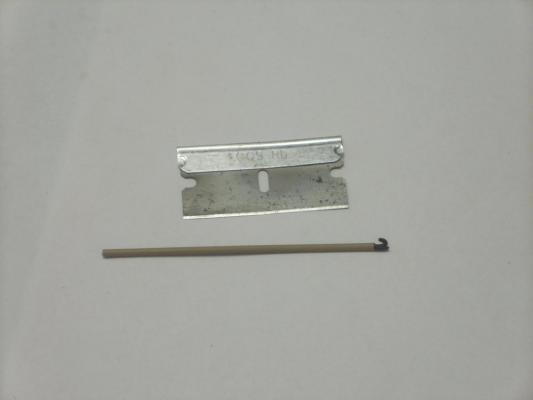
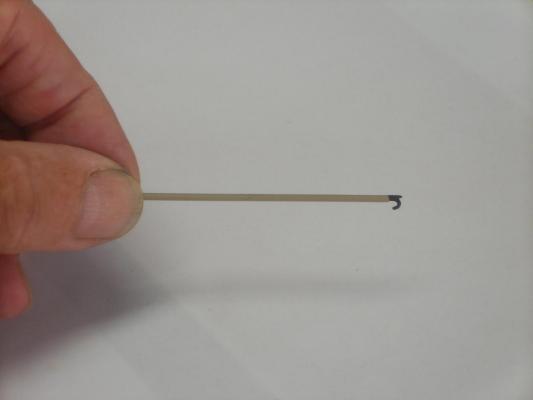
Hello all y'all fellow ship builders and my sincerest thanks to the many who dropped by and visited by dockyard - - and your likes. Thanks for the comments folks and your compliments. @ Dave: Hmmmm - a mini forge eh, not a bad idea. At one time I actually wanted to some iron work stuff but building an aircraft repair business blew that to smithereens. That's one of my 14 certificates, forging, smithing. No, it's just a piece of brass tubing with a brass rod stuck into it that I bend into a hook form. Then a small piece of straight brass rod for the bumper, all soldered together and painted. Duck soup kinda stuff. @ Pete: Thank yo for your kind words. You're no slouch yourself in the craftsman business. No, I have not given it any thought making stuff for others. Kinda afraid doing it. @ Remco: Thank you and now you also know how to fabricate one @ Sjors: How to make a boat hook 101 - - see answer above at Dave. You are going to need a whole bunch with all the little sloops and dingies. They used them for all kinds of things. @ Augie: Thank you for your kind comments. Yeah, I enjoy dressing things up but the boat hook was a necessity otherwise i couldn't close the launcher side doors and certainly not a bend up paperclip I'd love to be able to show the model to more people, somewhere and tell the story about her. @ Josh: Thank you and you are always welcome my friend. Metal working lessons eh. Never thought about it, it kinda falls in place for me I guess and don't think any more about it, assuming everybody knows how to. Among my 14 trade certificates I'm also a certificated "tinsmith" or steel sheet metal worker and of course aircraft sheet metal but that's a whole other thing. @ Nills: Hello my friend, thanks for dropping in and you very kind words, much appreciated coming from you. Accurate, I hope so because she's build by using the original building plans. @ Joe: Thank you very much Joe for your compliments - - - I don't deserve those high acculades - - - but love it All yuns make me blush what I am looking for is the imaginary approval of Adjudant van Warmerdam who saw to it that the original boat met all the specs and quality. @ Omega: Thank you too. @ Popeye: Well, the main problem is with the mismatch of the grey. I have no idea how that happened because Remco and I exchanged may photos with the colors. Could be that some reddish light filtered in from the artificial lights in the garage. The numbers on the port side are actually too far aft and don't comply with the original photos. Like I mentioned before, I need to do some playing with it. Well, that's it for me today. I had my 5th BCGI treatment this morning and the rest of the day was rather uncomfortable, every 2 to 3 minutes i had to go to the head, which was also painful. But I'm feeling much better now. That BCGI cocktail they inject into my bladder makes me also sleepy and tired. So I took it easy today. Waiting on the 1 mm brass tubes to make the railings. Then I can put the antennas up and hopefully make a start with the dingy. Y'all have a great modeling day and stay in good health and safe. Cheers,
-
Very ambitious plans with them sail there Pete. No wonder these things are so fast. Love to see her all dressed up in a full suit of sails. Your question: "Have you thought about you next project yet ? I am sure it will be amazing ." I need to complete my VOC ship "Soerabaya" first. And in between one of the Dutch fishing vessels, a Botter, Schokker a VOC Jacht in a 6" lamp. Gwen would love for me to make a model of the MV Musi. That's the KPM ship her father made captain on in 1955. First things first though, I'm not getting younger you know
-
Just plain lovely Remco. Cheers,
-
Terrific looking coppering job there Sjors. Like all of us have said and will be saying - - redoes are part of the "enjoyment." Cheers,
- 1,616 replies
-
- 2
-

-
- caldercraft
- agamemnon
- (and 1 more)
-
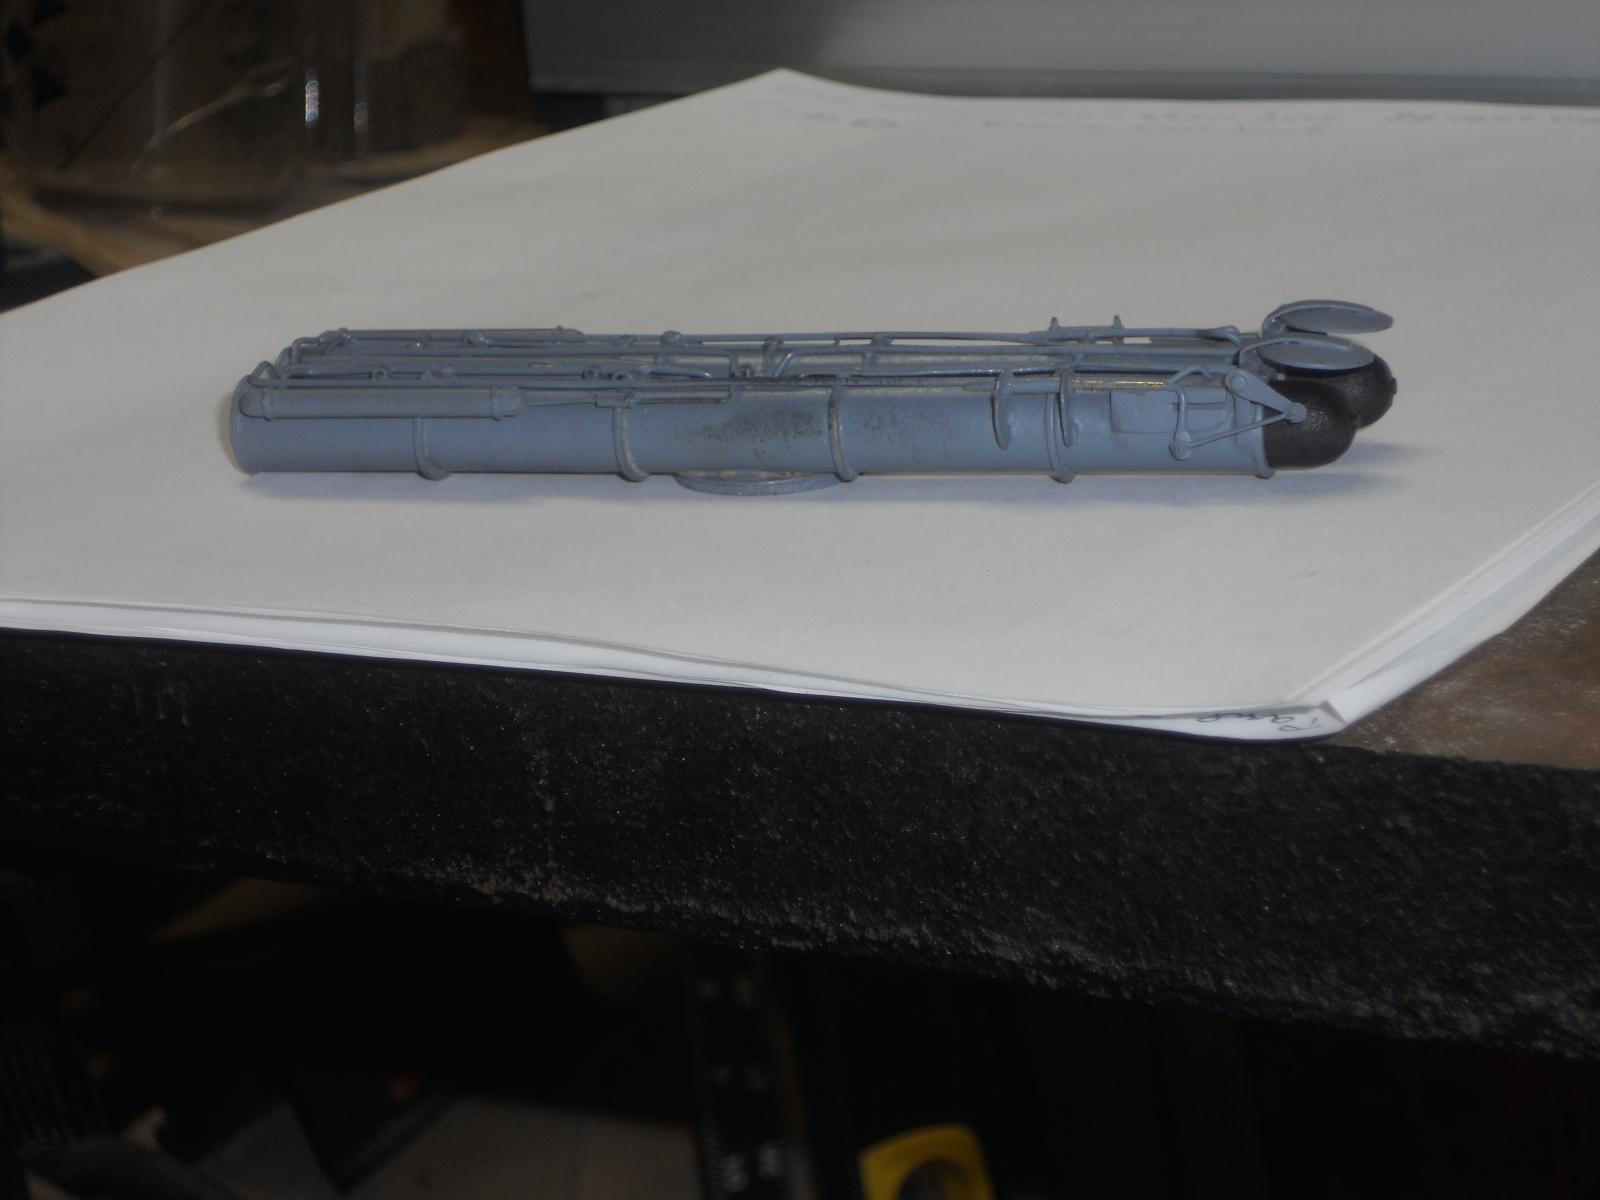
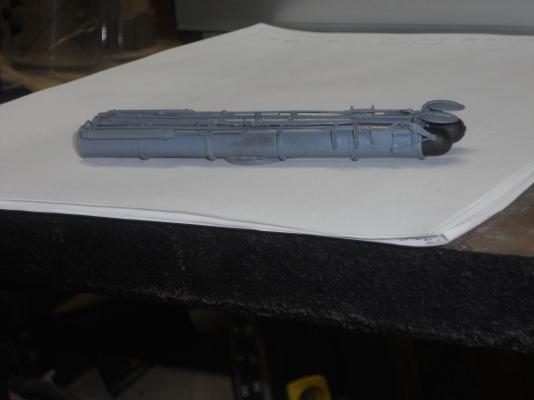
Thank you all for dropping in and your likes, it's really encouraging. Didn't do much today. Just finishing up on one more torpedo, drilled the pilot holes for the railing posts and made a boat hook so I can close the deck launcher doors. Still looking at the numbers on the con and thinking what I should do. The starboard side is actually not too bad and can be worked with. Let me try and use a new sharp pair of scissors and cut not that close to the black outline and see how that looks. The decal material is so fragile. Let me do some testing first though. I made a few pics of my new boat hook, hope yuns like it. Cheers.
-
Hoi Remco, yeah, the grey has a strange copper looking tint to it and would stand out like a sore thumb. I'm actually not pleased with how I managed putting it on the con and am seriously contemplating on replacing the numbers. I also have no idea why the color is off that far. When I received the decals they seemed to match. But that's not the case now. I'm going to give it a rest for now and as I mentioned yesterday, do some playing with some of the waste pieces. I still have one extra set of numbers though and IF I can manage painting very carefully around the black outlines I can then put the entire number on the con. Hi Pete, thank you very much my friend. Cheers,
-
Love the color combo Pete and a first class paint job to boot! Cheers,
- 220 replies
-
- 1
-
-
- finished
- volvo open 70
- (and 1 more)
-
Mayflower by SawdustDave - Finished
Piet replied to SawdustDave's topic in - Build logs for subjects built 1751 - 1800
Yep, that's one way of skinning a cat Dave, works great, lasts a long time. Cheers, -
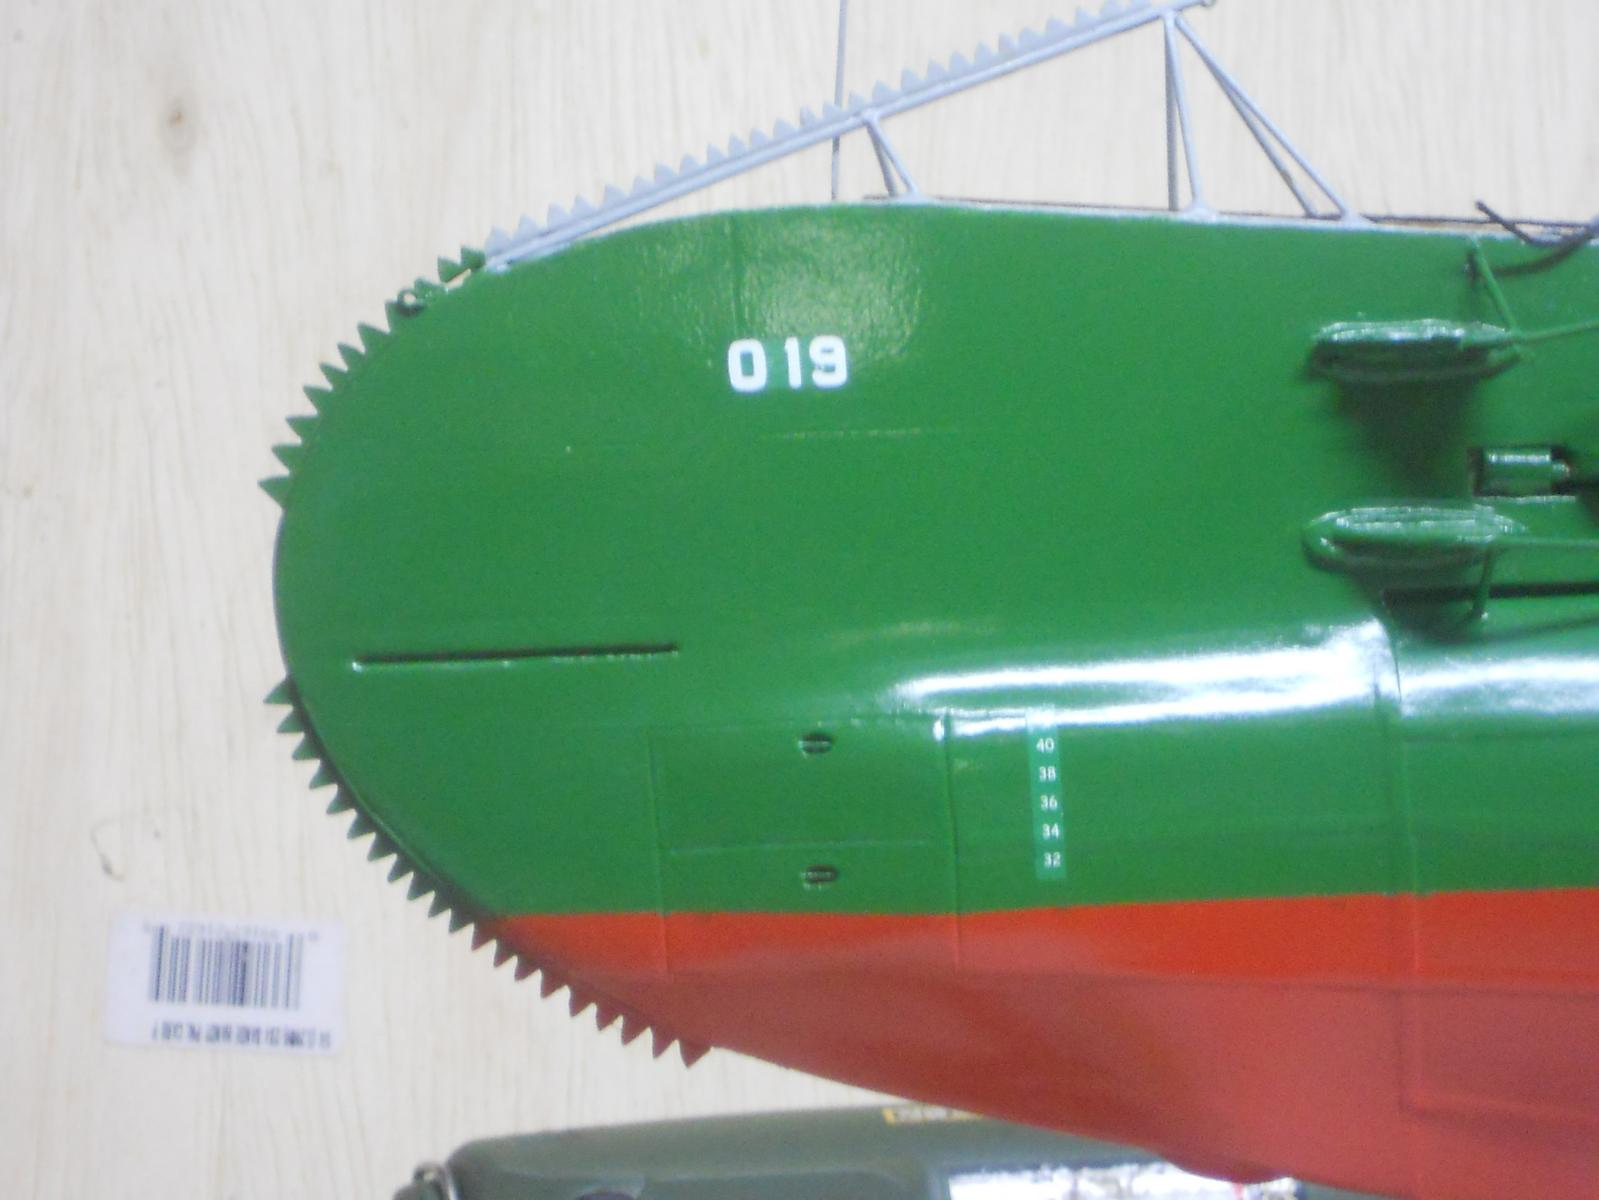
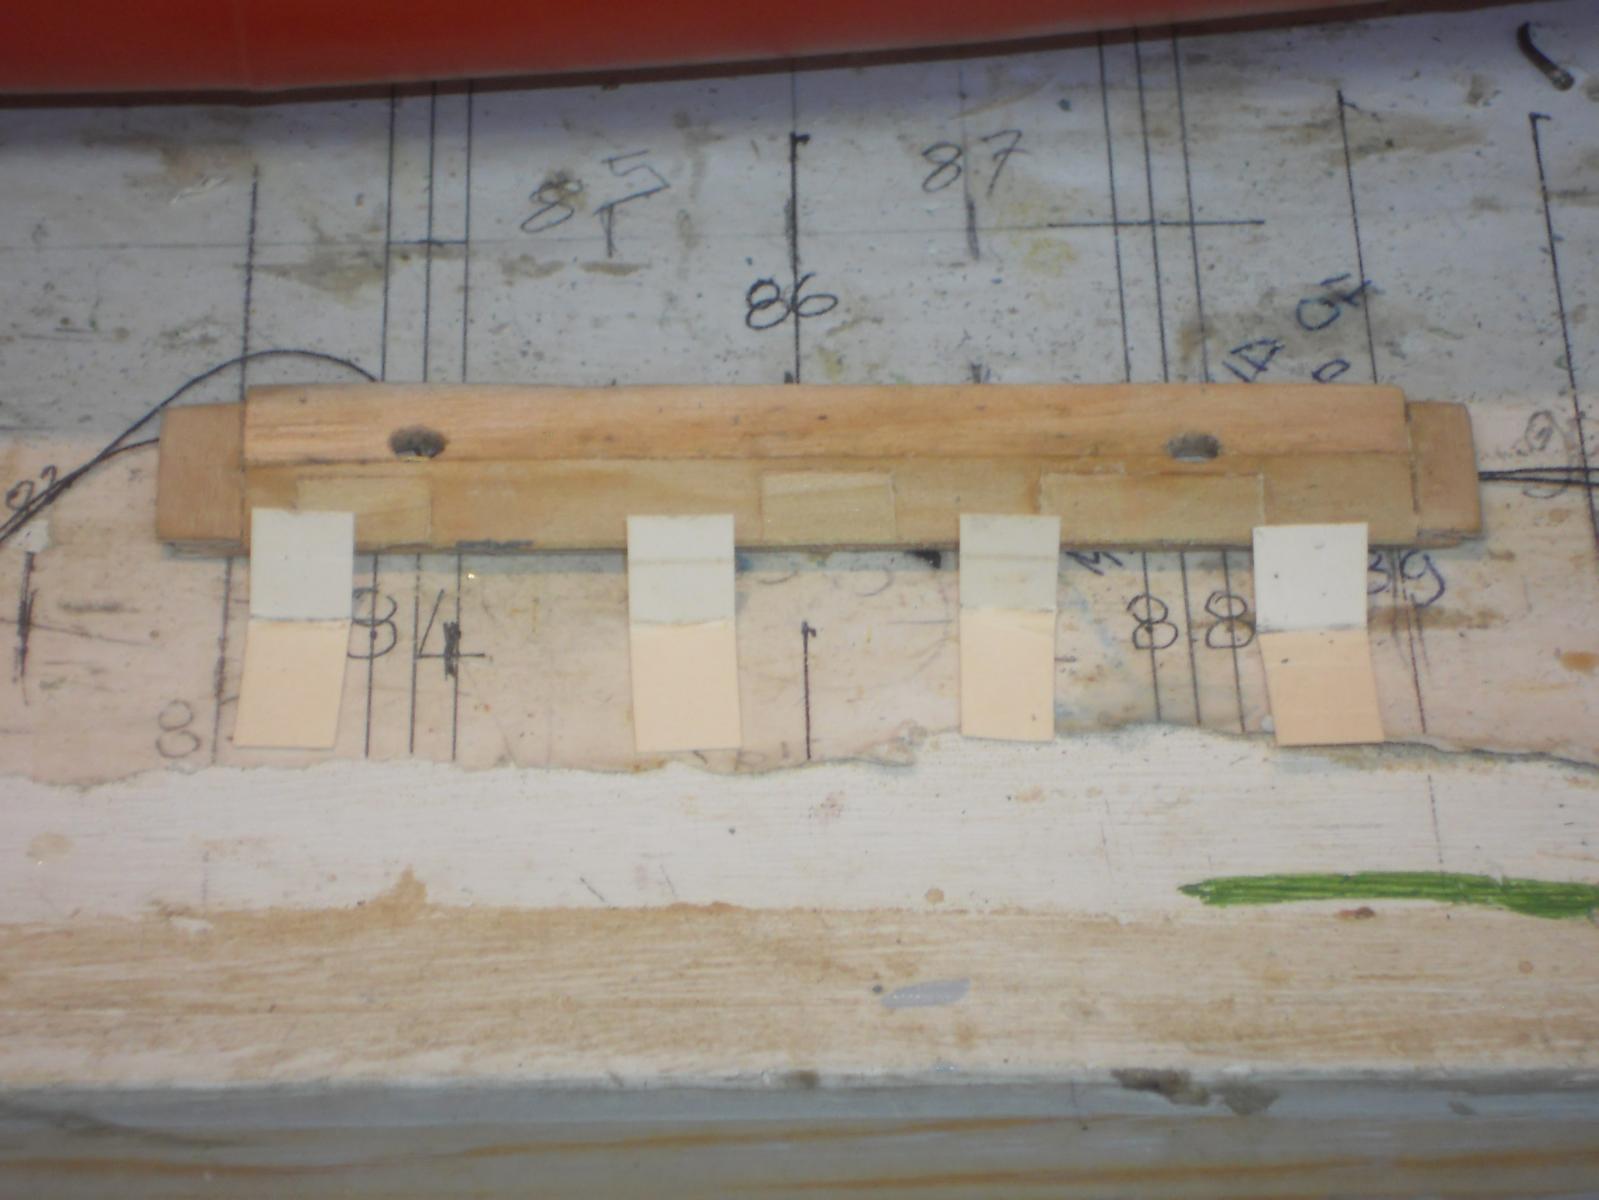
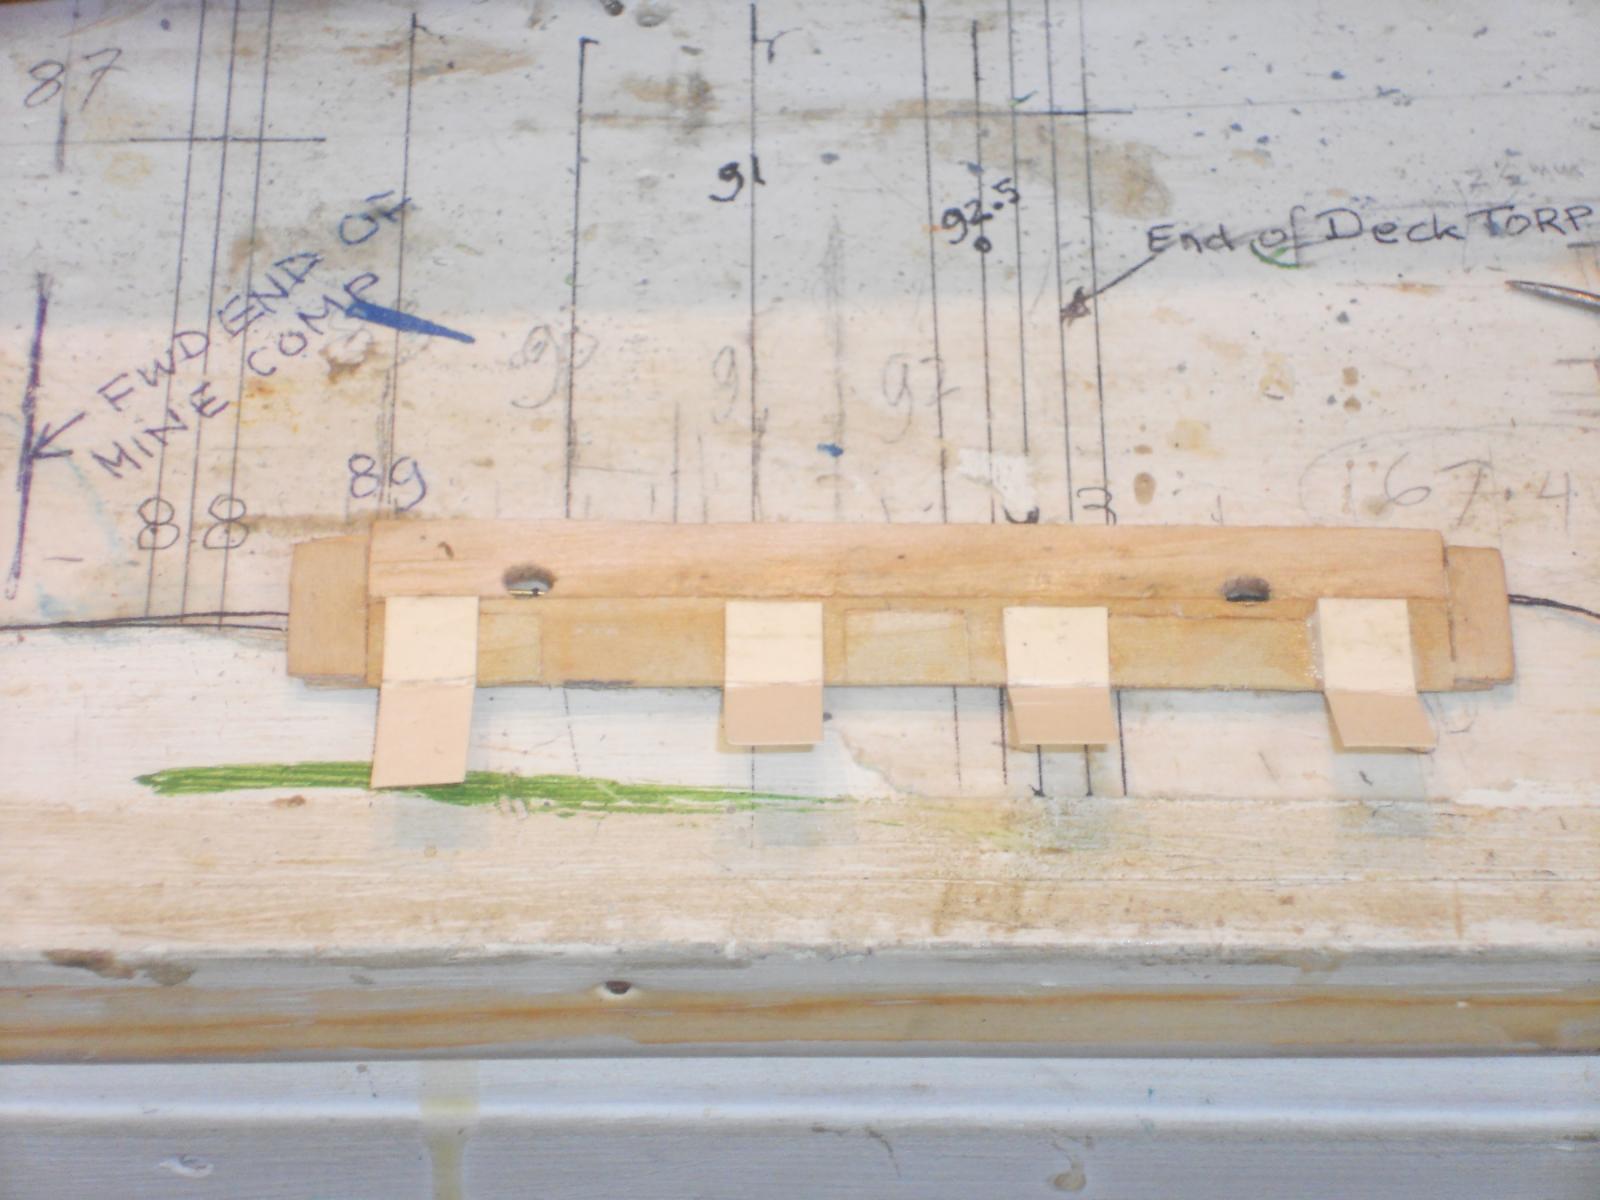
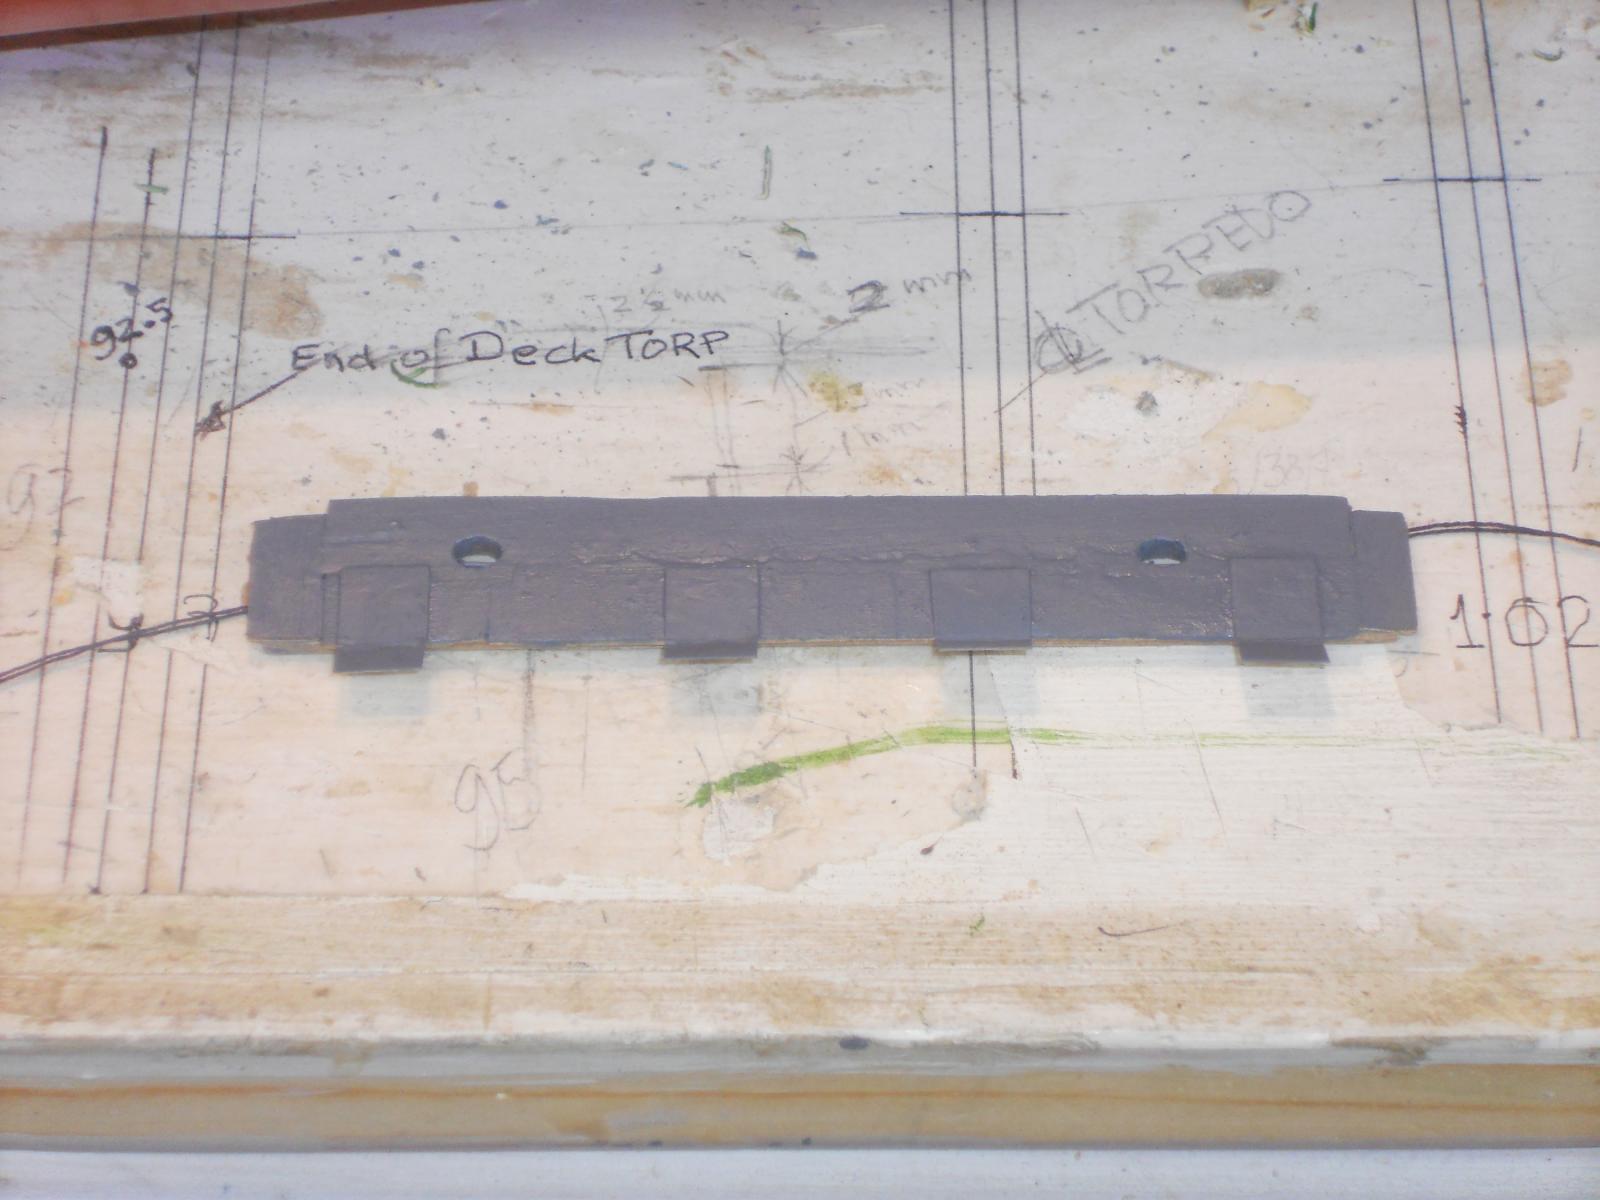
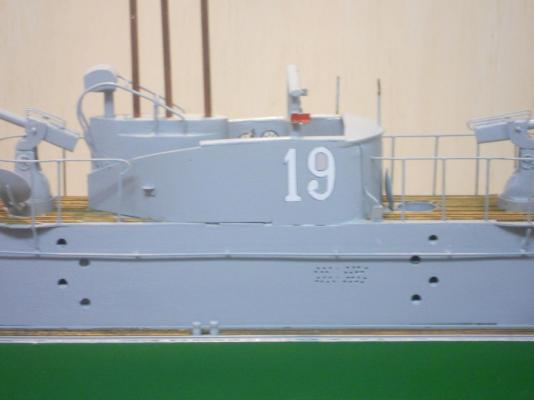
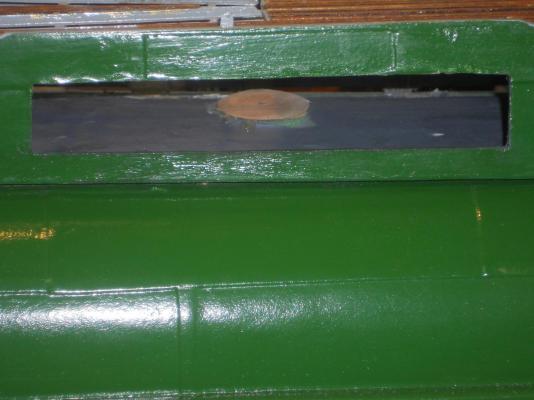
Hello everyone, This morning I mowed the front yard and the temps were already 95 F [that's 35 C] at 10 o'clock. That and the BCGI stuff in my bod really tuckered me out in not time flat. Took several breaks and drank a lot of water. I also dragged a dead tree out of the swale next to our house [that's a sloot for yun Dutchies ], it bothered Gwen a lot being there. Actually it's my neighbor's but she's a nice lady. After having a light lunch, one slice of California sprouted grain braid and a salad, I was rested enough to mozie on into the HOT garage and do some work. I opened the doors and turned the fan on full blast, not too bad, tolerable - - - for me. Gwen asked - how can you work in this oven - Hmmmm, is the Creator trying to tell me something - - - better get used to the heat, you bum, for that HOT place down belo - - - Actually, I love it when the temps are over 80 F, below that I have to wear a sweater . Well, I have finally done it - - - the O19 has now officially received her name! Sooooh - - -I decided to cut the mustard and install the decals Remco made for me. They worked out great except for those for the con. The grey was too far off color that I decided to cut each individual number out and attach them separately on the con. That was a struggle and may not have been worth the effort. I have one more set and could replace the ones I have put on the con and just VERY carefully paint the right grey over over the errant parts. But let my try first to doctor these up and play with it, perhaps a waste of time but so what, where else do I have to go. I'll use my finest drawing pen with India ink for the out line, it's water proof, and shape the letters, if needed. I'll do a Nenad and do a test run first with some scrap left-over decal stuff and see how that blends in. I still have my test piece I used to send color pics to Remco for the decals. I think that the green matches really good and may not even need touching up. I also ordered a package of 1 mm brass tubes for the railing. That could arrive in Palm Coast hopefully this Friday. If not, then we'll have to wait. I can then work on te flags - - - another fun project to try. I'll use a very old worn out hanky, it's nice and thin. I'll try acrylic paint that I used for my artwork and see how that works out. I could also pre-drill the railing stanchions holes to 3 mm depth, then I don't have to do them when the tubes arrive. Hmmmm, what else - - - oh yeah, the dingy. Here are a few pics of my efforts for today. I couldn't resist taking a shot of the torpedo actually going into the loading tube to the forward torpedo room. This is the last one being loaded and pretty soon we are ready for bear. Watch out all yuns with your big ships with lots of cannons Let's see, Kevin is loading depth charges and Dave is getting a "pinger." Ooooooooh, I scared now - - - not. This shows the O19 marking and the load numbers on the port bow. This shows the load numbers on the stern. Yes, I used a measuring device to have the bow and stern numbers come out even. O19 decal attached to the starboard side of the con. Yes, it needs some dressing or doctoring. O19 decal attached to the port side of the con. Here too, some doctoring is necessary but I'll do some paint blending tests first over the errant color over some scrap decal pieces. If that works out fine then I'll replace these here. Cheers,


-
Mayflower by SawdustDave - Finished
Piet replied to SawdustDave's topic in - Build logs for subjects built 1751 - 1800
Hey Dave, that sonar'll be useless against the O19, she can outrun your ship by two times, submerged! And don't forget the 5 inch deck gun mate. Nice looking stern and those windows are awesome, any curtains? Maybe a plant in front of each one, makes the skippers wife happy. Cheers, -
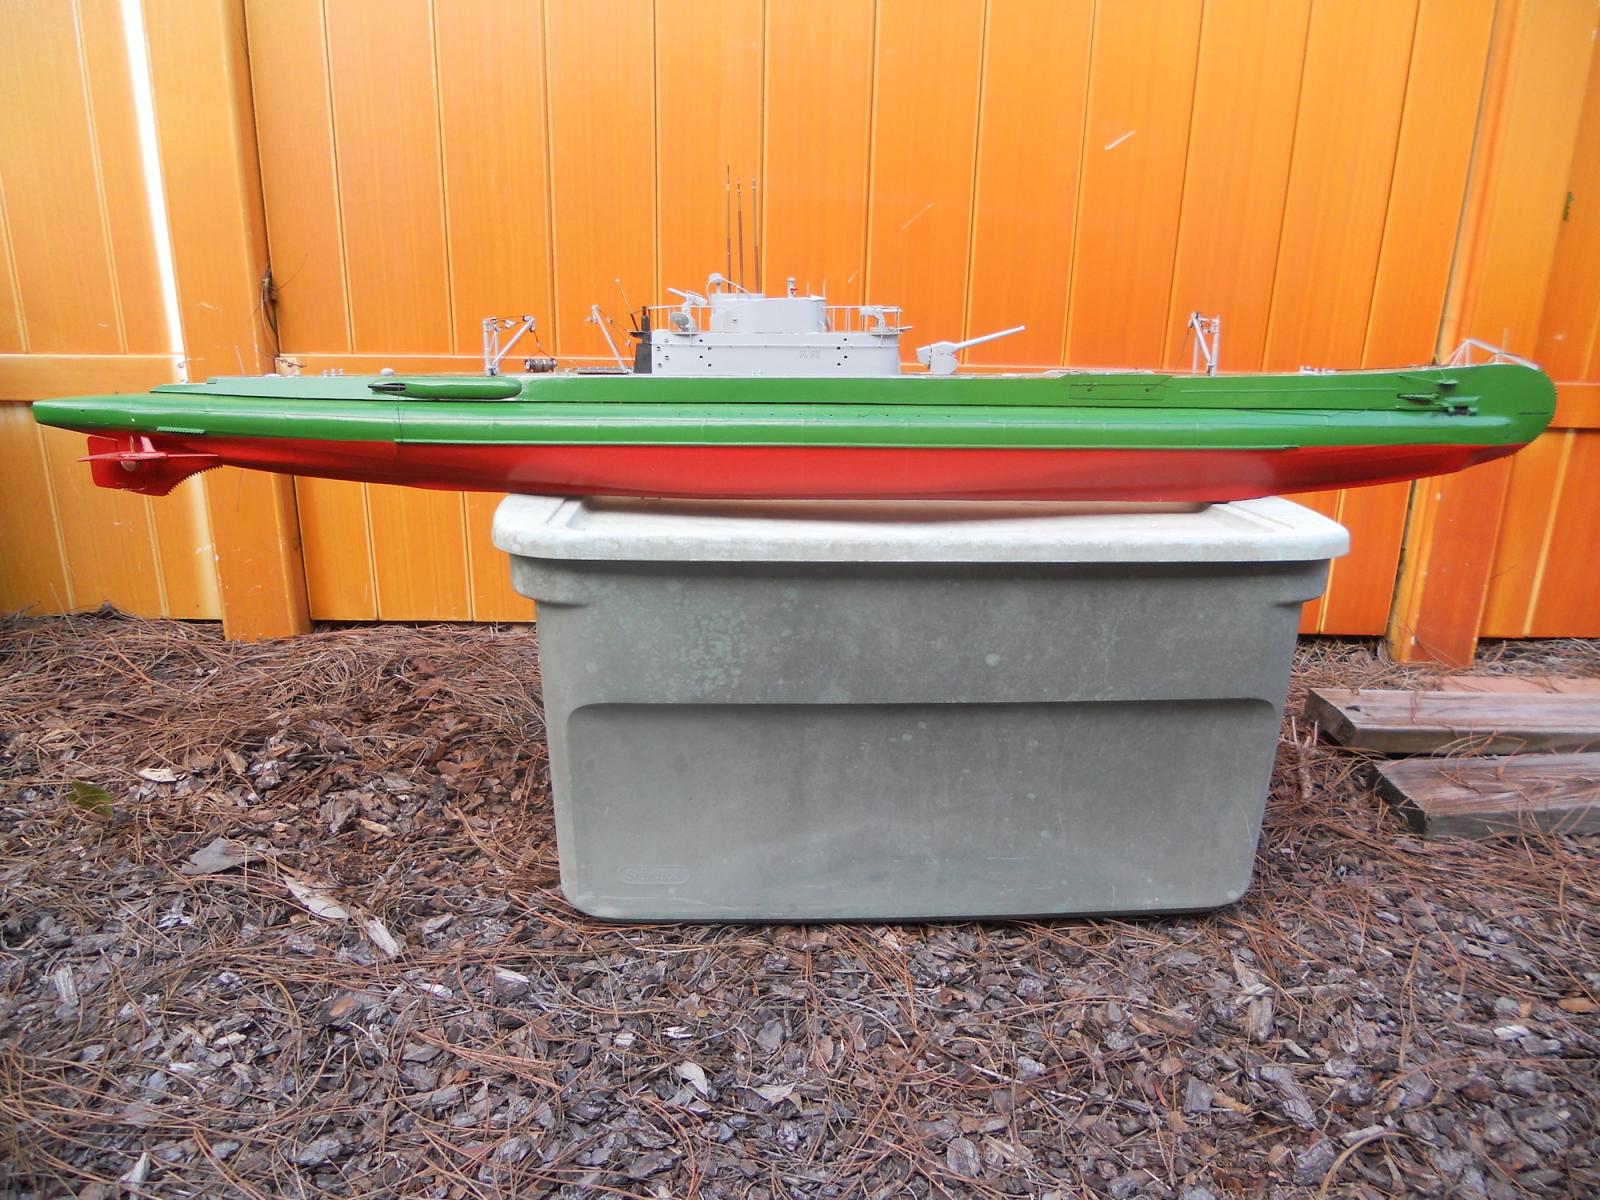
Wow, thank you all for visiting my shipyard and your likes. It's very humbling Hello Omega, thank you very much for your note of appreciation. Yes, it's realism I was after and I'm glad it shows. I didn't plan on getting it this far when I started the build but things kinda developed as I went along. Hi Mark, and thank you for your compliments. Well, actually airplanes and subs are not too different, their basic hull / fuselage forms are tubes - - - sewer pipes Yeah, I like to think that Adjudant van Warmerdam would be pleased. Hello Dave B, yep, she's taking on ammo, the fuel tanks are filled, engines have been test run, just waiting for the few final details before launching her off the ways. Hi Michael, thank you so very much for your kind words. Hoi Sjors, oh wouldn't that be a kick in the rear end chatting with old man Wilton but as I mentioned some ago - when he hears my name he'll probably throw me out his office. Actually I would love to visit the company and chat. Better yet I would really like to visit the Netherlands and have a get-together with all the Dutch modelers. Hmmm, Gwen keeps talking about visiting Holland before we are too old to travel. Hello Lawrence, great seeing you again, welcome. Thank you for your very compliments and kind words. I understand getting wrapped up in a build and not making time to visit and comment all the great builds here at MSW. I like your build my friend. No, subs don't have to surface to fire torpedoes, just come up to periscope depth. The torpedoes are set for how deep they must run before firing them, depending on the target. The aiming on this particular sub was done with an analog "computer" device that calculated the target's speed, distance and the position of the sub in relation to the taget. Cheers to all,
-
Mayflower by SawdustDave - Finished
Piet replied to SawdustDave's topic in - Build logs for subjects built 1751 - 1800
Beautiful job Dave. I really like the color combo and the fancy trim work. Okay, happy tree-nailing. Show us a close-up pic of the trunneling. Cheers, -
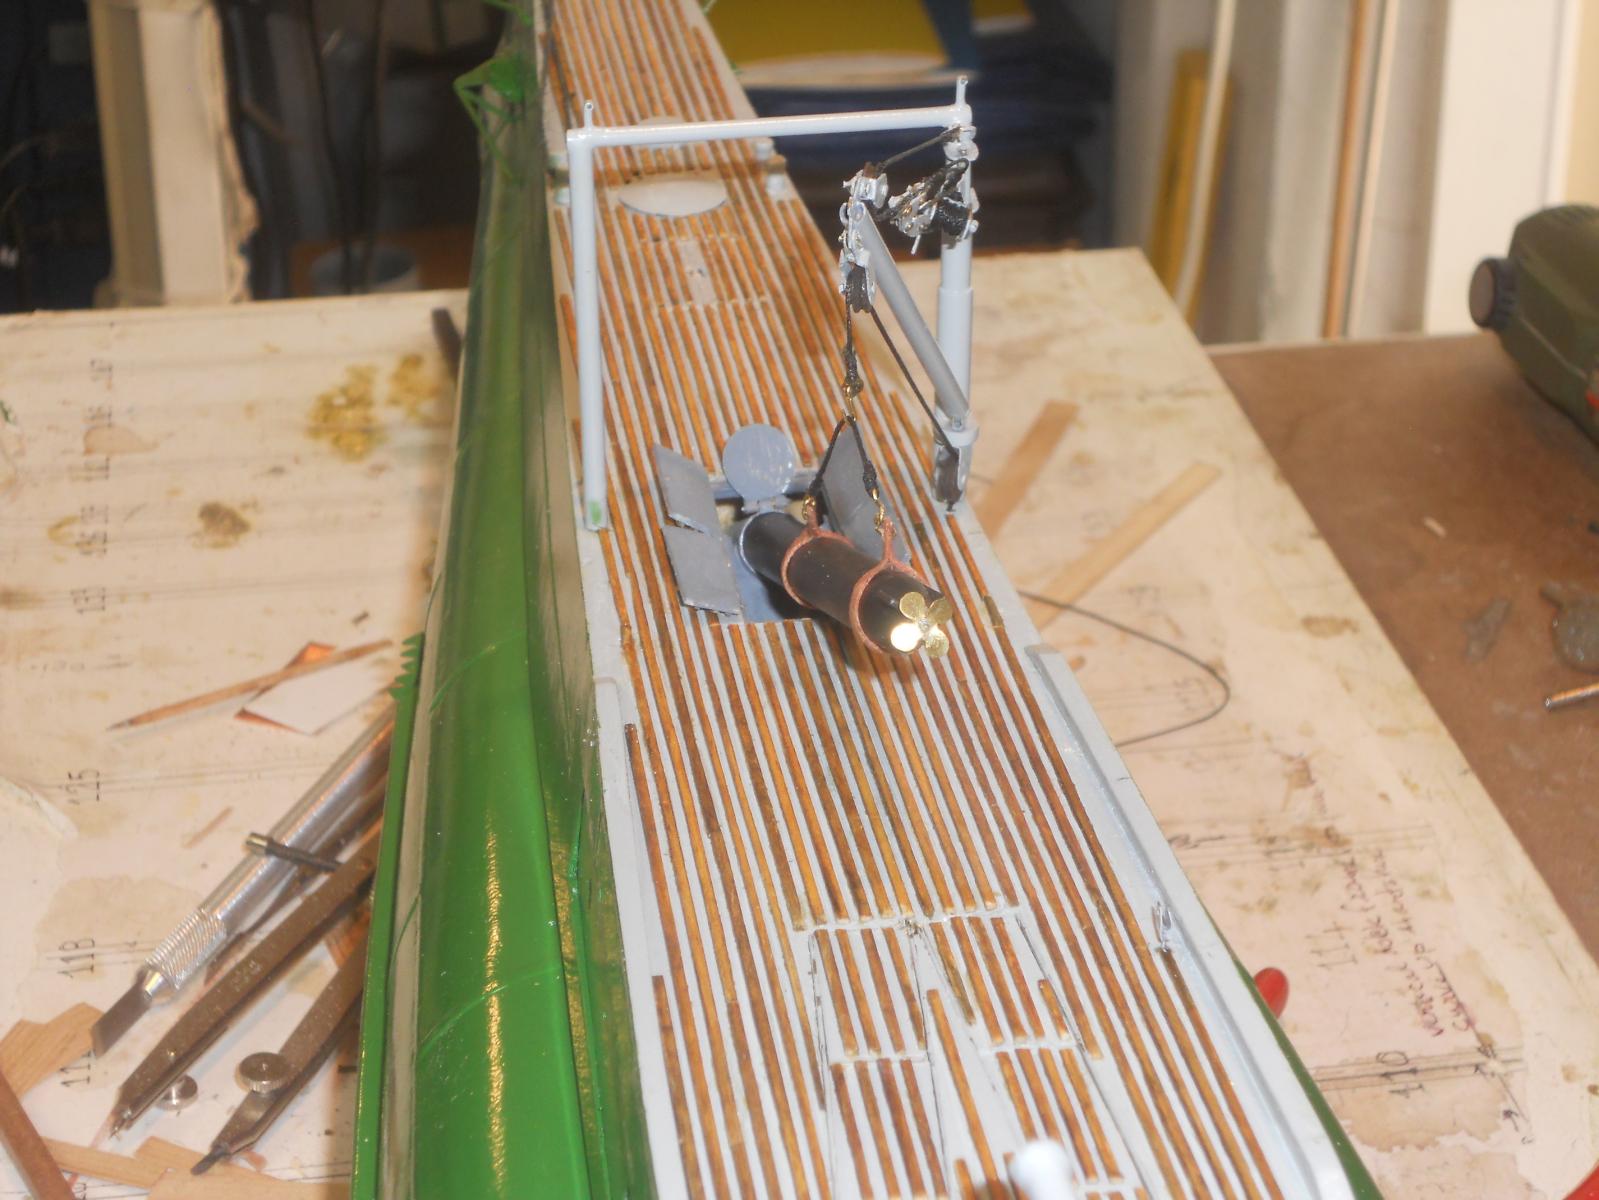
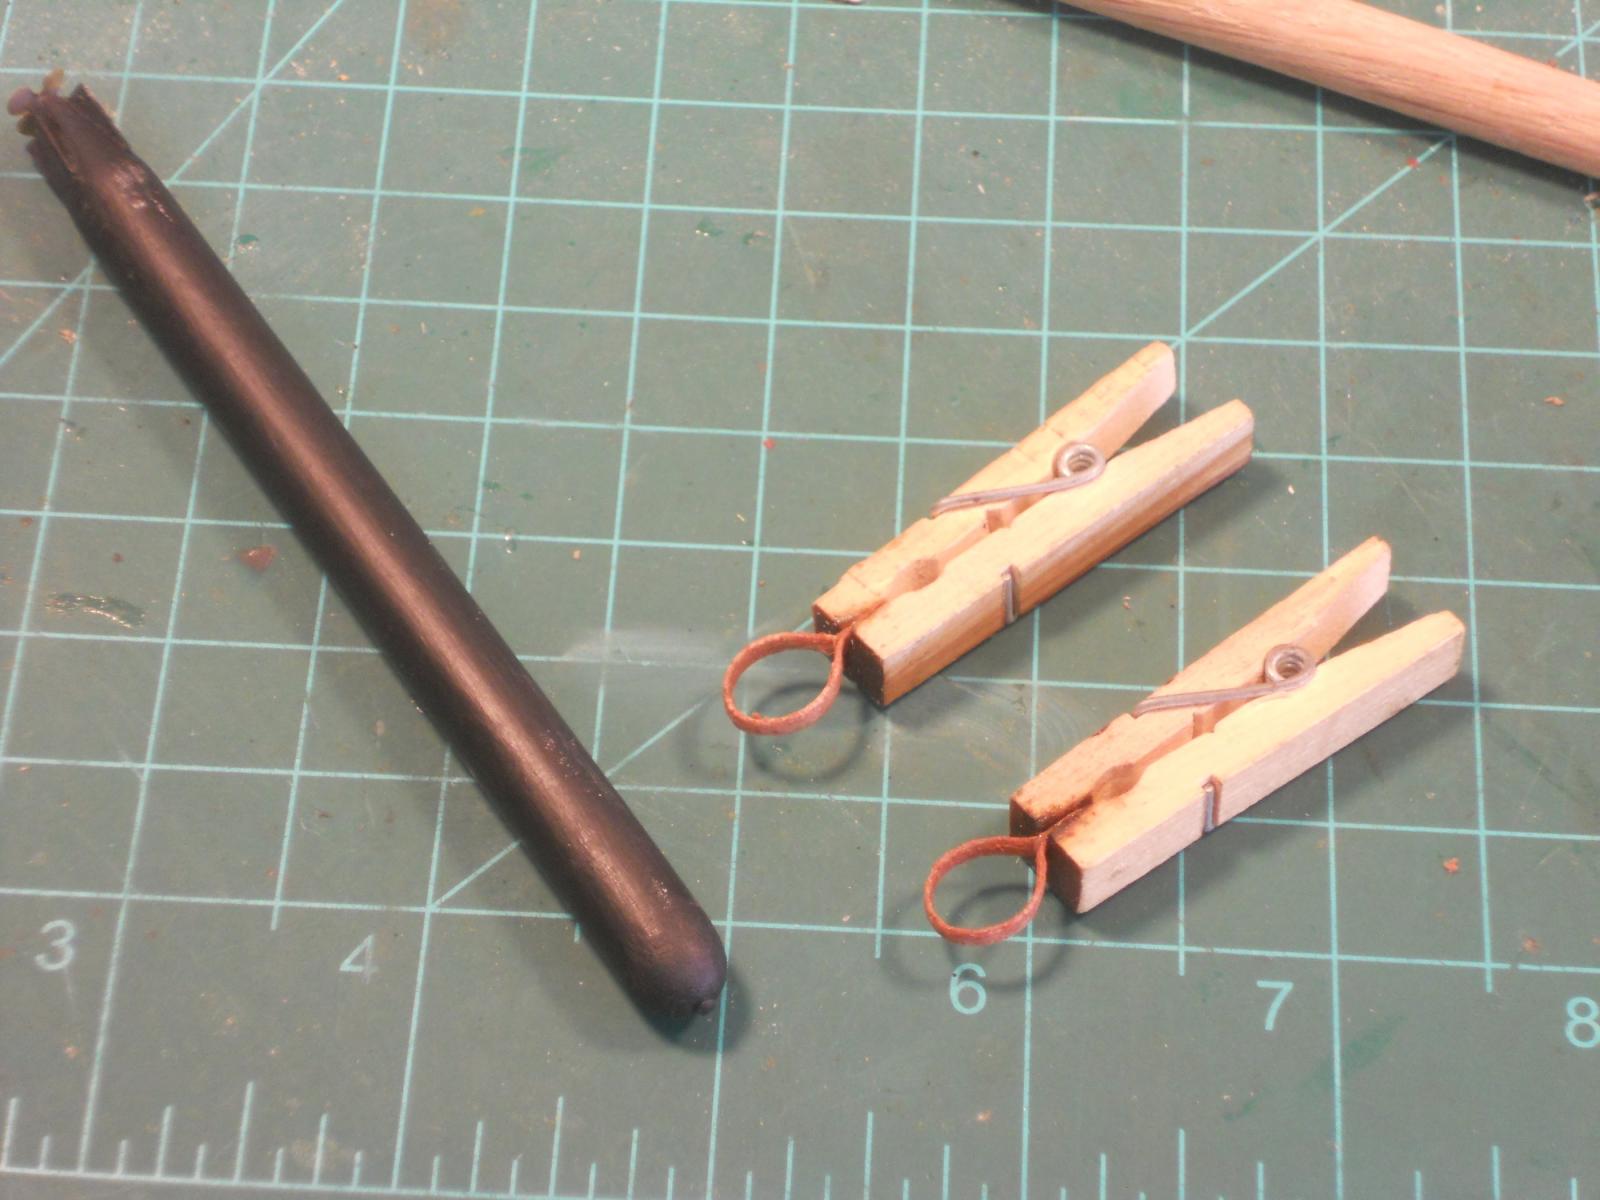
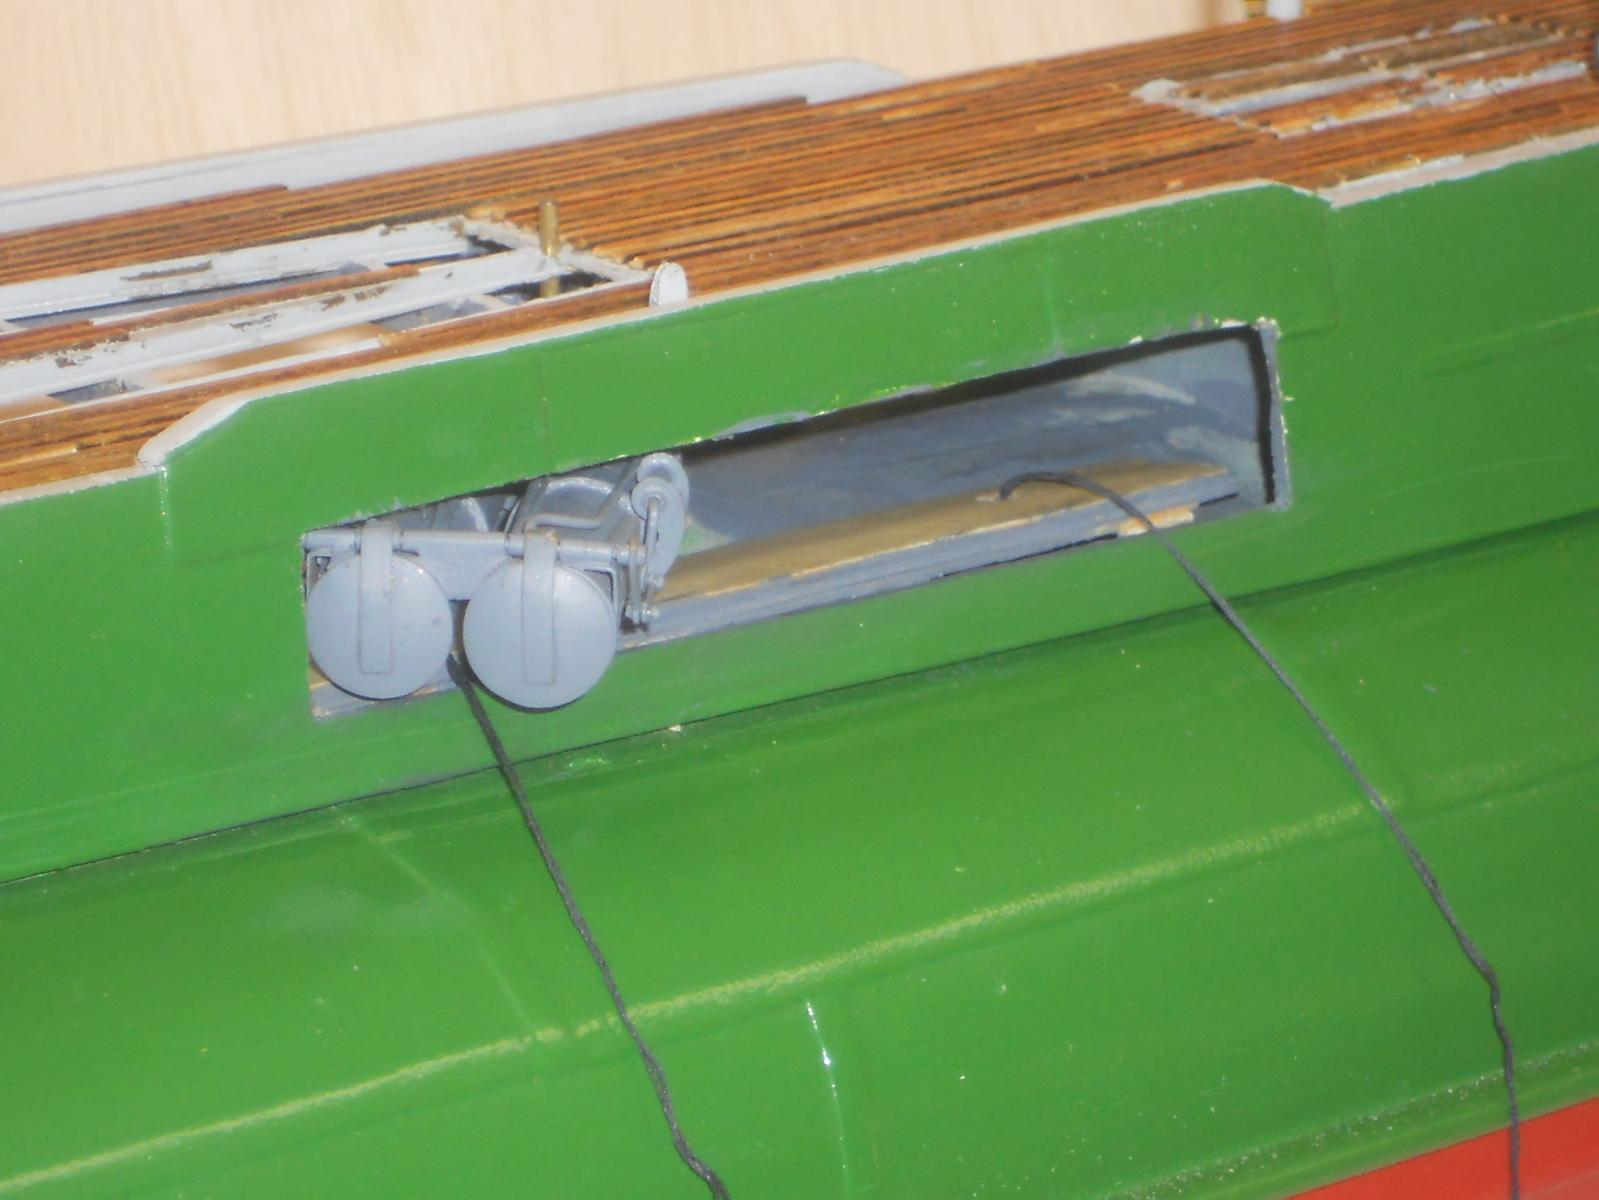
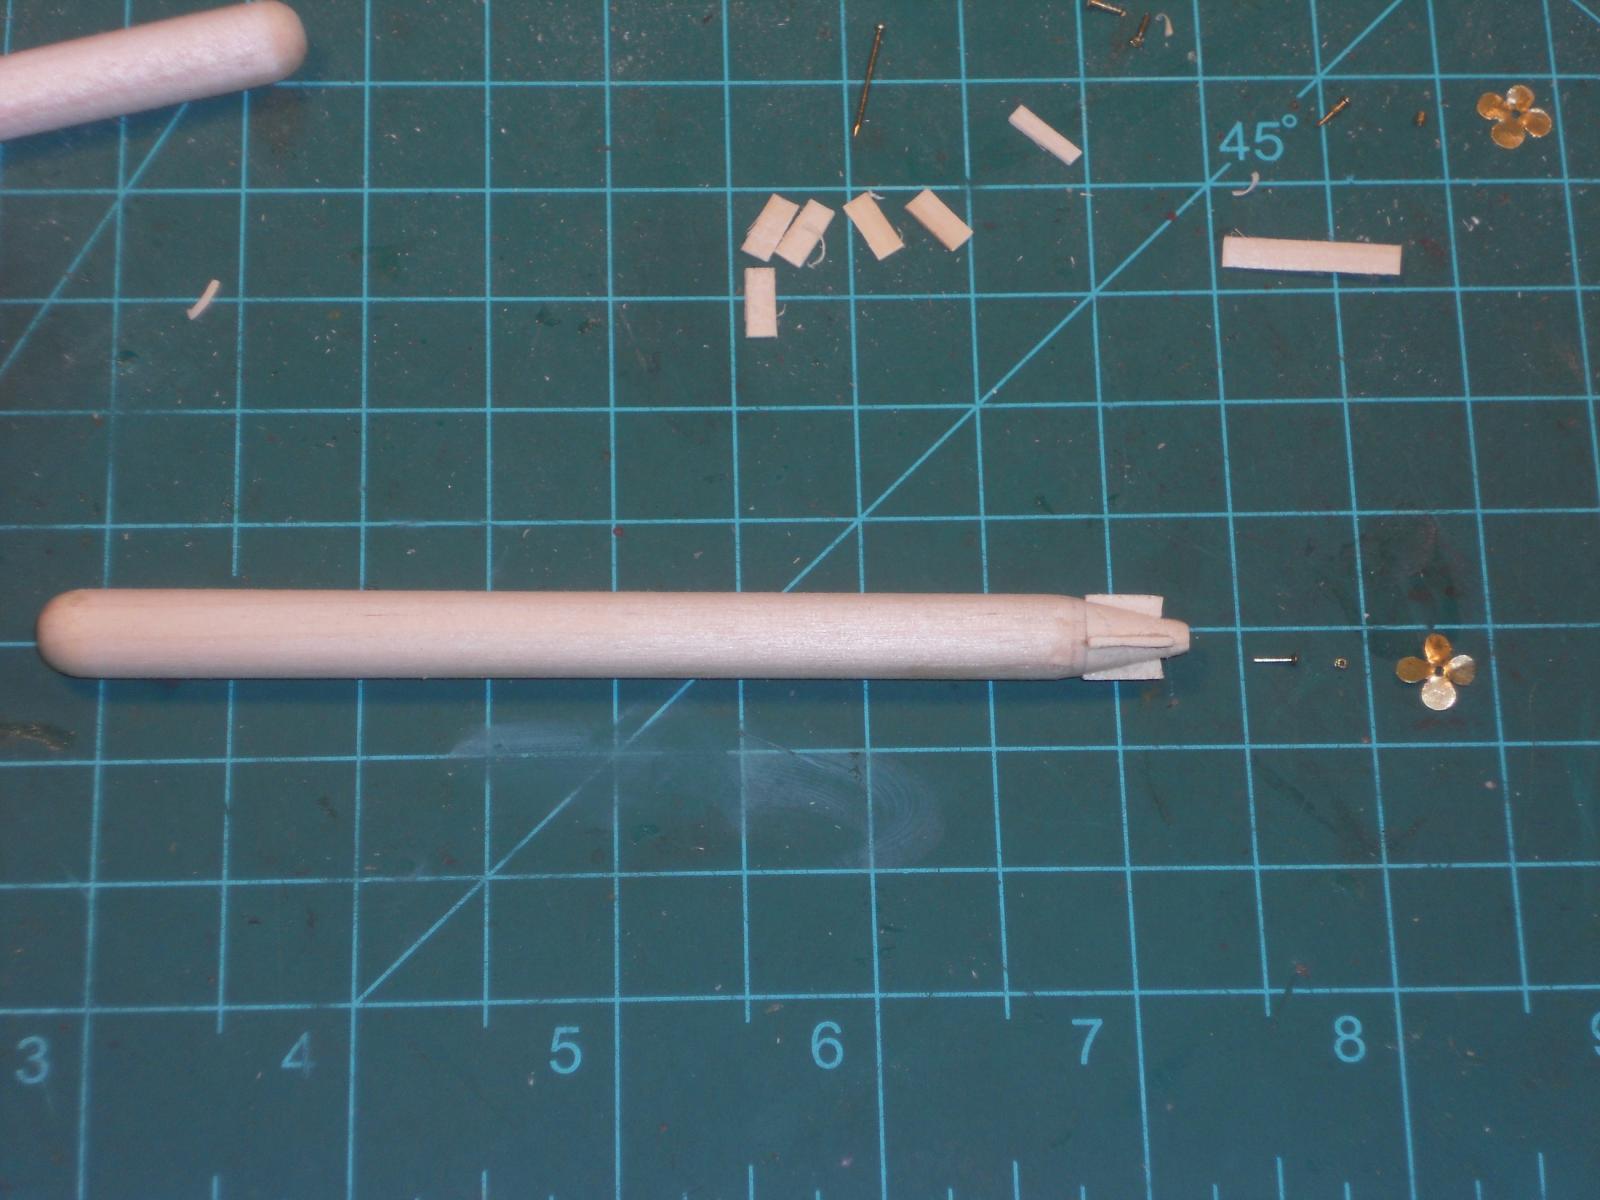
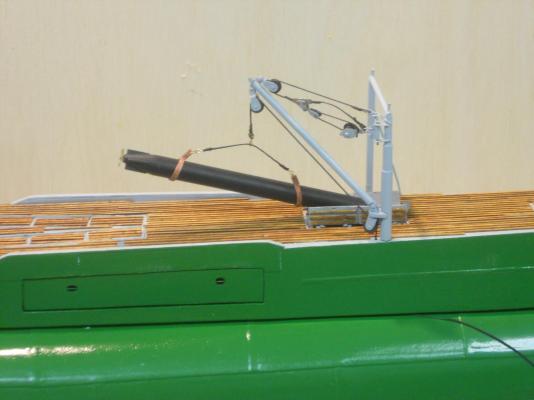
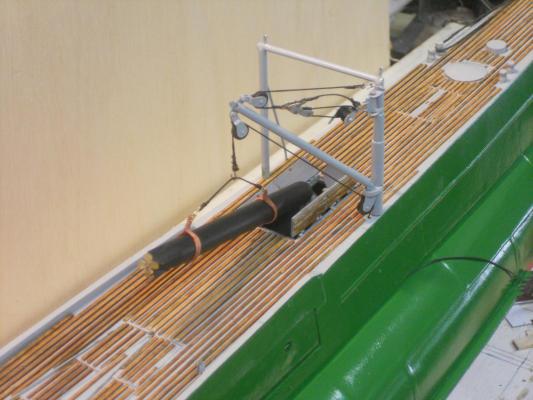
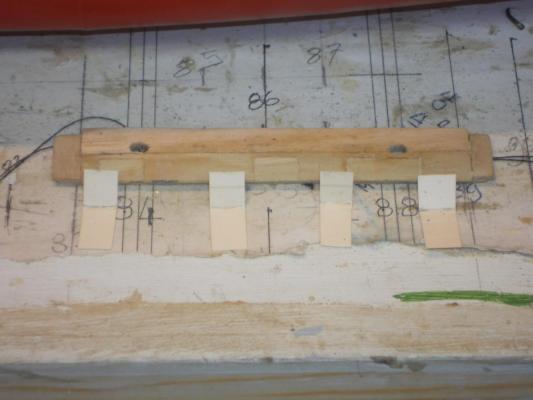
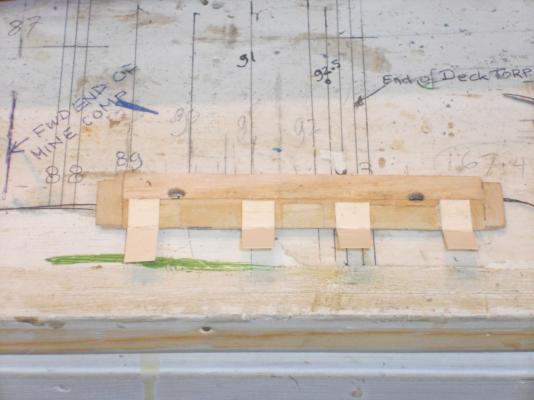
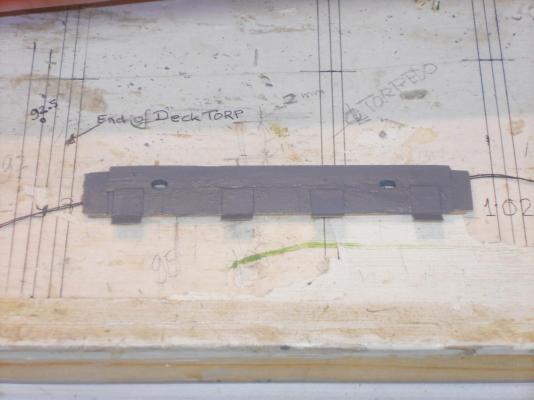
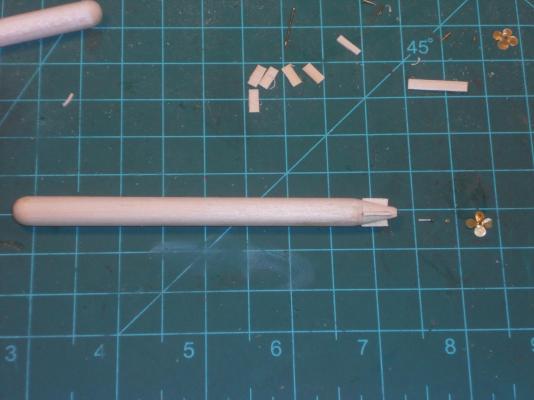
Hello everyone, and thank you again for your kind words and comments on my efforts. Today I spend some time in figuring what to do with the deck railing. According to the drawing there are about 36 stanchions on each side but that seems to get a little crowded so I decided to whittle it down to 29 per side. Now I have to check if I have enough 1 mm brass tubing for all of them. I'll do that Sunday and may have to place an order via internet, my local hardware store doesn't stock this small diameter tubing. I then decided to make two straps for loading torpedoes so I can hang one in the forward gantry for display purposes and of course - - - picture taking. The O19 model will just not be complete without showing how the torpedoes are loaded into the boat. I also finished the fourth torpedo that'll be used for display on the board with a mine. Oh yeah, I still want to make a spare anchor for the display board too. I carved a small opening in the aft side of the aft deck for the white nav light. I don't have a small clear plastic rod to simulate a lamp but used a piece of a toothpick an then glued a clear plastic window over the end. It's all these piddly little things that take up a lot of time. If I have to order some more 1 mm brass tubes for the railing then I can try to make a start with the dingy, who knows. Okay, here are just a few pics of today's efforts. This pic is for Ian - - so he can now look at it and not get night mares from staring at the business end of the launcher I wanted to have one torpedo hanging in the loading gantry for display purposes so I made a pair of straps. I may have to remake them longer to double wrap them around the torpedo. In any case. I used the hem of an old worn out hanky. I soaked it with nail polish and some light brown paint then wrapped it around the fourth torpedo I was making and glued the ends together with nail polish. I then made an oval eye to go through the strap ends. The next two pics show the torpedo hanging in the loading gantry, all I need now is a few crew members wrestling that baby into the loading tube. I'll have to take another look at an actual photo where they are loading one of these babies and see what kind of cabling or chains they have used. Cheers,

-
Thanks to all of you for visiting, your commends and your likes, it's much appreciated. Thanks Dave for your kind words and yes, she did her part against the Japs. I'm so sorry that it had to be without my father on board, he would have come home to us if he hadn't been promoted and placed on the Cruiser Hr. Ms. Java. Hi Vivian, thank you. Yes, she was an amazing boat at her time. Hoi Remco, thank you and yes, the completion is in sight but there seem to be a gezillion little details yet to be done. Hey, there are many very great libations for toasting a successful project but stay away from those sugary soda pops Hi John (Lad), thank you so very much my friend. Hello Ian, thank you too and a few months ago I did have Gwen take a pic of me holding the boat. You'll have to do some browsing my friend but we'll have another series of pics planned - - - stay tuned. Popeye, good to see you again and thanks for your compliments. Yeah, well - - - actually there are still quite a few little things left to do besides the dingy. I did some today, all very time consuming. I forgot to mention the railing There are about 36 posts on either side but I am wittling it down to 29 per side. I know that during the rebuild in Scotland in 1943 they removed them as well as the torpedo gantries. But this'll be the way my father knew her when he sailed on her between 1938 and 1941. Yep, the biggest problem or problems was that a lot of things were afterthoughts and not planned. All in all they all worked out okay. Hello Pete and thank you! Yeah, sometimes i just stand there and just look at her - - - thinking what my father would say if he could see her. Hoi Sjors, thank you! Hallo Kees and thank you for dropping in. Yep, she's a looker alright Cheers,
-
Wow, that's one sleek machine Pete! Looks fantastic. Cheers,
- 220 replies
-
- 1
-
-
- finished
- volvo open 70
- (and 1 more)
-
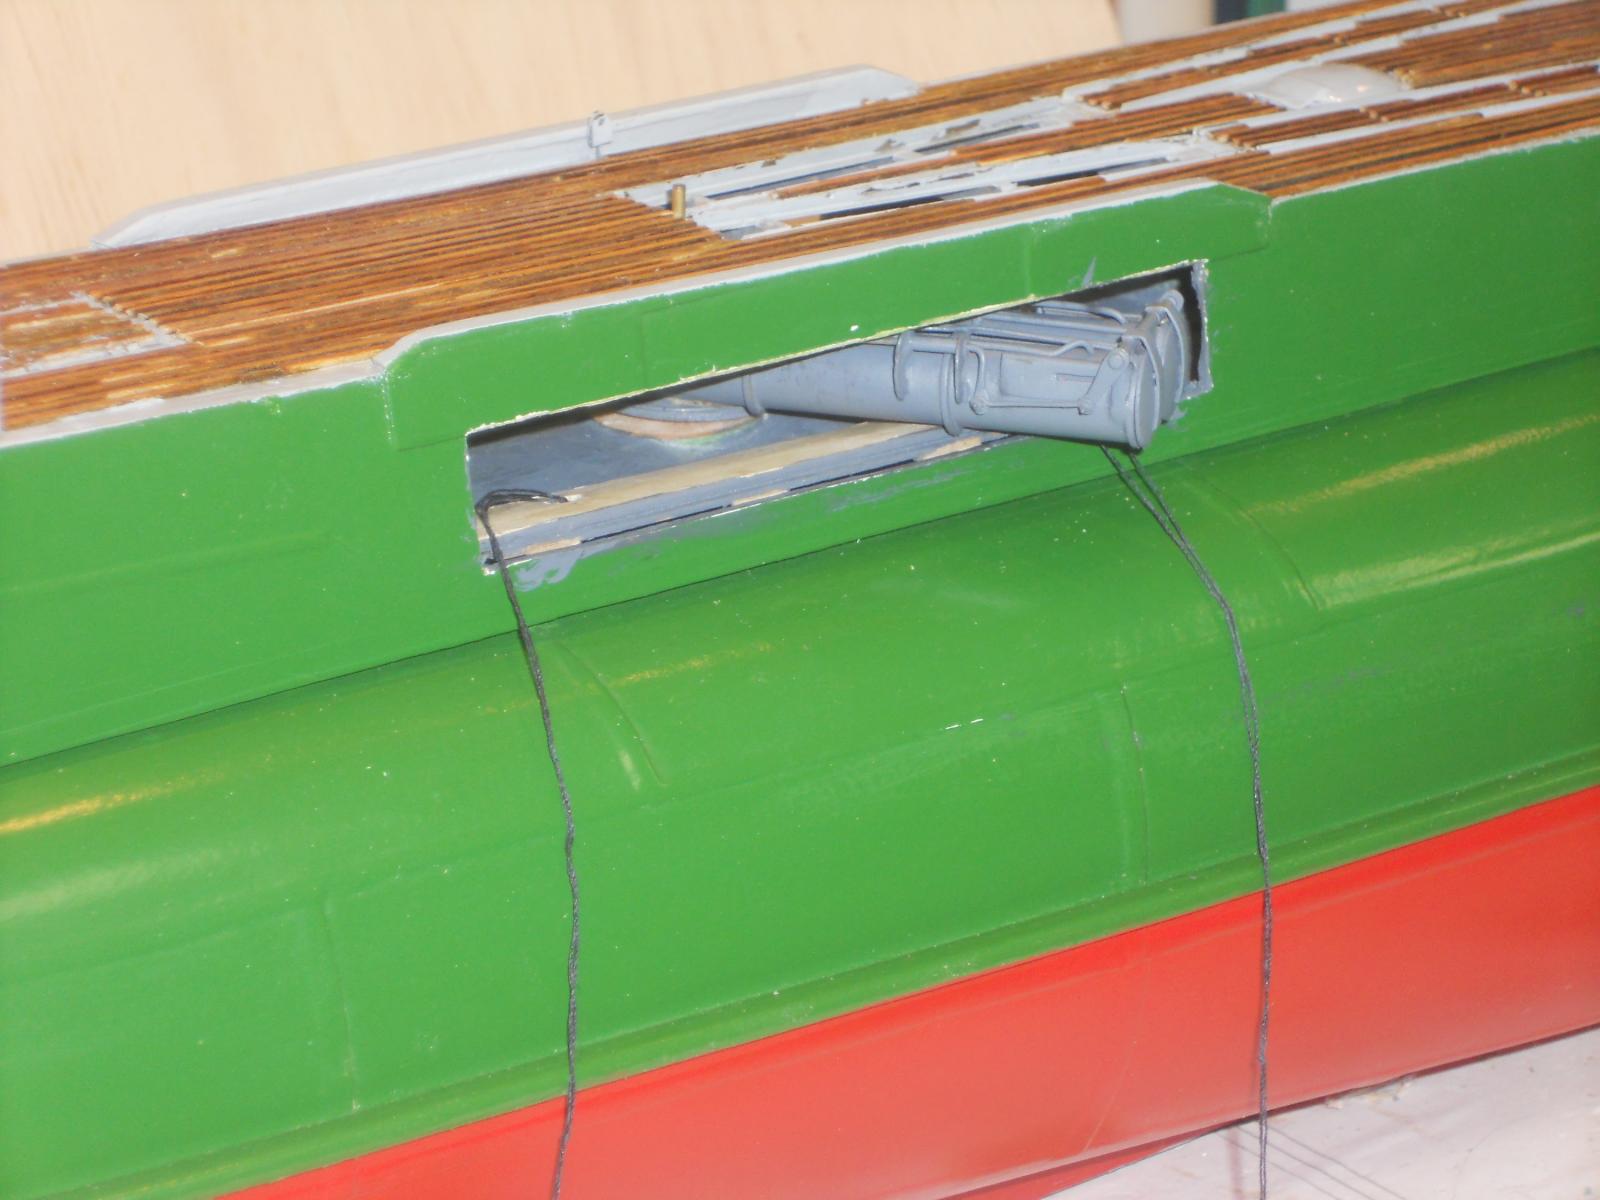
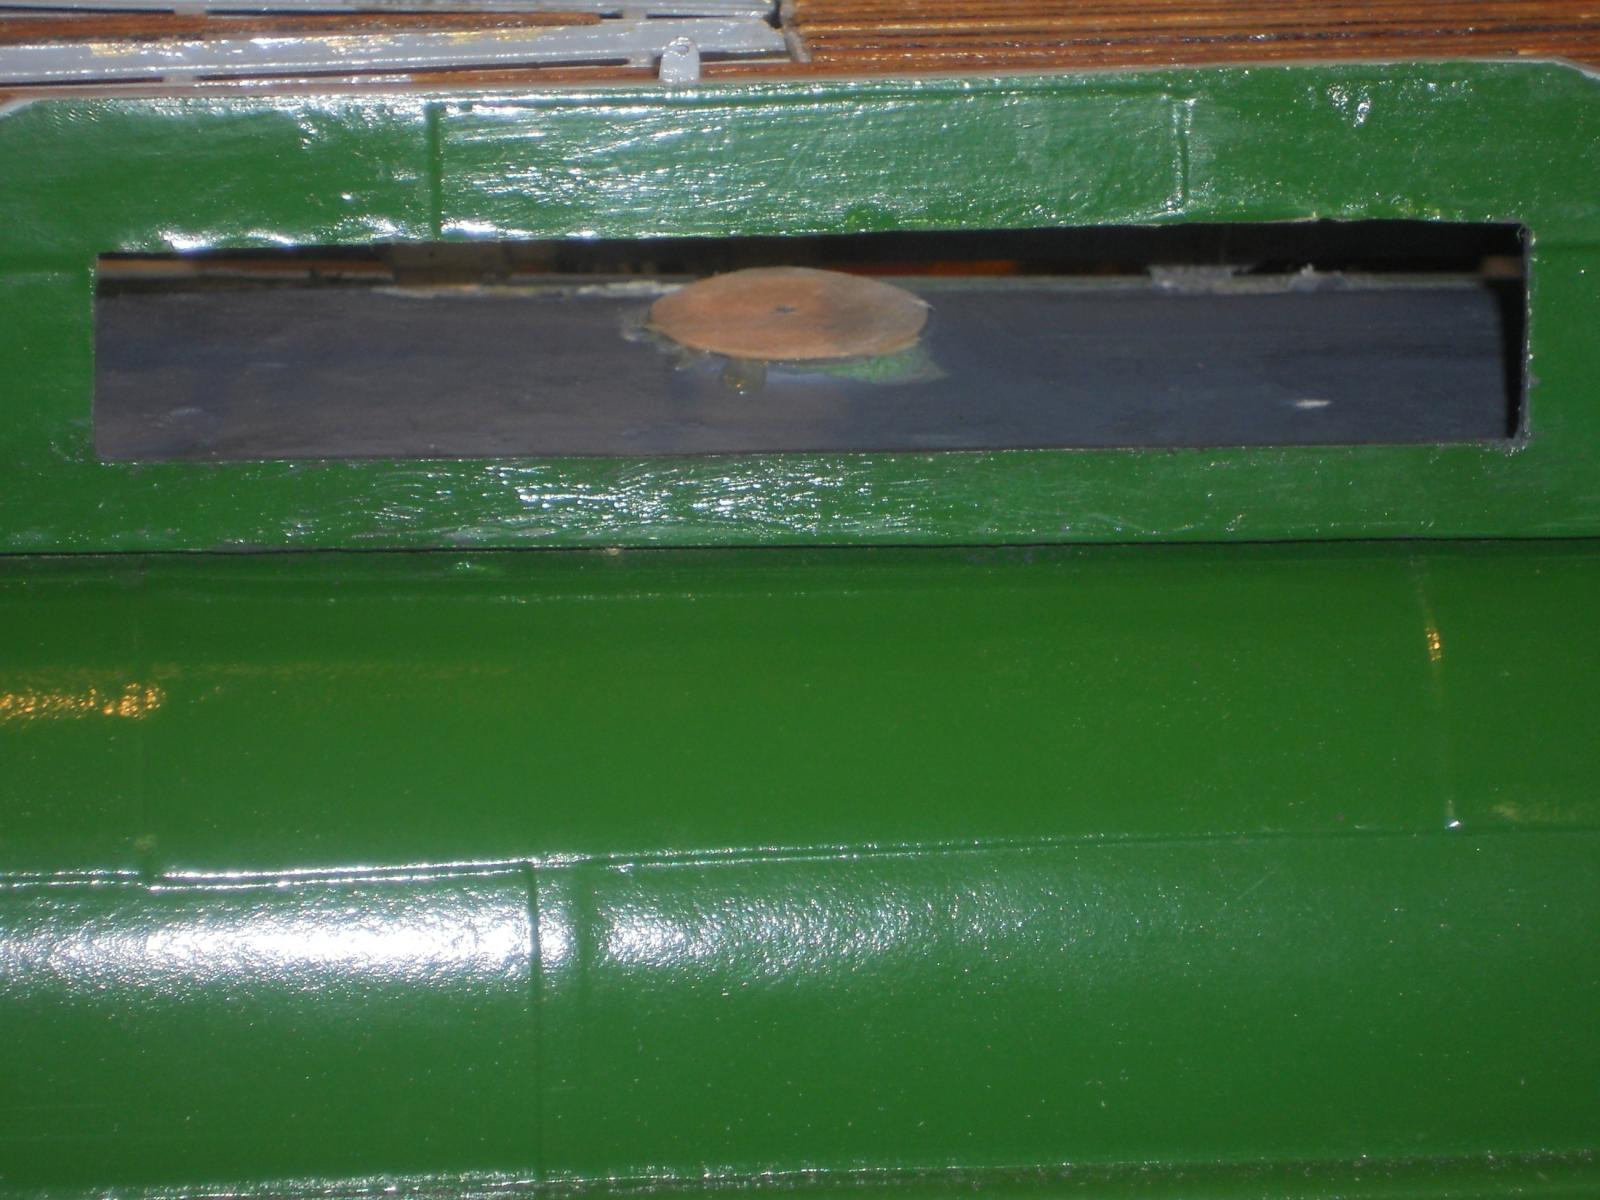
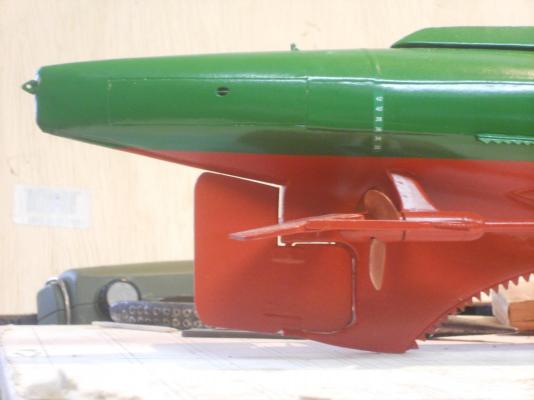
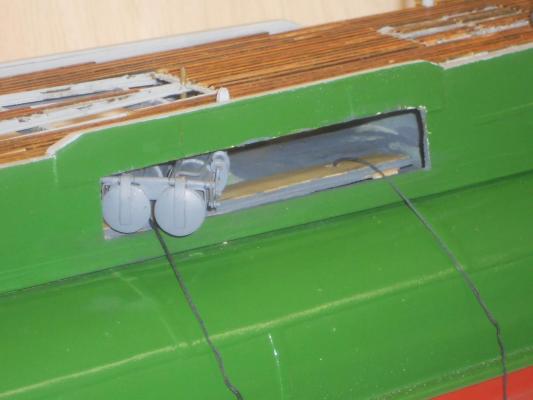
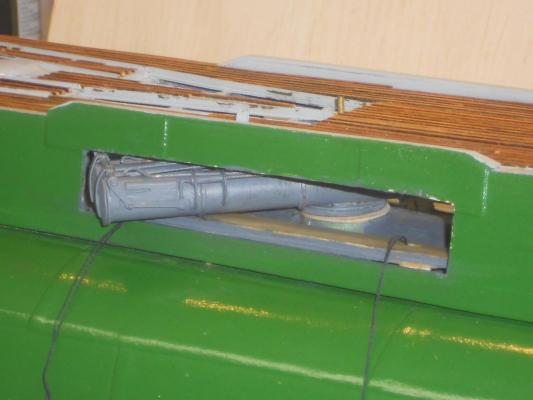
Hello ladies and gentlemen, boys and girls of all ages - - gather around and let me tell you a story - - - - - the Eureka moment has arrived the torpedo launcher compartment doors have been installed, the launcher has been tested for proper functioning (except the firing tests ) and the paint touch-up is completed! Champaign for everyone or a lighter refreshment for those who abstain Yep, this morning I glued the starboard door in place and while waiting for the glue to cure I started making another torpedo. After lunch I tried the door and it worked just fine. then I put the launcher in its place and tested the rotation of it over both doors on both sides. I lucked out - - - again! It worked as advertised! I'm a happy camper! I immediately started masking the port and starboard sides to spray paint the combat areas. I put four coats of paint over everything to make it blend in with the existing paint. It's looking pretty good, even close up. I guess I'll have to make a pair of boat hooks to help in closing the doors - - - i can hardly leave the strings on the doors now, could I ??? Okay, what's next on the agenda? Well, there is the dingy yet to make but I think I'll be making the flags and the ensign first and install the O19 decals and the load marking decals. Then install the antenna cables and could call the model completed. Hmmm, the dingy, well - - it could be on back order - - - but no, I'll make it too but as the final project as a separate model. Hmmm - - - another build log????? Perhaps not There's a lot of thinking involved here, I'm an aircraft fixer / maker - - not a dingy maker Oh well, we'll see what happens. Here are a few pics of today's effort. The first four pics are to demonstrate that the launcher really rotates freely over the opened doors. This shows the torpedo launcher pinned into place and in the process of rotating inside into its stowed position and also for eventual reloading - port side. This shows the torpedo launcher in the process of rotating towards the front of the boat - port side. This shows the torpedo launcher in the process of rotating towards the front of the boat - starboard side. This shows the torpedo launcher in the process of rotating towards the aft inside into its stowed position and / or for reloading - starboard side. Here I have masked enough of the boat to touch-up paint the parts that needed paint. I masked at the hard edges as much as possible to prevent a blending problem. The few areas I left unmasked blended in okay, perhaps some whet sanding with 800 grit paper or just some "Bonami" or "Comet" scouring powder will do the trick if I see where it would improve the paint job. Here is the O19 with the masking paper and tape removed after the painting is completed. I'm pretty happy with the results. We are getting close now, eh whot? Cheers,


-
Thanks everyone for visiting and catching up I see, and to those who clicked like, thank you. @ Remco: Thank you my friend, yeah, I kinda like that shot myself. @ Vivian: Thanks Viv for your kind words. @ Ian: Hmmm, scary eh? Yeah I guess, it's like looking at the business end of a gun like I did a long time ago with a snarling Jap soldier with his finger on the trigger. Just for you I'll make another pic of the launcher from the side so you don't get nightmares @ Popeye: Got caught up again I see, thanks for dropping in my friend. Yep, the doors are working out okay. Other ideas in mind? About what Popeye, another build? Something else on the sub perhaps? Remember that I still have to build the dingy and several other things before we can call the model finished. I still need to complete the VOC ship and a Dutch VOC or Staten Jacht in a lamp and my father in law's ship. Then I really need to get back to my art work. I guess I'll have stick around for another lifetime to do all the things I want to do @ Pete: Thank you, yeah, it came out pretty decent. @ Jud: Thanks for dropping in and following my build. I like to think that my father would like it but am afraid that he may have a few "constructive criticisms" But remembering him as a young boy he was always rather gentile in reminding me of my errors Cheers to all,
-
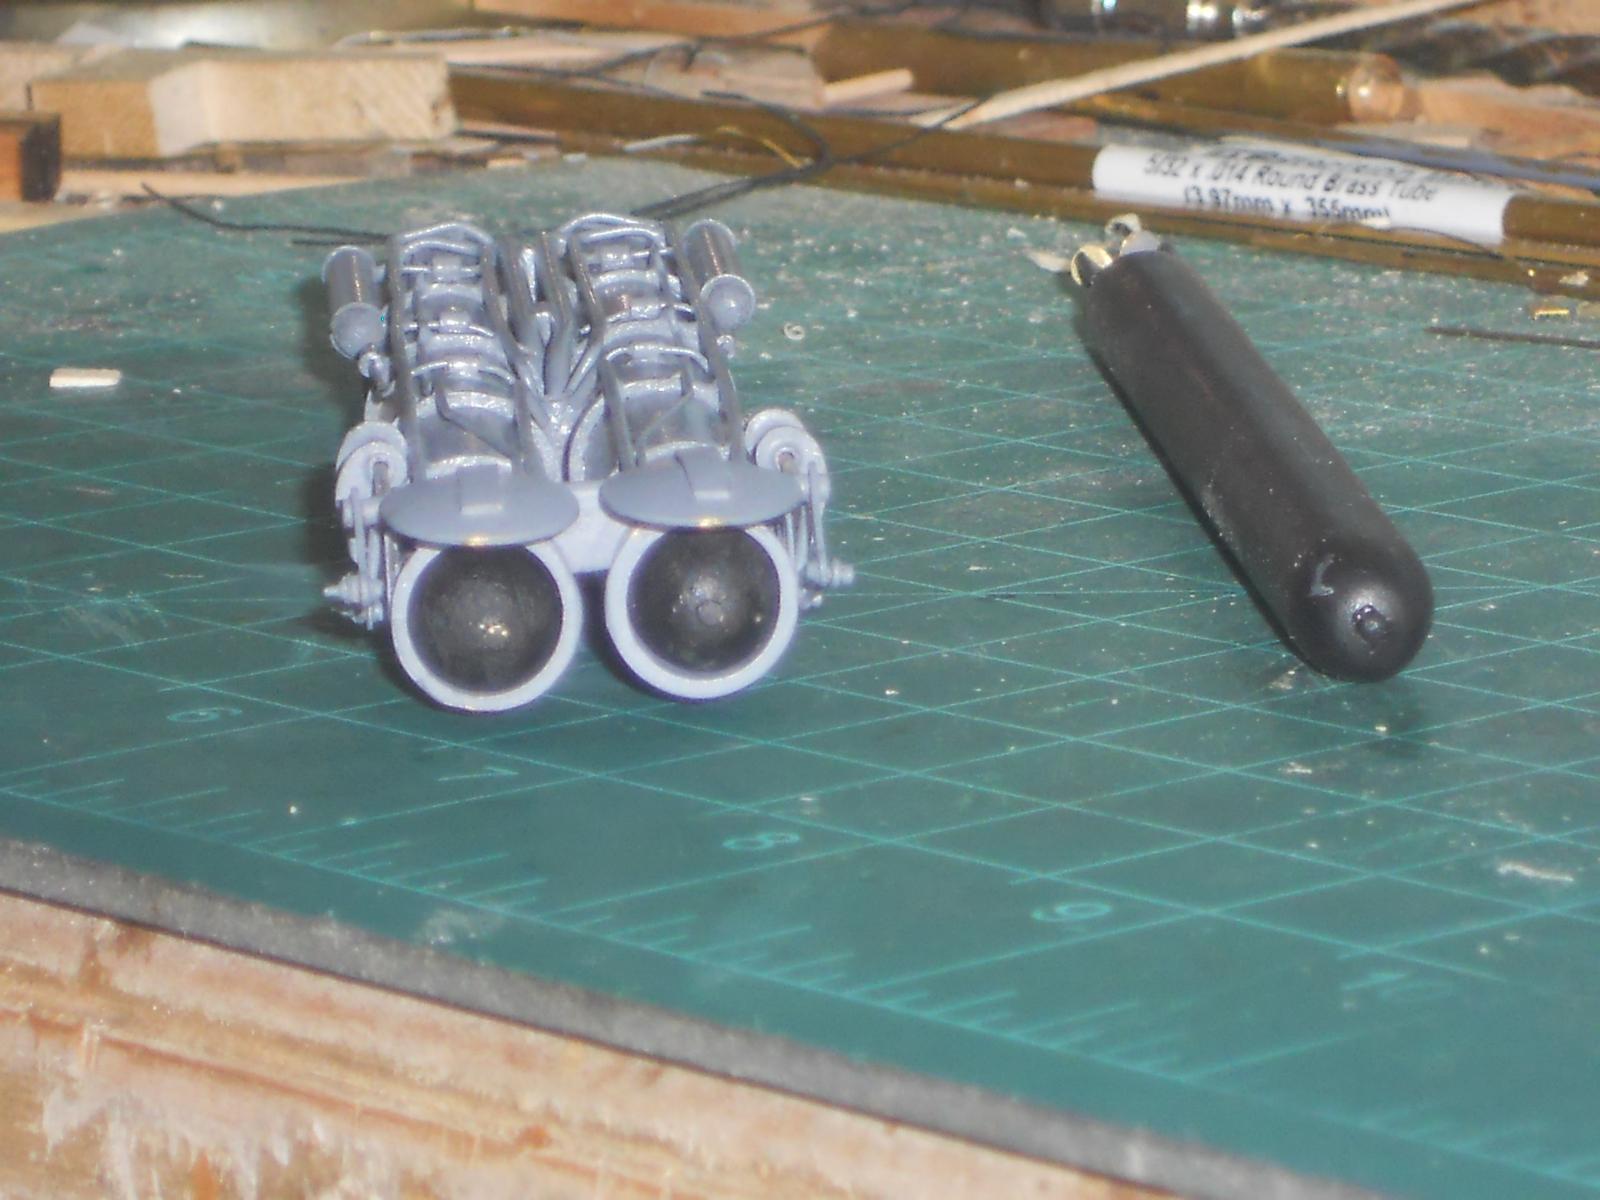
Thanks everyone for visiting and your likes, it's really appreciated. I had a semi good night last night and feel 95 % better then yesterday, almost my old self again The temp in the garage was tolerable today, still in the low 90's but the fan cooled it somewhat, at least that's we imagine Actually the temp outside was 96 F and I guess it must have been at least 105 F inside the garage. I guess you can't blame me for knocking off early yesterday. First thing I did was to remove the Rube Goldberg clamping rig and checked the launcher for fit, seems okay. Next I cut eight pieces of card stock for both doors and made a sharp crease in them for the hinge part and glued them to the back of the doors. While the glue was curing I continued work on the two torpedoes for the launcher, which I completed in between the door work. After the glue of the card hinges had cured enough I trimmed the loose ends and painted the backside of the doors dark grey to match the interior. By this time it was 12:30 and figured I may as well glue the port door on before knocking off for lunch. So I did and the glue is now curing overnight. I'll test it first thing in the morning with the launcher inside to see how it works - - - keeping fingers crossed. I didn't make a picture of the door being glued on, it's the same view is in a recent post. Then I'll turn the build dock around and install the starboard door with another fit try. If everything works then I'll start masking off the hull and deck so I can spray paint the green on. Oh goody goody gumdrops, we are coming close to completing the launcher project. Wish me luck folks. Here are few pics from my archive of today's work. A close-up shot of that added disc to the stationary launcher rotation plate. The interior still needs touching up with the dark grey paint. I took this pic right after I removed the clamping rig. Here you see the card hinges ready to be glued to the backside of the door, port in this case. Here I have glued them in place and as soon as the glue has cured I can trim the bottom part. I also painted the backside of the doors because the interior can still be seen when I remove the deck hatches over the launcher compartment. This shows one of the launcher torpedoes in the building progress. I have laid out the parts to attach the little propeller - - the prop, spacer and pin. I had the fins already glued on yesterday. After the props are installed on both torpedoes I can paint them flat black. You can see the next one on top left of the pic. Here I have finished both torpedoes and shoved then inside the launcher tubes for the picture. next to the launcher is a torpedo I made some time ago and may make a few more for spares. It looks quite convincing to me, just a dab of red paint for the fuse striker button Cheers.

-
Just a beautiful piece of work Pete, you really put your heart and soul into it. Superb! I love all the pics of these boats sailing you are adding. Cheers,
- 220 replies
-
- 1
-
-
- finished
- volvo open 70
- (and 1 more)
-
Beautiful trunneling Remco! It looks superb, especially that it's to scale and not overpowering. Agree with Alan, and having used different color wood that joint really stands out to show how a joint like that should be made! A challenge for all of us to emulate. Cheers,
- 1,215 replies
-
- 2
-
-
- sloop
- kingfisher
- (and 1 more)