
HOLIDAY DONATION DRIVE - SUPPORT MSW - DO YOUR PART TO KEEP THIS GREAT FORUM GOING!
×


David Lester
-
Posts
678 -
Joined
Content Type
Profiles
Forums
Gallery
Events
Everything posted by David Lester
-
 Gary - thank you for that advice, it's very welcome. I have been a little worried about this aspect of the build, taking note of how many different details there are to be added to this hull. With the planking finished I've been debating what to do next. Now I think I'll plot out the details on the sides of the hull and as you suggest use the davits as a starting point. Many thanks for other comments and likes, David
- 145 replies
-
- 2
-

-
- model shipways
- charles w. morgan
- (and 1 more)
-
I don't believe Cast Your Anchor deserves to have any slack cut for them. I placed an order with them a few weeks ago for about $70 cdn. They charged my visa instantly, yet the order has never arrived. I only live 70 miles from their location in Toronto and I would have expected it to arrive long before now. There is no current mail strike and no cross border/customs issues. They do not respond to emails and they do not answer their phone. In fact their voice mailbox is full, so it's impossible to leave a message. It's impossible to be in contact with them. This morning I googled "complaints about Cast Your Anchor" and a very long list of hits came up, mostly in various consumer forums. If the comments I'm reading are correct, then they have not been a legitimate business for some time - they leave their website in place, accept orders, make the visa charge instantly and then do nothing. I don't know if that is exactly the case or not, but my experience certainly leads me to believe that it might be. I contacted visa this morning and have set the wheels in motion to have my charge reversed. Even if they are still a legitimate company, I would advise everyone to avoid them like the plague. It isn't worth the aggravation. We have so many good suppliers to deal with, there is just no need to get involved with this outfit. David
-
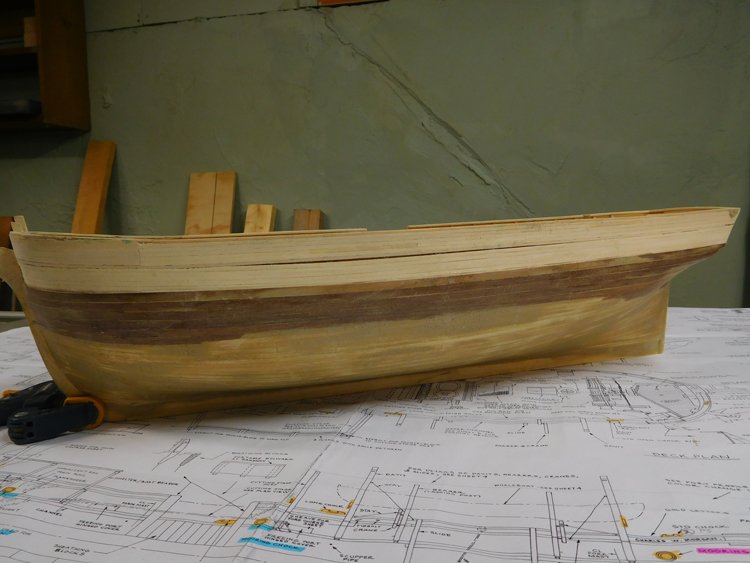
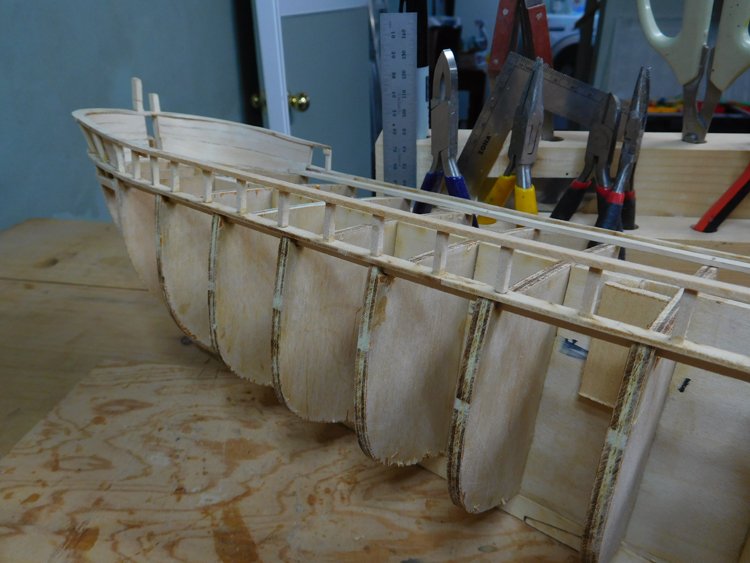
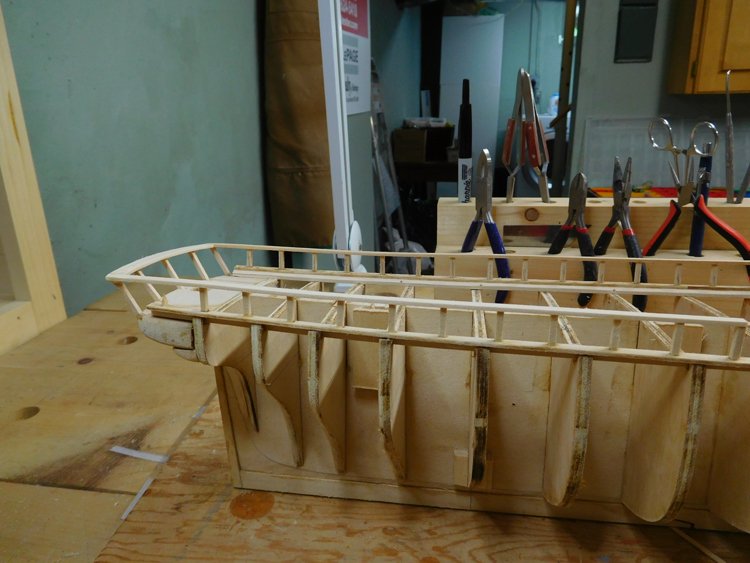
Good Morning, I have now finished planking the hull. I hesitated to include this picture, because it looks so bad, but here it is nevertheless. I'm not a very good hull planker and I'm always glad to have that part of the build behind me. This hull is single planked, and there is supposed to be a sharp line along the top edge of the wale, with the planking below the line thicker than the planking above the line. I could not seem to maintain a consistent lip along its length and it completely disappeared at the stem. To solve the problem, I first sanded the area of the wales flush with the upper planking and then applied a second layer of 3/64" walnut that I had left over from a previous kit. I planked down only as far as the point where the copper plating begins (which is quite high on this ship.) I feathered it out and applied filler. It is now well sanded and sealed with some poly. I know it looks awful at this point, but it's actually a smooth, solid and reasonably symmetrical hull with a very nice crisp line along the wales. I think it will look just fine once some black paint and copper plates are added. I know my planking skills would never allow me to build a model with an all natural finish where every plank is on full display like so many of you can do so well, but as long as I stick to paint and/or copper finishes I should be ok. So now, for me, the hard part is over and the fun part begins. David
- 145 replies
-
- 9
-
-
- model shipways
- charles w. morgan
- (and 1 more)
-
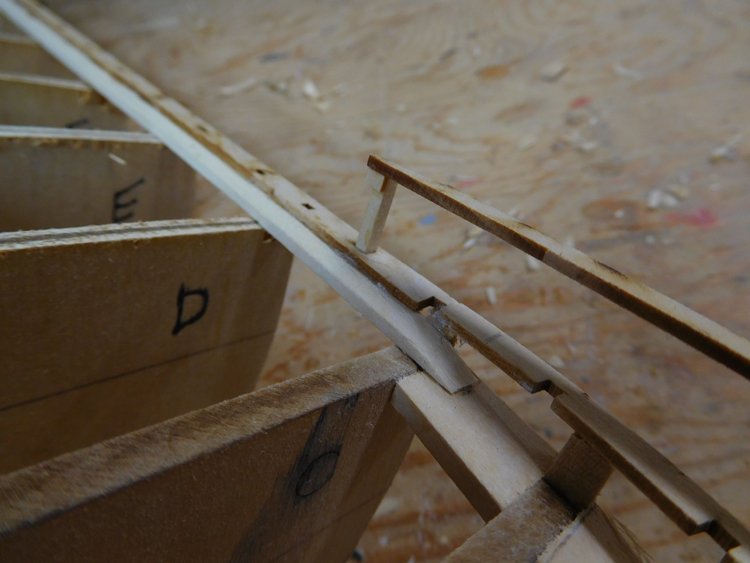
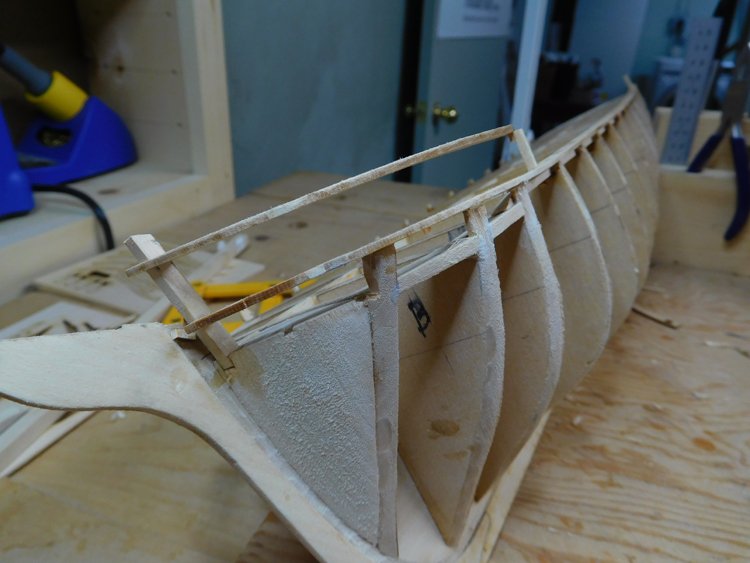
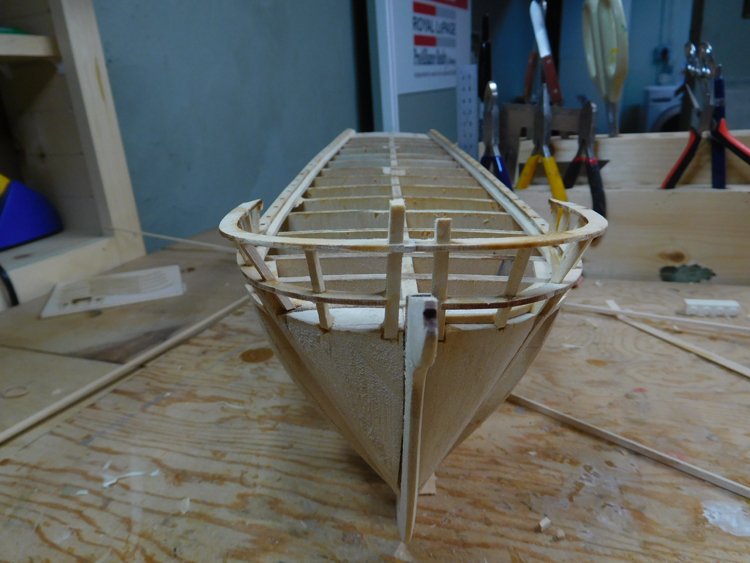
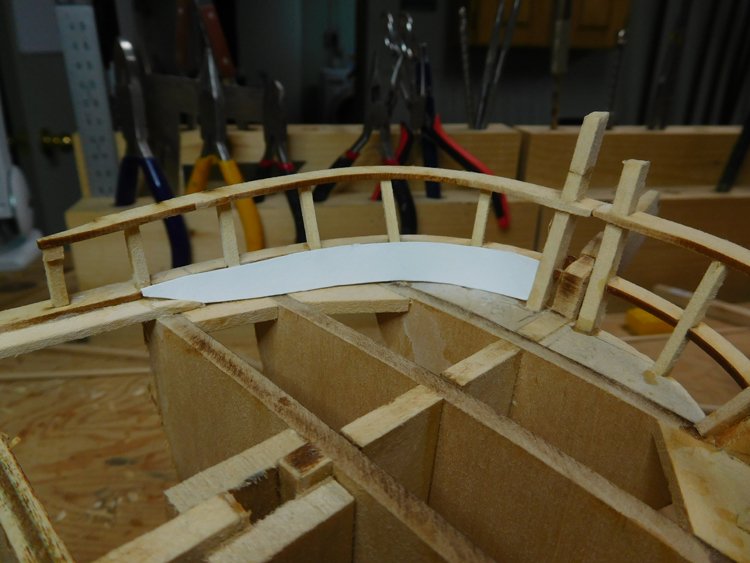
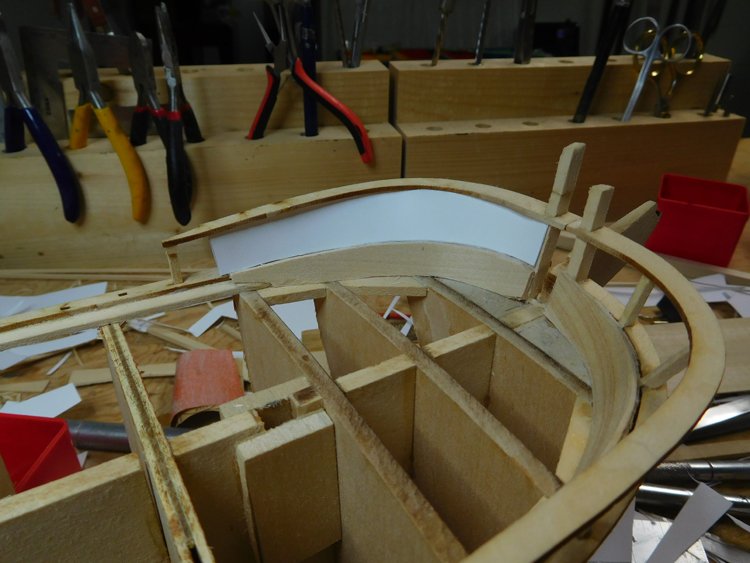
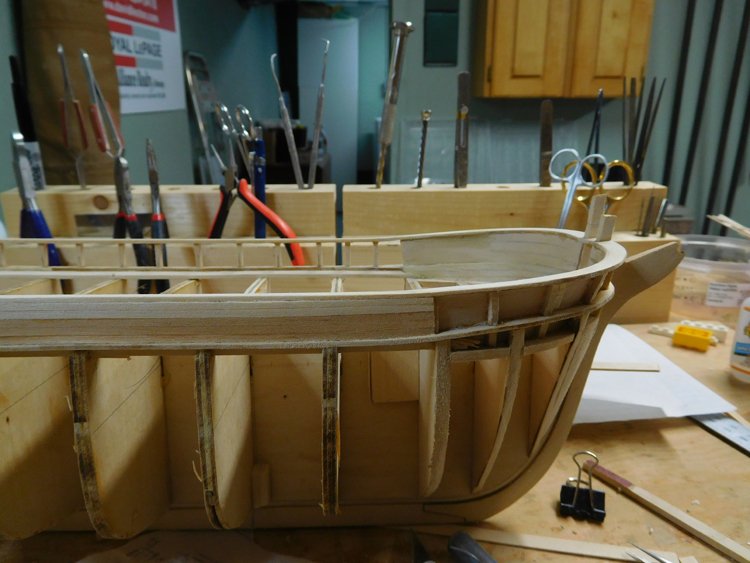
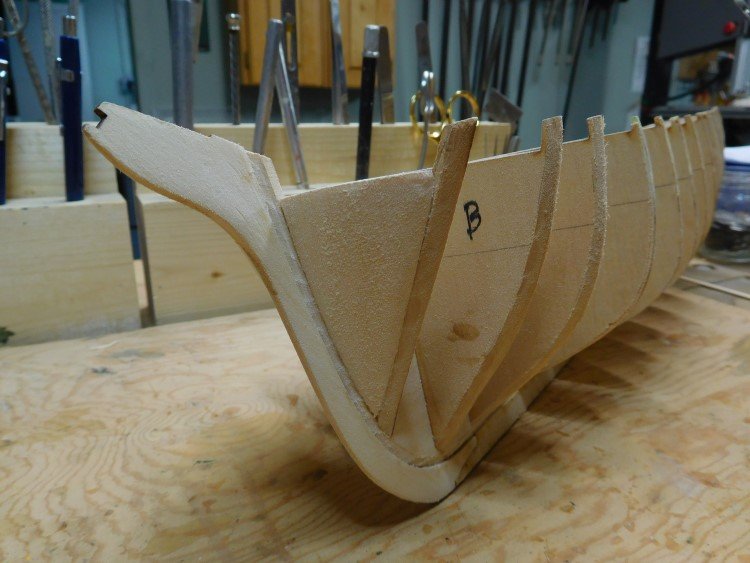
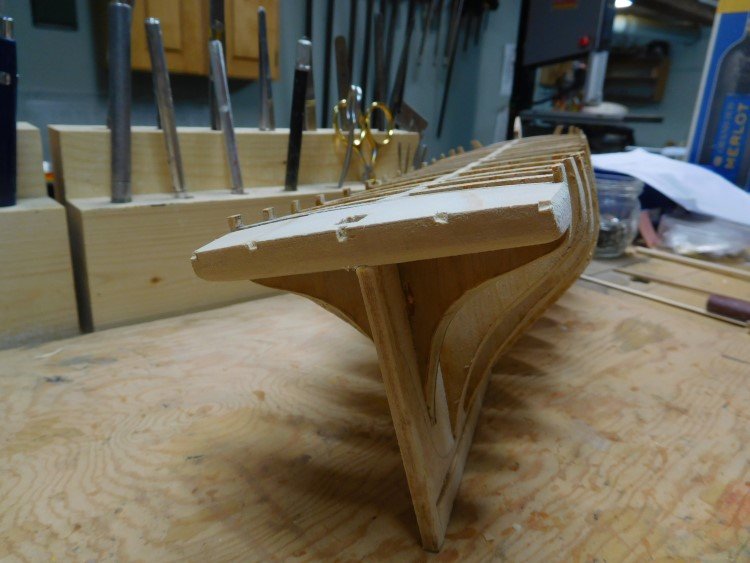
Good Morning - Just back home after a week away for a family wedding in British Columbia and we even managed to avoid all the smoke! We were in the famous Okanagan Valley which is stunningly beautiful, but I understand that even there the air quality had been poor due to smoke for much of the summer. Nothing but clear sunny skies for us though. Here is an update of my progress just before I left last week. I had been working on the bulwarks. The waterway is fairly easy to bevel and install, but it has an unusual profile at the bow where it meets the ceiling planks. It's not completely clear from the plans how this is achieved, but I think I interpreted it correctly as the ceiling planks ended up blending in just fine. The start of the bow framing. Here is the bow framing complete. It's a bit tricky as it spays outward, but actually easier than I have found on some other models because the laser cut parts fit very well. The bulwarks is planked only at the bow on this ship and this requires spiling which is something I have never done before. You can see the cardboard template I've made. The only way I could manage this was through trial and error until I finally got one that fit the space more or less correctly. The planks up to the top of the template are thicker than the ones above it. The plans indicate to use 3/64" stock for the lower planks and 1/32" stock for the upper planks. I don't have 3/64", so I applied two layers of 1/32" for the bottom and a single layer of 1/32" for the upper planks. I opted to apply each section as one piece and then I will indicate individual planks by scribing them. Here's the template for the upper set. The lower planking blends into the waterway pretty much as I think it's supposed to. The port side framing is in place and you can see where I've quickly drawn on planks at the bow just to get the idea of how it will look. In actuality very little of this shows as the anchor deck covers much of it. I was nevertheless happy to have the opportunity to try my hand at spiling and the fact that it will not be front and centre on the finished model is a bonus! Here the framing is finished and ready for planking. One little area that caused my more trouble than I thought it ought to was the upper rail as it rises at the bow. It takes a very steep rise at about the point where the planking ends. I had a lot trouble making this a smooth transition; I did it over a couple of times because I kept getting a sharp angle at the transition point, but finally I managed it. The next piece that goes on is called the log rail and that plank lays on its edge. As soon as I was able to lay it on the rail without a gap at the transition point I was satisfied. I've just started some upper planking and one little problem has become apparent. The plans call for a certain size stock for the top rail and the kit provided stock was either just under or just over that size (I can't remember the actual dimensions just at the moment.) I opted for the undersized one but should have chosen the oversized one. I spaced the rail carefully on the inside, but as you can see the rail is flush with the outer planning with no lip. Rather than pull the rail off, I've decided to sand it smooth with the planking and then add a 1/32" strip along its outside edge. I think that will work just fine and will make it easy to get a consistent depth of lip. Already I can see that I am going to have a bit of similar trouble with the planksheer, which also protrudes and I expect that I will be sanding it smooth and adding a small strip to it as well. I noticed in John's build log (charleswmorganmodel.com) that he had this problem with the planksheer as well and used that fix. So that's where I'm at right now. I'm spending the day recovering from the effects of air travel (I hate it) and will be soon back in my shop. David
- 145 replies
-
- 9
-
-

-
- model shipways
- charles w. morgan
- (and 1 more)
-
Thanks Chuck, So it is a matter of spiling just as if it was on the outside of the hull. It's something I haven't tried in the past, but I've been working on it this afternoon with some good results. I'll post some pictures soon in my build log. Thanks again for your help. David
-
Good Morning - I have a question concerning the bulwarks planking on my Charles W. Morgan. The bulwarks are planked only at the bow and it's a blunt end which means a significant curve is needed. That's not problematic in and of itself, but the issue for me is the fact that at the same time the bulwarks slope outwards. I can't seem to get the plank to bend in the required two planes at the same time. If the plank is flush to the deck or the plank below, it won't lay flat against the framing. If it's flat against the framing, it won't rest flush on the one below. I suspect there a technique for this, but I'm not sure what it might be. Is there a kind of "reverse spiling" or something of that nature? Does using the narrowest possible planks help? I know it's actually not too important for this model as most of this planking is hidden beneath the anchor deck, but I'm now really curious to learn if there is a technique that I don't know about that's better than my default setting of using half a bottle of CA glue and then sanding the heck out of it. Any suggestions or input would be much appreciated. Many thanks, David
-
I just hope that when I'm finished it doesn't resemble William H. Macy as he appears in "Shameless!" Thanks for checking in everyone. While it's still early days, I have to say that I'm very impressed with this kit so far. It's presenting plenty of challenge. I'm working on the planksheer, rails and stanchions and they're quite tricky, but at the same time the design of the kit is so good that it doesn't work against you. It's very satisfying and fun. Also, I can see that the kit provides lots of room for enhancement or upgrading which I hope to do to a certain degree. With so much reference material readily available that shouldn't prove to be a frustrating exercise. David
- 145 replies
-
- 2
-
-
- model shipways
- charles w. morgan
- (and 1 more)
-
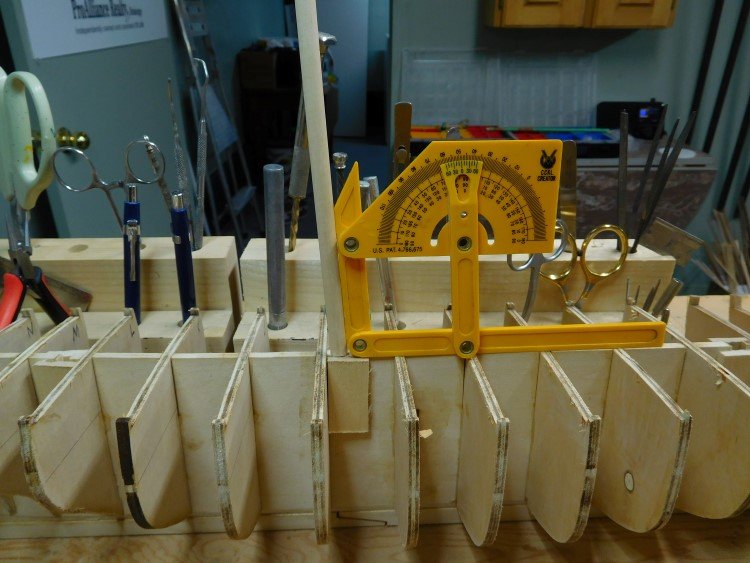
Hi Mike, Thanks. With that counter I'd make one curved cut first then find I didn't have a straight reference point for the next curve, so I'd redo it, forgetting about yet another curve in another plane. I swear this thing is from the fourth dimension. I've had that protractor for years, but I don't actually use it all that often. I don't think it's especially accurate, (it was quite cheap) but it seems to be just fine for this application. I've been over John's build log many times as well as his photos which are a valuable resource. There are some very minor differences between the photos and the plans, so I'll have to make some decisions when I get a little further along. Thanks for your offer. I may have to call on you to clarify something that is just out of camera range in John's pictures. David
- 145 replies
-
- 2
-
-
- model shipways
- charles w. morgan
- (and 1 more)
-
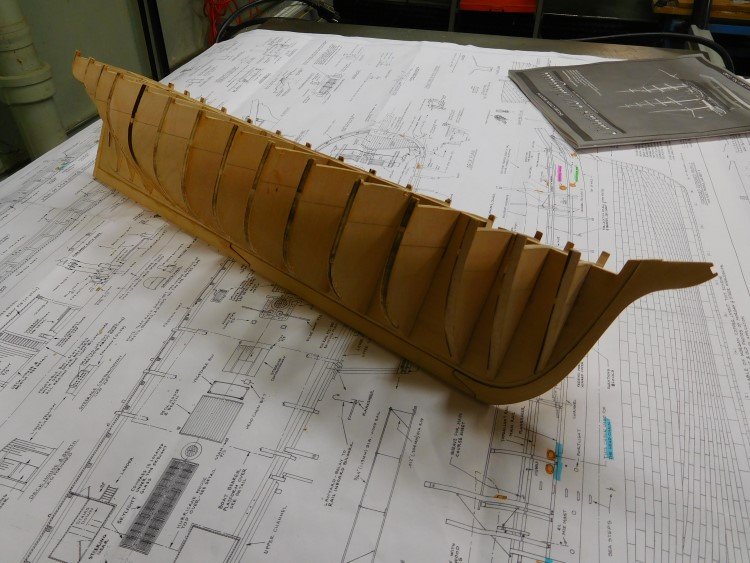
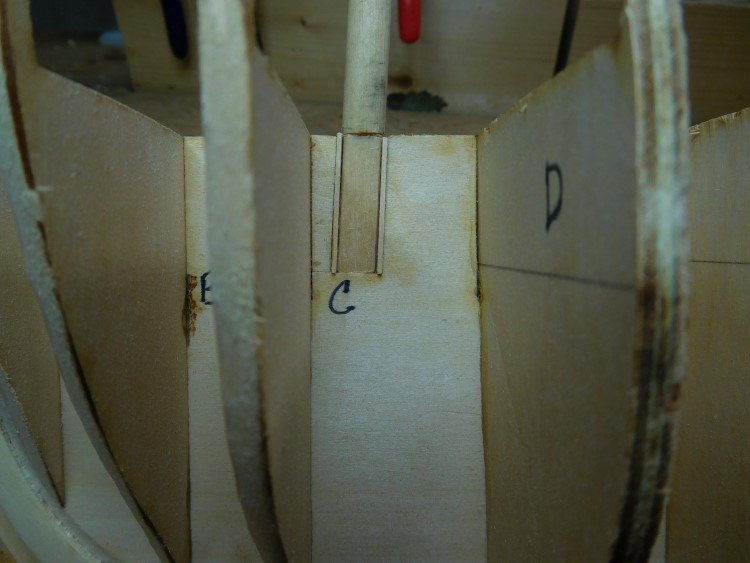
Hello All, Thank you all very much for checking in, comments, likes etc. I have a bit of progress to report. The keel is assembled, bulkheads added, mast slots readied and bow blocks and counter installed. In the past I've been a bit negligent about preparing the slots for the masts at this early stage, but this time I've looked after it and I think it will pay off. I added shims to the slots to hold the masts more or less at the proper angles. It's a lot easier now than trying to measure the angle when the deck is filled with furniture etc. which is my usual m.o. The bow blocks were easy enough to do, but for some reason I had a hard time with the counter. I normally have no trouble reading and understanding the plans when they are showing in two dimensions how something will look in three dimensions, but some reason I couldn't wrap my head around how this one was supposed to look. It took a couple of tries, but I think I now have an acceptable result. The stern blocks are almost finished and ready to add. David
- 145 replies
-
- 12
-
-
- model shipways
- charles w. morgan
- (and 1 more)
-
I am now launched on my latest project - the Charles W. Morgan. I though long and hard about what model I would like to build this time and for several reasons settled on this one. I was ready again for a fairly involved build which I think this is going to be, as well as a change of pace. Being a commercial vessel rather than a naval vessel it presents a vastly different set of features, particularly the deck details, and there are no cannons to rig! In addition there are plenty of resources readily available including excellent build logs and many photos on line, and of course it's always possible to visit the actual ship. So, the Charles W. Morgan it is. At the outset, for some reason, my wife could never seem to remember the name of this ship and at one point said, "So, have you settled on the William H. Macy, or whatever the heck it's called?" So, we now tend to refer to it as the William H. Macy! Last night I assembled the keel pieces and today have been dry fitting the bulkheads and I am quite impressed at how well they line up with the rabbet - very little adjustment will be needed. So far, so good. I'll post some pictures as soon as it starts to get a little more interesting. David
- 145 replies
-
- 8
-
-
- model shipways
- charles w. morgan
- (and 1 more)
-
Thank you Don. I have no problem doing another MS kit. They generally have excellent plans and I'm finding the Charles W. Morgan to be no exception. I think the PdeN was an anomaly and not typical. It was discontinued for a reason. David
-
Again, thanks for comments and likes. Jim, it's going to be the Charles W Morgan. I'll outline my thought process in choosing this kit when I start its build log. David
- 59 replies
-
- 1
-
-
- prince de neufchatel
- model shipways
- (and 1 more)
-
I had to hold myself back from jumping in with both feet on the Constitution which is a big build. I built one "learning kit" which was the Model Shipways Armed Virginia Sloop, and found it was enough to give me the confidence to tackle the Constitution. I believe the CWM is a pretty big build too, so your idea of getting some experience under your belt first is probably a good one. The Kate Cory should be a good choice to give you the type of experience you need to take on the CWM. David
-
Thank you everyone for your comments and "likes." They're very much appreciated. I'm now getting my workshop re-organized and ready to go for the next one. Thanks again, David
-
Hi Dan, Is this where I notify you of my completed build log? I'm a bit out of date. My Rattlesnake, Prince de Neufchatel and Virginia Privateer are all now finished. Many thanks for your help. David
-
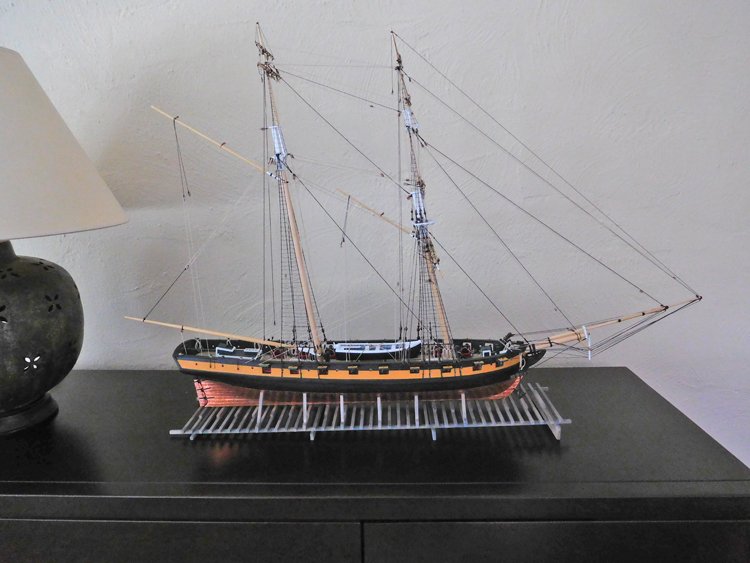
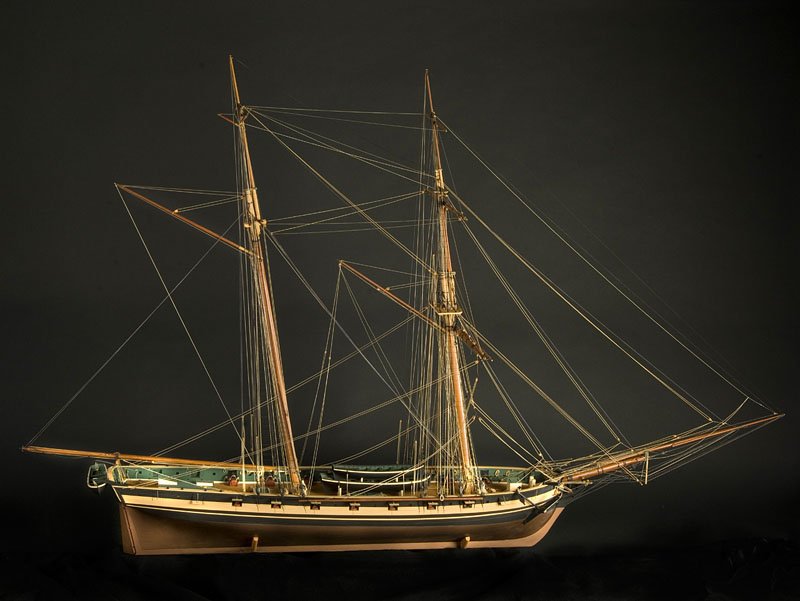
Well, I'm calling this model finished today. The last remaining items were rope coils and paint touch-up. I'm never really very happy with my rope coils, but I'm not sure I can get them any better than this. As I mentioned before, I tried the Tom Lauria method, and while it worked well enough, I found I was more comfortable if I reverted back to the similar, but slightly different method outlined by J Brent in his YouTube video. So, I have some thoughts on this model. I believe that the Prince de Neufchatel was an extraordinarily beautiful ship, and that was largely the reason I wanted to build this model. I was also in the mood for relatively simply and not too taxing a build, which I though this would be. I'm happy enough with the result, but I found it to be a very frustrating model to build and not my favourite by a long shot. The design flaws of the kit and really very poor plans presented some challenges that I didn't anticipate and took some of the pleasure away for me. I'm used to sketchy MS instructions, but they usually have excellent detailed plans, which makes it easy enough to figure out what to do. But not in this case and I had to resort to a lot of (sometimes unsuccessful) guesswork. Not helping the situation was the lack of consistent reference material for this ship. I managed to locate pictures of three different versions, apart from the MS version, but they all differed so greatly that they might as well have been of different ships. I know some other builders are concerned about the inaccurate gun carriages on this model, and I agree that the kit supplied ones seem too big, but I chose to go with them anyway as my motivation on this one was waning. I'm now getting ready to start my next build which will be the Charles W. Morgan and I'm hoping for a much more satisfying experience. It looks like a challenge, but the plans appear to be excellent and there is plenty of reference material available. Many thanks for comments, likes, etc. David
- 59 replies
-
- 16
-
-
- prince de neufchatel
- model shipways
- (and 1 more)
-
Almost finished! Over the weekend, I completed the running rigging. Now I have three more things to do - the anchors, the rope coils for the belaying pins and finally my "punch list" which is a number of minor repairs, paint touch-ups and other little tweaks. I've trying different ways to make the rope coils, but this time around I'm going to follow the method outlined by Tom Lauria in his Youtube video. Of course, success really just comes down to getting the coil's length and the length of the loop at the top right and that's dependent on me regardless of the method I use to make them, so I'm sure I'll find this as frustrating an exercise this time as I have in the past. But Tom's method looks promising, so I'll looking forward to giving it a go. Thanks for the "reactions." David
- 59 replies
-
- 8
-
-
- prince de neufchatel
- model shipways
- (and 1 more)
-
Hi Mysticfr, The whale boats are mini kits in themselves. While I haven't started my CWM yet, I did make four similar boats for my Constitution. Shaping the exteriors is relatively easy, but it's very hard shaping the interiors; it's difficult to get even the smallest tool into the corners at the bow and stern. I have since read of two techniques that might be helpful and I'm planning to try this time. The first is to leave the bottom piece off until after you've shaped the interiors. The allows much easier access from both top and bottom. And the second idea that I'm interested in trying is a little more drastic. It also involves leaving the bottom off at first, but then running the boat through a band saw lengthwise which would allow very easy access to the interior of each separate side. Once each interior side is shaped, glue the two halves back together, then add the bottom. Once all that is done, then shape the exterior. I'm not sure yet how helpful these techniques will be, but with seven boats to do, there's plenty of room for experimentation! David
-
Good Morning Mysticfr, The CWM is going to be my next project; I have one waiting on the shelf. While I think it will be a challenging build, there are plenty of good resources available. There are some build logs on this site and one builder has created his own website about his build, which offers lots of good advice and many good photos of the real ship. It's at www.charleswmorganmodel.com. Another builder has developed a mini practicum on how to build the tryworks, which is worth taking a look at. It's available under the resources section of the NRG website. And, of course, the actual ship itself is always available for first hand reference! I'll be starting mine this fall, so I'll be looking forward to following your progress at the same time. David
-
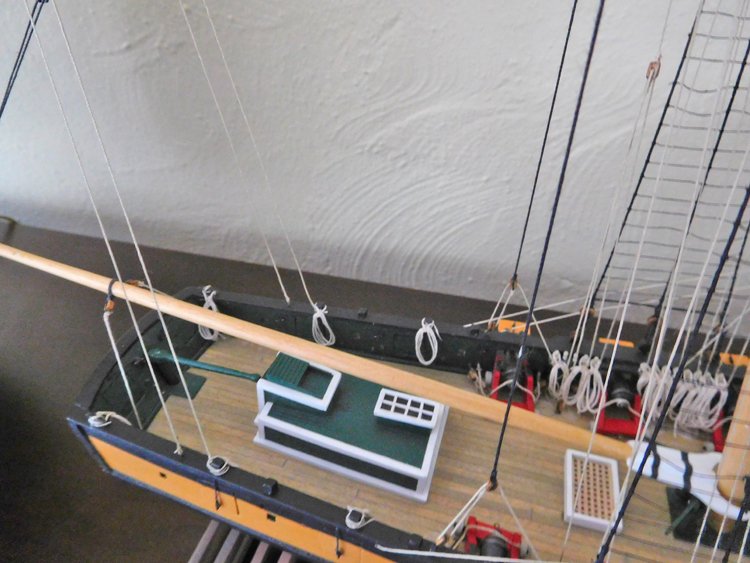
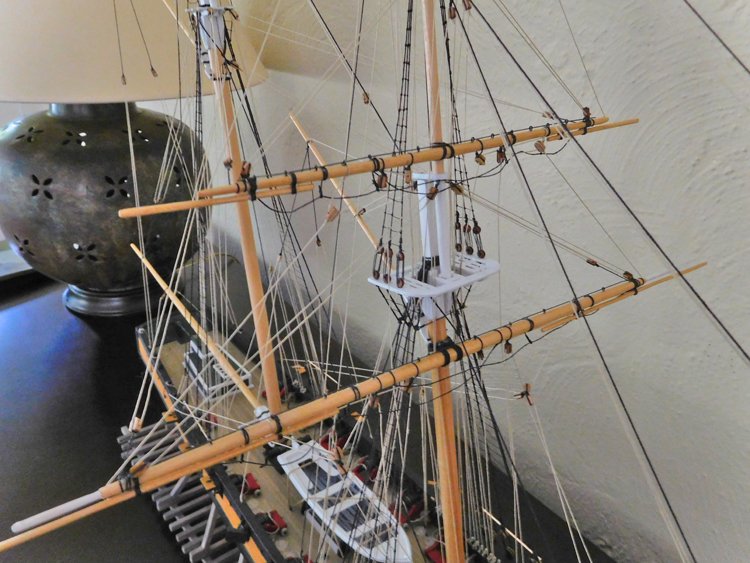
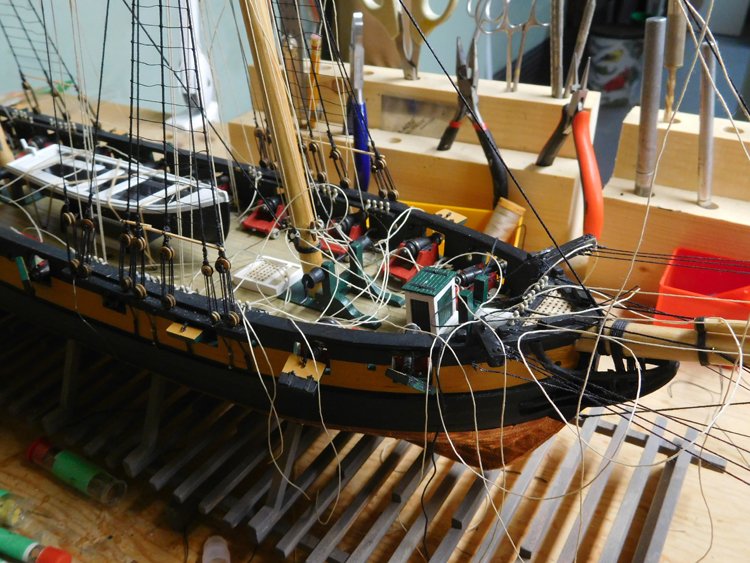
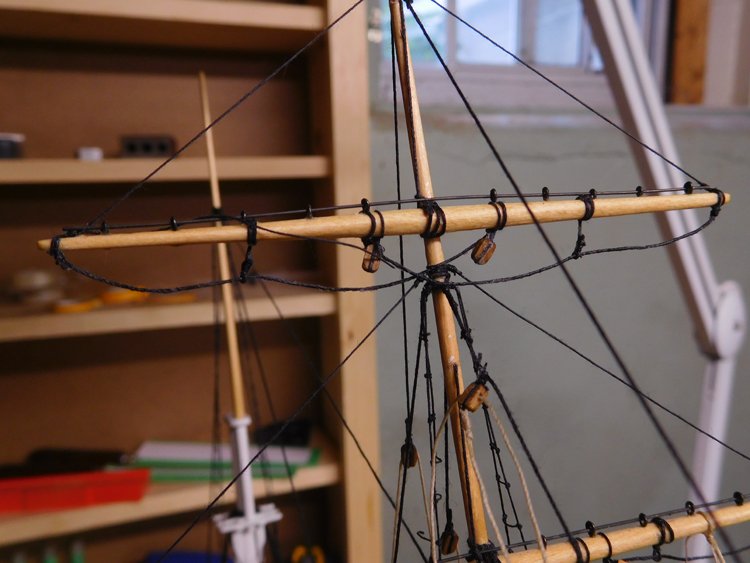
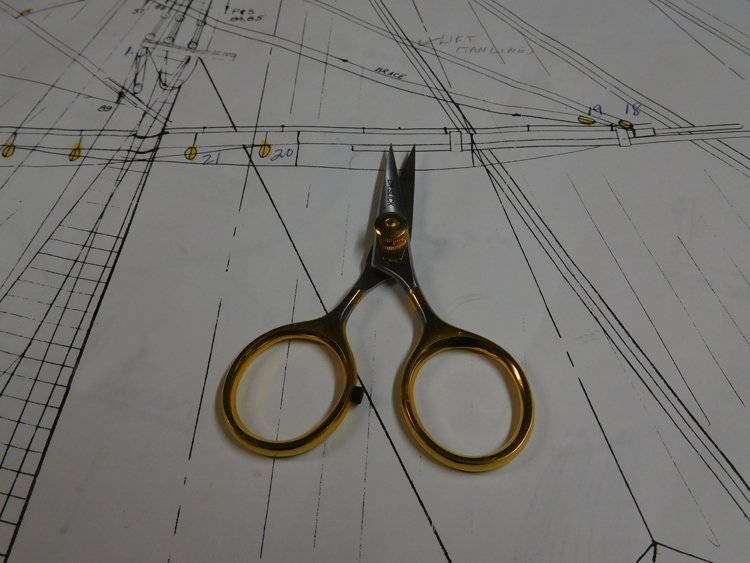
Hello All, Hope you're all enjoying the summer weather. We are having a very hot and humid spell - my basement is a welcome cool retreat. I've been working away at the rigging although I've been quite negligent about my build log. So here are a couple of update photos. It all looks quite a mess at this stage, as there is a number of unfinished lines, still left long, but I have learned from experience not to cut them off too soon. I have always found the footropes very difficult to do, and I've spent a fair bit of time on them for this model. My first attempt was not very good, so I experimented with using wire. I have some 26g annealed wire and I made a couple of sets with it. While it has some advantages, I still found it very hard to get it to lie smoothly without tiny twists and turns. In the end I went back to using line, but this time I used much more glue on it than I have in the past. I attached a large paper clip to the low point of each loop and applied a lot of glue. When it was dry, I removed the clips, which left sharp low points at the centre of each loop. I used a pair of tweezers and quite firmly grasped the line and ran them back and forth along the length of each loop. That seemed to work the low point out quite well and removed excess glue which showed up in a couple of spots. There are still a couple of tiny spots that look shiny, so I'll touch them up with a dab of flat black paint. The result isn't perfect, but it's the best I've been able to achieve so far. The last photo is of my new Dr. Slick scissors, which are now among my favourite things. I have gone through a couple of sets of cheap scissors from a sewing store and wanted something a little better. I found a discussion on this forum about scissors and based on the opinion of several others, I opted for these and I can't recommend them highly enough. They are very sharp and you can cut very close to the knot, but the chief advantage in my opinion is that they cut equally well at their very tip as they do along the length of the blade. which increases control and lessens the chance of cutting the wrong thing. David

- 59 replies
-
- 9
-
-
- prince de neufchatel
- model shipways
- (and 1 more)
-
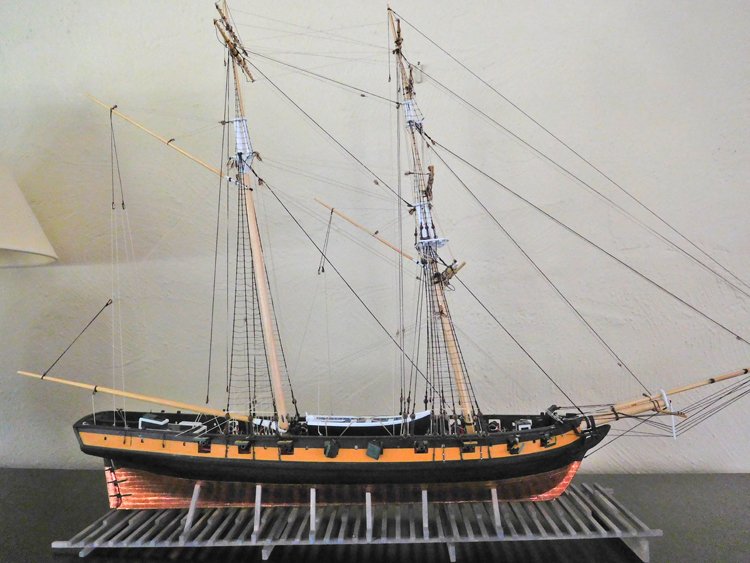
Good Morning All - Some progress to report. I've been working on several different fronts simultaneously. The main one has been the boat. It's a tricky little project and I didn't particularly enjoy it, however the result is satisfactory enough. It involves making a build board and in typical PdeN fashion, the instructions are not only vague, they are actually incorrect. I'm thankful to a couple of others' comments, who learned the hard way. The resulting boat is a pretty flimsy structure, with 1/32" planking over 1/16" square "frames." I chose to double plank the hull, which was a good thing to do and improved the result considerably. The second thing I've been doing is adding the jackstays and studding sail booms to the yards. On my Constitution build, I used plastic strips to simulate the iron bands. I found it difficult to do and I wasn't particularly pleased with the result. This time, I soldered brass strips and I'm quite happy with the outcome. And I've started work on the standing rigging. I have the bowsprit in place and the lower fore and main masts and have just started on the lower shrouds. That's going to be it for a little while. On the weekend we're heading to the UK for two weeks. Sadly, there are no ships on the itinerary this time, but last time we toured five, so I guess I can't complain. Again, thank you for comments and "likes." David
.JPG.732e7b3bfb2eafec2535dbc79888ada3.JPG)
.JPG.2512d7c8c605b40a5d234197398ce200.JPG)
.JPG.0e887554436da7d3454eafbc0a48532d.JPG)
.JPG.3f4ab3290cdb008dbe2925a38e3998ee.JPG)
.JPG.0014660c364b1b5caa7cfb26aeb4b33e.JPG)
.JPG.08913316d01d05471dd1fd0332bdc6ce.JPG)
.JPG.89a85ceb9e9ec0fe7a719ed3f8e42afe.JPG)
.JPG.5abee459133aeac4e02bd2b39c7a83e4.JPG)
.JPG.a54114248d53094bf72ec9cc6f342394.JPG)
- 59 replies
-
- 9
-
-
- prince de neufchatel
- model shipways
- (and 1 more)
-
Hi Jim, I'm really pleased you're doing a build log for this model and I'll be following along with great interest. David
- 104 replies
-
- 4
-
-
- constitution
- BlueJacket Shipcrafters
- (and 1 more)
-
Thanks Jim, I like the green too. I used the model at the Smithsonian as inspiration. Here's a picture of it. I would have loved to put in that second narrow stripe of yellow, but I knew that getting such a narrow stripe dead straight and even would be for me a "that way madness lies" scenario, so I left it out. David
- 59 replies
-
- 2
-
-
- prince de neufchatel
- model shipways
- (and 1 more)
-
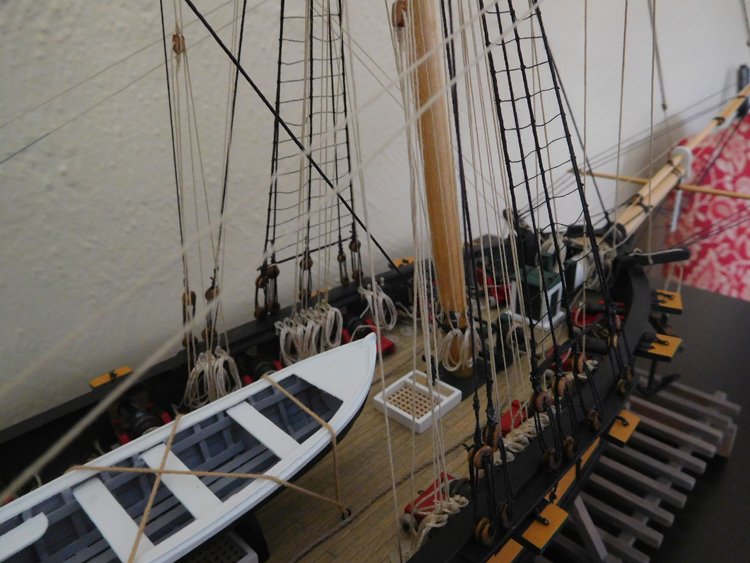
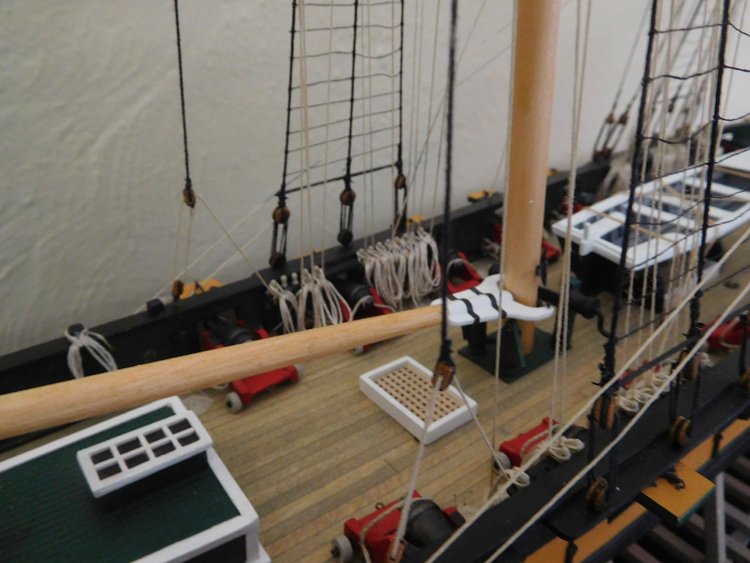
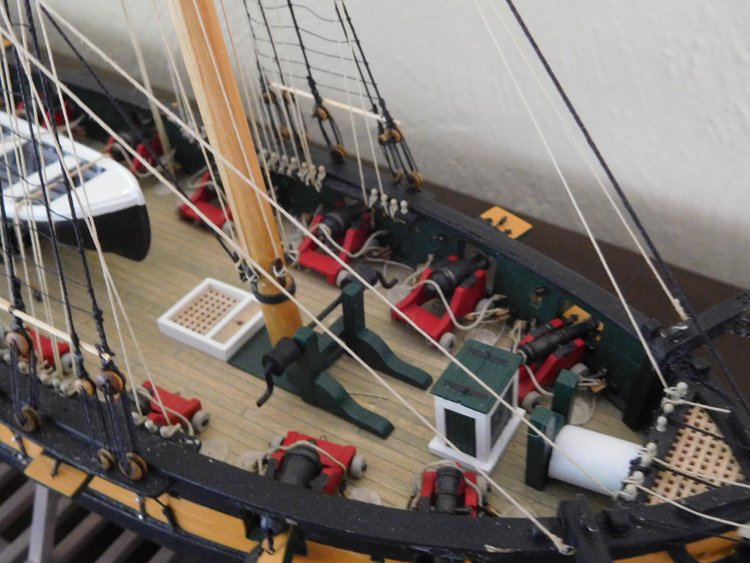
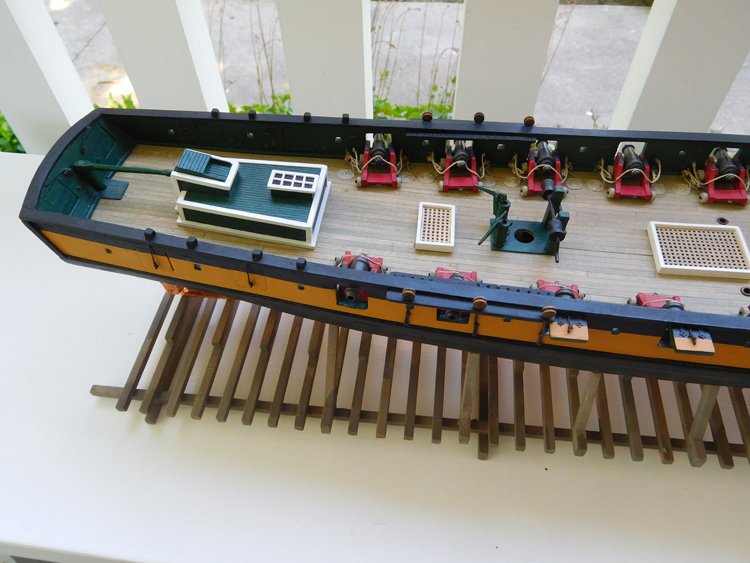
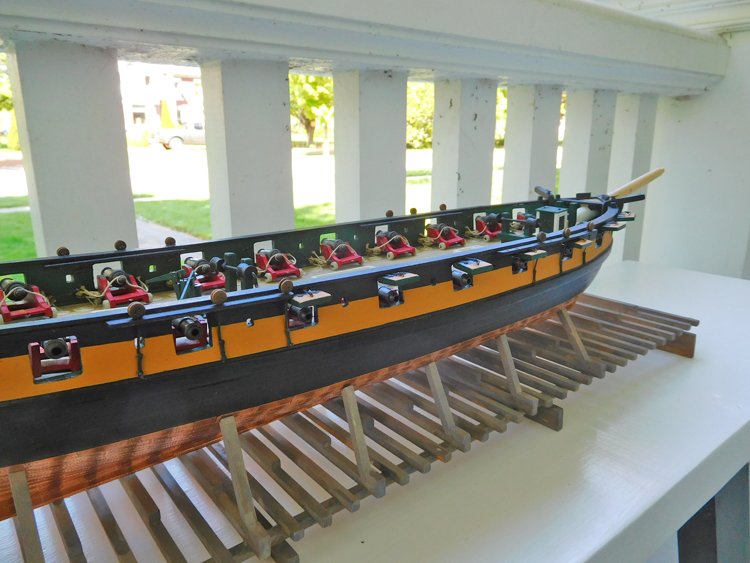
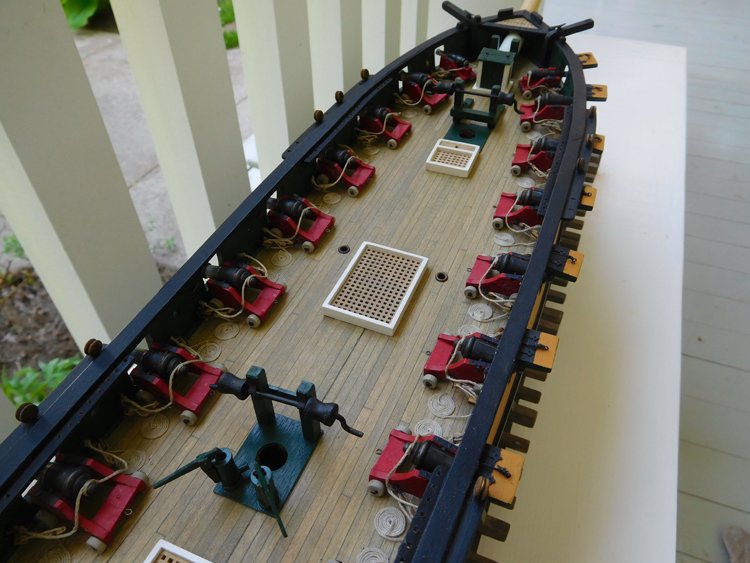
Good Morning All, Some progress to report - I've been finishing up details on the hull and deck. I've finished rigging the gun carriages and added most of the deck furniture and bowsprit. I've attached the rudder. Some of the chainplates are finished. So far I've only attached the ones that secure the lower shrouds. I placed the lower masts on the model and ran a line from the mast tops to the deadeyes in an effort to get the chainplates to line up accordingly. There are a few deadeyes that attach to stays which originate from a higher points on the masts, so I'm going to leave those ones until I have the masts in place. I'm in the process of adding the gunport lids. I'm running a line from the lid, through a hole in the hull and then attaching it to a cleat in the bulwarks. I saw this detail in the Reed book on modeling this ship. I believe only the anchors are left before beginning on the masts and spars. Oh, I almost forgot - the boat. It looks like a real challenge to get a good result. If I'm happy with my result, I'll add the boat, but if I'm not able to do a decent job on it, I'll just leave it off. Thanks again for comments and likes. David
- 59 replies
-
- 14
-
-
- prince de neufchatel
- model shipways
- (and 1 more)
-
That's a very nice job, Bob. I think leaving the nail heads off looks just fine. David
- 359 replies
-
- 5
-
-
- prince de neufchatel
- model shipways
- (and 1 more)
