


David Lester
-
Posts
679 -
Joined
Content Type
Profiles
Forums
Gallery
Events
Everything posted by David Lester
-
 That's too bad! Very easy to do though. I snapped a mast off my Constitution by swinging my light around when it wasn't high enough to clear. In any case almost anything can be repaired. Naked modelling? I'd be VERY careful with that. I have a tendency to drop my xacto knife a lot. David
 -
Hi Doug, I think I'd just have a go at it by hand with some sandpaper and round the corner over by eye. I think you'll get a good result. That's what I did for the bolsters on the mast tops on my Constitution and it wasn't hard to get a satisfactory result. Admittedly, each one wasn't very long, but even along the length of the waterway I think you'll be able to do it without too much trouble. David
-
Thanks for the suggestions Jon and Dave! I have since install the bits on the deck and that's essentially what I did, but there were only two to worry about. Lining up the seven in the railing would have been a bit harder. I didn't substitute a very short piece of brass rod for the positioning, David, but I think that's a great idea for increased control. David
- 67 replies
-
- 2
-

-
- rattlesnake
- mamoli
- (and 1 more)
-
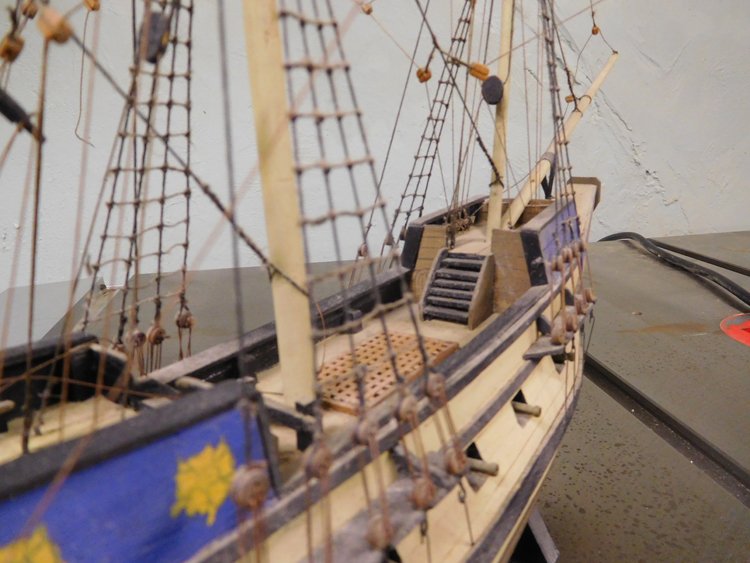
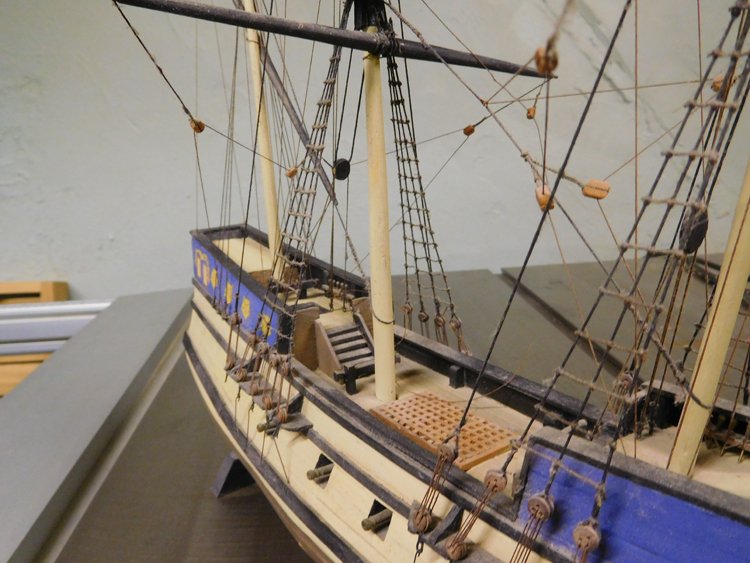
After much trial and error, I finally wrestled these railings to the ground. The mistake I made was trying to build the railing off the model and then install it. As soon as I built the railing on the model my problems disappeared. I was trying to glue the top ends of the balusters against the underside of the top rail and was having plenty of problems keeping them straight and properly spaced and then how was I going to install it. Butt joints at the rail and against the deck didn't seem secure enough to me given that rigging is belayed to these rails (and remembering the issues I had with the rails on my Constitution.) But if I anchored the balusters to the deck with pieces of brass rod, I wasn't sure of my ability to line up and drill seven holes all in the right place. So - my solution was this - the instructions call for 1.5 mm wood for the top rail. Instead I used a 1 mm strip and then attached a 1x1 mm strip along each length of the underside. This created a channel for the baluster to fit into, automatically lining them up and giving considerably more gluing surface. I then installed the two end balusters on the deck, drilling them and anchoring them with a piece of brass rod. Then I cut the remaining five balusters to length and with the top rail installed on the two end balusters I could slide the interior ones into place and locate them by eye. They're glued as well, but it's really the end two that provide the integrity for the structure. I'm pretty sure this will hold the belayed rigging without popping loose. Now on to the railing around the bow, which I'll approach in a similar fashion. David
.JPG.38ff58e29b6940c69b71645e3f92b6fd.JPG)
.JPG.2aa8e267a49a56ea8aa21d22c0a3a0e2.JPG)
.JPG.548b02abe96669250e0e7d3cfc3fd140.JPG)
.JPG.42f39934db35b30a1e5933e170a3dd9a.JPG)
.JPG.7cce98d1acf78094aaec7d6549796b8a.JPG)
.JPG.7662b505785ae6bb5aa69e8f551276bb.JPG)
.JPG.fc7bde7d73e9b8becbd6f209a9f6f2bc.JPG)
- 67 replies
-
- 7
-
-
- rattlesnake
- mamoli
- (and 1 more)
-
Decking looks great! David
-
I'm turning my attention to the head rails. I have the Bob Hunt practicum for this model which features a lot of kit bashing. I'm not really doing any kit bashing, but I have to make an exception with the head and cheek rails. The kit comes with cast metal ones which look ridiculous and in addition don't even fit (picture below.) Bob's kit bashing involves working with the Hahn plans which have a significantly different looking stem than that which comes with the kit, so the rails that he outlines don't quite fit the basic model either. So, I'm improvising them and the picture shows my progress so far. They're more or less similar to the ones Bob describes. Since I'm just working with basswood, carving a profile into the face of them is not practical, so I'm using some styrene strips to create a profile. I know it looks rough now, but with a little more sanding and once painted, they shouldn't be too bad. Once these are finished, I'll return my attention to the deck details which I'm taking a break from. I'm having trouble coming up with a satisfactory way to attach the railing tops to the balusters in a secure fashion (they have to withstand a bit of pressure as rigging is belayed to them.) I've tried a few ideas, but am still having trouble spacing them evenly and attaching them securely. So I've been "sleeping on it" and will return to that problem shortly. David
.JPG.591a13ef8940a7d297f44903a9a365fb.JPG)
.JPG.e8f3d6d28b0209bef383b03cca6705ab.JPG)
- 67 replies
-
- 3
-
-
- rattlesnake
- mamoli
- (and 1 more)
-
Hi Mike, You might want a back-up plan for the lettering. While I know some have had good luck with the Woodland Scenics lettering, I found it very frustrating to use. It's quite difficult to position each letter precisely where you want it, and even though I thought Id' rubbed each letter properly, in some cases when I lifted the sheet little bits of while lifted off with it, ruining not only that letter, but in fact the whole word to that point. I had good results using Microsoft Word. To get white lettering on black background, I just created a one-cell table and made the background black and the lettering white. I experimented quite a bit to get the font and spacing that suited. This was for my Constitution. I think this will work well for your Morgan too. I wouldn't worry too much about the black matching, with that white strip above the lettering, it should be enough to make any slight difference not noticeable. While this is ok for white lettering, I'm not quite as sure how well it will work for your gold lettering. Metallic colours are harder to duplicate than white, but with a bit of experimenting you might be able to find one that works well enough. I hope your Woodland Scenics option works for you, but if not, I wouldn't dismiss this alternative as a way to go. (ps I really like this model and it's on my shortlist for the future) David
-
Thanks Dave, Tumblehome is a new nautical term for me, so I had to check it out and I've added it to my vocabulary. You're certainly right about the extreme tumblehome on the Rattlesnake. Now I know why that false deck was so hard to install. David
-
Hi Doug, I was thinking some more about Alan's suggestion of sanding the dark areas and restaining the light areas and it reminding me of having toured the Gibbard Furniture facility in Napanee many years ago when they were still in business. They were makers of furniture of the highest quality and they were especially famous for their incredible finishes. According to the person conducting the tour, this spot sanding process was the secret to their impeccable uniform finishes. I think they used fine steel wool, and as I recall they referred to the process as "hand zipping." It might work for you. David
-
Hi Doug, Your planking looks nice, but I agree that the stain is not quite so successful. Are you using basswood for the planking? It always seems to be the most reluctant to take a stain evenly. I have always found finishing to be the hardest part of woodworking and it's not really much easier for models either. I had a similar situation on the deck of my Constitution (basswood) and finally solved the problem by thinning paint until it was very thin and and then painting it on and wiping it off. It worked very much like a stain, but with just a bit more pigment, so it covered more consistently, but still gave the appearance of stain rather than paint. I also recall that I masked off the rest of the model and went at the deck with paint stripper in an effort to get it as "bleached" as possible before applying the thinned paint. I experimented with colour first, mixing various browns and yellows etc. It might be worth a try playing around on some test wood to see if if this might be a possible solution. I also go through the port-starboard display debate with every model and every time I decide I have to make a switch, my standard by necessity seems to drop just a little. In the end the only really acceptable way to view my models is head-on only (and from about 25 feet away.) David
-
Good Morning All, Thanks for your comments and likes everyone, and zappto I agree, it was a beautiful ship, with a very long and lean look. A little progress to report - I have started work on the deck details. The stanchions for the forward rail are done, but not installed yet. Then I proceeded to the railing on the quarterdeck and realized that its height depends upon the height of the stanchion on the small platform in front of the quarterdeck, and that stanchion's height depends upon the placement of the platform so I needed to install it first. This of course led me to realize that I needed to install the cannon that sits under the platform on each side before the platform goes in, otherwise I'd never accomplish the rigging. So I set out to assemble the cannons. For some reason, there is no provision in this kit for the rigging of the cannons, (perhaps because they rest under a platform that runs the length of the main deck? - I don't know.) In any event, I've rigged all the ones that are on the main deck, with blocks left over from my Constitution and have installed four of them, and the small platforms that extend from the quarterdeck. One thing I hate doing is making the little hooks that are supposed to be used to attach the blocks to the eyebolts. I can never get them small enough, they always look terrible and they always come unhooked, so this time, I just seized the blocks to the eyebolts. It works for me, and the cannons will be only partially visible in any case. You can see my start at the details for the deck. For the gratings, I tried something that seems to work quite well. I assembled the grating to the approximate size and then I glued it to a piece of heavy black paper. This gave it considerable stability and will work well on this kit, because the gratings just get glued to the deck; there is no actual opening below them, so the black paper will be effective. I just have to remember when installing them "black side down, David" So that's pretty much it for now. David
.JPG.1dad06012552bebc165fd05df7f58277.JPG)
.JPG.5c8b5f56268eb46d44dc0e7e73c0fe0b.JPG)
.JPG.3e2c7b7643226c65d67c63bfde720730.JPG)
- 67 replies
-
- 4
-
-
- rattlesnake
- mamoli
- (and 1 more)
-
Good Morning All, Well, I've finally finished painting the hull. This took quite a bit more time than I anticipated. My problem was the line at the top of the wales where the black meets the yellow. The lower line where the black meets the white was easy to tape and achieve a decent result, but not so easy at the top of the wales. The wales is thicker than the planking above it, with a ledge. I wanted the top of the ledge to be black, not yellow, but taping to the 90 degree transition was very hard to do. I must have made four or five attempts and no matter how carefully I thought I was taping, I always ended up with an unacceptable result. It occurred to me that if i could tape flat on the yellow, just a fraction of an inch above the transition point it would be easier to get a clean tape line and perhaps it wouldn't be noticeable to the eye that the line was just barely higher than the top of the wales. So I ran a slightly dull pencil along the top of the wales and it placed a parallel line on the yellow, above the wales barely 1/16 of an inch or so. I taped to this line and it worked like a charm. The eye cannot easily detect what I have done and the result, while not perfect, is acceptable. We're off to a family reunion this weekend. You know what they say - "Family isn't a word, it's a sentence!" If I survive, I'll be back with more updates. David

- 67 replies
-
- 10
-
-
- rattlesnake
- mamoli
- (and 1 more)
-
USS Constitution (Mamoli 1:93) What to do?
David Lester replied to Techsan's topic in Wood ship model kits
Hi Techsan, I'm no expert, but judging by your pictures I would say that you have done a beautiful job so far. I think your model is well worth continuing with. I'm not sure how many of the remaining parts you feel you need to replace, but if you still have the plans, it shouldn't be too difficult to determine what you need and then source them from one or more suppliers, or buy the wood and fashion some of the replacement parts. Another option, although it would be expensive, is to try to obtain a whole second kit and work from it. I know the Mamoli company is not longer in business. Some of their kits are currently available from Dusek, but I don't believe the Constitution is one of them at this point. However, I'll bet you could still find one either through one of the major retailers or on ebay. I guess a third option would be to finish it off in admiralty style, it's almost there now. However you choose to approach it, I would encourage you to continue with this model. This model is crying out to be finished. David -
Thanks for that link Bill; I hadn't actually come across it yet. Although I am no where near the rigging stage, I have pored over the rigging plans at great length and have figured out their system. It appears arcane at first, but is really quite logical and well delineated. I also highlighted every part/line number with two different colours - one colour for lines and another for parts (blocks, deadeyes etc) which should speed up the process of cross referencing the number on the plan to the number on the list. David
- 67 replies
-
- 1
-
-
- rattlesnake
- mamoli
- (and 1 more)
-
Mystery Model - Question for Moderators
David Lester replied to David Lester's topic in Wood ship model kits
I think you're right Bill. There's a certain integrity in its imperfection that would be lost if I re-did it. My grandfather was a Toronto firefighter and after he retired, my dad got possession of his leather fireman's hat. Its condition was a bit beaten up and my dad thought it was a good idea to freshen it up with a coat of shiny black paint! My brother has the hat now and while it's still a wonderful keepsake, to a large extent its beauty, meaning and value have been largely compromised by its shiny black surface. I think maybe I'll leave well enough alone. David -
Thanks mog for your comments. I really do appreciate the beauty of a natural finish like the one you're currently doing, but until I can consistently cut every plank off within at least 1/4" of the stem or stern post, I'm afraid it will be paint for me. David
- 67 replies
-
- 1
-
-
- rattlesnake
- mamoli
- (and 1 more)
-
Mystery Model - Question for Moderators
David Lester replied to David Lester's topic in Wood ship model kits
Thank you all for the input. I'm debating right now whether or not to repaint and re-rig it. David -
Mystery Model - Question for Moderators
David Lester replied to David Lester's topic in Wood ship model kits
So here's the model I was referring to. I don't know who the manufacturer of the kit was and I don't know what ship it is or if it's an actual ship at all. As I mentioned I built it in 1975. Somewhere deep in my reptilian brain the name Black Swan is lurking, but that could be a false memory where I'm confusing the name Black Pearl with the fact that there is a swan on this model. I don't recall much about building it, but I do remember that the spars all came as square stock, and as a complete novice I was upset that they expected me to do something as outrageous as round square stock. At the time I was still going to school and we lived in a tiny walk-up apartment in Toronto. I built it on a folding TV table and with almost no tools. If anyone is able to shed any light on this model, I would be really interested in hearing your thoughts. Thanks!. David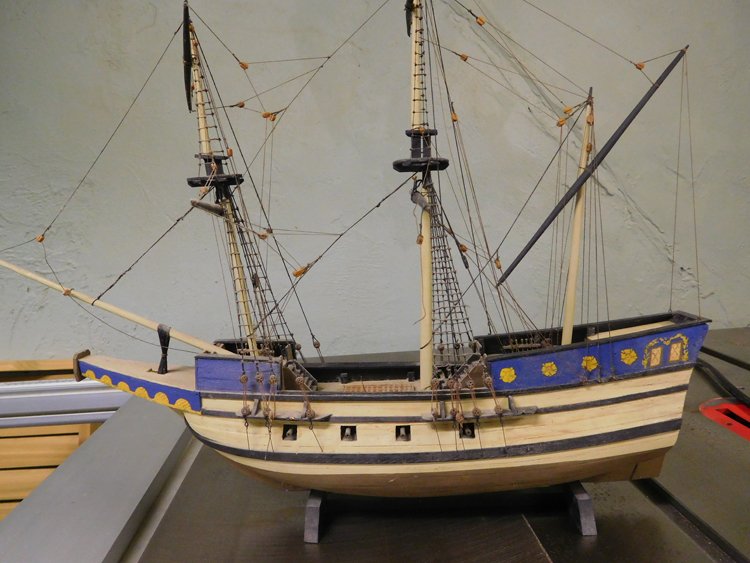
.JPG.05e8906af936ce04aa637cd034a7cc9b.JPG)
-
I have a question for the moderators. In 1975 when I was 23 years old, someone gave me a model ship kit which I built and still have. I did a pretty lousy job of building it, as I had no idea of what I was doing and it's currently in poor condition. I have scoured the internet trying to discover what model it is. I cannot find anything that appears even similar. My question is this, can I post a picture of it on this forum to see if anyone recognizes it? My concern is that I don't know whether it's a Chinese knock-off or not and I don't want to cause any trouble by posting it if it turns out it is. But now that I'm seriously interested in this hobby, my curiosity about this old model is growing. Many thanks, David
-
Hi Bill, That's a great idea for the instructions. However, I had already photocopied the instructions and enlarged them on 81/2 x 11 which is working quite well. With careful reading, the instructions are actually good and the plans seem to be very clear. I'm not finding too many problems in this area. The Mastini book has the best Italian-English nautical dictionary I've come across; certainly better than anything I've found on-line. Thanks to the generosity of Doug (Heronguy) I now have my own copy. David
- 67 replies
-
- 2
-
-
- rattlesnake
- mamoli
- (and 1 more)
-
Thanks for that link Dave. I took a look and it seems like a good approach. His results were quite nice. I'll give it a go next time. David
- 67 replies
-
- 1
-
-
- rattlesnake
- mamoli
- (and 1 more)
-
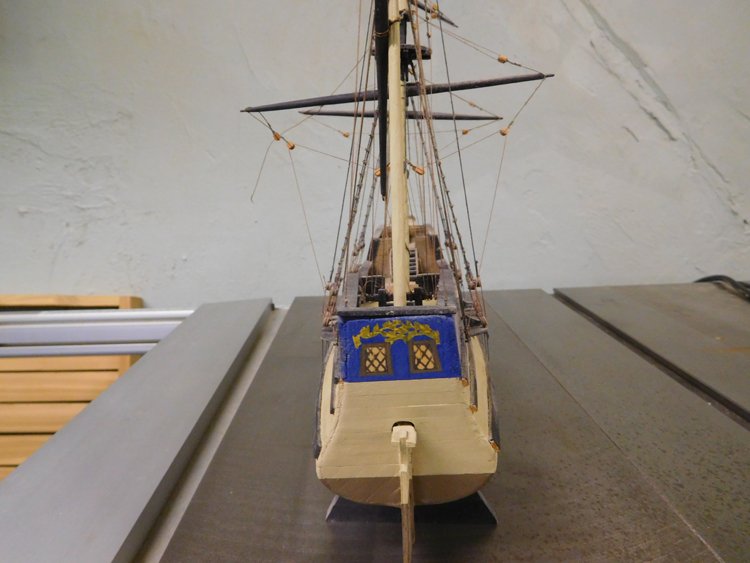
Hello Everyone, A little progress to report. Last time, I had made a failed attempt at painting the decorative molding for the transom. I think my second attempt has worked well enough. I read about the technique in a Blue Jacket newsletter; it was a new idea to me, but probably old hat to most of you. I first soaked the piece in vinegar, which was a good thing as it removed the cheesy looking gold finish on the cast metal, which might have interfered with a decent paint finish. I then primed the piece with white primer and then applied several coats of a bronze colour. As as rule I seldom like using metalic paints, but I have to admit that this Model Master bronze worked really well. Then I painted it with polyurethane to seal it - (one which requires mineral spirits to clean up, not water.) Then lastly two coats of the blue, not worrying too much about getting it on the bronze, and just wiping it off the high spots with a dampened rag. I'm sorry the pictures aren't better, but my camera doesn't focus well at such short distances. I have also finished the second layer of planking and I guess now it's time to paint the hull. I know that sounds like sacrilege to some but I tend to like painted hulls. This year we are having the rainiest spring I can remember, so more time in my basement than I expected. David
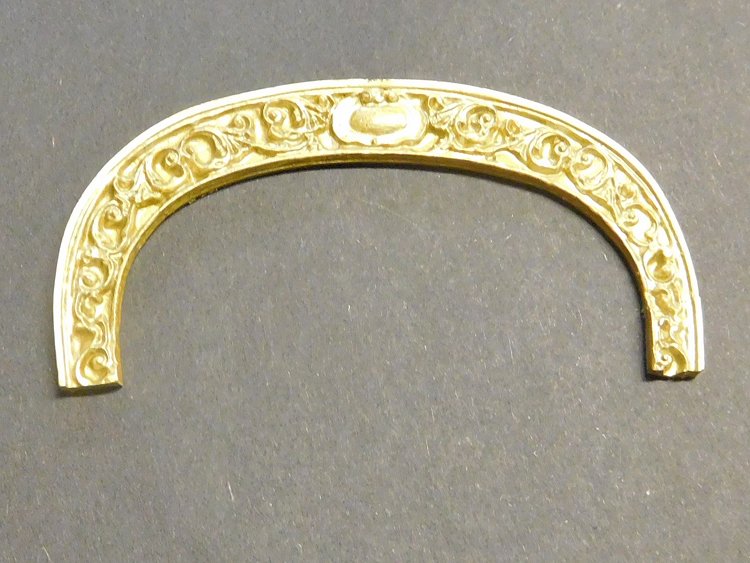
- 67 replies
-
- 7
-
-
- rattlesnake
- mamoli
- (and 1 more)
-
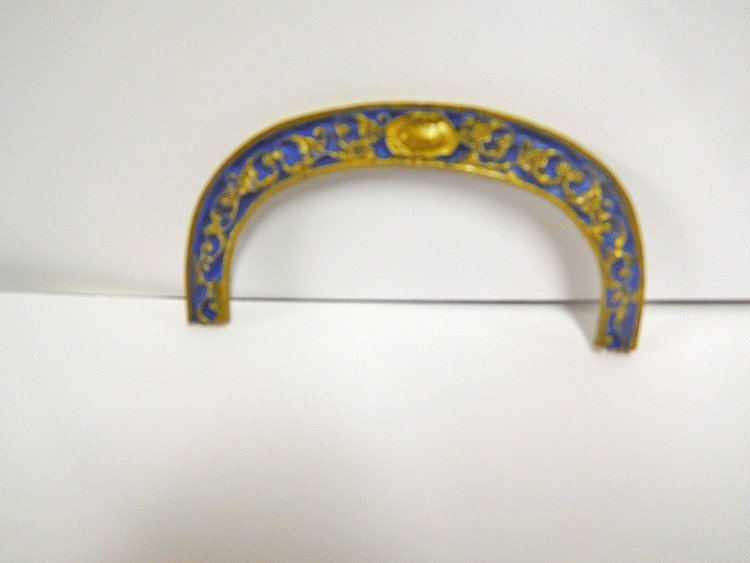
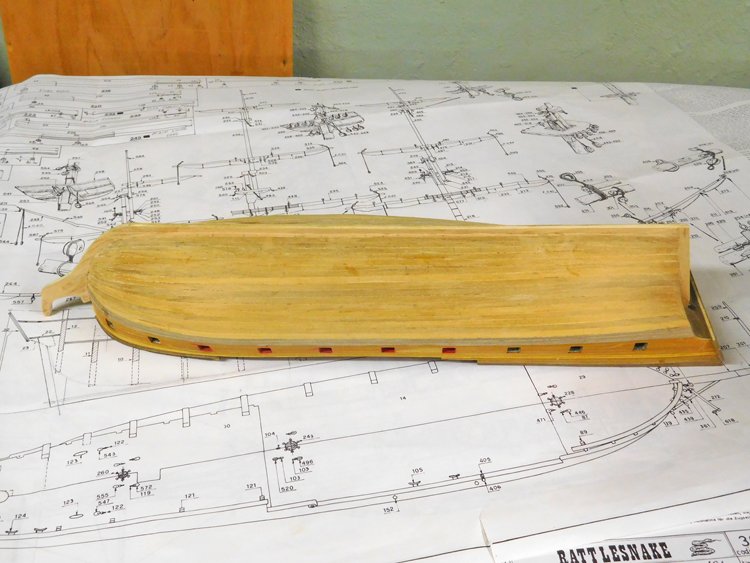
Happy Thursday Everyone, I have a bit of progress to report. All three decks are planked, the bulwarks are finished and the base for the forecastle railing is installed. I am now started the second layer of planking which is going along well enough. You'll notice several different colours in the wood, none of which is intentional; it's just the different woods that the kit supplies. At the same time, I'm painting the cast metal "carving" that goes on the transom. I read what sounded like a fool-proof method to apply two or more different colours with very crisp differentiation. As a result of my skillful application of that method, the piece is currently soaking a a shallow tray of paint stripper. I'm taking pictures at various stages of the process which I will upload once I have an acceptable result. David
.JPG.95bccd5cd4a244326861cb623c6adf36.JPG)
.JPG.a02361b5963563c485be573e2d88bfc9.JPG)
- 67 replies
-
- 5
-
-
- rattlesnake
- mamoli
- (and 1 more)
-
Hi Dave, Your model is looking beautiful! David
-
That keel doesn't appear to be too hard to fix. You haven't broken the rudder off yet? Breaking rudders off is my specialty (and I have quite a few sidelines too.) On my Constitution, reattaching the rudder for the second time was the very last thing I did. In any case, you're moving right along quite nicely. David