HOLIDAY DONATION DRIVE - SUPPORT MSW - DO YOUR PART TO KEEP THIS GREAT FORUM GOING! (89 donations so far out of 49,000 members - C'mon guys!)
×


GuntherMT
-
Posts
2,213 -
Joined
-
Last visited
Content Type
Profiles
Forums
Gallery
Events
Everything posted by GuntherMT
-
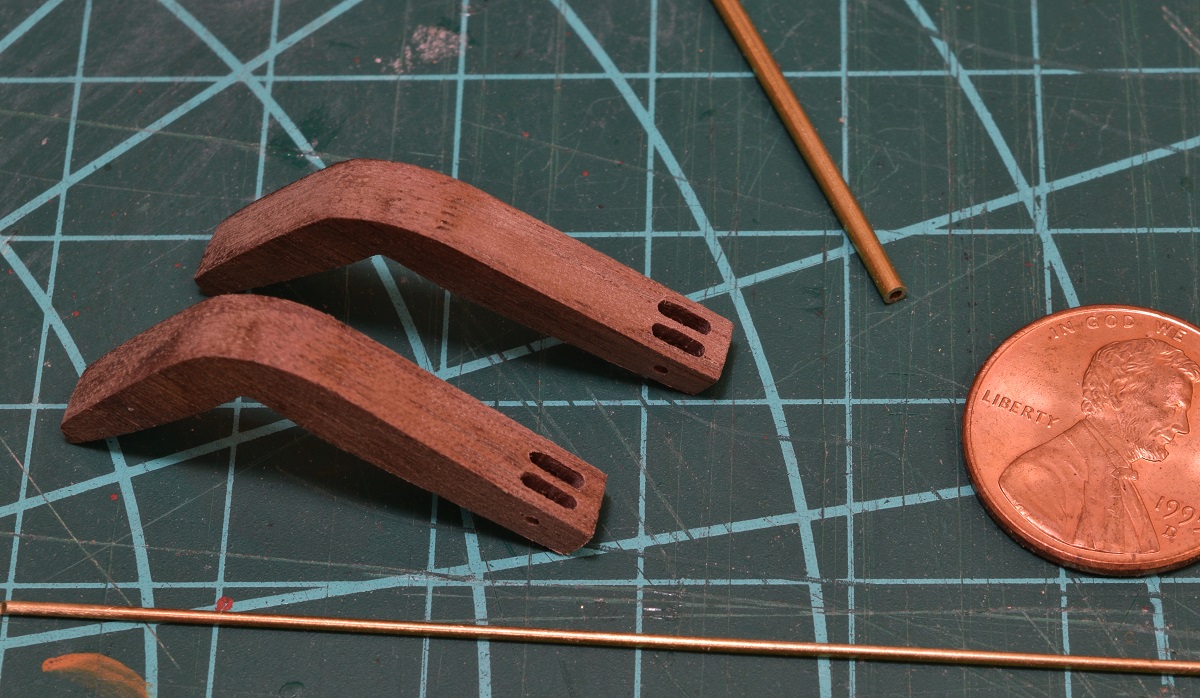
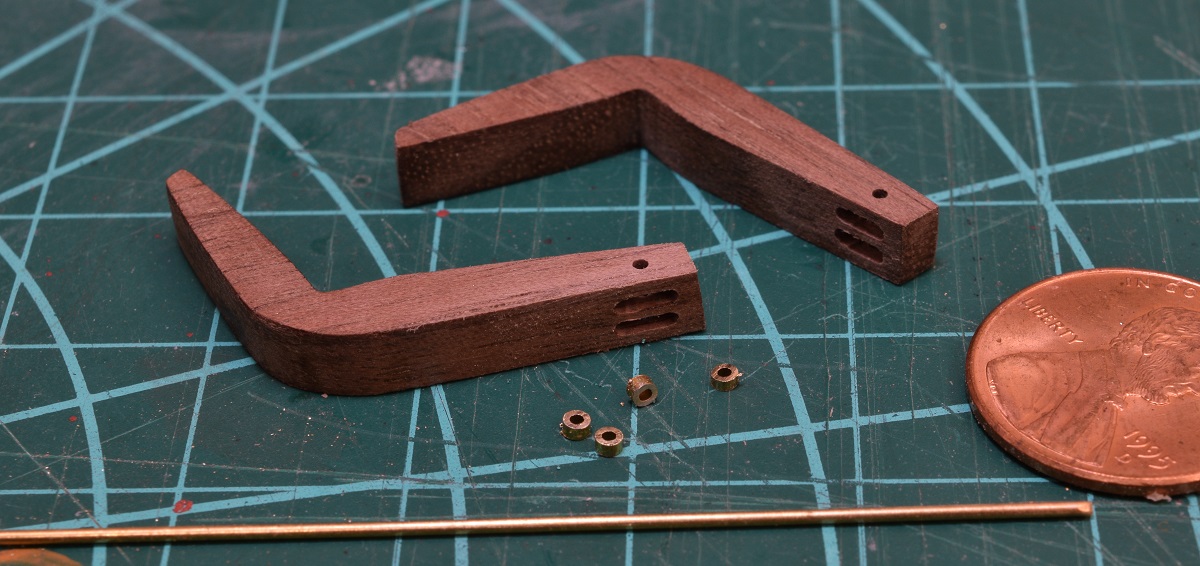
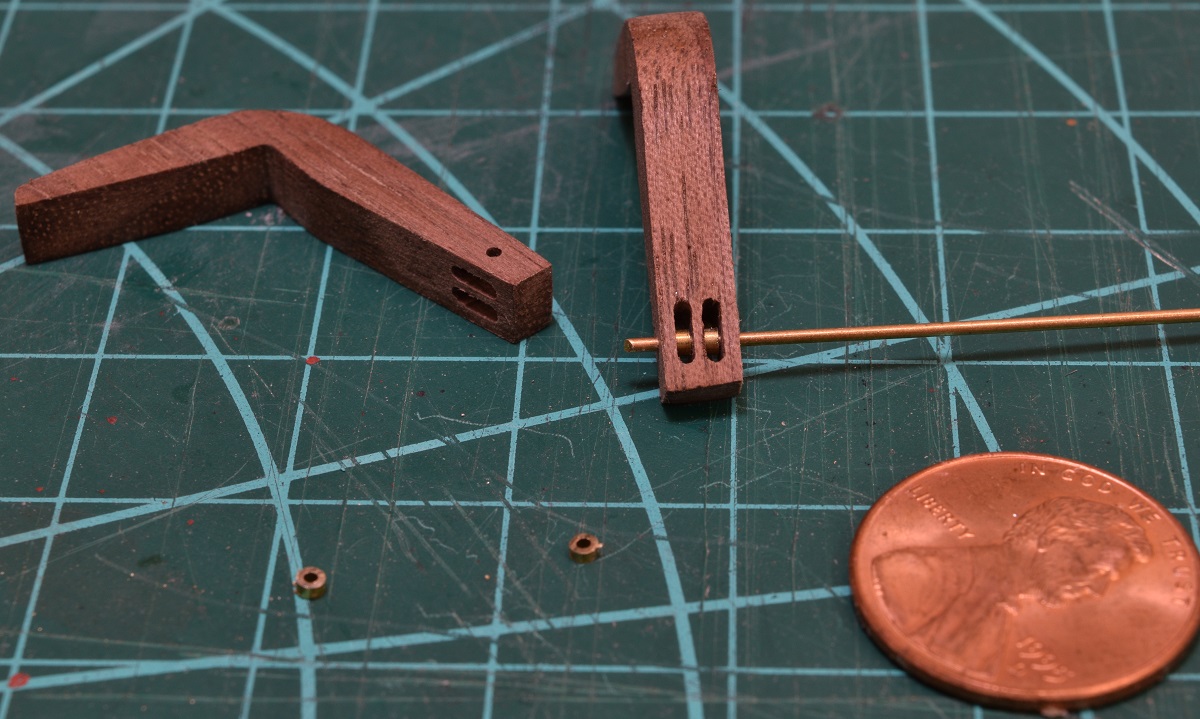
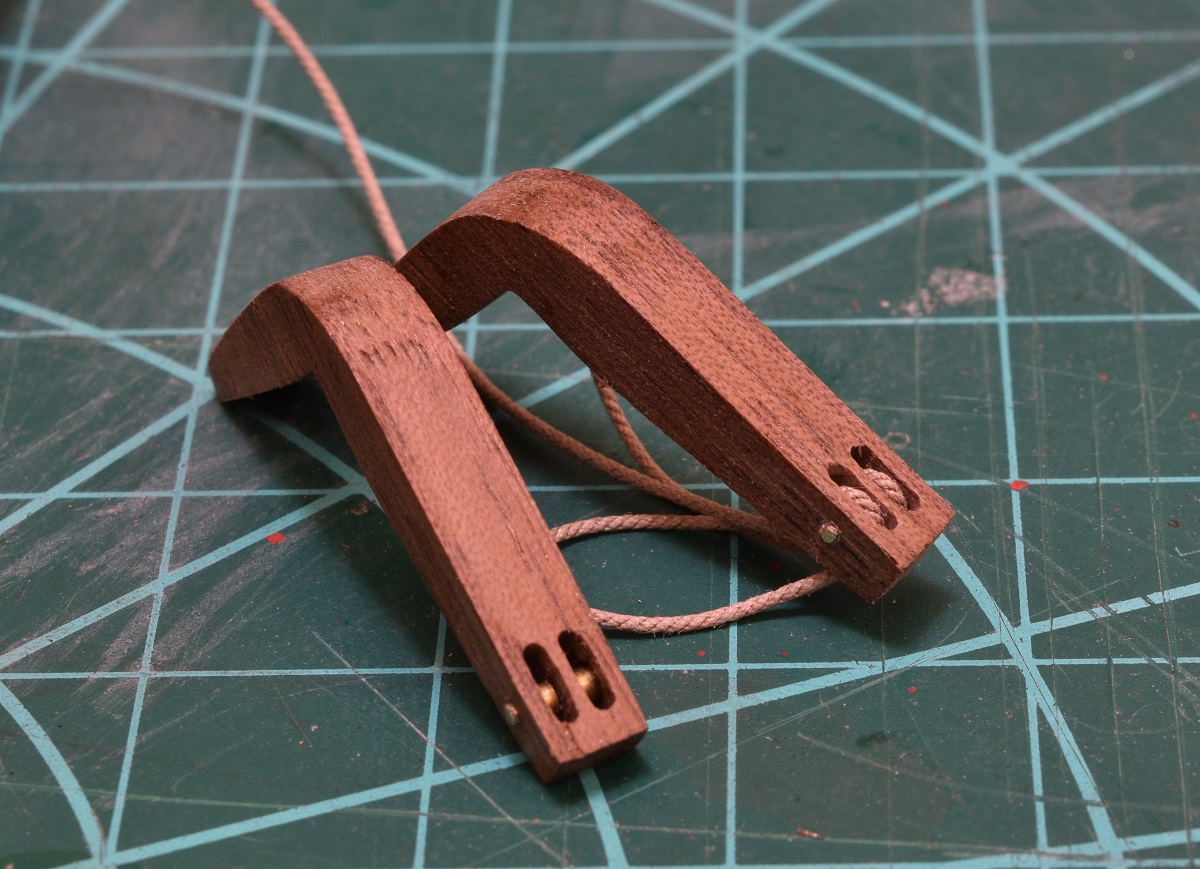
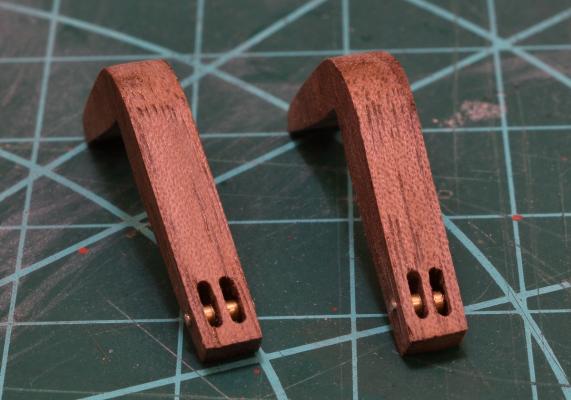
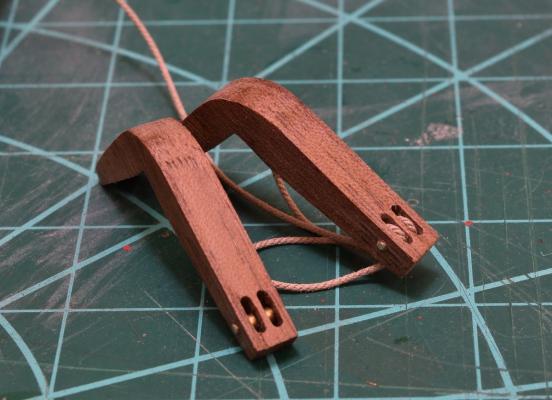
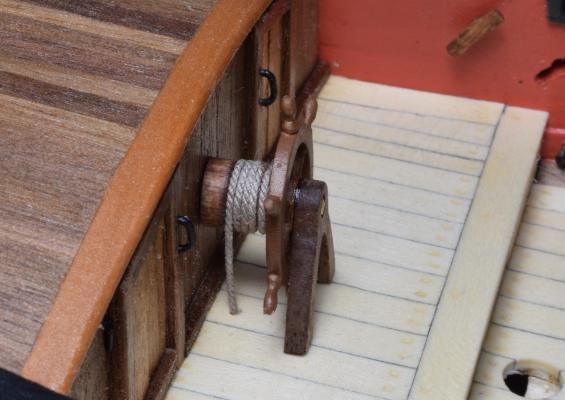
So instead of finishing the guns on the other side of my ship like I should have today, I totally went off on a tangent, for no real reason other than the idea popped into my head and I felt like it. I apparently have modeling ADD. I played with the Catheads. The base parts are part of the laser cut walnut parts, but the holes for the tackle to go through are not pre-cut of course. The kit instructions are to drill 4 holes, and then using your X-acto blade, cut a shallow slot between the hole pairs in order to make a fake sheave. The slot would be just deep enough for the rope to be flush with the top surface when the rope then runs through the holes. I apparently don't put any value on my time at all, so I decided I was going to make working sheaves with actual little tiny brass pulleys in full slots instead of faking it. First I cut out the slots, and then drilled a hole through the sheave slots for the axle to go. Here you can see the catheads with the other items I used - a brass rod for the axle, and a brass tube to be cut into the pulleys. Next up was cutting little tiny slices off of the tube to make the pulleys. Then sticking the little pulleys into the sheaves and fishing the axle through them. I secured the axle to the outside edge by applying super-glue and working the axles a bit to allow capillary action to pull the glue into the catheads. Complete! Then I fished a .021" rope through one of them to test it. Works perfectly. Such a huge waste of time for the heck of it on something that nobody will ever see once it's rigged, but hey, I had fun!


- 831 replies
-
- 14
-

-
- Armed Virginia Sloop
- Model Shipways
- (and 1 more)
-
The AVS is 1:48 scale, but for the rope and tackle I am using the "It looks about right" scale. I have no clue if they are correct for the scale, but they are about 10 million times better than the hilariously oversized blocks provided in the kit for this.
- 440 replies
-
- 2
-
-
- niagara
- model shipways
- (and 1 more)
-
Ken, Rather than clogging up your build with a giant post with a bunch of pictures on how I'm doing something, I added it to my build log. Here is a direct link to that post for you - http://modelshipworld.com/index.php/topic/8085-armed-virginia-sloop-by-gunthermt-model-shipways-scale-148/?p=328294
- 440 replies
-
- 3
-
-
- niagara
- model shipways
- (and 1 more)
-
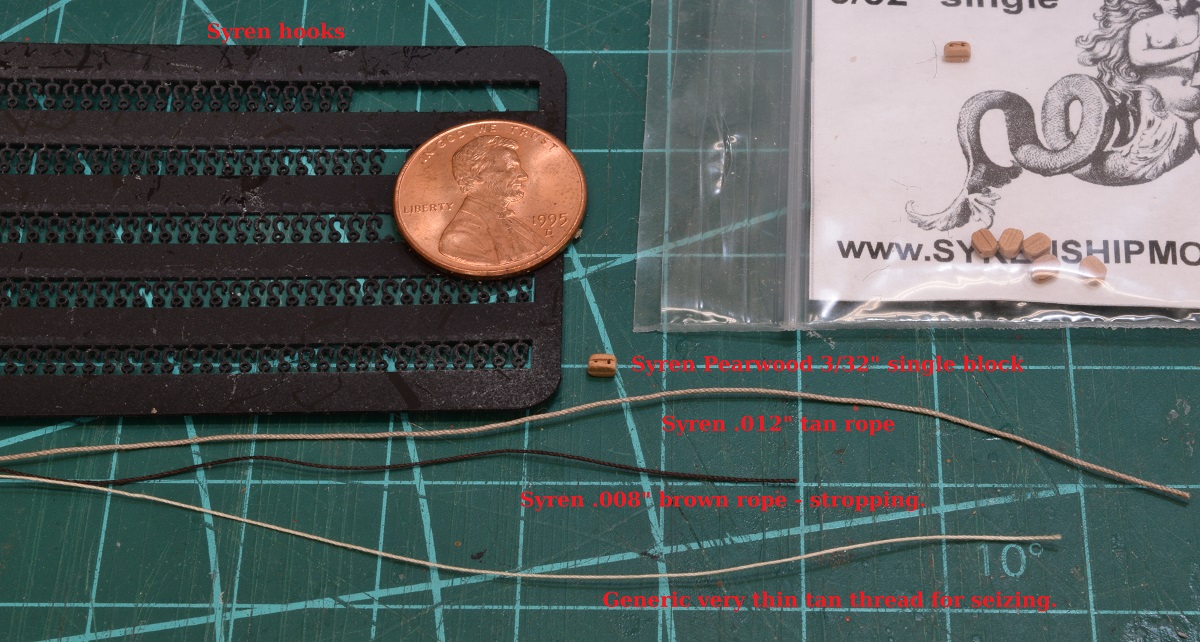
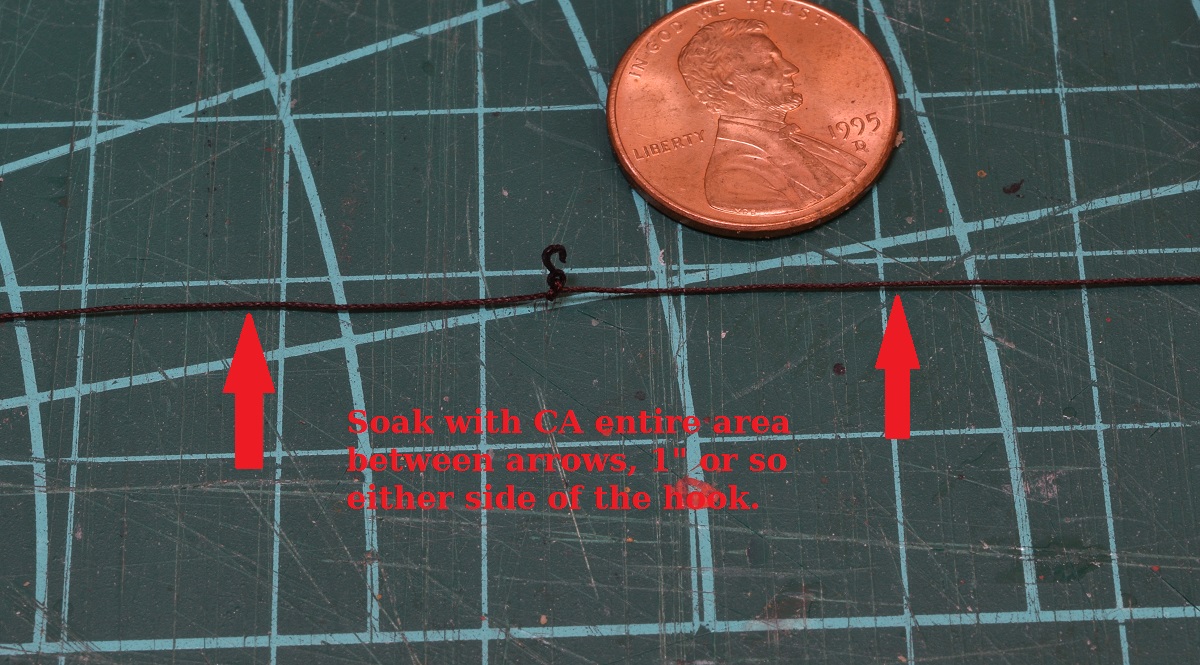
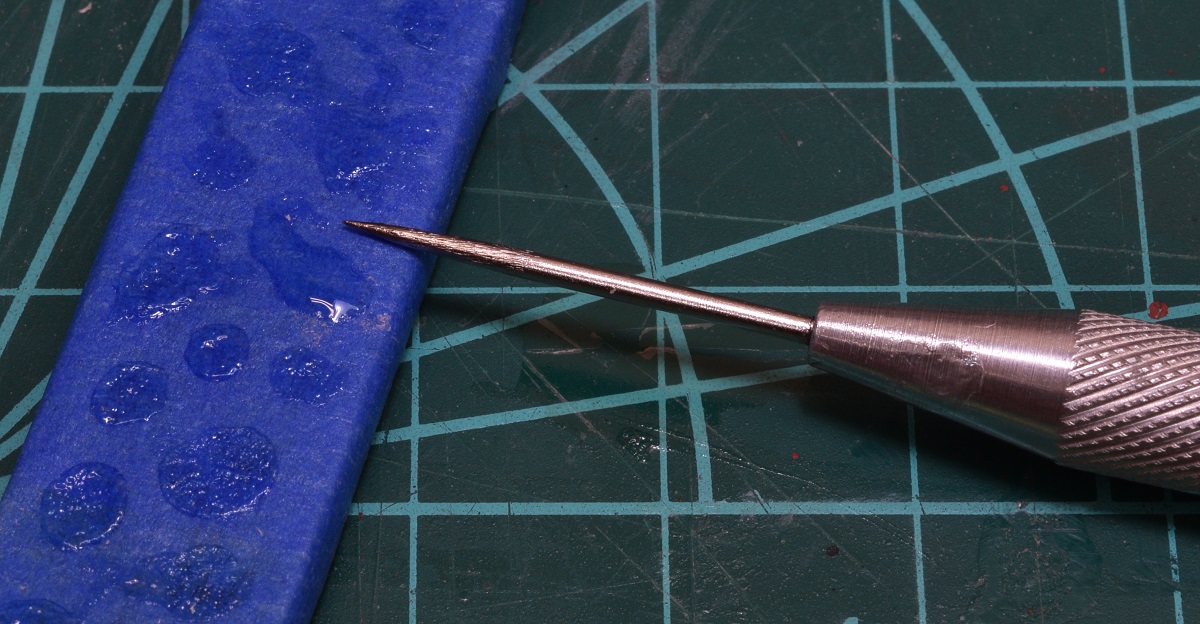
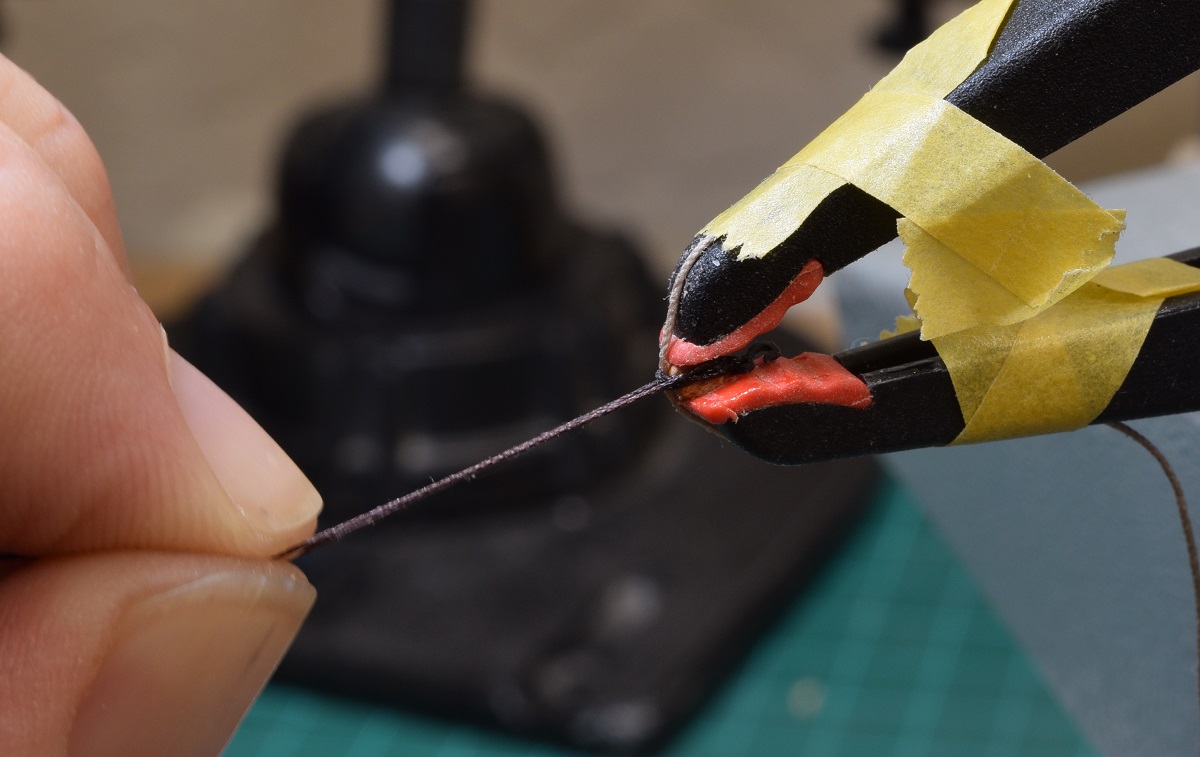
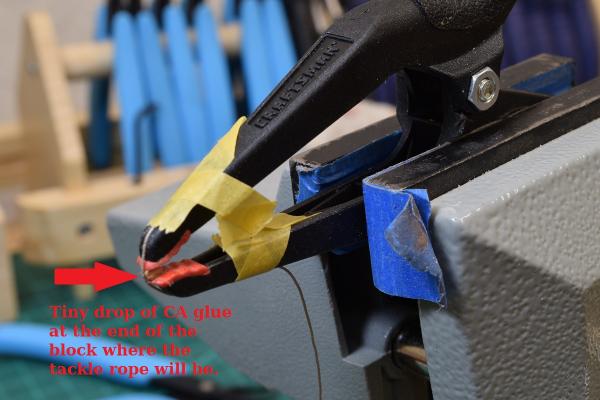
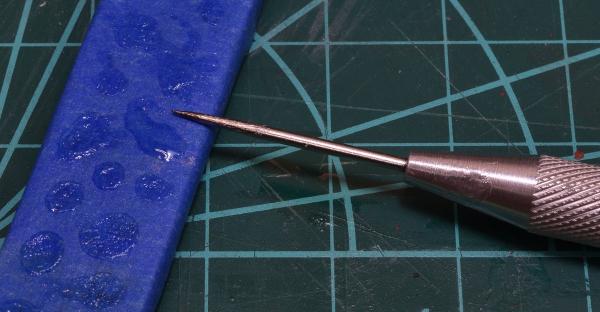
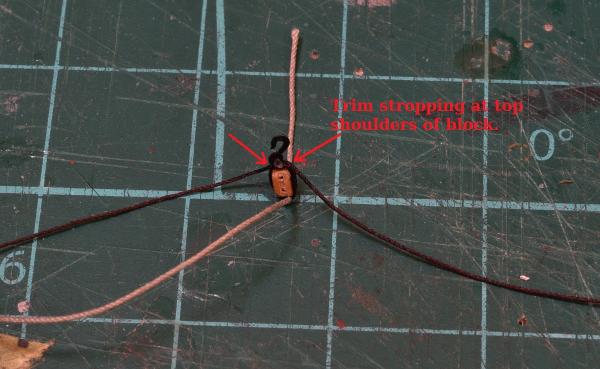
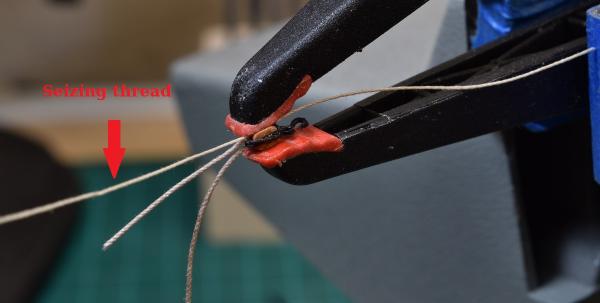
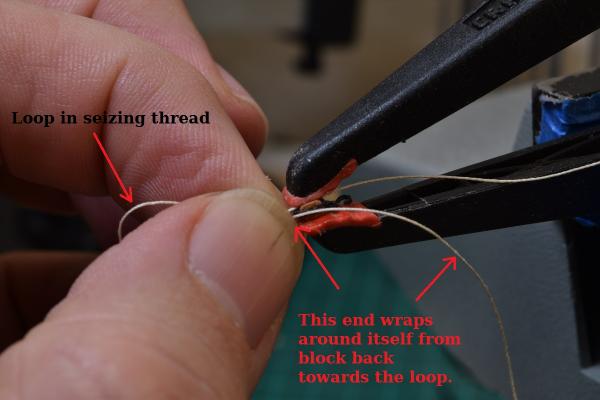
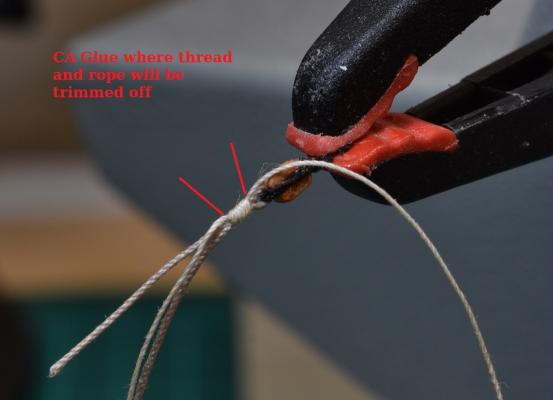
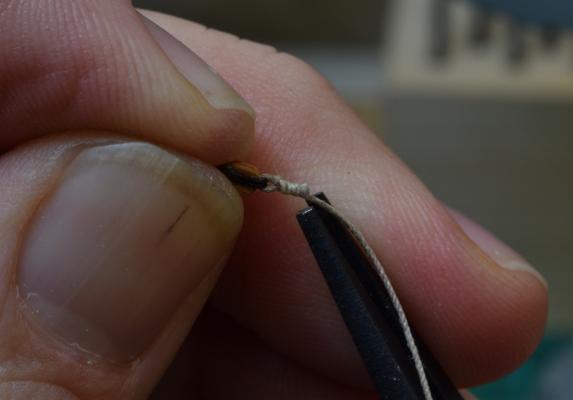
I had a request to document my method of stropping the single block to include the tackle rope, so this post is a pictorial step-by-step of how I do that. The materials. I am using Syren 5/32" Pearwood single blocks, Syren 3mm hooks, some generic tan thread I found that is very thin for seizing, .008" Syren brown rope for the stropping, and .012" Syren tan rope for the tackle line. I cut about 8" of .012" line for the tackle rope, this leaves me with about an inch or so left over after creating the rope coils on deck and an extra inch or so for the block end to make it easier to work with while seizing. I cut 6" or so of thread for the seizing to give me plenty to work with. If you leave it too short it can be hard to grab while wrapping the seizing, and it's thread, the spool is something silly like 300 yards long, I'll never run out and if I do it's cheap. For the same reason (ease of working) I cut 5" or so of the brown rope, even though less than an inch is actually used in the strop. 1) I put the single block into a clamp that I secured in my vise, and then tape down the tackle rope to the clamp across the base of the block. Before I tape the rope, I apply a very tiny dab of CA glue to the base of the block where the rope will cross it. I use the tip of a steel X-acto punch tool to apply the glue from a drop on a piece of tape. 2) I thread the stropping rope through one of the hooks and tie a single knot in the rope *before I cut the hook free from the sprue*!! I lost about half the hooks I tried to thread to the floor when I was trying to hold these tiny hooks and thread them when cutting them free first. Once I have a hook tied to the approximate middle of the brown rope, I soak about 1" or so on either side of the hook in CA glue (from the same drop on the tape I used above). 3) I don't really know how to capture a photo 'in progress' of the next step, but I'll try to describe it. Take the hook on the rope and put it in behind the block, centering the hook on the top of the block. Pull the rope down both sides of the block, cross them across the bottom of the block where the tackle rope is, and then continue up the other side of the block and then back across the top where the hook is. This will give you a double rope strop all the way around the block. Continue back down to the base, and then hold them steady for 30 seconds or so to let the CA take a good set. If the ropes are not even on the sides of the blocks, it is easy at this point to use the back edge of an X-Acto blade to push them into place. You can add glue at this point if needed, or in the next step. 4) Remove the block from the clamp. At this point if everything is looking good, you can trim the rope at the top shoulders of the block. If you need to adjust things, it's pretty easy with either the X-Acto blade or a very small set of pliers or whatever tool works to prod the rope into place. Add another dab of glue if anything comes loose and squeeze it into position with the pliers. 5) Using small flat blade pliers I then squeeze the tackle rope into shape at the base of the block. It will be stiff because of the CA. I also use the pliers to flatten down the ends of the trimmed stropping ropes, adding a tiny dab of CA if needed to get rid of the cut ends. 6) Put the stropped block back into the clamp, but this time clamp in the seizing thread with an inch or more going past the block. 7) To seize the tackle rope, form a loop with the seizing thread, with the top coming back up to the clamp. Leave the loop large enough to be able to thread the other end back through it, which is why I cut this thread longish. Take the top of the thread and while holding everything else in your left hand (or right hand if you are one of 'those' people), and wrap the thread around itself, starting at the block and working away from it. This part takes practice to make it work, as you really can't watch it, as it's all happening between your holding fingers to keep a tight seizing. I use only about 5 wraps on these tiny blocks or the seizing looks way too big. Once you have 5 wraps, take the loose end, and thread it through the loop between your fingers, and pull it firmly until it goes through your fingers so that it's tight. Bent nose tweezers can be helpful for this. 8) Now remove the assembly from the clamp, but keep holding everything with your left hand. Using your other hand, grab the end of the thread that was clamped with the block, and start pulling it. This will pull the loop closed between your fingers. Feel for the loop to close up against the seizing, and then pull the back of the thread tight again. Now you can stop holding with your left hand, and see how the seizing looks. If needed, slide it up closer to the block now, and play with the bottom thread to tighten up the seizing coils. Then finally, pull the top thread firmly until it completely pulls the loop inside of the seizing. You should end up with something like this (the practice part is important here, it took me doing a bunch of these before they didn't look a total mess). Now apply dabs of CA glue to the three points that will be trimmed - both ends of the seizing, and the extra tail on the tackle rope. Trim them off with nippers or nail clippers or whatever you have that will trim very close. 9) Dab a bit of CA on the trimmed ends, and using the flat nose pliers, crimp them to make them blend into the overall seizing. I use a very fine Xuron needle nose plier for this. No substitute for good quality tools I've learned. I get more use out of a single $25 plier than a full set of pliers from Lowe's that are cheap. 10) It's done! Hope others can find this helpful, it's a system that works well for me, when other systems that I've read and tried just didn't seem to click for me.


- 831 replies
-
- 20
-
-
- Armed Virginia Sloop
- Model Shipways
- (and 1 more)
-
Chuck's rope - http://www.syrenshipmodelcompany.com/miniature-rope.php Will do at least one block and take photo's this afternoon.
- 440 replies
-
- 1
-
-
- niagara
- model shipways
- (and 1 more)
-
I gave up on the double and went with a single notch on my AVS for the same reasons you state Doc. Given that the trim wasn't supposed to have a moulding cut at all, it still came out just fine, and yours looks great.
-
Nice work Ken. The line supplied by Model Shipways in their kits is probably the biggest gripe I have with MS. That rope is garbage. I threw it all out and am using Syren rope instead. Something to consider in the future, instead of gluing the train rope to the side of the block, instead glue it to the 'base' of the block before you strop it, and the strop will hold it on. Then take the tail, fold it back over and seize it. Of course your way is probably easier, and at the smaller scale you are working on it might look just as good when complete, I certainly didn't notice it in any of your photo's until you showed how you were doing it! Looking through my raw images, I see that I didn't take a single photo of how I was doing that, but if you are interested I'll take a few photo's today while I'm working on the tackle for the other half of my guns.
- 440 replies
-
- 3
-
-
- niagara
- model shipways
- (and 1 more)
-
Loving watching the construction from before I saw her the first time! By the way, your first drop box link works, but the 2nd one is bad, gives a document not found error.
-
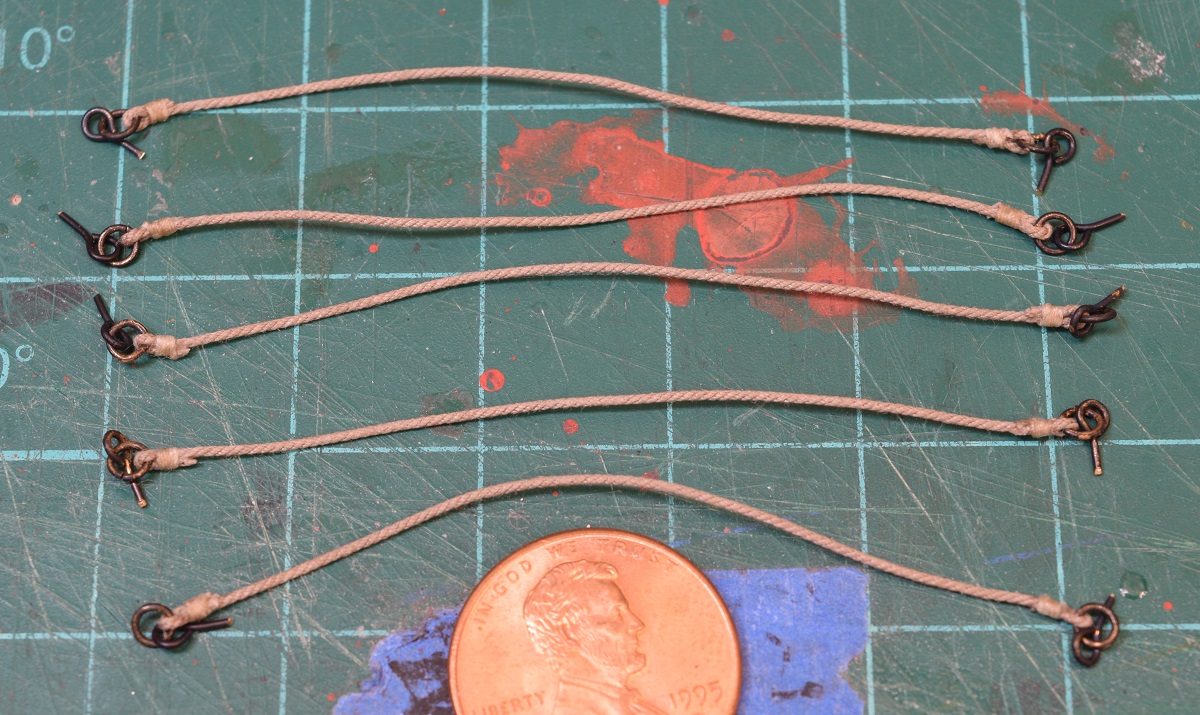
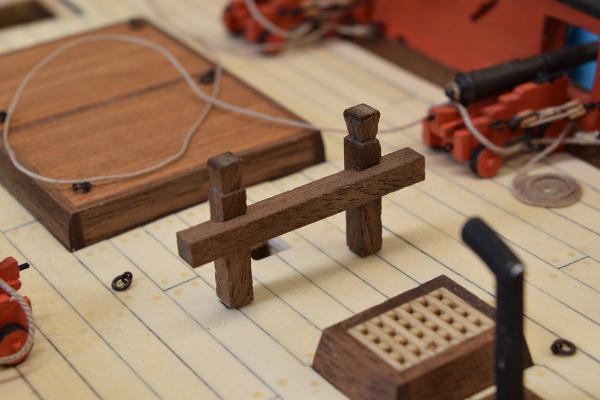
Thanks Doc. I'm not sure what a spreader yard horse is, but I'm sure I'll find out! Picture of the completed (but not glued) riding bitt. I need to do a bit of final filing as it's not quite sitting flush on the deck yet. And... I'm half way done with the gun rigging! Well, more than half really since I have the breaching lines done on all of them, but half way done with the out-haul tackle and rope coils. You can almost see what order I did them when how I got better. The first two were on the middle gun, where the first coils is sort of ragged, and the other one gets quite a bit better. Then I moved to the rear gun and I found a system that worked better for me and they went pretty smooth (if a bit fiddly) after that.


- 831 replies
-
- 19
-
-
- Armed Virginia Sloop
- Model Shipways
- (and 1 more)
-
Out of curiosity, why two hooks? Looks like you formed the hook out of the black wire, but then have it hooked into another brass hook to the carriage.
-
Coming along nicely Dave. For a profile scraper, I used a single-edged razor blade and just cut the profile with Dremel cut-off wheels. I mounted the razor in a vise and hand-held the Dremel. To cut the profile into the wood, I just hand held the wood and scraper and run it down the wood repeatedly with only light pressure. Would need something narrower than the normal cut-off wheel if I wanted to make anything other than a single line profile though.
-
Thanks Frank. Not planning on buying it currently, and will certainly take a look at yours before I do if that gets on my radar at some point! I did order a self-centering 4 jaw chuck, as that seems to be something that would be pretty great to have for working with square stock.
-
Thank you all for the encouraging comments and likes. Appreciated, helps keep me motivated to make progress! Thanks Frank, I visited the Sherline site and looked at it. I may add it to the stash one of these days, but for now I think I'm good without it, as I really don't have a 'thing' lined up that I need to use the lathe for anyway. Based on tonight, I think I'll only be adding 1 or 2 out-haul tackles per night, it's just really tedious working with such small stuff under the magnifier and then fiddling trying to get it all set on the gun on deck. I did 1 out-haul tonight, and also did a single rope coil on the previously completed gun. The method I used was kind of clunky, so I need to go back through some other build logs and remind myself of some of the cool techniques that others have used. I also built the riding bitts, although I didn't glue it down as I think it may be easier to deal with setting the mast later without this right next to that spot on the deck. I've got it so that it's a very tight press fit into the deck, so should be quite easy to place even if I wait until the mast is permanently attached. No photo's, I'll just include them in my next update, as I don't have time tonight to get them all processed.
- 831 replies
-
- 2
-
-
- Armed Virginia Sloop
- Model Shipways
- (and 1 more)
-
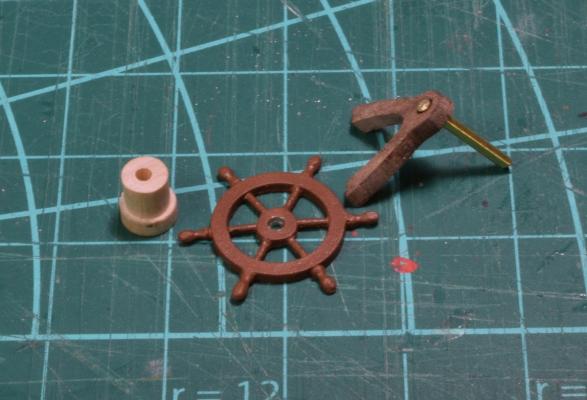
Making the quoin and handle as a single piece is a fantastic idea!
- 440 replies
-
- 2
-
-
- niagara
- model shipways
- (and 1 more)
-
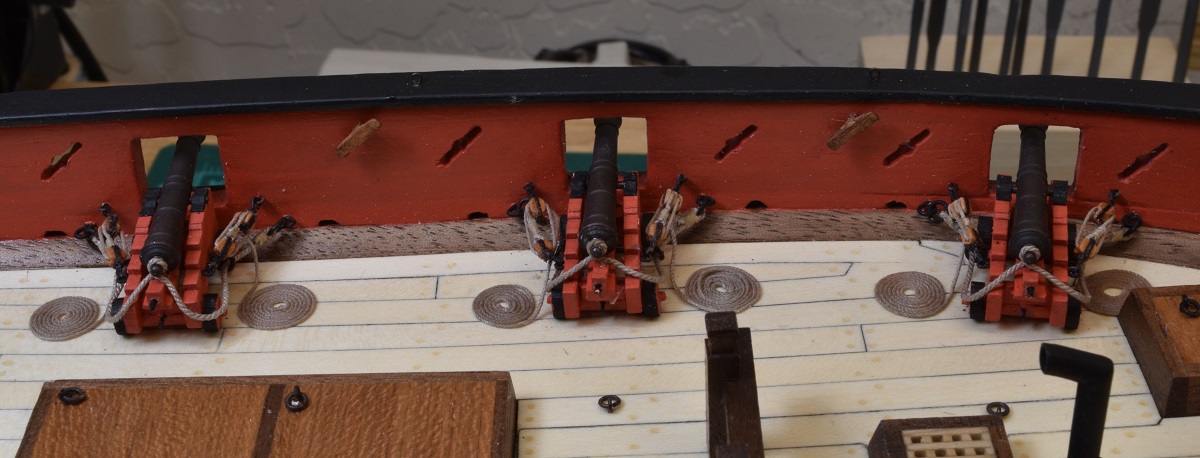
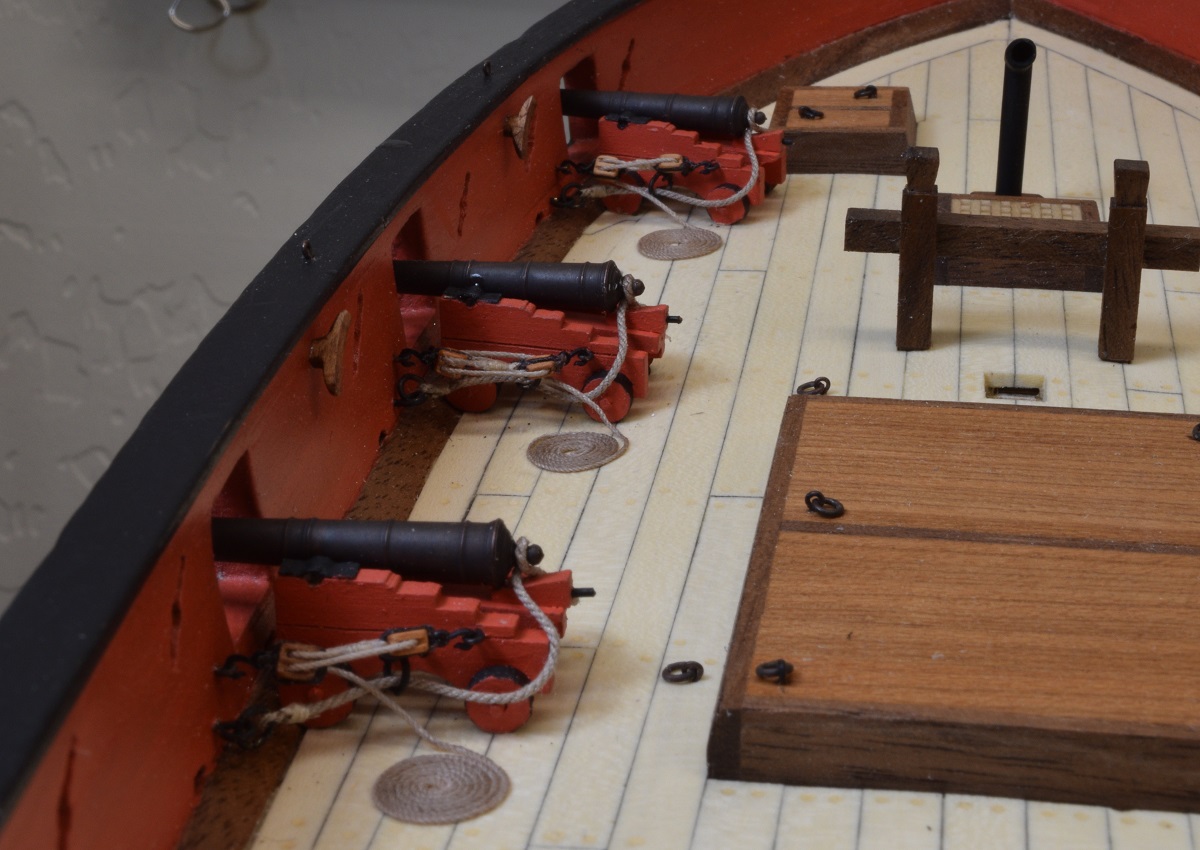
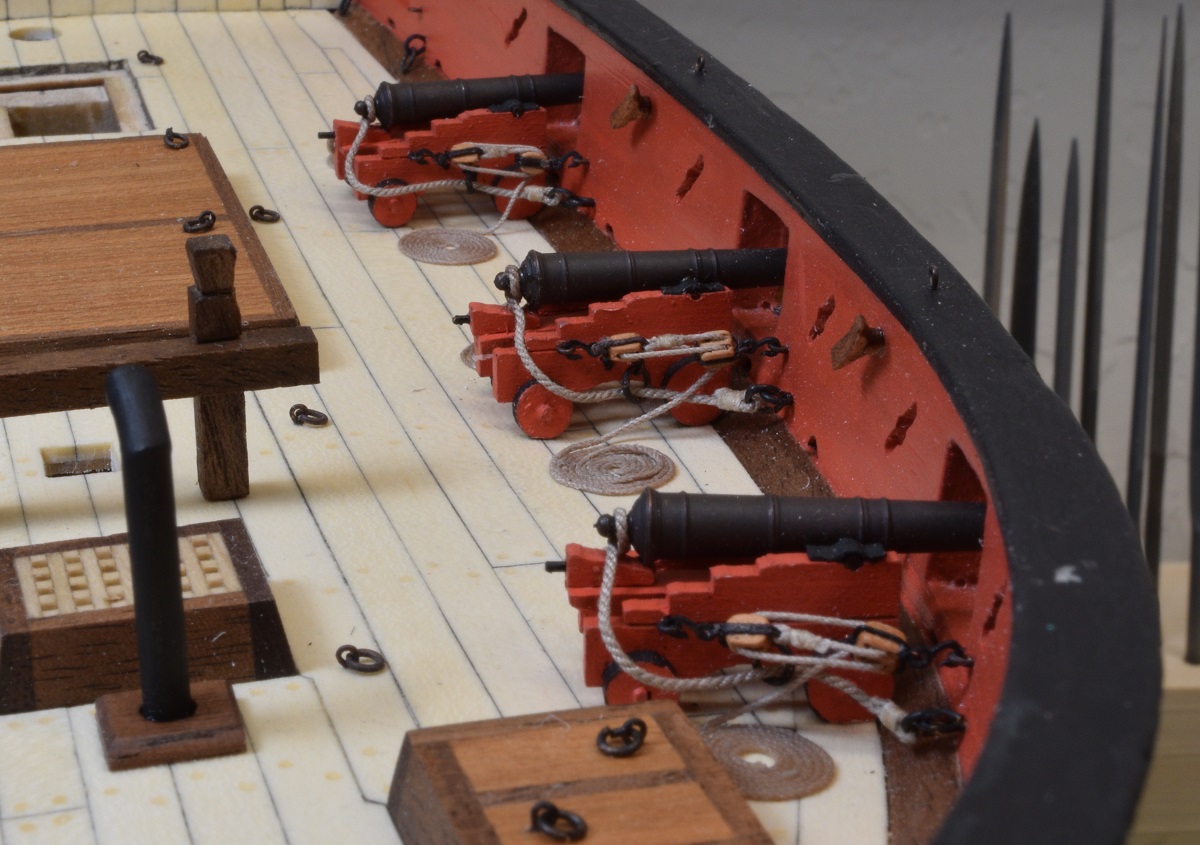
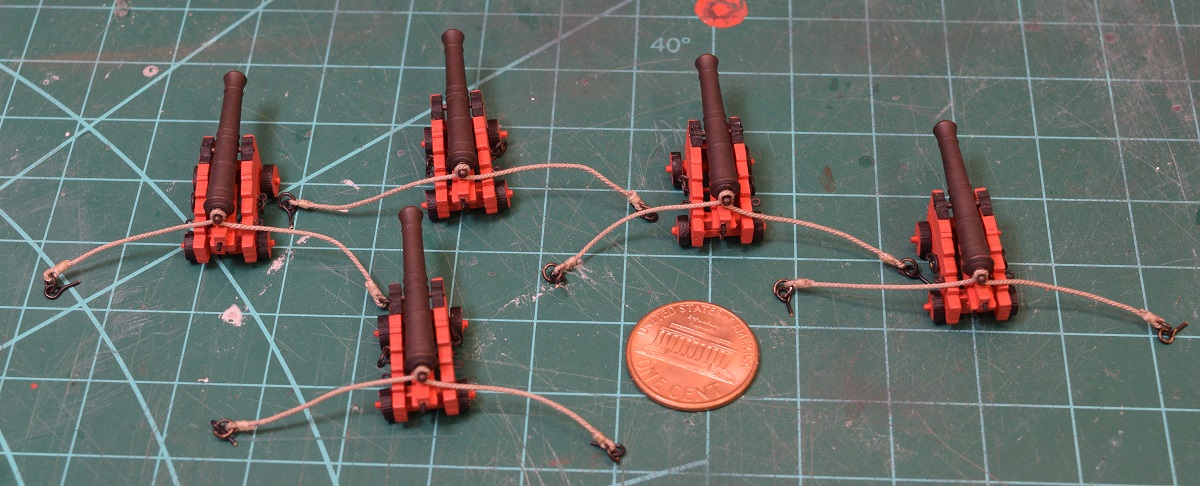
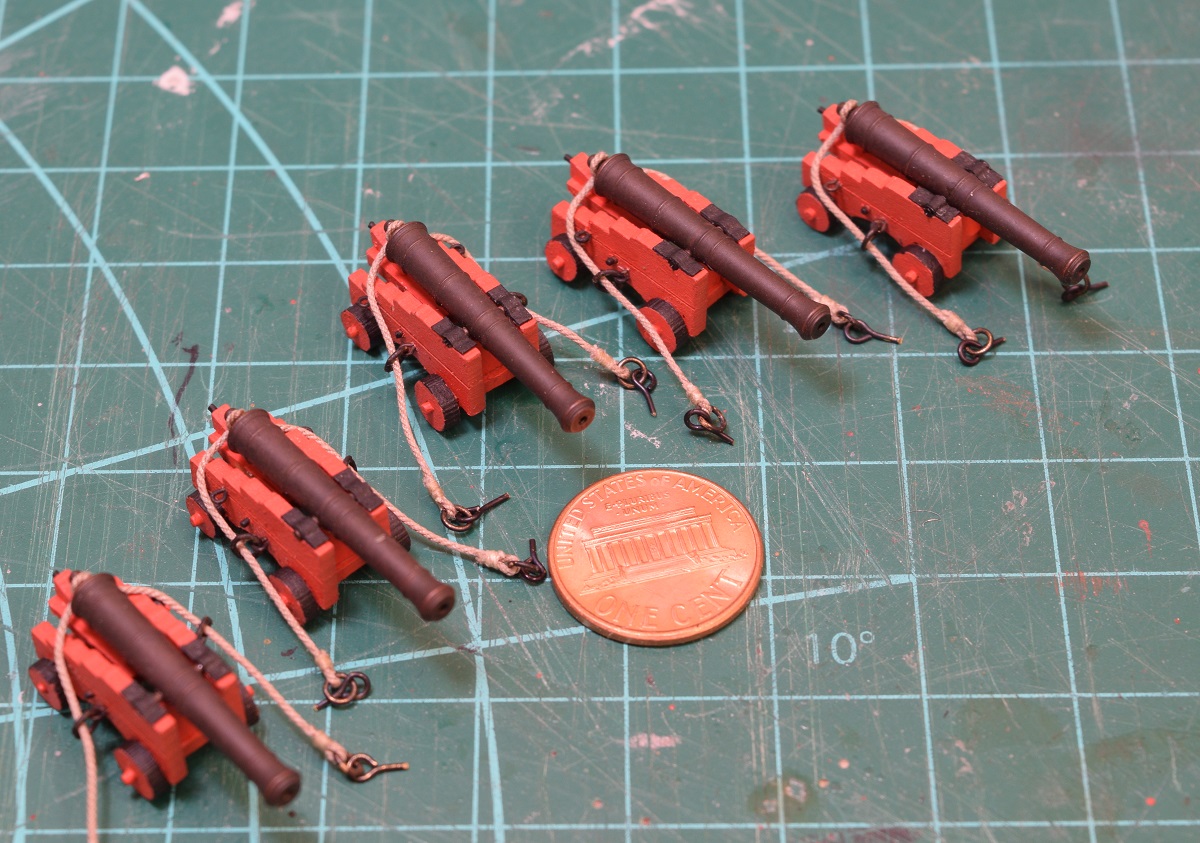
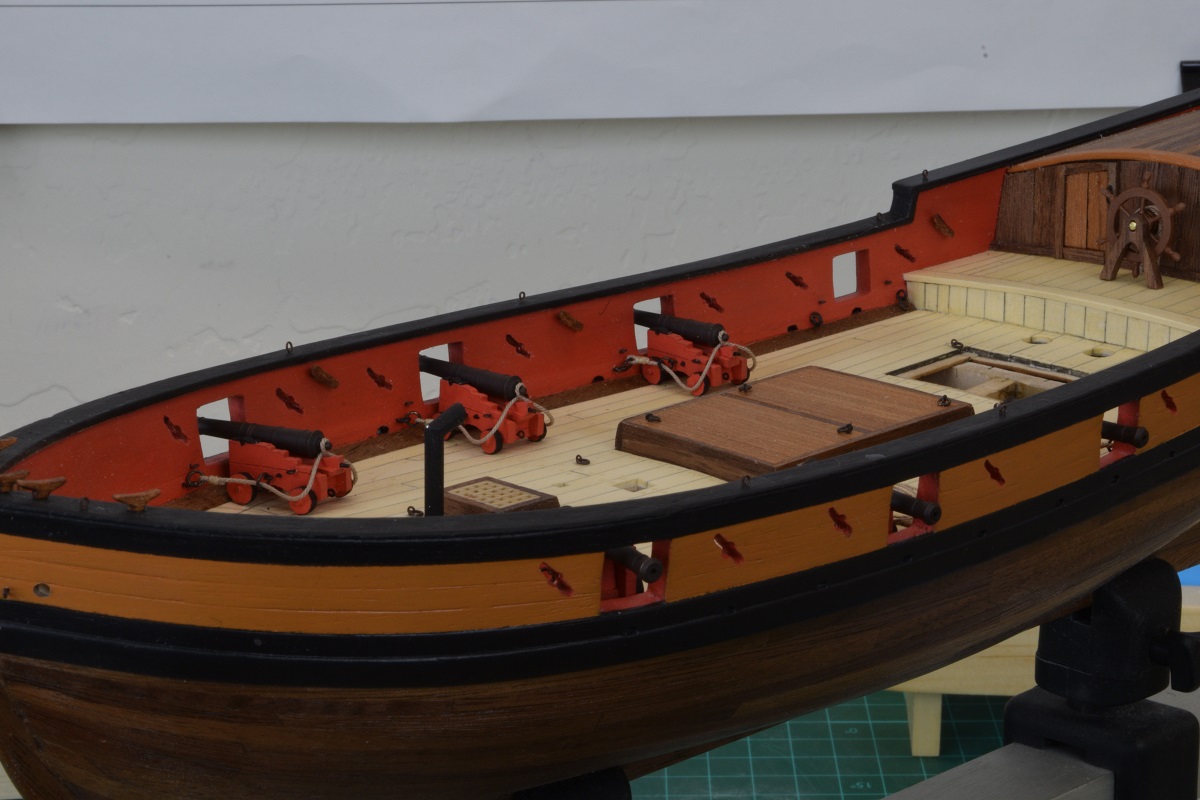
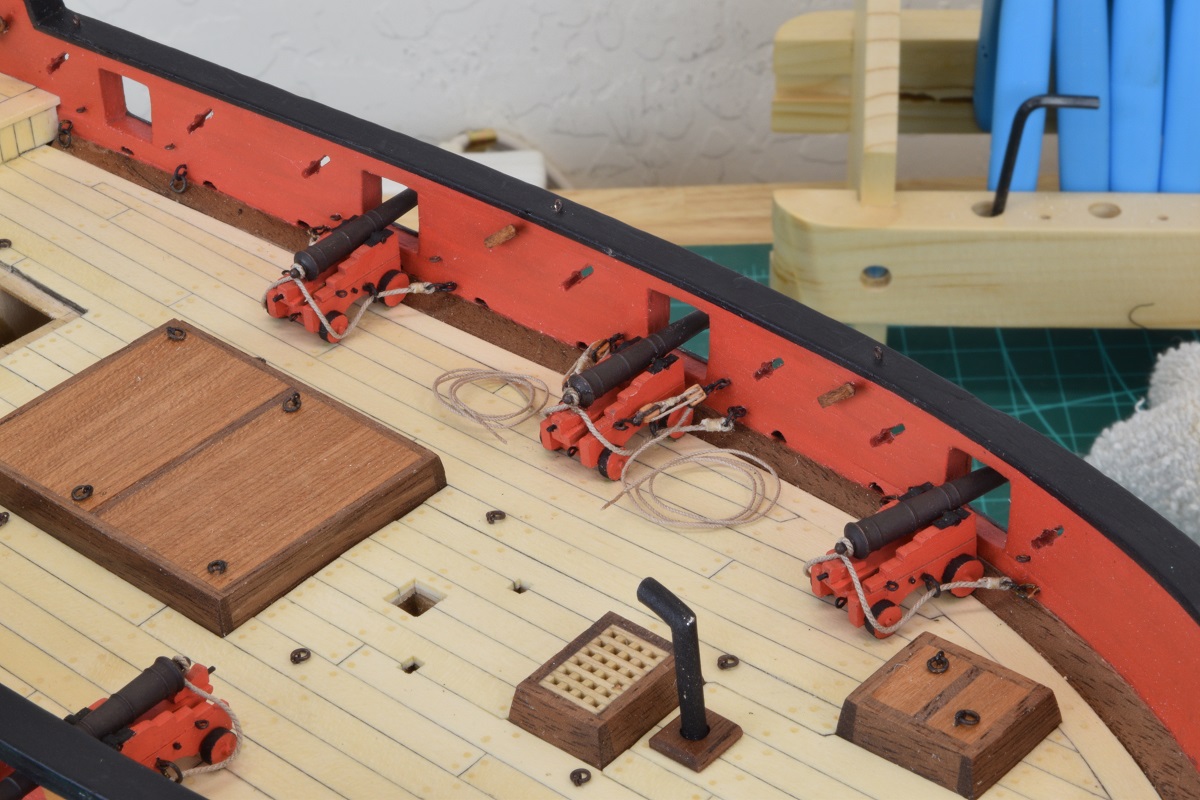
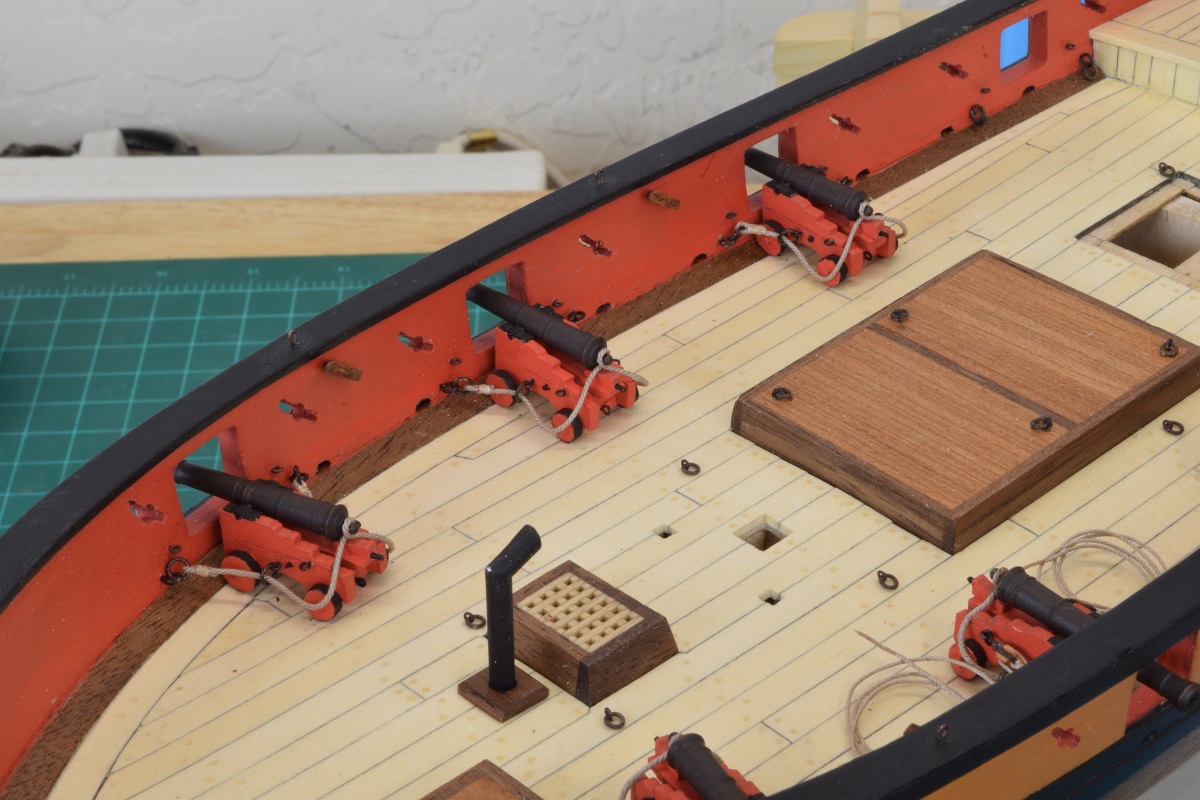
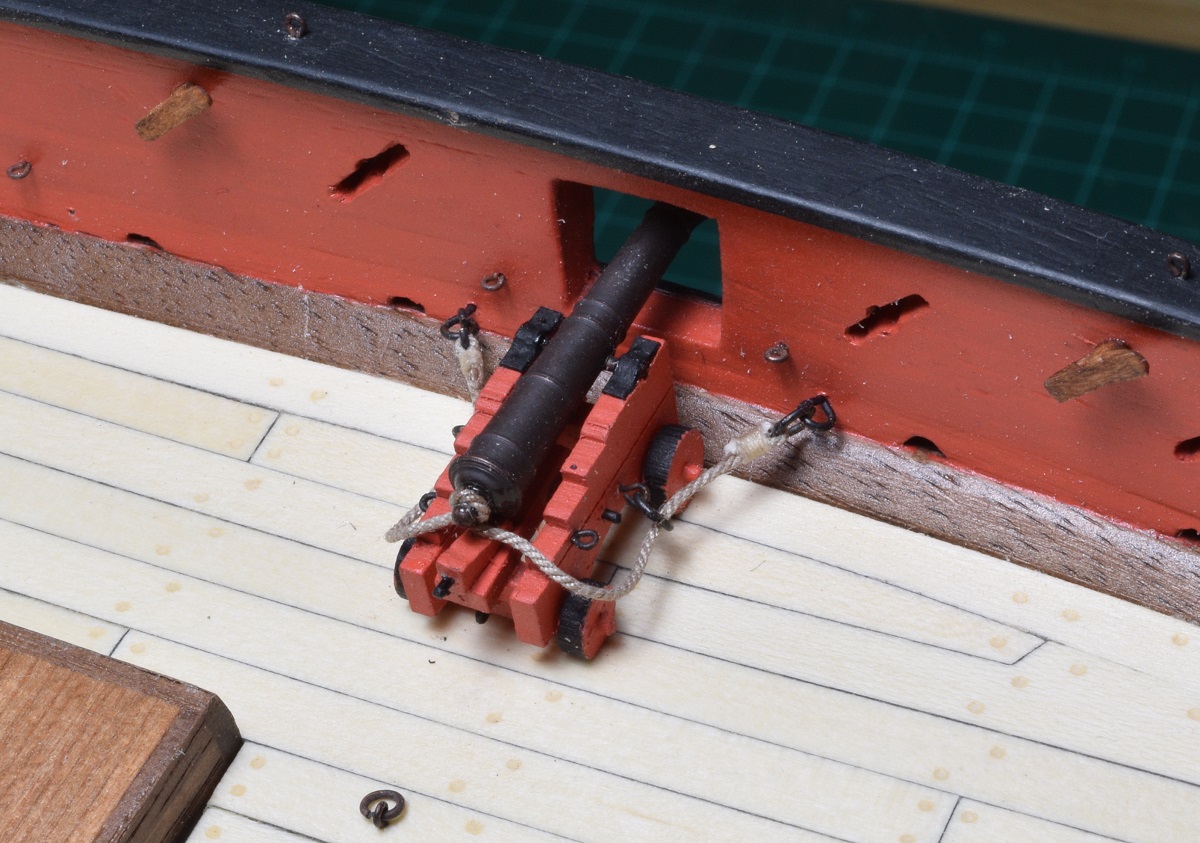
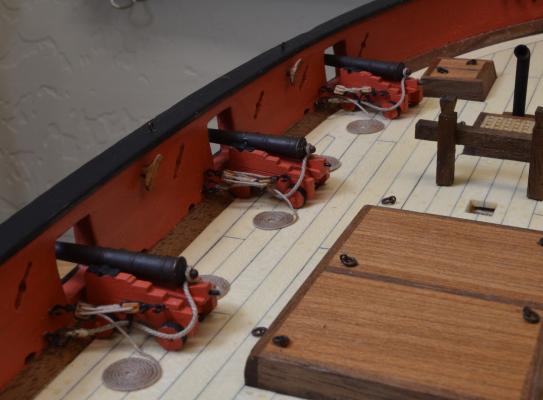
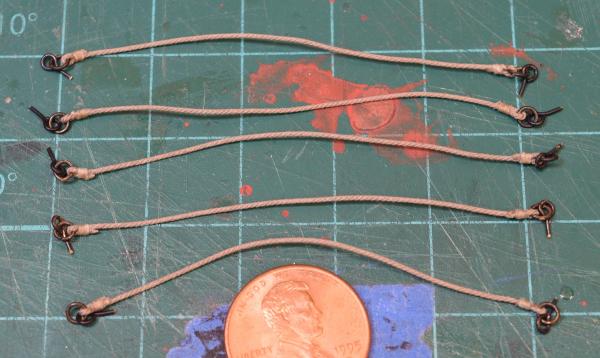
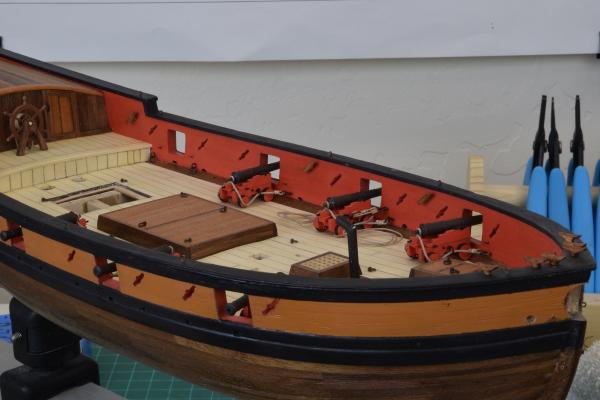
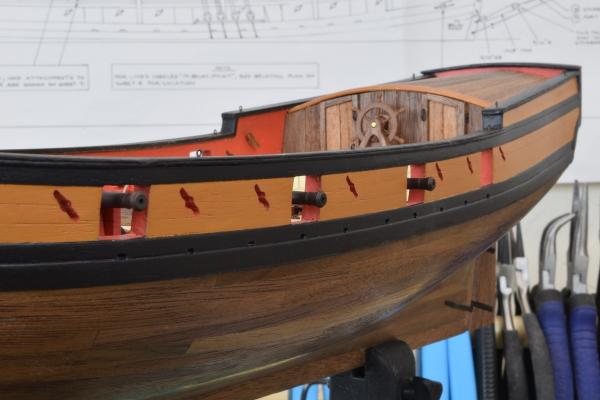
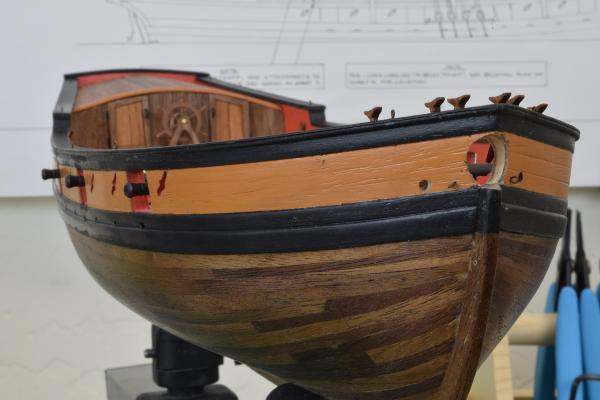
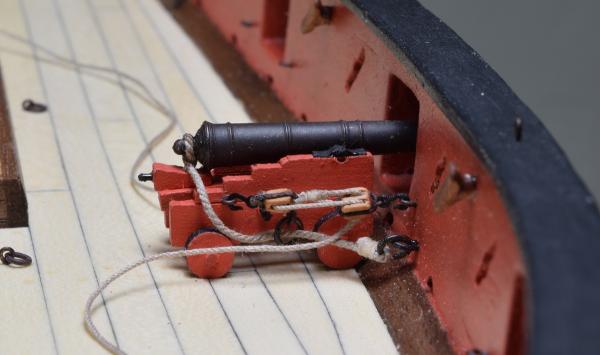
Time to get back to making progress on the ship. I made 5 more breaching lines, attached them to the cascabel's on the 5 cannons, and then opened up the side gun carriage rings, put the line through them, and re-closed the rings. I then attached the breaching lines to the bulwarks, glued them in, and glued the guns down. Everything in these pictures is now permanently attached to the ship (except for the sloppy rope coils that are just sitting there). I will attach the companionway later, I need to build and install a couple of elm-tree pumps that go really close to it, so I am waiting on that. I also need to do some touch-up here and there as I managed to ding some things, and knock a cleat loose while putting the cannons on. I really am far too clumsy for this hobby.


- 831 replies
-
- 21
-
-
- Armed Virginia Sloop
- Model Shipways
- (and 1 more)
-
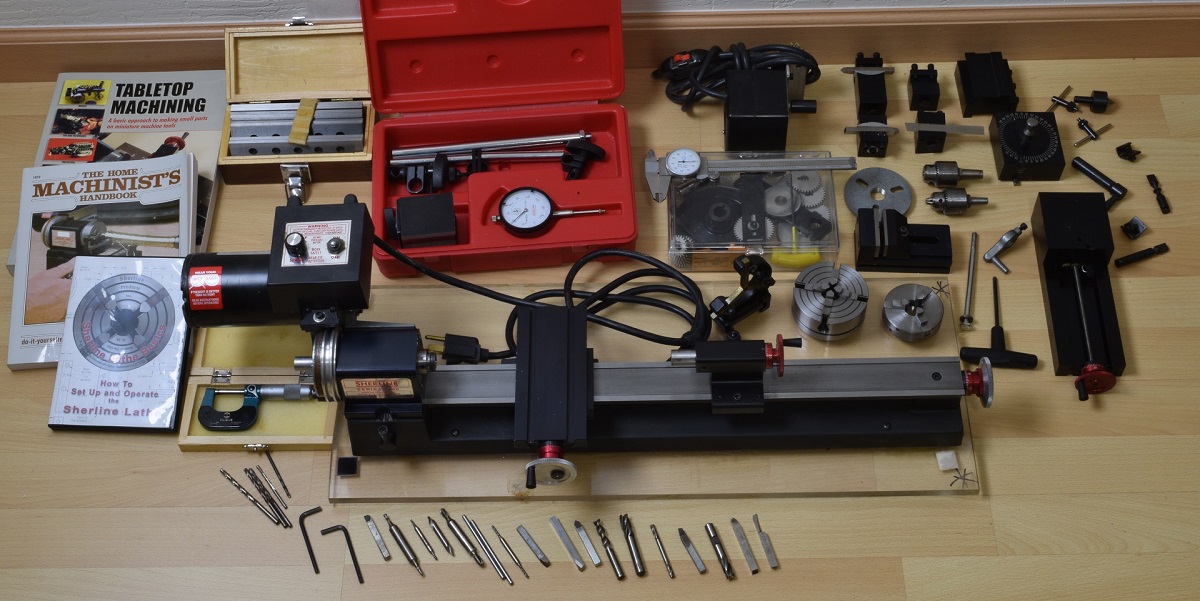
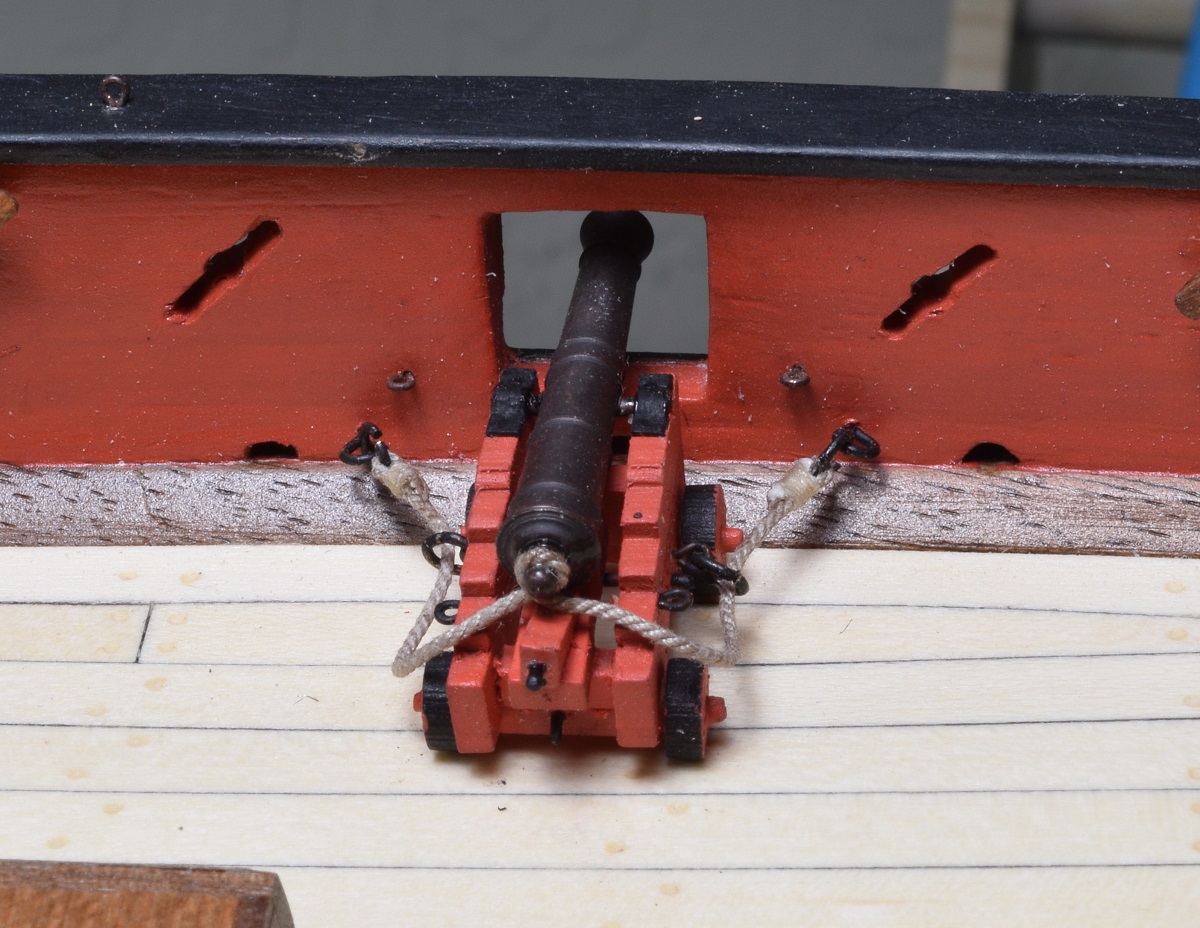
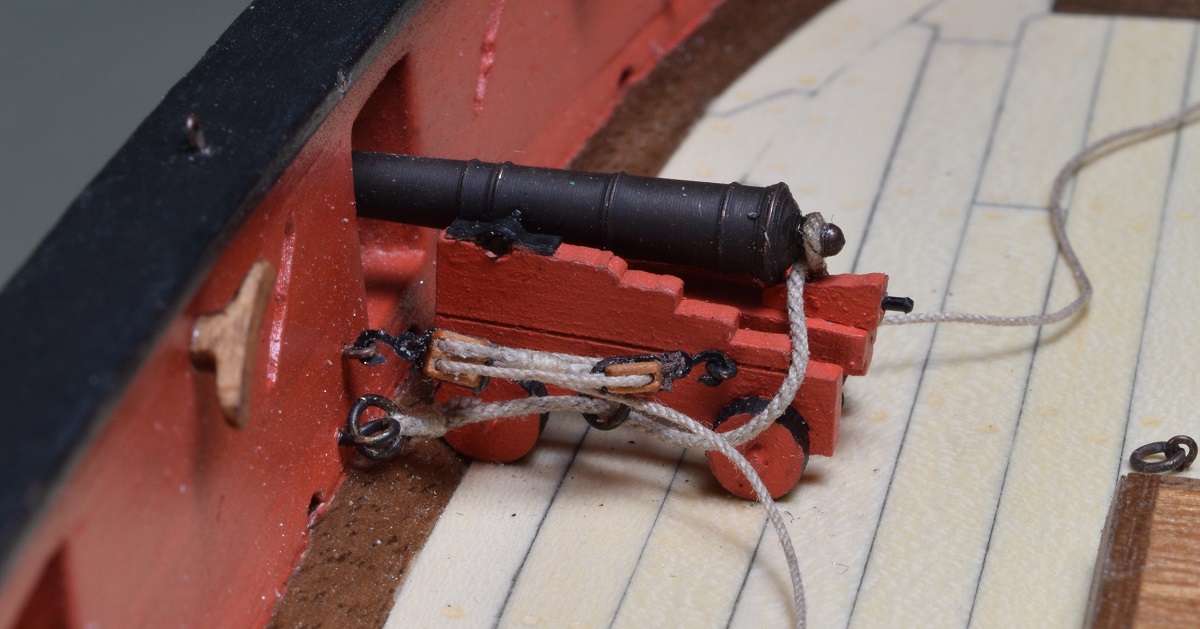
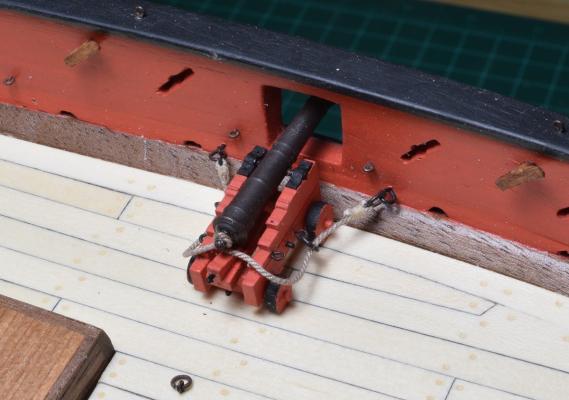
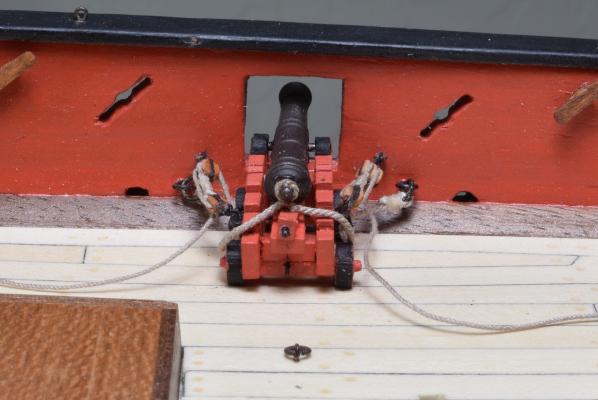
Thanks all, both for the comments and the likes. Please don't hesitate to offer constructive (or even not so constructive) criticism as well. I had no idea that there was a 'standard' length for breaching lines, even if I didn't go with that length purely for my own visual appeal reasons. Tonight I got back to the cannon. First I made a shorter breaching line and used much smaller seizing thread. I think it came out much nicer. Since I was happy with both the length and the look, I went ahead and fixed the gun into place and secured the breaching line. I then replaced the block with the broken hook, and rigged the out-hauls on both sides and after very carefully pulling the line tight, used a small brush and painted the lines with 50/50 white glue/water mix to help 'fix' the ropes. All that's left now is to do the rope coils, but I'm going to wait until all the guns are in place for that, so I can better picture the space available for both location and size of the coils. As far as the new toy goes, I don't really know enough about it to talk much really. It's the 17" Sherline, and I got it with a fairly good assortment of accessories, a couple of 'how to' books, and a DVD. It's very nice, and it's clearly designed for precision work, with a tool holder. The Proxxon (which I also have and can be seen in some of my photo's) uses a 'rest' rather than a tool holder, and doesn't throttle down to slow speeds, where the Sherline can be run from 0 speed on up. They are really designed for different uses, with the Proxxon being for wood turning using hand tools, and the Sherline is for using a tool-rest and precision work. I initially figured when buying the Sherline that I would sell the Proxxon, but after using it, I think they both have a different purpose on the work bench and will probably keep the Proxxon for doing hand-work using the tool-rest.


- 831 replies
-
- 14
-
-
- Armed Virginia Sloop
- Model Shipways
- (and 1 more)
-
Coming along nicely, and looking great Jon!
-
Thanks Russ. The dowels that came in the Constructo Carmen kit came out quite nice, so I guess I was expecting the same out of this one. Nope.
-
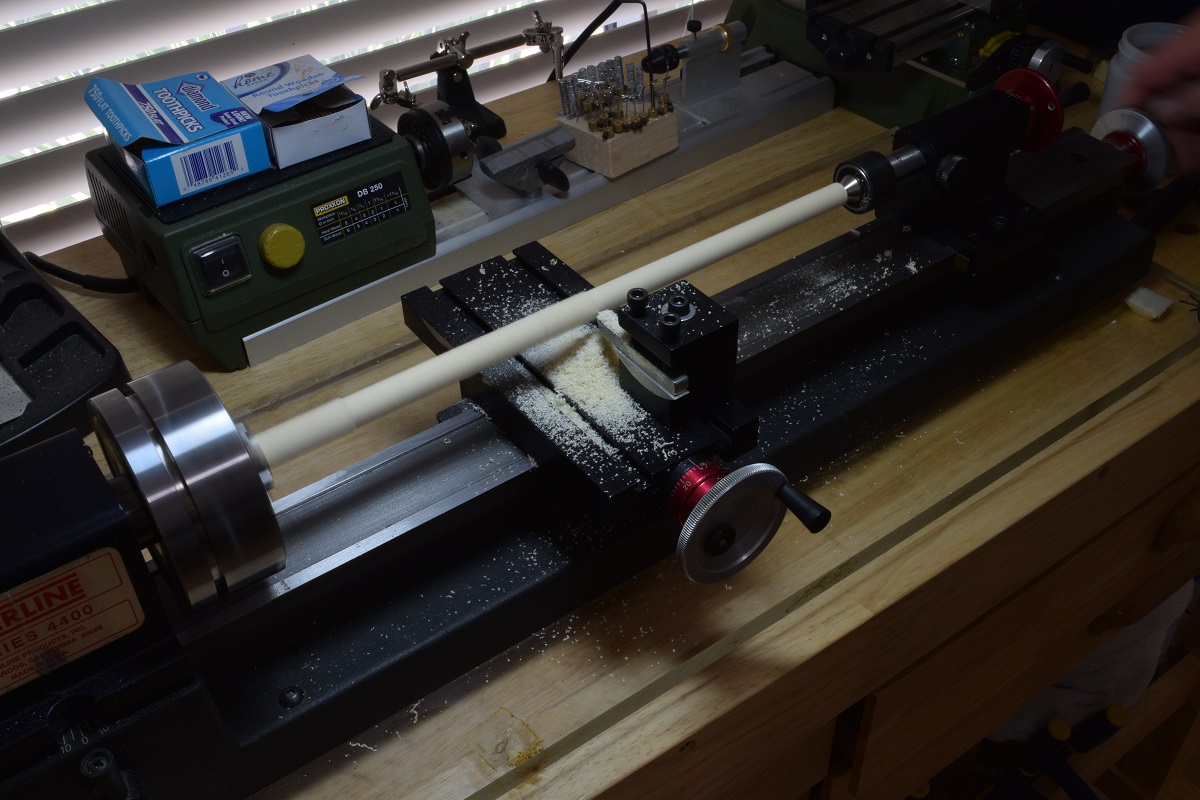
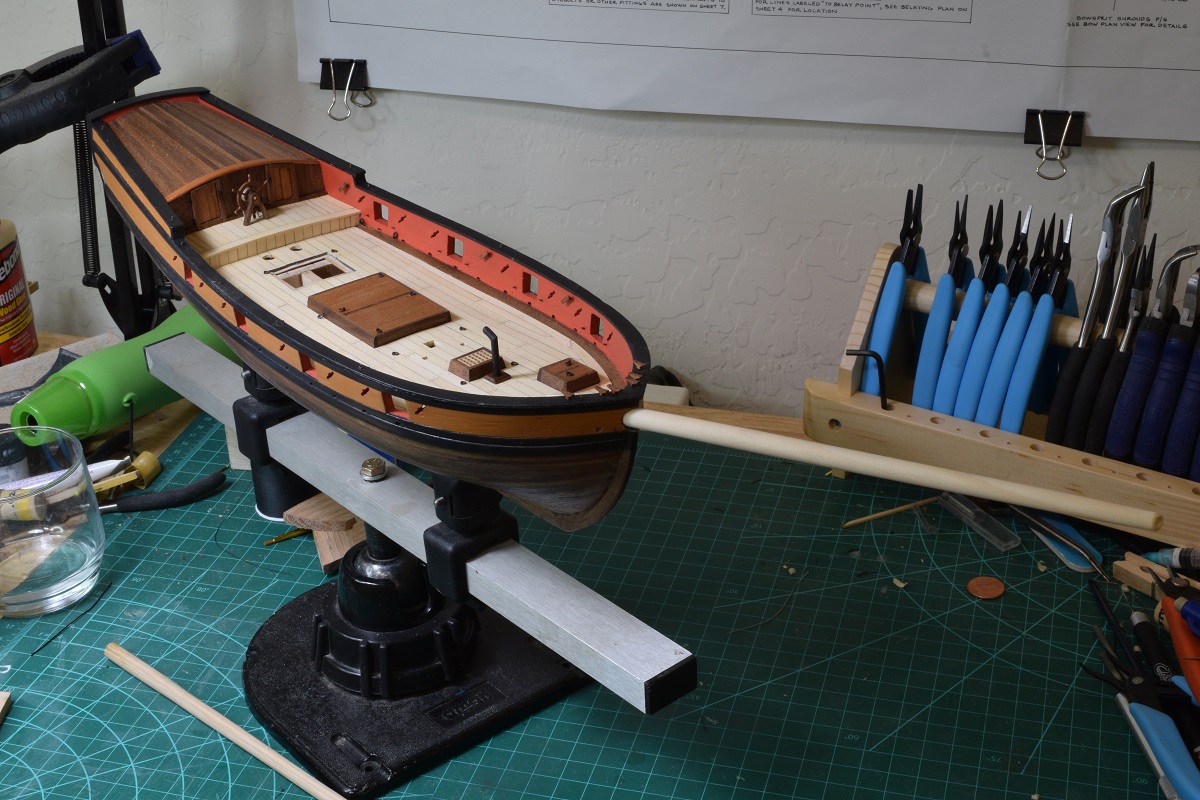
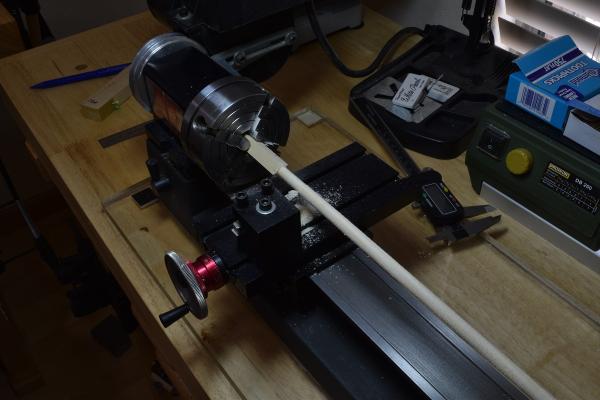
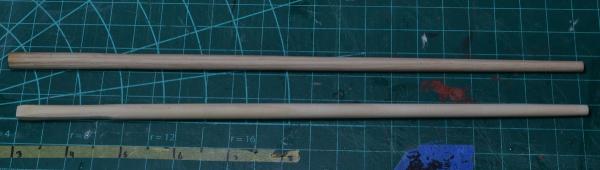
I got a new toy yesterday, so today instead of working on getting the guns rigged so that I can actually make some forward progress, I made a side-trip to shaping the bowsprit. Well, when I was done I decided that it was terrible, because the grain in this 'beech' dowel was just huge and terribly obvious. So I made a jaunt down to Lowe's after determining that I didn't have any wood on hand that would work as a replacement, and I purchased some poplar dowels and square stock both. When I got them home and really took a good look at them in the sunlight, I decided that the best piece with the best color and lightest grain was one of the square stock. I cut a length off a little long, and chucked it up in the new toy and began turning the square wood into round wood. Here you can see how terrible the kit dowel was (grain is huge) compared to the rough shaped replacement I made from poplar. And I stuck it on the boat just to test fit it. Next, I guess I'll get back to those fiddly little blocks, since there is no point in finishing the bowsprit since I need to get all the deck work done before I mount it.


- 831 replies
-
- 15
-
-
- Armed Virginia Sloop
- Model Shipways
- (and 1 more)
-
Using the parts 'sprue' as a jig is a fantastic idea. Going to tuck that one away! Looking great Ken, thanks for sharing.
- 440 replies
-
- 2
-
-
- niagara
- model shipways
- (and 1 more)
-
About time you started this Frank! I've seen this ship in person on a semi-regular basis for a while now, and it's simply beautiful, and the workmanship is amazing. I'm really looking forward to seeing the photo's and construction documentation from before I joined the Arizona ship building group.
-
Hi Buck, I keep getting derailed on further furniture, hopefully by the end of the summer I'll get it finished. I have an idea for a lighting plan, and know pretty much what I want to do with the furniture, but I need both the money, and time, and at the same time!
-
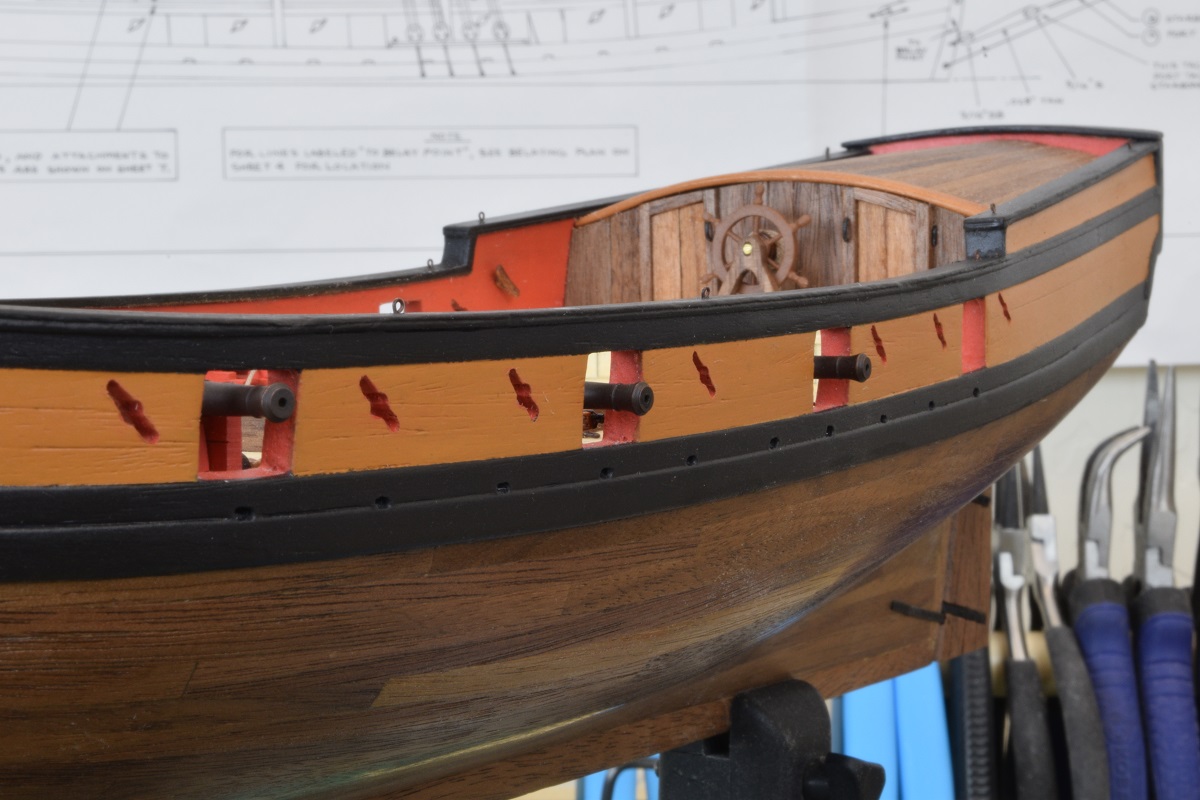
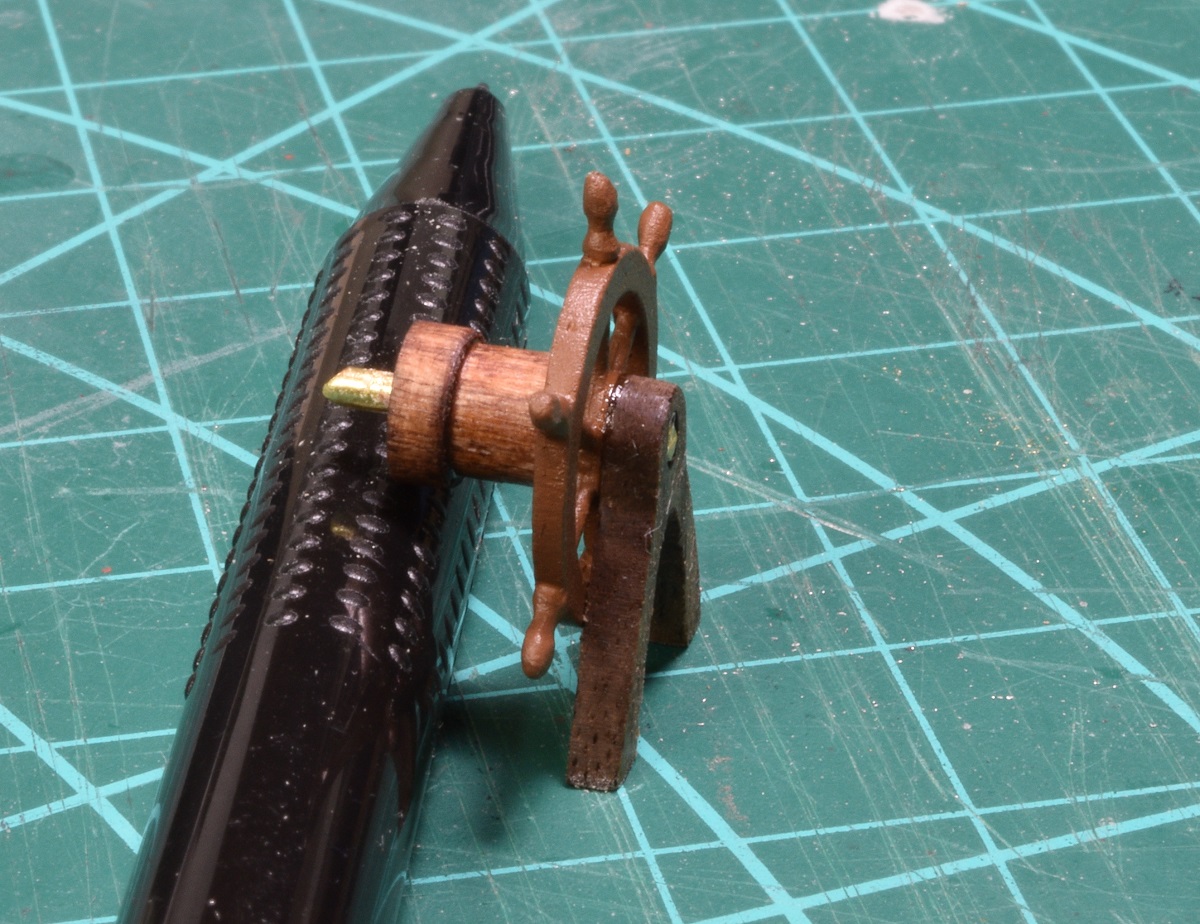
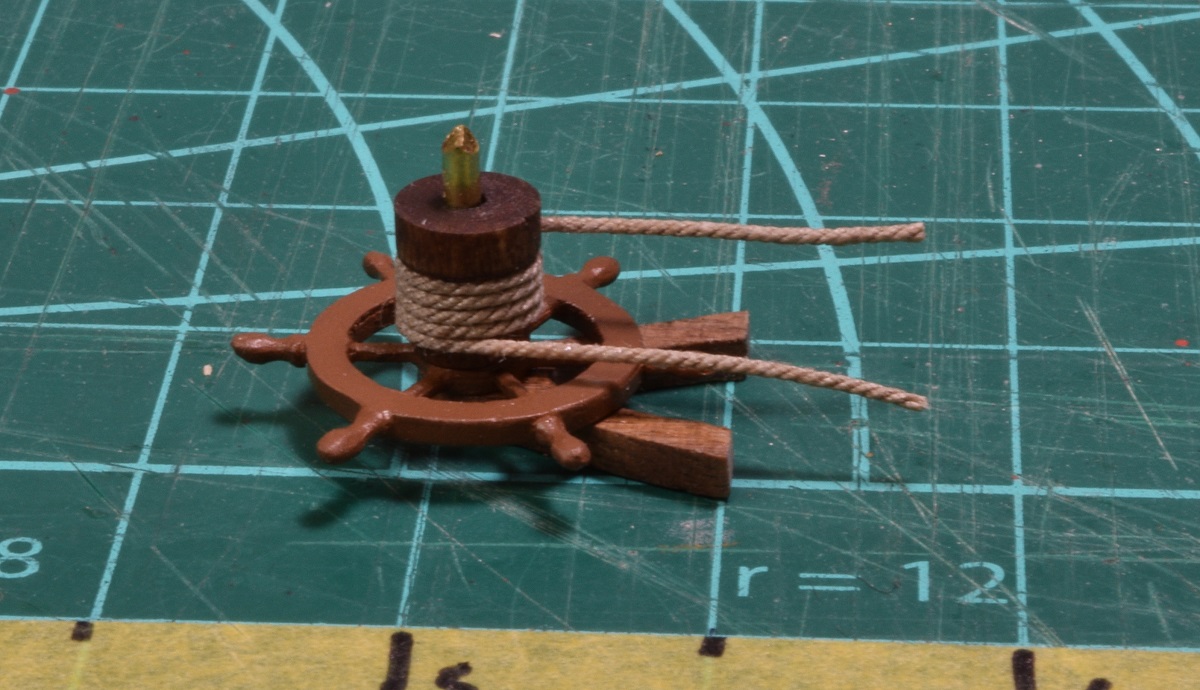
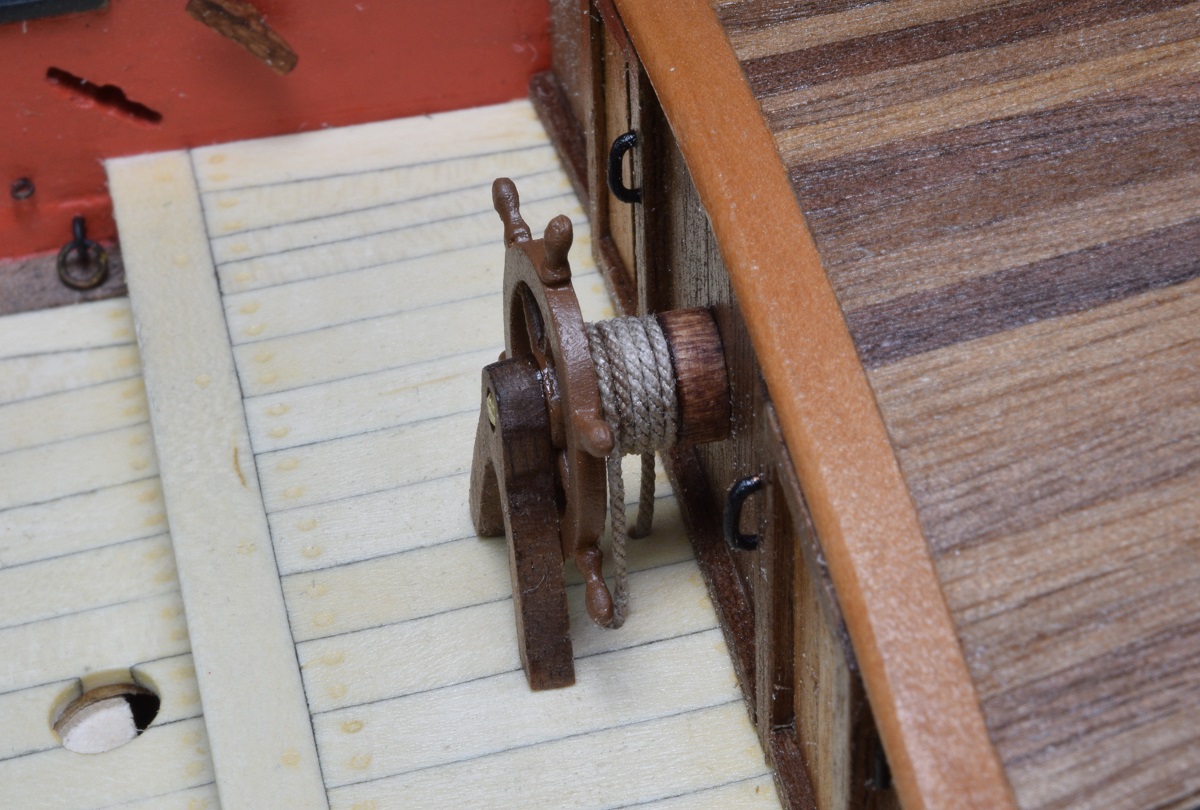
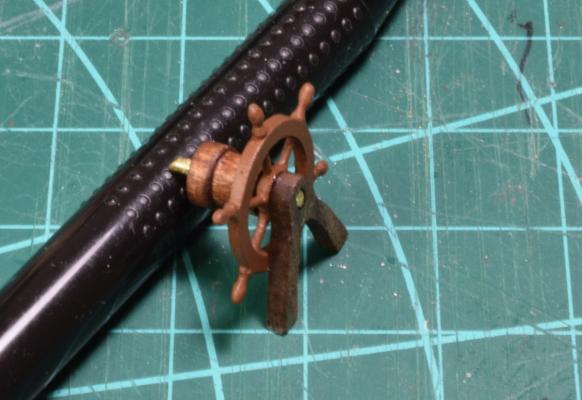
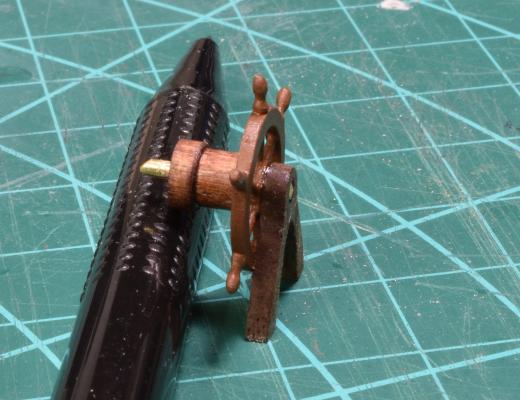
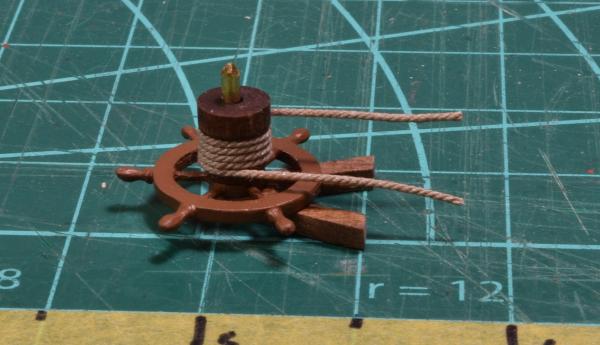
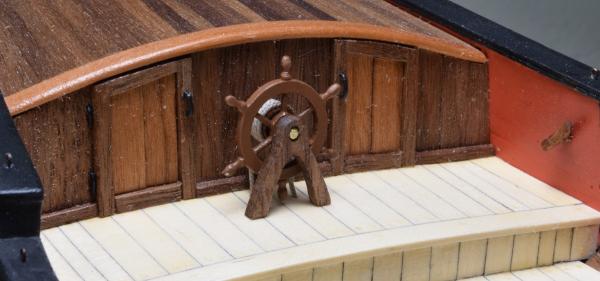
Took a break from tiny little blocks tonight, and gave the captain a way to steer his ship. Seems like a reasonable thing to do, given that she has a rudder and all. I did not replace the cast wheel with anything aftermarket, as all of the wood wheels I've seen are really 'fat', and I don't think they look right. I have read several articles on scratch making wheels, but I don't have the right equipment to use any of those methods yet, so I just painted the kit one and used it. Not sure the color is right, but I don't have a lot of brown paints, so this is what I ended up with.


- 831 replies
-
- 16
-
-
- Armed Virginia Sloop
- Model Shipways
- (and 1 more)
-
Planking came out just fine it looks like to me. For those last bends into the bow rabbet, I used water and heat, and bent them off the hull a little bit at a time until the fit was right. If you try to make the entire bend in one heat cycle, it will break like you experienced, or at least that was what I ran into. Soak, heat & bend, test fit. Soak, heat & bend a little more, test fit. Repeat as needed.