


Ryland Craze
-
Posts
1,569 -
Joined
-
Last visited
Content Type
Profiles
Forums
Gallery
Events
Everything posted by Ryland Craze
-
 Congratulations on finishing your first wooden ship model. The boat looks great and thanks for sharing your progress with us. Also, welcome to Model Ship World.
 -
Excellent kit. I am glad to see another Medway Longboat being built. You are off to a good start.
-
I used Minwax Wood Filler in a tube that was natural in color to fill small cracks. It matched the color of the Yellow Cedar very well. I also used the wood filler to seal up some joints throughout the model that were painted over. You are making good progress and your workmanship is excellent.
- 155 replies
-
- 1
-

-
- Medway Longboat
- Syren Ship Model Company
- (and 1 more)
-
This is an great kit for the first time wooden ship modeler. There are some excellent build logs of this kit that you can reference for your build. I look forward to following your progress.
-
Congratulations on finishing your King of the Mississippi. You did a nice job on building this model.
- 109 replies
-
- 1
-
-
- Finished
- Artesania Latina
- (and 1 more)
-
Nice start to your Medway Longboat. This was a fun build and I look forward to following your build. Did you use the templates at the end of Chapter two for lining out the bow? They were a great help for me.
-
☺️ Excellent kit!
-
Welcome to Model Ship World Michael. Your work is absolutely beautiful and you are an artist of the highest degree. I look forward to seeing more of your work.
-
Glad to hear that in time your injury will be healed. You just reminded us that you cannot take safety for granted. These tools can hurt or worse.
-
I use the flame from a cheap long reach butane lighter to burn off the CA buildup on the pin. Your Perry is looking good.
-
I have never used a needle threader. I just coat the end of the line (about 1/2 inch) with some CA to stiffen it and cut the end of the coated line at an angle when the CA dries. The final steps will go by quickly and the next thing you know you will be finished. Not many steps left.
-
Hi Floyd, I did serve the loop around the mast. This was explained in my post #174. Here is a link to that post: https://modelshipworld.com/topic/19354-medway-longboat-1742-finished-124-scale-by-ryland-craze/?do=findComment&comment=775296 I have also attached a close-up picture showing the servings and seizings on my model: I studied the pictures from Chuck's build and will be glad to forward you some of the close up pictures of Chuck's model that I took at the Northeast Joint Clubs Conferences if it will help clarify things.
.jpg.33d7ab1fb1b63f82351ca785b25f86f2.jpg)
-
Hi Greg and welcome to Model Ship World. I look forward to seeing your work with the 3-D printer.
-
Floyd, I did exactly as Grant did. I seized the loop as I explained in my December 17th post around the mast. I seize the served line loop a little higher up on the mast so that when I slide it down the mast it tightens up. I also use diluted white glue on my seizings. I hope you and your family have an enjoyable Christmas holiday.
-
Hi Shane and welcome to Model Ship World.
-
Hi Dirk and welcome to Model Ship World. It is great that you are going to finish your Dad's model and that you shared his modeling interests. I know he enjoyed this.
-
Hi Bob and welcome to Model Ship World. It is always nice when someone acquires a ship model in progress and completes the build. The Bluejacket Smuggler builds into a nice model. Please share your progress with us.
-
I made the wire jig exactly as you explained. Measured the distance between the deadeyes from the plans. It worked very well for me.
-
Very nice and clean looking. This is going to turn out to be a very good build.
- 51 replies
-
- 1
-
-
- Model Shipways
- norwegian sailing pram
- (and 1 more)
-
Your Longboat is looking good. You are heading toward the finish line. I stropped my deadeyes by forming the 24 gauge wire around the deadeye. I formed the strop so that the two ends met at the top of the deadeye. I trimmed the wire so that the two ends butted against each other. I then opened up the strop, applied some CA to the underside of the strop and squeezed the strop down into the grove in the deadeye. Be sure to insert the hook on the wire strope before you permanently close up the strope.
-
Hi Ray and welcome to Model Ship World. Thank you for your service. Like you, most of us started modeling at a young age. Ask away and we will be glad to answer your questions.
-
New Member Rock Harris: An Introduction
Ryland Craze replied to rock harris's topic in New member Introductions
Hi Rock and welcome to Model Ship World. I have never built a solid hull ship model so I cannot answer your question which is best to start with, a solid hull or plank on bulkhead/frame ship model. -
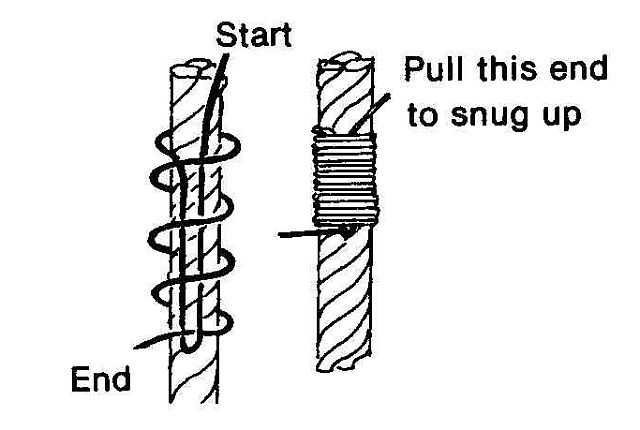
Floyd, I do my seizings the way my father taught me to tie flys to my fly fishing line. I found a picture that best illustrate this: I found the above image at this website: https://sites.google.com/site/shipwrightsfaq/smf-sn-shopnotes/smf-sn-seizing?tmpl=%2Fsystem%2Fapp%2Ftemplates%2Fprint%2F&showPrintDialog=1 I usually do six turns of cotton thread. Here is a YouTube video link of this process: Also, John Earl has an excellent article explaining his method of seizing on his website located here: https://www.modelboatyard.com/stropping.html There are many ways to do this. I use watered down white glue to coat my seizings and once dry, snip the tails of the seizing line close to the loops of the seizing. I prefer not to use CA on my rigging. Rigging was very enjoyable on my model.
-
Hi Jimmy and welcome to Model Ship World. You have some enjoyable hobbies and you have come to the right forum to help you build your wooden ship model skills. We are glad to have you aboard.
-
Hi Dan and welcome to Model Ship World. The Lowell Dory is an excellent kit to start your journey in building wooden ship models. The other kits in the series will help you build your skills.
